

LiGo RTX DUALphone 4088 User Manual

RTX DUALphone 4088
SET UP & USER GUIDE
Find more user manuals and product information at www.liGo.co.uk/manuals/
For all the latest product news, reviews and advice from liGo, please visit www.liGo.co.uk/blog/
www.liGo.co.uk
TELEPHONES |HEADSETS |TWO WAY RADIOS
PERSONAL CARE |BABY MONITORS
|
AND MUCH MORE
GET £5 OFF
*
your next purchase over £50
with voucher code:
liGo5reward
*
Not in conjunction
with any other oer

DUALphone 4088
and landline in one handset
user manual
No PC NeededHD Audio 2 Accounts HandsfreeNo PC Neede
d
i
o
2 A
ccounts
DUALPHONE 4088 USER MANUAL V13

2
ENGLISH
THIS IS HOW THE DUALPHONE WORKS . . . . . . . . . . . . . . . . . . . . . . . . . . . . . . . . . . . . . . . . . . . . . . . 4
HOW THE MANUAL IS ORGANIZED . . . . . . . . . . . . . . . . . . . . . . . . . . . . . . . . . . . . . . . . . . . . . . . . . . . 5
INSTALLATION AND BASIC FUNCTIONS – SECTION 1 . . . . . . . . . . . . . . . . . . . . . . . . . . . . . . . . . . . 6
In the box . . . . . . . . . . . . . . . . . . . . . . . . . . . . . . . . . . . . . . . . . . . . . . . . . . . . . . . . . . . . . . . . . . . . 6
Your handset at a glance . . . . . . . . . . . . . . . . . . . . . . . . . . . . . . . . . . . . . . . . . . . . . . . . . . . . . . . . . 7
How to install the base station . . . . . . . . . . . . . . . . . . . . . . . . . . . . . . . . . . . . . . . . . . . . . . . . . . . . 8
How to install the handset . . . . . . . . . . . . . . . . . . . . . . . . . . . . . . . . . . . . . . . . . . . . . . . . . . . . . . . 9
First time start-up . . . . . . . . . . . . . . . . . . . . . . . . . . . . . . . . . . . . . . . . . . . . . . . . . . . . . . . . . . . . . . . 10
Getting started with Skype . . . . . . . . . . . . . . . . . . . . . . . . . . . . . . . . . . . . . . . . . . . . . . . . . . . . . . . 12
Create a new Skype account . . . . . . . . . . . . . . . . . . . . . . . . . . . . . . . . . . . . . . . . . . . . . . . . . . . . . . 12
Sign in to Skype . . . . . . . . . . . . . . . . . . . . . . . . . . . . . . . . . . . . . . . . . . . . . . . . . . . . . . . . . . . . . . . 13
Skype features supported by DUALphone . . . . . . . . . . . . . . . . . . . . . . . . . . . . . . . . . . . . . . . . . . . . 15
Main display . . . . . . . . . . . . . . . . . . . . . . . . . . . . . . . . . . . . . . . . . . . . . . . . . . . . . . . . . . . . . . . . . . 15
Main menu . . . . . . . . . . . . . . . . . . . . . . . . . . . . . . . . . . . . . . . . . . . . . . . . . . . . . . . . . . . . . . . . . . . 17
Contacts . . . . . . . . . . . . . . . . . . . . . . . . . . . . . . . . . . . . . . . . . . . . . . . . . . . . . . . . . . . . . . . . . . . . . . . 18
Add a Skype contact . . . . . . . . . . . . . . . . . . . . . . . . . . . . . . . . . . . . . . . . . . . . . . . . . . . . . . . . . . . . 18
Add a SkypeOut or landline contact . . . . . . . . . . . . . . . . . . . . . . . . . . . . . . . . . . . . . . . . . . . . . . . . 20
Search for Skype users . . . . . . . . . . . . . . . . . . . . . . . . . . . . . . . . . . . . . . . . . . . . . . . . . . . . . . . . . . 21
Make and receive calls . . . . . . . . . . . . . . . . . . . . . . . . . . . . . . . . . . . . . . . . . . . . . . . . . . . . . . . . . . . 22
Call a Skype contact . . . . . . . . . . . . . . . . . . . . . . . . . . . . . . . . . . . . . . . . . . . . . . . . . . . . . . . . . . . . 22
Dial a landline number . . . . . . . . . . . . . . . . . . . . . . . . . . . . . . . . . . . . . . . . . . . . . . . . . . . . . . . . . . 22
Receive a call . . . . . . . . . . . . . . . . . . . . . . . . . . . . . . . . . . . . . . . . . . . . . . . . . . . . . . . . . . . . . . . . . 23
Troubleshooting . . . . . . . . . . . . . . . . . . . . . . . . . . . . . . . . . . . . . . . . . . . . . . . . . . . . . . . . . . . . . . . . 24
ADVANCED FUNCTIONS – SECTION 2 . . . . . . . . . . . . . . . . . . . . . . . . . . . . . . . . . . . . . . . . . . . . . . . . 26
Menu tree of your DUALphone . . . . . . . . . . . . . . . . . . . . . . . . . . . . . . . . . . . . . . . . . . . . . . . . . . . 26
Emergency calls . . . . . . . . . . . . . . . . . . . . . . . . . . . . . . . . . . . . . . . . . . . . . . . . . . . . . . . . . . . . . . . . 28
Skype settings . . . . . . . . . . . . . . . . . . . . . . . . . . . . . . . . . . . . . . . . . . . . . . . . . . . . . . . . . . . . . . . . . 29
Change your online status . . . . . . . . . . . . . . . . . . . . . . . . . . . . . . . . . . . . . . . . . . . . . . . . . . . . . . . 29
Choose auto or manual sign in . . . . . . . . . . . . . . . . . . . . . . . . . . . . . . . . . . . . . . . . . . . . . . . . . . . . 30
Change your Skype profi le . . . . . . . . . . . . . . . . . . . . . . . . . . . . . . . . . . . . . . . . . . . . . . . . . . . . . . . 31
Change your password . . . . . . . . . . . . . . . . . . . . . . . . . . . . . . . . . . . . . . . . . . . . . . . . . . . . . . . . . . 32
Create a personal voicemail greeting . . . . . . . . . . . . . . . . . . . . . . . . . . . . . . . . . . . . . . . . . . . . . . . . 33
Listen to your voicemail . . . . . . . . . . . . . . . . . . . . . . . . . . . . . . . . . . . . . . . . . . . . . . . . . . . . . . . . . . 34
Privacy . . . . . . . . . . . . . . . . . . . . . . . . . . . . . . . . . . . . . . . . . . . . . . . . . . . . . . . . . . . . . . . . . . . . 36
Notifi cation . . . . . . . . . . . . . . . . . . . . . . . . . . . . . . . . . . . . . . . . . . . . . . . . . . . . . . . . . . . . . . . . . . . 37
Phone settings . . . . . . . . . . . . . . . . . . . . . . . . . . . . . . . . . . . . . . . . . . . . . . . . . . . . . . . . . . . . . . . . . 38
Tones . . . . . . . . . . . . . . . . . . . . . . . . . . . . . . . . . . . . . . . . . . . . . . . . . . . . . . . . . . . . . . . . . . . . 38
Change the call alert . . . . . . . . . . . . . . . . . . . . . . . . . . . . . . . . . . . . . . . . . . . . . . . . . . . . . . . . . 38
Change the ring tone . . . . . . . . . . . . . . . . . . . . . . . . . . . . . . . . . . . . . . . . . . . . . . . . . . . . . . . . . 39
Adjust the ringing volume . . . . . . . . . . . . . . . . . . . . . . . . . . . . . . . . . . . . . . . . . . . . . . . . . . . . . 39
Adjust the keypad tones . . . . . . . . . . . . . . . . . . . . . . . . . . . . . . . . . . . . . . . . . . . . . . . . . . . . . . . 40
IN THIS USER MANUAL
CONTENTS

3
ENGLISH
Set the time and date . . . . . . . . . . . . . . . . . . . . . . . . . . . . . . . . . . . . . . . . . . . . . . . . . . . . . . . . . . . . 40
Set the preferred line . . . . . . . . . . . . . . . . . . . . . . . . . . . . . . . . . . . . . . . . . . . . . . . . . . . . . . . . . . . . 42
Change the country code . . . . . . . . . . . . . . . . . . . . . . . . . . . . . . . . . . . . . . . . . . . . . . . . . . . . . . . . . 43
Change the landline country setting . . . . . . . . . . . . . . . . . . . . . . . . . . . . . . . . . . . . . . . . . . . . . . . . . 45
Change the handset language . . . . . . . . . . . . . . . . . . . . . . . . . . . . . . . . . . . . . . . . . . . . . . . . . . . . . 46
Register / deregister your handset . . . . . . . . . . . . . . . . . . . . . . . . . . . . . . . . . . . . . . . . . . . . . . . . . . . 47
Internet settings . . . . . . . . . . . . . . . . . . . . . . . . . . . . . . . . . . . . . . . . . . . . . . . . . . . . . . . . . . . . . . . . 49
Adjust the earpiece volume . . . . . . . . . . . . . . . . . . . . . . . . . . . . . . . . . . . . . . . . . . . . . . . . . . . . . . . . 54
Mute the microphone . . . . . . . . . . . . . . . . . . . . . . . . . . . . . . . . . . . . . . . . . . . . . . . . . . . . . . . . . . . . 54
Connect a headset . . . . . . . . . . . . . . . . . . . . . . . . . . . . . . . . . . . . . . . . . . . . . . . . . . . . . . . . . . . . . . 55
Reset the phone and base . . . . . . . . . . . . . . . . . . . . . . . . . . . . . . . . . . . . . . . . . . . . . . . . . . . . . . . . . 55
Contacts . . . . . . . . . . . . . . . . . . . . . . . . . . . . . . . . . . . . . . . . . . . . . . . . . . . . . . . . . . . . . . . . . . . . . . . . 56
Exchange contact details request . . . . . . . . . . . . . . . . . . . . . . . . . . . . . . . . . . . . . . . . . . . . . . . . . . . 58
Rename a contact . . . . . . . . . . . . . . . . . . . . . . . . . . . . . . . . . . . . . . . . . . . . . . . . . . . . . . . . . . . . . . . 59
Remove a contact . . . . . . . . . . . . . . . . . . . . . . . . . . . . . . . . . . . . . . . . . . . . . . . . . . . . . . . . . . . . . . . 60
Block a contact . . . . . . . . . . . . . . . . . . . . . . . . . . . . . . . . . . . . . . . . . . . . . . . . . . . . . . . . . . . . . . . . . 61
Make and receive calls . . . . . . . . . . . . . . . . . . . . . . . . . . . . . . . . . . . . . . . . . . . . . . . . . . . . . . . . . . . . 62
Dialling . . . . . . . . . . . . . . . . . . . . . . . . . . . . . . . . . . . . . . . . . . . . . . . . . . . . . . . . . . . . . . . . . . . . . . . 62
Dial editor . . . . . . . . . . . . . . . . . . . . . . . . . . . . . . . . . . . . . . . . . . . . . . . . . . . . . . . . . . . . . . . . . . 62
Character map . . . . . . . . . . . . . . . . . . . . . . . . . . . . . . . . . . . . . . . . . . . . . . . . . . . . . . . . . . . . . . . 63
Speakerphone . . . . . . . . . . . . . . . . . . . . . . . . . . . . . . . . . . . . . . . . . . . . . . . . . . . . . . . . . . . . . . . 64
Start a new call during a call . . . . . . . . . . . . . . . . . . . . . . . . . . . . . . . . . . . . . . . . . . . . . . . . . . . . 64
Conference call . . . . . . . . . . . . . . . . . . . . . . . . . . . . . . . . . . . . . . . . . . . . . . . . . . . . . . . . . . . . . . 65
Skype Conference call . . . . . . . . . . . . . . . . . . . . . . . . . . . . . . . . . . . . . . . . . . . . . . . . . . . . . . . . . 65
Divert all calls . . . . . . . . . . . . . . . . . . . . . . . . . . . . . . . . . . . . . . . . . . . . . . . . . . . . . . . . . . . . . . . . 65
View call history . . . . . . . . . . . . . . . . . . . . . . . . . . . . . . . . . . . . . . . . . . . . . . . . . . . . . . . . . . . . . . 67
Set privacy for calls . . . . . . . . . . . . . . . . . . . . . . . . . . . . . . . . . . . . . . . . . . . . . . . . . . . . . . . . . . . . 68
Call waiting . . . . . . . . . . . . . . . . . . . . . . . . . . . . . . . . . . . . . . . . . . . . . . . . . . . . . . . . . . . . . . . . . 69
Dial outgoing calls . . . . . . . . . . . . . . . . . . . . . . . . . . . . . . . . . . . . . . . . . . . . . . . . . . . . . . . . . . . . . . . 70
Dial a telephone number from the outgoing calls list . . . . . . . . . . . . . . . . . . . . . . . . . . . . . . . . . . . . 70
Firmware update . . . . . . . . . . . . . . . . . . . . . . . . . . . . . . . . . . . . . . . . . . . . . . . . . . . . . . . . . . . . . . . . 71
SUPPORT INFORMATION – SECTION 3 . . . . . . . . . . . . . . . . . . . . . . . . . . . . . . . . . . . . . . . . . . . . . . . . 73
Advanced troubleshooting . . . . . . . . . . . . . . . . . . . . . . . . . . . . . . . . . . . . . . . . . . . . . . . . . . . . . . 73
FAQ . . . . . . . . . . . . . . . . . . . . . . . . . . . . . . . . . . . . . . . . . . . . . . . . . . . . . . . . . . . . . . . . . . . . . . . . . . 79
CE Declaration of Conformity . . . . . . . . . . . . . . . . . . . . . . . . . . . . . . . . . . . . . . . . . . . . . . . . . . . . . . 84
CONTENTS
IN THIS USER MANUAL
4
ENGLISH
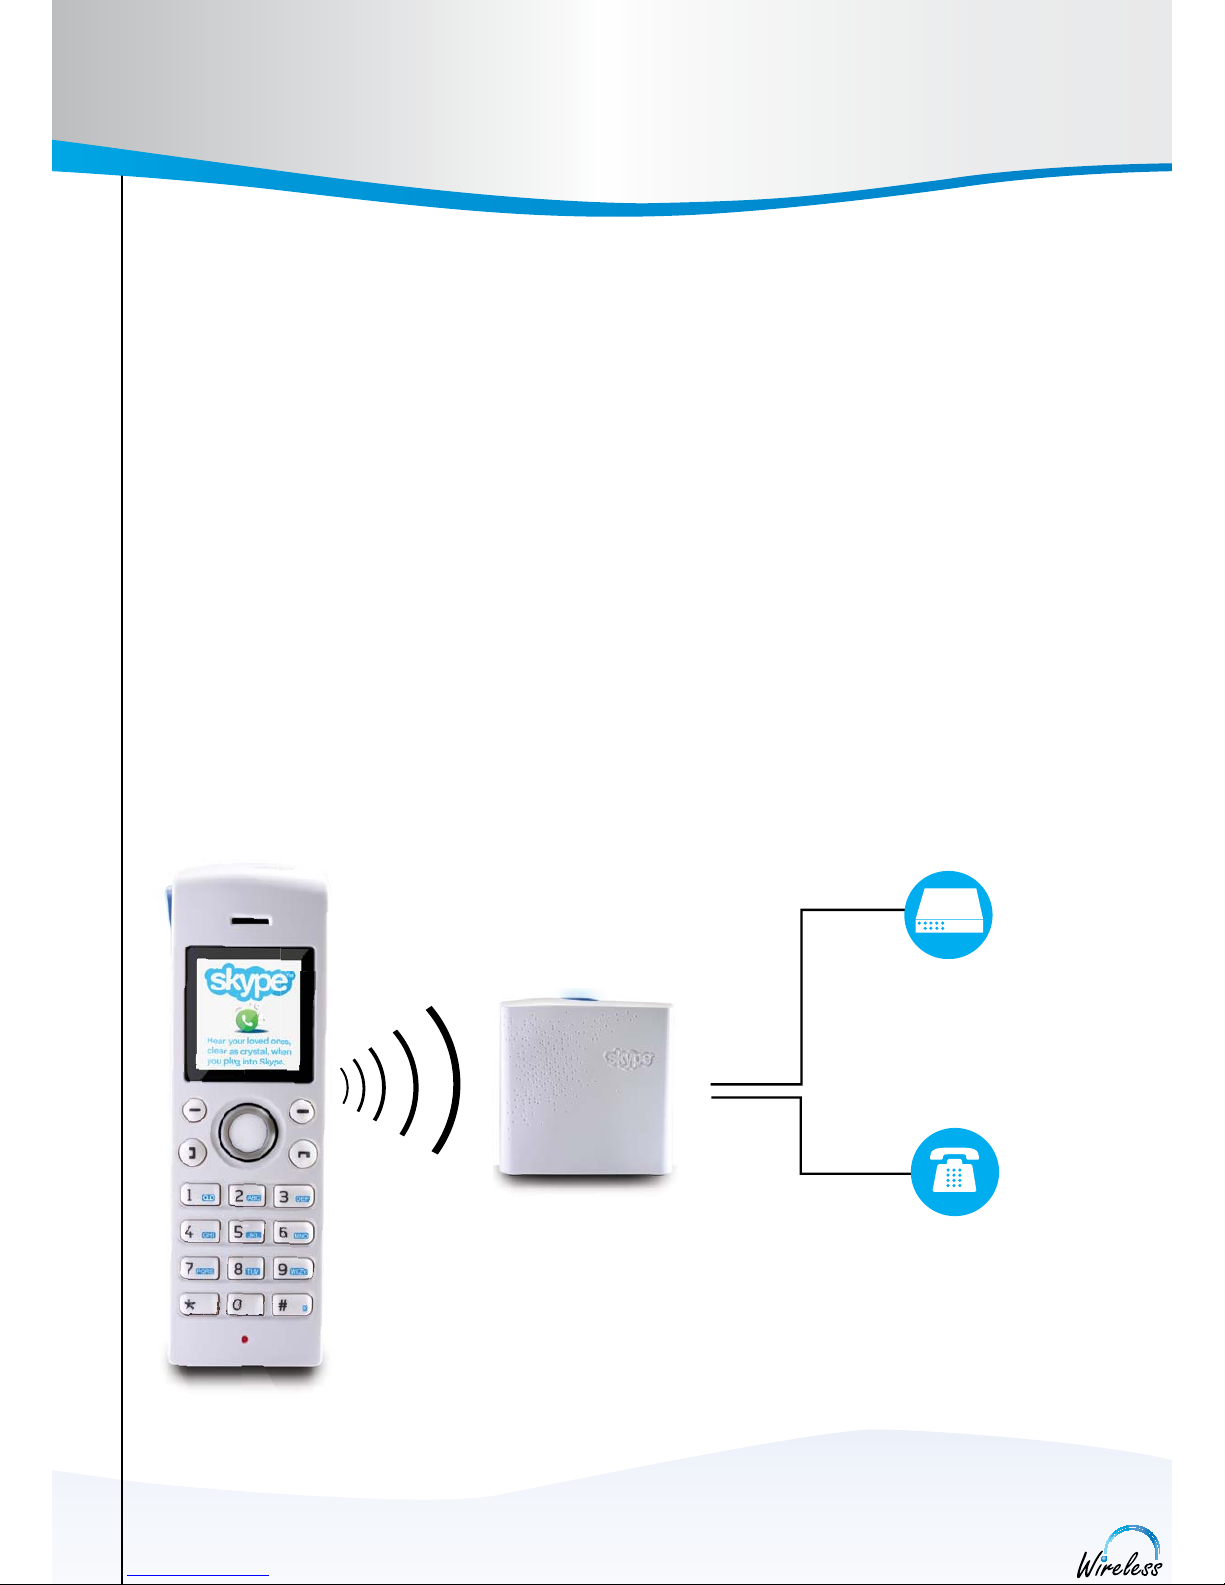
Your DUALphone could entirely change the way you think about using your telephone and using Skype. You
can use your DUALphone to make and receive both landline and Skype calls. And, because Skype is built into
your DUALphone, you no longer need a computer to use Skype.
In order to use your DUALphone for Skype calls, the base station must be linked up with an active Internet
connection. If you already have a computer linked up to your Internet connection, this device might occupy
the connection port that is needed by the DUALphone base station. In this case you need a router, allowing
you to attach more devices to your Internet connection.
Attach the router to the Internet connection and connect your computer and the base station to the router.
Should you have any questions regarding the use of the Internet and the router please contact your Internet
provider. You will fi nd more information on this issue under Advanced Troubleshooting.
Please note: When installing a new router you should be aware that it might take some time – up to one hour
– before it is properly registered with your Internet provider.
To use Skype telephony via your DUALphone you need a Skype account as well as a user name and a password. Please see Getting started with Skype in the Installation and basic functions section.
With Skype you call for free when talking to other Skype users – and you can buy a number of additional
features to expand the possibilities of your DUALphone. Please see Skype services in the Installation and
basic functions section.
THIS IS HOW THE DUALPHONE WORKS
BROADBAND
CONNECTION
( ROUTER/MODEM)
BASE STATION
LANDLINE OPERATOR
HANDSET
DSESE
ETT
T
THIS IS HOW THE DUALPHONE WORKS

5
ENGLISH
This manual falls in three parts:
(1) Installation and basic functions,
(2) Advanced functions,
(3) Support information.
NEW USERS:
• Please read Section 1 of this document. Section 2 is for more advanced users who wants a deeper
knowledge of the DUALphone. Section 3 is for FAQ and troubleshooting issues.
HOW THE MANUAL IS ORGANIZED
HOW THE MANUAL IS ORGANIZED
6
ENGLISH
1
SECTION
INSTALLATION AND BASIC FUNCTIONS – SECTION 1
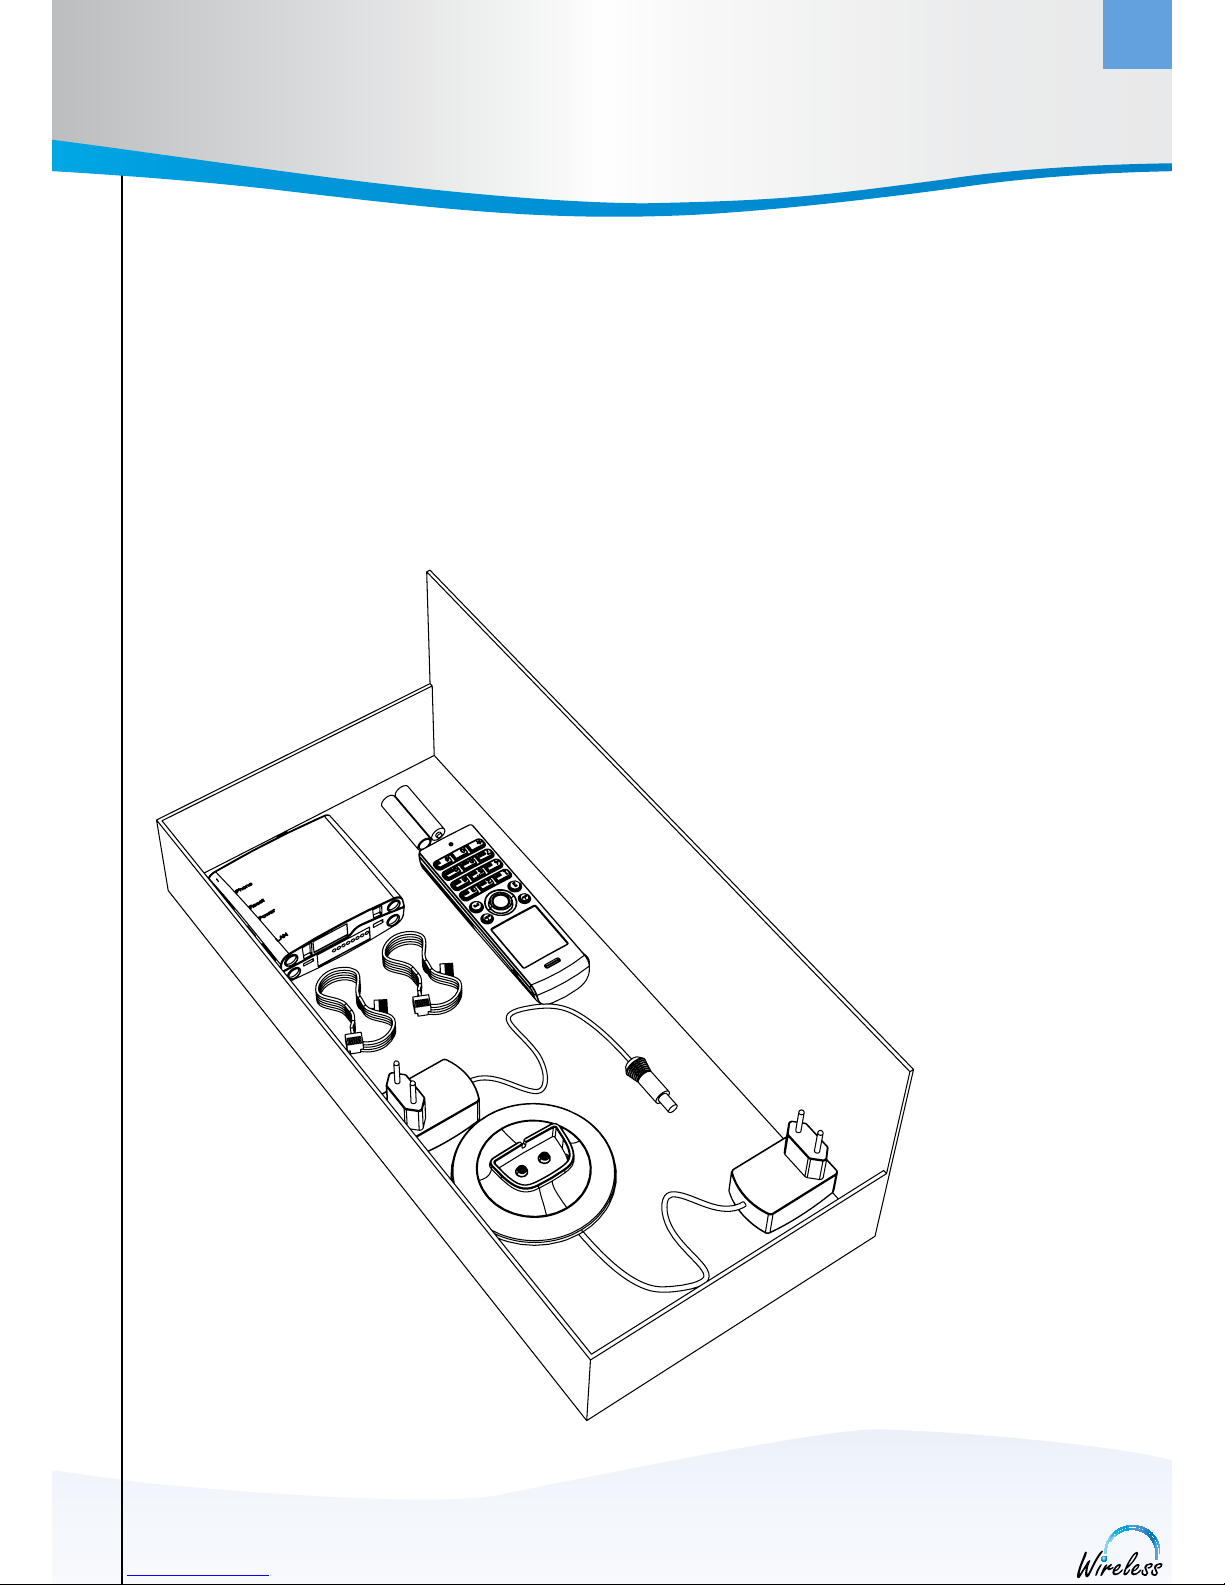
IN THE BOX
• 1 cordless DUALphone 4088 handset
• 2 AAA rechargable batteries
• 1 desktop charger with power supply
• 1 DUALphone 4088 base station
• 1 power supply for base station
• 1 ethernet cable
• 1 telephone cable
Should anything be missing, please contact your place of purchase.
INSTALLATION AND BASIC FUNCTIONS
1
SECTION
7
ENGLISH
1
SECTION
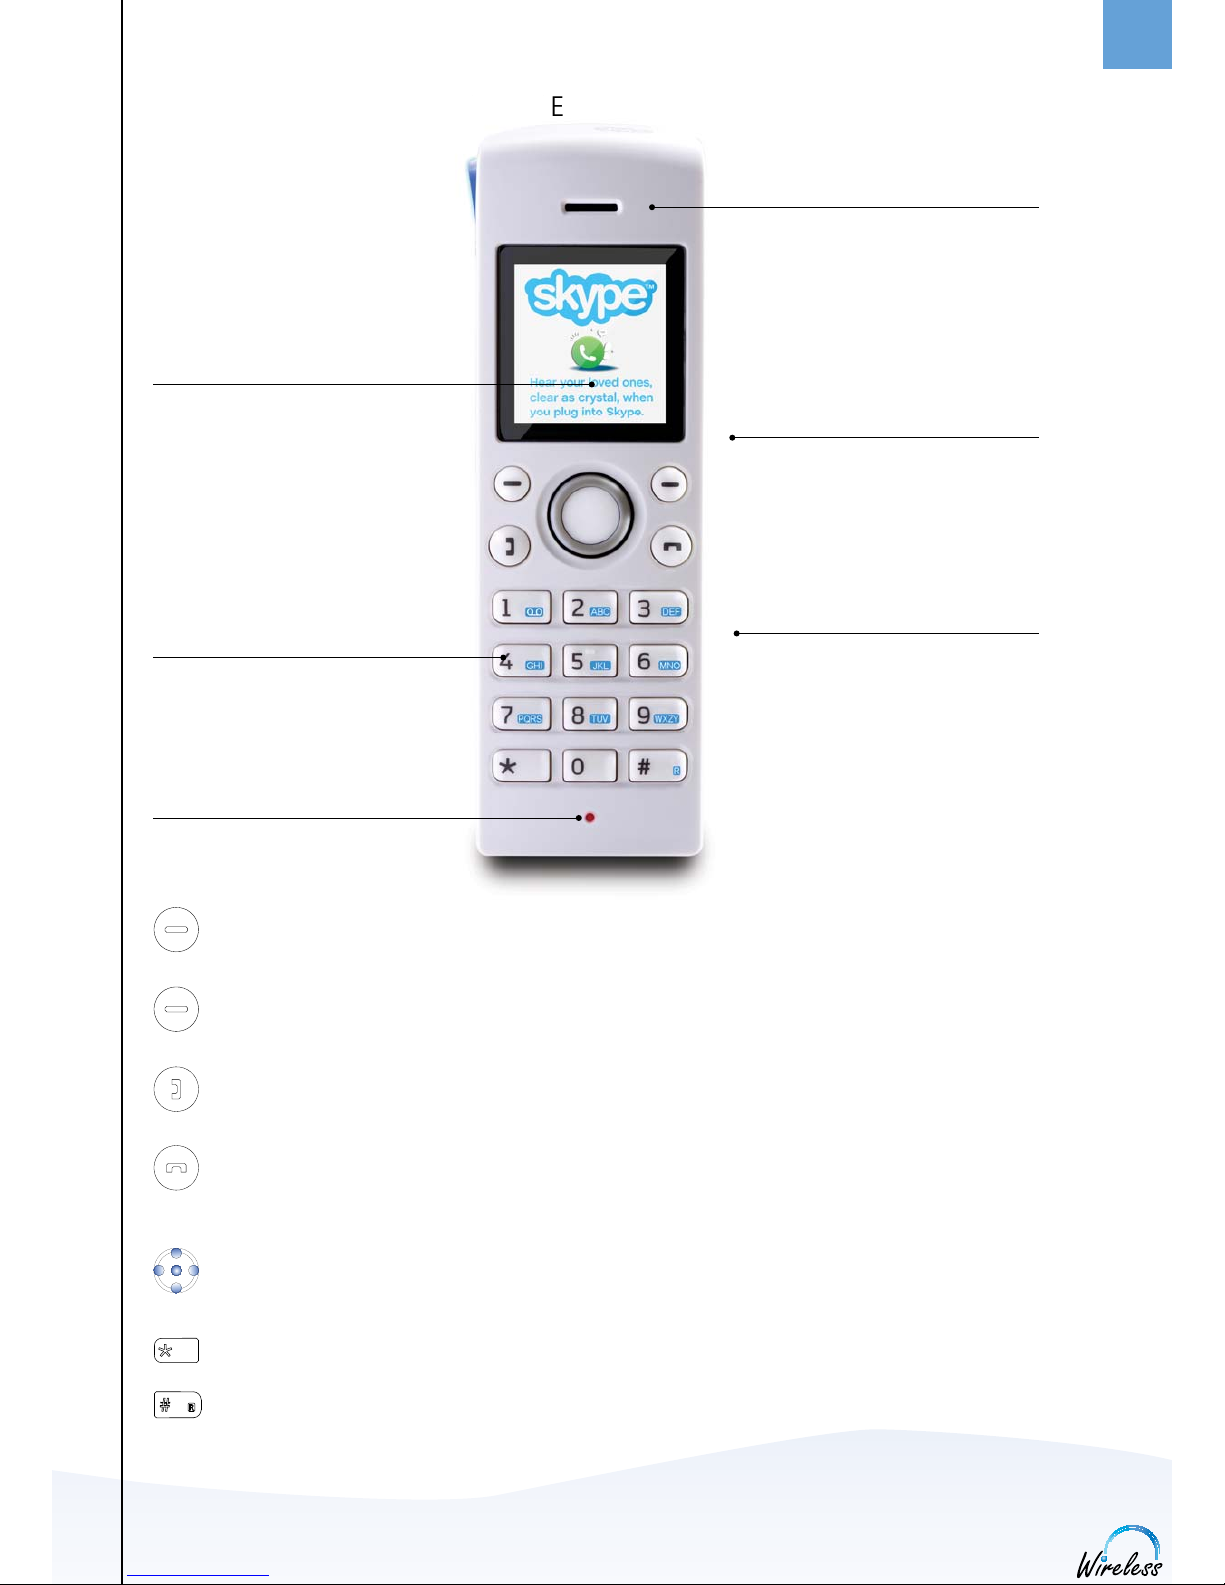
YOUR HANDSET AT A GLANCE
Left soft Key.
Selects the current menu item or confi rms a setting, depending on the current screen.
Right soft Key.
Cancels the last action or returns to the previous screen, depending on the current screen.
Call key.
Initiates or answers a call.
End/power key/Skype status.
When in call, ends a call. Turns the phone on or off by pressing and holding. From idle, provides access to Skype status menu with a short key press.
Navigation keys/Enter key.
The outer keys navigate up, down, left and right. The Enter key in the centre selects/confi rms a setting.
When you are in text editor, changes to lower-case, upper-case or numeric entry.
When you make a landline call, you can send a #-key by pressing the key shortly. If you wish to switch
between an ongoing call and a call waiting, press the key down for a longer period of time. When
you are in text editor, provides a symbol table.
A GLANC
Colour Display
Displays the status of your handset.
Key Pad
Keys used for entering digits 0-9 and
letters A-Z.
Microphone
Loudspeaker/ringer
For handsfree speakerphone and
ringing (on the back of the
DUALphone).
Headset jack
For 3.5 mm jack
(on the side of the DUALphone).
Earpiece
INSTALLATION AND BASIC FUNCTIONS
8
ENGLISH
1
SECTION
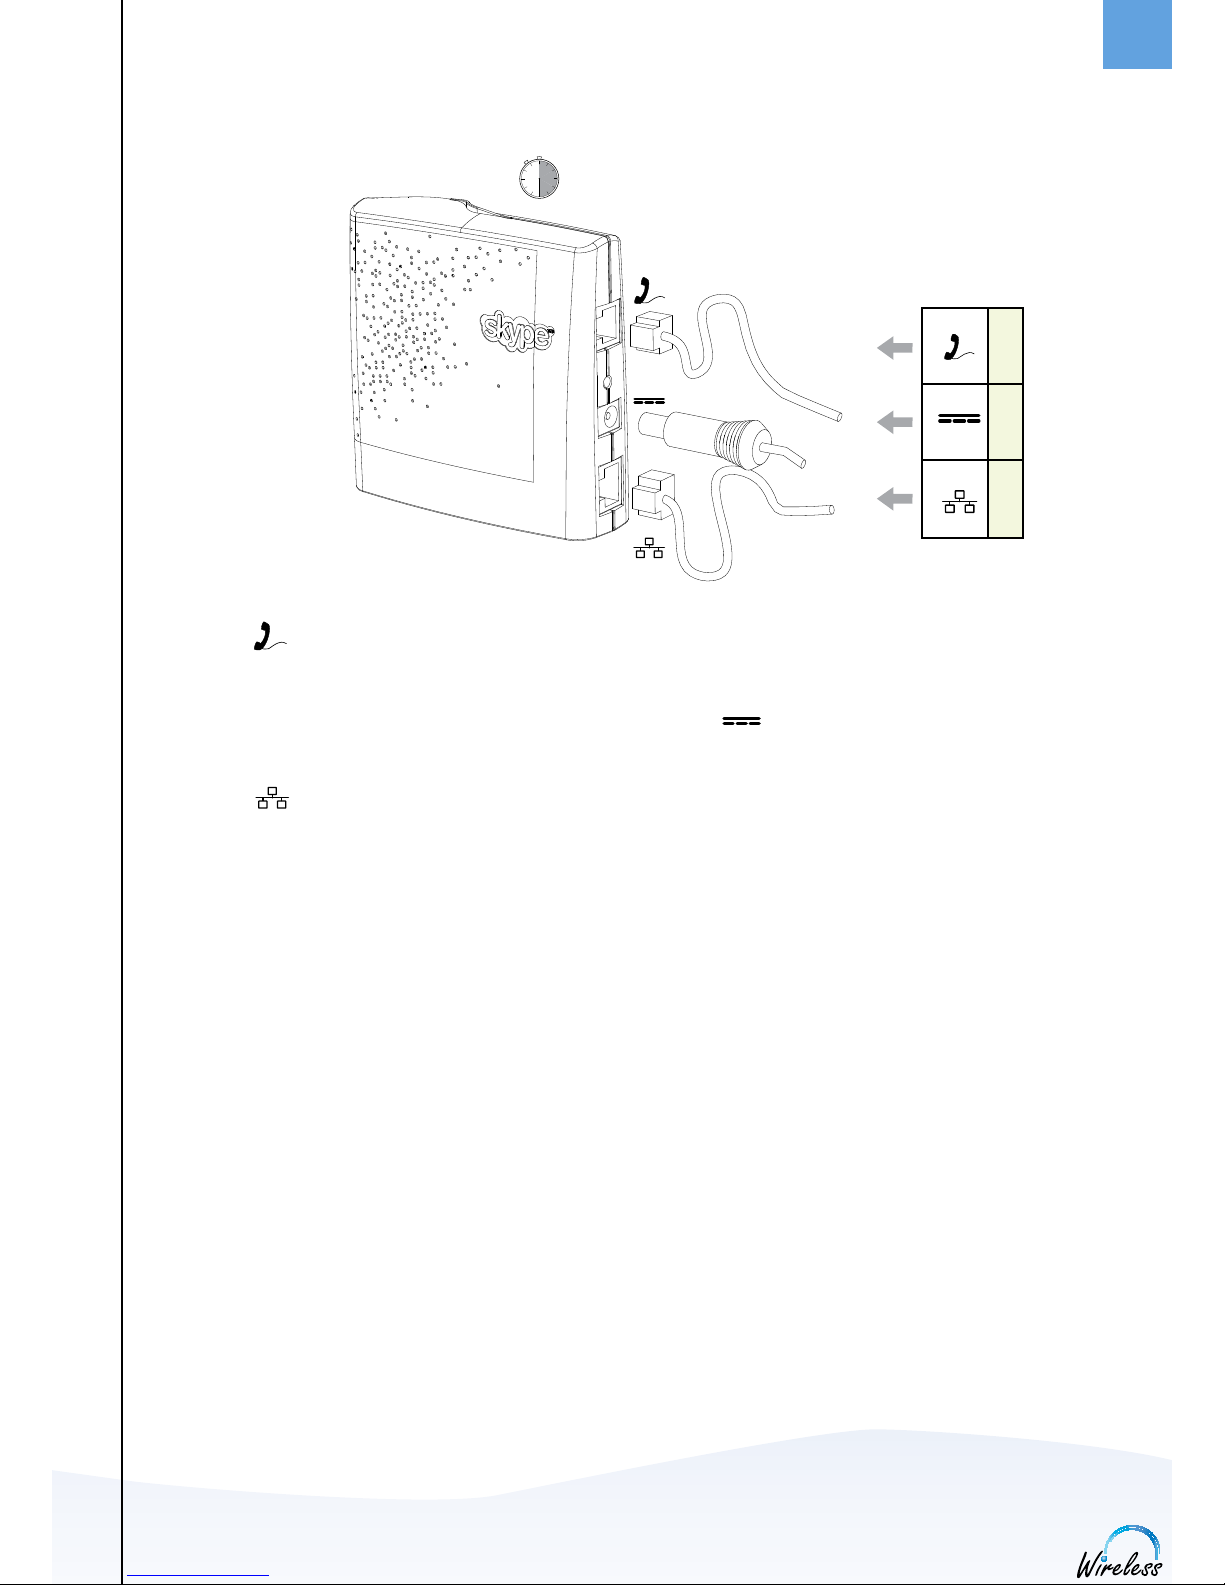
HOW TO INSTALL THE BASE STATION
a) Connect on the base station to a telephone socket (if available), using the provided telephone cable
and optional plug.
b) Connect the power adapter to an active power outlet and connect on the base station to the power
adapter.
c) Connect on the base station to a LAN (Local Area Network) port on your broadband connection
(modem, router, hub, switch etc.) using the provided Ethernet cable.
The light indicator on the top has two functions:
• Always on confi rms that the Ethernet cable is connected.
• Blinking indicates that the Ethernet cable is not connected.
c)
b)
a)
INSTALLATION AND BASIC FUNCTIONS
30 seconds wait for LED to light up after power reset
9
ENGLISH
1
SECTION
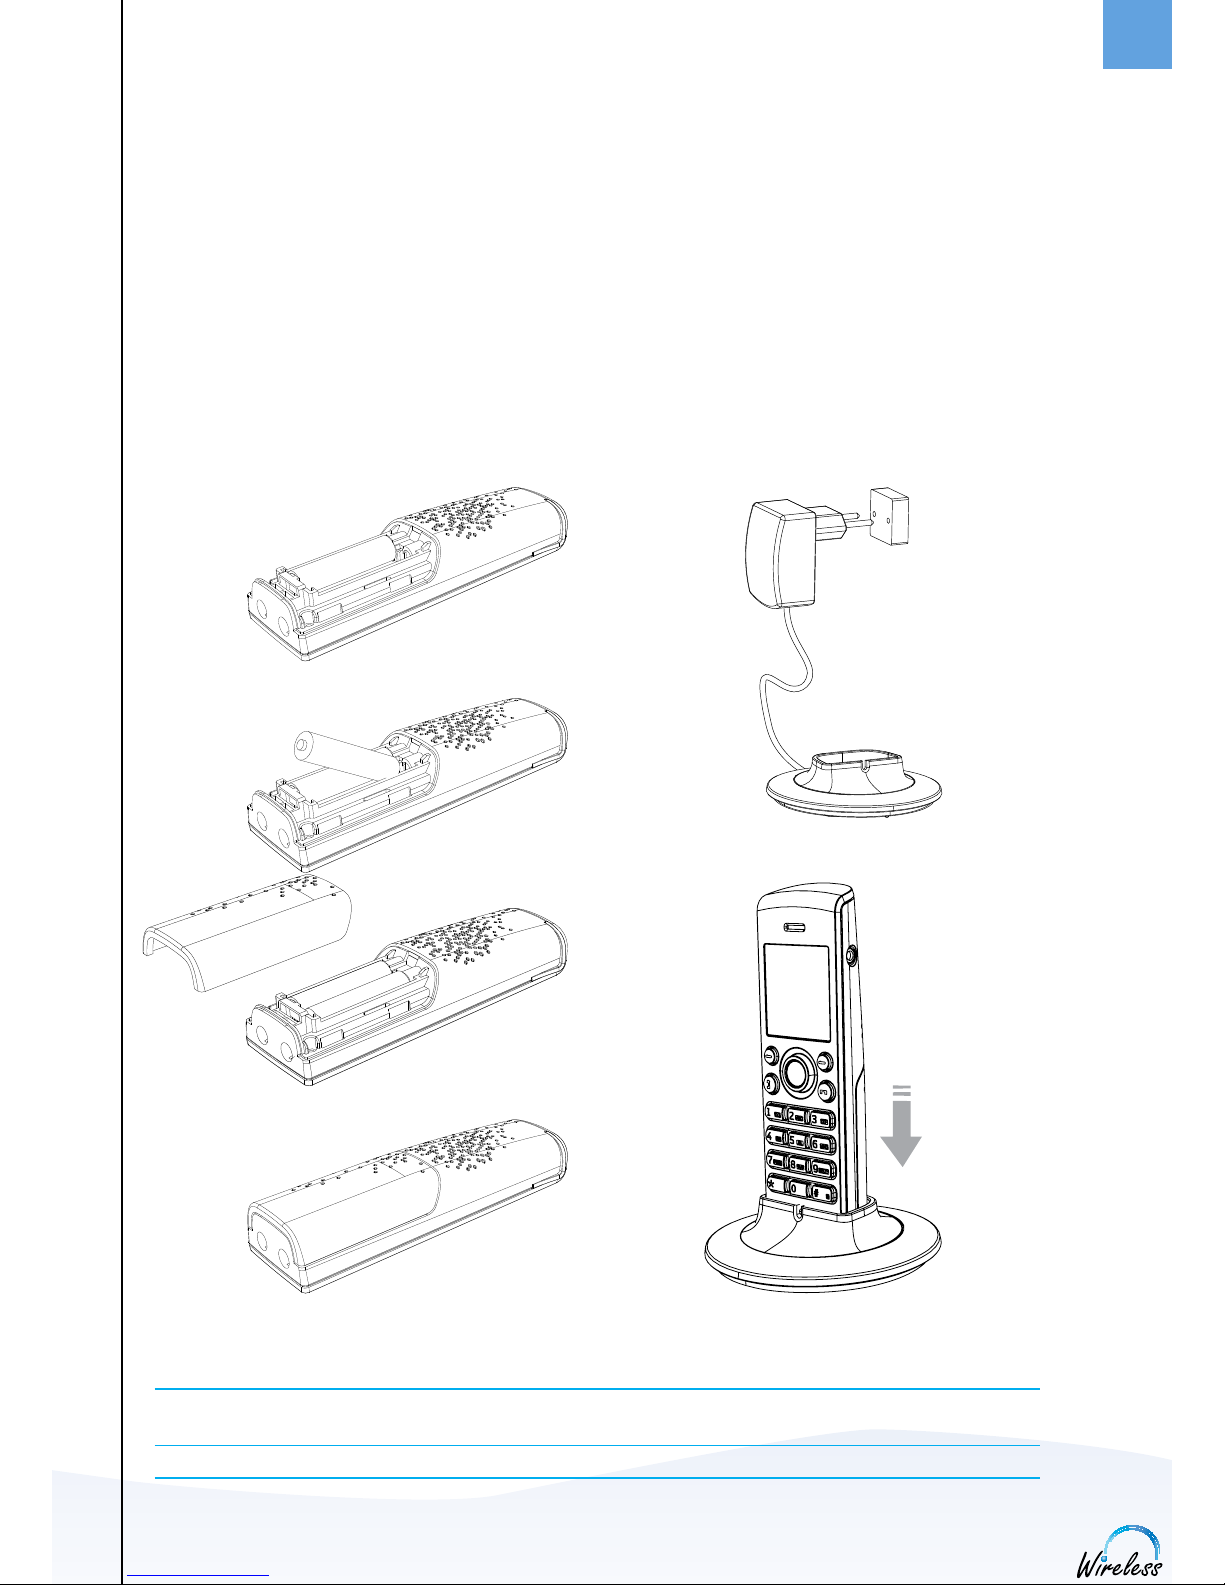
HOW TO INSTALL THE HANDSET
• Push the top of the battery compartment cover on the back of the handset inwards and downwards.
• Insert the two batteries provided with the handset, making sure that their plus and minus ends are facing
the same way as shown in the illustrations on the sides of the battery compartment.
• Slide the battery compartment cover shut.
• Connect the power adapter of the charging cradle to an active power outlet.
• Place the handset in the charging cradle to charge the batteries.
• Wait for 10 minutes and the batteries will be ready for fi rst-time start-up.
NOTES:
• After completion of the full installation procedure we recommend that you charge the batteries fully
befor e fi rst use. This takes approximately 6 hours.
• Normally, you need to be within 50 m of the base station to connect successfully.
INSTALLATION AND BASIC FUNCTIONS
1.
2.
3.
4.
6.
5.
10
ENGLISH
1
SECTION
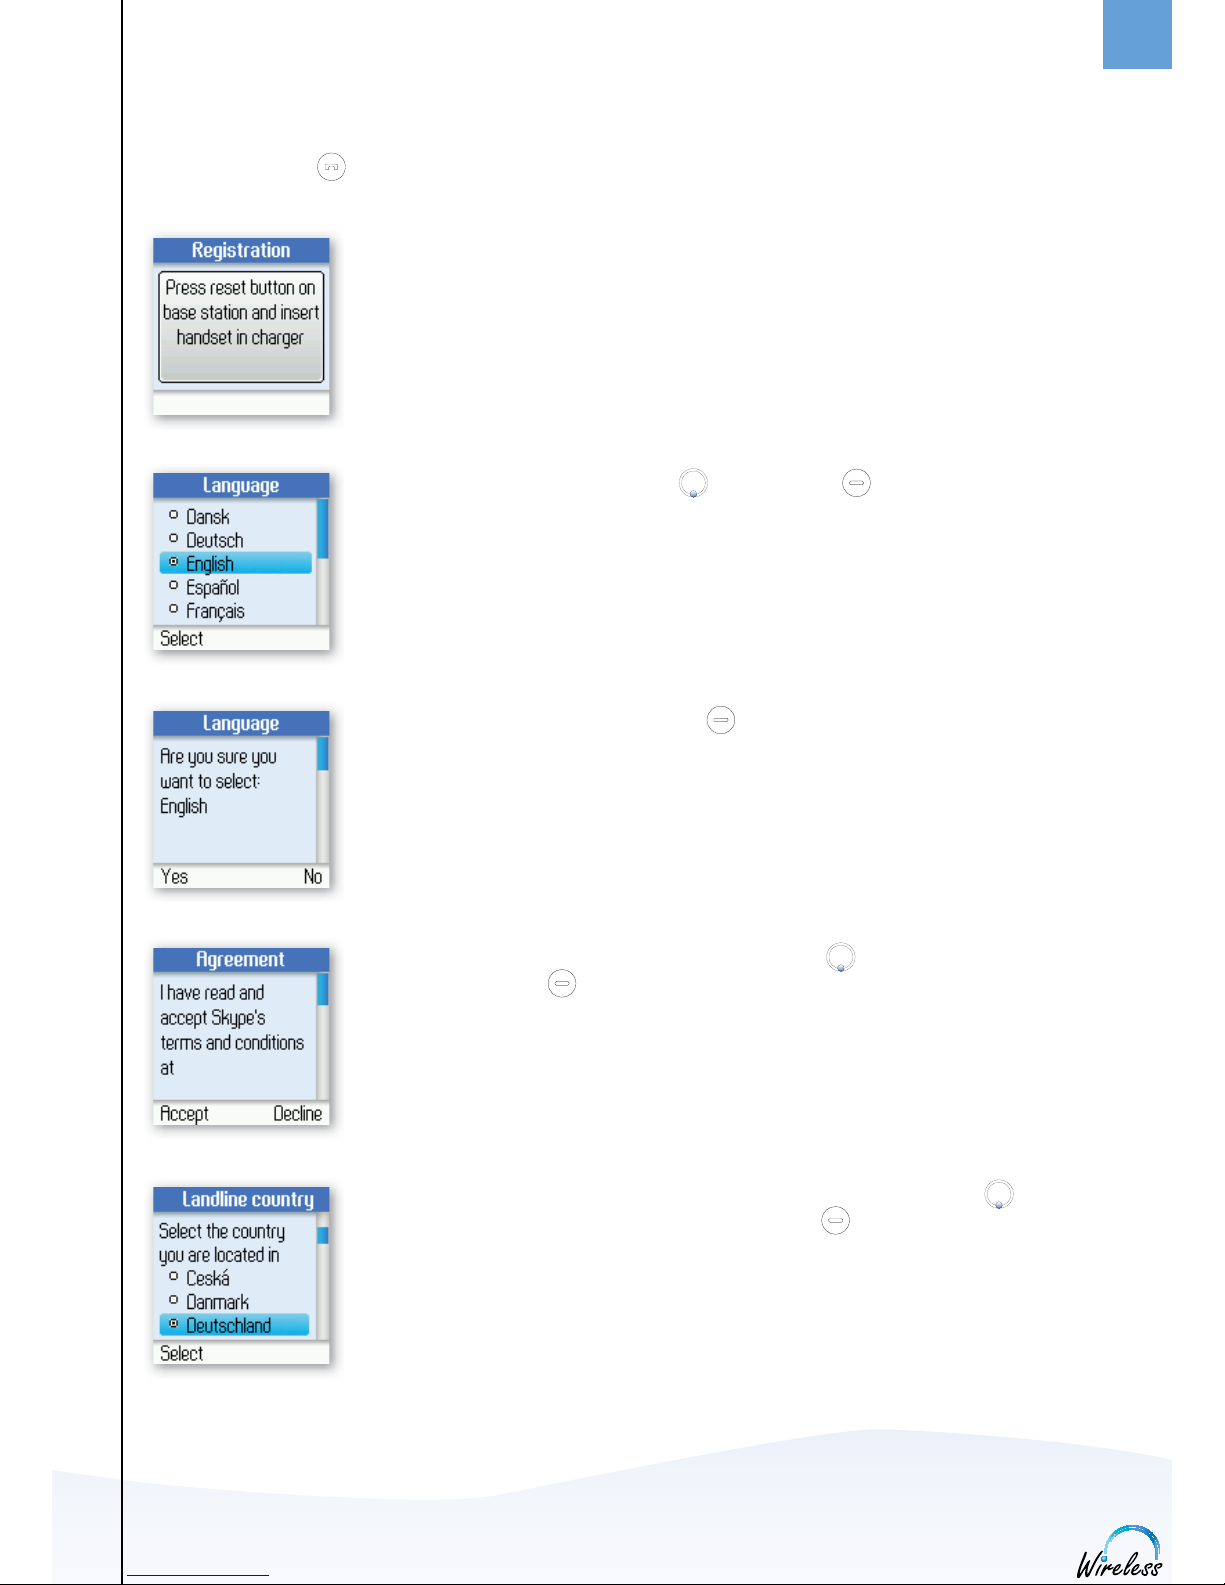
FIRST TIME START-UP
You must complete the following steps the fi rst time you use your DUALphone. Start by turning on the
handset by pressing until the handset turns on.
1) Reset the base station by pressing the button on the back of the unit and insert
the DUALphone in the cradle in order to register with the base station. The
DUALphone screen informs you when ready for next step.
2) Find your preferred language using , then press left to select
a language.
3) Confi rm your selection by pressing left .
4) You are then directed to the Skype Agreement. Use to read the entire text
and then press left to accept the agreement.
5) You are then directed to Country setting for landline confi guration. Use
to fi nd the country you are located in, then press left to select your country.
INSTALLATION AND BASIC FUNCTIONS
11
ENGLISH
1
SECTION
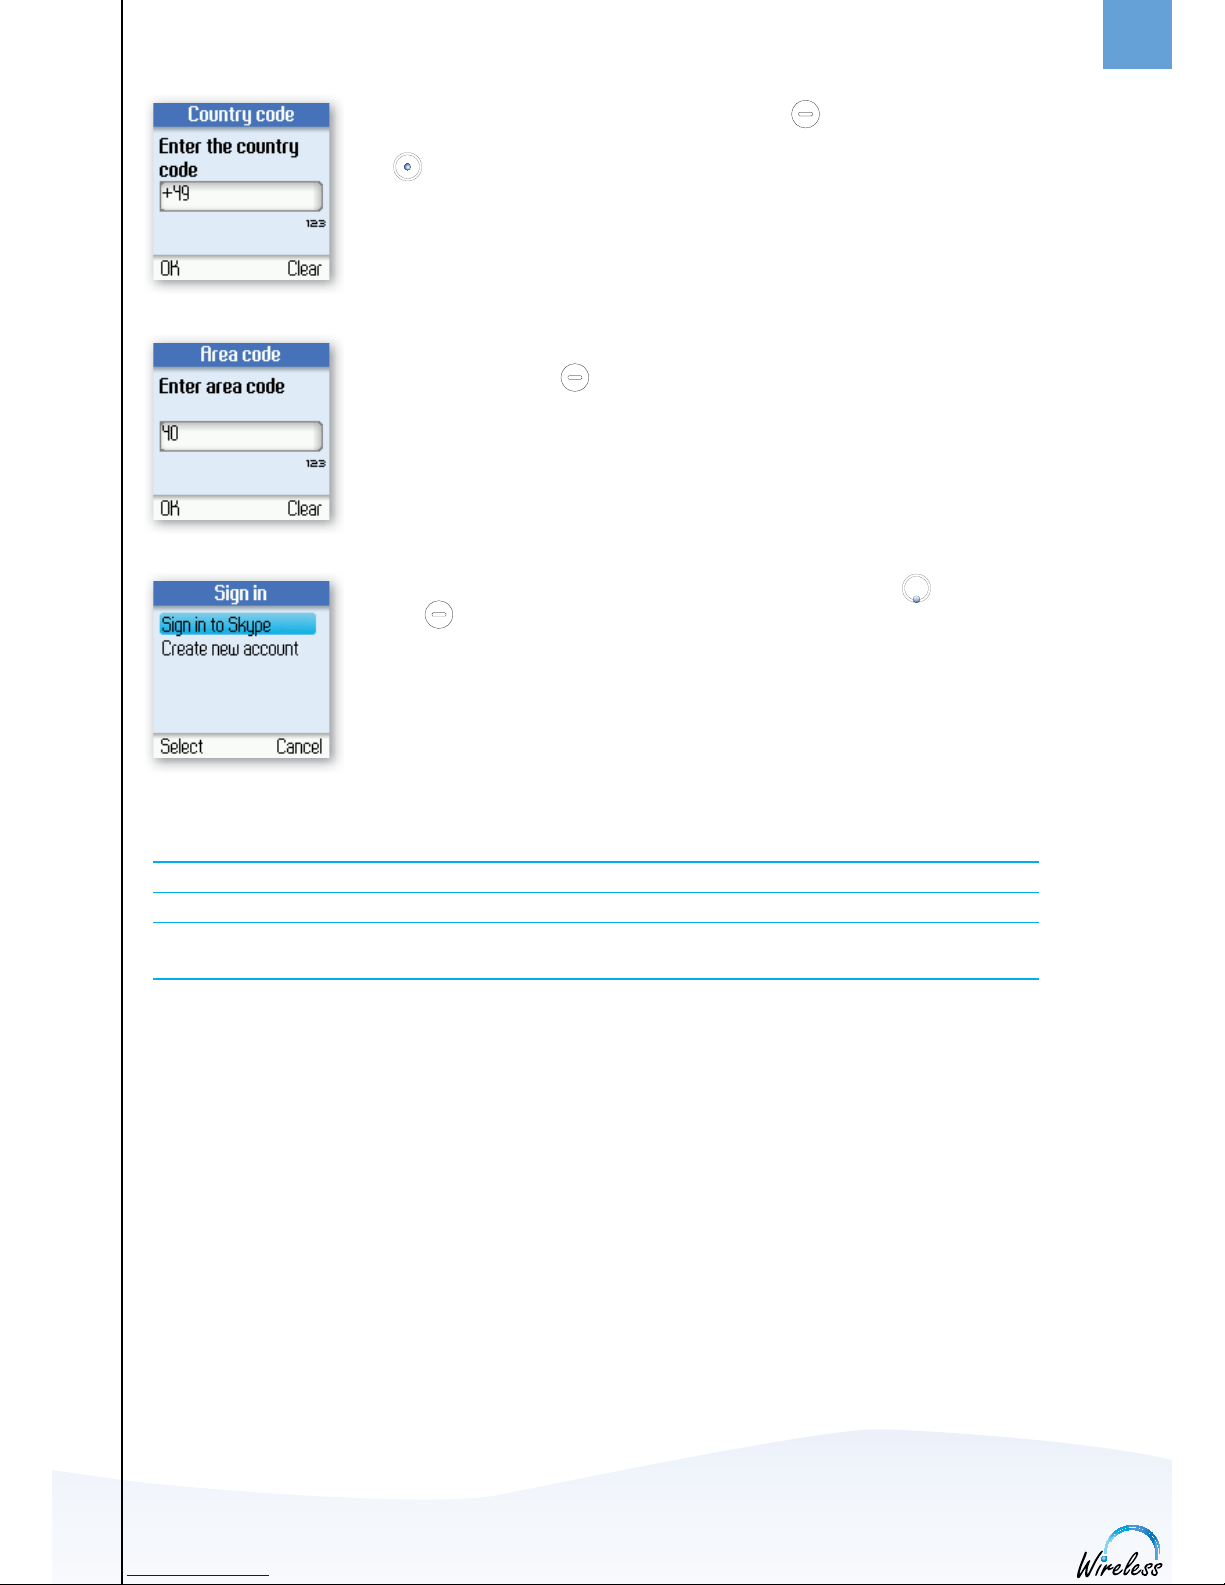
6) Confi rm the country code setting by pressing left . Alter your country code
by inserting “+” followed by the country code number of your choice and press
.
7) If your country uses area codes, please enter the area code following the above
procedure. Press left to continue.
8) Choose Sign in to Skype or Create new account by pressing followed by
left .
NOTES:
• The country setting confi gures the landline telephony port.
• If your country setting is not confi gured correctly, emergenc y calls may not work properly.
• Emergency calls via the landline are only possible if power is applied to the base station and the landline is
properly connected.
INSTALLATION AND BASIC FUNCTIONS
12
ENGLISH
1
SECTION
GETTING STARTED WITH SKYPE
You can confi gure your DUALphone with an existing Skype account during the fi rst-time installation, or you
can optionally create a new Skype account. You only need a Skype username and password defi ned by you to
create a new account. You can enter further account details when your DUALphone has been confi gured and
is online.
NOTE:
• Skype does not allow emergency calls. Such calls are therefore always routed to the traditional telephony
port.
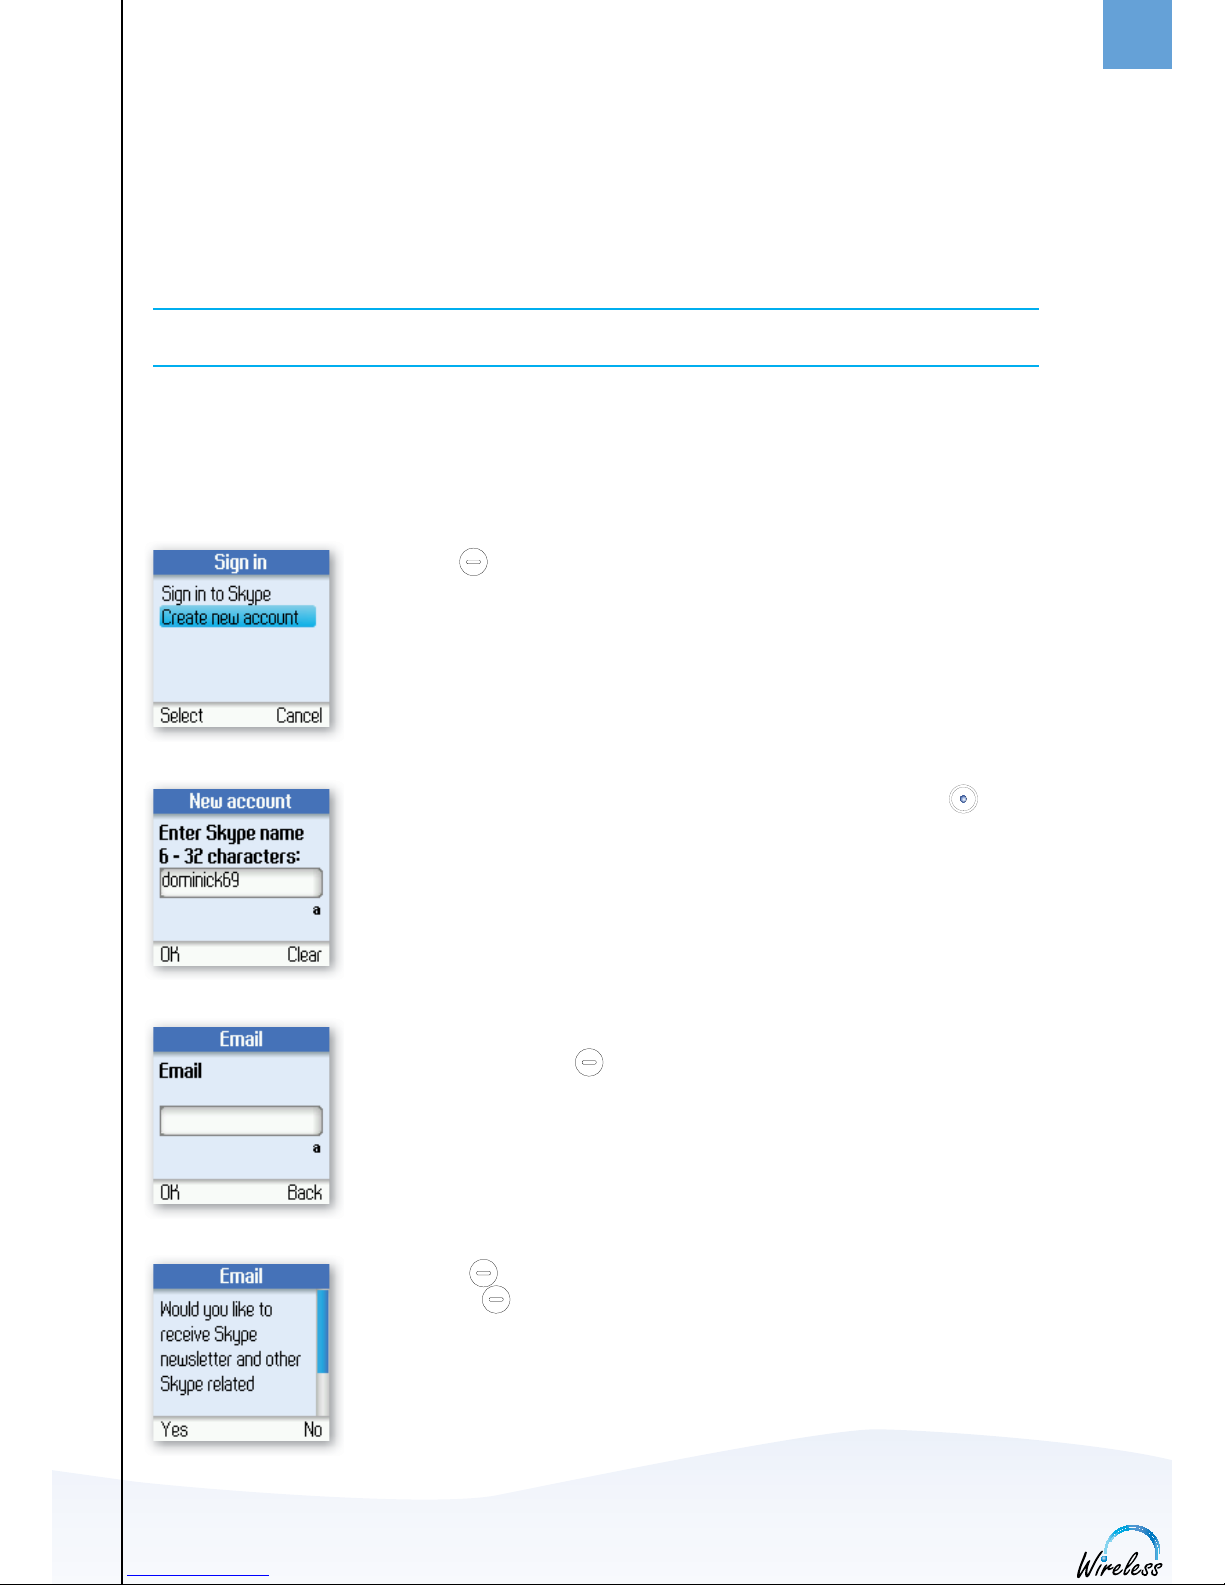
Create a new Skype account
If you do not have a Skype account, follow this procedure.
1) Use left to select Create new account.
2) Use the keypad to enter a Skype name of your own choice and press .
3) Use the keypad to enter a valid email address to be associated with your Skype
account and press left .
4) Press left to select “Yes” and receive the Skype newsletter to your email, or
press right to select “No” and receive no news from Skype to your email.
INSTALLATION AND BASIC FUNCTIONS
13
ENGLISH
1
SECTION
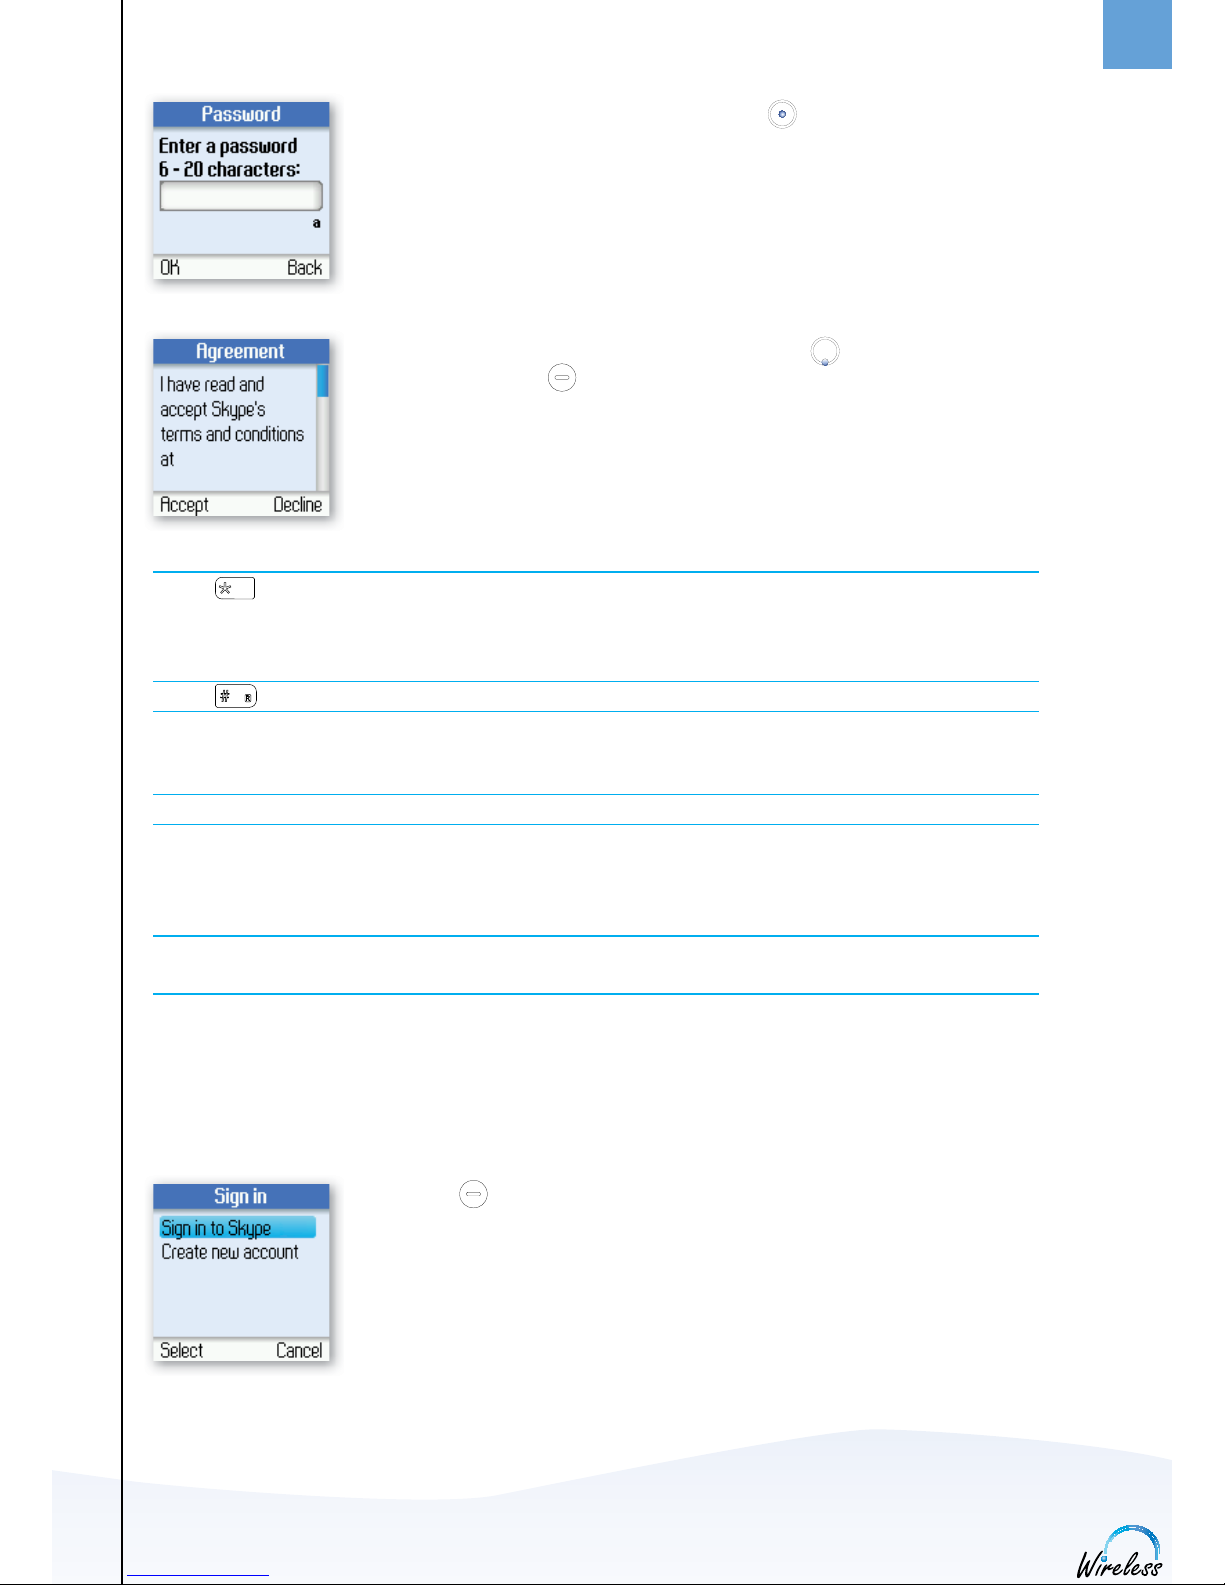
5) Use the keypad to enter a password and press . You are asked to confi rm
the password by entering it again.
6) You are then directed to the Skype Agreement. Use to read the entire text
and then press left to accept.
NOTES:
• Use to change to lower-case, upper-case or numeric entry when entering your Skype name and
password. Skype names can be 6-32 characters. You can use any mix of upper- and lower-case characters,
numbers and punctuation marks. You cannot use spaces and your name cannot begin with a number or
punctuation mark. If the name is already in use, you will be prompted to try another name.
• Use to input symbols from the symbol table.
• Passwords can be 6-20 characters. You can use any mix of upper- and lower-case characters, numbers and
punctuation marks. You cannot use spaces, your password cannot begin with a number or punctuation
mark, and you cannot use your Skype name as a password.
• Please be patient as the creation of your Skype account may take several minutes to perform.
• After you have created your Skype Name, it is strongly recommended that you register an email address for
your Skype Name on the Skype website. This will allow Skype to generate a new password for you in the
event that you lose your password. Go to www.skype.com and sign in to your account. Then follow the
on-screen instructions for registering an email address for your account.
• To create a new account minimum one account must not be in use. It is not possible to create a new
account if you are already signed in to both accounts.
Sign in to Skype
When you have a Skype account, you can sign in to Skype. Please have your Skype name and password ready
before you sign in and beware of lowercase/upper-case and special characters.
1) Use left to select Sign in to Skype.
INSTALLATION AND BASIC FUNCTIONS
14
ENGLISH
1
SECTION
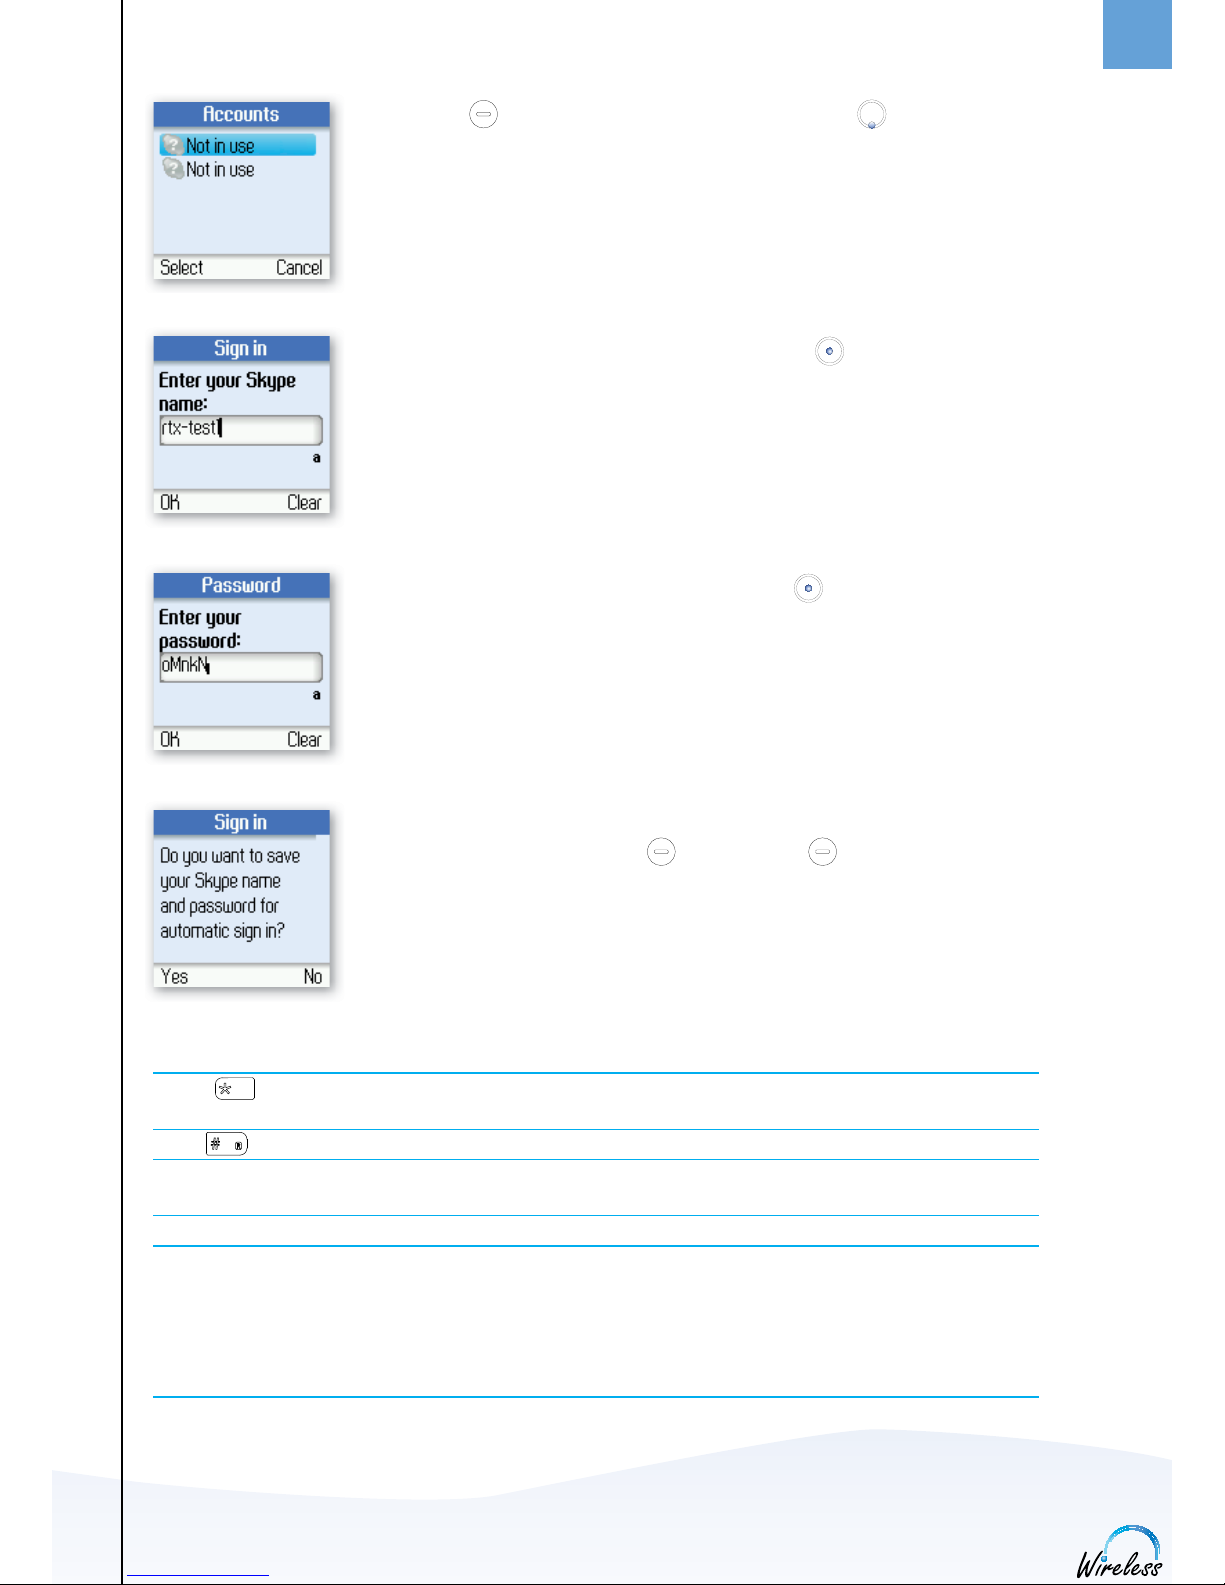
2) Press left to sign in to the fi rst Skype account, or use to sign in to the
second Skype account.
3) Use the keypad to enter your Skype name and press .
4) Use the keypad to enter your password and press .
5) You are now asked whether you want to save your Skype name and password
for automatic sign-in. Press left to accept, right to decline.
NOTES:
• Use to change to lower-case, upper-case, or numeric entry when entering your Skype name and
password.
• Us to input symbols from the symbol table.
• If you have forgotten your Skype password go to www.skype.c om and choose “Sign in”. Then choose
“Forgot your password?” and follow the directions on your computer screen.
• Please be patient as synchronization of Skype contacts might take several minutes.
• It is possible to be signed in to two different Skype accounts on one base station, and hereby on two
handsets. If a Skype account is already in use on the base station, the Skype name and status will be dis-
played on the dual account screen. If an account is not in use it will be displayed as “Not in use”, and you
can sign in with your Skype name and password. It is also possible to be signed in with more handsets on
the same Skype account, up to four handsets can be registered on the same base station.
INSTALLATION AND BASIC FUNCTIONS
15
ENGLISH
1
SECTION
Skype features supported by DUALphone
After you have created your Skype account, you can call other people with Skype accounts for free. Skype also
offers additional subscription features, including:
All of these features are supported by your new DUALphone and are available at www.skype.com. Please
visit www.dualphone.net to explore which future Skype features your DUALphone supports.
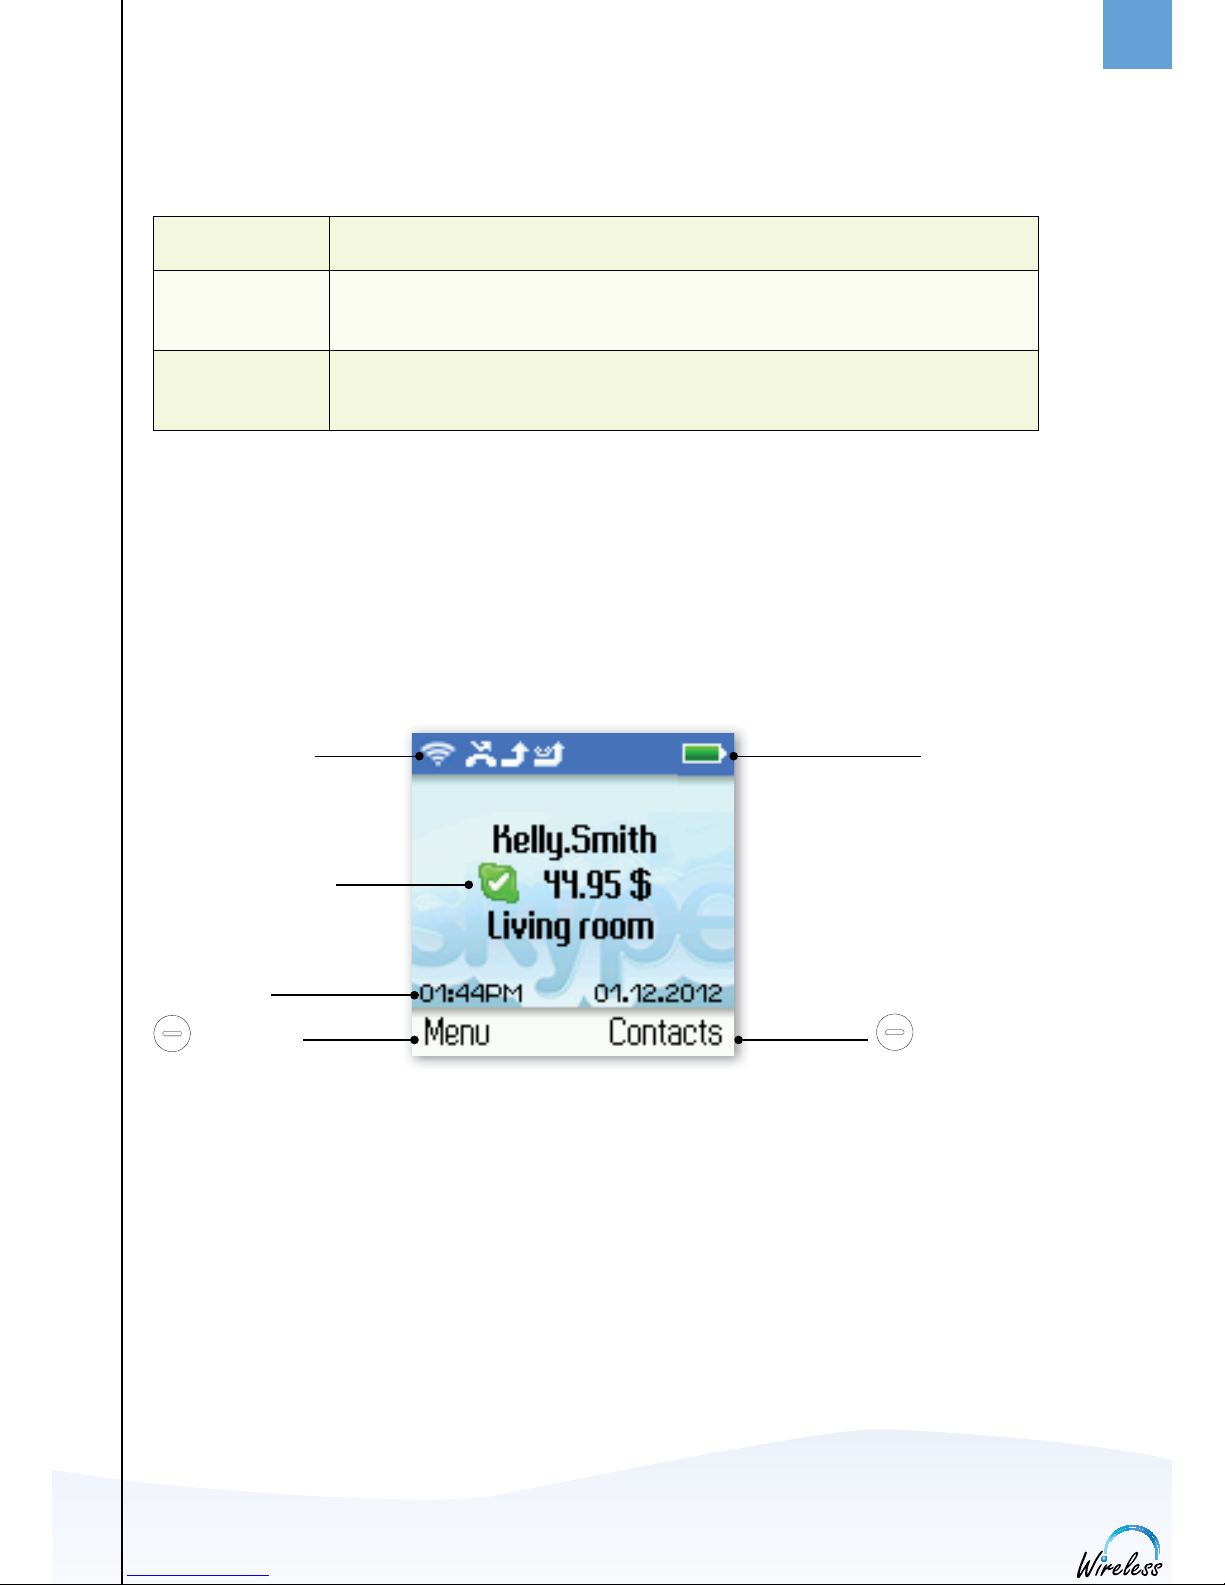
Main Display
The main display of your DUALphone provides various status indicators and access to the Skype menu-based
interface. The illustration below shows the main screen and its elements.
Radio signal status
and notifi cations
Skype™ online status
Current time
(Right) Action
(Left) Action
INSTALLATION AND BASIC FUNCTIONS
SkypeOut
Allows you to make calls to ordinary landline and mobile phones.
Online number
Provides you with an ordinary phone number for receiving Skype calls on your
DUALphone from ordinary landline and mobile phones.
Skype Voicemail
Skype Voicemail allows you to send and receive voicemail messages and record a
greeting.
Battery status

16
ENGLISH
1
SECTION
INSTALLATION AND BASIC FUNCTIONS
Current time
The currently set time.
Skype credit
Your current Skype credit balance.
Action
Left soft key.
Selects the current menu item or confi rms a setting, depending on the
current screen.
Action Right soft key.
Cancels the last action or returns to the previous screen, depending on the
current screen.
Short cut to outgoing calls.
Short cut to all call history.
Short key press is a short cut to the Skype status menu.
Short cut to search Skype users.
Intercom.
Radio signal status
Indicates the strength of the radio signal.
No radio signal.
Radio signal.
Battery status
Indicates the status of the battery.
Low level.
Partially charged.
Fully charged.
Charging.
Notifi cations
Displays notifi cation icons.
Missed call.
Call forward to your skype voicemail is activated.
Call forward to a landline/mobile number is activated.
New voicemail.
Exchange contact details request.
Silent mode is active.
Keypad locked.
Skype credit is close to expiry.
Headset connected.
Skype online status
Indicates your current Skype online status.
Online.
Away.
Do not Disturb. Indicates you are busy.
Offl ine (not signed in).
Invisible. Still online, but unseen by others.
17
ENGLISH
1
SECTION
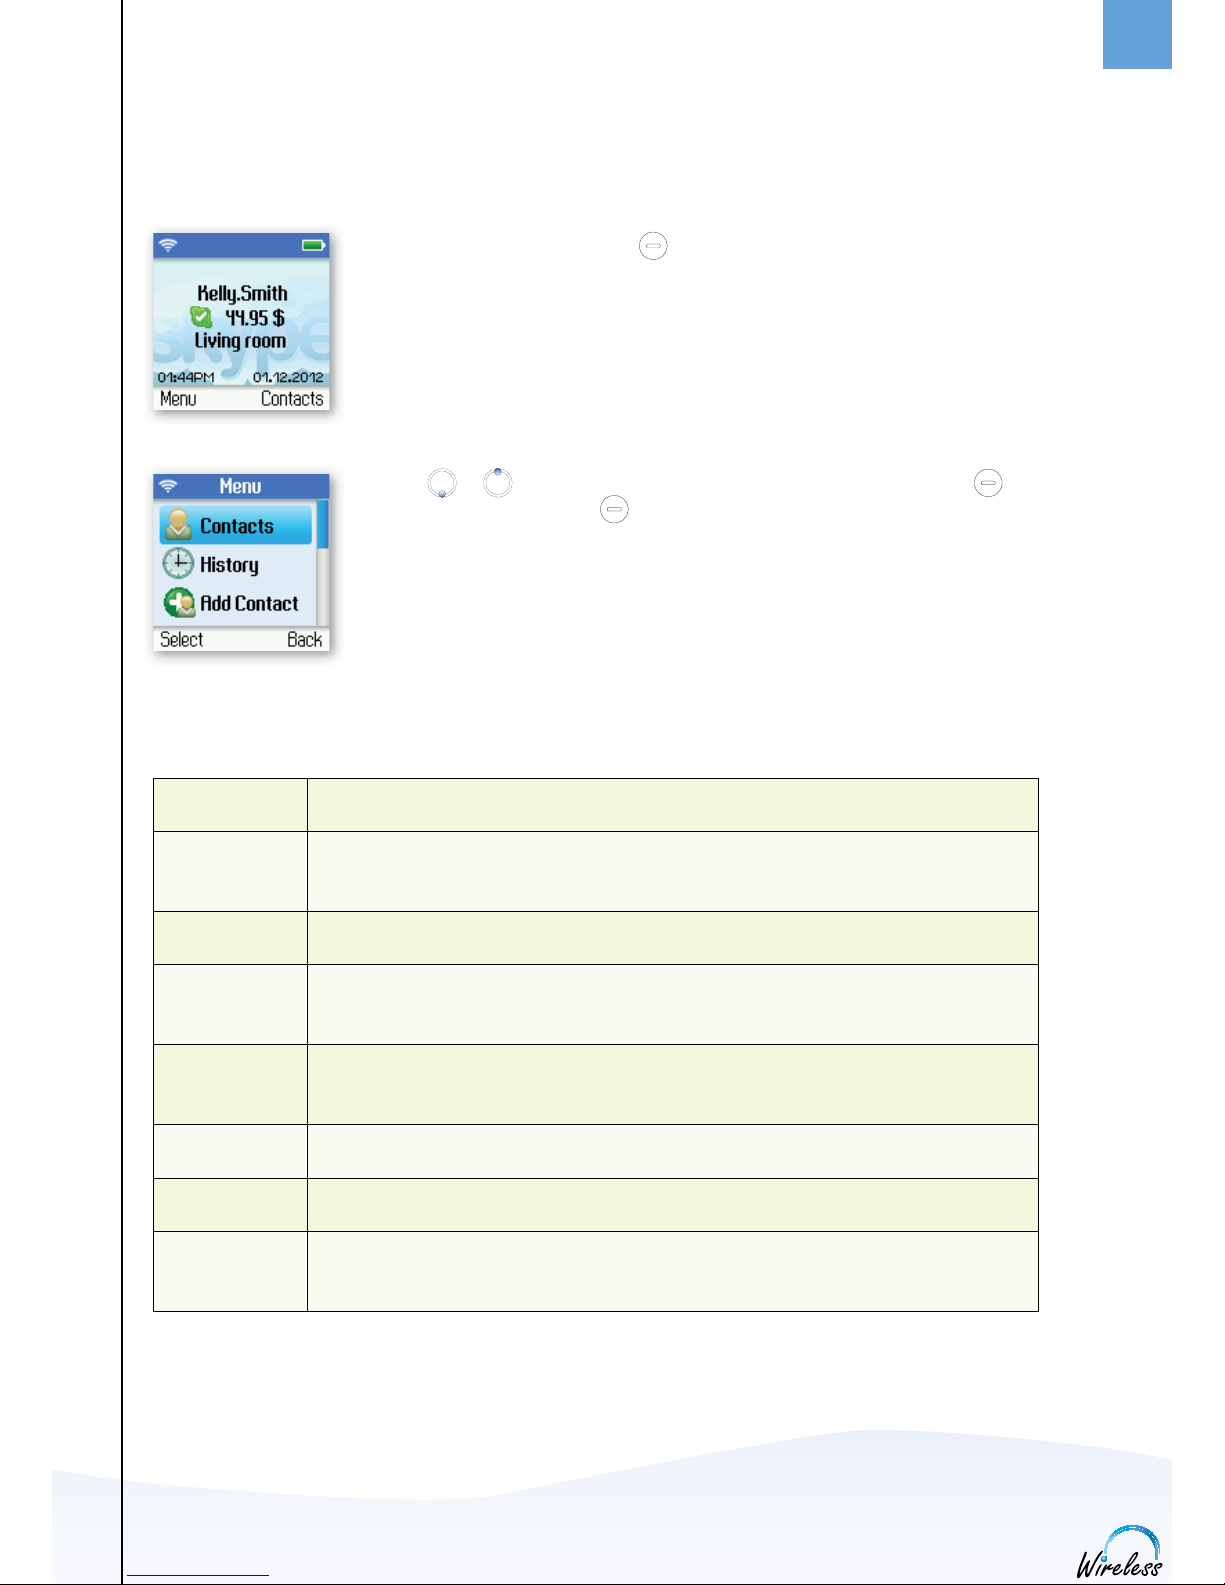
Contacts
Your contact list and the current Skype status of your contacts.
History
Your calls, missed calls, incoming and outgoing calls, voicemails and exchange contact
details.
Add Contact
Adds a Skype user or SkypeOut number to your contact list.
Intercom Call between handsets.
Status
Sign in to Skype, create a new account, change your profi le, change your password,
choose auto sign-in.
Search Searches for Skype contacts online.
Services View Skype credit, Skype Online Number and Skype Voicemail status.
Settings
Settings for call divert, privacy, sounds, time and date, manage blocked users, cordless
settings, phone settings, information and advanced settings.
Main Menu
The main menu provides easy access to all of your Skype and DUALphone settings.
1) From idle screen just press left to enter the main menu.
2) Use or to navigate and highlight an item. Select by pressing left or
go back by pressing right .
The following table outlines the main menu items:
INSTALLATION AND BASIC FUNCTIONS
18
ENGLISH
1
SECTION
CONTACTS
Your contact list displays all of the names you can make calls to. If you have an existing Skype account, your
contact list is automatically downloaded when you sign in. If you are new to Skype and have just created an
account, your contact list will be empty. You will need to add contacts to your list.
Skype protects the privacy of its users by requiring exchange contact details on names that you wish to add to
your contact list. When you add a name to your list, an exchange contact details request is sent to the user.
The user can accept or decline the request. When a request is accepted, you can see when your contacts are
online and make calls to them. You can also view their personal profi le details.
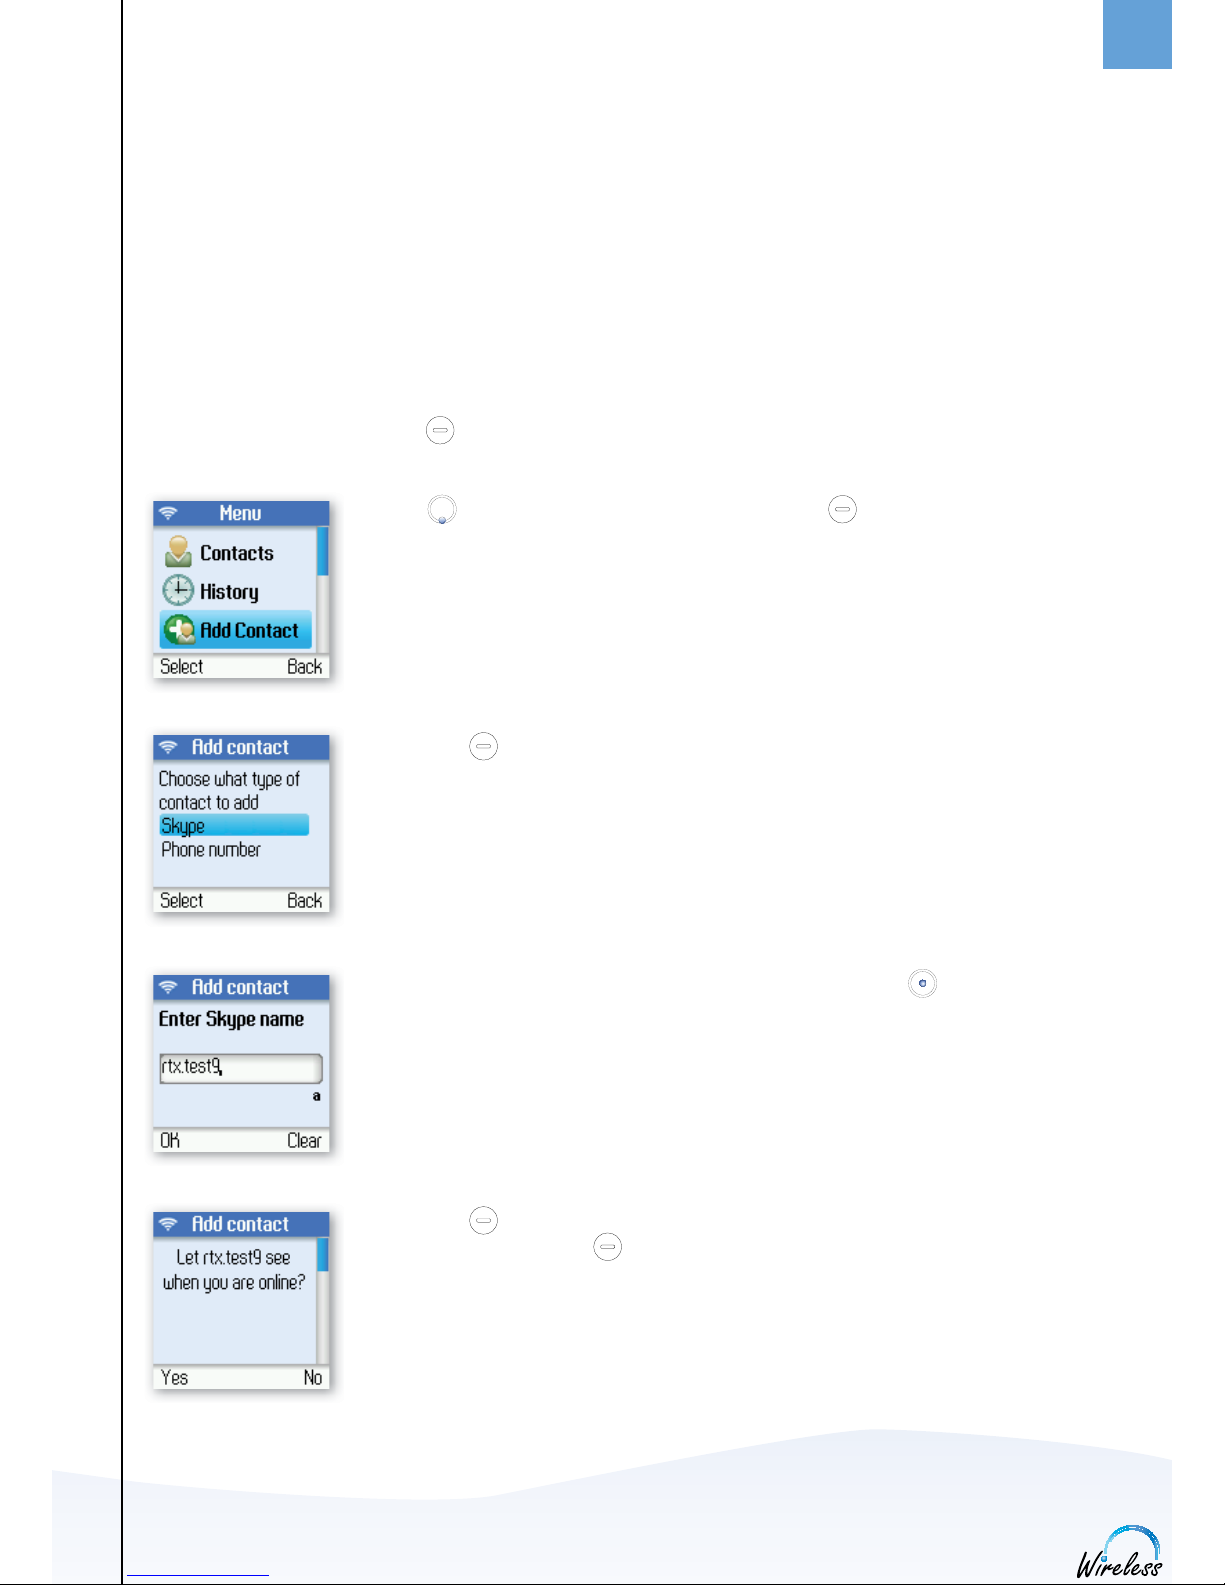
Add a Skype Contact
To add a Skype contact, press left to select Menu, then:
1) Use to go to Add Contact, select by pressing left .
2) Press left to select Skype.
3) Use the keypad to enter the Skype name or full name and press .
4) Press left to select “Yes” and let your newly added contact see when you
are online, or press right to select “No” such that you appear offl ine to this
contact.
INSTALLATION AND BASIC FUNCTIONS

19
ENGLISH
1
SECTION
5) Confi rm by pressing right back or send a request to exchange contact
details by pressing left .
NOTES:
• After you press left in step 4, an exchange contact details request is sent to the contact. When it has
been sent, a confi rmation message is displayed. The name is added to your contact list, and when accepted by the contact it will change status.
• Please be patient as synchronization of Skype contacts might take several minutes.
• Use “Echo/Sound Test Service” to test your Skype connection. Calling Echo/Sound Test Service will
launch an automated testing robot that allows you to record and play back sound.
INSTALLATION AND BASIC FUNCTIONS

20
ENGLISH
1
SECTION
INSTALLATION AND BASIC FUNCTIONS
Add a SkypeOut or landline contact
To add a SkypeOut or landline contact, press left to select Menu, then:
1) Use to go to Add Contact, select by pressing left .
2) Use to enter a phone number for use with SkypeOut or landline.
Select by pressing left .
3) Use the keypad to enter the contact’s name and press .
4) Use the keypad to enter the full phone number and press .
SkypeOut numbers (even local numbers) must be entered in the following
format: “+” followed by “country code”, “area code” and “number”.
NOTES:
• Use to change to lower-case, upper-case or numeric entry.
• Use to input symbols from the symbol table.
• SkypeOut allows you to make calls to traditional landline and mobile phones. Go to www.skype.com to
learn more about SkypeOut. Search for “call phones and mobiles”.
21
ENGLISH
1
SECTION
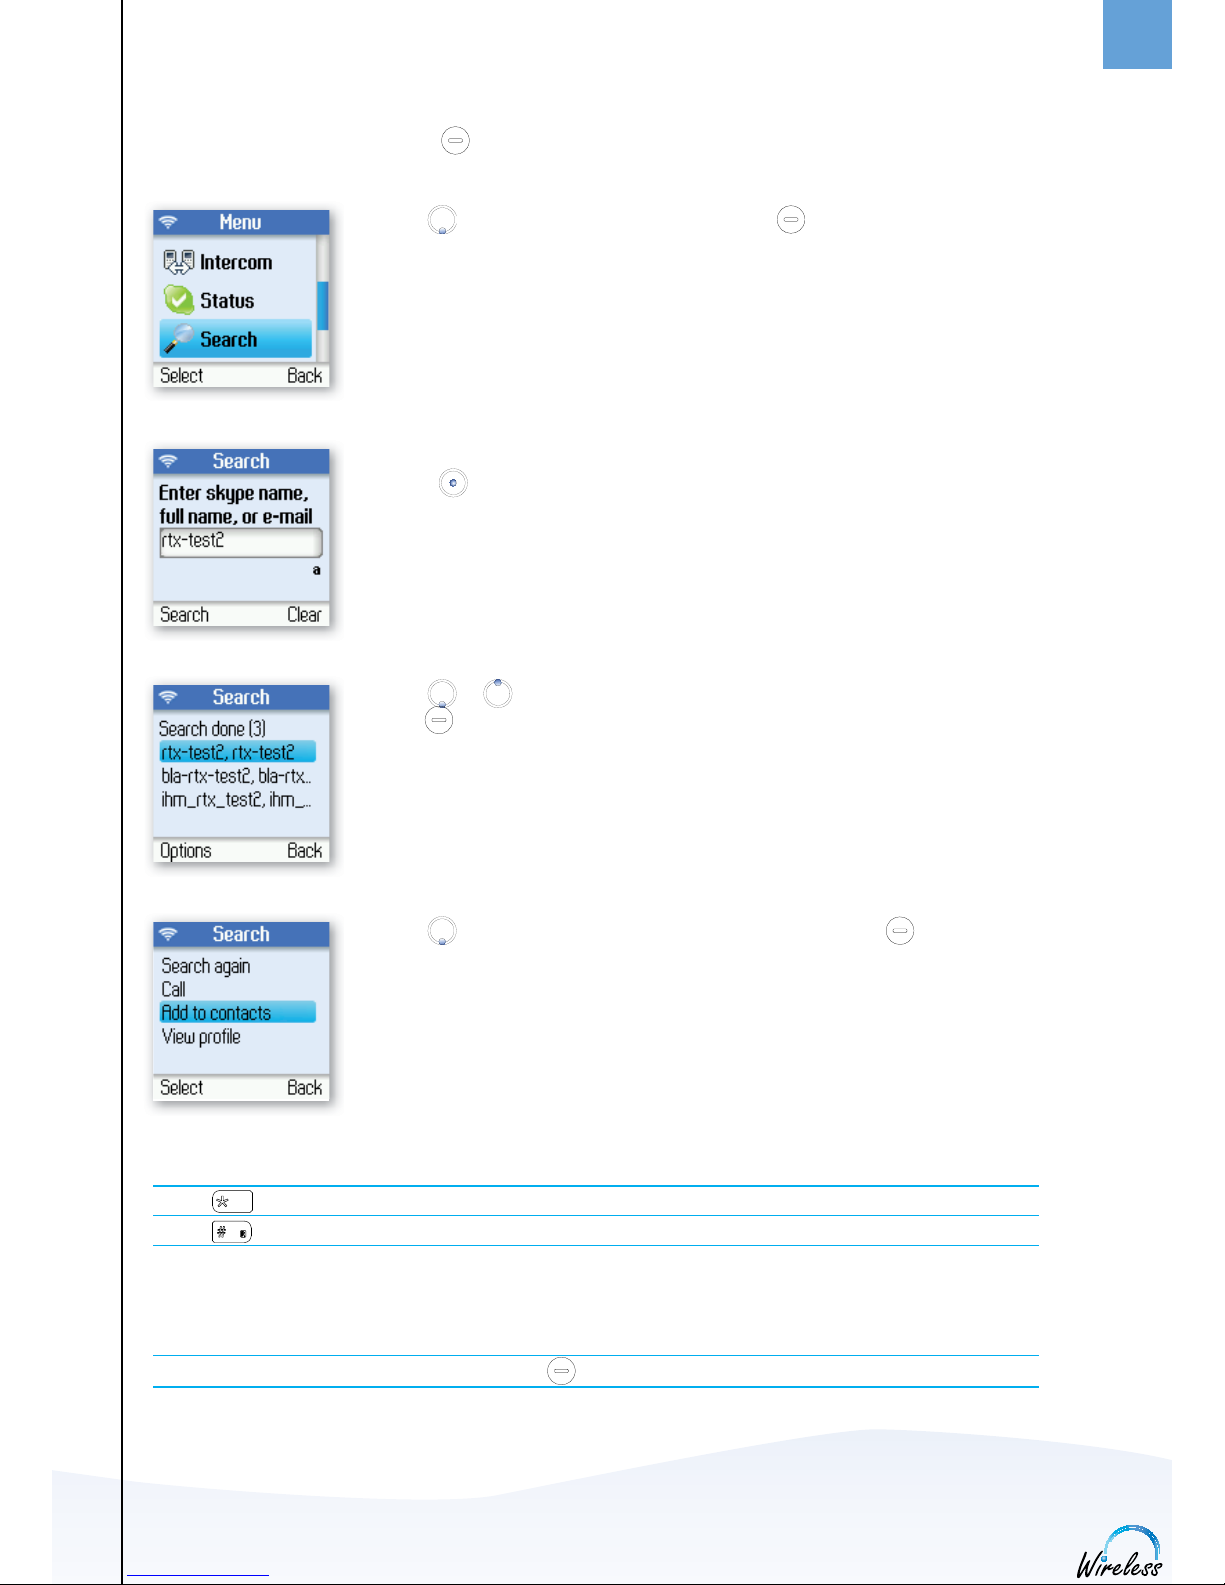
Search for Skype users
To search for Skype users, press left to select Menu, then:
1) Use to go to Search, select by pressing left .
2) Use the keypad to enter the Skype name or full name name and
press .
3) Use or to navigate and highlight a name from the list, select by pressing
left .
4) Use to highlight Add to contacts, select by pressing left .
NOTES:
• Use to change to lower-case, upper-case or numeric entry.
• Use to input symbols from the symbol table.
• Other options available during a search include:
Search again – Repeats the search.
Call – Calls the selected name.
View profi le – Displays the selected name’s profi le.
•
You can stop a search at any time by pressing
.
INSTALLATION AND BASIC FUNCTIONS
22
ENGLISH
1
SECTION
MAKE AND RECEIVE CALLS
The procedures for making and receiving calls apply to any type of call – Skype-to-Skype calls, SkypeOut calls
and Online Number calls. Furthermore, you can use your phone for landline telephony.
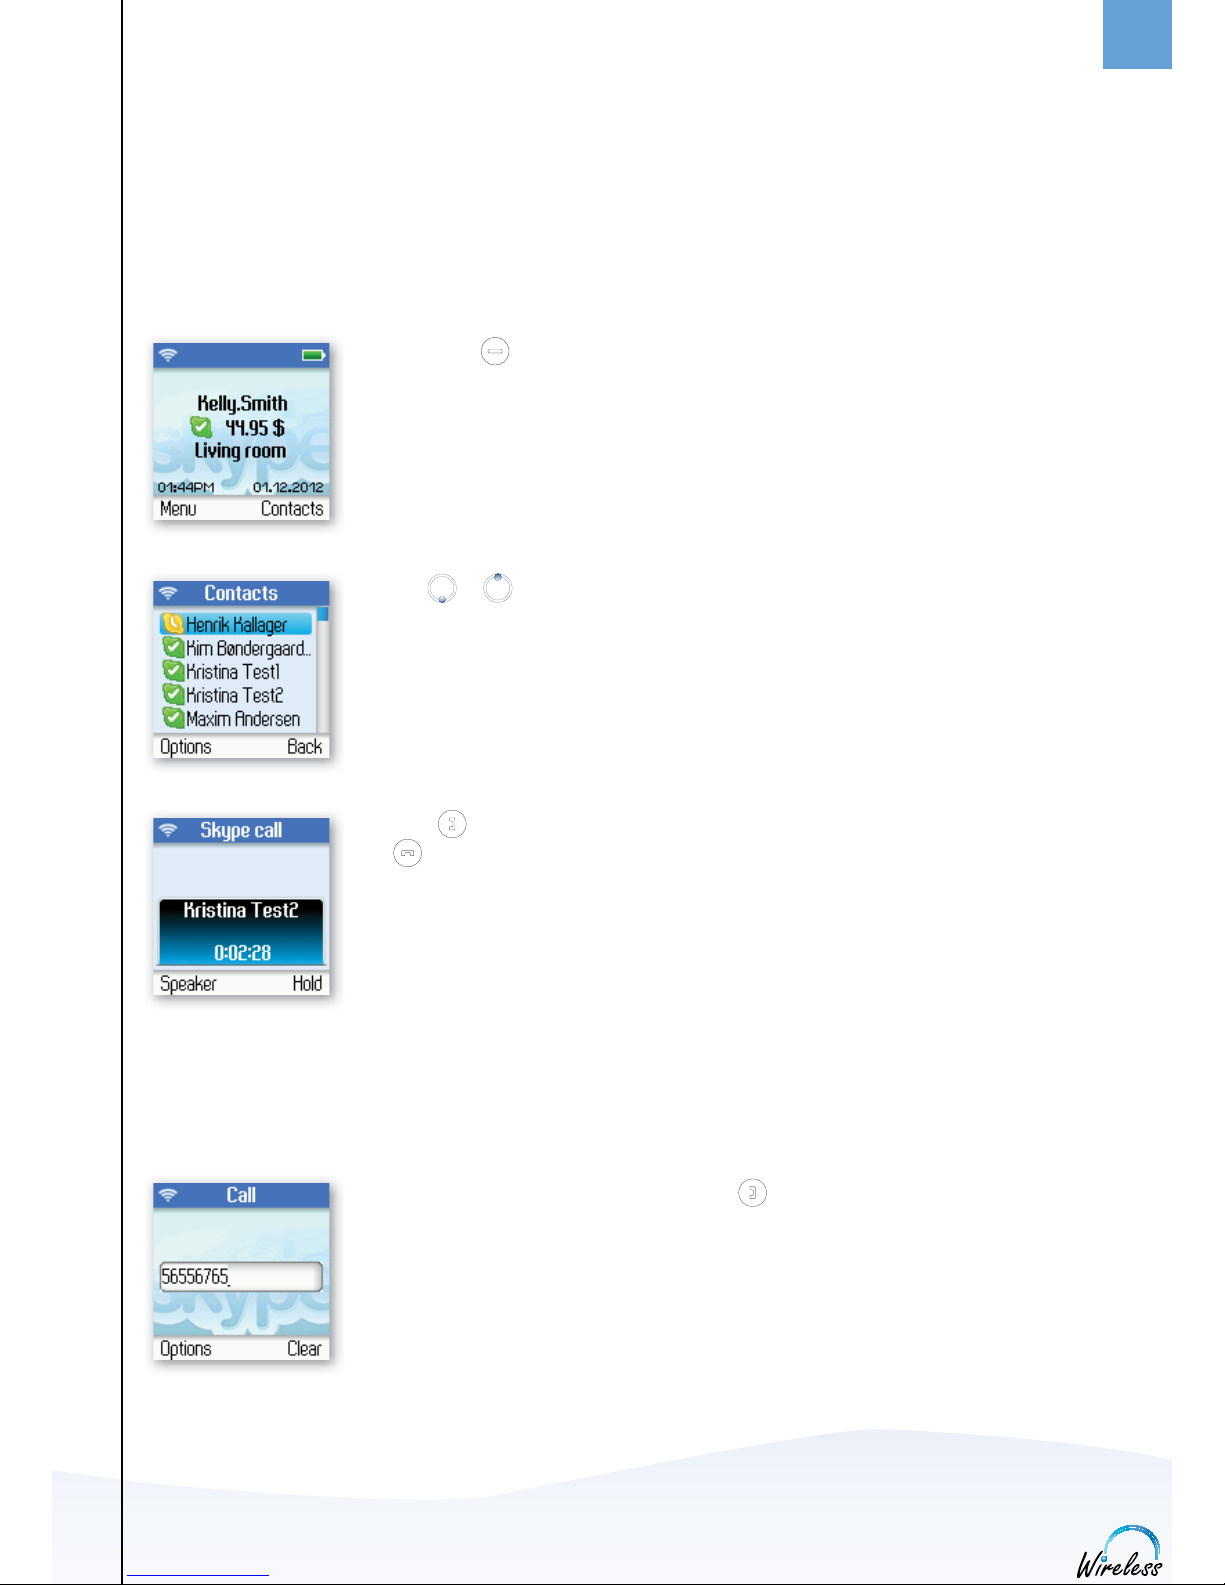
Call a Skype contact
To make a Skype call:
1) Press right to select Contacts.
2) Use or to select a contact from the list.
3. Press to call. Wait for the call to connect, ring, and be answered. Press
to end the call.
Dial a landline number
To dial a landline number:
1) Use the keypad to enter the number. Press to call the number.
INSTALLATION AND BASIC FUNCTIONS
23
ENGLISH
1
SECTION
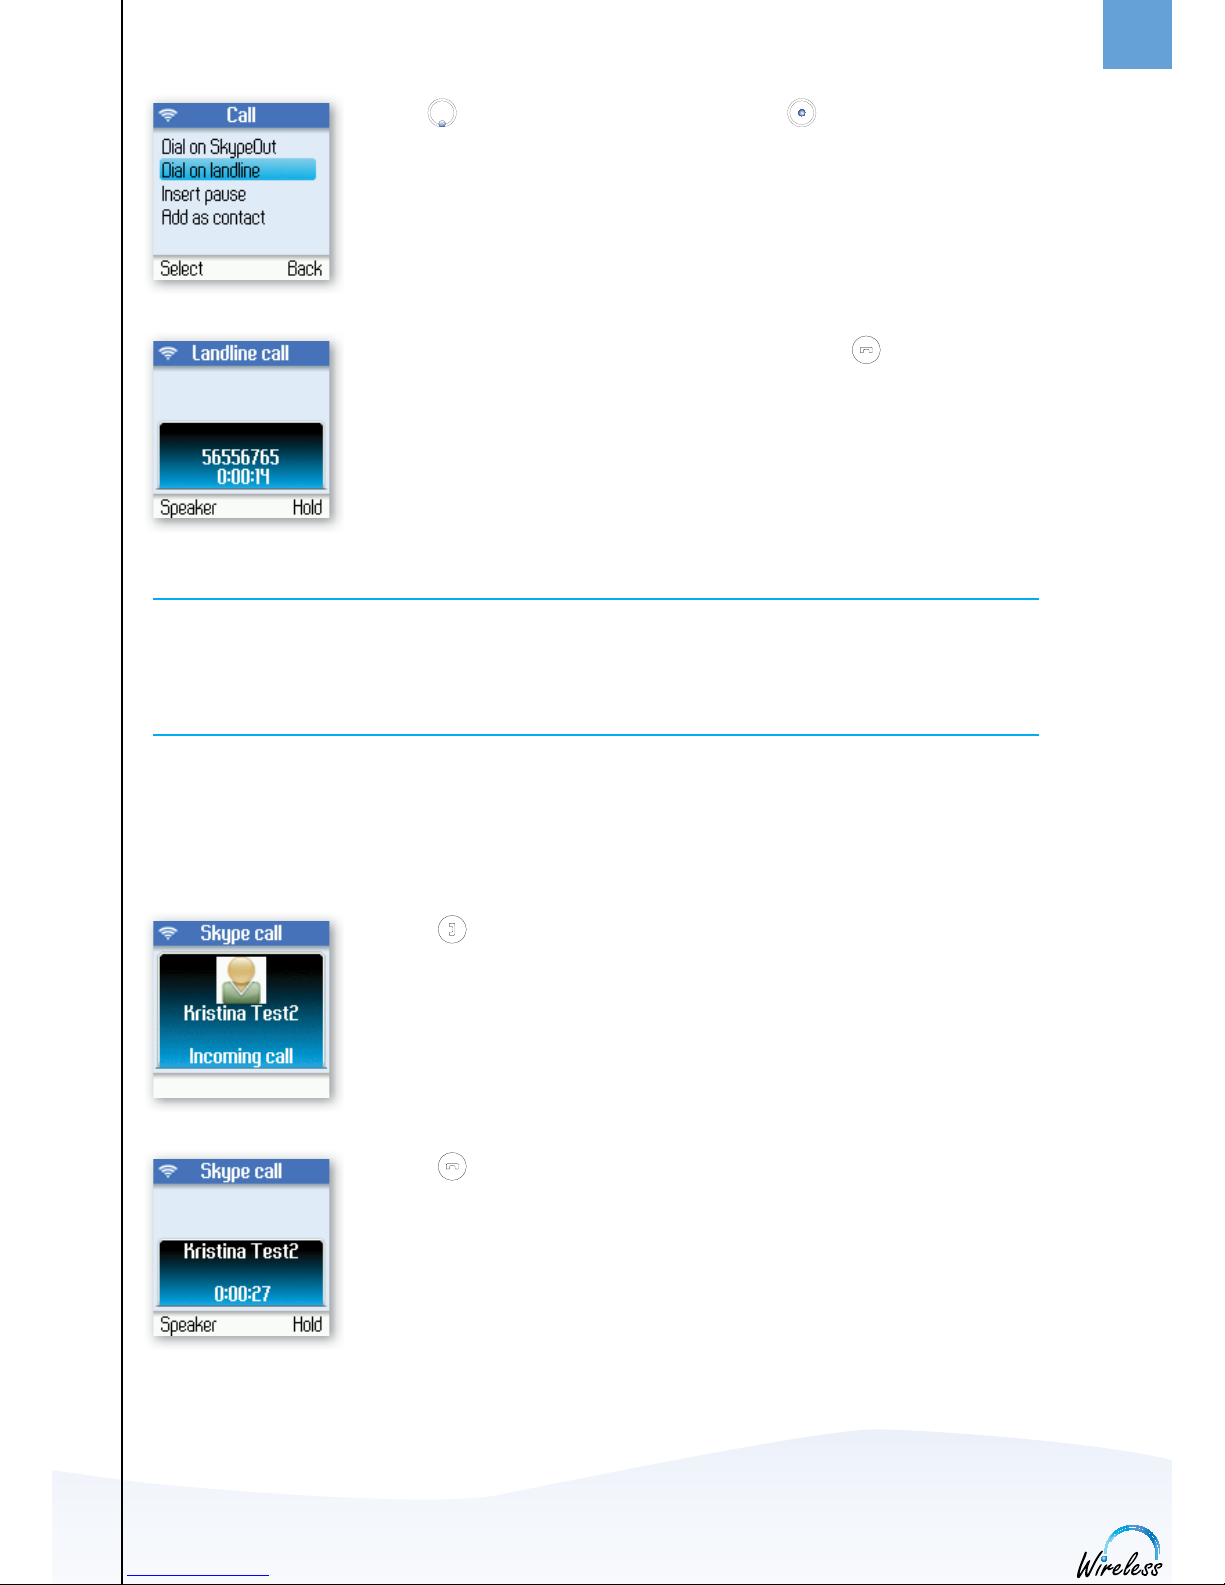
2) Use to select landline or SkypeOut and press .
3) Wait for the call to connect, ring and be answered. Press to end the call.
NOTES:
• You can select a preferred line for dialing by going to Menu > Settings > Phone settings > Preferred line.
Choose one of the following options:
1) Always landline
2) Always SkypeOut
3) Always ask
RECEIVE A CALL
When someone calls you, the ringing tone sounds and the incoming call message is displayed. To receive a
Skype, Online number or landline call:
1) Press to receive the call.
2) Press to end the call.
INSTALLATION AND BASIC FUNCTIONS
24
ENGLISH
1
SECTION
INSTALLATION AND BASIC FUNCTIONS
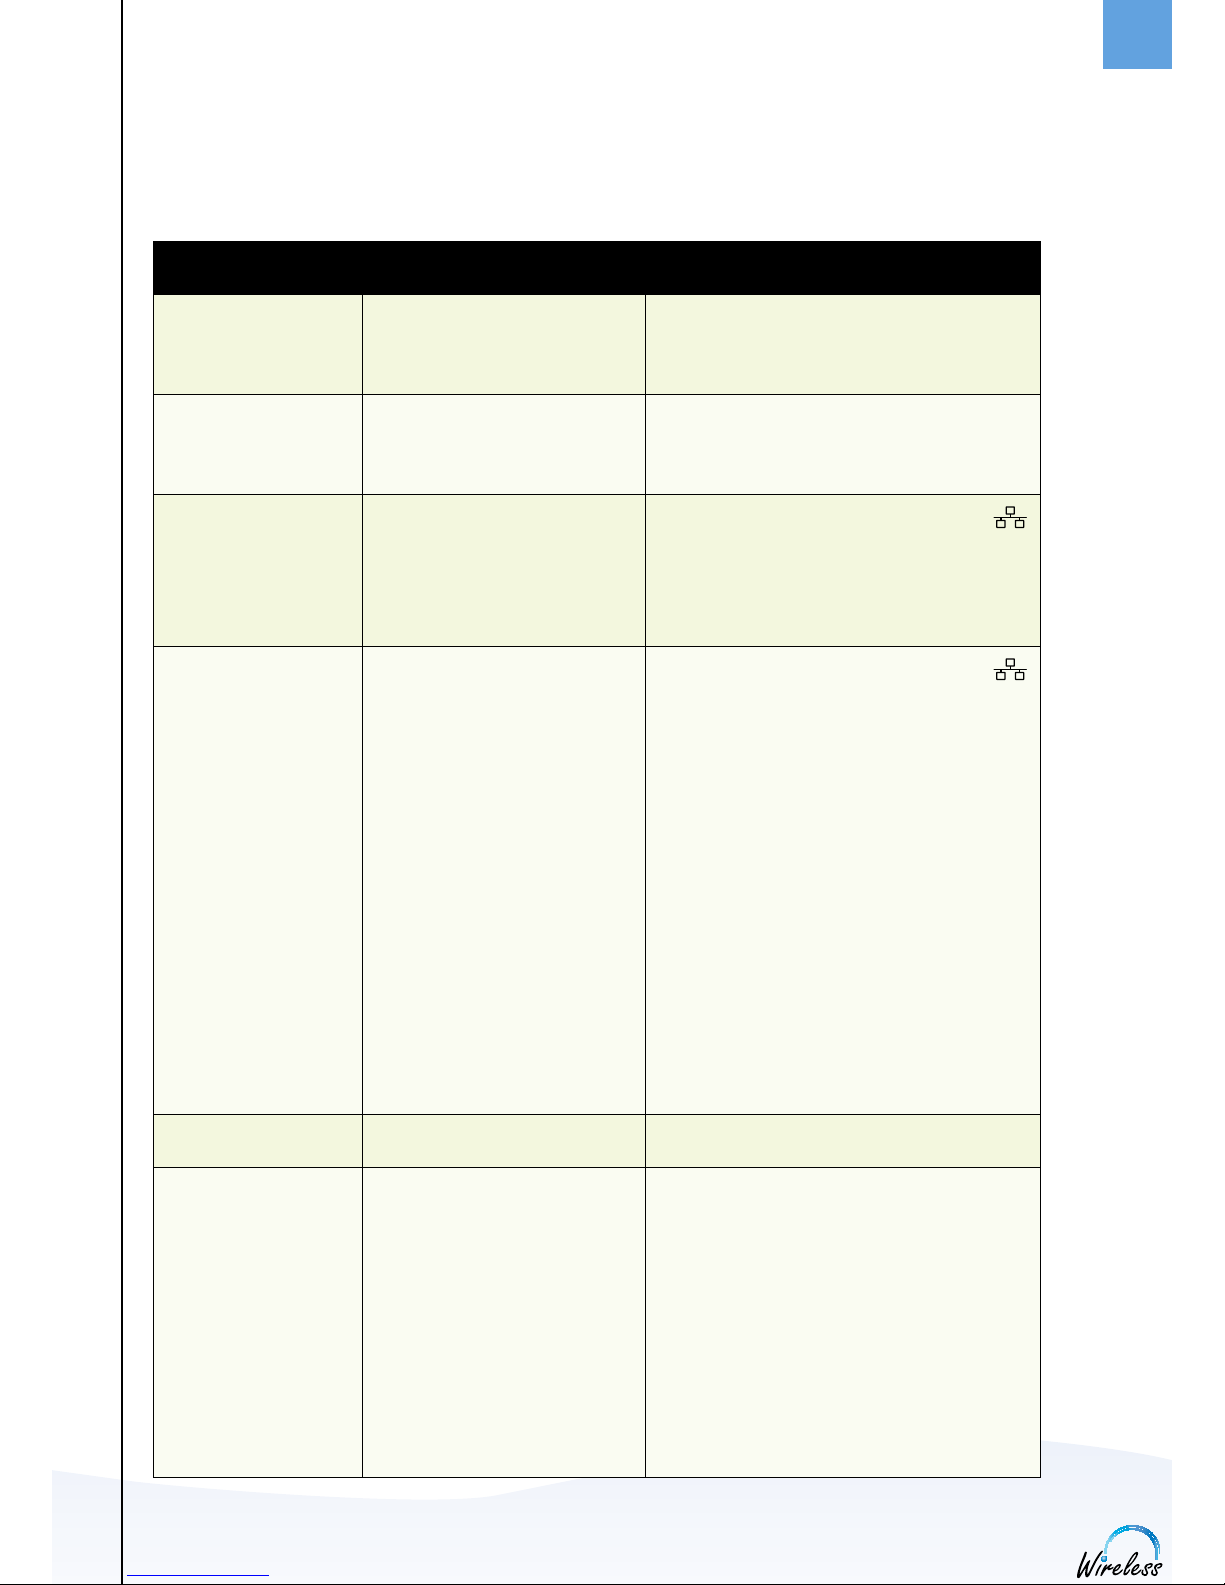
TROUBLESHOOTING
This is a guide to the most common problems that may occur during installation or use of your DUALphone.
You can easily solve some of the problems yourself, but may need your broadband service provider or landline
provider to help you with others. Check www.dualphone.net for more information.
PROBLEM POSSIBLE CAUSE SOLUTION
My DUALphone
does not work
• The software needs to be
updated to the latest version.
• Go to the Setting menu and select Advanced
settings and Firmware update. Select the
latest software version and confi r m to update.
I cannot sign in to
Skype
• Skype does not accept your
Skype name and/or password.
• Check if you are using the correct Skype
name and password. Beware of upper-case/
lower-case letters and numeric numbers.
Screen displays:
“Network connection
lost” and the base
station light indicator
is blinking slowly
• The Ethernet cable is not
connected.
• Check that the Ethernet cable between
on the base station and the LAN port on
your broadband connection (modem, router,
hub, switch etc.) is connected properly.
I cannot make a
Skype call
• The Ethernet cable is not
connected.
• The router or the modem is
not turned on.
• The base station cannot
retrieve the IP address
• You are not signed in as a
Skype user.
• Check that the Ethernet cable between
on the base station and the LAN port on
your broadband connection (modem, router,
hub, switch etc.) is connected properly.
• Turn on the power to the modem or router
and reset the base station.
• In Internet settings, check that the IP mode
corresponds to the IP mode of your Internet
connection or you are behind a proxy server.
Check the user manual for the proxy settings
guidance.
• Go to the status menu and select Sign in as
a Skype user. From there refer to the section
“Sign in to Skype” in this guide.
No display
• The batteries are discharged. • Charge or replace the batteries.
Handset is not
registering
• Base station is not ready for
registration.
• The charging cradle is not
connected.
• There are no batteries in the
handset.
• Reset the base station by pressing the key on
the back of the base station and try to
register again.
• Make sure the power supply is properly
connected to the charging cradle and that
the power is on.
• Make sure the batteries are correctly fi tted
into the handset. Reset the base station and
try to register again.
25
ENGLISH
1
SECTION
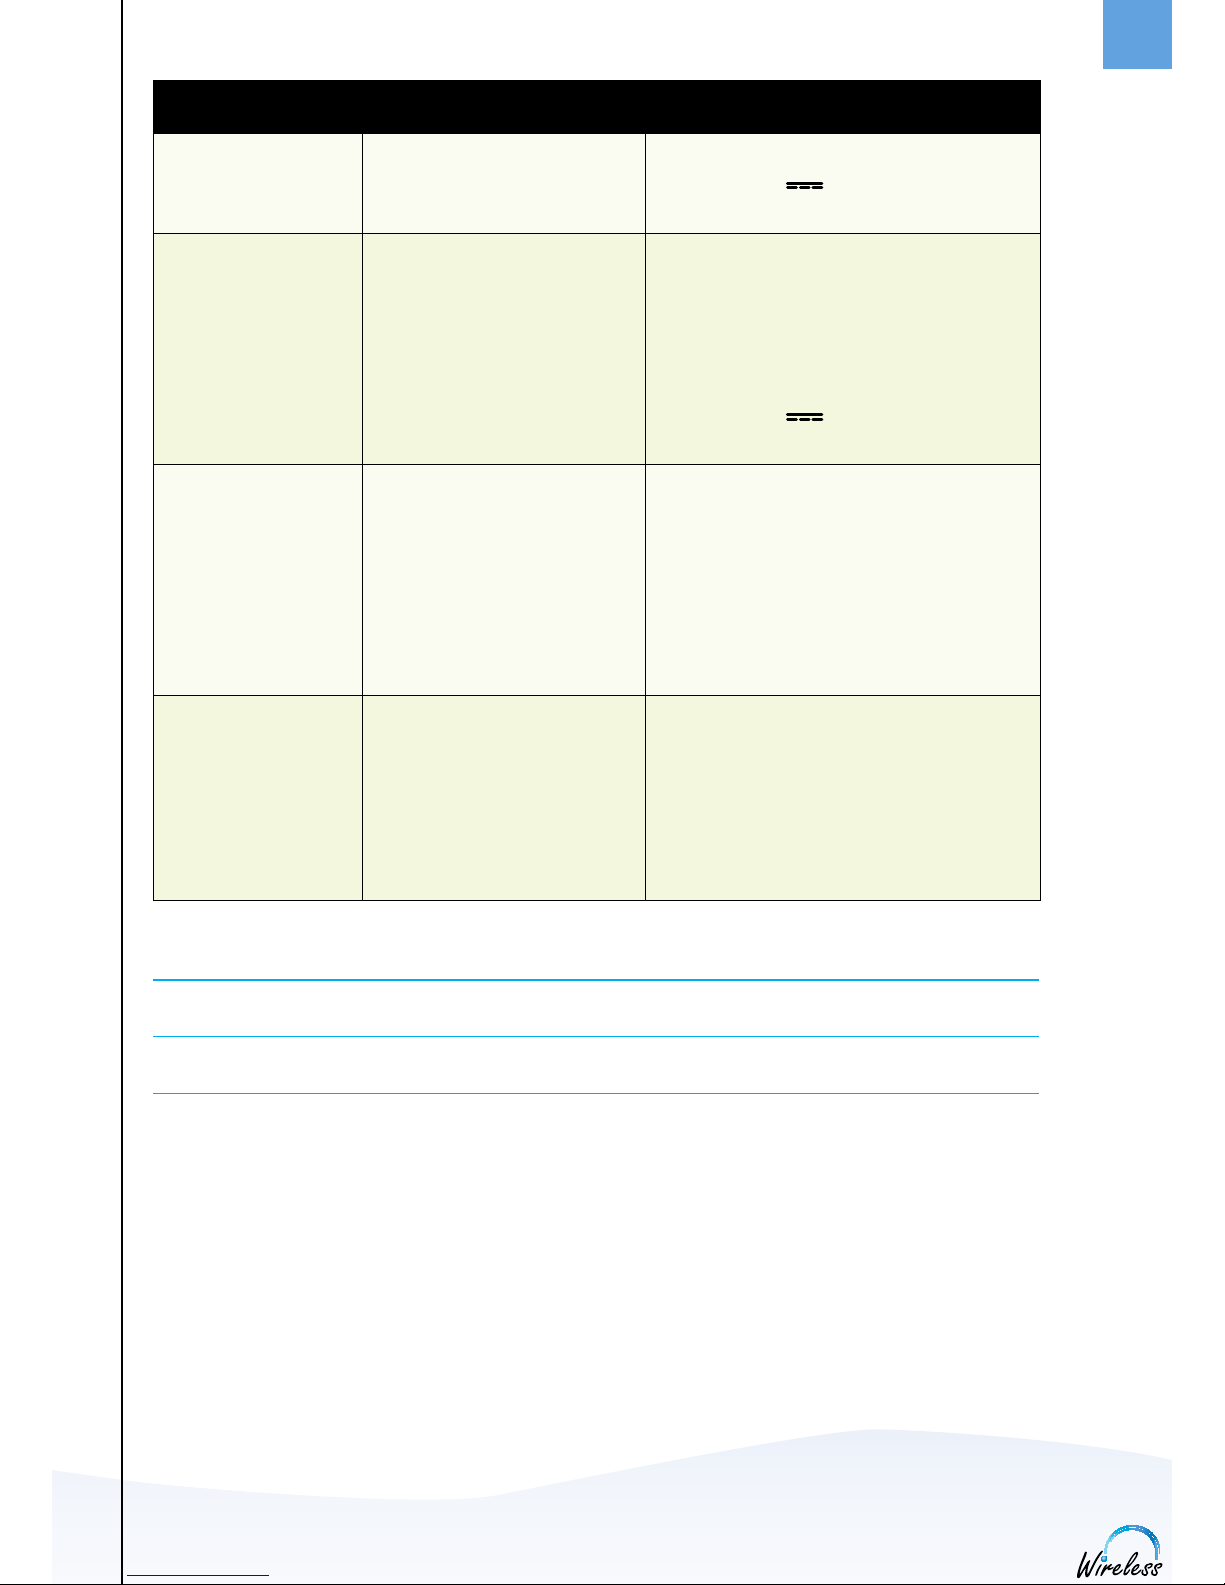
PROBLEM POSSIBLE CAUSE SOLUTION
Handset is not
registering
(continued)
• The base station is not
connected .
• Make sure that the power supply is properly
connected to on the base station and
that the power is on.
No connection
between handset
and base station
• You are out of range of the
base station.
• The handset is not registered.
• The base station is not
connecte d to power.
• Move closer to the base station.
• Register the handset.
• Make sure the power supply is properly
connected to
on the base station and
that the power is on.
Handset on the
charging cradle does
not charge
• The cradle is not powered.
• The handset is not placed
properly in the charging cradle.
• The batteries are not inserted
correctly.
• Connect the power adapter of the charging
cradle to an active power outlet.
• Place the handset correctly in the charging
cradle.
• Check the position of the batteries.
Handset does not
ring
• The Skype status is set to
offl ine or do not disturb.
• The handset ringer may be off.
• The handset may be too far
away from the base station.
• Set your Skype status to online.
• Increase the ringer volume.
• Move closer to the base station.
INSTALLATION AND BASIC FUNCTIONS
NOTES:
•
This Installation Guide covers the basic installation process and the most common features of your
DUALphon e.
•
For more advanced functionality descriptions you should consult the User Manual found at
www.dualphone .net
 Loading...