

Page 1
User Instructions for Ligno-VersaTec
Moisture Meter
Lignomat USA Ltd.
14345 NE Morris Ct
Portland, OR 97230
E-mail: sales@lignomat.com
www.lignomat.com
Tel: 503-257-8957
800-227-2105
FAX: 503-255-1430
Page 2

Table of Contents
Functions .............................................................................................. 3
Accessories ............................................................................................ 4
..
Ligno-VersaTec, the Meter .................................................................. 5
First Step: Check and Change Settings for Pin and Pinless ............ 6
Summary of available Wood and Material Settings ......................... 6
Function and Calibration Check for Pin - Pinless - RH ................... 23-25
Check Software Version ....................................................................... 22
Change from US to Metric System (0F to 0C and inches to mm) .... 22
EMC Chart for Relative Humidity and Wood Moisture/EMC ........ 18
Pin Mode
Pin Technology and Settings ............................................................... 7
Measurements ...................................................................................... 8
Measuring Wood, Sheetrock, Concrete and other Bldg Materials... 8, 9
Monitoring using the Ligno-VersaTec ............................................... 10, 20
Monitoring using the BL2 Data Logger and Wireless ...................... 19
Function and Calibration Check - Pin ............................................... 23
Pinless Mode
Pin Technology and Settings .............................................................. 11
Measurements ...................................................................................... 12
Dual-Depth 1/4” and 3/4” ................................................................. 13
Toggle between 1/4” and 3/4” ............................................................. 14
Measuring Wood, Bamboo and Veneer ............................................. 14, 15
Find Settings for Composites and Engineered Boards .................... 15
Measuring Building Materials ............................................................ 16
Wood Floor Installations .................................................................... 17
Calculating Specific Gravity ................................................................ 19
Function and Calibration Check - Pinless ......................................... 23, 24
RH Mode
RH Technology ..................................................................................... 20
Measuring Ambient Conditions RH, T, DP, GPP............................... 20
Data Logger for Ambient Conditions RH, T, DP, GPP, EMC............. 19
..
In-situ RH Test for Concrete Moisture .............................................. 21
EMC Chart for Relative Humidity and Wood Moisture / EMC ....... 18
Function and Calibration Check - RH BluePeg ................................ 25
2
Page 3
Ligno-VersaTec, a Multi-Function Meter: Pin - Pinless - RH
The Ligno-VersaTec comes with 220 built-in corrections for measuring dif-
PIN
SCAN
RH
ferent wood species, bamboo, panel products and sheetrock. Also built-in are
reference scales (pg 6) for measuring concrete and other building materials.
The Ligno-VersaTec with RH BluePeg probe and adapter RH can measure
relative humidity, temperature, dew point and GPP. Accessories are
available for in-situ RH moisture testing of concrete slabs and wall cavities.
1.
Use as Pinless Meter:
meter by itself as a dual-depth pinless meter with selectable measuring depth 3/4” and 1/4”. The pinless mode of
the Ligno-VersaTec has the same features as the Ligno-
Scanner SDM.
2.
Use as Thermo-Hygrometer:
sion RH BluePeg probe. The connection between meter
and probe can be made by the adapter RH or an extension
cable. Ligno-VersaTec indicates ambient relative humid-
You can use the Ligno-Versatec
Add fast-responding, preci-
E12
E14V
ity and temperature, GPP and dew point.
3.
Use for in-situ RH Testing in Concrete:
sleeves and the removable RH probes for in-situ RH
testing. The Lignomat system complies to ASTM F2170.
Pin or pinless mode can be used to take qualitative mois-
ture measurements in concrete. ASTM F2659. Page 21.
4.
Use as Pin Meter:
- Add slide hammer electrode E12. Teflon-coated pins
allow measuring up to 2” deep. Differences between
surface and core moisture can be detected with the E12.
- Add inspector electrode E14V. The E14V is a tool used
in construction and restoration to track moisture in
corners, behind moldings, under base boards and
other hard-to-reach places. The handle can be
elongated to reach high up or down low. Add EL pins 7”
Add RH cable,
long. E14V with EG pins 3/4” is also used to measure
hard materials (bamboo). Page 9.
The pin mode of the Ligno-VersaTec has the same features as the Lignometer K.
3
Page 4
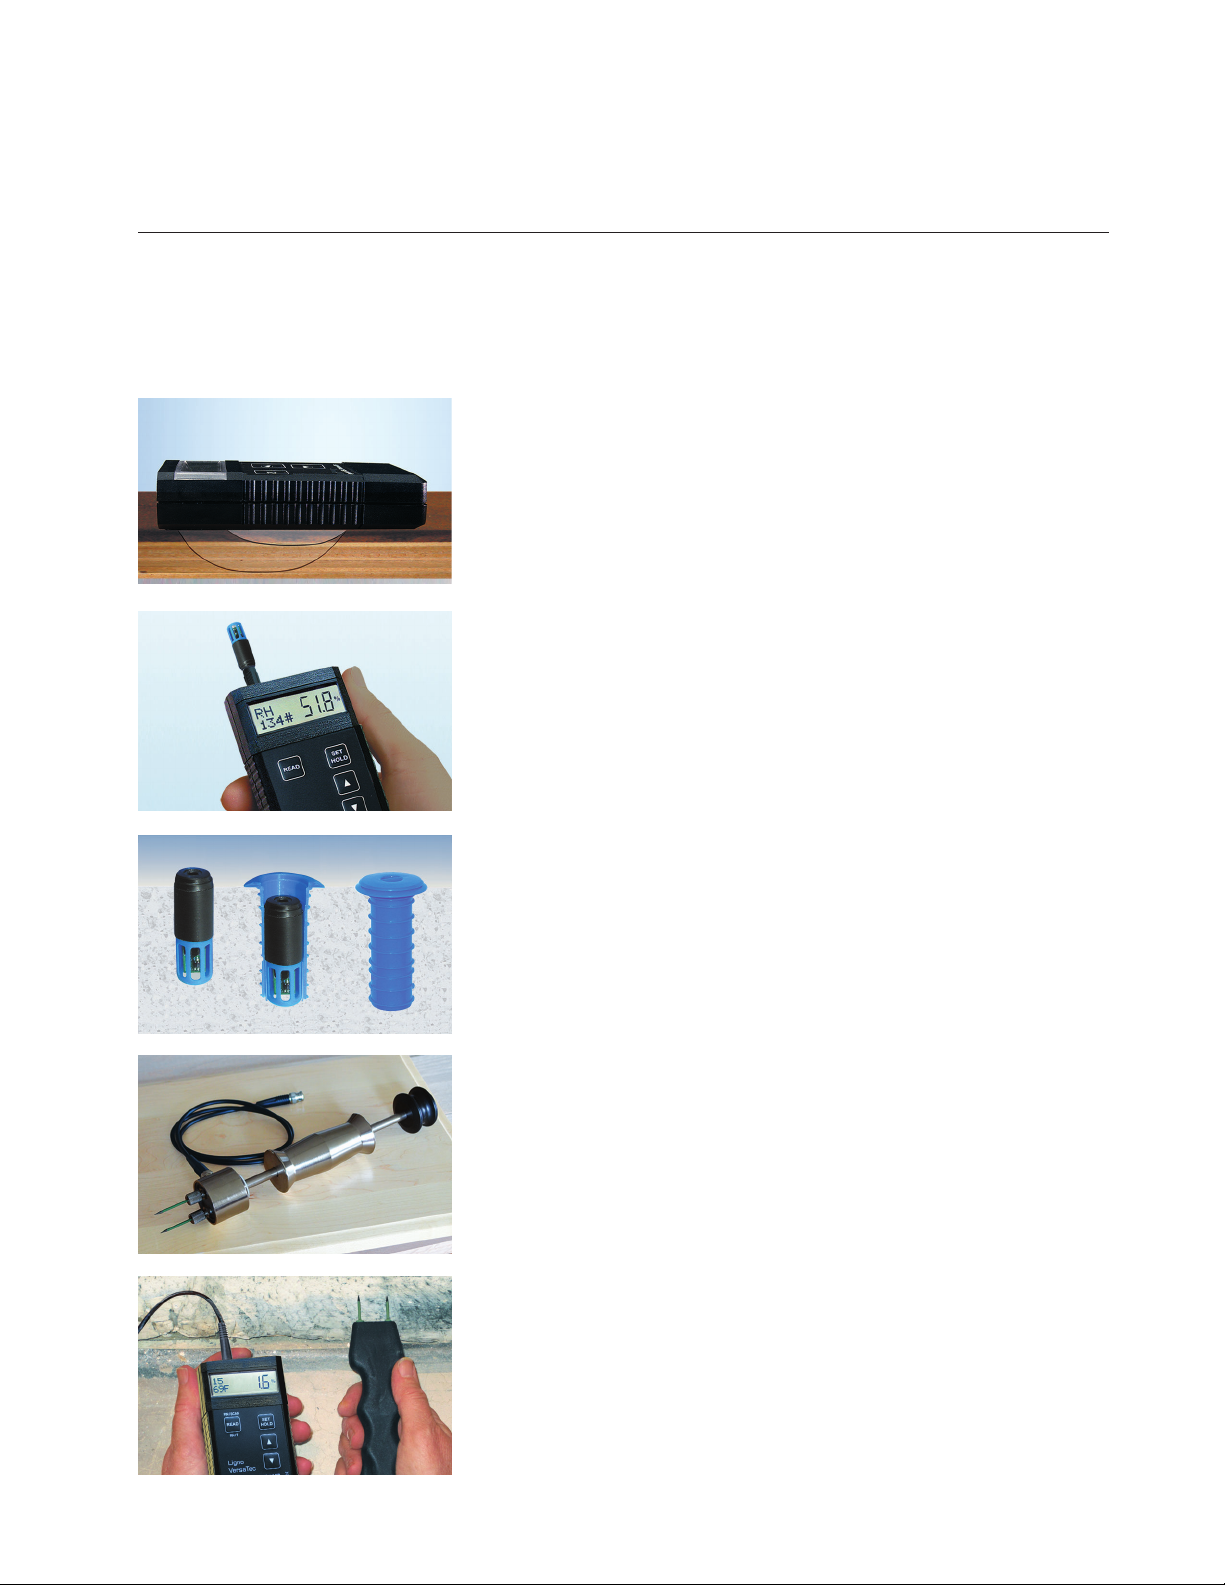
Accessories
Slide-Hammer Electrode
E12 measures surface
and core up to 2” deep.
Detects a moisture gradient within the board.
Pins: DZ, DA, DB
DZ DA DB
Coated pins:
DZ, DA, DB
up to 2” deep.
For electrode E12
Drive-in Electrode
E10 shown with EL
pins up to 7” deep.
Pins: EL, EG coated
EV, EA, EC uncoated
EL EG EC EA EV
Coated pins:
EG up to 3/4” deep
EL up to 7” deep.
electrodes E10, 14, 16
Inspector Electrode
E14V, slim to reach
corners. For hard materials such as bamboo.
Can be extended.
Pins: EL, EG coated
EV, EA, EC uncoated
Uncoated pins:
EA, EV, EC
up to 5/8” deep.
electrodes E10, 14, 16.
Specialty Electrode
E16 for hard building
materials (concrete).
Pins: EL, EG coated
EV, EA, EC uncoated
Thermo-Hygrometer:
add RH BluePeg probe
and adapter to meassure RH/T/DP/GPP.
RH BluePeg probes.
For concrete test and
relative humidity of air.
Calibration Check:
Pin and pinless meters from
Lignomat internally check
and adjust the calibration
before each reading.
Check blocks are used to
confirm calibration and
function of pinless meters
and pin meters, cables,...
Salt solutions are necessary
to check RH BluePeg probes.
More info on pages 23-25.
RH cable with
sleeve-seal-plug.
RH adapter.
Sleeves 1.8” and 3” long
for in-situ moisture
testing in concrete.
TS check block for
all Lignomat pinless
meters.
4
TP check block for
all Lignomat pin
meters, cables,...
Sleeve with RH probe
to measure moisture
in wall cavities with
or without insulation.
Salt solution to check
RH BluePeg probes,
RH 75%.
Page 5
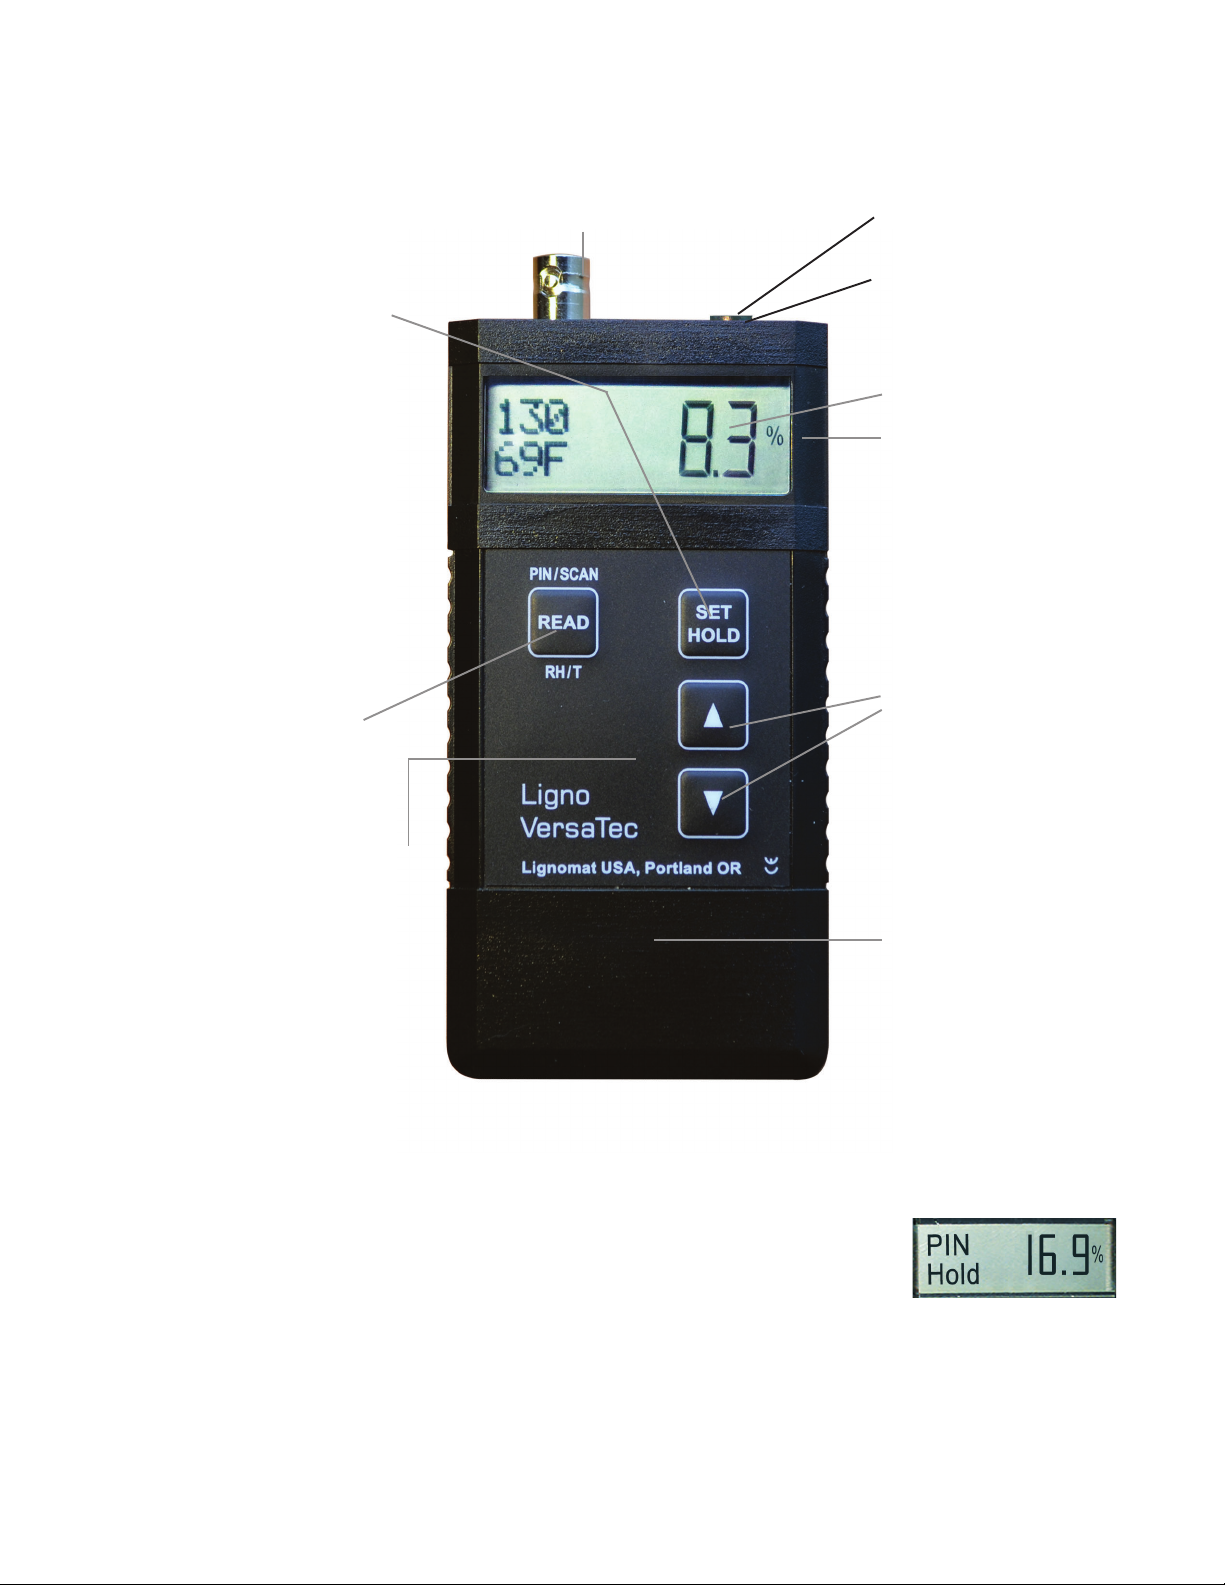
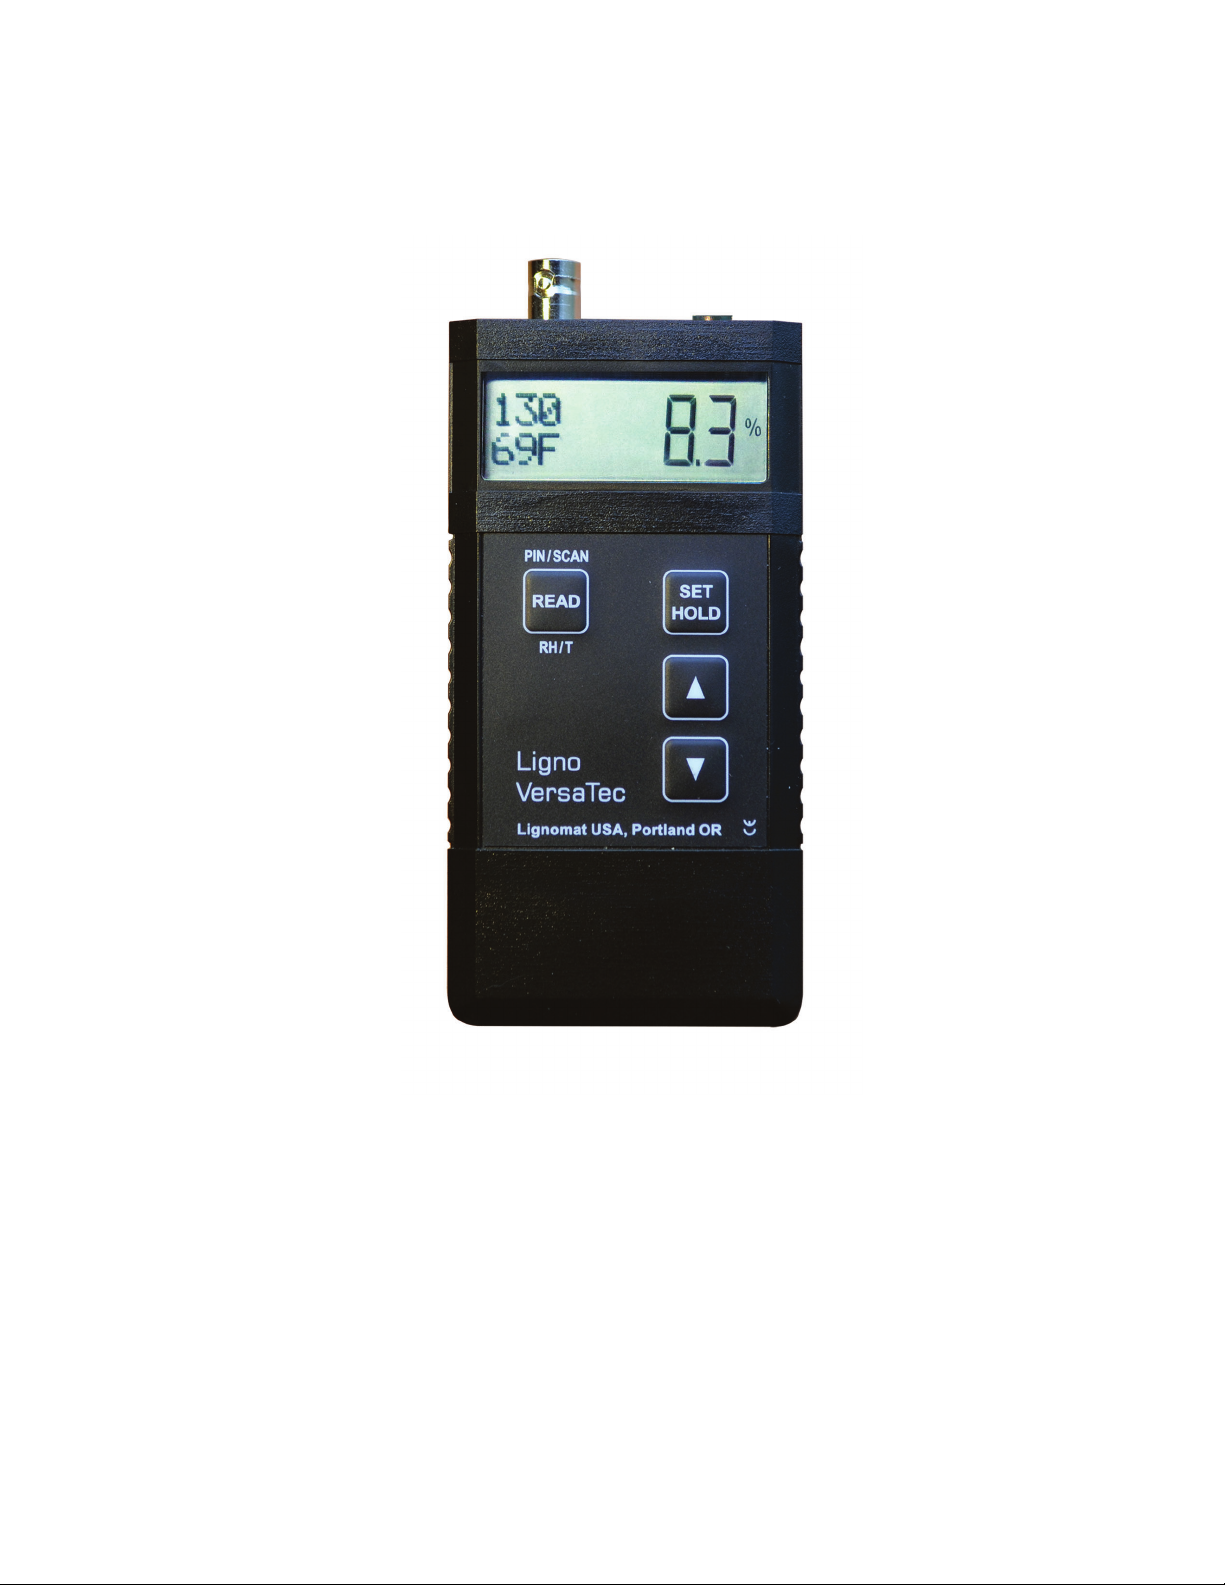
Ligno-VersaTec, the Meter
If the display is blank and
the SET/HOLD key is
pressed repeatedly,
active settings are displayed:
- pin or scan mode.
- wood or material setting.
- wood temperature (pin).
- measuring depth (pinless).
If the display shows a
measured value and the
SET/HOLD key is pressed
repeatedly, the meter is put
into HOLD mode first.
Then, the active settings are
recalled. See above.
Press up or down key
to change settings.
For measurements in
pin, pinless or RH mode,
press the READ key.
Two measuring pads are
mounted on the back of the
meter. The measuring pads
cover an area of:
2.75” L x 1.75” W
(6.8 x 4.2 cm)
Overall size of Meter:
4.5” x 2.4” x 1”
(12 x 6 x 2.5 cm)
BNC connector for:
- cable from electrode.
- adapter H for in-kiln cables.
3.5mm Stereo connector
for RH BluePeg using
- RH Adapter.
- RH cable.
Once the RH probe is
connected, the meter
switches automatically
into RH mode.
Measured value.
% sign is only present, if
the indicated value is a
moisture percentage.
If % sign is missing,
the value is a reference
number.
Press up or down key
to change settings.
The up or down key can
also be used to change
depth settings in pinless
mode while taking measurements. Toggle mode.
Page 14.
Battery cover is located
at the back of the meter.
Battery: One 9V battery.
A low battery symbol will
appear on the display,
when the battery is
drained to 25%.
Hold Function for all Modes: Pin - Pinless - RH
The HOLD key is used (while taking readings) to “freeze” measured
values for three minutes. During that time you can switch back to
measuring by pressing the READ key again. This feature is helpful when
taking notes or when measuring in areas, where the display cannot be read.
Warranty: All Lignomat meters have a 2-year warranty.
Accessories have a 1-year warranty. Battery and pins are excluded.
5
Page 6
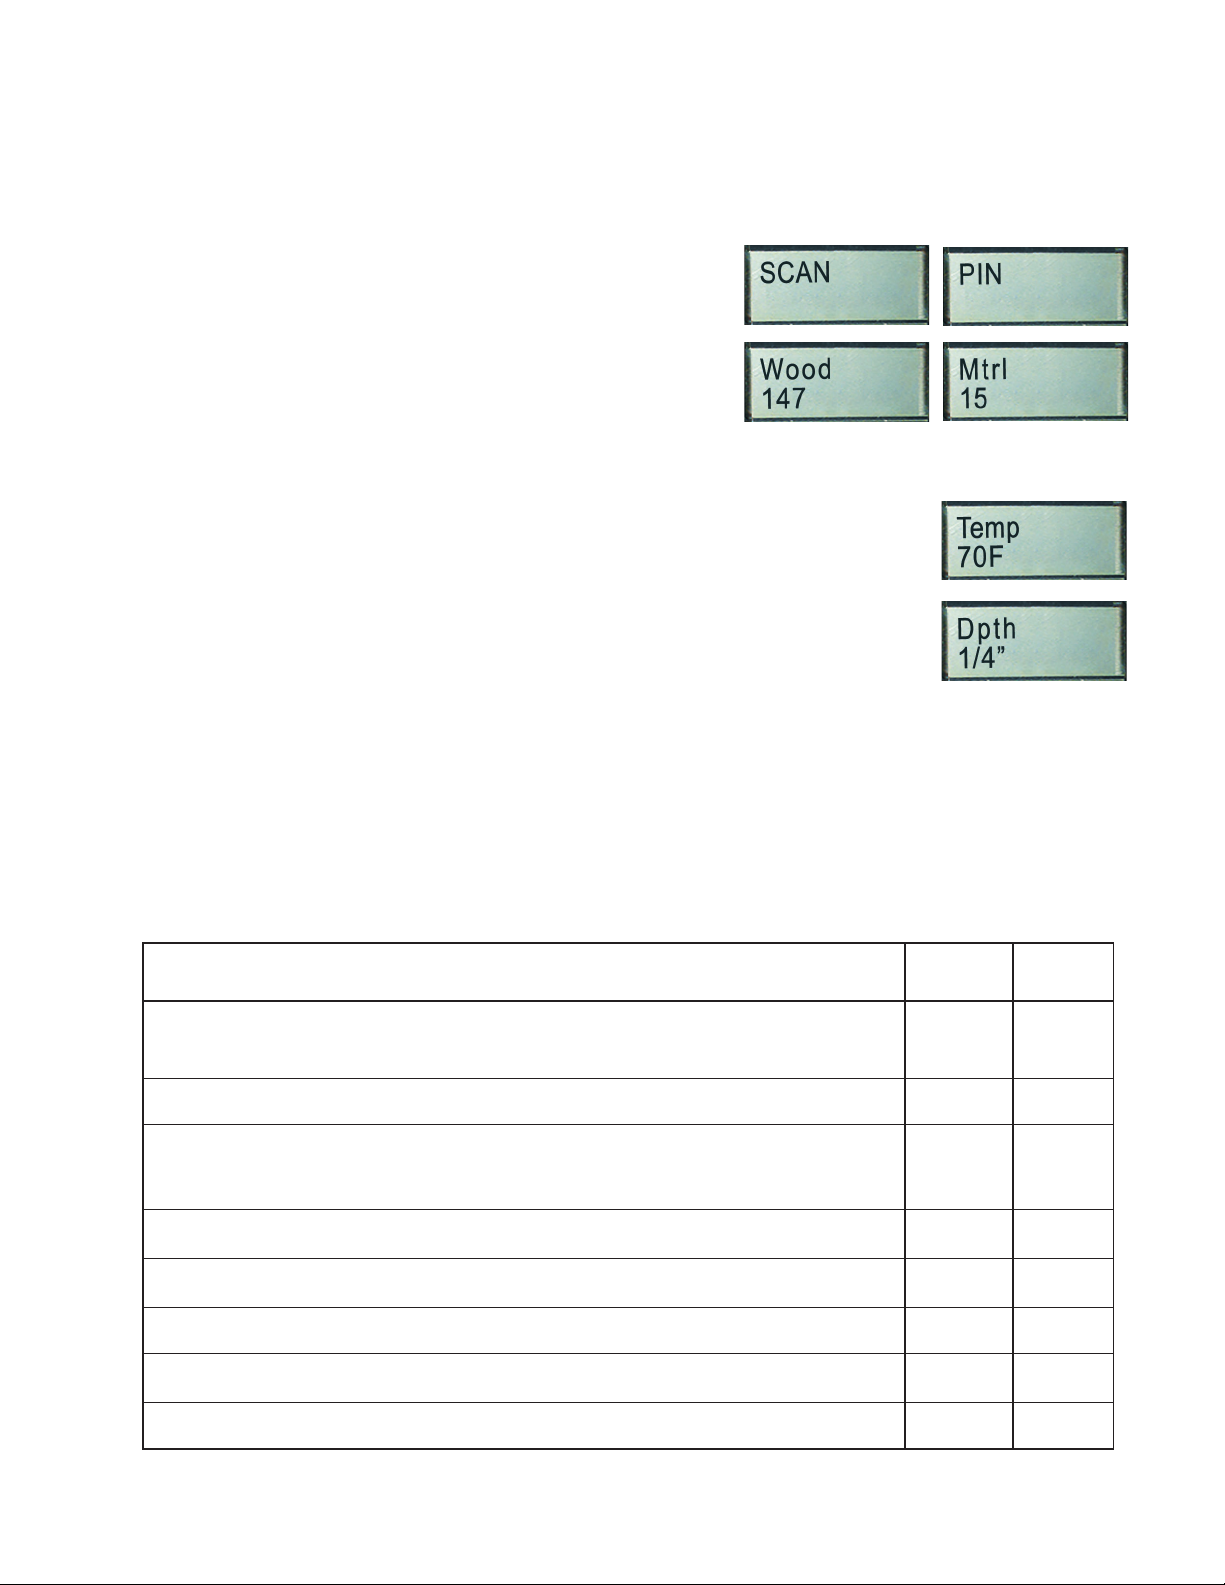
First Step : Check and Change Settings for Pin / Pinless Mode
Before using the Ligno-VersaTec, the active (previously chosen) settings in the meter
need to be checked and if necessary changed to fit the job to be done. To recall active
settings, press the SET/HOLD key repeatedly.
Use up or down keys to change settings:
1st
2nd
3rd
4th
See table below: Not all code numbers 0-250 are available for pin and pinless mode.
If the wood or material setting is not available in pin and pinless mode, the meter
will automatically select the available mode. If the code number is not defined at all,
Measuring mode: Pin or scan (pinless).
Setting for wood and non-wood materials:
# 0-250. Corrections for different wood
species and non-wood materials are needed
in pin and scan mode. Check table below and pocket-guide
for available settings for pin and/or pinless mode.
Setting for wood temperature: Wood temperature corrections
are only needed in pin mode.
temperature of the wood at the depth of the pins. Page 7(2).
Setting for measuring depth: 1/4” and 3/4”. Measuring depth
is only used in pinless mode. Page 13.
It is difficult to determine the
the mode indicated at the left side of the display toggles between PIN and SCAN.
Example: Code# 30 is only available in SCAN mode. Code# 108 is not defined at all.
SUMMARY OF AVAILABLE WOOD AND MATERIAL SETTINGS PIN SCAN
Settings for moisture measurement of individual wood species 111-230 111-230
Settings for measurement of wood species with known specific gravity - 30-100
Settings for EMC measurements with Lignomat’s EMC sensor 5, 105 -
Settings for wood moisture measurements of wood groups #1-4 101-104 #1-4 is used in old Lignometers. #2 and #3 is used in all mini-Lignos 1-4 -
Settings for bamboo, vertical, horizontal, strand and engineered 170-180 11-24*
Settings for moisture measurements of sheetrock and gypsum 15 15
Reference Scale for concrete and other similar materials 25 25
Reference Scale for bldg materials other than concrete or sheetrock 10 10
Reference Scale for laminates and composites made of wood 0 0
*11-24 for bamboo only work on depth setting 1/4”.
6
Page 7
Pin Technology and Settings
The Ligno-VersaTec functions as a resistance-type meter in pin mode. The conductivity
between the pins is measured and the moisture content is calculated according to the
active wood species and wood temperature settings. The meter indicates the highest
moisture value within the small measuring area between the tip of the teflonized pins.
Ligno-VersaTec pin measurements have to be corrected for:
Pin Mode
(1) Wood species or other materials being measured.
(2)
Wood temperature.
-
Settings for measuring depth do not affect pin measurements.
(1) The settings for the most common wood species, bamboo products and different
building materials are listed on the laminated pocket guide included with the meter.
For unlisted species or new products call customer service at 800-227-2105. If no list-
ing is available, Lignomat offers testing to determine the correct setting.
Pin mode (Unlisted code numbers do not work in pin mode) code #
Moisture measurements of individual wood species, 5-99.9% 111-230
Bamboo in pin mode within wood settings, 5-99.9% 170-180
Reference scale for laminates and composites made of wood, 0-99.9 0
Moisture measurements of sheetrock and gypsum, 0.1-22% 15
Reference scale for concrete and other similar materials, 0-99 25
Reference scale for bldg materials other than concrete or sheetrock, 0-99 10
Wood groups used in older Lignomat pin meters, 5-99.9% 1-4, 101-104
EMC measurements with Lignomat’s EMC sensor, 5-27% 5, 105
The meter will not produce values in pin mode for code numbers not listed here. Page 6.
(2)
The meter needs to be set for the correct wood temperature. Different ambient
temperatures do not affect the readings. However, measuring hot or cold lumber will
affect the readings. The Ligno-VersaTec has corrections for different wood temperatures
built-in. Once you set the meter for the wood temperature and for the wood species, the
corrected moisture value is displayed. Temperature adjustments are not necessary if the
meter is set for a wood temperature of 700F and the lumber is within 55-850F.
It is difficult to actually measure the wood temperature at the depth, where the tips of
the electrode pins are measuring. If the wood has been acclimated to the ambient (air)
temperature, choose the ambient temperature. If the wood is not acclimated, choose the
average temperature over the last few hours.
7
Page 8
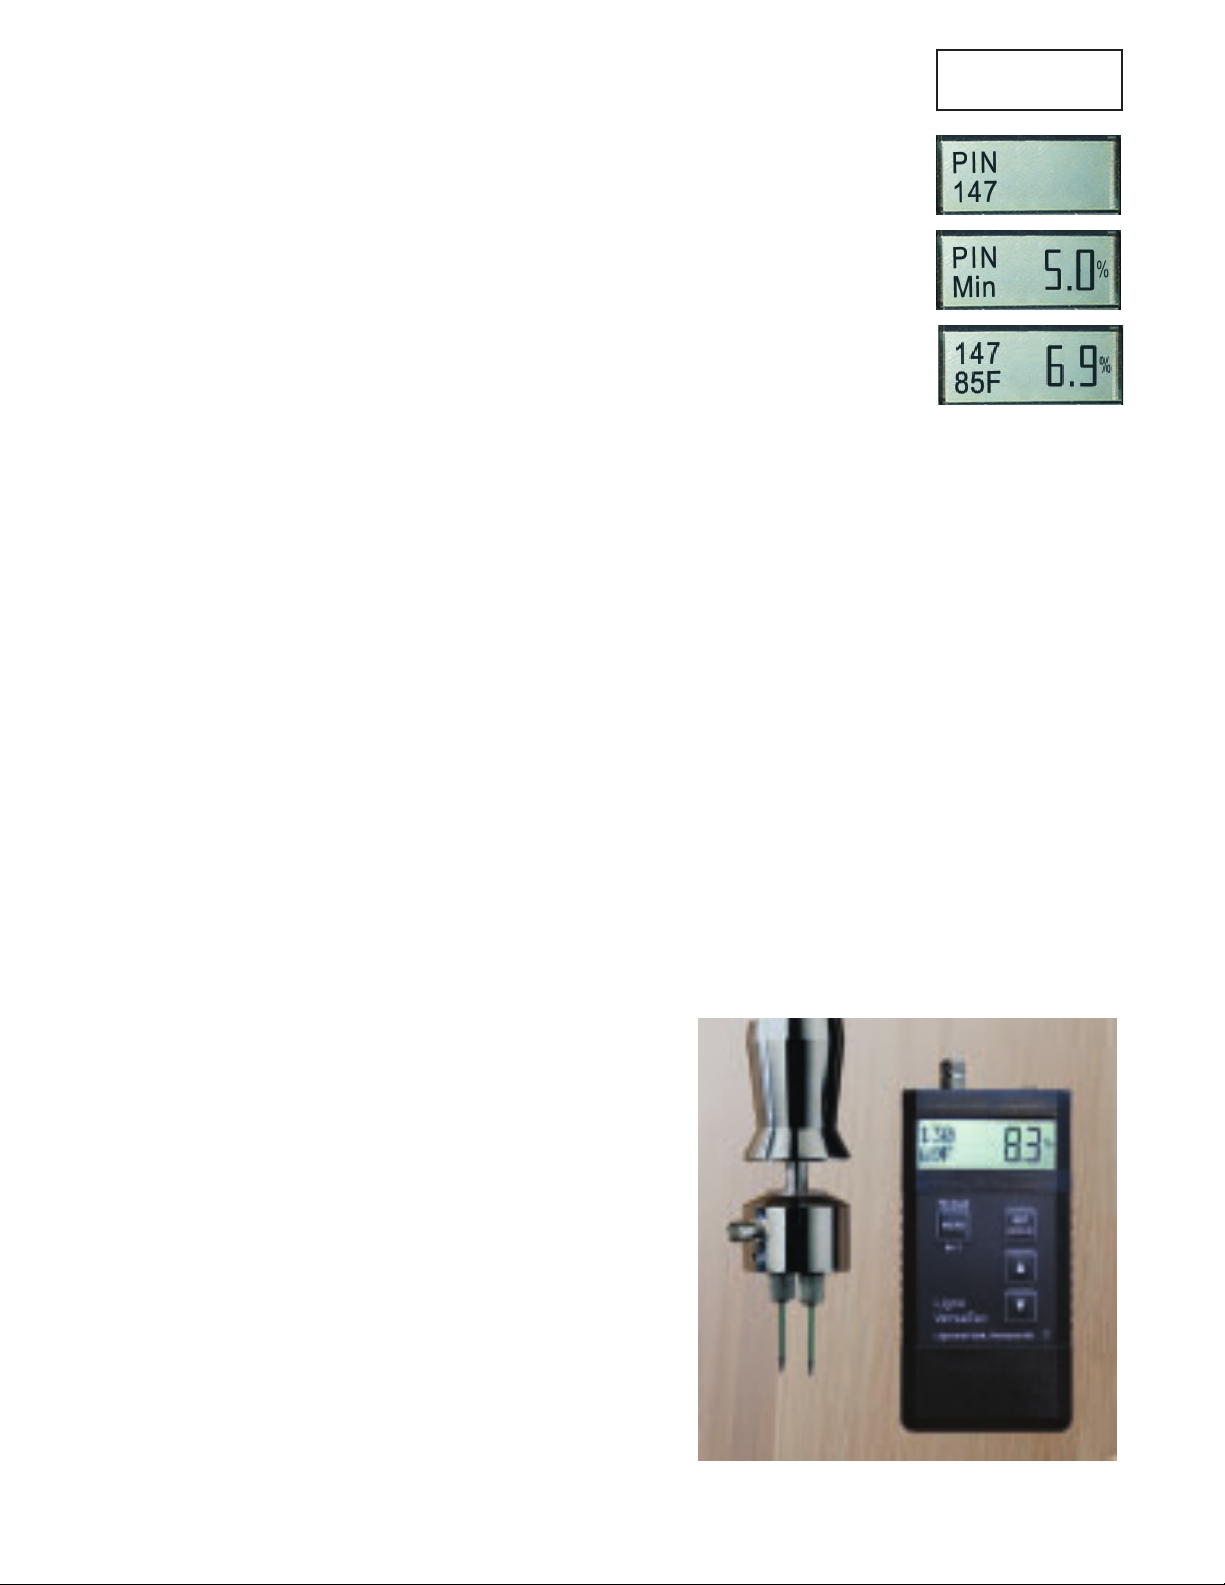
Measurements
After settings have been checked and changed, press the READ key to
obtain readings. The active settings appear briefly. Then, if no electrode
is connected or if the electrode is not inserted into any material, the
lowest possible reading for the active material and temperature settings
appears. Example: PIN/Min is 5% for setting 147 for 700F. If an elec-
trode is connected and inserted into material, the moisture value and
the active settings for material and wood temperature are displayed.
Example: Wood species 147, wood temp 850F, measured value 6.9%.
While taking measurements:
- If the material is too dry to be measured, the meter will show the lowest possible
value indicated by PIN/Min on the left side of the display.
- If the material is too wet to be measured, the highest possible value is indicated by
PIN/Max on the left side of the display.
Pin Mode
Obtain stable Readings at low Moisture Contents
- Minimize electro-magnetic interference: If you measure close to computers, electrical
wires or power tools in use, readings could become erratic. To avoid the interference,
take measurements in a different location.
- Reduce static electricity: In dry climates and at low moisture contents static electricity
may cause erratic readings. The wood, the meter and the person holding the meter
should not move while taking measurements. Best results are achieved, when the meter
is placed on the board to be measured.
Measuring Wood
Select the correct setting for wood species and
wood temperature. Page 7.
Wood Range is 5-99%. Readings above fiber
saturation point (25-30%) are less accurate.
The slide-hammer electrode E12 with teflon-
insulated pins is most commonly used for
wood. As the pins are hammered towards the
core, consecutive readings indicate any changes
between surface and core moisture. For core
readings at least a third of the board needs to
be penetrated.
8
E12
Page 9

The ability to measure a moisture gradient up to 2” deep is
one important reason why customers still use pin electrodes.
In pinless mode you can measure only up to 3/4” deep. If high
moisture levels are suspected deeper down, the only option to
measure deeper than 3/4” are pin electrodes:
- Electrode E12 with DB pins can measure up to 2” deep.
- Electrode E14V, E10 or E16 with EL pins measure up to 7”.
If the pins on the electrode E12 do not seem strong enough
for hammering into hard wood or strand bamboo, use the
electrode E14V with EG pins. The E14V and the EG pins are
built sturdy enough for hard pounding.
Measuring Building Materials
Pin ModePin ModePin Mode
Sheetrock: Select material code #15 for stan-
dard gypsum boards.
Range: 0-22% (based on oven dry weight)
- Dry sheetrock ranges from 0.1% to 0.7%.
- Values of 0.8%-0.9% are questionable.
- Any value 1% or higher is considered wet.
Values of 8-12% for dry sheetrock are WME
percentages (Wood Moisture Equivalent).
Use the inspector electrode E14V or electrode
E10. Teflon-insulated pins EG and EL allow
pin-pointing the source of moisture problems, differentiating between surface moisture
and moisture coming from behind the sheetrock. Select pins from 1/4” to 7” depth.
- The Electrode E14V is the ideal tool for water restoration jobs. Designed extra slim to
fit into tight places, under baseboards, around pipes, in corners, etc. The handle can
be extended to reach ceilings without a ladder or floors without crouching. You
can hammer on top of the E14V to insert pins in a precise location at a precise depth.
E14V
- The electrode E10 is another option. Sturdy enough to hammer on top to insert pins.
Concrete and Other Hard Building Materials: Select material code #0. Instant
readings can be obtained with the electrode E16. These readings do not give moisture
percentages. Page 21. However, problem areas of high moisture can be located instantly
by comparing readings from different areas. A chart is enclosed with the electrode E16,
which lists readings and corresponding values given in weight-percent.
9
Page 10

Pin Mode
- The Electrode E16 consists of two separate posts,
which makes inserting into hard materials easier.
Warning: Test results from pin or pinless meters are not accurate enough to decide
whether or not to lay a wood floor over a concrete slab. An RH in-situ probe test
and/or a Calcium-Chloride test is recommended by most wood floor manufacturers.
See Page 21 for RH in-situ probe test in concrete with the Ligno-VersaTec.
Monitoring using the Ligno-VersaTec
Extension cables and probes can be installed to monitor remote areas, which are
otherwise unreachable. Install probes, connect cable and leave the open cable end
easily accessible. The Ligno-VersaTec can be connected via adapter H, and measure-
ments can be obtained at any time to check for changes in moisture content.
Restoration - Leak Surveillance: An easy way to check the drying progress or to
make sure that a leak is not happening again.
Wood Floor: Metall screws are placed on the
underside of the floor planks or in the subfloor.
Works well during acclimation and for long-
term monitoring after the floor is installed.
Lumber Drying - Air Drying - Storage:
Teflon-coated PK probes and extension cables
are placed inside the lumber stack. This is an
area, which cannot be reached any other way
for pin moisture measurements. Enables you
to measure in the center of the kiln charge
without entering a hot kiln.
Photo shows:
1 Adapter H: connects cable to VersaTec.
2 PK probes for lumber.
3 EG teflon-coated pins and screws.
4 H-Cable with connectors for PK
probes and adapter H.
5 EMC sensor: VersaTec is set up to
show EMC values using EMC sensor.
1
3
2
1
2
4
35
Lignomat offers everything necessary to monitor and control lumber drying from one-
cable in-kiln monitor to a fully automatic kiln control system. Contact customer ser-
vice at 800-227-2105 to find a solution for your application. See also page 19.
10
Page 11

Pinless Technology
The Ligno-VersaTec functions as a capacitance-type
meter in pinless (scan) mode. The measuring pads on
the back of the meter emit and pick-up low-powered
electromagnetic signals. The reading generated by the
Ligno-VersaTec is an average of the entire measuring
field between the surface and the maximum depth of
penetration. Moisture closer to the surface has a
greater impact on the average than the moisture closer
to the maximum depth of penetration.
Ligno-VersaTec pinless measurements have to be corrected for
Pinless Mode
(1) Wood species, bamboo products and other materials being measured.
-
Settings for wood temperature do not affect pinless measurements.
(2)
Measuring depth is important for pinless meters, selectable depth 1/4” and 3/4”.
(1)
building materials are listed on the laminated pocket guide included with the meter.
Code numbers for unlisted wood species can be determined by using specific gravity
(SG). For example, if the SG is 0.42, the code would be 42. Values for SG can be found
on the Internet: Search for <specific gravity... > followed by the wood species. The SG
can also be calculated from weight, length, width and height of sample. Page 19.
ing is not available, Lignomat offers testing to determine the correct code number.
The code numbers for the most common wood species, engineered products and
For unlisted species or new products call customer service at 800-227-2105. If a list-
Pinless mode (unlisted code # do not work in pinless mode) code #
Moisture measurements of individual wood species, 5-60% 111-230
Measurements of wood with known specific gravity (same as Ligno-Scanners) 30 -100
Bamboo, vertical, horizontal, strand, etc., 5*-60% 11-24
Reference scale for concrete and other similar materials, 0-99 25
Sheetrock and gypsum, 0.1-2% 15
Reference Scale for bldg materials other than concrete or sheetrock, 0-99.9 10
Reference Scale for laminates and composites made of wood, 0-99.9 0
Meter will not produce values in pinless mode for code numbers not listed here. Page 6.
(2) Measuring depth is affecting pinless measurements. You can choose between 1/4”
(7mm) and 3/4” (20mm) depending on material thickness.
More information on page 13.
11
Page 12

Measurements
After settings are checked/changed, press the READ key to obtain
moisture readings. The active settings appear briefly. Then, if the
measuring pads are not in contact with any material, the lowest possible value for the active material setting appears: SCAN/Min is 4.3%
for setting 160. If measurements are taken, the measured value
(9.6%), the active setting for material (160) and measuring depth
(1/4”) are displayed.
While taking measurements:
- If the material is too dry to be measured, the meter will show the lowest possible
value indicated by SCAN/Min on the left side of the display.
- If the material is too wet to be measured, the highest possible value is indicated by
SCAN/Max on the left side of the display.
To obtain accurate measurements:
Pinless Mode
Turn the meter on and place it on the test sample
(for wood in the direction of the grain). Press down
lightly, holding the outer sides of the meter without
touching the test sample with your hand. It is important to put light pressure on the meter towards
the test sample. For accurate measurements:
- The test sample should be big enough to cover both
measuring pads.
- The test sample should be at least as thick as the selected measuring depth. Page 13.
- If the surface is not smooth and flat, several measurements should be taken.
Select the highest value.
Note, all materials within the measuring field contribute to the value indicated. If the
test sample is composed of different materials, the value indicated may not be a true
moisture percentage, but may only be a reference number. It can be hard to find the
correct code number for engineered or composite materials. Page 15: Find Settings for
Composite and Engineered Boards.
To make sure the material underneath the test sample is not influencing the measurements, arrange an air space underneath the test sample. For example: Elevate one end
of the test board to create an air space underneath the board. If this is not possible,
make sure the Ligno-VersaTec is set for the correct measuring depth.
Measuring veneer, page 15.
12
Page 13

Dual-Depth 1/4” and 3/4”
Selectable dual-depth 1/4” and 3/4” is a unique feature only available in Lignomats
dual-depth meters: Ligno-Scanners SD and SDM, Ligno-DuoTec BW and Ligno-
VersaTec. All dual-depth meters from Lignomat have 2 independent sets of calibrations,
one for 1/4” deep and one for 3/4” deep.
Measuring depth is crucial for all pinless meters.
Most pinless meters are calibrated for a fixed
material thickness of 3/4”. That means, accurate
measurements can only be taken if the material
is at least 3/4” thick and no more than 1.5” thick.
If test samples are thicker than 1.5”, core measurements are only possible with a pin
electrode.
If test samples are thinner than the measuring depth, readings may be inaccurate:
- If not enough test material is underneath the measuring pads, values will be too low.
- If material underneath the test sample is included in the measuring field, values
Pinless Mode
could be too high.
New ways to use the dual-depth capability of the Ligno-VersaTec:
-- Measuring products less than 3/4” thick: Many panel and floor products are only
5/8” thick, which does not work well for a 3/4” measuring depth. One example:
When floor planks 5/8” thick are installed and measured with a pinless meter set for a
3/4” measuring depth, you cannot be sure that the subfloor or concrete underneath is
not affecting the readings. With the Ligno-VersaTec on the 1/4” depth setting, you
definitely only measure the floor planks .
-- Measuring engineered products: You can find the moisture content of the thin top
layer made from hardwood by using the corresponding species setting and 1/4” depth.
Using those results, a setting can be found for the entire floor plank. Page 15.
-- Toggle function: The measuring depth can be changed with up or down keys with
out moving the meter. This allows you to compare surface and core moisture.
Toggling can also be used to diagnose floor failures or to monitor acclimation.
-- 1/4” depth setting allows for checking dryness of waterbased finishes. Works great
for veneer or for measuring moisture close to the surface.
-- Many building materials including drywall are less than 3/4” thick. For those
materials the 1/4” depth works better and gives true measurements.
13
Page 14

Toggle between 1/4” and 3/4”
To toggle: Place the meter on the test sample and
press READ. The active measuring depth is
indicated on the left side of the display. Hold the
meter with one hand and put light pressure on
the meter to obtain accurate measurements. Use
the other hand to toggle between 1/4” and 3/4”:
Press the up key to switch to 3/4”.
Press the down key to switch to 1/4”.
You do not have to move the meter at all.
Toggling enables you to obtain 2 moisture values
at different depth levels in the same location.
This is the best way to compare surface and core
moisture with the pinless measuring technology. Use the Ligno-VersaTec with a pin
electrode to measure a moisture gradient in thicker wood.
Pinless Mode
Measuring Wood:
Check/change wood species setting: Code numbers 111-230. These code numbers are
the same for pin and pinless mode. Wood can also be measured in pinless mode using
code numbers 30-100, based on specific gravity. For example, fora specific gravity of
0.42, choose #42. All pinless meters from Lignomat including the Ligno-VersaTec are
programmed for code numbers 30-100.
Check/change depth setting according to the thickness of the wood. Page 13: Dual-Depth.
To measure, press the READ key and place the meter on the wood in the direction of
the grain. Press down lightly, holding the outer sides of the meter without touching
the test sample with your hand.
Measuring range for wood is 5*-60%.
Measurements above fiber saturation (25-30%) are less accurate.
* The lowest measurable moisture value depends on the specific gravity of the wood
species. To find the lowest moisture value for a species setting, hold the meter in the
air and press READ.
The lowest values for hardwoods are usually lower than 5%. The
lowest values for softwoods are usually higher than 5%.
for setting #160 is 4.3%.
For example,
the lowest value
Measuring Bamboo:
Lignomat developed a unique set of calibrations for different types of bamboo floors
and engineered bamboo products, code # 11-24. Depth is limited to 1/4” since bamboo
14
Page 15

Pinless Mode
products are usually less than 3/4” thick. Make sure that the selected measuring depth
is 1/4”, when using code numbers 11-24. Also available in Ligno-DuoTec BW and SDM.
The values indicated by the Ligno-VersaTec are WME percentages. WME is the wood
moisture equivalent. The following example shows what WME means: If bamboo is
acclimated to ambient conditions of 42%, the Ligno-VersaTec on the correct bamboo
setting indicates 8%. If wood is acclimated to the same 42% relative humidity, the
wood moisture content is also 8%. Pg 18.
Measuring Veneer: We recommend placing a lite-weight (non-weight) material
such as styrofoam underneath the test sample when measuring veneer or other thin
materials. It not only prevents inaccurate readings, but also helps to create a flat measuring platform. To obtain accurate readings for very thin veneer it may be necessary to
make a stack of several sheets.
You can also find a setting for single veneer sheets. See below: Start with Step 2, if you
know the moisture content of the veneer sheet. Otherwise, start with Step 1b, if you
have a sheet acclimated to a known relative humidity.
Find Settings for Composite and Engineered Boards
Follow steps 1 and 2 to find settings for products not listed on the species card.
For best results, the test sample should be acclimated to a uniform moisture content.
Step 1: Determine the moisture content (MC value) of the test sample using 1a) or 1b).
1a) If the top layer is wood, find the MC value by taking readings. Set the meter to the
wood species of the top layer at 1/4” depth, even if the top layer is thinner than 1/4”.
1b)
If the top layer is not wood or the product is less than 1/4” thick (veneer), the test
sample has to be well acclimated in a known relative humidity. Then you can find the
MC value in the EMC chart. Moisture measurements with the meter are not needed.
Look up the relative humidity and find the corresponding EMC value. For a test
sample acclimated in 40-50% rel. humidity, the MC value is 8.5% . Page 18.
Step 2: Determine the new setting using the MC value found in step 1.
Select setting # 50 and 3/4” depth. Use depth 1/4” for a test sample less than 3/4”
thick. Then, take a reading.
--If the reading is lower than the MC value found in step 1, choose a setting lower than 50.
--If the reading is higher than the MC value found in step 1, choose a setting higher than 50.
Then, take another measurement. Change the setting, until you get a reading close to
the MC value determined in step 1.
The new-found setting can be used in the future for the same type of boards.
15
Page 16

Measuring Building Materials:
Select the correct material setting. If the material is not listed on the laminated species card, use one of the reference scales:
- for laminates and composites made from wood..................................... code #0
- for concrete and building materials with a similar specific gravity.... code #25
- for drywall and building materials with a similar specific gravity....... code #15
- for building materials in between concrete and drywall ...................... code #10
Measuring with a reference scale is best done when a dry sample is available.
Measure the dry sample and use the number as base value for
comparing readings. Even if no dry sample is available, higher
values indicate more moisture.
Note, no % sign. Reference scales do not indicate moisture percentages.
When taking measurements, make sure the surface is clean. If surfaces are uneven,
try different orientations of the meter and use the highest value.
Pinless Mode
Water damage restoration: Pin and pinless measurements are crucial when tracking
moisture problems. The Ligno-VersaTec, a dual-depth pinless meter, measures up to
3/4” deep. A quick way to find trouble areas. If the problem is buried deeper down, pin
measurements with electrode E14V and long EL pins are the only option to reach the
problem areas. In addition, the electrode E14V can measure areas a pinless meter
cannot reach such as corners, around pipes and window sills, under base boards, etc.
Sheetrock: Setting #15 (Range: 0-2.0%). The indicated moisture percentages are
based on dry weight, same as wood moisture percentages. Meters indicating moisture
values of 8-12% for dry sheetrock, use scales based on WME, wood moisture equivalent (top of page 15).
Moisture percentages for sheetrock based on dry weight
- Dry sheetrock ranges from 0.1% to 0.7%.
- Values for 0.8% and 0.9% are questionable.
- Any value 1% and higher is considered wet.
Sheetrock is often thinner than 3/4”. The Ligno-VersaTec, a dual-depth pinless meter
with 1/4” measuring depth is ideal to measure thinner sheetrock. Even if the sheetrock
is installed, the 1/4” measuring depth gives true moisture percentages, without including any material behind the sheetrock.
Since the maximum measuring depth of the Ligno-VersaTec in scan mode is limited to
3/4”, it may be more conclusive to investigate moisture problems with the electrode
E14V in pin mode. Pins 3/4” and 7” long are available for the E14V. Page 9.
16
Page 17

Pinless Mode
Concrete:
comparable to relative humidity readings in concrete. Readings indicate high and low
moisture levels. However, the measuring depth is limited to 3/4” deep.
Measurements with non-invasive meters provide a preliminary evaluation of moisture
conditions. Moisture meters are not able to indicate absolute moisture percentages
(ASTM F2659). Page 21.
Warning: Test results from pin or pinless meters should not be used to decide whether
or not to lay a wood floor over a concrete slab. An RH in-depth probe test and/or a
Calcium-Chloride test is recommended by most wood floor manufacturers.
Follow the floor manufacturer’s installation instructions and perform the required testing to guarantee the manufacturer’s warranty.
Setting #25 (Range: 0-99.9). Moisture readings are given on a relative scale
Wood Floor Installation:
Wood moisture meters and thermo-hygrometers are essential tools for floor installers.
Adding Lignomat’s humidity probe RH BluePeg
allows using the VersaTec as pin/pinless meter
and as precision thermo-hygrometer. Page 20.
Whenever possible, wood moisture and relative
humidity should be measured.
First:
Next:
Mark sample boards and take readings of the same spot repeatedly.
Last:
signs off on the installation. Select several moisture sensitive areas, under windows,
inside doors, by the refridgerator, etc. Take readings with both depth levels and document the measurements with moisture content, species setting, measuring depth and
location. Take a photo to pinpoint the location. Use the Ligno-VersaTec with the RH
BluePeg probe to take relative humidity and temperature measurements.
Keeping track of moisture conditions may in the end protect you from unwarranted
Take measurements when the floor is delivered, to make sure the floor is dry.
Take measurements (moisture and RH) before, during and after acclimation.
The moisture content of a floor should be documented at the time the customer
claims and help find the cause of a problem. If you ever have to go back to check out a
complaint, you can measure the same areas again and compare with the original measurements. The dual-depth readings can indicate if moisture was absorbed from the
down-side of the floor or from the up-side of the floor. See EMC chart on page 18 for
equilibrium moisture contents and the corresponding relative humidity and temperature. If EMC and MC are kept in close range, wood floors are absolutely stable.
17
Page 18

Relative Humidity, Wood Moisture and EMC Chart
Recommended ambient conditions in buildings are 30-50% relative humidity at 60800F. If ambient conditions stay within this range, the amount of expansion and contraction of wood floors and furnishings at 6-9% moisture content is limited. (Table from
US Dept of Agriculture “Wood Handbook, Wood as an Engineering Material”)
EMC Chart
Relative Humidity in %
Temp. 5 10 15 20 25 30 35 40 45 50 55 60 65 70 75 80 85 90 95 98
30 1.4 2.6 3.7 4.6 5.5 6.3 7.1 7.8 8.7 9.5 10.4 11.3 12.4 13.5 14.9 16.5 18.5 21.0 24.3 26.9
40 1.4 2.6 3.7 4.6 5.5 6.3 7.1 7.8 8.7 9.5 10.4 11.3 12.4 13.5 14.9 16.5 18.5 21.0 24.3 26.9
50 1.4 2.6 3.6 4.6 5.5 6.3 7.1 7.9 8.7 9.5 10.3 11.2 12.3 13.4 14.8 16.4 18.4 20.9 24.3 26.9
60 1.3 2.5 3.6 4.6 5.4 6.2 7.0 7.8 8.6 9.4 10.2 11.1 12.1 13.3 14.6 16.2 18.2 20.7 24.1 26.8
70 1.3 2.5 3.5 4.5 5.4 6.2 6.9 7.7 8.5 9.2 10.1 11.0 12.0 13.1 14.4 16.0 17.9 20.5 23.9 26.6
80 1.3 2.4 3.5 4.4 5.3 6.1 6.8 7.6 8.3 9.1 9.9 10.8 11.7 12.9 14.2 15.7 17.7 20.2 23.6 26.3
90 1.2 2.3 3.4 4.3 5.1 5.9 6.7 7.4 8.1 8.9 9.7 10.5 11.5 12.6 13.9 15.4 17.3 19.8 23.3 26.0
100 1.2 2.3 3.3 4.2 5.0 5.8 6.5 7.2 7.9 8.7 9.5 10.3 11.2 12.3 13.6 15.1 17.0 19.5 22.9 25.6
Example: For a relative humidity of 35% and a temperature of 70
0
F, the EMC is 6.9%. A wood
floor at 6.9% moisture content is stable, if the surrounding air has a relative humidity of 35% and
a temperature of 700F. In short a floor is stable, when MC and EMC are the same.
Using Pin / Pinless Mode and Thermo-Hygrometer Function
Dimensional Stability of Wood:
for dimensional stability of wood. Use the Ligno-DuoTec BW to measure both. If wood shrinks,
warps, cups, checks or delaminates, it always has to do with changes in wood moisture and/or
relative humidity. No shrinking and warping occurs, when an equilibrium with the surrounding air
has already been reached, which means wood is not losing or absorbing any more moisture.
Predictions and Explanations:
content. Compare the measured values with the EMC chart above to predict, if wood is stable or
will loose or gain moisture.
-- A hardwood floor shows gaps from shrinking. The moisture content at the present time measures 6.2% and the rel. humidity is at 30%. The only explanation for the gapping is, that the
floor was installed at a higher moisture content. Once exposed to the dry air, the floor dried out
Wood moisture and relative humidity are crucial factors
Measure relative humidity, temperature and moisture
and the gapping occurred.
-- If a dry floor with a perfect moisture content of 6.2% is exposed for a long time to air with a
relative humidity of 60% at 700F, it can be predicted that the floor will absorb moisture until 11%
has been reached. Depending on the wood species, a 5% increase in moisture content can be
accompanied by a substantial amount of expansion.
No more surprises!
Use the EMC chart and your Ligno-DuoTec to predict problems. The
chart is also helpful to explain to your customers, why relative humidity in their home matters.
18
Page 19

Restoration and Building Industry:
Mold has become a great concern in the building
industry. Mold can grow almost anywhere, if the relative humidity rises above 80% and temperatures are moderate (not screaming hot or icy cold). The critical moisture percentage is above 16%
for mold growth in wood. This critical moisture percentage can be exceeded, when water infiltrates a structure by leaks, floods and broken pipes or when buildings are not sealed properly.
Repair work is necessary to avoid lasting damage.
Use the Ligno-VersaTec to measure moisture content and rel. humidity. Compare both values.
Establish the extent of damage and monitor progress until all repairs are done.
Monitoring RH and MC with Data Loggers
The Ligno-VersaTec can be used as a very accurate and reliable
thermo-hygrometer as described on the next page. However, a
thermo-hygrometer provides only at-the-moment measurements. For monitoring over time we offer the BL 2 data logger.
The BL2 data logger comes with the precision RH BluePeg
probe. 32000 Data sets can be sampled in time intervals of
30 seconds to 24 hours. Audible alarms can be set. A great watchdog for restoration
work, floor installation, job-site surveillance, long term recordings of storage facilities.
Adding the MC Tracker to the BL2 allows recording wood moisture
centent and relative humidity. It is like continuously taking readings with 3 wood moisture meters and 1 thermo-hygrometer.
Lignomat also offers wireless transmitters for measuring moisture, humidity, temp.
Calculating Specific Gravity
Specific gravity can be found on the Internet by entering <specific gravity ....> followed by the
wood species. Specific gravity can be calculated by dividing:
Dry Weight x 1.73
------------------------------------ Length x Width x Heights
Dry Weight
-------------------------------------
...........................................................................
Length x Width x Heights
......................................................
...................................
...................................
> enter Dry Weight in ounces
> enter Length, Width and Heights in inches
> enter Dry Weight in grams
> enter Length, Width and Heights in centimeters
If the specific gravity is 0.42, the Ligno-VersaTec should be set to #42 in pinless mode.
For unlisted species or new products call customer service at 800-227-2105. If no listing is
available, Lignomat offers testing to determine the correct setting.
Note: Species settings for pin meters are determined by oven testing. The specific gravity
settings cannot be applied to correct measurements with a pin meter.
19
Page 20

RH Mode
RH Technology
The Ligno-VersaTec functions as an RH meter or a thermo-hygrometer, when the RH
BluePeg probe is connected. The RH BluePeg probe uses a single micro-chip factory calibrated to NIST standard.
Applications include:
- measuring ambient air conditions
- in-situ moisture test in concrete, next page.
Measuring Range for relative humidity:
0-99.9%
Accuracy for RH: +/-1.8% for 10% - 90%
+/-3% for below 10% and above 90%
Measuring Range for temperature:
50F-1800F (-150C to 820C)
Accuracy for temp:
+/-0.50F for 320F-1040F (00C-400C)
+/-10F for <320F and >1200 F (<00 C and >490 C)
Measuring Range for GPP: 0-99.9
Measure and Monitor Ambient Conditions
As soon as the RH BluePeg probe is connected to the Ligno-VersaTec, the meter automatically switches into RH mode and indicates values for:
RH: relative humidity
T: ambient temperature
DewP: dew point temperature
GPP: grains per pound
#: RH probes have individual 3-digit numbers
All values for RH, temperature, Dew Point and GPP can be obtained by first pressing
READ, then HOLD and then using the up or down key to scroll between RH/T/DP/GPP.
The connection between Ligno-VersaTec and RH BluePeg
probe can be made by the male-male 35mm RH Adapter,
only available from Lignomat. An extension cable (35mm
stereo) can also make the connection. The cable is available
from Lignomat up to 50 ft long for monitoring remote areas
Note: When using the VersaTec as a thermo-hygrometer, the accuracy rating of
Lignomat’s RH probe with +/-1.8% is far above the over-the-counter available thermohygrometers. Over-the-counter hygrometers usually have a rating of +/-5% for RH.
20
Page 21

RH Mode
In-situ RH test for Moisture in Concrete
The in-situ RH test gives the most reliable results for concrete moisture testing to
determine, if a floor covering should be installed or adhesive or epoxy can be applied.
See separate instructions for in-situ probe test with RH BluePeg probes. Instructions
are available on line or as booklet from Lignomat (800-227-2105).
ASTM standard F2170 describes equipment and procedure. The
duration of the test is now 24 hours, a time limit set by the ASTM
standard. All of Lignomat’s RH parts comply with the latest standard F2170.
The in-situ RH concrete test has gained recognition over the past
few years. Many floor covering manufacturers have added the RH
concrete test to their warranty requirements. Check the floor
manufacturers manual to guarantee the manufacturer’s warranty.
If you own a Ligno-VersaTec the following accessories are needed
to perform in-situ RH moisture testing in concrete:
RH Probes, RH Sleeves, RH Cable with cable-end-stopper.
Also needed drill, brush, vacuum attachment.
Measuring Concrete Moisture with the Ligno-VersaTec
The Ligno-VersaTec offers three different technologies to
measure moisture in concrete.
Pin: Adding the Electrodes E16 allows measuring up to 7” deep. This was the preferred
method several years ago. However, it has been proven, that the results are only qualitative measurements. Only high and low moisture areas can be found.
Pinless: Using the pinless mode of the Ligno-VersaTec, the measuring depth is limited
to 3/4”. Within that 3/4” depth high and low moisture levels can be determined. The
3/4” depth does not include the middle section of the slab and therefore cannot be
used to determine whether or not a resilient floor covering can be installed. A correct
percent value cannot be established, only high and low moisture areas can be found.
Pin and pinless, ASTM F2659, quantitative versus qualitative.
In-situ RH testing: Use the RH mode of the Ligno-VersaTec with the RH BluePeg
probes, and measure the relative humidity and temperature inside a hole in the concrete. The relative humidity values obtained from inside the hole are directly related
to the moisture condition of the concrete.
see next page: Why the RH test gives the most reliable results.
21
Page 22

Why the RH test gives the most reliable results:
Moisture distribution within an open concrete slab is often not uniform, especially when the slab
has not dried completely or when the slab is on grade. The surface shows low moisture levels,
whereas higher moisture levels are found in the middle of the slab or towards the bottom (especially for slabs on grade). Once the open concrete slab is covered by the floor covering, moisture will be pulled up from the bottom towards the drier surface until an even moisture distribution has been reached. The increase in moisture close to the surface can cause problems with
epoxy, adhesives and floor coverings.
It has been shown, that moisture measurements taken at 40% of the slab thickness give the
same results when the slab is open and later-on when the slab is covered. Therefore, test
results from the open slab at 40% depth can be used to predict what the moisture content will be
once the slab is closed. This allows manufacturers of adhesives, epoxy and floor coverings to
set a permissible range for their products. If the slab is not on grade, the ASTM standard F2170
allows testing at 20% depth.
Permissible RH values are set by manufacturers of adhesives, epoxis and floor coverings.
Check the floor manufacturer’s installation manual.
Check Software Version. Change from US to Metric System.
Temperature is indicated in 0F or 0C. Measuring depth is indicated in inches or mm. To
change, disconnect the battery and press the SET key twice. Connect the battery again.
Display shows software version as a 3-digit number. Example 3.19.
The active 0C or 0F setting appears on the right side of the display in the upper or
lower corner. The setting for temperature can only be changed, while the 3-digit soft-
ware number is displayed.
To switch the setting from 0F to 0C, use down key.
To switch the setting from 0C to 0F, use up key.
The setting for inches or mm cannot be changed manually, it follows
the temperature setting:
- If 0C is set, the measuring depth is automatically indicated in mm.
- If 0F is set, the measuring depth is automatically indicated in inches (“).
22
Page 23

Function and Calibration Check for Pin and Pinless Mode
All pin and pinless meters from Lignomat including the Ligno-VersaTec are built with
high quality components, micro-processor based, to guarantee stable calibrations for
many years of usage. All meters from Lignomat internally check and if necessary
adjust the calibration before each reading. Therefore, the meters are not set up to be
re-calibrated manually by the user.
Before the battery is drained completely and the meter will not give any
more values, a warning sign appears in the middle of the display, indicating the battery should be replaced soon.
Function Test: Pin and pinless measurement functions can be tested for open and
closed circuit connections manually.
Calibration Test: Pin and pinless measurements can be tested for calibration accuracy
with check blocks provided by Lignomat. Using the external pin and pinless calibration
check block confirms that all connections function properly:
- in pinless mode from the measuring pad to the display.
- in pin mode from the tip of the pins to the display (including pins, hand probe or
electrode, cable, meter and all connections)
For sensitive testing we recommend using the check block before and after a test series.
Every time you check, the indicated value should be within +/- 1% of the test standard.
Pin Mode
Manual function check: Step 1 and Step 2
Calibration check: Step 3
Step 1: Open circuit check. Set the meter to pin mode, select code # 103 and a wood
temperature of 700F. First check the meter only. Press the READ key and a low moisture value of 5.0% should be indicated with PIN/Min on the left side of the display.
Next connect the cable. Press the READ key again and a value of 5% should be indicated. Last check the meter with cable and electrode (do not touch the electrode pins).
Your equipment passed the open circuit check if the 5% value is indicated every time.
If the 5% value cannot be confirmed at the first check, the meter is defective, at the
second check the cable is defective, at the third check the electrode is defective.
Step 2: Closed circuit check. Connect meter, cable and electrode. When the READ key
is pressed and the metal tips of both pins are touched with two fingers, a reading
higher than at least 12% should be indicated. If that is not the case, disconnect the
electrode (electrode is defective). To check the cable, put your thumb on the open
cable end. The cable is ok, if a reading higher than 12% is indicated.
23
Page 24

Step 3: Lignomat offers an external calibration check
block TP. The block is used to confirm the calibration
of all Lignomat pin meters. Connect meter, cable and
electrode. Set the meter to pin mode. Select code # 103
and a wood temperature of 70
0
F. Place pins on screws
for a value of 12% and 20%. Test confirms that meter,
electrode and cable work, and the calibration is correct.
Note: Step 3 can be done instead of Step 2. However,
the open circuit check described in Step 1 should always
be performed.
If steps 1, 2 or 3 fail either the battery needs to be replaced or the electrode, the cable
or the meter are defective. Contact customer service at 800-227-2105.
Pinless ModePinless Mode
Pinless Mode
Pinless ModePinless Mode
Manual function check for pinless meters: Step 1 and 2
Calibration check for pinless meters:Step 3
Step 1: Open circuit check. Set the meter to pinless mode,
choose code # 50. Hold the meter in the air to make sure
no material is touching the measuring plates. When the
READ key is pressed, a low moisture value of 5.4% should
be indicated with SCAN/Min to the left side of the display.
For 1/4” and the 3/4” depth the same value should appear.
Step 2: Closed circuit check. Place the pinless meter on your forearm and press the
READ key. A high moisture value should be indicated. An additional meter check can
be performed by measuring a ream of paper. If the paper test is done repeatedly with
the same setting, the indicated value should not vary significantly over the course of a
year. This can be used to check consistancy / accuracy
of the pinless calibration.
Step 3: Lignomat offers an external calibration check
block TS for all Lignomat pinless meters. The check
block for pinless meters from Lignomat is a material
plate which produces a defined reading, when the
meter is lightly pressed against its surface.
If step 1, 2 or 3 fail either the battery needs to be replaced or the meter is defective. Call customer service
800-227-2105.
24
Page 25

Function and CalibrFunction and Calibr
Function and Calibr
Function and CalibrFunction and Calibr
Function Check for RH measurements: Step 1
Accuracy check for RH BluePeg probe: Step 2
Step 1: Connect the RH BluePeg probe to the
Ligno-VersaTec using the small RH adapter and
also the RH cable. Press the READ key. A value
for either RH, T, DT or GPP appears. Press the
HOLD key and then the up key repeatedly to
recall the other values. Check if the indicated
values are within the expected range. If you read
a temperature of 1500F, you know something is
wrong. We recommend this test before using the
RH BluePeg probes for the first time.
Step 2: The accuracy of the RH BluePeg probe needs to be checked periodically. This
check can only be performed by exposing the sensor on the circuitboard to a known
relative humdity. For on-site checking we sell salt solutions for 75% and for 33% RH.
aa
tion Ttion T
a
tion T
aa
tion Ttion T
est - RH Meterest - RH Meter
est - RH Meter
est - RH Meterest - RH Meter
ss
s
ss
Accuracy check for in-situ RH probes for concrete moisture testing: The ASTM standard
F2170 sets the rules for test equipment, procedure and frequency of accuracy testing.
Since the standard is still modified periodically, we recommend to purchase the latest
F2170 standard to be up-to-date with all requirements. Available from the ASTM website. Lignomat offers to check RH probes three times free of charge during the first year.
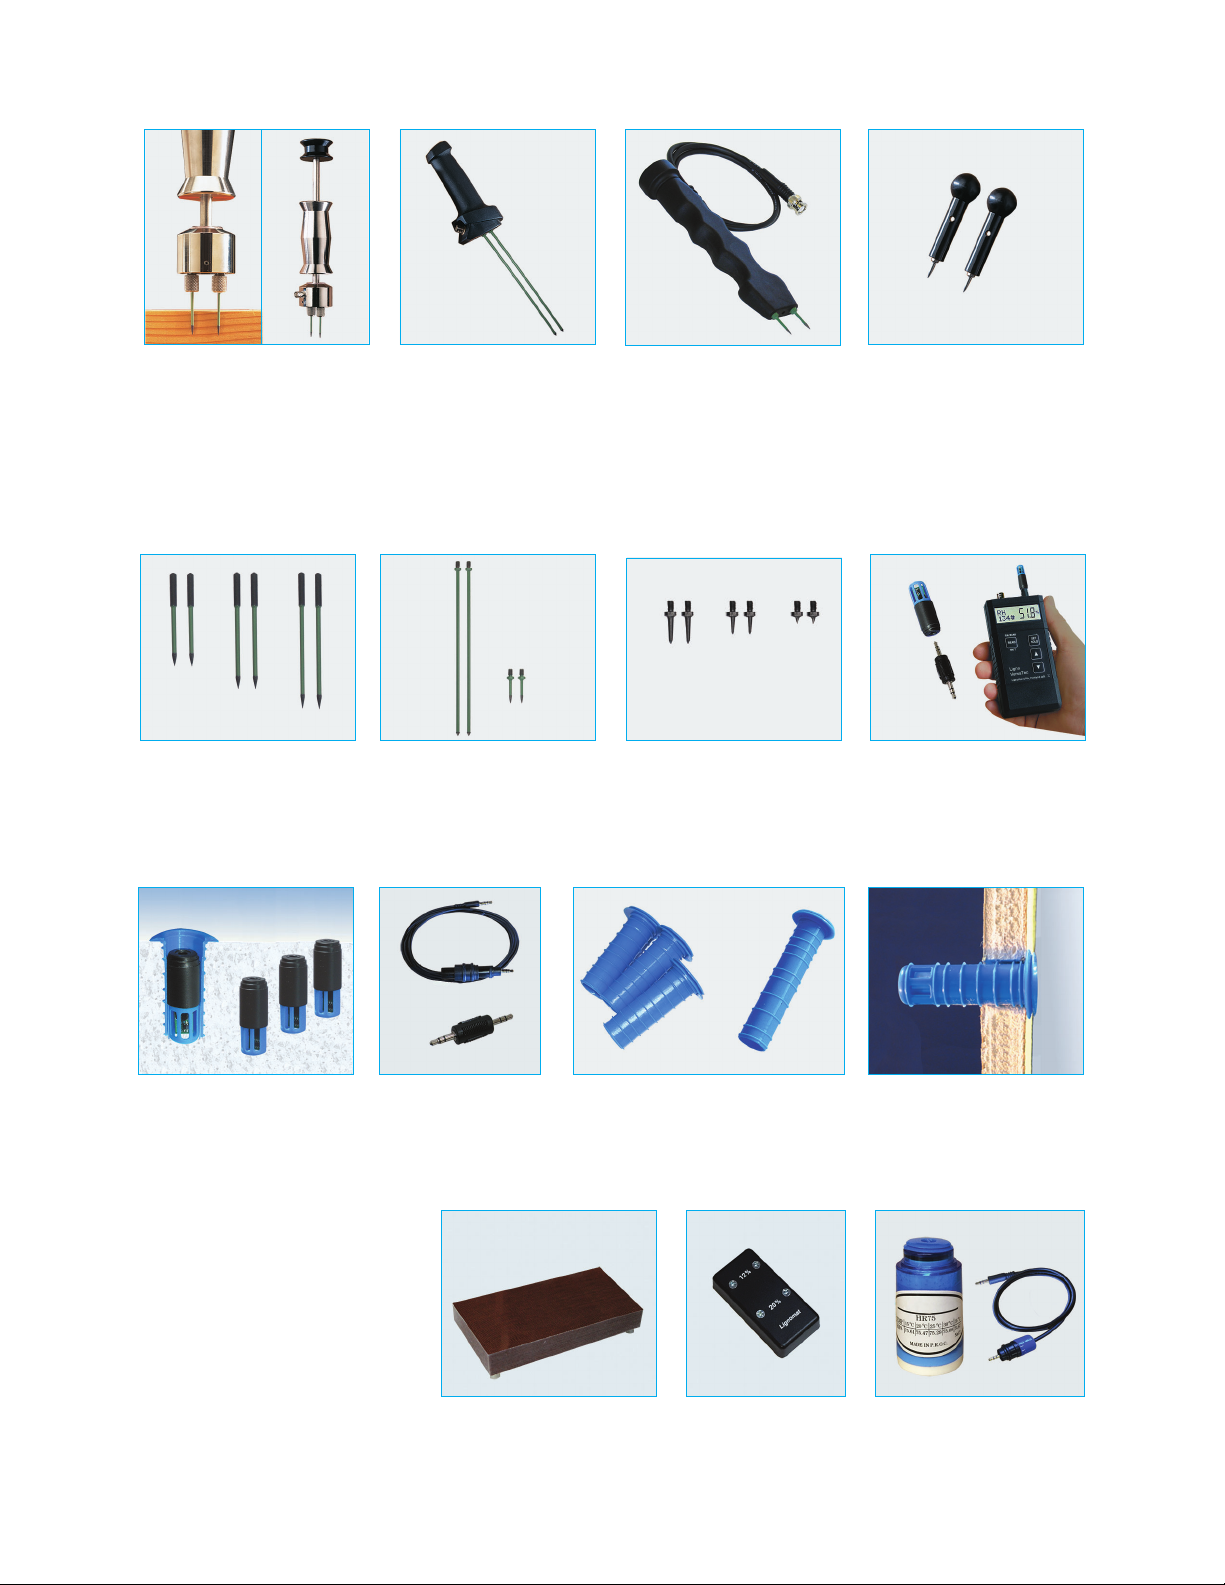
V24-KML Package with RH Accessories
Cable
Sleeves for in-situ
Ligno-VersaTec meter
with connector for
electrode and RH cables
Electrode E12 for
depth measurement
in pin mode
probe testing
RH BluePeg probe
with RH Adapter
Inspector
electrode E14V
in pin mode
25
long EL pins
 Loading...