

Lightwave Communications SCS1620 Product Manual
Secure Console Server
Model SCS1620
Product Guide
Part Number 15.00.032
Revision B
February 2002

SCS1620 Product Manual Lightwave Communications
Page ii www.lightwavecom.com

A Lantronix Company SCS1620 Product Manual
Copyright & Trademark
© 2002, Lightwave Communications, a Lantronix Company. All rights reserved. No part of the
contents of this book may be transmitted or reproduced in any form or by any means without the
written permission of Lantronix. Printed in the United States of America. Also electronically
distributed via Adobe PDF file format.
Ethernet is a trademark of XEROX Corporation. UNIX is a registered trademark of The Open
Group. Windows 95, Windows 98, Windows 2000, and Windows NT are trademarks of
Microsoft Corp. Netscape is a trademark of Netscape Communications Corporation. Adobe
Acrobat and PDF are trademarks of Adobe Corporation. Other trademarks and service marks are
held by their respective owners.
SCS1620 Product Guide
Lightwave Communications, Inc. (LCI)
100 Washington Street
Milford, CT 06460 USA
Phone (800) 871-9838 • (203) 878-9838
Fax: (203) 874-0157
Email: info@lightwavecom.com
Internet: www.lightwavecom.com
Lantronix
15353 Barranca Parkway
Irvine, CA 92618 USA
Phone: (949) 453-3990
Fax: (949) 453-3995
Internet: www.lantronix.com
15.00.032 Rev. B Page iii

SCS1620 Product Manual Lightwave Communications
Disclaimer & Revisions
Operation of this equipment in a residential area is likely to cause interference in which case the
user, at their own expense, will be required to take whatever measures may be required to correct
the interference.
Attention: This product has been designed to comply with the limits for a Class A
digital device pursuant to Part 15 of FCC Rules. These limits are designed to provide
reasonable protection against such interference when operating in a commercial
environment. This equipment generates, uses, and can radiate radio frequency
energy, and if not installed and used in accordance with this guide, may cause
harmful interference to radio communications.
Changes or modifications to this device not explicitly approved by Lantronix will void the user's
authority to operate this device.
The information in this guide may change without notice. The manufacturer assumes no
responsibility for any errors that may appear in this guide.
Date Rev. Part
No.
February 2002 B 15.00.032 Manual style updates. Kernel v2.01 enhancements
Comments
Page iv www.lightwavecom.com

A Lantronix Company SCS1620 Product Manual
Declaration of Conformity
(according to ISO/IEC Guide 22 and EN 45014)
Manufacturer’s Name & Address:
Lightwave Communications, 100 Washington Street, Milford, CT 06460 USA
Declares that the following product:
Product Name & Model: Secure Console Server 1620 (SCS1620)
Conforms to the following standards or other normative documents:
Safety:
EN60950: 1992+A1, A2, A3, A4, A11
Electromagnetic Emissions:
EN55022 Class A: 1998 (CISPR 22, Class A: 1993, A1: 1995, A2: 1996)
EN 1000-3-2/A14: 2000
EN 10003-3: 1994
Electromagnetic Immunity:
EN55024: 1998 Information Technology Equipment-Immunity Characteristics:
EN61000-4-2: 1995 Electro-Static Discharge Test
EN61000-4-3: 1996 Radiated Immunity Field Test
EN61000-4-4: 1995 Electrical Fast Transient Test
EN61000-4-5: 1995 Power Supply Surge Test
EN61000-4-6: 1996 Conducted Immunity Test
EN61000-4-8: 1993 Magnetic Field Test
EN61000-4-11: 1994 Voltage Dips & Interrupts Test
Supplementary Information:
This Class A digital apparatus complies with Canadian ICES-003 (CSA) and has been verified as
being compliant within the Class A limits of the FCC Radio Frequency Device Rules (FCC Title
47, Part 15, Subpart B CLASS A), measured to CISPR 22: 1993 limits and methods of
measurement of Radio Disturbance Characteristics of Information Technology Equipment. This
product also complies with the requirements of the Low Voltage Directive 72/23/EEC and the
EMC Directive 89/336/EEC.
This product carries the CE mark since it has been tested and found compliant with the following
standards:
Safety: EN 60950
Emissions: EN 55022 Class A
Immunity: EN 55024
15.00.032 Rev. B Page v

SCS1620 Product Manual Lightwave Communications
Table of Contents
1.0 System Description .........................................................................................9
1.1 System Features ..........................................................................................9
1.2 Hardware Features ....................................................................................10
2.0 System Overview...........................................................................................11
2.1 Typical Use ................................................................................................11
2.2 System Components..................................................................................11
2.3 Access Control...........................................................................................11
2.4 Connection Formats..................................................................................11
2.4.1 Serial...................................................................................................11
2.4.2 Network..............................................................................................11
2.4.3 Modem...............................................................................................12
2.4.4 Power Manager..................................................................................12
2.5 Device Port Buffer .....................................................................................12
2.6 System Resource Information....................................................................12
3.0 Installation.....................................................................................................13
3.1 Physical Installation....................................................................................13
3.2 Power.........................................................................................................13
3.2.1 AC Input.............................................................................................13
3.2.2 DC Input.............................................................................................14
3.3 Connecting a Terminal (Console) ..............................................................14
3.4 Connecting to the Device Port..................................................................15
3.5 Connecting the Network Port ...................................................................16
3.6 Connecting the Modem Port.....................................................................16
3.7 Power Manager Port..................................................................................17
4.0 Quick Start Set-up.........................................................................................18
4.1 Method #1 - Using Front Panel Display.....................................................18
4.2 Method #2 - Quick Start via Telnet ...........................................................20
Page vi www.lightwavecom.com

A Lantronix Company SCS1620 Product Manual
5.0 SCS1620 Administration ...............................................................................21
5.1 System Administrator Functions................................................................21
5.1.1 Log In as System Administrator..........................................................21
5.1.2 Logging Out.......................................................................................22
5.2 Security and Passwords .............................................................................22
5.2.1 Change the sysadmin password.........................................................22
5.2.2 Change the root password .................................................................22
5.3 The setup User Interface..........................................................................23
Auto-Run of setup on Initial Startup ...............................................................23
Manually using setup......................................................................................24
5.3.1 Start of setup Script..........................................................................26
5.3.2 Configure Hostname and IP...............................................................27
5.3.3 Configure Timezone...........................................................................31
5.3.4 Configure DNS...................................................................................32
5.3.5 Configure Services..............................................................................35
5.3.6 Configure Modem..............................................................................37
5.3.7 PPP, and CHAP or PAP ......................................................................41
5.3.8 Configure NIS.....................................................................................44
5.3.9 Configure LDAP..................................................................................46
5.3.10 Configure the Firewall........................................................................48
5.3.11 Done...................................................................................................53
5.4 SAVE..........................................................................................................56
5.4 Reboot.......................................................................................................57
6.0 Commands....................................................................................................58
6.1 Summary of Commands ............................................................................58
6.1.1 SAVE Command.................................................................................58
6.1.2 reboot Command.............................................................................59
6.1.3 poweroff Command.........................................................................59
6.2 System Commands....................................................................................60
6.3 Device Commands.....................................................................................65
6.4 Creating and Managing Users...................................................................67
6.5 End User commands..................................................................................71
6.5.1 User Log In.........................................................................................71
6.5.2 Escape Sequence...............................................................................72
6.5.3 Break Sequence..................................................................................72
7.0 Modem Setup ...............................................................................................73
7.1 Installing a Modem Card ...........................................................................73
7.2 Modem Initialization..................................................................................74
8.0 User Access and Functions............................................................................75
8.1 Terminal Port.............................................................................................75
8.2 Network Port .............................................................................................75
8.3 Modem Module.........................................................................................75
8.4 Selecting a Device Port .............................................................................76
8.5 Direct Mode ..............................................................................................76
15.00.032 Rev. B Page vii

SCS1620 Product Manual Lightwave Communications
Appendix A – Terminal Port and Adapter Pinouts..................................................78
Appendix B – Flash Update Procedure....................................................................84
B.1 Updating the SCS1620 Software...............................................................84
B.1.1 Software Download............................................................................84
B.2 Flash Replacement Procedure...................................................................84
Appendix C – System Specifications........................................................................87
C.1 Physical ......................................................................................................87
C.2 Environmental............................................................................................87
C.3 Electrical ....................................................................................................87
C.3.1 AC Power ...........................................................................................87
C.3.2 DC Power ...........................................................................................88
C.4 Interface.....................................................................................................88
C.4.1 Terminal and Device...........................................................................88
C.4.2 Network..............................................................................................88
C.4.3 Modem...............................................................................................88
C.4.4 Power Manager..................................................................................88
C.5 Compliance and Certification....................................................................89
Appendix D – DC Power Specifications...................................................................90
D.1 DC Power Source ......................................................................................90
D.2 Overcurrent Protection..............................................................................90
D.3 DC Supply Connector................................................................................90
Appendix E – Hexadecimal ASCII Code..................................................................91
Appendix F – Some UNIX Command Help..............................................................93
F.1 less command............................................................................................93
F.2 vi Editor commands...................................................................................95
F.2.1 Using vi...............................................................................................95
F.2.2 vi Modes.............................................................................................95
F.2.3 Using vi in Command mode...............................................................96
F.2.4 Closing a file opened in vi..................................................................96
Page viii www.lightwavecom.com
A Lantronix Company SCS1620 Product Manual
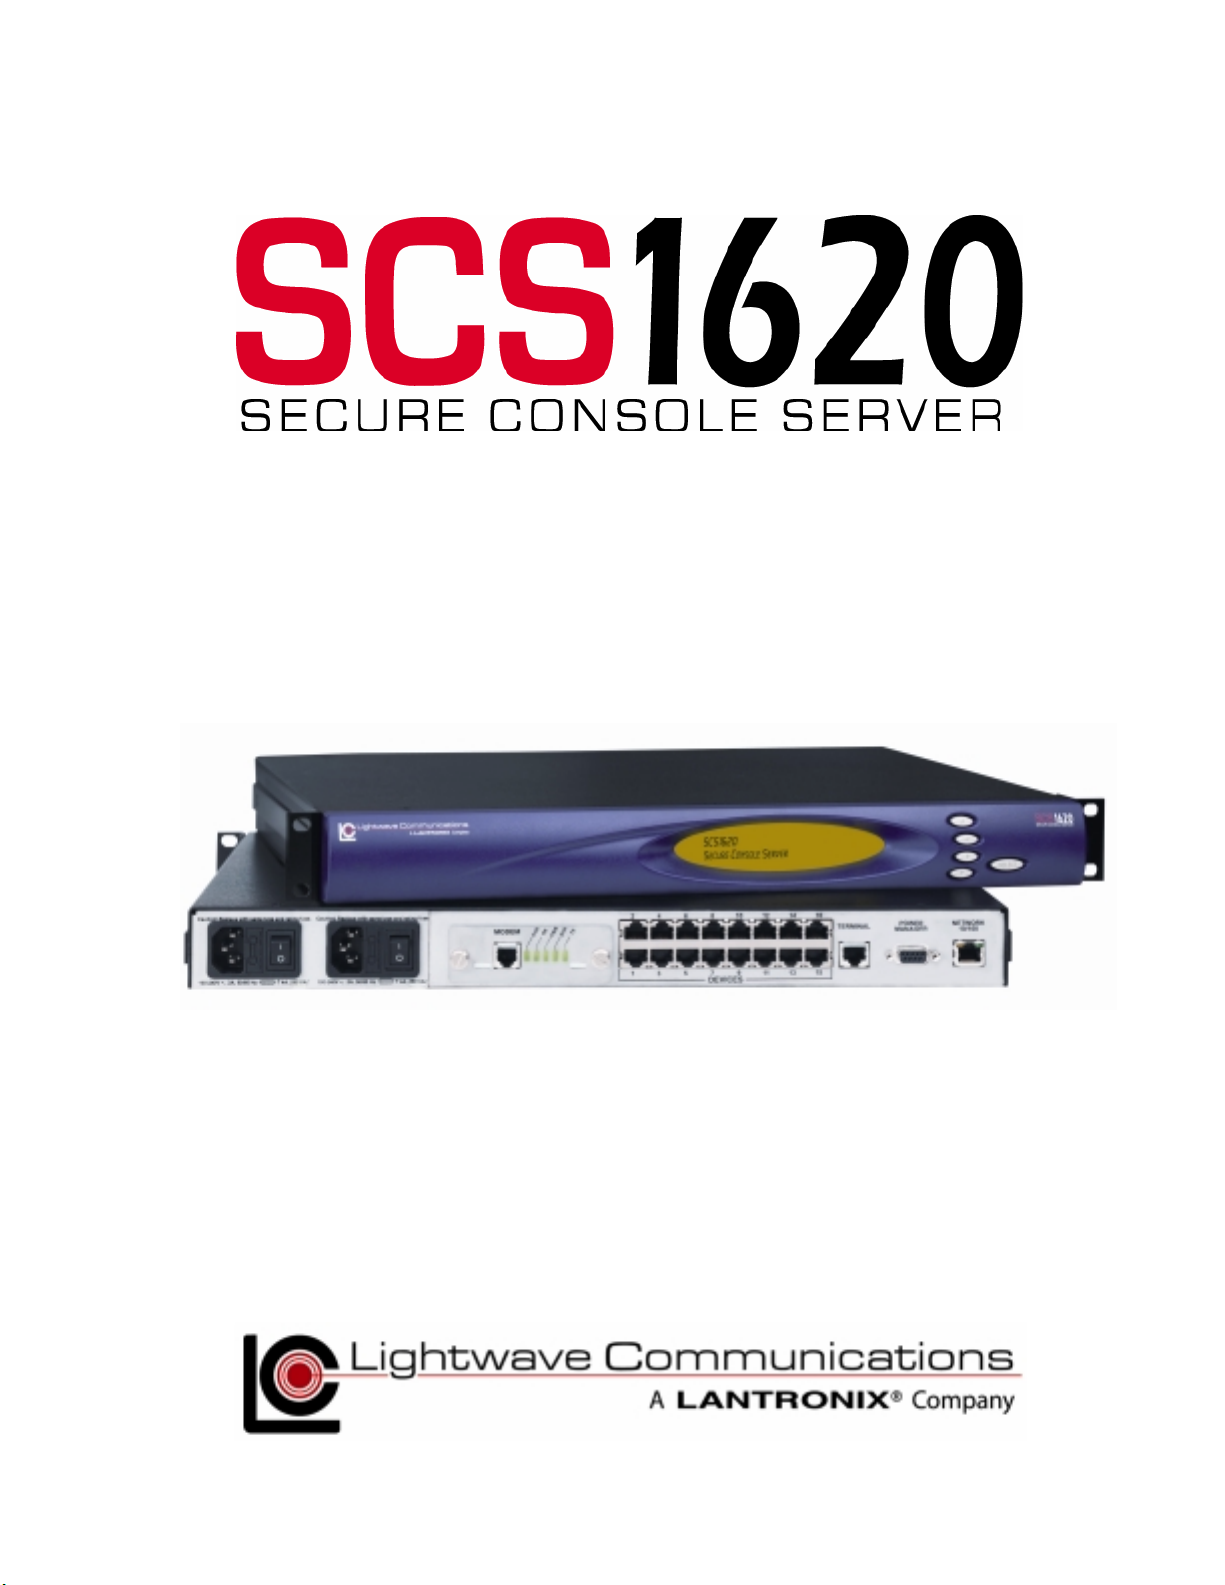
1.0 System Description
The Lightwave Secure Console Server 1620 (SCS1620) is a fully customizable
console server offering secure encryption and authentication. The SCS1620 is a
compact solution for remote and local management of up to 16 devices with
RS-232C compatible serial consoles.
MODEM Module
(optional)
Redundant Power Inputs
(AC shown; 48VDC available)
(RS-232) Port
RS-232 DEVICE
Ports (1-16)
Two-line
LCD Display
TERMINAL
POWER MANAGER
Front Panel
Setup Switches
10/100
NETWORK Port
Port (to PCU8)
1.1 System Features
• Connect up to sixteen (16) RS-232 serial consoles
• 10/100-baseT IP network compatible
• ID / Password Security, configurable access rights
• OpenSSH version 2 security
• Open LDAP
• NIS capable for remote database rights
• Modem support for PPP (PAP or CHAP) and Callback
• No unintentional break will ever be sent to attached servers
• Local access through TERMINAL port (the 1620's Console port)
• Support for Lightwave PCU8 Power Control Unit
• Field upgradeable Flash memory
15.00.032 Rev. B Page 9

SCS1620 Product Manual Lightwave Communications
1.2 Hardware Features
• 1RU tall (1.75 inches) rack-mou ntable Server
• One (1) 10/100 baseT Network Port for connection to your IP network
• Sixteen (16) serial DEVICE ports, RS232, connected via Category 5
(RJ45) wiring
• One (1) serial TERMINAL port, for VT100 console or PC with emulation
• One (1) POWER MANAGER port, DB9F serial interface, for Lightwave
PCU8 Power Control Unit
• Optional: One (1) Modem Module, for analog Dial-Up connections
• 256KB-per-port Buffer Memory for DEVICE ports
• Front Panel 2-line backlit LCD display and pushbutton controls
• 128MB FLASH Memory, 128MB RAM
• Redundant Power Inputs
• Power Options: Universal AC (100-240V) or -48VDC
• Convection cooled, silent operation, low power consumption
Page 10 www.lightwavecom.com

A Lantronix Company SCS1620 Product Manual
2.0 System Overview
2.1 Typical Use
The SCS1620 is often used to manage up to 16 serial devices (servers, routers,
switches, etc.) where security is mandatory. Each attached device must have an
RS-232C compatible serial console port.
A User accesses the attached servers with keyboard commands from their local
terminal, through a network connection, or through a dial-up connection.
2.2 System Components
All system components are enclosed in a rack-mountable metal chassis. Each
chassis has 16 DEVICE ports, one TERMINAL port, and one NETWORK port.
An optional MODEM module is available and can be added at any time. Power
supplies are factory-installed, and may be either for universal AC operation, or for
–48 VDC operation. The SCS1620 front panel features an LCD display and
pushbuttons for access to some system information.
2.3 Access Control
Access to attached servers is controlled by assigning access rights to system
user profiles. Each user profile is assigned an ID, a password, and access rights.
Users must have a user profile to access any of the attached devices.
The System Administrator determines and configures the profile settings of the
SCS1620. Other access options may include externally-configured authentication
methods using NIS, OpenLDAP, or other OS-based methods.
2.4 Connection Formats
2.4.1 Serial
All devices attached to both the device ports and the terminal port must support
the RS-232C standard. Category 5 cabling with RJ45 connections is used for the
Device port connections and for the Terminal Port.
Device ports (numbered 1 through 16) can be individually configured as DTE or
DCE devices, and support seven (7) baud rate options of 2400, 4800, 9600,
19200, 38400, 57600 and 11520 0 baud .
2.4.2 Network
The SCS1620 network interface is a 10/100 BaseT connector, for use with a
conventional TCP/IP network using standard RJ45-terminated Category 5
cables. The network parameters must be configured by the system administrator
before the Console Server may be accessed over the network.
15.00.032 Rev. B Page 11

SCS1620 Product Manual Lightwave Communications
2.4.3 Modem
The optional Modem module connects to a conventional telephone line using
standard RJ11 modular telephone cable. The analog modem on the card
connects at speeds up to 38,400 baud. The Modem is required for any PPP
features.
With the Modem installed, the SCS1620 supports:
• Plain Text TTY
• PPP connection, with PAP or CHAP authentication
• Callback connection
2.4.4 Power Manager
The POWER MANAGER port is provided for connecti on to Li g htwave's Power
Control Unit, the PCU8. This serial interface uses a DB9 female connector. The
Power Manager port is configured as Port 17, and is similar to the DEVICE ports.
2.5 Device Port Buffer
Each device port stores 256 KB (approximately 400 screens) of I/O data in a
FIFO buffer. This data may be viewed while the user is not directly interacting
with the attached device.
2.6 System Resource Information
The SCS1620 is programmable using OS-level commands and options. The
System Administrator (sysadmin) configures the product using a command-line
interface or one of several prepared scripts, using UNIX / Linux commands.
There are numerous resources on the Internet (and elsewhere) providing
information about security options, programming tools and techniques and
configuration advice. A few of the Internet sites are listed below.
• SSH info: www.openSSH.org
• RFC's (the standards and details behind the Internet): www.rfc-editor.org
• RFC1700; assigned numbers: www.faqs.org/rfcs/rfc1700.html
• PuTTY, a free Win32 Telnet/SSH Client (reco mm en ded) :
http://www.chiark.greenend.org.uk/~sgtatham/putty/
• Security: www.bastille-linux.org
• An online manual on Linux security :
http://www.linuxdoc.org/LDP/solrhe/Securing-Optimizing-Linux-RHEdition-v1.3/
The following sites have more information about Linux (from basic to advanced):
• www.kernel.org
• www.linuxdoc.org
• www.linuxlinks.com
Page 12 www.lightwavecom.com

A Lantronix Company SCS1620 Product Manual
3.0 Installation
The SCS1620 uses convection cooling to dissipate excess heat. Be careful to not
block the air vents on the sides of the unit. If mounted in an enclosed rack, it is
recommended that the rack have a ventilation fan to provide adequate airflow
through the unit.
3.1 Physical Installation
The SCS1620 may be installed either in an EIA-standard 19-inch rack (1U tall) or
as a desktop unit. For desktop use, four rubber feet are provided, and the rack
mount brackets may be removed.
3.2 Power
The SCS1620 consumes less than 20W of electrical power. The SCS1620 is
available as AC-powered models or DC-powered models, and offers redundant
input power connections.
3.2.1 AC Input
The AC version of the SCS1620 uses two universal auto-switching AC power
supplies for redundant operati on. The power supplies accept AC input voltage
between 100-240 VAC with a frequency between 50/60 Hz. The system is fully
functional on either supply. The supplies are individually switched and fused, and
the AC inputs are isolated except for chassis ground.
AC power inputs and power switches on rear of SCS1620 chassis
15.00.032 Rev. B Page 13

SCS1620 Product Manual Lightwave Communications
3.2.2 DC Input
The DC version of the SCS1620 accepts standard –48 VDC telco power. The
SCS1620 accepts two DC power inputs for supply redundancy. The DC power
Wago connectors are provided with the DC-powered systems, and the
connectors are also available separately from Lightwave.
See Appendix D for specifications regarding the DC power source.
3.3 Connecting a Terminal (Console)
The TERMINAL port (a Console port) is used for local access to the SCS1620
and the attached devices. A dumb terminal or computer may be attached to the
serial port if the port uses RS-232-C protocol and VT100 emulation is supported.
Inserting a serial Console cable in the TERMINAL port
Page 14 www.lightwavecom.com

A Lantronix Company SCS1620 Product Manual
The default communication para meter s for th e TERM INAL por t are :
• 9600 baud,
• 8 data bits,
• 1 stop bit,
• No parity,
• Xon/Xoff flow control, and
• port type of DCE.
Adapters from Lightwave Communications may be used to connect the
TERMINAL port to the serial port on your console or other DTE device.
See Appendix A for adapter and port pinouts.
1. Attach the Lightwave adapter to your console (use PN 200.0066 Adapter
in most cases) or your PC's serial port (use PN 200.0070 Adapter).
2. Connect the Cat 5 cable to the adapter. Connect the other end to the
SCS1620 TERMINAL port.
3. Turn on the terminal or start your computer’s communication program.
3.4 Connecting to the Device Port
Any serial device that has a console port may be connected to the SCS1620 for
consolidated remote administration. Device Ports are individually configurable
(DEVICE_1 through DEVICE_16). The console port must support the RS-232-C
interface. Additionally, many servers must either have the serial port enabled as
a console, or must have the keyboard and mouse detached. Consult the server
hardware and/or software documentation for more information.
Modem
Module
Connections on Rear of SCS1620, Device Ports in center
The default communication parameters for the Device ports are:
• 9600 baud,
• 8 data bits,
• 1 stop bit,
• No parity,
• Xon/Xoff flow control, and
• port type of DCE.
Serial Device
ports
Terminal
port
10/100 Network
port
Power Manager
(PCU8) port
15.00.032 Rev. B Page 15
SCS1620 Product Manual Lightwave Communications
The DEVICE ports can be configured for baud rates of 2400 - 115.2K baud, and
as DTE or DCE. The data word must be 8/none/1 and employ Xon / Xoff flow
control.
3.5 Connecting the Network Port
The SCS1620’s network port (10/100 BaseT) allows remote access to the
attached devices and the system administrative functions.
The network parameters for the network port must first be set up before the
SCS1620 may be reached remotely.
See Section 4 for a Quick Start for setting up your Network Port. Also refer to the
setup
setup command in Section 5.3 for additional network configuration.
setupsetup
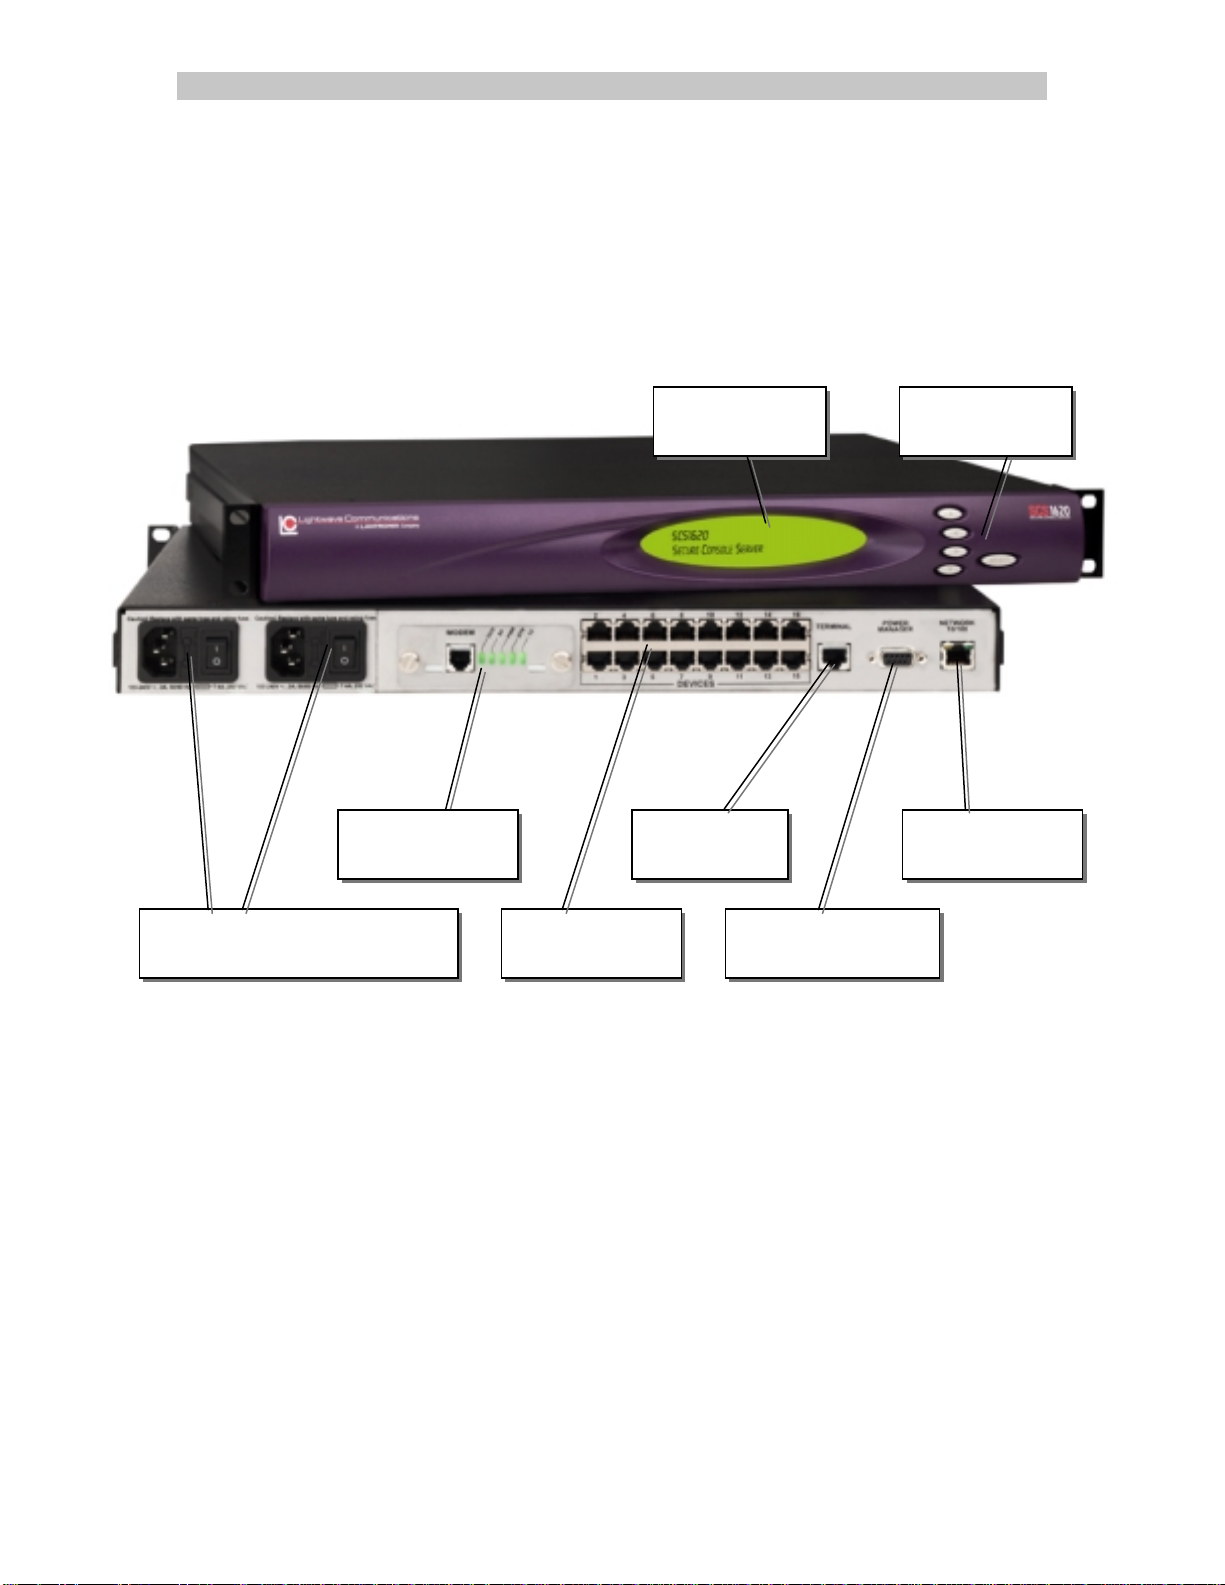
3.6 Connecting the Modem Port
An optional modem module is available for the SCS1620. The modem may be
installed at the factory or can be ordered separately for later installation.
SCS1620 modem modul e
The SCS1620 modem is an analog modem supporting connection rates up to
38,400 baud. The modem has a single RJ11-type analog telephone jack plus five
status LEDs. The user interface to the modem is identical to that foun d on the
terminal port or the network port. The Modem is configured as Device Port 19.
The default communication parameters for the MODEM port are:
• 38400 baud,
• 8 data bits,
• 1 stop bit,
• No parity, and
• RTS/CTS flow control.
Page 16 www.lightwavecom.com

A Lantronix Company SCS1620 Product Manual
The Modem is initially set up using the setup
system. Refer to Section 7 for Modem Installation instruction s, if installing a
modem into a working SCS1620 system.
setup program (see Section 5.3) of the
setupsetup
3.7 Power Manager Port
The Power Manager port is configured as Device Port 17, and operates like the
other DEVICE ports, except that its physical interface is a DB9F serial connector.
The Power Manager port is intended for the Lightwave PCU8 Power Control Unit.
The default communication parameters for the POWER MANAGER port are:
• 9600 baud,
• 8 data bits,
• 1 stop bit,
• No parity,
• Xon/Xoff flow control, and
• port type of DTE.
The Power Manager Port, like the DEVICE ports, can be configured for baud
rates of 2400 - 115.2K baud, and DTE or DCE. The data word must be 8/none/1
and employ Xon / Xoff flow control.
15.00.032 Rev. B Page 17

SCS1620 Product Manual Lightwave Communications
4.0 Quick Start Set-up
Out of the box, the IP network port identity is set to a generic default value.
Quick Start gets your IP network port up and running quickly, so you may
administer the SCS1620 using your network.
Be sure to address the Security issues first when administering the system.
Quick Start assumes the system is plugged in and turned on, and that you
know the IP address that the SCS1620 must be set to in order to operate on
your network, and that you are ready to connect to your network port.
There are two methods to Quick Start the network connections:
• you may use the front panel display and buttons, or
• you may use your existing IP network
4.1 Method #1 - Using Front Panel Display
The front panel display and pushbuttons can be used to set up the basic network
interface, which will allow the sysadmin to access the SCS1620 using your
existing IP network.
Front Panel LCD Display and Pushbuttons
The front panel display initially shows SCS1620 (the server name) and the date
and time. Using the five pushbuttons, the sysadmin can change the IP settings,
Time features and Terminal settings. The front panel display will time out (without
accepting any unsaved changes) and return to 'date and time' if no buttons are
pressed for 30 seconds.
After changing the values for your network, the port will restart (the front panel
display will indicate 'restarting'), after which the network connectio n is active.
Use the front panel buttons to set up the basic network parameters. There is one
'SELECT' button and four arrow buttons (Up, Left, Right and Down). The front
panel can change the IP Address, Subnet Mask, Gateway and DNS settings;
Date/Time and Time Zone features; and Terminal (Console) port baud rate
settings.
Page 18 www.lightwavecom.com

A Lantronix Company SCS1620 Product Manual
Use the arrow buttons to navigate from one option to another, or to increment or
decrement a numerical entry of the selected feature. Use SELECT to enter the
Edit mode of a chosen step, or to advance to the next step when editing.
1. To CHANGE the settings, press RIGHT ARROW to enter the display
programming mode, and to scroll between the available options (press
button again for additional steps). Have your information handy since the
display will time out if you take more than 30 seconds b etween entries.
Options include:
o Network Settings
o Terminal Settings
o Release Date
o Time/Date Settings
o return to norm al display
In this case, stop scrolling at the Network Settings display.
Normal Network Terminal Release Dates Time / Date Settings >
IP Setting Settings System Time Zone
Subnet Mask LCD Calendar
Gateway
DNS1
DNS2
2. When the display shows the feature that you wish to e dit, press the
SELECT key to enter the editing mode. The disp lay will show "Editing
Network Settings" (or other feature if chosen).
3. A cursor appears under one character of the existing IP address setting.
• Use the left or right arrows to move the cursor to the left or to the right
position. Use the Up and Down arrows to increment or decrement the
numerical value. Your new values will be 'saved' later.
• Note: You must change both the IP Address and the Subnet Mask
together for a valid IP address combination.
3. Again, use the left or right arrows to move the cursor to the left or to the
right position. Use the Up and Down arrows to increment or decrement the
numerical value. Press SELECT to choose the remaining options to edit.
4. When done, press the DOWN ARROW key again to 'Save Changes?',
followed by a Yes/No prompt. Use the arrow keys to choose Yes, and
press SELECT to save the changes.
• When you are done, the front panel returns to the Clock display.
• The Network Port will reset to the new settings, and can then connect
to your IP network for further administration.
15.00.032 Rev. B Page 19

SCS1620 Product Manual Lightwave Communications
• If you take longer than 30 seconds between entries, the SCS1620 will
time out and exit; any of your unsaved changes will be ignored.
5. To REVIEW the saved settings, simply press the UP or DOWN arrows to
step through the current settings.
4.2 Method #2 - Quick Start via Telnet
Assuming you have a functioning IP network, and you know your workstation's IP
address, you can access the SCS1620 via telnet commands. If you add a route
to your workstation, you can use telnet to connect to the SCS1620, instead of the
Terminal Port. The default IP address of the SCS1620 is 10.0.0.1, with a subnet
mask of 255.0.0.0.
• For Windows 9x, from the DOS / command prompt, type:
route add 10.0.0.1 mask 255.0.0.0 <your workstation's IP address>
route add 10.0.0.1 mask 255.0.0.0 <your workstation's IP address>
route add 10.0.0.1 mask 255.0.0.0 <your workstation's IP address> route add 10.0.0.1 mask 255.0.0.0 <your workstation's IP address>
<enter>
<enter>
Then, from your command line, type:
telnet 10.0.0.1 <enter>
to access the SCS1620.
<enter><enter>
• For Linux / Unix, type:
route add 10.0.0.1 gw <your workstation's IP address> <enter>
route add 10.0.0.1 gw <your workstation's IP address> <enter>
route add 10.0.0.1 gw <your workstation's IP address> <enter>route add 10.0.0.1 gw <your workstation's IP address> <enter>
telnet 10.0.0.1 <enter>
telnet 10.0.0.1 <enter>telnet 10.0.0.1 <enter>
Page 20 www.lightwavecom.com

A Lantronix Company SCS1620 Product Manual
5.0 SCS1620 Administration
This section outlines the administration functions and commands, accessed
using a command-line interface. The administration functions and commands
enable the administrator to configure the SCS1620 to suit the application,
including user IDs, devices, and terminal and access rights.
Note: Commands and entries are case-sensitive in the SCS1620.
Some system commands display the syntax options when accessing the
command. Many OS-related functions are described in the online MAN pages,
accessible using the HELP screens of the system.
Examples of most commands are provided below. All system commands require
the <ENTER> key to respond, and are case-sensitive.
5.1 System Administrator Functions
When the SCS1620 is first insta lled and powered up, it must be configured to
operate with your network. Connect the terminal port to a terminal device or
computer using a terminal emulation program (refer to section 3.4 for instructions
on connecting to the terminal port).
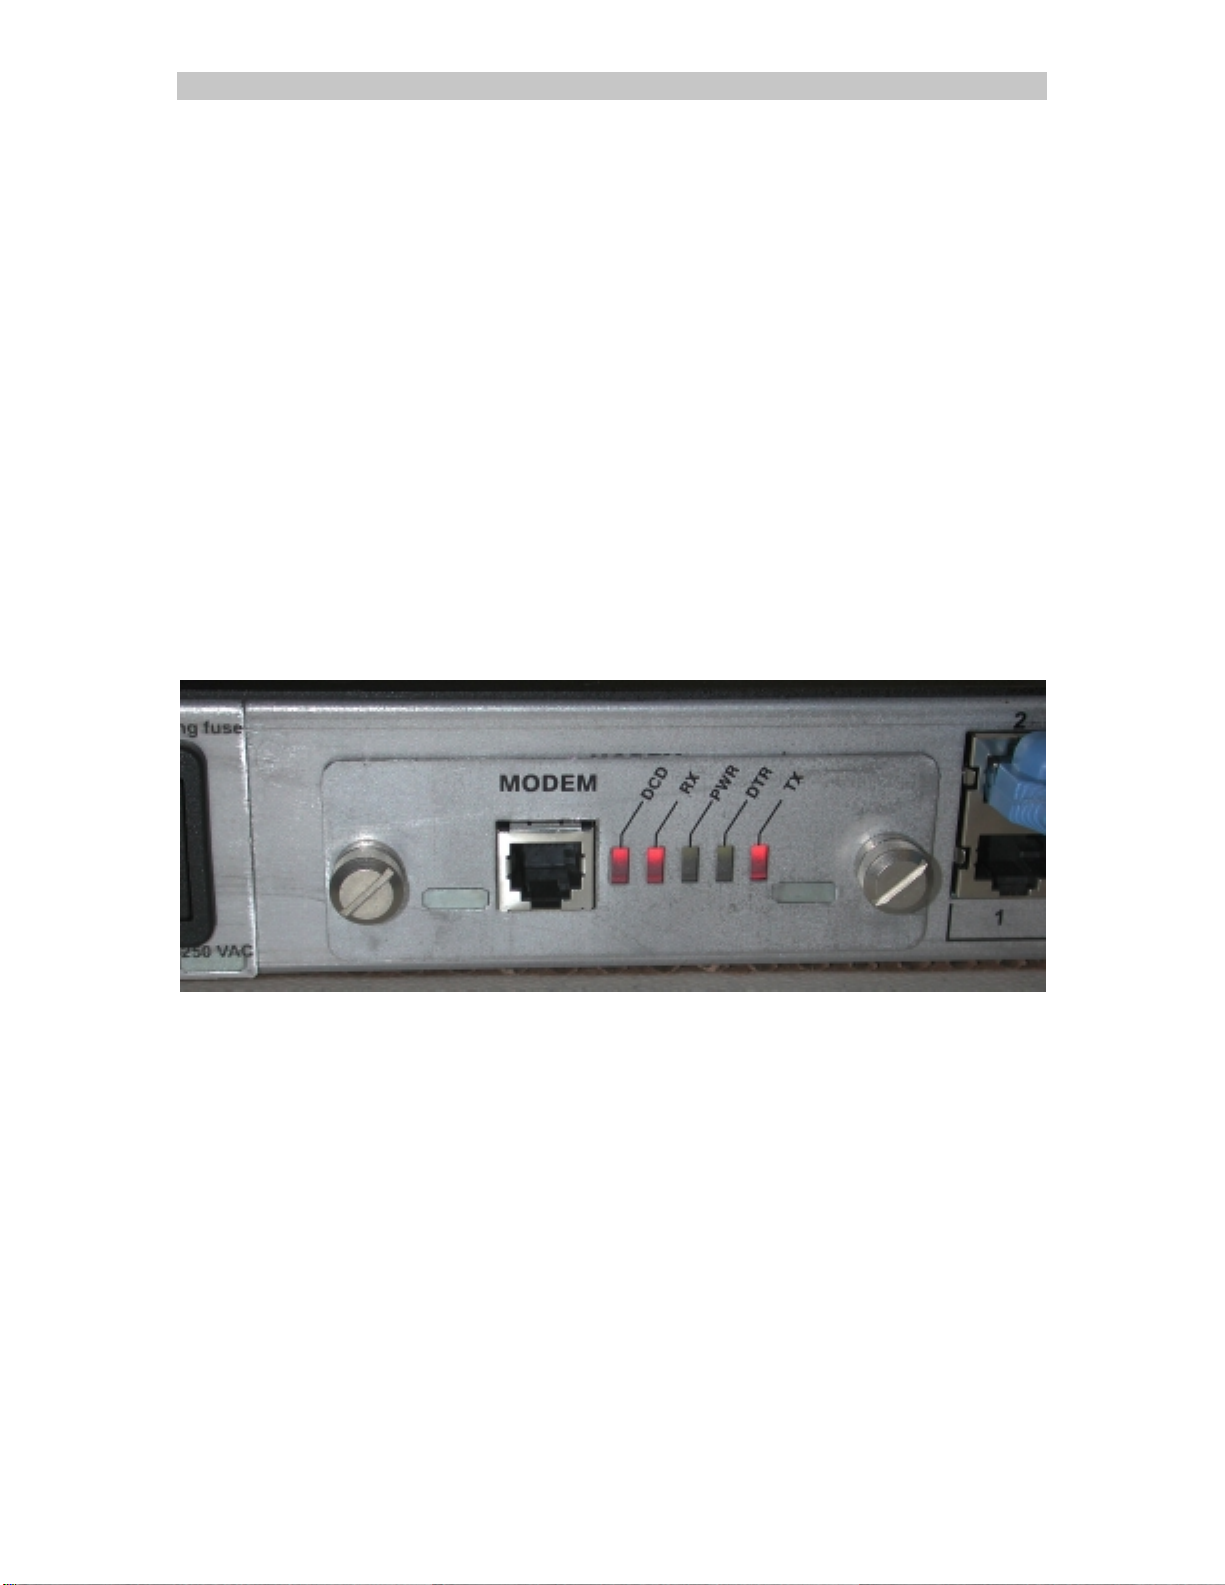
The serial terminal will display the following text after power-up:
SCS1620
SCS1620 login:
5.1.1 Log In as System Admin i st rator
You are prompted for a user name. The 'sysadmin' is a predefined user with
special system privileges. Some commands are only accessible to the System
Administrator. Type 'sysadmin' to log in for System Administration purposes.
SCS1620 login: sysadmin
You are prompted for the Password. The characters for the password are NOT
acknowledged on-screen. The default password is 'PASS'.
SCS1620 login: sysadmin
Password:
sysadmin>
15.00.032 Rev. B Page 21

SCS1620 Product Manual Lightwave Communications
5.1.2 Logging Out
To log out from a session, enter the command logout
network session, the Console Server will disconnect the telnet session. If logging
out from a direct serial session, the SCS1620 returns to the login:
When you are done with any pr ogramming change s, you should always log out.
logout. If logging out from a
logoutlogout
login: prompt.
login:login:
5.2 Security and Passwords
The SCS1620 uses Linux / UNIX commands to administer the system. The
System Administrator (sysadmin) and the Users access the system using a shell
interface, which limits what the user or sysadmin will affect in the operating
system. Those that are familiar with Linux realize that there are numerous
commands and files that are not discussed in this manual (intentionally). Some of
the SCS1620's options (e.g., ssh, LDAP) interact with operating system directly.
The shell is designed to offer the appropriate level of administration while
maintaining the integrity of the system. This can be defeated if the sysadmin
does not protect the system by changing the passwords upon installation. The
system's default values are configured to minimize security issues, however, as
features are turned on by the sysadmin, more potential security holes open up.
The sysadmin programming level is as close to 'root' as is required to administer
the SCS1620, but it is not the most-senior root level. The root level is
intentionally removed from the shell, however, it exists in the system and its
password must be changed to protect from unauthorized access or changes.
Note: There are no 'back door' passwords. You can lock the system down and
prevent programming access if you misplace your passwords. If you forgot the
passwords you entered, the system FLASH must be replaced.
One interesting, relevant article (of many) on Linux Security can be found at:
http://linux.com/interact/newsitem.phtml?sid=82&aid=6326.
5.2.1 Change the sysadmin password
The System Administrator must change the password for the sysadmin level
before it is connected to a network or accessible from 'the outside world'.
5.2.2 Change the root password
The System Administrator must change the password for the root level. Although
root access is not required by the sysadmin or the users, it is accessible by the
sysadmin and can be accessed using ssh.
This is especially important if ssh is enabled since ssh can offer the ability for
root-level access by a remote system (depending on sysadmin settings).
Page 22 www.lightwavecom.com
A Lantronix Company SCS1620 Product Manual
5.3 The setup
Note: The following example screens were captured using PuTTY (visit
http://www.chiark.greenend.org.uk/~sgtatham/putty/ for more informat ion) on a
Windows 2000 PC. Many other terminal emulation packages can also be used.
Programs such as Hyperterminal are included with the Windows operating
system, and commercial packages may also be used, if desired.
Auto-Run of setup
The scripted programming session (setup
Administrator logs into the SCS1620 for the first time. It is a text-based user
interface, and requires VT100 terminal support using the keyboard (no mouse).
setup User Interface
setupsetup
setup on Initial Startup
setupsetup
setup) automatically runs when the System
setupsetup
At default values, SSH is not enabled (encryption keys have not been generated)
so telnet is often used to initially access and configure the SCS1620.
The Text User Interface is also accessible at any time thereafter by running the
command setup
The initial automatic invocation of the setup script helps the user set up the
majority of the system functions when it is first installed. It also SAVES the
programming changes to non-volatile memory to ensure that the desired
changes are maintained. Upon completion of this automated script file, the
SCS1620 will automatically reboot to ensure that all processes will be updated.
15.00.032 Rev. B Page 23
setup from the s ysadmin command line.
setupsetup
SCS1620 Product Manual Lightwave Communications
Manually using setup
The setup
setup command is automatically run to initially configure the SCS1620; it
setupsetup
may be run manually at any time thereafter.
If using the setup
terminal (this session screen was generated using SSH login, which shows a
slightly different prompt before logging in):
setup command, you will see the following display on your VT100
setupsetup
setup
setupsetup
Only one sysadmin can log in to the setup
there are a very small number of persons (preferably only one or two) with
sysadmin account access.
Page 24 www.lightwavecom.com
setup command at one time. Hopefully,
setupsetup
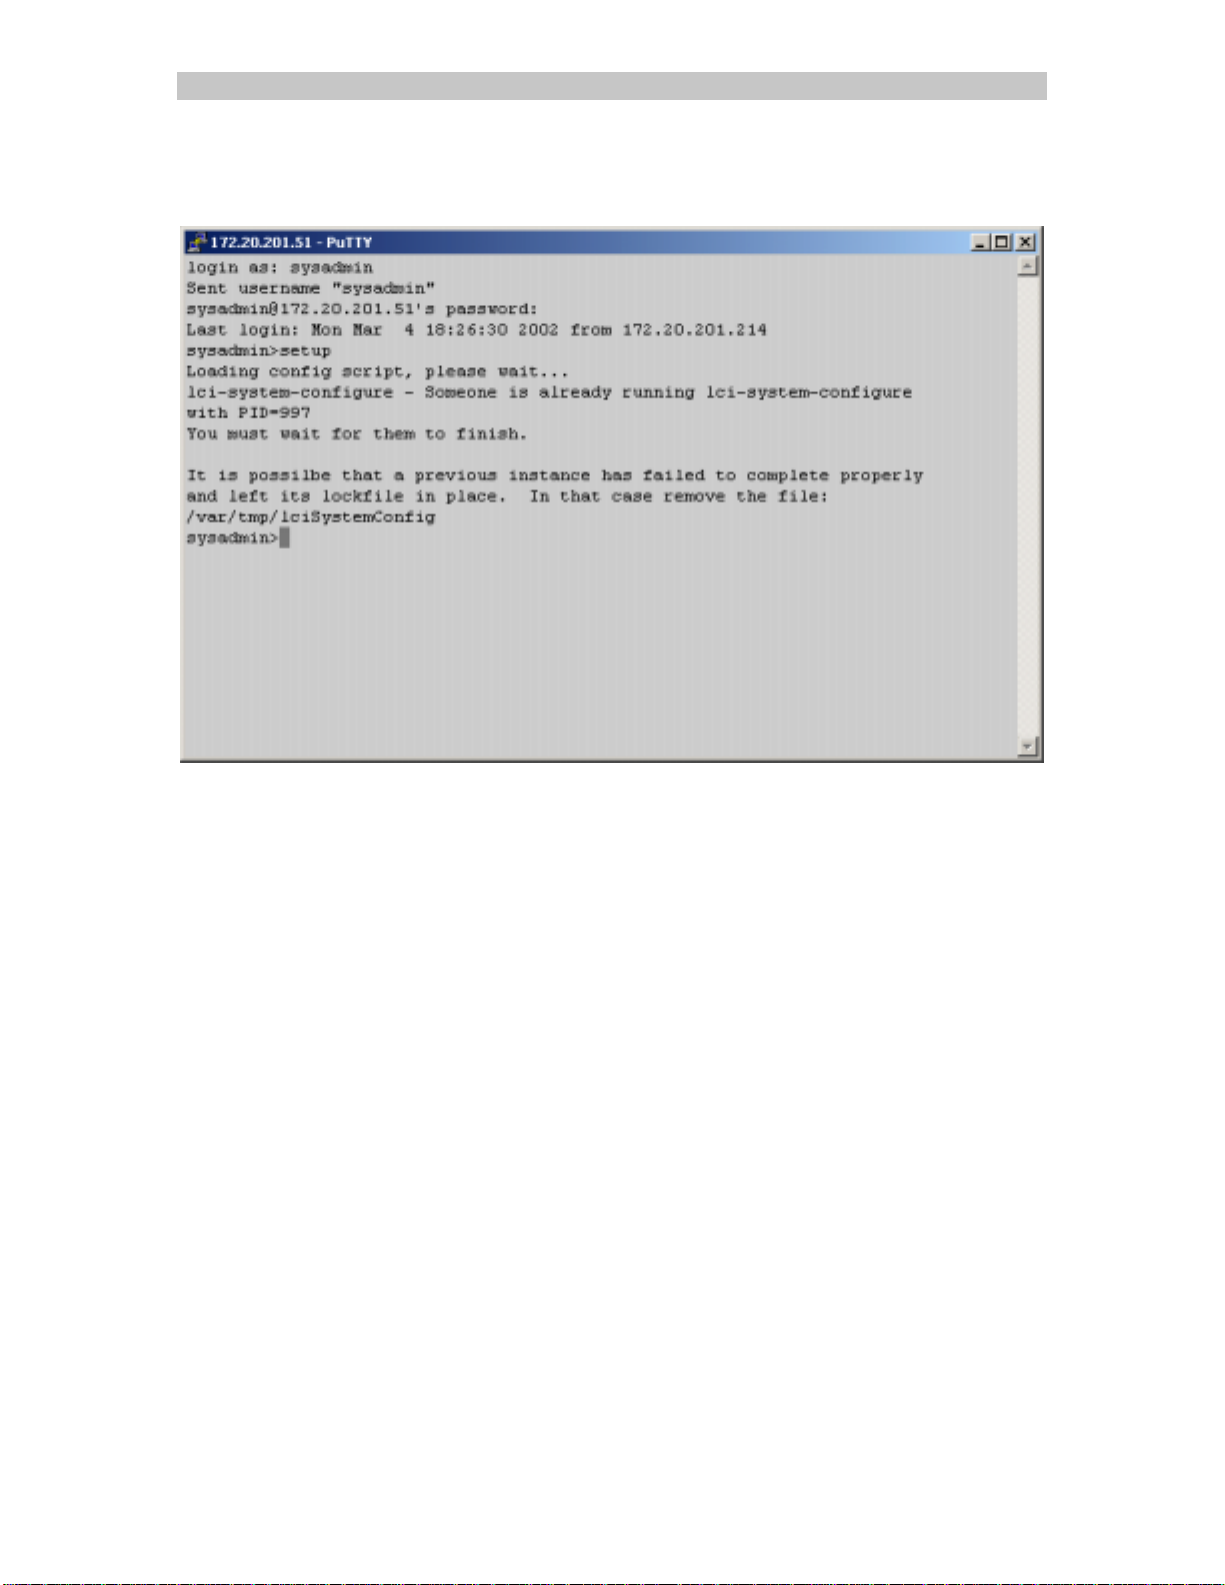
A Lantronix Company SCS1620 Product Manual
If more than one sysadmin logs into setup at a time, the latter will get the
following message:
The setup screen is shown after successfully reaching the setup mode.
The experienced Linux user may also directly edit any parameter they choose.
The setup screen is put in place to guide all users through the initial setup of
system features, and it is recommended that you use this script to get started.
15.00.032 Rev. B Page 25
SCS1620 Product Manual Lightwave Communications
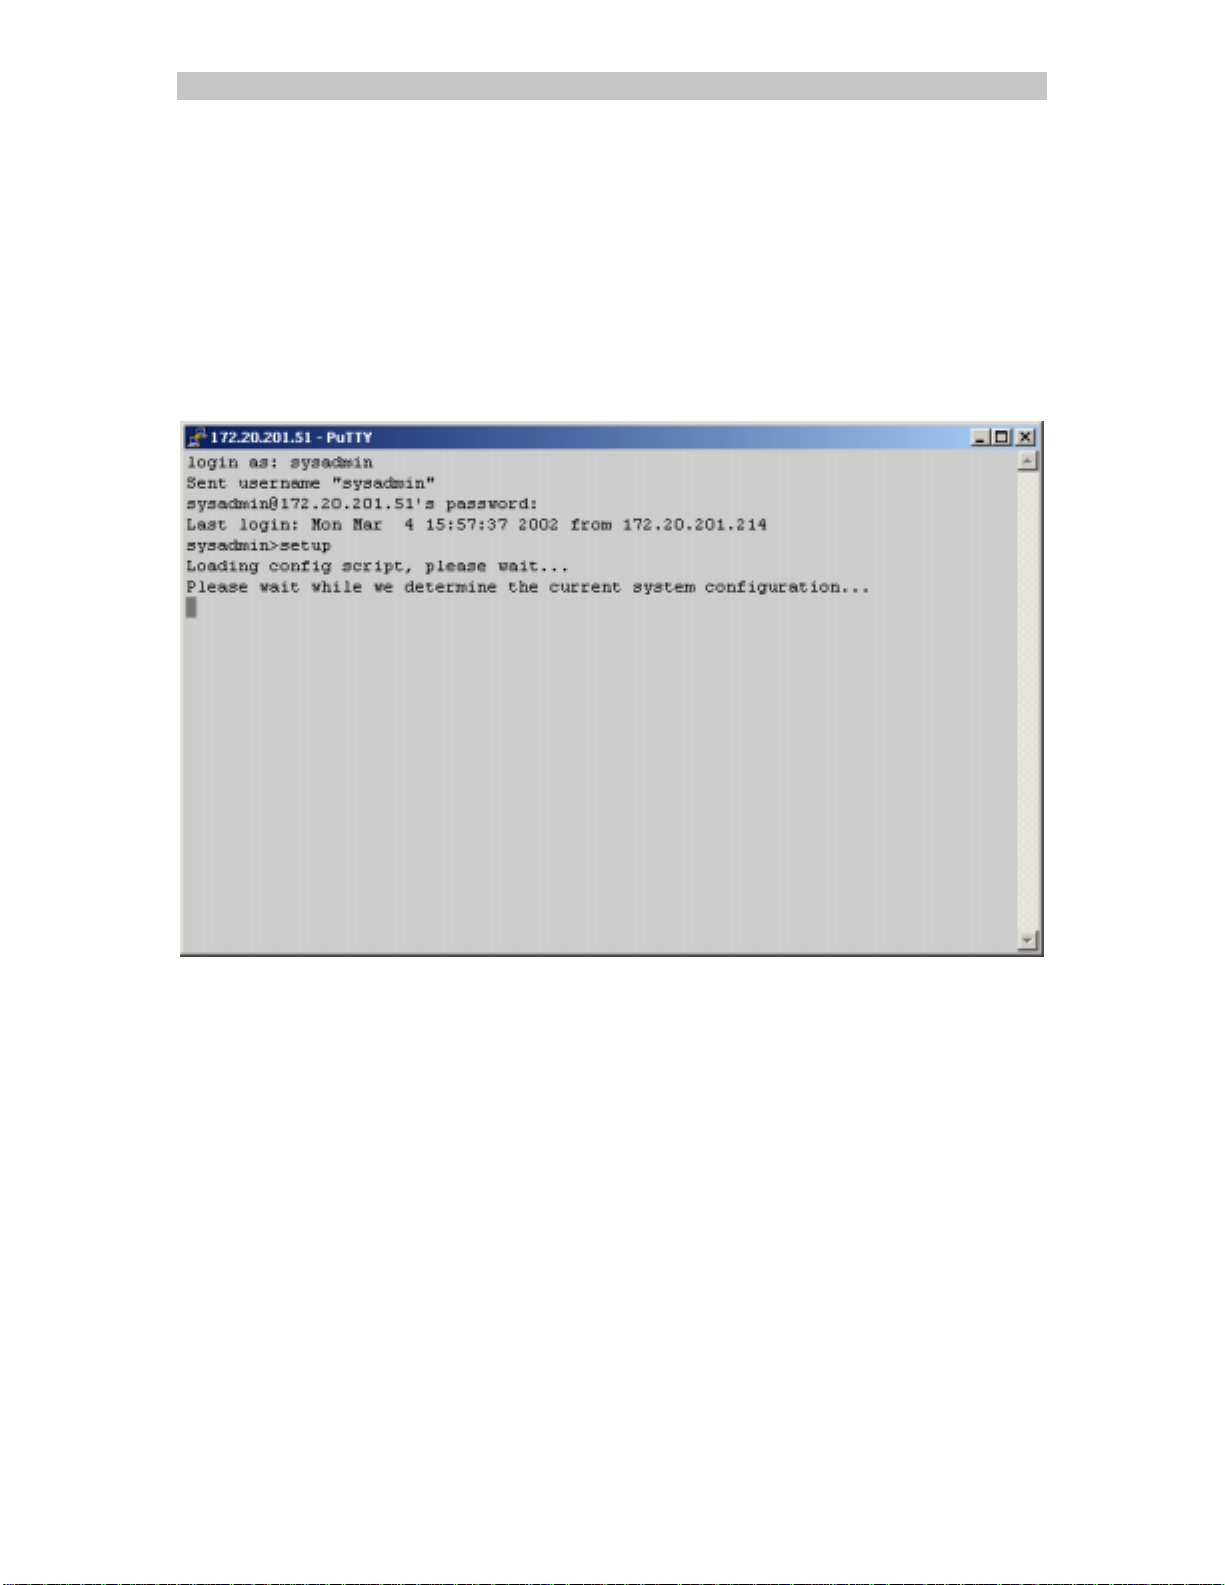
5.3.1 Start of setup
The following display is shown when the setup
automatically (from the first time the sysadmin logs in) or if the sysadmin typed
setup
setup after logging in.
setupsetup
setup Script
setupsetup
setup program starts, whether
setupsetup
Select < Next > (using Tab and Arrows) and press Enter to proceed.
The script continues to the Menu List (shown on the next page), which includes
10 options and 'DONE'. The sysadmin can step through the menu using the
arrow keys, or use a combination of arrow keys and the Tab key to select
different options.
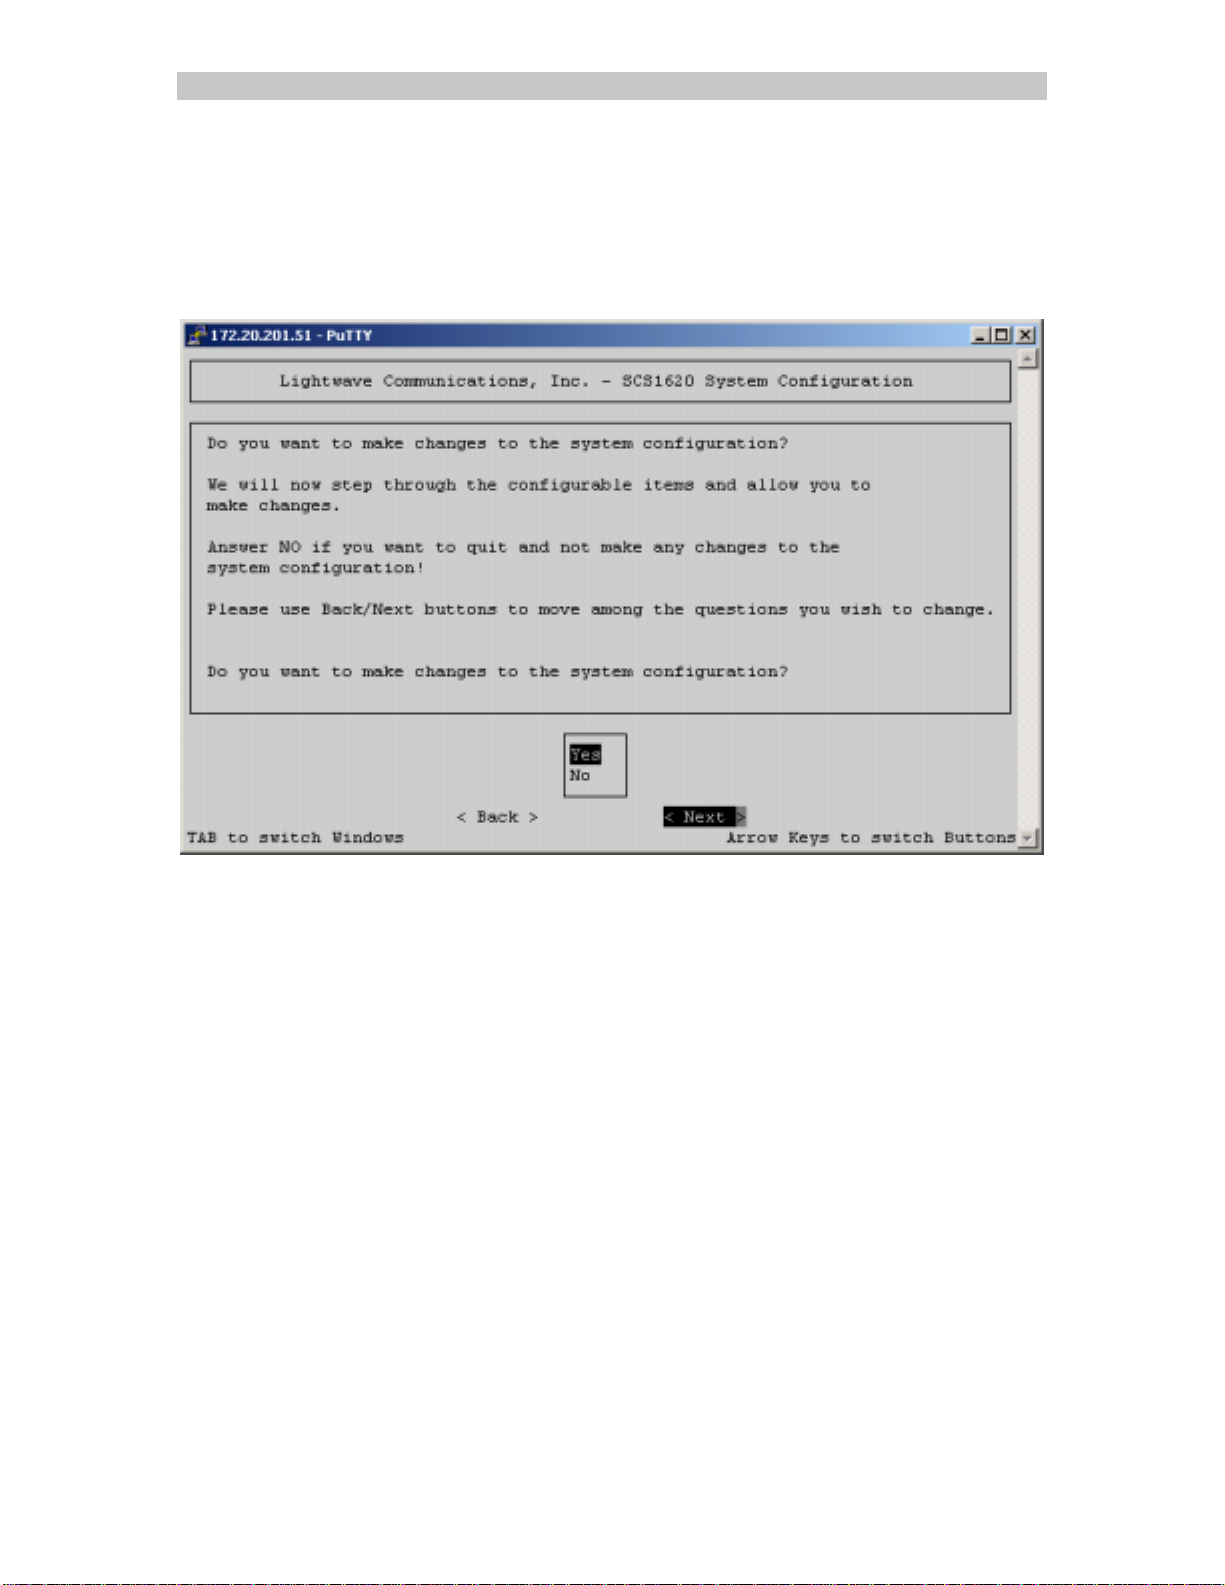
• If you choose No, the setup
command prompt. No changes are made to the system.
• If you choose Yes, the setup
depending on other entries you will be prompted for. You can still
Select Yes or No (using the up and down arrows), then select Next (using Tab),
and press Enter to proceed.
setup program ends, and you return to the
setupsetup
setup program steps through the various options,
setupsetup
Page 26 www.lightwavecom.com

A Lantronix Company SCS1620 Product Manual
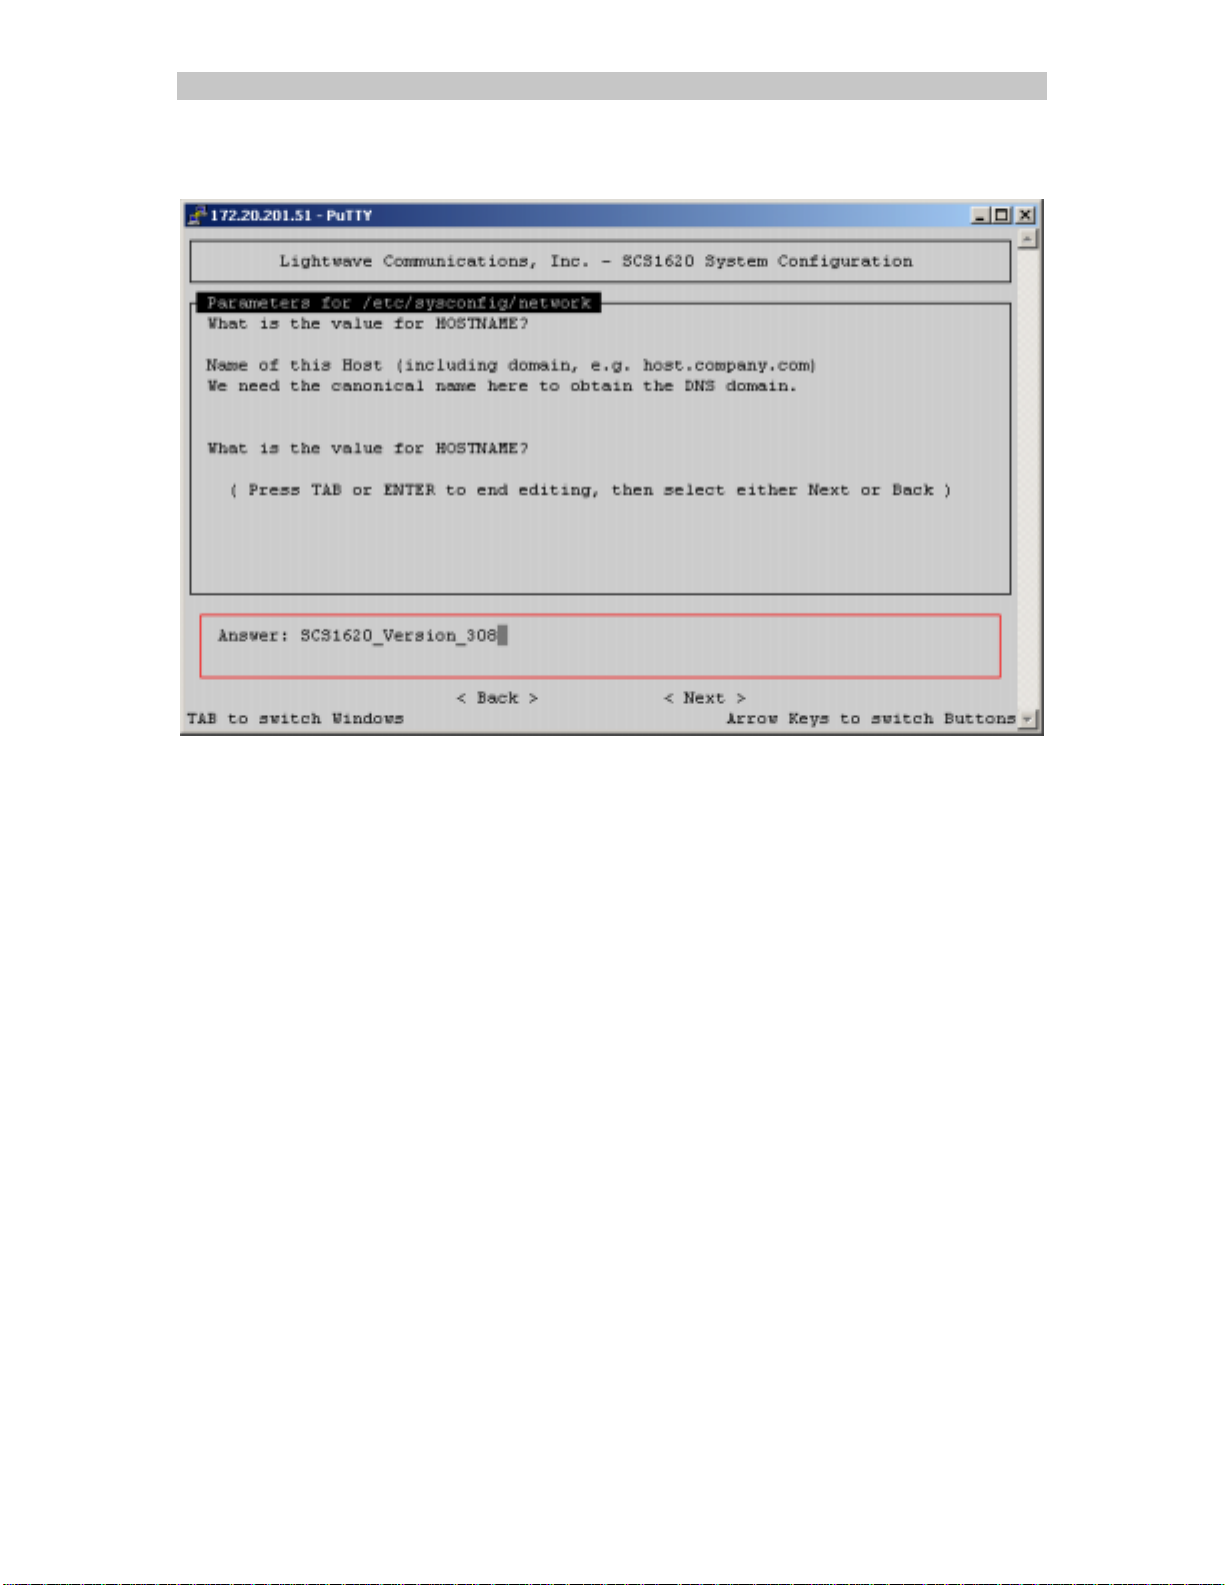
5.3.2 Configure Hostname and IP
Configure Hostname, IP Address, Network Mask, LAN Router Address
(Gateway), and NIS Domain
• Hostname including domain
• IP Address (of the SCS1620)
• Network Mask (of IP address)
• Gateway (IP address of the Router of this network)
• If using NIS, the NIS domain name
Select a menu item, and simply press Enter to proceed. In this example, we start
at the top of the list, with Hostname and IP address.
Press Enter to proceed.
15.00.032 Rev. B Page 27
SCS1620 Product Manual Lightwave Communications
Type in a value for the Hostname.
Use < Back > at any time if you wish to go back one screen. Select < Next >
(using Tab and Arrows) and press Enter to proceed.
Note: The HOSTNAME appears as your command prompt when logged in to the
system, and also appears on the front panel LCD display of the SCS1620.
Type in a value; press Enter to proceed.
Page 28 www.lightwavecom.com
A Lantronix Company SCS1620 Product Manual
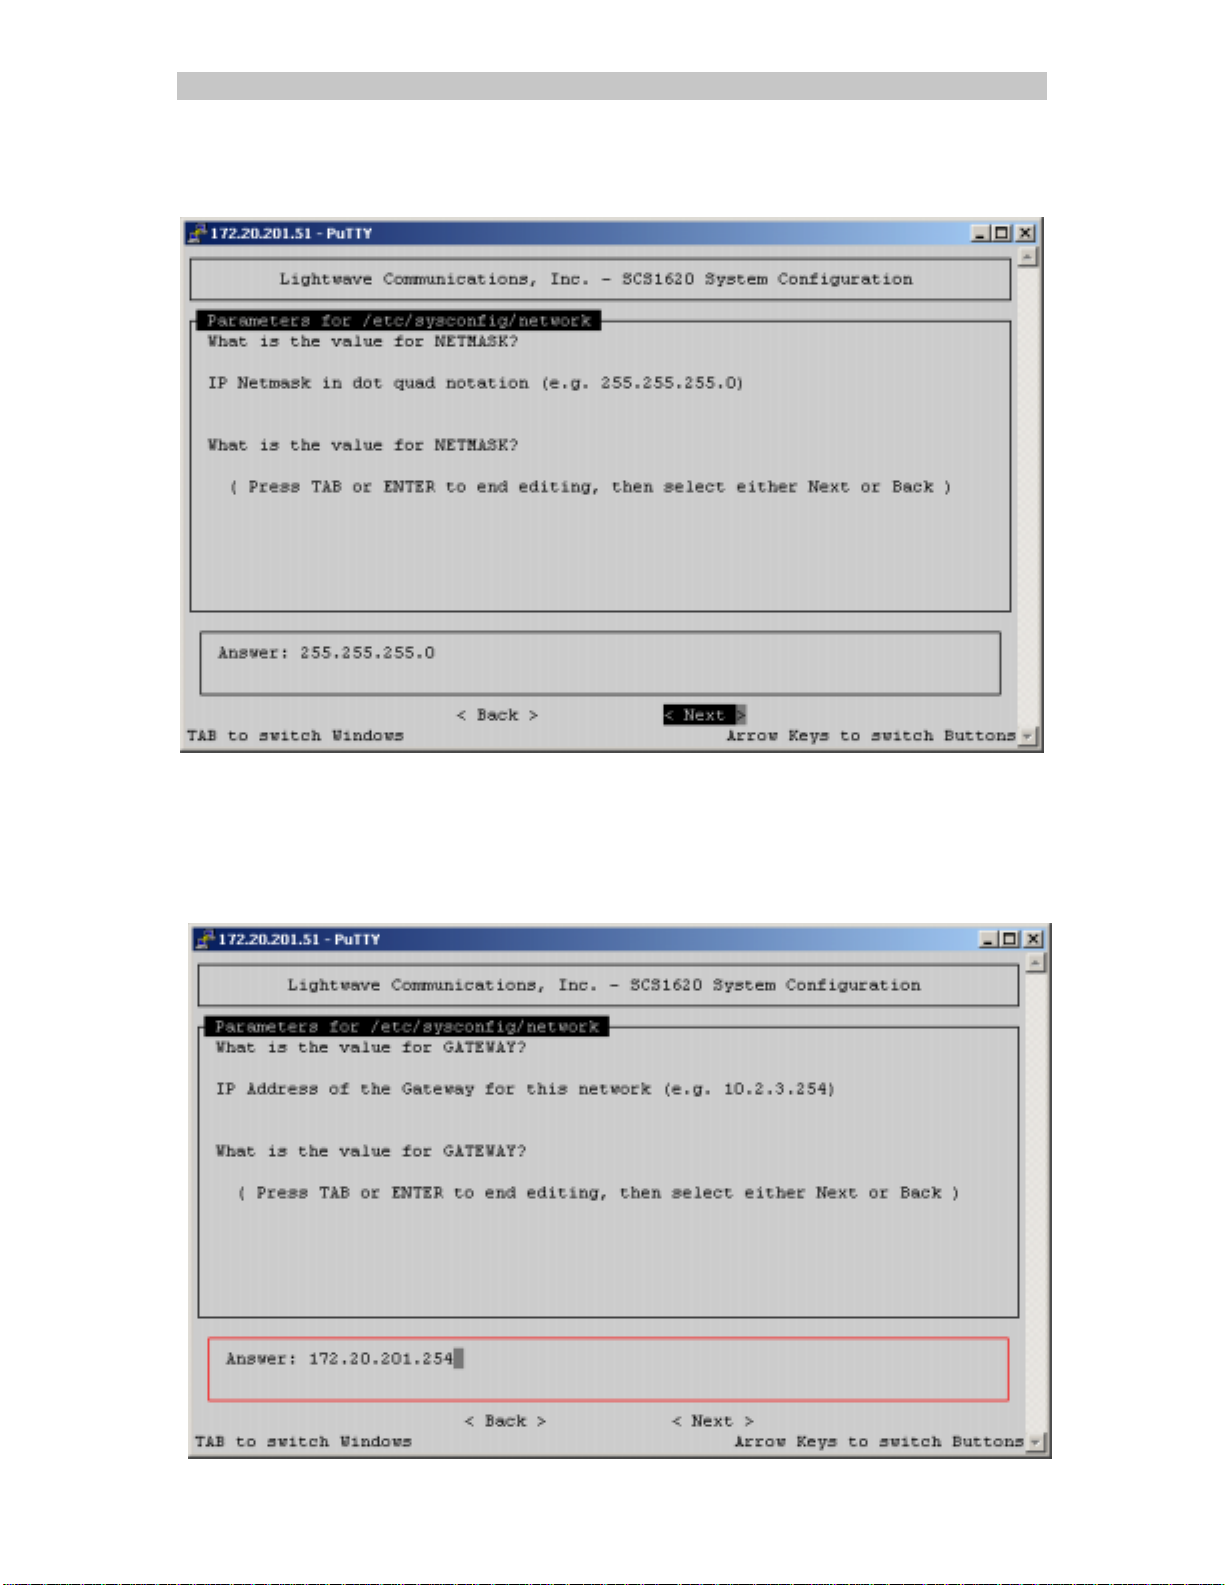
Enter the value for the Network Mask, in dot-quad notation; select < Next >
(using Tab and Arrows) and press Enter to proceed.
Note: Do NOT use leading 0's in the numeric fields for numbers less than 100.
For example, if your netmask is 255.255.255.28, do not enter "028" for the last
segment.
Enter the IP Address of your gateway .
15.00.032 Rev. B Page 29
SCS1620 Product Manual Lightwave Communications
Select < Next > (using Tab and Arrows) and press Enter to proceed.
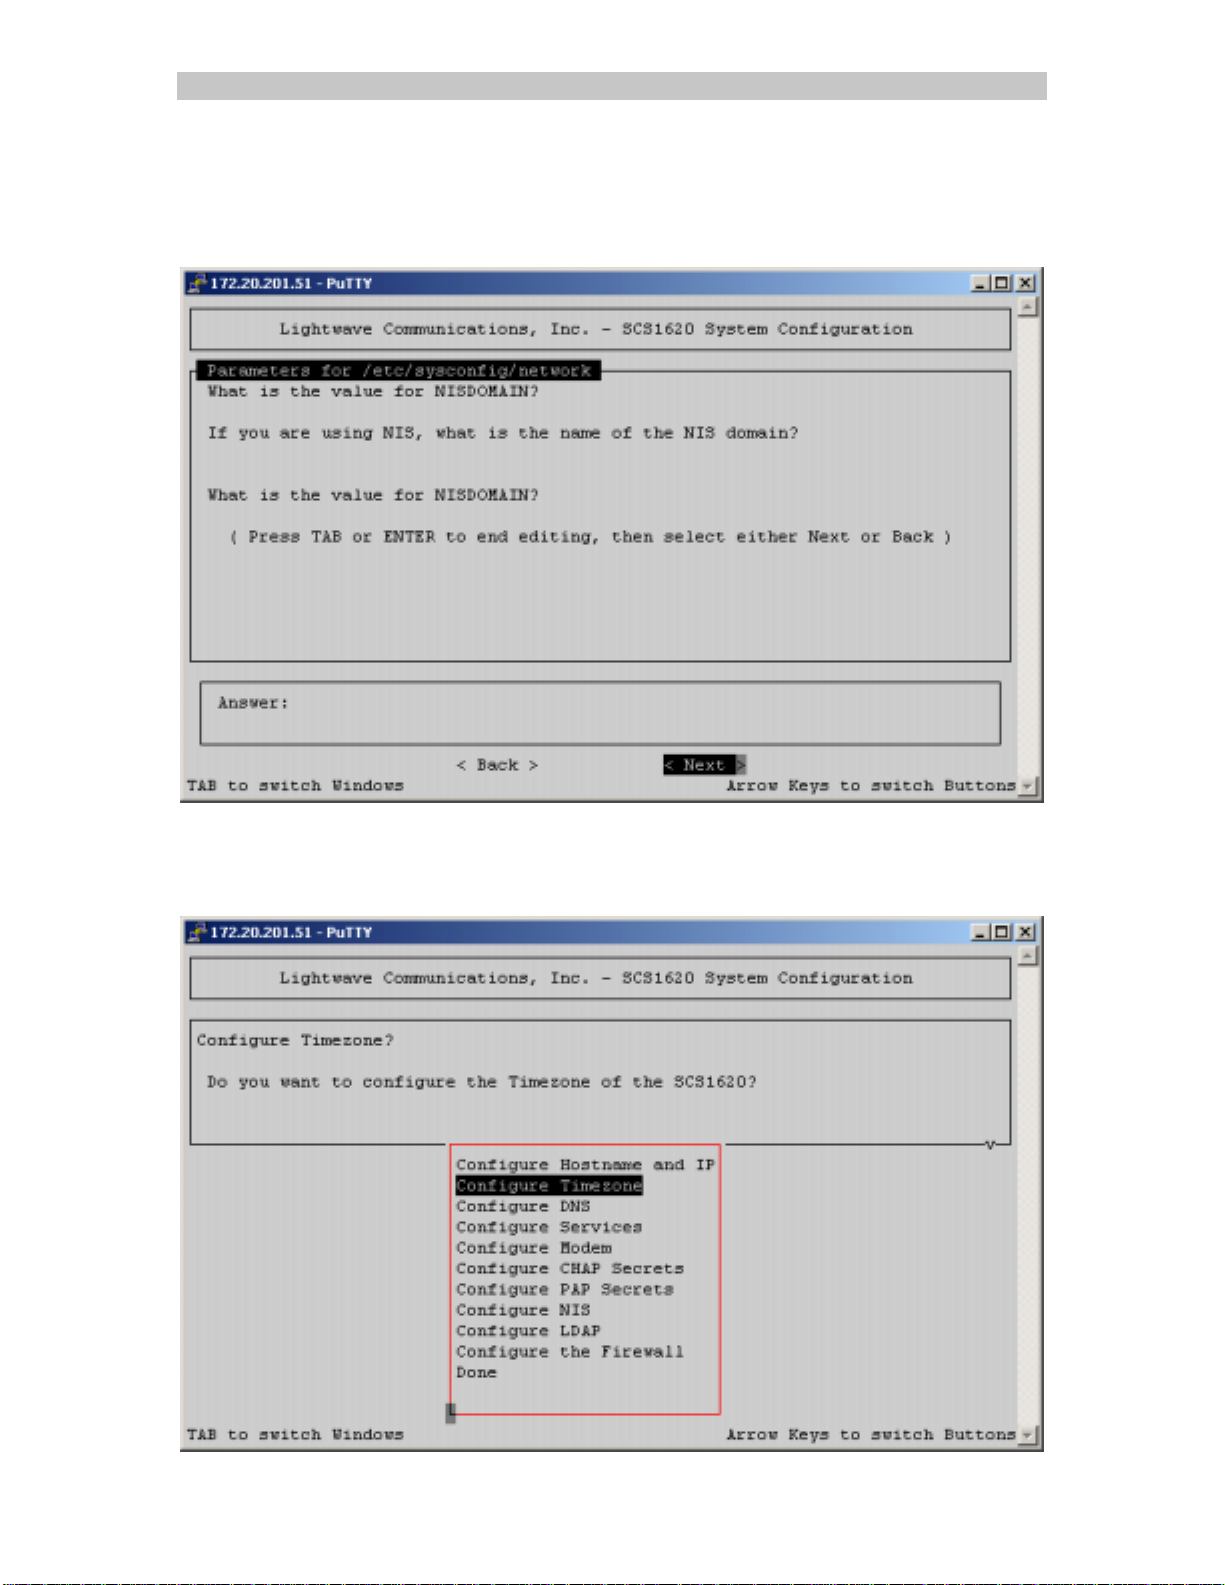
If you will be using NIS, enter a value for the NISDOMAIN; select < Next > (using
Tab and Arrows) and press Enter to proceed.
You are returned to the setup program menu. You may select any menu option,
or proceed with the next item, which in this case is Configure Timezone.
Page 30 www.lightwavecom.com
 Loading...