

Version 2
Connect Series
www.lightwaverf.com
Lightwave Link
Instruction Manual
Model No. JSJSLW500

EC DECLARATION OF CONFORMITY
Responsible Authority:
LightwaveRF PLC,
Innovation Campus Birmingham
Faraday Wharf
Holt Street
Birmingham
B7 4BB
Tel: +44 (0)121 250 3625
Email: enquiries@lightwaverf.com
Model Number(s): JSJSLW500
Description: Lightwave Link
Directives this equipment
Complies with: 2006/95/EC The Low Voltage Directive N/A
2004/108/EEC The Electromagnetic Compatibility Directive
1999/5/EC R&TTE Directive
93/68/EEC CE Marking Directive
Standards Applied in order to verify compliance
Safety: BS EN 60730-1: 2011
Health:
R&TTE: EN 301 489-1 V1.9.2: (2011-09), EN 301 489-3 V1.4.1: (2002-08)
EN 300 220-1 V2.1.1: 2006, EN 300 220-2 V2.1.2: 2007
EMC: EN 301 489-1 V1.9.2: (2011-09), EN 301 489-3 V1.4.1: (2002-08),
EN 55022: 2010, EN 61000-3-2: 2006 +A1: 2009 +A2: 2009 Class A,
EN 61000-3-3: 2008, EN61000-4-2: 2009,
EN 61000-4-3: 2006 +A1: 2008 +A2: 2010, EN 61000-4-4: 2012,
EN 61000-4-5: 2006, EN 61000-4-6: 2009, EN 61000-4-11: 2004
For and on behalf of LightwaveRF PLC
---------------------------------------Name J Shermer
Position Managing Director
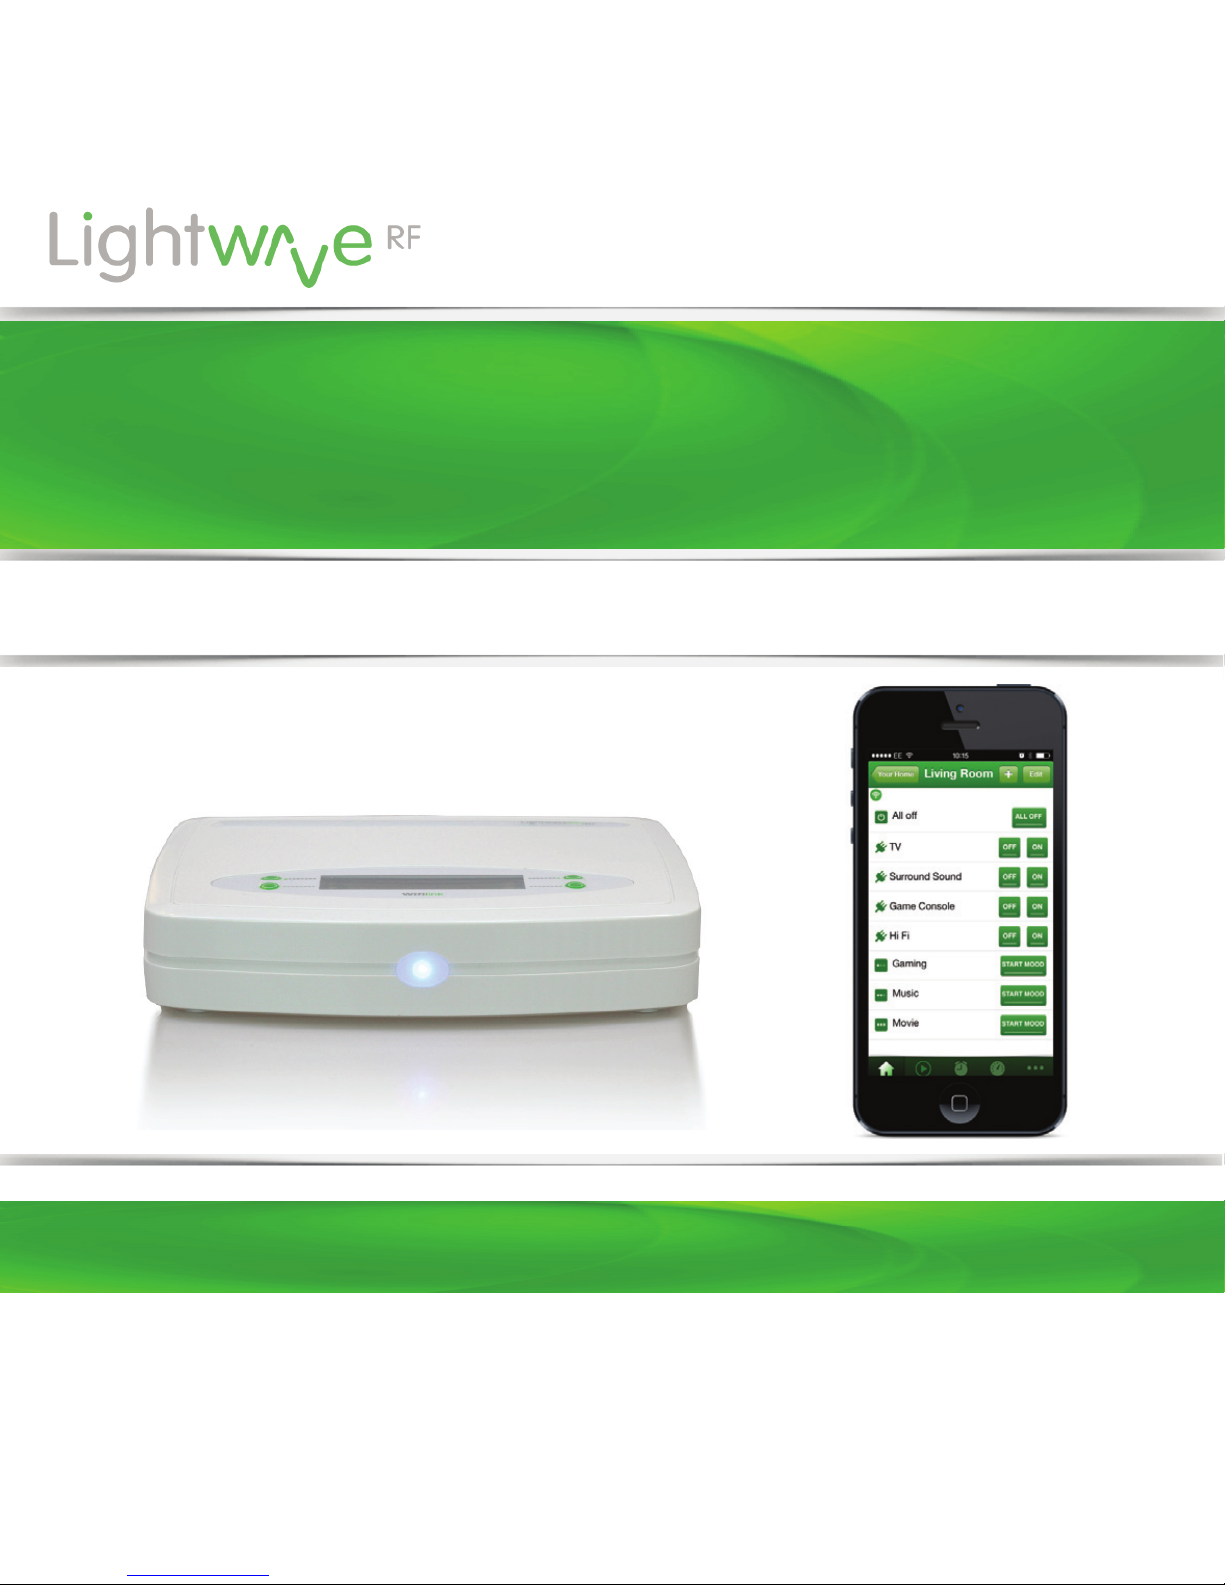
Get Started
How do I get started?
What do I need?
A standard home WiFi router with a broadband
connection, a WiFi enabled device such as a
smartphone, and some LightwaveRF devices to
control are all that is required.
Power the Lightwave Link and connect it to your
home WiFi router. The instructions in this booklet
will explain how. The Lightwave Link will the set
itself up automatically. Download the free
‘LightwaveRF’ App and follow the in-App
instructions.
Help Video & further guidance
For additional guidance, and to watch a video
that will help guide you through the installation
process, please visit the support section on
www.lightwaverf.com
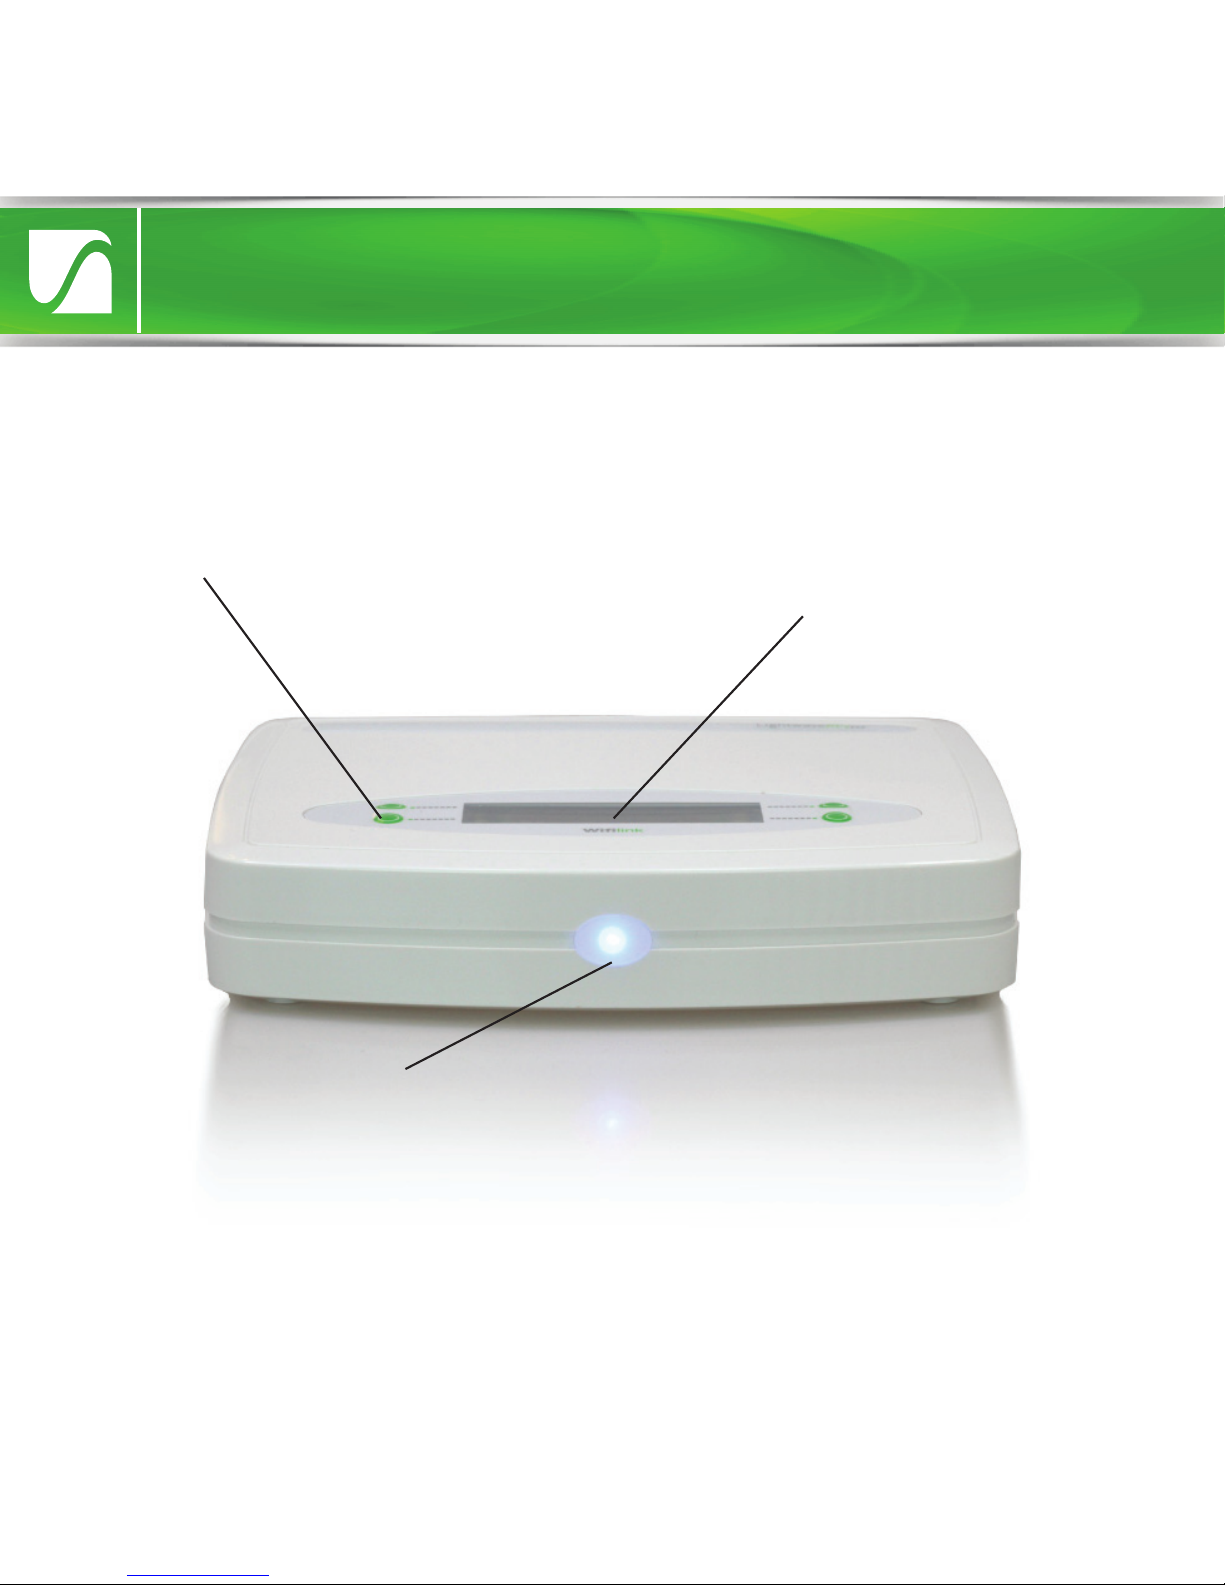
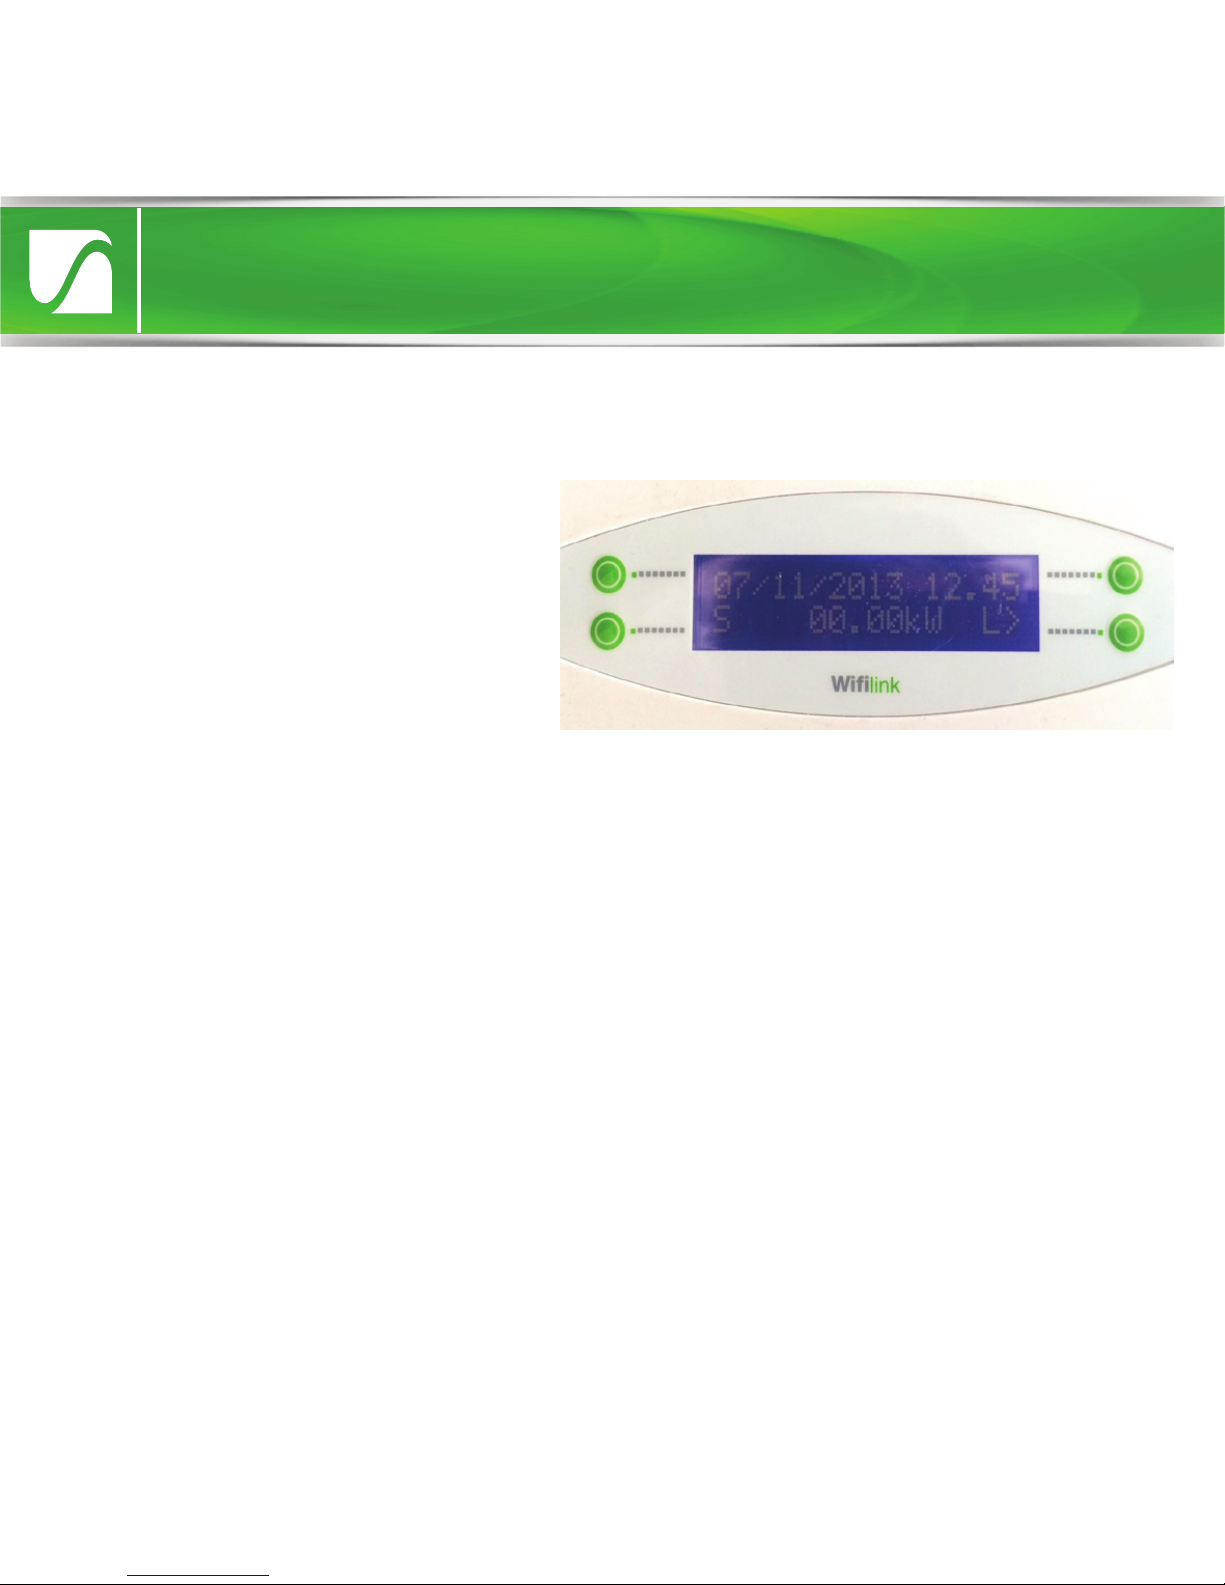
Indicator LED
Menu Buttons
Device Setup
Information display
Overview
If at any stage you encounter a problem that you cannot resolve, please visit
the support section on www.lightwaverf.com for additional assistance.
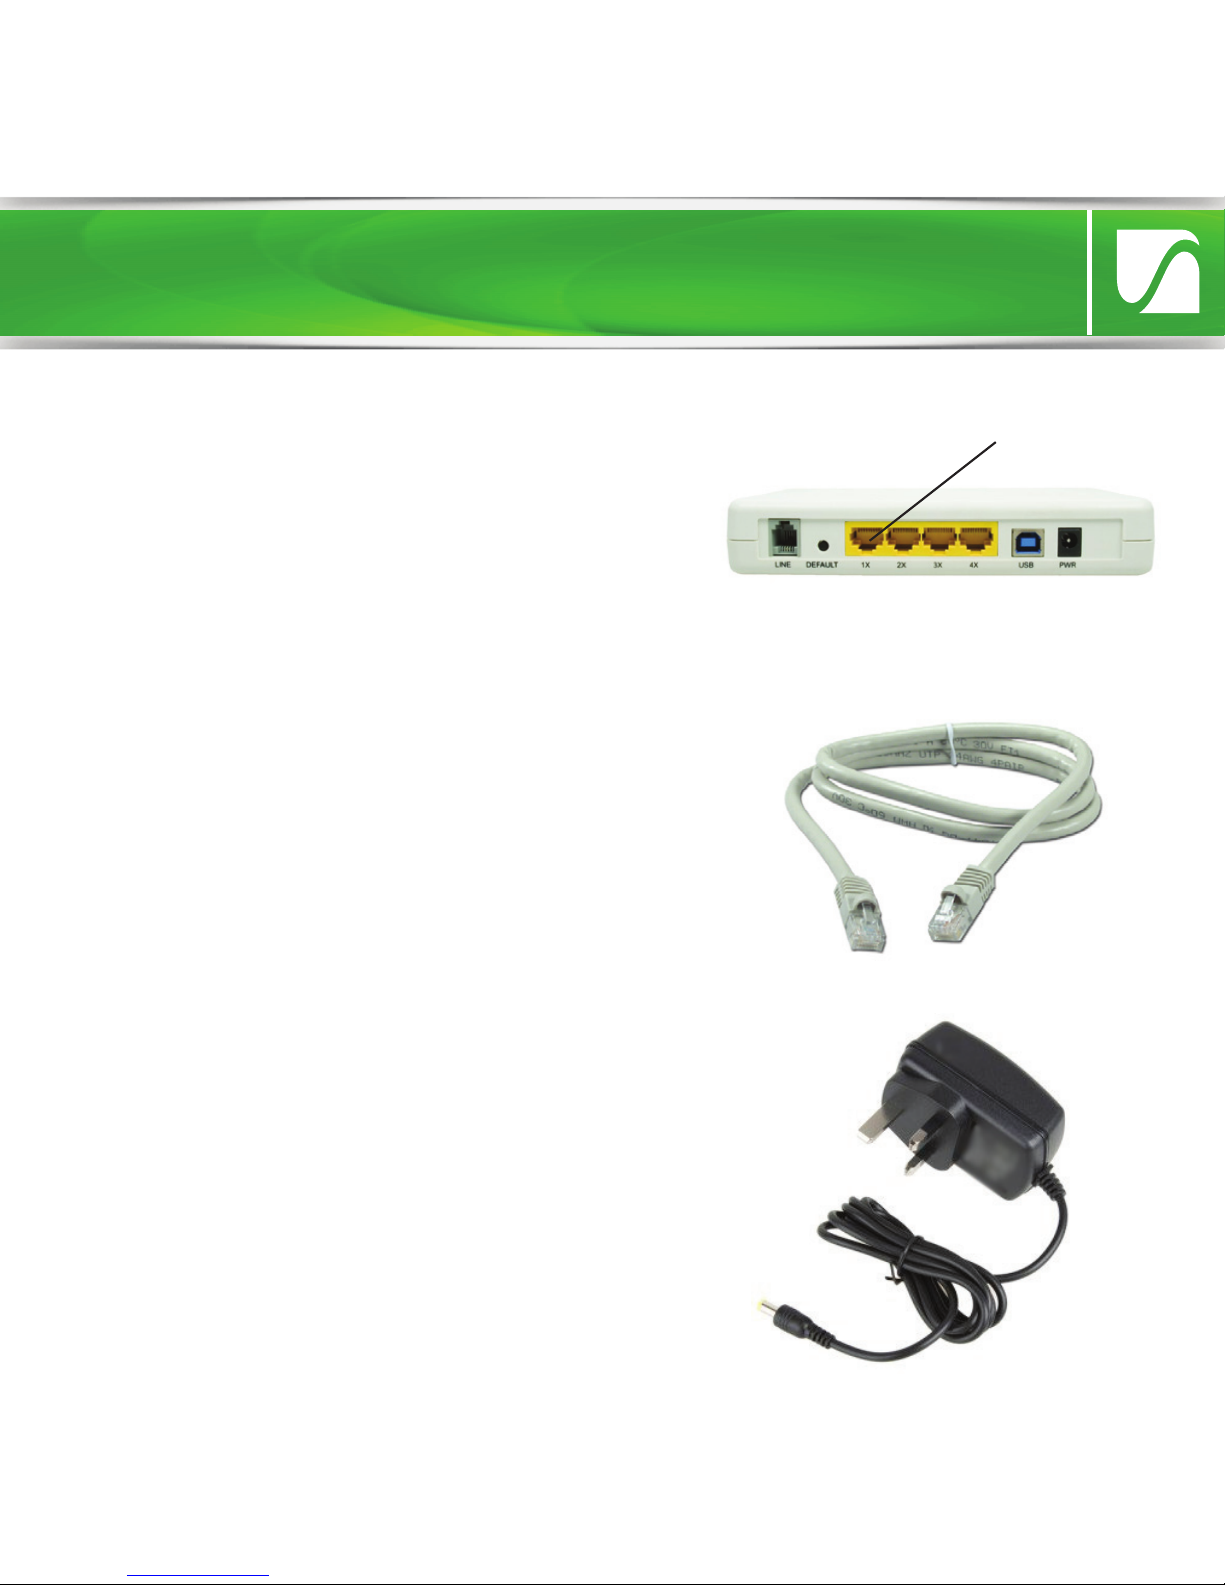
The Lightwave Link requires a
wireless router with a permanent
internet connection in order to
operate. You will also require a WiFi
enabled smartphone, tablet or PC.
1. Take the ethernet connector cable
(supplied) and connect it to any spare
available LAN port on your wireless
router. Connect the other end of the
cable to the Lightwave Link’s single
port.
2. Plug in the power supply, and push
the jack plug into the AC connection
on the back of the Lightwave Link. Turn
on the power supply. The green LED on
the Lightwave Link will illuminate to
indicate that the Link has power and is
ready to be set up from the
LightwaveRF smartphone or Web App.
LAN port
typical wireless router
Device Setup
Menu Options
Pressing the top left or right green buttons will scroll through the menu. The
following options are available:
Energy Monitor
‘Install/Link’ - Allows an energy monitor to be linked with the Lightwave
Link by pressing this button and then pressing the manual button on the
Energy Monitor (see Energy Monitor Instructions for more information).
Set Time zone
‘-1hr’ - Sets the Lightwave Link time to 1hr earlier.
‘+1hr’ - Sets the Lightwave Link time to 1hr later.
Device Setup
The main information display
on the Lightwave Link
normally shows the date, time
and energy reading (if energy
monitor connected). The letter
‘S’ signifies that the Lightwave
Link has a connection with the
LightwaveRF server.
Understanding the Display

Device Setup
Set Summertime
‘O’ - Disables BST/GMT automatically changing
‘Auto’ - Enables BST/GMT automatically changing
System
‘Info’ - This displays the Lightwave Link firmware and also the number or
Timers (T), Events (E) and number of currently running Events (R).
‘MAC/IP’ - This displays the MAC address of the Link (also found on the
back of the unit) as well as the IP address on your local network.
Reset
‘Dereg’ - de-registers all WiFi devices currently paired to the Link.
‘Reset’ - Removes all paired devices, energy monitors and events/timers.
Brightness
‘Dim’ - This dims the screen and disables the blue front LED.
‘Bright’ - Enables the blue LED and raises the brightness of the screen.
Cloud Server
‘O’ - This prevents the Link from accessing the servers aside from obtaining
the time. Remote commands will not operate. It is similar to a 'privacy' option.
‘On’ - This allows for remote commands to go through the server and
remote access is allowed.

App Setup
1. Download the LightwaveRF App from the App
Store or Google Play. It should automatically install
onto your device.
2. Select the App icon and enter the App.
3. Please follow the in-App instructions which will
take you through the setup procedure. The dimmer
setup section in this booklet will show you how to
link the dimmers to the App.
4. If you need extra help with setup, please refer to the Help section in the
App (you can find this by entering the App, pressing the ‘more’ tab on the
menu bar and selecting ‘Help’).
Web App
You can also control the Lightwave Link from the LightwaveRF Web App.
This is a more extensive platform very suited to setting up and viewing
large installs. It also allows you to access the Heating Planner, which
provides more detailed and convenient scheduling. This can be accessed
at www.lightwaverf.house.
App Setup

App Setup
Basic App features
Rooms
The LightwaveRF Apps organise your
linked LightwaveRF lighting and power
devices into rooms which you can name.
These rooms could be, most commonly,
the rooms of your house, such as ‘lounge’
or ‘kitchen’, but you can personalise
them to represent what ever you like.
Within these rooms you can set up and
access LightwaveRF devices. You can
name these devices as anything that
you choose, so, a dimmer could be
labelled ‘bedside light’ or a socket
‘kettle’, for instance.
The LightwaveRF Web App will also
allow rooms to be grouped together to
form ‘zones’.

App Setup
Choosing device type & Moods
Once you have set up a room, you can
begin to populate it with LightwaveRF
devices. You need to define the device
type as this allows the correct command
buttons to be displayed when you control
that device from the App. Dimmers, for
example, should be set to ‘dimming’.
Other options for other devices include
On/o (e.g. Sockets or Relays),
Open/close (e.g. In-line Relay)
When setting up a room, you can also
select a ‘Mood’. A Mood allows you to
group together several LightwaveRF
devices and control them from one button.
You can also set the dim level or on/o
status you want the devices to come on at.

App Setup
Additional App features
Events
An Event is simply a list of LightwaveRF devices that you want to control at
the same time. When you activate the Event, all the devices in the list will do
whatever you have preset them to do. You could, for instance, set an Event
called ‘cinema’ which, when activated, will drop the projector screen, dim the
lights, and close the curtains, all at the touch of one button.
Timers
You can add a Timer to any single LightwaveRF device to control it
automatically at a set time. However, being able to control Events is what
really makes Timers such a useful feature. You can set up an Event and trigger
it automatically at the same time everyday, at dusk, three times a day, every
Wednesday, or whatever combination you desire. This can be used to, say,
automatically turn on outdoor lights at dusk every day, turn on lights in a
random pattern when you are out for security, or to turn on the radio and
slowly bring up bedroom lights on a weekday.

App Setup
Planning Heating Schedules
Each heating device can be independently scheduled. This allows you to plan
when your heating comes on in each room every day. You can access and
save schedules by selecting the relevant device from the Heating Page. This
way, you can easily customise your routine as your daily activities change.
Plan the schedule for the boiler by selecting and scheduling the main
LightwaveRF Home Thermostat.
Heating devices
The Lightwave Link can also be used to
coordinate and schedule LightwaveRF heating
devices. Each heating device, such as
Thermostats, Radiator Valves and Boiler
Switches, can be linked to the LightwaveRF
App in the same way as other LightwaveRF
devices using the Heating Page. These devices
can be set up and controlled on the
LightwaveRF App. You can also use the
LightwaveRF Web App (accessed from
www.lightwaverf.house) to operate and
schedule
heating devices. This is ideal for use on a tablet.

App Setup
Energy Monitor
The Energy Display screen shows energy
usage information gathered from a
LightwaveRF Energy Monitor linked to the
Lightwave Link. This data is live and
updated every 15-30 seconds.
Triggers
Triggers can be displayed and accessed
using the LightwaveRF smartphone App.
They are most conveniently set up using the
Web App on a tablet. Trigger devices are
designed to send an RF signal to the
Lightwave Link whenever they are activated.
This could be by pressing a button on a
Heating Remote, by the opening of a
Magnetic Trigger, or by the detection of
movement on a PIR. The Lightwave Link will
automatically take an action that has been
preset using the App; it can turn on/o a
number of devices, trigger a mood, or even
send an ‘alert’ to your smartphone.

Creative Ideas for the Lightwave Link
1. (Basic): Scene lighting
Required: Lightwave Link, Dimmer(s), Dimmable Plug-ins
LightwaveRF Dimmer Switches & Dimmable Plug-ins enable you to control all
of your ceiling lights and socket powered lamps individually or together as a
group. The Mood settings on the app allow you to set and recall your own
favourite lighting scenes at the touch of a button. You can dim all the lights
for watching a movie or create a relaxed mood for entertaining - even add
your favourite colour by including LightwaveRF LED strips in a mood. At the
end of the evening, press the ‘all o’ button to turn o all lights and lamps.

2. (Intermediate): Family safety
Required: Lightwave Link, Sockets
Dangerous appliances in the kitchen (blender, microwave, hot plate, etc.)
might be a worry if you’re not always around to supervise the family. With the
Lightwave Link, you can control the Sockets from anywhere using your
smartphone. This means that you can lock dangerous devices when you’re on
your way home from work, or even turn o something left on accidentally
(hair straighteners are a very common problem!) If the kids are up early, you
can lock everything in the kitchen automatically on a timer whilst you sleep.
Creative Ideas for the Lightwave Link

3. (Advanced): Simulated occupancy
Required: Lightwave Link, Dimmer(s)/Plug-ins
This setup gives you control over your devices from anywhere in the world.
Via the Lightwave Link, every LightwaveRF Dimmer or Plug-in can be
controlled using a smartphone wherever you are. So, when you’re away on
holiday, you can turn on lights to make it look like someone’s home. You can
even set them to come on automatically at dierent times each evening
using a timed event and the ‘random delay’ feature - enough to fool even the
most watchful of intruders!
Creative Ideas for the Lightwave Link

Troubleshooting
Problem: My Lightwave Link wont connect to the server (‘Time Not
Set/Server-NO REPLY/Check Cable’ displayed on screen)
Solution: There may be a connection problem between your network and
the LightwaveRF server. First, check the Ethernet cable connection. If this is
properly connected, try plugging the cable into another port on your WiFi
router. If possible, try using an alternative Ethernet cable to ensure that there
is not a cable fault. Also, make sure that there are no non-standard
firewall/port forwarding rules on your network (the Lightwave Link operates
on ports 69 & 2011 on UDP for remote connectivity and 9760 & 9761 for local
connectivity).
Problem: On the restoration of power after a power cut, my LightwaveRF
devices remain in the ‘o’ state even if they were previously ‘on’.
Solution: After a power cut LightwaveRF devices will default to the ‘o’
position as a safety measure (for example it may be dangerous for an
un-monitored device like a hot plate connected to a LightwaveRF Socket to
turn on after a power cut). The exception to this are the LightwaveRF CFR
bulbs which default to ‘on’. If you would like a device to default to ‘on’ after a
power cut instead, a fridge for example, you can do this by putting the device
into linking mode, immediately cutting power to the Lightwave Link and
resoring it. If successful, the LED indicator light/s on the device will
flash to
indicate that they have stored the new command from the Lightwave
Link.

Problem: The Energy Monitor does not register (reading is 00.00kW)
Solution: Check the Energy Monitor clamp. Ensure that it is correctly
positioned around the positive feed (red/brown cable) coming into the
electricity meter and firmly clamped shut.
Problem: The Energy Monitor does not register (reading is --/--kW).
Solution: First, ensure that the Energy Monitor has fresh batteries; if the
battery strength is weak then the Monitor will not transmit properly. Next,
ensure that the Energy Monitor is in range of the Lightwave Link. Try moving
it closer to the Link (even if the clamp has to be disconnected) and see if a
reading appears (even if it is 00.00kW).
Problem: My Lightwave Link will not connect. I have a BT HomeHub.
Solution: If you have a BT HomeHub 4 and are now experiencing
connectivity issues with your Lightwave Link, it is likely that it will be related
to the ‘Smart Setup’ feature of the HomeHub router. Disabling this fixes the
connectivity issues on most setups. To do this, you will need to use your
internet browser to adjust the Home Hub settings by going to
http://bthub.home and then clicking ‘Advanced Settings’. In this section,
select ‘Home Network’ and choose to disable the ‘Smart Setup’ feature.
The Lightwave Link should be able to connect and behave as expected
once this has been done.
Troubleshooting

Q. What do the ‘S’ or ‘X’ letters represent on the screen?
A. An ‘S’ confirms that the Lightwave Link is connected to the LightwaveRF
server. An ‘X’ signifies that Cloud Server link is turned o.
Q. How do I know if I have the latest firmware?
A. The Lightwave Link will automatically check for firmware updates
several
times a day and on boot up. There is no need to manually update
this.
Q. Does the Lightwave Link require a static IP address?
A. Our system uses the MAC address of the Lightwave Link for remote
commands and as such does not require you to have a static IP. The system
will work with or without a static IP address.
Q. How much power does the Lightwave Link use?
A. 3.4W.
Q. Can I set the time manually?
A. No. This is set by checking with an internet NTP Server.
Q. How many devices can I have on the Lightwave system?
A. Each device has 6 memory slots for up 6 controllers (one of these can be
the Lightwave Link allowing multiple smartphones to control up to 240
devices.
FAQs

Q. How do I use a Signal Booster with the Lightwave Link?
A. The Signal Booster can extend the range of 6 unique commands from the
Lightwave Link. Each of these commands needs to be transmitted using the
LightwaveRF app whilst the Booster is in linking mode for it to be saved and
stored. It will then automatically repeat the signal when ever that command is
sent using the LightwaveRF app.
Q. Do I need a permanent internet connection?
A. On startup the Lightwave Link always needs an internet connection to
acquire the time and its location. It is possible to use the Link without this
connection later, however remote commands will not function.
Q. Which ports does the Lightwave Link use?
A. The Lightwave Link operates on ports 69 & 2011 on UDP for remote
connectivity and 9760 & 9761 for local connectivity.
FAQs

Specification
RF frequency: 433.92 MHz & 868 MHz
Input rating: 12V
Output rating: 3.4W
Warranty: 2 year standard warranty
Technical Specification

www.lightwaverf.com
Innovation Birmingham Campus
Faraday Wharf
Holt Street
Birmingham
B7 4BB
01707 386035
Version 2
 Loading...