

Connect Series
www.lightwaverf.house
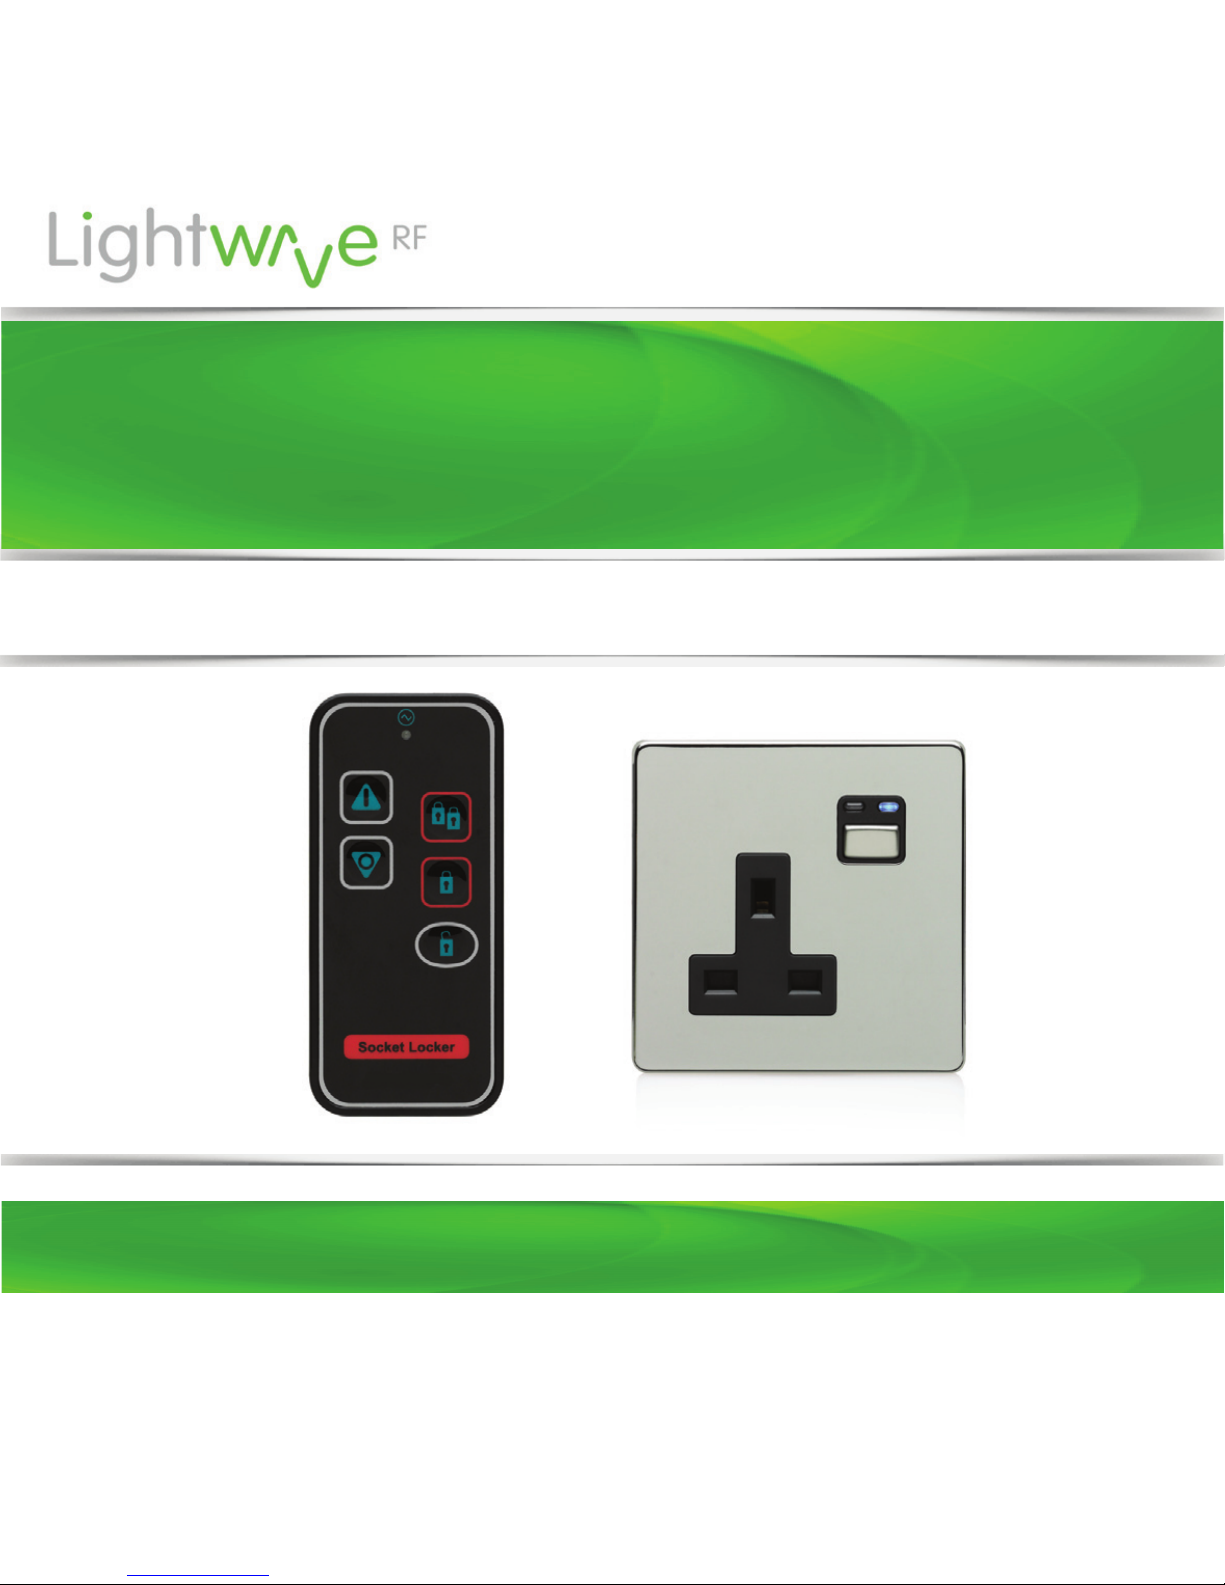
Socket Locker
Model No. LW103
Instruction Manual
Version 2.1

EC DECLARATION OF CONFORMITY
Responsible Authority:
LightwaveRF PLC,
Innovation Campus Birmingham
Faraday Wharf
Holt Street
Birmingham
B7 4BB
Tel: +44 (0)121 250 3625
Email: enquiries@lightwaverf.com
Model Number(s): JSJSLW103
Description: Socket Locker
Directives this equipment
Complies with: 2006/95/EC The Low Voltage Directive N/A
2004/108/EEC The Electromagnetic Compatibility Directive
1999/5/EC R&TTE Directive
93/68/EEC CE Marking Directive
Standards Applied in order to verify compliance
Safety: BS EN 60730-1: 2011
Health:
R&TTE: EN 301 489-1 V1.9.2: (2011-09), EN 301 489-3 V1.4.1: (2002-08)
EN 300 220-1 V2.1.1: 2006, EN 300 220-2 V2.1.2: 2007
EMC: EN 301 489-1 V1.9.2: (2011-09), EN 301 489-3 V1.4.1: (2002-08),
EN 55022: 2010, EN 61000-3-2: 2006 +A1: 2009 +A2: 2009 Class A,
EN 61000-3-3: 2008, EN61000-4-2: 2009,
EN 61000-4-3: 2006 +A1: 2008 +A2: 2010, EN 61000-4-4: 2012,
EN 61000-4-5: 2006, EN 61000-4-6: 2009, EN 61000-4-11: 2004
For and on behalf of LightwaveRF PLC
---------------------------------------Name J Shermer
Position Managing Director

How does it work?
How do I get started?
Refer to the setup guide on the following pages
to get going. This will guide you through the
setup process and explain how to link the Socket
Locker to your LightwaveRF devices.
The Socket Locker will allow you to ‘lock’ your
LightwaveRF sockets, dimmers and plug-ins.
This prevents them from being turned on or o
manually for safety.
Help video & further guidance
For additional guidance, and to watch a video
that will help guide you through the installation
process, please visit the support section on
www.lightwaverf.com
Get Started
IMPORTANT: Please retain these instructions for guidance on how to link
remote handsets and other LightwaveRF controllers. For additional
guidance please visit the support section on www.lightwaverf.com
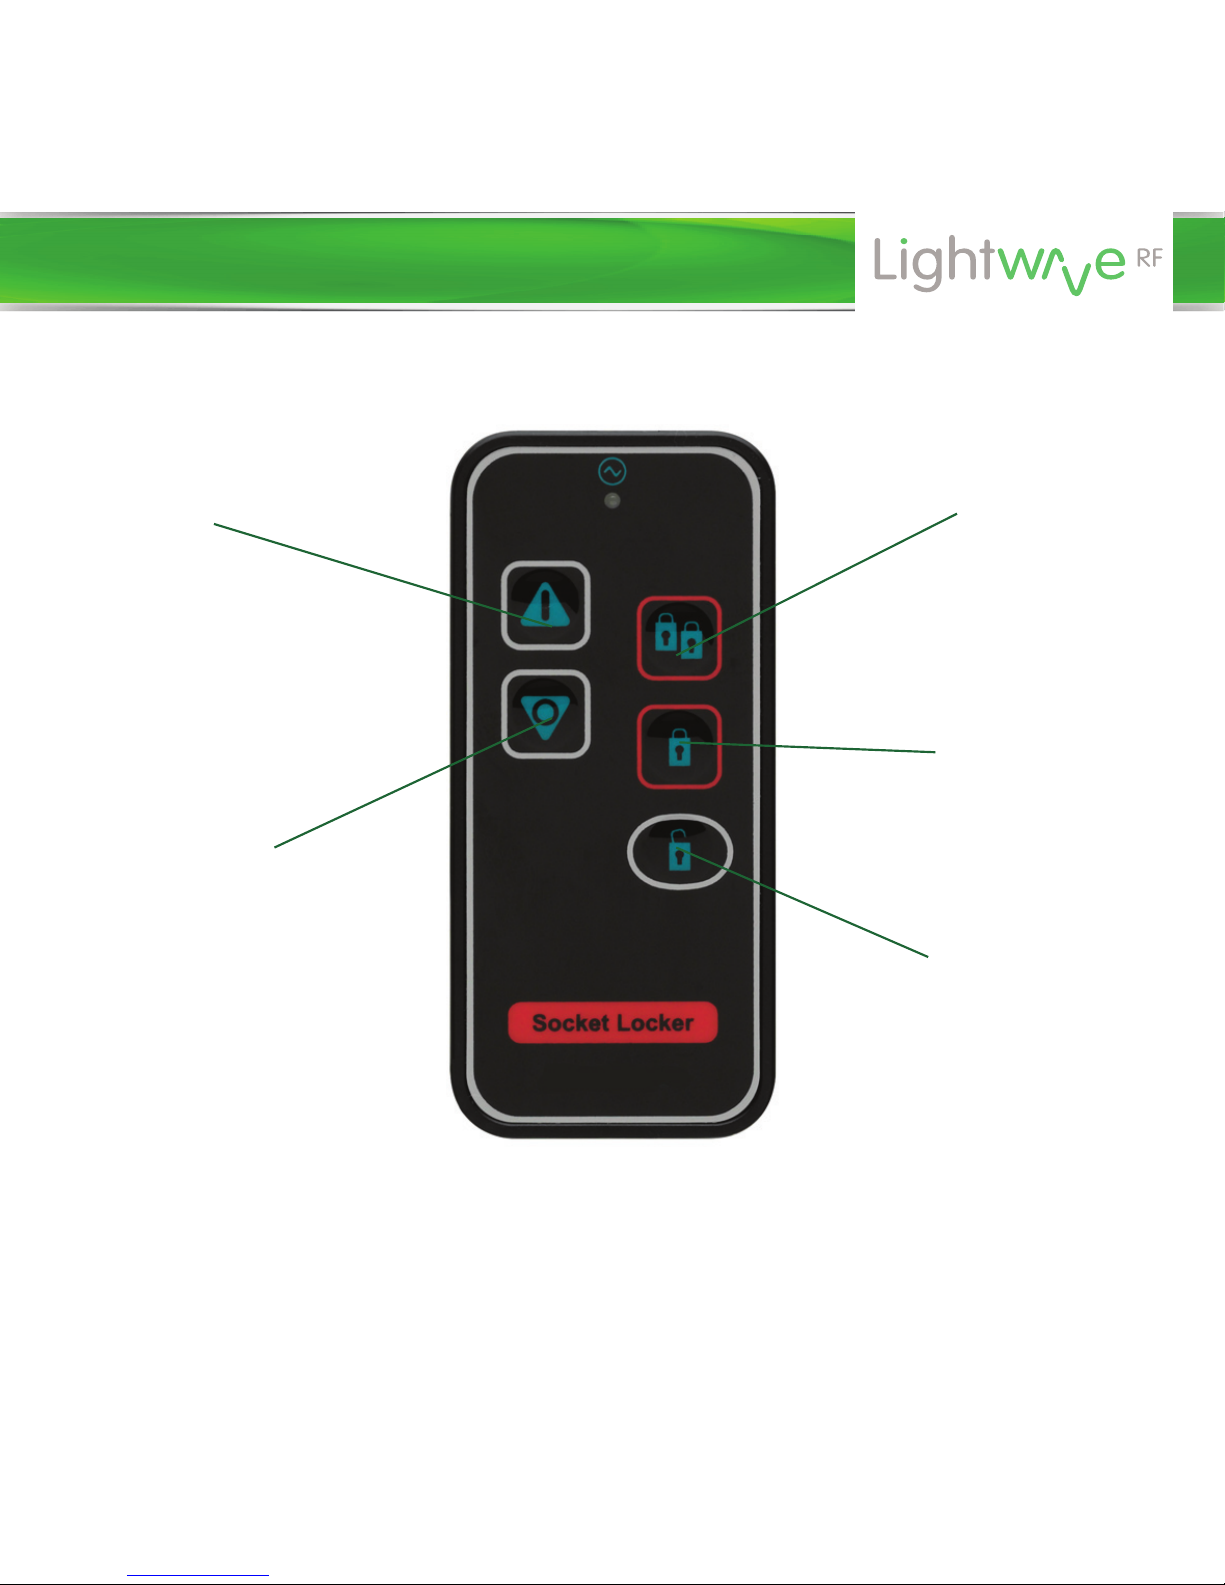
On button.
Lock button.
Double lock
button.
Overview
O button.
Unlock button.
Device setup
Setup
Linking the Socket Locker to a LightwaveRF dimmer or socket
LightwaveRF devices each have 6 unique memory slots (except Basic
Plug-ins) which means they can link with up to 6 LightwaveRF controllers in total.
NOTE: If you are using a smartphone/tablet/PC to control the socket via the
Lightwave Link, this will always count as ONE controller and take up one
memory slot even if you are using multiple smartphones/tablets.
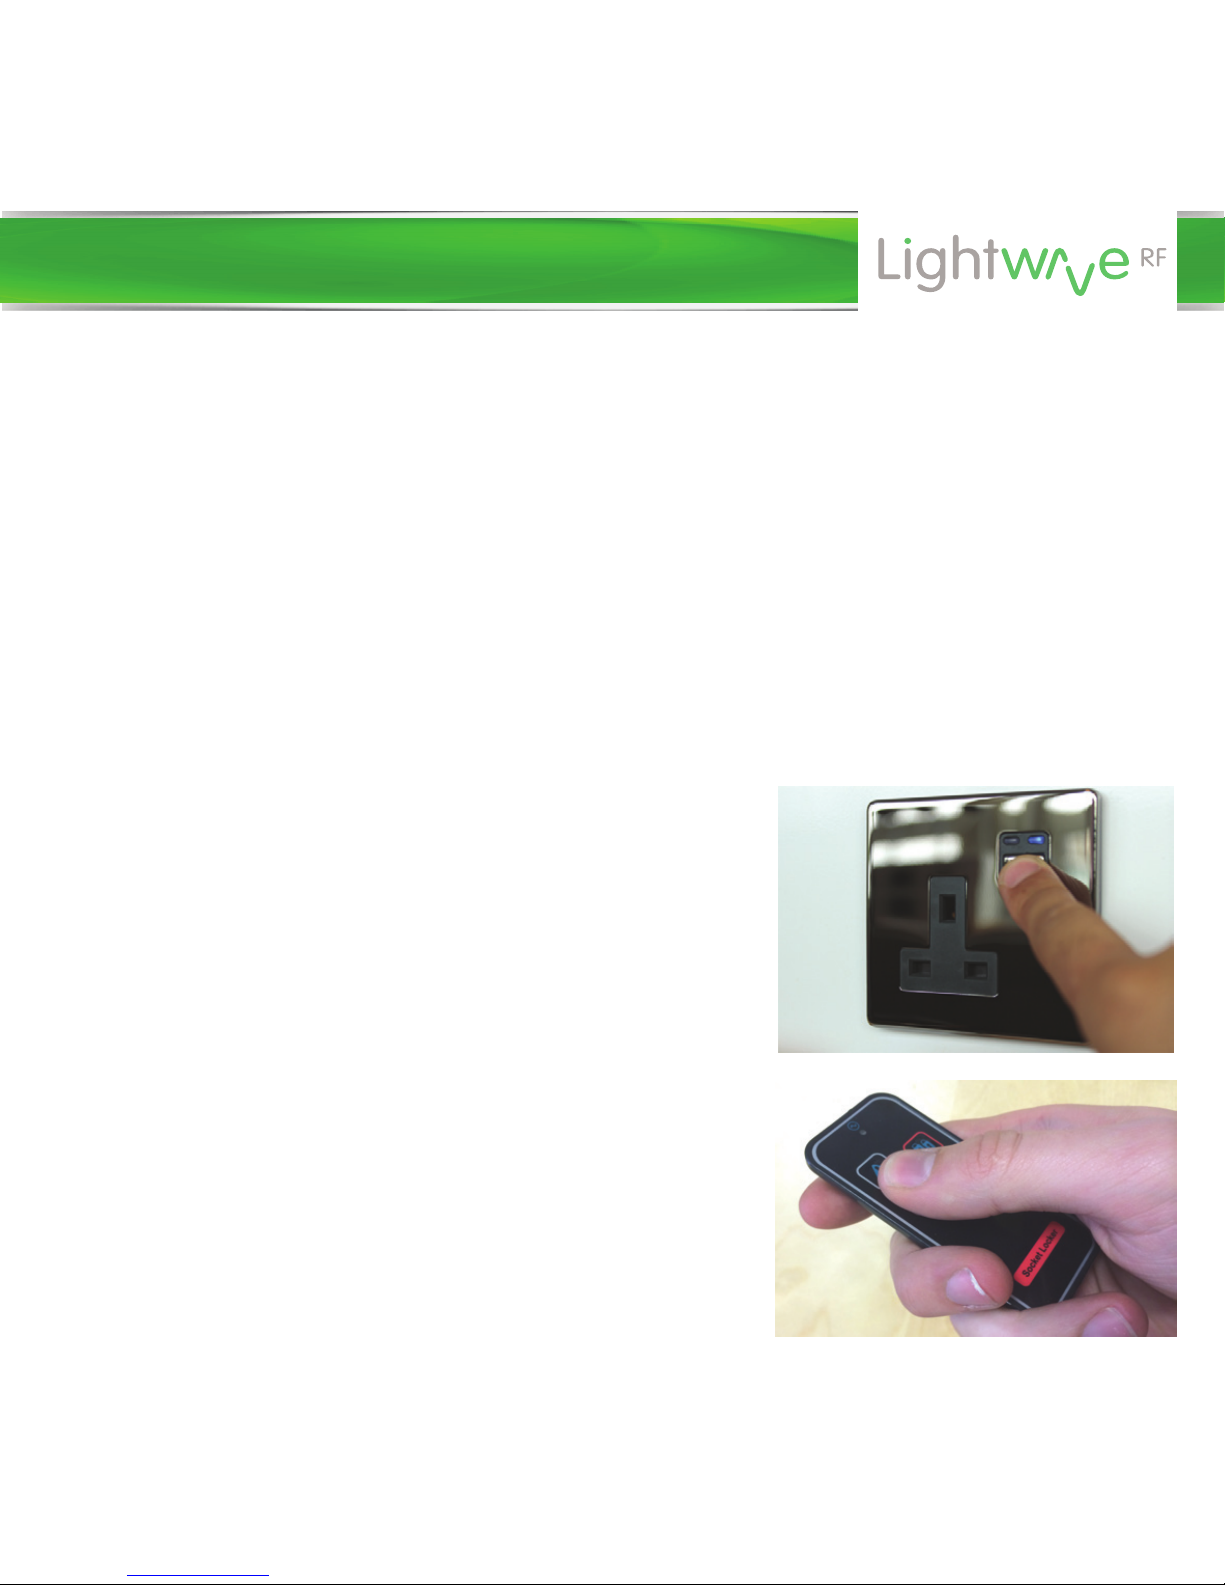
1. On the socket or dimmer, press and
hold down the button/s until the blue
and amber LEDs flash alternately. The
device is now in ‘linking mode’.
2. On the Socket Locker, press the
‘on’ button; the blue light on the
socket or dimmer will flash to confirm
that the Socket Locker is now linked.
Device setup

NOTE: Linking mode lasts for 12 seconds; if no signal is received from a
remote handset during this time, then the socket will automatically exit
learning mode without linking to the handset.
If, when expecting a quick flashing blue LED to confirm pairing, a slow
amber flash is received instead, then the socket memory is full, and no
further remotes may be linked with it unless one of the existing remotes is
unpaired first (see below).
1. On the socket or dimmer, press and hold
down the button/s until the blue and
amber LEDs flash alternately, and then
release it. The device is now in linking
mode.
2. On the Socket Locker, press the ‘on’ or
‘o’ button; the amber light on the socket
will flash to confirm that the remote is
now unlinked.
Unlinking the Socket Locker and clearing the socket memory
Removing a single device:
Device setup

NOTE: Reliable range of operation is around 15 metres indoors and up to
100m outdoors using the Lightwave Link. This figure may vary depending
upon the environment; very thick walls, bodies of water or large metal objects
may interfere with radio range.
If the distance between the transmitter and receiver is too great to achieve
reliable operation, the LightwaveRF Signal Booster may be used in
conjunction with this product to increase the range.
Clearing memory (will remove all linked remotes):
1. Press and hold down the dimmer or
socket button until the blue and amber
LEDs flash alternately, and then release
it. The device is now in linking mode.
2. Press and hold down the button again
(the bottom button in the case of the
dimmer) until the blue and amber LEDs
flash simultaneously. Then, tap (don’t
hold) the button (bottom button on the
dimmer); the amber LED will flash
quickly to confirm that the memory has
been cleared.
Device setup

Locking the socket
• The Socket Locker is designed to ‘lock’ LightwaveRF devices so that
pressing the manual buttons will not operate them. This can also be
achieved using the LightwaveRF App. If it is locked on, then a LightwaveRF
socket, relay or plug-in will not turn o manually. If it is locked o, then they
will not turn on manually. A locked device is usually signified by a slow
flashing amber LED or simultaneously flashing blue & amber LEDs.
• To lock a device, press the ‘lock’
button on the Socket Locker (or
Smartphone App).
• To unlock a device, press the
‘unlock’ button on the Socket Locker
(or Smartphone App).
Pressing the ‘double lock’ button also
locks manual button on the linked
device. However, in addition it will
prevent any other LightwaveRF
remotes or the App from issuing RF
commands to that device.
Lock
button.
Double lock
button.
Unlock
button.
Remote operation

Slowly flashing amber: the socket or dimmer is locked
Blue & flashing amber: the socket or dimmer has been
successfully locked / unlocked
Flashing LED sequences on a socket or dimmer
IMPORTANT: If the Socket Locker is misplaced, locked sockets can be reset
by turning of mains power to the circuit for a period of 30 seconds.
NOTE: You can also lock other
LightwaveRF devices such as
plug-ins and relays using the Socket
Locker. LightwaveRF basic plug-ins
or CFLs cannot be locked. For
information on how to link the
Socket Locker to other devices,
please refer to the instructions for
that particular device available on
the support section of
www.lightwaverf.com.
Remote operation

2. (Intermediate): Time for bed kids
Required: Socket, Socket Locker
No matter when you tell the children that it’s time to turn o the games
console and go to bed they always manage to find a way of carrying on. With
Lightwave you can make sure that when you say it’s time, it really is time. If
the gaming console or television is plugged into a LightwaveRF socket, you
can use a Socket Locker to lock them so that they cannot be turned back on.
If you have the Lightwave Link, you can also do this from your smartphone
and set the lock to activate automatically a bedtime every day!
Creative ideas

3. (Advanced): Family safety
Required: Sockets, Lightwave Link
Dangerous appliances in the kitchen (blender, microwave, hot plate, etc.)
might be a worry if you’re not always around to supervise the family. With the
Lightwave Link, you can control the sockets from anywhere using your
smartphone. This means that you can lock dangerous devices when you’re on
your way home from work, or even turn o something left on accidentally
(hair straighteners are a very common problem!) If the kids are up early, you
can lock everything in the kitchen automatically on a timer whilst you sleep.
Creative ideas

Problem: The Socket Locker will not operate the dimmer / socket.
Solution: The Socket Locker may be encountering interference or may be
at the edge of its reliable range of operation. First, ensure that there are no
large pieces of metal or bodies of water in the path of the transmission. If the
problem persists, try moving closer to the device, or consider using a
LightwaveRF Signal Booster to extend the range by relaying the signal
between Socket Locker and target device.
Problem: The Socket Locker will not link to a LightwaveRF socket or
dimmer.
Solution: Check the Socket Locker battery strength: if the battery strength
is low, it will not produce enough power to drive the RF radio signal. Tap any
‘on’ button on the controller to transmit a signal. A strong battery signal is
indicated by the LED light on the controller remaining lit for 1-2 seconds after
releasing the button. A low battery is indicated if the LED light turns o
immediately. If this happens, please replace the battery.
Problem: I've misplaced the Socket Locker and my devices are locked
Solution: You can reset locked devices such as sockets and dimmers by
turning o the mains power for 30 seconds. This will unlock the device (but
not reset the memory).
Troubleshooting

Specification
RF frequency: 433.92 MHz
Input rating: 3V (battery)
Warranty: 2 year standard warranty
Technical Specification

Version 2.1
2 Quadrant Park
Mundells
Welwyn Garden City
Herts
AL7 1FS
01707 386035
www.lightwaverf.house
 Loading...