

Page 1
Sierra User Guide
Page 2

Welcome
Congratulations on purchasing a Lightspeed Aviation Sierra headset. Your headset is a premium
product that will provide many years of comfortable high performance for your ying endeavors.
If this is your rst Lightspeed Aviation headset—welcome to the Lightspeed family! We look forward
to building a lasting community with our customers founded on products and service that are best in
class. To support your passion for ying we invite you to visit LightspeedAviation.com where you’ll nd
useful insights about our other products and aviation.
Thank you for choosing a Lightspeed Aviation headset.
Page 3

Contents
Introduction .....................................................................2
Getting Started
Fitting Your Headset...................................................4
Battery Installation .....................................................5
Battery Types ................................................................6
Battery Life ...................................................................6
Controller .......................................................................6
Using Your Sierra Headset
Turning ON and OFF ..................................................8
Matching Stereo/Mono Setting to an
Audio Panel ..................................................................8
Setting the DIP Switch ..............................................8
ComPriority ..................................................................9
Wired Auxiliary Devices ...........................................9
Bluetooth and Cell Phones
Connecting Bluetooth Cell Phones for
the First Time ............................................................. 10
Bluetooth Mode—ON and OFF ......................... 11
Bluetooth Features ..................................................12
FAQs ................................................................................... 13
Peak Performance Tips ............................................. 15
Specications ................................................................ 16
Warranty Information ............................................... 17
Contact Lightspeed Aviation ................................. 20
Page 4

Introduction
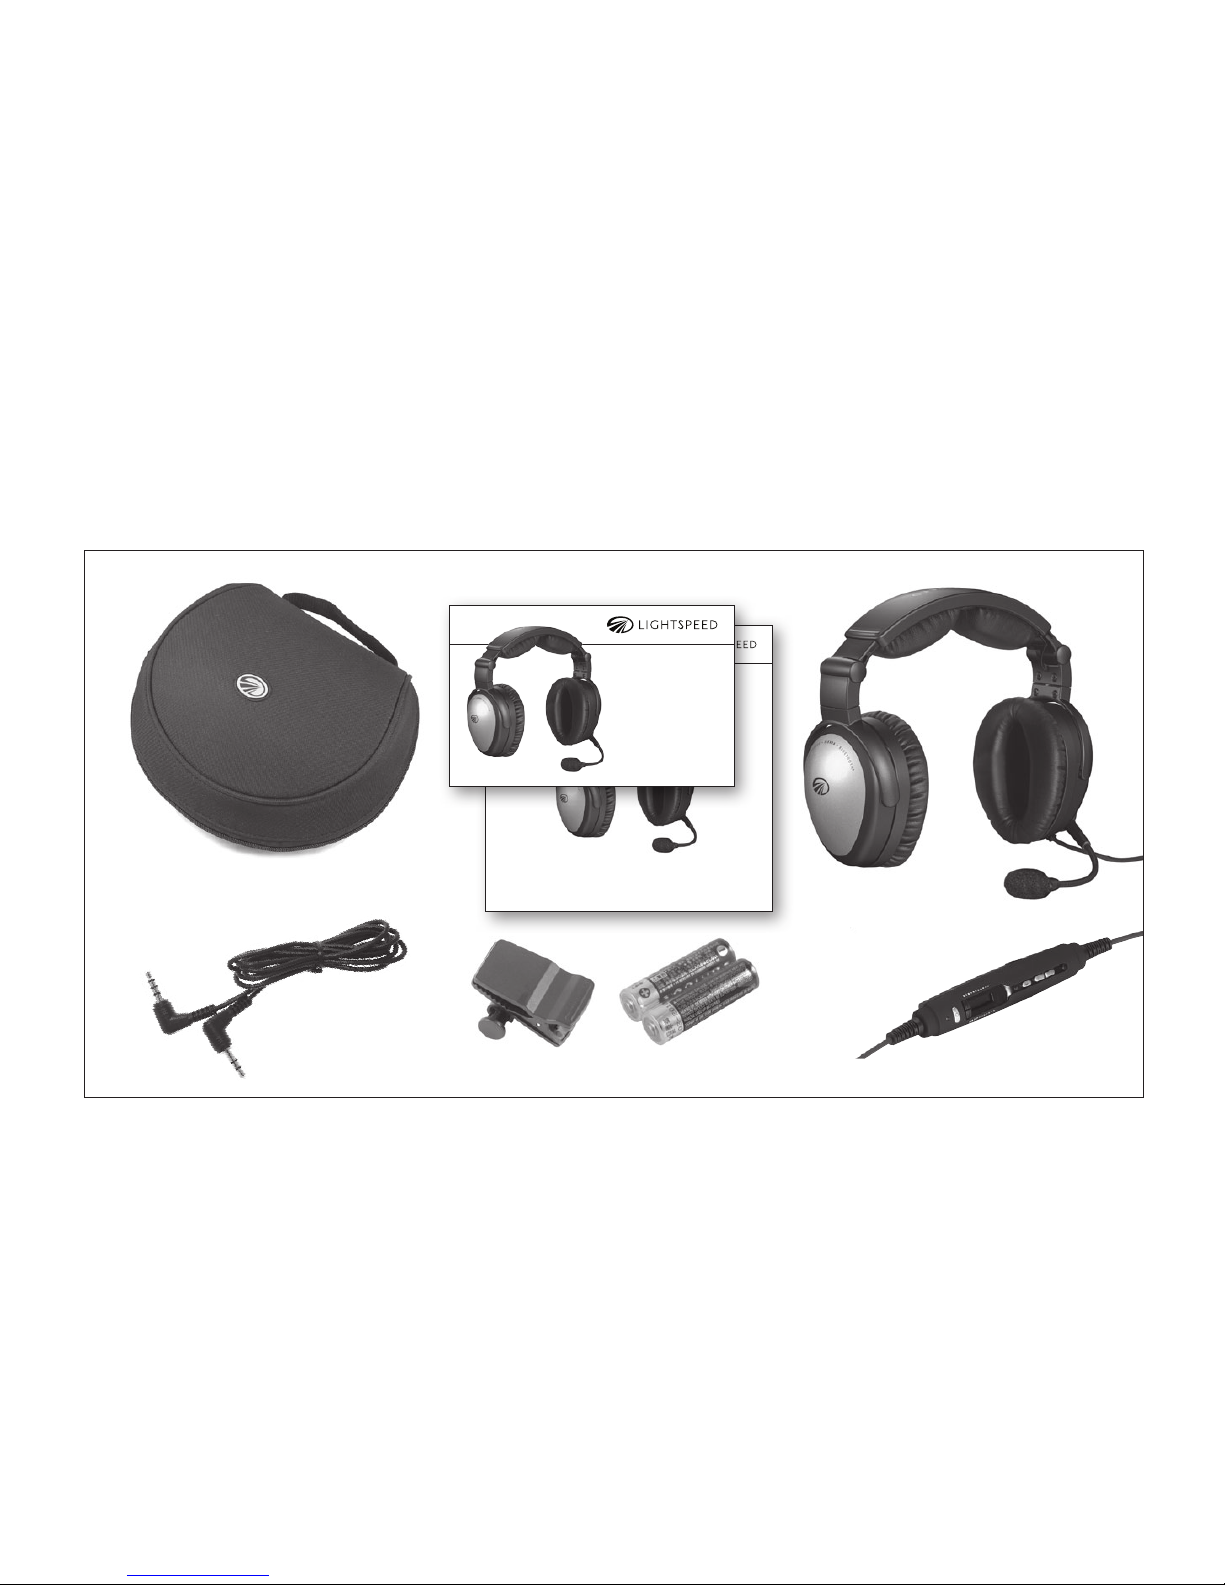
Your Sierra headset package includes (clockwise,
from top left on the following page):
• Carrying case
• User and Quick Start guide with warranty
information
• Sierra ANR headset with Sierra controller
• Two AA batteries
• Cord clip
• Audio device cable with 3.5mm connector
2
Page 5
Sierra Quick Start Guide
Sierra User Guide
3
Introduction
Page 6
Getting Started
Fitting Your Headset
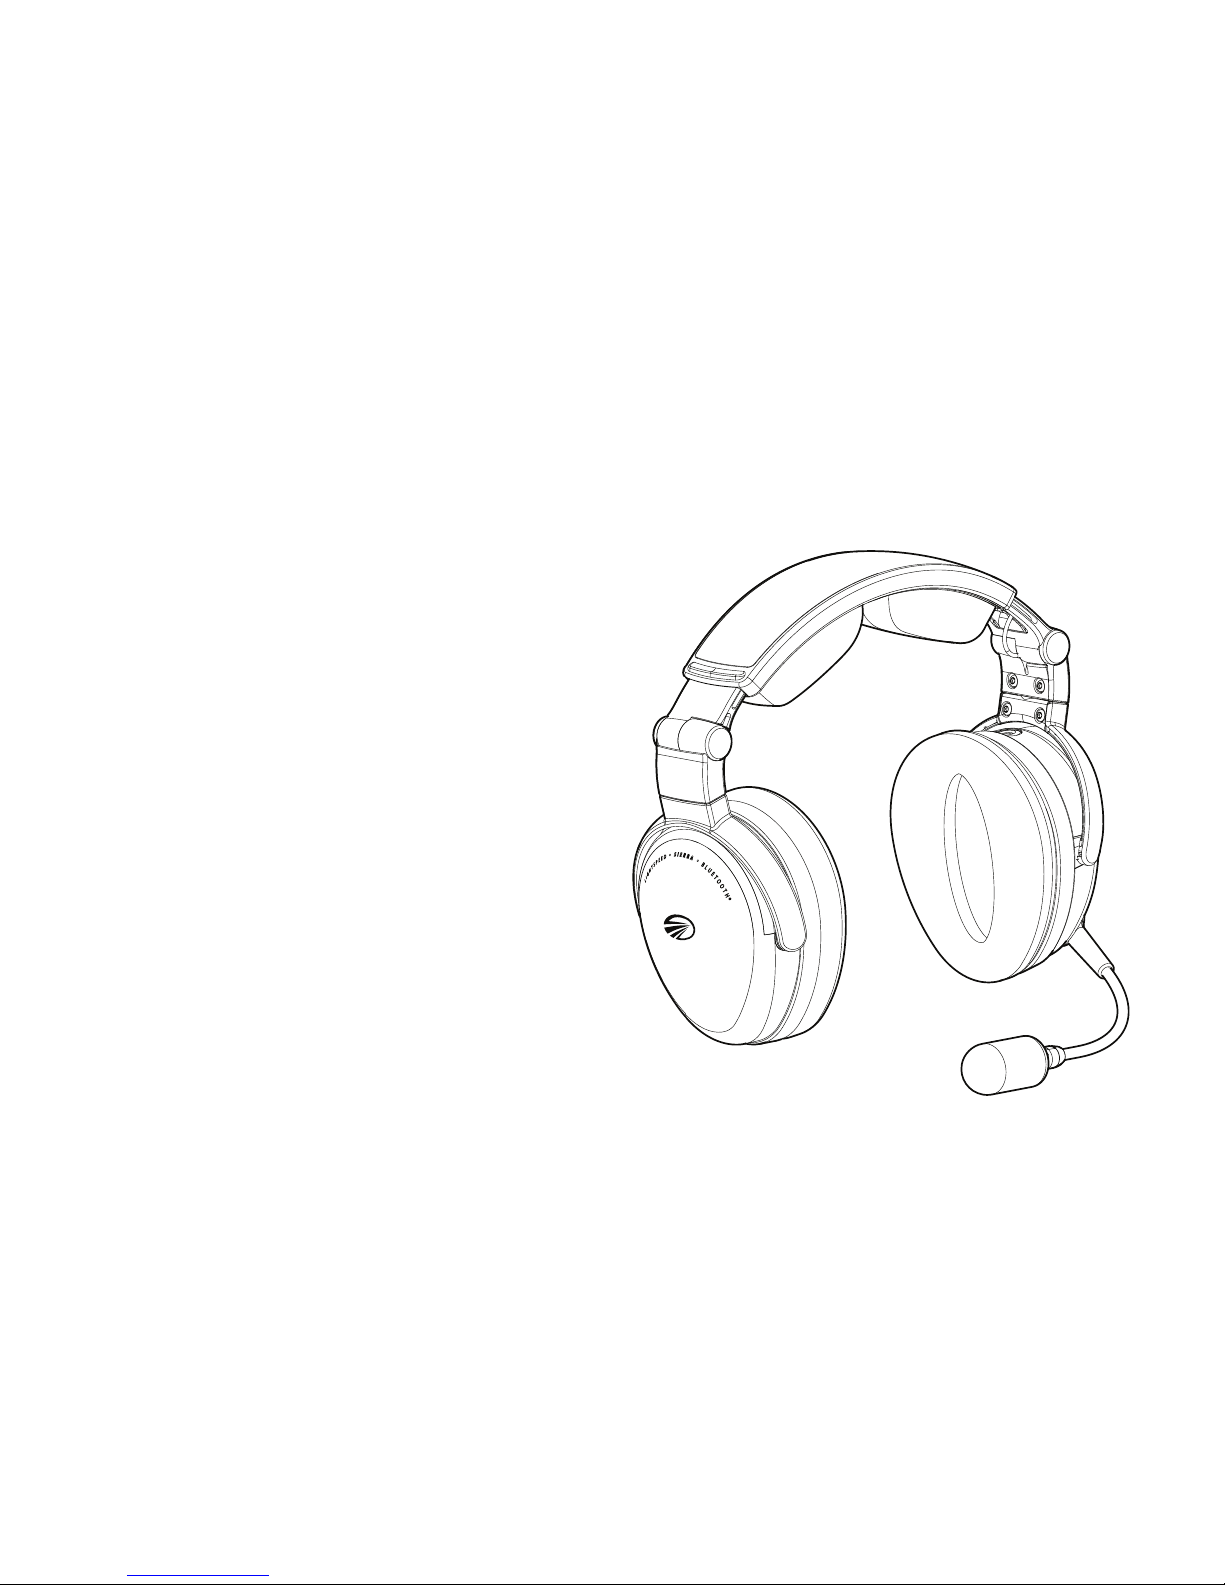
Fitting your headset properly is the key to
comfortable use and superior Active Noise
Reduction (ANR) capabilities. To gain peak
performance from the ANR feature it’s necessary
to have a solid seal around your entire ear
combined with a symmetrical t on your head.
The following tips will assist in achieving the
proper t.
A. Fit your ears entirely within the ear cups
providing a solid seal.
B. Rest the headband lightly on top of your
head with the right and left sliders extended
to equal lengths.
4
Page 7
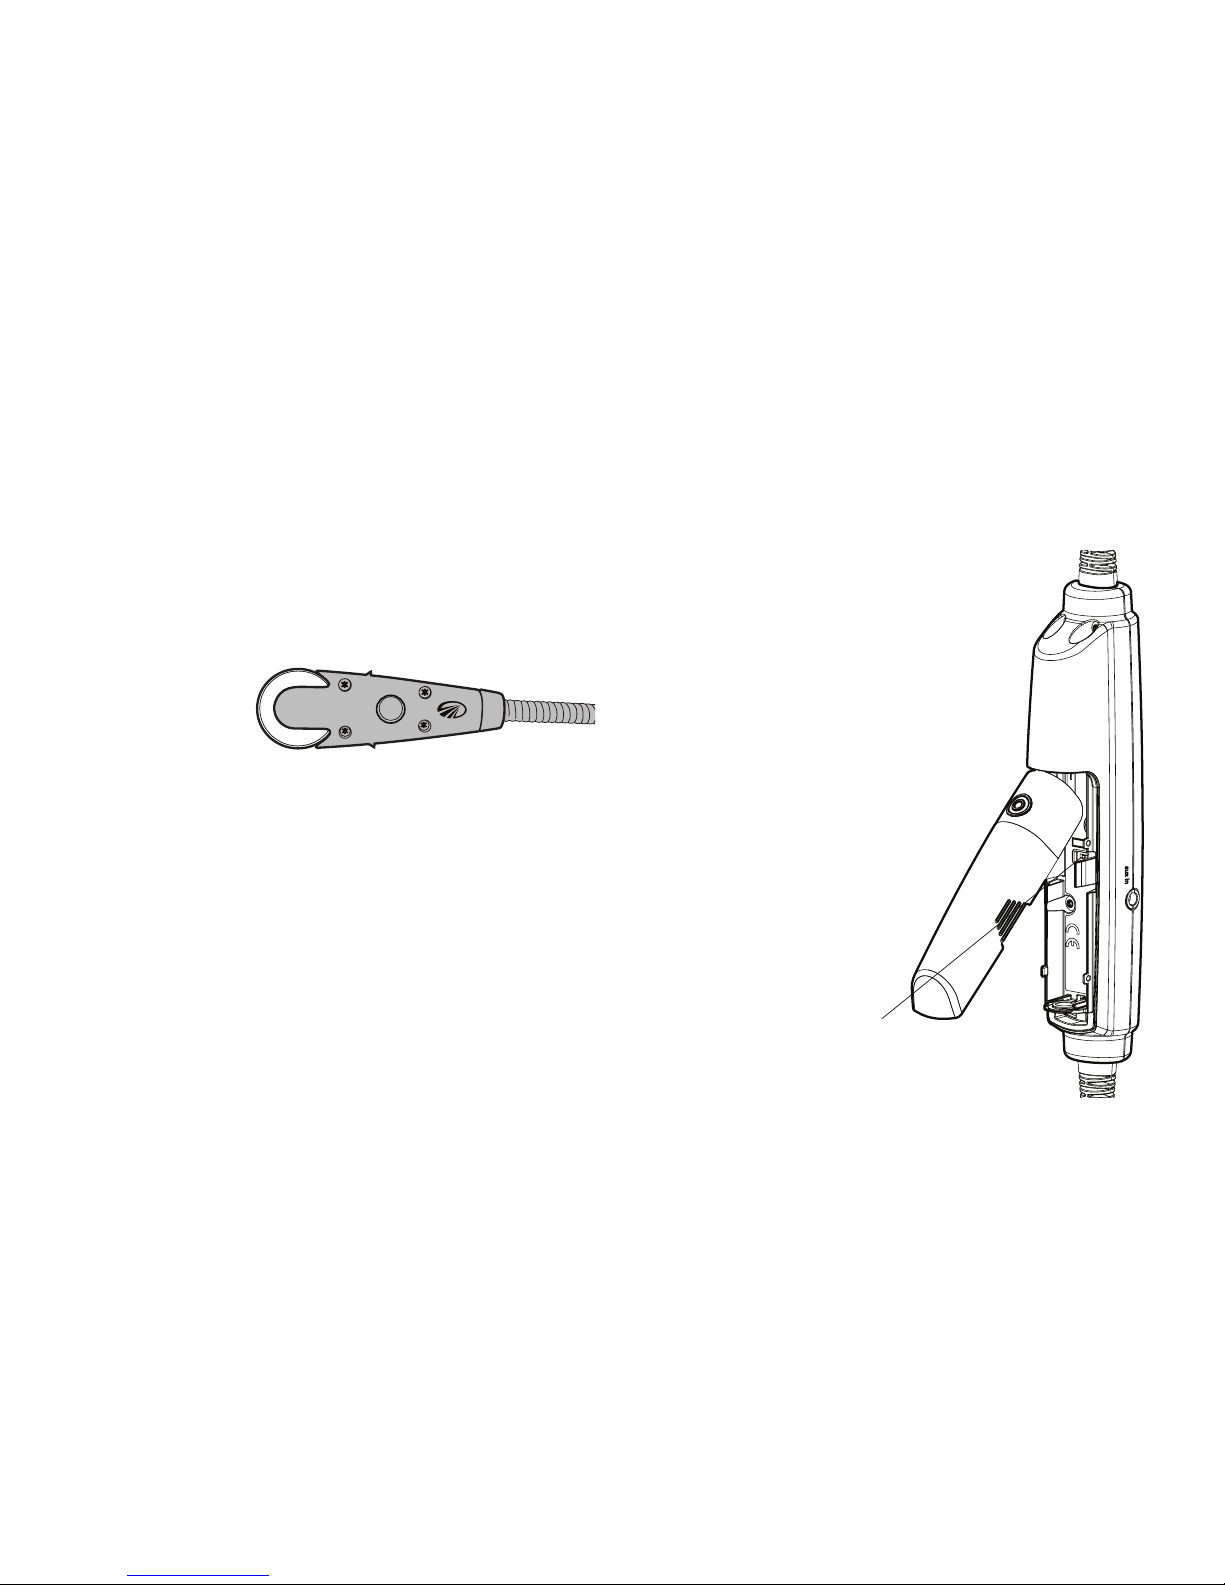
C. Position the microphone inch from your
mouth, with the gain adjustment cap facing
away from you (visible when you remove the
mic mu).
Note: The microphone will not transmit unless
plugged into an intercom.
Battery Installation
The Sierra headset requires two AA batteries
(included). Use alkaline or lithium batteries for
best performance.
A. Open the controller battery/DIP switch door
by either pressing down on the
circle icon or by pulling open the
door along the notched edges.
Insert two AA batteries with the
correct polarity positioning.
B. The LED ashes GREEN when
charged batteries are in use
and the power is on.
C. When batteries begin to
run low the power LED
ashes red.
Battery/DIP switch door
Stereo/mono switch
5
Getting Started
This side of the microphone
should face away from you.
Page 8

If the LED ashes red during ight the
headset will continue to operate. Install new
batteries as soon as possible at any indication
of low batteries.
Battery Types
Use two “AA” alkaline or lithium batteries. Lithium
batteries may provide improved battery life in
colder temperatures. We do not recommend
using re-chargeable batteries or mixing battery
types and brands.
Battery Life
A set of batteries can provide up to 40 hours
of power. However, heavy Bluetooth usage
can signicantly reduce battery life. Under
quiet conditions Sierra will auto shut o
approximately ve minutes after the headset is
removed from your head.
The Controller
A. Power indicator LED: Flashes green when
power is supplied to Sierra and batteries are
strong. Flashes red when batteries are low.
B. Power button: Powers on headset, turning
on Active Noise Reduction (ANR). Press
button once to turn Sierra on; press and
hold to turn Sierra o. To toggle the LED
brightness from bright to dim quickly press
the power button twice.
C. Volume control: Controls audio panel volume
with individual sliders for each ear. Does not
aect the volume of auxiliary devices.
6
Getting Started
Page 9
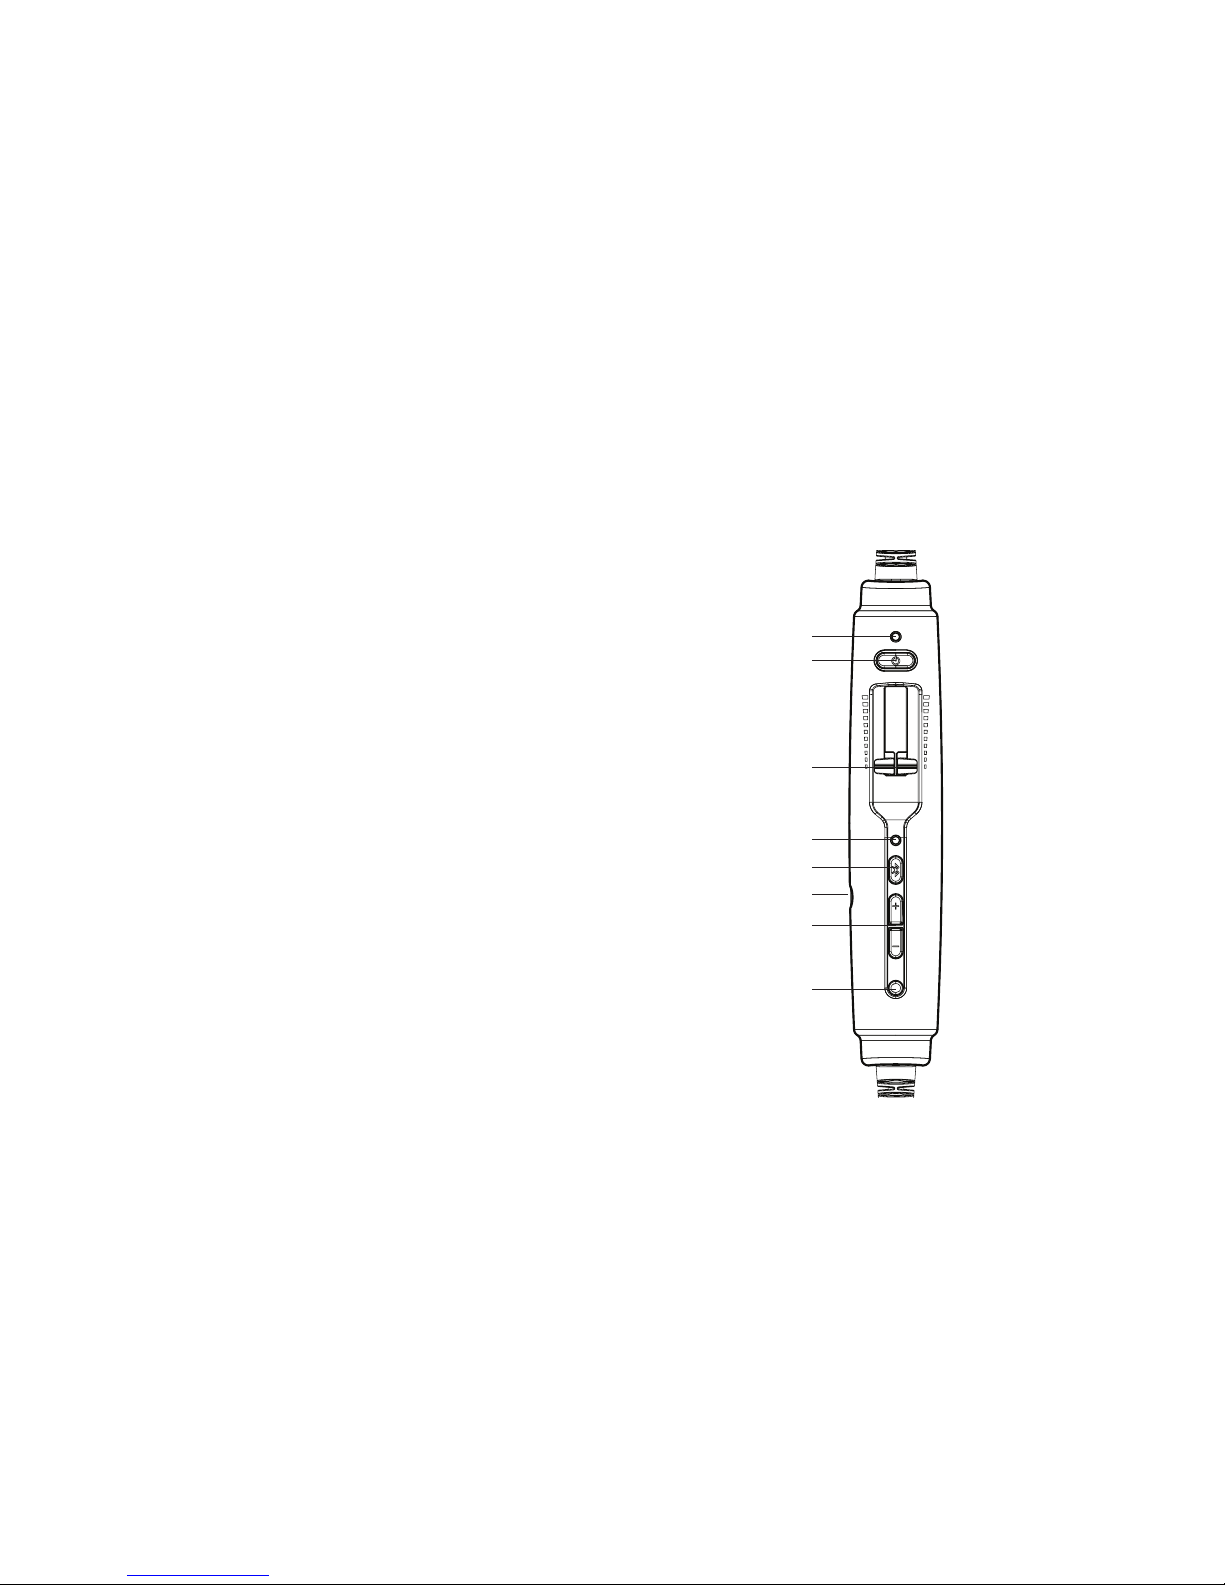
D. Bluetooth indicator LED: Flashes blue
when Bluetooth mode is on and red when
Bluetooth is being turned o. In pairing
mode, ashes alternating red and blue.
E. Bluetooth button: Turns on and o the
Bluetooth signal and controls Bluetoothconnected devices.
F. Auxiliary input jack: Provides a wired input
for audio devices only (not cell phones).
G. Bluetooth volume buttons: Controls the
volume of Bluetooth devices.
H. ComPriority button: Quiets music and audio
from auxiliary devices during radio communications. Does not aect cell phone calls.
A
B
C
D
E
F
G
H
The Sierra controller
7
Getting Started
Page 10

Using Your Sierra Headset
Turning ON and OFF
ON: Press the power button once to turn on the
headset. The green power LED ashes when
power is supplied. Active Noise Reduction (ANR)
is engaged when you turn on the headset.
OFF: Press and hold the power button until the
green power LED turns o.
Sierra will auto shut o approximately ve
minutes after removing the headset and under
quiet conditions.
The power LED ashes red when batteries are
low; see Battery Installation, on page 5.
Matching Stereo/Mono Setting to an Audio Panel
The Stereo/Mono DIP switch setting should
match the signal from your audio panel. For a
stereo panel, best performance is gained by
setting the headset for stereo. The same is also
relevant to a mono panel. Incorrect settings result
in communications being heard in only one ear.
The Stereo/Mono DIP switch does not aect
auxiliary devices, so you can enjoy auxiliary audio
in stereo regardless of how the Stereo/Mono DIP
switch is set.
Setting the DIP Switch
The DIP switch is factory set to match most
aircraft audio panels. To change a DIP switch
setting open the controller battery compartment
door. Use a small pointed object like a wood
8
Page 11

toothpick to slide the DIP switch to ON or OFF
depending on your preference.
ComPriority
ComPriority is turned on or off by the bottommost controller button. With ComPriority on
and when radio communications are detected,
the volume of auxiliary devices will be
significantly reduced.
To enable ComPriority, turn on the feature, plug
into your intercom and talk into the headset
microphone while playing music over a wired
device; see Wired Auxiliary Devices, on page 9. If
enabled your auxiliary music will decrease when
you start to talk.
Note: ComPriority does not aect cell phone calls.
9
Wired Auxiliary Devices
To connect a music player to Sierra’s auxiliary
input jack, use the cord provided.
To adjust the volume on a device connected to
Sierra’s auxiliary input jack, use the controls on
the device itself.
Cell phone capability works only when
connected via Bluetooth, not through the
auxiliary input jack.
Note: Sierra will not stream music wirelessly.
Using Your Sierra Headset
Page 12

10
Bluetooth and Cell Phones
Connecting Bluetooth Cell Phones for the
First Time
Before using a Bluetooth cell phone for the
rst time with Sierra it must be “paired” or
electronically connected.
To pair a Bluetooth cell phone with Sierra:
1. Turn on the headset and verify the green
LED is ashing. Make sure Sierra’s Bluetooth
mode is turned o. Blue or red ashes from
the Bluetooth LED should not be present (see
“Bluetooth Mode—ON and OFF”, page 11).
2. Press and hold the Sierra Bluetooth button
for about ve to ten seconds or until the
Bluetooth LED continually ashes red and
blue. This indicates the Sierra pairing mode
setting and lasts about two minutes. If this
step takes longer and the Bluetooth LED is
no longer alternating red and blue, start over
from step one.
3. With Sierra in pairing mode, follow the menu
prompts on your Bluetooth phone directing
it to look for Bluetooth devices.
4. Select Lightspeed-V### (numbers may vary)
on your Bluetooth phone from the list of
found devices
5. If asked to enter a password or PIN, enter 0000
Your cell phone should now be paired and ready
for continued use with Sierra.
Page 13

11
Bluetooth Mode—ON and OFF
ON: With Sierra turned ON, press and hold the
Bluetooth button; see page 7, until you hear
a high tone and the Bluetooth indicator LED
ashes three blue pulses. For rst time pairing
see instructions on this page.
OFF: Press and hold Sierra’s Bluetooth button for
about three seconds until a high tone is emitted
and the Bluetooth indicator LED ashes three
red pulses.
Note: The Bluetooth feature must be turned ON for
Bluetooth connected devices to correctly function.
When you turn on the Sierra Bluetooth mode it
will connect to the most recently paired device.
Most Bluetooth cell phones connect to Sierra
automatically. If that doesn’t happen it may be
necessary to use the cell phone menu of found
devices to signify Lightspeed-V### (numbers
may vary).
Note: The microphone will not transmit unless
plugged into an intercom.
Note: Sierra will not stream music wirelessly.
Bluetooth and Cell Phones
Page 14

12
Bluetooth Features
Depending on the Bluetooth prole of the phone,
you can use Sierra’s Bluetooth buttons to perform
several functions. Some typical functions are:
• Press the Bluetooth button once for voice
dialing (if supported by your phone).
• Press the Bluetooth button once to answer
the phone when it rings.
• Press the Bluetooth button once to
disconnect from a call.
• Press and hold the Bluetooth button for two
seconds to redial the last number called.
• Use the Bluetooth volume buttons (Sierra’s +
and – buttons) to adjust the volume.
Note: Cell Phone capability works only when
connected via Bluetooth.
Bluetooth and Cell Phones
Page 15

13
Why do I hear radio communications in only
one ear?
Sierra’s Stereo/Mono DIP switch is probably set
to Stereo while your audio panel is transmitting
a mono signal. To x this, change Sierra’s Stereo/
Mono DIP switch to Mono. This setting does not
aect music or audio from auxiliary devices; you
can hear stereo sound on auxiliary devices even
when the Stereo/Mono DIP switch is set to Mono.
When pairing Sierra with my Bluetooth phone,
why does my phone indicate it cannot connect?
The headset may not be in pairing mode. To enter
pairing mode, you must start with Bluetooth mode
turned fully OFF; (see “Connecting Bluetooth Cell
Phones for the First Time,” on page 10).
Why doesn’t my Bluetooth phone accept
Sierra’s 0000 passcode?
Your headset may not be in pairing mode. Some
phones prompt for a pass code without checking
for pairing mode. When the phone cannot pair
with the headset, it rejects the passcode. To enter
pairing mode, you must start with Bluetooth mode
turned fully OFF (see “Connecting Bluetooth Cell
Phones for the First Time,” on page 10).
How can I reduce static noise during cell
phone calls?
To reduce RF interference during phone calls,
keep cell phones at least 12 inches from the
Sierra controller and headset when making calls.
FAQs
Page 16
FAQs
When ying what causes a warbling noise in
the ear cup?
If your ear is not entirely inside the cup, with a
tight seal, air can seep in and cause the ANR to
compensate for uneven internal cup pressure.
14
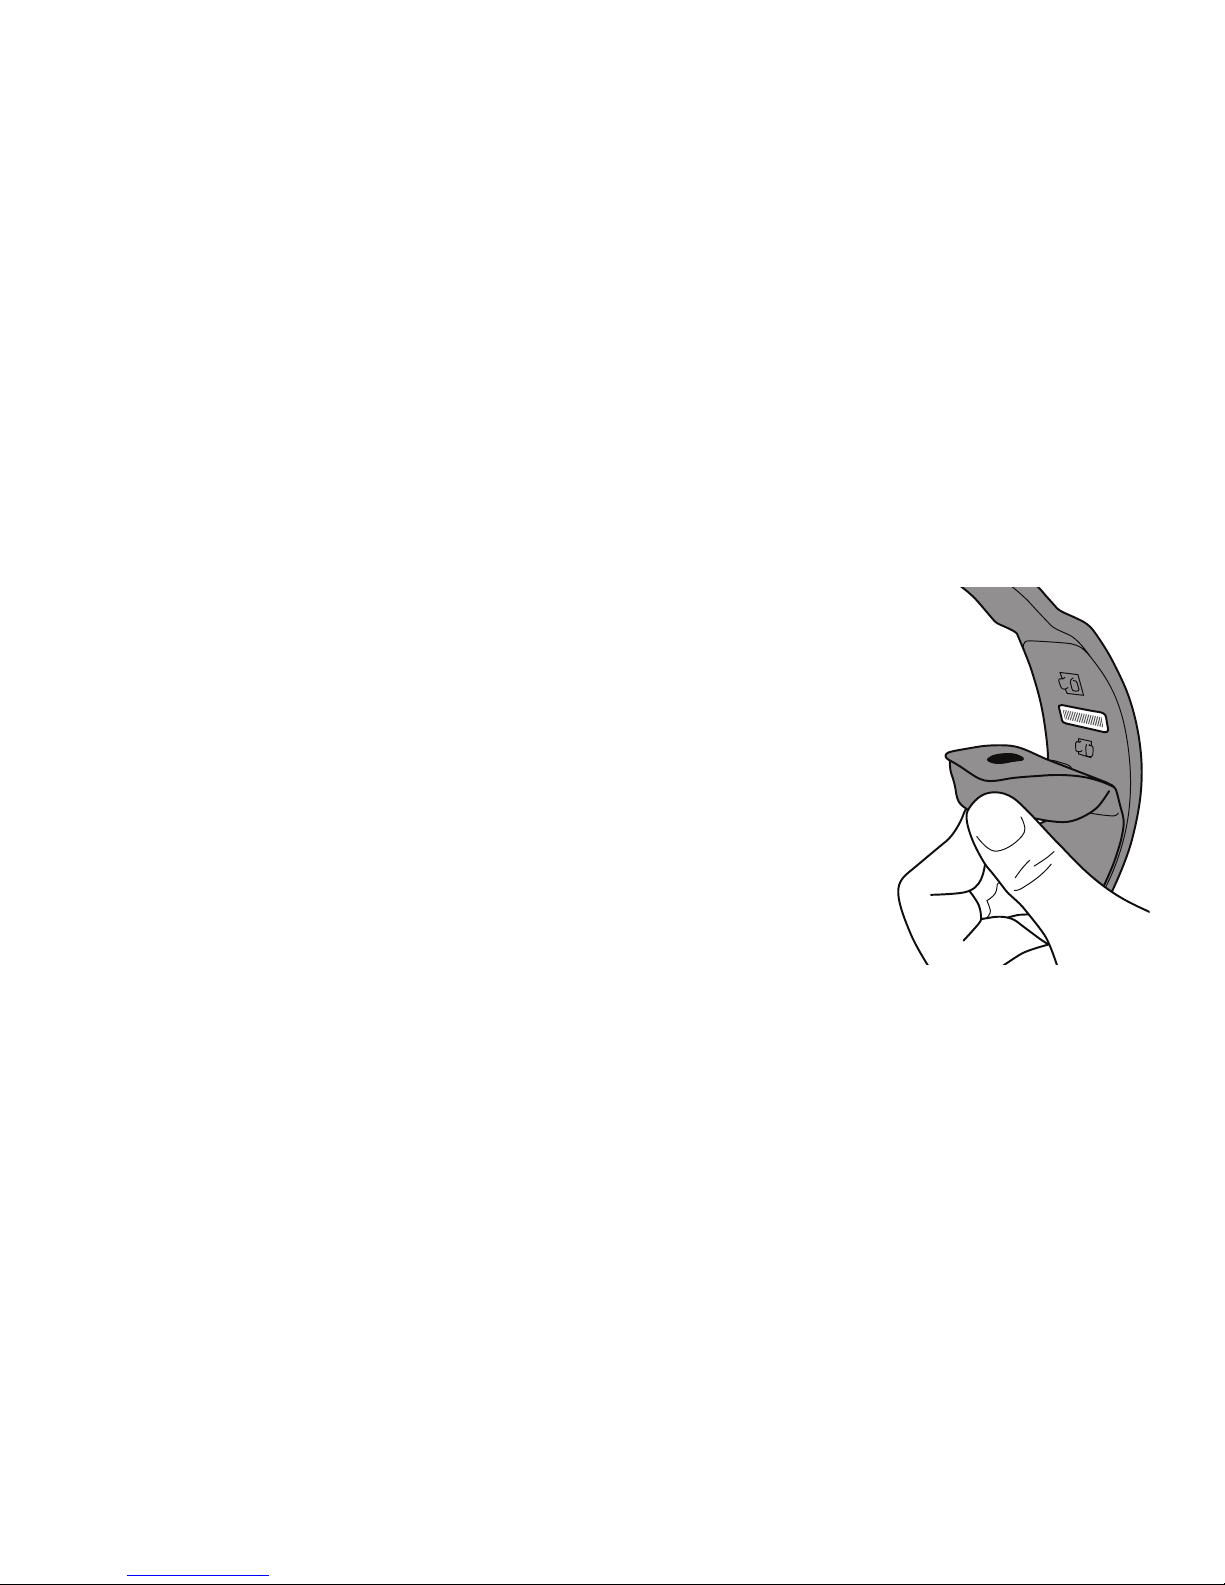
Where is my product serial number?
The serial number (a
small, white, bar-code
sticker with numbers)
can be found on the
headset underneath
the head pad. The
head pad, located on
the inner radius of the
headband, must be
removed to reveal the
serial number. Simply
pinch the cushioned
part of the head pad, pull down and it will
snap out.
Page 17

Peak Performance Tips
15
• Start with an excellent t—see “Fitting your
headset,” on page 4.
• Set Sierra’s Stereo/Mono DIP switch to
match the signal from your audio panel; see
“Matching Sierra’s Stereo/Mono setting to
your audio panel signal,” on page 8.
• Keep cell phones at least 12 inches from the
Sierra controller and headset when making
call to reduce static noise during phone calls.
• To conserve battery life, turn OFF Bluetooth
mode when not in use.
• You can use auxiliary devices such as a
music player by connecting to Sierra’s
auxiliary input jack and a cell phone by
connecting via Bluetooth.
• Lightspeed recommends replacement of
the soft goods on your headset (ear seals,
head pads and mic mus) every 18 months
to ensure peak ANR performance and
comfort. These are wear items and are not
covered by the Lightspeed warranty and
are available for purchase on our website at
LightspeedAviation.com/content.cfm/Store
• When packing your headset into its case,
place the mic just over the headband to
avoid chang the boom.
Page 18

16
Specifications
Connector
Dual general aviation connectors with .250-inch
commercial stereo headphone plug and .206inch MIL-SPEC microphone plug
General
Battery power supply: 3V, two AA batteries
Weight: 16 oz.
Headphone
Transducer: 40mm moving coil
Frequency response: 20 Hz-20 kHz
Nominal impedance @ 1 kHz:
O—Mono: 180 ohms, On—Mono: 300 ohms
O—Stereo: 250 ohms, On—Stereo: 600 ohms
Microphone
Transducer principle: Noise-canceling electret
Frequency response: 200 Hz-6000 Hz
Maximum SPL: 114 dB
Terminating impedance: 220–2200 ohms
Operating voltage: 8V-16V DC
ANR
Maximum SPL: Greater than 120 dB at 100 Hz
Page 19

17
Warranty Information
We encourage you to register your headset at
our website LightspeedAviation.com. That way,
if your headset ever needs servicing, registration
helps assure quick and ecient processing.
5-Year Limited Warranty for New Aviation Headsets Sold by
Lightspeed Aviation, Inc.
Lightspeed Aviation, Inc. (“LSA”) warrants that the new aviation
headset sold by LSA (“New Headset”) is free from all material
defects in workmanship and materials. For the New Headset, all
warranties provided by LSA and all implied warranties imposed by
law are limited to a 5-year period, beginning on the purchase date
shown on the New Headset’s sales receipt (“Warranty Period”).
This 5-year Limited Warranty (“Limited Warranty”) is provided
solely for the benet of the initial purchaser of the New Headset
(“Purchaser”), and it excludes all 3rd parties, including distributors,
dealers, retailers, subsequent owners, and other users of the New
Headset. This Limited Warranty is not assignable and remains in
full force and eect during the Warranty Period, but only if the
New Headset: (a) has been properly maintained; (b) has not been
abused or misused; and (c) has not been repaired, altered, or
modied without LSA’s approval. This Limited Warranty specically
excludes all taxes, shipping costs, and problems relating to any:
(1) repair, alteration, or modication not approved by LSA; (2)
abuse or failure to properly maintain the New Headset; (3) faulty
workmanship by any person, except LSA or its approved agent; (4)
operation of the New Headset, except as specied in its operating
manual; (5) ordinary wear and tear; or (6) nish and appearance
item. For each claim made under this Limited Warranty (“Claim”),
Purchaser must, within 10 days of discovering a New Headset
problem indicating a breach of this Limited Warranty, deliver to
LSA a written notice that explains in detail the New Headset’s
specic defect, that shows proof of Purchaser’s purchase of
the New Headset before the end of the Warranty Period, and
that shows proof that this Limited Warranty applies to the New
Headset. LSA or its agent may investigate any Claim. For each
Claim, LSA may, in its sole discretion, choose any of the following
exclusive remedies: (I) repair or replace the New Headset or any
part thereof, without charge to Purchaser, but rst Purchaser
must return the New Headset to LSA’s authorized repair facility,
pre-paying all shipping charges, and Purchaser must accept
Page 20

18
Warranty Information
the same as repaired or replaced at the facility’s location (i.e.,
FOB the facility) within 10 days of the date of LSA’s completion
notice sent to Purchaser, or else LSA will deem the New Headset
abandoned, in which case LSA may keep, sell, or otherwise discard
it; or (II) refund the New Headset’s purchase price to Purchaser.
Without paying any amount to Purchaser, LSA may keep, sell, or
otherwise discard all replaced New Headsets and parts thereof
and all New Headsets where LSA has refunded the purchase
price to Purchaser. In repairing or replacing any New Headset,
LSA may, in its sole discretion, use new, used, or reconditioned
parts or provide a refurbished used headset as a replacement.
In connection therewith, LSA warrants that all new, used, or
reconditioned parts or refurbished used headsets will be free
from all material defects in workmanship and materials during the
Warranty Period and for a period of up to 90 days thereafter, but
only to the extent that such event occurs during the nal 90 days
of the Warranty Period. LSA may, in its sole discretion, (i) establish
separate, additional, non-warranty repair and replacement
programs for any new or used headset (“Non- Warranty Service
Programs”), (ii) the Non-Warranty Service Programs may cover
any time period, before or after any Warranty Period has expired,
and (iii) charge any amount and impose any term with respect
to any Non-Warranty Service Program. For Non-Warranty Service
Programs, LSA warrants that all new, used, reconditioned, or
refurbished parts and headsets used to repair or replace any
headset will be free from all material defects in workmanship
and materials, but only for a limited period of 90 days thereafter.
Purchaser acknowledges that used or reconditioned parts may
be used to repair any new or used headset, and that a refurbished
used headset may be provided as a replacement for any new
or used headset. LSA may hire a 3rd party to repair or replace
any new or used headset. “Including” means “including, but not
limited to. ” THE TERMS IN THIS DOCUMENT ARE THE ONLY TERMS
THAT GOVERN LSA’S WARRANTY OBLIGATIONS FOR ANY NEW OR
USED HEADSET OR PART THEREOF. NO ORAL OR OTHER WRITTEN
TERM APPLIES. THIS DOCUMENT PROVIDES THE EXCLUSIVE
REMEDY FOR ALL CLAIMS AGAINST LSA WITH RESPECT TO ANY
NEW OR USED HEADSET OR PART THEREOF. NOTWITHSTANDING
ANY PROVISION TO THE CONTRARY IN THIS LIMITED WARRANTY,
LSA RESERVES THE RIGHT TO MODIFY, AT ANY TIME AND FROM
TIME TO TIME IN ITS SOLE DISCRETION, ANY AND ALL TERMS IN
THIS LIMITED WARRANTY. EACH SUCH MODIFICATION IS DEEMED
Page 21

19
EFFECTIVE UPON PUBLICATION ON LSA’S WEBSITE OR OTHERWISE.
TO THE EXTENT ALLOWED BY LAW: LSA DISCLAIMS AND
PROVIDES THIS LIMITED WARRANTY IN LIEU OF ALL OTHER
EXPRESS OR IMPLIED WARRANTIES, INCLUDING ANY WARRANTY
OF MERCHANTABILITY OR FITNESS FOR A PARTICULAR PURPOSE.
LSA IS NOT LIABLE FOR CONSEQUENTIAL, INCIDENTAL, PUNITIVE,
INDIRECT, SPECIAL, LOST PROFITS, OR SIMILAR DAMAGES
CLAIMED UNDER ANY STATUTE OR LEGAL OR EQUITABLE THEORY.
LSA’S TOTAL LIABILITY FOR ALL CONTRACT, TORT (INCLUDING
NEGLIGENCE), STATUTORY, OR OTHER CLAIMS ARISING FROM OR
RELATING TO THIS LIMITED WARRANTY OR ANY HEADSET OR PART
THEREOF IS LIMITED TO $1,000. SOME STATES DO NOT ALLOW
THE LIMITATION OF CONSEQUENTIAL DAMAGES, SO THE ABOVE
LIMITATIONS MIGHT NOT APPLY TO PURCHASER. THIS LIMITED
WARRANTY GIVES PURCHASER SPECIFIC LEGAL RIGHTS, AND
PURCHASER MIGHT HAVE OTHER RIGHTS THAT VARY FROM STATE
TO STATE.
FOR PURCHASERS IN CALIFORNIA: PURCHASER HAS THE RIGHT TO
HAVE THE NEW HEADSET SERVICED AND REPAIRED DURING THE
WARRANTY PERIOD. THE WARRANTY PERIOD WILL BE EXTENDED
FOR THE NUMBER OF WHOLE DAYS THAT THE NEW HEADSET
HAS BEEN OUT OF PURCHASER’S HANDS FOR WARRANTY
REPAIRS. IF A DEFECT EXISTS DURING THE WARRANTY PERIOD,
THIS LIMITED WARRANTY WILL NOT EXPIRE UNTIL THE DEFECT
HAS BEEN FIXED. IF ANY WARRANTY REPAIR HAS BEEN DELAYED
BECAUSE OF CIRCUMSTANCES BEYOND PURCHASER’S CONTROL,
OR IF ANY WARRANTY REPAIR DID NOT REMEDY A DEFECT AND
PURCHASER NOTIFIES LSA OF SUCH FAILURE WITHIN 10 DAYS
AFTER THE REPAIR, THE WARRANTY PERIOD WILL BE EXTENDED
FOR A PERIOD EQUAL TO THE DURATION OF THE DELAY. IF,
AFTER A REASONABLE NUMBER OF ATTEMPTS, THE DEFECT
REMAINS UNFIXED, PURCHASER MAY RETURN THE NEW HEADSET
FOR REPLACEMENT OR REFUND, SUBJECT TO A REASONABLE
DEDUCTION FOR PURCHASER’S USE OF THE NEW HEADSET. ANY
EXTENSION OF THE WARRANTY PERIOD DOES NOT AFFECT ANY
PROTECTION OR REMEDY AVAILABLE TO PURCHASER UNDER
APPLICABLE LAW.
Warranty Information
Page 22

20
Visit our website: LightspeedAviation.com
Call us: 800.332.2421
Fax: 503.968.7664
Mail to: Lightspeed Aviation
6135 Jean Road
Lake Oswego, OR 97035 USA
Product registration: Please register at
LightspeedAviation.com
to optimize your customer
experience.
Contact Lightspeed Aviation
Page 23

Copyright Lightspeed Aviation, Inc. All rights reserved.
Lightspeed Aviation is a trademark and Sierra is a registered trademark of Lightspeed Aviation, Inc.
Bluetooth is a registered trademark of the Bluetooth SIG.
iPhone is a trademark of Apple, Inc.
Cert: 0046503
Lightspeed Aviation, Inc.’s Management
System is Registered to ISO 9001:2008
Page 24
Lightspeed Aviation
6135 Jean Road
Lake Oswego, Oregon 97035
800.332.2421 toll free
503.968.3113 tel
503.968.7664 fax
LightspeedAviation.com
Part Number 704-00001-000 Rev. A3 0912
 Loading...