

Light Sky IP Aquabeam Series, IP1000E Aquabeam, IP3000E Aquabeam, IP2000 Aquabeam, IP2000E Aquabeam Service Manual
...
Ser vice Manual
Pro d uct s e rie:
Pro d uct m o de:
IP se r ie
IP1000E、IP2000、IP2000E、
IP3000、IP3000E
WWW.lightsky.com.cn
Aquabeam

Contents catalogue
1.The installation and routine maintenance.................................................................................................2
2. The maintenance method and attentions..................................................................................................3
3. The treatment of exceptional falt...............................................................................................................4
4. The exploded view....................................................................................................................................8
5. 0 lamp dismounting and mounting................................................................................................22 IP300
6. IP series X Motor replacement...............................................................................................................24
7. IP series Y replacement................................................................................................................28 Motor
8. IP series X/Y Motor drive PCB ........................................................................................34 replacement.
9. .....................................................................................36IP series CMY and color wheel replacement..
Thank you for choosing our product! This fixture is the same as our other models, The design and production are all
through comprehensive quality control to ensure the excellent performance , and maximum to approach the customers'
satisfaction and demand.
1. Please read all the contents of this manual and keep it for your reference.
2. During the using of this manual for maintenance, please pay attention to the following points:
A. Prepare for maintenance, includes the maintenance tools.
B. Make good records of maintenance and repair.
C. Take the photos as record before disassembly the part to sure that all parts can be easily remounted.
D. All the parts and screws should be placed separately to avoid mistake.
3. Do not cut the belt, even if the light is equipped with spare belt.
4. No repairing and maintenance is allowed with Power ON, keep safe;
5. Make sure the failure reason is found before dismantle the fixture.
6. The maintenance requires professional skill.
7. The part that it's not listed in Service Manual, please refer to ‘User Manual’.
8. The copyright of this service manual is owned by Fly Dragon lighting equipment Co. Ltd, brand LIGHTSKY.
Attention:
Based on the fixture’s continuous upgrade , the data or part contained in this manual
are probably to be changed in the future. while Our company reserves the right to change
the relevant information in following product improvement without the further notice.
The publisher of this manual is not responsible for the accuracy of the information in this
manual and will not be responsible for the consequences associated with the information.
1

The installation and routine maintenance
1. The installation and use: Please read carefully with the lights attached ‘User Manual’, in strict
accordance with the related manual content to guide the installation and use.
2. To install and use the lights, pay attention to the following points:
◆ The lights installation: the light must be installed on the surface of the solid & noncombustible
object. When the light is hung, it is necessary to verify that the facilities and the light hook can
withstand at least 10 times of lights weight, and add the safety rope and other security measures;
◆ Electrical connections:
◎ The professional skill person is required;
◎ The lighting power connections must be installed in accordance with the relevant standards,
the incorrect power supply connection may lead to damage the light!
◎ Please check whether the power supply voltage and frequency meet the requirements of the
light before power on, and check the power cord connection, whether the plug and socket are
closely connected, each light must be properly grounded;
◎ Please do not use the power cable with damaged insulating layer , if the power cable
insulating layer is damaged, it must be operated by the manufacturer or distributor or a
professional qualification person to avoid danger!
◆ If the lights were controlled by the console, it must be turned on by different groups so as not to
turn on the lights in large quantities and to bring down the city electricity in a flash;
◆ When the light fixture is ON, the projected object should be more than 12 meters distance
to avoiddanger.
◆ The distance between the light fixture and ventilation at least 1 meters, and no obstructions is
allowed.
◆ No direct contact between lamp and eyes is allowed when the lamp is turned ON.
◆ Don't let the light in long time Power On when the light fixture with failure issue;
◎Correct steps:Onced Confirmed the light is not working properly, the power cable and signal
connection should be disconnected from the light,move to the workbench or ground for inspection;
◆ Do not switch on/off the light frequently, even if the lamp is not turned ON or installed, for which
will affect the life span of the fixture.
◆ In long time use, it’s not recommended to use over 4 hours each time, otherwise it will greatly
shorten the service life of light. The alternate operation method can be used to solve Above issue.
◆ Please cut off the power immediately if the light working with some unusual noise;
◆ If the light is strongly hit by accident, check the interior of light firstly to make sure there is no
short circuit, no electric leakage. and the lamp is fine. then , test the fixture with Power ON.
◆ Do not pack the lighting fixture into carton or flycase before it is completely cooled;
◆ After the event is finished, we suggest turn OFF the lamp by console, but let the lamp fan keep
working for a few minutes to cool down the fixture interior temperature.the bulb can be off by
console, and let the light continue
◆ When replacing the new lamp, it must be carried out at the condition that the fixture is completely
cooled and power off. Wear clean gloves, check the new lamp to make sure there is no oil stain,
dirt or fingerprints, and wipe them with clean paper or alcohol.
◆ Do not use it in wet, rain, dusty or blown sand situation if there are not enough protections.
◆ When the fixture is accidentally with water intrusion and seriously humid, the power must be cut
OFF immediately, and open cover plate, wipe off the water, and put the light in the outdoor
ventilation area to dry (the cover plate should be opened);
◆ Keep distance from the smoke machine, bubble machine, snow machine and so on to avoid
influence to the lights; if lights must be close to smoke machine, bubble machine, snow machine,
please shorten the cleaning period gab of lights.
2

Maintenance methods and attentions
1. Cleaning period: In order to ensure the light fixture to be operated normally, it should keep the
lights clean, the cleaning period generally is one month, if the light is used in a environment with
dust ,or near to the smoke machine, bubble machine or snow machine, the cleaning period should
be shortened.
2. Cleaning Method:
◎ If there is dust inside the lights, firstly use the vacuum cleaner, gasbag or air gun (with pressure)
to blow the dust on the surface gently, or use a soft brush to wipe it;
◎ Clean the optical lens, use the odorlessness tissue paper or cotton cloth to wipe the granular
material, then, use the cotton cloth soaked with ethanol (alcohol) or odorlessness paper to
remove dust and odor residue, lastly, use the distilled water for final cleaning, then dry it with a
soft cotton cloth;
◎ clean the color wheel, Gobo wheel and optical lenses ,because they are easy to be scratched,
so do not use destructive solvents for cleaning;
◎ The other parts should be cleaned by the soft cotton cloth;
◎ Clean the focus, zoom and other sliding parts should adopt the high and low temperature
resistant lubricating oil, do not use unqualified oil to effect mechanical slide;
◎ The lens and other rotating parts must be inspected regularly, keep them clean and stable,
if there is a obvious damage or looseness, it is necessary to replace or reinforce to prevent the
accident.
3. Cleaning attentions:
◎ All the lights in the cleaning and maintenance must be power off, completely disconnect from
the power, and move the light on the desk or on the ground.
◎ Do not use any paper or cloth which will produce the crumbs to clean the inside of the light.
Do not use any destructive solvent except the special cleaning solution or absolute alcohol,
and do not flush the lamp with water.
◎ Do not touch the glass bulb by hands directly to avoid the fingerprints which will lead to the
uneven heating and bulb burst.
◎ Attention intensity when clean rotation Gobo & color wheel and strobe plate to avoid the
deformation and interference, do not collide and shift the electronic induction element to keep
sensor function correctly.
◎ Do not pull the power and signal connection cables inside the light strongly to avoid the
abnormal connection.
◎ After cleaning, check the cleaning parts for deformation, stripping, disconnection or other
abnormality, make sure the alcohol and other flammable materials is completely volatile away
after cleaning, then switch on the light to avoid the fire.
3

The following are the common faulty issues of lights and the corresponding treatments. All the repairs
shall be handled by professional technician. all the fixtures must be Switch off before maintenance.
1. Faulty issue 1 : Lamp can not TURN ON
◎ Check if the lamp comes to the end of life span or damaged, then, replace the same type of lamp with
the same specifications.
◎ Check that if the fixture received the lamp turn ON order from the DMX controller or if the DMX
controller send the order to the fixture of Lamp Turn on.
◎ Check if there are too many lamps Turn ON at same time, which effect the city power in improper
operation, try to TURN ON this lamp individual .
◎ Check If the lamp is too hot ,or the interior temperature is not cool enough, which makes the lighting
fixture in lamp self-protection procedure. so, just Let the lamp cooling for more than 15 minutes with all
Power off .when the lamp and fixture cooled enough the lamp would be turned on normally .
◎ Check the DC380V power supply output & connection cables to see if they are good connection, and
check if the power supply itself is abnormal, if yes ,replace the same type of power supply.
Check if the e-ballast’s cables are connected well to the lamp, and check if the E-ballast itself work ◎
fine, If no, please replace same type of E-ballast.
Check if the electronic temperature switch is damaged, use the multimeter to check two cables marked ◎
WK on the Driver PCB ,which located on the base bottom., if these two cables are conducted means the
temperature switch is connected properly, otherwise replace the electronic temperature switch.
Check the display board menu: Information—Fans speed, check the Rump fan: FAN1, Lamp fan1, ◎
Lamp fan2, these three fans speed should be more than 500RPM,otherwise, the lamp would be turn off
automatically. if the fan speed is less than 500RPM , check these fan to see if they are workingfine , if fan
work improperly ,please replace the fan .
if the fan work proper, but the display board show wrong information, then , please replace a new display
board.
Check the menu: Information—Fixture Temperatures—LAMP TEM, check the temperature sensor near ◎
the lamp, whether the temperature is normal. Otherwise check whether the temperature sensor is
damaged or the connecting cable is abnormal.
Fa ul ty i ss ue s Ma in te n an ce
2, Faulty Issue 2 : Lamp TURN ON & OFF Automatically
Troubleshooting:
If the lamp TURN ON & OFF automatically after a few minutes, check whether the cooling system is
working properly, the failed cooling system will cause the high temperature inside the light which would
generate lamp self-protection procedure and turn OFF AND ON automatically..
◎ Check if the lamp come to the end of lifespan ,if yes , please replace the same type of lamp
◎ Check if the electronic temperature switch near the lamp is damaged or abnormal.
Check whether the electronic temperature sensor near the lamp is damaged. ◎
◎ Check the lamp fan to see if they run properly, or if there are the dust, paper scraps, foreign objects
and others cased the poor heat dissipation.
◎ When the lamp fans are working well, check the display menu, Information—Fans speed, check Rump
fan. Check the FAN1/Lamp fan1/Lamp fan2, if one of the fan speed is 0 or with an unexpected data
fluctuation, and the lamp ON/OFF in a short time, check the Yellow fan cable to see if connect well.
◎ Check whether the power is under-supply, or the power supply DC28V output is abnormal.
4

3.Faulty issue 3: The spot is off-center, dark, uneven:
Troubleshooting:
◎ Check if the lamp come to the end of service life which cause the brightness insufficient,replace the
same model lamp .
◎ Check if there is dust on the optical components, clean it.
◎ Check if the power is under-supply.
◎ When the spot is off-center in left & right direction, finely adjust the lamp screw to change the lamp
position until the ideal spot.
◎ When the spot is off-center in up & down direction, please refer the 'User Manual' and adjust it via
display board menu, the following is the steps: Menu— SERVICE— Calibration— STAT Gobo— Gobo,
then adjust the spot. the password is 2222.
4. Faulty Issue 4: Reset failure, display board failure
Troubleshooting:
◎ Make sure the lighting fixture connect normally with the city power.
◎ Open base cover, check if the fixture’s power supply input fuse is burned.
◎ Check if the fixture’s power supply input and output voltage is normal.
◎ Check the fixture’s interior connection cables and plugs to see if they are in good conditions.
◎ Check if the display screen is damaged, replace a new display board .
5. Faulty Issue 5: the fixture is out of control
Troubleshooting:
◎ Make sure the DMX IP address is correct.
◎ Open base cover, check if the cables between DMX connector-- the X/Y board-- the Display
board are in good connection.
◎ Check if signal cable have broken circuit and short circuit, if the display board keep flashing
means the signal connection is abnormal .
◎ Check if console setup is correct and ensure the console output signal is working.
◎ Check if the communication chip on display board is burned, if yes, please replace a new display
board.
The light fixtures start to be out of control or disorder after several hours working: the main reason◎
is the PCB boards are in bad heat radiation, which means too hot. then, Open the base box cover,
clean the fan dust, make sure the fans are normal working, then clean up the air inlet and outlet.
Abnormal operation, which means the user adopts “ ONE ORDER, Multi-pcs fixture ON” working ◎
way. it generate Ten Thousand V Power to ignitor the lighting fixture in one second, which cause
the fixture out of control , PCB board burned etc. so, the factory recommend “ ONE ORDER ,
ONE FIXTURE ON”
5

6. Faulty Issue 6: The Gobo wheel, color wheel or CMY module is stuck, or with shaking,stepping
out and out of control performance
Troubleshooting:
◎ The stuck issue is usually caused by the mechanical reasons, such as the Gobo wheel or color
wheel is deformed , the screw is loose etc.
◎ shaking , stepping out or out of control maybe caused by the screw loose and missing, but the
damage of the related chips in the PCB, interior bad cables connection, the damage of motors
are would be the reason of these issue.
Method of confirming the Motor cause: first, find the corresponding motor cable, for example, the
GOBO wheel is M, find the M position in the PCB. Measure the motor with a multi meter. if the
motor is damaged, replace the motor. If the cable is bad connection, fix it.
◎ Check the space between the small magnet and the sensor, the best distance should be between
1.0-2.0mm, the big distance will case the inaccurate location or asynchronous.
7. Faulty Issue 7 :The focus or prism has big noise, stuck ,and stepping out.
◎ The focus and prism have sliding parts, if there are some noise, shake, stuck, it's generally caused
by lacking of mechanical lubricant or blocked by massive dust, it needs to be cleaned regularly, and
add heat-resistant and cold-resistant lubricant.
◎ The focus stuck may be caused by the motor damage or the screws on the motor are loose or
missing.
◎ The aging, loose or broken of prism belt would cause the issue of prism and focus ‘s stuck,
stepping out.
◎ The stuck and stepping out: Except the above reasons, the other cause maybe: the damage of
the corresponding chip on the PCB, the bad connection of motor cable, the cable short circuit to
the ground, or the motor damage.
6

8. Faulty Isssue 8: the PAN/TILT direction out of step, no position correct, bad synchronization
Troubleshooting:
◎ Check if the PAN/TILT sensor are covered with too much dust , clean it water-free alcohol.
◎ Check if the PAN/TILT sensor are damaged. when POWER ON, manually move the Pan/ Tiltbut
no reset, it means the PAN/TILT sensor are damaged, then replace the new ones.
◎ The wrong distance between the PAN/TILT senor and sensor data reading wheel, the sensor
data reading wheel should be in the middle position, and no scrape, no collide, no rub.
◎ For outdoor use, check if there is water appears on the sensor data reading wheel, which would
cause PAN/TILT issue.
◎ Check if the cable of PAN/TILT motors are loose and bad contact.
◎ Check if the PAN/TILT belt is too tight, aging or loose, adjust or replace the belt.
◎ When PAN/TILT position is deviate from original, please enter into Display board MENU, and the
adjust steps are as followings: SERVICE—Adjust—Pan or Tilt, adjust it , Exit it.
7
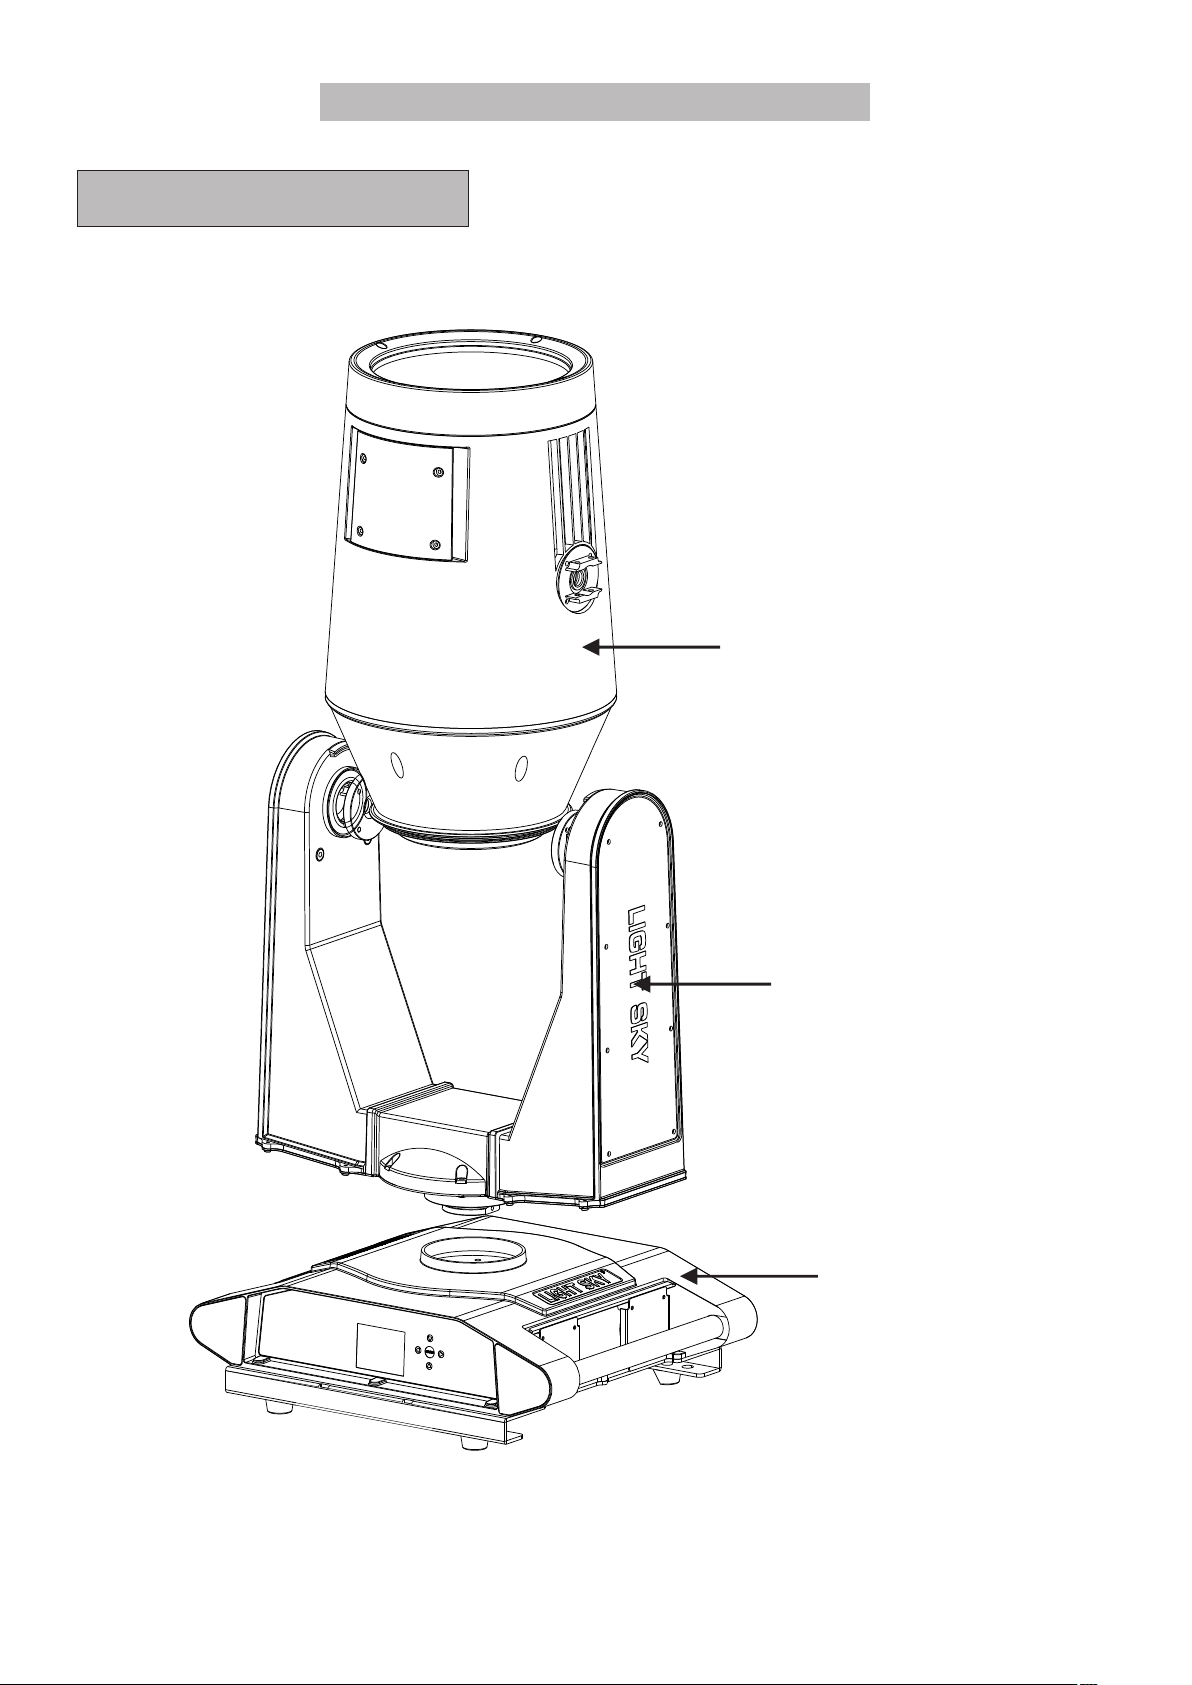
Exploded view
Brief exploded view
Head module
U-arm m o d u l e
Base module
8
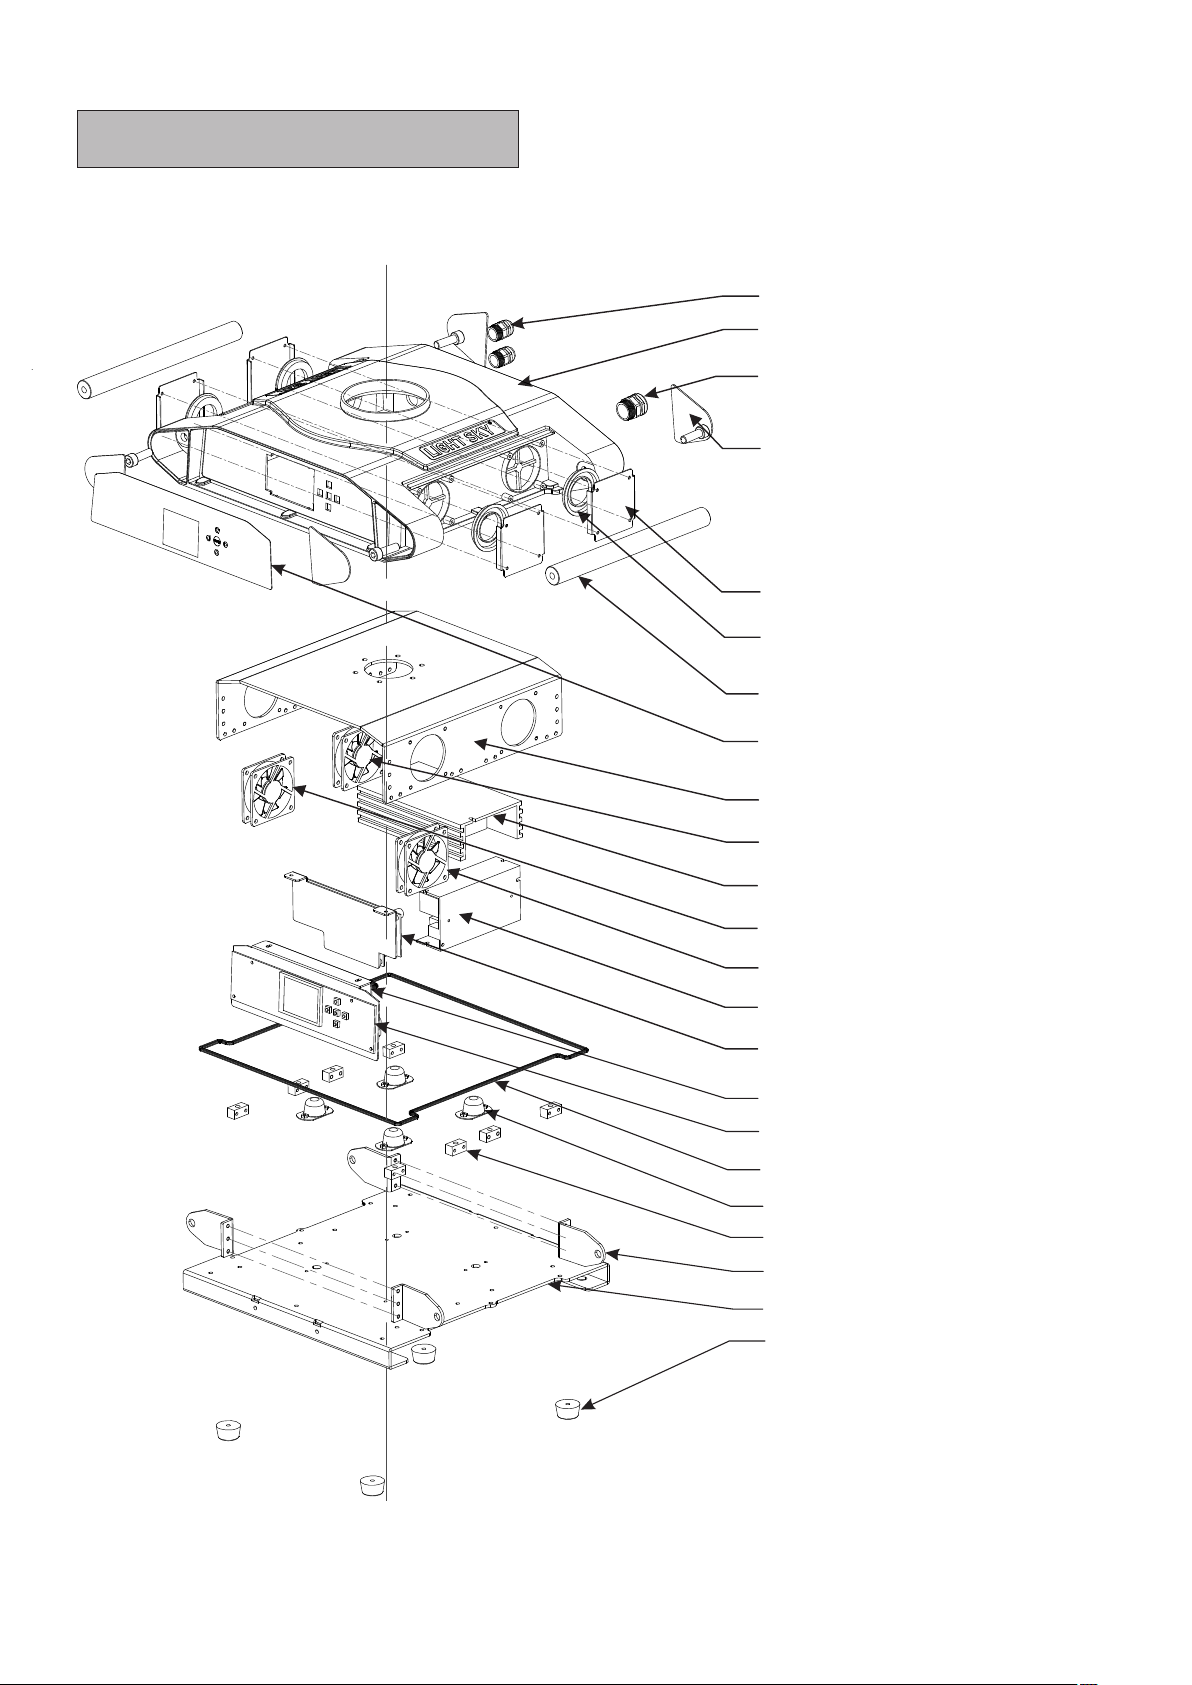
Base exploded view
Item number
1: M1300767
2: M03014008
3: M1300768
4: M01028005
5: M01028003
6: M02028018
7: M02028001
8: M23020003
09: M01028002
10: M1200101(Fan,6*6)
11: M1000962(600W power supply)
12: M1200101(Fan,6*6)
13: M1200111((Fan,IP3000)
14: M1000954A(150W power supply)
15: Z0600100099(X/Y board)
16: M1501230(E- b a l l a s t)
17: Z0600300004A(display board)
18: M03014013A
19: M0102171
20: M02028002
21: M01028004
22: M01028001
23: M0300308
9
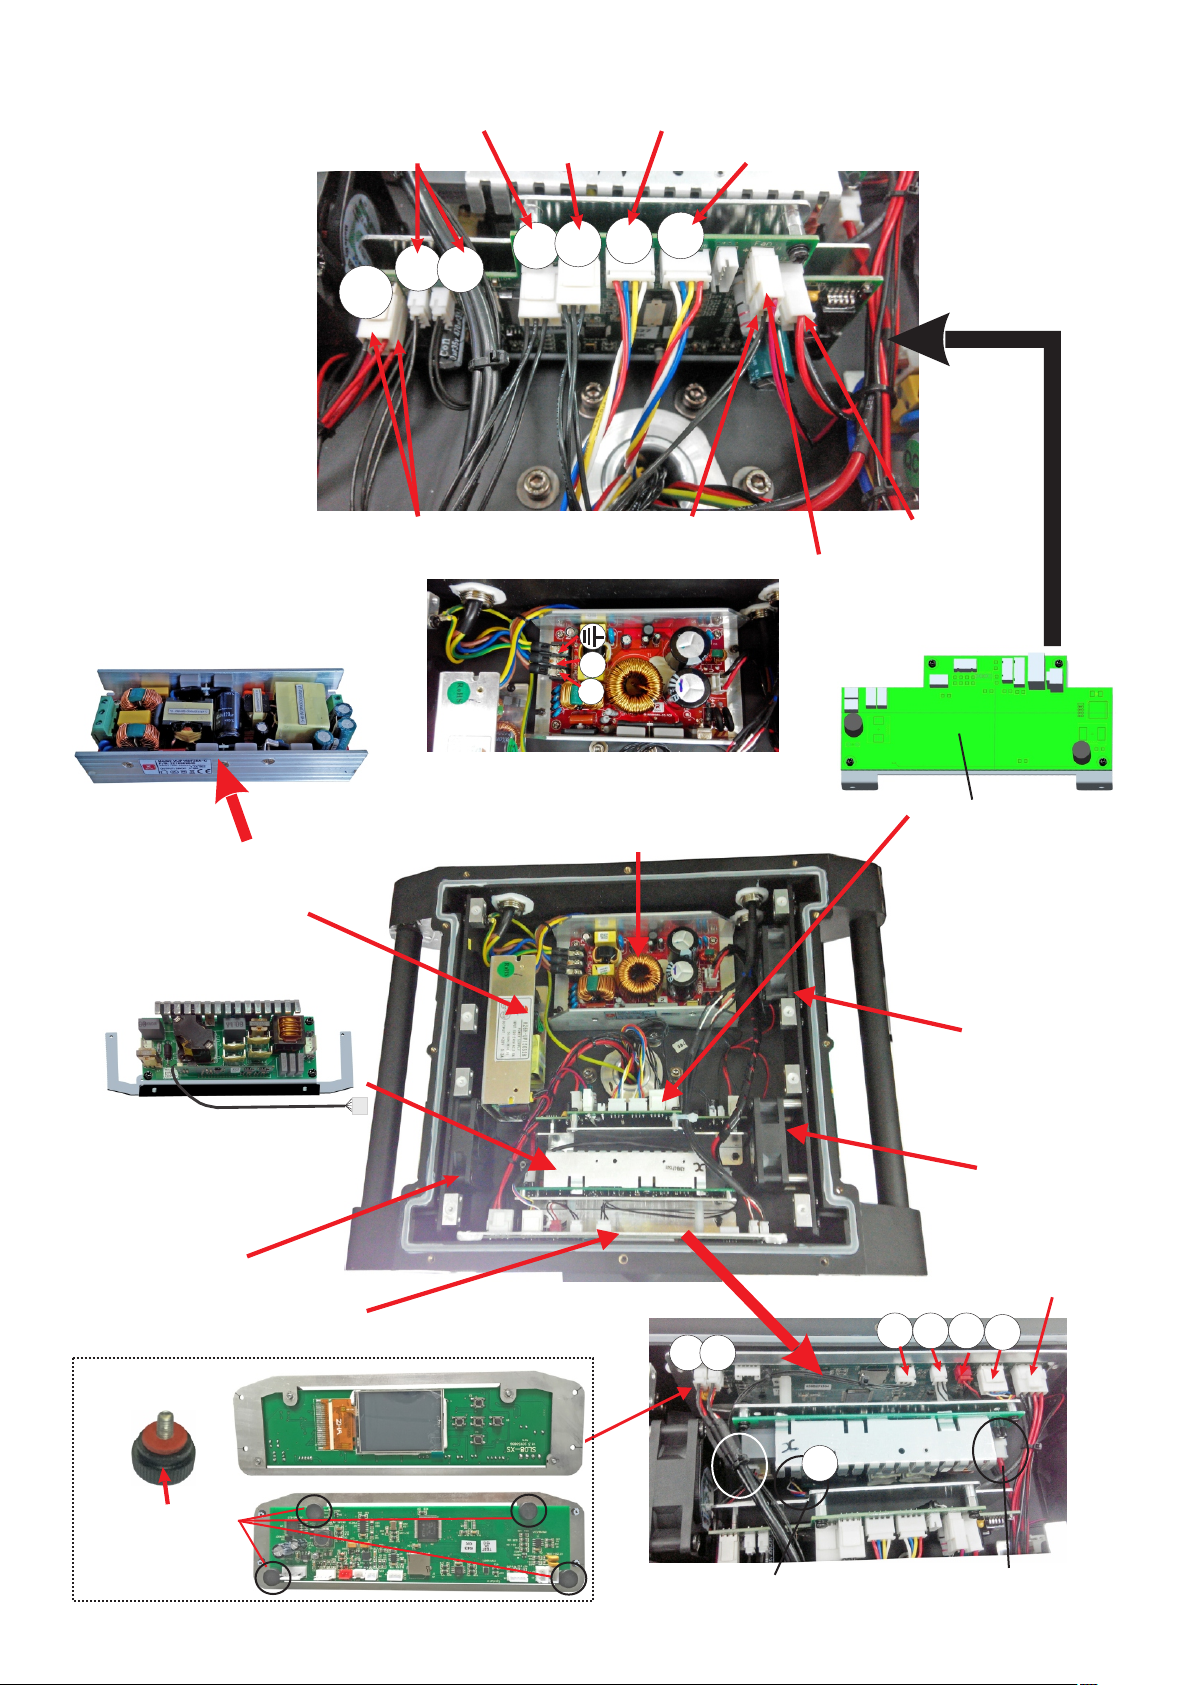
Signal cable
BUS
FA N
X motor cable
Y motor cable
BUS 1
X
Y
X sensor cable
Y sensor cable
Y1
X1
Base 12V fan cable
Item number: M 1 0 0 0 9 5 4 A
VUP150 F 2 8 A344
IN:100 - 2 4 0VAC 50/60 H z
OUT:28 V D C 5 .36A
150W Pow e r s u pplier
U-arm 24V fan cable
Base 24V fan cable
N
L
Item number: M 1 0 0 0 9 6 2
RUP6 0 0F380 A
AC10 0 -240V A C 380, 1 . 58A
600W P o wer sup p lier
X/Y PCB power cable
X/Y PCB pa r t
Fan
Item number: M1200101
E-Ballast
Item number: M1501230
Fan
Item number: M1200111
Display board
Item number: Z0600300004A
manual screw
DMX D M X
Lamp con t r o l cable:LA M P
10
LAMP
Fan
Item number: M1200101
Pow e r sup ply
BUS
TEM
LAMP
SW
E-ball a s t - Lamp
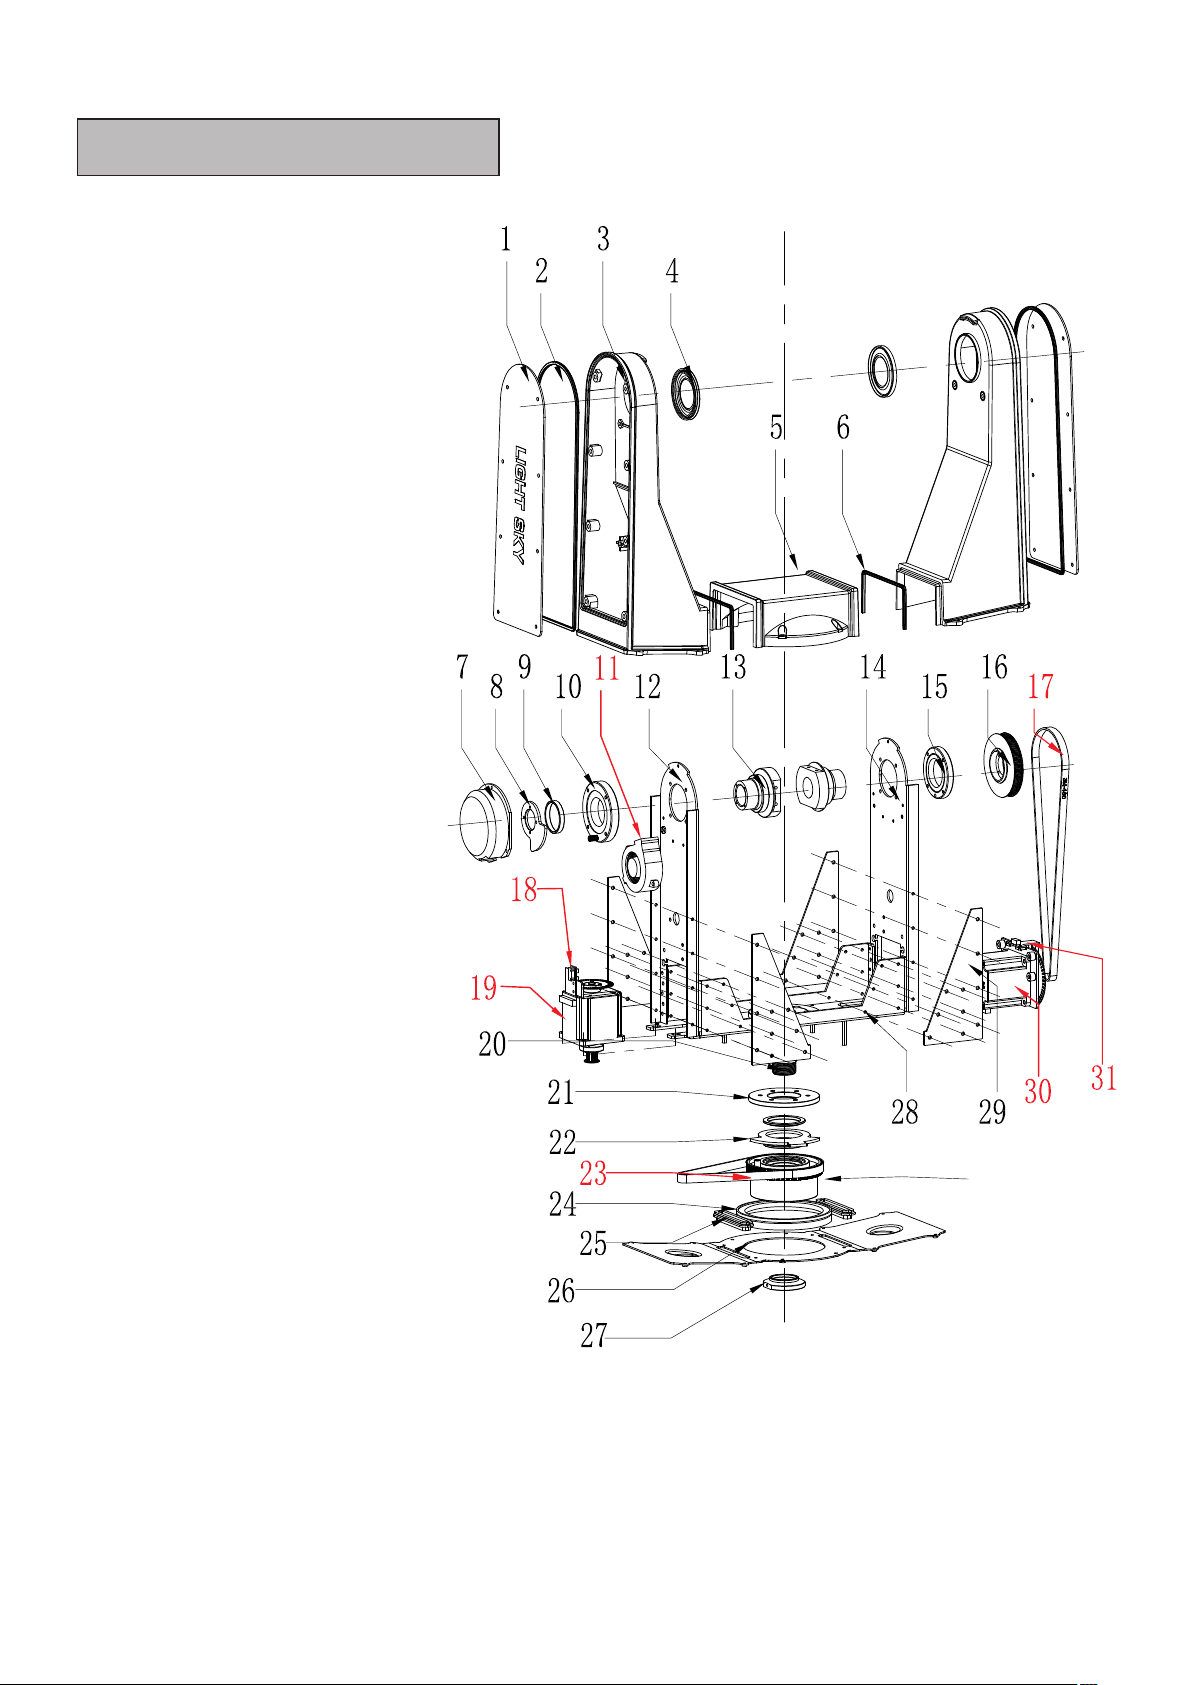
U-ar m exploded view
Item number
1: M01028012
2: M03014013A
3: M03014007
4: M03014011
5: M03014006
6: M03014013A
7: M02028027
8: M01028016
9: M02028013
10:M02028005A
11:M1200521(Fan)
12:M01028010A
13:M02028006
14:M01028010
15:M02028005
16:M02028007
17:M0800256A(Belt)
18:Z0600500004(position board)
19:M0500639(motor)
20:M02028008
21:M02028009
:22 M 0 102513
23:M0800213B(Belt)
:24 M 0 3014014
:25 M 0 3014015
:26 M 0 1028014
:27 M 0 202503
:28 M 0 1028009
32
:29 M 0 1028015
30:M0500640(motor)
31:Z0600538(Position board)
:32 M 0 2028010
11
 Loading...