

Page 1
QCOMMANDER REPLICA
Instruction Manual
Mode d’Emploi
Bedienungsanleitung
Manual de Instrucciones
20, Greenhill Crescent
Watford WD18 8JA
England
Tel: 01923 6908090
Fax: 01923 698081
info@lightprocessor.co.uk
www.lightprocessor.co.uk
REP/UNI/07/01
Page 2

Page 3

QCommander Replica English, Français, Deutsch, Español
Page 1
Page 4

QCommander Replica English, Français, Deutsch, Español
Page 2
INTRODUCTION
The QCommander Replica is a partner product to LightProcessor’s QCommander controller. It is
designed for use in situations where further programming of the lighting is not envisaged and the
requirement is simply to play back previously-recorded programmes, usually in a non-mobile
application such as a museum or retail premises.
It is programmed via a PCMCIA card (supplied with the Replica), which has previously been used to
extract the memory contents of the QCommander on which the programmes were made. Once
loaded, the Replica functions independently and the QCommander is no longer required. It may
subsequently be re-programmed in the same way.
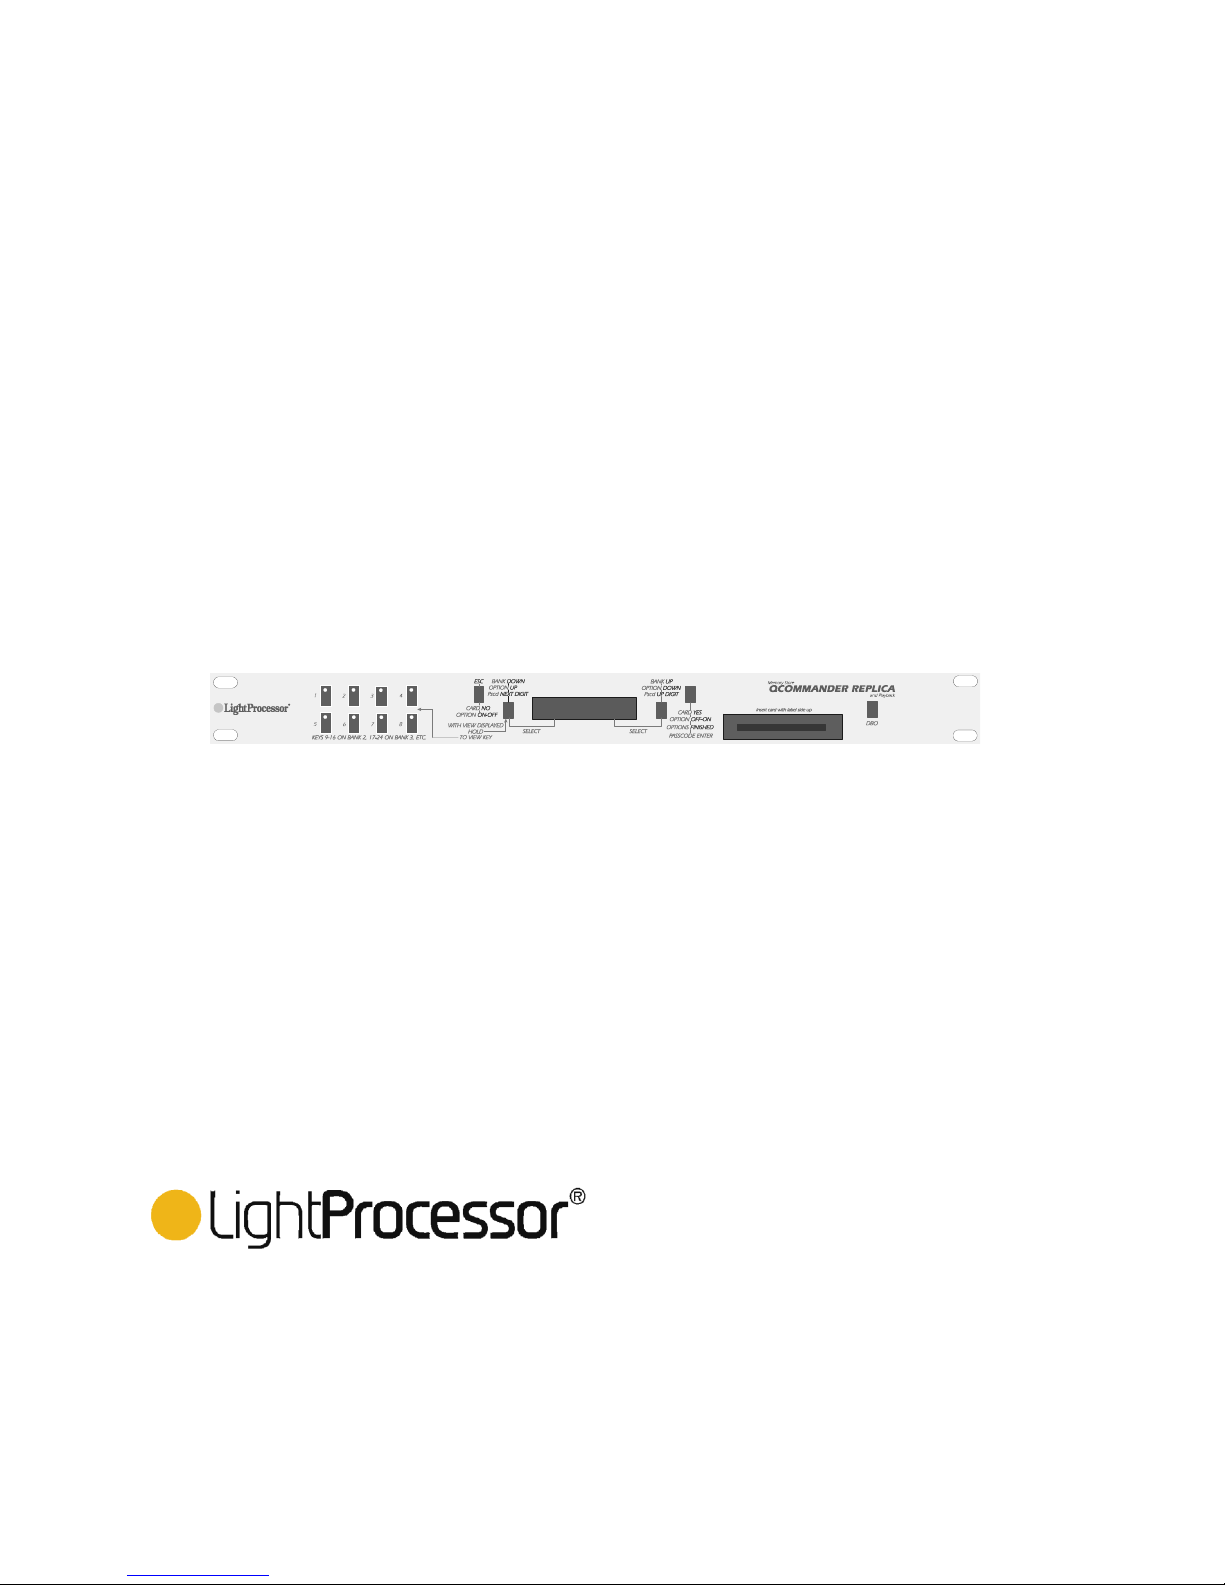
The Replica is a 19 inch rack-mounting device, taking up one unit of rack space. It is operated via the
front panel. Note that the function of a control button changes according to what is showing in the
display.
CONNECTIONS
The Replica incorporates a universal voltage power adapter and may be plugged directly into the
mains. The mains lead connects via the rear panel.
All control connections are made to the rear panel. Output is DMX via a 5-pin XLR connector. There is
a mono Jack socket for the input of an audio signal, so that effects may be output, synchronised to
music. A 25-pin sub-D connector allows for the connection of a 16-way analogue device (for example,
the QCommander Input Extender) for the operation of any patches that have been programmed. A
9-pin sub-D connector has been fitted to allow for RS232 functions in later versions of the product but
note that they are not implemented in this version. The Replica has MIDI in, out and thru capabilities.
POWER UP
When power is applied to the Replica, it performs a self test and, during this time, the word QReplica
is shown in the display. At the end of the self test you will see the words RUN and SET in the display.
The Replica is now ready for use.
RUN
Stored effects are played back in RUN mode. There are sixty-four virtual output buttons arranged as
eight actual buttons on eight BANKs. The sixty-four virtual buttons correspond to the QCommander’s
output buttons and are numbered accordingly. Buttons 1-8 of the QCommander are found on Bank 1,
9-16 on Bank 2, 17-24 on Bank 3 etc. See diagram 1. A blackout is effected by pressing the
BLACKOUT switch but see System Option 4.
With RUN in the left side of the display press the left hand SELECT button. The display shows VIEW
and BANK. Press BANK. To move between the BANKs, press the BANK UP or BANK DOWN
buttons.
Press any one of the numbered buttons 1-8 to output the effect(s) contained in that button. To view
the contents of the button, hold down the VIEW button and press the button.
Note that the Replica has no access to the QCommander’s GO and FREEZE commands.
SET
SET is used to set up the four-digit passcode that protects the SET menu from unauthorised access. It
is also used to access the memory card functions and the system options. The memory card functions
allow you to load a QCommander’s memory into the Replica and to load a Replica’s memory content
into a memory card. A specially-programmed memory card may also be used to update the operating
system.
Page 5

QCommander Replica English, Français, Deutsch, Español
Page 3
SETTING AND ENTERING THE PASSCODE
You may enter a passcode to protect both the RUN and SET menus . When your Replica is delivered,
the passcode 0000 is in place and all menu levels are open. Setting up the passcode with anything
other than 0000 invokes the security system. Any security system in place may be cancelled by
re-instating the passcode 0000.
With SET in the right hand side of the display press the right hand SELECT button. With PSCD in the
right hand side of the display press the right hand SELECT button. Press RUN or SET to choose the
menu to protect. The display now shows 0000. Press PSCD UP DIGIT. Note that after 9 the display
passes back to 0. To select a digit and move to the next, press PSCD NEXT DIGIT. When all four
digits have been set, MAKE A NOTE OF THE CODE AND PUT IT SOMEWHERE SAFE. Press
PASSCODE ENTER.
You will subsequently need to enter the passcode to go beyond the RUN/SET display when you
select SET.
CARD
The QCommander Replica uses a PCMCIA card, type 1, 512Kb, SRAM. Note that there are various
options available within this specification, such as rechargeable batteries, and these will affect the
price you pay.
The memory cards supplied by LightProcessor are of the rechargeable type. From discharged to fully
charged takes approximately 40hrs. When dispatched from our factory, cards are nominally fully
charged and should be able to store data for up to eighteen months without corruption. However, we
recommend that cards are charged every six months.
To charge a card, insert it in the card slot and select CARD when in the CARD/PSCD display. The
card must be inserted in its slot to perform card operations. If it is not, you will receive an error
message.
Formatting the card
A previously-unused card will need to be formatted before it can receive data. Use the
BACKUP routine described below.
Backing up and Restoring Data
In the RUN/SET display select SET to access the CARD/PSCD display. Select CARD to
access the SYSTEM/DATA display. Select DA TA to access the BACKUP/RESTORE display.
To save the Replica’s memory to the card, select BACKUP. At the prompt
‘overwrite card?’ or (‘create new backup card?’ when formatting a new card), press
CARD YES. You will see the message ‘Do not interrupt.’ When you see the message
‘Transfer Done’, press ESC. The Replica will then return to the RUN/SET display.
To upload a card’s contents into the Replica, select RESTORE. At the prompt
‘overwrite memory?’, press CARD YES. You will see the message ‘Do not interrupt.’
When you see the message ‘Transfer Done’, press ESC. The Replica will then return
to the RUN/SET display.
Installing a New Operating System and Changing System Options
In the RUN/SET display select SET to access the CARD/PSCD display. Select CARD to
access the SYSTEM/DATA display. Select SYSTEM to access the OPTIONS/NEW display.
To update the operating system, select NEW. The display prompts ‘Install new
sys?’ Press CARD YES. The system will update and then return to the QREPLICA
display and then RUN/SET.
Page 6

QCommander Replica English, Français, Deutsch, Español
Page 4
To change the system options, select OPTIONS. Scroll down the list of options
using the OPTION DOWN button and up the list with the OPTION UP button. Press
the OPTION ON-OFF button to de-select a selected option. Press the OPTION OFFON button to select a de-selected option. Press OPTIONS FINISHED? OK? to return
to the OPTIONS/NEW display.
The options are explained as follows:-
01 Autoplay ON/OFF. Default = OFF. The Replica may be set up to automatically
play back the contents of a previously-selected output button immediately power is
applied: the button will have been previously selected using option 14.
02 MenuTimer ON/OFF. Default = OFF. With the menu timer ON, the display reverts
to RUN/SET after 30 seconds if no further buttons are pressed.
03 CommsMode MID/232. Default = MIDI. RS232 not yet implemented.
04 BlackAll ON/OFF. Default = OFF. Only channels of the type shutter and Dimmer
are affected by the operation of the Blackout switch. When set to ON, all channels go
to 0 when the blackout button is pressed.
05 Send MIDI ON/OFF. Default = ON. Must be set to ON to enable MIDI out.
06 MIDIrxchn 0-15. Default = 0. The button OPTION OFF-ON increases the channel
number; OPTION ON-OFF decreases the channel number.
07 MIDIOmni ON/OFF. Default = OFF. When set to ON, the Replica receives on all
channels 0-15.
08 ScnsFade ON/OFF. Default = OFF. Fade-out times on static scenes are ignored,
as they could clash with fade-in times on subsequent scenes.
09 InstSY&FX ON/OFF. Default = OFF. When set to ON, the installation of a new
system also updates the fixture library.
10 RptShow ON/OFF. Default = OFF. A show may be set to run just once or to loop
continuously until manually switched off by setting this option to ON.
11 AskStrike ON/OFF. Default = OFF. This option may be set to ON to allow for
those intelligent fixtures which must be specifically switched on before use. If set to
ON, you are asked after the opening QReplica screen whether you wish to strike the
lamps.
12 AutStrike ON/OFF. Default = OFF. Set this option to ON to automatically strike
the lamps of those fixtures that require to be specifically switched on.
13 P-showBlk ON/OFF. Default = ON. Calls a blackout before a show runs.
14 Startkey 001. Default = 0. Choose a key for the autoplay option. See option 01.
15 MIDIOffset 000. Default = 0. The default MIDI map starts at note 0, applying to
button 1 on bank 1. An offset may be applied using this option, using the OPTION
OFF-ON and OPTION ON-OFF buttons.
16 Erase mem OK? Resets all options to default. Empties all memories.
To end, use OPTION UP to get to option ’00 FINISHED? OK?’ Press OPTIONS FINISHED to
go back to the OPTIONS/NEW display. Use ESC to go back through the menu levels to
RUN/SET.
Page 7

QCommander Replica English, Français, Deutsch, Español
Page 5
NOTES ON USING MIDI
To enable MIDI you must first ensure that option 03 is set to MIDI. Then set option 05 to ON if you
wish to use MIDI out.
The Replica sends MIDI OUT only on MIDI channel 0.
By default the Replica receives MIDI on channel 0, although it can receive on any channel 0-15. To
setup which channel the Replica will receive, use option 06. To setup the Replica to receive on any
MIDI channel 0-15 (omni on), use option 07.
The Replica’s 64 output keys are used to send and receive MIDI. See diagram 2 at the end of this
manual for details of send and receive music and MIDI notes. Option 15 allows you to offset the MIDI
note map, i.e. the first button on the Replica does not have to be note 0.
Outputting a MIDI note by pressing a key will activate the same numbered key on any QCommander
or Replica receiving MIDI IN on that channel (whatever the contents of the receiving key might be). It
is therefore possible to use multiple QCommanders and Replicas as a Master and Slaves.
FOR EASE OF REFERENCE THE MENU STRUCTURE OF THE REPLICA IS SET OUT IN
DIAGRAM NO. 3 AT THE END OF THIS MANUAL.
Page 8

QCommander Replica English, Français, Deutsch, Español
Page 6
INTRODUCTION
La QCommander Replica est un produit complémentaire à la QCommander de LightPro cessor. Elle a
été conçue pour une utilisation dans les situations où les changements fréquents de programmation
ne sont pas envisagés et où vous voulez tout simplement restituer les programmes préalablement
enregistrés, par exemple dans une installation non-mobile comme une musée o u un magasin.
Vous la programmez au moyen d’une carte PCMCIA (fournie avec votre Replica) que vous utilisez
pour extraire le contenu de la mémoire de la QCommander dans laquelle vous avez enregistré votre
programmation. Une fois chargée, la Replica fonctionne indépendamment et vous pouvez emmener
la QCommander. Vous pouvez re-programmer la Replica de la même manière.
La Replica est un appareil rackable dans 1U d’espace. Le câble entre dans le boîtier par la face
arrière. Les boutons de contrôle se trouvent sur la face avant. Notez qu’ils changent leur fonction
selon ce qui est affiché.
CONNECTIONS
L’alimentation 115/230V (PSU) est intégrée et vous raccordez la Replica directement au secteur. Le
câble entre par la face arrière.
Toutes les connections se font par la face arrière. Le protocol de sortie est DMX au moyen d’une fiche
XLR à cinq broches. Il y a une entrée audio en mono pour synchroniser avec la musique. Une prise
sub-D à 25 broches permet la connection d’un appareil analogique à 16 voies (par exemple la
QCommander Input Extender), pour faciliter l’opération des patches que vous pouvez enregistrer
dans la QCommander. Une prise sub-D à neuf broches permet un fonctionnement en RS232 dans les
versions futures. La Replica dispose des fonctions MIDI in, out et thru.
MISE EN MARCHE
Quand vous mettez en marche la Replica, elle exécute un test interne. Vous voyez dans l’afficheur le
mot QReplica. Au bout du test vous voyez dans l’afficheur les mots RUN et SET. La Replica est prête
pour l’emploi.
RUN
Dans le mode RUN vous restituez les effets enregistrés. Les 64 boutons virtuels de sortie sont rangés
sur huit pages [BANKS]. Les 64 boutons correspondent de la manière suivante aux 64 boutons de
sortie de la QCommander. Les boutons 1-8 (de la QComander) se trouvent sur BANK 1, 9-16 sur
BANK 2, 17-24 sur BANK 3 etc. Voyez le diagramme no. 1. Utilisez le bouton BLACKOUT pour
produire un noir sec mais voyez aussi l’option no. 4.
Quand le display affiche RUN/SET appuyez sur le bouton SELECT à gauche. Le display affiche VIEW
et BANK. Appuyez sur BANK. Pour passer entre les pages [BANKS], appuyez sur les boutons BANK
UP et BANK DOWN.
Appuyez sur n’importe quel des boutons numérotés 1-8 pour sortir l’effet mémorisé dans ce bouton-là.
Pour voir le contenu d’un bouton, maintenez poussé le bouton VIEW et appuyez sur le bouton.
Les commandes GO et FREEZE de la QCommander n’existent pas dans la Replica.
SET
Vous utilisez SET pour établir le code de passe qui protège le menu SET d’un accès non-autorisé. En
plus vous l’utilisez pour avoir accès aux fonctions de la carte mémoire et les options du système. Les
fonctions de la carte vous permettent de charger la mémoire de la Replica avec le contenu d’une
carte qui a été chargé à son tour avec la mémoire d’une QCommander. Elles vous permettent aussi
de conserver la mémoire d’une Replica sur une carte. Une carte spéciale peut être utilisée pour
mettre à jour le système opératoire de la Replica.
Page 9

QCommander Replica English, Français, Deutsch, Español
Page 7
ETABLISSEMENT ET UTILISATION DU CODE DE PASSE
Vous pouvez protéger les deux menus SET et RUN au moyen d’un code de passe. Quand vous
recevez votre Replica, elle a le code de passe 0000 et tous les niveaux du menu sont ouverts.
L’entrée de n’importe autre code arme le système de sécurité. Vous pouvez annuler le systè m e de
sécurité, en entrant de nouveau le code 0000.
Quand le display affiche à droite le mot SET, appuyez sur le bouton SELECT à droite. Quand le
display affiche à droite les lettres PSCD, appuyez sur le bouton SELECT à droite. Appuyez sur RUN
ou SET pour choisir le menu à proteger. Vous voyez affiché 0000. Appuyez sur PSCD UP DIGIT.
Notez qu’après le 9, le display retourne à 0. Pour sélectionner un chiffre et passer au prochain,
appuyez sur PSCD NEXT DIGIT. Quand vous avez entré les quatre chiffres NOTEZ VOTRE CODE
DE PASSE ET CONSERVEZ-LE EN SECURITE. Appuyez sur PASSCODE ENTER.
Désormais vous devrez entrer le code de passe pour passer au delà de SET quand vous voyez
affiché RUN/SET.
CARTE
La Replica emploie une carte PCMCIA type 1, 512Kb, SRAM. Notez qu’il y a disponible de différentes
options qui correspondent à cette spécification, pour exemple les batteries rechargeables, et elles
détermineront le prix à payer.
Les cartes fournies par LightProcessor sont du type rechargeable. Il prend approximativement 40
heures pour charger une carte complètement plate. Lors de l’envoi de notre usine les batteries sont
chargées et devraient tenir leur charge depuis 18 mois mais nous recommandons néanmoins que
vous chargez la batterie tous les six mois. Pour charger une carte, insérez-la dans la fente et
sélectionnez CARD quand il est affiché dans le display.
Il est obligatoire que la carte est insérée dans la fente avant de commencer les opérations de carte,
sinon vous verrez un message d’erreur dans le display.
Formatage de la Carte
Vous devez formater une carte neuve avent qu’elle puisse recevoir les données. Employez la
procédure BACKUP qui suit.
Mémorisation des Données à la Carte et Chargement dans la Replica
Quand le display affiche RUN/SET, choisissez SET pour passer au display CARD/PSCD. Choisissez
CARD pour passer au display SYSTEM/DATA. Choisissez DATA pour passer au display
BACKUP/RESTORE.
Pour conserver la mémoire de la Replica sur la carte, choisissez BACKUP. Au message
de guidage ‘overwrite card?’ [remplacer les données existantes] ou (‘create new backup
card?’ durant un formatage), appuyez sur CARD YES. Vous verrez le message ‘Do not
interrupt’ [ne pas interrompre]. Quand vous voyez le message ‘Transfer done’ [transfert
terminé], appuyez sur ESC. La Replica retournera au display RUN/SET.
Pour charger le contenu d’une carte dans la Replica, choisissez RESTORE. Au message
de guidage ‘overwrite memory?’ [remplacer les données existantes] appuyez sur CARD YES.
Vous verrez le message ‘Do not interrupt’ [ne pas interrompre]. Quand vous voyez le
message ‘Transfer done’ [transfert terminé], appuyez sur ESC. La Replica retournera au
display RUN/SET.
Installation d’une Nouvelle Système Opératoire et Changement des Options
Quand le display affiche RUN/SET, appuyez sur SET pour passer au display CARD/PSCD.
Choisissez CARD pour passer au display SYSTEM/DATA. Choisissez SYSTEM pour passer au
display OPTIONS/NEW.
Page 10

QCommander Replica English, Français, Deutsch, Español
Page 8
Pour mettre à jour le système opératoire, choisissez NEW. Le display demande ‘install
new system?’ [installer un nouveau système?]. Appuyez sur CARD YES. Le système se
mettra à jour et puis vous verrez le display QREPLICA avant de retourner à RUN/SET.
Pour changer les options de système, choisissez OPTIONS. Défilez par la liste des
options au moyen des boutons OPTION DOWN et OPTION UP. Appuyez sur les boutons
OPTION ON-OFF et OPTION OFF-ON pour changer l’option. Appuyez sur OPTIONS
FINISHED ? OK?, pour retourner au display OPTIONS/NEW.
Les options disponibles sont les suivante s: -
01 Autoplay ON/OFF. Par défaut = OFF. Vous pouvez programmer la Replica pour une
restitution automatique lors de la mise sous tension sans la necessité d’appuyer sur un
bouton de sortie. Vous choisissez le bouton désiré dans l’option no. 14.
02 MenuTimer ON/OFF. Par défaut = OFF. Mise à ON, le display retourne à RUN/SET au
bout de quelques secondes, si vous n’appuyez pas sur n’importe quel autre bouton.
03 CommsMode ON/OFF. Par défaut = MIDI. RS232 pas encore disponible.
04 BlackAll ON/OFF. Par défaut = OFF. Normalement c’est seulement les canaux shutter ou
dimmer qui sont asujettis à l’opération du bouton Blackout. Quand l’option est mise à ON,
tous les canaux sont asujettis à l’opération du bouton Blackout.
05 Send MIDI ON/OFF. Par défaut = ON. Si vous voulez utiliser MIDI out, vous devez
sélectionner ON.
06 MIDIrxchn 0-15. Par défaut la Replica reçoit MIDI sur le canal 0. Appuyez sur le bouton
OPTION OFF/ON pour augmenter le numéro de canal et sur OPTION ON/OFF pour le
réduire.
07 MIDI Omni ON/OFF. Par défaut = OFF. Si vous sélectionnez ON, la Replica reçoit MIDI
sur tous les canaux 0-15.
08 ScnsFade ON/OFF. Normalement vous sélectionnez OFF, pour ne pas tenir compte du
temps de descente après une scène, parce qu’il pourrait être en conflit avec le temps de
montée de la prochaine.
09 InstSY&FX ON/OFF. Par défaut = OFF. Sélectionnez ON pour mettre à jour la
bibliothèque des projecteurs asservis lors de la mise à jour du système opératoire.
10 RptShow ON/OFF. Par défaut = OFF. Sélectionnez ON pour qu’un show défile en
continuation et OFF pour qu’il défile une seule fois.
11 AskStrike ON/OFF. Par défaut = OFF. Il y a des marques de projecteurs dont les lampes
doivent être spécifiquement allumées avant l’utilisation des projecteurs. Si vous utilisez cette
option, l’afficheur vous demande lors de la mise sous tension, si vous voulez allumer les
lampes. - ‘Strike Fixture Lamps?’ STORE: Allumer, ESCAPE: Annuler.
12 AutStrike ON/OFF. Par défaut = OFF. Il y a des marques de projecteurs dont les lampes
doivent être spécifiquement allumées avant l’utilisation des projecteurs. Cette option rend la
procédure automatique. Lors de la mise sous tension l’afficheur montre ‘Striking Lamps.’
13 P-showBlk OFF. Par défaut = ON. Pour éviter les conflits d’instructions, tous les canaux
sont éteints avant de sortir un show.
14. Startkey. Par défaut = 0. Choisit le bouton pour l’option Autoplay. Voyez l’option 01.
Page 11

QCommander Replica English, Français, Deutsch, Español
Page 9
15. MIDI Offset 000. Par défaut = 0. Le plan MIDI par défaut commence à la note 0, qui
correspond au bouton 1 sur BANK 1. Au moyen de cette option vous pouvez déplacer la note
MIDI. Utilisez les boutons OPTION OFF-ON et OPTION ON-OFF.
16. SysReset OK. Remet toutes les options à leur valeurs par défaut et vide toutes les
mémoires.
Pour terminer, utilisez le bouton OPTION UP pour arriver à 00 FINISHED? OK? Appuyez sur
OPTIONS FINISHED pour retourner au display OPTIONS/NEW et puis sur ESC pour passer par les
niveaux du menu vers le haut.
A PROPOS DE L’UTILISATION DE MIDI
Avant de pouvoir utiliser MIDI vous devez assurer que l’option 03 est mise à MIDI. Puis mettez l’option 05 à
ON si vous voulez utiliser MIDI out.
La Replica transmet les signaux MIDI OUT uniquement sur le canal 0.
Par défaut la Replica reçoit MIDI sur le canal 0, quoiqu’elle puisse recevoir les signaux MIDI IN sur les canaux
0-15. Pour déterminer sur quel canal la Replica va recevoir, utilisez l’option 06. Pour recevoir sur tous canaux
0-15, mettez l’option 07 à ON.
Nous utilisons les 64 boutons virtuels de sortie pour transmettre et recevoir les signaux MIDI (voyez le
diagramme no. 2 à la fin de ce manuel). L’option 15 vous permet de faire un déplacement du plan MIDI, c’est
à dire qu’il n’est pas obligatoire que le premier bouton du Replica soit la note 0.
Si vous transmettez une note MIDI en appuyant sur un bouton de sortie, le même bouton sur un autre Replica
ou QCommander qui reçoit le canal 0 sera déclenché et le contenu transmis aux sorties. Il est donc possible
d’utiliser les Replicas et les QCommanders en mode maìtre/esclave.
VOYEZ LE DIAGRAMME NO. 3 A LA FIN DE CE MANUEL QUI MONTRE LA STRUCTURE ENTIERE DU
MENU.
Page 12

QCommander Replica English, Français, Deutsch, Español
Page 10
EINFÜHRUNG
Die QCommander Replica ist ein Partner-Produkt des QCommanders von Lig htProcessor. Sie kann
genutzt werden, wenn eine weitere Programmierung der Beleuchtung nicht beabsichtigt ist, z.B. in
feststehenden Einrichtungen, wie Museen oder Verkaufsräumen. Sie ist dazu bestimmt, schon vorher
abgespeicherte Programme abzuspielen. Der Speicher der Replica wird von einer PCMCIA-Card
geladen, die vorher mit dem Speicher-Inhalt eines QCommanders programmiert wurde. Einmal
programmiert, arbeitet die Replica selbsttätig und der QCommander wird nicht mehr benötigt. Ein
Update der Replica wird in gleicher Weise durchgeführt.
Die Replica kann in einem Rack montiert werden, sie benötigt 1HE. Sie besitzt einen integrierten
115/230V PSU, so daß sie direkt an die Stromversorgung angeschlossen werden kann. Der
Stromanschluß erfolgt über die hintere Panele.
Die Bedienung der Replica erfolgt auf der Vorderseite. Beachten Sie, daß die Funktionen einer Taste
wechseln können, je nachdem, was in welchem Modus sich das Ge rät befindet.
VERBINDUNGEN
Alle Kontroll-Verbindungen werden auf der hinteren Panele hergestellt. Die Replica besitzt einen
DMX- Ausgang mit einer 5-pin-XLR Verbindung. Sie besitzt ebenfalls einen Mono-Audio-JackBuchse als Eingang eines Audio-Signals. Effekte können daher synchron zur Musik abgespielt
werden. Ein 25-pin sub-D-Stecker ermöglicht eine Verbindung mit einem 16-Wege analog-Eingang
zum Abspielen von programmierten Patchen. Ein 9-pin-sub-D-Stecker ermöglicht RS232-Funktionen
in nachfolgenden Versionen dieses Produkts, beachten Sie aber, daß RS232-Funktionen nicht in
dieser Version enthalten sind. Ferner besitzt die Replica MIDI in-, out- und thru-Verbindungen.
POWER
Wenn die Replica eingeschaltet wird, wird zunächst einen Selbst-Test durchgeführt. Während dieser
Zeit erscheint das Wort QReplica im Display. Nach Beendigung des Selbst-Testes erscheint RUN und
SET im Display. Die Replica ist nun startbereit.
RUN
Im RUN Modus können gespeicherte Effekte abgespielt werden. Di e 64 v i rtuellen Ausgangs-Tasten
sind als acht Tasten auf acht Bänken angeordnet. Sie korrespondieren zu den 64 Ausgangs-Tasten
des QCommanders und sind entsprechend numeriert. Tasten 1-8 befinden sich auf Bank 1, Tasten
9-16 auf Bank 2, 17-24 auf bank 3 usw.
Wenn RUN in der linken Seite des Dispays erscheint, drücken Sie die Select-Taste auf der linken
Seite. Im Display erscheint VIEW und BANK. Drücken Sie BANK. Um zwischen den einzelnen
Bänken zu wechseln, drücken Sie BANK UP oder BANK DOWN.
Drücken Sie nun eine beliebige durchnumerierte Taste 1-8, um die Effekte abzuspielen, die auf dieser
Taste gespeichert sind. Um den Inhalt der Taste zu sehen, halten Sie die View-Taste gedrückt und
drücken Sie die Taste.
Die QCommander-Befehle GO und FREEZE existieren nicht in der Replica.
SET
SET wird benötigt, um den Passcode einzugeben, der das SET-Menü vor unberechtigtem Zugriff
schützt. Ferner können die Funktionen der Memory-Card und die System-Optionen zugänglich
gemacht werden. Mittels der Memory-Card kann aus dem Speicher des QCommanders auf die
Replica überspielt werden und der Inhalt des Replica-Speichers kann auf eine Memory-Card
übertragen werden. Ausserdem ist es möglich, mittels einer speziell programmierten Memory-Card
ein Update des Systems durchzuführen.
Page 13

QCommander Replica English, Français, Deutsch, Español
Page 11
EINSTELLUNG UND EINGABE DES PASSCODES
Sie können ebenfalls einen Passcode eingeben, um die Funktionen der SET- und RUN-Menü zu
schützen. Bei Lieferung ist der Passcode 0000 eingestellt und alle Menü-Levels sind offen. Wenn ein
anderer Code als 0000 eingegeben wird, wird das Sicherheits-System aktiviert. Dies kann durch die
Eingabe von 0000 wieder rückgängig gemacht werden.
Wenn in der rechten Seite des Displays SET erscheint, betätigen Sie die Select-Taste auf der rechten
Seite. Wenn PSCD erscheint, drücken Sie wiederum die Select-Taste auf der rechten Seite. Drücken
Sie RUN bzw. SET, um zu wählen, welches Menü zu schützen. Im Display erscheint nun 0000.
Drücken Sie PSCD UP DIGIT. Wählen Sie eine Ziffer aus und gehen Sie zur nächsten Ziffer, indem
Sie PSCD NEXT DIGIT drücken. Beachten Sie, dass nach 9 wiederum 0 im Display erscheint. Wenn
alle vier Ziffern eingestellt sind, notieren Sie den Code auf und bewahren Sie ihn an einem sicheren
Ort auf. Drücken Sie PSCD ENTER.
Dieser Passcode wird benötigt, um über das RUN/SET-Display hinauszugehen, wenn SET
ausgewählt wird.
MEMORY-CARD
Die QCommander Replica benötigt eine PCMCIA-Card, type1, 512Kb, SRAM. Beachten SIe, das
innerhalb dieser Spezifikation verschiedene Optionen erhältlich sind.
Die Memory-Cards, die von Lightprocessor geliefert werden, sind wieder aufladbar. Die Lebensdauer
einer aufgeladenen Card beträgt ca. 40 Stunden. Die Cards sind aufgeladen, wenn sie das Werk
verlassen und können Daten bis zu 18 Monate speichern. Wir empfehlen, die Card alle sechs
Monate neu aufzuladen. Um die Karte aufzuladen, führen Sie sie in den Slot ein und wählen CARD
wenn im Display Card erscheint.
Die Card muss sich in dem Slot befinden, um Card-Operationen durchzuführen. Wenn dies nicht der
Fall ist, erscheint eine Fehler-Meldung.
Formatieren der Karte
Eine neue Karte muss zunächst formatiert werden, bevor sie Daten empfangen kann. Benutzen Sie
die unten erläuterten BACKUP-Routine.
Back Up und Speichern von Daten
Gehen Sie zum RUN/SET-Display und wählen Sie SET, um Zugang zum CARD/PSCDDisplay zu bekommen. Wählen Sie dann CARD, um Zugang zum SYSTEM/DATA-Display zu
bekommen. Das BACKUP/RESTORE-Display erscheint bei Auswahl von DATA.
Um Daten aus dem Speicher der Replica auf die Card zu übertragen, wählen Sie
BACKUP. Wenn ‘overwrite card?’ (bzw. create new backup card? im Falle einer
Formatierung) erscheint, betätigen Sie mit CARD YES. Es erscheint nun die
Mitteilung ‘Do not interrupt’. Wenn die Nachricht ‘Transfer Done’ erscheint, drücken
Sie ESC. Die Replika kehrt dann zu dem Run/SET-Display zurück.
Um Daten aus der Card auf dem Speicher der Replica zu übertragen, wählen Sie
RESTORE. Wenn ‘overwrite memory?’ erscheint, betätigen Sie mit CARD YES. Es
erscheint nun die Mitteilung ‘Do not interrupt’. Wenn die Nachricht ‘Transfer Done’
erscheint, drücken Sie ESC. Die Replica kehrt dann zu dem Run/SET-Display zurück.
Installieren eines neuen Systems und Änderung der System-Optionen
Wählen Sie im RUN/SET-Display SET, um zum CARD/PSCD-Display zu gelangen. Wählen
Sie CARD, SIe gelangen nun zum SYSTEM/DATA-Display. Wählen SIe hier SYSTEM, um
zum OPTIONS/NEW-Display zu gelangen.
Um ein Update des Systems durchzuführen, wählen Sie NEW. Im Display
erscheint ‘Install new sys?’. Drücken Sie CARD YES. Das System wird ein Update
durchführen und dann zu dem QReplica Display auf die RUN/SET-Stufe zurückehren.
Page 14

QCommander Replica English, Français, Deutsch, Español
Page 12
Um die System-Optionen zu ändern, wählen Sie OPTIONS. Scrollen Sie durch die
Liste der möglichen Optionen, indem Sie die Option Down/Up-Tasten betätigen.
Drücken Sie die OPTION ON-OFF-Taste, um eine angewählte Option wieder
auszuschalten. Drücken Sie die OPTION OFF-ON-Taste, um eine gewünschte Option
einzuschalten. Drücken Sie OPTIONS FINISHED? OK? um zu dem OPTIONS/NEWDisplay zurückzukehren.
Folgende Optionen stehen zur Verfügung:
01 Autoplay ON/OFF. Satandart = OFF. Die Replica kann direkt mit dem Abspielen
beginnen, wenn sie angestelt wird, ohne das eine Taste betätigt wird. Die Taste muss
vorher ausgewählt werden. Siehe dazu Option 14.
02 Menu Timer On/Off. Standart = OFF. Wenn der Menu-Timer auf ON gestellt ist,
kehrt das Display zu RUN/SET nach 30 Sekunden, wenn keine anderen Tasten
betätigt werden.
03 CommsMode ON/OFF. Standart = MIDI. RS232 noch nicht in Betrieb.
04 BlackAll ON/OFF Standart = OFF. Nur Dimmer- und Shutter-Kanäle reagieren auf
den Blackout-Schalter. Wenn diese Option in Betrieb ist, reagieren alle Kanäle.
05 Send MIDI ON/OFF. Standart = ON. Muss eingestellt sein, um MIDI-Out zu
ermöglichen.
06 MIDIrxchn 0-15. Der Standart-Empfangs-Kanal für MIDI ist Channel 0. Dies kann
geändert werden. OPTION OFF/ON erhöht die Channel-Nummer, OPTION ON/OFF
verringert die Channel-Nummer.
07 MIDIOmni ON/OFF. Standart = OFF. Wenn On eingestellt ist, empfängt die
Replica auf allen Kanälen 0-15.
08 ScnsFade ON/OFF. Standart = OFF. Wenn OFF eingestellt ist, werden die Fade–
Out Zeiten statischer Szenen ignoriert, weil sie mit Fade-in Zeiten in
aufeinanderfolgenden Szenen zusammenstossen könnten.
09 InstSY&FX ON/OFF. Standart = OFF. Wenn ON eingestellt ist, erfolgt bei
Installation eines neues Systems gleichzeitig ein Update der Fixture-Bibliothek.
10 RptShow On/OFF. Standart = OFF. Eine Show kann so eingestellt werden, dass
sie nur einmal abgespielt wird oder kontinuierlich ablauft bis sie manuell ausgestellt
wird (Einstellung ON).
11 AskStrike ON/OFF. Standart = OFF. Wenn diese Option auf ON gestellt ist, fragt
die Replica zunächst,ob die Beleuchtung einschalten werden soll
12 AutStrike ON/OFF. Standart = OFF. Stellen Sie diese Option auf ON um die
Lampen automatisch auf die Fixtures zu richten, die spezifisch eingeschaltet werden
sollen.
13 P-showBlk OFF/ON. Standart = ON. Erzeugt ein Blackout vor dem Ablauf einer
Show.
14 Startkey. Standart = 0. Wählen Sie einen Schlüssel fuer die Autostart-Option.
Siehe Option 01.
15 MIDIoffset 000. Standart = 0. Midi startet standartmässig bei 0 und ist auf Taste 1
auf Bank 1 angeordnet. Ein Offset kann durch Benutzung dieser Option eingestellt
werden.
Page 15

QCommander Replica English, Français, Deutsch, Español
Page 13
16 SysReset Ok? Bringt alle Optionen auf die Standart-Einstellung zurück. Alle
Speicher werden gelöscht.
Zu beenden, drücken Sie die Taste OPTION UP, um '00 FINISHED? OK?’ zu erreichen.
Drücken Sie OPTIONS FINISHED, um zum Di splay OPTIONS/NEW zurückzukehren.
Drücken Sie ESC, um durch die Levels zurück zu RUN/SET zu gehen.
MIDI HINWEISE
Um MIDI-Funktionierung zu ermöglichen, sichern Sie zunächst, daß die Option Nr. 03 auf ON gestellt
ist. Danach stellen Sie die Option Nr. 05 auf ON, wenn Sie MIDI out verwenden wollen.
Die Replica sendet MIDI nur auf Kanal Nr. 0.
Die Replica empfängt MIDI standart auf Kanal 0, obgleich sie auf irgendeinem Kanal 0-15 empfangen
kann. Die Option Nr. 06 stellt den Kanal ein. Sie kann ebenfalls auf alle Kanäle 0-15 empfangen,
indem Sie Option Nr. 07 auf ON stellen.
Sie benutzen die 64 virtuellen Ausgangstasten der Replica, um MIDI zu senden und empfangen.
Sehen Sie Diagram Nr. 2 am Ende dieser Bedienungsanleitung. Die Option Nr. 15 erlaubt die
Einstellung eines Offset, d.h. die erste Taste der Replica kann anders als MIDI-Note 0 sein. Siehe
Diagram Nr. 2.
Wenn MIDI in Betrieb ist und Sie drücken eine Ausgangstaste, wird die gleiche Taste bei allen
anderen Replicas und QCommanders im MIDI-System gedrückt, soweit diese Geräte so konfiguriert
sind, daß sie MIDI auf dem Sende-Kanal empfangen können. Es ist daher möglich, mehrfache
QCommanders und Replicas in Master/Slave-Modus zu verwenden.
DIE GANZE MENÜ-STRUKTUR FINDEN SIE IM DIAGRAM NR. 3 AM ENDE DIESES BUCHES.
Page 16

QCommander Replica English, Français, Deutsch, Español
Page 14
INTRODUCCION
La QCommander Replica es un producto complementario a la QCommander d e LightProcessor. Ha
sido diseñado para un uso en las situaciones donde no es prevista más p rogramación depués de la
programación original y Ud. quiere solamente poder restituir los p ro gramas anteriormente grabados,
por ejemplo en una instalación no móvil como un museo o una tienda.
Ud. programa la Replica por medio de una tarjeta PCMCIA (proveida con su Replica) que utiliza para
extraer el contenido de la memoria de una QCommander en el cual Ud. ha grabado su programa ción.
Una vez cargada, la Replica funciona independentemente y Ud. puede sacar la QCom mander. Ud.
puede programar la Replica una segunda vez de la misma manera.
La Replica es un aparato rackable en 1U de espacio. La alimentación (PSU) es integrada y se hace la
conexión directamente a la red. El cable entra en la caja por el panel de detrás. Ud. puede
seleccionar el voltaje de operación por medio de un botón en el panel de detrás.
Los botones de control se hallan en el panel de delante. Note que se cambian sus funciones según lo
que aparece en el display.
CONEXIONES
Todas las conexiones se hacen por el penal de atrás. La salida es el DMX512 por medio de un
enchufe XLR5. Hay una entrada audio en mono para permitir una sincronización con la música. Un
conectador sub-D a 25 polos permite una conexión a un aparato analógico a 16 circuitos, por
ejemplo, el Input Extender de LightProcessor, para facilitar los patches que Ud. puede programar en
la QCommander. Un conectador sub-D a nueve polos permitira un funcionamiento RS232 e n
versiones futuras. La Replica es dotada de las funciones MIDI in, out y thru.
PONER EN MARCHA
Cuando Ud. pone en marcha la Replica, hace una prueba interna. Aparece en el display la palabra
QReplica. Después de test aparece las palabras RUN y SET.
RUN
En este modo de operación Ud. restitue los programas grabados. Los 64 botone s virtuales de salida
son arreglados en ocho páginas [BANKS]. Los 64 botones corresponden a los 64 botones de salida
de la QCommander. Los botones 1-8 de la QCommander se hallan en el BANK 1, 9-16 en el BANK 2,
17-24 en el BANK 3 et c. Vea el diagrama no. 1.
Cuando aparece RUN/SEt en el display, presione el botón SELECT a la izquierda. Aparece VIEW y
BANK en el display. Presione BANK. Ud. pasa entre las páginas [BANKS] por medio de los botones
BANK UP y BANK DOWN.
Presione cualquier de los botones numerados 1-8 para salir el efecto memori zado en ese botón. Para
ver el contenido de un botón, mantenga presionado el botón VIEW y presione el botón numerado.
Note que la Replica no da acceso a las funciones GO y FREEZE de la QCommander.
SET
Se sirve de SET para establecer un código que protege el menú SET de un acceso no autorizado.
Además lo utiliza para ganar acceso a las funciones de la tarjeta de memoria y las opciones del
sistema. Las funciones de la tarjeta le permite de cargar la memoria de la Replica con el cont enido de
una tarjeta que ha sido cargado a su vez de una QCommander y de archivar la memoria de una
Replica en una tarjeta. Se sirve de una tarjeta especial para actualizar el sistema operativo de la
Replica.
Page 17

QCommander Replica English, Français, Deutsch, Español
Page 15
GRABACION Y UTILIZACION DE UN CODIGO DE PROTECCION
Ud. Puede proteger los menús SET y RUN por medio de un código de protección. Cuando Ud. recibe
su Replica, ella tiene ya instalada el código 0000 y todos los niveles están abiertos. Si Ud. entra
cualquier otro código, se hace armado el sistema de seguridad. Ud. peude cancelar el sistema de
seguridad, entrando una vez más el código 0000.
Cuando aparece en el display la palabra SET, presione el botón SELECT a derecha. Cuando
aparecen las letras PSCD, presione el botón SELECT a derecha. Presione RUN o SET para escoger
el menú que proteger. Aparece 0000. Presione Presione Pscd UP DIGIT. Note que después del 9, el
display vuelve a 0. Para seleccionar una cifra y pasar a la próxima, presione PSCD NEXT DIGIT.
Cuando ha entrado Ud. las cuatro cifras, NOTE SU CODIGO Y ALMACENELO EN SEGURIDAD.
Presione PASSCODE ENTER. De aquí en adelante le falta entrar el código de protección para pasar
más allá de SET cuando ve Ud. RUN/SET en el display.
TARJETA
La Replica emplea una tarjeta PCMCIA tipo 1, 512Kb, SRAM. Note que hay varias opciones posibles
dentro de esta especificación, como, por ejemplo, si las pilas son del tipo recargable o no. Esto
afectará el precio que paga Ud.
La QCommander trabaja con una tarjeta PCMCIA, tipo 1, 512KB SRAM. Note que hay varias
opciones posibles dentro de esta especificación, como, por ejemplo, si las pilas son del tipo
recargable o no. Esto afectará el precio que paga Ud.
Las tarjetas de memoria de LightProcessor las podrá encontrar en su distribuidor y son del tipo
recargable. Tarda más o menos 40 horas en estar cargada completamente. Cua ndo salen de la
fábrica están totalmente cargadas y es posible almacenar los datos hasta 18 meses. Recomendamos
no obstante que Ud. carga la pila cada seis meses. Para cargar una tarjeta, inserelo en el lector y
presione CARD cuando aparece la palabra en el display.
No funcionarán las operaciones de tarjeta si la tarjeta no es inserada en el lector y vedrá Ud. un
mensaje de error en el display.
Formatear la Tarjeta
Es necesario fomatear una tarjeta no anteriormente empleado. Sirvase de la rutina BACKUP
describida debajo.
Memorizar los Datos en la Tarjeta y Cargarlos en la Replica
Cuando aparece en el display RUN/SET, escoga SET para pasar al display CARD/PSCD.
Escoga CARD para pasar al display SYSTEM/DATA. Escoga DATA para pasar al display
BACKUP/RESTORE.
Para almacenar la memoria de la Replica en la tarjeta, escoga BACKUP. Al
mensaje de guía ‘overwrite card?’ [ sustituir los datos existentes] o al formatear
‘create new backup card’ [crear nueva tarjeta], presione CARD YES. Ud. vedrá el
mensaje ‘Do not interrupt’ [ no interrumpir]. Cuando Ud. ve el mensaje ‘Transfer
done’ [transferencia hecho], presione CARD NO. La Replica vuelve al display
RUN/SET.
Para cargar el contenido de una carta en la Replica, escoga RESTORE. Al
mensaje de guía ‘overwrite memory?’ [ sustituir los datos existentes], presione CARD
YES. Ud. vedrá el mensaje ‘Do not interrupt’ [ no interrumpir]. Cuando Ud. ve el
mensaje ‘Transfer done’ [transferencia hecho], presione CARD NO. La Replica
vuelve al display RUN/SET.
Instalación de un Nuevo Sistema Operativo y Cambio de las Opciones.
Cuando aparece en el display RUN/SET, presione SET para pasar al display CARD/PSCD.
Escoga CARD para pasar al display SYSTEM/DATA. Escoga SYSTEM.
Page 18

QCommander Replica English, Français, Deutsch, Español
Page 16
Para actualizar el sistema operativo, escoga NEW. El display pregunta ‘install new
system?’ [instalar nuevo sistema?] Presione CARD YES. El sistema se actualizará y
entonces Ud. vedrá en el display QREPLICA antes de volver a RUN/SET.
Para cambiar las opciones del sistema, escoga OPTIONS. Pase por la lista de
opciones por medio de los botones OPTION DOWN y OPTION UP. Presione lo s
botones OPTION ON-OFF y OPTION OFF-ON para cambiar la opción. Presione
OPTIONS FINISHED? OK? para volver al display OPTIONS/NEW.
Las opciones del sistema son las siguientes:-
01 Autoplay ON/OFF. Por defecto = OFF. Ud. puede programar la Replica p ara salir
una restitución automática cuando lo pone en marcha sin presionar ningún botón. Ud.
selecciona el botón en la opción 14.
02 MenuTimer On/OFF. Por defecto = OFF. Puesto a ON, el display vuelve a
RUN/SET después de algunos segundos, Ud. no presiona ningún otro botón.
03 CommsMode ON/OFF. Por defecto = MIDI. RS232 no todavía incorporado.
04 BlackAll ON/OFF. Por defecto = OFF. Normalmente solo los canales grad ador y
obturador son sometidos a la operación del botón Blackout (negro total). Cuando esta
opción está seleccionada, todos los canales le son sometidos.
05 Send MIDI ON/OFF. Por defecto = ON. Si quiere Ud. servirse de MIDI out,
seleccione ON.
06 MIDIrxchn 0-15. Por defecto = 0. Por defecto recibe la Replica MIDI en el canal
0. Presione el botón OPTION OFF/ON para aumentar el número de canal y el botón
OPTION ON/OFF para reducirlo.
07 MIDI Omni ON/OFF. Por defecto = OFF. Si Ud. selecciona ON, la Replica recibe
MIDI en todos los canales 0-15.
08 ScnsFade ON/OFF. Por defecto = OFF. Normalmente Ud. seleccionará OFF,
para no hacer caso del tiempo de fundido después de una escena estatica, porque e s
posible que estaría en conflicto con el tiempo de fundido antes de la próxima escena.
09 InstSY&FX ON/OFF. Por defecto = OFF. Seleccione ON para actualizar la
biblioteca de proyectores robotizados cuando Ud. actualiza el sistema operativo.
10 RptShow ON/OFF. Por defecto = OFF. Selecciona ON, para que un show co rra
en continuación y OFF para que corra una vez solamente.
11 Encendido de Lámparas Ofrecido. Por defecto = OFF. Por defecto apagado.
Hay algunos proyectores que necesitan una instrucción específica encender la
lámpara. Si esta opción es seleccionada, se ve en el display cuando se enciende la
QCommander, ‘Strike Fixture Lamps. STORE = Encienda las lámparas, ESCAPE =
Cancele.
12 Encendido de Lámparas Automático. Por defecto = OFF. Por defecto apagado.
Hay algunos proyectores que necesitan una instrucción específica encender la
lámpara. Si esta opción es seleccionada se encienden automáticamente las
lámparas.
13 p-SHOWblK OFF/ON. Por defecto = ON. Para evitar un conflicto de instrucciones
a un canal, es normal apagar de antemano todos los canales llamdos por el show.
14 Startkey. Por defecto = 0. Escoga un botón para la opción Autoplay. Vea la
opción 01.
Page 19

QCommander Replica English, Français, Deutsch, Español
Page 17
15 MIDIOffset 000. Por defecto = 0. El plan MIDI empieza en la nota MIDI 0 en el
botón 1 en la página 1. Utilizando esta opción Ud. puede cambiar el desplazamiento.
16 SysResetOK. Borra todas las memorias y repone los valores por defecto.
Para terminar, sirvase del botón OPTION UP para llegar a ‘00 FINISHED? OK?’ Presione
OPTIONS FINISHED para volver al display OPTIONS/NEW. Sirvase del botón ESC para
pasar por los niveles del menú.
USANDO MIDI
Para utilizar MIDI es necesario configurar la Replica; en primo lugar ponga la opción no. 03 e n MIDI.
Entonces ponga la opción 05 en ON si Ud. quiere transmitir MIDI.
La Replica transmite solamente en el canal no. 0.
Por defecto la Replica recibe MIDI en el canal no. 0, aunque pueda recibir en cualquier canal 0-15.
Para determinar cual canal va a recibir, ponga la opción 06. Para permitir la recepción de las señales
MIDI en todos los canales 0-15, ponga la opción 07.
Ud. utiliza las 64 teclas virtuales de la Replica para transmitir y recibir las notas MIDI. Las opción 15
le permite mover el plan MIDI, es decir que no es obligatorio que la primera tecla de la Replica es la
nota 0.
Presionando una tecla saldrá una nota MIDI y activará la misma-numerada tecla en cual quieres
Replicas y QCommanders que recibe MIDI en este canal. Así es posible utilizar múltiples
QCommanders y Replicas en modo maestro/esclavo.
VEA LA ESTRUCTURA DEL MENÚ EN EL DIAGRAMA 3 AL FIN DE ESTE MANUAL.
Page 20

QCommander Replica English, Français, Deutsch, Español
Page 18
SPECIFICATION
PRODUCT NAME QCommander Replica.
POWER REQUIREMENTS 115/230V ~ AC nominal (95-264V ~ AC)
Frequency 48-62Hz.
Single phase + N + E.
Input current 250mA max.
Installer to fit suitable power connector and to fuse at 5A, or
in accordance with local regulations.
POWER CONNECTOR Supplied with unterminated 3-core mains flex.
CONTROL INPUTS RS232 via 9-pin sub-D connector, male (not yet
implemented).
0-10V analogue via 25-pin sub-D connector, female.
Audio via ¼ inch mono Jack socket, female .
MIDI in, out and thru via 5-pin DIN connectors, female.
CONTROL OUTPUTS USITT DMX512 via 5-pin XLR connector, female.
PHYSICAL CHARACTERISTICS 485 x 230 x 45mm. (1U, 19 inch rack mounting).
ENVIRONMENT Temperature 0-35°C.
Relative humidity 0-90% non-condensing.
Pollution degree 2.
Installation category 2.
Protection classification IP30.
CONFORMANCE LVD (using EN60950)
EMC (using EN55014 and EN50082-1)
Page 21

QCommander Replica English, Français, Deutsch, Español
Page 19
Diagram 2.
Diagram 1.
Page 1
Page 2
C
MIDI NOTE 0C#1
DD#E FF#G G#AA#B CC#DD#
2 3 4 5 6 7 8 9 10 11 12 13 14 15
E16F17F#18G19G#20A21A#22B23C24C#25D26D#27E28F29F#30G
31
G# A A#
B
C
C#
D
D#
EFF#GG#AA#B
32 33 34
35
36
37
38
39
40 41 42 43 44 45 46 47
CC#48DD#E FF#GG#AA#B CC#DD#
49 50 51 52 53 54 55 56 57 58 59 60 61 62 63
M
I
D
D
L
E
Default MIDI Map
QCommander output keys correspond
to the eight banks on the Replica.
Page 22

QCommander Replica English, Français, Deutsch, Español
Page 20
Diagram 3.
 Loading...