

Page 1

Castor 8
179S
12VOLT
NL
Gebruikershandleiding
GB
User manual
D
Bedienungsanleitung
F
Manuel de l’utilisateur
Geproduceerd door / Produced by / Hergestellt von / Produit par:
TECHMAR B.V. • CHOPINSTRAAT 10-11 • 7557 EH HENGELO • THE NETHERLANDS
+31 (0)88 43 44 517 • [email protected] • WWW.LIGHTPRO.NL
MI3959 - 20181224
Page 2

A
1
3
4
2
5
6
7
Page 3
B C
1
2
D
3
1
2
4
Page 4
E
3
4
1
F
5
2
Page 5
G
C
D
2
1
3
1
3
3
3
2
1
3
1
3
2
4
3
3
2
4
Page 6
NL
Castor 8
Gebruikershandleiding
Bedankt voor de aankoop van de Lightpro Castor 8.
Dit document bevat de benodigde informatie voor
correct, efciënt en veilig gebruik van het product.
Raadpleeg de algemene handleiding van het Lightpro
12-volt systeem en de gebruikershandleiding van uw
transformator voor meer informatie over de aanleg en
aansluiting van uw lichtplan.
Lees de informatie in deze handleiding zorgvuldig
door voor ingebruikname van het product. Bewaar
deze handleiding bij het product ter naslag in de
toekomst.
PRODUCTBESCHRVING
De Lightpro Castor 8 is een LED spot voor buitengebruik. Het armatuur kan op een vaste ondergrond
worden gemonteerd met de meegeleverde schroeven
of in de grond worden gestoken met de meegeleverde steker. Dit product is uitsluitend te gebruiken
als buitenverlichting in combinatie met het 12-volt
systeem van Lightpro. Elke wijziging aan het product
kan gevolgen hebben voor de veiligheid, garantie en
correcte werking van het product en/of het andere
onderdelen van het systeem.
Specicaties
Product Lightpro Castor 8
Artikelnummer 179S
Verbruik (max.) 8W
Lichtstroom 80 – 800 Lm
Afmetingen (H x B x D) 130 x 60 x 120 mm
Beschermingsklasse IP44
Omgevingstemperatuur -20°C tot 50°C
Kabellengte 1m
Dimbaar Ja, met ingebouwde dimmer
MONTAGE
Inhoud van de verpakking
[Afbeelding A]
1. Armatuur Castor 8
2. Grondsteker
3. Schroef
4. Plug
5. Lightpro connector
6. Grote inbussleutel
7. Kleine inbussleutel
Controleer of alle onderdelen aanwezig zijn in de
verpakking. Voor vragen over onderdelen, service,
eventuele klachten of andere zaken kunt u altijd bij ons
terecht. E-mail: [email protected]
Optie 1: plaatsing op een vaste ondergrond of aan
de wand
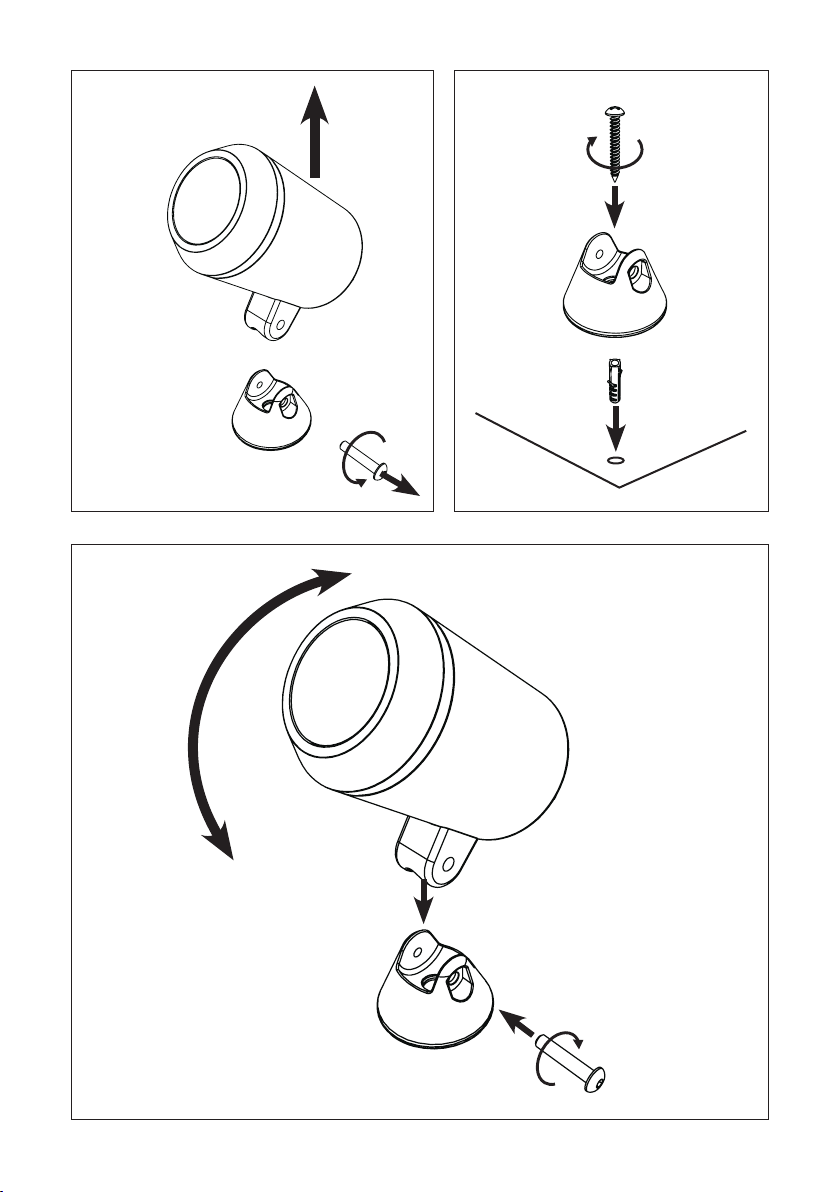
[Afbeelding B]
1. Haal de schroef uit de voet met de meegeleverde
grote sleutel (Afbeelding A [6]).
2. Haal het armatuur uit de voet.
[Afbeelding C]
- Monteer de voet met de meegeleverde schroef op
de ondergrond.
Boor indien nodig een gat voor in de ondergrond
en gebruik de meegeleverde plug.
[Afbeelding D]
1. Plaats het armatuur in de voet.
2. Plaats de schroef in de voet.
3. Stel het armatuur in de gewenste stand.
4. Draai de schroef vast met de meegeleverde grote
sleutel (Afbeelding A [6]).
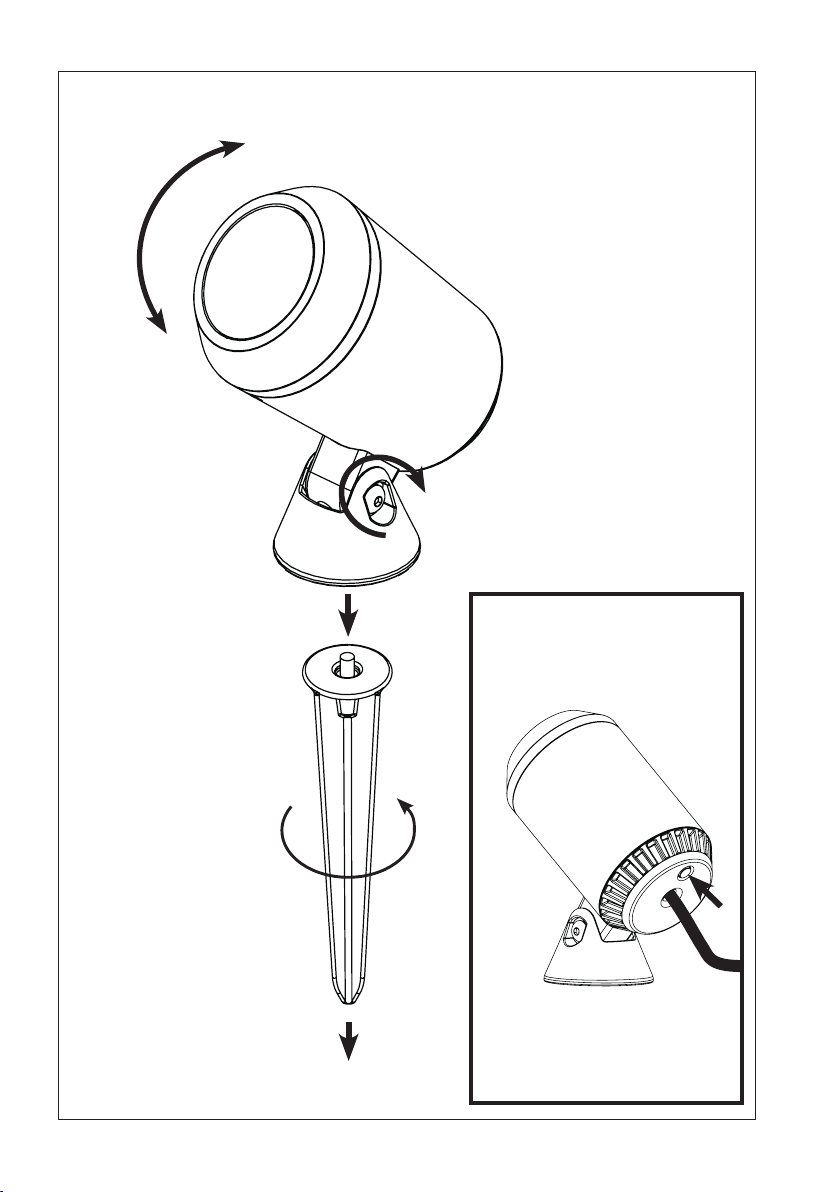
Optie 2: plaatsing in de grond
[Afbeelding E]
1. Plaats de grondsteker onder de voet.
2. Draai de grondsteker stevig vast.
3. Stel het armatuur in de gewenste stand.
4. Draai de schroef vast met de meegeleverde grote
sleutel (Afbeelding A [6] ).
5. Plaats het armatuur in de grond.
DIMMERFUNCTIE
Het armatuur is voorzien van een ingebouwde
dimmer. Hiermee is de lichtopbrengst instelbaar in 6
stappen.
[Afbeelding F]
• Druk op de knop om de gewenste lichtopbrengst in
te stellen.
Page 7
GB
Castor 8
User manual
Thank you for purchasing the Lightpro Castor 8.
This document contains the required information for
correct, efcient, and safe use of the product. Consult
the general manual of the Lightpro 12-volt system
and the user manual of your transformer for more
information about the set up and connection of your
light plan.
Read the information in this manual carefully before
using the product. Keep this manual near the product
for consultation in the future.
PRODUCT DESCRIPTION
The Lightpro Castor 8 is an LED spot for outdoor use.
The xture can be installed on a xed underground
with the included screws, or be placed in the ground
with the included spike. This product may only be
used as outdoor lighting in combination with the
Lightpro 12-volt system. Any alterations made to
the product may have consequences for the safety,
warranty, and correct functioning of the product and/
or other parts of the system.
Specications
Product Lightpro Castor 8
Article number 179S
Power (max.) 8W
Luminous ux 80 – 800 Lm
Dimensions (H x W x D) 130 x 60 x 120 mm
Protection class IP44
Ambient temperature -20°C to 50°C
Cable length 1m
Dimmable Yes, with built-in dimmer
INSTALLATION
Packaging content
[Figure A]
1. Fixture Castor 8
2. Ground spike
3. Screw
4. Plug
5. Lightpro connector
6. Hex key (large)
7. Hex key (small)
Check if all parts are present in the packaging. For
questions about parts, service, and any complaints or
other remarks, you can always contact us. E-mail: info@
lightpro.nl
Option 1: placement on a xed underground or
mounting to a wall
[Figure B]
1. Remove the screw from the base using the included
large hex key (Figure A [6]).
2. Remove the xture from the base.
[Figure C]
- Install the base onto the underground with the
included screw.
If necessary, drill a hole in the underground and use
the included plug.
[Figure D]
1. Place the xture in the base.
2. Place the screw in the base.
3. Put the xture in the desired position.
4. Fasten the screw using the included large hex key
(Figure A [6]).
Option 2: placement in the ground
[Figure E]
1. Place the spike underneath the base.
2. Properly fasten the spike.
3. Put the xture in the desired position.
4. Fasten the screw using the included large hex key
(Figure A [6]).
5. Place the xture in the ground.
DIMMER FUNCTION
The xture is equipped with a built-in dimmer. The
light output can be set to 6 different levels.
[Figure F]
• Push the button to set the desired light output.
Page 8
D
Castor 8
Benutzeranleitung
Vielen Dank, dass Sie sich für die Lightpro Castor 8
entschieden haben.
Dieses Dokument enthält die notwendigen Informa-
tionen für den korrekten, efzienten und sicheren
Gebrauch des Produkts. Weitere Informationen zur Installation und zum Anschluss Ihres Beleuchtungsplans
nden Sie im allgemeinen Handbuch zum Lightpro
12-Volt-System und in Ihrer Transformator-Benutzeranleitung.
Bitte lesen Sie die Informationen in diesem Handbuch
sorgfältig durch, bevor Sie das Produkt in Betrieb nehmen. Bitte bewahren Sie dieses Handbuch zusammen
mit dem Produkt auf, um zukünftig nachschlagen zu
können.
PRODUKTBESCHREIBUNG
Lightpro Castor 8 ist ein LED-Strahler für den Außeneinsatz. Die Leuchte kann mit den mitgelieferten
Schrauben an einer festen Fläche montiert oder mit
dem mitgelieferten Spieß in den Boden gesteckt
werden. Dieses Produkt kann nur in Kombination mit
dem 12-Volt-System von Lightpro als Außenbeleuchtung verwendet werden. Jede Veränderung am Produkt
kann die Sicherheit, die Gewährleistung und den ordnungsgemäßen Betrieb des Produkts und/oder anderer
Teile des Systems beeinträchtigen.
Specicaties
Produkt Lightpro Castor 8
Artikelnummer 179S
Leistung (max.) 8W
Lichtstrom 80 – 800 Lm
Abmessungen (H x B x W) 130 x 60 x 120 mm
Schutzart IP44
Umgebungstemperatuur -20°C bis 50°C
Kabellänge 1m
Dimmbar Ja, mit eingebautem
Dimmer
MONTAGE
Verpackungsinhalt [Bild A]
1. Leuchte Castor 8
2. Erdspieß
3. Schraube
4. Dübel
5. Lightpro Konnektor
6. Kleiner Inbusschlüssel
7. Großer Inbusschlüssel
Überprüfen Sie, ob alle Teile in der Verpackung
vorhanden sind. Bei Fragen zu Einzelteilen, Service,
Reklamationen oder anderen Angelegenheiten kön-
nen Sie uns jederzeit kontaktieren.
E-Mail: [email protected]
Option 1: Installation auf einem festen Untergrund
oder an der Wand [Bild B]
1. Entfernen Sie die Schraube mit dem mitgelieferten
großen Schlüssel aus dem Sockel (Bild A [6]).
2. Entfernen Sie die Leuchte vom Sockel.
[Bild C]
• Montieren Sie den Sockel mit der mitgelieferten
Schraube auf der Oberäche.
Falls erforderlich, bohren Sie ein Loch in den
Untergrund und verwenden Sie den mitgelieferten
Dübel.
[Bild D]
1. Setzen Sie die Leuchte auf den Sockel.
2. Setzen Sie die Schraube im Sockel ein.
3. Richten Sie die Leuchte auf die gewünschte Stellung aus.
4. Ziehen Sie die Schraube mit dem mitgelieferten
großen Schlüssel fest (Bild A [6]).
Option 2: Platzierung im Boden [Bild E]
1. Setzen Sie den Erdspieß unter den Sockel.
2. Drehen Sie den Erdspieß fest.
3. Richten Sie die Leuchte auf die gewünschte Stellung
aus.
4. Ziehen Sie die Schraube mit dem mitgelieferten
großen Schlüssel fest (Bild A [6]).
5. Platzieren Sie die Leuchte im Boden
DIMMERFUNKTION
Die Leuchte ist mit einem eingebauten Dimmer
ausgestattet. Damit ist die Lichtleistung in 6 Stufen
einstellbar.
[Bild F]
• Drücken Sie die Taste, um die gewünschte Lichtleis-
tung einzustellen.
Page 9
FR
Castor 8
Manuel de l’utilisateur
Nous vous remercions pour l’achat de Lightpro Castor 8.
Ce document contient les informations nécessaires pour
une utilisation adéquate, efcace et sûre du produit.
Consultez le mode d’emploi général du système Lightpro 12-volts et le manuel de l’utilisateur de votre transformateur pour de plus amples informations sur l’aménagement et le raccordement de votre plan d’éclairage.
Lisez attentivement les informations sur le produit dans
ce mode d’emploi pour la mise en service du produit.
Conservez ce mode d’emploi à proximité du produit
pour pouvoir le consulter ultérieurement.
DESCRIPTION DU PRODUIT
Le Lightpro Castor 8 est un spot LED pour l’extérieur. Il
est possible de monter l’armature sur un support xe à
l’aide des vis fournies ou de l’enfoncer dans le sol avec
la pointe fourni. Ce produit s’utilise uniquement comme
éclairage extérieur en combinaison avec le système
12-volts de Lightpro. Toute modication apportée au
produit peut avoir des conséquences pour la sécurité, au
niveau de la garantie et pour le fonctionnement adéquat
du produit et/ou d’autres composants du système
Specicaties
Produit Lightpro Castor 8
Numéro d’article 179S
Puissance (max.) 8W
Flux lumineux 80 – 800 Lm
Dimensions (H x L x P) 130 x 60 x 120 mm
Indice de protection IP44
Température ambiante -20°C tot 50°C
Longeur de câble 1m
Dimmable Oui, avec variateur intégré
INSTALLATION
Contenu de l’emballage
[Image A]
1. Lumière Castor 8
2. Pointe
3. Vis
4. Cheville
5. Lightpro connecteur
6. Grande clé hexagonale
7. Petite clé hexagonale
Contrôlez que toutes les pièces soient bien présentes
dans l’emballage. Vous pouvez toujours nous contacter
pour des questions sur les pièces, le service, des plaintes
éventuelles ou d’autres choses. Email : [email protected]
Option 1 : placement sur un support xe ou au mur
[Image B]
1. Retirez la vis du pied à l’aide de la grande clé fournie
(Image A [6]).
2. Retirez la lumière du pied.
[Image C]
• Montez le pied à l’aide de la vis fournie sur le support.
Le cas échéant, percez préalablement un trou dans le
support et utilisez la cheville fournie.
[Image D]
1. Placez la lumière dans le pied.
2. Placez la vis dans le pied.
3. Réglez la lumière dans la position désirée.
4. Serrez la vis à l’aide de la grande clé fournie (Image
A [6]).
Option 2 : placement dans le sol
[Image E]
1. Placez la pointe sous le pied.
2. Vissez bien la pointe.
3. Réglez la lumière dans la position désirée.
4. Serrez la vis à l’aide de la grande clé fournie (Image
A [6]).
5. Placez la lumière dans le sol.
FONCTION VARIATEUR
La lumière est pourvue d’un variateur intégré. Vous
pouvez régler l’intensité lumineuse sur 6 positions.
[Image F]
• Appuyez sur le bouton pour dénir l’intensité lumineu-
se désirée.
Page 10
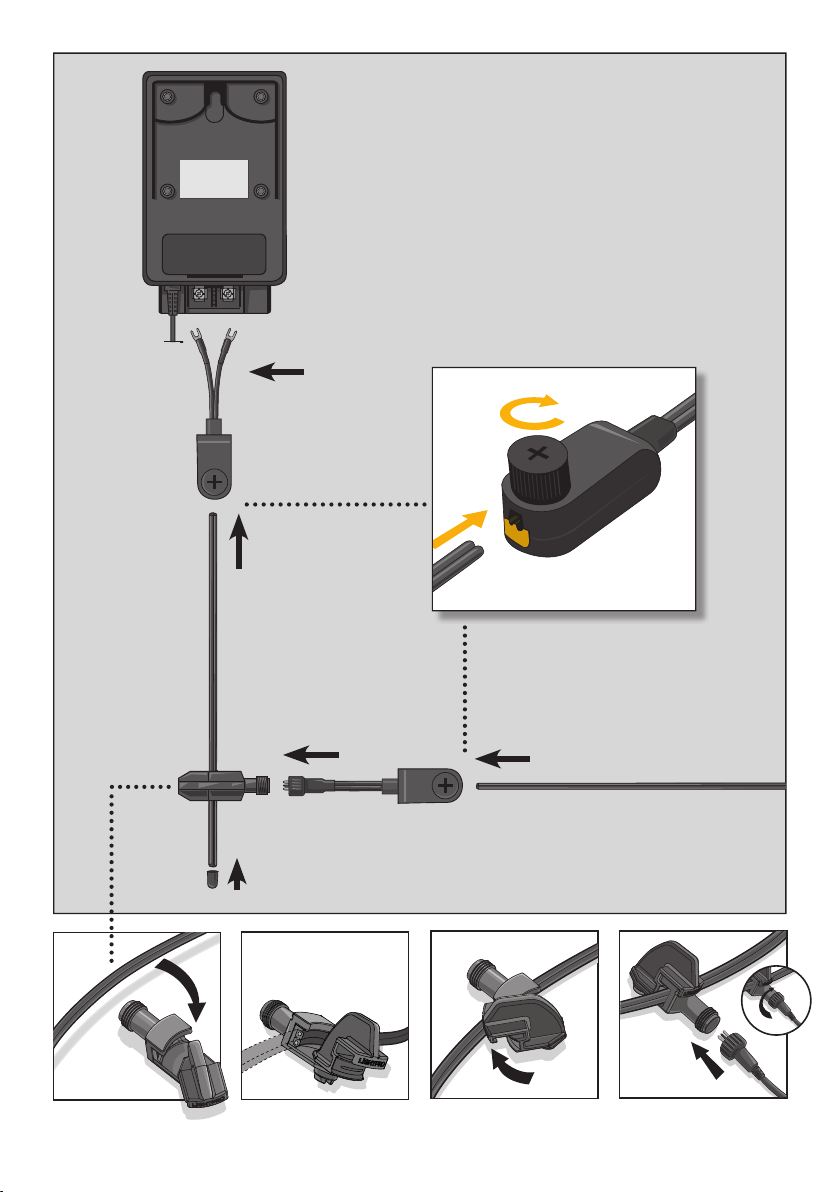
Connector
Type Y (143A)
THE SYSTEM
Transformer (144A/145A)
connection to transformer
JUST TURN IT!
Connector
Type F (137A)
JUST TWIST AND CONNECT!
connection to make a branch
Connector
Type M (138A)
Page 11
NL
GB
INSTALLATIE VAN DE LAMPEN
• Plaats de producten op de gewenste plaats en leg de
kabels zodanig dat deze ruimschoots op de transformator
of kabels kunnen worden aangesloten.
• Als producten voorzien zijn van een afvoergat voor water
dan moet dit gat naar beneden worden gericht.
• Gebruik corrosievaste bevestigingsmaterialen (standaard
meegeleverd) als u de producten wilt vastschroeven.
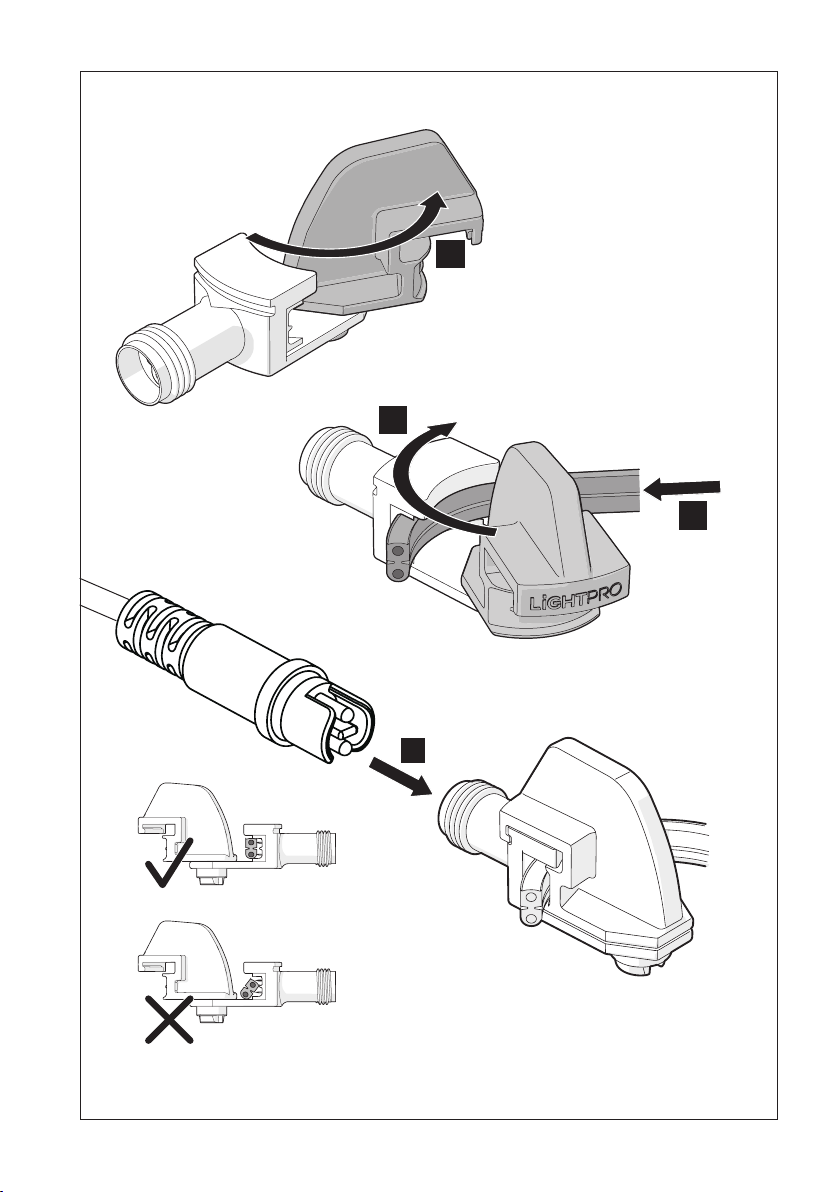
• Sluit de stekkers van de producten aan op de hoofdkabel met behulp van de connector zoals aangegeven op
afbeelding [G].
• Raadpleeg de handleiding van uw transformator voor
meer informatie.
ONDERHOUD
• Monteer dit product altijd zodanig dat het bereikbaar
blijft voor onderhoud. Dit product mag niet vast worden
ingegoten of ingemetseld.
• Schakel het systeem uit door de stekker van de transformator uit de wandcontactdoos te nemen voor het plegen
van onderhoud.
• Reinig het product regelmatig met een zachte, schone
doek. Vermijd schuurmiddelen die het oppervlak kunnen
beschadigen.
• Reinig producten met RVS onderdelen eenmaal per 6
maanden met RVS reiniger.
• Gebruik geen hogedrukreiniger of agressieve chemische
reinigingsmiddelen bij het schoonmaken van het product,
dit kan onherstelbare schade aan het product veroorzaken.
DE
INSTALLATION DER LAMPEN
• Installieren Sie das Produkt in der gewünschten Position
und verlegen Sie die Kabel so, dass sie einfach mit dem
Transformator oder dem Hauptkabel verbunden werden
können.
• Wenn Produkte über eine Wasserablauföffnung verfügen,
muss diese nach unten zeigen.
• Wenn Sie die Produkte fest in Boden verankern möchten,
verwenden Sie dazu Befestigungsmaterial aus nicht-rostenden Materialien (als Standard mitgeliefert).
• Verbinden Sie die Leuchten an den Hauptkabel mit dem
Konnektor wie auf Bild [G] gezeigt wird.
• Weitere Informationen nden Sie in Ihrer Anleitung zum
Transformator.
WARTUNG
• Bringen Sie dieses Produkt stets so an, dass es zu Bedienungs- und Wartungszwecken zugänglich bleibt.
• Schalten Sie das System aus, indem Sie den Transformator
zur Wartung aus der Steckdose ziehen.
• Reinigen Sie das Produkt regelmäßig mit einem weichen,
sauberen Tuch. Vermeiden Sie Schleifmittel, die die
Oberäche beschädigen können.
• Reinigen Sie Produkte mit Edelstahlteilen einmal alle 6
Monate mit Edelstahlreiniger.
• Verwenden Sie bei der Reinigung des Produkts keine
Hochdruckreiniger oder aggressive chemische Reinigungsmittel, da dies zu irreparablen Schäden am Produkt führen
kann.
INSTALLATION OF THE LIGHTS
• Install the products in the desired position and lay the
cables so they can be comfortably connected to the transformer or main cable.
• If products are provided with a drain hole for water, this
hole must be pointing downwards.
• Use non-corrosive xing materials (supplied as standard) if
you want to bolt the products down.
• Connect the lights to the main cable by using the connec-
tor as shown in gure [G].
• Consult the manual of your transformer for more information.
MAINTENANCE
• Always t this product so that it can still be accessed for
servicing or maintenance. This product must not be permanently embedded or bricked in.
• Turn off the system by pulling the plug of the transformer
from the socket for maintenance.
• Regularly clean the product with a soft, clean cloth. Avoid
abrasives that can damage the surface.
• Clean products with stainless steel parts with a stainless
steel cleaning agent once per six months.
• Do not use a high pressure washer or aggressive chemical
cleaning agents when cleaning the product. This can cause
irreparable damage.
FR
INSTALLATION DES LAMPES
• Installez les produits dans la position désirée et positionnez les câbles de telle sorte qu’ils puissent être raccordés
confortablement au transformateur ou au câble principal.
• Si les produits sont équipés d’un orice d’évacuation de
l’eau, orientez celui-ci vers le bas.
• Utilisez des équipements de xation non corrosifs (fournis
en standard) si vous souhaitez visser les produits..
• Raccordez les prises des produits au câble principal comme indiqué dans l’image [G].
• Consultez le mode d’emploi de votre transformateur pour
de plus amples informations.
ENTRETIEN
• Installez ce produit de telle sorte qu’il soit accessible pour
la réparation ou l’entretien. Ce produit ne doit jamais être
encastré ou imbriqué de façon permanente.
• Débranchez le système en retirant la che de la prise de
courant murale avant d’effectuer l’entretien
• Nettoyez régulièrement le produit avec un chiffon doux et
propre. Evitez les produits abrasifs qui peuvent endommager la surface.
• Nettoyez les produits avec des éléments en inox une fois
tous les 6 mois avec un nettoyant pour acier inoxydable.
• N’utilisez pas de nettoyeur haute-pression ou de nettoyants chimiques agressifs pour nettoyer le produit, cela peut
entrainer des dommages irréparables pour le produit.
Page 12

5
NL - Afgedankte elektrische apparatuur mag niet in het huisvuil terechtkomen. Breng, indien
mogelijk, deze apparaten naar een recyclingbedrijf. Voor informatie over recycling kunt u terecht bij een gemeentelijk afvalverwerkingsbedrijf of bij uw dealer.
GB - Discarded electrical equipment must not be put in the household waste. If possible, take it
to a recycling company. For details of recycling, contact a municipal waste processing company
or your dealer.
DE - Entsorgen Sie elektrische Geräte nicht im Hausmüll. Nutzen Sie die Sammelstellen in ihrer
Gemeinde. Fragen Sie Ihre Gemeindeverwaltung nach den Standorten der Sammelstellen.
FR - Ne pas jeter les équipements électriques usagés dans la poubelle domestique. Si possible,
remettez-les à une entreprise de recyclage. Pour tout détail concernant le recyclage, contactez
un organisme municipal de traitement des déchets ou votre revendeur.
NL - 5 jaar garantie – bezoek onze website op lightpro.nl voor de garantievoorwaarden
GB - 5 year warranty – visit our website at lightpro.nl for warranty conditions
YEARS
DE - 5 Jahre garantie – Besuchen Sie unsere Website unter lightpro.nl für die Garantiebedingungen
FR - Garantie de 5 ans – visitez notre site Web à lightpro.n; pour les les conditions de garantie
NL - Voor vragen over onderdelen, service, eventuele klachten of andere zaken kunt u altijd bij
ons terecht. E-mail: [email protected]
DE - Wenn Sie Fragen zu Einzelteilen oder zum Service haben, oder wenn Sie uns eine
Beschwerde oder andere Hinweise übermitteln möchten, können Sie sich jederzeit an uns wenden. E-Mail: [email protected]
GB - For questions about parts, service, any complaints or other matters, you can contact us at
any time. E-mail: [email protected]
FR - Pour tout renseignement concernant les pièces de rechange et les réparations ou pour les
éventuelles plaintes et autres problèmes, n’hésitez pas à nous contacter à l’adresse suivante:
12VOLT
 Loading...