


Our team has over 150 years of combined paddlesports experience
and have been witness to many new technologies. The invention of
the pedal drive has changed the game for paddlesports and vastly
expanded its accessibility. Now there’s no need to perfect your pad-
dling form to eciently glide across the water. At Lightning Kayaks,
we are dedicated to bringing kayaks to the market that are feature
rich, Made in the USA, and reasonably priced. Thank you for your
purchase!
2

TABLE OF CONTENTS
Kayak Overview............................................................4-5
Freedom Drive .............................................................6-8
Kayak Storage............................................................9-10
Transportation............................................................11
Warranty.................................................................12-14
3
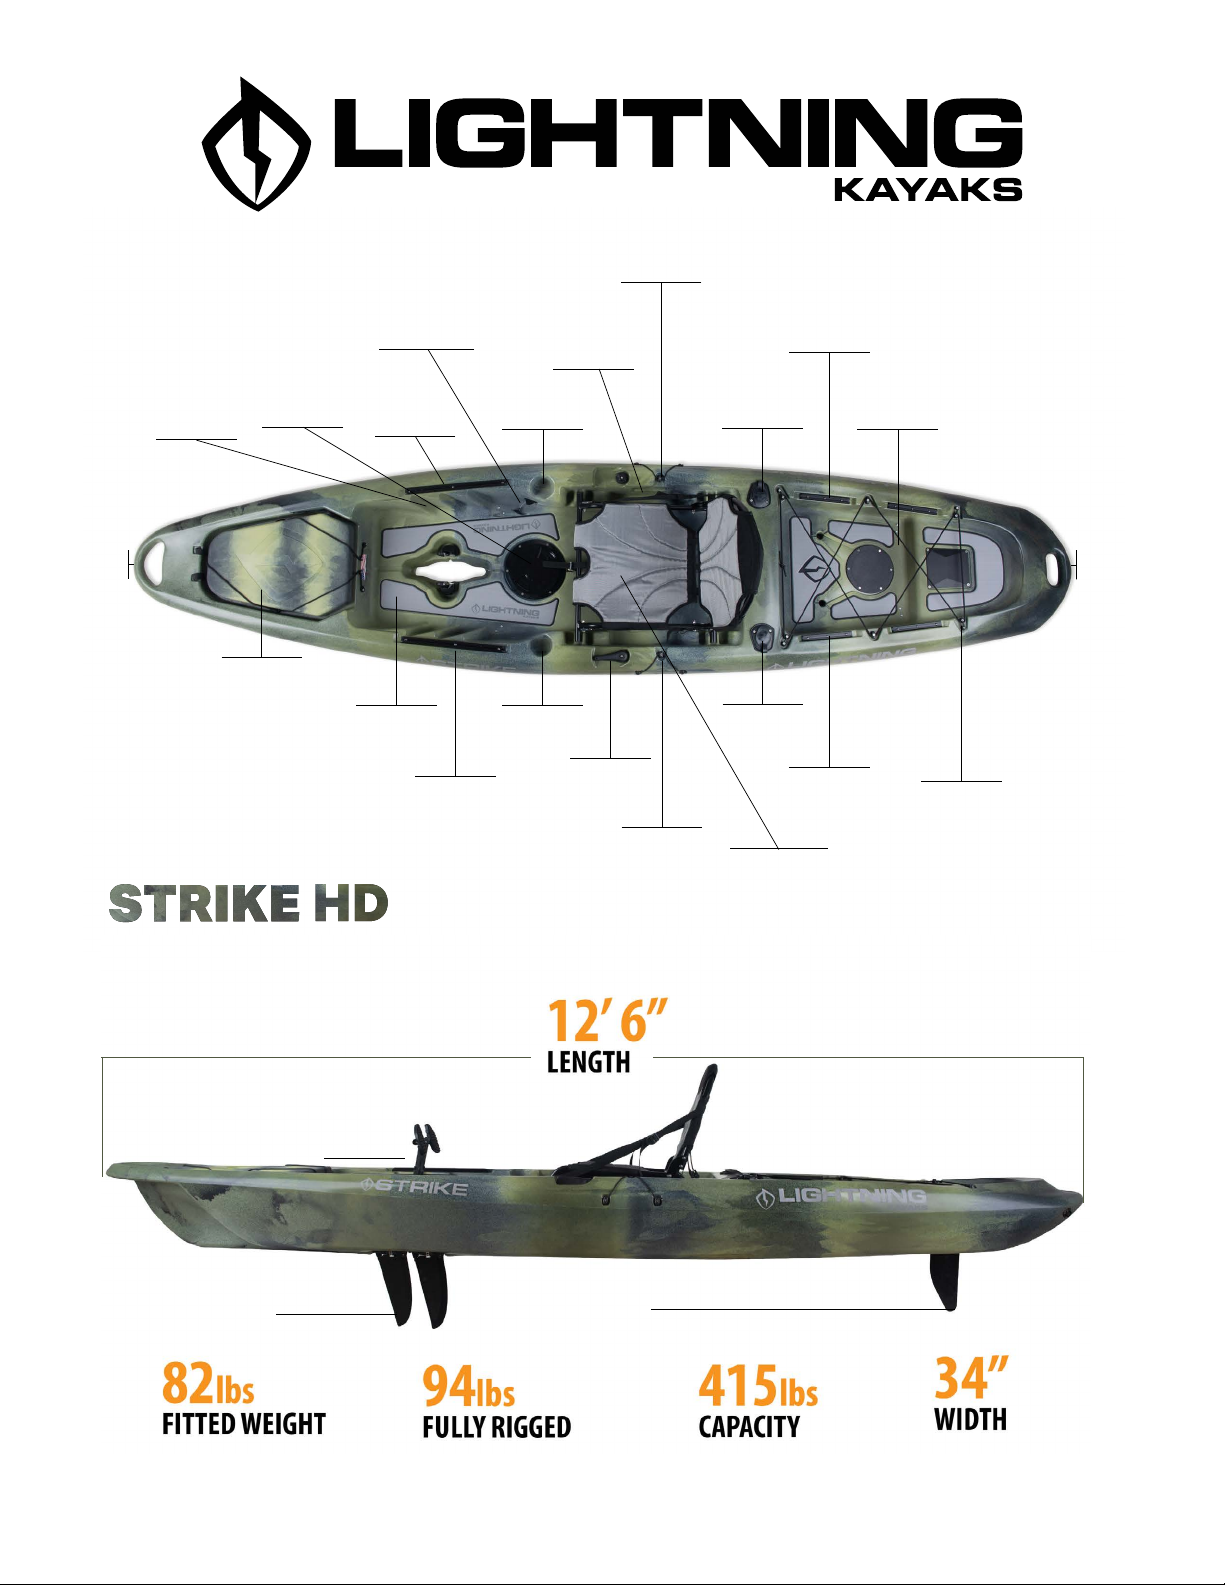
Foot
Cup Holder
Cup Holder
3 Position
Seat System
• Forward and rear
low position
• Center high
position
Steering Lever
Paddle Holder
Paddle Holder
Rod Holder
Rod Holder
18” Gear Track
18” Gear Track
Bungee Tie
Downs
Rear Carrying
Handle
Large Rear
Tankwell
Side Carrying
Handle
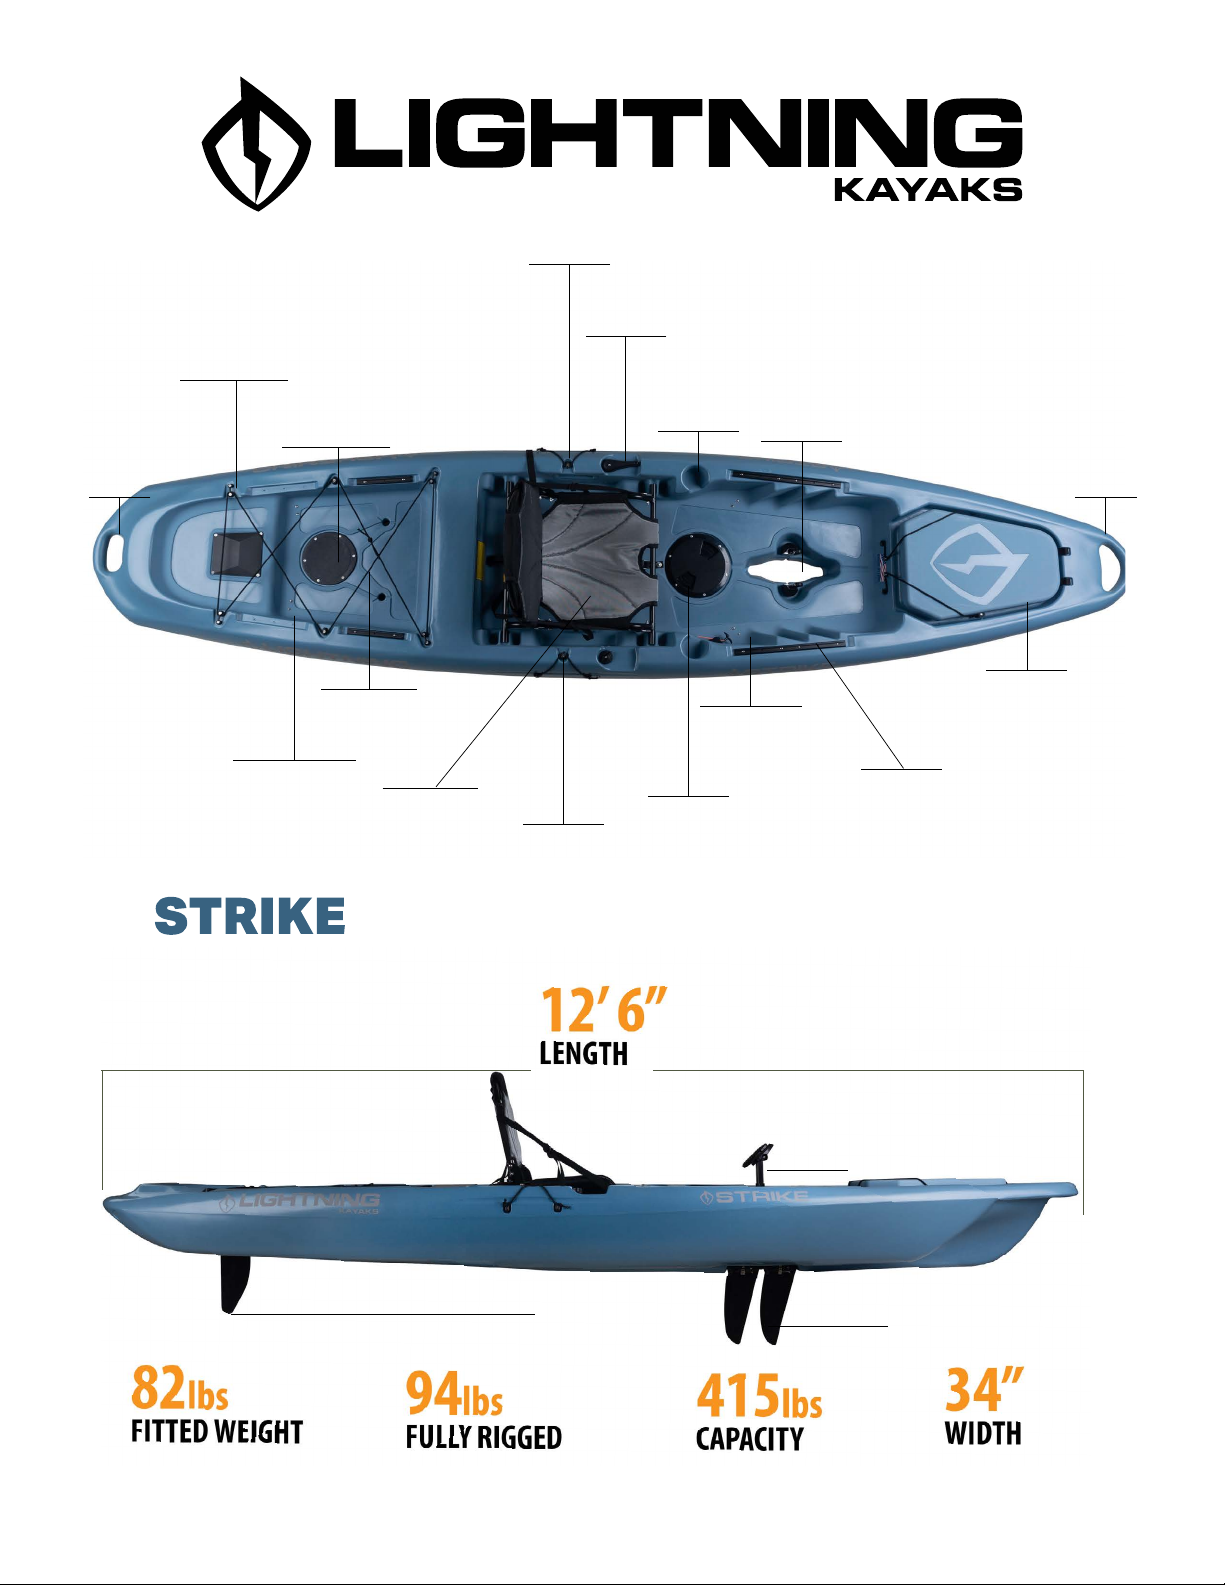
Rests
8” Hatch
Rudder Pull
Cord
• Spring loaded
rudder
16” Gear
Track
Cup
Holder
Side
Carrying
Handle
Paddle
Holder
Rod
Holder
8” Gear
Track
Large
Rear
Tankwell
Front
Carrying
Handle
Hull Weight – 82lbs
Fully Rigged – 94lbs
Capacity – 400lbs
Large Front
Storage-
Hatch
MarineMat
Flooring
Length – 12’ 6”
Width – 34”
Freedom
Drive
16” Gear
Track
Cup
Holder
Steering
Lever
Paddle
Holder
Rod
Holder
8” Gear
Track
3 Position
Seat System
• Forward and rear low
position
• Center high position
Rear
Carrying
Handle
Bungee Tie
Downs
Propulsion
Fins
Spring Loaded Rudder That Hides
Under the Boat
4
Carrying
Handle
Bungee Quick
Release Hook
Rudder
Assembly
Access Hatch
Paddle
Holder
Steering
Lever
Self Draining
Cup
Holders
Freedom
Drive
Pedal
System
Carrying
Handle
Extra Large
Rear Tankwell
for Gear Storage
Hull Weight – 82lbs
Fully Rigged – 94lbs
Capacity – 400lbs
Gear Storage
Bungee
High/Low
Adjustable
Length – 12’ 6”
Width – 34”
Seat
Paddle
Holder
Quick Rudder
8” Center
Hatch
Large Front
Storage Hatch
Up/Down
Control
16” gear
tracks
Freedom
Drive
Spring Loaded Rudder That Hides
Under the Boat
Propulsion
Fins
5

INSTALLING THE FREEDOM DRIVE
Locked Unlocked
• Make sure the pedal posts are seated in the middle adjustment position
while inserting into the hull.
Front
Rear
• Lower the Freedom Drive into opening of the hull near your footbraces.
Use the alignment pin on each side to push the drive into the locks. The
Drive lock will cover the alignment pin if done correctly.
6

• To adjust the Freedom Drive for dierent height users: Squeeze the pedal
adjustment bracket located on the pedal post. While squeezing bracket,
move the pedal post to a more comfortable position. Remember that your
legs should not fully extend as this can cause your knees to lock. Make
sure the metal pin has correctly seated in the adjustment hole for each
pedal post.
Pedal Adjustment Bracket
• To nd the correct pedal position for the Freedom Drive, always start with
the pedal posts in the 4th position when installing the drive. When you
have the seat where you want it, put your feet on both pedals and the
ns straight down, your knees should be comfortably bent. If your knees
are over extended (straight) or too close to your chest (over stretched),
try another pedal position until your knees are comfortably bent.
7

RUDDER OPERATION
• Always make sure the rudder is in the stored position when beaching or
transporting your kayak.
• The rudder is spring loaded and will raise up if you run into a log or obstruction and will return to its downward position once past the obstruction.
• To lift the rudder, always have the steering lever in the forward position.
This ensures the rudder is centered and ready to be raised. The rudder WILL
NOT raise properly.
• Pull the rudder pull cord forward until you hear the rudder retract. While
still holding the pull cord fully extended, place the cord in the rudder cleat to
secure the rudder.
• Always ensure you are in 18-24” of water before lowering the rudder. To
lower the rudder, grab the T handle rudder pull cord and pull down from the
cleat, the T handle will nest next to the kayak once lowered.
Cleat
BEACHING YOU KAYAK
When you’re ready to beach or entering shallow water, please follow these steps.
• Make sure the steering lever is in the forward centered position. Pull the rudder cord forward and cleat to raise the rudder (Figure 1). Push one pedal all
the way forward to raise the ns up under the kayak (Figure 2).
FIG. 1 FIG. 2
8

KAYAK STORAGE
Storing your kayak correctly will ensure a longer product life. In this
section we will go through correct and incorrect methods of storing
your kayak.
Correct
Storing your kayak upside
down on crossbars or hanging
from wide strapping are two
acceptable ways to keep your
kayak stored.
Incorrect
Storing your boat on its hull or
deck side up on cross bars can
dent the bottom of your kayak.
Storing your boat on its side
over a long period of time can
atten or dent the sides of your
kayak.
Hanging your kayak by the
scuppers can distort the scup-
per holes and weaken your
kayak.
Do not hang the kayak by handles or pad eye deck ttings.
These are not designed to
handle the long-term load of a
kayak and will fail.
Do not use PVC tubes as runners to store your kayak on.
9

• Always remove all water from your kayak before storing.
• Remove the Freedom Drive and rinse well with freshwater
• Do not leave tie-down straps tight over a long period of time as they will
dent your kayak
• Storing in non-recommended congurations can result in hull damage and
void your warranty.
• Do not store your kayak on a kayak cart. A kayak cart should be used for
transportation purposes only and not as a storage platform. Do not leave
your boat on a kayak cart for more than one hour (LESS TIME IN WARMER
TEMPERATURES OR DIRECT SUNLIGHT)
STORE OUT OF THE WEATHER
10

TRANSPORTATION
1
2
3
1
2
3
Our recommendation for the best way to transport your kayak is to purchase
a roof rack or trailer. Using proper cradles that support the hull, the boat can
be transported deck side up. Straps can then be laid across the kayak and
tied to your vehicles rack bars. Straps should be tight but not crazy tight as
they will distort the shape of your kayak. Do not use ratchet straps as this
will prevent overtightening.
Be sure to read your vehicle owner’s manual to ensure that
!
you comply with all specications, precautions and recommendations.
Running a strap or rope from the bow and stern of a the kayak to each
bumper is required. If your bumpers do not have a gap to pass a rope
around, look underneath. There should be a loop of metal, that you can at-
tach to.
Many owners like to use the scupper holes to tie the boat to the car. This
helps prevent the kayak from sliding back and forth or the tie-down rope
from slipping o the kayak. Transporting only is acceptable when running a
line through the scupper hole, never hang or store your kayak by the scup-
per or drive well opening.
11

Two Year Limited Warranty
Lightning Kayaks takes great pride in the kayaks we produce. We adhere to a strict
set of standards to ensure you a great me on the water. Lightning Kayaks guarantees and warrants your new kayak against defects in workmanship and materials
for two (2) years from its purchase date for the original owner. For the warranty
to be valid, the original purchaser must register their kayak through the Lightning
Kayaks website within one month of purchase. Warranty is only valid to the original owner.
Implied Warranty Informaon
Any implied warranes, including implied warranty of merchantability and tness
for a parcular purpose, shall be no longer than the duraon of this express warranty. Some states do not allow limitaons on how long an implied warranty lasts,
so the above limitaons may not apply to you.
Lightning makes no express warranes in addion to this Limited Warranty. Lightning dealers have no authority to make any warranes on behalf of Lightning Kayaks in addion to or inconsistent with those stated herein.
To the extent any provision of this warranty is prohibited by Federal, State or Municipal law and cannot be preempted, it shall not be applicable. This warranty gives
you specic legal rights. You may have other rights, which vary from state to state.
Two Year Limited Warranty for Lightning Kayaks
Lightning Kayaks warrants that this boat is free from defects in materials and
workmanship to retail customers in their approved regions.
Two-year coverage on hull and all components.
This warranty does NOT cover:
• Normal wear and discoloraon.
• Damage caused by abuse or failure to perform normal maintenance.
• Damage caused by hing submerged objects or beaching without retracng
Freedom drive and rudder.
12

• Damage caused by mooring or storing boat in water.
• Damage caused by improperly supporng kayak when transporng or stor-
ing.
• Weather related damage, such as freezing, prolonged sun exposure, or high
winds.
• Damage caused by alteraons or modicaons.
• Transportaon of boat or parts to Lightning Kayaks or its dealers.
• Any boat used for rental or in commercial service of any kind.
• Any other consequenal damage, incidental damages or incidental expense,
including damage to property. Some states do not allow the exclusion or
limitaon of incidental or consequenal damages, so this limitaon may not
apply to you.
To obtain warranty service:
Within 30 days of discovering a defect, take your boat, along with proof of purchase (sales receipt or registraon card) to the authorized Lightning Dealer from
whom you purchased your boat, unless you have moved or are traveling. In that
case, take it to the nearest authorized Lightning dealer.
If you purchased your Lightning Kayak direct, you will need to ll out the aached
form, include relevant photos and describe the defect in full detail.
Our Pledge
At Lightning Kayaks, we’re water enthusiasts like you. We know the importance of
spending me on the water, me with family and counng on your gear to provide
exceponal experiences. Our goal is to keep you on the water enjoying our kayak
for years to come.
Warranty
Rest assured that when you purchase your new Lightning Kayak from an authorized
Lightning dealer or direct through us, it comes with a 2-Year Warranty. The Warranty does not cover normal wear and tear, improper storage, or running into stu.
The Warranty covers defects in the materials, manufacturing and design.
13

Disclaimer – Product Life Cycle
Every Lightning Kayak has a useful product life cycle. The length of that life cycle
will vary depending on mulple factors including; the construcon and materials,
storage and transport, maintenance and care, and the amount and type of use
your kayak is subjected to over its life. Our sta have over 100 years of service to
this industry, however, we can’t engineer our products to survive improper usage,
such as incorrect storage or transport, exposure to excessive heat or sunlight, or
collisions with your neighbor’s garage. Whatever the case may be, we’ll always
point you in the right direcon.
Product Registraon
Registering your Lightning Kayak will enable us to contact you with Lightning prod-
uct updates which may contain very important and relevant informaon relang to
the Lightning product you purchased, as well as make other valuable content available to you should you choose to opt-in.
FAQ
How shallow of water can I use the Freedom Drive?
Answer – We recommend no shallower than 18” for a fully executed stroke.
For waters less than 18”, we recommend a half pedal stroke to keep your
ns from hitting the bottom and potentially damaging your drive. Always
remember to PUSH A PEDAL ALL THE WAY FORWARD WHEN BEACHING.
This will raise the ns up into a recess under the kayak for protection.
What sort of maintenance is there on the Freedom Drive?
Answer – The Freedom Drive should always be rinsed with fresh water
when done kayaking for the day. This will keep the parts moving freely. Occasionally use a silicone spray on the chains for smoother operation.
14

 Loading...