

Page 1
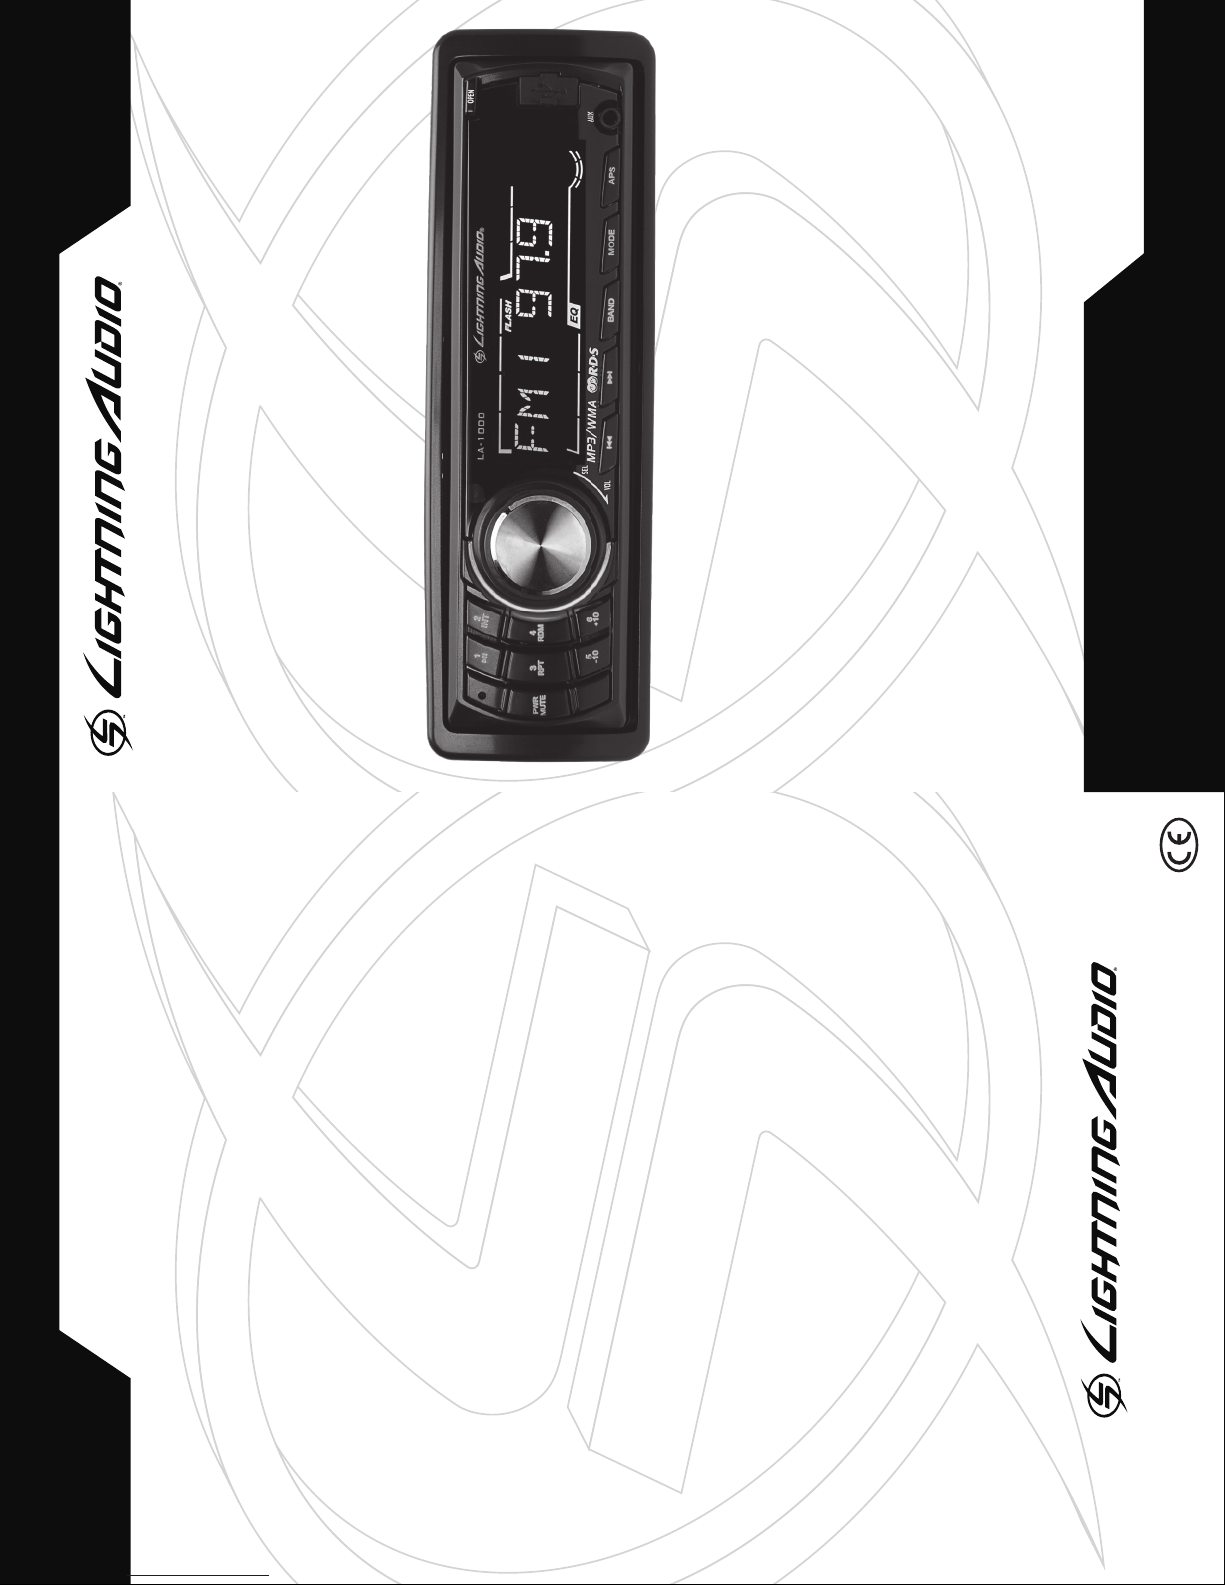
Owners
Manual
LA-1000
SOLO RECEPTOR DEL ESTRUENDO
SINGLE DIN RECEIVER
www.lightningaudio.com
955 N. Fiesta Blvd, Suite 4 • Gilbert, Arizona 85233 U.S.A. • (800) 726-8178
020613 1230-58188-01 Printed in China
Page 2
Introduction
Dear Customer,
Congratulations on your purchase. At Lightning Audio we are
pleased that you chose our product.
For maximum performance we recommend you have your new
Lightning Audio product installed by an Authorized Lightning
Audio Dealer. Please read your warranty and retain your receipt
and original carton for possible future use.
Visit our web site for the latest information on all Lightning Audio
products; www.lightningaudio.com
or, in the U.S. call 1-888-881-8186 or FAX 1-800-398-3985
Table of Contents.
2 Introduction
3 Specifications
4-5 Design Features
6-7 Installation
Contents
Installation Considerations
Mounting Locations
Wiring
8-11 Operation
Basic
Radio
USB/SD Card/CD
Remote Control
11 Troubleshooting
12 Limited Warranty Information
If, after reading your manual, you still have questions regarding this
product, we recommend that you see your Lightning Audio dealer. If you
need further assistance, you can call us direct at 1-800-669-9899. Be sure
to have your serial number, model number and date of purchase available
when you call.
PRACTICE SAFE SOUND
Continuous exposure to sound pressure levels over 100dB
may cause permanent hearing loss. High powered auto
sound systems may produce sound pressure levels well over
130dB. Use common sense and practice safe sound.
Safety
This symbol with “WARNING” is intended
to alert the user to the presence of important
instructions. Failure to heed the instructions will
result in severe injury or death.
This symbol with “CAUTION” is intended to
alert the user to the presence of important
instructions. Failure to heed the instructions can
result in injury or unit damage.
•To prevent injury and damage to the unit, please read and follow the
instructions in this manual. We want you to enjoy this system, not get
a headache.
•If you feel unsure about installing this system yourself, have it installed
by a qualified Lightning Audio technician.
•Before installation, disconnect the battery negative (-) terminal to
prevent damage to the unit, fire and/or possible injury.
FCC Compliance Statement
This equipment has been tested and found to comply with the limits for a
Class B digital device, pursuant to part 15 of the FCC Rules. These limits are
designed to provide more reasonable protection against harmful interference
in a residential installation.
Operation is subjected to the following two conditions: (1) This device
may not cause harmful interference, and (2) the device must accept any
interference received, including interference that may cause undesired
operation.
This equipment generates, uses, and can radiate radio frequency energy
and, if not installed and used in accordance with the instructions, may
cause harmful interference to radio communications. However, there is
no guarantee that interference will not occur in a particular installation.
If this equipment does cause harmful interference to radio or television
reception, which can be determined by turning the equipment off and on,
you are encouraged to try to correct the interference by one of the following
measures:
• Reorient or relocate the receiving antenna.
• Increase the separation between the equipment and receiver.
• Connect the equipment into an outlet on a circuit different from that to
which the receiver is connected.
• Consult the dealer or an experience radio/TV technician for help.
2
Page 3
Specications
General
Supply Voltage: DC 12V
Current Consumption: Max. 10A
Power Output: 200 watts (50x4)
Number of Channels: 4-Stereo
Unit Dimensions: 7”(W) x 4”(D) x 2”(H)
FM Section
Frequency Range:
Effective Sensitivity: 40dB
IF Frequency: 10.7MHz
AM Section
Frequency Range:
Effective Sensitivity: 40dB
IF Frequency: 450KHz
RCA Line Out
Output: 1.2V @ Max.
LA-1000
87.5MHz-107.9MHz US
87.5MHz-108 EU
530KHz-1710KHz US
522KHz-1620KHz EU
Quantity: 1 Pair + 1 Subwoofer
MMC/SD or USB Playback
System: MP3/WMA Audio System
Frequency Characteristics: 20Hz-100Hz <=5dB
10KHz-20KHz <=5dB
Signal to Noise: 50dB (1KHz)
Compatibility
©2013 Rockford Corporation. All Rights Reserved. LIGHTNING AUDIO and associated logos where applicable, are registered trademarks of Rockford Corporation in the United States and/or other countries. All other
trademarks are the property of their respective owners. Specifications subject to change without notice.
3
Page 4
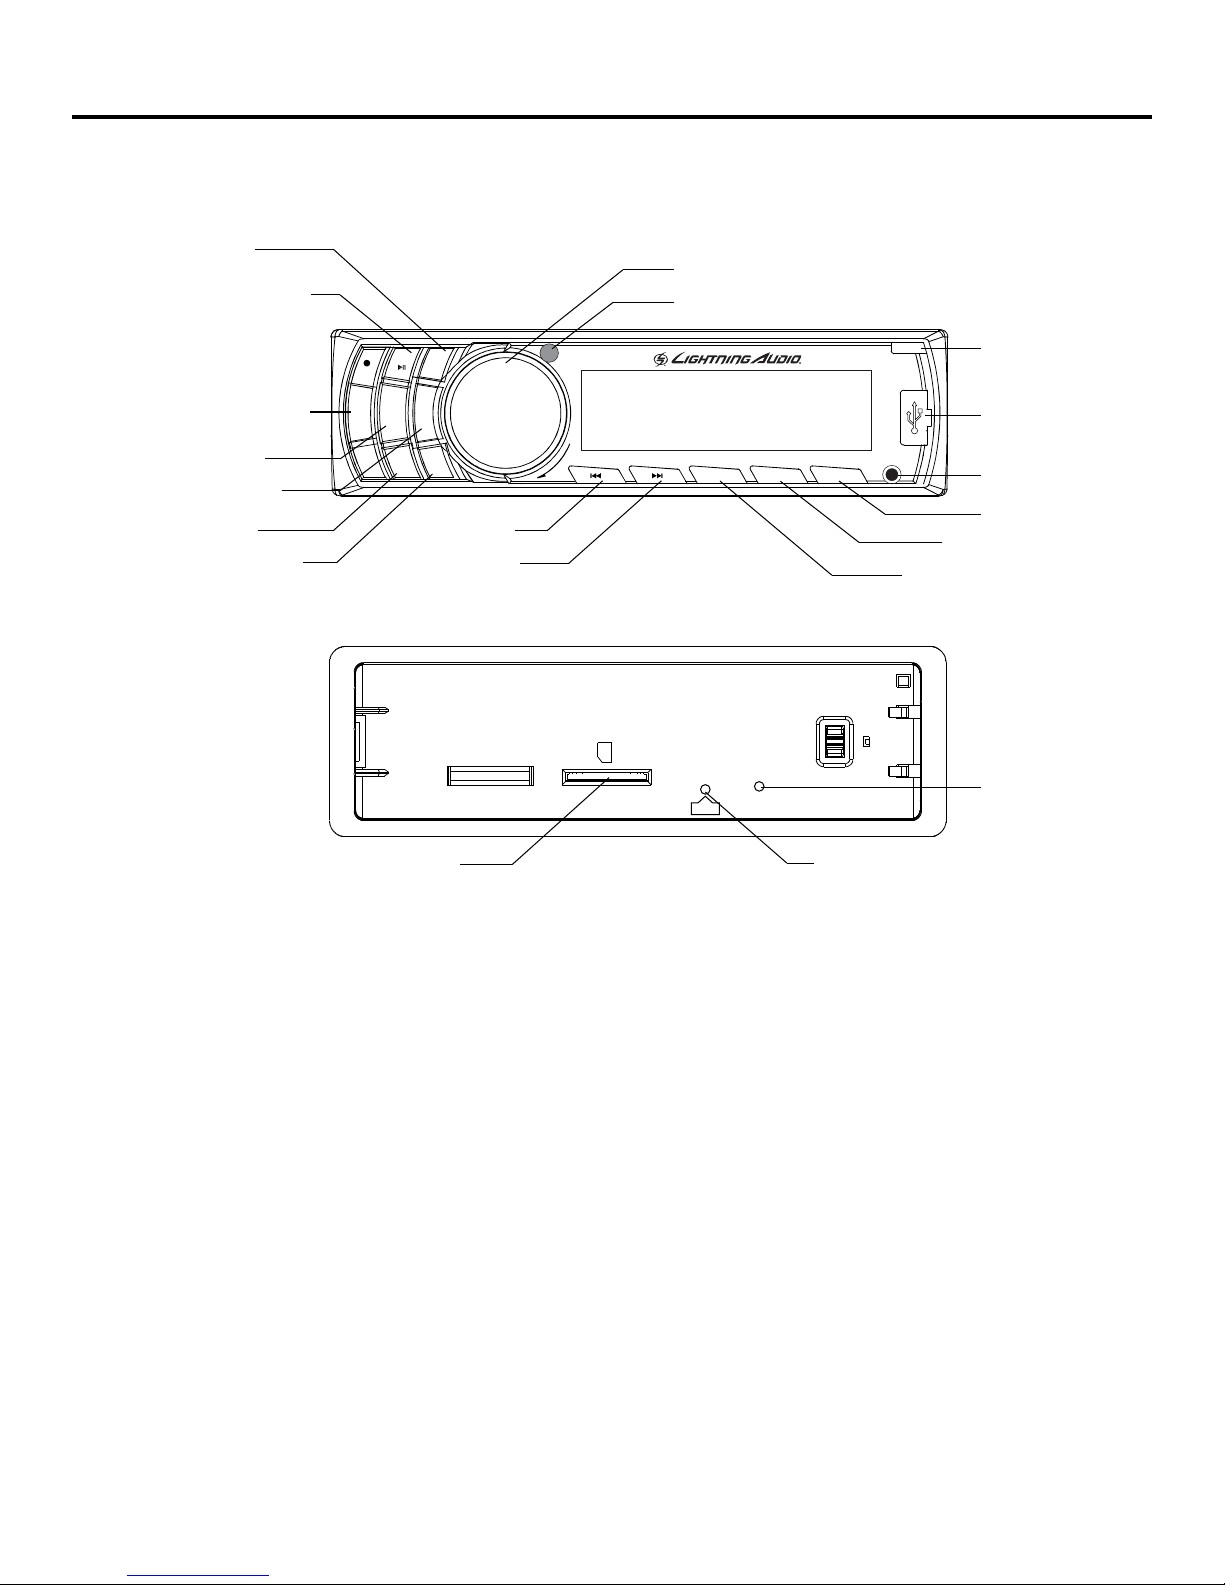
Design Features - Front
2/INTRO button
1/PLAY/PAUSE button
VOLUME/SELECT button
IR remote sensor
POWER/MUTE button
3/REPEAT button
4/RANDOM button
5/-10 button
6/+10 button
LA-1000
21
INT
PWR
3
MUTE
4
RPT
RDM
5
6
-10
+10
REV button
FWD button
SD Card slot
OPE N
OPEN button
USB input
SEL
VOL
BAND MOD E APS
AUX
AUX input
APS button
MODE button
BAND button
SD
RESET
LED indicator
RESET button
illus.-1.1
4
Page 5
LA-1000
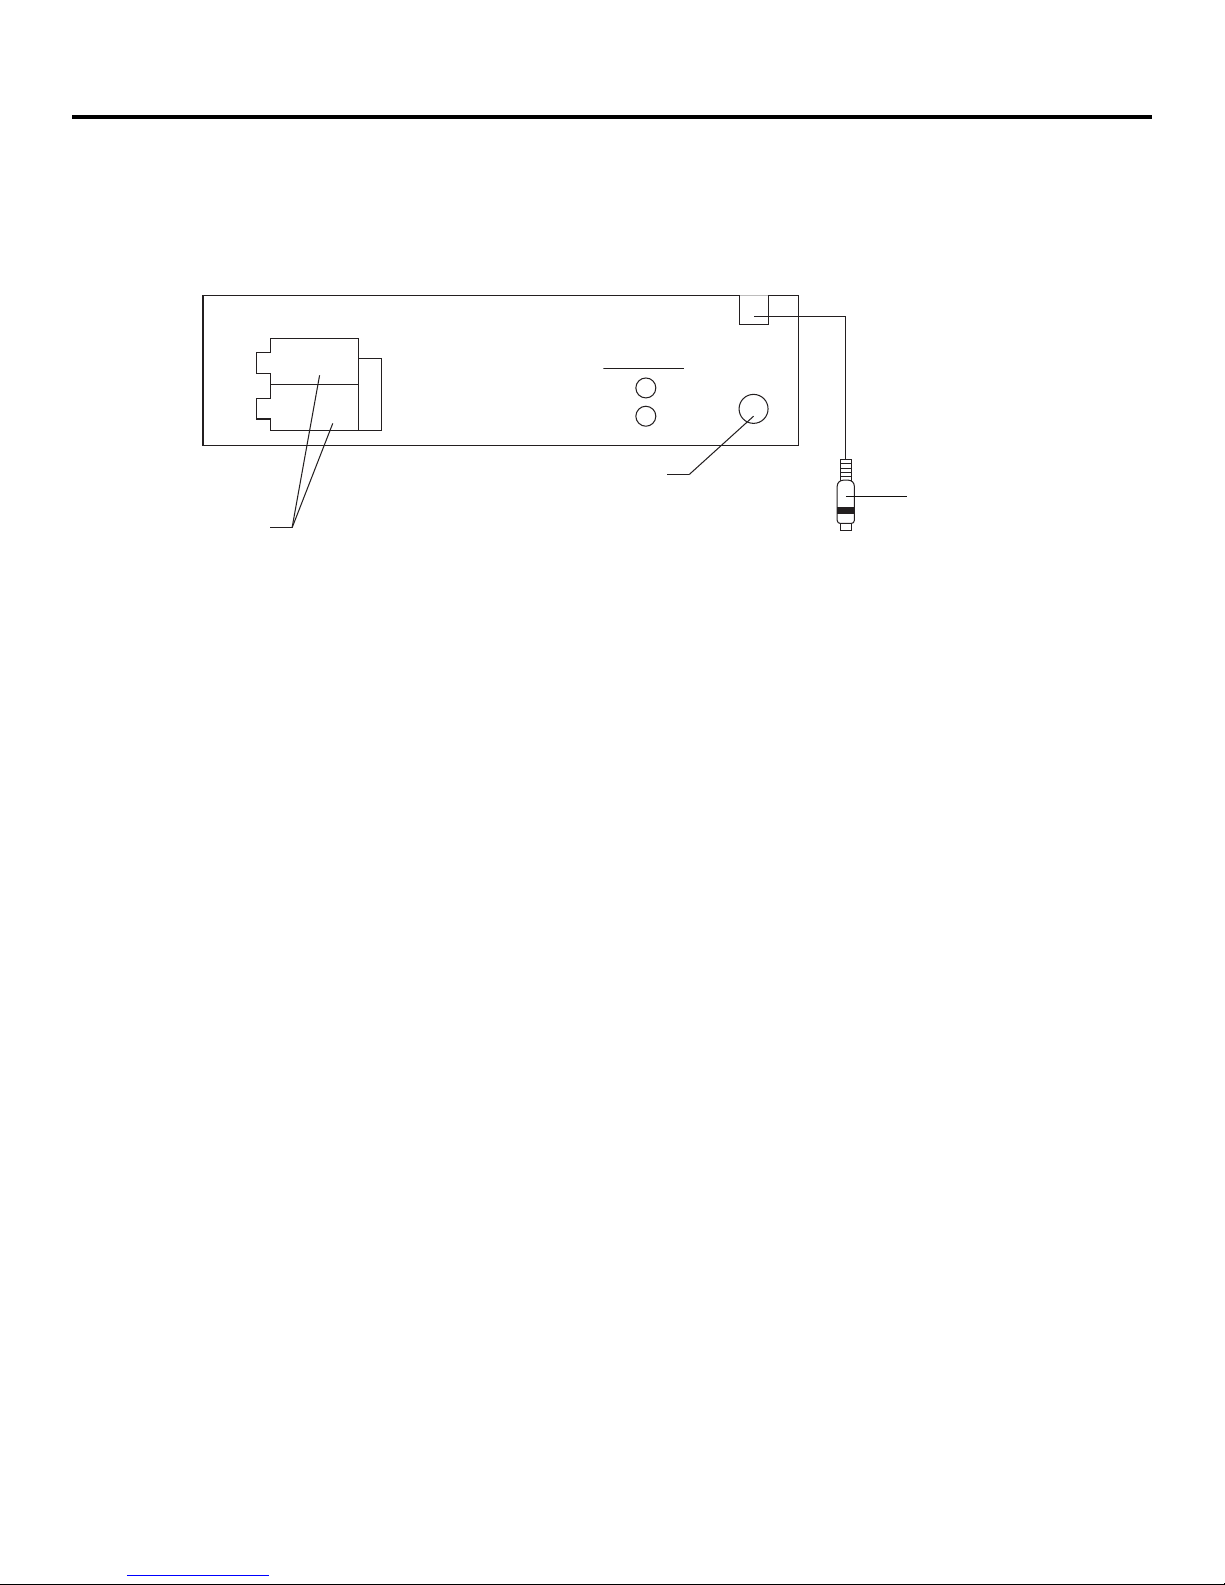
Design Features - Back
Wiring harnesses
included
SOCKET A
SOCKET B
FUSE 10A
RCA out
FR
FL
ANTENNA input
SUBWOOFER line out
illus.-1.2
5
Page 6

Installation
Contents
•Source Unit
•Remote Control
•Metal Mounting Sleeve
•Speaker Harness
Installation Considerations
The following is a list of tools needed for installation:
•Volt/Ohm Meter
•Wire strippers
•Wire crimpers
•Wire cutters
•#2 Phillips screwdriver
•Battery post wrench
This section focuses on some of the vehicle considerations for installing
your new source unit. Pre-planning your system layout and best wiring
routes will save installation time. When deciding on the layout of your new
system, be sure that each component will be easily accessible for making
adjustments.
If you feel unsure about installing this system yourself, have it installed by
a qualified Lightning Audio technician.
Before installation, disconnect the battery negative (-) terminal to prevent
damage to the unit, fire and/or possible injury.
Before beginning any installation, follow these simple rules:
1. Be sure to carefully read and understand the instructions before
attempting to install the unit.
2. For safety, disconnect the negative lead from the battery prior to
beginning the installation.
3. For easier assembly, we suggest you run all wires prior to mounting
your unit in place.
4. Route all of the RCA cables close together and away from any high
current wires.
5. Use high quality connectors for a reliable installation and to minimize
signal or power loss.
6. Think before you drill! Be careful not to cut or drill into gas tanks, fuel
lines, brake or hydraulic lines, vacuum lines or electrical wiring when
working on any vehicle.
7. Never run wires underneath the vehicle. Running the wires inside the
vehicle provides the best protection.
8. Avoid running wires over or through sharp edges. Use rubber or plastic
grommets to protect any wires routed through metal, especially the
firewall.
9. ALWAYS protect the battery and electrical system from damage with
proper fusing. Install the appropriate fuse holder and fuse on the +12V
power wire within 18” (45.7 cm) of the battery terminal.
10. When grounding to the chassis of the vehicle, scrape all paint from
the metal to ensure a good, clean ground connection. Grounding
connections should be as short as possible and always be connected
to metal that is welded to the main body, or chassis, of the vehicle.
Seatbelt bolts should never be used for connecting to ground.
•Power Harness
•Chassis Keys
•Mounting Backstrap
•Mounting Screws
•Hand held drill w/assorted bits
•Assorted connectors
•1/8” Dia. Heatshrink Tubing
•Soldering Iron
•Solder
•Heatgun
Mounting Locations
The mounting position of your source unit will have a great effect on the
performance of your in-dash Media Player. The source unit can be installed
in a wide range of operating locations. However, care should be taken to
ensure optimum performance.
Instrument Panel
Mounting the source unit in the instrument panel provides optimum
access. The source unit should be securely mounted using the “Standard
Mount” or “ISO-DIN Mount” method to ensure optimum Media Player
performance.
Center Console
Mounting the source unit in the center console also provides optimum
access. Be sure the installation does not interfere with the operation of the
gear shift or parking brake.
Glove Box
Mounting the source unit in the glove box is adequate, but does not provide
easy access. Glove box mounting should only be done if “Instrument
Panel” or ”Center Console,” mounting is not acceptable (i.e., maintaining
integrity of older vehicles with metal dashboards.)
Under Dash
Mounting the source unit under the dash is adequate, but does not provide
easy access. Under dash mounting should only be done if “Instrument
Panel,” ”Center Console” or ”Glove Box” mounting is not acceptable.
Mount the source unit off to the side of the driver’s area to reduce
interference with the parking brake, gear shift, or operating pedals.
NOTE: The source unit should have a mounting angle within ±20° from
horizontal.
Engine Compartment
Never mount the source unit in the engine compartment. Mounting the
source unit in the engine compartment will void your warranty.
6
Page 7
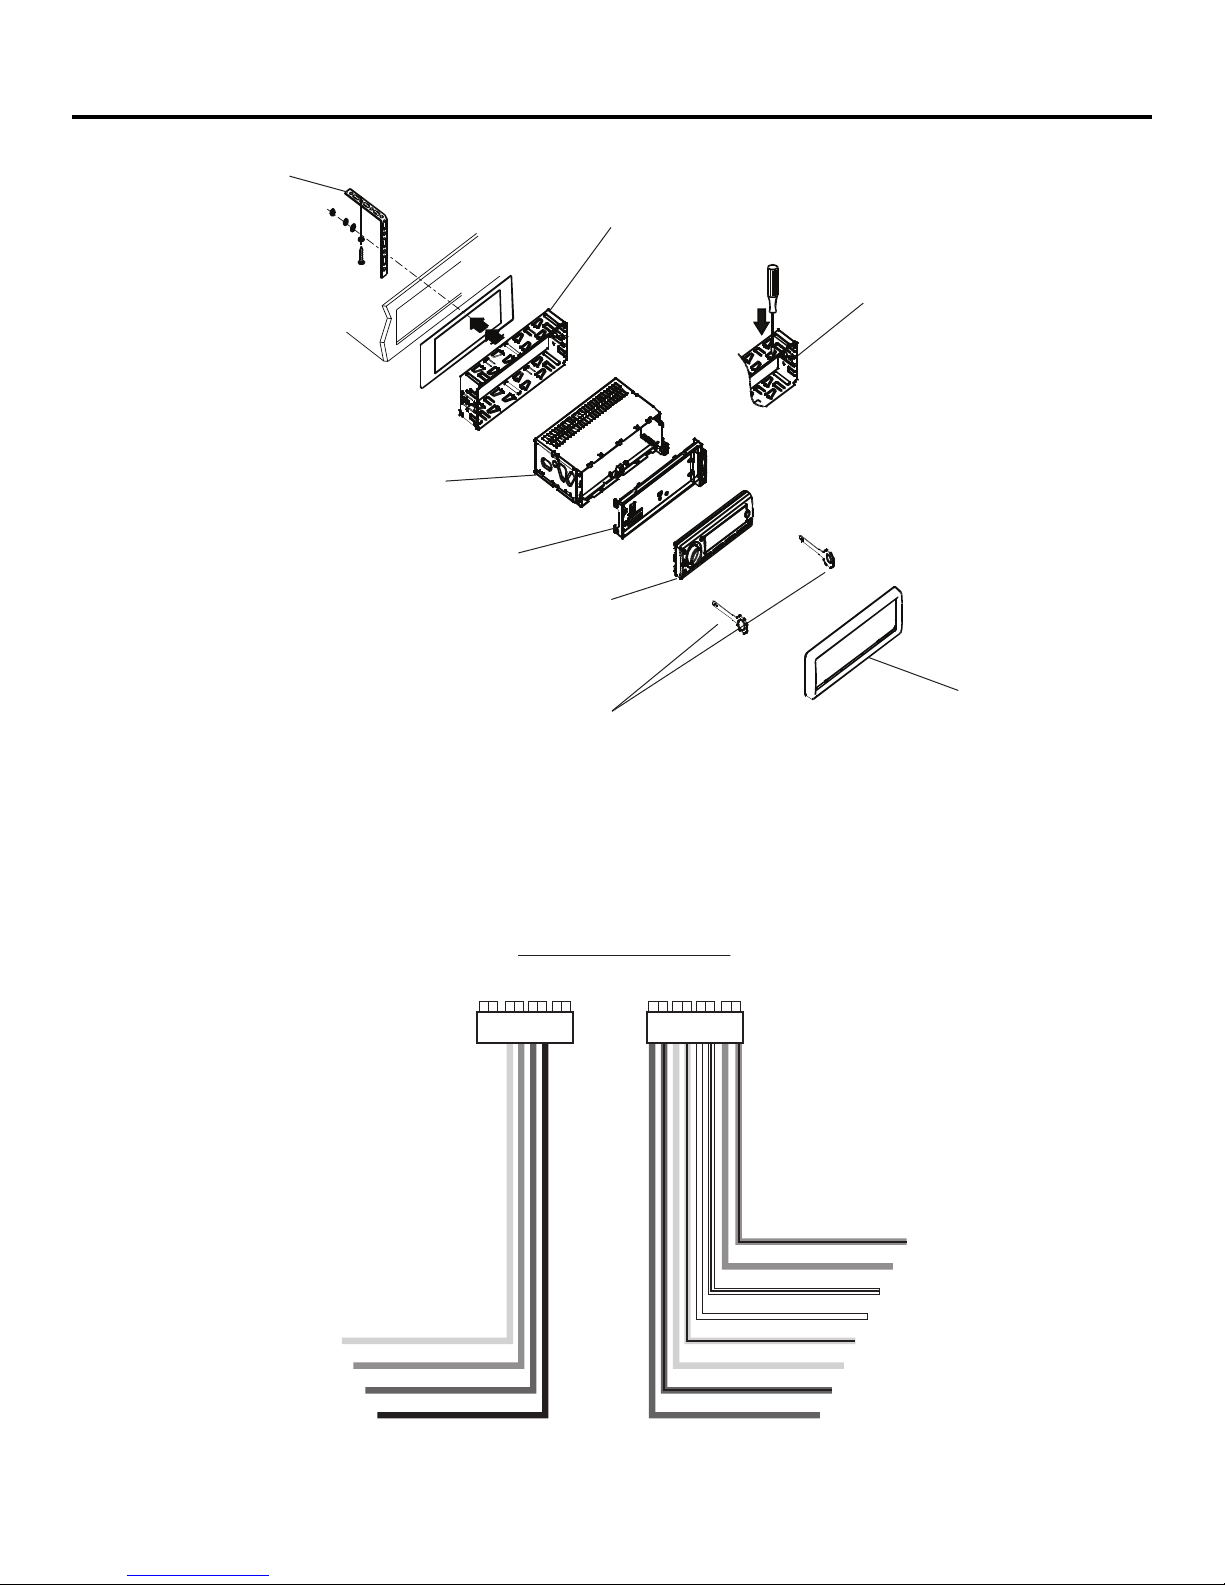
Metal Support Strap
Installation
Metal Mounting Sleeve
Bend tabs against dashboard
with a screwdriver.
Unit Chassis
Fixed Faceplate
Front Panel
To remove the unit from the metal mounting sleeve, insert the two keys
supplied into the left and right side slots of the chassis at the same time.
Then pull the chassis out of the metal mounting sleeve as shown.
Included Wiring Harnesses
YELLOW (Memory +12V)
BLUE (Remote Turn On)
RED (+12V to Ignition)
BLACK (Ground)
Plastic Trim Ring
illus.-2.1
CONNECTOR BCONNECTOR A
GREEN/BLK (R.L. Speaker)
GREEN (R.L. Speaker)
WHITE/BLK (F.L. Speaker)
WHITE (F.L. Speaker)
GRAY/BLK (F.R. Speaker)
GRAY (F.R. Speaker)
VIOLET/BLK (R.R. Speaker)
VIOLET (R.R. Speaker)
7
illus.-2.2
Page 8

Operation
Basic Operation:
To turn the unit on/off
When the unit power is Off, it may be switched On by pressing any button except
the OPEN button. When the unit is On, press and hold the POWER button for more
than 0.5 seconds, to switch the power off.
To select function mode
Press the MODE button to change function mode as follows: --> TUNER --> USB
(after inserting USB stick)-->CARD (after inserting SD card) --> AUX -->
When there is no media (USB/CARD), those modes will be skipped.
To adjust the volume level
Rotate VOL knob left or right to desired volume level.
To mute or resume sound
Press the MUTE button to eliminate or resume sound immediately during playback.
To resume the sound immediately, you can also press SEL button or rotate VOL
knob.
To set sound mode
Press SEL button shortly and repeatedly to select mode of VOL(volume), BASS,
MID, TRE, BAL and FAD in the sequence and circulation. In each mode, the waiting
time is about 5 seconds, and when the waiting time is over, it will return to the last
display mode. After selecting a sound mode, use volume control to set level of the
selected sound mode.
To set menu
Press SEL button and hold for more than 2 seconds to turn on TA mode, then
press SEL button shortly and repeatedly to select AF, TA SEEK/ALARM, PI ON/
OFF, RETURN S/L, MASK DPI/ALL, BEEP ON/OFF, EQ, SUBW ON/OFF, VOL LAST/
DEFA, AVOL (0-30), AMERICAS/EUROPE, MONO/STEREO (in radio mode), LOUD
ON/OFF, DX/LOCAL (in radio mode), CLOCK ON/OFF, 12/24, SET CLOCK. After
selecting a desired item, use volume control to set.
TA mode
Traffic Announcements. When this feature in ON, the unit will receive traffic
bulletins. (Does not work in all regions)
AF mode
Alternative Frequencies. When this mode is active, the radio locks onto the best
possible frequency for a station in a particular part of the country.
TA SEEK mode
When a newly tuned station does not received.
PI mode
Program Identification. Setting of the sound during a search for stations.
RETURN mode
The initial amount time of automatic TA or PI search mode selected. When PI
information is not received during the return time, the radio will start to retune to
the next same PI station. When the same PI station is not received during a search,
the radio goes to the last station and waits 4-5 minutes until a PI code is received.
RETURN L: 150 seconds RETURN S: 90 seconds
MASK DPI/MASKALL
MASK DPI masks only AF which have a different PI. MASK ALL masks
the AF which have a different PI and no RDS signal.
BEEP mode
ON mode: The beep is generated when any key is pressed.
OFF mode: The beep sound is disabled.
EQ mode
The unit has predefined EQ settings to adjust your levels to compliment the music
being played.
USERSET/FLAT/CLASSIC/ROCK/POP
When EQ is set to USERSET, user settings are used.
SUBW mode
Activates the Subwoofer ouput line on the unit.
VOL mode
Intitial volume when the unit is turned on for the first time.
VOL LAST: The volume level when switching off will be restored with power On.
VOL DEFA: The volume level of the main unit after power on is a constant value.
When selecting VOL DEFA item, press SEL button to display AVOL , then you can
pre-set the constant volume level after power on with VOL control.
AVOL mode
This is the initial preset volume the unit will be played a turn on. Rotate VOL knob
left to right for desired level 0-30.
AMERICAS/EUROPE mode (in radio mode)
Select to AMERICAS or EUROPE depending on what country you are in.
MONO/STEREO mode (in radio mode)
Select between STEREO or MONO. The MONO setting can improve the reception
in the case of poor stereo reception.
LOUD mode
This feature boosts low frequencies. It is useful at low volumes.
DX/LOCAL mode (in radio mode)
Two levels of sensitivity for tuner searching, local and distant.
CLOCK mode
This mode turns the clock ON or OFF.
12/24 HOUR mode
To set the clock format 12 or 24.
SET CLOCK mode
Sets the time using the VOL knob. Turning VOL knob clockwise controls hours.
Counter clockwise controls minutes.
To remove front control panel
Press OPEN button to release front control panel from unit chassis, then you can
remove it from unit chassis. When front control panel is removed, the LED indicator
on front cabinet flashes.
To reset unit
Before operating the unit for the first time, or after replacing the car
battery or changing the connections; you must reset the unit. To reset the
unit, remove the front control panel, then press RESET button with a pen or paper
clip. This operation will erase clock setting and stored contents.
Radio Operation
To select radio band
Pressing the BAND button briefly and repeatedly to select the desired radio band.
The sequence for the radio bands is as follows:
-->FM1-->FM2-->FM3-->AM1-->AM2-->
8
Page 9

Operation
To search for a radio station manually or automatically
Press and hold the >>| button to activate MANUAL searching mode.
In MANUAL mode: Press the >>| or |<< button briefly to manual tune up/down
for the desired radio station frequency step by step.
In AUTO mode: Press the >>| or |<< button, to automatically tune up/down for the
radio station frequency. (If in MANUAL mode and without further operation, the
unit will change to AUTO mode a few seconds later.)
To store current station or turn on a preset one
1) Press one of the 6 number buttons and hold for more than 1 second to store
the current station in the preset memory bank of the number button for the current
band. In this way the unit can store 30 preset stations.
2) Press one of the 6 number buttons briefly to turn on the preset station stored in
the preset memory bank of the number button for the current band.
3). To scan for each preset station or auto search for the strongest stations
1) When pressing and holding the APS button for more than 1 second, the radio
searches from the current frequency and checks the signal strength level until
the 6 strongest stations are found. And then the 6 strongest stations are preset
to the corresponding preset memory numbered bank. The auto-storage operation
is implemented in the each selected band. When the auto-storage operation is
finished, the radio executes Preset scan.
2) When pressing the APS button or A.P button briefly, the radio searches for each
preset station in the current band and holds at that preset station for 5 seconds,
and then searches again.
4. To search for stations with a PTY (PROGRAMTYPE) program (RDS only)
Press and hold PTY/MODE on main unit to select one of PTY programs such as:
POP M- - NEWS-- off. While selecting POP M or NEWS, pressing one of the 6
preset buttons briefly and repeatedly can select your desired PTY program as
described in preset buttons. When turning on a PTY program, the PTY program
and PTY word is flashed on LCD. After selecting a desired PTY program and no
operation for 2 seconds, it will search for the station of the PTY program. During 1
loop, if the desired station of the PTY programs not found, PTY NONE is displayed,
then returns to previous normal radio and PTY icon disappears.
* When PTY mode is on, the 6 number buttons are shared as follows:
PTY music group -------------------------- PTY speech group
1. POP M, ROCK M 1. NEWS, AFFAIRS, INFO
2. EASY M, LIGHT M 2. SPORT, EDUCATE, DRAMA
3. CLASSICS, OTHER M 3. CULTURE, SCIENCE, VARIED
4. JAZZ, COUNTRY 4. WEATHER, FINANCE, CHILDREN
5. NATION M, OLDIES 5. SOCIAL, RELIGION, PHONE IN
6. FOLK M 6. TRAVEL, LEISURE, DOCUMENT
AF [ALTERNATIVE FREQUENCIES] mode
When pressed briefly, AF switching mode is selected and the state of AF switching
mode is displayed by AF segment in display.
Segment off: AF switching mode off.
Segment on: AF switching mode on, and has RDS information.
Segment flashing: AF switching mode on, but RDS information is not received yet.
When AF switching mode is selected, the radio checks the signal strength of AF all
the time. The interval of checking time of each AFs depends on the signal strength
of the current station, from a few minutes for strong station to a few seconds for
a weak station. Every time that a new AF is stronger than the current station, it
switches over to that frequency for a very short time, and the NEW FREQUENCY is
displayed for 1-2 seconds. Because the mute time of AF switching or checking time
is very short, it is almost inaudible in case of normal program. During FM mode,
when AF is on, SEEK, (SCAN), AUTO-MEMORY function can only receive and save
RDS program.
TA [TRAFFIC ANNOUNCEMENT] mode
When TA mode is on (TA is displayed on LCD), it will begin to seek TA station and
TA SEEK will be displayed on LCD.
When traffic announcement is transmitted:
1). If the unit is in SD, USB mode, it will switch to radio mode temporarily.
2). If volume level is below 20, volume level is raised to 20, and returns to its
previous mode and volume level when the traffic announcement is over. If volume
is adjusted during traffic announcement, only the traffic announcement volume is
valid.
* When TA mode is on, SEEK, AUTO MEMORY function can be received or saved
only when traffic program identification code has been received.
USB/Card OPERATION:
1. To insert or pull out SD card or USB stick
When needing to playback SD or USB music, remove front control panel or open
the cover of USB port, insert SD card or USB stick into SD slot or USB port. Then
the playing mode will be changed into SD or USB mode and display Card or USB
on LCD (When SD card and USB stick are both inserted into their slot or port, the
playing mode will be changed into the mode of the latter one), and then play the
first track of SD or USB.
2. To select next or previous track to play
Press the >>| button briefly to play next track.
Press the |<< button briefly to play the current track from the beginning of it if the
playing time is more than 2 seconds.
Press the |<< button briefly to play the previous track if the playing time is less
than 2 seconds.
3. To play fast forward or reverse
Press and hold >>| or |<< button to play fast forward or reverse.
4. To play previous or next 10th track
Press 5/-10 or 6/+10 button to play previous or next 10th track.
5. How to use 1/>||/TOP button
During playback, press 1/>||/TOP button to pause playback. When in pause mode,
press 1/>||/TOP button to play again.
Press and hold 1/>||TOP button to select the first track for playback.
6. To scan tracks
During playback, press INT button briefly to play the first 10 seconds of each track,
press INT button again to cancel INT function and retain playing the track currently
selected.
7. To repeat track(s)
During playback, press RPT button briefly to play the current track repeatedly, and
the LCD will display RPT ONE.
Press and hold the RPT button to play the tracks in the Album repeatedly, and the
LCD will display D-RPT.
Press RPT button again to cancel RPT function, and the LCD will display RPT OFF.
8. To play tracks in random
During playback, press RDM button briefly to play all tracks in random. Press it
again to cancel RDM function.
9
Page 10
Operation
9. To quickly select a track to play
Press APS or A.P button repeatedly to select TRACK SEARCH, FIRST CHARACTER
SEARCH or DIRECTORY SEARCH mode.
1) In TRACK SEARCH mode , the LCD will display TRK 000 and flash the biggest
digit 0 that the USB stick or SD card contains. Then use volume control to enter
a number of the flashing digit from 0 ~ 9. Then press SEL button to confirm the
number and flash next smaller digit 0. With the same means, enter the number of
the other flashing digit. After finishing entering the number of all flashing digits,
press BAND button to play the track of the selected serial number.
2) In FIRST CHARACTER SEARCH mode, the LCD will display A--SEARCH, If
there are some files names with the first characters are A , SEARCH will change
into the first file name with first character is A, by the order of A~Z and 0~9;
otherwise, it will change into NONE.
Use volume control to select files first character by the order of A~Z and 0~9. Then
press >>| or |<< button to select one file its first characters as the selected one.
Finally press BAND button to play the selected file.
3) In DIRECTORY SEARCH mode , the LCD will display the root folder (if there
is no root folder, it will found a root folder named D-ROOT). Then use volume
control to select your desired folder and then press BAND button to enter the
folder and play the first track in the folder, and press >>|/|<< button to play your
desired track in the folder.
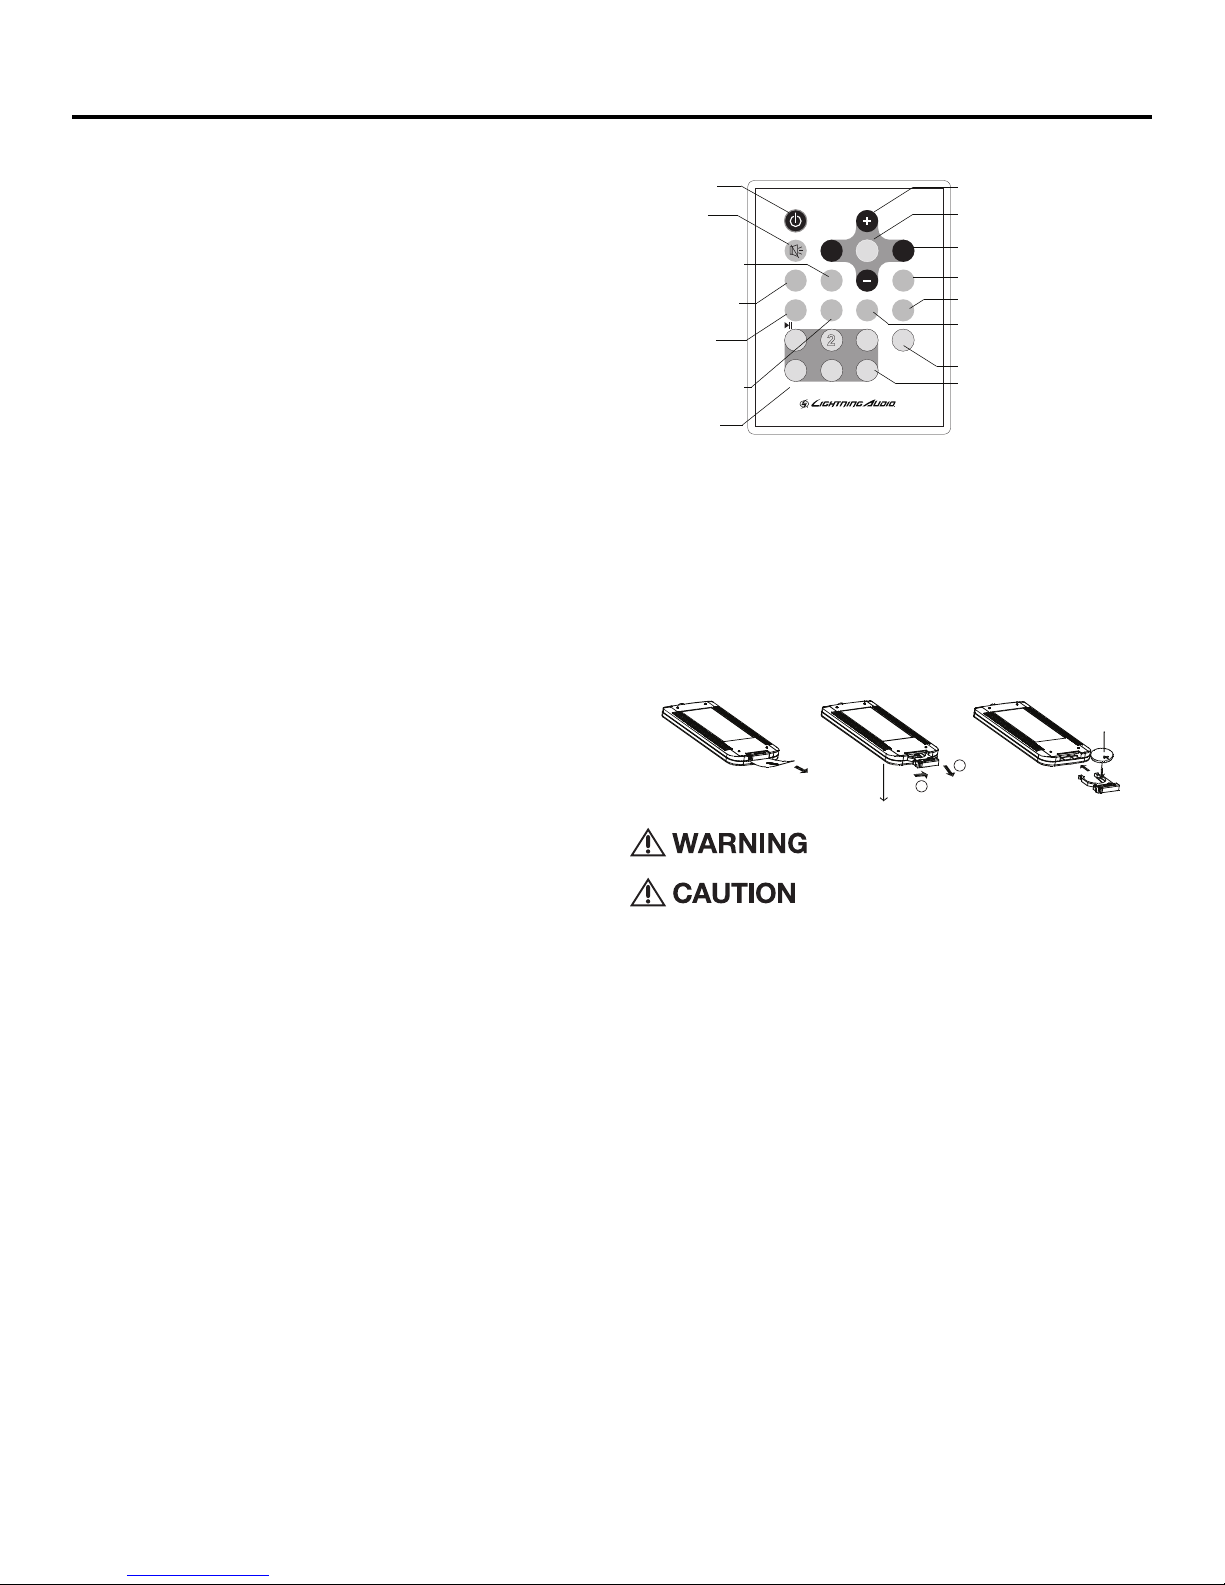
Remote Control
POWER button
MUTE button
A.P (Auto Program)
button
CLK (Clock) button
MODE button
/PLAY/PAUSE/
TOP button
BND (Band) button /
INT (Intro) button
RDM (Random)
button
POWER
MUTE
DN
A.P
CLK
MODE
BND
INTTOP RPT
14253
RDM
SEL UP
AF
PTY TA
SCN
6
+ /
button
-
SEL (Select) button
UP/DOWN button
AF (Alt. Freq.) button
TA (Traffic Announcement) button
PTY (Program Type) button /
RPT (Repeat) button
SCN (Scan) button
NUMBER buttons
Load/unloading battery of remote control
1. Please remove insulating sheet out of remote control before use. Pull out
insulating sheet in the direction as per Fig. 1.
2. When changing battery for remote control, first pull the movable block hold in
the direction as indicated in Fig. 2, Arrow A. Then pull the battery holder out
from the remote control in the direction as indicated in Fig.2, Arrow B.
3. Replace the old battery by a new battery with (+) polarity side upward. Then
return the battery holder to the remote control by pressing the battery holder.
Please see Fig.3.
B
Fig. 1 Fig. 2 Fig. 3
A
Improper use of battery may cause overheating or
explosion. Which may result injury or fire.
Battery leakage may cause damage to the remote
control(Battery Life: 6 months with normal use in
normal room temperature).
• Do not short the battery.
• Do not throw the battery into the fire.
• To avoid the risk of accident, keep the battery out of reach of children.
+ Side Up
10
Page 11
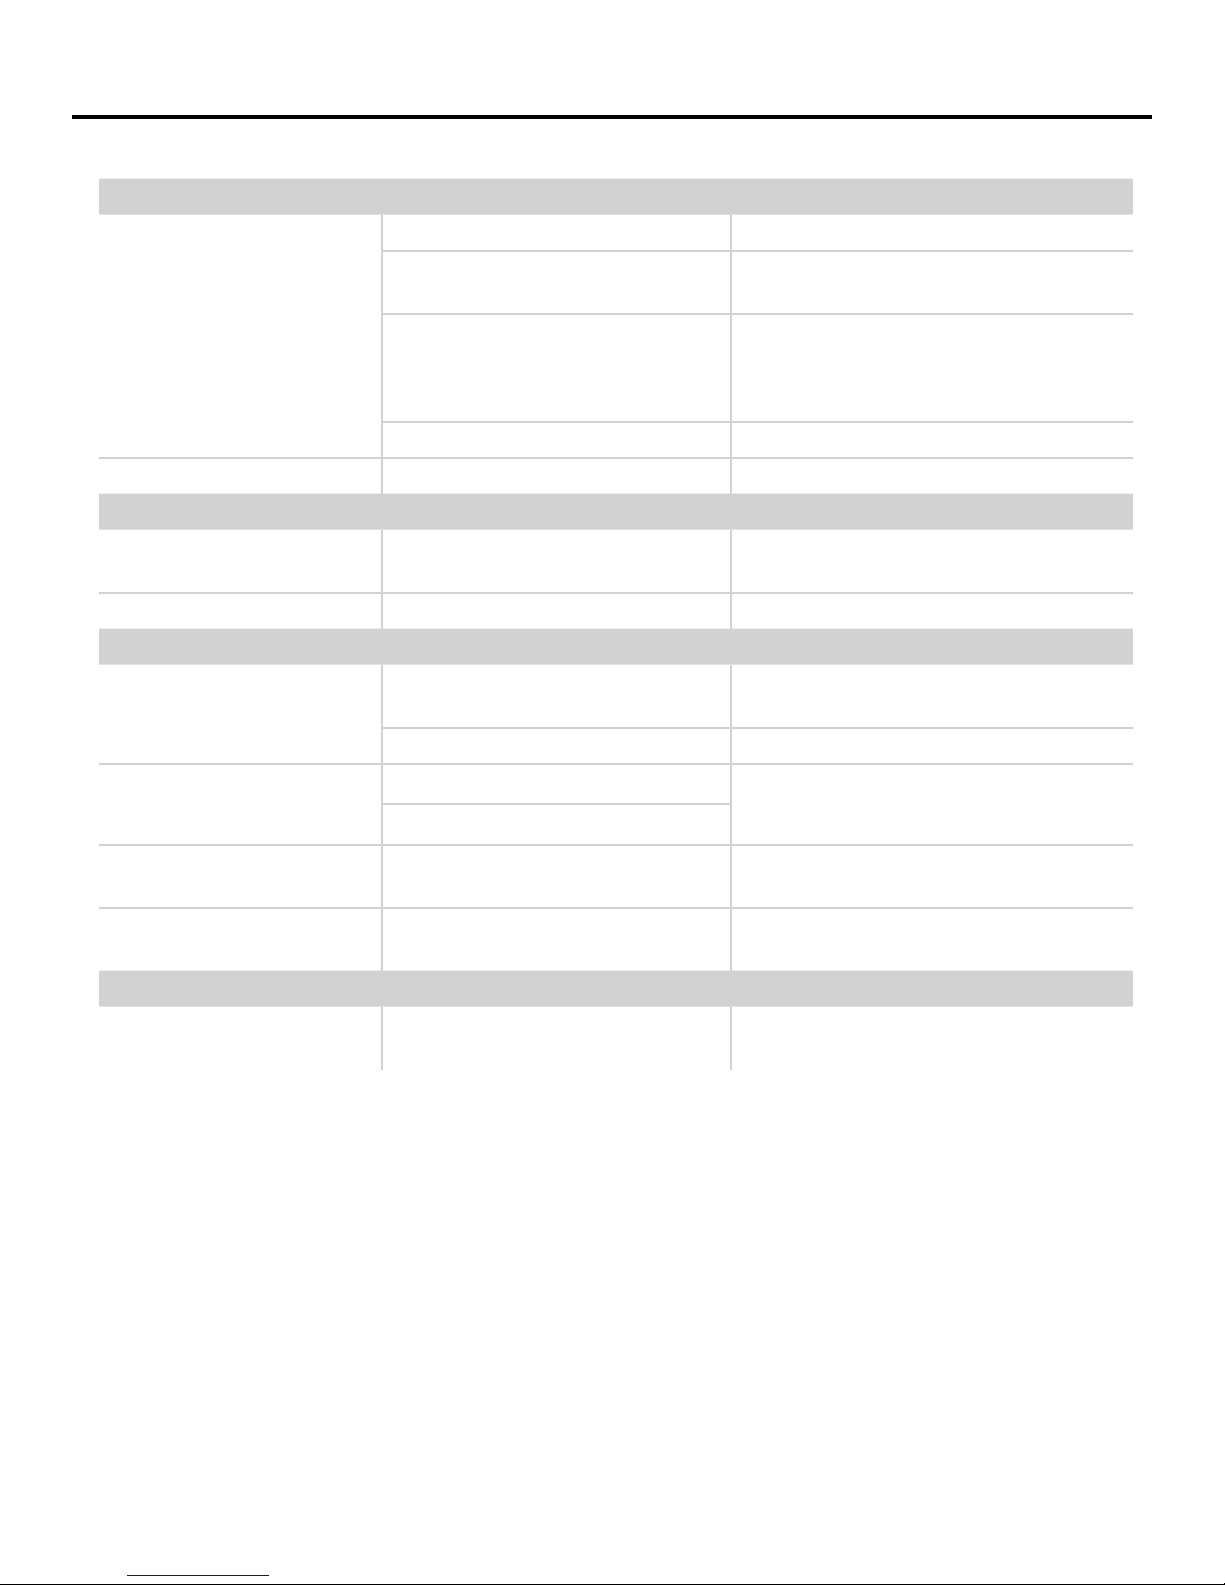
Symptom Diagnosis Remedy
Basic
Blown fuse Check fuse of the unit, replace with correct rating.
Troubleshooting
Vehicle’s ignition is off
Source unit does not turn on.
Unit resets itself when engine is off Incorrect connection between ACC and battery Check wiring and repair as necessary
Tuner fails to tune any stations
Unable to tune stations in seek mode You are in a weak signal area Make sure the tuner LOC mode is off
USB device cannot be inserted
USB device is not recognized
Voltage applied to Red and Yellow wires is not
between 10.8 & 16 volts or there is not voltage
present
Unit is not properly grounded Check wiring and repair as necessary
Radio
No antenna or disconnected or open connection
in cable
USB Devices
The USB device has been inserted in the wrong
direction
The USB device connector is broken Replace with a new USB device
The USB device is damaged
Connectors are loose
If connected following the instructions, the unit will not
operate with ignition off.
Check battery connection and fuses and repair or
replace as necessary. If voltage is above +16 volts,
have the electrical system inspected by and authorized
car service center
Check all connections and repair as necessary
Reverse the connection direction of the USB device,
try it again
Disconnect USB device and reconnect. If the device is
still not recognized, try replacing with a different USB
device
No sound heard with the display “No
File” shown
Sound skips or is noisy MP3/WMA files are not encoded properly Use MP3/WMA files encoded properly
MP3 is not playing back
No MP3/WMA files are stored on the USB
device
MP3
Writing error occurred. The MP3 format is not
compatible.
Store these files on the USB device
Make sure MP3 has been written in a supported format
11
Page 12

Limited Warranty Statement
Lightning Audio offers a limited warranty on products on the following terms:
Length of Warranty
Headunits - One year replacement warranty from date of original purchase - requires proof of purchase.
Speakers - One year replacement warranty from date of original purchase - requires proof of purchase.
Amplifier s - One year replacement warranty from date of original purchase - requires proof of purchase.
What is Covered
This warranty applies only to Lightning Audio products sold to consumers by an authorized Lightning Audio Dealer in the United States
of America. Products purchased by consumers from an authorized Lightning Audio Dealer located outside of the USA are covered by the
authorized Lightning Audio Distributor for the country in which the products were purchased.
Who is Covered
This warranty covers only the original purchaser of Lightning Audio product purchased from an authorized Lightning Audio Dealer in the
United States. In order to receive service, the purchaser must provide Lightning Audio with a dated copy of the sales receipt stating the
customer name, dealer name and product(s) purchased. Products found to be defective during the warranty period will be replaced (with a
product deemed to be equivalent at Lightning Audio’s sole discretion) by Lightning Audio.
What is Not Covered
1. Damage caused by accident, misuse, abuse, improper installation or operation, water or moisture, excessive heat, theft, or shipping
2. Any cost or expense related to the removal or reinstallation of product
3. Items previously repaired, serviced or modified by an unauthorized service center
4. Any product which has had the serial number defaced, altered, or removed
5. Subsequent damage to other components
6. Any product purchased outside the U.S.
7. Any product not purchased from an authorized Lightning Audio Dealer
Limit on Implied Warranties
Any implied warranties of fitness for use and merchantability are limited in duration to the period of the express warranty set forth above. Some
states do not allow limitations on the length of an implied warranty, so this limitation may not apply. No person is authorized to assume for
Lightning Audio any other liability in connection with the sale of the product.
How to Obtain Service
Defective products should be returned to your local authorized Lightning Audio Dealer for warranty service or, you may call 1-888-881-8186
for Lightning Audio customer service. You must obtain an RA# (Return Authorization number) prior to returning any product to Lightning
Audio. Return Authorizations are valid for 30 days. You are responsible for the shipment of defective product to Lightning Audio and you
MUST include valid proof of purchase. Mark your RA# clearly on outside of your shipping carton. Products received without a valid RA# will
be refused and returned to sender at sender’s expense.
12
 Loading...