

Lightmaxx LIG0010721-000 LED DROP III RGB 3x6m, LIG0010720-000 LED DROP II RGB 2x3m, LIG0010719-000 LED DROP I RGB 1x2m User Manual

Bedienungsanleitung
Deutsch Seite: 1-11
User Manual
English Page: 12-21
LightmaXX LED DROP System
LED Effect Backdrop Curtain
Art.: LIG0010719-000 LED DROP I RGB 1x2m, incl. Controller & Bag
Art.: LIG0010720-000 LED DROP II RGB 2x3m, incl. Controller & Bag
Art.: LIG0010721-000 LED DROP III RGB 3x6m, incl. Controller & Bag
Sehr geehrter Kunde,
vielen Dank, dass Sie sich für ein Produkt von LightmaXX entschieden haben.
In der folgenden Anleitung erhalten Sie wichtige Informationen über dieses Produkt, sowie deren
Eigenschaften und Funktionen.
Dear Customer,
Thank you for purchasing our product from LightmaXX.
To fully enjoy the benefits of this product,
Please read and understand the important information and instructions
Included in this manual.

LightmaXX LED DROP System Effect Backdrop Curtain ____________
Inhaltsverzeichnis
1.Produkt-Einleitung & Merkmale Seite 2
2.Sicherheitshinweise Seite 3
3.Anschluss ans Stromnetz + Verpackungsinhalt/ Zubehör + Typen Seite 4
4.Montage und Befestigungsmöglichkeiten Seite 5
5.LED DROP Controller & Anschlüsse Seite 6
6. Tastenbelegung + Menü Optionen & Führung Seite 7
7.Kombination von LED DROP + Verpackung & Transport Seite 8
8.Programmliste für Auto und Sound Modus Seite 9
9.DMX Kanalbelegung Seite 10
10.Wartung und LED Austausch __________ Seite 11
1

LightmaXX LED DROP System Effect Backdrop Curtain ____________
Sehr geehrter Kunde,
vielen Dank, dass Sie sich für ein Produkt von LightmaXX entschieden haben.
Um den sicheren Umgang des Produkts zu gewährleisten, lesen Sie bitte vor Inbetriebnahme
aufmerksam die Betriebsanleitung.
Wir wünschen Ihnen viel Spaß und viele erfolgreiche Veranstaltungen
mit ihrem neuen Lightmaxx LED DROP System.
1. Produkt-Einleitung
Vielen Dank, für die Wahl des Lightmaxx LED DROP Systems.
Dieses Produkt ist die neueste Entwicklung aus dem Hause LightmaXX
und zählt zu den fortschrittlichsten und bedienungsfreundlichsten LED Vorhangsystemen.
Das dafür benutzte Trägermaterial ist klassischer Bühnenolton B1 nach DIN 4102
und darf ohne Einschränkungen auf öffentlichen Veranstaltungen eingesetzt werden.
Produktmerkmale
DMX Kanäle: 7 DMX Kanäle nach internationalem DMX512 Standard
Lichtquelle: SMD LED 3 in 1 / RGB Longlife bis zu 100.000 Std.
LED Anzahl: 30 Stk. je m²
LED Pitch: 180mm
Abstrahlwinkel: 120°
Steuerung: LED Controller mit Display und Menüführung
Steuerungsmöglichkeiten: DMX, Auto Run, Sound to Light, SD Karten Playback
Anzahl der Programme: 30 fertige Programme auf SD Karte
Anschlüsse: XLR 3 pol. DMX IN & OUT, 230V IEC Kaltgerätestecker
und 5pol. XLR auf 4pol NC Adapter für den Anschluss des Vorhangs am Controller.
Montage: Ringösen zur einfachen und schnellen Montage inkl Mehrweg-Kabelbinder.
*Achtung, Kabelbinder sind in einigen Ländern nicht als Montagematerial zugelassen*
*Bitte informieren Sie sich vor der Installation ob sie diese auch verwenden dürfen*
Zertifikationen: CE, SGS, Rohs
Betriebsspannung: AC90V-240V 50/60Hz
2

LightmaXX LED DROP System Effect Backdrop Curtain ____________
2. Sicherheitshinweise
1 . Nach Erhalt Ihres neuen LED DROP , überprüfen Sie bitte die Umverpackung , den Artikel
und das Zubehör , ob sie im Einklang mit der Packliste und in gutem Zustand sind.
Falls Teile fehlen oder ein Defekt erkennbar ist,
kontaktieren Sie bitte den Händler. Dieser wird sich um eine Reparatur ggf. Austausch
Ihres Vorhangs kümmern.
2 . Der LED DROP ist nur für den Innenbereich bestimmt !
3 . Den LED DROP bitte fernhalten von Regen, Feuchtigkeit, Wasser und anderen Flüssigkeiten.
4 . Der LED DROP sollte 0,5m von entflammbaren Stoffen entfernt sein.
5 . Bitte schützen Sie den LED DROP vor Stößen, Quetschungen, starken Vibrationen etc.
6 . Der LED DROP Controller muss an einem Ort mit ausreichender Belüftung installiert
werden mit mindestens 50 cm Abstand zu brennbaren Stoffen.
7 . Der Anschluss , Installation, Betrieb und Wartung des LED DROP sollte durch qualifizierte
Person durchgeführt werden.
8 . Achten Sie darauf, das keine Lüftungsschlitze am LED DROP Controller blockiert sind.
9 .Bitte tretten Sie niemals oder reißen am Stoff der LED DROP,
achten Sie immer auf die interne Kabelverbindung.
10 . Der elektrische Anschluss darf nur von qualifiziertem Fachpersonal durchgeführt werden .
11 . Stellen Sie sicher, dass die Spannung und Frequenz der Stromversorgung entsprechen den
Energiebedarf des Gerätes entspricht.
12 . Betreiben Sie den LED DROP ausschließlich an einen geerdeten Stromkreis ,
um das Risiko eines Stromschlags zu vermeiden.
13 . Betreiben Sie den LED DROP niemals an einem Dimmer.
14 . Achten Sie darauf, das Netzkabel immer im einwandfreien Zustand ist .
15 . Entfernen Sie niemals den Netzstecker durch ziehen oder zerren am Kabel .
16 . Betreiben Sie dieses Produkt nicht in der Transporttasche oder Cases etc..
17 . Trennen Sie immer das Gerät von der Stromversorgung bevor Sie eine Reinigung
oder Wartungsarbeiten durchführen.
18 . Tragen Sie niemals dieses Produkt von jeder beweglichen Teil , immer die hängenden /
Halterung oder die Griffe .
19 . Die maximale Umgebungstemperatur beträgt 40 °,
betreiben Sie dieses Produkt nicht bei höheren Temperaturen.
20 . Im Falle einer schweren Funktionsstörung , trennen sie den LED DROP vom Stromnetz und
wenden Sie sich an den Händler.
3
LightmaXX LED DROP System Effect Backdrop Curtain ____________
Warnung
Alle Schäden, die durch Nichtbeachtung dieser Bedienungsanleitung
oder irgendeine nicht autorisierte Änderung dieses Produkt verursacht wurden,
sind von der Garantie ausgeschlossen .
3. Anschluss an das Stromnetz
Wichtig !
Dieses Produkt ist mit einem IEC Schuko- Kaltgeräte- Stromkabel geliefert.
Falls Sie einen anderen Anschluss an das Stromnetz vorsehen,
beachten Sie dass das nur von einer qualifizierten Fachkraft durchgeführt werden darf.
International
EU Kable
UK Kable
US Kable
Belegung
L
Baun
Rot
Gelb/Braun
Phase
N
Blau
Schwarz
Grau
Neutralleiter
⊥
Gelb/Grün
Grün
Grün
Schutzleiter
Hinweis: Stellen Sie sicher, dass der Schutzleiter richtig angeschlossen ist.
Verpackungsinhalt & Zubehör
1x LED DROP Vorhang
1x LED DROP Controller
1x SD Karte inkl. 30 Programmen
1x IEC Schuko-Kaltgeräte Netzkabel
1x Bedienungsanleitung
3-5x Ersatz-LEDs (je nach Größe des LED Drop)
1x 5pol. XLR auf 4 pol. NC Adapterkabel.
1Pkg Mehrweg-Kabelbinder
Erhältliche LED DROP Größen und Gewichte
Art.: LIG0010719-000 LED DROP I H: 1m W: 2m 66 LEDs 3.6kgs 26X14X16cm
Art.: LIG0010720-000 LED DROP II H: 2m W: 3m 176 LEDs 7.5kgs 51X23X28cm
Art.: LIG0010721-000 LED DROP III H: 3m W: 6m 512 LEDs 17kgs 51X76X29cm
4
LightmaXX LED DROP System Effect Backdrop Curtain ____________
4. Montage & Befestigungsmöglichkeiten
Der LED DROP kannen durch einzelne oder in Kombination mit weiteren LED DROP Vorhängen
verwendet werden, um eine größere LED Fläche zu erhalten.
Verwenden Sie zur Montage die dafür vorgesehenen Ringösen um den LED DROP aufzuhängen
oder mit weiteren zu verbinden.
Bitte beachten Sie das die beiliegenden Mehrweg-Kabelbinder nicht in allen Regionen
als zulässiges Montagematerial gelten.
Erkundigen Sie sich welche Montage in Ihrere Region zulässig ist.
Benutzen Sie im Zweifelsfall handelsübliche Spannfix für Molton
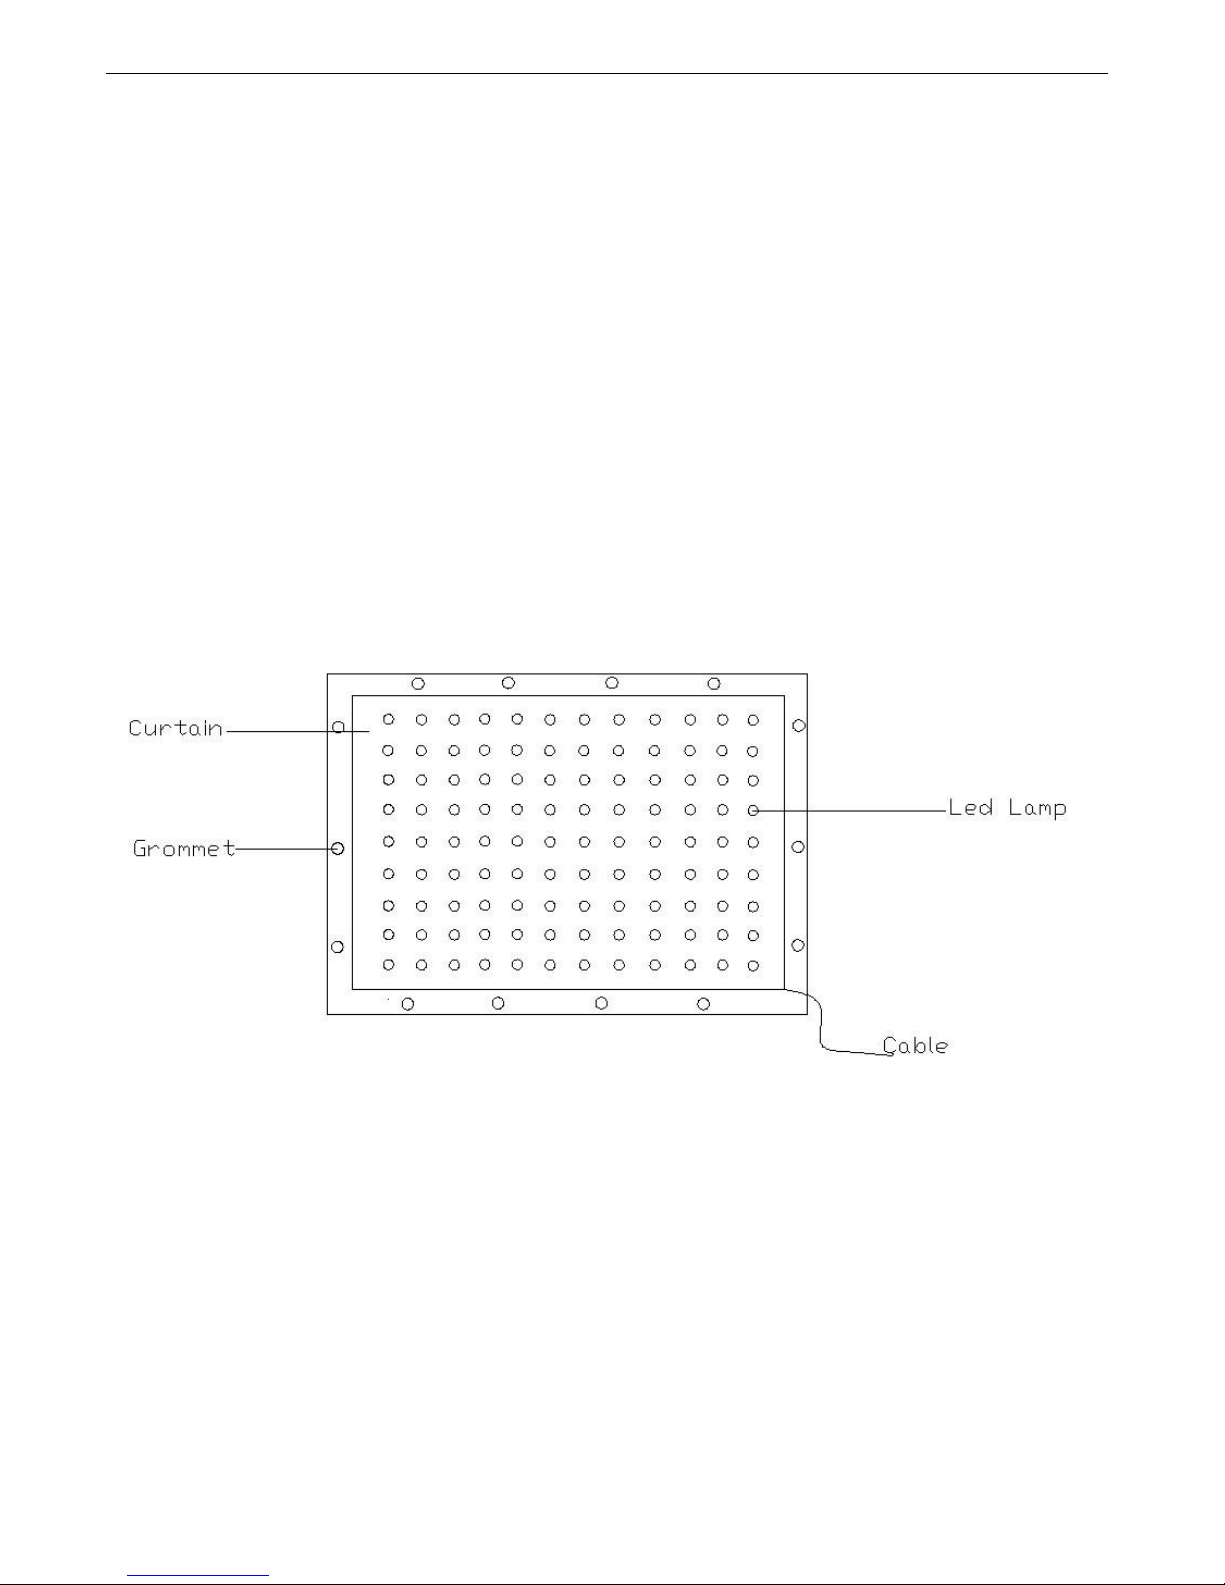
Produktübersicht
LED DROP Frontansicht
5

LightmaXX LED DROP System Effect Backdrop Curtain ____________
5. LED DROP Controller
LED DROP Controller-Anschlüsse
6

LightmaXX LED DROP System Effect Backdrop Curtain ____________
6. Tastenbelegung des LED DROP Controller
Taste
Funktion
FUN
Menü oder Funktionen
ENTER
Menüfunktionen bestätigen und speichern
UP
Aufwärts durch die Funktionen scrollen
DOWN
Abwärts durch die Funktionen scrollen
Controller Menü Optionen
Menu
Function
Program
Programme (01- 30)
Speed
Programm-Tempo ( 01 - 20 , Schnell- Langsam)
DMX512
DMX Modus EIN / AUS
A001
DMX Addresse (001 - 512)
Sound
Sound to Light EIN / AUS
Automatic
Automatik Modus EIn / AUS
Version
Aktuelle Firmware Version
Controller Menü Führung
7

LightmaXX LED DROP System Effect Backdrop Curtain ____________
7. Kombination von mehreren LED DROP Vorhängen
Bringen Sie die LED DROP Vorhänge fachgerecht an die gewünschten Positionen.
Benutzen Sie schwer entflammbare Bänder oder Spannfix
um die LED DROP Systeme an den Ringösen zu verbinden.
Durch handelsübliche DMX 5 pol. Verlängerungskabel
erreichen Sie eine größere Distanzen zwischen Controller und LED DROP Vorhang .
Verkabeln Sie das System nach dem Schema wie auf dem Bild unten
Demontage und Transportgerechte Verpackung
(1) Schalten Sie den LED DROP Controller aus und Trennen hn vom Stromnetz
(2) Lösen Sie alle Signalverbindungen wie DMX und NC Vorhangverbindung
(3) Lösen sie Ihre Montagevorrichtungen und nehmen den Vorhang ab.
(4) Reinigen Sie den Vorhang gegebenenfalls
(5) Falten Sie den Vorhang vorsichtig und legte sie in den Karton
(6) Falten Sie den Vorhang immer so dass sich keine LED Platinen im Knick befinden
8

LightmaXX LED DROP System Effect Backdrop Curtain ____________
8. Programmliste für Automatik und Sound to Light Modus
Program
Effect
Program
Effect
Program 1
Falling Horizontal Line
Program16
Center Burst
Program 2
Single Arrow ( Up - Down )
Program17
Outer Burst
Program 3
Single Arrow ( L - R )
Program18
EQ Effect
Program 4
Single Arrow ( R - L )
Program19
Rolling Color
Program 5
Color Chase ( Down - Up )
Program20
Rolling Color + Strobe
Program 6
Color Chase ( Up - Down )
Program21
Inner Zone
Program 7
Color Chase ( L - R )
Program22
Outer Zone
Program 8
Color Chase ( R - L )
Program23
Single Diamond Spread
Program 9
Color Bar Chase ( R - L )
Program24
Single Diamond Squeeze
Program 10
Color Bar Chase ( L - R )
Program25
Inward Arrow ( L , R )
Program 11
Windmill ( Clockwise )
Program26
Crisscross ( Up , Down )
Program 12
Fan ( Counterclockwise )
Program27
X-Factor
Program 13
Single Color + Strobe
Program28
Double Diamond Squeeze
Program 14
Multi Box Frenzy ( Single Color )
Program29
Green X-Factor
Program 15
Multi Box Frenzy ( Multi Color )
Program30
Multi Rain
9

LightmaXX LED DROP System Effect Backdrop Curtain ____________
9. DMX Kanalbelegung
Kanal
Funktion
Wert
CH 1
Programm
Off
Dimmer
0
1-7
8-255
CH 2
Strobe
0-255
CH 3
Rot
0-255
CH4
Grün
0-255
CH 5
Blau
0-255
CH 6
Autoprogramme 1-15
0-15 OFF
1: 16-31
6: 96-111
11: 176-191
2: 32-47
7: 112-127
12: 192-207
3: 48-63
8: 128-143
13: 208-223
4: 64-79
9: 144-159
14: 224-239
5: 80-95
10: 160-175
15: 240-255
CH 7
Autoprogramme 16-30
0-15 OFF
16: 16-31
21: 96-111
26: 176-191
17: 32-47
22: 112-127
27: 192-207
18: 48-63
23: 128-143
28: 208-223
19: 64-79
24: 144-159
29: 224-239
20: 80-95
25: 160-175
30: 240-255
CH 8
Geschwindigkeit
0-255
10

LightmaXX LED DROP System Effect Backdrop Curtain ____________
10. Wartung & Austausch der LEDs
1. Schalten Sie den LED DROP Controller aus.
2. Trennen Sie das Netzkabel und das Signalkabel.
3. Öffnen Sie den Reißverschluss an der Seite des LED DROP Vorhangs
4. Ziehen Sie die Stecker an der LED Platine ab.
5. Entfernen Sie den runden LED Halterahmen aus dem Vorhang.
6. Entfernen Sie nun die defekte LED Platine.
7. Schließen Sie die Ersatz-LED Platine an
(Bitte beachten Sie die kleinen Markierungen "+" und "-" auf der Platine)
8. Setzen Sie den runden LED Halterahmen in das Loch auf dem Vorhang.
9. Schließen Sie das Netzkabel und das Signalkabel, dann den Controller
und testen Sie die Funktion der soeben getauschten LED .
10. Schließen den Reißverschluss am LED DROP Vorhang wieder.
11

LightmaXX LED DROP System Effect Backdrop Curtain ____________
Index
1.Safety Notes Page 13
2.Advantages + Technical Parameters Page 14
3.Packing Content + Installation Page 15
4.Controller Overview Page 16
5.Menu Options + Controller Operation Page 17
6. Combination & Installation several LED DROP Systems Page 18
7.Program List Page 19
8.DMX Channel Charts Page 20
9.Maintenance & Replacement of LEDs Page 21
12

LightmaXX LED DROP System Effect Backdrop Curtain ____________
Welcome to use the LED dynamic DMX Tri curtain , please read following Safety Notes as
well as those in User Manual carefully before connection, installing, operation or
maintaining this product.
1. Safety Notes
1. After receiving the new curtain, please open the packing carton to check the goods and all
other accessories whether they are consistent with packing list and in good condition, in case
finding something damaged by transportation, please contact the reseller or distributor to
repair or change.
2. Curtain is for indoor use only!
3. Curtain should be far from rain, moisture, water and any other liquid.
4. Curtain should be far from flammability, explode and heating.
5. Curtain should be far from shock,vibration,impact and dust.
6. Curtain must be installed in a location with adequate ventilation, at least 50cm from
adjacent surfaces.
7. The connection, installation, operation and maintenance of curtain should be processed by
qualified person.
8. Make sure no ventilation slots are blocked.
9. Prohibit trample and tear the curtain, keep the internal cable connection in order.
10. Electrical connection must be carried out by qualified person.
11. Make sure the voltage and frequency of power supply match the power require of this
device.
12. Always connect this product to a grounded circuit to avoid the risk of electrocution.
13. Do not connect curtain to a dimmer.
14. Make sure the power cord is not crimped or damaged.
15. Never pull out the plug from power cord by pulling or tugging on the cord.
16. Never operate this product with the covers removed.
17. Always disconnect this product from the power supply before cleaning or attempting any
maintenance work.
18. Never carry this product from any moving part, always use the hanging/mounting bracket
or the handles.
19. The maximum ambient temperature is 40℃, Do not operate this product at higher
temperatures.
20. In case of a serious operation problem, stop using this product immediately and contact
reseller or distributor.
Warning:
Any damages caused by the non-observance of this manual or any unauthorized modification to this
product are not be subject to warranty.
13

LightmaXX LED DROP System Effect Backdrop Curtain ____________
Important:
This product is supplied with an open power cable without a plug, so before connecting this product
to the mains with a power cable, make sure the right color cable connected to the right place. The
following table is for your reference.
International
EU Cable
UK Cable
US Cable
Pin L Brown
Red
Yellow/Copper
Fase
N
Blue
Black
Silver
Nul
⊥
Yellow/Green
Green
Green
Earth
Note: Make sure this product connected to the earth properly.
2. Advantages
1. SMD LEDs 3-in-1 full color mixing.
2. Pure color and longer life.
3. Soft, smooth and flexible, can be folded.
4. Fire retardant velvet, against fire.
5. Small volume and light weight.
6. Easy connection and combination.
7. Easy installation and transportation.
Technology Parameters
Product Description
All curtains are made of high brightness SMD LEDs 3 in 1/RGB, and fire retardant velvet cloth. 30
exciting patterns, and support for 7 channels of DMX, the curtain also comes equipped with a sound
activation mode, and the ability to choose and run your favorite program with a simple press of a
button without a DMX-512 console.
2 layers of smooth velvet sewn with wool. Many grommets fitted on our industrial machines around
the cloths. Fitted with a standard UK/USA/EUROPE main plug, just plug it into a plug socket on the
controller, turn on the power supply ,and then choose and run your favorite program.
Product Specification
Voltage: Input Voltage: AC90V-240V, 50/60Hz, 25W/150W, 3A/2A
Output Voltage: DC 5V/5A, DC5V/30A
Fuse: 2A
Power consumption: 30W~150W
Lamp: SMD LEDs 3 in 1 / RGB
Life: 50,000 hours
LED Pitch: 180mm
Number of LEDs: 30pcs LEDs per square
DMX channel: 7 CH.
LED display in the controller
Control system: Controller with SD Card / DMX Controller / Sound Active / Auto run
Number of program: 30 programs
Led color: 3 in 1 / RGB , mixing 7 colors
Cloth color: Black, White (Can be custom made)
Certification: CE & SGS
14

LightmaXX LED DROP System Effect Backdrop Curtain ____________
3. Packing Content
One curtain
One Controller
One Power Cable
One User Manual
Spare LEDs
Reusable Zip Ties
Note: The curtain is connected to the controller directly.
Size
Color
Leds
Weight
Packing Size
H: 1M X W: 2M
RGB 7 Colors
66pcs
3.6kgs
26X14X16cm
H: 2M X W: 3M
RGB 7 Colors
176pcs
7.5kgs
51X23X28cm
H: 3M X W: 6M
RGB 7 Colors
512pcs
17kgs
51X76X29cm
Installation
Curtains can be used by single or through combination to make a large led curtain.
Product Overview
(1) LED Vision Curtain
15

LightmaXX LED DROP System Effect Backdrop Curtain ____________
4. Controller Overview
(3) Controller Description
Button
Function
FUN
Menu or Function
ENTER
Display menu or set the selected menu as the
function you need
UP
Upwards the menu or increase the number value of
the function you selected
DOWN
Downwards the menu or decrease the number value
of the function you selected
16

LightmaXX LED DROP System Effect Backdrop Curtain ____________
5. Menu Options
Menu
Function
PU
Program (01- 30)
SP
Program speed ( 01 - 20 , fast - slow)
Add
DMX Address
A001
DMX Address (001 - 512)
Sound
Sound active
Controller Operation
Installation
(1) After receiving the new curtain, take out to check whether the curtain is damaged, and all
accessories is as per the Packing Include, make sure all things are already.
(2) Unfold the curtain.
(3) Hang the curtain on the truss with reusable zip ties, and fasten the reusable zip ties at the other
three sides of this curtain.
(4) Use male and female velcro at the left and right side of the curtain to make the nearby vision
curtain connect together.
Combine several pieces LED Vision Curtain to make a big curtain
There are male and female velcro at the left and right side of the curtain , the function of these velcro
is just to combine several pieces into one. But not to load too much.
17

LightmaXX LED DROP System Effect Backdrop Curtain ____________
6. Combine several pieces LED Vision Curtain to make a big curtain
There are male and female velcro at the left and right side of the curtain , the function of these velcro
is just to combine several pieces into one. But not to load too much.
Signal Cable Connection
There is Signal Cable with 4pin plug at the back of each curtain, Connecting this Signal Cable to the
controller, and then lock the nut on the plug. For several pieces curtains, just need to connect the
controllers with 3pin DMX Signal Cable.
Power Cable Connection
Get out the Power Cable from the carton, before connecting this cable between controller and power
supply, please make sure the voltage is AC90V-240V 50Hz-60Hz.
Disassembly
(1) Take off Power Cable
(2) Take off Signal Cable
(3) Unfasten the velcro between curtains
(4) Release all reusable zip ties
(5) Clean the curtain
(6) Fold the curtain and put it into the carton
18

LightmaXX LED DROP System Effect Backdrop Curtain ____________
7. Program List
Program
Effect
Program
Effect
Program 1
Falling Horizontal Line
Program16
Center Burst
Program 2
Single Arrow ( Up - Down )
Program17
Outer Burst
Program 3
Single Arrow ( L - R )
Program18
EQ Effect
Program 4
Single Arrow ( R - L )
Program19
Rolling Color
Program 5
Color Chase ( Down - Up )
Program20
Rolling Color + Strobe
Program 6
Color Chase ( Up - Down )
Program21
Inner Zone
Program 7
Color Chase ( L - R )
Program22
Outer Zone
Program 8
Color Chase ( R - L )
Program23
Single Diamond Spread
Program 9
Color Bar Chase ( R - L )
Program24
Single Diamond Squeeze
Program 10
Color Bar Chase ( L - R )
Program25
Inward Arrow ( L , R )
Program 11
Windmill ( Clockwise )
Program26
Crisscross ( Up , Down )
Program 12
Fan ( Counterclockwise )
Program27
X-Factor
Program 13
Single Color + Strobe
Program28
Double Diamond Squeeze
Program 14
Multi Box Frenzy ( Single Color
)
Program29
Green X-Factor
Program 15
Multi Box Frenzy ( Multi Color )
Program30
Multi Rain
19

LightmaXX LED DROP System Effect Backdrop Curtain ____________
8. DMX Channels Charts
Channel
Function
Value
CH 1
Programm
Off
Dimmer
0
1-7
8-255
CH 2
Strobe
0-255
CH 3
Red
0-255
CH4
Green
0-255
CH 5
Blue
0-255
CH 6
Auto program 1-15
0-15 OFF
1: 16-31
6: 96-111
11: 176-191
2: 32-47
7: 112-127
12: 192-207
3: 48-63
8: 128-143
13: 208-223
4: 64-79
9: 144-159
14: 224-239
5: 80-95
10: 160-175
15: 240-255
CH 7
Auto program 16-30
0-15 OFF
16: 16-31
21: 96-111
26: 176-191
17: 32-47
22: 112-127
27: 192-207
18: 48-63
23: 128-143
28: 208-223
19: 64-79
24: 144-159
29: 224-239
20: 80-95
25: 160-175
30: 240-255
CH 8
Speed
0-255
20

LightmaXX LED DROP System Effect Backdrop Curtain ____________
9. Maintenance & Replacement the LEDs
1. Cut off the power supply
2. Disconnect the power cable and signal cable
3. Open the zip fastener at the side of led curtain
4. Disconnect the wires between the LEDS
5. Take out the LED holder from the cloth
6. Take out PCB board with LEDs
7. Connect the replace PCB board with LEDs (Please note the small marks "+" and "-" on the
PCB board)
8. Insert the lamp holder into the hole made on the cloth
9. Connect the power cable and signal cable, then turn on the power for testing
10. Still without working, please test the wires connection
11. Close the cloth again
www.musicstore.de
www.musicstore.com
21
 Loading...