

Lighting Fixtures REG825 Series, REG825-24, REG825-22 Installation Instructions Manual

REG825 LED RECESSED
INSTALLATION INSTRUCTIONS
APPLIES TO MODELS
REG825-22, REG825-24
WARNING: RISK OF FIRE OR ELECTRIC SHOCK!
Read all product labels and instructions before installing fixture.
The electrical rating of these products is 120-277VAC, the installer must determine whether they have 120-277V at the
luminaire before installation.
Luminaire wiring and electrical parts may be damaged when drilling for installation of LED Troer.
Check for enclosed wiring and components.
LED Troer installation requires knowledge of luminaires electrical systems. Installation should be performed by a
qualified electrician in accordance with the National Electrical Code and relevant local code.
Install this Troer only in ceilings that have the construction features and dimensions shown in the drawings.
WARNING
Only those open holes indicated in the drawings may be made or altered as a result of troer installation.
Do not leave any other open holes in an enclosure of wiring electrical components.
Do not make or alter any open holes in an enclosure of wiring or electrical components during kit installation.
To prevent wiring damage or abrasion. Do not expose wiring to edges of sheet metal or other sharp objects.
The recessed luminaire is intended for mounting only in a covered ceiling where only the LED side of the
luminaire will be exposed to damp or dry locations.
INSTALLATION SHOULD ONLY BE PERFORMED AFTER POWER TO THE
FIXTURE HAS BEEN DISCONNECTED.
Disconnect power at the source before installation, inspection or removal.
Do not use if product is damaged.
Do not alter, relocate, or remove wiring, lamp holders, power supply, or any other electrical component.
Do not use abrasive materials, glass cleaners or other solvents on cover plate or lens. Use of these substances may
damage fixture. To clean the faceplate use a damp cloth.
This product must be installed in accordance with the applicable installation code by a person familiar with
the construction and operation of the product and the hazards involved.
Suitable for damp or dry locations only.
Specifications and data subject to change without notice. Consult factory when critical.
Consult factory for additional configurations and options not listed or shown.
www.ullighting.net | 718.726.7500U.L. Lighting Fixtures Corp.
Visit our website for the most current data
Rev. 05/2017
Page 1 of 2
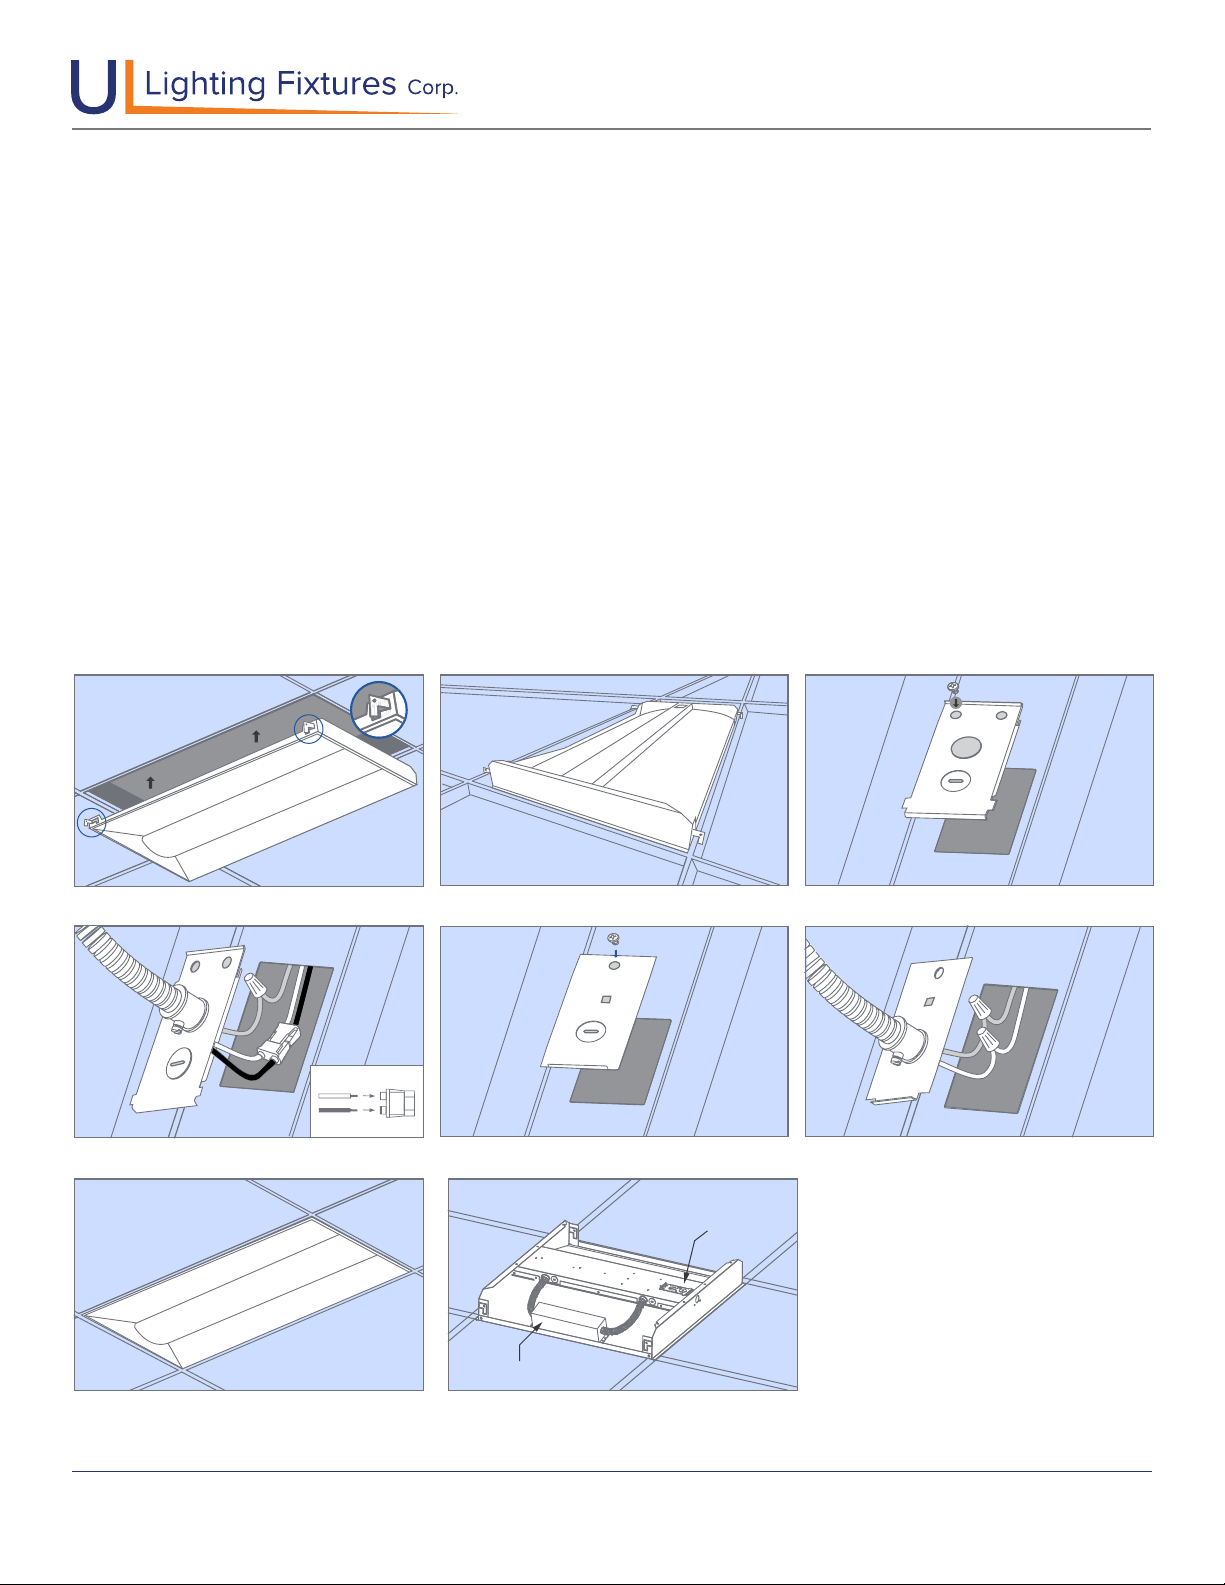
FIGURE 1
REG825
FIGURE 4
REG825 LED RECESSED
INSTALLATION INSTRUCTIONS
INSTALLATION INSTRUCTIONS
BEFORE INSTALLATION
1. Make sure the power is turned o at the source to the location at which you are installing the product.
2. Remove existing troer is applicable.
Step 1: Pull earthquake clips out on each corner. (Figure 1)
Step 2: Place troer in ceiling making sure each earthquake clip is securely hooked on T-Bar Grid. (Figure 1 and 2)
Step 3: Remove access conduit plate. Insert power supply into access conduit plate using appropriate electrical fittings.
(Figure 3 and 4)
Step 4: Insert black wire (line) from the access supply in the port of the LED quick connector marked with a black circle.
Insert white wire (neutral) into the unmarked port. Connect the LED quick connector to the troer. Replace access
conduit plate after wiring.
Step 5: For 0-10V dimming circuits, wire at access conduit plate. Remove knockout and access conduit plate. Insert 0-10V
dimming circuit using appropriate electrical fittings and wire the grey and purple wires to troer using wire nuts.
Replace access conduit plate after wiring. (Figure 5 and 6)
Step 6: Return power back to the source and installation is complete. (Figure 7)
FIGURE 2 FIGURE 3
FIGURE 7
FIGURE 5
Remote Emergency Battery Backup
FIGURE 6
Access Plate
Specifications and data subject to change without notice. Consult factory when critical.
Consult factory for additional configurations and options not listed or shown.
www.ullighting.net | 718.726.7500U.L. Lighting Fixtures Corp.
Visit our website for the most current data
Rev. 05/2017
Page 2 of 2
 Loading...