

Page 1
USER INSTRUCTIONS
VENOM &
GENESIS
LIGHTFORCE.COM
1
Page 2
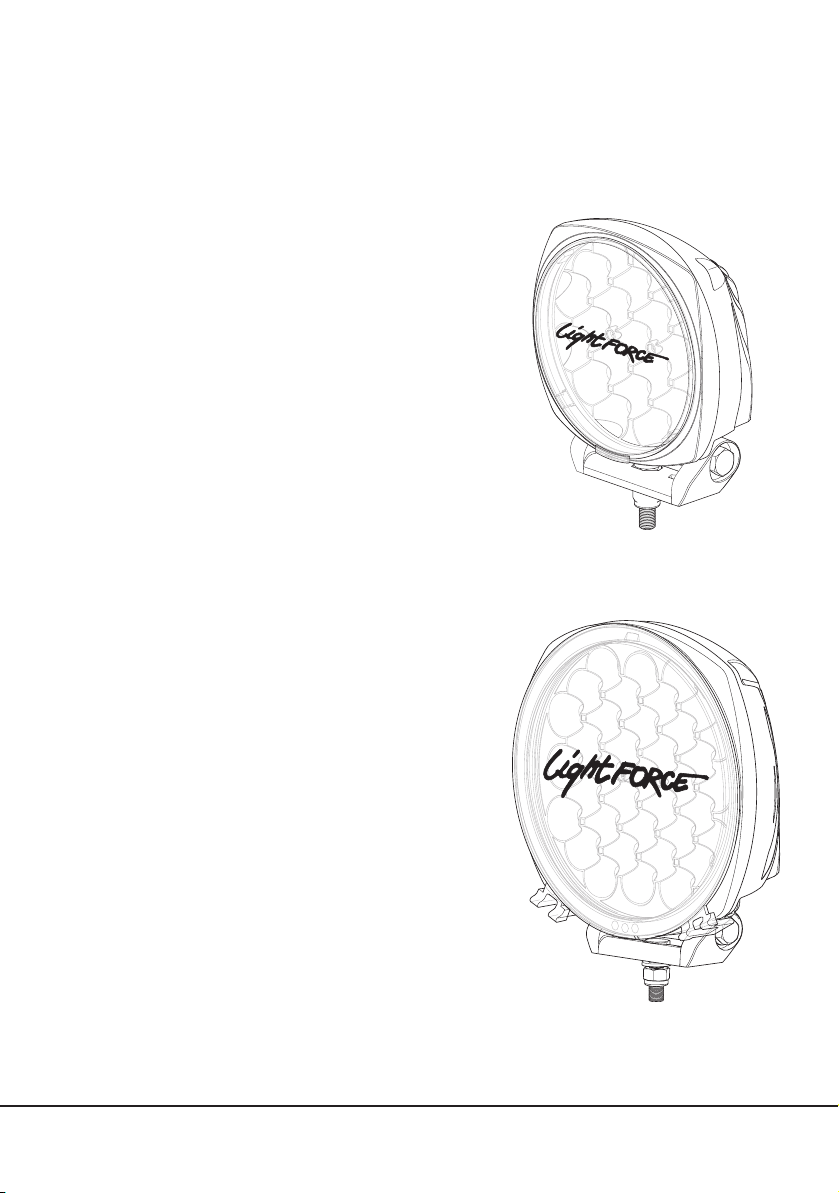
VENOM LED & GENESIS LED
INSTALLATION INSTRUCTIONS
VENOM LED KIT CONTENTS
• 1 x DL150 Venom LED light
• 1 x Spot lter
• 1 x Reversible mounting bracket (tted loose to light)
• 2 x M10 x 35mm stainless steel hex bolts with washers and
nyloc nuts (side bolts tted to light)
• 1 x M10 x 35mm stainless steel hex bolt with washer and
nyloc nut (tted to bracket for mounting)
• 1 x 4 pin waterproof harness adaptor
• 1 x User instructions.
GENESIS LED KIT CONTENTS
• 1 x DL210 Genesis LED light
• 1 x Spot lter
• 1 x Reversible mounting bracket (tted loose to light)
• 2 x M10 x 35mm stainless steel hex bolts with washers and
nyloc nuts (side bolts tted to light)
• 1 x M10 x 35mm stainless steel hex bolt with washer and
nyloc nut (tted to bracket for mounting)
• 1 x 4 pin waterproof harness adaptor
• 2 x 1/4” x 1 1/4” long UNC stainless steel hex bolt with
washer and nut (in bag)
• 1 x User instructions.
2
Page 3

VENOM LED & GENESIS LED
INSTALLATION INSTRUCTIONS
TOOLS REQUIRED
• 17mm socket on ratchet
• 7/16” socket (optional for DL210 mounting)
• Torque wrench.
GENERAL CARE AND SAFETY TIPS
To wash your lights, use plenty of warm soapy water and a soft cloth only (this prevents surfaces from marking).
Never use any solvent based cleaners or industrial detergents when cleaning these lights, as permanent damage
may occur.
PERSONAL SAFETY WARNING
High intensity light source. Do not look directly into the light during operation, eye injury may result.
3
Page 4
VENOM LED & GENESIS LED
INSTALLATION INSTRUCTIONS
IMPORTANT NOTES
1. Before tting the stainless steel hardware, apply a small amount of anti-seize to the thread of the 35mm
mounting bolts.
2. Mounting points vary in design and load capacity. Ensure the light is within manufacturers recommended
weight specications before tment.
3. Failure to correctly mount light may cause damage to light and vehicle.
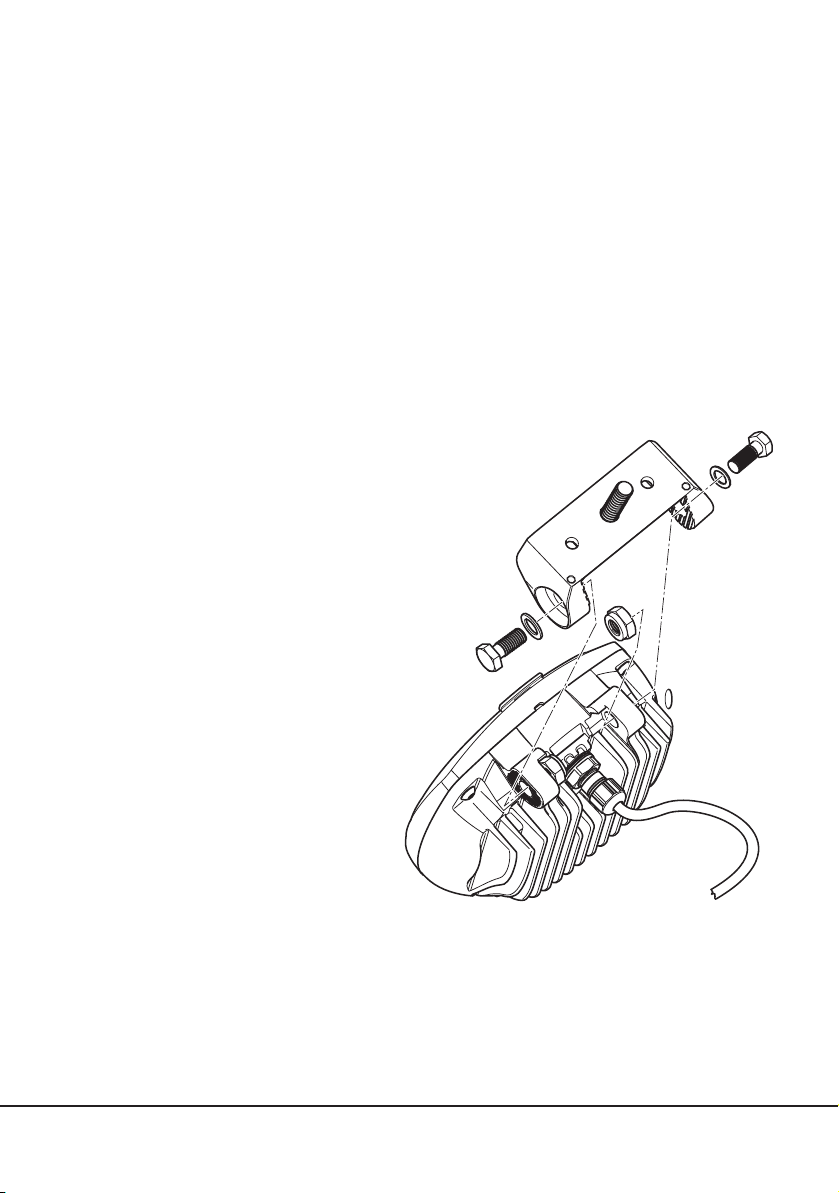
MOUNTING BRACKET
1. Remove nyloc nut and M10 washer from M10 x
35mm bolt attached to the bottom of mounting
bracket
2. Locate the bracket in a suitable position
using the M10 x 35mm bolt. It is
recommended that the base area of the mounting
bracket is totally supported
3. Align light to preferred driving position
4. Fit the washer and M10 nyloc then tighten using
a 17mm socket & ratchet to specied torque
(35Nm)- do not use rattle guns.
5. Tighten 2 x M10 x 35 side bolts to
recommended torque (35Nm).
4
Page 5
VENOM LED & GENESIS LED
INSTALLATION INSTRUCTIONS
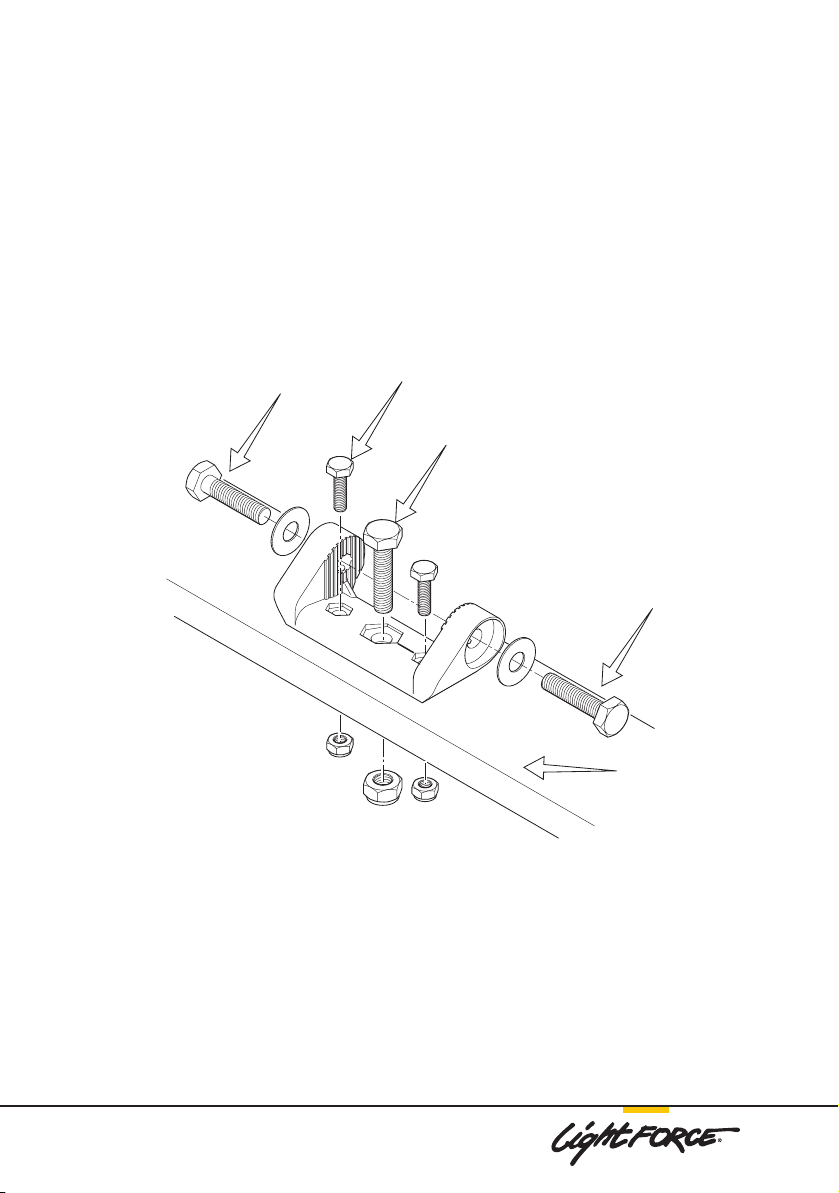
OPTIONAL FOR GENESIS LED
For high vibration environments we recommend tting the supplied 1/4” x 1 1/4” long UNC
stainless steel hex bolts with washers and nuts. Torqued to 8Nm.
Side Bolt
M10 x 35
Front Facing
Optional
Mounting Bolt
M10 x 35
NOTE When lights are used in extreme environments always re-check torques.
The mounting bracket can be rotated 180o for an additional tment option.
Side Bolt
M10 x 35
Optimum Mounting
Bracket Position
5
Page 6
VENOM LED & GENESIS LED
INSTALLATION INSTRUCTIONS
ELECTRICAL CONNECTIONS
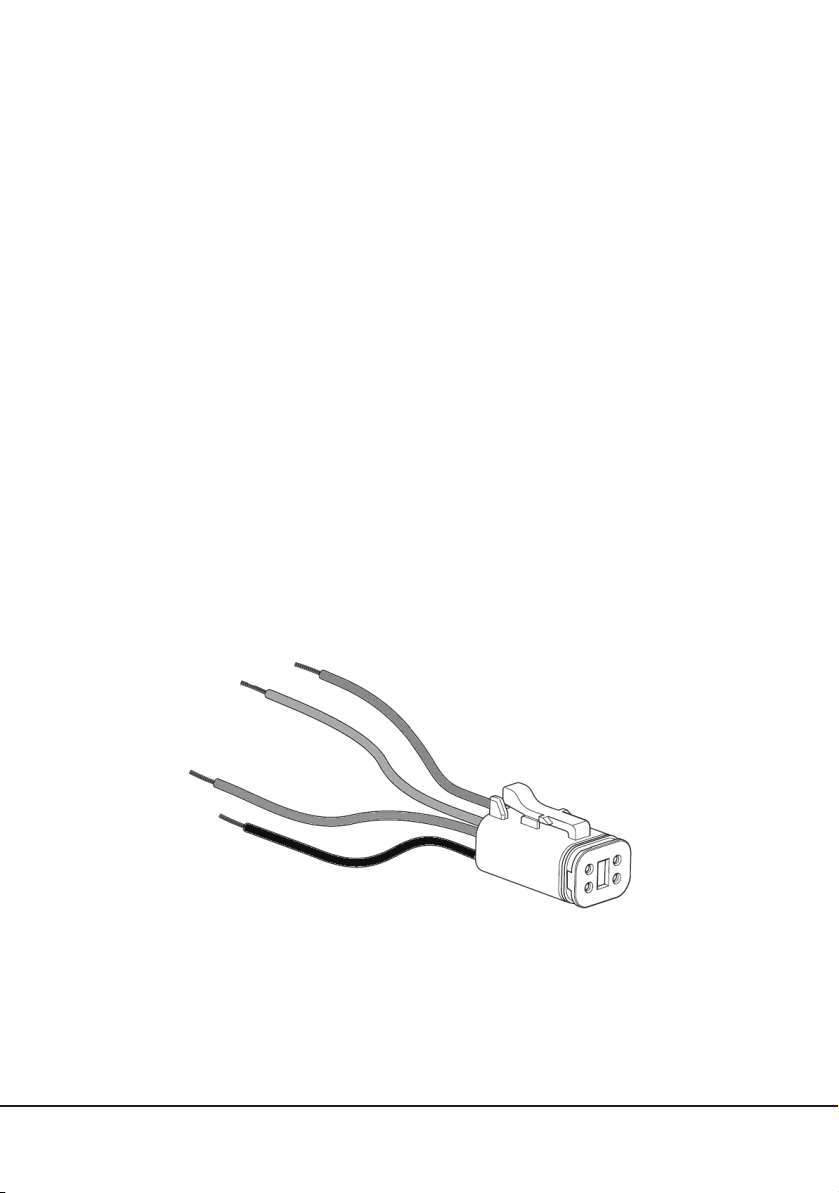
Venom LED and Genesis LED lights are tted with a waterproof 4 pin electrical connector.
Included in the kit is the mating connector tted with short lengths of cable for integration with an appropriate
wiring harness. i.e. Harness must be capable of 15A per light.
If existing wiring harness is suitable, the included connector needs to be tted directly to your existing driving light
circuit.
CONNECTOR WIRE COLOUR IDENTIFICATION
1. Red: Positive for full intensity– connect to positive output wire on relay / vehicle harness
2. Black: Negative - connect to negative (earth)
3. Blue: Positive for day time positioning (optional) - connect to ignition signal wire
4. Yellow: Positive for night time positioning (optional) - connect to low beam signal wire.
NOTE: To operate night time positioning, ensure blue wire is also connected to ignition signal wire.
Blue
Yellow
Red
Black
Warning: Only connect positioning lights in locations where they are legal to use. Please check local laws.
6
Page 7

VENOM LED & GENESIS LED
INSTALLATION INSTRUCTIONS
NOTE
For maximum performance, three mode operation and safety, we recommend the use of optional wiring harness
LFDLHTS – for tment follow the installation instructions included with the harness.
CAUTION
Improper installation of the connector will affect the reliability and operation of your lights. Do not remove the
waterproof connector from the driving light cable; this will lead to water ingress and void warranty.
Lightforce driving lights are designed to be mounted in the horizontal/forward facing position only.
Pointing the light upwards can cause heat damage to the lens. Failure to comply with this requirement may void
warranty.
7
Page 8
VENOM LED & GENESIS LED
INSTALLATION INSTRUCTIONS
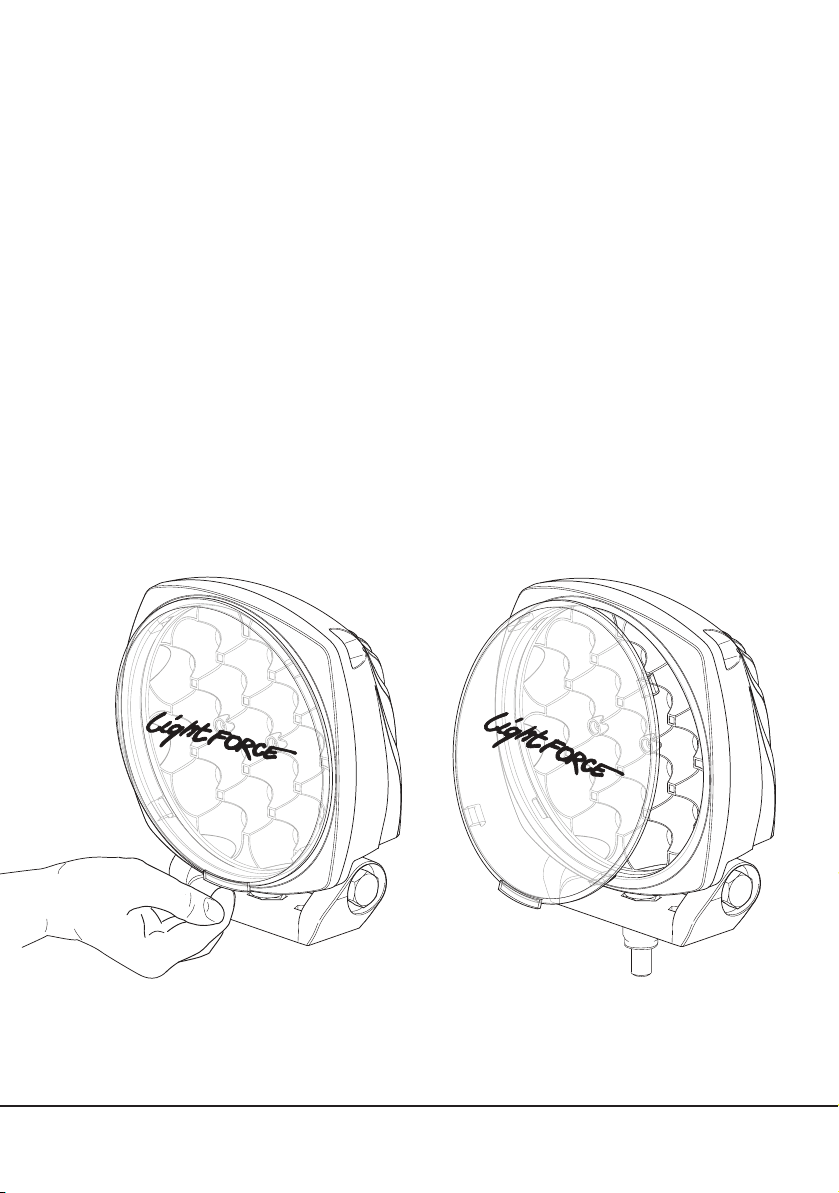
VENOM LED FILTER REMOVAL
• Filter is held in place by 4 clips.
• Lift tab at bottom of light and pull lter away from bezel releasing the clips.
VENOM LED FILTER REFITTING
• Insert the lter at the top position
• Push lter onto bezel using lter tab until side clips are engaged
• Ensure lter is correctly aligned within bezel.
8
Page 9
VENOM LED & GENESIS LED
INSTALLATION INSTRUCTIONS
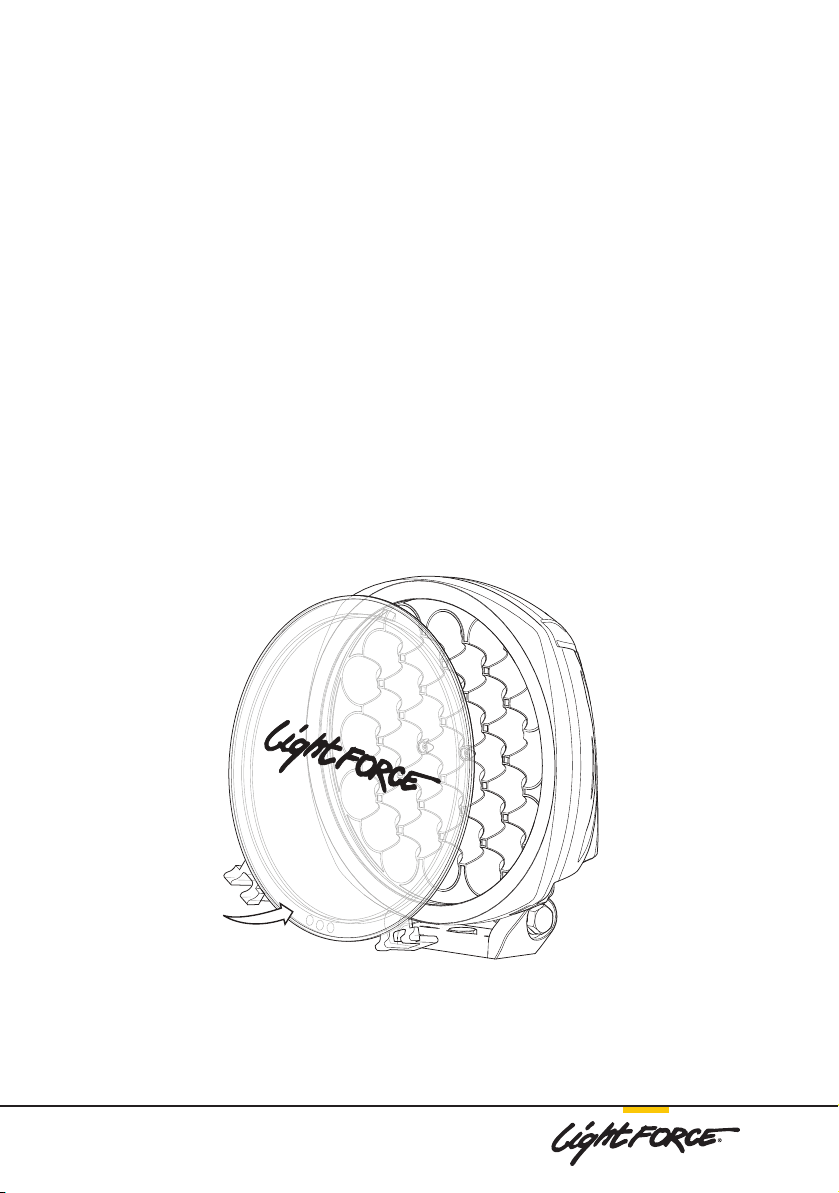
GENESIS LED FILTER REMOVAL
• Unlock each lter tab from the light by lifting the rear of the tab away from the bezel
• Swing the base of the lter away from the light
• The lter will drop down and away from the light.
GENESIS LED FILTER REFITTING
• Genesis lters have a location lug at the top and locking tabs at the bottom
• Insert the locating lug into the recess found at the underside of the top of the bezel
• While pushing lter up, push the base of lter in towards the light
• Lock each lter tab in by pushing down on the forward facing lever tabs.
9
Page 10

VENOM LED & GENESIS LED
INSTALLATION INSTRUCTIONS
VENOM LED TECHNICAL SPECIFICATIONS
• Power: 75 Watts
• Raw lumens: 7850
• Effective lumens: 6800
• Input voltage range: 10 – 32V
• Current draw: 5.7 Amps @13.2V
VENOM LED FEATURES
• 75W LED within a 150mm housing
• 21 x Lumileds LEDs
• 3 Stage Operation
• Full intensity
• Day time positioning
• Night time positioning
• CISPR25* compliant reducing radio frequency
interference
• Cast aluminium housing and bezel
• Colour temperature: 5000K
• LED lifespan: up to 50,000 hours
• Input cable length: 460mm (18.11”)
o
• Operating temperature: -40
• Weight including bracket: 1.2kg (2.65lb)
• Hard-wearing UV stable powder coat nish
• Reverse polarity voltage protection
• High current waterproof connectors
• IP69K rated to protect against moisture / contam-
inant ingress
• Genuine Gore® waterproof membrane with
mechanical seal
• Thermal overload protection
• Impact resistant polycarbonate lter.
to 63oC (-40o to 145oF)
*CISPR25 is the internationally recognised standard covering allowable limits of electromagnetic radiated and
conducted interference for components installed in vehicles
10
Page 11

VENOM LED & GENESIS LED
INSTALLATION INSTRUCTIONS
GENESIS LED TECHNICAL SPECIFICATIONS
• Power: 140 Watts
• Raw lumens: 13850
• Effective lumens: 12000
• Input voltage range: 10 – 32V
• Current draw: 10.5 Amps @13.2V
GENESIS LED FEATURES
• 140W LED within a 210mm housing
• 37 x Lumileds LEDs
• 3 Stage Operation
• Full intensity
• Day time positioning
• Night time positioning
• CISPR25* compliant reducing radio frequency
interference
• Cast aluminium housing and bezel
• Hard-wearing UV stable powder coat nish
• Colour temperature: 5000K
• LED lifespan: up to 50,000 hours
• Input cable length: 460mm (18.11”)
o
• Operating temperature: -40
• Weight including bracket: 2.4kg (5.29lb)
• Reverse polarity voltage protection
• High current waterproof connectors
• IP69K rated to protect against moisture / contam-
inant ingress
• Genuine Gore® waterproof membrane with
mechanical seal
• Thermal overload protection
• Impact resistant polycarbonate lter.
to 63oC (-40o to 145oF)
FASTENER TORQUE
SPECIFICATIONS
• M10 x 35mm bottom and side mount
bolt - 35Nm (26lb-ft)
• 1/4” x 1 1/4” long UNC stainless steel hex
bolts - 8Nm (6lb-ft)
RECOMMENDED WIRE SIZE
• 1.25mm2 (AWG 16) minimum per circuit
11
Page 12
VENOM LED & GENESIS LED
INSTALLATION INSTRUCTIONS
DRIVING LIGHT FILTERS
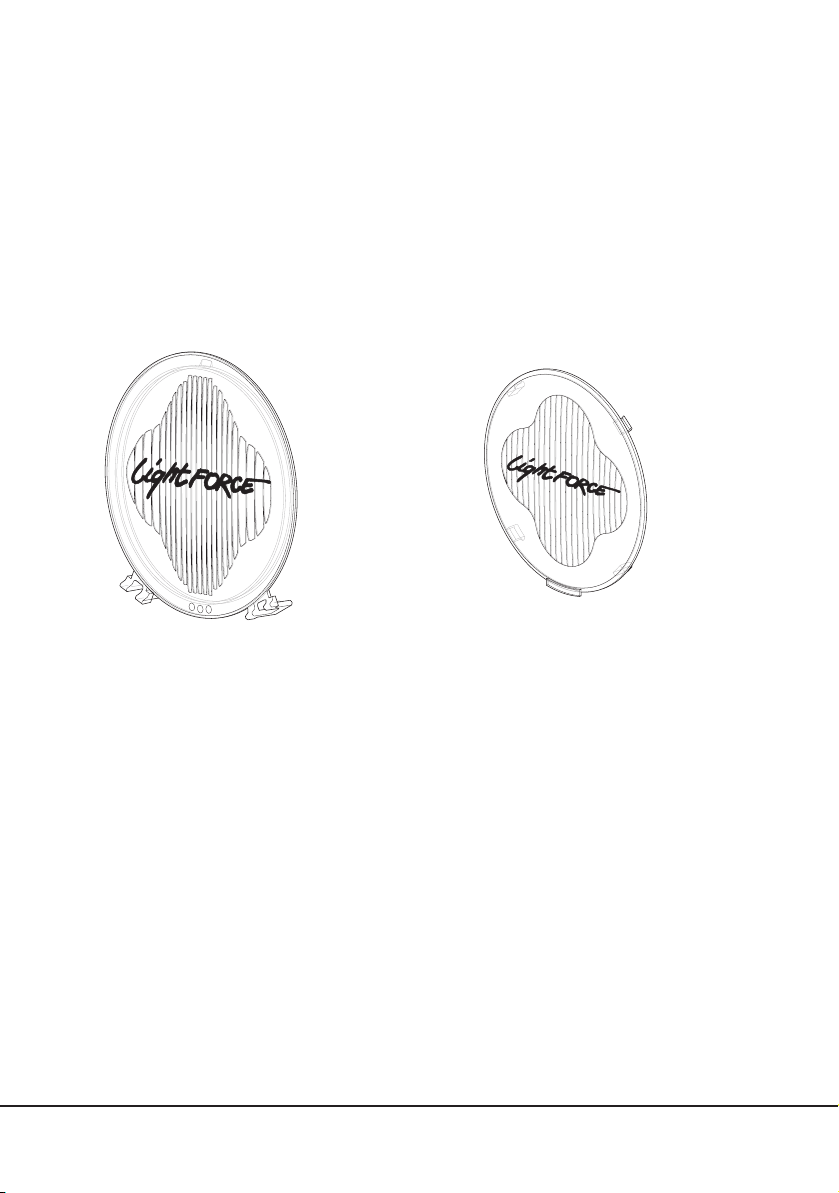
Durable polycarbonate covers should remain tted to driving lights at all times. They are capable of absorbing road
grime and bombardment for many years. These replaceable covers should be renewed from time to time to protect
your investment and maintain maximum beam output. Your Venom LED & Genesis LED lights come standard with
spot lters. Clear combo lters are used to change the beam pattern.
Genesis LED 210mm – clear combo
(Part No. F210CC)
When a pair of Genesis LED driving lights are tted
with clear combo lters the beam pattern will spread
to *120m wide at 250m along the road
Venom LED 150mm – clear combo
(Part No. F150CC)
When a pair of Venom LED driving lights tted with
clear combo lters the beam pattern will spread to
*120m wide at 230m along the road
ALSO AVAILABLE
• Crystal blue lters are used to increase clarity when driving
• Amber lters are used to enhance vision when off-road driving through haze and dust
• Yellow lters are used to enhance vision in fog, haze and dust.
*Independently tested in approved NATA laboratory. National Association of Testing Authorities Accredited,
Australia 2016. Photometric testing performed by Photometric Solutions International Pty Ltd (PSI) Huntingdale VIC
September 2016
12
Page 13
VENOM LED & GENESIS LED
INSTALLATION INSTRUCTIONS
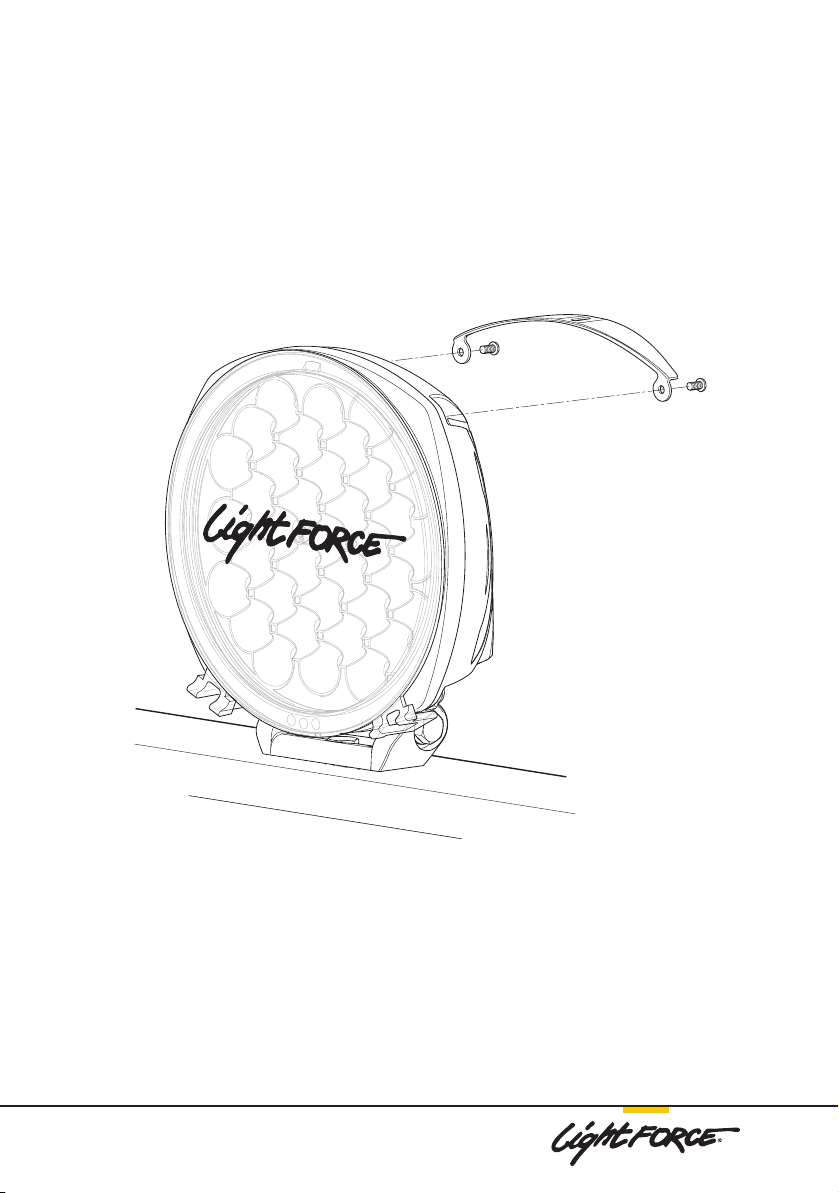
GENESIS LED TOP STAY BRACKET
(Part No. DL210TSB)
Your Genesis LED can be used with a top stay bracket for increased mounting rigidity.
NOTE This is recommended when using lights in high vibration environments
13
Page 14
VENOM LED & GENESIS LED
INSTALLATION INSTRUCTIONS
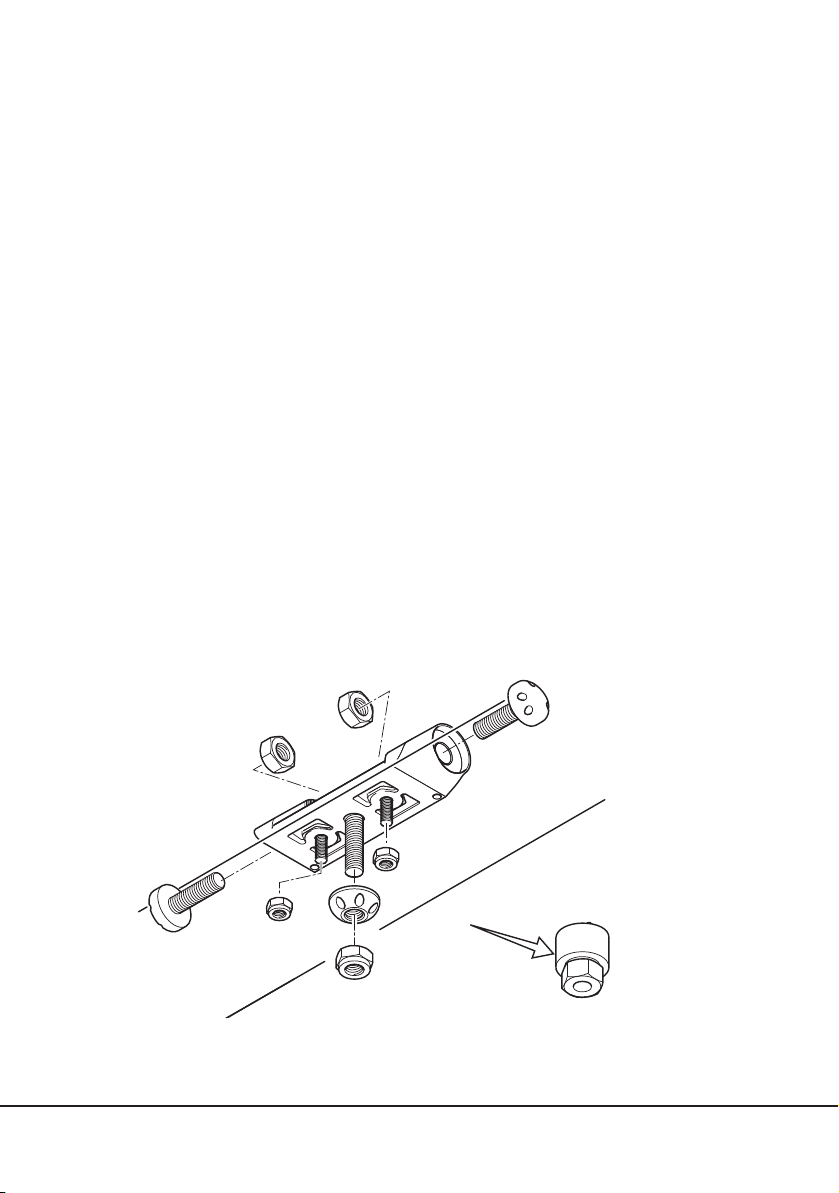
CROSS BOLT SECURITY FASTENER KIT
The simple to install security bolts and nuts will help protect your investment. (Part No. ATNSG2)
This kit contains 4 x M10 x 35mm anti-theft bolts plus 2 x M10 security nuts for the mounting bolts, both with
corresponding coded keys requiring a 17mm, 11/16” spanner.
For use with the Venom LED, Genesis LED and Striker LED Driving Lights.
SECURING LIGHT TO MOUNTING BRACKET - replace the 4 standard M10 bolts
• Remove the standard M10 bolts and washers from each side of the mounting bracket and t the anti-theft
bolts, reusing the existing washers. Each bolt is 35mm in length exclusively designed for use with the Genesis
LED and Venom LED driving lights.
SECURING MOUNTING BRACKET TO VEHICLE – replace standard nyloc nuts
• Remove the standard M10 nyloc nut and replace with anti-theft nyloc nuts as per diagram
All bolts are machined from 304 stainless steel. The key will only t the anti-theft bolts/nuts in one position. Coded
key is machined from steel with zinc protective coating.
14
Security Nut Socket
Page 15
VENOM LED & GENESIS LED
INSTALLATION INSTRUCTIONS
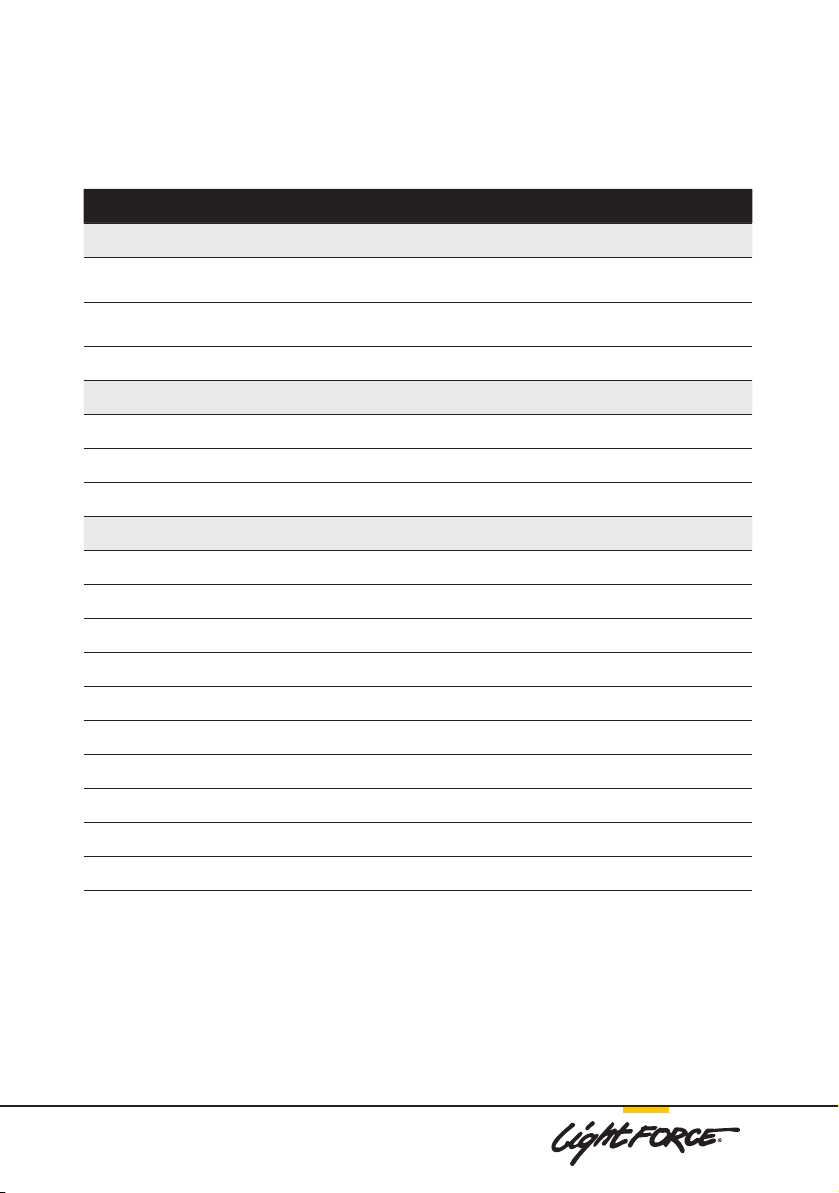
ORDER CODE DESCRIPTION
ACCESSORIES
LFDLHTS
ATNSG2
LEDMB Replacement mounting base for Genesis and Venom LED lights inc hardware
VENOM LED
F150CB Venom 150mm – crystal blue
F150A Venom 150mm – amber
F150CC Venom 150mm – clear combo
GENESIS LED
DL210TSB 210mm Genesis LED top stay bracket
FC210C Genesis 210mm – clear spot
F210CC Genesis 210mm – clear combo
Driving light harness 12V 4 pin, 3 stage switch operation with waterproof connectors. Suits DL150/DL210
Safeguard Anti-theft security lock set suits Venom LED & Genesis LED - kit includes
4 x 35mm bolts, 2 nuts and 1 key
F210WC Genesis 210mm – clear wide
F210CB Genesis 210mm – crystal blue spot
F210CCB Genesis 210mm – crystal blue combo
F210 WCB Genesis 210mm – crystal blue wide
F210Y Genesis 210mm – yellow spot
F210WY Genesis 210mm – yellow wide
CBF210A Genesis 210mm – amber spot
15
Page 16

For warranty information and to register your product
for warranty purposes, visit lightforce.com/warranty
LIGHTFORCE AUSTRALIA PTY LTD
11 Manton Street, Hindmarsh SA 5007
Email: [email protected]
Telephone: (08) 8440 0888
www.lightforce.com
All logos and images are subject to relevant trademark and copyright protection Lightforce Pty Ltd. Copyright © 2018. Data and
specications contained maybe subject to change without notice. Lightforce Australia Pty Ltd shall not be liable for damage,
malfunction, failure resulting from accident, misuse, misapplication, unauthorised repair, neglect, modication, unauthorised or
non standard replacement parts, accessories, bulbs, batteries or voltage or operation of the product beyond its technical and or
environmental specication
DLLEDINS 181122-1-Genesis-LED-Venom-LED-Instructions
.
16
 Loading...