

Page 1
Page 2
Page 3
CONTENTS
VENOM Overview
VENOM Kit Contents
VENOM Installation Guide
VENOM Mounting
VENOM Electrical Connections
VENOM Removing and Refitting the Filter
VENOM Removing the Bulb
VENOM Technical Specifications
VENOM Replacement Spares and Accessories
VENOM Warranty
4
7
8
9
11
13
14
16
17
18
Page 4
LIGHTFORCE IS AUSTRALIA’S LEADING DESIGNER AND MANUFACTURER OF INNOVATIVE
VENO
HIGH INTENSITY LIGHTING SYSTEMS.
With over 30 years of experience in creating world class driving lights, Lightforce is now a global leader in
lighting solutions. Tried and tested, Lightforce delivers products that have been designed,
developed and manufactured to operate in environmental extremes – from the harsh Australian Outback
and Sahara Desert to the freezing Alaskan Tundra and beyond.
Page 5
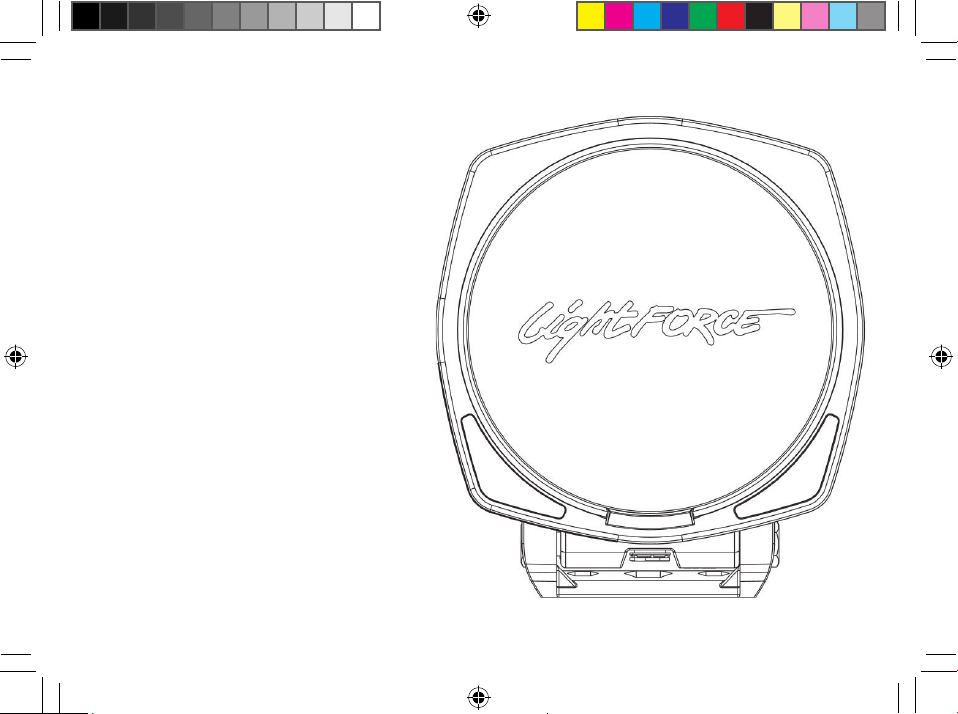
Combining ten years of research and development with the latest in technology and style, Venom brings
long distance driving lights to the next level. Featuring a series of hi-tech LED lights surrounding the edges;
Venom incorporates a level of distinction not previously seen in the Lightforce range. Not only looking sleek
and stylish, the additional LED lighting provides a level of safety unseen in other driving lights on the market.
In order to cater to your needs, we have taken our most popular sized driving light, the 170mm and lifted it
to the next level equipped with an integral HID ballast and European high performance bulb. Combined with
the smallest depth of any Lightforce product to date and the unique Lightforce four point mounting system,
Venom is the ultimate in stylish driving
accessories.
The 170mm Venom has a shallow footprint making it perfect for smaller mounting situations in which a full
bodied light might not be suitable. Venom is the perfect fit for smaller SUVs and 4WDs, without having to
compromise on clear, sharp light and visibility distance.
5
Page 6
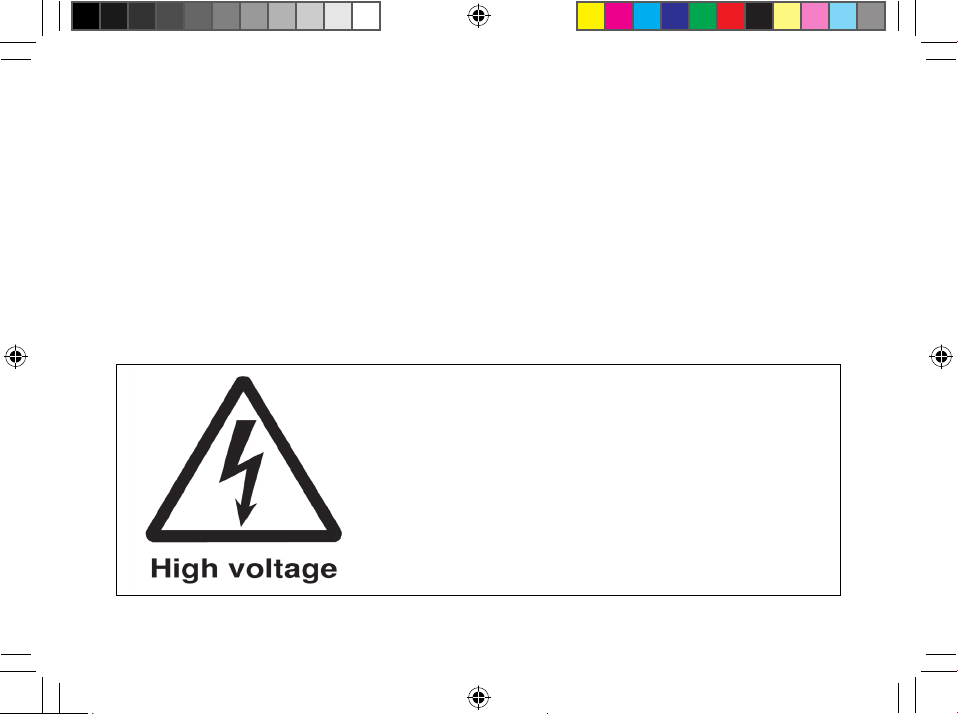
SAFETY NOTE
• Always disconnect power before disassembly of light
• Always wear safety glasses when handling any bulb
• Do not handle the glass section of the bulb
Handle the base of the bulb only, if glass gets dirty then clean with
isopropyl alcohol or methylated spirits.
WARNINGS
High intensity light source. Do not look into the LED during operation. Eye injury may result. Refer to
LED Eye Safety at http://www.cree.com/xlamp_app_notes/led_eye_safety.
Page 7
KIT CONTENTS
1 x Venom Light
1 x Clear Filter (fitted to light)
1 x Lightforce Sticker
1 x Base Mount Bracket
1 x Lightforce Portable Lighting Catalogue
1 x M10 x 35mm SS Bolt
1 x User Instructions
2 x M10 x 20mm SS Bolt
1 x Vehicle Side Connection Harness Adapter
3 x M10 SS Washers
Page 8
INSTALLATION GUIDE
TOOLS REQUIRED:
• 17mm socket on ratchet x 2
• Torque wrench(s) to suit from 5Nm to 70Nm
GENERAL CARE AND SAFETY TIPS
To wash your lights, use plenty of warm soapy water and a soft cloth only (this prevents the surface
from marking). If cleaning the INSIDE face of your filter, use copious amounts of water and a soft cloth
(this surface is not as durable as the outer surface of you lens or filter and can mark if not cared for).
CAUTION
Never use any solvent based cleaners or industrial detergents when cleaning your lights.
Page 9
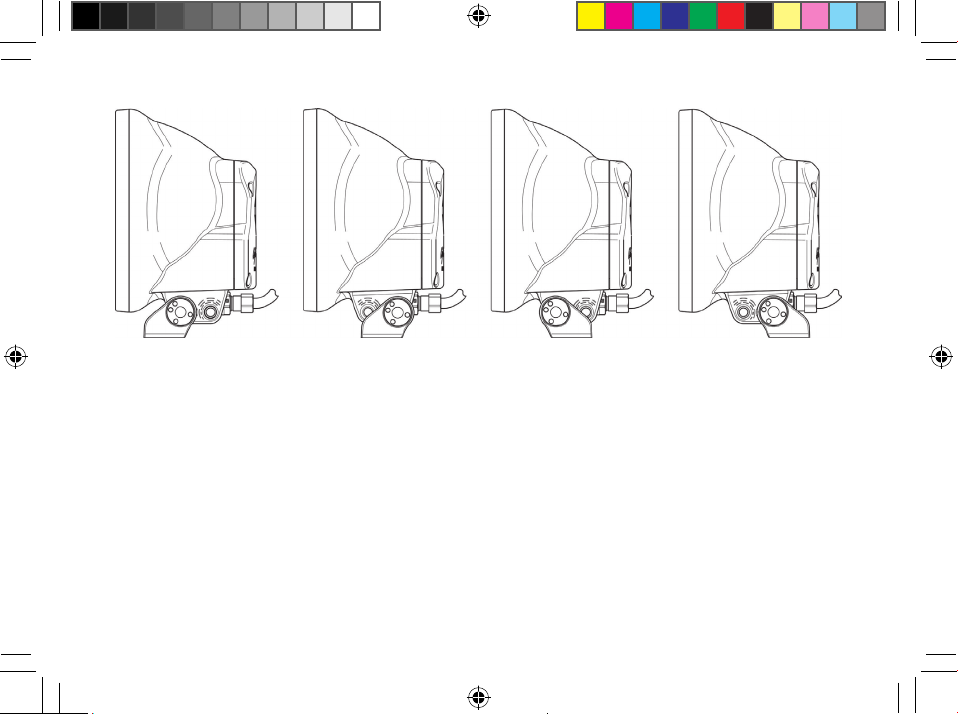
MOUNTING
Venom has four different mount positions (two cross-bolt holes and a reversible mount; see picture)
Before fitting the mount, select the most suitable position for your application
• Insert M10 x 35mm mounting bolt into base mount bracket
• Attach base mount bracket to light housing and insert M10 x 20mm side-bolts
• Insert M10 x 20mm side-bolts
• Tighten side-bolts until firm (not tight)
9
Page 10
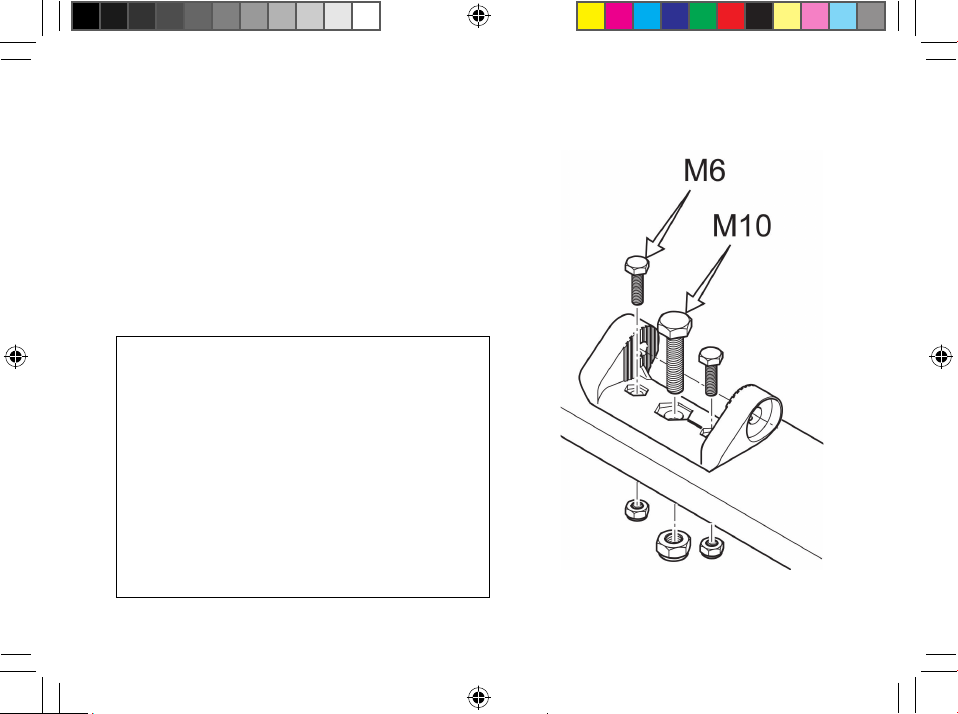
MOUNTING CONT.
• Fit light into position on light mount
• Tighten base mounting bolt until firm
• Approximately aim light (i.e. point straight ahead)
then tighten both bolts as per recommended torque
specifications (see specifications section)
NOTE
M6 Mounting Bolts - If extra mounting security is
required or you have a problem with your light
rotating, there are two M6 mounting holes either
side of the main M10 mounting bolt. These will
accommodate any M6 bolt with an 11mm head
size.
Page 11
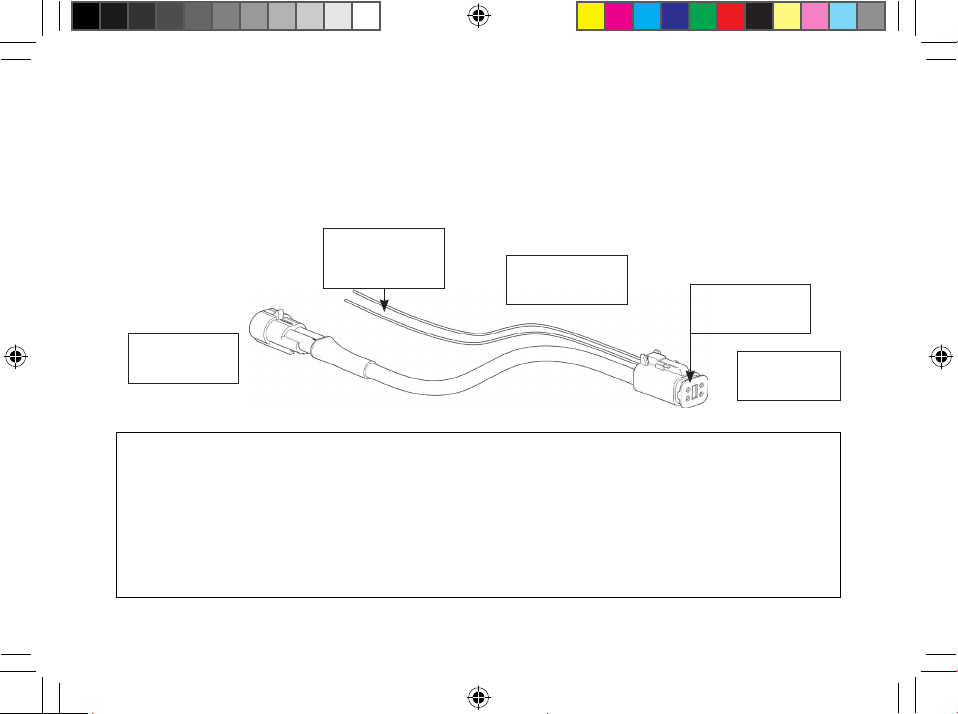
ELECTRICAL CONNECTIONS
Venom is fitted with a waterproof electrical connector. Included is the mating connector fitted to a harness
adaptor - for connection with the existing wiring harness. This harness needs to be fitted directly to your
driving light loom.
To vehicle driving
light loom
To park light Signal
- 1 metre in length
trim to suit
White: Positive
Blue: Negative
Ensure orange seal
is in place
To Venom
driving light
CAUTION
Improper installation of the connector will affect the reliability and operation of your lights.
Do not remove waterproof connector from driving light cable; this may lead to water ingress and void
warranty.
Page 12
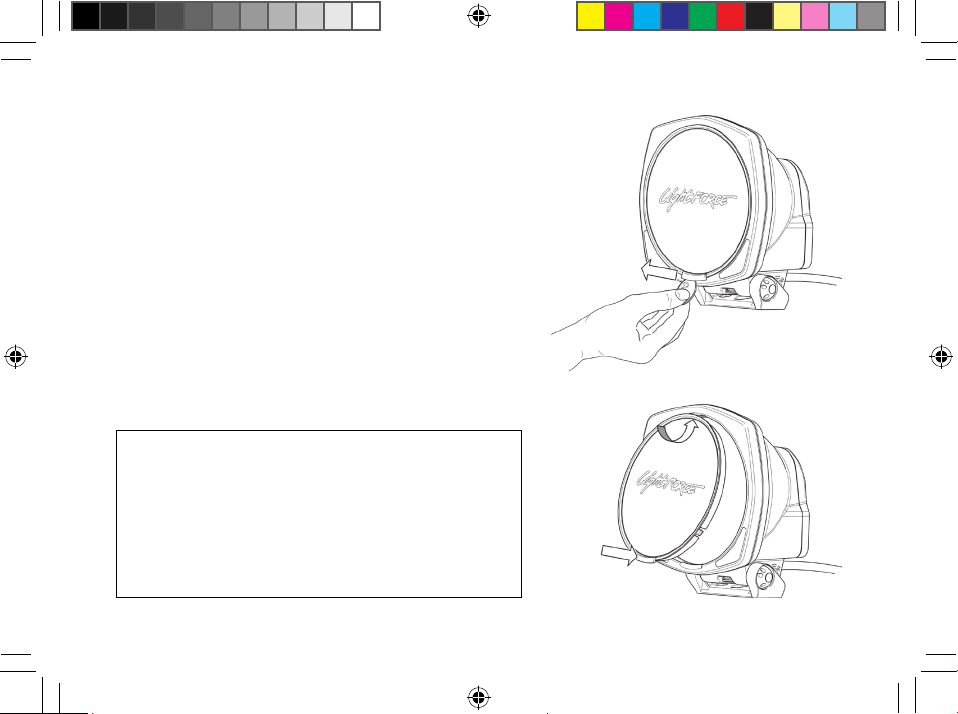
REMOVING AND REFITTING THE FILTER
Filter Removal
• Insert coin at bottom of light between filter tab and bezel
• Twist coin and using the tab pull filter away from bezel
Refitting
• Insert the filter at the top position
• Push filter onto bezel using filter tab at bottom until side
clips are engaged
• Ensure filter is correctly aligned within bezel
CAUTION
When handling the filter, take care of the surface as
this can mark easily (for cleaning see ‘General Care
and Safety Tips’ section).
Page 13
REMOVING THE BULB
TOOLS REQUIRED:
• 4mm allen key
SAFETY NOTE
• Always disconnect power before disassembly of light
• Always wear safety glasses when handling any bulb
• Do not handle the glass section of the bulb
Handle the base of the bulb only, if glass gets dirty then clean with
isopropyl alcohol or methylated spirits.
Page 14
REMOVING THE BULB CONT.
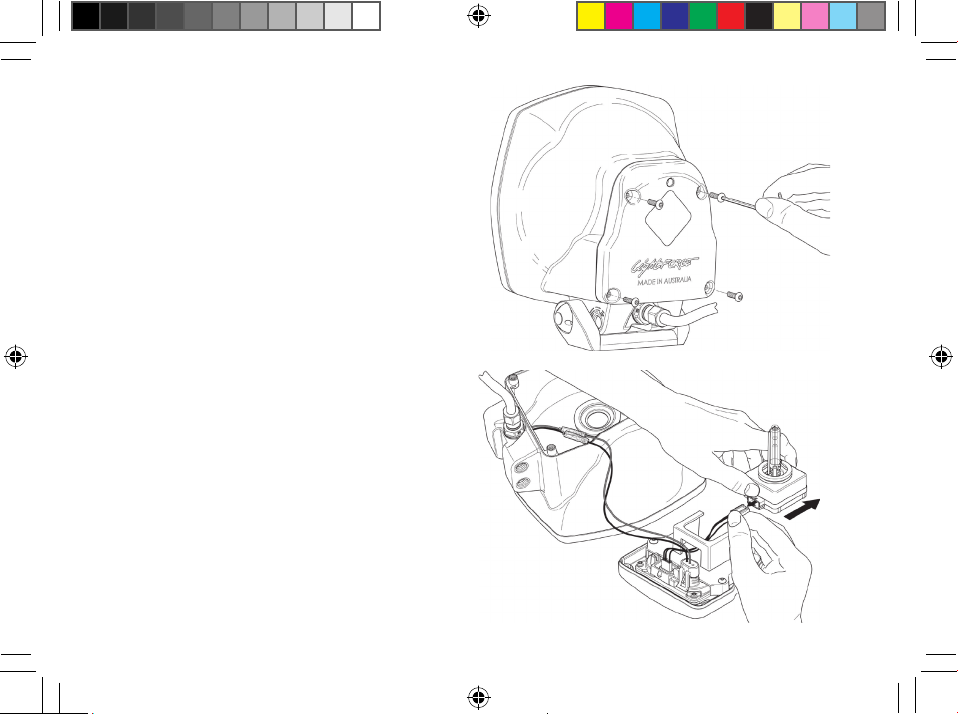
Rear Cover Removal:
• Undo the four stainless steel retaining
bolts (using 4mm allen key)
• Remove the rear cover
Bulb Removal
• Remove connector from bulb by
applying a firm pulling pressure while
gently moving connector from side
to side
• Slide bulb vertically up from white
bulb holder
Page 15
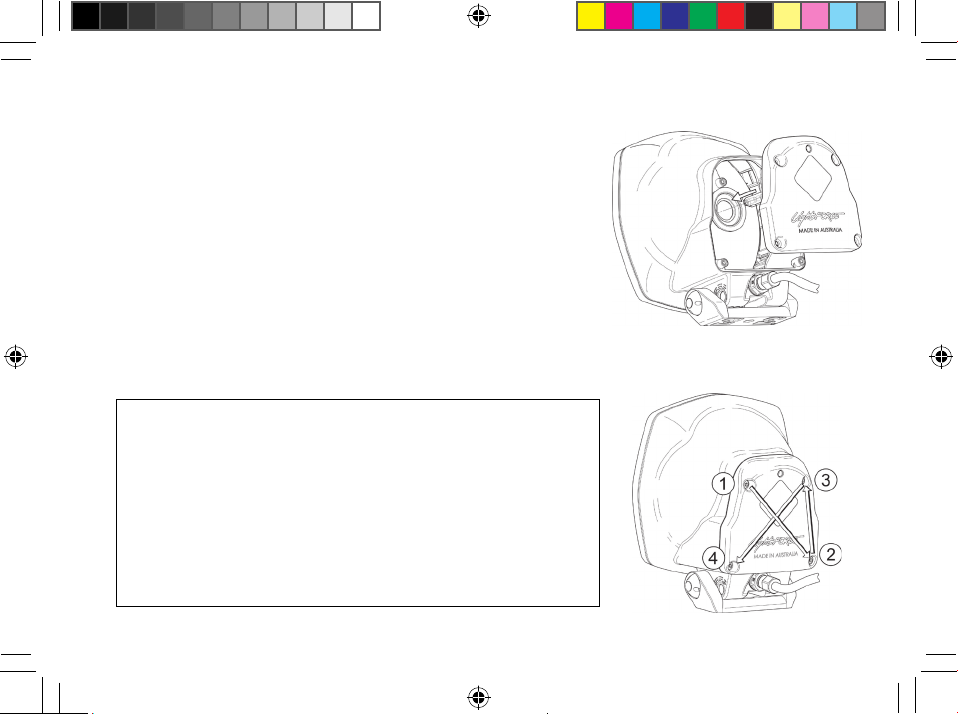
Bulb and Rear Cover Refitting
• Fit bulb into white bulb holder in rear cover
• Refit connector to bulb
• Carefully position bulb through central hole in reflector as per
below, ensure aluminium focal ring is in place (red 50W, blue 35W)
• Refit rear cover to housing while ensuring no wires are trapped
• Nip up retaining bolts following the sequence below
• Tighten using specified torque figure (see specification page)
IMPORTANT
When removing rear cover / housing, do not damage the rubber
seal that runs around the outside of the rear cover. Ensure it is
fitted correctly maintain sealing of the assembly.
This will avoid water / dirt ingress. Incorrect fitment voids warranty.
Page 16
TECHNICAL SPECIFICATIONS
RECOMMENDED WIRE SIZE
2.0mm2 (14AWG) MINIMUM
HID
35W / 12V Light (12.5 to 16 V, Typ. 13.5V)
35W / 24V Light (24 to 32 V, Typ. 27V)
50W / 12V(12.5 to 16 V, Typ. 13.5V)
50W / 24V (24 to 32 V, Typ. 27V)
CURRENT
35W / 12V Light (stable current of 3.1A at 13.5V)
35W / 24V Light (stable current of 1.6A at 27V)
50W / 12V Light (stable current of 4.3A at 13.5V)
50W / 24V Light (stable current of 2.2A at 27V)
MOUNTING FASTENER TORQUE SPECIFICATIONS
M10 x 35mm bottom mount bolt - 70Nm (50lb-ft)
M10 x 20mm cross-bolt - 35Nm (26lb-ft)
Rear cover mounting bolts - Snug fit
RECOMMENDED OPERATING TEMPERATURE
(AMBIENT)
o
40
C (104oF) MAXIMUM
Page 17
REPLACEMENT SPARES AND ACCESSORIES
Order Code Description
ATNBOLT VENOM SECURITY KIT
MBS170 EURO STABILISER BRACKET
HIDBULBASS 4200K / 35W REPLACEMENT HID BULB
F170C SPOT CLEAR REPLACEMENT FILTER
F170CC COMBO CLEAR REPLACEMENT FILTER
F170CB SPOT CRYSTAL BLUE REPLACEMENT FILTER
F170CCB COMBO CRYSTAL BLUE REPLACEMENT FILTER
17
Page 18
WARRANTY
Lightforce lights are proudly designed in Australia and backed by our limited warranty.
AUSTRALIA
“Lightforce” means Lightforce Australia Pty Ltd ABN 54 069 439 774 Address: 28 Orsmond Street, Hind-
marsh, SA ,5007. Telephone: +61 8 8440 0888.
WHAT THIS WARRANTY COVERS:
Lightforce warrants that each product that you purchase is free from defects in materials and workmanship
under normal use and conditions during the warranty period. If the product fails due to a covered defect
during the warranty period, Lightforce shall provide you with a remedy under this Limited Warranty. The
warranty period for the product starts on the original date of purchase specified on your sales receipt or
invoice unless Lightforce informs you otherwise in writing.
Page 19
THE BENEFITS GIVEN BY THIS WARRANTY ARE IN
ADDITION TO YOUR RIGHTS AND
REMEDIES AT LAW, INCLUDING THOSE UNDER THE
AUSTRALIAN CONSUMER LAW.
Version AU 2014.01
Page 20
www.lightforce.com
 Loading...