

Page 1
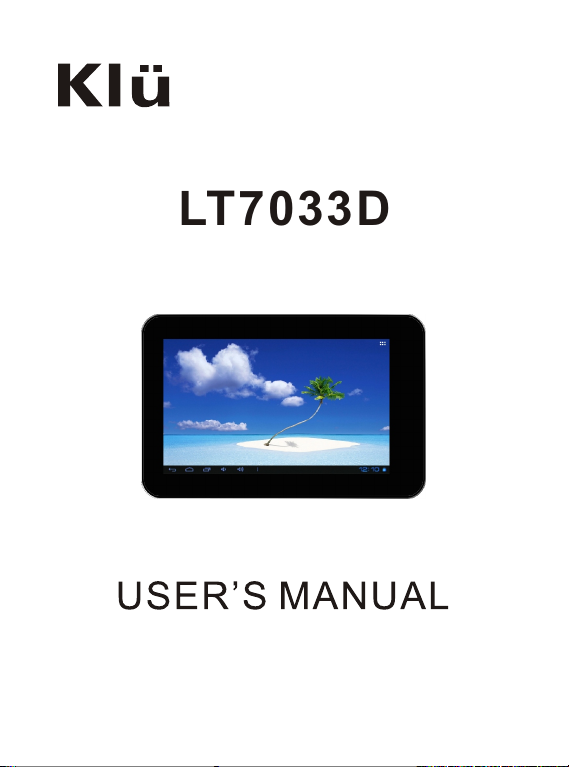
LT7033D
Page 2

Page 3

Thanks For Purchasing Your Tablet
This user manual has been specially designed to guide you through the
functions and features of your device.
1) Please read this manual carefully before using your device to
ensure safe and correct use.
2) The descriptions in this manual are based on the default settings of
your device.
3) Do not use this unit near water. Do not place over the unit any
container with liquid inside.
4) Please do not put your device in high temperature, moisture or dust
place; the tablet is not waterproof.
5) Avoid falling or violent collision, do not violently shake the touch
screen, otherwise, it could lead to damage or display unnormal.
6) If system shutdown automatically, bootable again soon after the
shutdown.
7) Please charge the tablet regularly if not use it for long time to avoid
the damage caused by the excessive consumption from battery.
8) Do not disassemble or use alcohol, thinner or benzene class to swab
product surface.
9) Please do not use the tablet when driving or walking in the street,
otherwise it may lead an accident.
10) Please choose the appropriate volume, if had tinnitus, please
lower the volume or stop using.
11) Memory space available dishonest nominal for the android system
itself takes up part of the memory space and the operation of the
program will also take up space if you open them.
12) Storage capacity that dishonest nominal for android system
occupies about hundreds of MB storage capacity, also in order to
install the software needs, the system must lay off certain storage
capacity, so the actual usable space and nominal space have
deviation.
13) When CPU in high-speed operation, especially in 3D games or in
long time playback high-definition video, the fuselage will have the
phenomenon of fever.
14) Please keep this manual for future reference.
Page 4
Catalog
Chapter One(overview)
Appearance
1.1
Buttons
1.2
Open and shut down
1.3
Open and close standby mode
1.4
Lock and unlock the screen
1.5
Homepage information column
1.6
Text input
1.7
Reset
1.8
USB Connect
1.9
Accessories
1.10
Chapter Two (Internet)
Browser
2.1
Chapter Three (Applications)
Camera
3.1
Calendar
3.2
Calculator
3.3
Explorer
3.4
Downloads
3.5
Chapter Four (System setting)
Wireless networks setting
4.1
Sound setting
4.2
Display setting
4.3
Application setting
4.4
Date & Time setting
4.5
Language and input setting
4.6
Chapter Five (Specification)
Chapter Six (Attentions)
1
2
2
2
2
3
3
4
4
4
4
5
6
7
7
8
8
8
9
9
10
10
11
12
Page 5

Chapter One Overview
1.1 Appearance
Camera
Reset
Volume+Volume-
Power
Earphone
DC IN
USB
USB
T
F
TF card
MIC
Speaker
1
Page 6

1.2 Buttons
Power button
Long press the power button 2-3 seconds to open the screen
When open the tablet, short press this button to enter the off-screen
state and short press again to light up the screen.
Note:
If the tablet is hanging, please use a small hardware to reset at the
bottom upper right corner.
Volume
Press Volume+/- to adjust the volume.
1.3 Open and shut down
Open
Long press the power button (see the appearance) 2-3 seconds, pictures
will show up until to the interface.
Shut down
Long press the power button, then the screen shows would you like to
shut down, press OK to shut down in charging state, when the tablet is
off, press the power button, it will shows charging feature, once again
to click power button, the tablet will be opened.
1.4 Open and close standby mode
Open the standby mode
In boot mode, you can tap the power button, the system will into the
standby mode which can save power.
Close the standby mode
In the standby mode, light tap of the power button of the device, enter
the normal state.
1.5 Lock and unlock the screen
Lock
You can set the sleep time in the system of display.
The system will sleep automatically and lock the screen to the standby
mode if without any inactivity when reaches the preset of standby time.
Unlock
Move the sign to unlock, show as below.
Drag this to unlock the screen and enter the application interface.
2
Page 7

1.6 Homepage Information Column
Sound record
Back
Recent search
Host interface
Menu shortcut key
USB Debug
USB
WIFI
Time
Batter power
1.7 Text Input
When use the tablet, you can use the virtual keyboard to enter text,
number, symbols directly by touching screen. After selecting the
Android input method, the default keyboard show as below:
q
w
e
r
a s
d
z x
?123
To switch the numbers and letters, please press this
To switch the capital and lowercase letter, please press
,
y
t
f
c
u
i
g
v
b
h
j
n m
k l
p
o
.
?123
3
Page 8

1.8 Reset
Press the reset button at the bottom upper right corner of the device,
then you device will restart and reset.
1.9 USB connect
Please connect PC with in-box USB cable for your tablet and you will see
on your tablet, click this sign and turn on USB storage to connect
your device.
Turn off USB storage to disconnect your device with PC.
1.10 Accessories
Power Adapter
USB Cable
User manuaI
OTG Cable
1
1
1
1
Chapter two: Internet
2.1 Browser
Require network support before using a web browser, if there are
network supporting problems, please contact your network operator or
the service provider.
Tablet's web browser can connect to the Internet.
via WIFI to satisfy your business and individual network needs .
Please touch (Setting) to set up the WIFI so that can use the
browser normally.
Touch here (Browser) in the application list to enter the browser
pages; the default homepage is the Recently Viewed showing
recently viewed pages.
4
Page 9

Browser supports the following features.
Enter the URL-touch the input area to get the soft keyboard, then text
the UPL.
Bookmark searchclick this to add into the bookmark
Touch this to read the favorite website that collected
Touch this to search the internet
Touch this to add new browser
Touch this to close the browser
Chapter three: Application
3.1 Camera
Touch this in the application list to enter the camera, the views
showed on the screen and you can do the following as picture:
Camera
Click this to get Snap shot
Click this to set up white
balance, scene mode,
Camera setting
Click this to video and do the
relevant operation.
5
Page 10

3.2 Calendar
Touch this to calendar, for the first time into the calendar interface will
remind to add the Google account, which facilitates more calendar
operation, if do not need to set, click on the later, otherwise to set up
Google account settings, set into the calendar interface, the default
page shows the months.
Date view: long press to the event to rebuilt, view, edit, and delete;
Click on the blank area can set up new events; long press the blank
area, you can built new events or display/not display the lunar day
view.
Week view: Long presses the event to rebuilt, view, edit, and delete
events; long press the blank area you can rebuilt events or display/not
display the lunar weeks view.
Month view: Long press date to build new calendar items or display/
not display the lunar month view.
Agenda: list all events click or read the details.
In any views, when you switch to other date, week or month, all can be
back to today or week or month now y touching “today” button.
6
Page 11

3.3 Calculator
Touch here in the application list to get into the calculator
3.4 Explorer
Touch here (File manager) in the application list, it supports the
files mutual copy in this two places SD Card, internal memory and
USB.
Touch to list the files of Internal memory
Touch to list the files of TF card
Touch to list the files of USB disk
To Copy/Cut/Delete, touch , choose the file you want, then do it
through the tip button.
7
Page 12

3.5 Downloads
Click here in the application list; you can preview the downloading
or done document contents.
Click download file to stop or delete the download contents
Chapter Four: System setting
Click here (Setting) to enter the system setting interface.
4.1 Wireless networks setting
This setting module includes: the wireless and network Settings
The wireless local area network Settings
Open wireless LAN switches, the system will scan available wireless
network automatically and display the wireless local area network in
the list
Among them, if the local area networks have the sign behind it, it
represents the network has been encryption, it needs to enter the
password to connection.
The sign represents the networks do not need a passwordm can
be connected directly
You can choose the network from the list you want m click it to connect
directly, also you can click the advanced, then click connected to
network; you can also select add wireless local area network to add by
hand
Network notice: open the switch, it will notice if there any opne
networks
The wireless local area network certificate: the wireless local area
network loading and management
4.2 Sound setting
In Sound setting, you can choose mute switch which can get more
detailed settings if you need. Click the volume setting can set up the
notice, the media and the disk boot switch voice
]alarm of volume and choose the prompt operation sound and the bell
and software
8
Page 13

4.3 Display setting
Display settings contains: Brightness, Wallpapers Settings,
Automatic rotating Settings, Dormancy time and Font size.
Brightness
The user can adjust brightness manually to get the lightness you want.
Wallpaper Settings
In the wallpaper setting, you can set up the wall paper and dynamic
wallpaper; the wallpaper can be chosen from gallery.
Dormancy time
When the screens in light state a period of time, it will automatically
lock to save the power if without any operations.
Font size
You can set up the font size according to individual's favorite, there
were respectively: small, ordinary, big, huge.
4.4 Application setting
In the application setting, you can manage the running services and
access rights management and development but only for developer.
Application management
In this setting, it is easy to manage and delete some applications that
have been installed.
First, get into the application list, click the according to name sort
buttons to order the alphabet and number; click the all menu to scan
the running program or programs that provide by a third party software
developers.
Click on an application, you can see the application's relevant
information to clear
The cache, unload programs, clear the default value or forced to stop
operation, etc
Running services
In this setting, you can end and set up some programs that are running
Access management
In this setting, by using the opening or prohibition to manage the
applications to access content permissions.
9
Page 14

4.5 Date & Time setting
In this setting interface, you can set up your system time and series
options.
Time setting
You can use automatic time from the network, to choose the time zone,
to set specific date and time and display format in time setting.
4.6 Language and input Setting
In this setting interface, you can choose the language you want
Input method
In here the input methods can be set by users, you can add the words
in the dictionary or to delete.
Android keyboard
You can set up automatic capital function of opening or closing.
10
Page 15

Chapter Five (Specification)
Dimension(mm*mm*mm)
Weight
LCD
OS
Processor
Memory
WI-FI
Connections
Battery
Service time
Operating temperature
Video support
Audio support
Picture support
Adapter Input
Adapter Output
191×118×11.5
Approx 300g
7 "800 × 480
Android 4.0.4
1.2G Hz
512MB DDR3 RAM, 4GB internal
802.11b/g/n
Micro-USB, Micro-SD (up to
32GB), Headphone Jack
3.7V 3000mAh Li-Poly
Up to 15h music mode, 3h
internet, 4h video
Between -10 et 45
AVI, WMV, MP4, MKV, RM, RMVB,
FLV, MOV, 3GP
MP3, WMA, WAV, APE, FLAC,
AAC, OGG
JPG, JPEG, BMP, GIF, PNG
AC 100-240V, 50/60Hz
DC 5V 2A
11
Page 16

Chapter Six (Attentions)
This device complies with Part 15 of the FCC Rules. Operation is
subject to the following two conditions: (1) This device may not cause
harmful interference, and (2) This device must accept any interference
received, including interference that may cause undesired operation.
Warning: Changes or modifications to this unit not expressly approved
by the party responsible for compliance could void the user's authority
to operate the equipment.
NOTE: This equipment has been tested and found to comply with the
limits for a Class B digital device, pursuant to Part 15 of the FCC Rules.
These limits are designed to provide reasonable protection against
harmful interference in a residential installation. This equipment
generates, uses and can radiate radio frequency energy and, if not
installed and used in accordance with the instructions, may cause
harmful interference to radio communications.
However, there is no guarantee that interference will not occur in a
particular installation. If this equipment does cause harmful
interference to radio or television reception, which can be determined
by turning the equipment off and on, the user is encouraged to try to
correct the interference by one or more of the following measures:
Reorient or relocate the receiving antenna.
Increase the separation between the equipment and receiver.
Connect the equipment into an outlet on a circuit different from
that to which the receiver is connected.
Consult the dealer or an experienced radio/TV technician for
help.
12
 Loading...