

Page 1
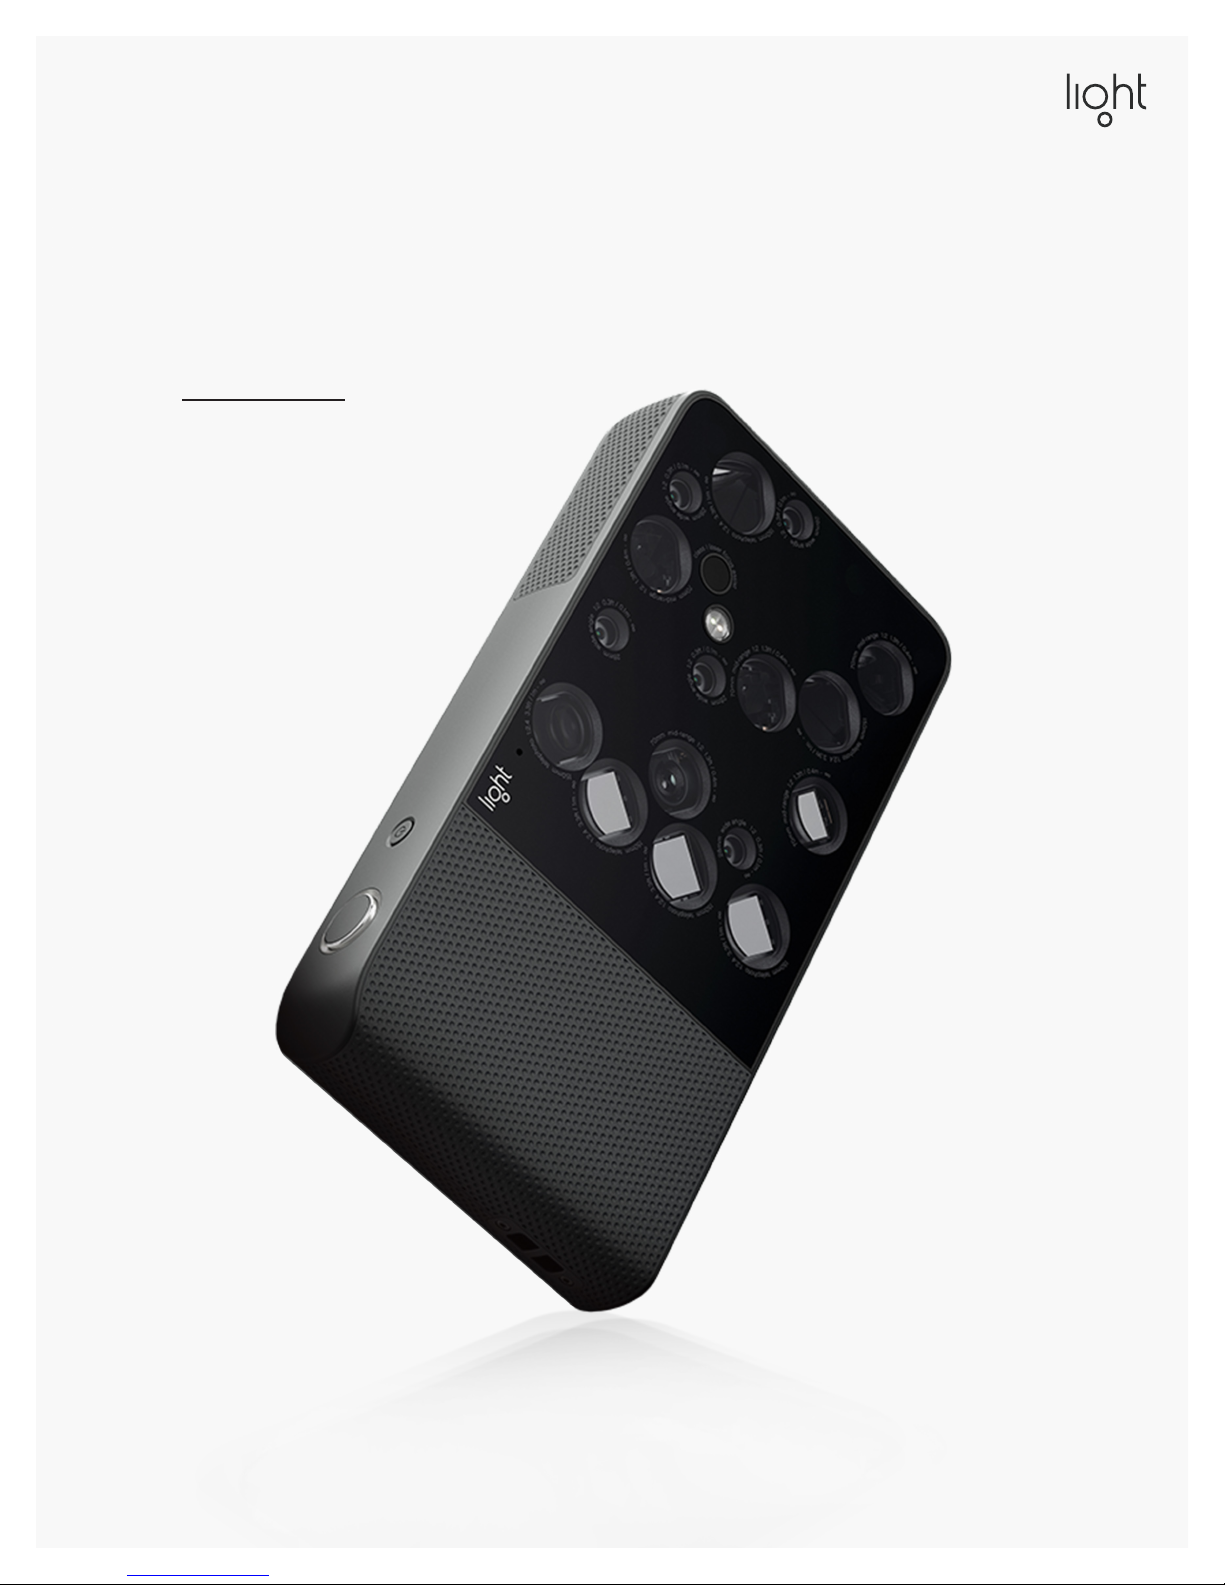
L16
User Guide
light.co
Page 2

Table of Contents
Getting Started
L16 overview
Power on, power off, sleep, wake
Charging and battery life
Home screen
Device settings
Restart, Reset and Update
Update Light L16
Update Lumen
Restart Light L16
Reset Light L16 settings
Photo Capture
At a glance
Take a photo
Auto exposure mode
Manual exposure mode
Focus
Zoom
Burst mode
Self-timer
Flash
Grid
Camera Settings
Exposure information
Device status
Haptic vibration
Audio
Metering modes
Gallery
View your photos
Organize your photos
Process photos on Light L16
Safety, Handling and Support
Care for your Light L16
Care for your Light L16's lithiumion battery
Help Light make the L16 better
Technology Partners
Lumen
A quick look
System requirement: Lumen
Transfer photos
Light raw files – LRI & LRIS
Curate your work
Process photos
Adjust depth effect
Fine-tune focus
Edit depth – refine edge
Edit depth – blend area
Edit depth – match depth
Export as JPGs and DNGs
Page 3
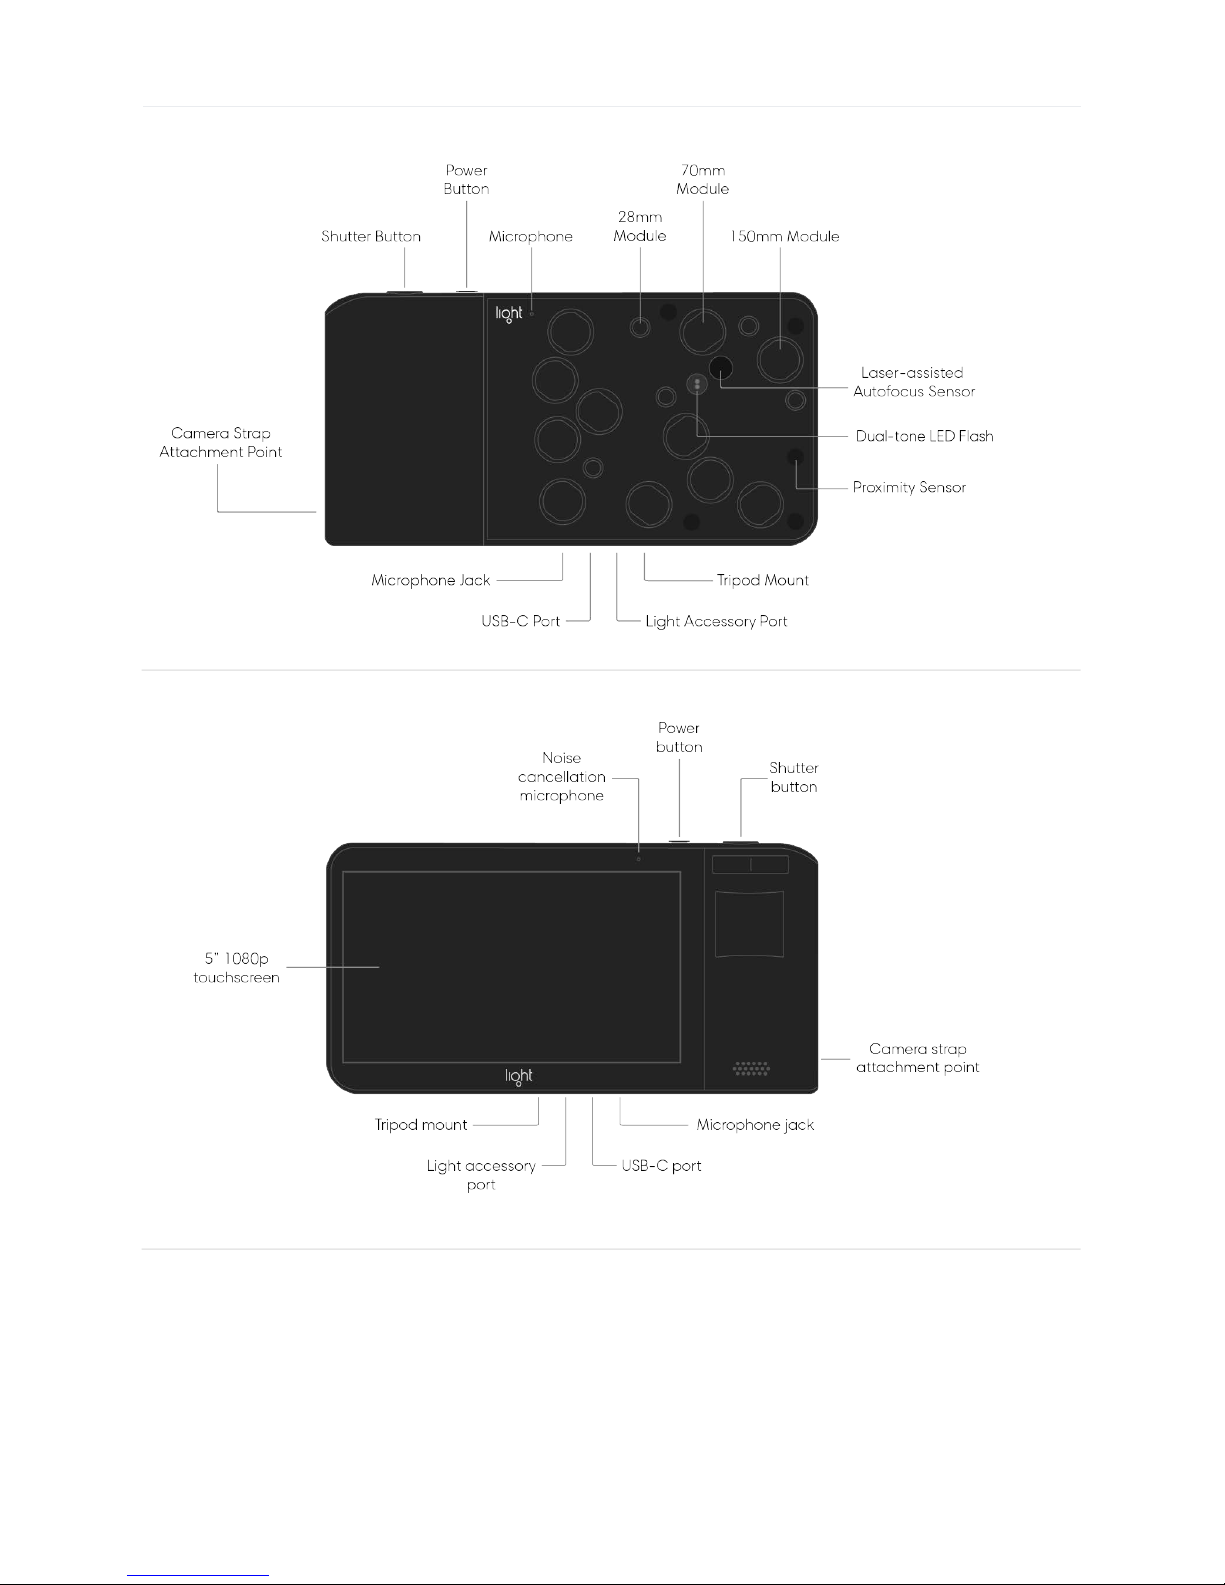
L16 Overview
This guide describes Light L16 software version V1.3.0.1
2/67
Page 4
Power on, power off, sleep, wake
Turn on your Light L16. Press and hold the power button until the Light logo appears on
your screen. The camera interface will appear shortly after.
Turn off your Light L16. Press and hold the power button until the Power off option
appears on your screen. Tap it to power off.
Sleep the Light L16 display. Tap the power button once to put Light L16 to sleep. (The
display screen will turn black.)
Note: By default, the display will sleep automatically after 2 minutes of inactivity. You can
adjust this in device settings.
Wake to your last activity. Tap the power button once to wake up your Light L16 and
resume your previous activity.
3/67
Page 5

Double-click or swipe to camera mode. If the Light L16 wakes to the lock screen, double-
click the shutter button or press and swipe up from the camera icon to open the camera
mode.
Charging and battery life
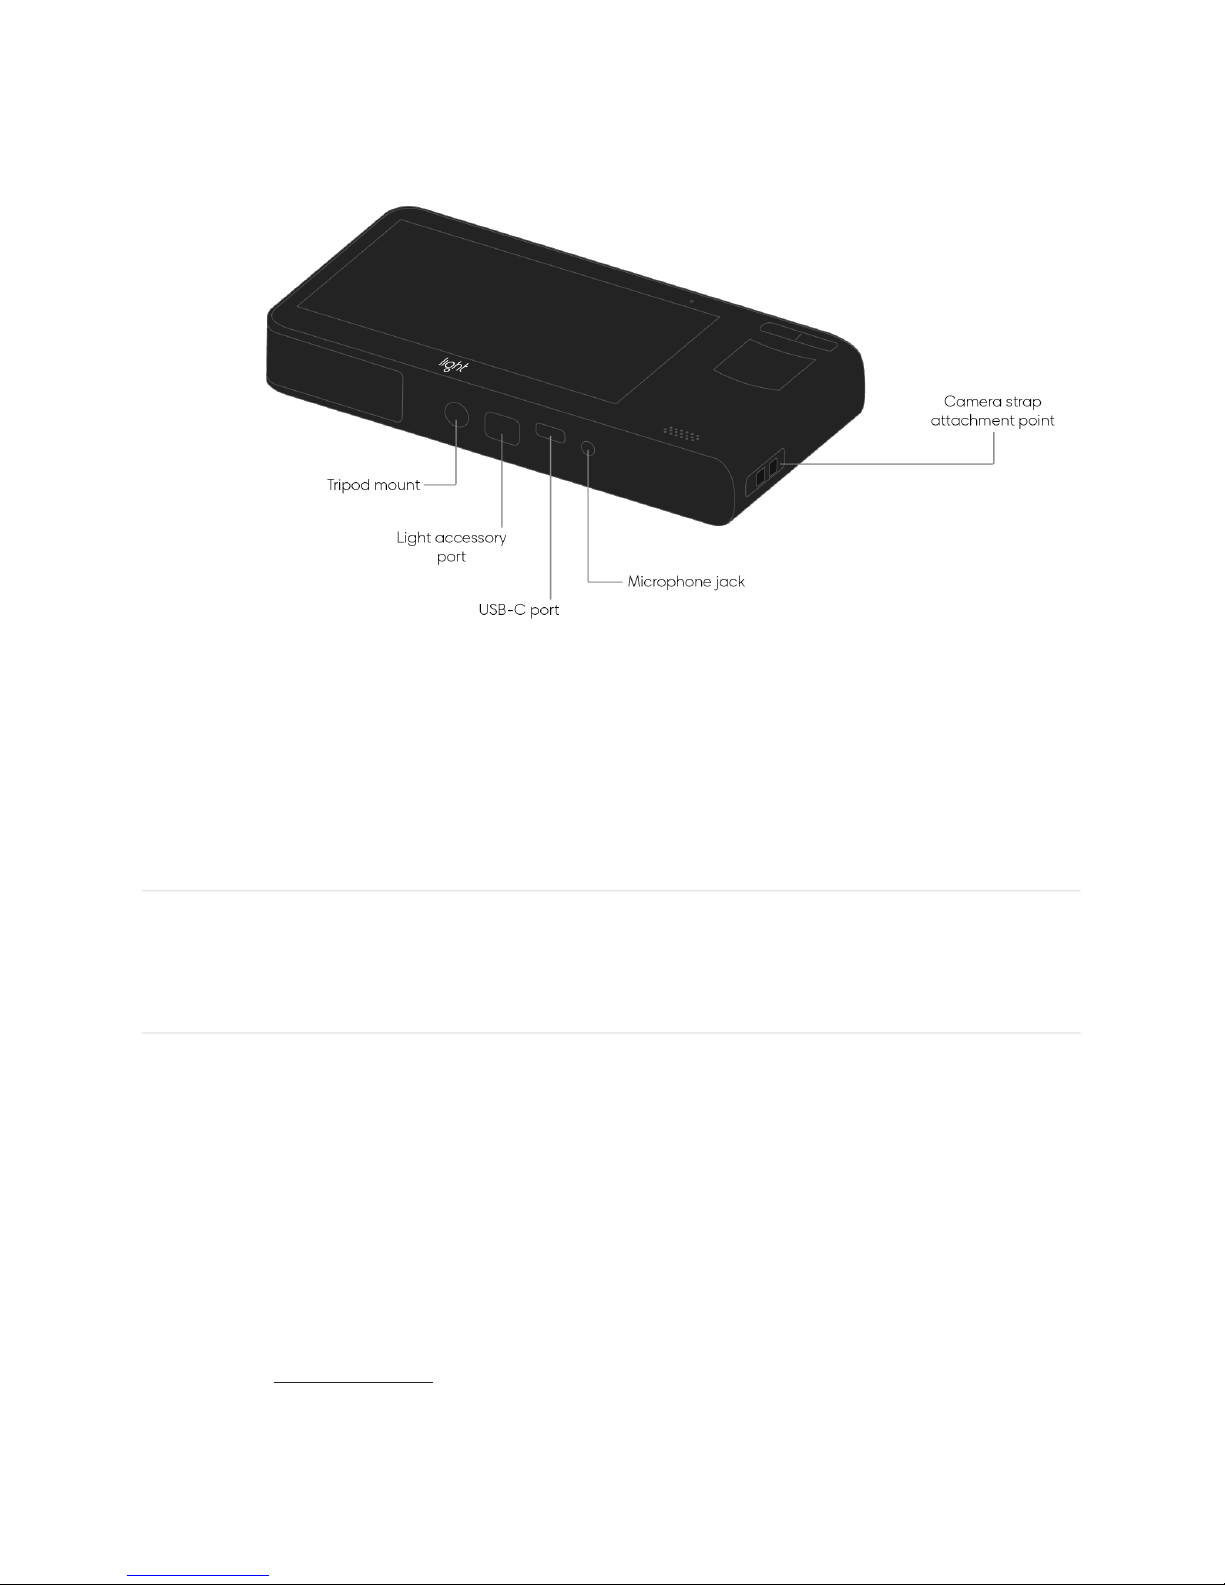
Charge your Light L16. Plug the small end of the included USB-C cable into the USB-C
port on the bottom of your Light L16. Next, plug the opposite end of the cable into the
included power adapter, then plug the adapter into a power outlet.
The Light official quick-charger. In the box with your Light L16 is a Light official USB 3.0
Quick Charge adapter. Charging with the Light official adapter ensures a proper and speedy
charge.
Charging statuses. There are three ways the Light L16 can charge:
“Charging Rapidly” appears when using the Light official USB 3.0 Quick Charge
adapter. Charging with this method produces a full charge in around 90 minutes of
time.
“Charging” appears when using a charger that does not support 3.0 Quick Charge.
“Charging Slowly” appears when charging with devices that have restricted power
output. For example, you might see this while connected to your computer.
Note: Power delivery methods from other vendors may not produce desired charging results.
It’s recommended that you always use the provided Light official 3.0 Quick Charge adapter.
If you lose the Light official adapter, contact us
and we’ll help you out!
Turn on or off the battery indicator (device status
). Open the Toolbar , then tap the
gear icon
to open the camera settings menu. Tap the switch next to “device status” to
toggle on or off the battery percentage indicator. Along with battery percentage, toggling
device status on will also show your total images remaining.
Check remaining power. If you do not wish to turn on the battery indicator, swipe down
from the top of the touchscreen to open the Control Center. In the top right corner of the
Control Center, you see a battery icon and percentage remaining.
Preserving battery power.
When your camera begins charging, a charging symbol appears on the screen and the
blue light around the shutter button begins to pulse.
4/67
Page 6
When not shooting, it’s best to keep your Light L16 screen off.
If you know you won’t be using your Light L16 for an extended period of time, fully
power down the camera before storing it in your case.
Even if you're not using them, Wi-Fi and Bluetooth can consume power. You can turn
both off from the Control Center by swiping down twice from the top of the
touchscreen.
Pro Tip: For information on Light L16’s lithium-ion battery, read Care for your Light L16's
lithium-Ion battery.
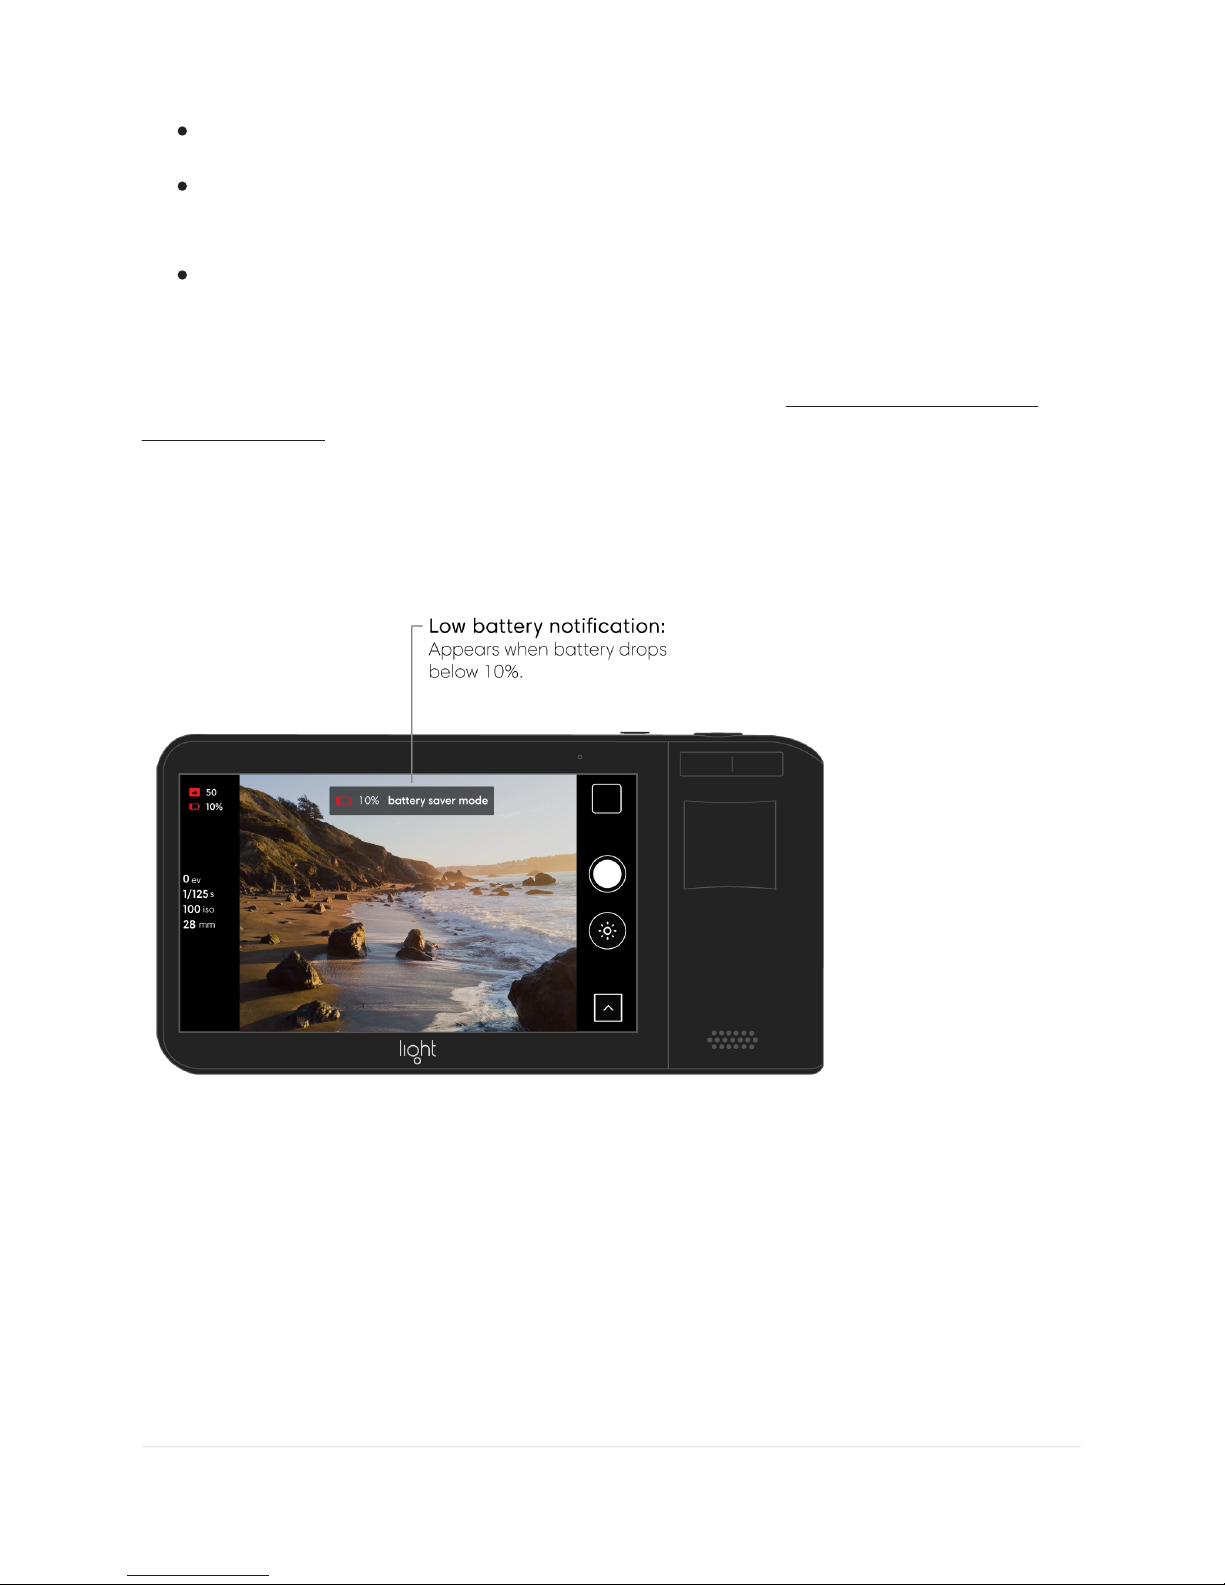
Low battery notification. When battery power drops below 10%, your Light L16 will alert
you with a low battery notification.
Note: Camera functionality requires a minimum power level of 10% in order to move mirrors
and focus lenses properly. Below 10% power, other features such as the gallery and sharing
are still available.
5/67
Page 7

Home screen
The Light L16 is built on Android with the Light camera running as an app. Aside from the
Light Camera app and the Light Gallery app, the Light L16 has several other pre-installed
apps.
Access Android controls. Swipe down from the top of the touchscreen to reveal the
Android controls on the right.
Square: Tap the square icon to show your open apps. Swipe up or down to rotate
through them. To close an app, tap the X in the top right corner, or swipe the app to
the left or right. (The square icon will only show up if you have unlocked your device.)
Circle: Tap the circle icon to go to the home screen. Depending on your security
settings, you may need to unlock your device.
Triangle: Tap the triangle icon to go back to the previous screen.
Close the Light Camera app. Swipe down from the top of the touchscreen to reveal the
Android controls on the right. Tap the square icon to show your open apps. Tap the X in the
top right corner of the Light camera app.
Note: If you don't see the square icon, you need to unlock your device. Tap the circle icon,
then swipe up from the bottom and enter your pin, passcode, or pattern. The square icon will
appear on the right.
Access other available apps. From the home screen, tap the arrow icon on the right to
open the apps menu.
Browser – Connect to the web and share images to social media.
Feedback – Send feedback to Light. If you are not connected to Wi-Fi, your feedback
will be saved until you are back online.
(Device) Settings – Personalize your device with settings for brightness, sound, Wi-Fi,
etc.
Android is a trademark of Google Inc.
TM
6/67
Page 8

Device settings
Access device settings.
Wireless & networks
Airplane mode
Turn Airplane mode on or off.
1. Access the device settings menu (see above).
2. From the Control Center, tap the Airplane mode symbol to toggle airplane mode on
or off.
3. From the full device settings menu, tap “more” under the wireless and networks.
4. Tap the activation switch to toggle Airplane mode on or off.
Bluetooth
Turn Bluetooth on, pair a device.
1. Access the device settings menu (see above).
2. Tap the Bluetooth symbol to toggle Bluetooth on and open the Available Devices
menu.
3. Your Light L16 will search for nearby devices. When you see the name of your
device, tap it to connect. Your Light L16 will then connect with the device.
Note: Bluetooth does not work with Mac or iOS devices yet.
Turn Bluetooth off.
1. Access the device settings menu (see above).
From the camera or gallery modes, swipe down three times from the top of the
touchscreen to access the Control Center for access to quick settings. To access
the full menu, tap the gear icon in the top right corner.
From the home screen, tap the arrow icon on the right to open the
apps menu. Tap the Settings app to open the full device settings
menu.
7/67
Page 9

2. Tap the Bluetooth symbol to open the Available Devices menu.
3. Tap the activation switch to toggle Bluetooth off.
Wi-Fi (wireless)
Turn Wi-Fi on, connect to a network.
1. Access the device settings menu (see above).
2. Tap “Wi-Fi” to open the available wireless networks menu.
3. Tap the activation switch to turn Wi-Fi on.
4. Your Light L16 will search for nearby wireless networks. When you see the name of
your wireless network, tap it to connect. If the network is secured and you need a
password, you'll see a lock symbol next to the network name.
5. "Connected" will appear under the network name when you've successfully joined.
That Wi-Fi network will now be a "saved network" and will automatically connect when
in range, as long as Wi-Fi is enabled.
Turn Wi-Fi off.
1. Access the device settings menu (see above).
2. Tap “Wi-Fi” to open the available wireless networks menu.
3. Tap the activation switch to turn Wi-Fi off.
Device
Display
Adjust brightness level.
1. Access the device settings menu (see above).
2. Tap “Display.”
8/67
Page 10

3. Tap “Brightness level” and drag the slider left or right to adjust the screen
brightness.
Turn Adaptive brightness on or off.
1. Access the device settings menu (see above).
2. Tap “Display.”
3. Tap the activation switch next to “Adaptive brightness” to toggle on or off.
Note: The Light L16 has an adaptive brightness sensor to determine and optimize
your brightness level for your surroundings. It is recommended that you keep adaptive
brightness on.
Change the wallpaper on your home screen.
1. Access the device settings menu (see above).
2. Tap “Display.”
3. Tap “Wallpaper” then tap to open the wallpapers folder. You can use the default
Light wallpaper or choose a photo from your gallery.
Adjust display timeout.
1. Access the device settings menu (see above).
2. Tap “Display.”
3. Tap “Sleep” then choose your desired amount of time: 2 minutes (default), 5
minutes, 10 minutes, 30 minutes.
Daydream. To control what happens when your camera is docked and/or
sleeping, turn Daydream on.
1. Access the device settings menu (see above).
2. Tap “Display.”
3. Tap “Daydream,” then tap the activation switch to toggle Daydream on.
4. Pick your desired option and adjust the settings for that option using the gear icon .
Sound & notification
9/67
Page 11

Adjust L16 shutter volume.
1. Access the device settings menu (see above).
2. Tap “Sound & notification.”
3. Drag Notification volume slider right or left to increase or decrease
the shutter volume.
Turn Do not Disturb on or off.
1. Access the device settings menu (see above).
2. Tap “Sound & notification.”
3. Tap the activation switch next to do not disturb to toggle on or off.
Apps
Access app information.
1. Access the device settings menu (see above).
2. Tap “Apps.”
3. Tap an app to view app-specific information.
Battery
View battery information.
1. Access the device settings menu (see above).
2. Tap “Battery” to open the battery sub-menu and view battery charge information.
Personal
Location
Turn on device location.
1. Access the device settings menu (see above).
10/67
Page 12

2. Tap “Location.”
3. Tap “Mode” to change location modes.
Security
Lock your Light L16.
1. Access the device settings menu (see above).
2. Tap “Security.”
3. Tap “Screen lock” and choose your preferred screen lock option:
None
Swipe
Pattern
Pin
Password
Note: If you forget your pattern, pin, or passcode, there's no way to reset it without
losing all photos stored on the camera. If you have forgotten your pattern, pin, or
passcode, contact us
and we will help you unlock your camera.
Backup & reset
Reset your network settings.
1. Access the device settings menu (see above).
2. Tap “Backup & reset.”
3. Tap “Network settings reset” then the reset settings button to reset all of your Light
L16’s saved Wi-Fi and Bluetooth settings.
Factory data reset.
1. Access the device settings menu (see above).
2. Tap “Backup & reset.”
3. Tap “Factory data reset” then the reset camera button to erase all data from your
L16 camera’s internal storage. This includes all system data and settings, photos, and
other user data.
11/67
Page 13

System
Date & time
Set date and time automatically.
1. Access the device settings menu (see above).
2. Tap “Date & time.”
3. Tap the activation switch next to “Automatic date & time” to use network-provided
information.
Set date and time manually.
1. Access the device settings menu (see above).
2. Tap “Date & time.”
3. Make sure the activation switch next to “Automatic date & time” is toggled off.
4. Tap “Set date” to set your camera’s date.
5. Tap “Set time” to set your camera’s time.
Select a time zone.
1. Access the device settings menu (see above).
2. Tap “Date & time.”
3. Tap “Select time zone” to set your camera’s time zone.
Use 24-hour format.
1. Access the device settings menu (see above).
2. Tap “Date & time.”
3. Tap the activation switch next to “Use 24-hour format” to toggle on or off.
About L16 Camera
Check for software updates.
12/67
Page 14

1. Access the device settings menu (see above).
2. Scroll to the bottom and tap “About L16
Camera.”
3. Tap "Software update."
4. Tap “Update” to check for any available updates.
Note: To find available updates, your Light L16 must be connected to a wireless
network (see Wi-Fi above).
Turn on or off automatically check for updates.
1. Access the device settings menu (see above).
2. Tap “About L16 Camera.”
3. Tap “Software update.”
4. Tap the checkbox next to “Auto update” to toggle on or off whether Light L16 checks
for updates automatically.
Note: Your Light L16 will only check for updates when you are connected to a wireless
network (see Wi-Fi above).
Locate your Light L16 serial number.
1. Access the device settings menu (see above).
2. Tap “About L16 Camera.”
3. Tap “Status.”
4. Scroll down until you see “Serial number.”
Read the Light L16 Legal information.
1. Access the device settings menu (see above).
2. Tap “About L16 Camera.”
3. Tap “Legal information.”
Check your Light L16 software package.
1. Access the device settings menu (see above).
2. Tap “About L16 Camera.”
3. Scroll down until you see “LightOS version.”
Android is a trademark of Google Inc.
13/67
Page 15
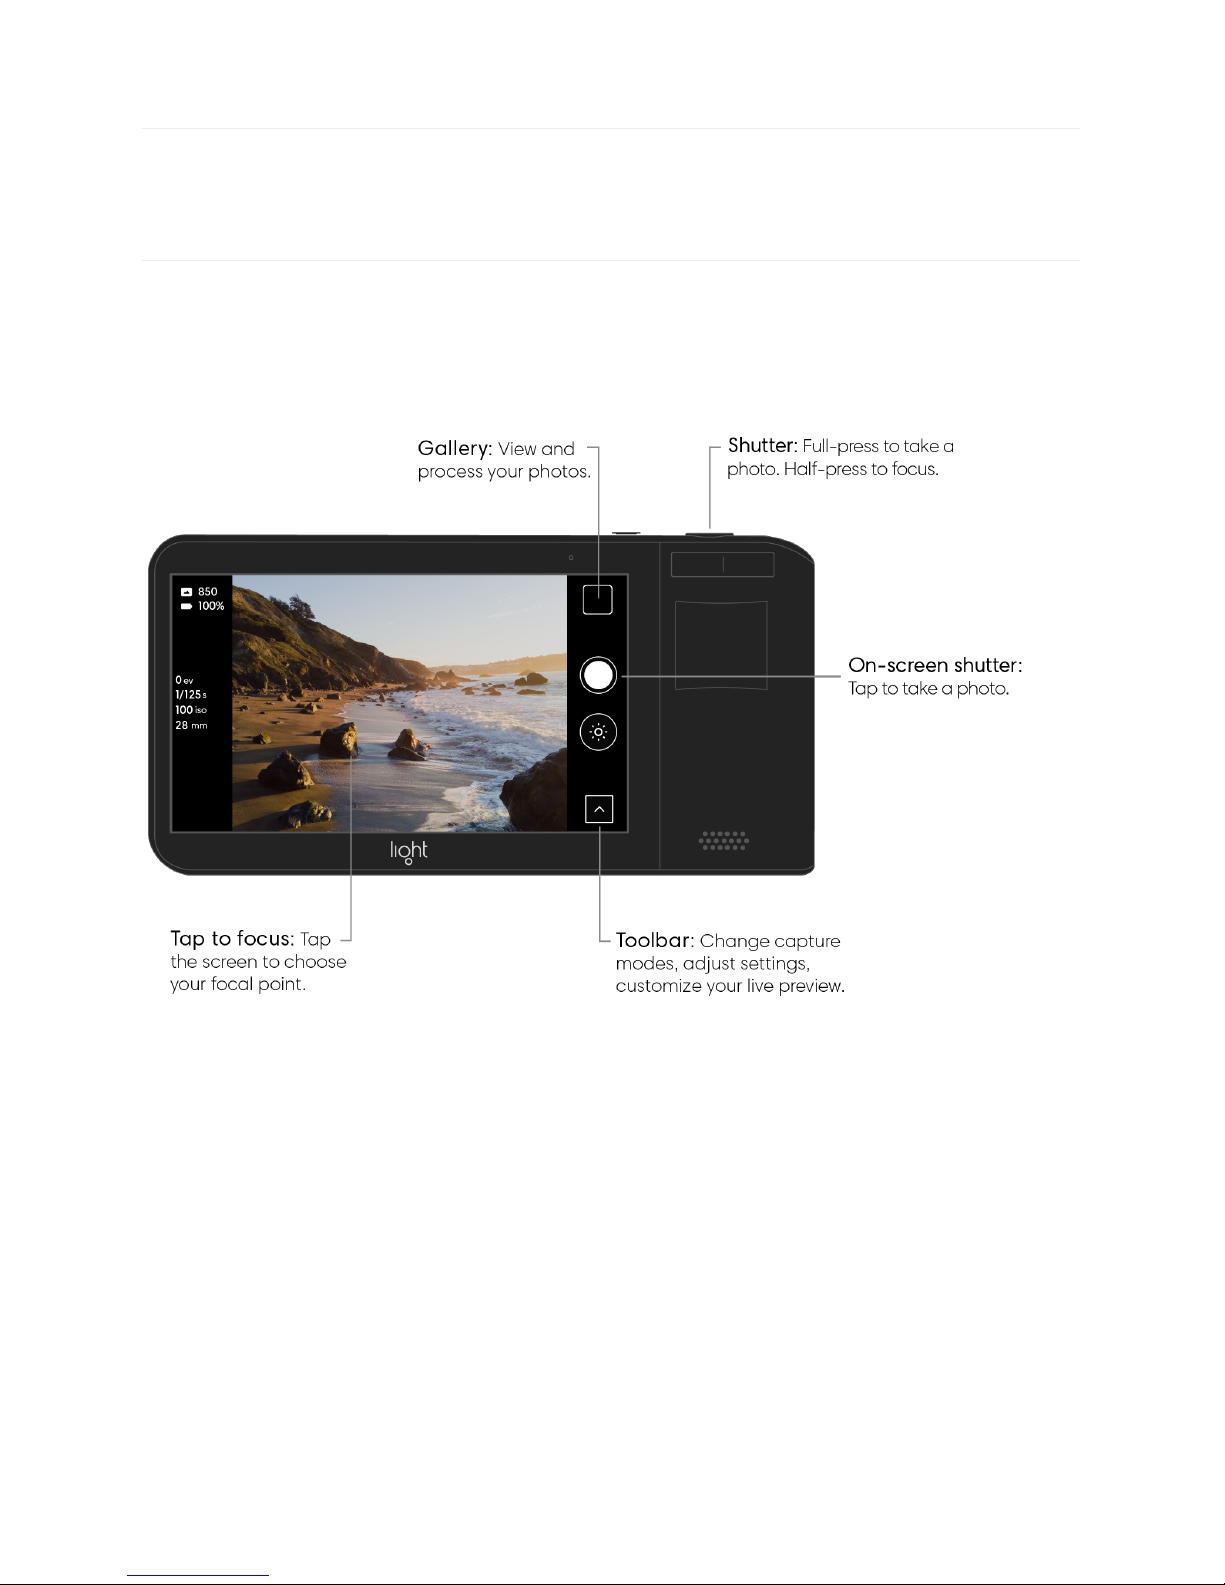
Photo Capture
At a glance
With your Light L16, you can take pictures in one of two modes: Auto or Manual. In each
mode, you have the ability to adjust exposure and preview your adjustments live on screen.
Additional control options like self-timers and display grids can be found in the Toolbar.
14/67
Page 16
Take a photo
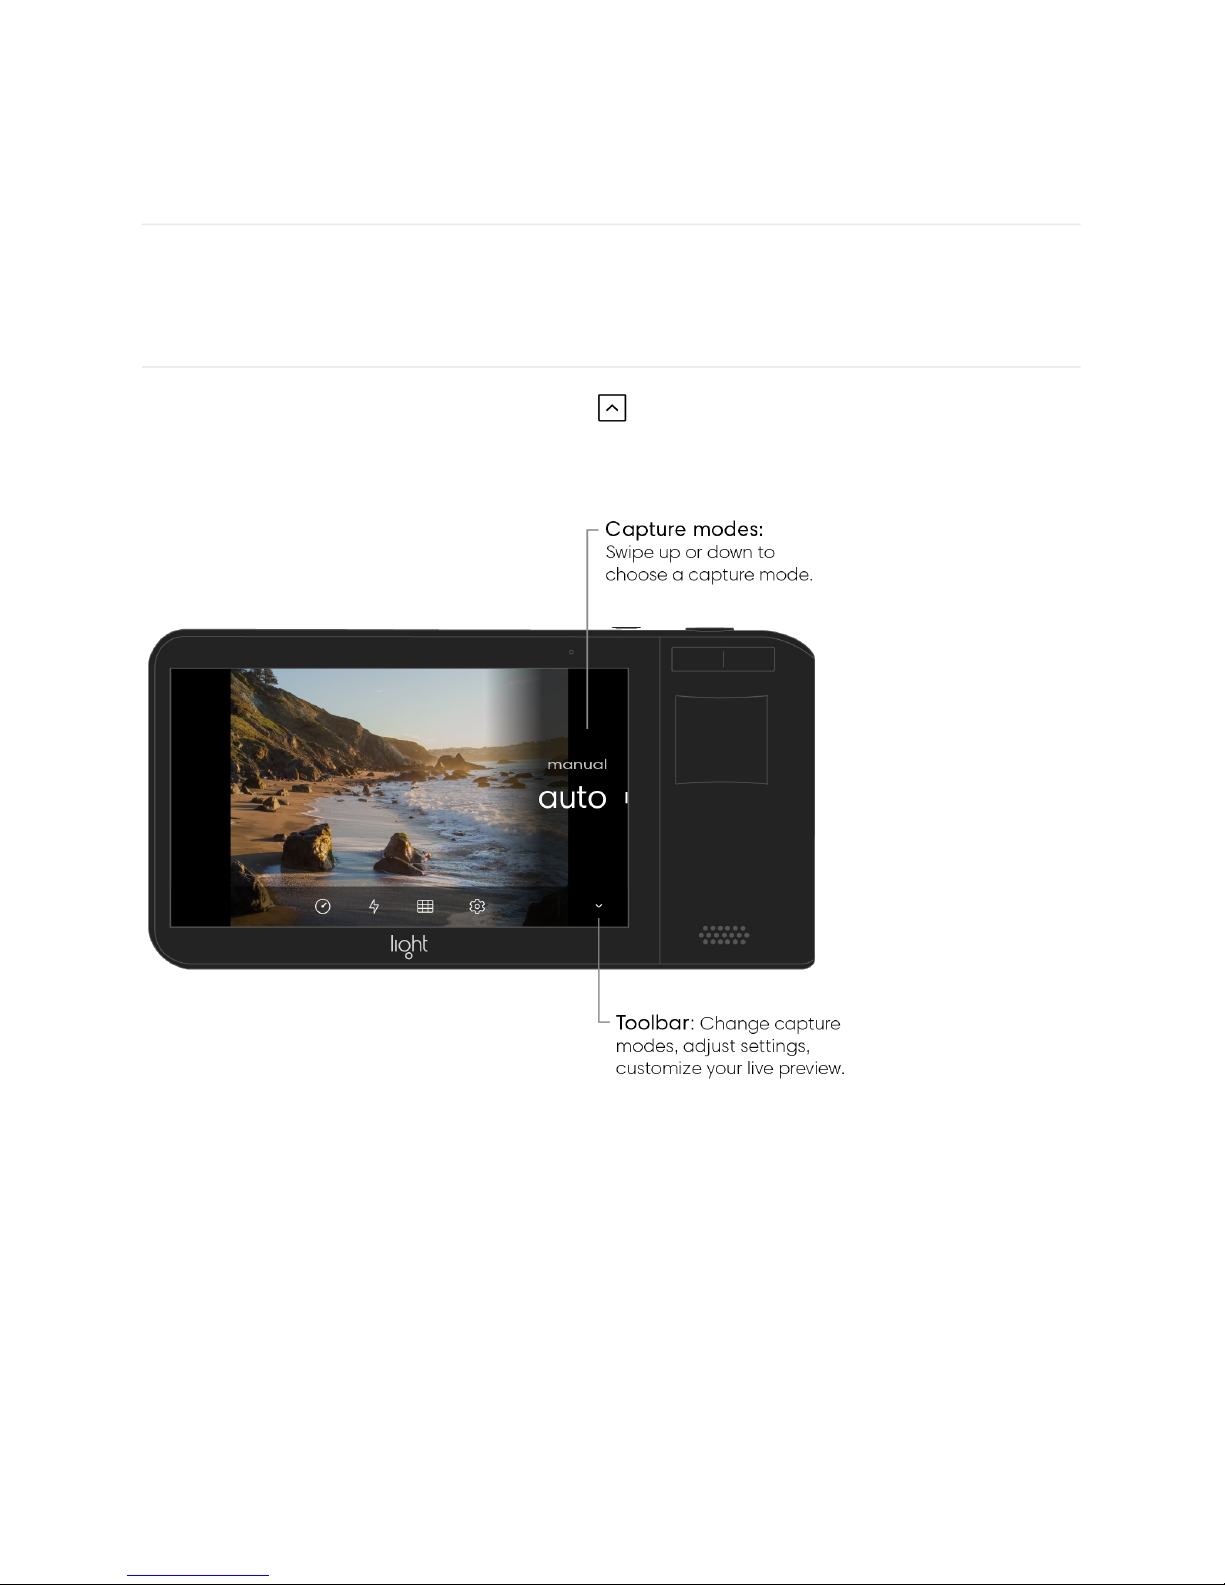
Choose a capture mode. Tap the up arrow to open the Toolbar. Above it, you see two
capture mode options: Auto and Manual. Swipe up or down to highlight your preferred photo
capture mode.
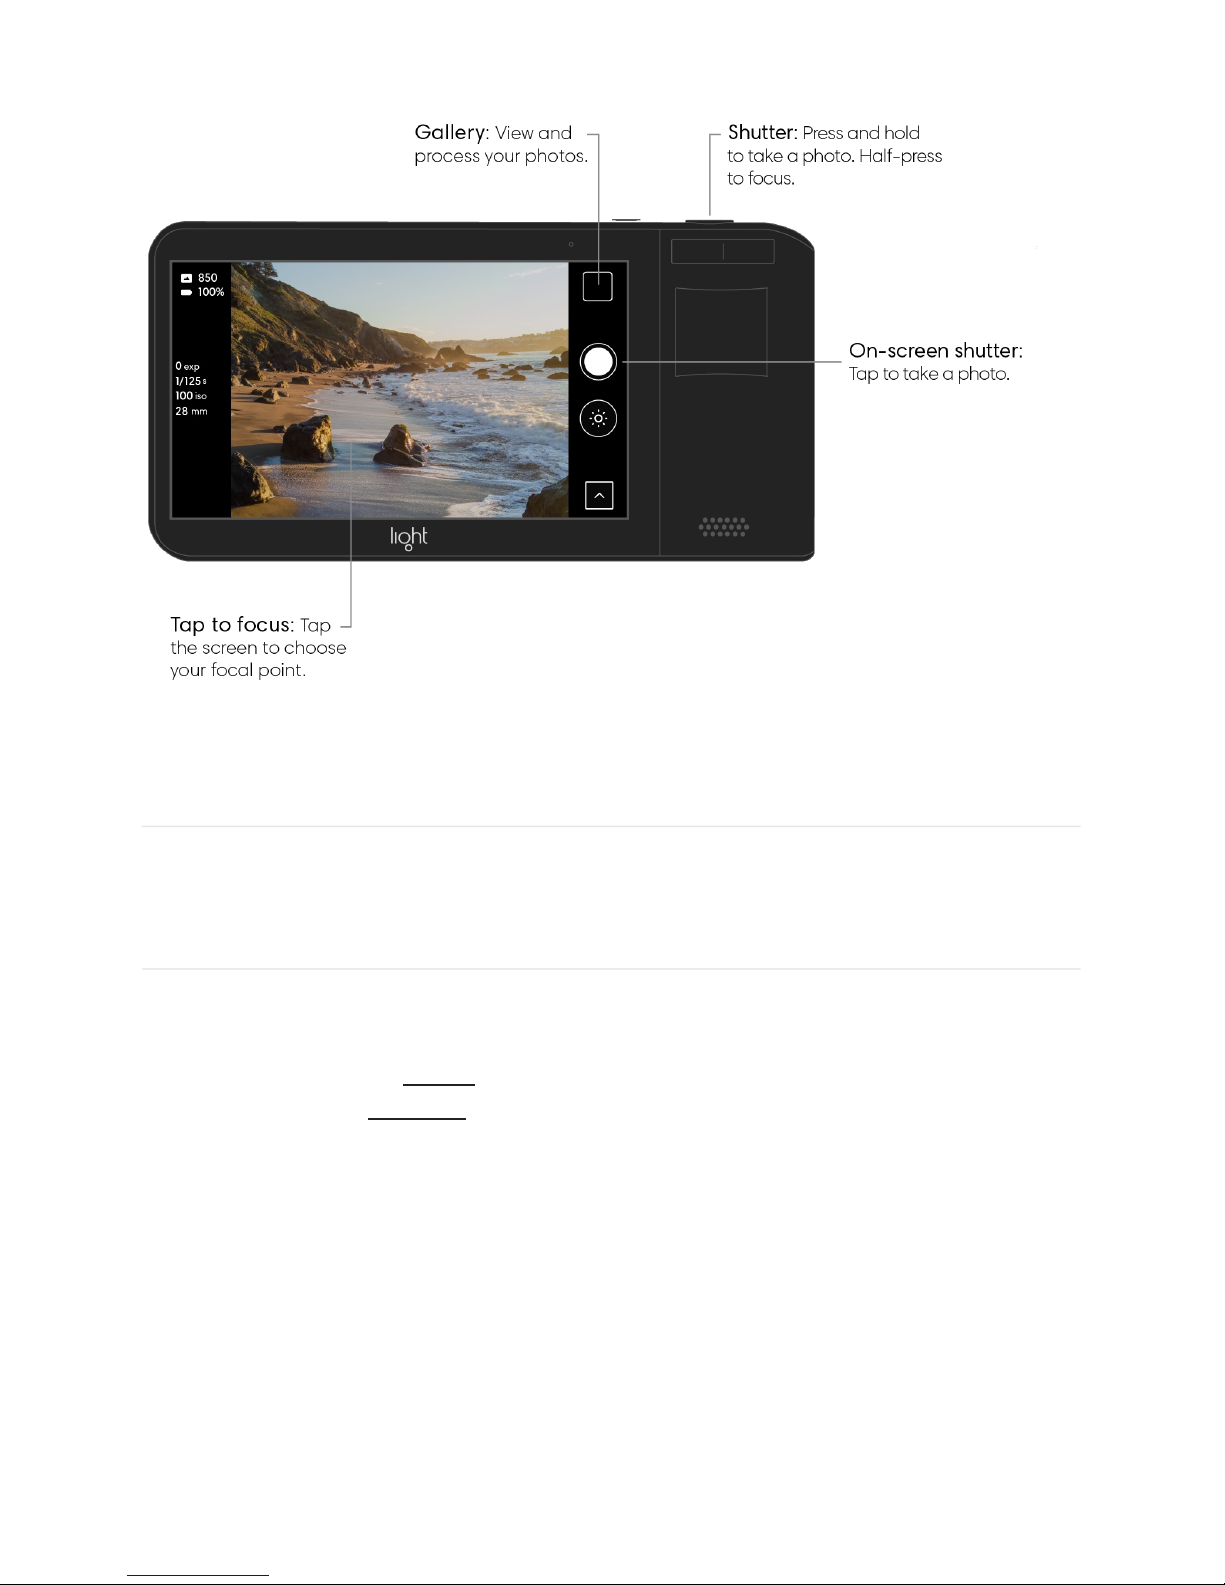
Take a photo. Tap on the screen to focus on your desired subject. After focus is achieved,
press and hold the shutter button to take a photo. The screen will flash black when a photo
has been taken. After a moment, you see a new thumbnail appear in the gallery icon in the
screen’s upper right corner.
15/67
Page 17
Auto exposure mode
Auto mode sets exposure (ISO and shutter speed) automatically. Depth of field (the amount
of blur before and after your subject) for images taken with Light L16 is adjustable after your
images are transferred to Lumen, the Light desktop software. There is no native aperture
control on Light L16 – click here to learn more!
16/67
Page 18
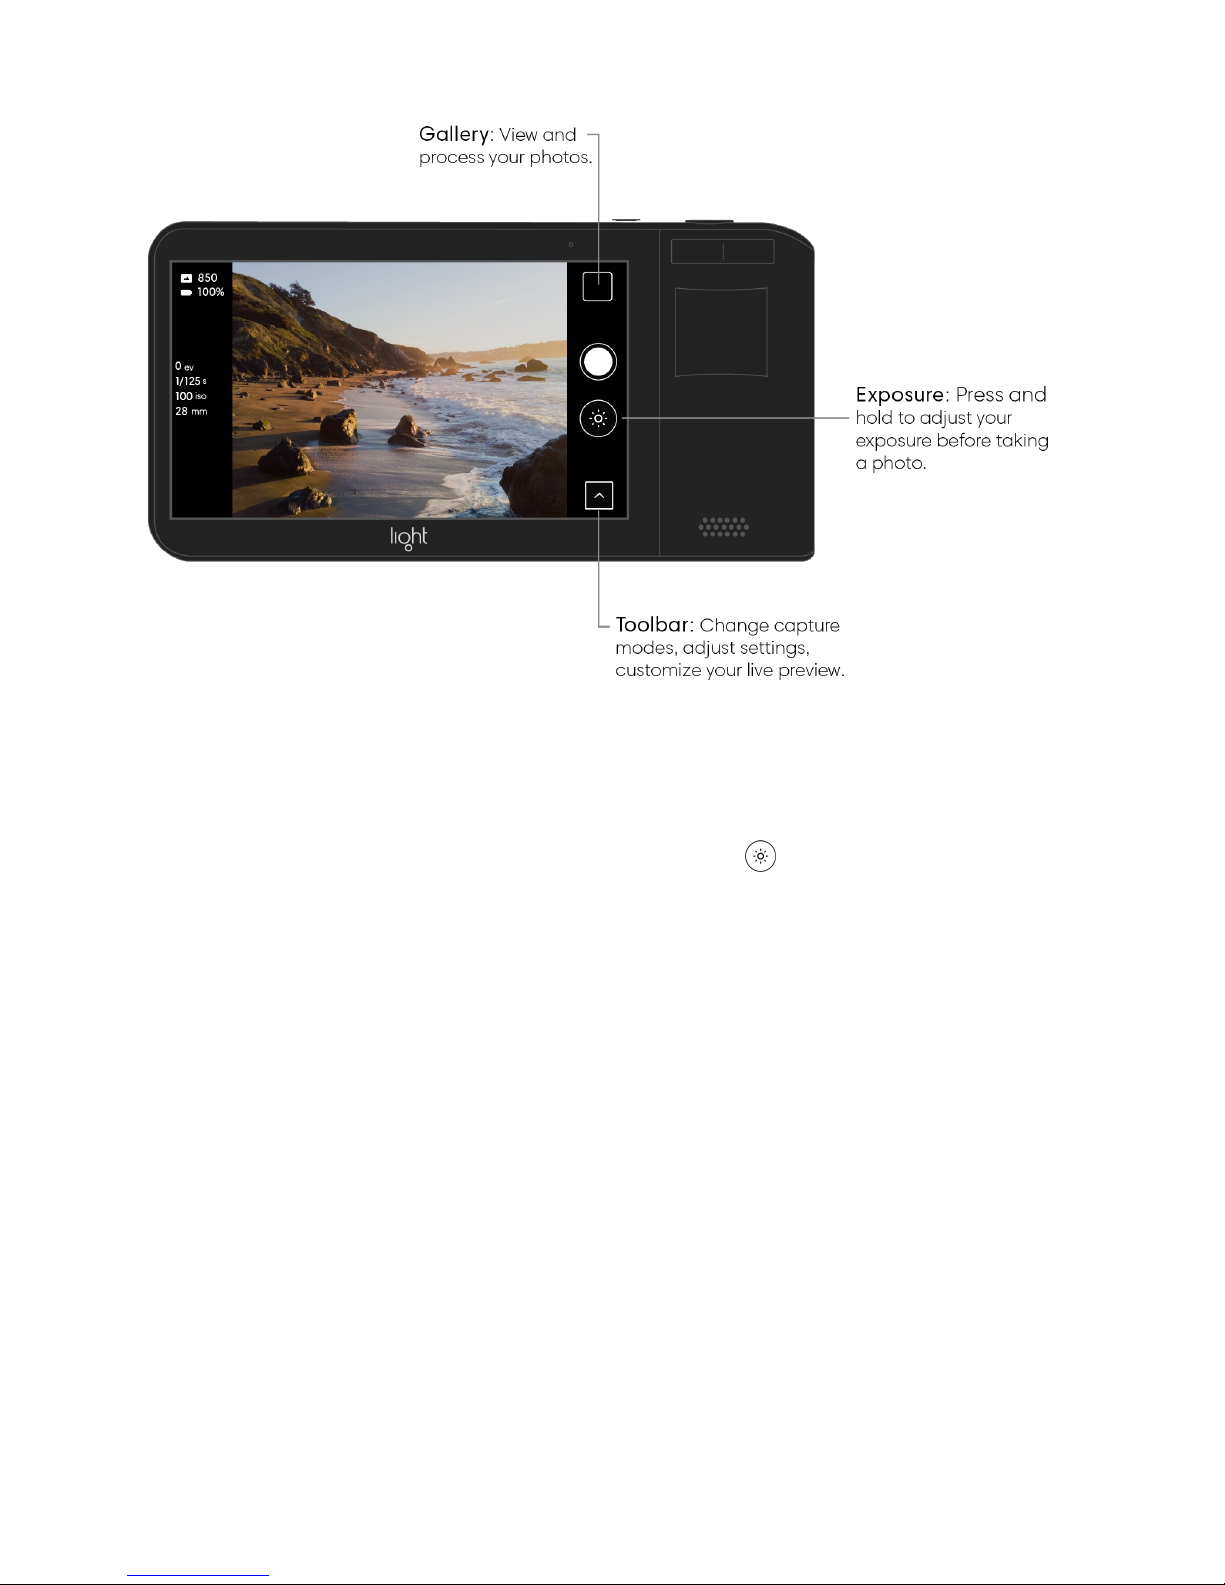
Adjust exposure in auto mode. Auto mode automatically adjusts exposure based on the
scene in front of you. If you’d like, you can make adjustments to the calculated exposure
before taking a photo. Press and hold the Exposure button on the right side of the
screen to open the Exposure slider. While holding the button, move your finger up or down
to set Exposure to your desired value. As you drag up or down, you see a live preview of
your changes.
17/67
Page 19
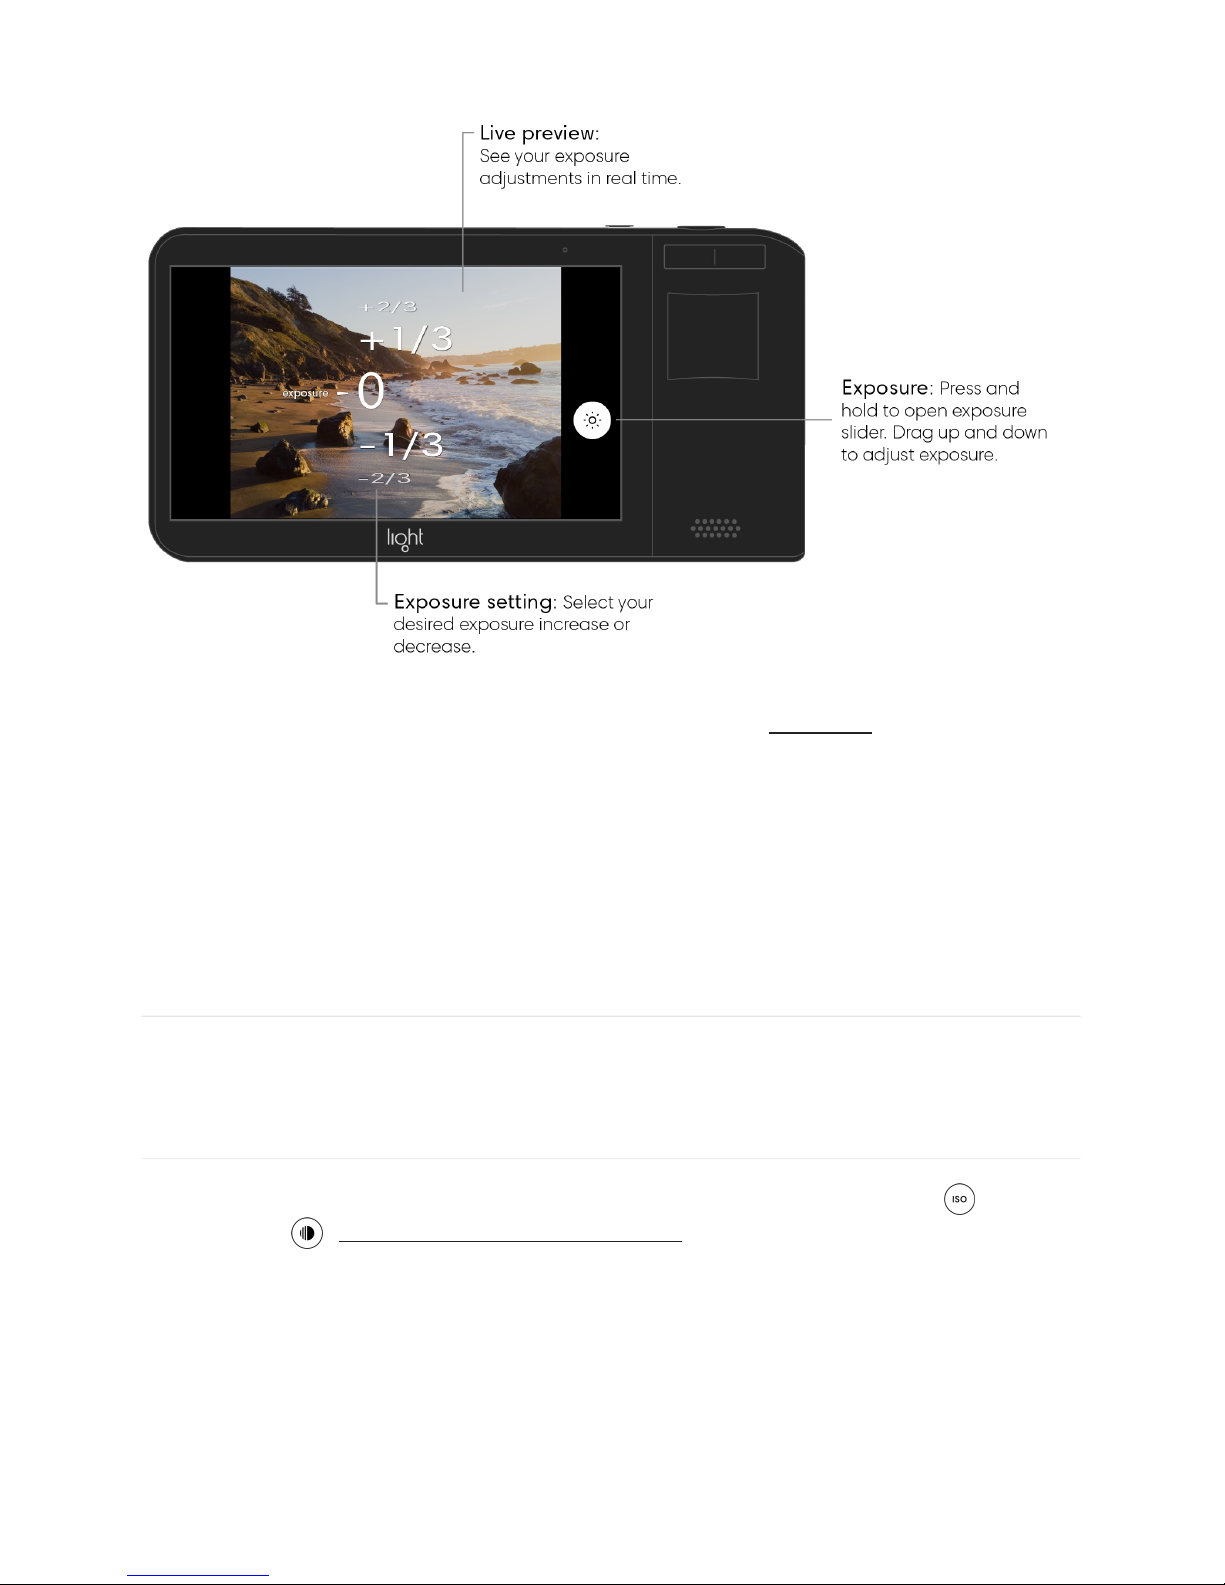
Note: The exposure slider is measured in 1/3rd stops of light. Click here to learn more about
exposure values (EV).
Manual exposure mode
Manual mode allows you to adjust exposure through two capture controls: ISO and
shutter speed . What are ISO and shutter speed?
18/67
Page 20
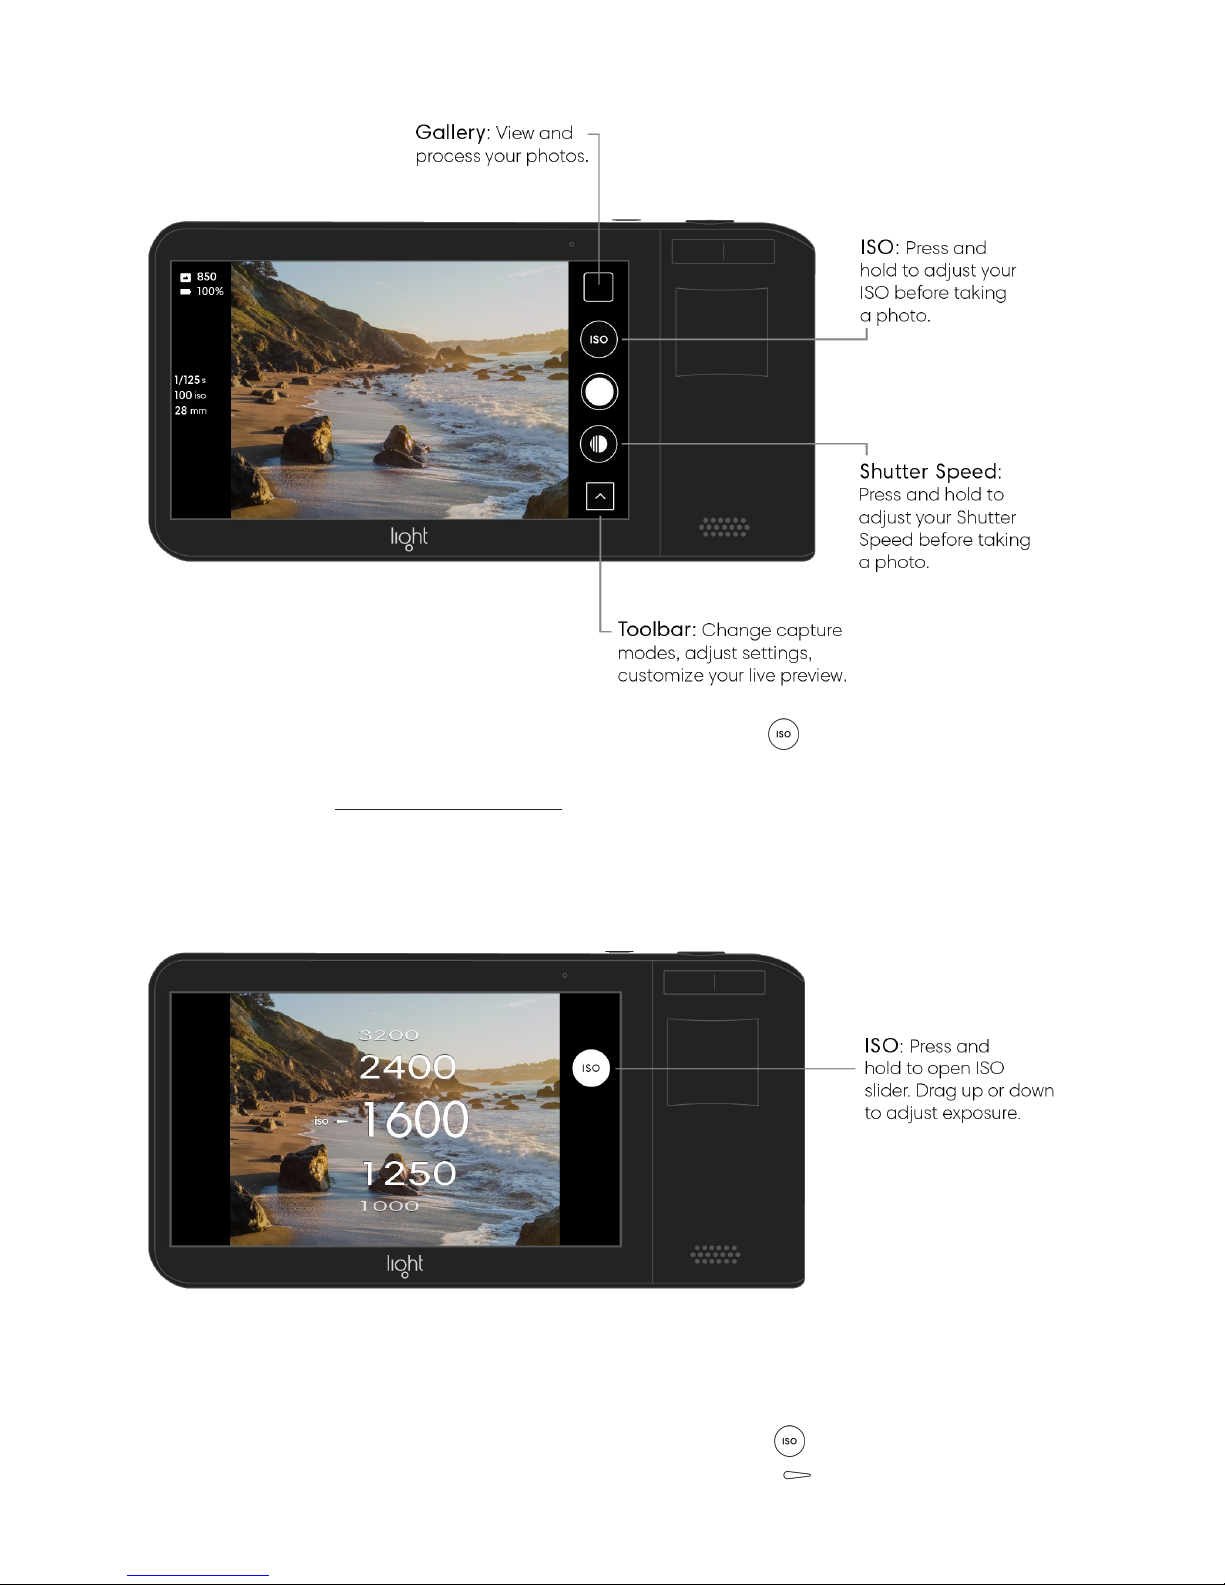
Adjust ISO in manual mode. Press and hold the ISO button on the right side of the
screen to open the ISO slider. While holding, move your finger up or down to set your
desired ISO value. Learn more about ISO.
View your current ISO value. Press and hold the ISO button to open the ISO slider.
Your previously used ISO value is indicated by a hollow carrot .
19/67
Page 21
With exposure information turned on, you can see your ISO value in the Info bar on the left
of the screen. For more information, read Exposure Information.
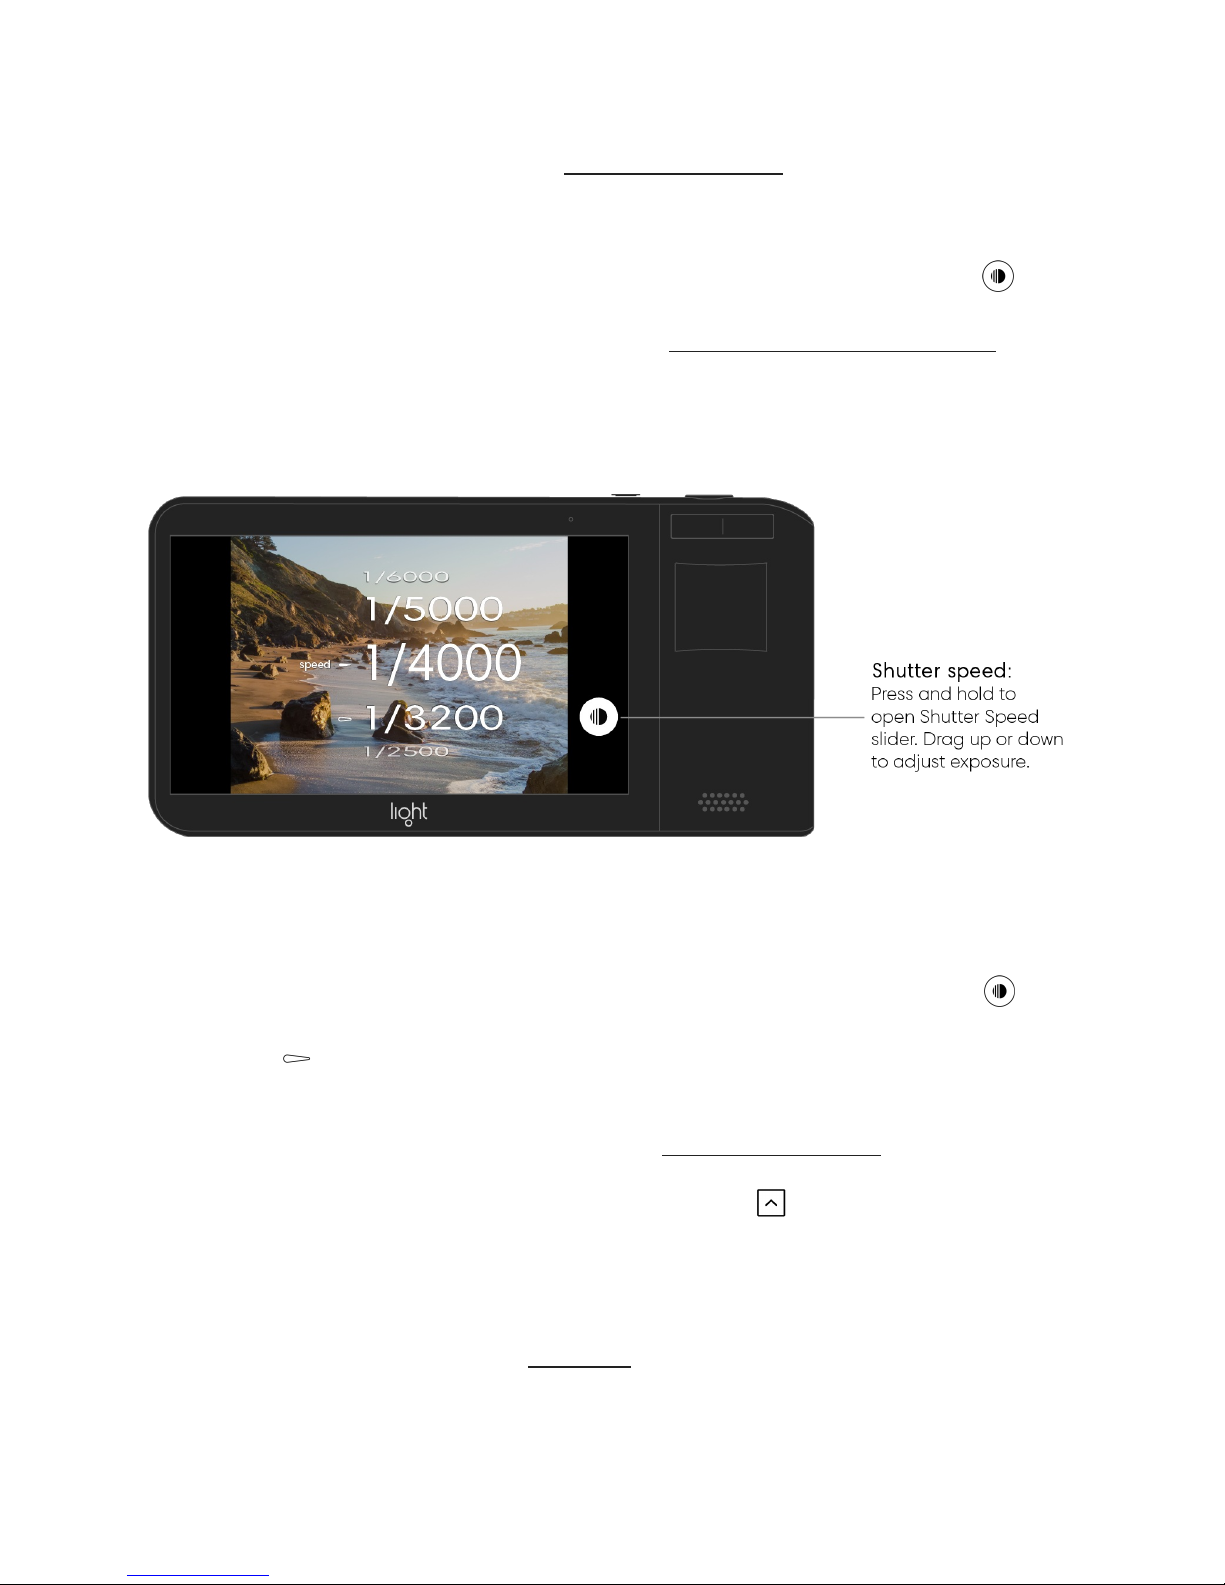
Adjust Shutter Speed in manual mode. Press and hold the shutter speed button on
the right side of the screen to open the shutter speed slider. While holding, move your finger
up or down to set your desired shutter speed value. Learn more about shutter speed.
View your current shutter speed value. Press and hold the shutter speed button to
open the shutter speed slider. Your previously used shutter speed value is indicated by a
hollow arrow .
With exposure information turned on, you can see your shutter speed value in the Info bar
on the left of the screen. For more information, see Exposure Information.
Tip: If you don’t want to use manual mode, tap the up arrow to open the Toolbar. Above
it, you see two capture mode options: auto or manual. Swipe up or down to highlight your
preferred mode.
Note: The Light L16 does not have native aperture control. You can adjust aperture after
transferring images to your computer. Click here to read more about why Light L16 doesn’t
have native aperture control.
20/67
Page 22
Focus
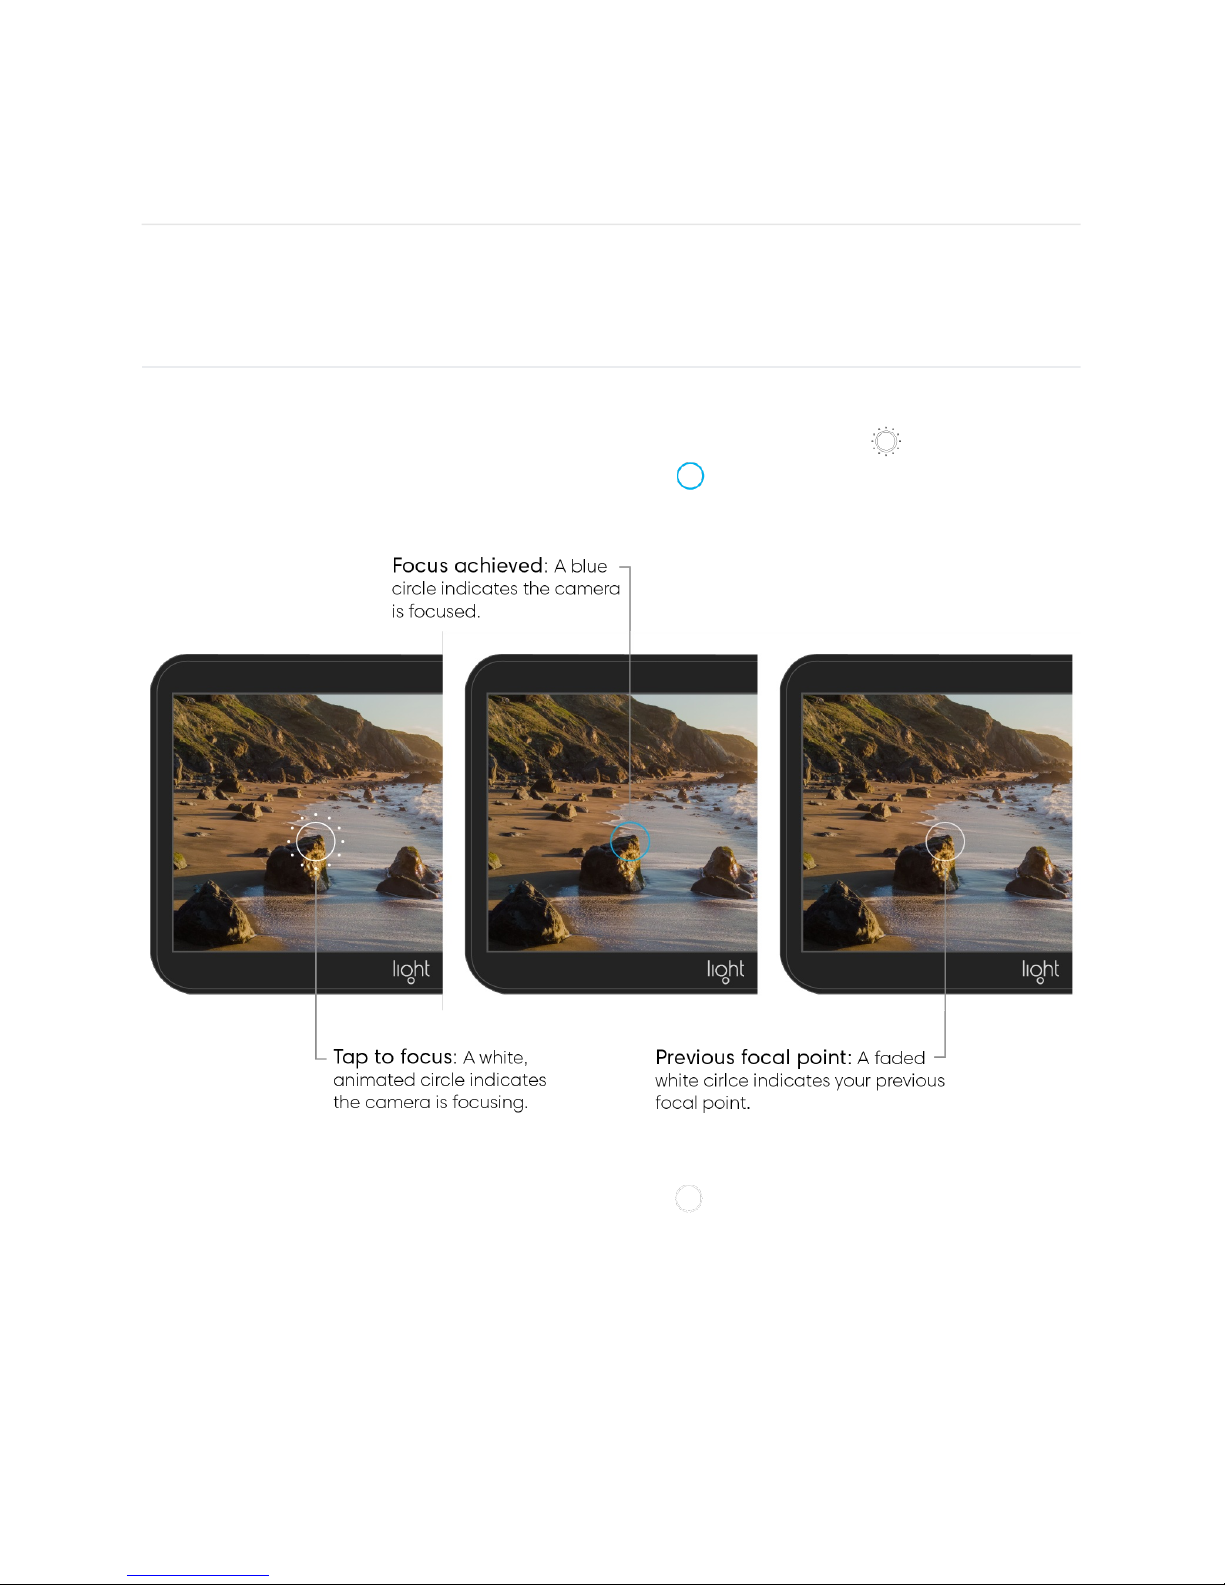
Tap to focus. In manual or auto mode, tap your desired focus object on the touchscreen to
focus the camera at that location and distance. An animated circle icon indicates the
camera is focusing and a final solid, blue circle icon indicates that focus has been
achieved.
After 3 seconds, the blue focus circle fades to white at your previous focal point.
Half-shutter press to focus. Instead of tap to focus, you can also half-press the shutter
button to start the focusing sequence at your current focal point (indicated by a faded, white
circle). An animated circle icon indicates the camera is focusing and a final solid, blue circle
icon indicates that focus has been achieved.
Note: The L16 uses mirrors to position lenses based on where you tap to focus. Because of
this, if you are ever unsure whether you have focused properly, just tap again, or half-press
the shutter button, to refocus.
21/67
Page 23
Zoom
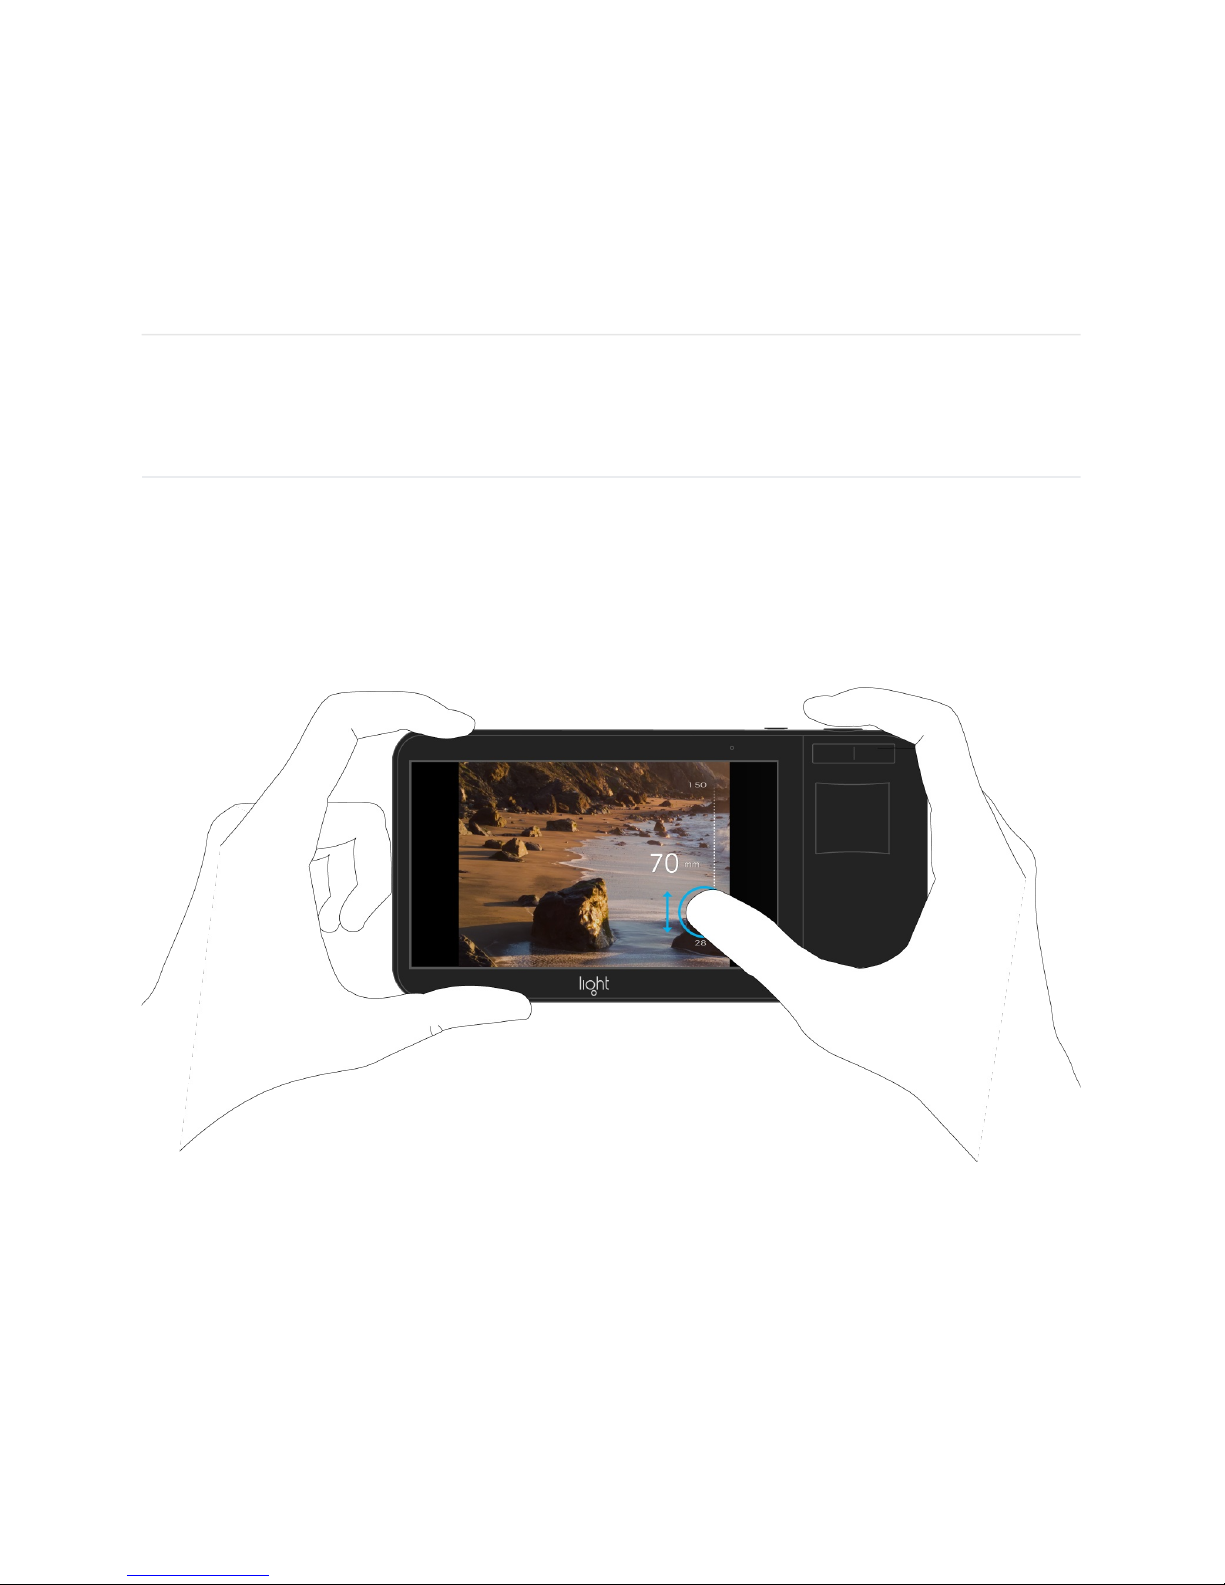
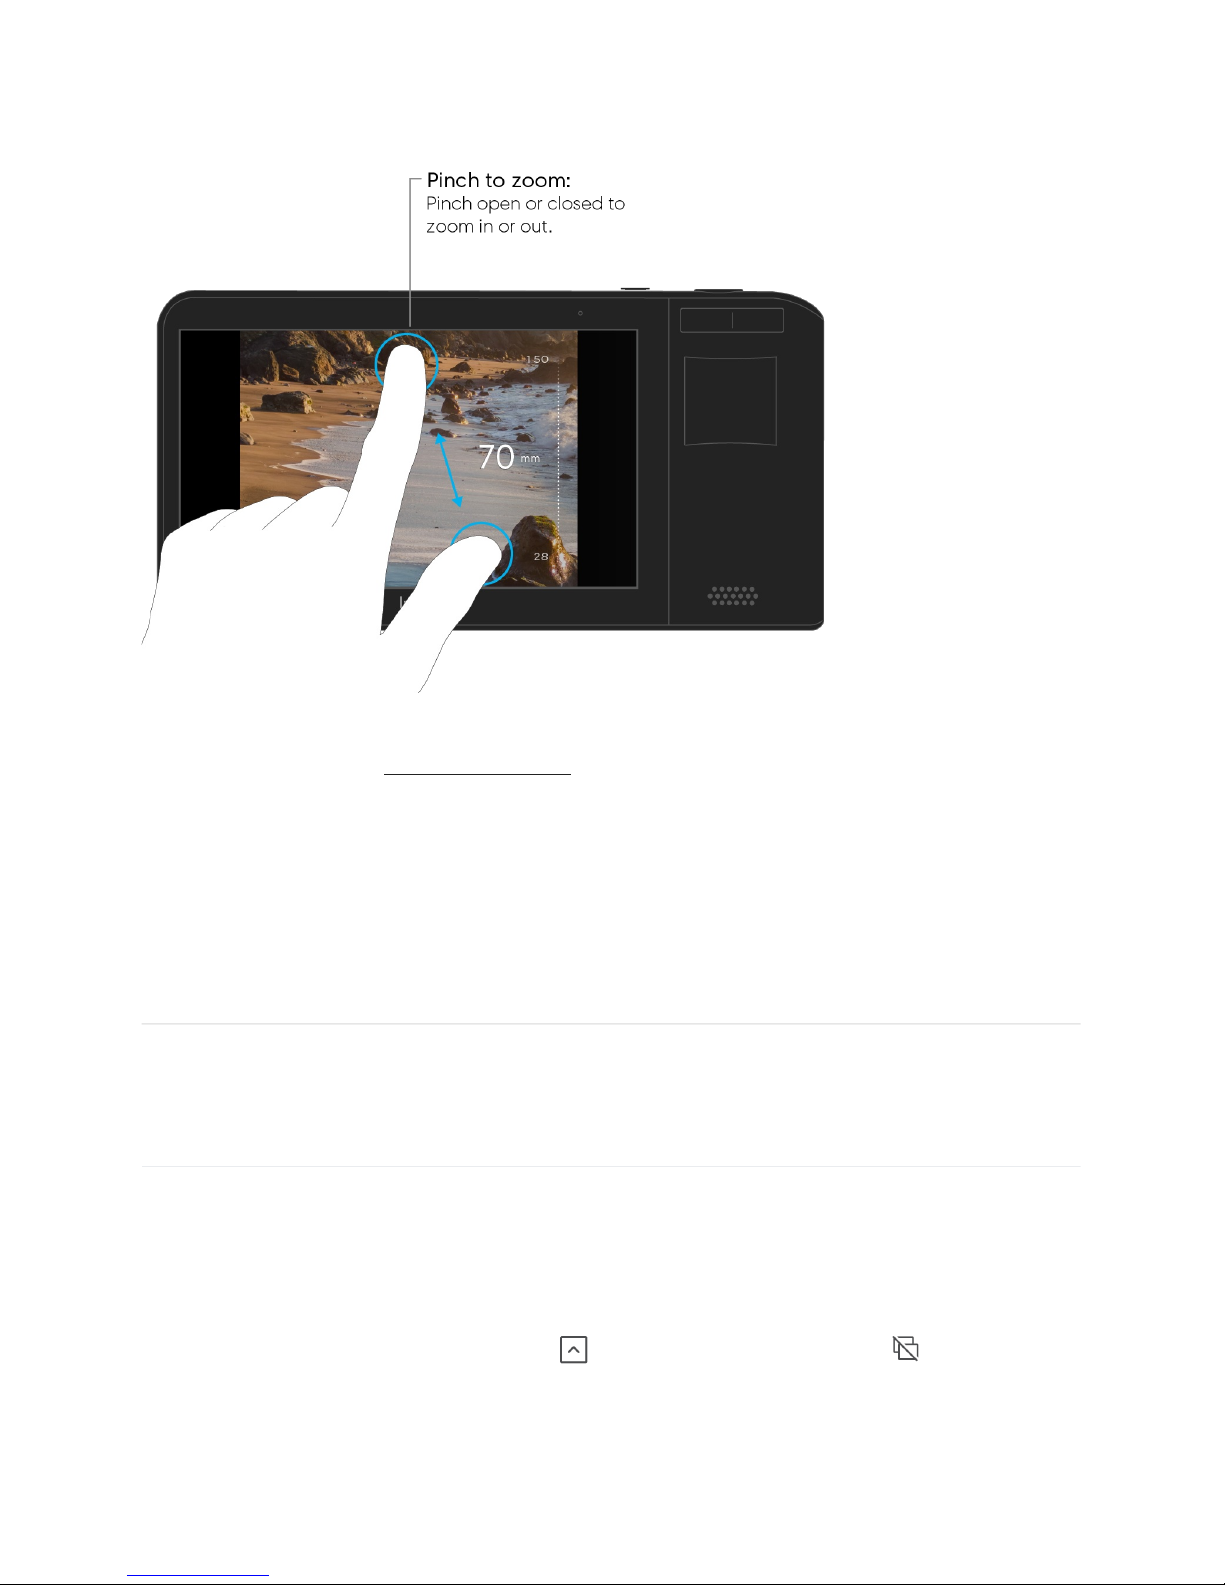
There are multiple ways to zoom on Light L16.
Press, hold and slide to zoom. Place your thumb on the screen and slide up or down to
zoom in or out respectively.
Flick to jump. Place a finger on the screen and swipe up quickly to jump to the next prime
zoom level. Flick-to-jump will stop at the following values: 28mm, 35mm, 70mm, and
150mm.
Pinch to zoom. Place two fingers on the screen and pinch open or closed to zoom in or out
respectively.
22/67
Page 24
Note: By default, Light L16 will boot up to a 35mm zoom level. To learn about why that is,
check out our article on variable resolution
.
Burst mode
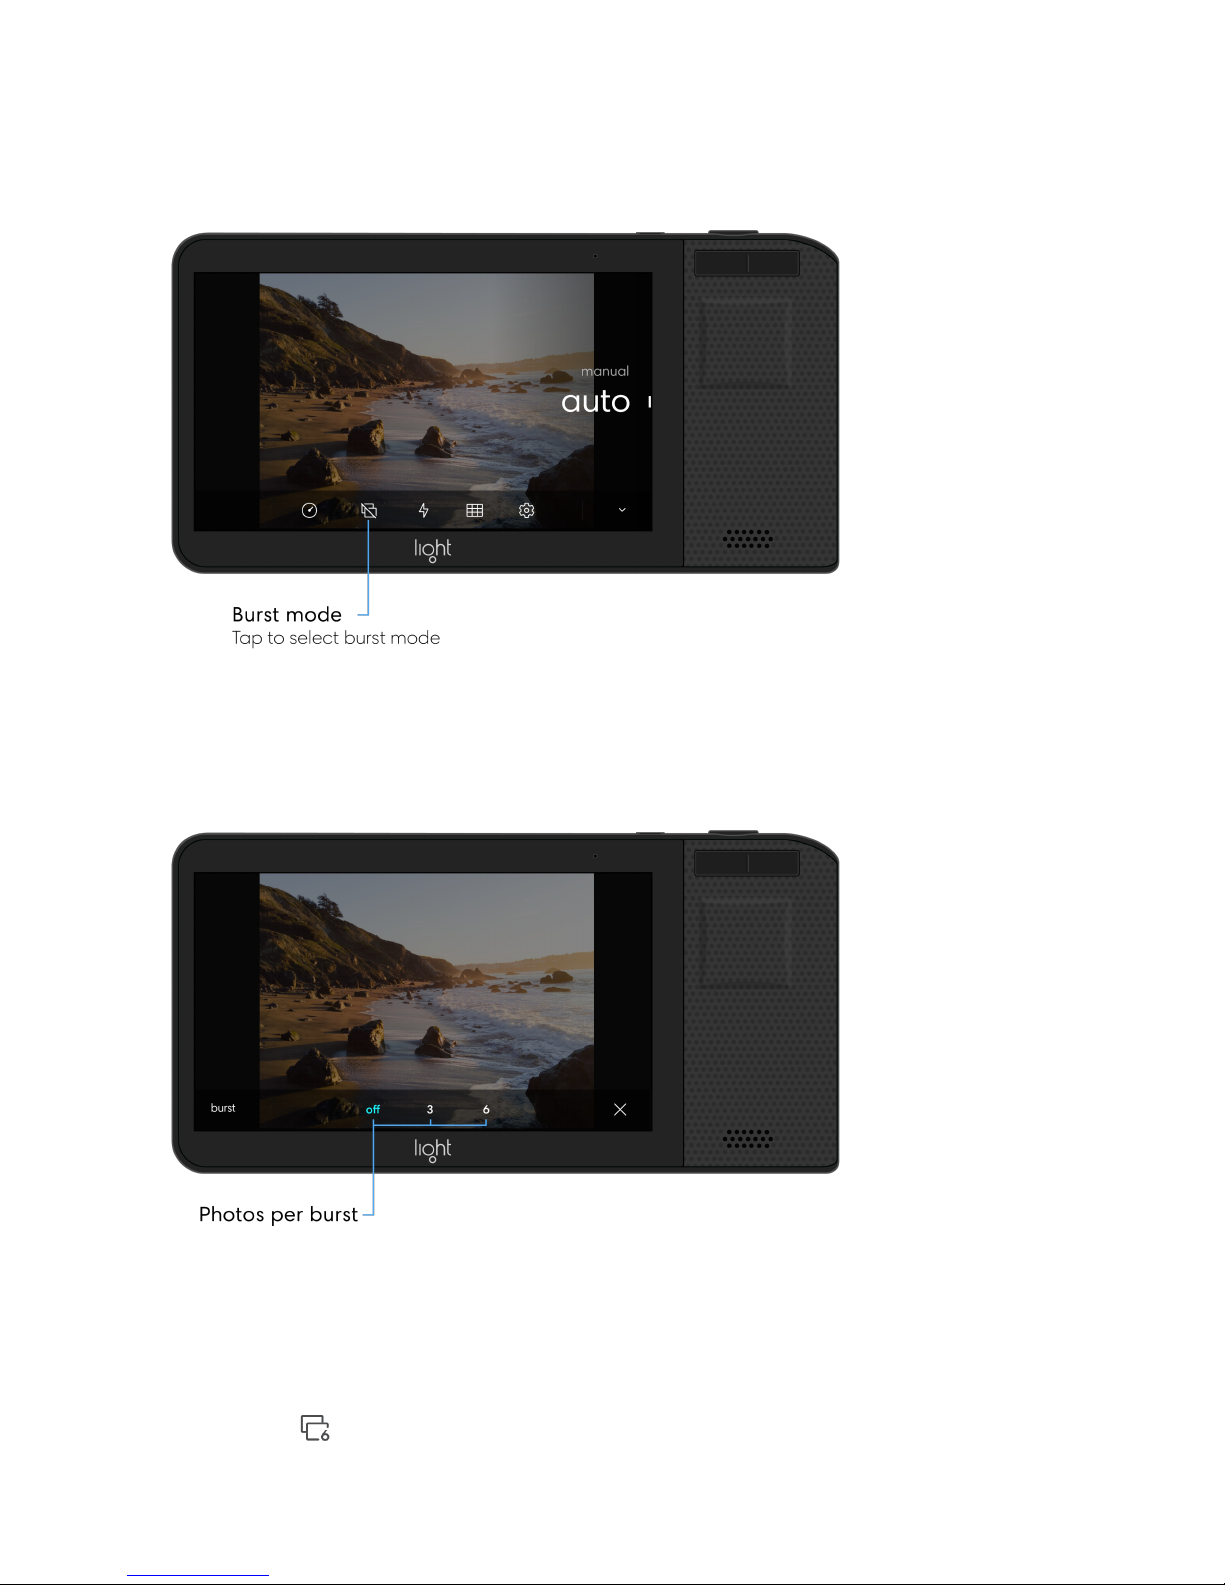
To help you capture action shots and motion, the L16 has a burst mode. When on, pressing
the shutter button will capture multiple frames in rapid succession, helping freeze fast-
moving objects.
Turn on burst mode. Open the Toolbar
and tap the burst mode icon
the available burst mode options: 3 or 6.
to show
23/67
Page 25
Note: If burst mode is on, you will see a burst mode icon in the bottom left corner of the
camera screen . Depending which burst mode option is selected, the icon will appear
with either a 3 or a 6.
24/67
Page 26
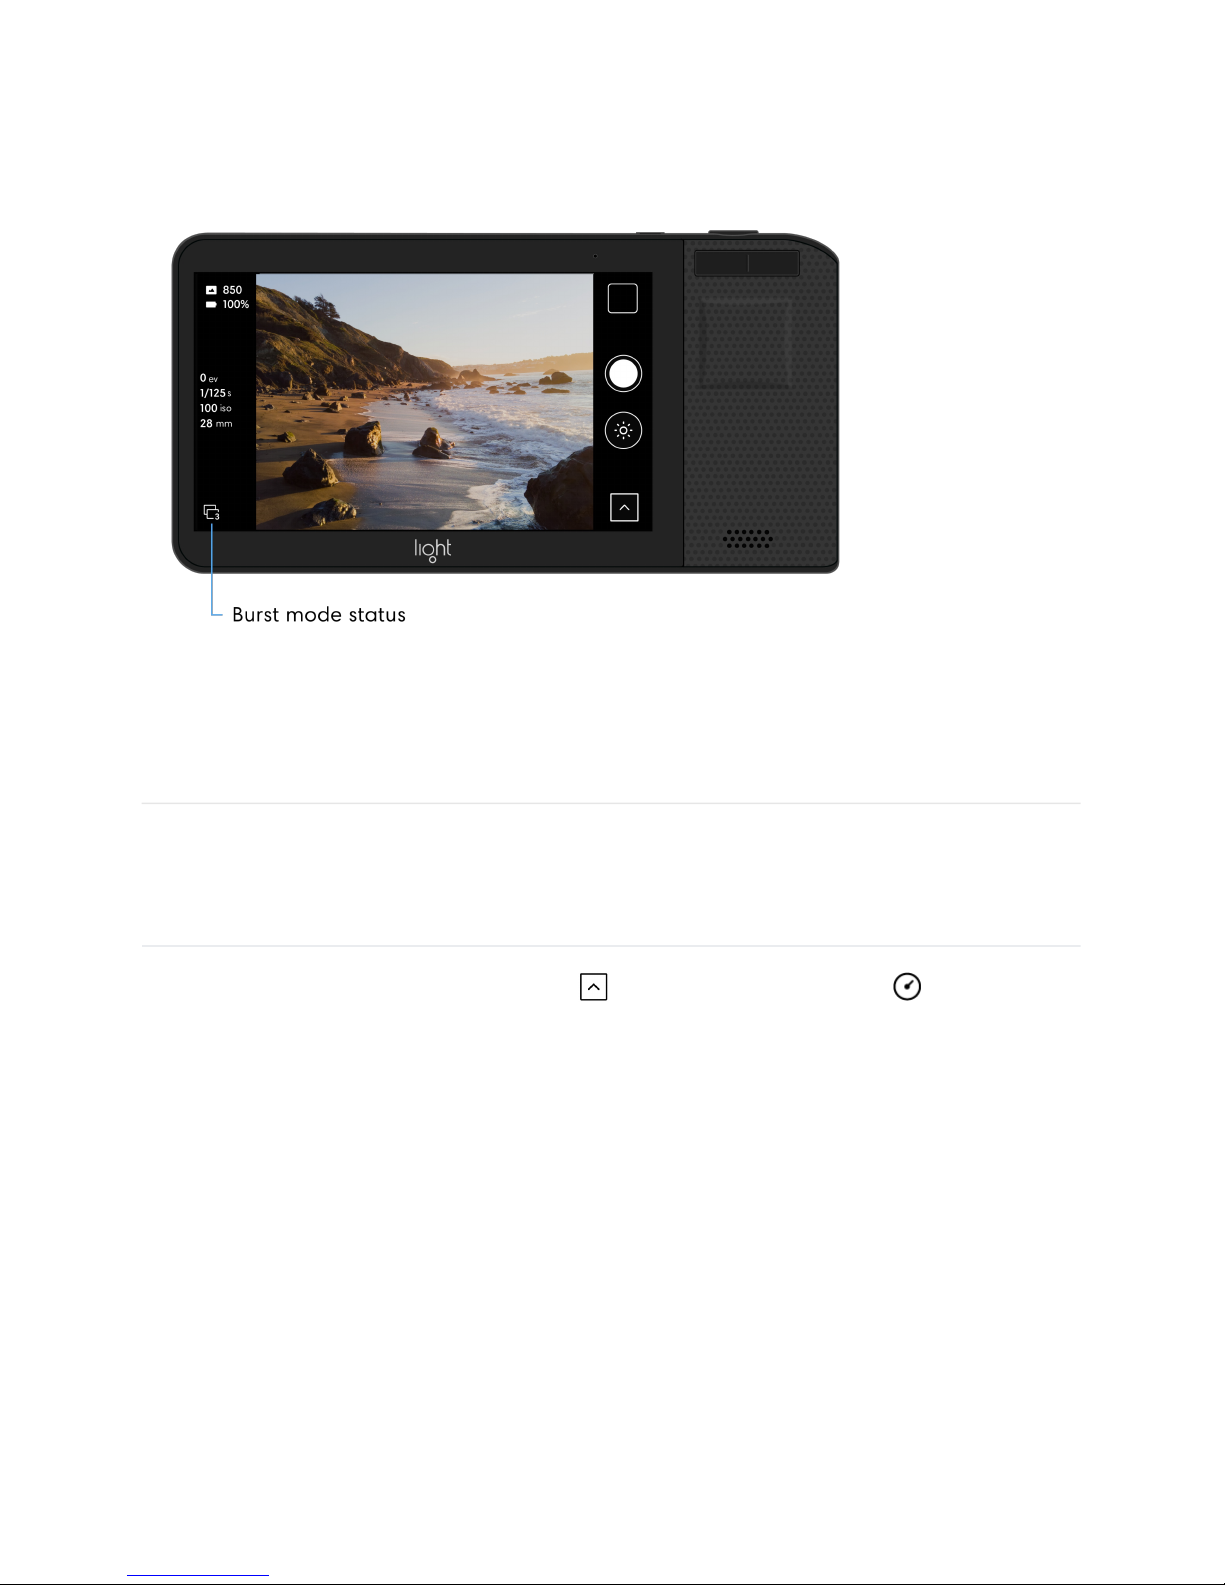
Tip: You can quickly change or turn off burst mode by tapping the icon in the lower left
corner of the capture screen.
Self-timer
Turn on the self-timer. Open the Toolbar and tap the self-timer icon to show the
available self-timer options: 3, 5, 10, or 20 seconds.
Note: If self-timer is on, you will see a self-timer icon in the bottom left corner of the camera
screen.
25/67
Page 27
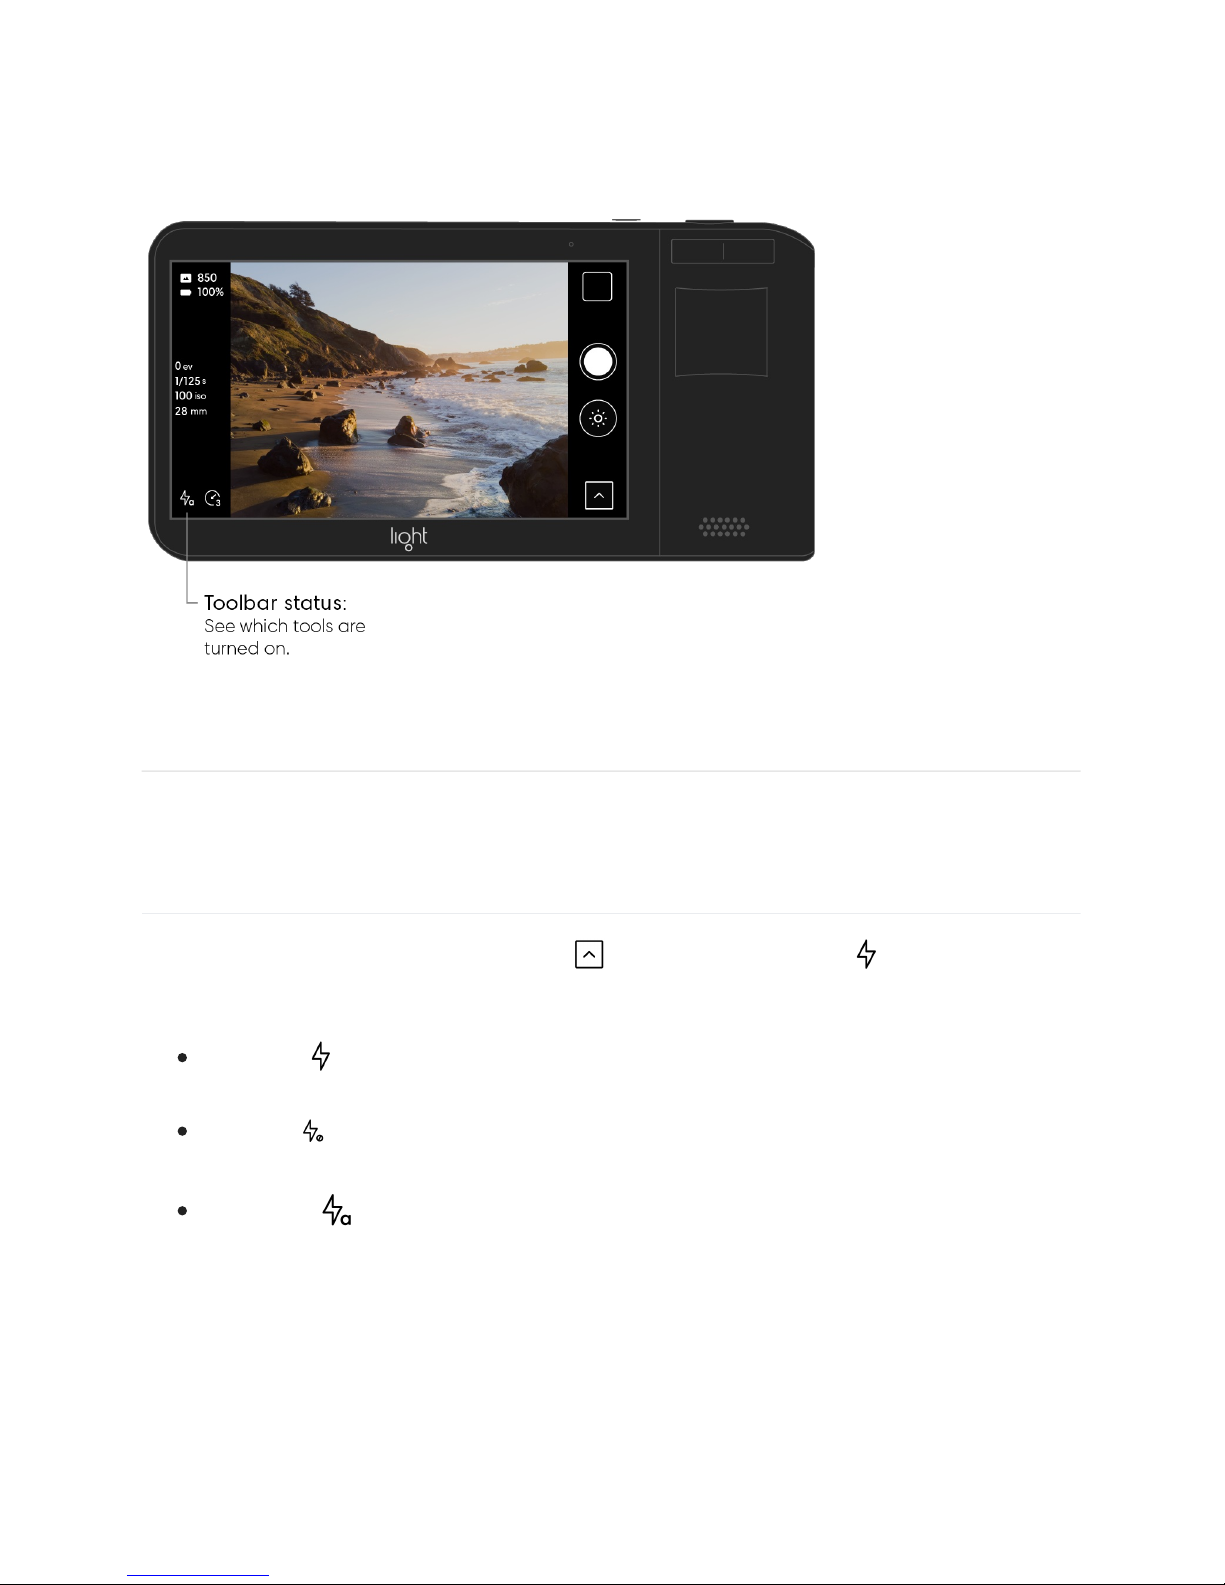
Flash
Choose a flash mode. Open the Toolbar
and tap the Flash icon to show the the
available flash options.
Flash On
Note: If Flash is set to Auto or On, you will see a Flash icon in the bottom left corner of the
camera screen.
Flash Off : Flash will not fire.
Flash Auto : The Light L16 will determine if flash is necessary to
provide a proper exposure. Flash Auto is only available in Auto mode.
: Fires the flash every time you take a photo.
26/67
Page 28
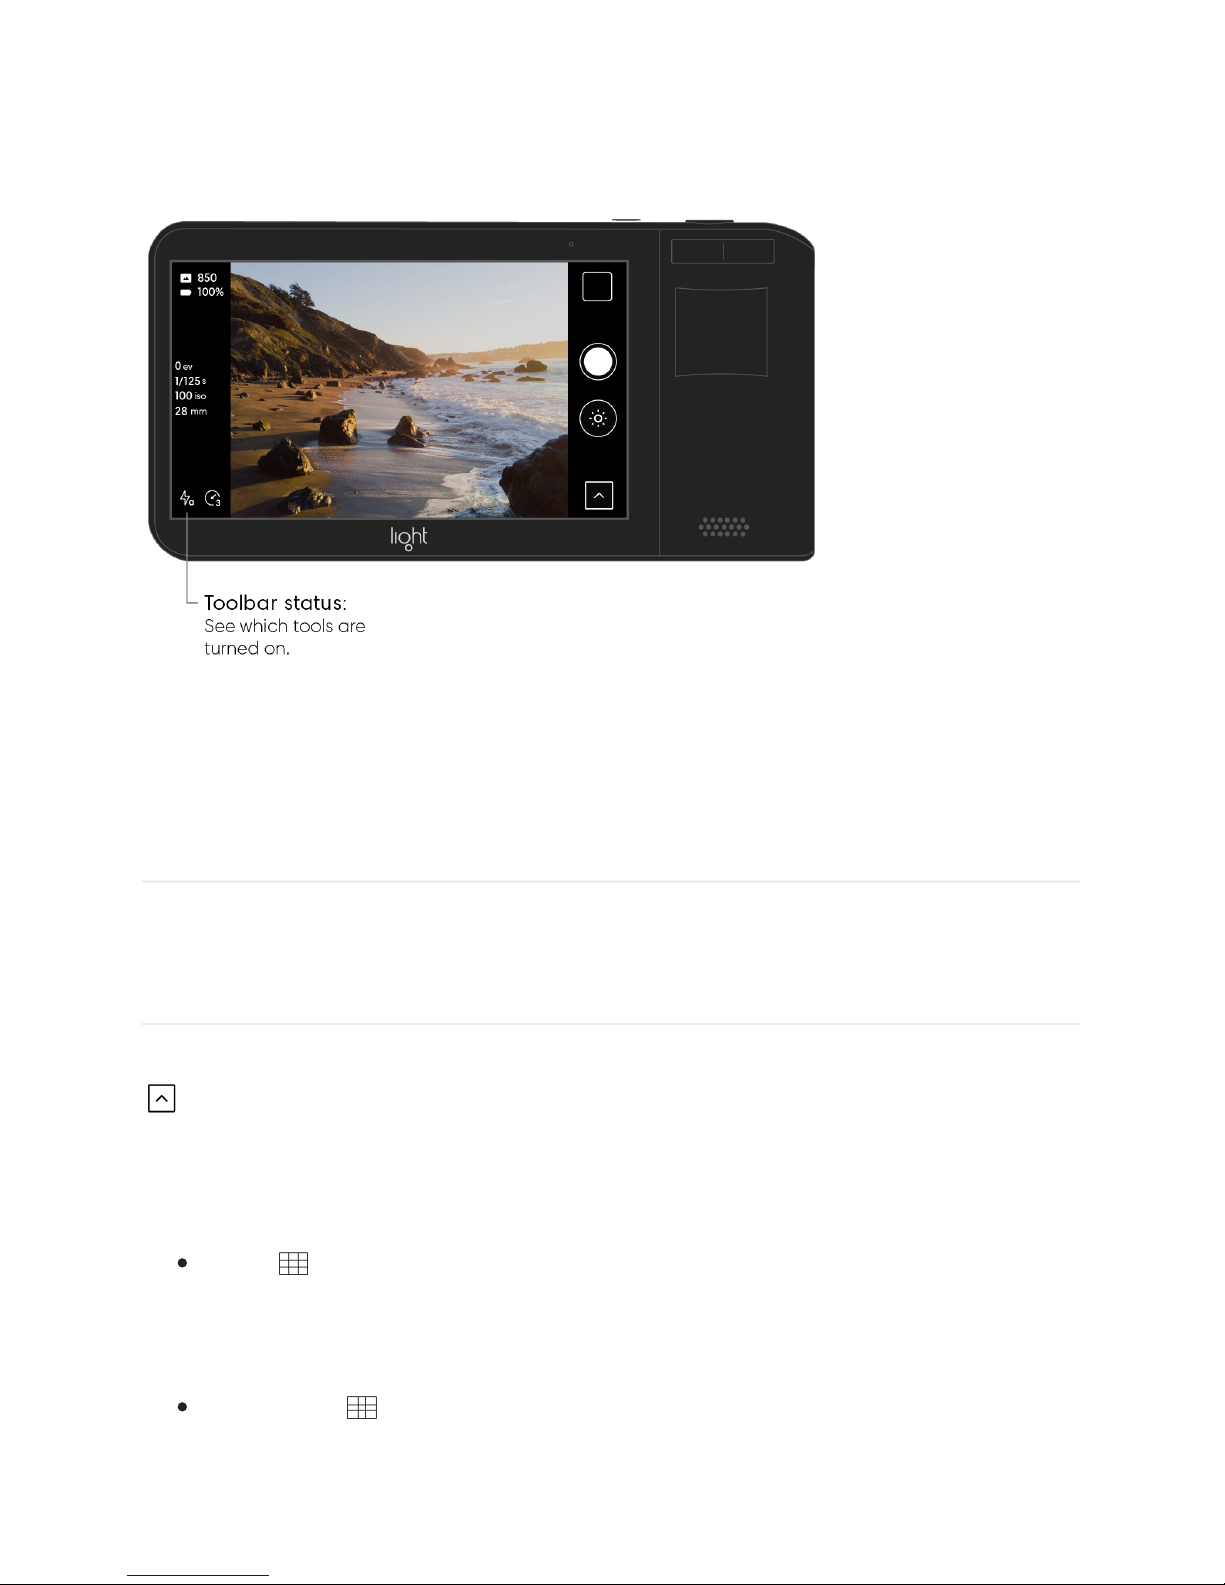
Grid
Turn on the Grid. To display grid lines over your Light L16’s live preview, open the Toolbar
and tap the Grid icon to show the available grid options.
Grid options.
Thirds
The thirds grid divides the screen into a 3x3 grid of equal rectangles. This grid helps
you follow the Rule of Thirds when composing.
Golden Ratio
The Golden Ratio grid divides the screen into sections based on the golden ratio. This
grid helps you follow the Golden Rule when composing.
27/67
Page 29
Camera Settings
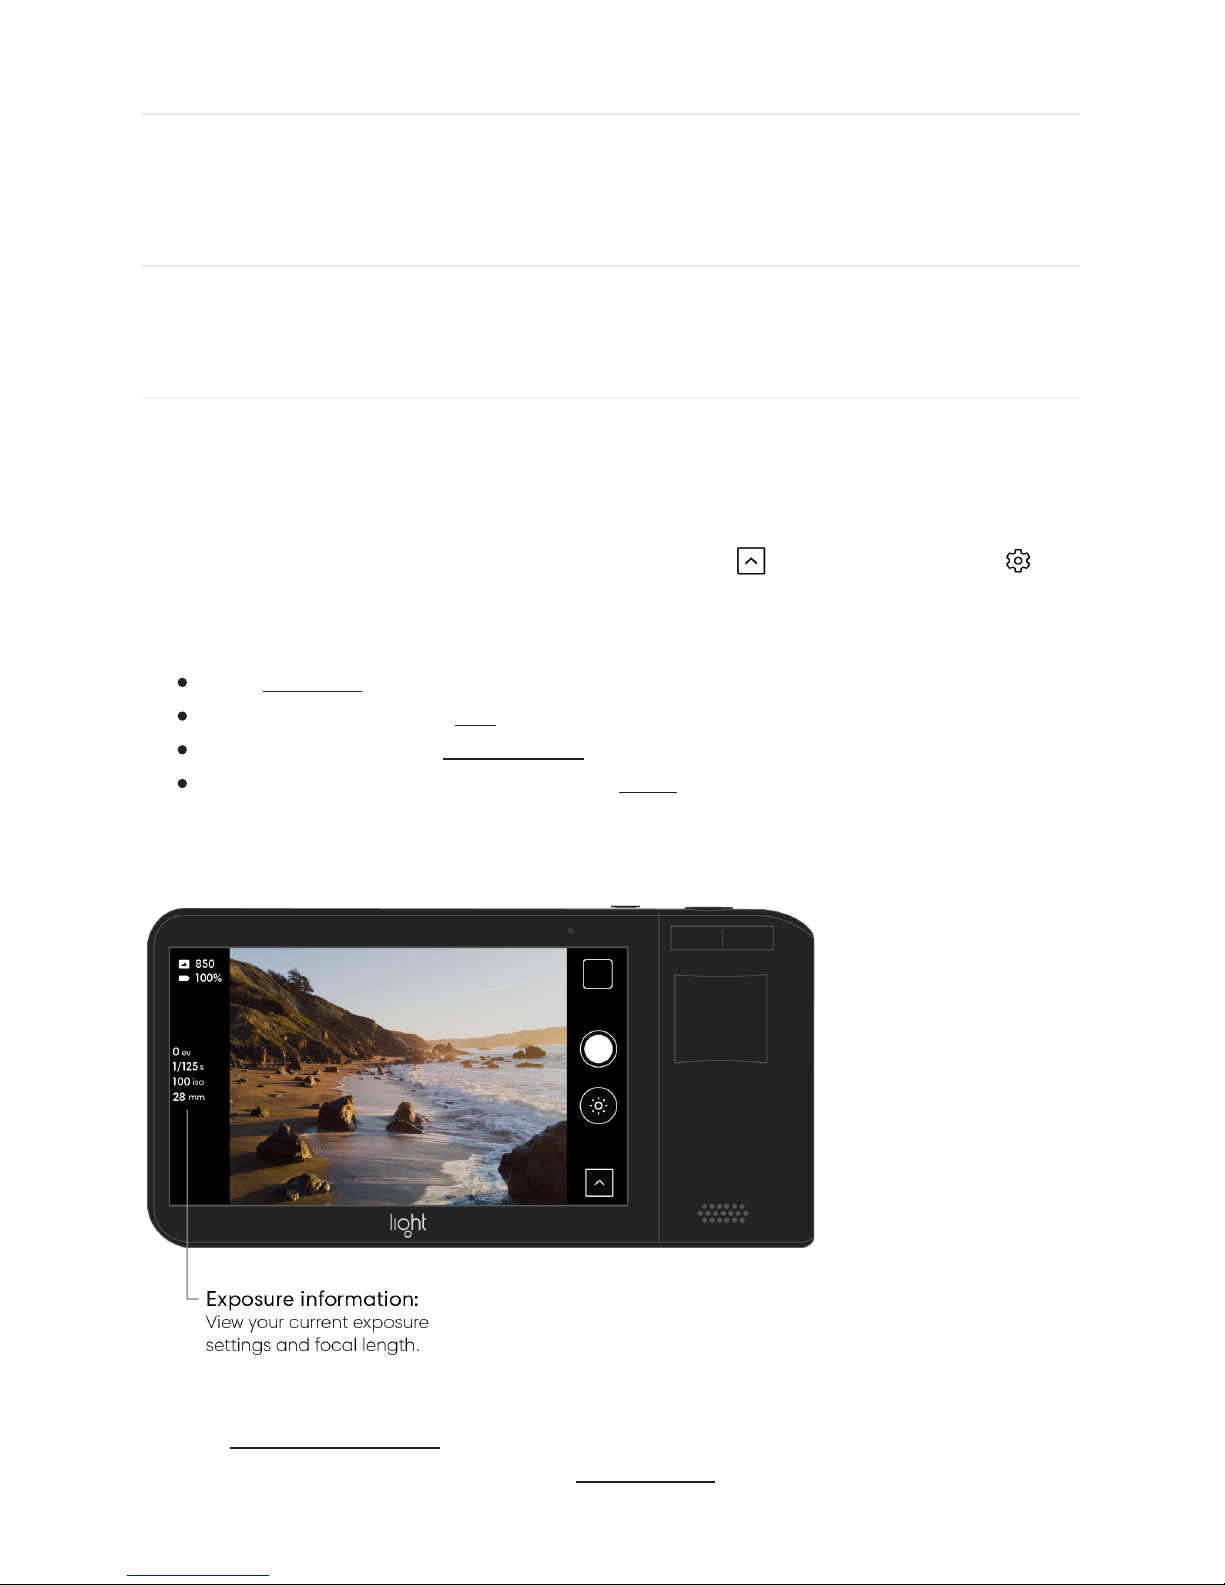
Exposure information
Light L16’s Exposure Information allows you to view important information about your
current capture settings, including exposure information, shutter speed, ISO, and focal
length.
Turn on or off Exposure Information. Open the Toolbar and tap the gear icon to
open the camera settings menu. Tap the switch next to “exposure info” to reveal the
exposure information on your capture screen:
exp – Exposure shows how much you have increased or decreased your exposure.
iso - Shows your current ISO value.
s – Shows your current shutter speed value.
mm – Shows your current focal length or zoom level.
Note: In auto exposure mode, shutter speed and ISO are automatically calculated. To set
your ISO and shutter speed manually, see manual mode.
28/67
Page 30
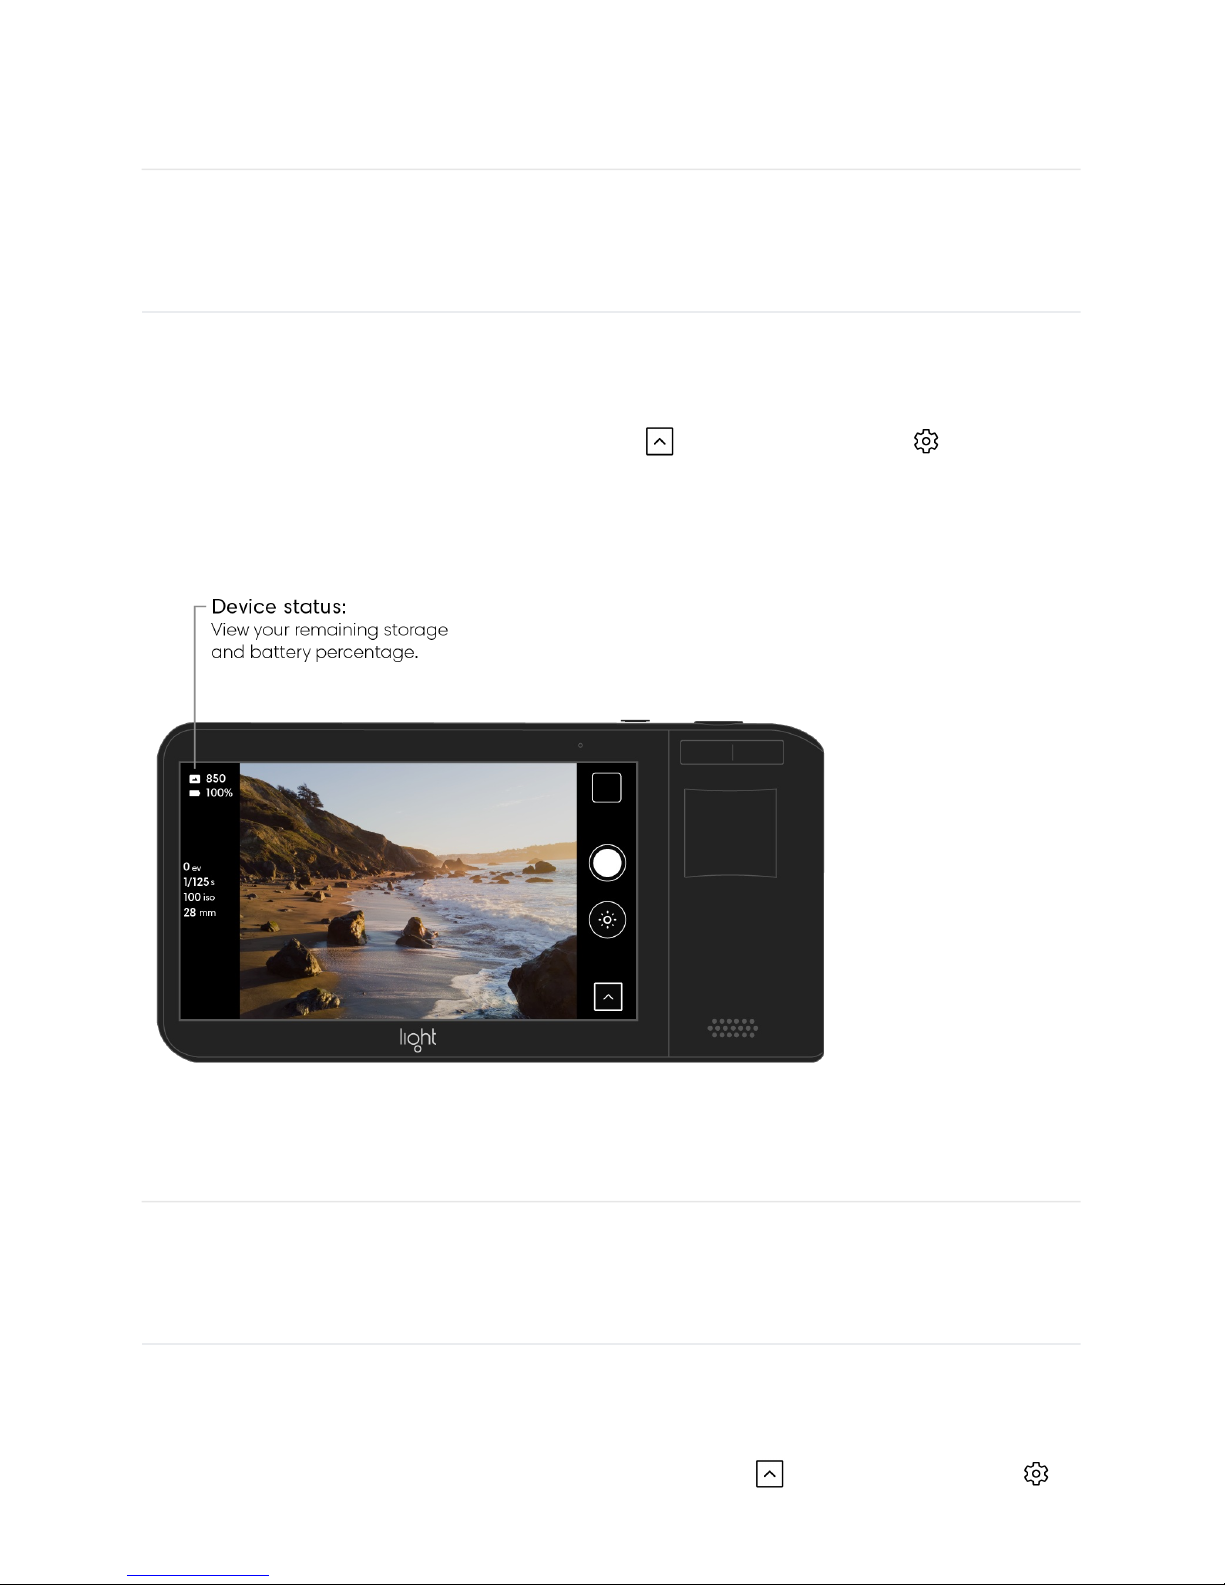
Device status
The Light L16’s device status shows information about your camera’s current battery
percentage and remaining storage.
Turn on or off device status. Open the Toolbar and tap the gear icon to open the
camera settings menu. Tap the switch next to “device status” to toggle on or off the battery
percentage indicator and number of photos remaining.
Haptic vibration
The Light L16 is equipped with a haptic vibrator to give you feedback while shooting,
adjusting controls, zooming, and more.
Turn on, off, or adjust haptic vibration. Open the Toolbar and tap the gear icon
to open the camera settings menu. Tap “haptics” to open the haptics settings menu and
29/67
Page 31
view the available options:
Off
Normal (default)
Strong
Audio
The Light L16 plays audio noises to give you feedback while shooting and using the self-
timer.
Turn on or off audio. Open the Toolbar
and tap the gear icon to open the
camera settings menu. Tap the switch next to “audio” to toggle on or off.
Adjust shutter volume. First, access device settings:
From the home screen, tap the arrow icon on the right to open the
apps menu. Tap the Settings app to open the full device settings
menu.
Scroll to the Device section then tap Sound & notification > Adjust volume. Drag the
Notification volume slider left or right to increase or decrease the volume.
Metering modes
In order for the L16 to determine proper exposure, it measures the available light in a scene
using a built-in light meter. You can choose between two types of metering to adjust how the
L16 measures the light in a scene.
Choose a metering mode. Open the Toolbar
and tap the gear icon to open the
camera settings menu. Tap "metering mode” to open the metering mode sub-menu. Choose
your desired metering mode:
From the camera or gallery modes, swipe down three times from the top of the
touchscreen then tap the gear icon in the top right corner.
30/67
Page 32
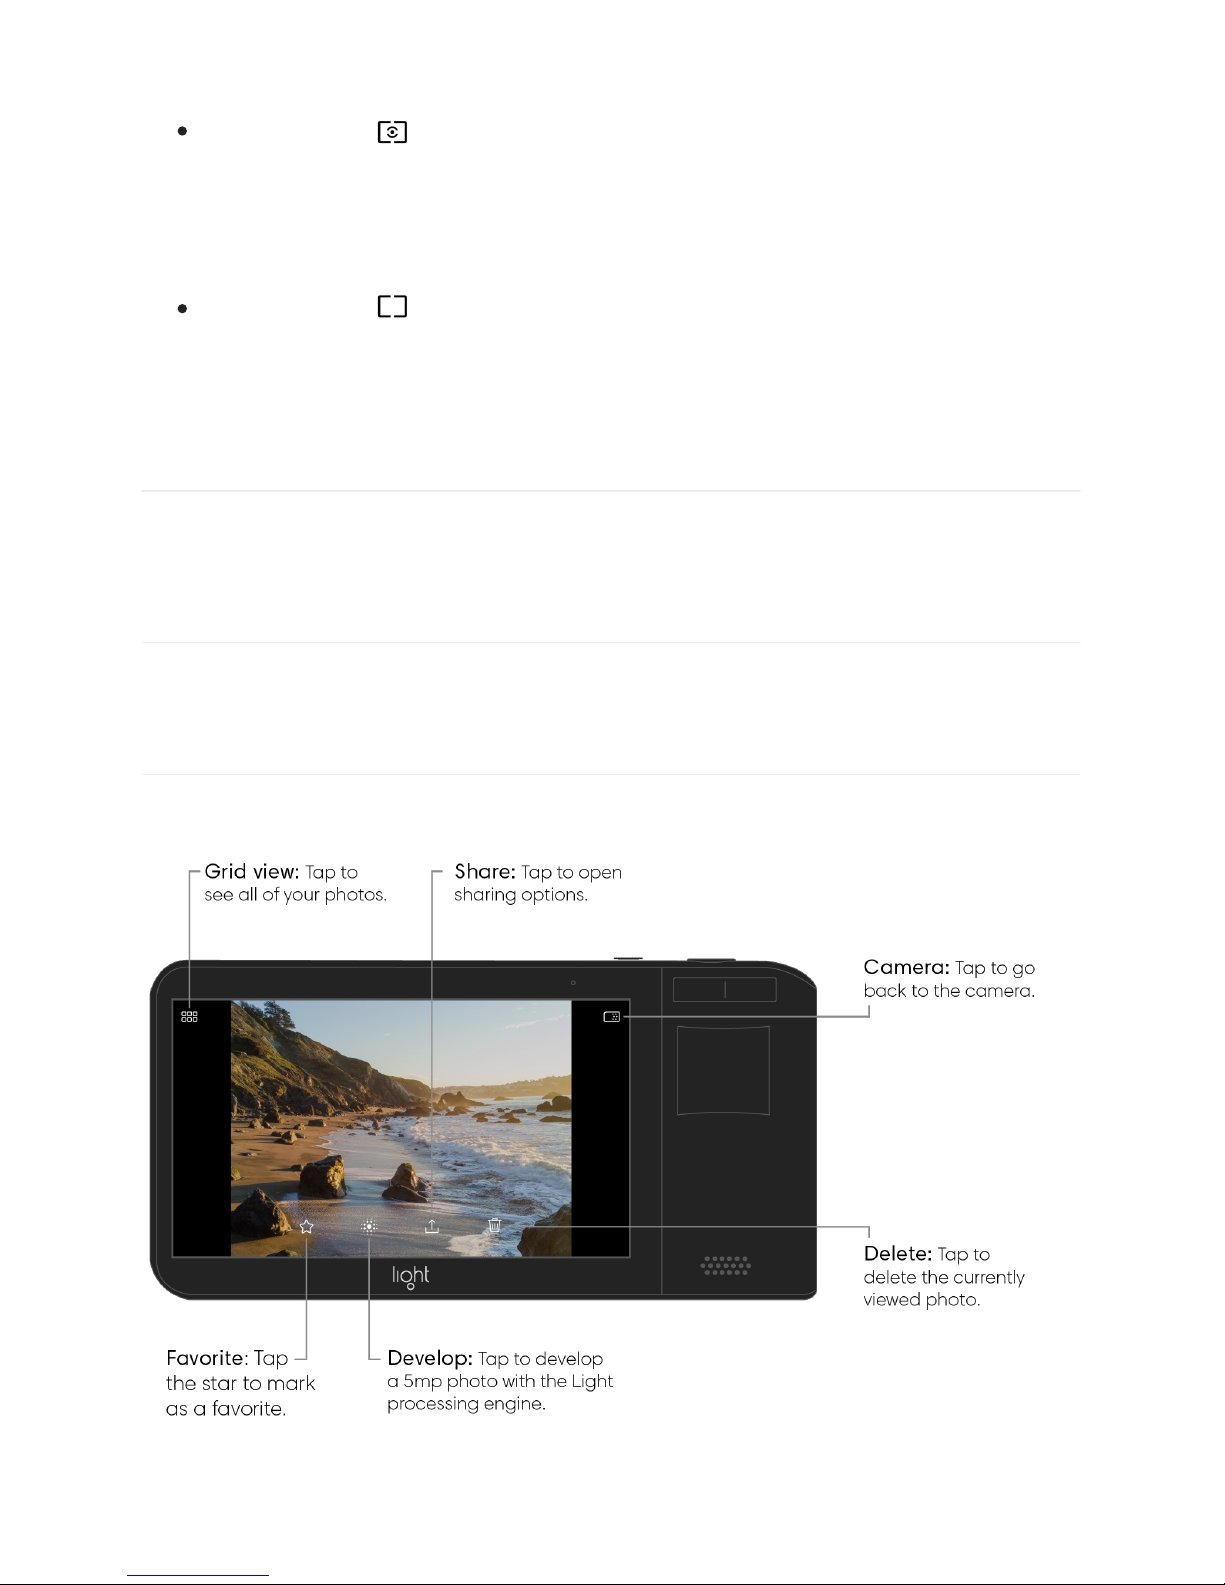
Touch-weighted
Metering is determined by reading the light at your selected focus point
and the area surrounding it. Use this option to meter more specifically
for your focus point.
Center-weighted
Metering is determined by reading the light at the center of your L16's
frame. Use this option to meter more broadly for the entire scene.
Gallery
View your photos
Within your Light L16 gallery you can view, organize, and process your photos.
31/67
Page 33
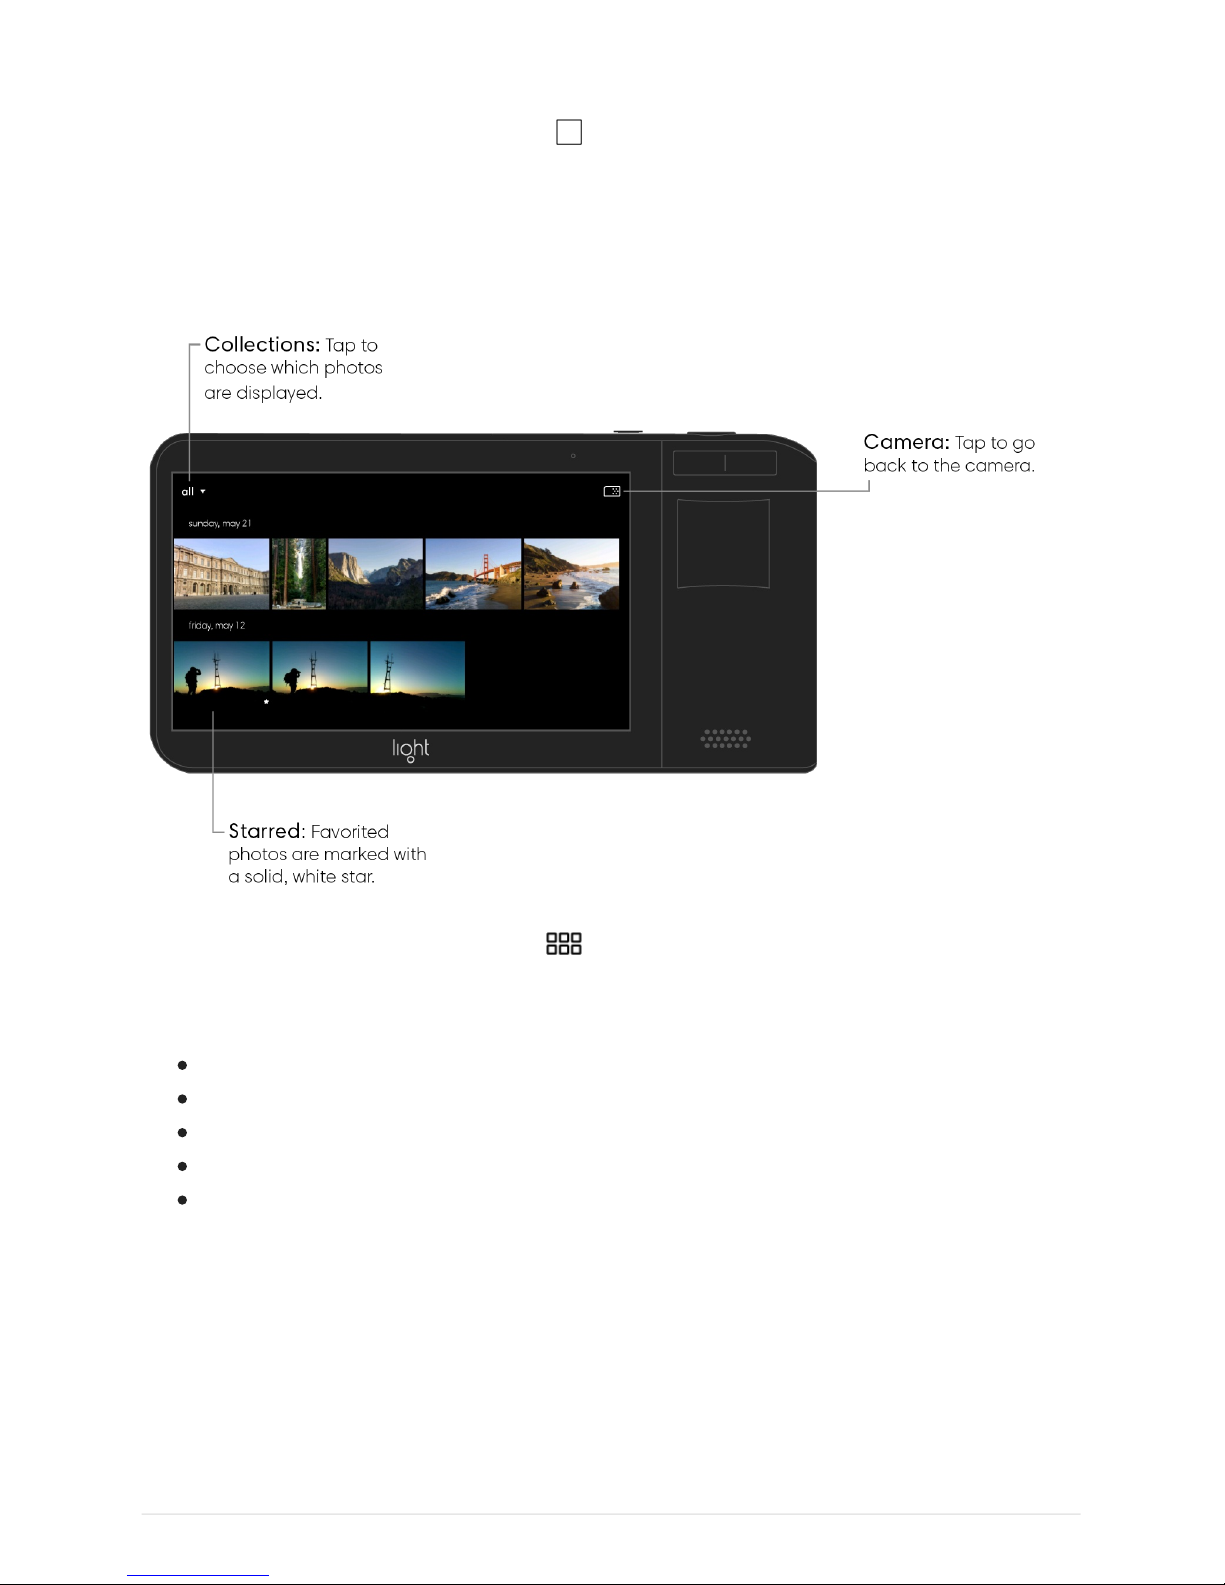
View your photos. Tap the gallery icon in the top right corner of your screen to access
the gallery. Swipe left to see your previous photos or swipe up to show your photos in a
filmstrip. Tap a thumbnail in the filmstrip to view a photo.
Zoom in or out. Double-tap or pinch a photo open or closed. Drag to see other parts of the
photo.
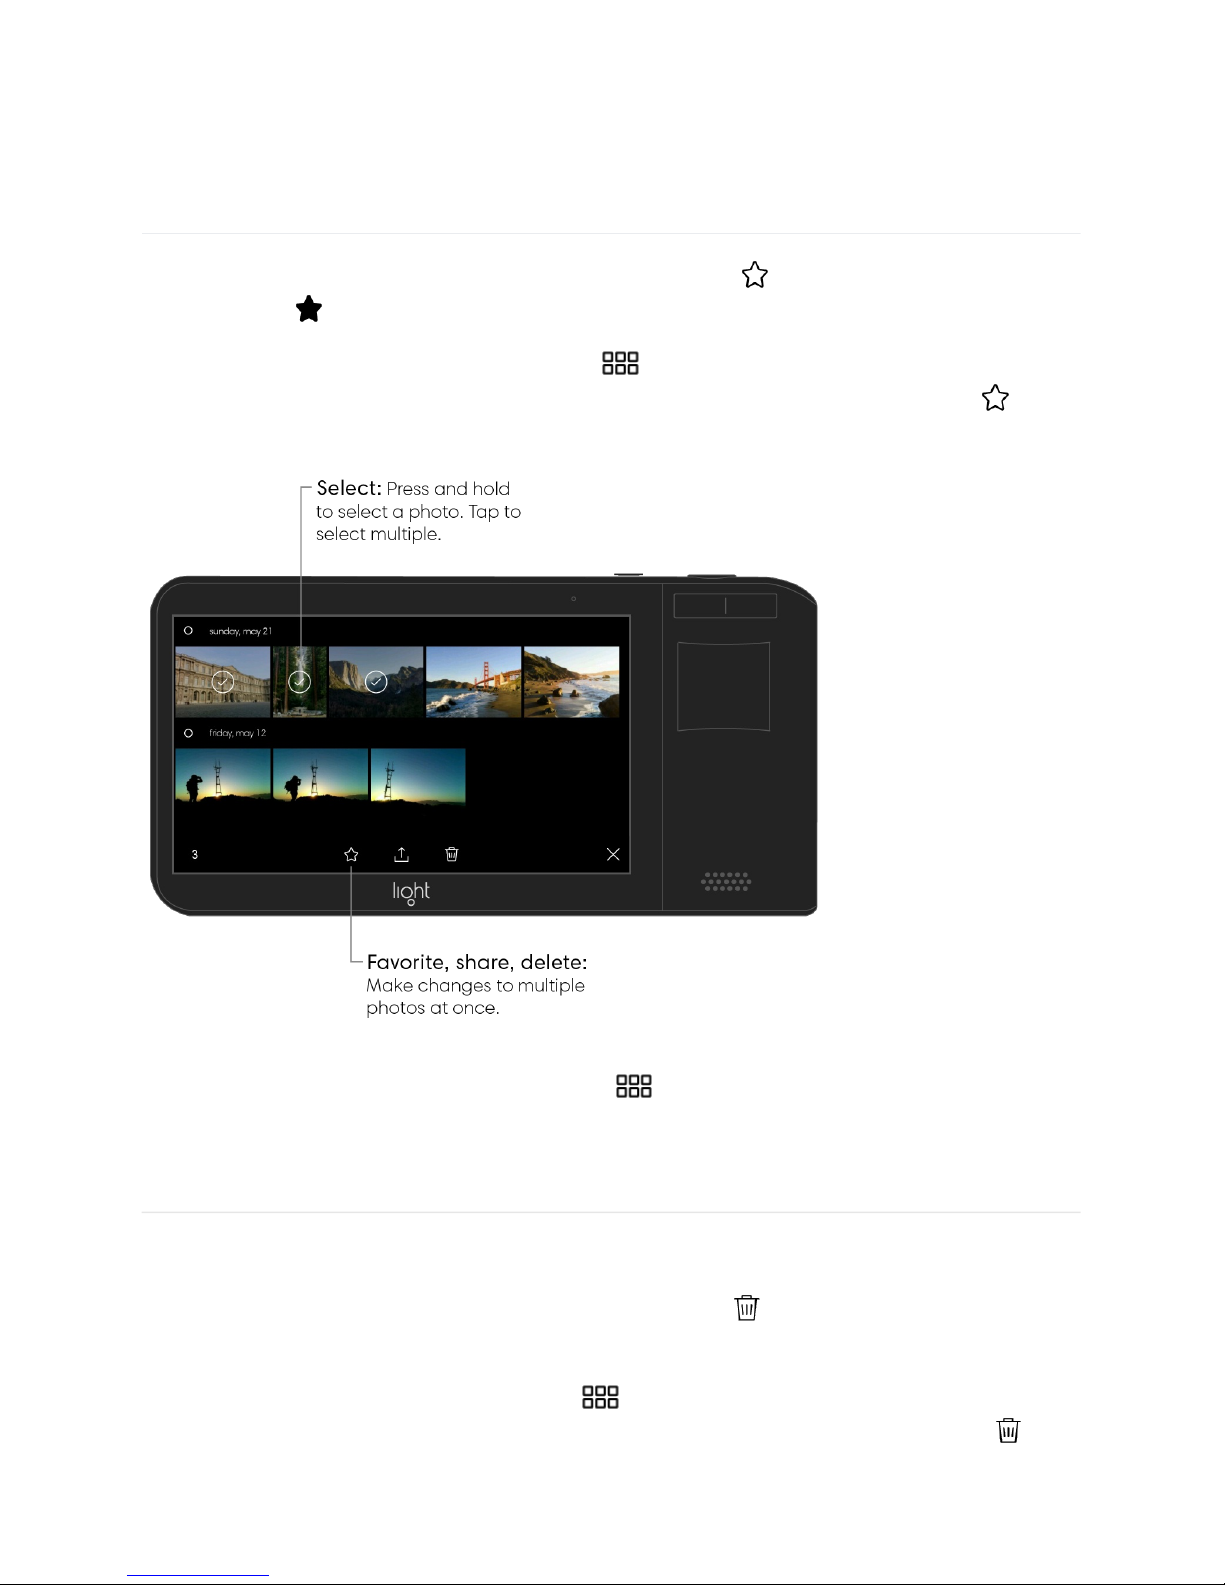
Browse collections. Tap the grid icon in the upper-left corner of the gallery to see all
of your photos organized by date. Tap “all” in the top left corner to change which photos are
displayed. There are several sorting options:
All – show all of your photos excluding deleted items.
Favorited – show only your favorited photos.
Developed – show only your developed photos.
Photo – show only photos.
Deleted – show your deleted photos.
32/67
Page 34
Organize your photos
Favorite a photo. While viewing a photo, tap the star icon to mark it as a favorite. A
solid star icon indicates a photo has been favorited.
Favorite multiple photos. Tap the grid icon to see all of your photo, then press and
hold on an image to select it. Tap to select any other photos then tap the star icon to
mark them as favorites.
View your favorite photos. Tap the grid icon to see all of your photos, then tap “all” in
the top left corner followed by “favorited.”
Delete a photo. While viewing a photo, tap the trash icon to delete it. If you accidentally
delete a photo, you can tap “undo” to bring it back.
Delete multiple photos. Tap the grid icon to see all of your photos, then press and
hold on an image to select it. Tap to select any other photos then tap the trash icon to
delete them.
33/67
Page 35
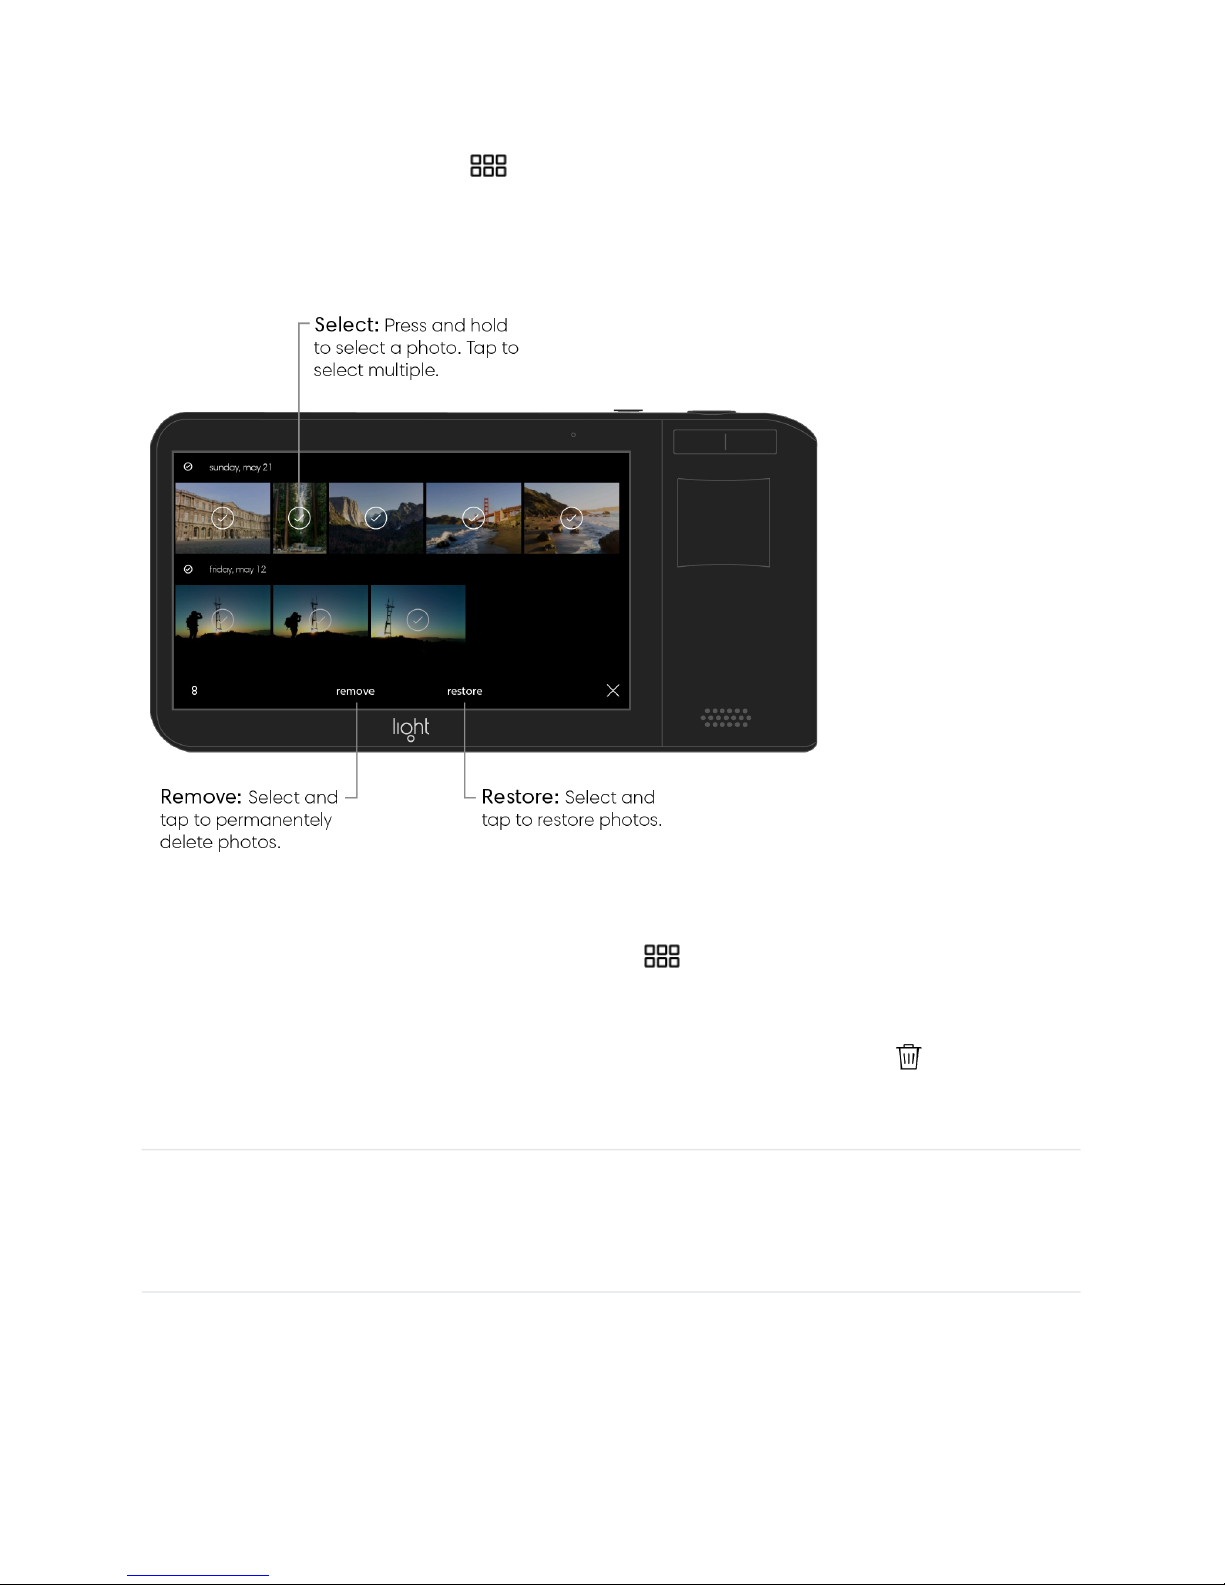
Recover deleted photos. Deleted photos are placed in your deleted folder. To access the
deleted folder, tap the grid icon to see all of your photos, then tap “all” in the top left
corner followed by “deleted.” From the deleted folder, press and hold on a photo to select it,
then tap “restore.” You can restore multiple photos at once by selecting more photos before
tapping “restore.”
Permanently deleted photos. Tap the grid icon to see all of your photos, then tap “all”
in the top left corner followed by “deleted.” To delete all photos, tap “remove all.” To delete
only selected photos, press and hold on a photo to select it, then tap “remove.” You can
remove multiple photos at once by selecting more photos before tapping “ remove all.”
Process photos on Light L16
When you take a photo with your Light L16, 10 or more images are captured at once. In
order to maximize battery power, only one camera is used to generate a thumbnail in the
preview screen and gallery. The process option on your L16 allows you to create a higher
resolution photo (13 megapixels – optimized for your device and social sharing) with just 5 of
34/67
Page 36
the 10+ images. Since processing high-resolution photos takes lots of power, we reserved
the ability to develop full-resolution photos (52+ megapixels with 10+ images) for Lumen, the
Light desktop software.
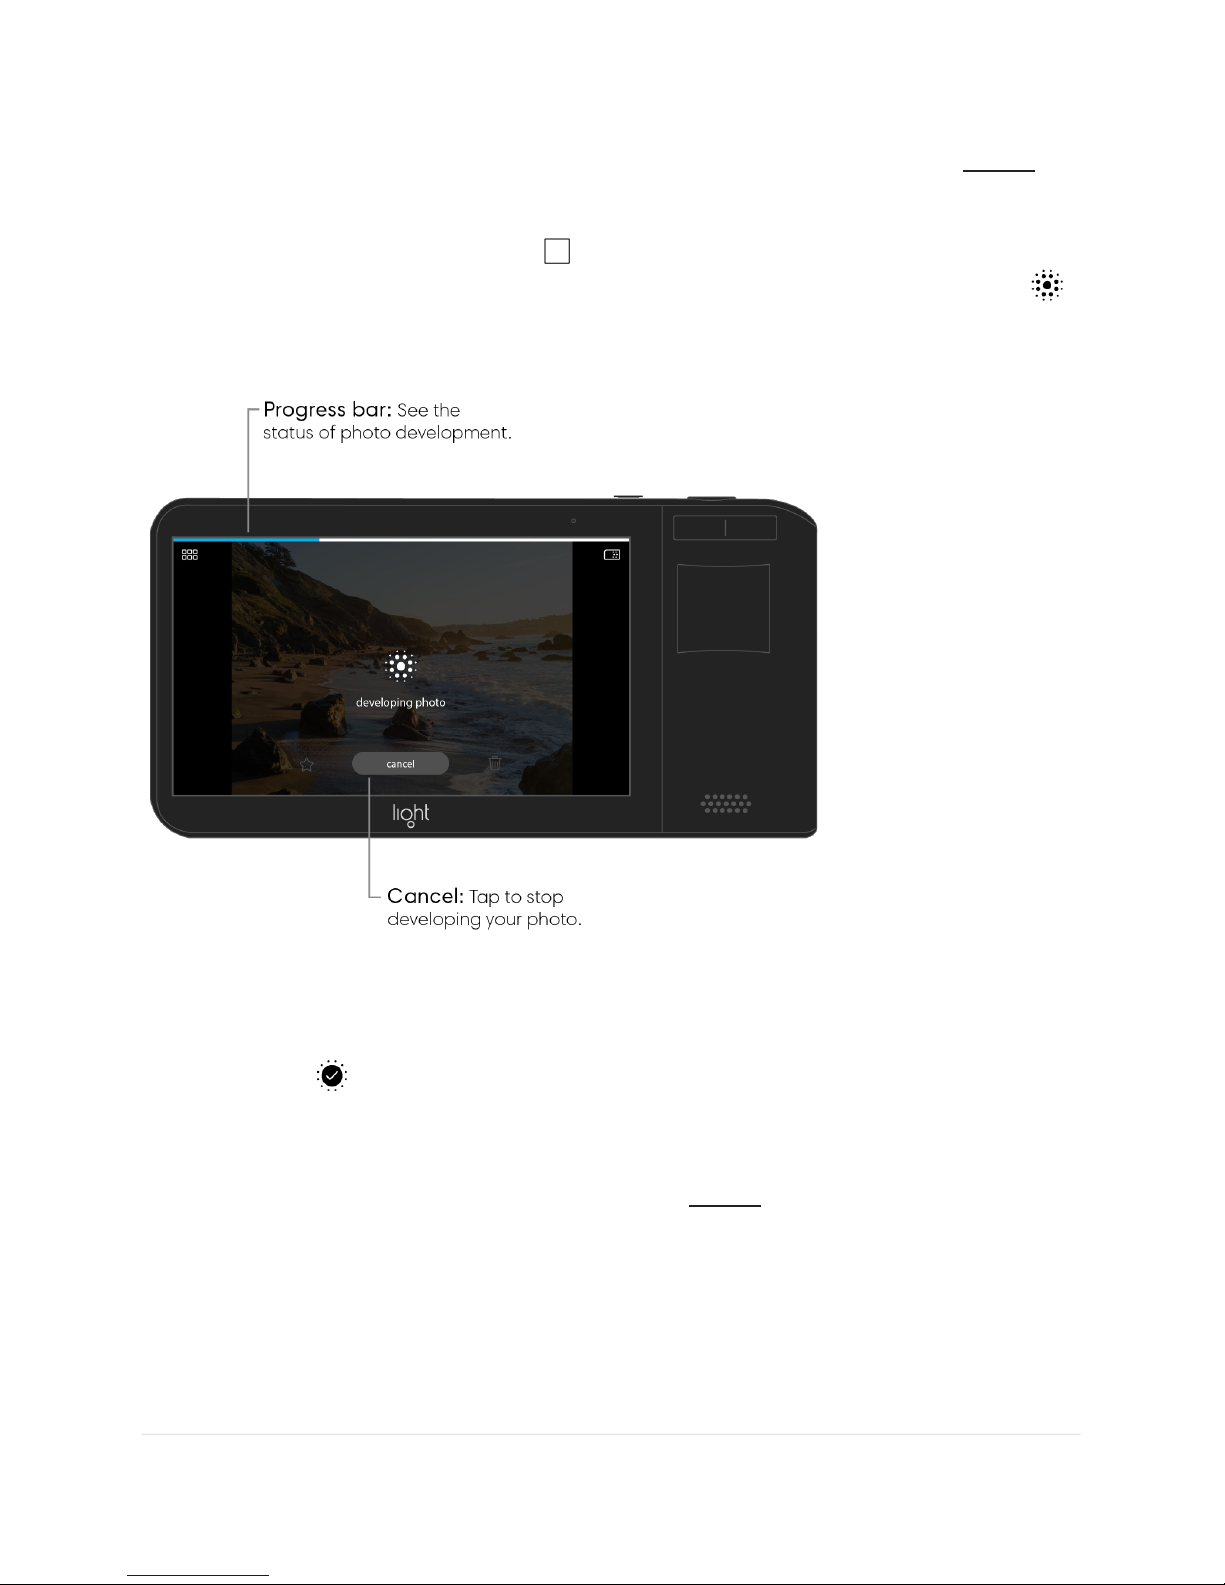
Process a photo. Tap the gallery icon in the top right corner of the camera screen to
access the gallery. Navigate to the photo you wish to process and tap the process icon .
You'll see a progress bar appear at the top of your screen while your photo is fusing its
different images together. This may take a minute.
Your Light L16 will produce a 13-megapixel photo to replace your original unprocessed
photo in the gallery. When finished processing, the icon changes to indicate the photo has
been processed .
Note: Processed photos cannot be unprocessed. However, your original photo will be
unchanged. What you see in the gallery is simply a low-resolution preview of what your final
image will look like. Once you transfer your images to Lumen, you can process full-size
versions of your photos.
35/67
Page 37
Lumen
A quick look
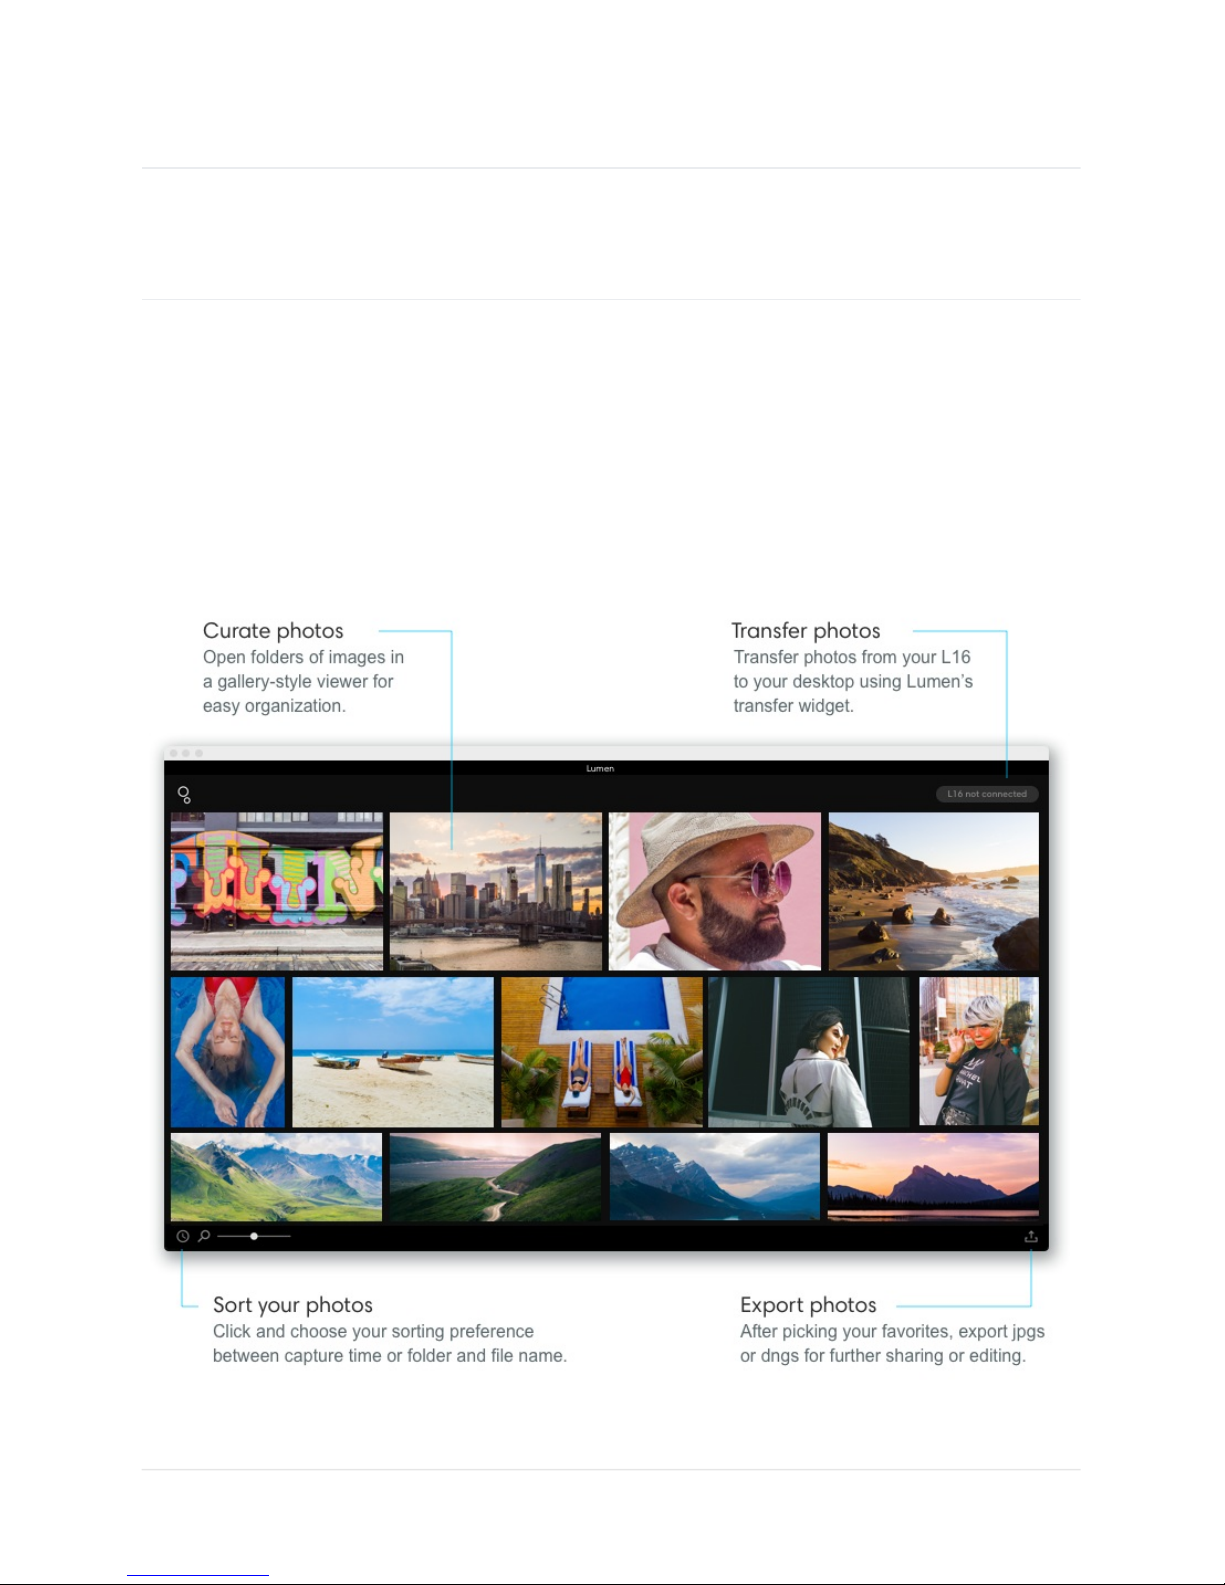
Lumen lets you transfer your images from your camera to your computer, after which our
algorithms fuse together each set of 10+ images to form your high-resolution photos. You
can fine-tune your photos by adjusting depth of field and sharpening or blurring certain
areas. Once you’re finished polishing, Lumen allows you to export your L16 photos as JPGs
for immediate sharing, or DNGs to finish refining in your favorite photo editor.
This guide describes Light Lumen software version V2.0.58
36/67
Page 38

System requirement: Lumen
Lumen is where our computational processing magic happens. The desktop software uses
proprietary algorithms to fuse 10+ images together and create one exquisite photo. To use
Lumen, your computer will need to be up to speed with our supported operating systems
and system requirements.
Windows
Windows 7 (with Service Pack 1), Windows 8.1, or Windows 10
2012 machines or newer
8 GB or more of RAM (16 GB recommended)
200MB of available hard-disk space (1GB recommended)
64-bit processor
Mac
Mac OS X version 10.10.5 (Yosemite) or higher
2012 machines or newer
8 GB or more of RAM (16 GB recommended)
200MB of available hard-disk space (1GB recommended)
64-bit processor
Note: We're trying to support as many operating systems as possible. You may choose to
run Lumen on a different machine, but performance may be compromised.
Transfer photos
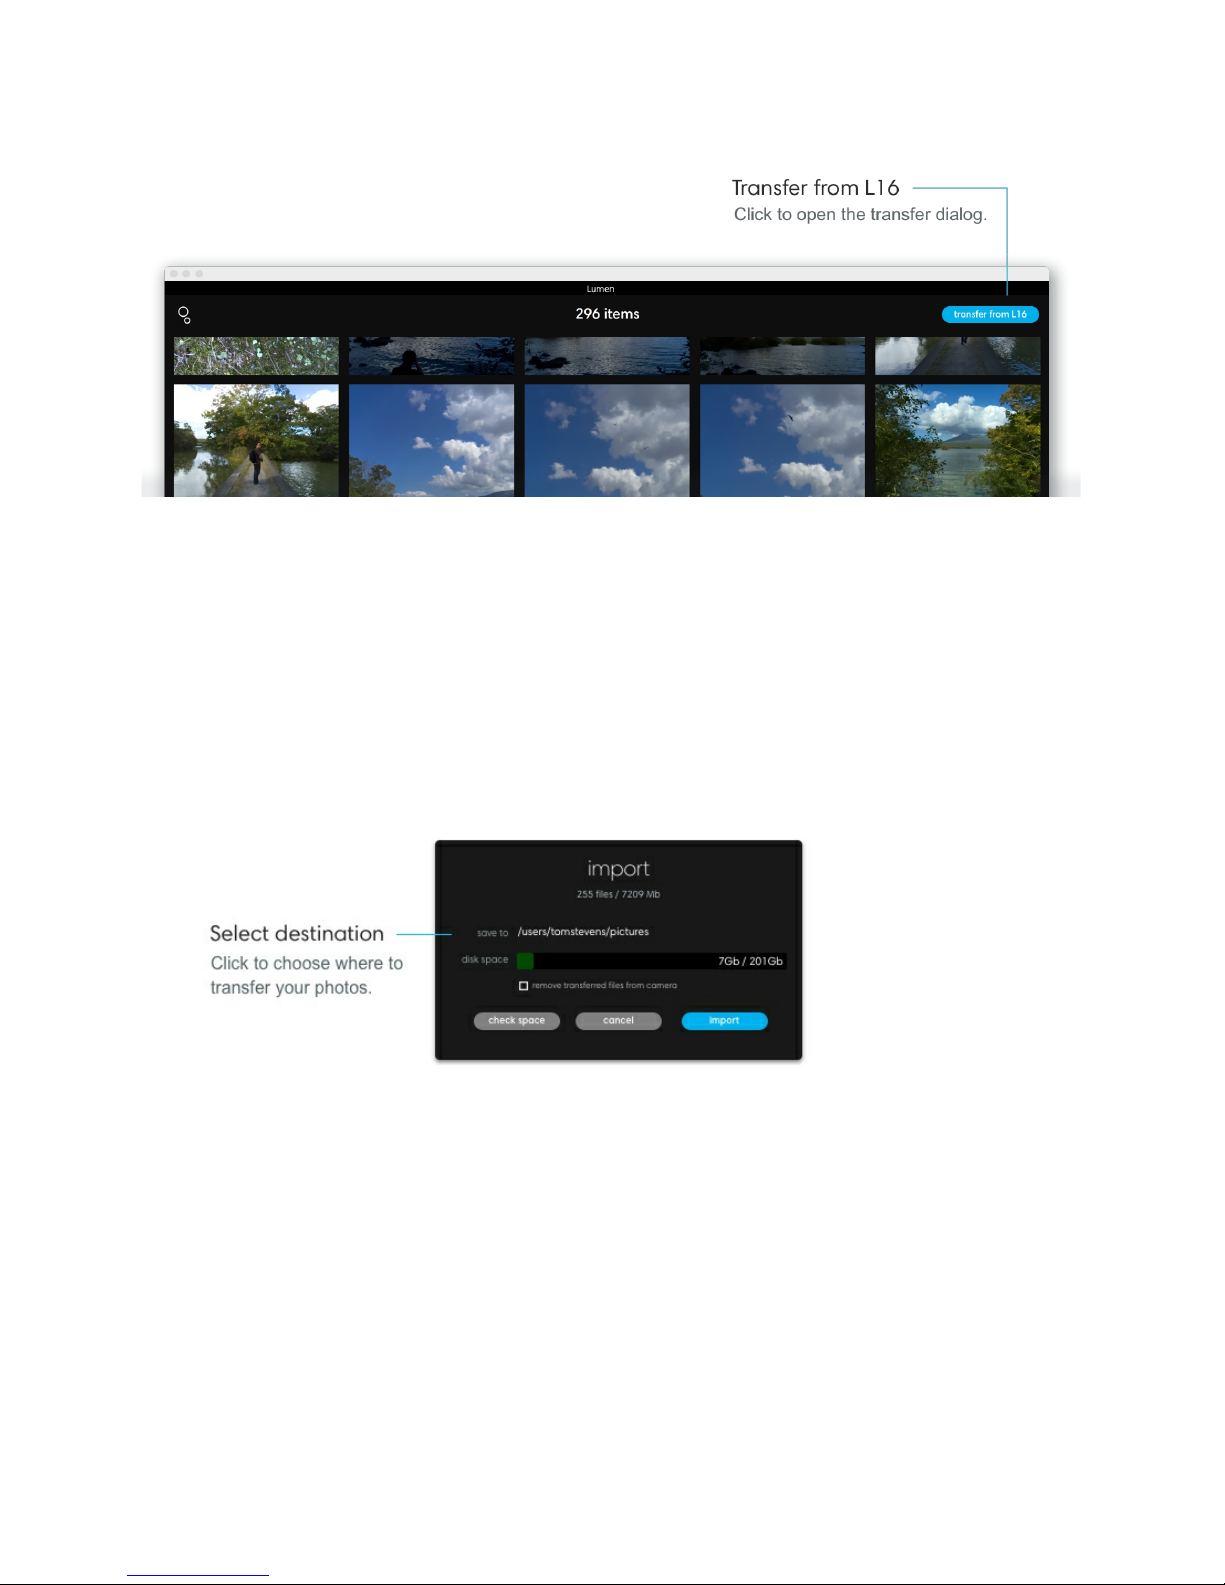
Transfer photos. With Lumen on your computer, connect your Light L16 to your computer's
USB port via the included USB-C cable. When your L16 is connected, the grey button in the
top right corner will change to blue and read "transfer from L16." Click the button to open the
transfer dialog.
37/67
Page 39
Note: If your camera is locked, no images will appear in the transfer dialog. Once you unlock
your camera, you will see your images appear.
Transfer all photos. In the transfer dialog, click "All" to select all photos on your L16. Click
the transfer icon in the top right corner to choose where to transfer your photos. Click
"import" to begin transferring your photos.
Remove transferred files from camera. Click this check box if you want to remove your
photos from your camera as they are being transferred.
Transfer selected photos. If you want to select specific images to transfer, click photos to
select them individually. Click the transfer icon in the top right corner to choose where to
transfer your photos. Click "import" to begin transferring your photos.
38/67
Page 40
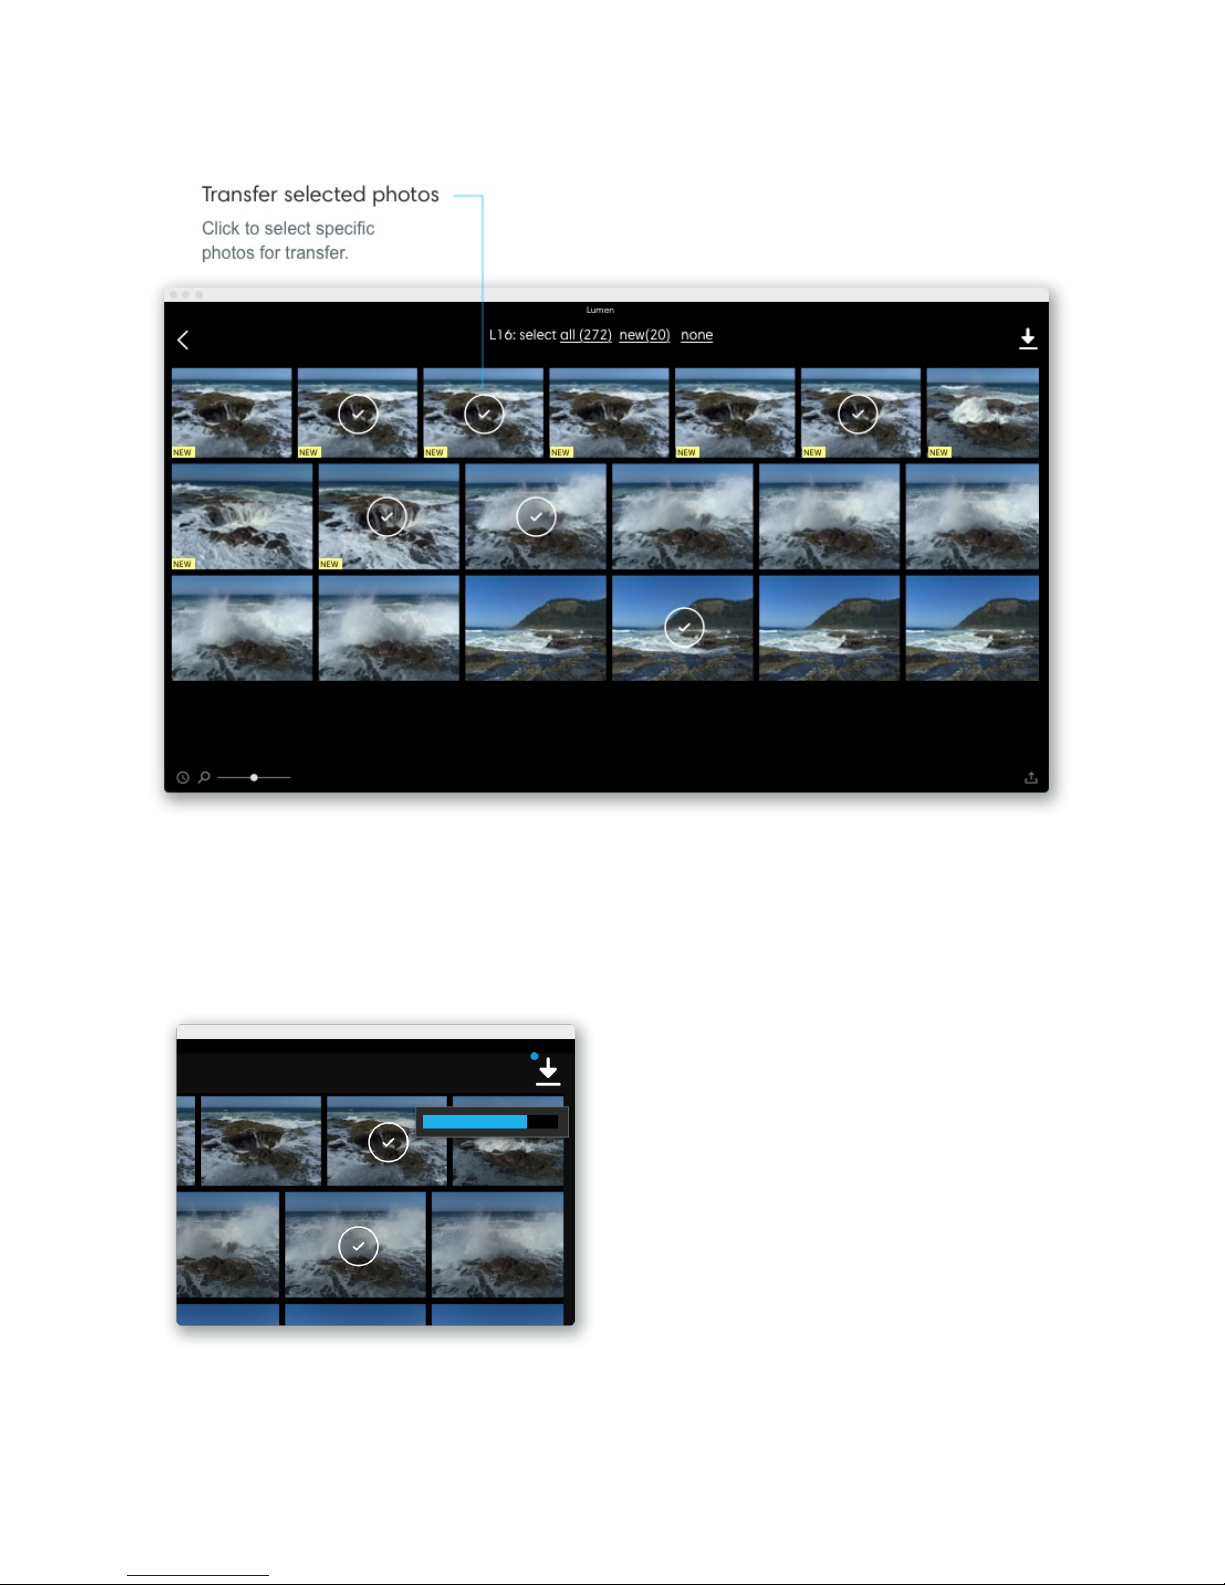
Note: A blue dot next to the transfer icon indicates your transfer is happening. Additionally,
you can hover over the icon to see the current progress of your transfer.
View transferred photos. Click the back arrow to close the transfer dialog. Click File >
Open folder... and choose the folder where your transferred files were saved. With the folder
highlighted, click Open.
39/67
Page 41

Light raw files – LRI & LRIS
LRI (.lri) files. When transferring your photos to your desktop, you may notice that the file
names include ".lri" at the end. Because the Light L16 captures 10+ images at once—and
because we save the fusing of these photos for the desktop—the Light L16 bundles all of
the information about your capture into a Light Raw File (LRI).
.LRIs function similarly to how other RAW files work: any changes you make to the photo in
Lumen doesn't affect the original raw file. This means you can edit and export multiple
copies of your photo without making any changes to the original file.
LRIS (.lris) files. Whenever you edit an LRI file on your desktop, Lumen will create a new
"LRIS" file with an identical name as your original LRI file. This LRIS file contains your depth-
editing information. You can think of this file as a sidecar for your original file that contains all
of the information about how you edited the photo. When you are done editing and decide to
export a photo, Lumen will read your LRIS file and your LRI file together and process a
single JPG or DNG (depending on your preference).
Move LRI files. When you move LRI files around on your computer, or if you move them to
an external hard drive, be sure to keep the LRI and LRIS files together. If you separate them,
you will lose any depth edits you have made to your photos.
Rename LRI files. When you rename LRI files on your computer, or if you rename them on
an external hard drive, be sure to also rename the corresponding LRIS files. If you they have
separate names, Lumen will not recognize the edited LRIS file associated with your LRI.
Curate your work
After transferring your LRI files, Lumen lets you view folders of photos in a gallery for easy
browsing and sorting. Thumbnails displayed in Lumen’s gallery view are based on a quick
fusion of 5 of your 10+ images per photo. You can see full-resolution versions of your photos
by processing or exporting.
40/67
Page 42
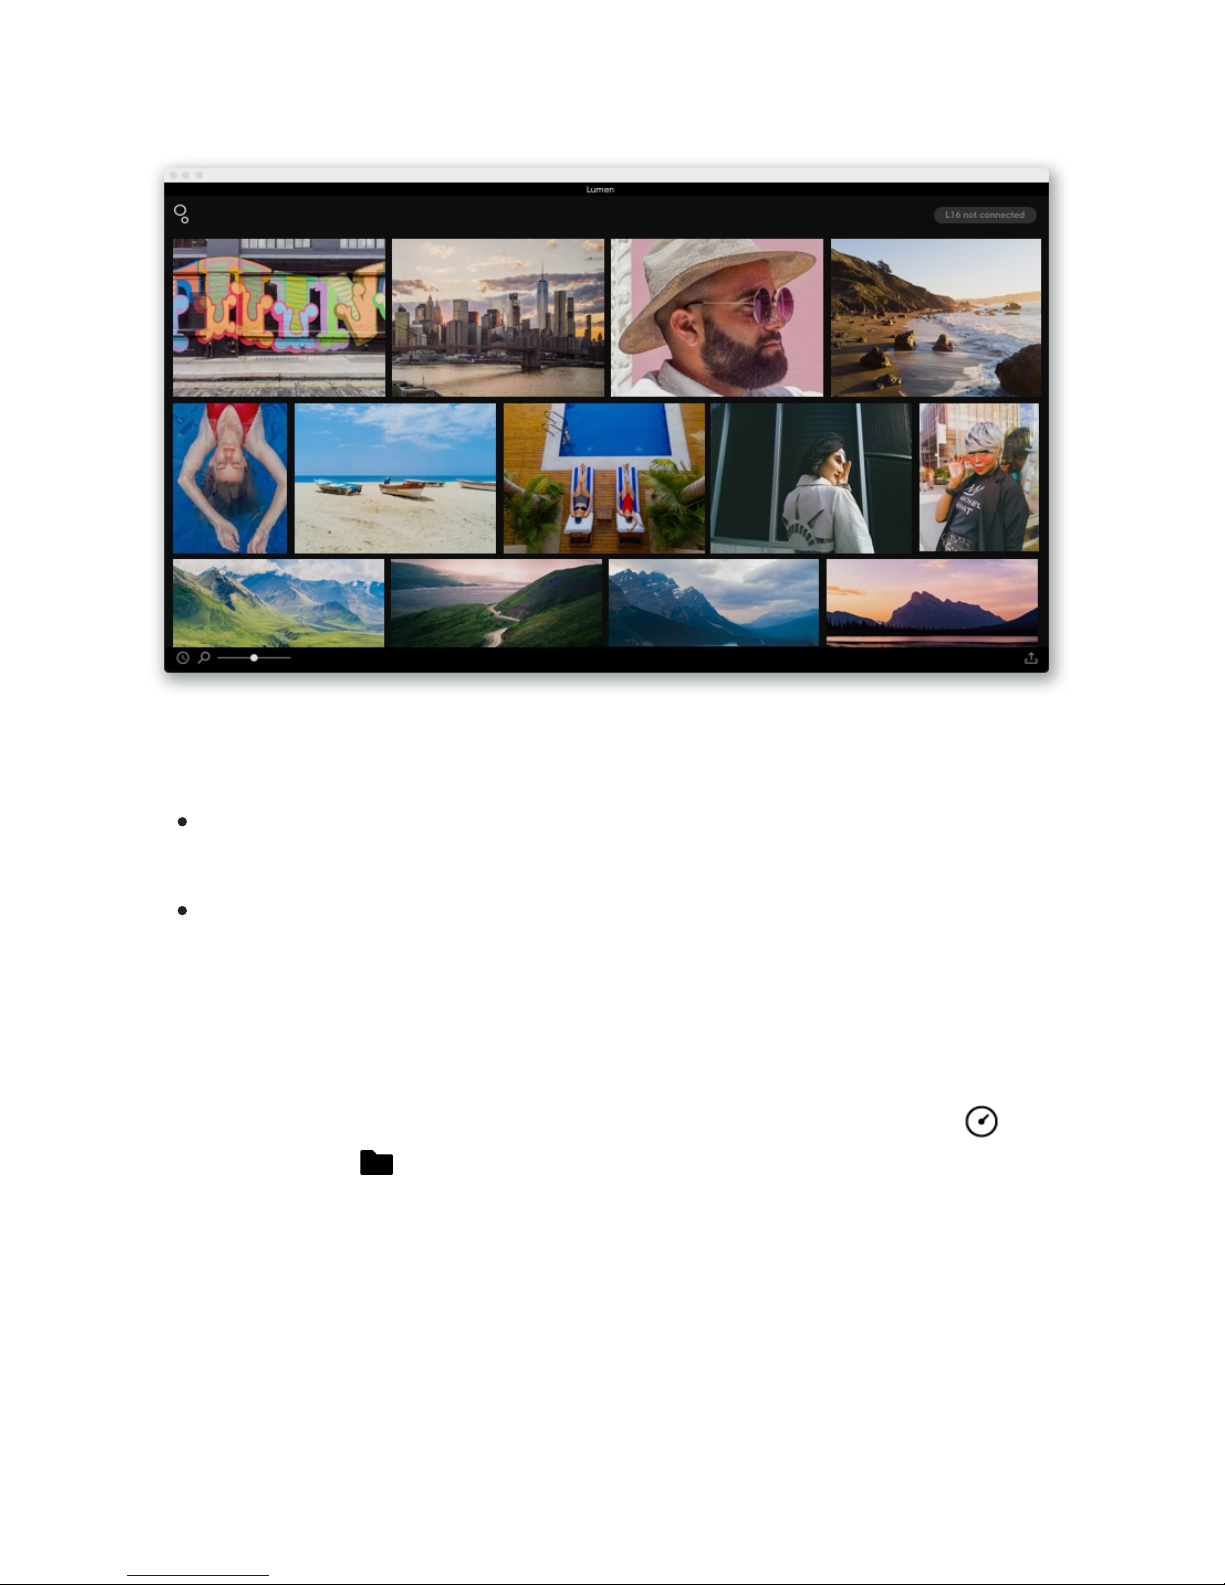
Open a folder of photos. There are two ways to open a folder:
Click File > Open folder... and navigate to your folder of Light Raw Files (.lri). With the
folder selected, click “Open.”
Click the Light logo in the top left of the application window, navigate to your folder of
Light Raw Files (.lri), select it, and click “Open.”
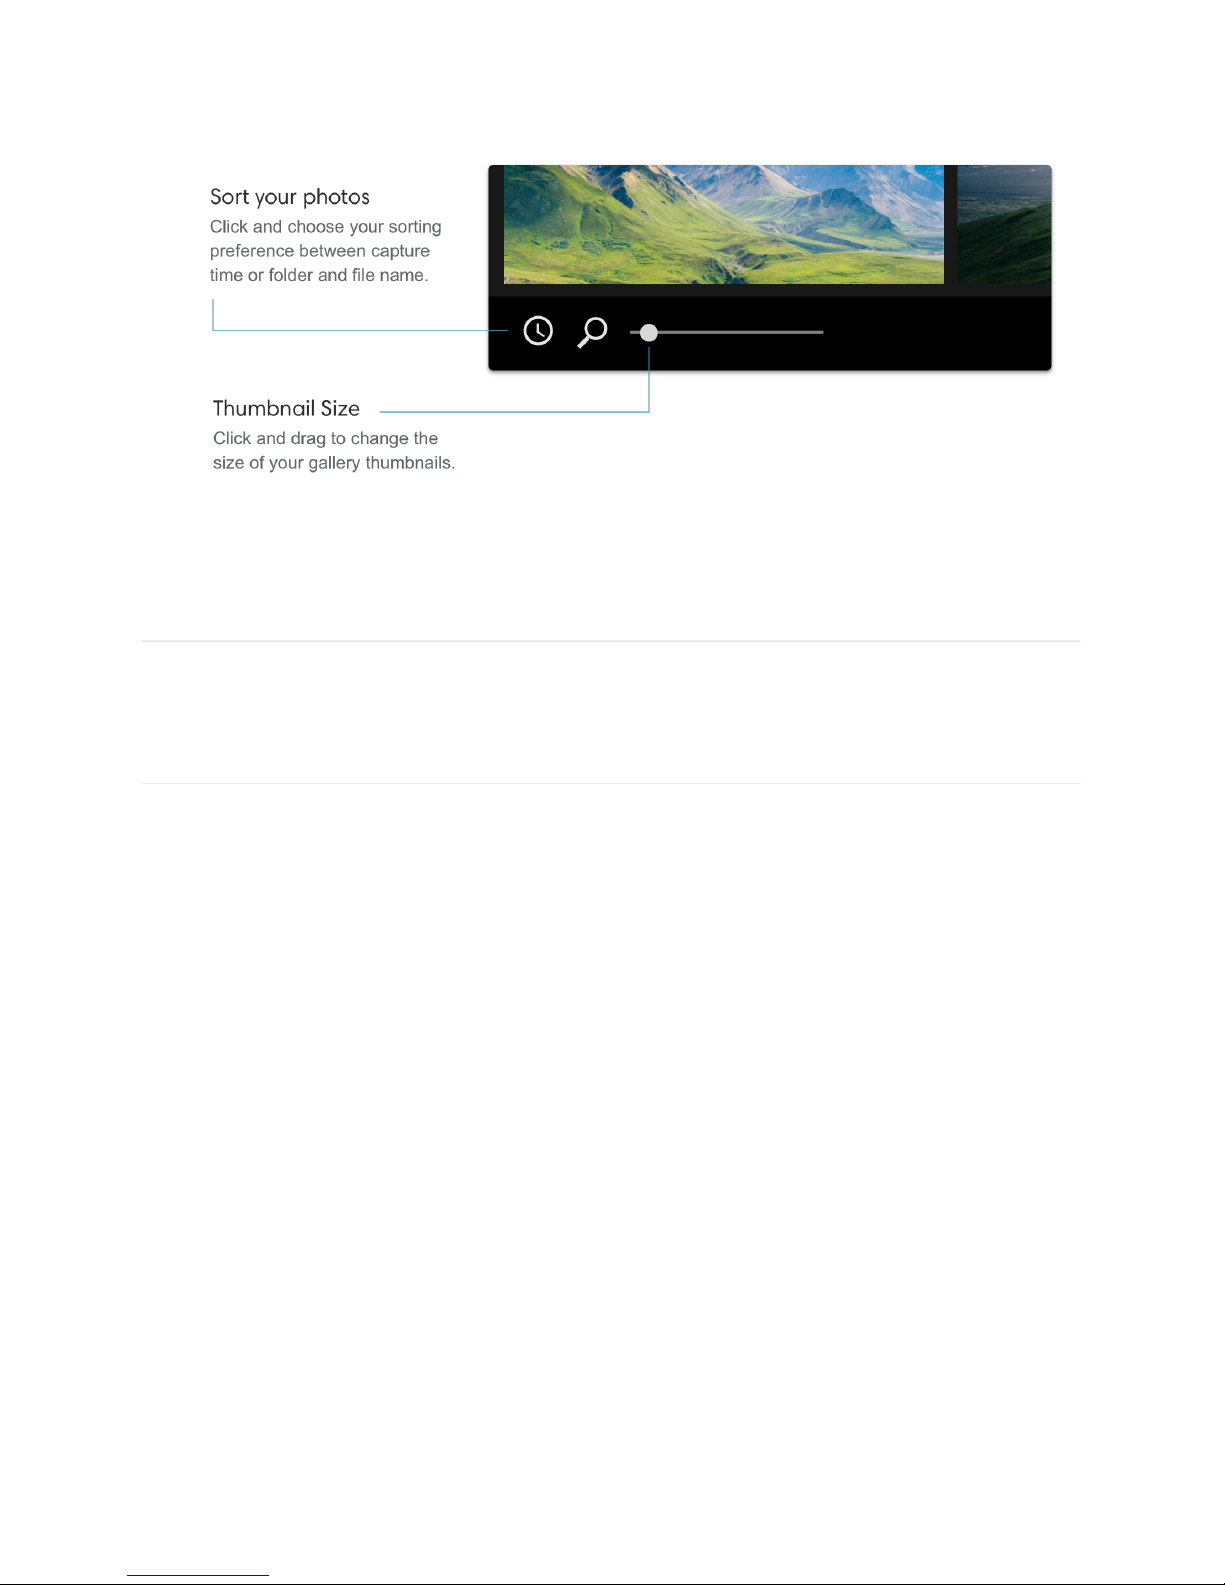
Adjust the size of your gallery thumbnails. Drag the zoom slider left or right to see your
photos bigger or smaller.
Sort capture time or folder and file name. Click the icon in the bottom left corner next to
the zoom bar to choose how your files are sorted. You can sort by capture time or
folder and file name .
41/67
Page 43
Select photos. Click on a photo to select it. While holding shift, click on multiple photos to
select them.
Process photos
The real magic of our computational photography can be seen when processing images.
Processing a photo uses Light’s proprietary algorithms to combine 10+ images (captured
every time you press the shutter button) into one final, high-resolution photo.
Process a photo. From the gallery, double-click a photo to open it in full screen. Lumen will
switch from gallery mode to processing mode and a processing progress bar will appear.
42/67
Page 44
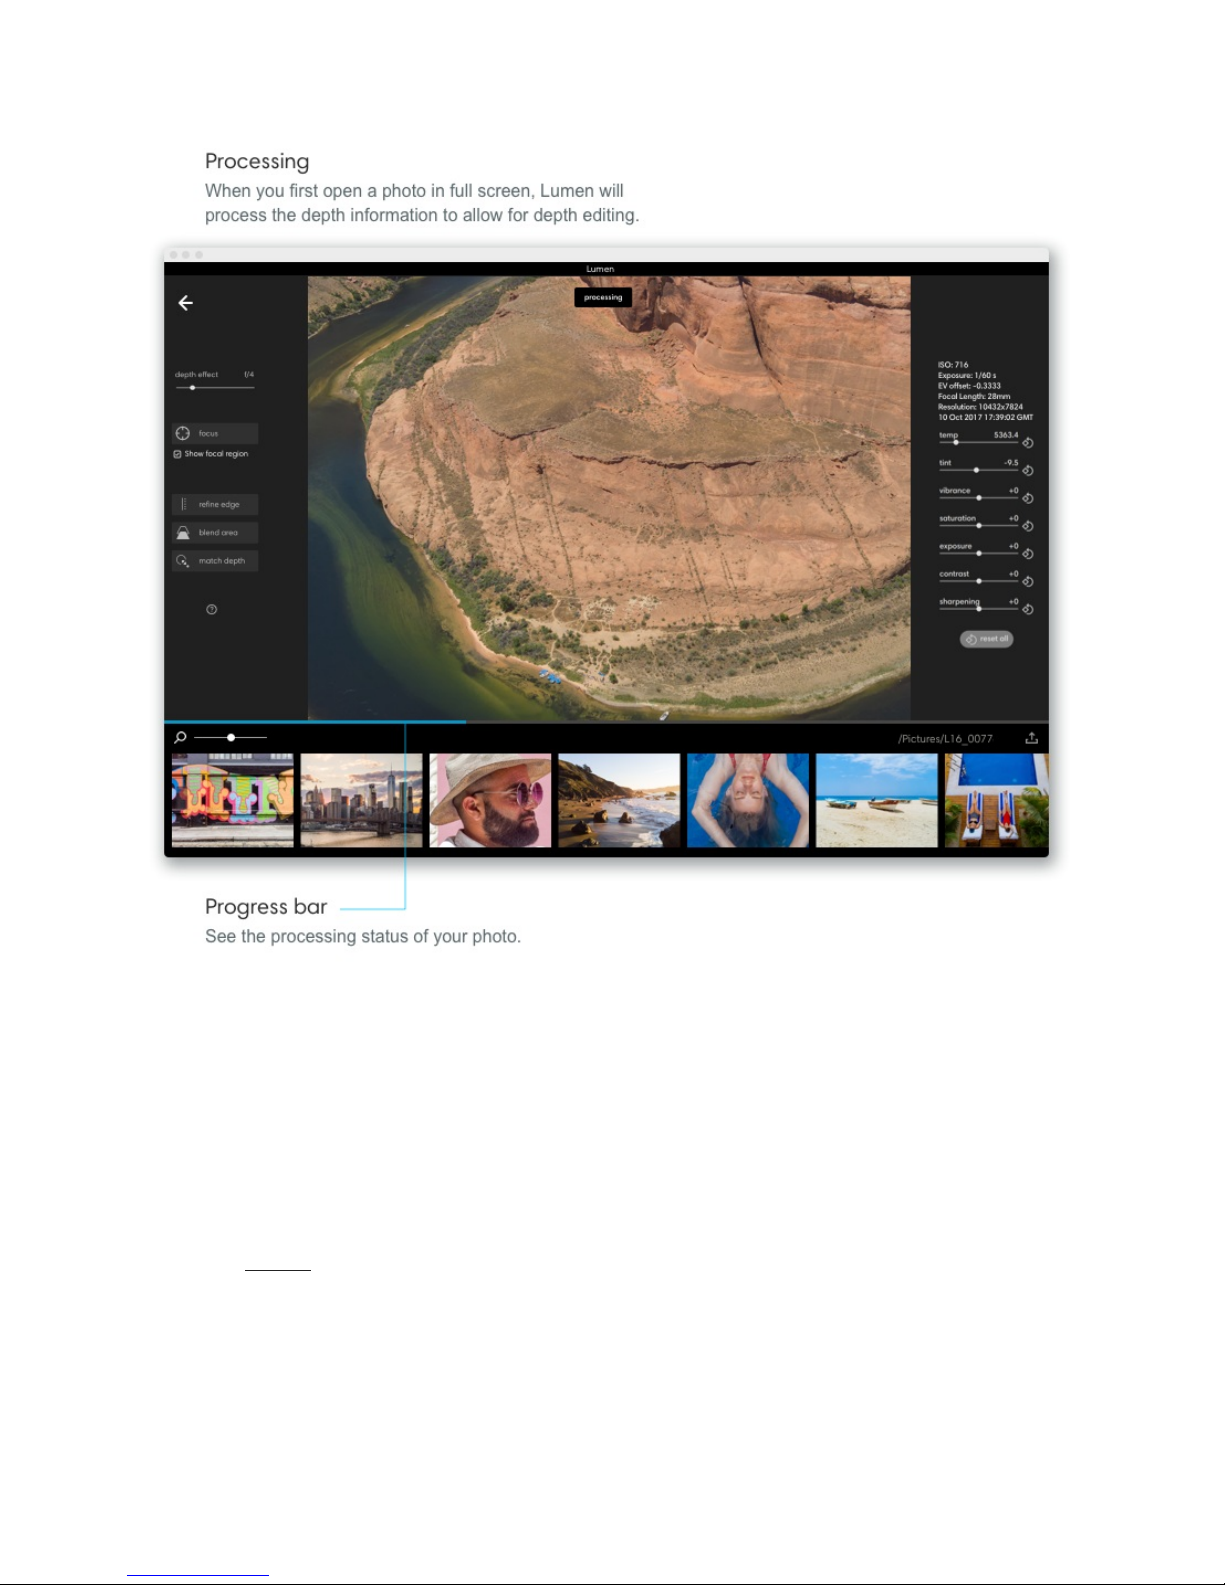
Preview full resolution by zooming in or out. Scroll up or down on your trackpad, or drag
the zoom slider in the bottom left corner to the left or right to zoom.
Fusing 10+ images takes some time. As you zoom in on your photo, Lumen will process the
area you have zoomed in on in real time. If you see the progress bar appear, Lumen is still
processing the area you have zoomed in to. Processing for the entire image is saved for
when you export your photos.
43/67
Page 45
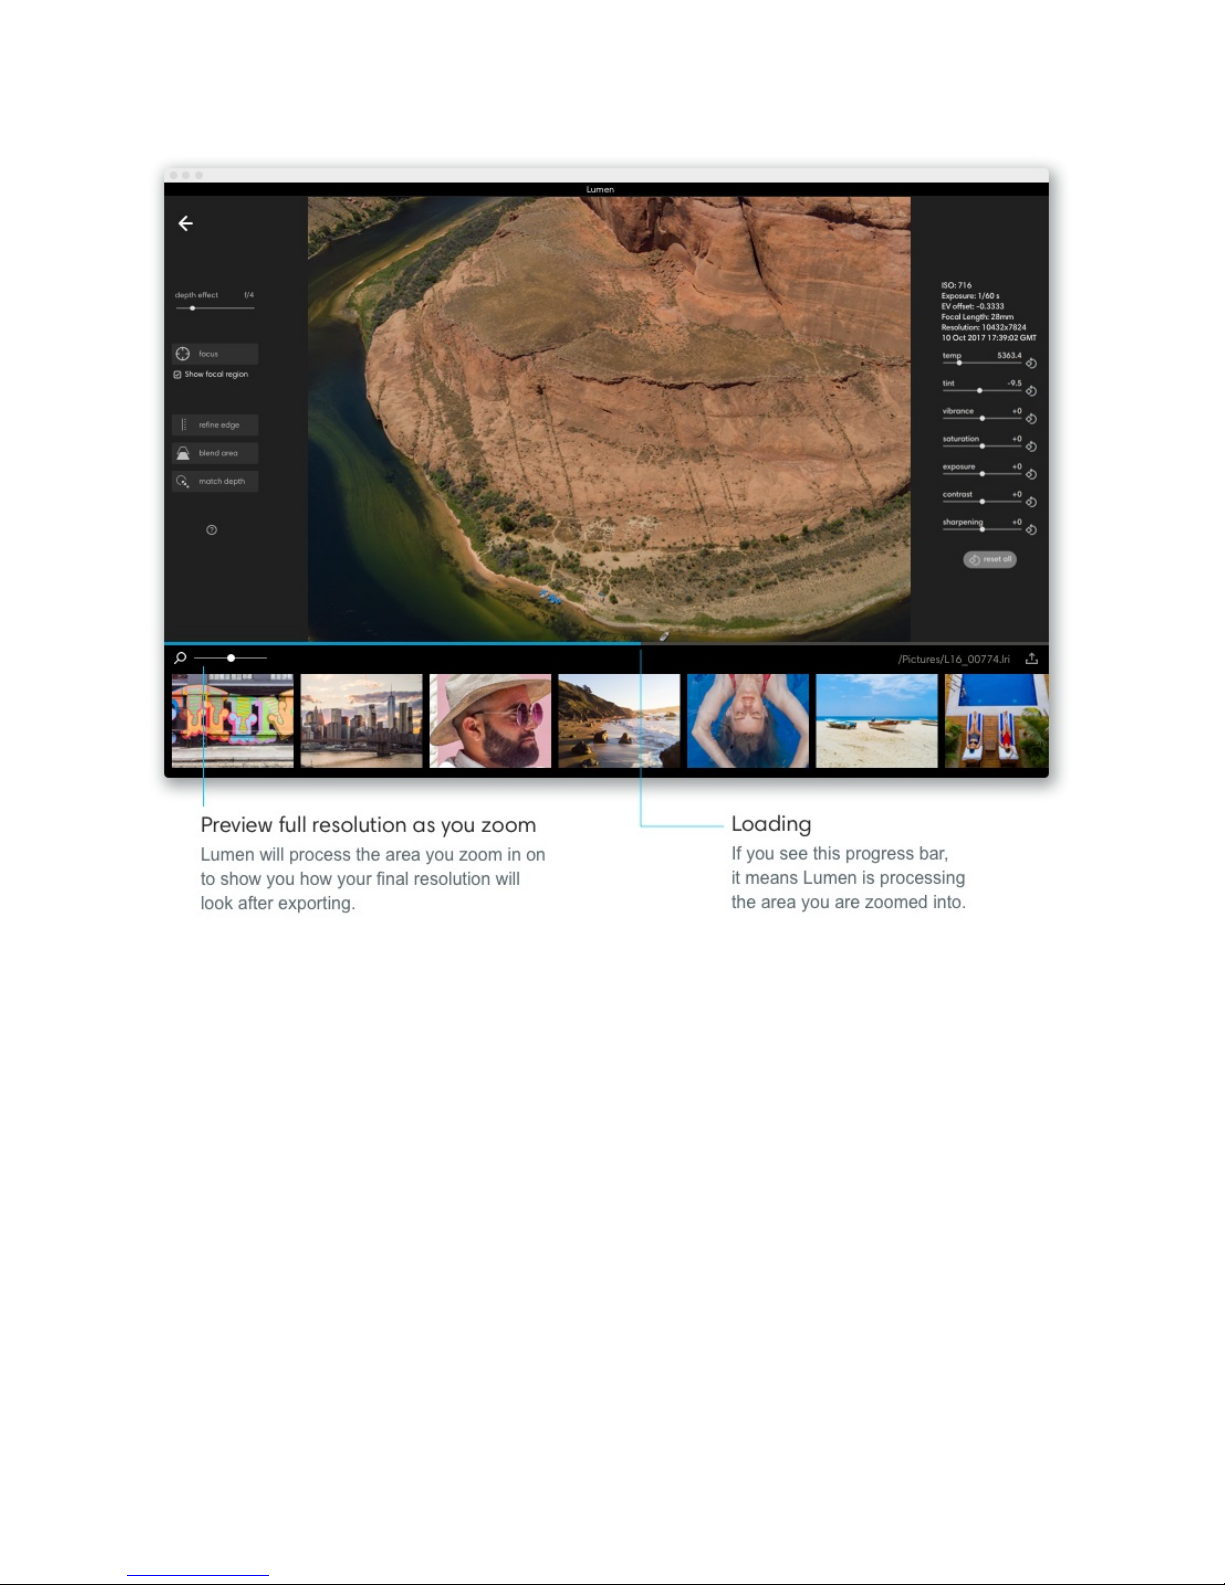
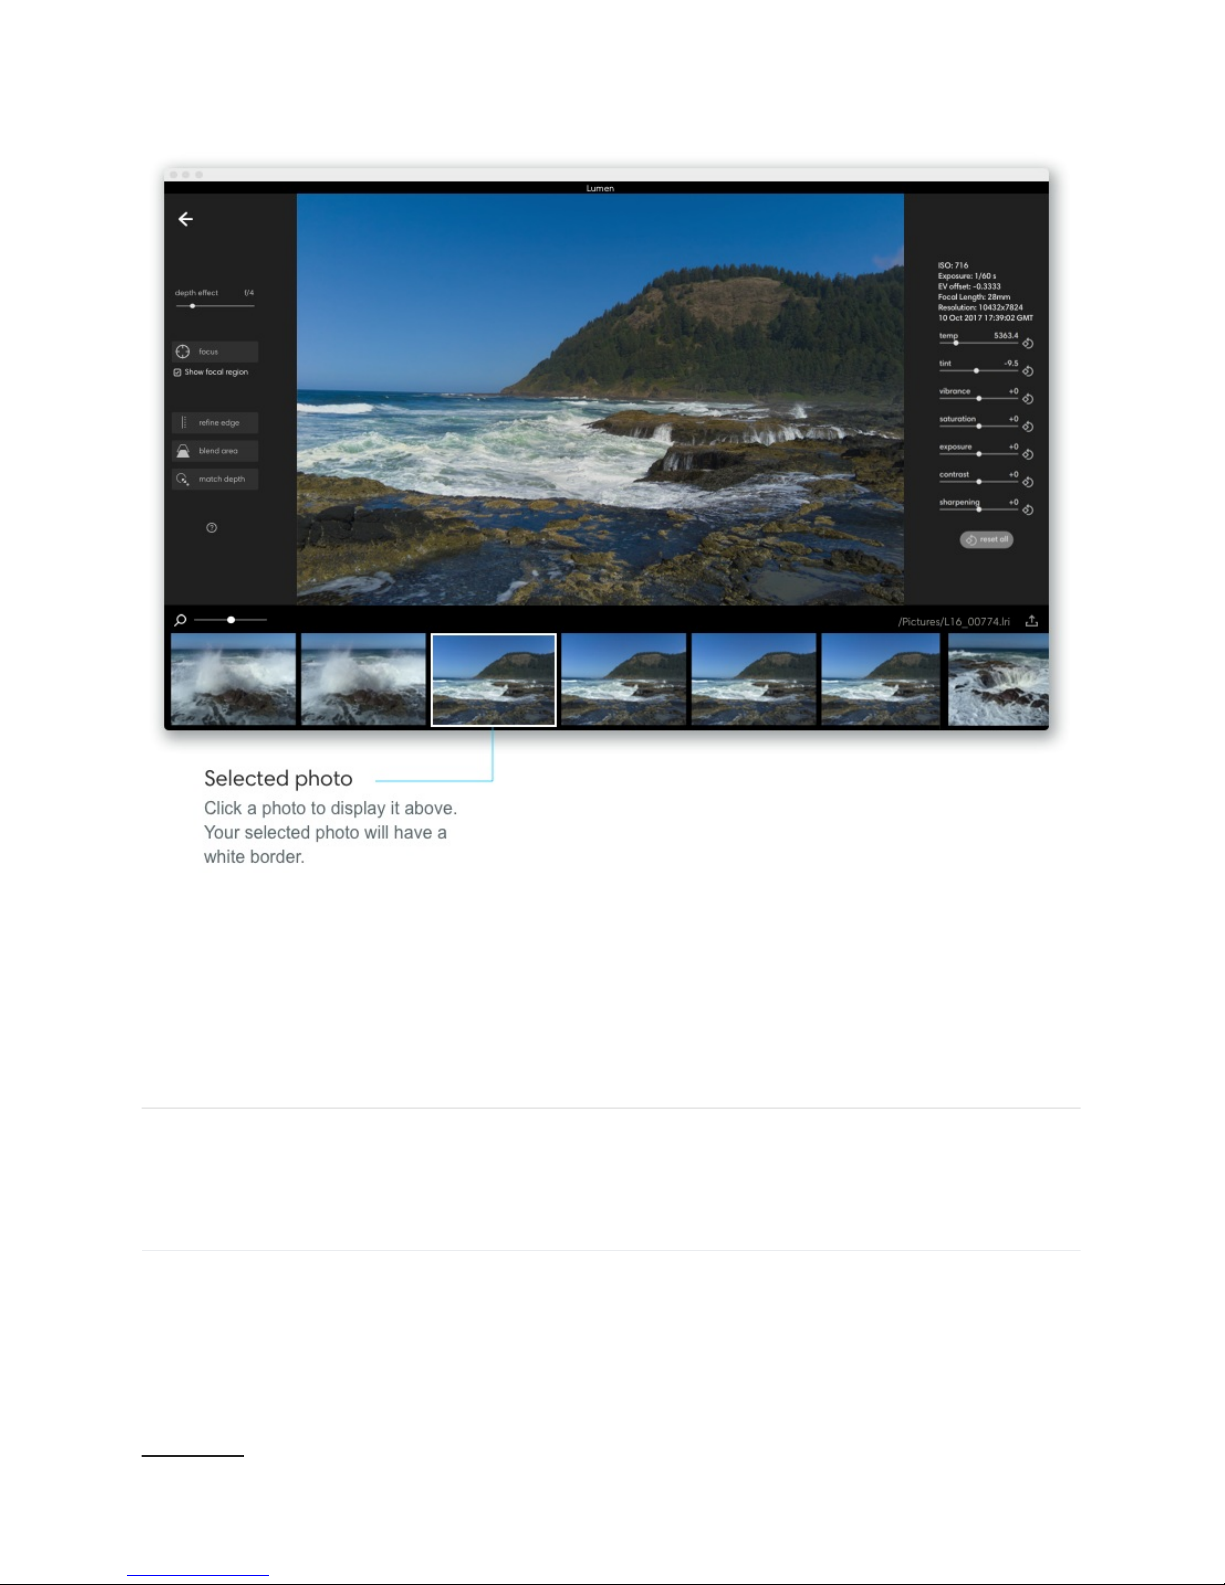
Choose another photo from the filmstrip. In processing mode, you can switch which
photo you are processing by selecting a different photo from the filmstrip. Just click once on
a new photo to open it.
44/67
Page 46
Adjust depth effect
One of the most revolutionary concepts to come from computationally fusing 10+ images
together is the ability to change depth of field long after a photo has been taken. Even if
you’ve been shooting and editing photos for years, you’ve most likely never been able to edit
depth of field after capturing your images.
Click here to learn more about how we’re able to generate depth information for your photos.
45/67
Page 47
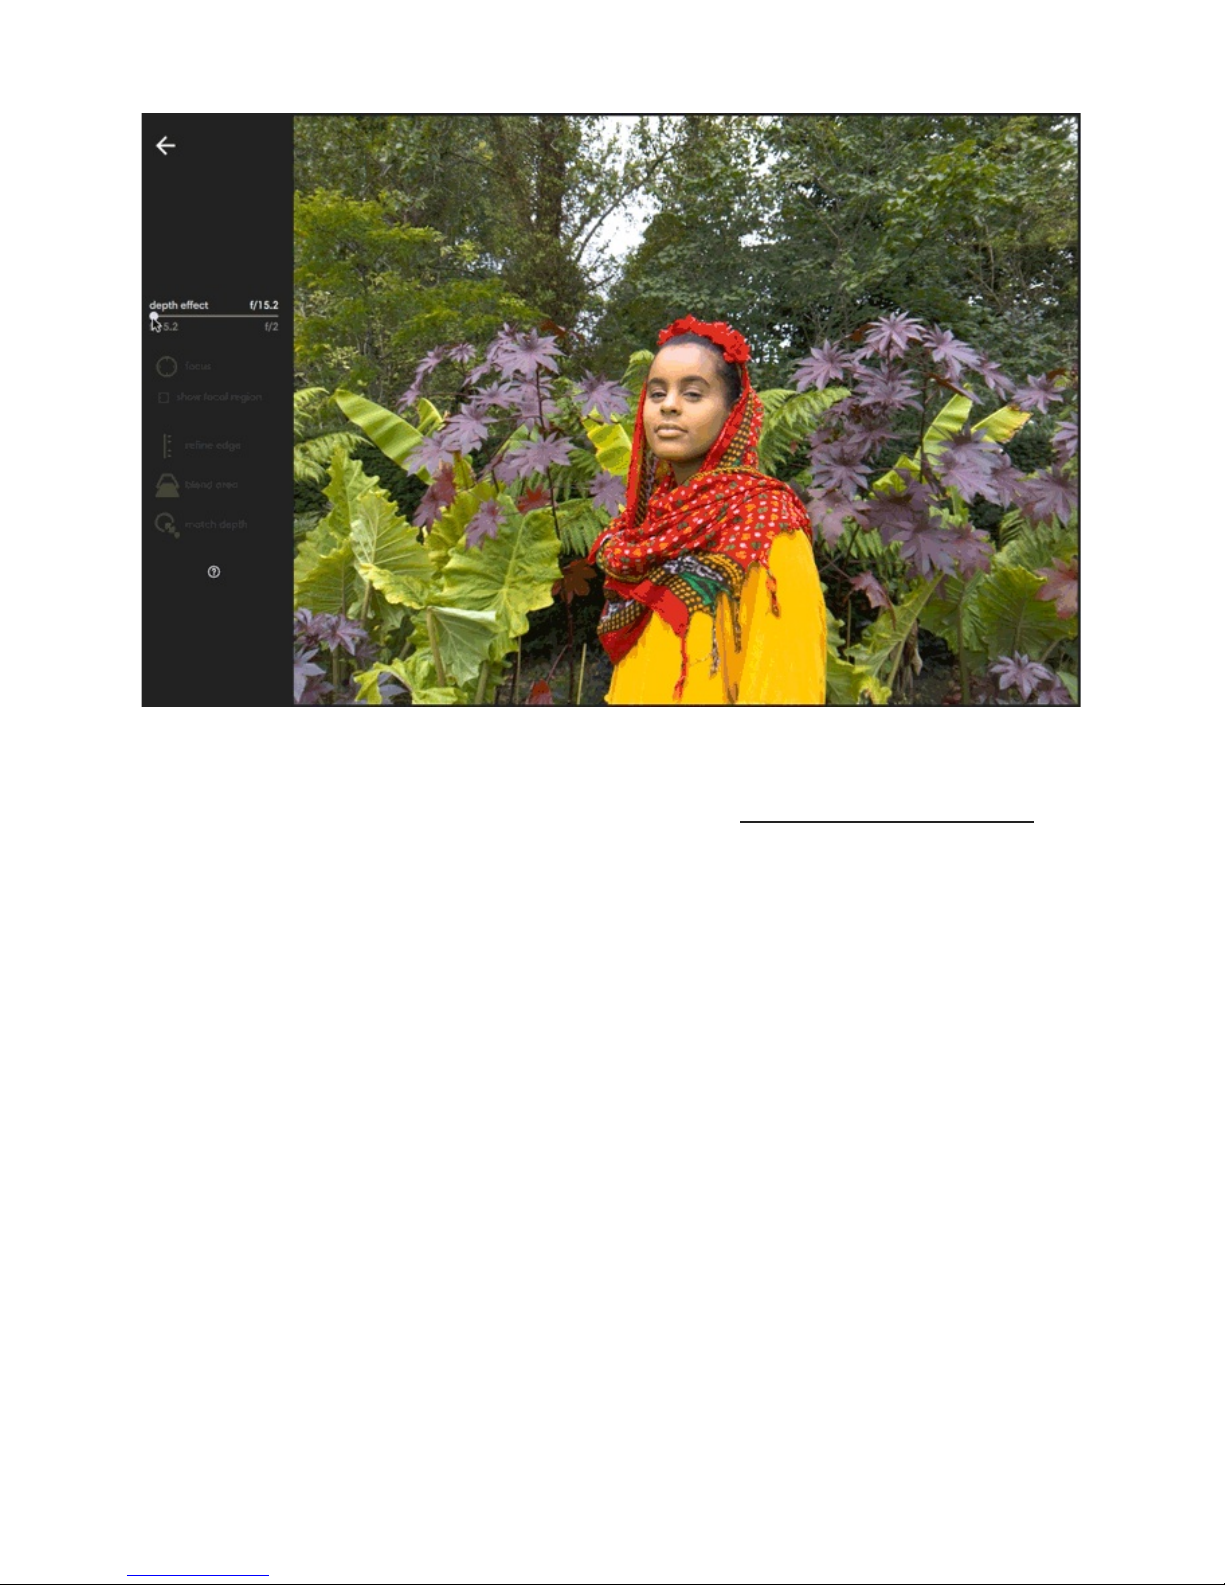
Adjust depth effect. After opening a photo in processing mode, Lumen will process your
photo. When processing is finished, the Depth Effect tool will change from grey to white,
indicating you can use it. The depth effect slider is given in aperture values or f-numbers. To
increase depth effect, drag the slider to the right. As you increase depth, the area around
your focal point begins to blur. The closer you get to the right side of the slider, the more out-
of-focus the areas in front of and behind your focal point will be, simulating the shallow
depth-of-field effect of a wide-aperture lens.
46/67
Page 48
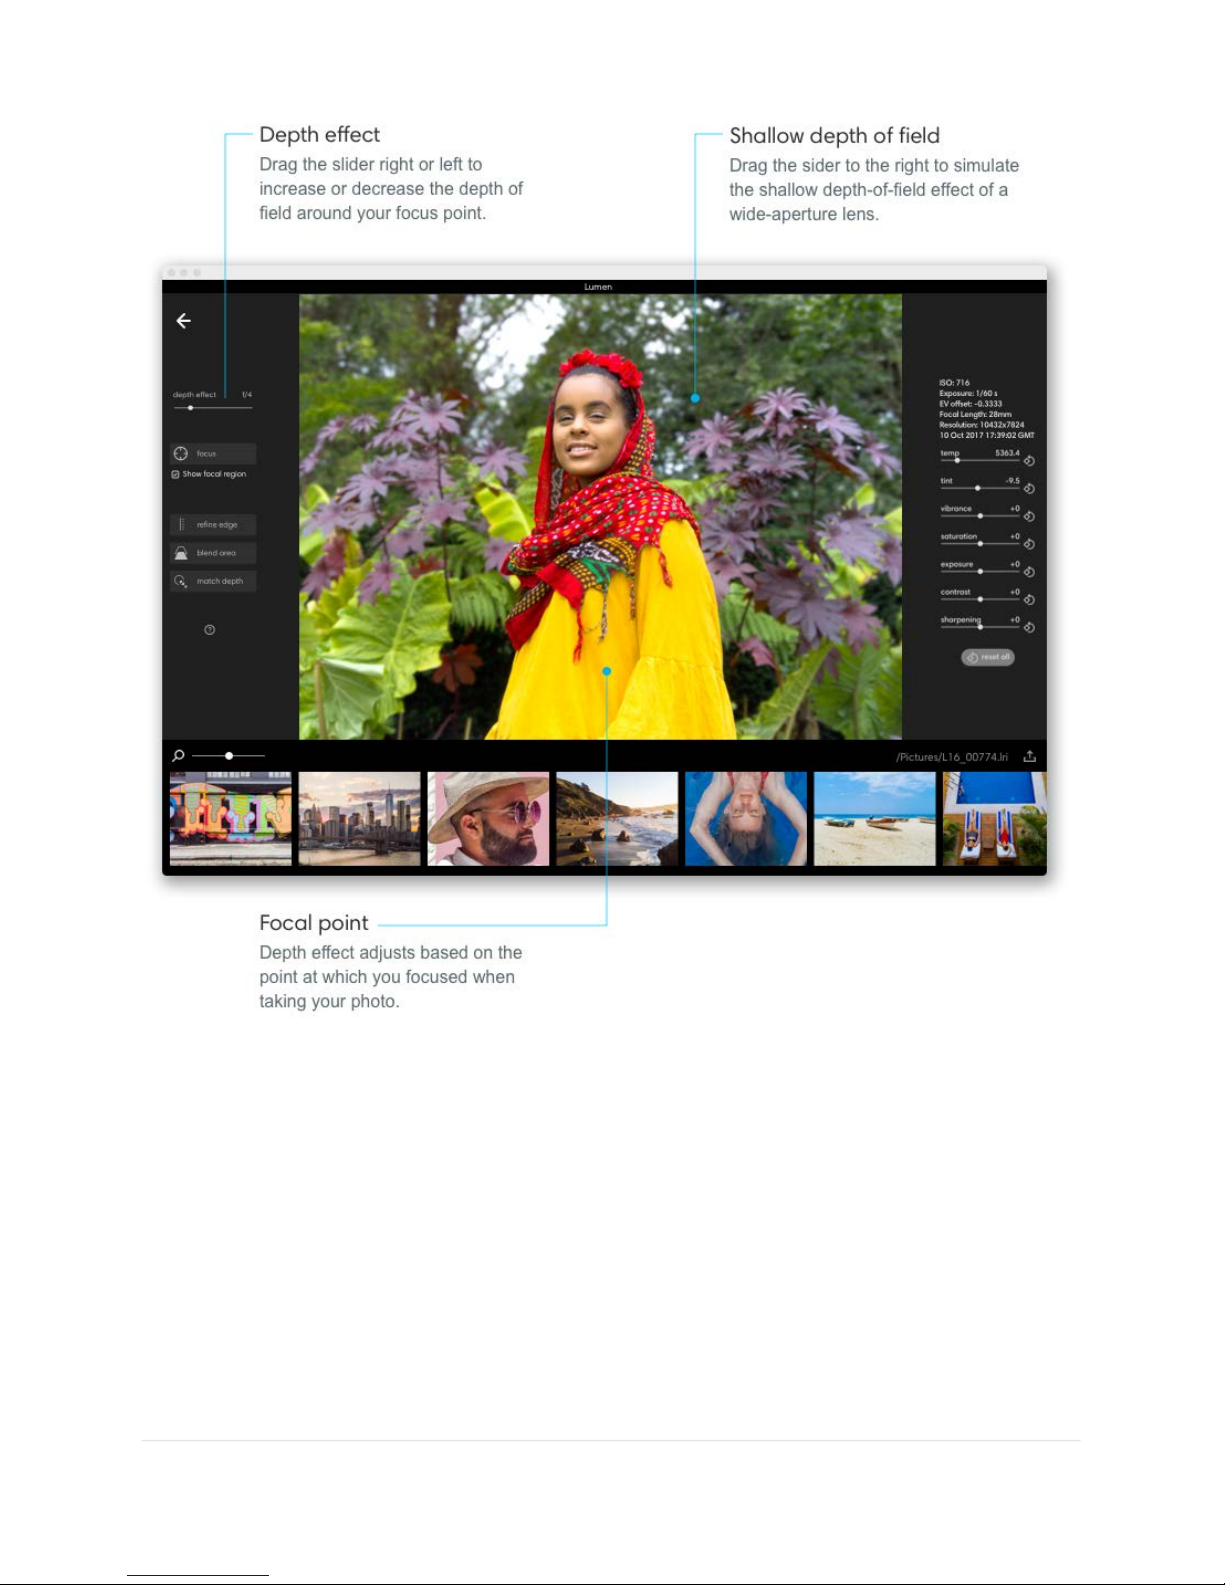
Note: You may notice the f-numbers are different from photo to photo. That's because the f-
numbers match to your focal length and are the equivalent aperture Lumen can generate for
that given zoom.
Reset depth edits. If at any point you want to start over with your depth edits, click Edit >
Reset depth edits.
Revert to original. If at any point you want to start over with an unedited photo, click Edit >
Revert to original.
47/67
Page 49
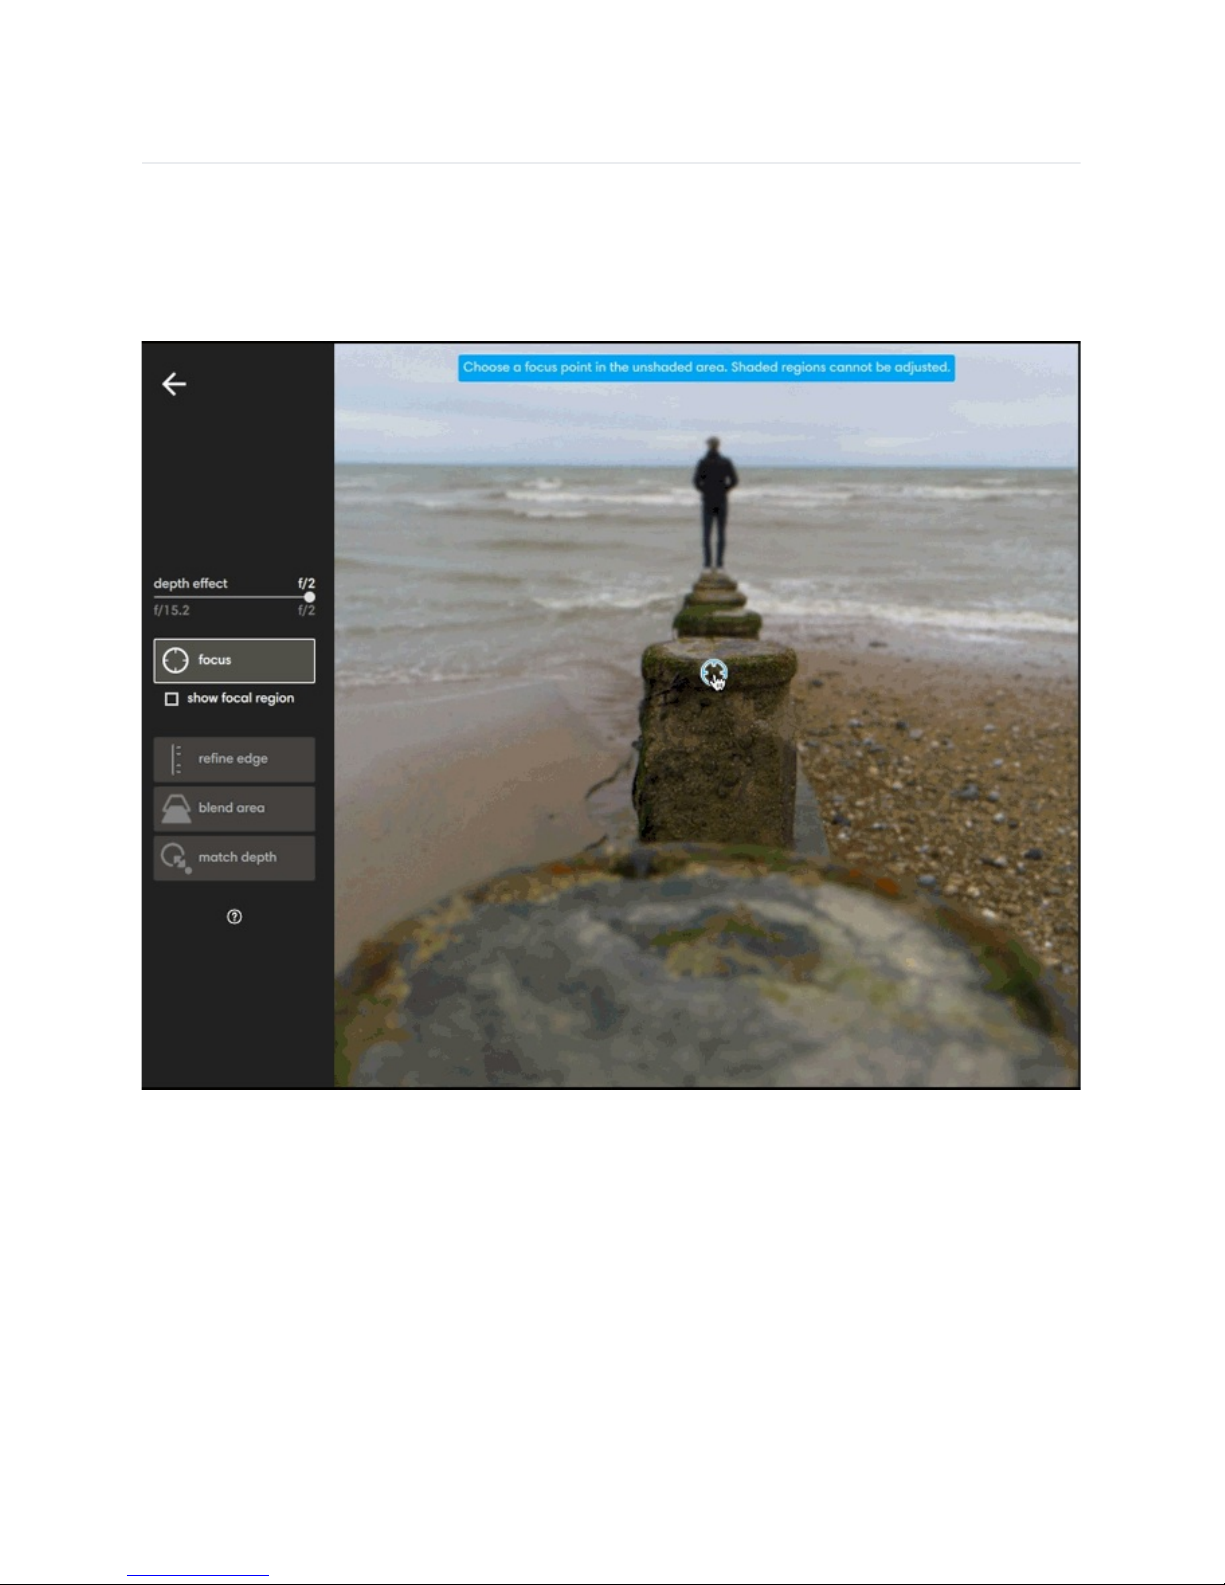
Fine-tune focus
Depth effect on the L16 allows you to create dramatic photos with subjects that stand out
from their backgrounds. However, applying depth effect can sometimes make your subject
appear blurry. In these situations, the focus tool can be used to adjust the focus of your
subject and make a soft focal point sharp again.
Adjust focus. Click focus to activate the focus tool. When activated, a grey shaded mask
may appear over parts of your image. The shaded mask indicates which areas of your photo
were not in focus when your photo was taken. Any areas that were not in focus when your
photo was captured, cannot be in focus with depth effect applied.
The unshaded areas of your photo show where you originally focused when you took the
photo. If your subject is shaded, that means your subject was not in focus when you took the
photo
48/67
Page 50
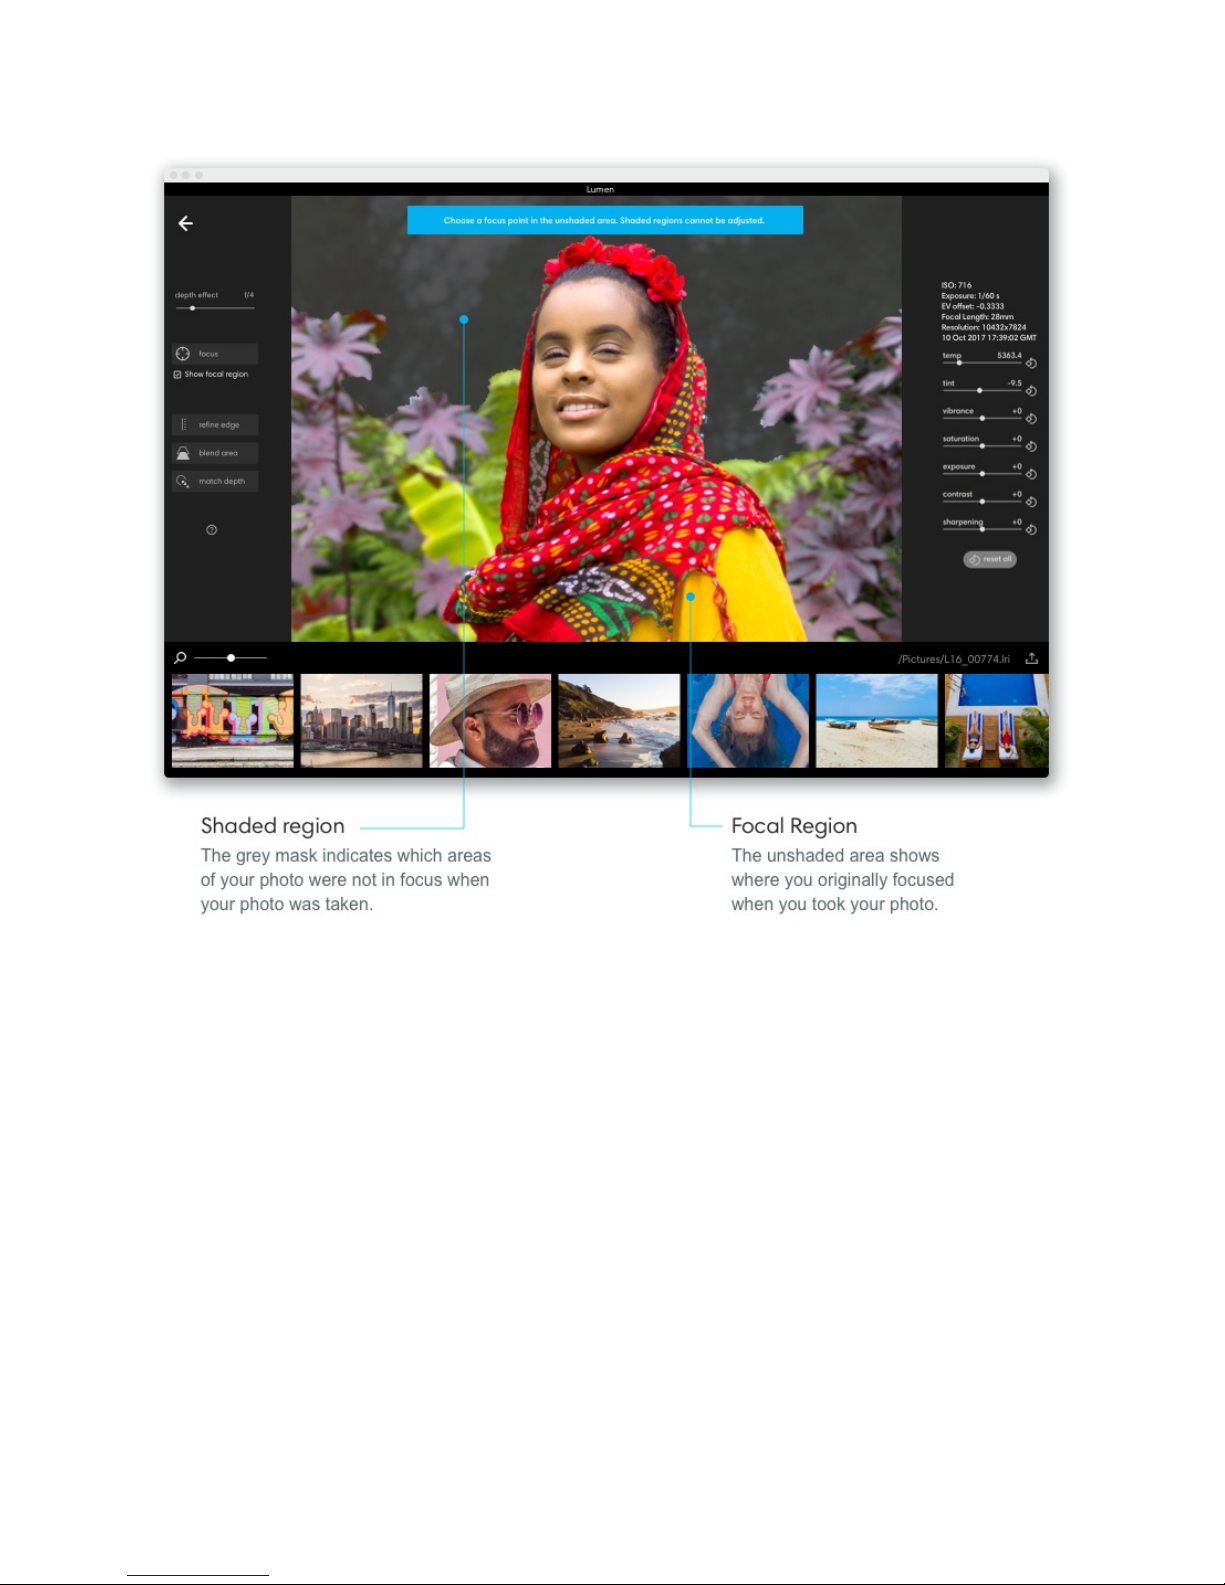
Click a point in the unshaded area to adjust to be in focus.
49/67
Page 51
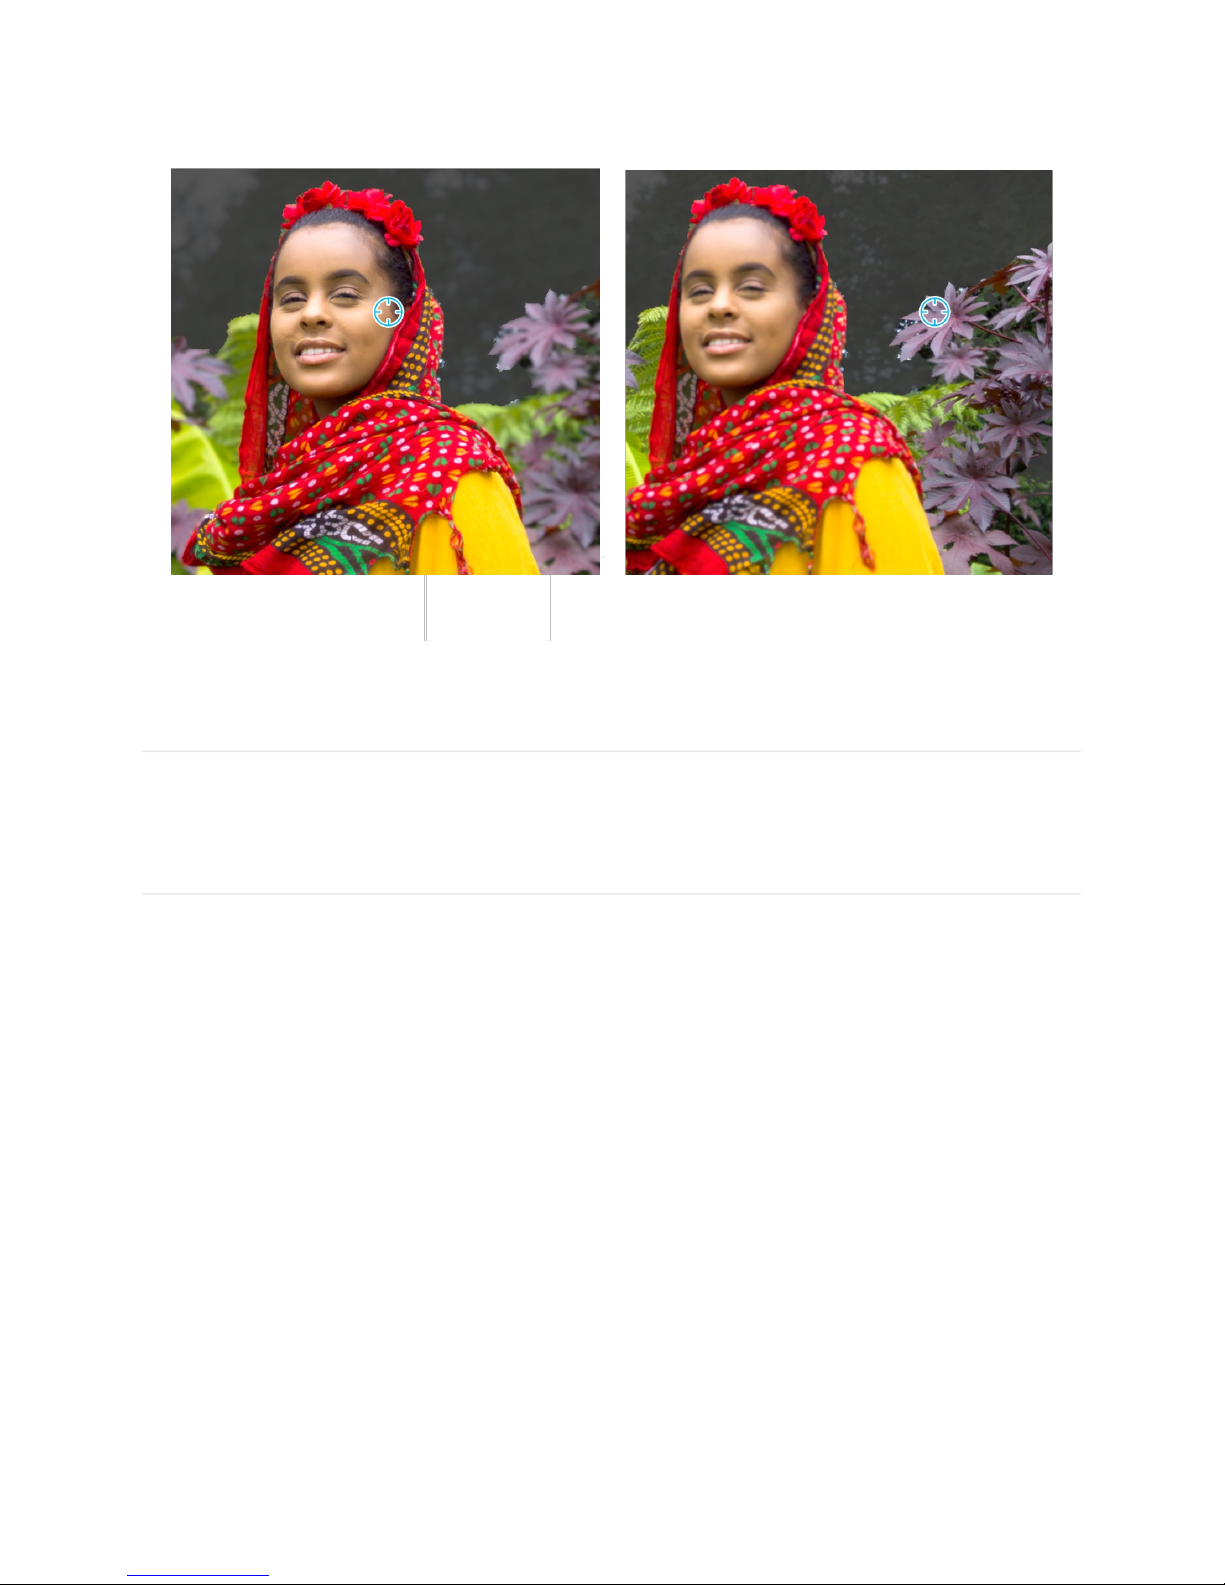
Note: You can disable the grey shaded mask by unchecking "show focal region" below the
focus tool.
Edit depth – refine edge
Adjusting depth effect can occasionally create inconsistent edges on larger, in-focus
objects. The refine edge tool creates a more definitive and accurate difference between two
varying depths along an edge. Use this tool to make jagged boundaries smooth.
Access the refine edge tool. Apply some depth effect to your photo to activate the refine
edge tool. Click “refine edge."
Adjust your brush size. Scroll up or down with your mouse wheel or drag two fingers up or
down on your trackpad to increase or decrease the size of your brush.
50/67
Page 52
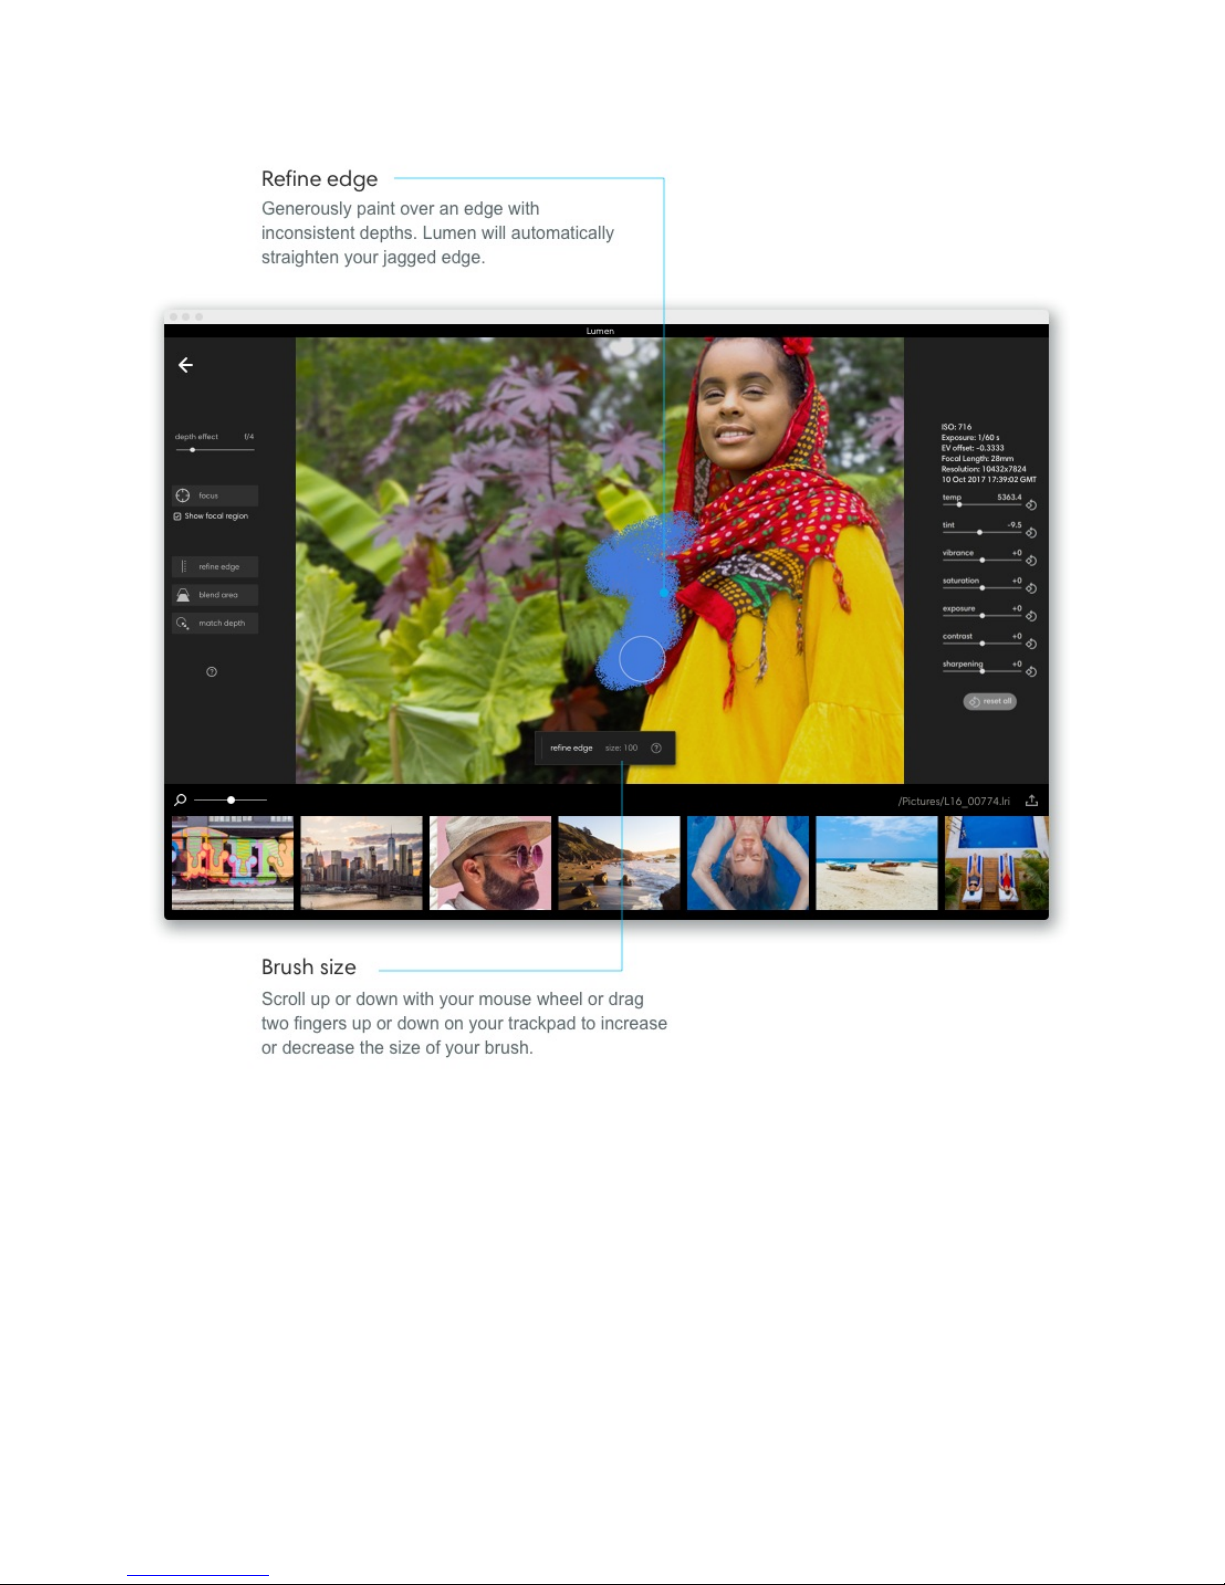
Edit an area using refine edge:
1. Zoom in on the inconsistent area or object you would like to edit.
2. Pick a brush size that’s big enough to generously cover the inconsistent edge. It helps
Lumen to have information from both the foreground and the background.
3. Paint over the area.
4. Let go of your cursor: Lumen will automatically smooth your jagged edge.
51/67
Page 53

Edit depth – blend area
Sometimes there may be inconsistent blur in your photos—especially in areas that stretch
across multiple depths, such as roads, walls, or tables. Use the blend area tool to smooth
the transition between depth gradients.
Access the blend area tool. Apply some depth effect to your photo to activate the blend
area tool. Click "blend area."
Adjust your brush size. Scroll up or down with your mouse wheel, or drag two fingers up or
down on your trackpad to increase or decrease the size of your brush.
52/67
Page 54
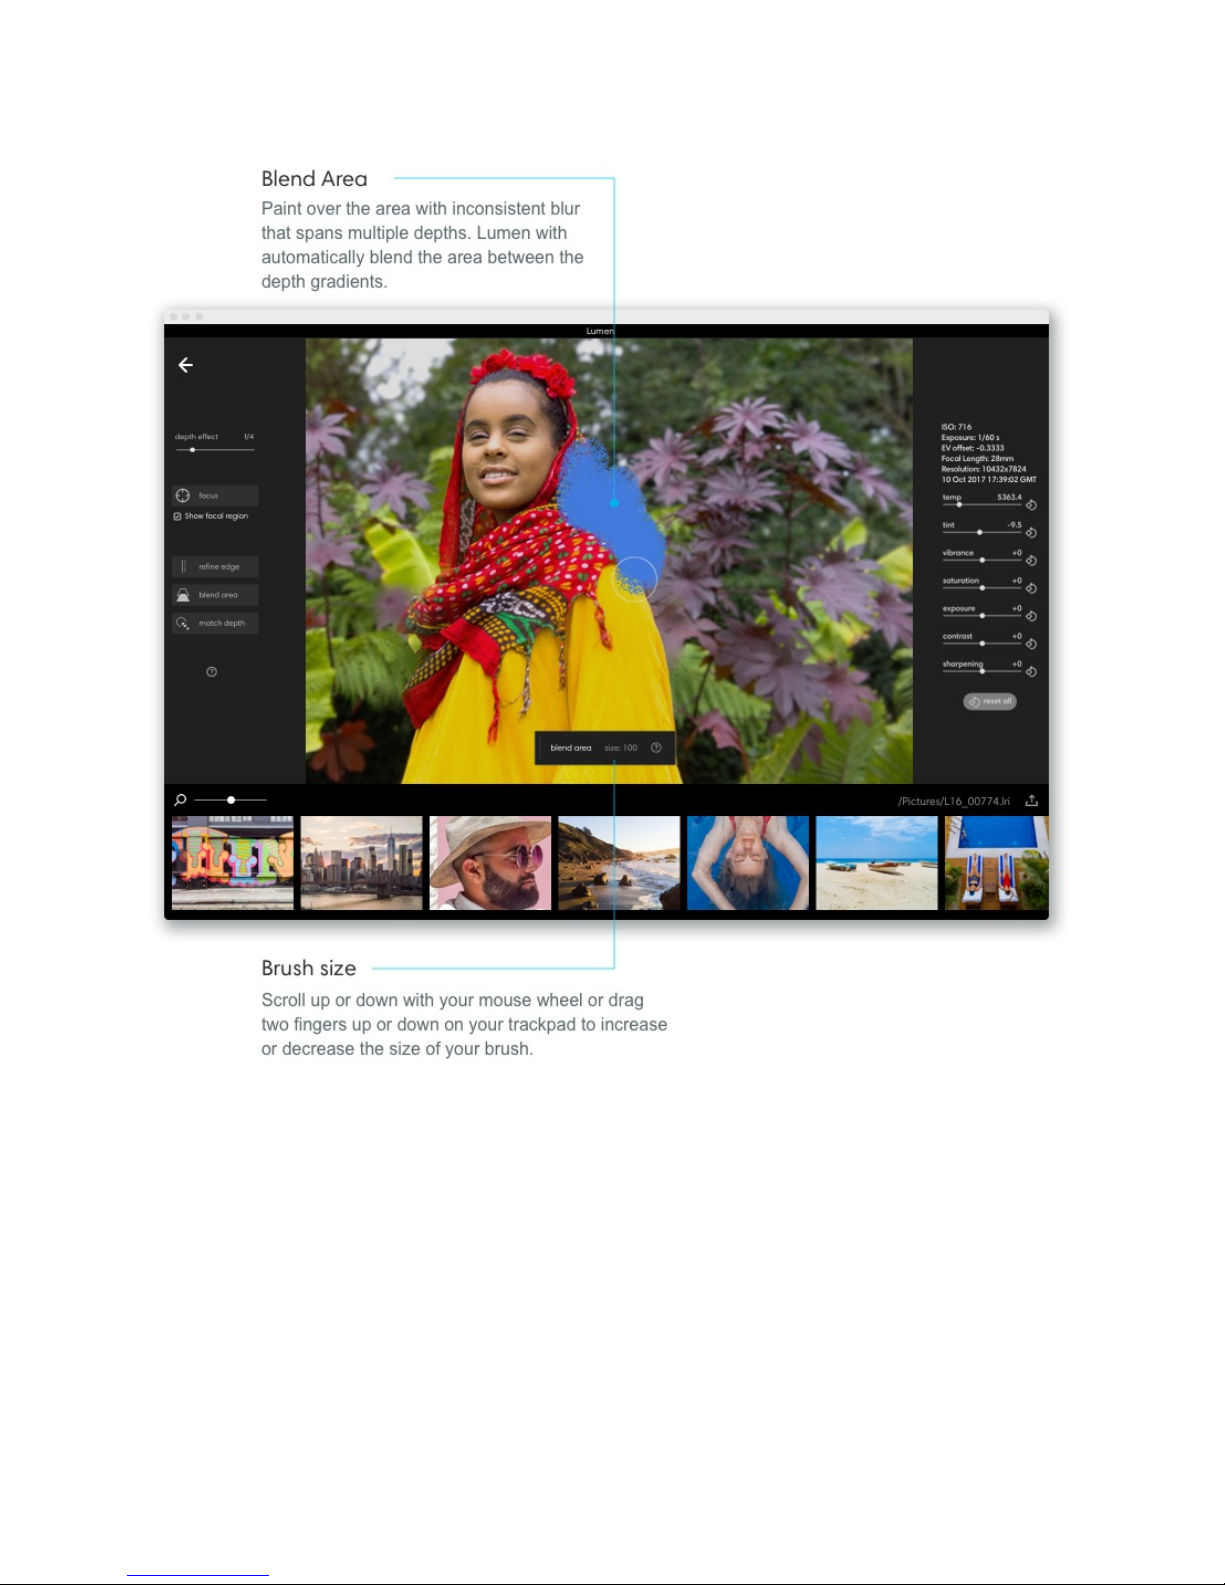
Edit an area with blend area:
1. Zoom in on the inconsistent area or object.
2. Pick a brush size that’s big enough to cover both the inconsistent part and the
surrounding region.
3. Paint a boundary around the inconsistent blur and then fill it in. Lumen will pull the
depth gradients from both the consistent and inconsistent areas and then average
them together.
4. Let go of your cursor: the average depth gradient will be applied to the selected area.
53/67
Page 55

Edit depth – match depth
Fusing together the Light L16’s 10+ images creates a depth map that aligns all of the objects
in your photo. Occasionally, these depth maps contain inconsistencies, especially when
there are similar colors or patterns that overlap. In these cases, Lumen’s algorithms have
difficulty determining what should be in focus and what should be blurred. In addition to the
refine edge and blend area, match depth can be used to fix some of these inconsistencies.
Match depth
This tool lets you apply the same level of depth to separate areas of your photo. You can
use this tool for all sorts of creative edits.
54/67
Page 56
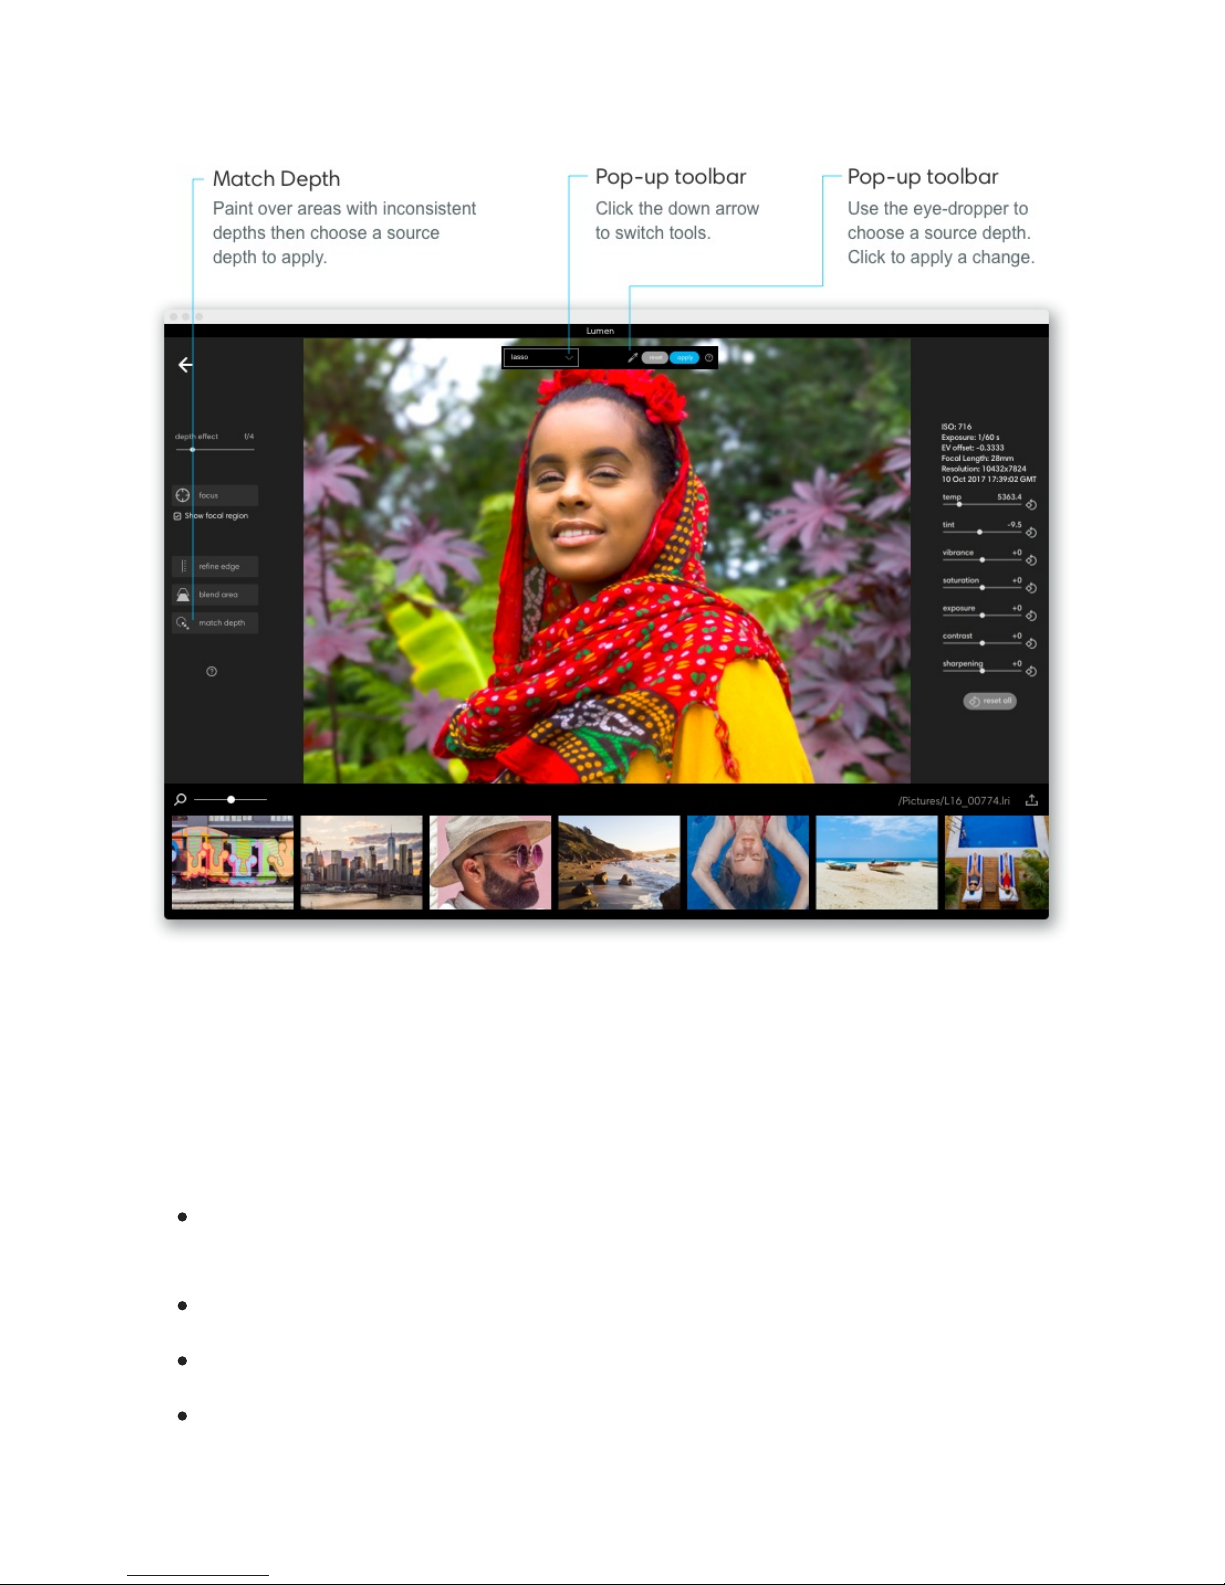
Access the match depth tool. Apply some depth effect to your photo to activate the match
depth tool. Click "match depth" to display the match depth toolbar near the top of your
image.
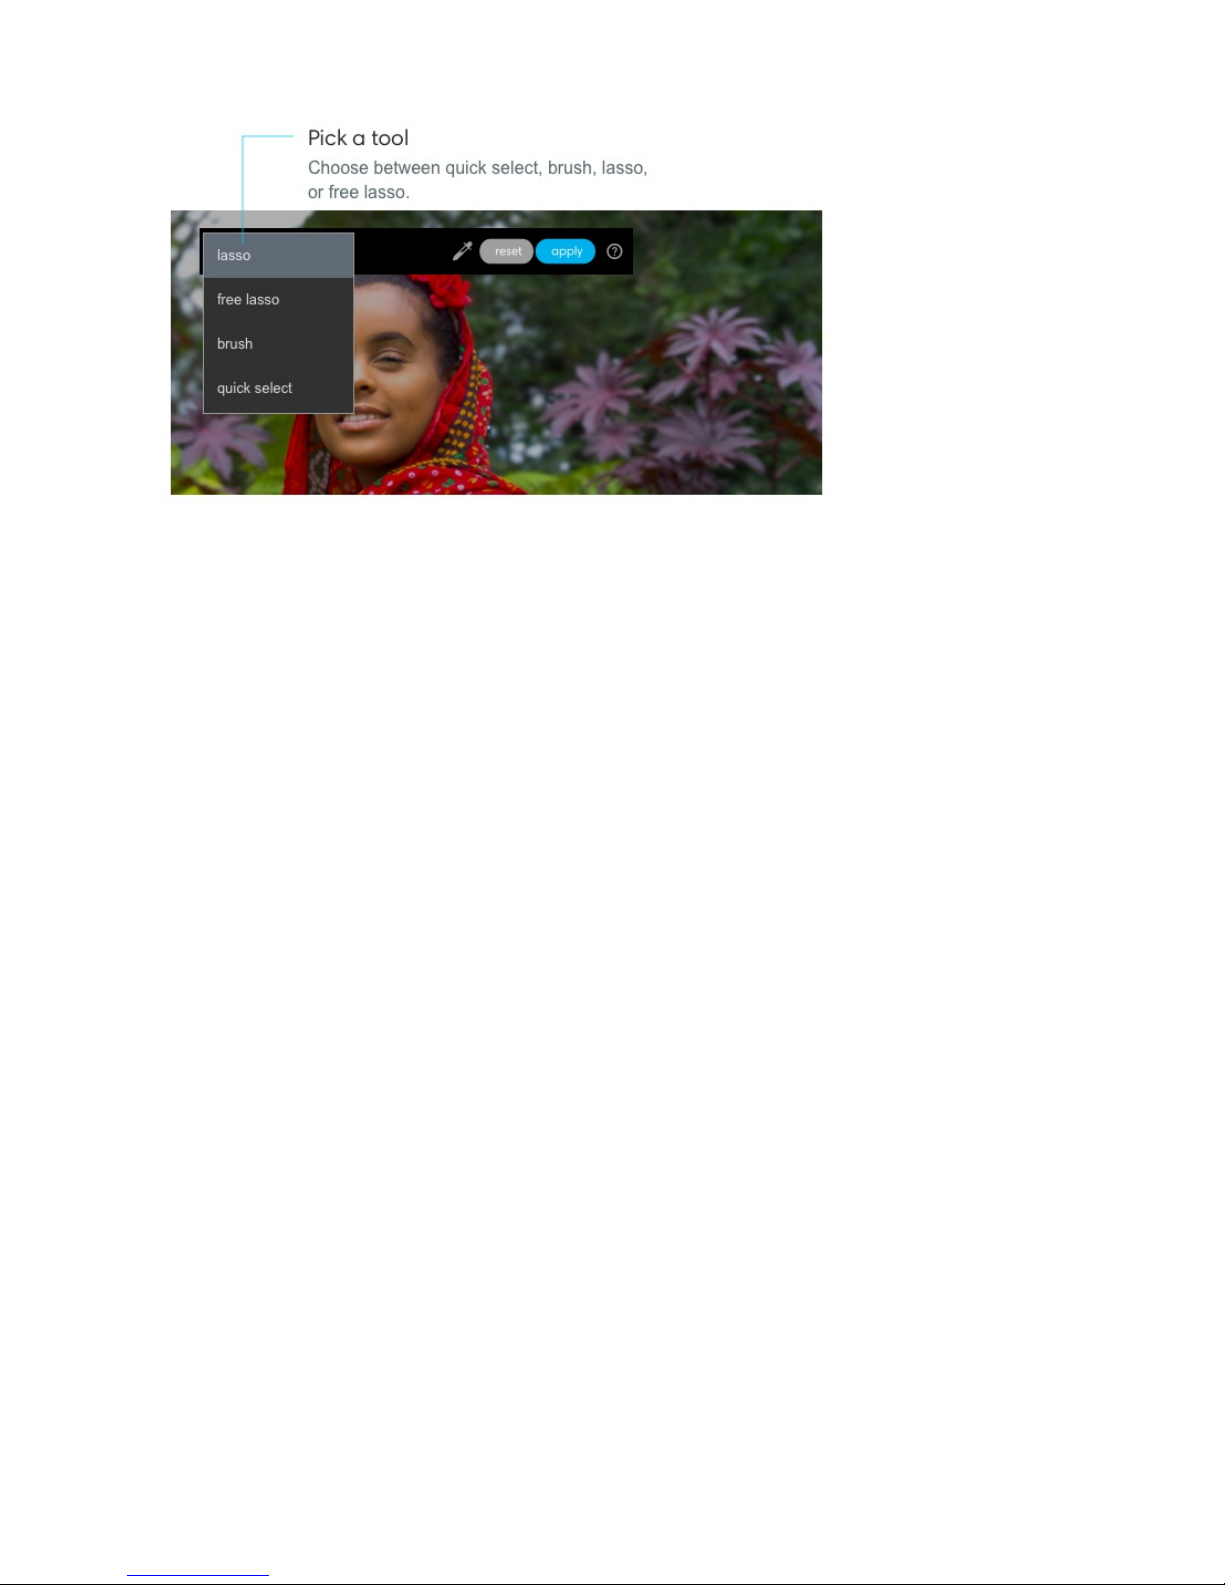
Change your selection method. Click the icon to the left of plus-minus in the pop-up
toolbar and choose a selection tool:
Quick select – Drag to paint. Lumen will make a smart selection based on the area
you are painting over.
Brush – Drag to paint exactly what you want to edit.
Lasso – Click to draw a polygonal shape around the region you want to edit.
Free lasso – Click to freely draw around the region you want to edit.
55/67
Page 57
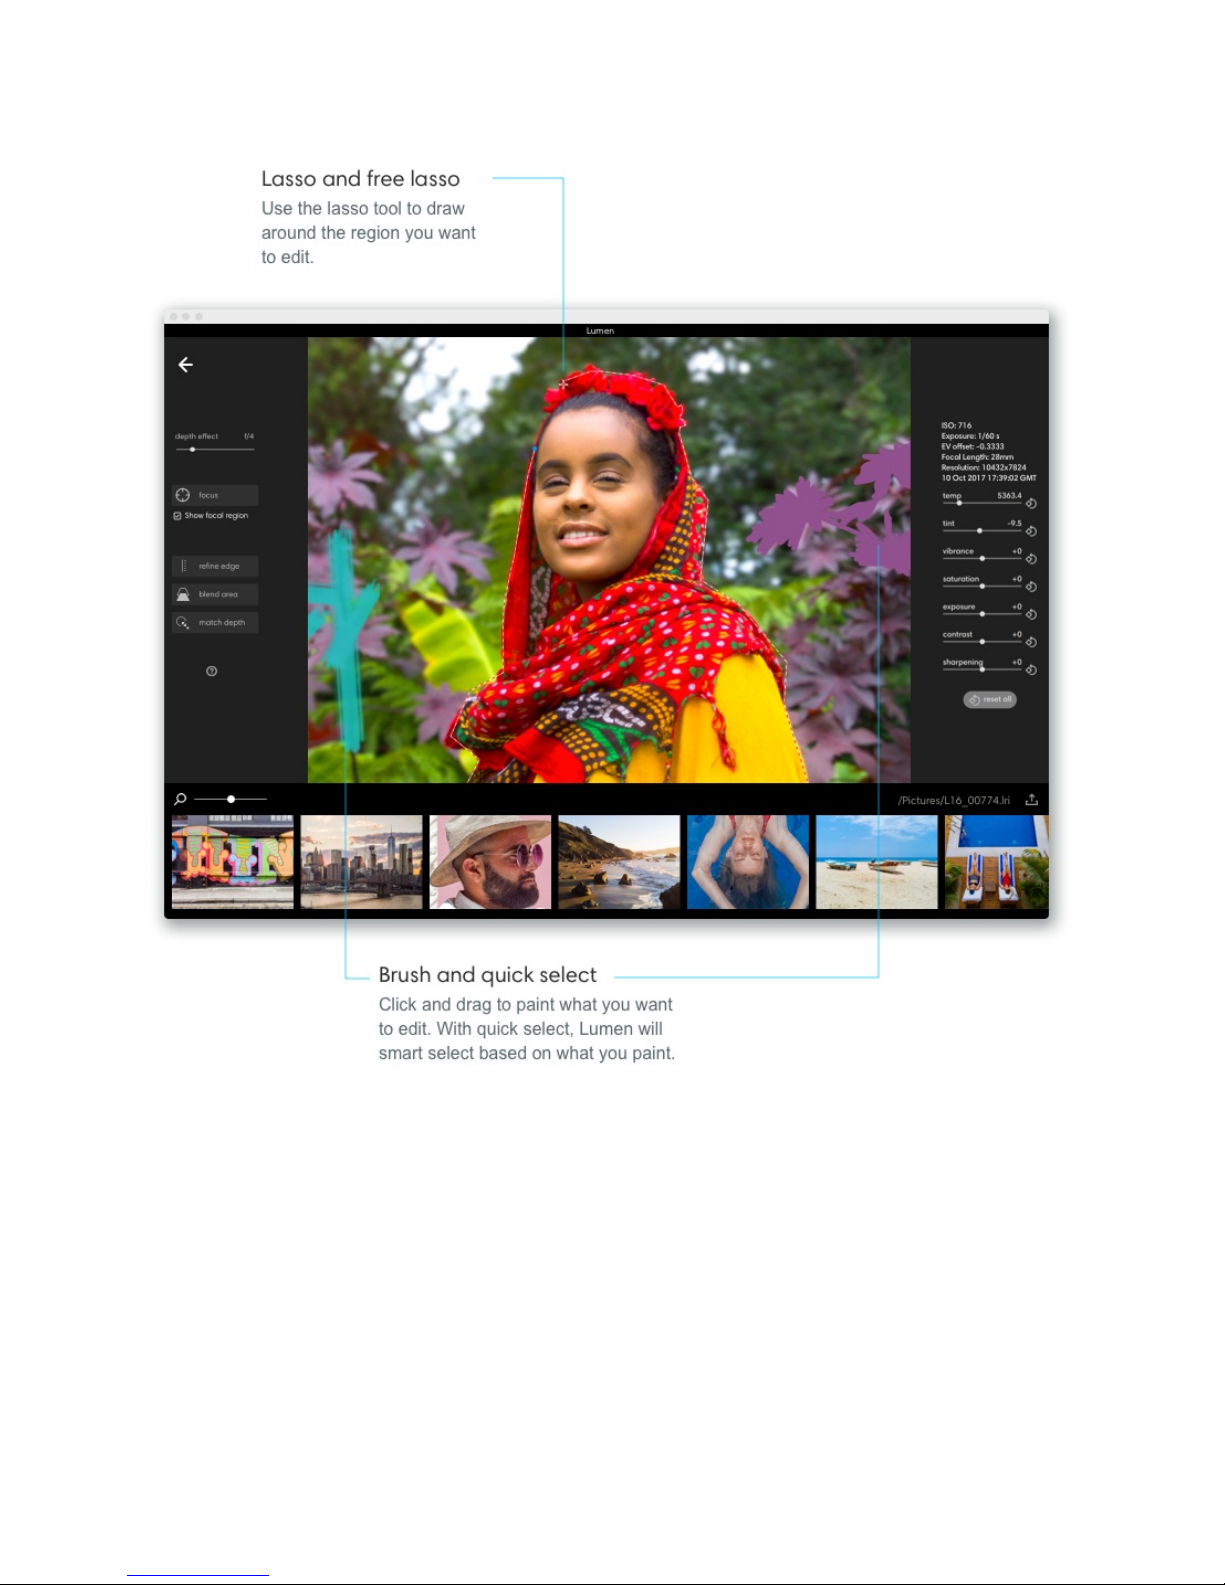
Adjust your brush or point size. Scroll up or down with your mouse wheel or drag two
fingers up or down on your trackpad to increase or decrease the size of your brush. You
cannot adjust point size for the lasso tool or free lasso tool.
Make a selection. Select or paint the area you would like to change. For brush and quick
select, after painting, a pink mask appears over your selected area.
56/67
Page 58
Edit a selection. To remove parts of your selection, click the “–” icon in the pop-up toolbar
and paint the area you want to take away. To add more to your selection, click the “+” icon in
the pop-up toolbar and paint to add to your selection.
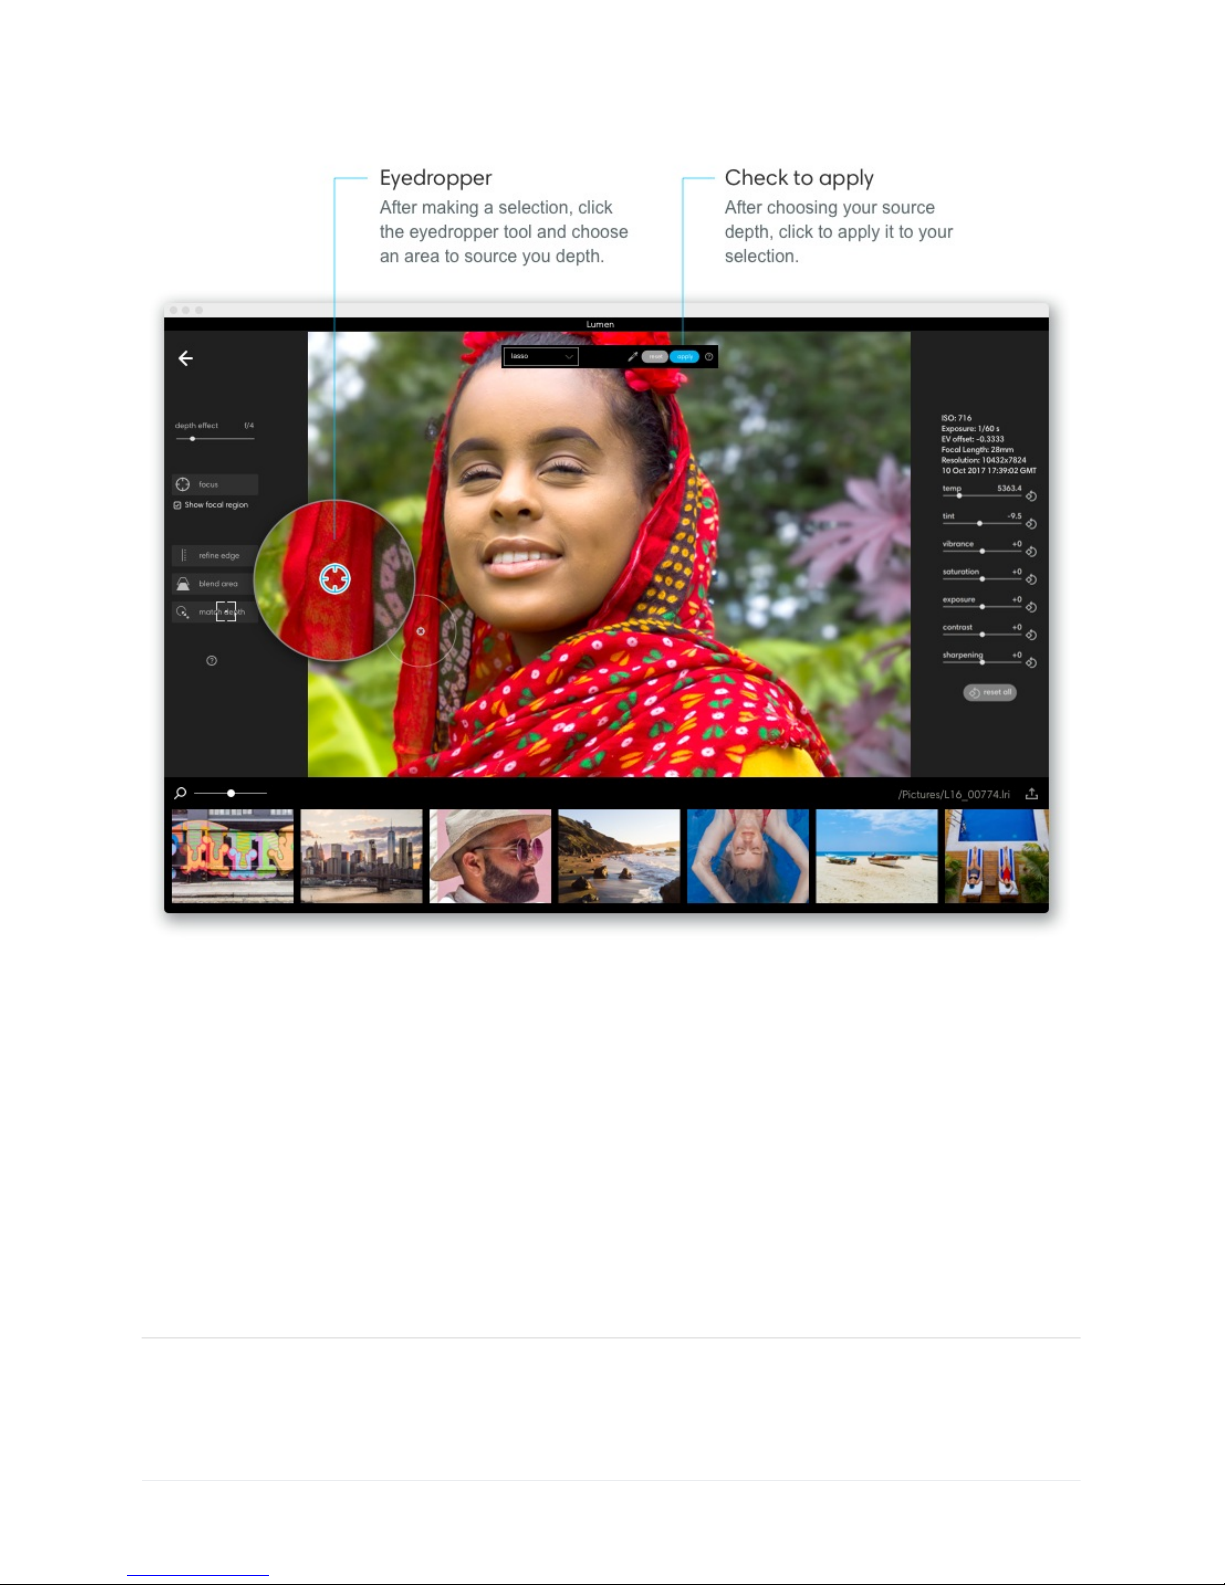
Pick a source depth. Once you're finished refining your selected area, click on the
eyedropper tool and choose a point in the image where you would like to match the depth.
Click "apply" to match your selected area to your source depth.
57/67
Page 59
Undo and redo depth edits. If you make a mistake or want to revert a change, you can click
Edit > Undo depth edit or Redo depth edit.
Reset all depth edits. If you want to start over with depth editing your photo, click Edit >
Reset depth edits. This will reset all edits except for depth effect. To reset depth effect,
choose Edit > Revert to original.
Export as JPGs and DNGs
58/67
Page 60
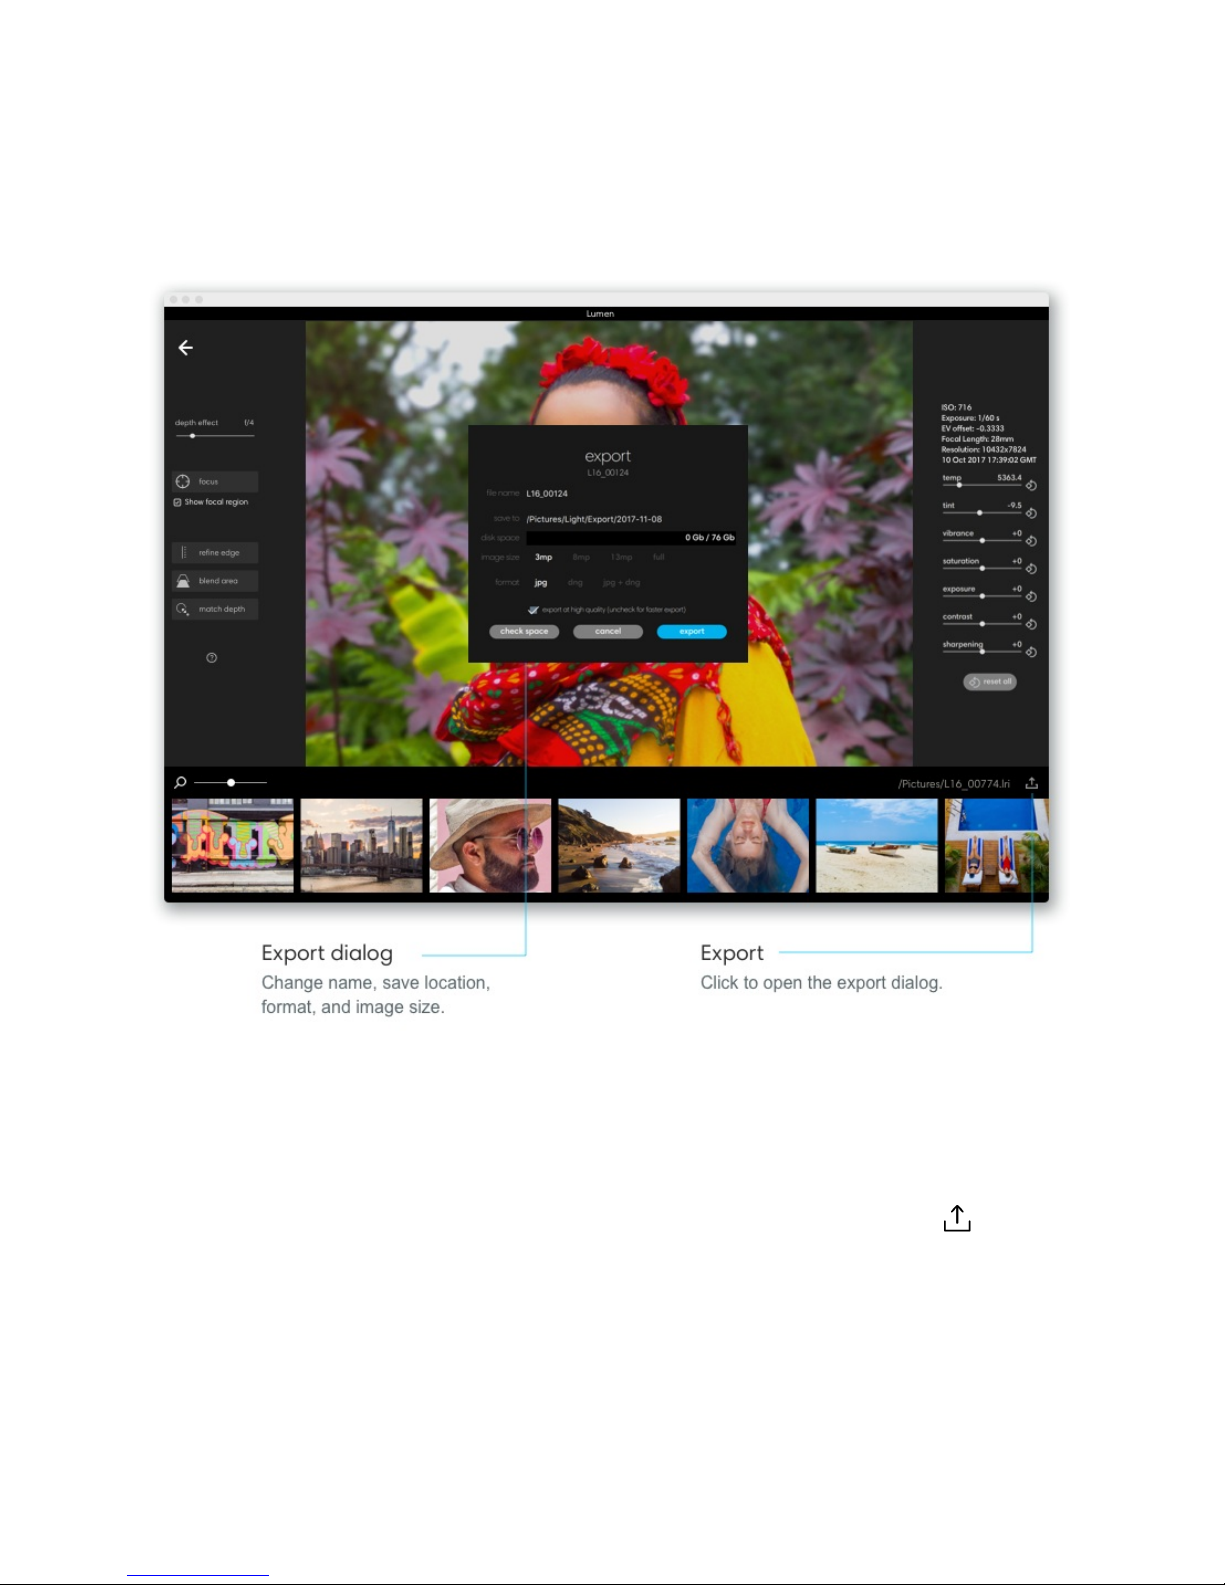
Exporting photos from Lumen writes a new file type and simultaneously processes the
entirety of your photos with Light’s proprietary, computational algorithms. When exporting,
you have the freedom to choose your preferred file type and image size.
Change your filename. If you are exporting just one photo, you can change
the photo’s filename in the export dialog that appears.
Export multiple photos. From the gallery, hold shift and click to select the photos you want
to export. Click the export icon in the bottom right corner of the application window.
Export a single photo. Select the photo you want to export and click the Export icon in
the bottom right corner of the application window.
59/67
Page 61

Choose where to save your photos. In the export dialog, click the field next to ‘save to” to
select the folder where you would like to export your photo.
Choose your desired file format. You can choose between 3 options:
jpg – For quick and easy sharing on social media or email, choose jpg.
dng – If you would like to export the maximum quality file and edit your photos in
another application like Adobe Lightroom or Photoshop, choose dng.
jpg + dng – If you prefer to have both, choose jpg + dng.
Choose your jpg file size and quality. For jpg files you can choose how large of an image
you would like and at what quality you would like it:
3mp – Perfect for social sharing.
8mp – Print up to 8” x 10”.
13mp – Print up to 10” x 13”.
full – Print up to 25” x 34”.
Restart, Reset and Update
Update Light L16
Light L16 over-the-air (OTA) updates.
The Light L16 camera has the amazing ability to update software over the air. OTA updates
allow the Light L16 to acquire new features, better processing, and increased performance
and speed. When new software updates are released by Light, and when your Light L16 is
connected to Wi-Fi, a notification appears at the top of your screen to let you know that a
software update is available.
Update Light L16. Just tap the update notification at the top of your screen and your Light
L16 will download the latest software. After downloading, you will be asked to install it. To be
safe, we recommend transferring your photos from the camera before installing a new
software package.
60/67
Page 62

Note: Depending on what version you are currently using, you may need to perform more
than one update to get to the latest version of the software.
Check for software updates manually. If you miss an update notification or you have
turned off “automatically check for updates,” you can check for a new update manually:
1. Access device settings.
From the home screen, tap the arrow icon on the right to open
the apps menu. Tap the Settings app to open the full device
settings menu.
2. Scroll to the bottom and tap “About L16 Camera.”
3. Tap “Software update.”
4. Tap “Update” to check for any available updates.
Note: To find available updates, your Light L16 must be connected to a wireless network
(see Wi-Fi in device settings
).
Turn on or off “automatically check for updates.”
1. Access device settings.
From the home screen, tap the arrow icon on the right to open
the apps menu. Tap the Settings app to open the full device
settings menu.
2. Scroll to the bottom and tap “About L16 Camera.”
3. Tap “Software update."
4. Tap the checkbox next to “Auto update” to toggle on or off whether Light L16 checks
for updates automatically.
Note: Your Light L16 will only check for updates when you are connected to a wireless
network (see Wi-Fi in device settings
).
From the camera or gallery modes, swipe down three times from the top of the
touchscreen then tap the gear icon in the top right corner.
From the camera or gallery modes, swipe down twice from the top of the
touchscreen to access the Control Panel for access to quick settings. To access
the full menu, tap the gear icon in the top right corner.
61/67
Page 63

Update Lumen
Update Lumen. When a new update is available, Lumen will notify you with a pop-up.
Simply click update to install and relaunch with the latest version.
Check for an update. To check and see if you are on the latest version of Lumen, in the
menu bar click Lumen > Check for Updates...
On November 13th, we released a completely revamped version of Lumen, our desktop
application. Lumen v2.0, while still beta, has significant improvements in speed and
performance. In order to view and edit images shot with the latest version of our camera
software, you will also need the latest version of Lumen.
If you already have Lumen, you must uninstall your current version of Lumen before
downloading and installing Lumen v2.0.
Follow these instructions to get the latest version of Lumen:
Mac
Uninstall Lumen 1.0:
1. Open the Applications folder and find Light Lumen Beta.
2. Drag the Light Lumen Beta icon to the trash to uninstall.
Install Lumen v2.0:
1. Go to https://light.co/lumen
and click the Mac download button.
2. Once the download is complete, open the installer (called ‘lumen.dmg’).
3. In the pop-up window, drag Lumen to the Applications folder. Your installation is
complete.
62/67
Page 64

4. Open the Applications folder and double-click Lumen to launch the app.
Windows
Uninstall Lumen 1.0:
1. Open the start menu and click settings (gear icon).
2. Go to apps and find Light Lumen Beta.
3. Click Light Lumen Beta, then click uninstall.
Install Lumen v2.0:
1. Go to https://light.co/lumen
and click the Windows download button.
2. Once the download is complete, click the installation file (called lumeninstall.exe) to
open the setup window.
3. Click "next" to walk through the installer setup until you reach the installation page.
Click install.
4. Once complete, click finish and open Lumen v2.0.
Restart Light L16
If something isn't working correctly, there are two ways you can try to restart your Light L16.
Restart the Light L16 Camera app. Swipe down from the top of the touchscreen to reveal
the Android icons on the right.
Tap the square icon to show your open apps. Tap the X in the top right corner of the Light
L16 Camera app to close it.
Note: If you don't see the square icon, you need to unlock your device. Tap the circle icon,
then swipe up from the bottom and enter your pin, passcode, or pattern. The square icon will
appear on the right.
TM
63/67
Page 65

Restart your Light L16. The easiest way to restart your Light L16 is by power cycling it.
Press and hold the Power button until the Power off option appears on your screen. Tap it to
power off.
If you are still experiencing issues with your camera, please contact us and we will help you
troubleshoot.
Reset Light L16 settings
Reset Light L16 settings. From the home screen, tap the arrow icon on the right to open
the apps menu. Tap the Settings app to open the device settings menu. Go to Personal and
tap Backup & reset > Factory data reset.
Tap the reset camera button to erase all data from your L16 camera’s internal storage. This
includes all system data and settings, photos, and other user data.
Safety, Handling and Support
Care for your Light L16
Storing your Light L16. Included with your Light L16 is a soft case for storing the camera.
The outside of the case is made of durable eco-yarn to protect the camera when it’s in your
pocket or bag. The inside of the case is made of microfiber cloth to help clean your Light
L16.
How to clean your Light L16:
Inside the soft case is an attached microfiber cleaning cloth. To access the cloth, put
your finger inside the case, find it, then pull straight out. The cloth stays attached to
the case.
The Light L16’s glass surfaces are made of extremely durable Gorilla Glass. To clean
the front or back surface of your Light L16, wipe in circular motions with a lint-free,
non-abrasive cloth. If necessary, you can also lightly dampen the cloth with water.
64/67
Page 66

How NOT to care for your Light L16:
Do not use cleaning products or compressed air when cleaning your Light L16.
It is best not to clean Light L16 while it’s charging.
Do not dry your Light L16 using any external heat source, such as a blow dryer.
Care for your Light L16's lithium-ion battery
Like many other electronic products, the Light L16 is powered by a lithium-ion battery. We’ve
heard all kinds of advice on how to retain battery life, so we wanted to clear up some of the
confusion. Here are a few good habits that will optimize your battery’s lifespan:
Your battery is under less stress when it’s between 40% and 80% charged. Whenever
possible, try to stay in that range. This is especially helpful to remember if you’ll be
storing your camera for long periods of time.*
Frequently draining your battery to 0% can hurt your battery’s long-term health.
Completely discharging your battery once a month, however, helps the camera stay
calibrated.
Leaving your camera plugged in even when the battery is full can hurt battery life.
Once you notice your camera’s battery is at 100%, go ahead and unplug it.
Keep your camera in cool and dry environments, particularly for extended periods of
storage. This will help keep your battery in tip-top condition.
*Keeping your battery in the range of 40%-80% is ideal, but not necessary. Your battery
won’t be destroyed if it goes above or below this range.
65/67
Page 67

Help Light make the L16 better
We want your Light L16 to get better over time. You can help by automatically sending
diagnostic reports to Light. These reports are incredibly helpful for us to know what is
working and what to improve. (And it's all anonymized.)
Turn on diagnostic report.
1. Accessing device settings:
From the home screen, tap the arrow icon on the right to open
the apps menu. Tap the Settings app to open the full device
settings menu.
2. Scroll to the bottom and tap “About L16 Camera.”
3. Tap "User Experience Program."
4. Tap the check box next to "Diagnostics report" to turn it on.
Technology Partners
Light has partnered with several world-class partners in order to create the L16. Some of
those partners include: Qualcomm, Global Unichip, Taiwan Semiconductor Manufacturing
Company.
TouchSense © Technology licensed from Immersion
Corporation. TouchSense and other Immersion
software contained herein are protected under one or
more of the U.S. Patents found at the following
address: www.immersion.com/trademarks-and-
patent-markings/ and other patents pending.
This product uses Assertive Display technology by Apical Limited.
From the camera or gallery modes, swipe down three times from the top of the
touchscreen then tap the gear icon in the top right corner.
66/67
 Loading...