

Page 1
Liftup A/S | Hagensvej 21| DK-9530 Støvring | Denmark | T: +45 96 86 30 20 | M: [email protected] | www.liftup.dk
User Manual
RAIZER
®
USER MANUAL – RAIZER® – GB VERSION 1.4
Page 2

Liftup A/S | Hagensvej 21 | DK-9530 Støvring | Denmark | T: +45 96 86 30 20 | M: [email protected] | www.liftup.dk | CVR DK-1015 3964
USER MANUAL – RAIZER – GB VERSION 1.4
2
Contents
1. Foreword.........................................................................................................................................................3
1.1 Quick Guide ..............................................................................................................................................3
2. EC declaration of conformity .....................................................................................................................4
3. Type certificate ..............................................................................................................................................5
4. Terms of use ...................................................................................................................................................6
5. Technical specifications ................................................................................................................................7
6. Safety instructions .........................................................................................................................................8
6.1 Assembly ....................................................................................................................................................8
6.2 Avoiding personal injury. ........................................................................................................................8
6.3 Overload. ...................................................................................................................................................8
7. Personal safety ...............................................................................................................................................9
7.1 Avoiding personal injury .........................................................................................................................9
7.2 Seatbelt .......................................................................................................................................................9
7.3 Handling ................................................................................................................................................... 10
8. Functionality ................................................................................................................................................. 11
9. Prior to use .................................................................................................................................................. 11
10. Operation ..................................................................................................................................................... 12
10.1 Assembly and use of the Raizer® ....................................................................................................... 12
10.2 Assembly of left-hand side .................................................................................................................. 13
10.3 Assembly of right-hand side ................................................................................................................ 14
10.4 Lifting of person ..................................................................................................................................... 16
10.5 Operation of the Raizer® by means of seat buttons .................................................................... 18
10.6 Operation of the Raizer® by means of remote control ............................................................... 20
10.7 How to pair the remote control transmitter and receiver ........................................................ 21
11. Disassembly ................................................................................................................................................. 22
12. Charging of the Raizer® ............................................................................................................................ 23
13. Maintenance ................................................................................................................................................. 24
13.1 Cleaning: .................................................................................................................................................. 24
13.2 Mechanical maintenance ...................................................................................................................... 24
13.3 Remote control* ................................................................................................................................... 24
14. Maintenance checklist ................................................................................................................................ 25
15. Service log book ......................................................................................................................................... 27
16. Spare parts ................................................................................................................................................... 28
17. Troubleshooting ......................................................................................................................................... 34
18. Electrical diagram........................................................................................................................................ 35
19. Disposal ........................................................................................................................................................ 36
20. Right of complaint ...................................................................................................................................... 36
Page 3

Liftup A/S | Hagensvej 21| DK-9530 Støvring | Denmark | T: +45 96 86 30 20 | M: [email protected] | www.liftup.dk | CVR DK-1015 3964
3
USER MANUAL – RAIZER – GB VERSION 1.4
1. Foreword
Congratulations on purchasing your new Raizer.
This is an original user manual for your new Raizer.
NB: It is important to read this manual before using
the Raizer.
The Raizer is a battery-powered mobile lifting chair
which raises a fallen person up to an almost standing
position in a few minutes. It can be operated by only a
single assistant and requires no physical input from
the assistant aside from a helping hand.
The Raizer is simple to operate by means of the
control panel mounted on the side of the seat, or via
a remote control*.
*Supplementary equipment
1.1 Quick Guide
There is a supplementary Quick Guide in the pocket of the
carrying bag.
You can store this user manual in the same place.
Scan to retrieve an extra Quick Guide
Page 4
Liftup A/S | Hagensvej 21 | DK-9530 Støvring | Denmark | T: +45 96 86 30 20 | M: [email protected] | www.liftup.dk | CVR DK-1015 3964
USER MANUAL – RAIZER – GB VERSION 1.4
4
2. EC declaration of conformity
Manufacturer: Liftup A/S
Address: Hagensvej 21, DK-9530 Støvring
Telephone: +45 9686 3020
Reg. no. 523867 - Danish Medicines Agency
Hereby declares that:
Equipment: RAIZER
®
Battery operated mobile lifting chair
Raizer is in compliance with:
Medical Device Directive MDD 93/42/EEC. Medical devices under class 1 (according to
rule 1of annex IX of the Council Directive MDD 93/42/EEC).
Conformity assessment was performed according to Annex VII.
EMC Directive 2014/30/EU.
ROHS-Directive: 2011/65/EU.
RED 2014/53/EU, Radio Equipment Directive.
Raizer meets the relevant requirements notably in following standards:
EN/ISO 10535:2006 Hoist for the transfer of disabled persons
Confirmed by Danish Technological Institute, certificate no. 222
EN 12182:2012 Technical aids for disabled general requirements and test
methods
EN 300 440 Electromagnetic compatibility and Radio spectrum Matters (ERM)
The above products are manufactured under the following management system:
EN ISO 9001: 2008 Quality management, Certificate No. 44 100 117583
EN 14971: 2012 Application of risk management to medical devices
Director Flemming Eriksen
Title Name
Liftup A/S, Hagensvej 21, DK-9530 Støvring
Company
15-09-2016 _____________________________
Date Signature
Page 5

Liftup A/S | Hagensvej 21| DK-9530 Støvring | Denmark | T: +45 96 86 30 20 | M: [email protected] | www.liftup.dk | CVR DK-1015 3964
5
USER MANUAL – RAIZER – GB VERSION 1.4
3. Type certificate
INSERT COPY OF CE-MARK
HERE
Page 6
Liftup A/S | Hagensvej 21 | DK-9530 Støvring | Denmark | T: +45 96 86 30 20 | M: [email protected] | www.liftup.dk | CVR DK-1015 3964
USER MANUAL – RAIZER – GB VERSION 1.4
6
4. Terms of use
The Raizer should only be used to bring a person lying on the floor to a seated or almost
standing position, who cannot do so by themselves. The person may then require relocation
from this position.
The max. load of the Raizer is 150kg with max. 1 person at a time on the chair.
The max. load is also stated on the CE-mark on the rear of the seat. The Raizer can be used
approx. 40 times at full load on a full charge. A charger is included with your Raizer.
Read this user manual thoroughly before using the device.
The owner of the device is obliged to maintain it according to the maintenance
guide in section 13.
Lifting capacity: Max. 150 kg.
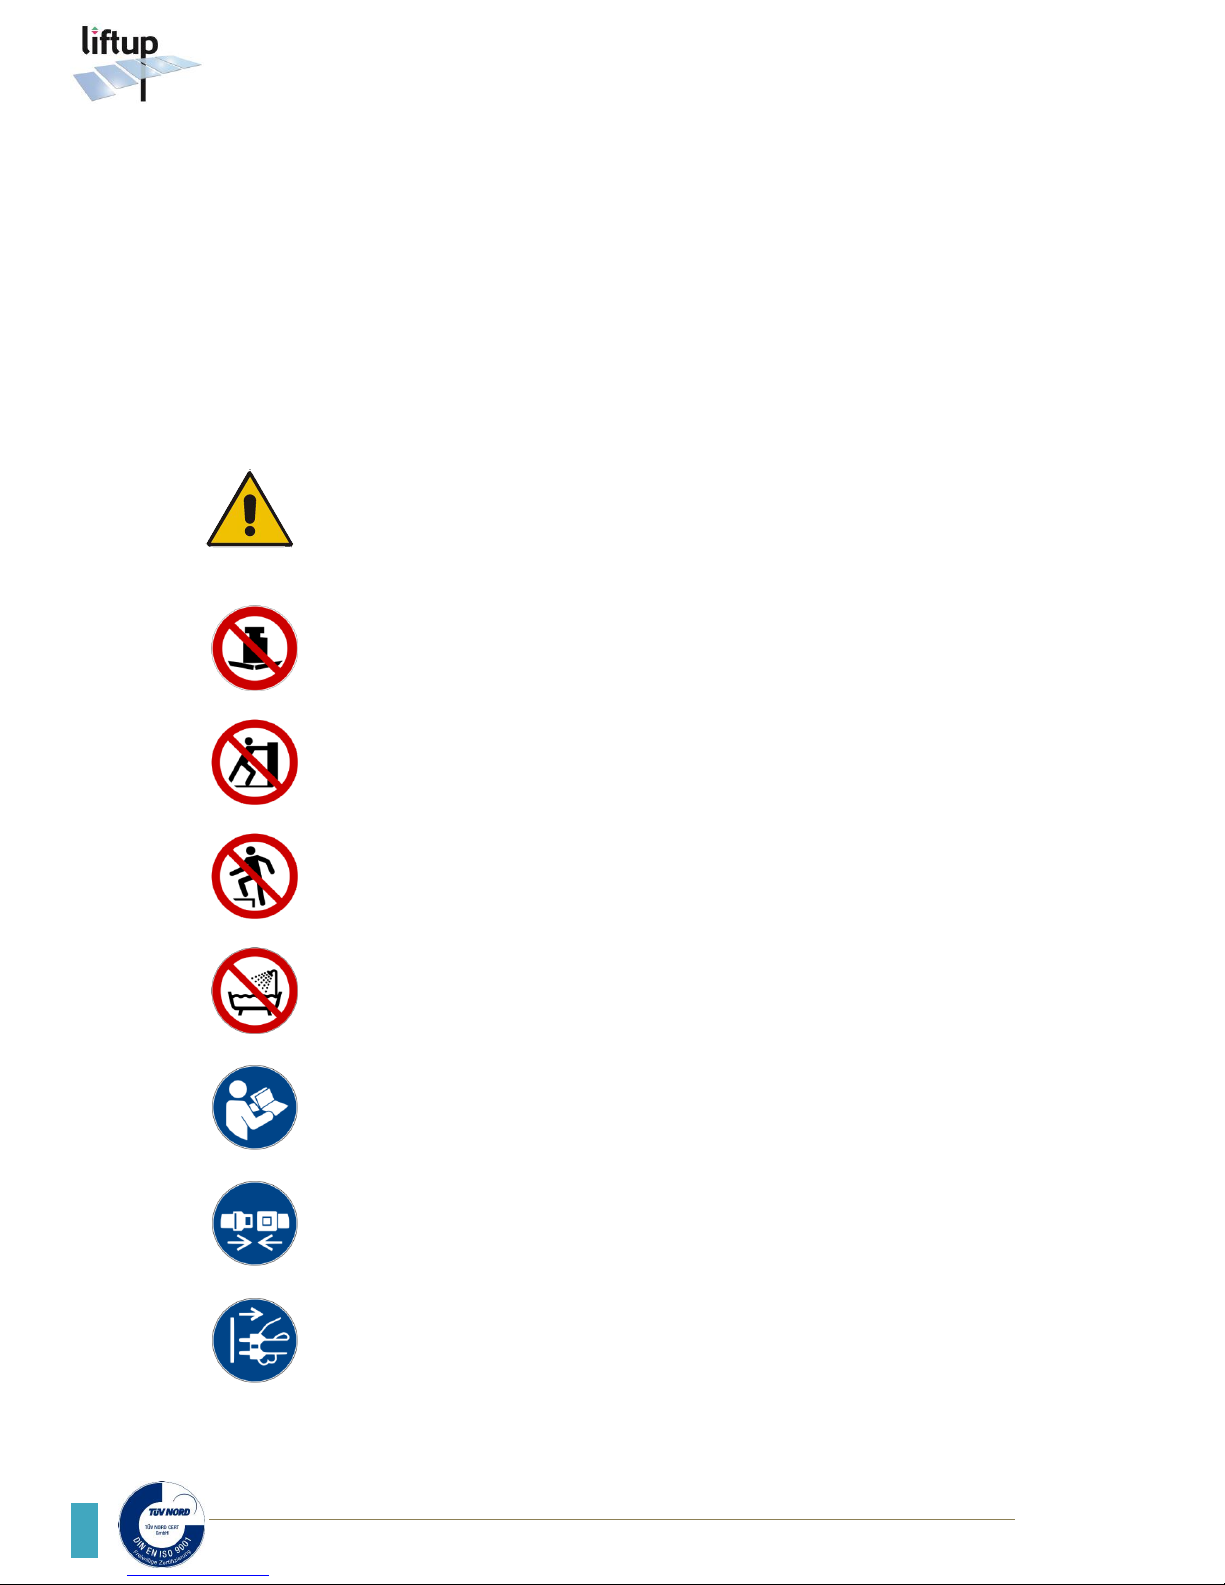
Do not push or transport the lifting chair while the person is sitting in it.
Do not stand on the lifting chair.
Do not use this device in or around water – see 13.1.
Read the user manual thoroughly before using this device.
Fasten the seatbelt before performing a lift.
Disconnect and remove the charger before use.
Page 7
Liftup A/S | Hagensvej 21| DK-9530 Støvring | Denmark | T: +45 96 86 30 20 | M: [email protected] | www.liftup.dk | CVR DK-1015 3964
7
USER MANUAL – RAIZER – GB VERSION 1.4
5. Technical specifications
Example:
Technical specifications:
Charger (2 pcs.): 12V. 90-264V
12 V car adapter
Battery: LiFePo4, 12V, 5AH
Number of lifts on a full charge: 40 with a max. load.
Approx. 100 with an average load.
Duty Cycle: 1 min. / 5 min.
Charging time: Max. 6 hours (230V charger)
Charging of depleted battery: 10–15 min = 1 lift
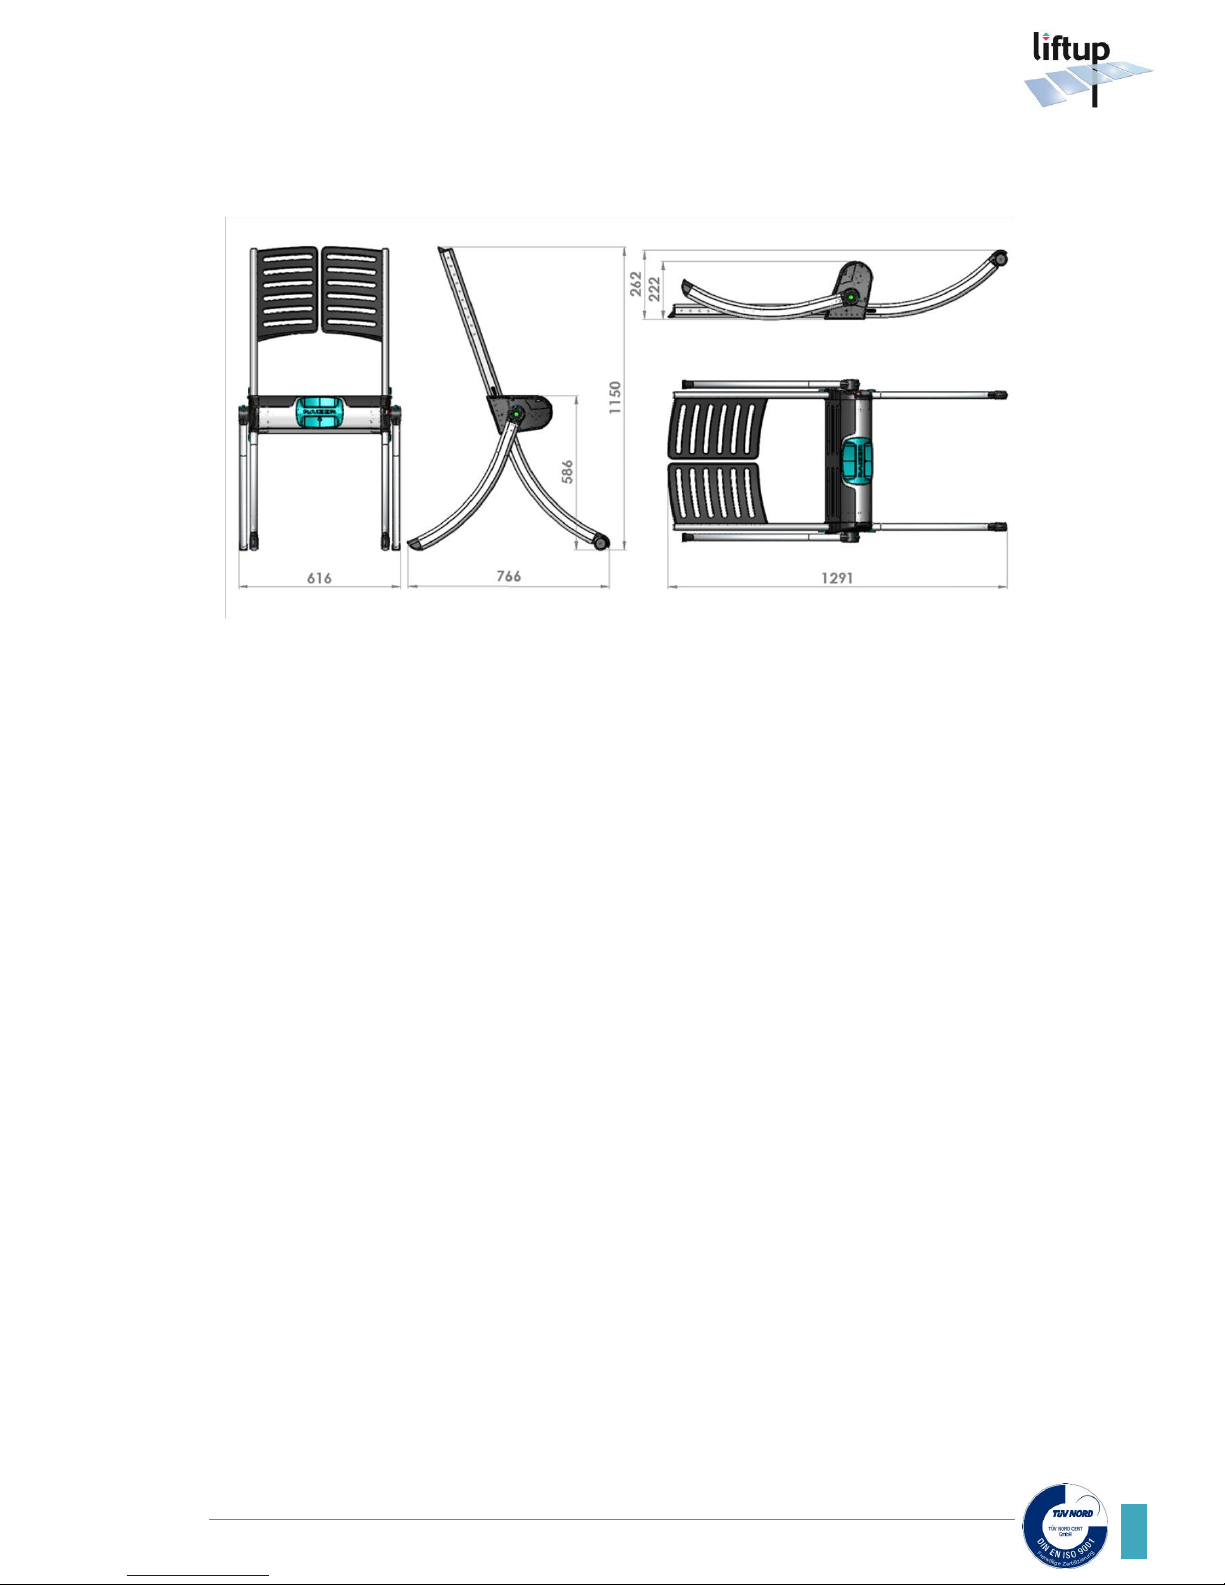
Dimensions (L x W x H): Standing 766 x 616 x 1150 mm
Lying 1291 x 616 x 262 mm
Weight: Seat 9kg. + legs and back rest 4kg. – total 13kg.
Lifting capacity: Max. 150kg.
Lifting time: 20-30 secs.
Noise level: < 70 dB A
Working temperature: +5ºC to +40ºC
Storage temperature: -25ºC to +70ºC
Water and dust: IP 42
Expected service life: > 5 years
Patented technology
Registered design
Right reserved to make technical modifications
Page 8
Liftup A/S | Hagensvej 21 | DK-9530 Støvring | Denmark | T: +45 96 86 30 20 | M: [email protected] | www.liftup.dk | CVR DK-1015 3964
USER MANUAL – RAIZER – GB VERSION 1.4
8
6. Safety instructions
6.1 Assembly
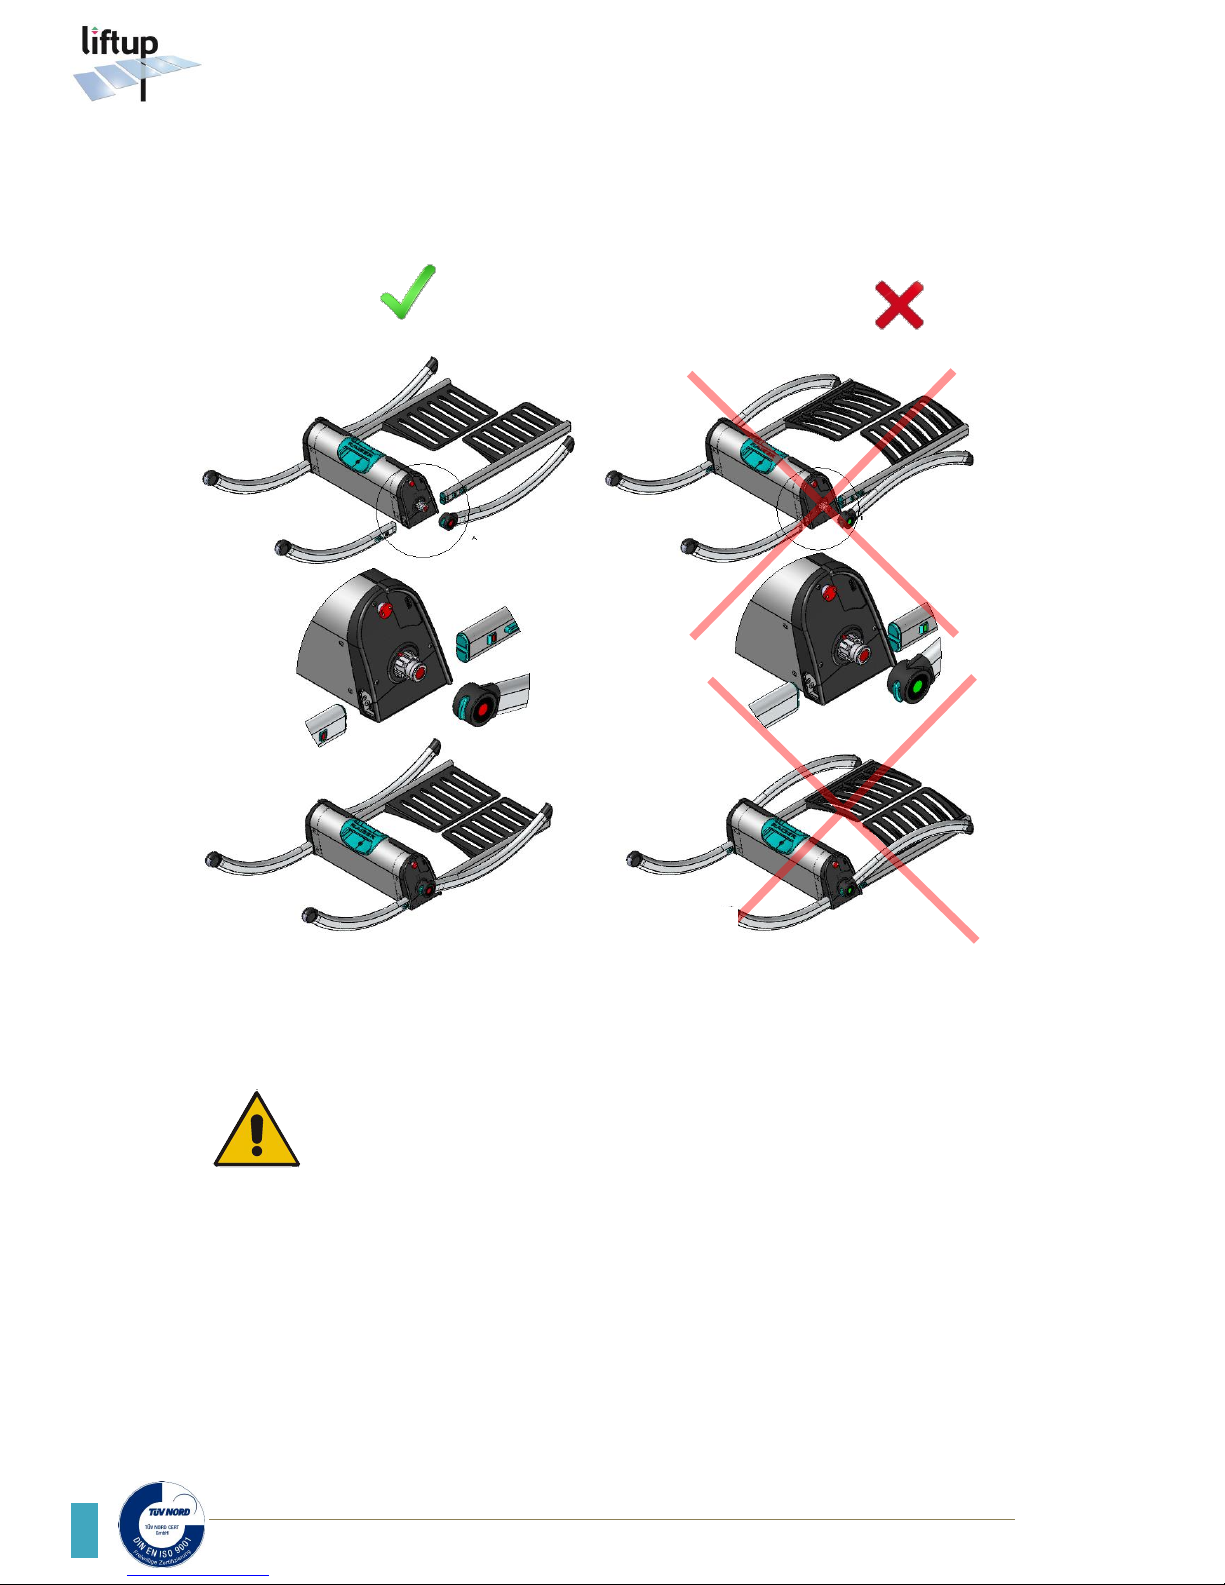
Correct assembling of legs and back rest: Incorrect assembling of legs and back rest:
Observe green marks on right-hand side Observe red marks on left-hand side
6.2 Avoiding personal injury.
Although the Raizer comes fitted with various safety features never use it if
unintended persons or animals are close by, as there may otherwise be a risk of
crushing. Never allow children to play with the Raizer.
6.3 Overload.
In order to avoid damage to the device in the event of overload (max. 150kg), it is fitted with
an overload cutout, which when triggered halts the lifting chair and issues an audible alarm. In
the event of overload, run the chair down to the horizontal position/floor level.
With heavy loads on the Raizer, the chair may sink slowly if it is not in operation – this is
completely normal. For safety reasons the Raizer is designed to sink slowly under heavy loads.
This has been introduced in order to avoid mechanical breakage in the event of overload.
Green = right-hand side
Red = left-hand side
Page 9
Liftup A/S | Hagensvej 21| DK-9530 Støvring | Denmark | T: +45 96 86 30 20 | M: [email protected] | www.liftup.dk | CVR DK-1015 3964
9
USER MANUAL – RAIZER – GB VERSION 1.4
7. Personal safety
7.1 Avoiding personal injury
- To avoid personal injury it is NOT permitted to use the lifting chair when someone or
something is at risk of being injured by crushing, cutting, falling, slipping, or similar.
- It is important that the assistant ensures that the chair can move without putting
anyone or anything at risk.
- Be extra careful when there are children and physically or mentally challenged people
on or near the chair, as these groups cannot always be expected to be able to foresee
the possible consequences of its movements.
- Never load more on the chair than the 150kg stated on the loading sign as the
maximum load.
- DO NOT use the lifting chair until the person is secured with the seat-fitted seatbelt.
7.2 Seatbelt
- The seat is fitted with a seatbelt to secure the person using the chair.
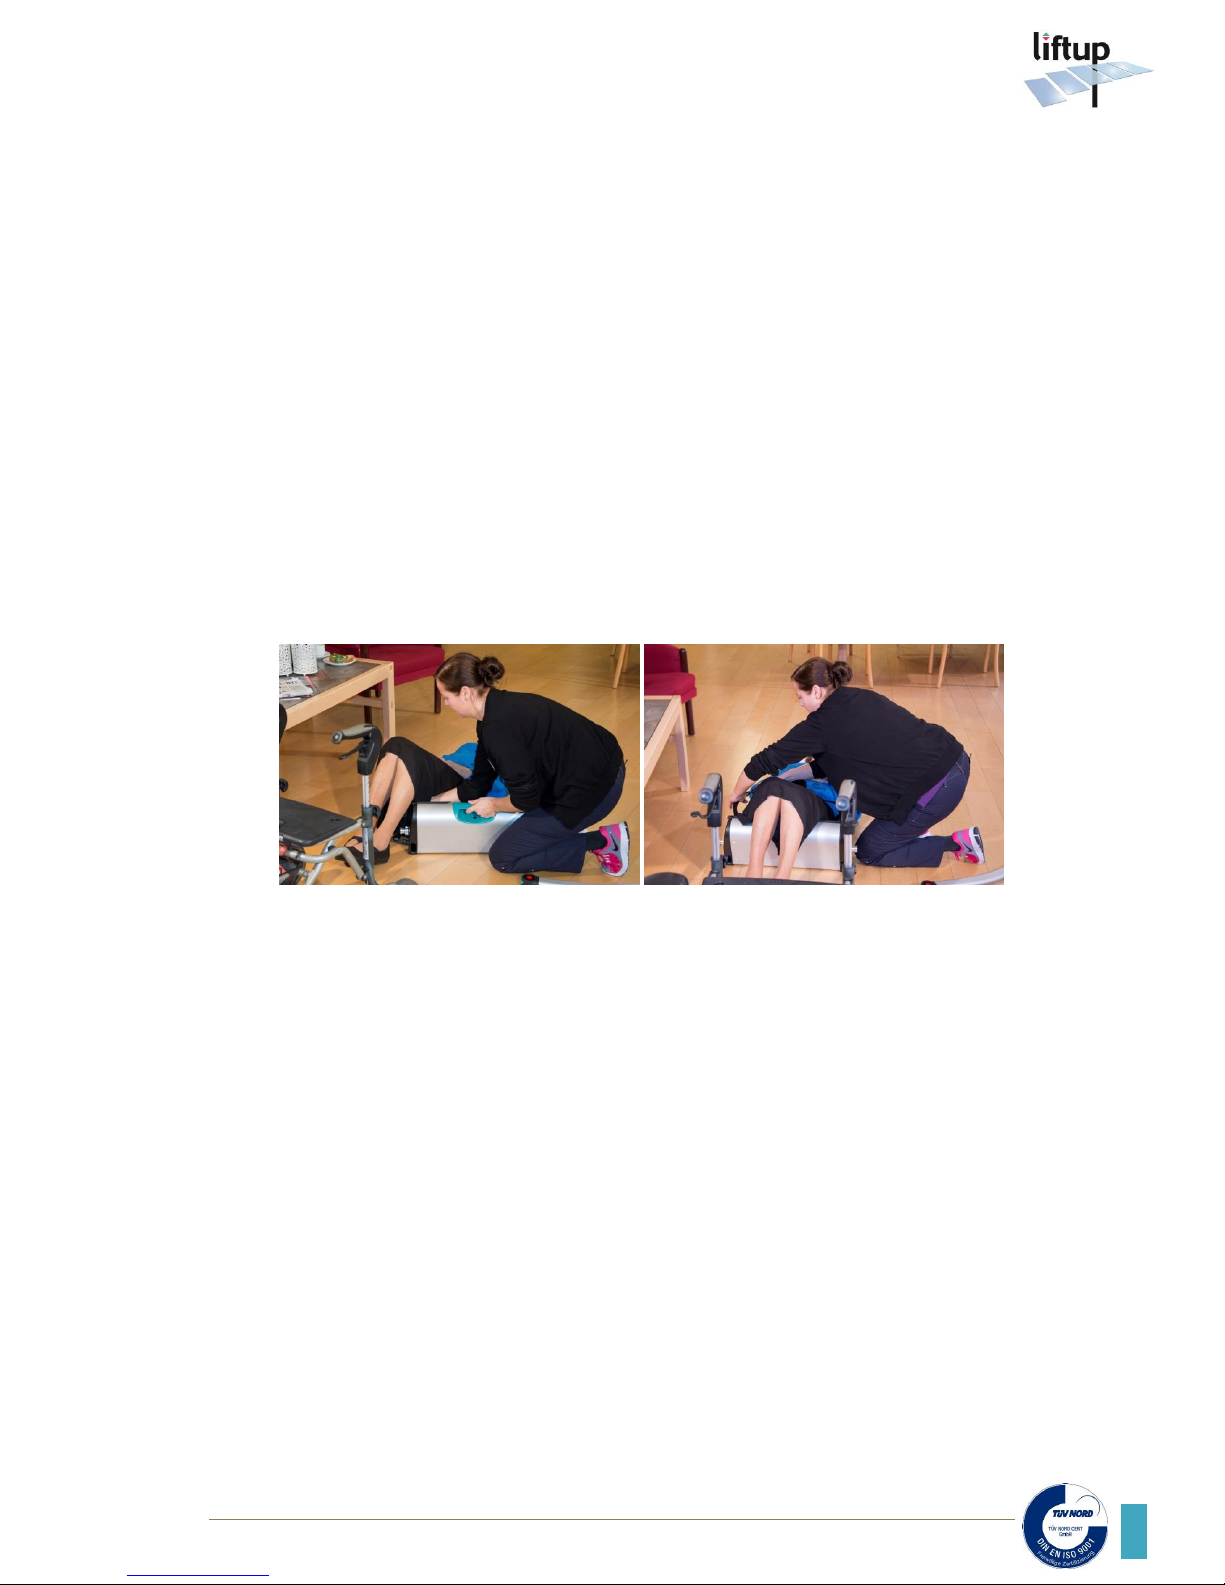
- DO NOT use the chair until this person is secured with the seatbelt around their hips.
After assembly of the Raizer under the person on the floor, fasten and click the seatbelt
around the hips.
Page 10
Liftup A/S | Hagensvej 21 | DK-9530 Støvring | Denmark | T: +45 96 86 30 20 | M: [email protected] | www.liftup.dk | CVR DK-1015 3964
USER MANUAL – RAIZER – GB VERSION 1.4
10
7.3 Handling
The Raizer will normally be supplied by your dealer. The chair is ready for use upon delivery.
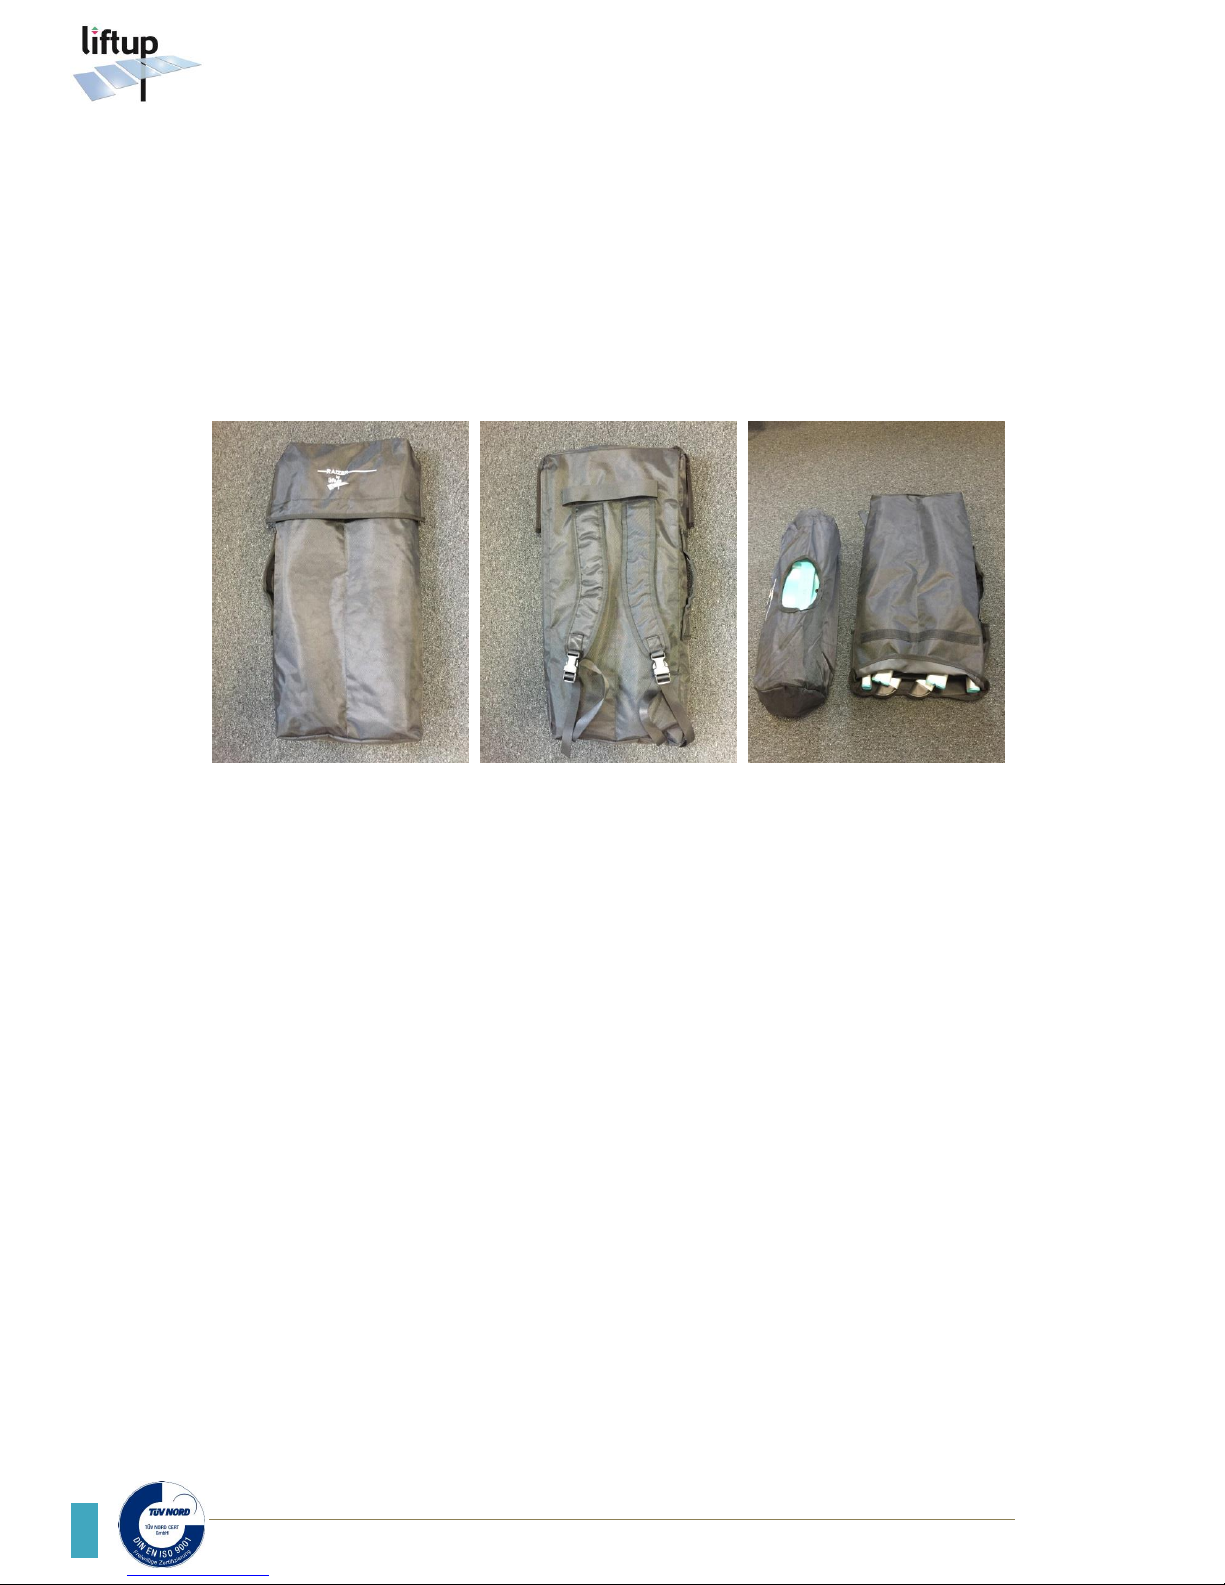
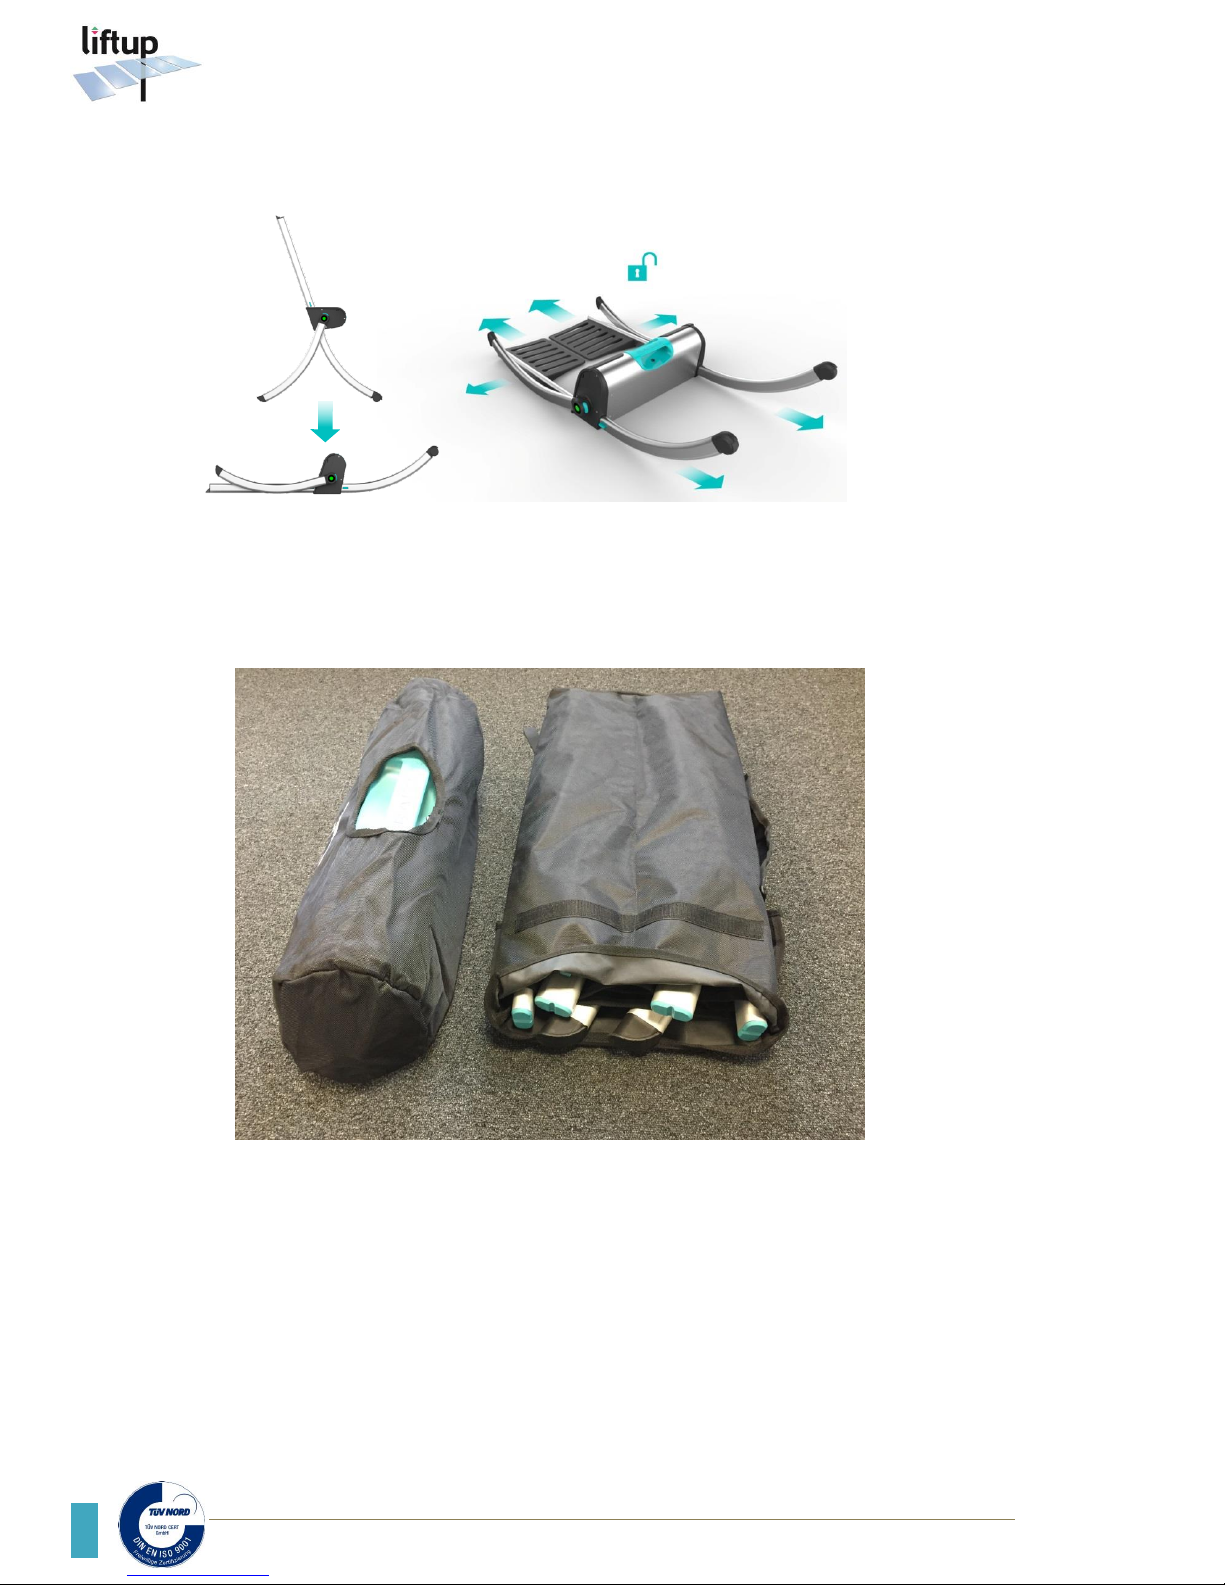
The Raizer can be transported in the 2 supplied bags. One is a case for the seat itself. The seat
is carried by the turquoise handgrip.
The back rest and legs are carried in the bags using carrying straps for hand or back (long strap
for shoulders, or two straps as a backpack).
Do not subject the Raizer to severe knocks or blows as this can affect product functionality.
Keep the accompanying remote control* dry and do not subject it to severe blows, such as by
throwing it or dropping it, etc. Cleaning may only be done using a well-wrung cloth.
Never use a high-pressure jet or running water to rinse the chair, as this can damage the
product.
*Supplementary equipment
Page 11

Liftup A/S | Hagensvej 21| DK-9530 Støvring | Denmark | T: +45 96 86 30 20 | M: [email protected] | www.liftup.dk | CVR DK-1015 3964
11
USER MANUAL – RAIZER – GB VERSION 1.4
8. Functionality
The Raizer is a battery-powered mobile lifting chair which raises a fallen person up to an
almost standing position in a few minutes. It can be operated by only a single assistant and
requires no physical effort from the assistant aside from a helping hand.
It works by the assistant assembling the Raizer around the fallen person and is operated by
using the button panel on the seat or by means of the remote control*. The assistant can raise
the fallen person to a sitting or almost standing position ready for relocation.
To use the Raizer, hold down the button for the entire lift. The lifting will stop if the button is
released.
9. Prior to use
NB: Ensure that the Raizer is always fully charged. 2 chargers are supplied with the device, and
we recommend that it is always on charge when not in use. See also section 12.
The Raizer can be stored wherever desired. However, lifting speed will be reduced if the
battery temperature falls below 0ºC. In practice, though, even if stored in a vehicle in a severe
frost (-15ºC), if charged, the Raizer will always be able to perform its task.
*Supplementary equipment
Page 12
Liftup A/S | Hagensvej 21 | DK-9530 Støvring | Denmark | T: +45 96 86 30 20 | M: [email protected] | www.liftup.dk | CVR DK-1015 3964
USER MANUAL – RAIZER – GB VERSION 1.4
12
10. Operation
10.1 Assembly and use of the Raizer
®
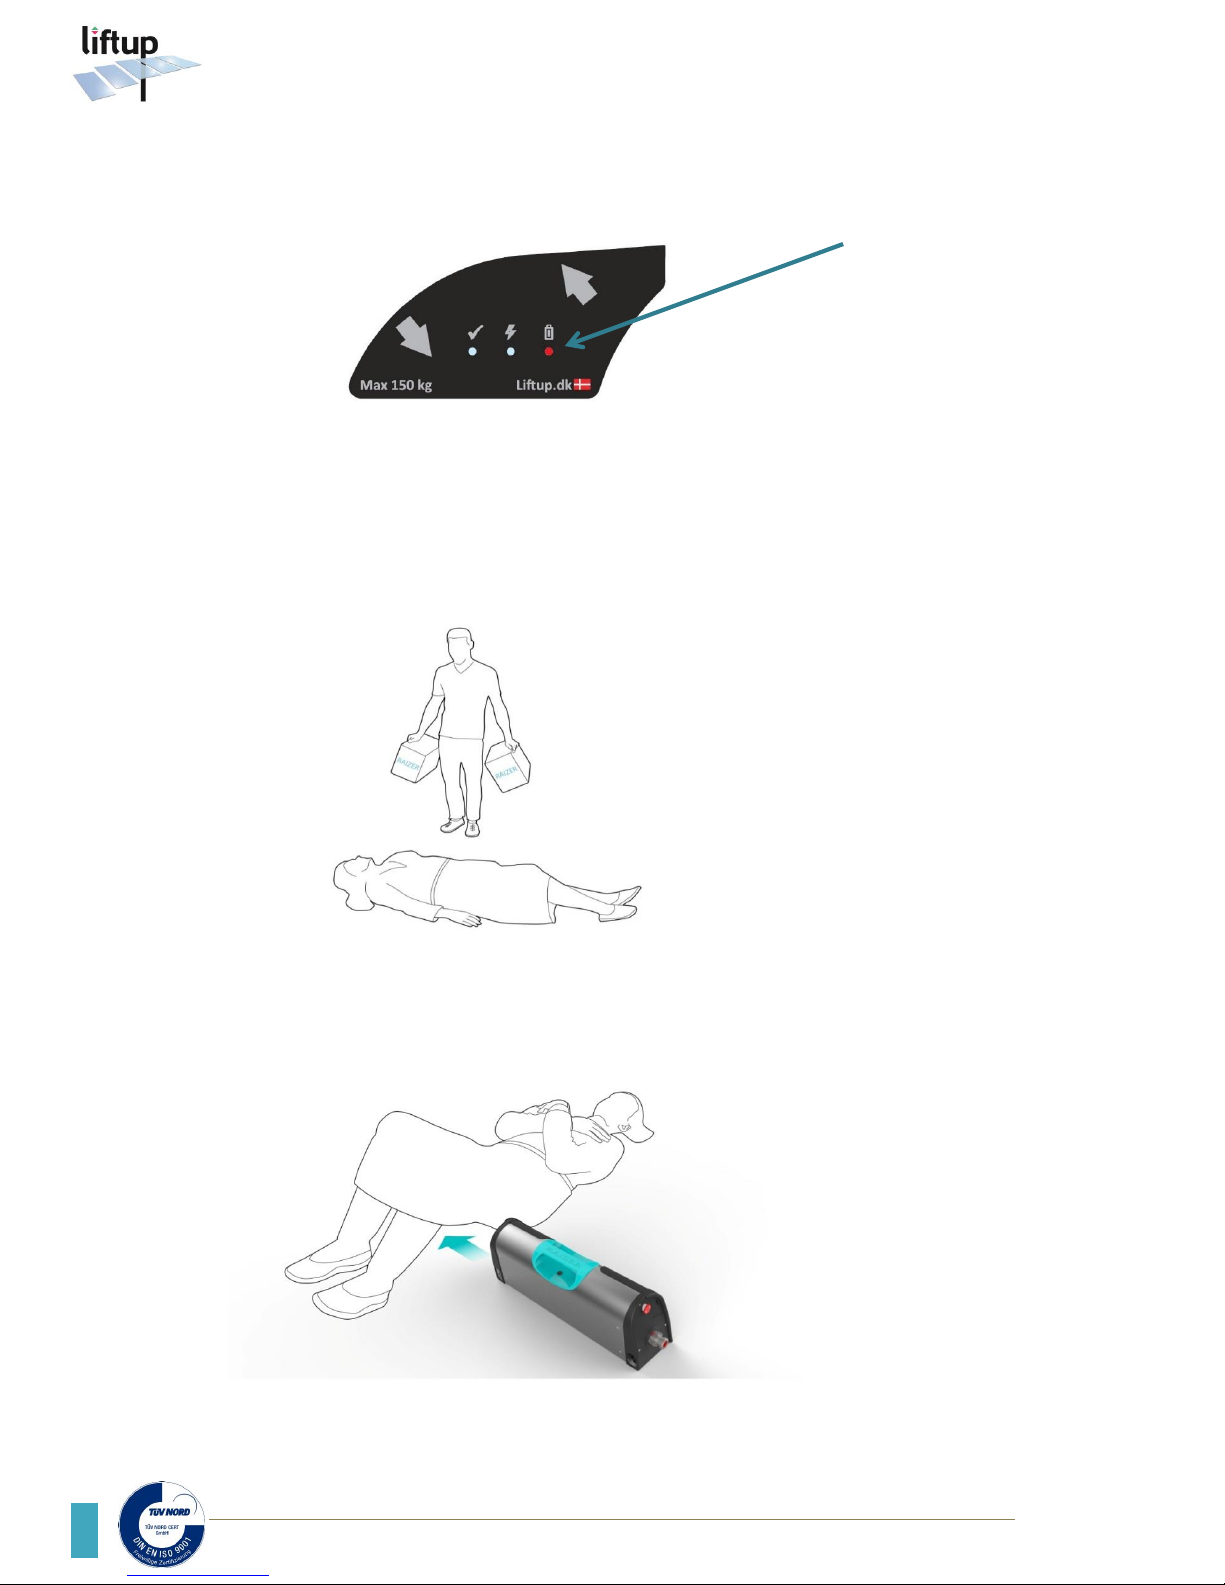
Ensure that the
Raizer is fully
charged before
use.
To turn it on,
press the up or
down buttons on
the side of the
Raizer.
A steady green
LED indicates a
fully-charged
battery.
Approach to the
fallen person
Place the seat on
the floor by the
person's side.
Lift the thighs to
an angled position.
Carefully push the
seat in under the
thighs.
1
2
3
Page 13
Liftup A/S | Hagensvej 21| DK-9530 Støvring | Denmark | T: +45 96 86 30 20 | M: [email protected] | www.liftup.dk | CVR DK-1015 3964
13
USER MANUAL – RAIZER – GB VERSION 1.4
10.2 Assembly of left-hand side
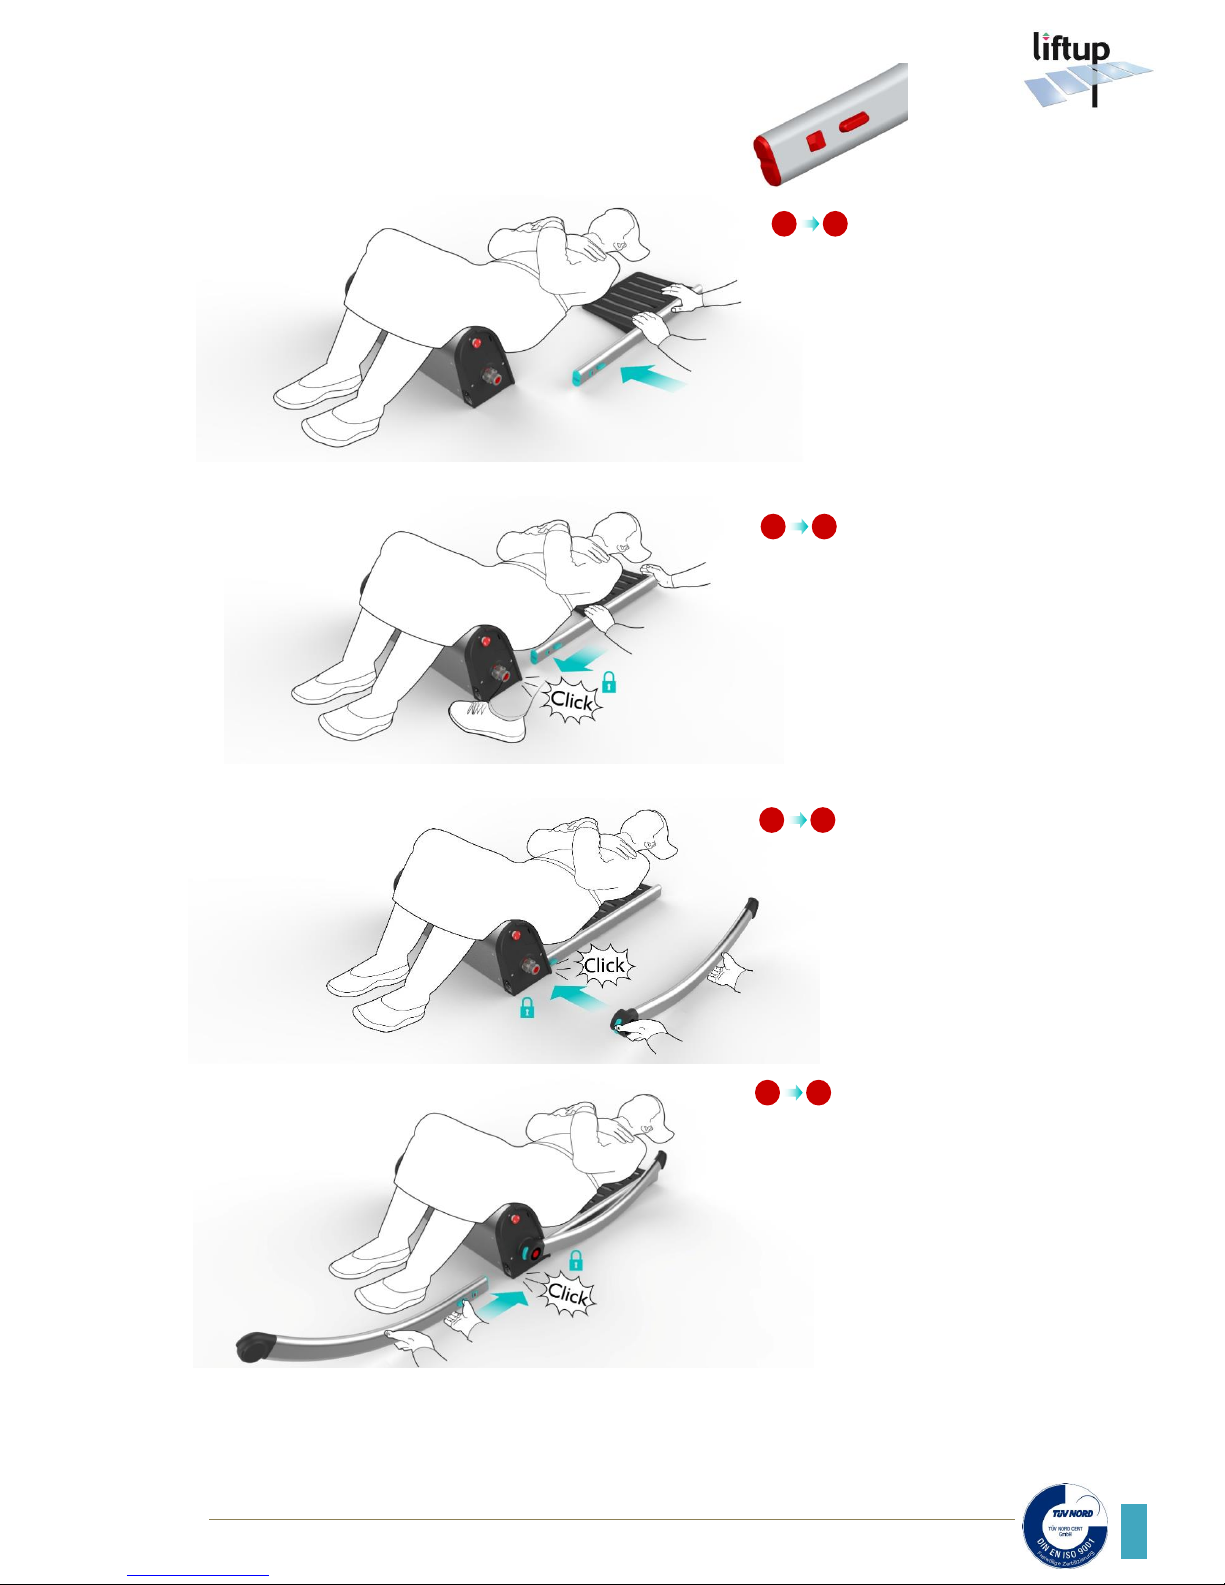
Items for assembly on the left-hand side are marked with a red circle.
Turn the person’s
shoulder by a
careful push of the
elbow.
Carefully push the
back rest (marked
red for left-hand
side) in under the
person’s shoulder.
Slide the back rest
in and click into
place in the seat.
If necessary, place
a foot in front of
the seat to prevent
it from moving
forward.
Push the rear leg
(marked red for
left-hand side)
onto the shaft and
click into place.
Slide the front leg
(marked red for
left-hand side) into
the seat and click
it into in place.
Note that the
snap-lock is to face
outwards.
1 2 3
4
Page 14
Liftup A/S | Hagensvej 21 | DK-9530 Støvring | Denmark | T: +45 96 86 30 20 | M: [email protected] | www.liftup.dk | CVR DK-1015 3964
USER MANUAL – RAIZER – GB VERSION 1.4
14
10.3 Assembly of right-hand side
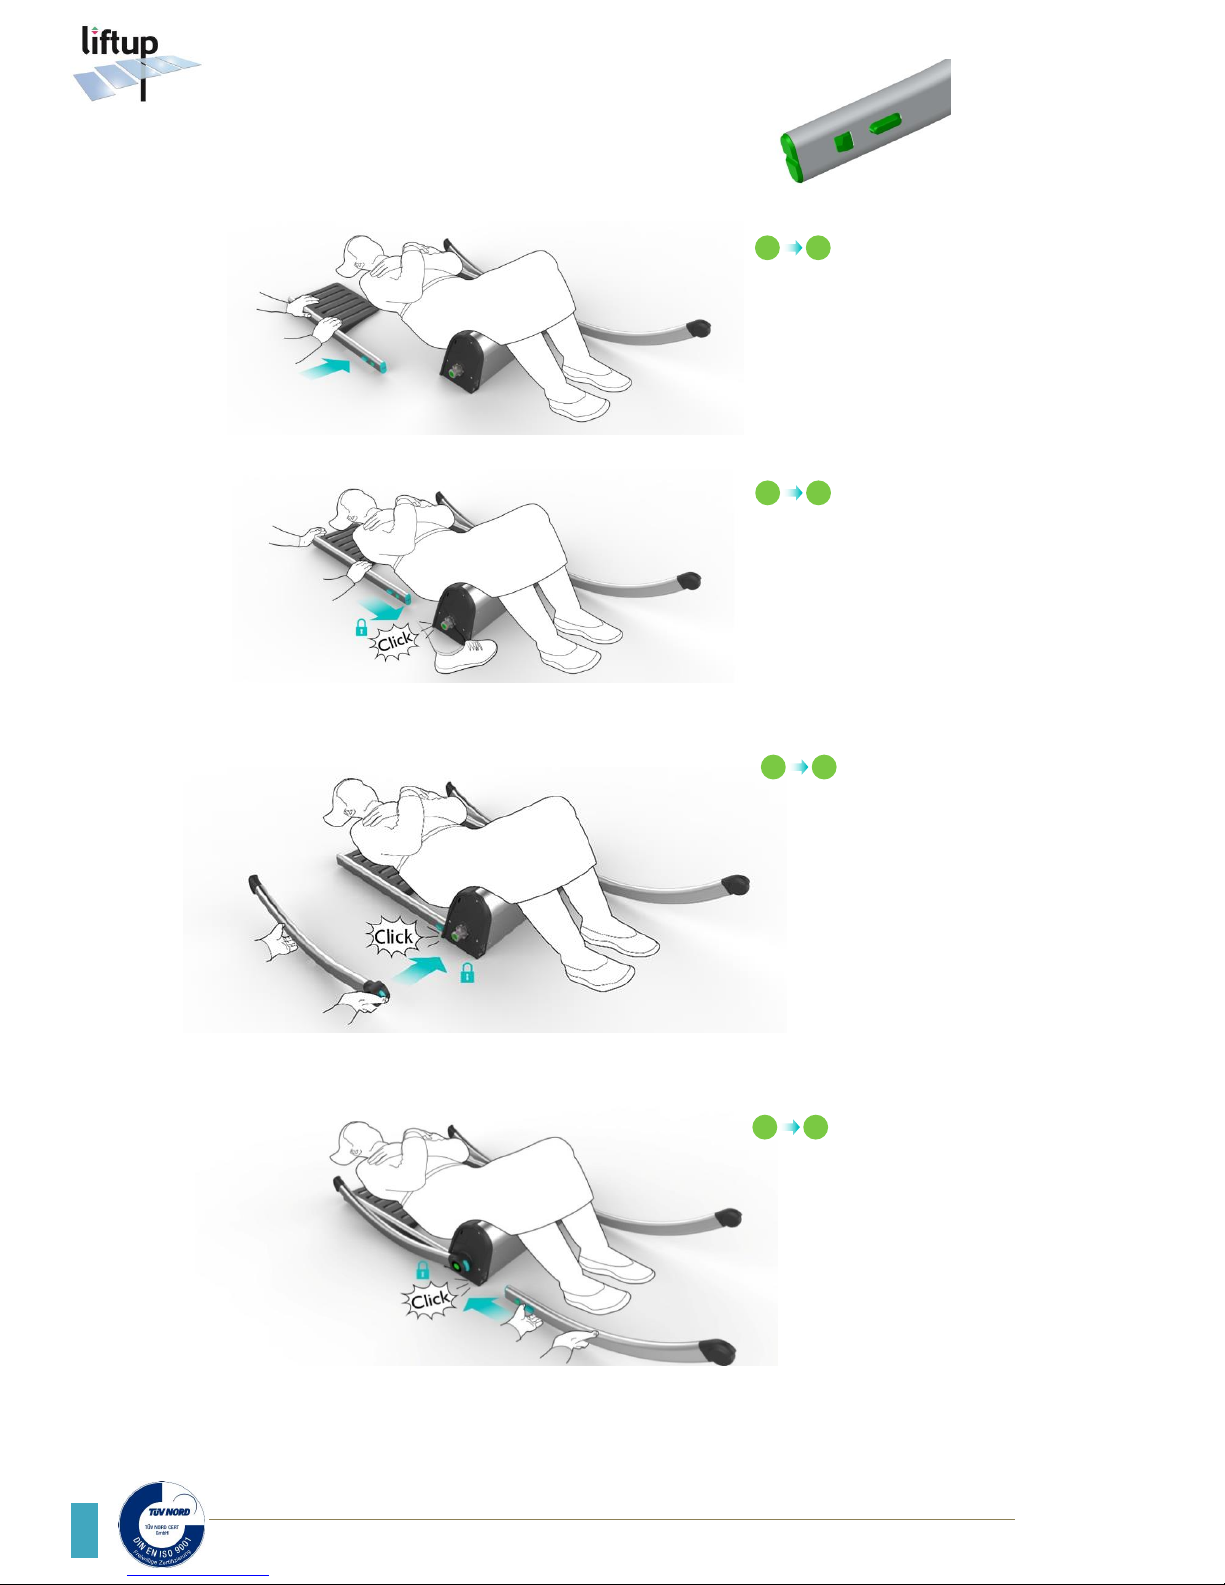
Items for assembly on the right-hand side are marked with a green circle.
Carefully turn the
person’s shoulder
by a push of the
elbow.
Carefully push the
back rest (marked
green for right-hand
side) in under the
person’s shoulder.
Slide the back rest
in and click into
place in the seat.
If necessary, place a
foot in front of the
seat to prevent it
from moving
forward.
Push the rear leg
(marked green for
right-hand side)
onto the shaft and
click into place.
Note: right-hand
and left-hand rear
legs are mounted
on the drive shaft
so they are parallel,
i.e. in the same
position as the
opposite side
(marked green for
right-hand side) into
the seat and click it in
place.
lock is to face
outwards.
1
2
3
4
Page 15
Liftup A/S | Hagensvej 21| DK-9530 Støvring | Denmark | T: +45 96 86 30 20 | M: [email protected] | www.liftup.dk | CVR DK-1015 3964
15
USER MANUAL – RAIZER – GB VERSION 1.4
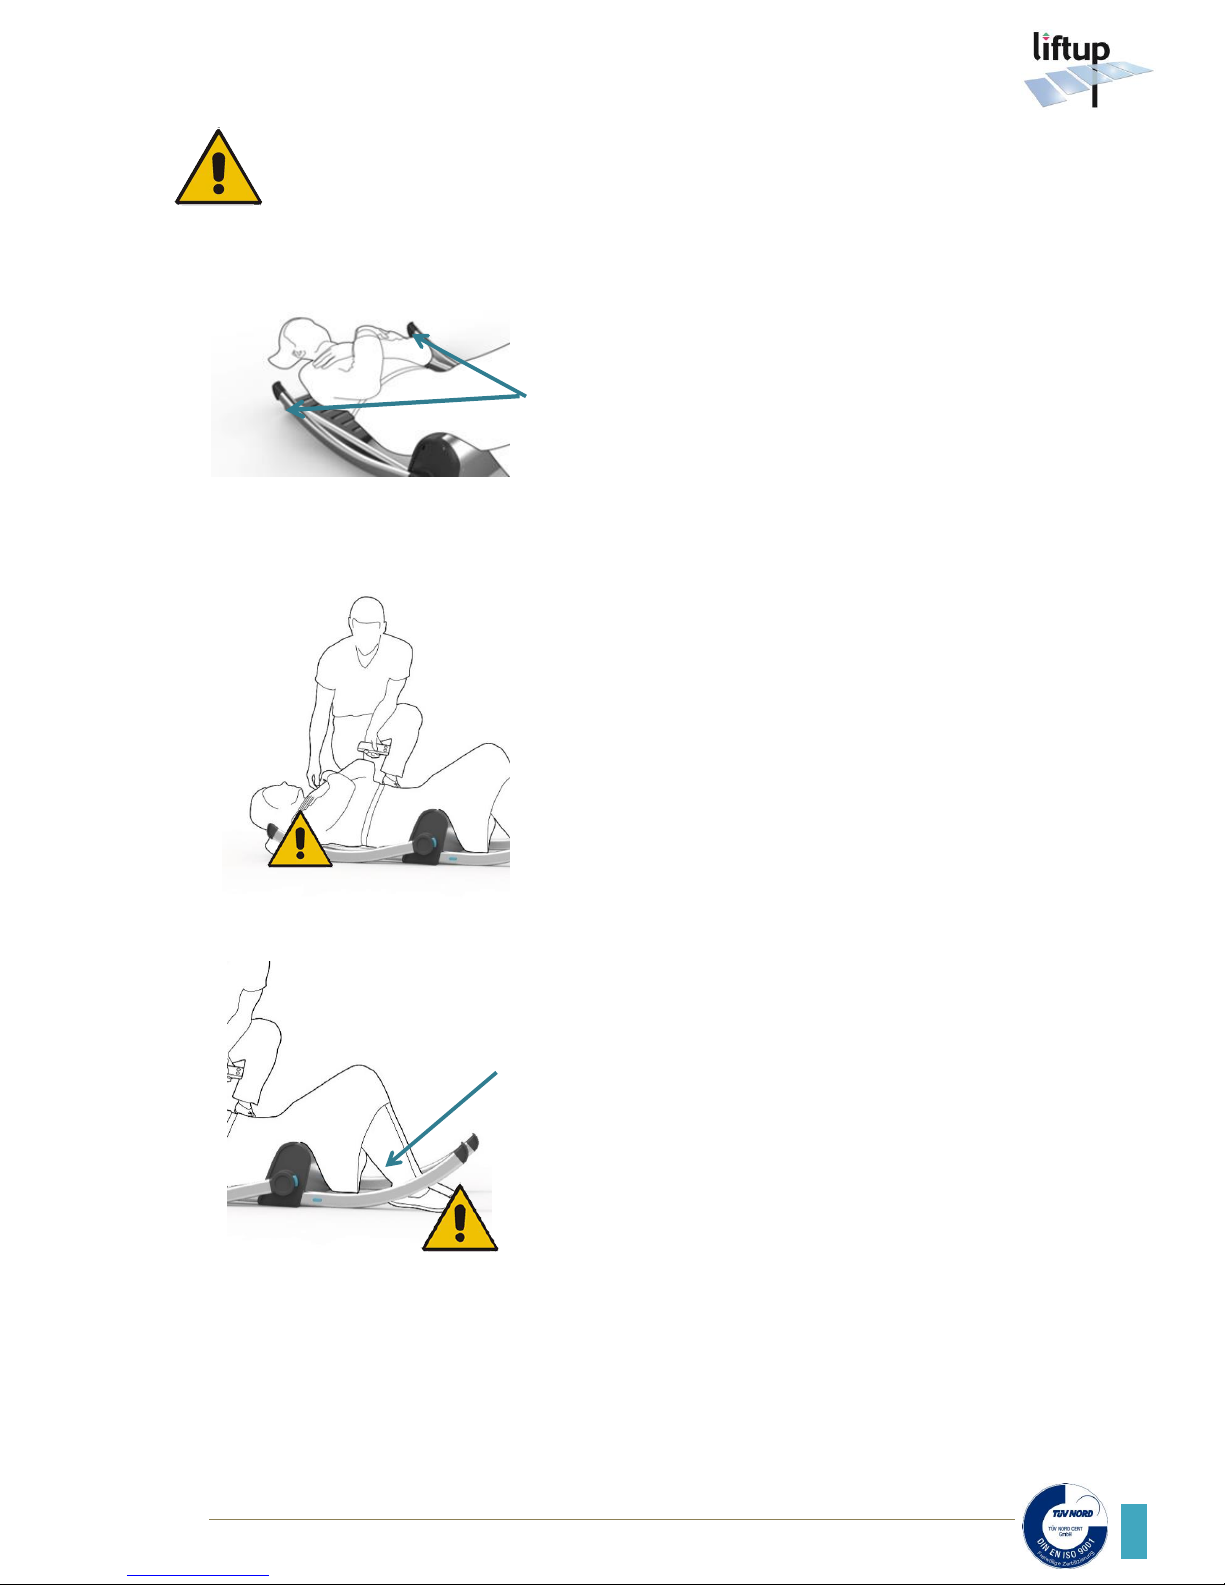
Only raise the chair when you are sure that the person’s feet, arms, hands or other
body parts are not at risk of being struck or run over by the action of the chair!
THE REAR LEGS
The rear legs are fitted horizontally and lie just above the
floor along the shoulder (as in the illustration). Should
this not be the case, be careful to fit both rear legs in
parallel.
Be aware of the positioning of the shoulders and make
sure that the arms are crossed upon the chest, due to
the fact that the rear legs move down towards the floor
as soon as the up button is pressed. This may put the
person’s shoulders and arms at risk of injury if not
positioned correctly.
THE FRONT LEGS
Ensure that the person’s legs are together and their
feet/legs are not at risk of getting in under a front leg
when the chair is raised, as the front legs move toward
the floor before the chair begins to lift its user.
Page 16
Liftup A/S | Hagensvej 21 | DK-9530 Støvring | Denmark | T: +45 96 86 30 20 | M: [email protected] | www.liftup.dk | CVR DK-1015 3964
USER MANUAL – RAIZER – GB VERSION 1.4
16
10.4 Lifting of person
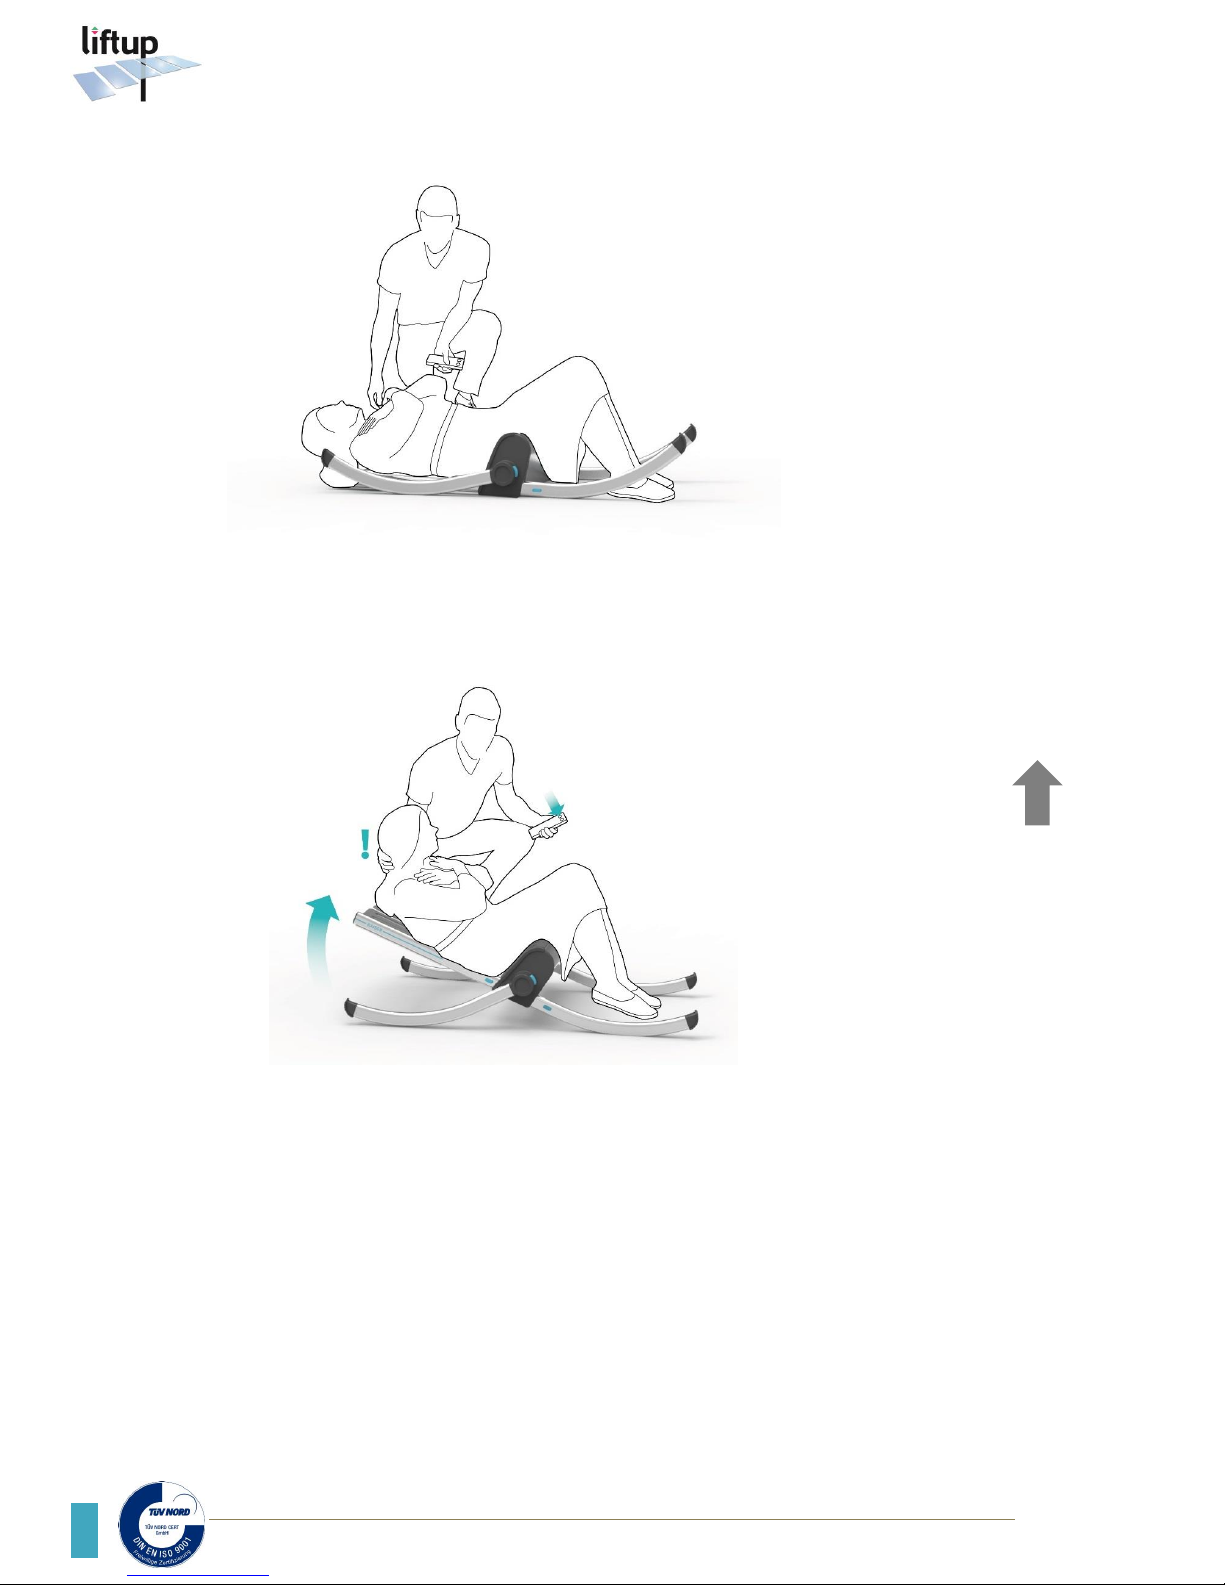
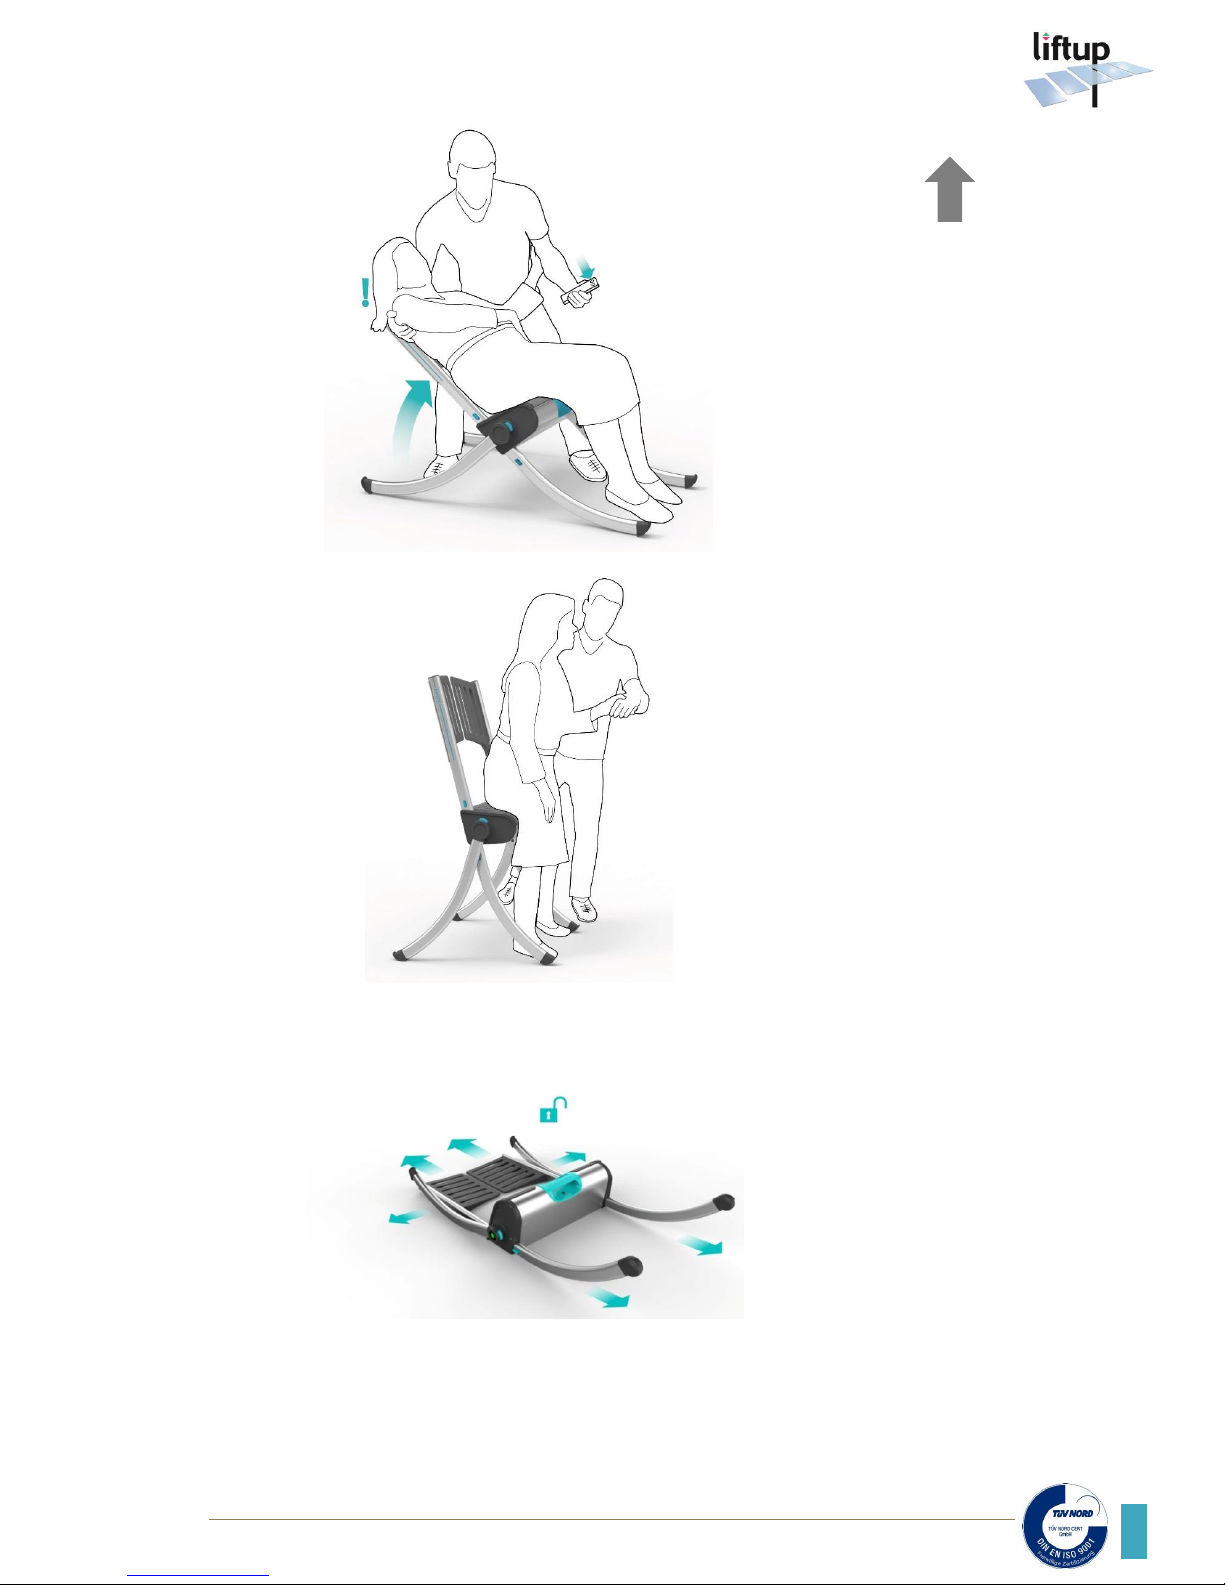
After assembly of
the Raizer under
the fallen person,
wrap and click the
seatbelt around
their hips.
The Raizer is now
ready to lift the
user.
Support the
person’s neck with
one hand.
Press the
“up
arrow” on the side
panel or remote
control*
The Raizer can be
operated from
either side.
1
2
Page 17
Liftup A/S | Hagensvej 21| DK-9530 Støvring | Denmark | T: +45 96 86 30 20 | M: [email protected] | www.liftup.dk | CVR DK-1015 3964
17
USER MANUAL – RAIZER – GB VERSION 1.4
Keep pressing the
“up arrow”
until the
person is in
the required
position.
The Raizer
will
automatically stop
when the person is
in a sitting
position.
NB: The Raizer is
prevented from
moving too far up
and will stop
automatically in
the top position,
whereupon a long
beep will be
emitted.
Run the Raizer
into a
horizontal position and
disassemble.
3
4
5
Page 18
Liftup A/S | Hagensvej 21 | DK-9530 Støvring | Denmark | T: +45 96 86 30 20 | M: [email protected] | www.liftup.dk | CVR DK-1015 3964
USER MANUAL – RAIZER – GB VERSION 1.4
18
10.5 Operation of the Raizer
®
by means of seat buttons
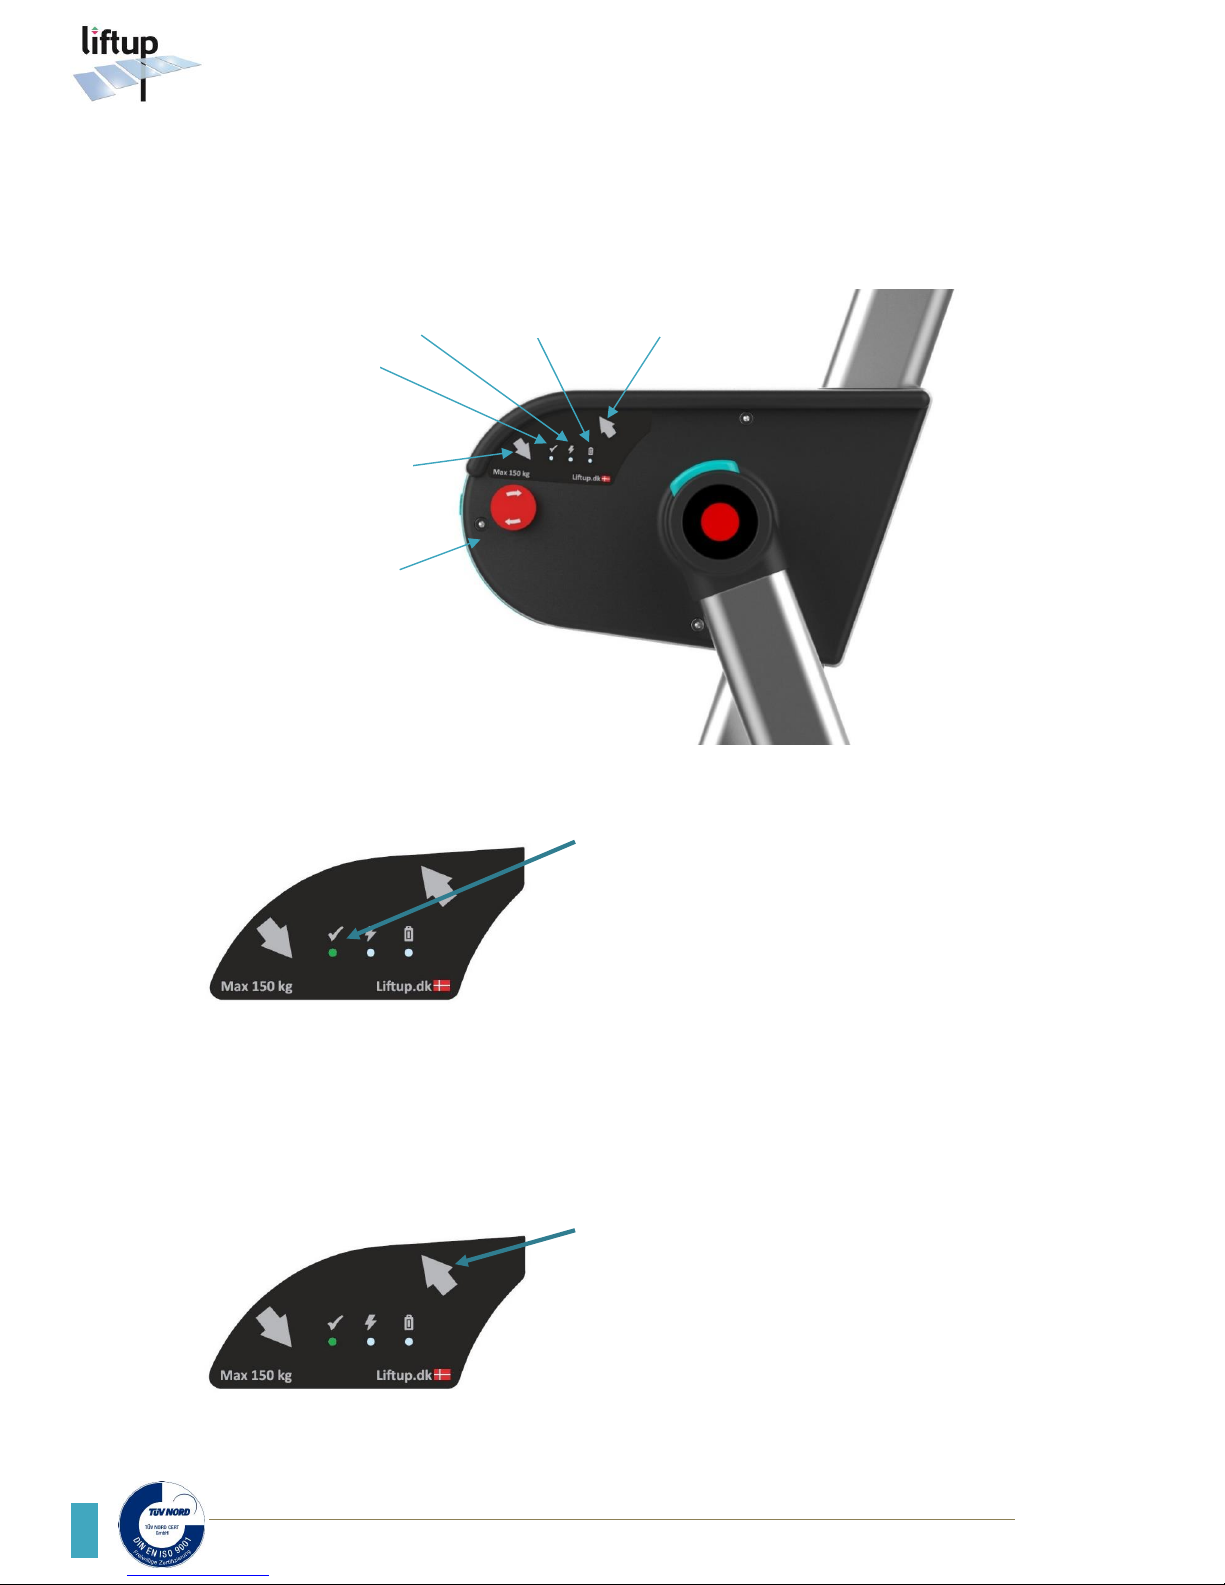
The rotating legs must be fitted correctly before the
Raizer can operate. The green LED will be lit when
the device is ready for use. (see items 10.2 and 10.3
of section 10)
Operate the Raizer with a continuous press of the
“up arrow” or “down arrow” buttons.
The Raizer will switch off automatically after not
being used for 10 minutes (it will emit a long beep
before powering down).
Operate the Raizer by continuously pressing one of
up/down arrows on the side of the chair.
Press here to drive the lifting chair upwards.
It will only run for as long as the button is activated.
Chair up
Løftestol ned
Battery status
Charger status
Ready for use
Chair down
STOP button
1
2
Page 19
Liftup A/S | Hagensvej 21| DK-9530 Støvring | Denmark | T: +45 96 86 30 20 | M: [email protected] | www.liftup.dk | CVR DK-1015 3964
19
USER MANUAL – RAIZER – GB VERSION 1.4
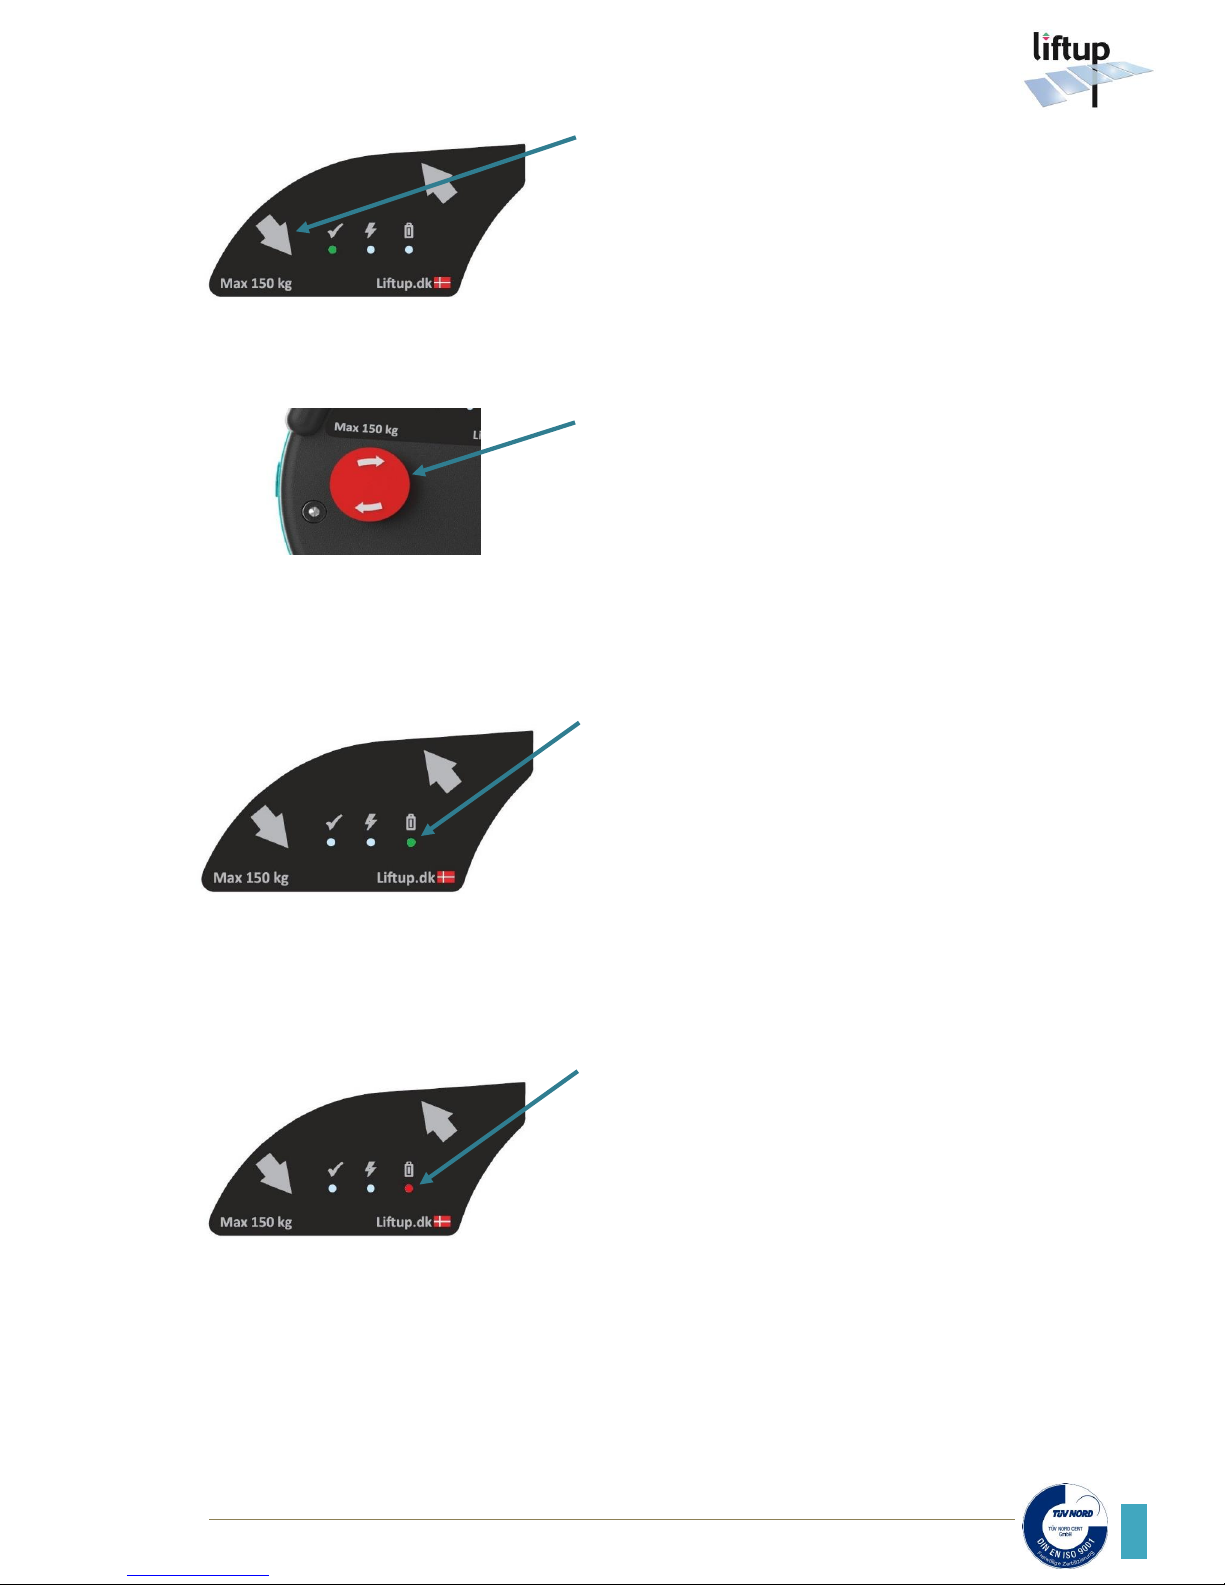
Press here to drive the Raizer
downwards.
It will only run for as long as the button is activated.
Press the stop button to deactivate the Raizer.
All movement functions will be turned off.
Turn the stop button in the direction of the arrows
to reactivate the device.
The LED will be lit green when the device is more
than 20% charged up.
NB: During operation with a load the LED can
change to red – this is normal.
The LED will be lit red to indicate a battery capacity
of below 10%.
In this state there is a max. of 0-5 lifts left in the
battery. You will/need to charge the Raizer (see
section 12, Charging).
3
6
5
4
Page 20
Liftup A/S | Hagensvej 21 | DK-9530 Støvring | Denmark | T: +45 96 86 30 20 | M: [email protected] | www.liftup.dk | CVR DK-1015 3964
USER MANUAL – RAIZER – GB VERSION 1.4
20
10.6 Operation of the Raizer
®
by means of remote control
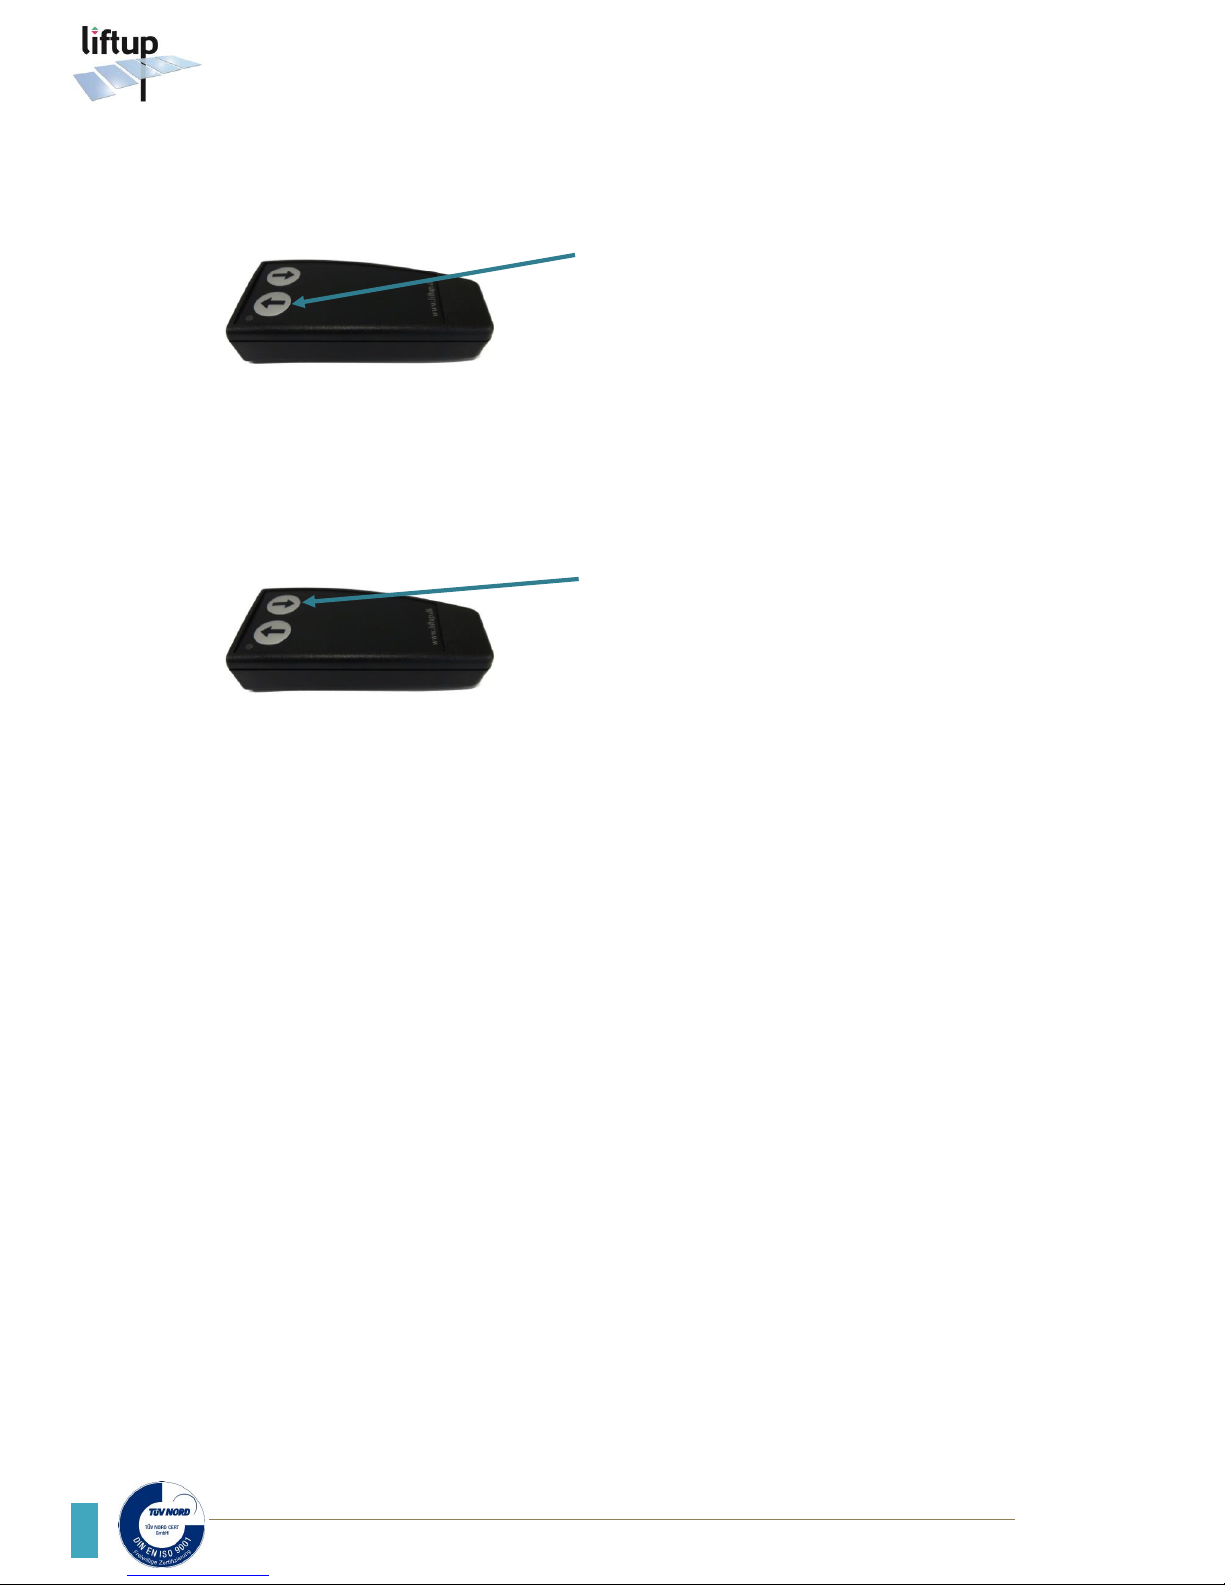
Press here to drive the chair upwards.
It will only run for as long as the button is activated.
NB: In order to operate the remote control the
up/down button on the Raizer has to be activated
(by a light press of the up/down arrows on the side
of the chair)
Press here to drive the chair downwards.
It will only run for as long as the button is activated.
*Supplementary equipment
2
1
Page 21

Liftup A/S | Hagensvej 21| DK-9530 Støvring | Denmark | T: +45 96 86 30 20 | M: [email protected] | www.liftup.dk | CVR DK-1015 3964
21
USER MANUAL – RAIZER – GB VERSION 1.4
10.7 How to pair the remote control transmitter and receiver
How to reset transmitter and receiver:
To reset a remote control* so it is no longer associated with the Raizer, do as follows:
1. Press the UP (↑ ) and DOWN (↓ ) buttons on the remote control* at the same
time and hold them down for approx. 5 seconds until the control LED on the
remote control* begins to flash slowly. The remote control is now in installation mode
for 2 minutes.
2. Perform the following within the 2 minutes:
Press: UP(↑ ), UP(↑ ), DOWN(↓ ), DOWN(↓ ), UP(↑ ), DOWN(↓ ), UP(↑ ), DOWN(↓ )
When the control LED starts to flash quickly, the remote control* is no longer associated with
the Raizer.
Pairing of extra remote control*
1. Ensure that there is power to the Raizer.
2. The Raizer must be switched off
The device will switch off automatically after 10 minutes without use (it will emit a
long beep before powering down).
3. Press the UP (↑ ) and DOWN (↓ ) buttons on the remote control* at the same time
and hold them down for approx. 5 seconds until the control LED on the remote
control* begins to flash slowly. The remote control* is now in installation mode for 2
minutes.
4. Within these 2 minutes switch on the lifting chair you require associated with the
remote control*. Press the up/down arrows on the side of the chair.
5. The control LED on the remote control* is associated with the lifting chair when it
stops flashing.
6. Test the system so as to ensure the pairing has been performed correctly; if not,
repeat 1-5 above.
*Supplementary equipment
Page 22
Liftup A/S | Hagensvej 21 | DK-9530 Støvring | Denmark | T: +45 96 86 30 20 | M: [email protected] | www.liftup.dk | CVR DK-1015 3964
USER MANUAL – RAIZER – GB VERSION 1.4
22
11. Disassembly
Run the Raizer
into
a horizontal
position and
disassemble.
Put all parts into
the carrying bags.
2
1
Page 23
Liftup A/S | Hagensvej 21| DK-9530 Støvring | Denmark | T: +45 96 86 30 20 | M: [email protected] | www.liftup.dk | CVR DK-1015 3964
23
USER MANUAL – RAIZER – GB VERSION 1.4
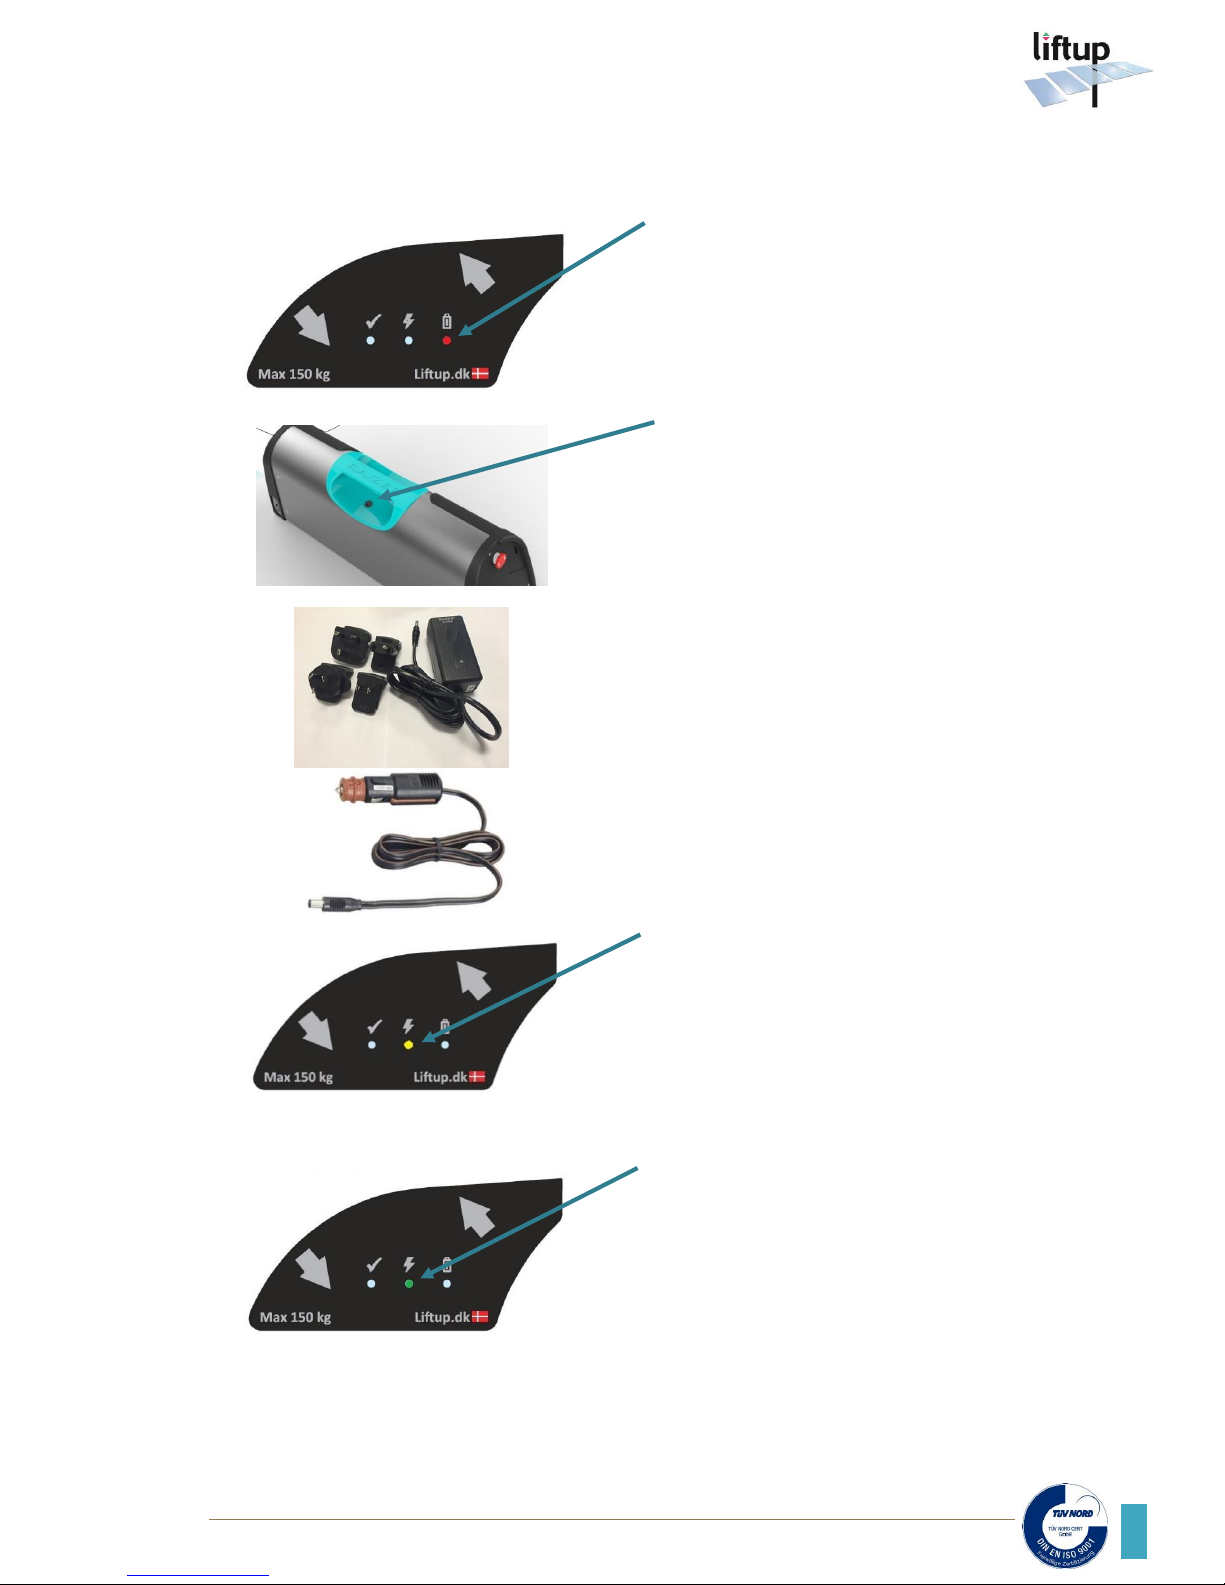
12. Charging of the Raizer
®
The LED will be lit red to indicate a
battery capacity of below 10%.
NB: This will only light when the chair is
powered on.
The charger socket is located below the
handgrip of the seat.
Connect a 220 VAC charger to the socket
on the Raizer
Or connect a 12 VDC charger to the
socket on the Raizer
The LED will be lit yellow to indicate
charging.
A green LED indicates a fully-charged
battery.
6
3
2
1 5 4
Page 24
Liftup A/S | Hagensvej 21 | DK-9530 Støvring | Denmark | T: +45 96 86 30 20 | M: [email protected] | www.liftup.dk | CVR DK-1015 3964
USER MANUAL – RAIZER – GB VERSION 1.4
24
13. Maintenance
13.1 Cleaning:
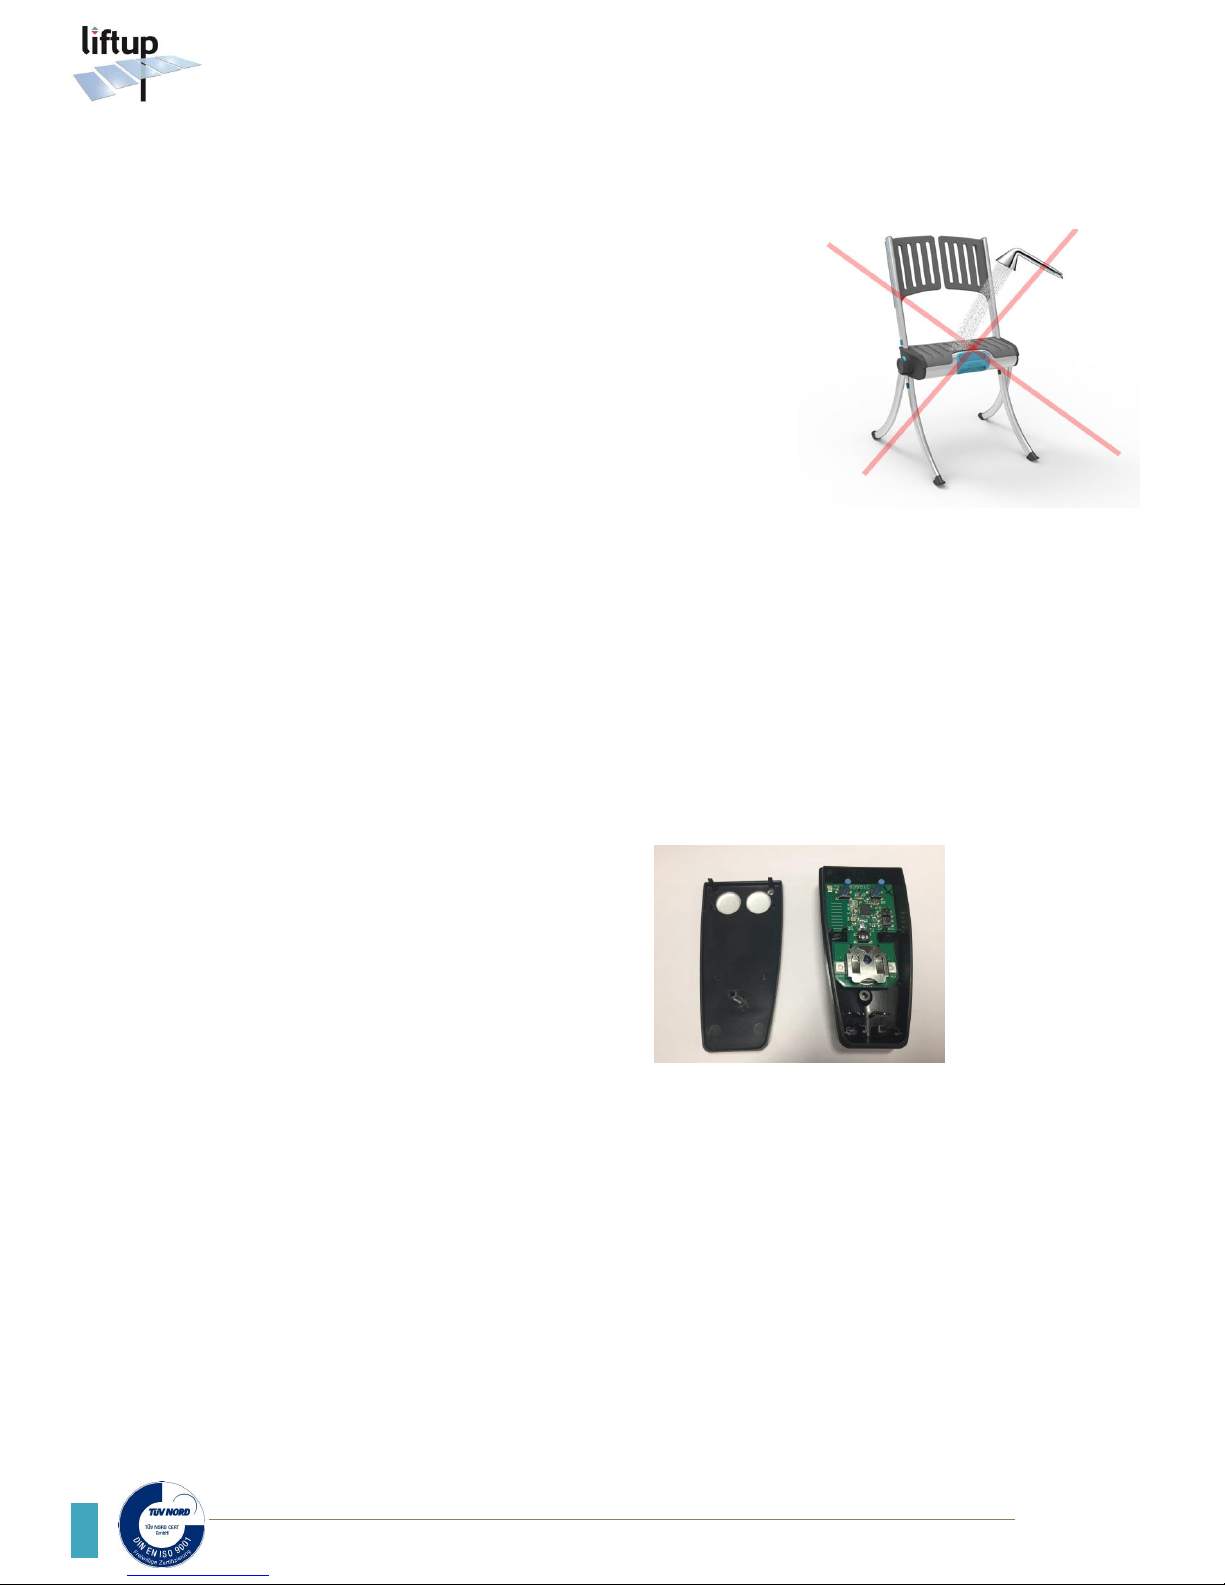
The Raizer is not water-proof.
NB: General cleaning may only be done using a well-wrung cloth.
You can disinfect your Raizer by using alcohol-based disinfectants
at a concentration of 70–85 v/v%.
DO NOT use running water, a high-pressure jet or a hose directly
on the Raizer.
13.2 Mechanical maintenance
The mechanical maintenance of the Raizer shall normally only be
undertaken in connection with the regular annual service
inspection. This is to be undertaken by a qualified service technician in accordance with the
checklist in section 14.
Should unexpected errors or unusual sounds occur, contact your dealer at once:
www.raizer.com.
13.3 Remote control*
A CR2032 battery is installed in the remote control*. NB: In order to ensure reliable
function swap the batteries every 2nd year. To swap the battery, do the following:
1. Loosen the screw on the rear of the
remote control
2. Remove the back panel
3. Swap the battery
4. Refit the back panel and test
*Supplementary equipment
Page 25

Liftup A/S | Hagensvej 21| DK-9530 Støvring | Denmark | T: +45 96 86 30 20 | M: [email protected] | www.liftup.dk | CVR DK-1015 3964
25
USER MANUAL – RAIZER – GB VERSION 1.4
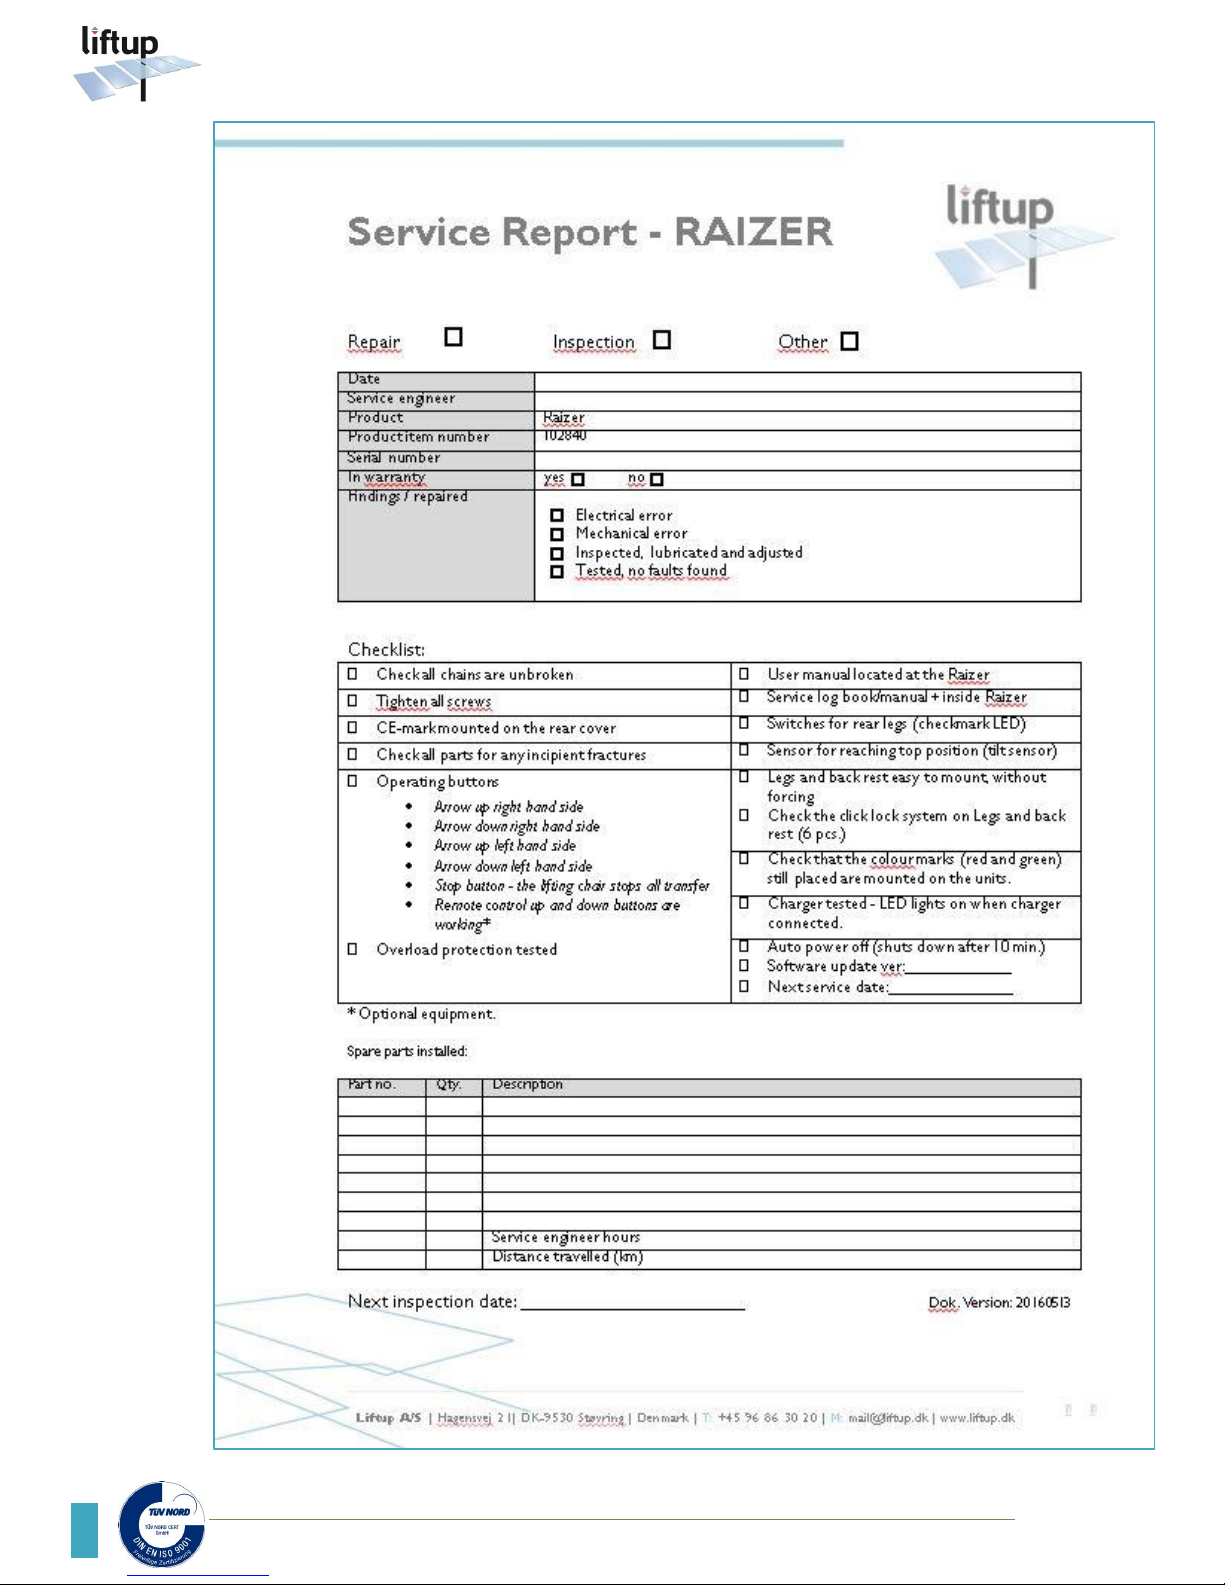
14. Maintenance checklist
In addition to the general maintenance described in section 13, we recommend routine annual
inspections performed by a qualified service technician. The dealer you have bought the Raizer
from will offer this service, but if you wish to use another service provider, you as the owner
of the Raizer is responsible for ensuring that the chosen service technician is suitably qualified
in the product in question.
https://www.liftup.dk/en/distributors/
For safety reasons it is very important that these inspections are maintained, since lacking or
improperly performed inspections may result in personal injury.
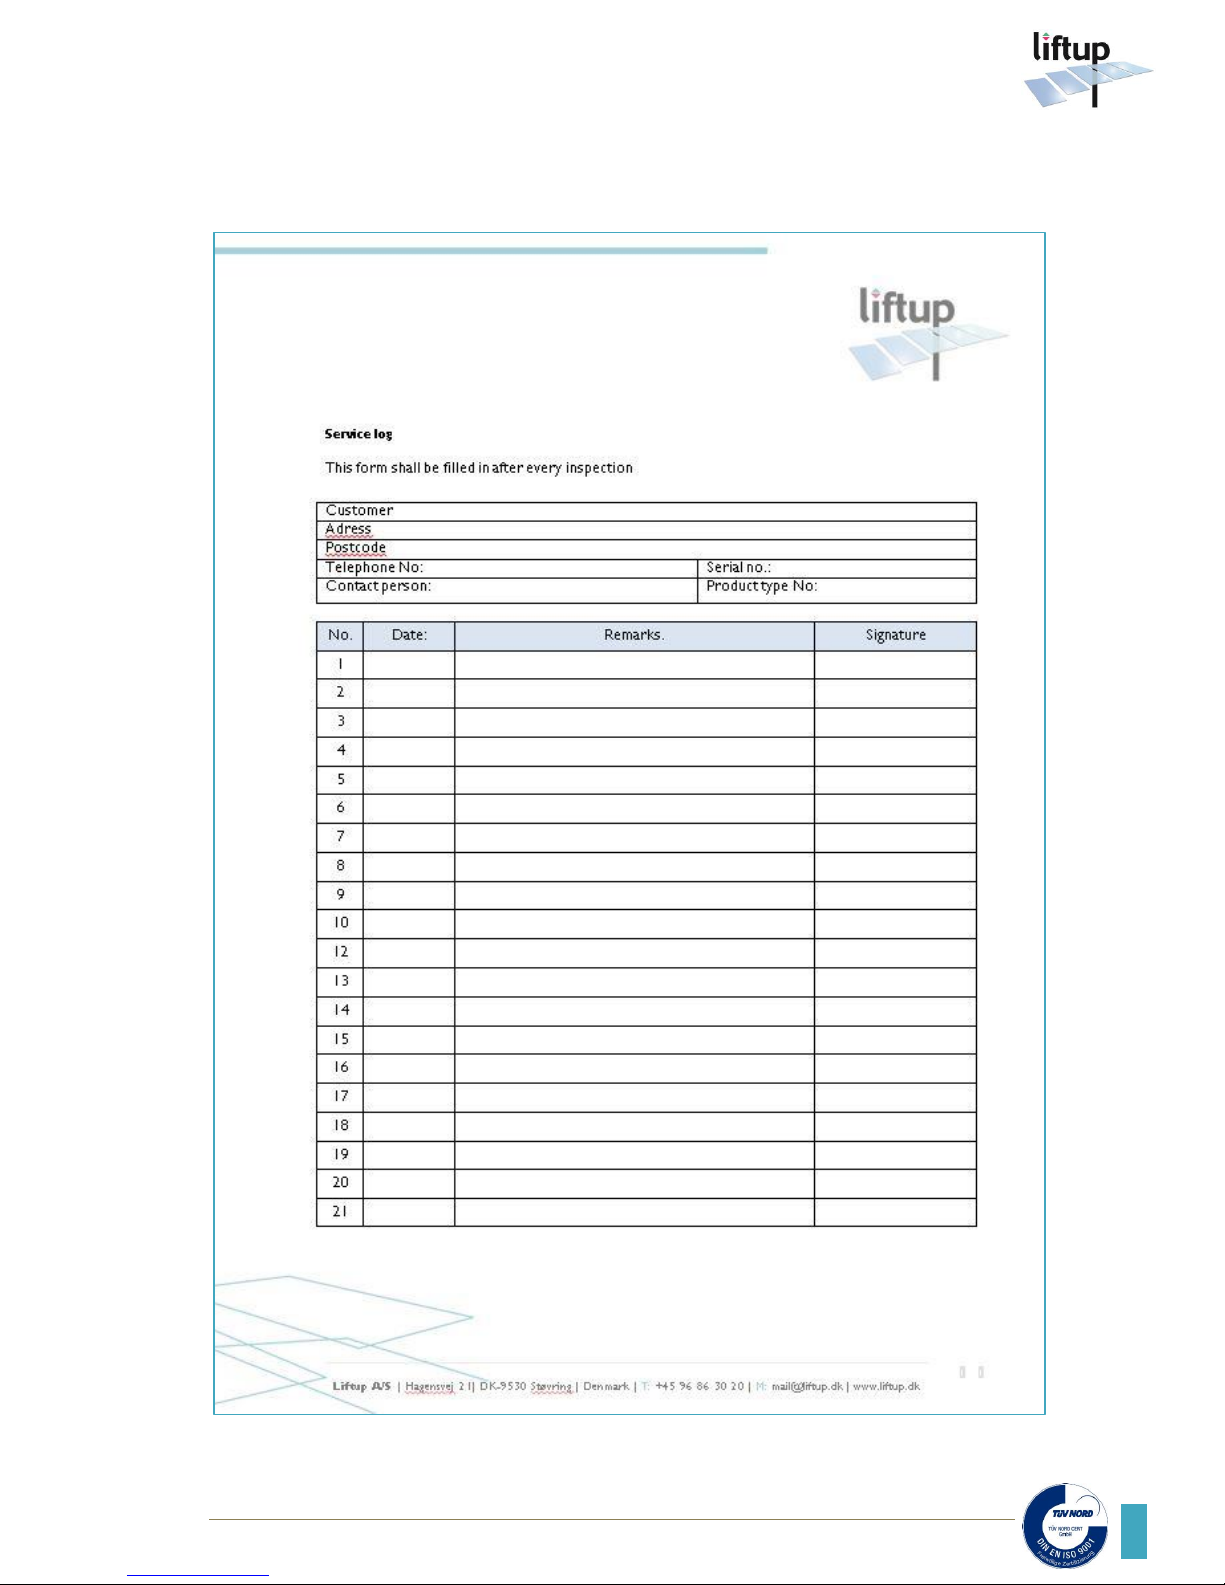
All service inspections are to be logged in the service log book - see section 15.
Page 26
Liftup A/S | Hagensvej 21 | DK-9530 Støvring | Denmark | T: +45 96 86 30 20 | M: [email protected] | www.liftup.dk | CVR DK-1015 3964
USER MANUAL – RAIZER – GB VERSION 1.4
26
Page 27
Liftup A/S | Hagensvej 21| DK-9530 Støvring | Denmark | T: +45 96 86 30 20 | M: [email protected] | www.liftup.dk | CVR DK-1015 3964
27
USER MANUAL – RAIZER – GB VERSION 1.4
15. Service log book
Page 28
Liftup A/S | Hagensvej 21 | DK-9530 Støvring | Denmark | T: +45 96 86 30 20 | M: [email protected] | www.liftup.dk | CVR DK-1015 3964
USER MANUAL – RAIZER – GB VERSION 1.4
28
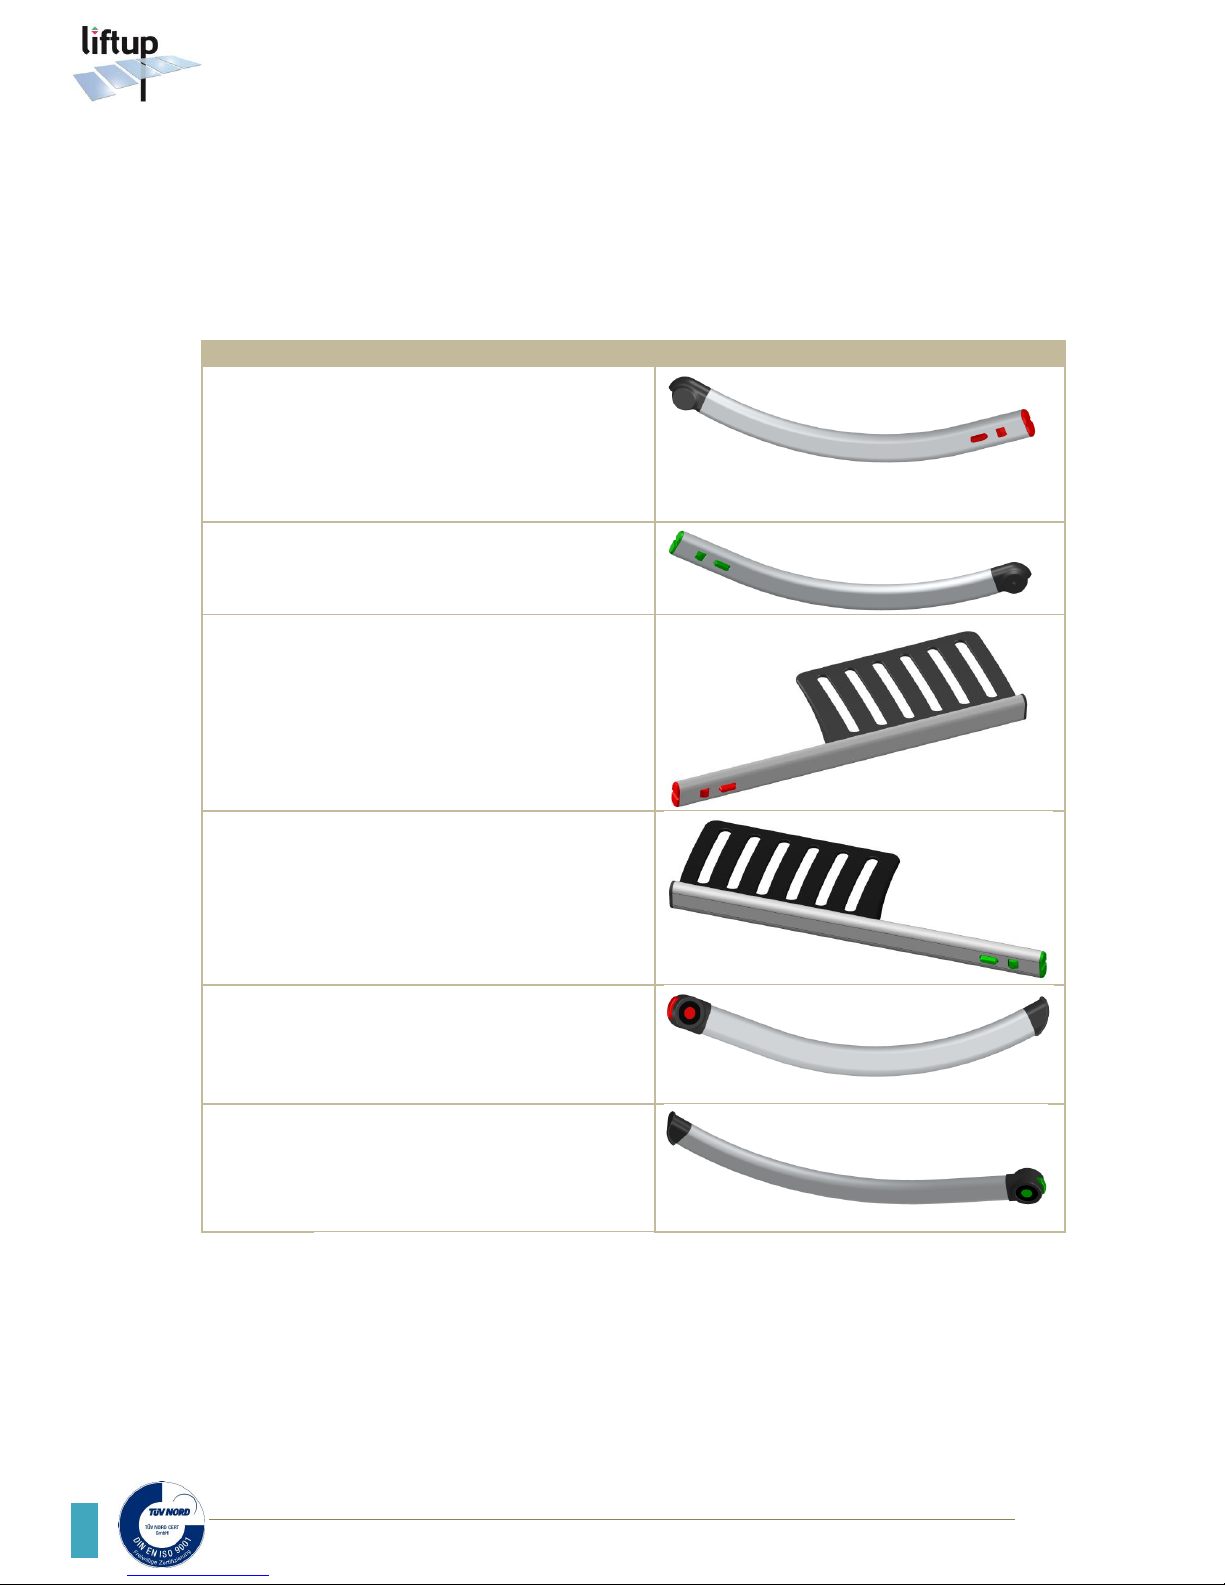
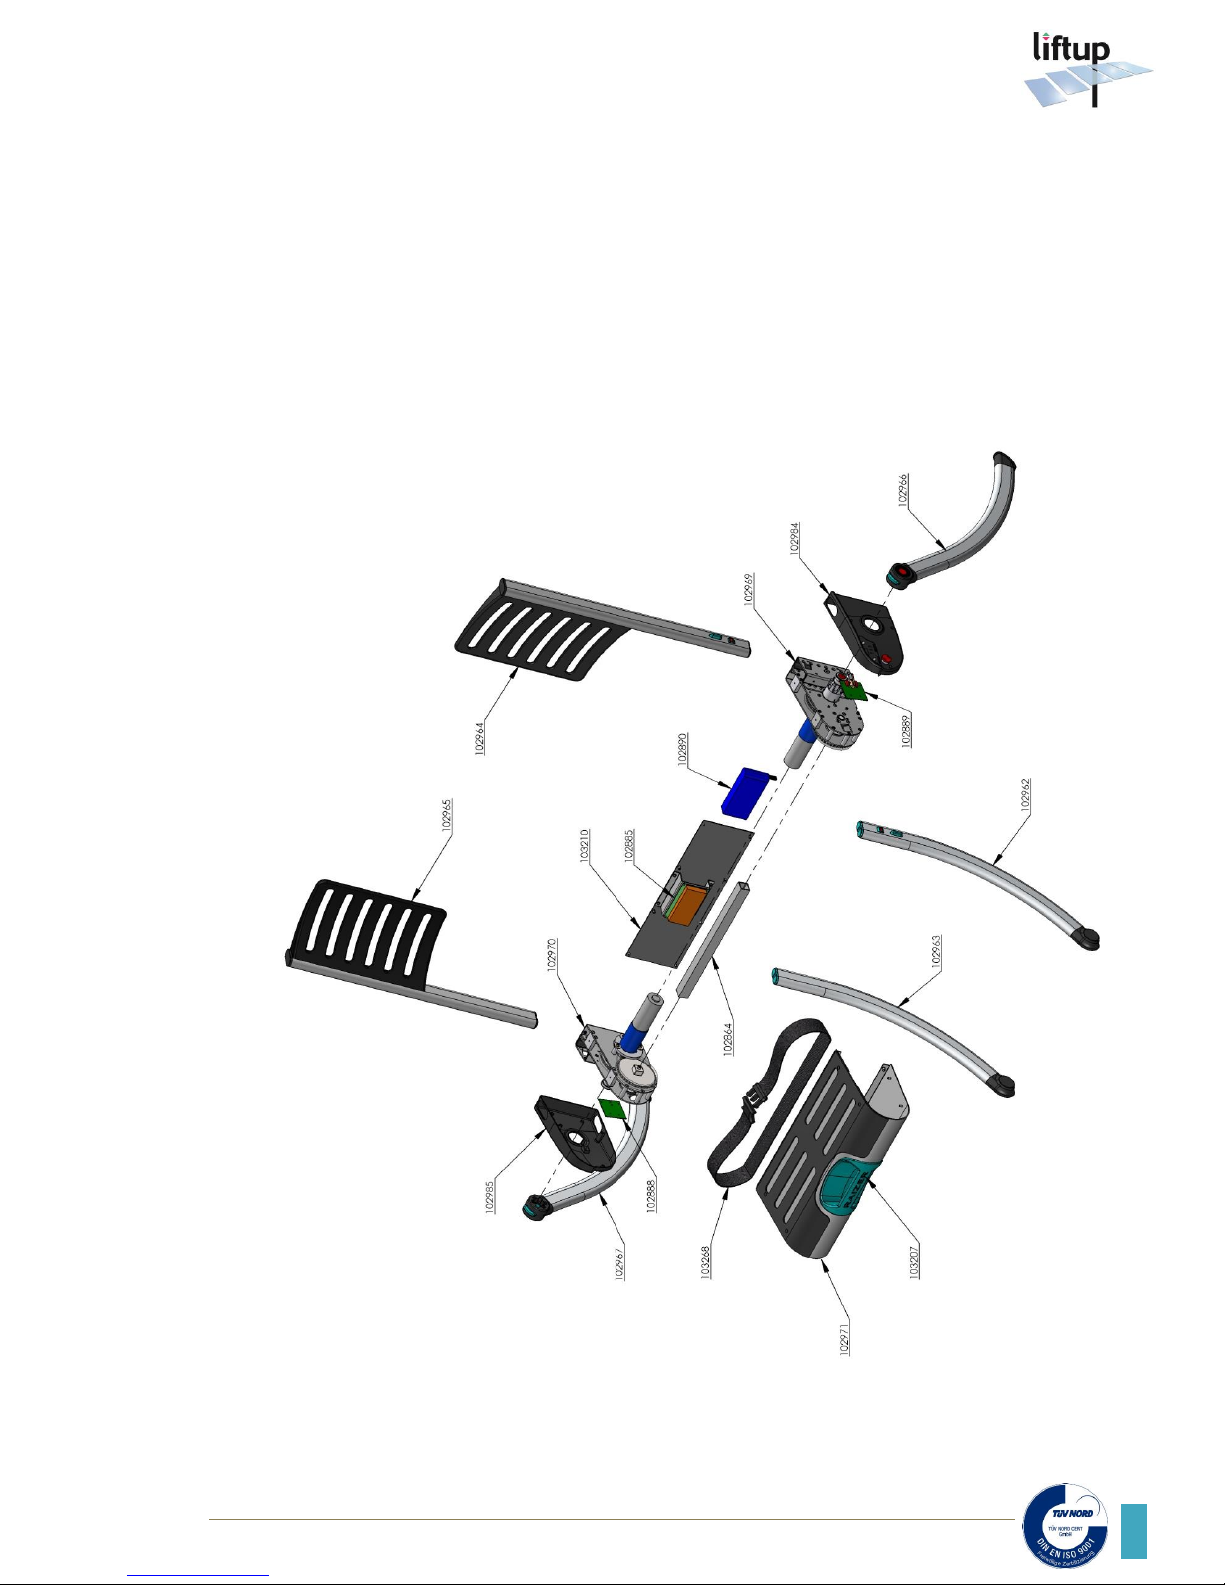
16. Spare parts
NB: It is important to use only original spare parts. Replacement of parts may only be
undertaken by a qualified service technician.
The use of non-original spare parts may void the right of complaint. Furthermore, product
safety may be compromised, which may pose a risk to personal safety.
Part no.
Description
Photo/illustration
102962
Front leg complete, left hand side /
red (incl wheel)
102963
Front leg complete, right hand side /
green (incl wheel)
102964
Back rest complete, left hand side,
red
102965
Back rest complete, right hand side /
green
102966
Rear leg complete, left hand side / red
102967
Rear leg complete, right hand side
/green
Page 29
Liftup A/S | Hagensvej 21| DK-9530 Støvring | Denmark | T: +45 96 86 30 20 | M: [email protected] | www.liftup.dk | CVR DK-1015 3964
29
USER MANUAL – RAIZER – GB VERSION 1.4
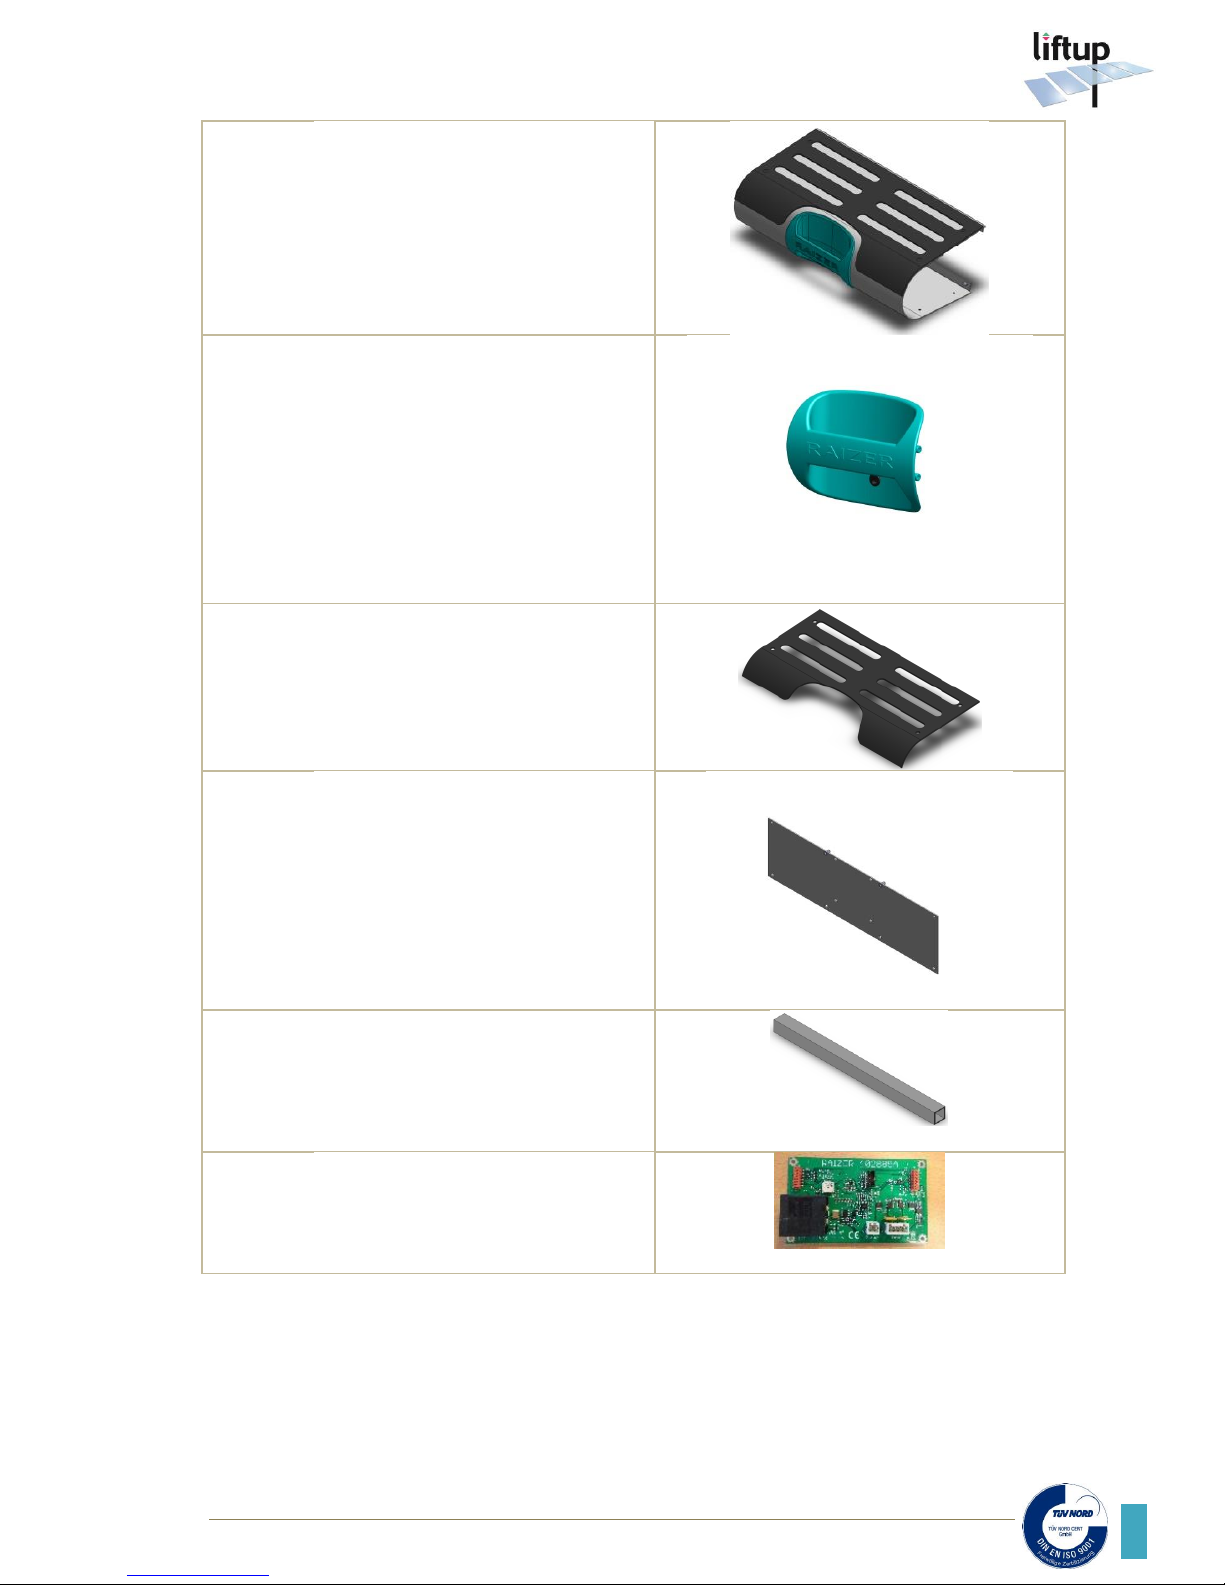
102971
Cover complete, Raizer
103207
Handle complete, Raizer
103535
Seat cover, silicone
103210
Rear cover complete, Raizer
102864
Connecting rod for drive units
102885
Control Board, Raizer
Page 30
Liftup A/S | Hagensvej 21 | DK-9530 Støvring | Denmark | T: +45 96 86 30 20 | M: [email protected] | www.liftup.dk | CVR DK-1015 3964
USER MANUAL – RAIZER – GB VERSION 1.4
30
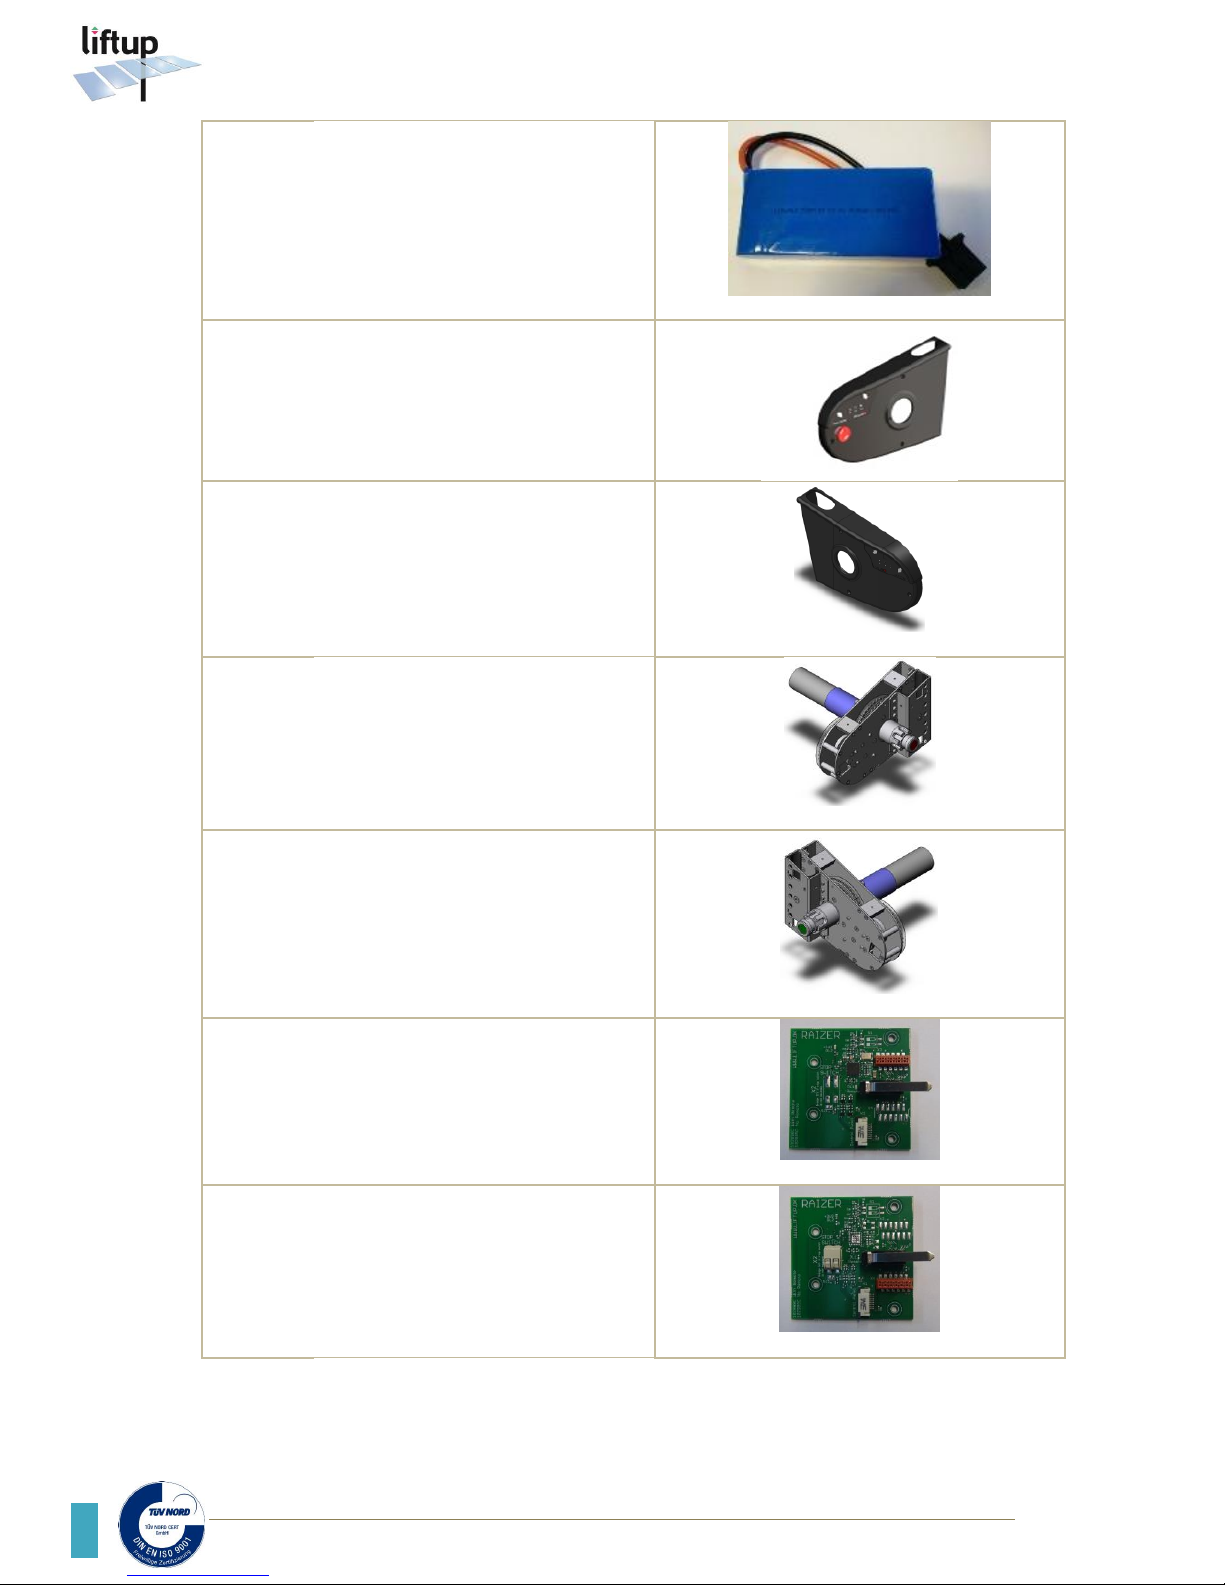
102890
Battery 12V 5Ah LiFePo4 Raizer
102984
Side cover complete, left hand side
(stop-button side)
102985
Side cover complete, right hand side
102969
Motor unit, complete left hand side /
red
102970
Motor unit, complete, right hand side
/ green
102888
Raizer side PCB with RF Reciever,
102889
Raizer side PCB without.RF Reciever
Page 31
Liftup A/S | Hagensvej 21| DK-9530 Støvring | Denmark | T: +45 96 86 30 20 | M: [email protected] | www.liftup.dk | CVR DK-1015 3964
31
USER MANUAL – RAIZER – GB VERSION 1.4
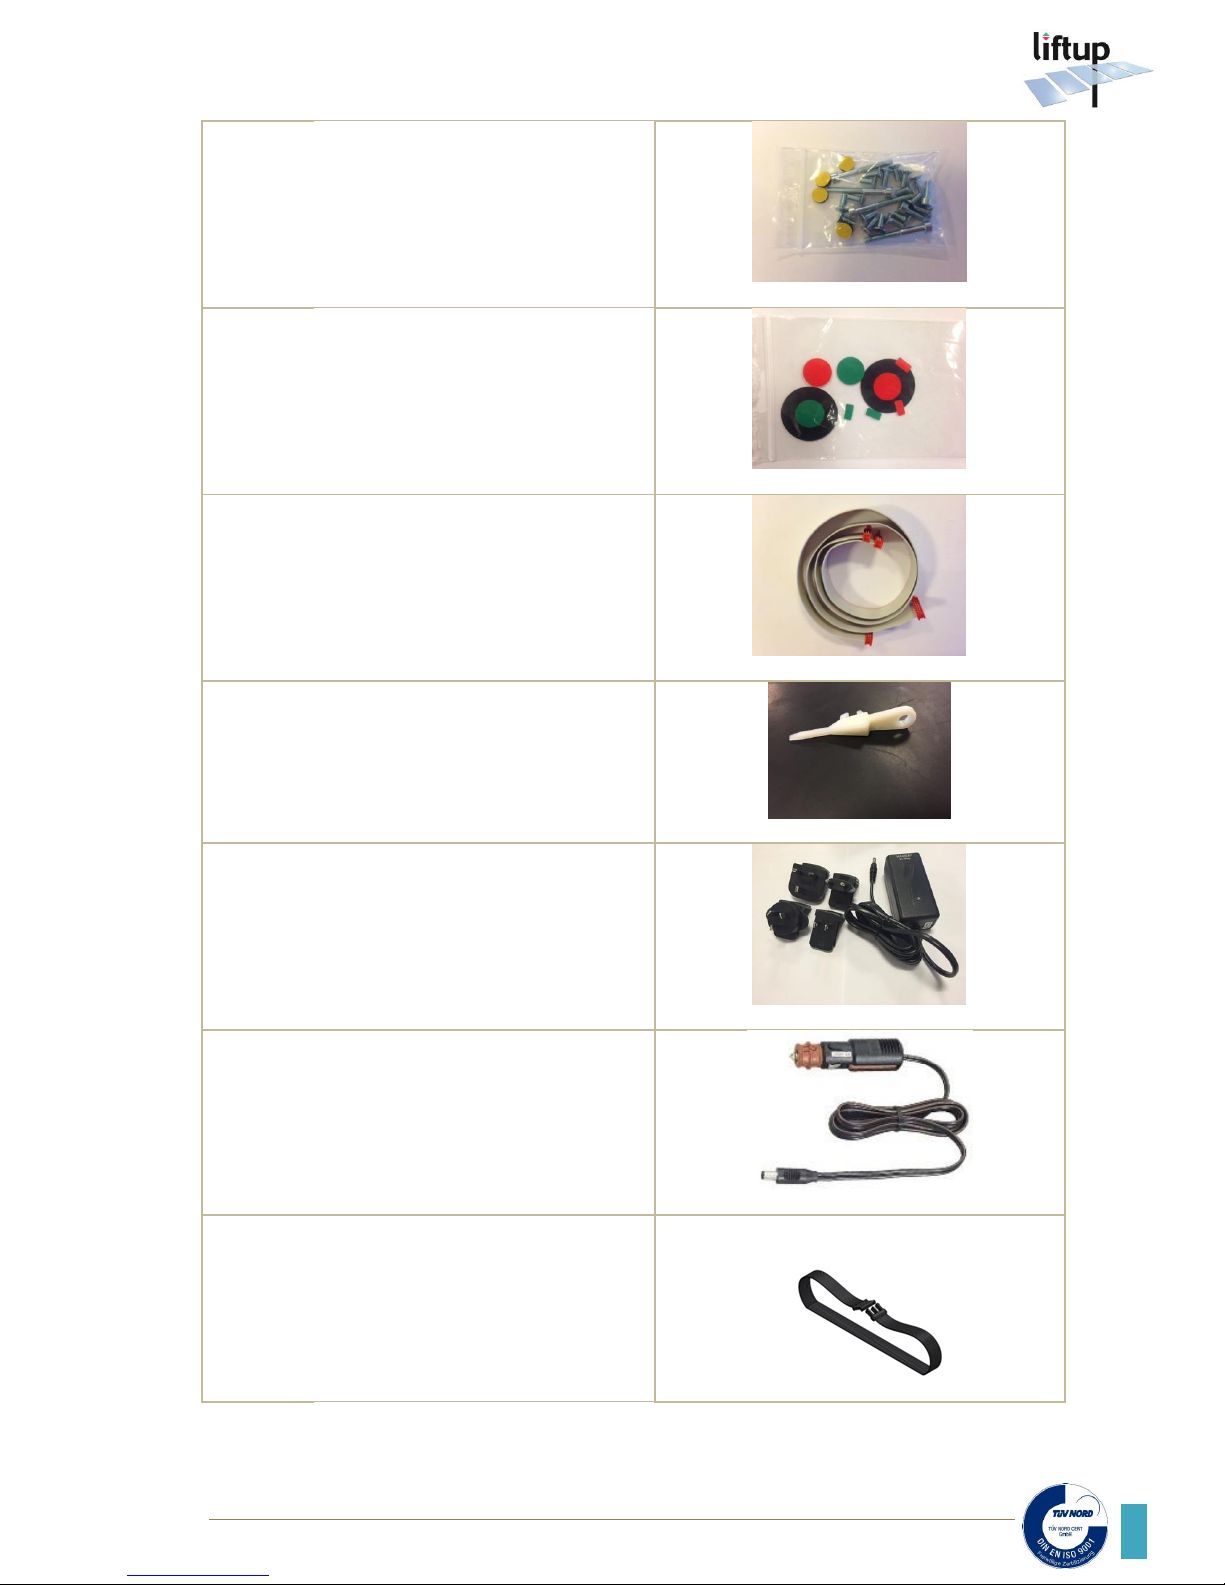
103270
Screw kit, Raizer
102927
Color buttons, Raizer
102980
Micromatch Cable 12 pol, for Raizer
103421
Socket tool for Raizer
102921
Battery charger 1205 SRP
102641
Cigarette lighter plug w .fuse for
Raizer
103728
Seatbelt for Raizer complete
Page 32
Liftup A/S | Hagensvej 21 | DK-9530 Støvring | Denmark | T: +45 96 86 30 20 | M: [email protected] | www.liftup.dk | CVR DK-1015 3964
USER MANUAL – RAIZER – GB VERSION 1.4
32
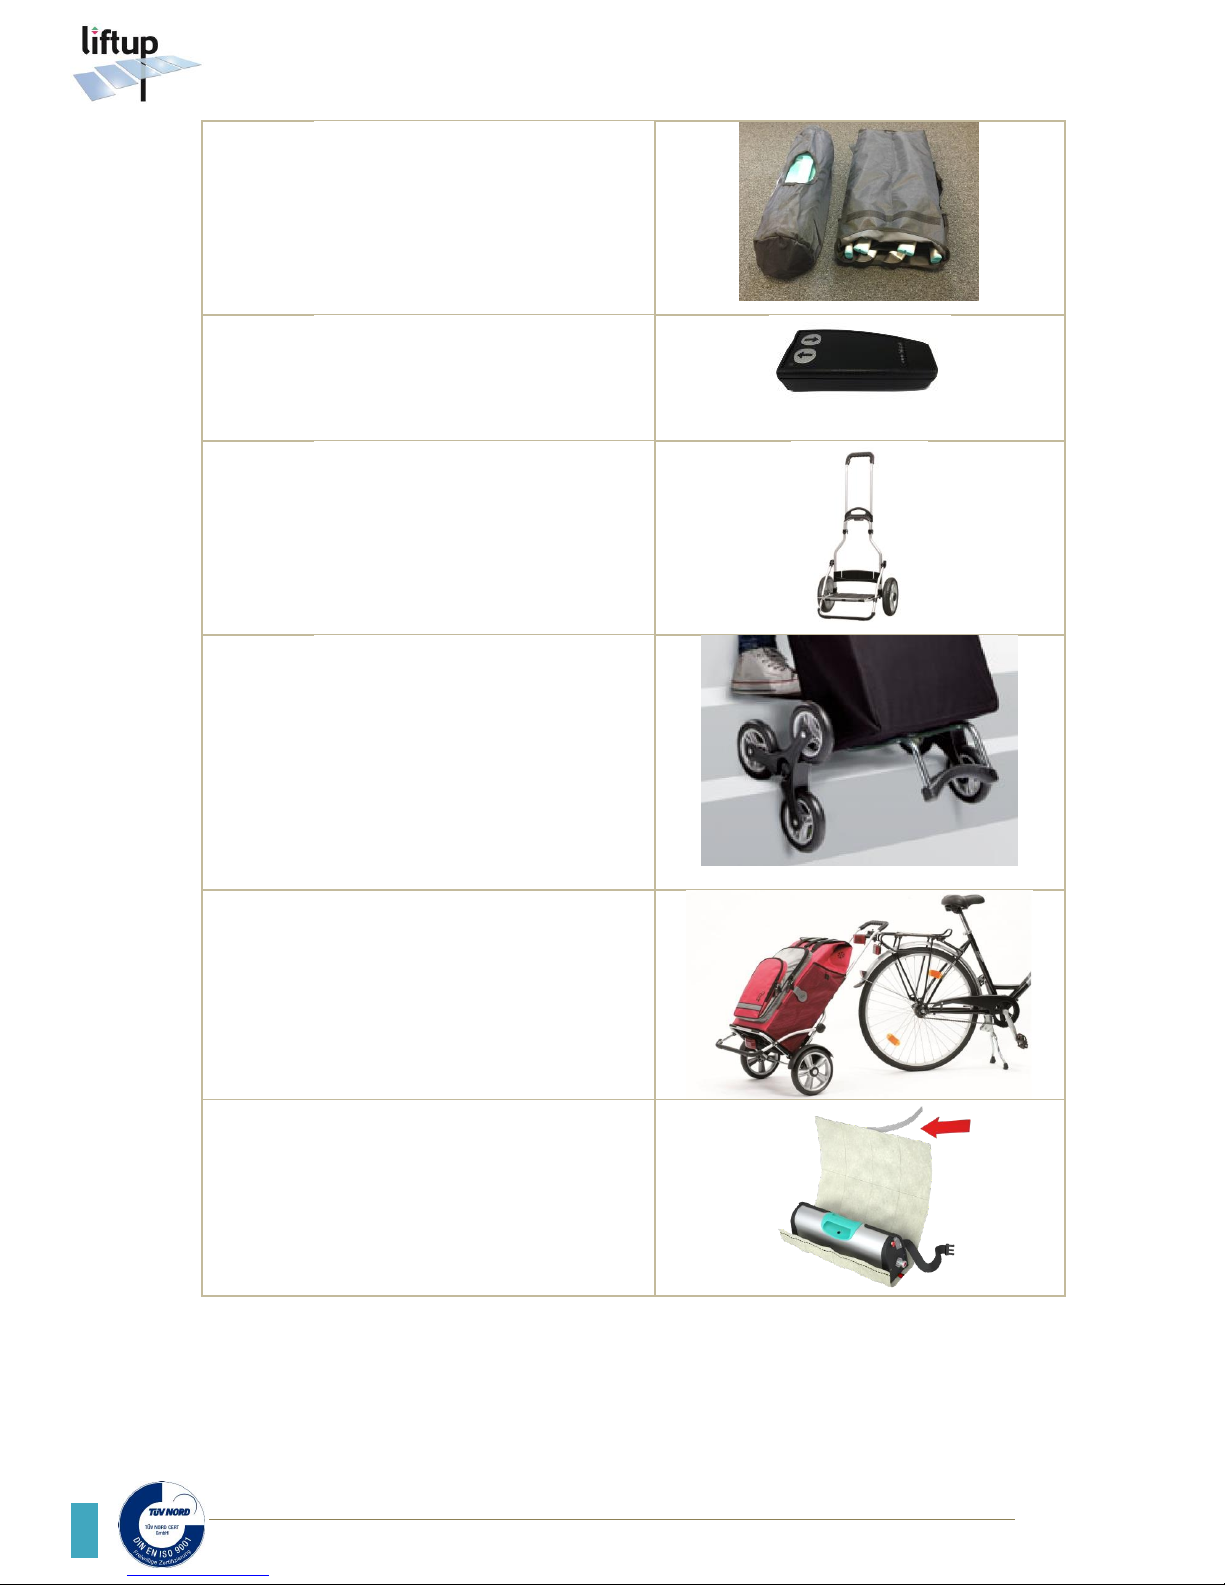
102956
Carry case for Raizer
101604
Remote control – transmitter unit
(Supplementary equipment)
103311
Trolley, Raizer
(Supplementary equipment)
103314
Triple Wheel, 2pcs. Trolley, Raizer
(Supplementary equipment)
103313
Bike bracket kit, Trolley, Raizer
(Supplementary equipment)
103741
Disposable hygiene cover (10 pcs.)
(Supplementary equipment)
Page 33
Liftup A/S | Hagensvej 21| DK-9530 Støvring | Denmark | T: +45 96 86 30 20 | M: [email protected] | www.liftup.dk | CVR DK-1015 3964
33
USER MANUAL – RAIZER – GB VERSION 1.4
Page 34
Liftup A/S | Hagensvej 21 | DK-9530 Støvring | Denmark | T: +45 96 86 30 20 | M: [email protected] | www.liftup.dk | CVR DK-1015 3964
USER MANUAL – RAIZER – GB VERSION 1.4
34
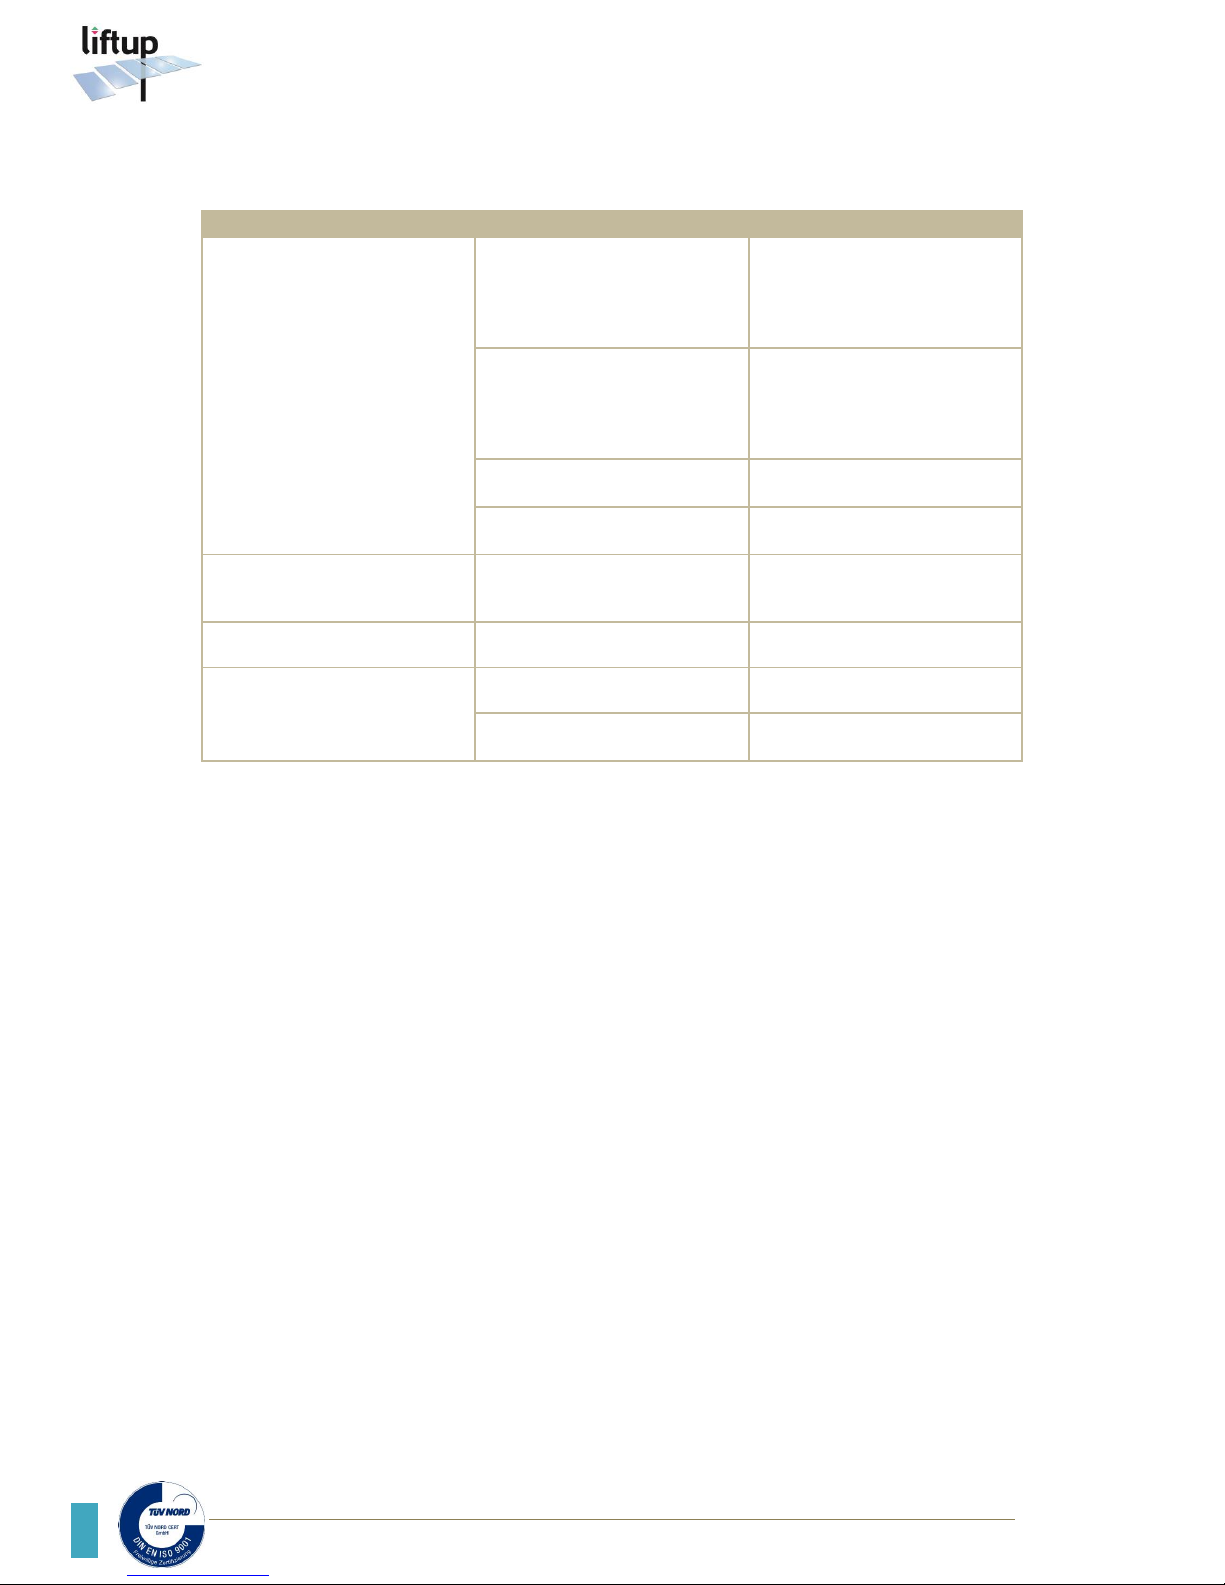
17. Troubleshooting
Issue
Cause
Solution
The Raizer does not run, even if
the up/down arrows are
pressed.
The stop button is activated.
2-tone alarm.
Turn the stop button in the
direction of the arrows and it
will click out. See section 10.2.
Check that the ready-for-service
LED is lit green.
The rear legs are not correctly
fitted.
2-tone alarm.
Check that the ready-for-service
LED is lit green.
If not: Fit the rear legs so that
they click completely into the
shaft. See section 10.1.
The Raizer is overloaded.
2-tone alarm.
Remove the load from the
Raizer. See section 6.3.
The battery is depleted.
See LED
Charge the Raizer battery.
See section 12.
The Raizer runs askew, when
the up/down arrows are
pressed.
The legs are not fitted in parallel.
Fit left and right rear legs so they
are in parallel. See section 10.1.
The Raizer stops at the top
position.
The chair has reached the top
stop. Long beep.
Completely normal. The chair
has reached its max. height.
Remote control* does not work
The Raizer is not powered
on/activated
Briefly press the up or down
buttons on the side of the device
The remote control* is not
correctly paired with the Raizer.
See section 10.7.
*Supplementary equipment
Page 35
Liftup A/S | Hagensvej 21| DK-9530 Støvring | Denmark | T: +45 96 86 30 20 | M: [email protected] | www.liftup.dk | CVR DK-1015 3964
35
USER MANUAL – RAIZER – GB VERSION 1.4
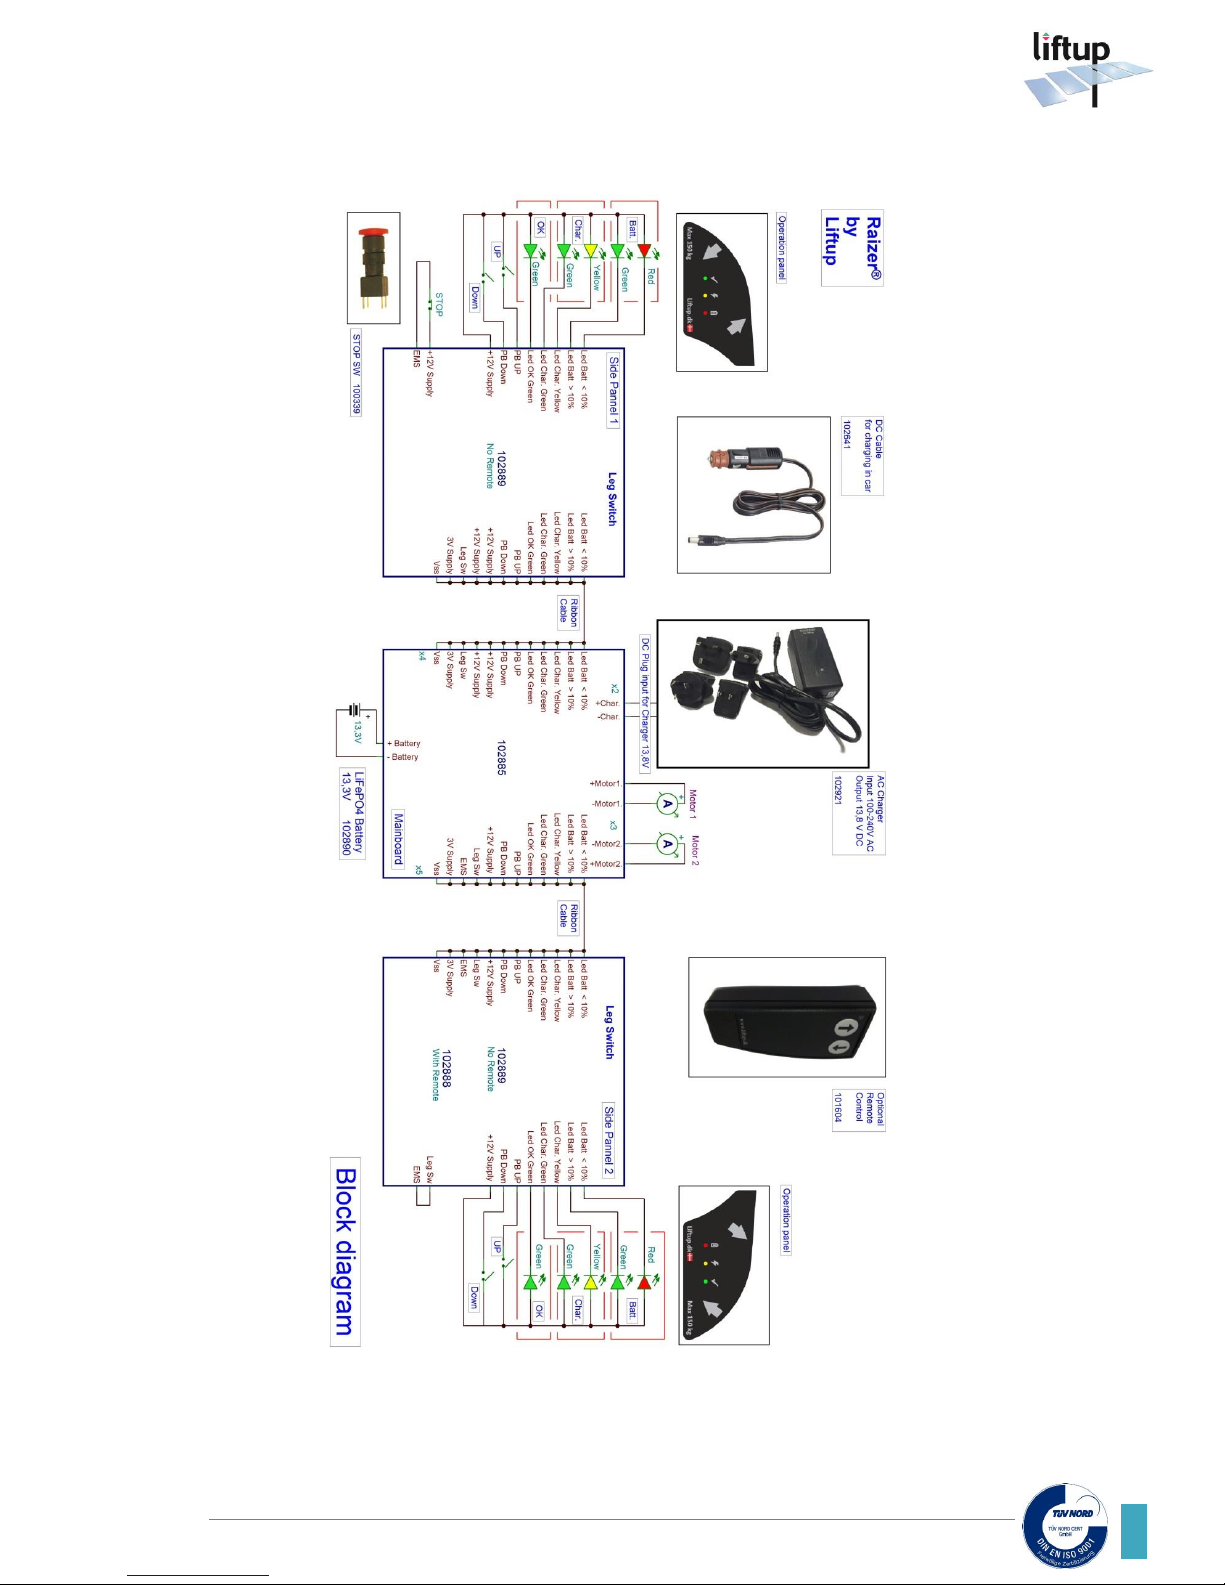
18. Electrical diagram
Page 36

Liftup A/S | Hagensvej 21 | DK-9530 Støvring | Denmark | T: +45 96 86 30 20 | M: [email protected] | www.liftup.dk | CVR DK-1015 3964
USER MANUAL – RAIZER – GB VERSION 1.4
36
19. Disposal
It is the duty of the owner to dispose of the product in accordance with the regulations
applicable at the time.
Consider contacting your dealer for advice on disposal.
Please note that the motor unit contains batteries which must be disposed of separately.
20. Right of complaint
The right of complaint encompasses the at any time applicable rules regarding the right of
complaint. Read more about this in the terms of sale and delivery.
http://www.liftup.dk/en/about-liftup/general-conditions/
NB: If the prescribed service inspections are not maintained the right of complaint may be lost.
Failing to perform these inspections can also have serious consequences for product safety. It
rests with the customer to ensure compliance with the prescribed service inspections at all
times. Cf. Danish Working Environment Authority Executive Order 1109 §14.
Enjoy your new Raizer®
Best regards, Liftup
 Loading...