

Page 1
Liftup A/S | Hagensvej 21 | DK-9530 Støvring | Denmark | T: +45 96 86 30 20 | M: [email protected] | www.liftup.dk
User manual
EasyLift V3 PLUS
USER MANUAL – EASYLIFT V3 PLUS – GB VERSION 2.1
Page 2

USER MANUAL – EASYLIFT V3 PLUS – GB VERSION 2.1
Liftup A/S | Hagensvej 21 | DK-9530 Støvring | Denmark | T: +45 96 86 30 20 | M: [email protected] | www.liftup.dk | CVR DK-1015 3964
2
Contents
1. Foreword ................................................................................................................................................... 4
2. Declaration of Conformity ................................................................................................................... 5
3. Labelling of the equipment .................................................................................................................... 6
4. Terms of use ............................................................................................................................................. 7
5. Technical specifications .......................................................................................................................... 8
6. Safety instructions .................................................................................................................................10
6.1 Installation and maintenance .........................................................................................................10
6.2 Unintended movements of lift ......................................................................................................10
6.3 Lift movement ...................................................................................................................................10
6.4 Avoiding personal injury .................................................................................................................10
6.5 Overload of the lift ..........................................................................................................................10
6.6 Personal safety ..................................................................................................................................11
6.7 Anti-crushing .....................................................................................................................................11
6.8 Safety barriers ...................................................................................................................................12
6.9 Handling ..............................................................................................................................................13
6.10 Unlocking door in case of emergency .........................................................................................13
7. Functionality ...........................................................................................................................................15
8. Assembly .................................................................................................................................................15
9. Start-up ....................................................................................................................................................15
10. Operating the lift ...................................................................................................................................16
10.1 Daily use .............................................................................................................................................16
10.2 Operating the lift from the UPPER level ....................................................................................17
10.3 Operating the lift from the LOWER level .................................................................................17
10.4 Operating the lift from the platform ...........................................................................................17
10.5 Emergency stop ................................................................................................................................17
10.6 ON/OFF switch ................................................................................................................................18
10.7 Audible alarms ..................................................................................................................................19
10.8 Emergency alarm devices (optional equipment) .......................................................................20
11. Operation ................................................................................................................................................21
11.1 Battery backup ..................................................................................................................................21
11.2 Calibration following emergency stop/power failure ..............................................................21
12. Maintenance ............................................................................................................................................22
13. Pairing transmitter and receiver ........................................................................................................24
13.1 Remote control and receiver of the lift .....................................................................................24
13.2 Wireless call station and receiver of the lift ..............................................................................25
Page 3

USER MANUAL – EASYLIFT V3 PLUS – GB VERSION 2.1
Liftup A/S | Hagensvej 21 | DK-9530 Støvring | Denmark | T: +45 96 86 30 20 | M: [email protected] | www.liftup.dk | CVR DK-1015 3964
3
14. Installation and handover .....................................................................................................................27
15. Maintenance checklist ..........................................................................................................................28
16. Service logbook .....................................................................................................................................30
17. Spare parts and accessories ................................................................................................................31
18. Disassembly ............................................................................................................................................34
19. Disposal ...................................................................................................................................................34
20. Right of complaint .................................................................................................................................34
October 2019
Page 4
USER MANUAL – EASYLIFT V3 PLUS – GB VERSION 2.1
Liftup A/S | Hagensvej 21 | DK-9530 Støvring | Denmark | T: +45 96 86 30 20 | M: [email protected] | www.liftup.dk | CVR DK-1015 3964
4
1. Foreword
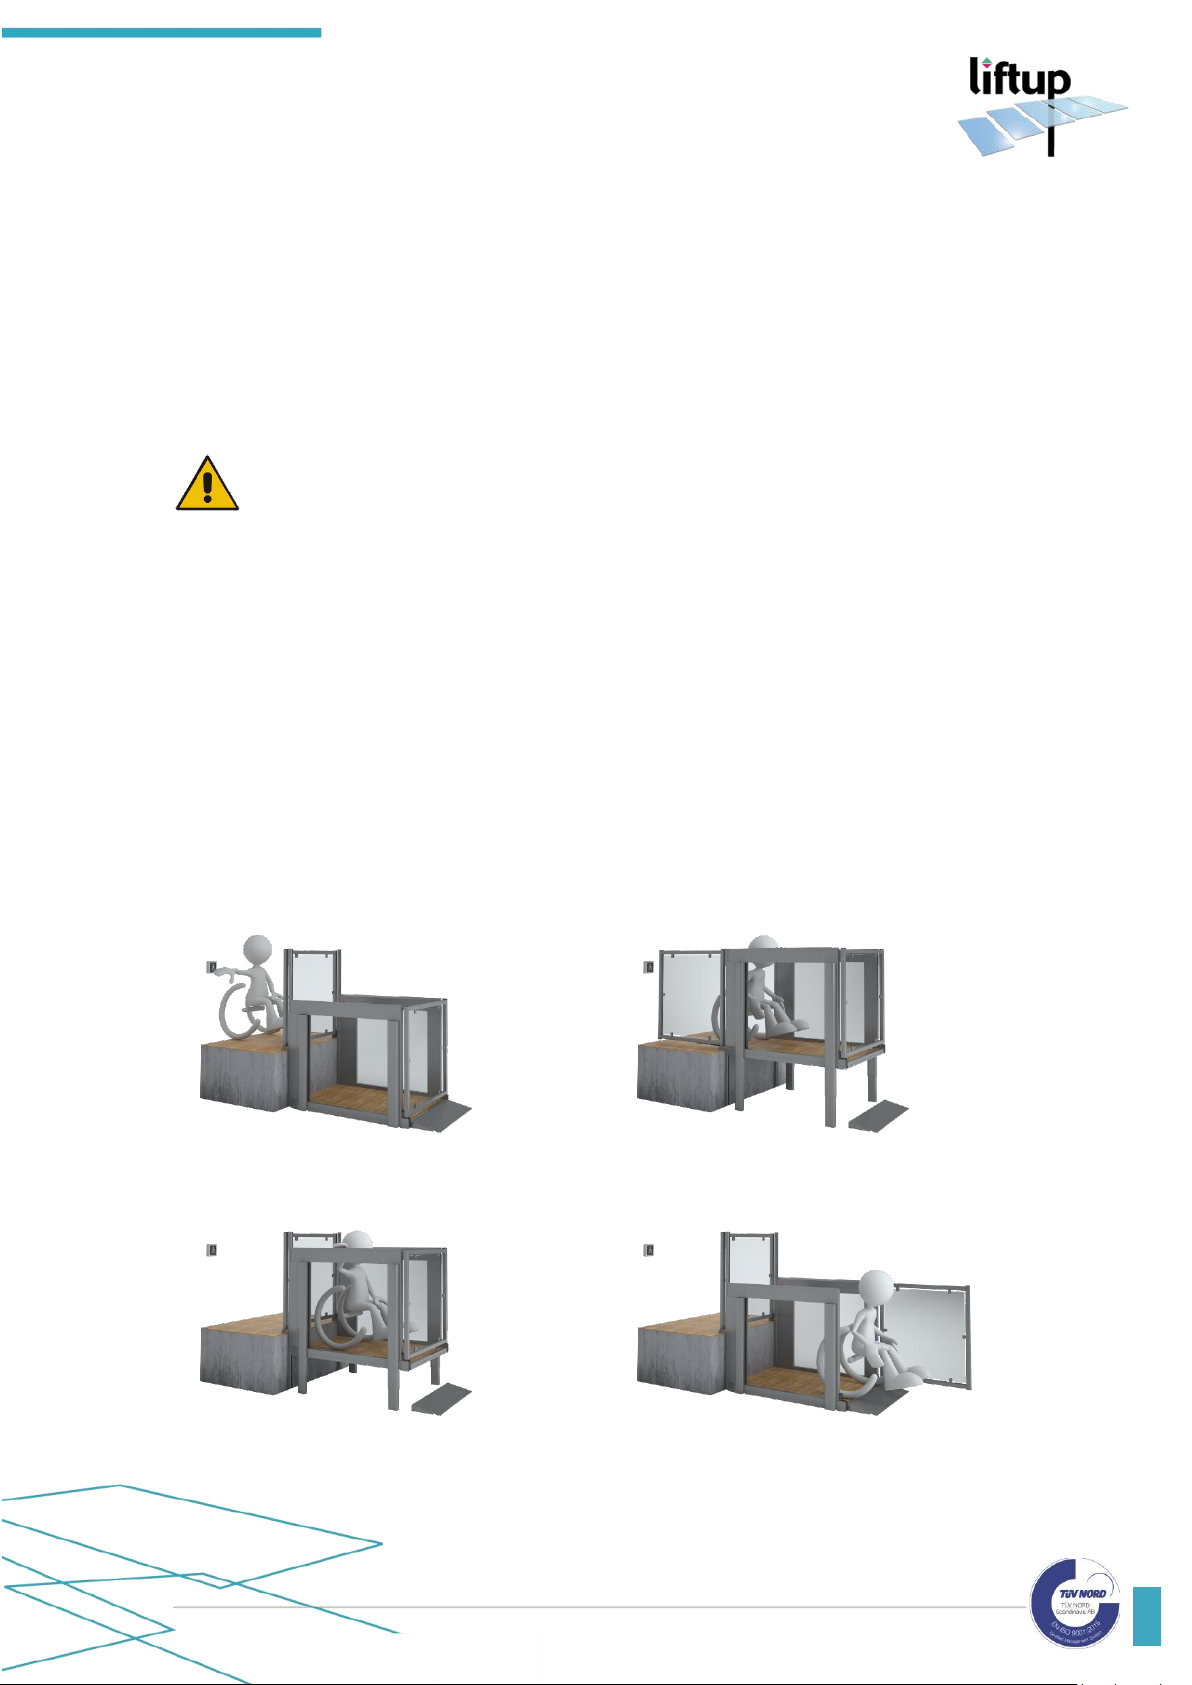
Congratulations on purchasing your new EasyLift lifting platform.
This is an original user manual for your new EasyLift V3 PLUS. Hereinafter we use the term
EasyLift for EasyLift V3 PLUS, if nothing else is specifically indicated.
It is important to read this manual before using the lifting platform
Set-up and installation MUST be undertaken by a qualified Liftup service technician, to ensure
correct assembly. Improper assembly can lead to unintended risks of personal injury.
EasyLift is a lifting platform for wheelchairs, offering users easy and stylish access between two
levels.
The lifting platform is easy to operate using operating panels mounted on the wall, on the lifting
platform, or by means of a remote control.
In this user manual “EasyLift lifting platform” will be mentioned as “lift”.
Page 5
USER MANUAL – EASYLIFT V3 PLUS – GB VERSION 2.1
Liftup A/S | Hagensvej 21 | DK-9530 Støvring | Denmark | T: +45 96 86 30 20 | M: [email protected] | www.liftup.dk | CVR DK-1015 3964
5
2. Declaration of Conformity
Manufacturer: Liftup A/S
Address: Hagensvej 21, DK-9530 Støvring, Denmark
Telephone: +45 9686 3020
hereby declares that:
Equipment: EasyLift V3 PLUS
Lifting platform for wheelchair users and persons with impaired
mobility
Year: 2019
Is in compliance with relevant safety and health requirements in:
EMC-Directive: 2014/30/EU
Machinery Directive: 2006/42/EC
ROHS-Directive: 2011/65/EU
For the assessment, relevant parts of the following have been used:
DS/EN 60204 Safety of machinery – Electrical equipment of machines.
DS/EN 13849-1 and -2 Safety-related parts of control systems
CEO
Søren Elisiussen
Position
Name
Liftup A/S, Hagensvej 21, DK-9530 Støvring, Denmark
Place
10 October 2019
Date
Signature
Page 6
USER MANUAL – EASYLIFT V3 PLUS – GB VERSION 2.1
Liftup A/S | Hagensvej 21 | DK-9530 Støvring | Denmark | T: +45 96 86 30 20 | M: [email protected] | www.liftup.dk | CVR DK-1015 3964
6
3. Labelling of the equipment
Insert copy of
CE certification mark here
Page 7
USER MANUAL – EASYLIFT V3 PLUS – GB VERSION 2.1
Liftup A/S | Hagensvej 21 | DK-9530 Støvring | Denmark | T: +45 96 86 30 20 | M: [email protected] | www.liftup.dk | CVR DK-1015 3964
7
4. Terms of use
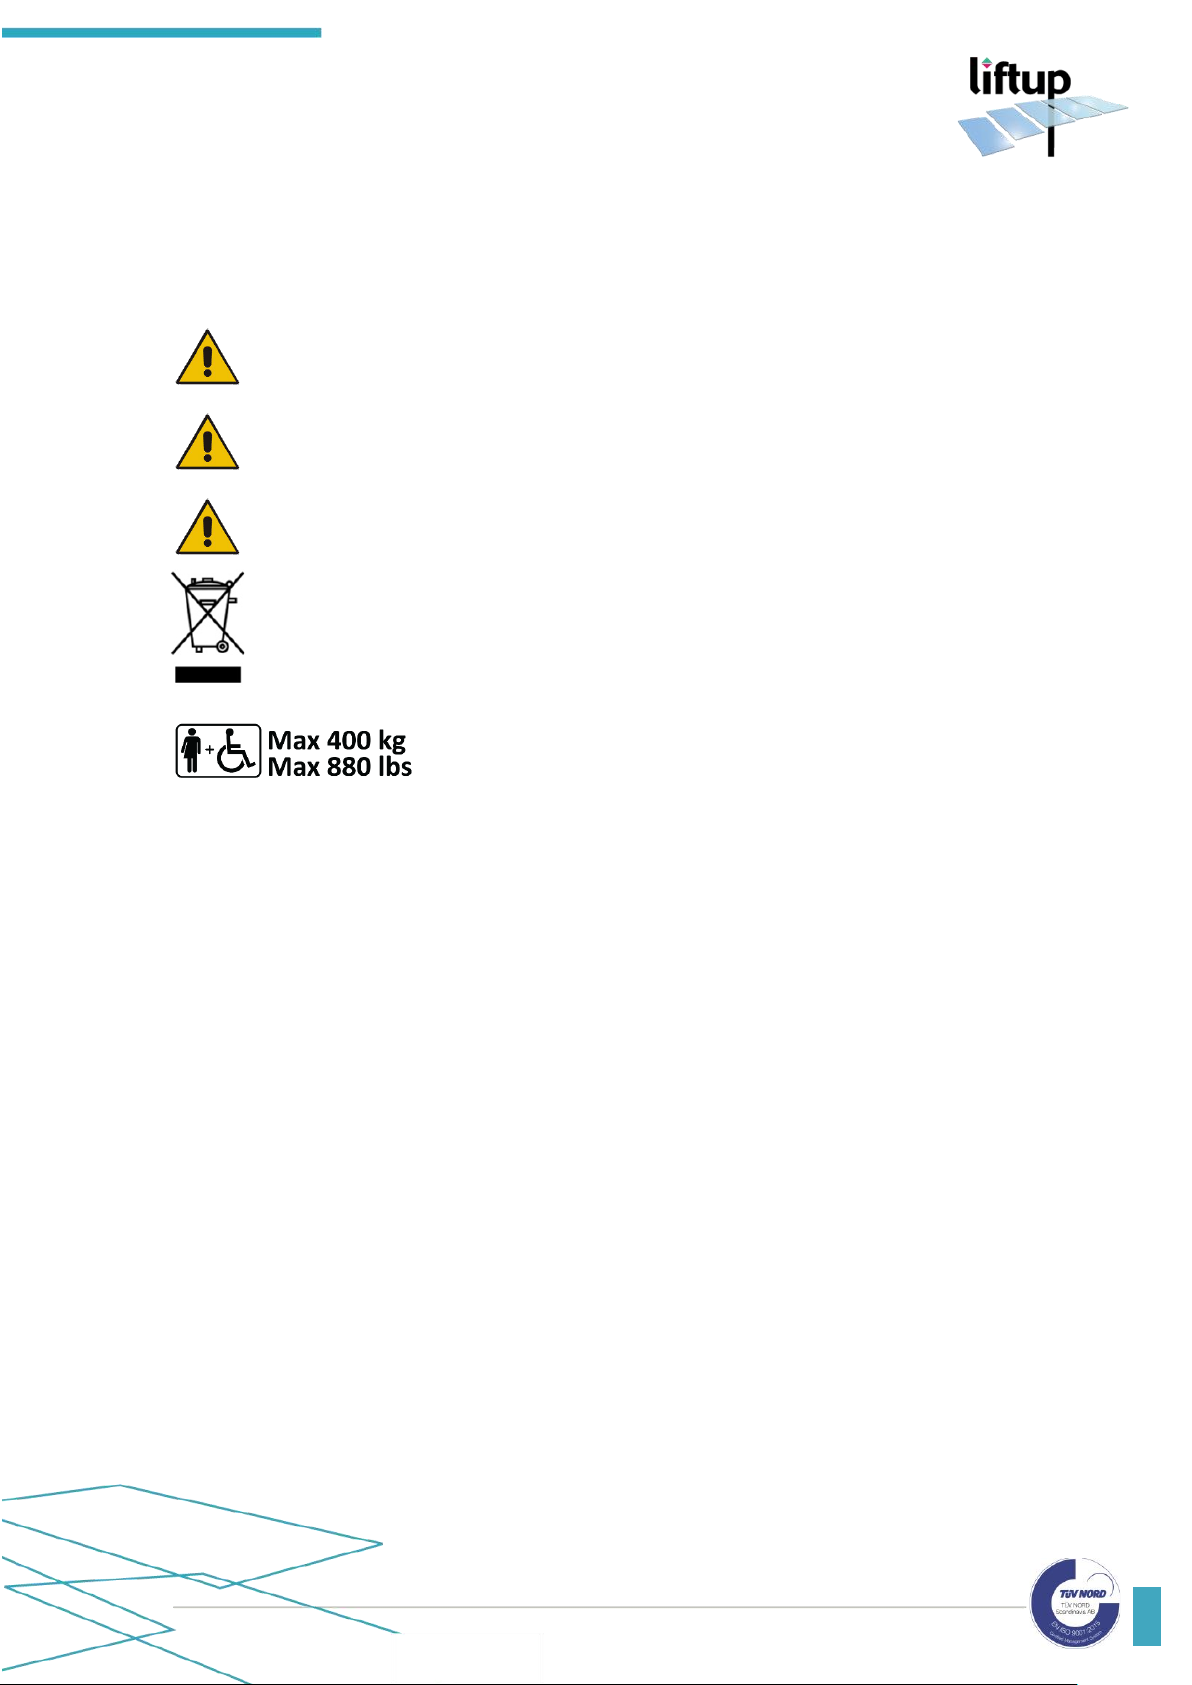
The lift is exclusively for the use of wheelchair users and persons with impaired mobility. The
maximum load is 400 kg evenly distributed on the lift or a maximum of two persons.
Read this user manual thoroughly before using the lift
IMPORTANT! The lift must NOT be used for goods transport, including loaded
pallets or other types of heavy loads.
The owner of this lift is obliged to maintain it according to the Maintenance guide
(see section 12).
Do not dispose of batteries or electrical or electronic equipment with unsorted
household rubbish. When disposing of this device, ensure compliance with local
ordinances and regulations.
The maximum load is 400 kg (880 lbs) or a maximum of 2
persons evenly distributed on the platform.
If the lift is accessible to the public, it is the responsibility of the owner to ensure that inspections
are performed in accordance with the legal provision and at correct intervals, and that necessary
safety equipment is provided for.
Page 8
USER MANUAL – EASYLIFT V3 PLUS – GB VERSION 2.1
Liftup A/S | Hagensvej 21 | DK-9530 Støvring | Denmark | T: +45 96 86 30 20 | M: [email protected] | www.liftup.dk | CVR DK-1015 3964
8
5. Technical specifications
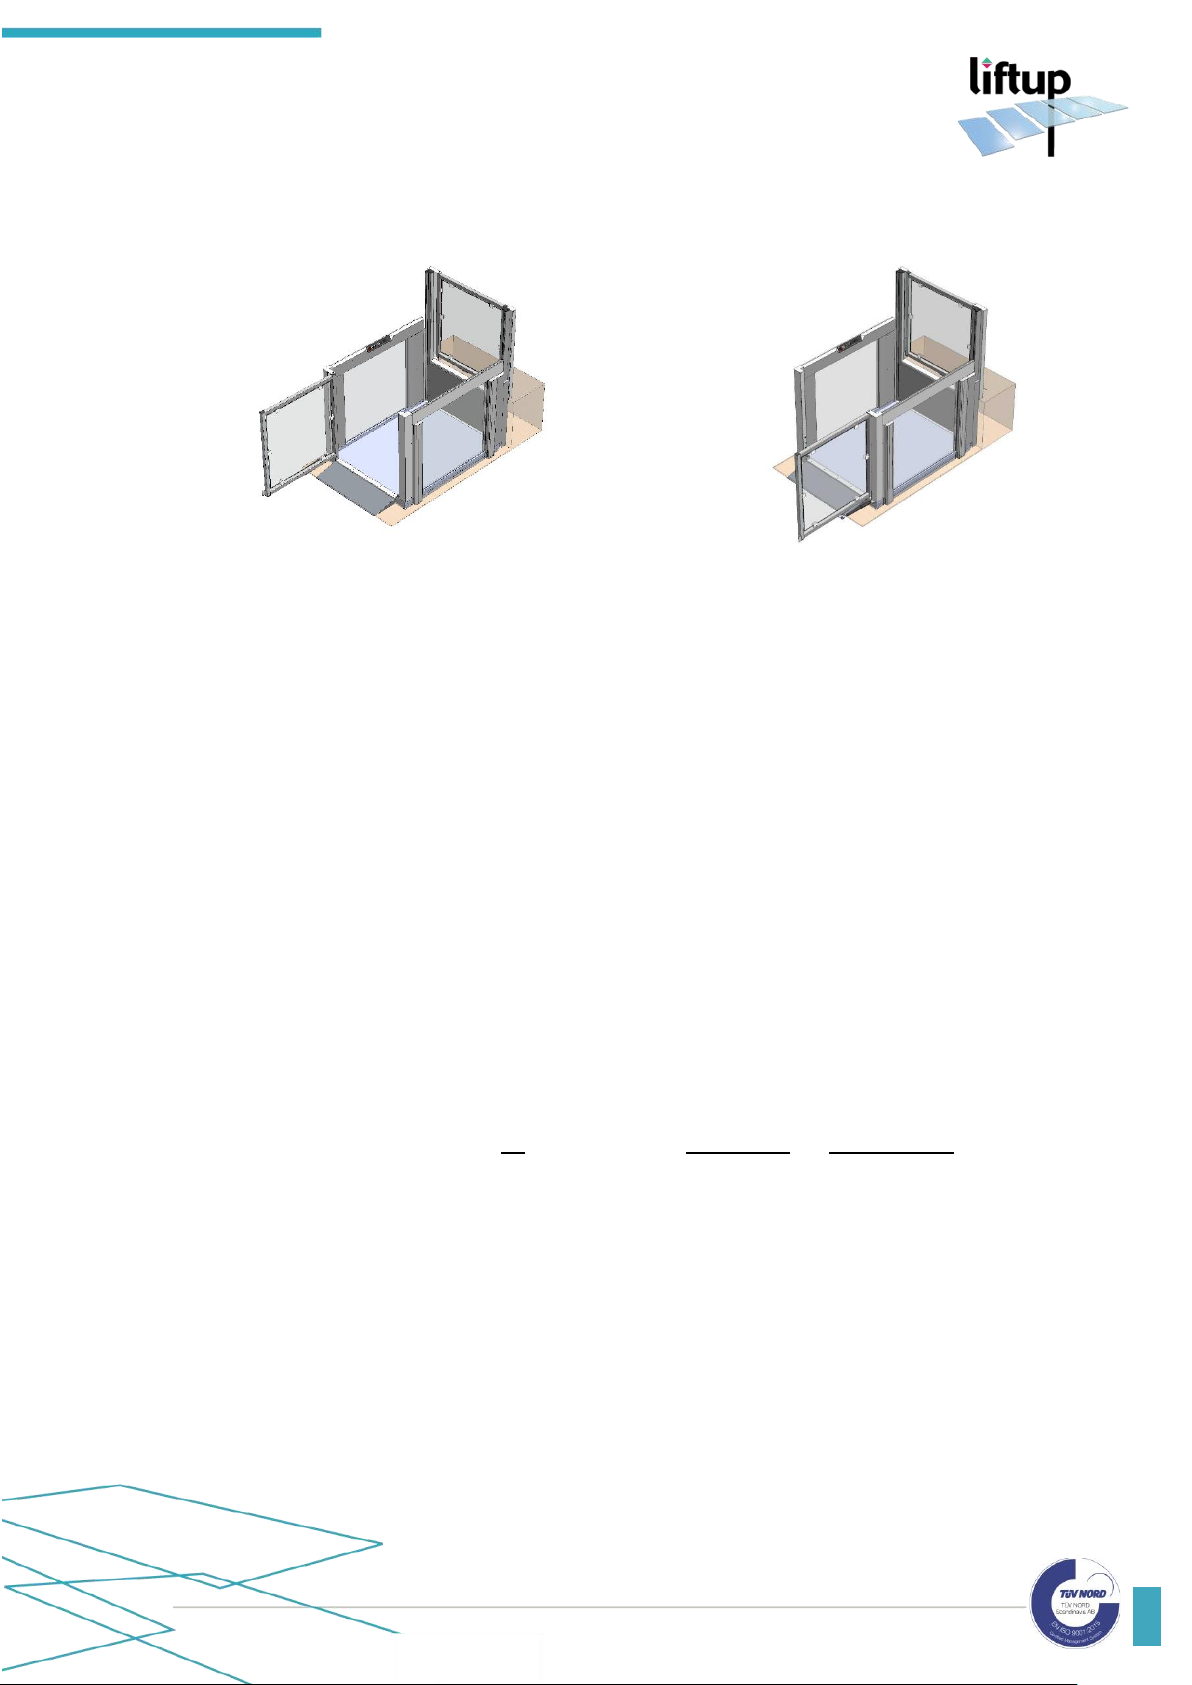
EasyLift 800/900 V3 PLUS
EasyLift 1100 V3 PLUS
Technical specifications:
Power: 110 - 240 V/50 Hz (1.1 A) Max: 90 W, Standby < 6 W
Lifting capacity: 400 kg or two persons
Lifting height: 0 – 1250 mm (0 – 49.21”)
Platform size:
Internal dimensions: W 800/900/1100 mm (31.50/35.43/39.37”)
L 1400 mm (55.12”)
External dimensions: 800/900 PLUS
W 960/1060 mm (37.8/41.73”)
L 1750 mm (68.9”)
1100 PLUS
W 1260 mm (49.61”)
L 1820 mm (71.65”)
Dead weight: 200 kg approx. (EasyLift 800/900 PLUS)
250 kg approx. (EasyLift 1100 PLUS)
Noise level: < 70 dB
Water and dust: IP23
Lifting speed/
temperature:
°C
mm/second
inches/second
+40 ˚C
- +5 ˚C:
40 mm
1.57”
+5 ˚C
- -5 ˚C:
20 mm
0.79” -5 ˚C
- -20 ˚C:
10 mm
0.39”
Max. 200 kg/440 lbs
-20 ˚C
- -25 ˚C:
10 mm
0.39”
Approval: Directive 2006/42/EC on machinery
Duty cycle: 2 min. / 5 min.
Battery capacity: 30 cycles at 25˚C
Flat battery: 10 min. charge = one trip
Fully charged = 5 hours
Page 9

USER MANUAL – EASYLIFT V3 PLUS – GB VERSION 2.1
Liftup A/S | Hagensvej 21 | DK-9530 Støvring | Denmark | T: +45 96 86 30 20 | M: [email protected] | www.liftup.dk | CVR DK-1015 3964
9
All radio components comply with the following standards:
EU 2014/53/EU, Radio Equipment Directive (RED)
FCC (USA) CFR 47 Part 15
EN 62479:2010 Human exposure
EN 300 440, v2.1.1 Electromagnetic compatibility + Radio spectrum Matters Draft
EN 301489-1, v2.2.0 Electromagnetic compatibility + Radio spectrum Matters Draft
EN301489-17, v3.2.0 Electromagnetic compatibility + Radio spectrum Matters
AS/NZS 4268 Radio Equipment and Systems –Short Range devices
AS/NZS 2772.2 Radio Frequency Fields (mean power < 1 mW)
Right reserved to make technical modifications.
Page 10

USER MANUAL – EASYLIFT V3 PLUS – GB VERSION 2.1
Liftup A/S | Hagensvej 21 | DK-9530 Støvring | Denmark | T: +45 96 86 30 20 | M: [email protected] | www.liftup.dk | CVR DK-1015 3964
10
6. Safety instructions
6.1 Installation and maintenance
Do not try to install or service your lift yourself - this MUST be done by an authorised* service
technician.
Do not remove the protective plates or safety plates on your lift, as this may lead to personal
injury.
*Has completed a Liftup product and service course.
6.2 Unintended movements of lift
If during the use of your lift movement or action occurs which is not described in this manual,
stop the unit and call technical assistance.
Should your lift not move with a plane movement as a lifting platform, calibrate it by running it
down to floor level. If the problem continues, call technical assistance.
6.3 Lift movement
The space under the lift must be kept free of all objects, which may impair its downward
movement. Otherwise, the lift cannot be moved down to the lower level and thus cannot fulfill
its function as a lifting platform.
If an object/material prevents the lift moving in a downward direction, the lift will suspend its
movement and issue an audible alarm and move upwards 2-3 cm automatically. This will allow
the object to be removed. The object or material must be removed before the lift may be used
again.
6.4 Avoiding personal injury
In order to avoid personal injury, users may NOT use the lift when someone or something is at
risk of injury through crushing, cutting, falling, tripping or the like. The user/operator shall strive
to the greatest extent possible to ensure that the lift can move without risk of causing injury.
Be extra careful when small children and disabled persons are on or around the lift, since these
groups cannot always be expected to be able to foresee the possible consequences of the lift
movements.
6.5 Overload of the lift
In order to avoid damage to equipment due to overloading (max.400 kg evenly spread), the lift
is fitted with overload protection which stops the lift and issues an audible alarm if overload
occurs. In the event of overload, run the lift downward to exit.
Page 11
USER MANUAL – EASYLIFT V3 PLUS – GB VERSION 2.1
Liftup A/S | Hagensvej 21 | DK-9530 Støvring | Denmark | T: +45 96 86 30 20 | M: [email protected] | www.liftup.dk | CVR DK-1015 3964
11
6.6 Personal safety
The lift is fitted with various safety features which ensure that the user or other people are not
injured when using the lift.
WARNING! Although the lift comes fitted with various safety features, never use
it if persons or animals are close by, as there may otherwise be a risk of crushing.
Never allow children to play with the lift.
6.7 Anti-crushing
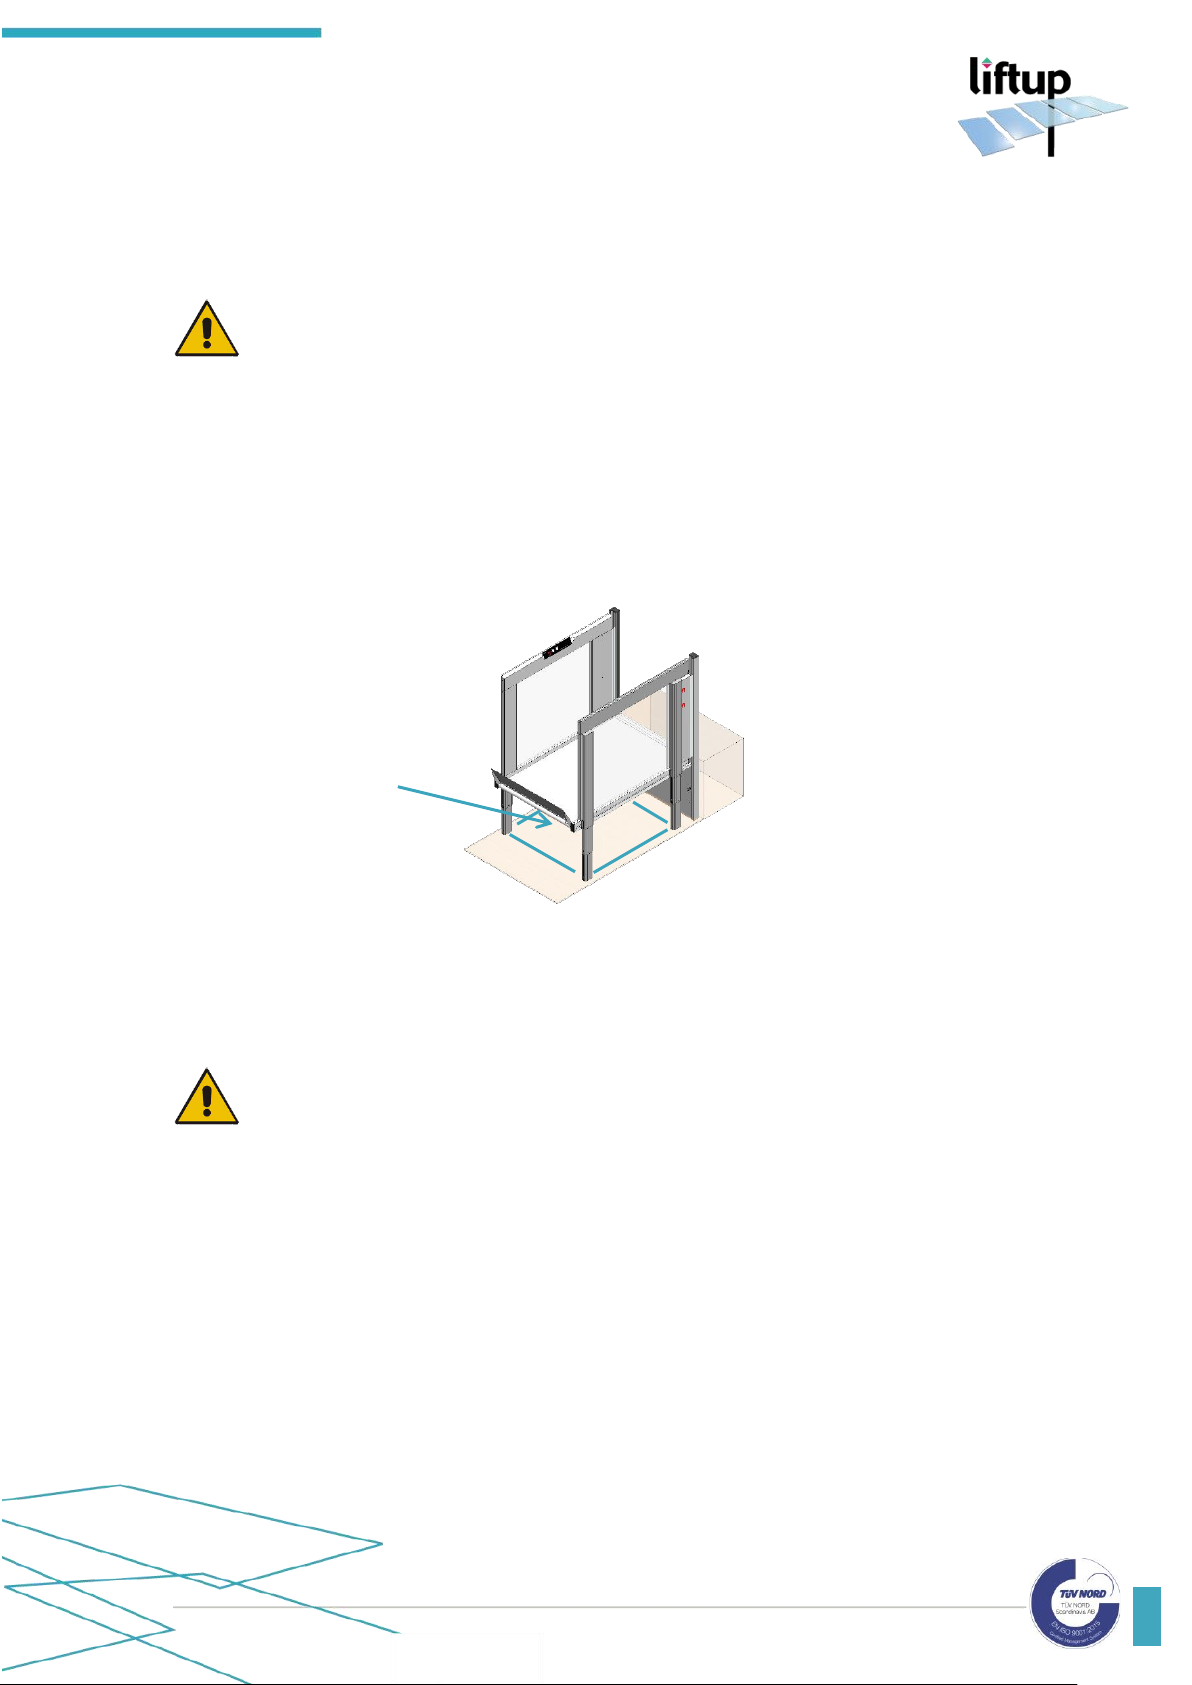
Beneath the entire lift a number of pressure plates (anti-crushing) are fitted which are activated
if an object is going to be crushed below. When this feature is activated, the lift stops and then
runs approx. 2 cm upwards, while at the same time an audible alarm is issued (see section 10.7).
If the anti-crushing feature is activated, release the operating button. Remove any objects under
the lift and then again run it to floor level. (If needed, move the lift up a small distance so you
can easily remove objects from under it).
IMPORTANT! Keep in mind that when the lift is used outdoors, leaves, branches
and snow can affect the anti-crushing safety feature, and so you should check regularly
that the lift will not be obstructed when moving downward.
For outdoor installations we recommend returning the lift to ground level after use,
in order to prevent unwanted objects finding their way under the lift
Anti-crushing
protection zone
Page 12
USER MANUAL – EASYLIFT V3 PLUS – GB VERSION 2.1
Liftup A/S | Hagensvej 21 | DK-9530 Støvring | Denmark | T: +45 96 86 30 20 | M: [email protected] | www.liftup.dk | CVR DK-1015 3964
12
6.8 Safety barriers
6.8.1 Ramp as roll-off protection
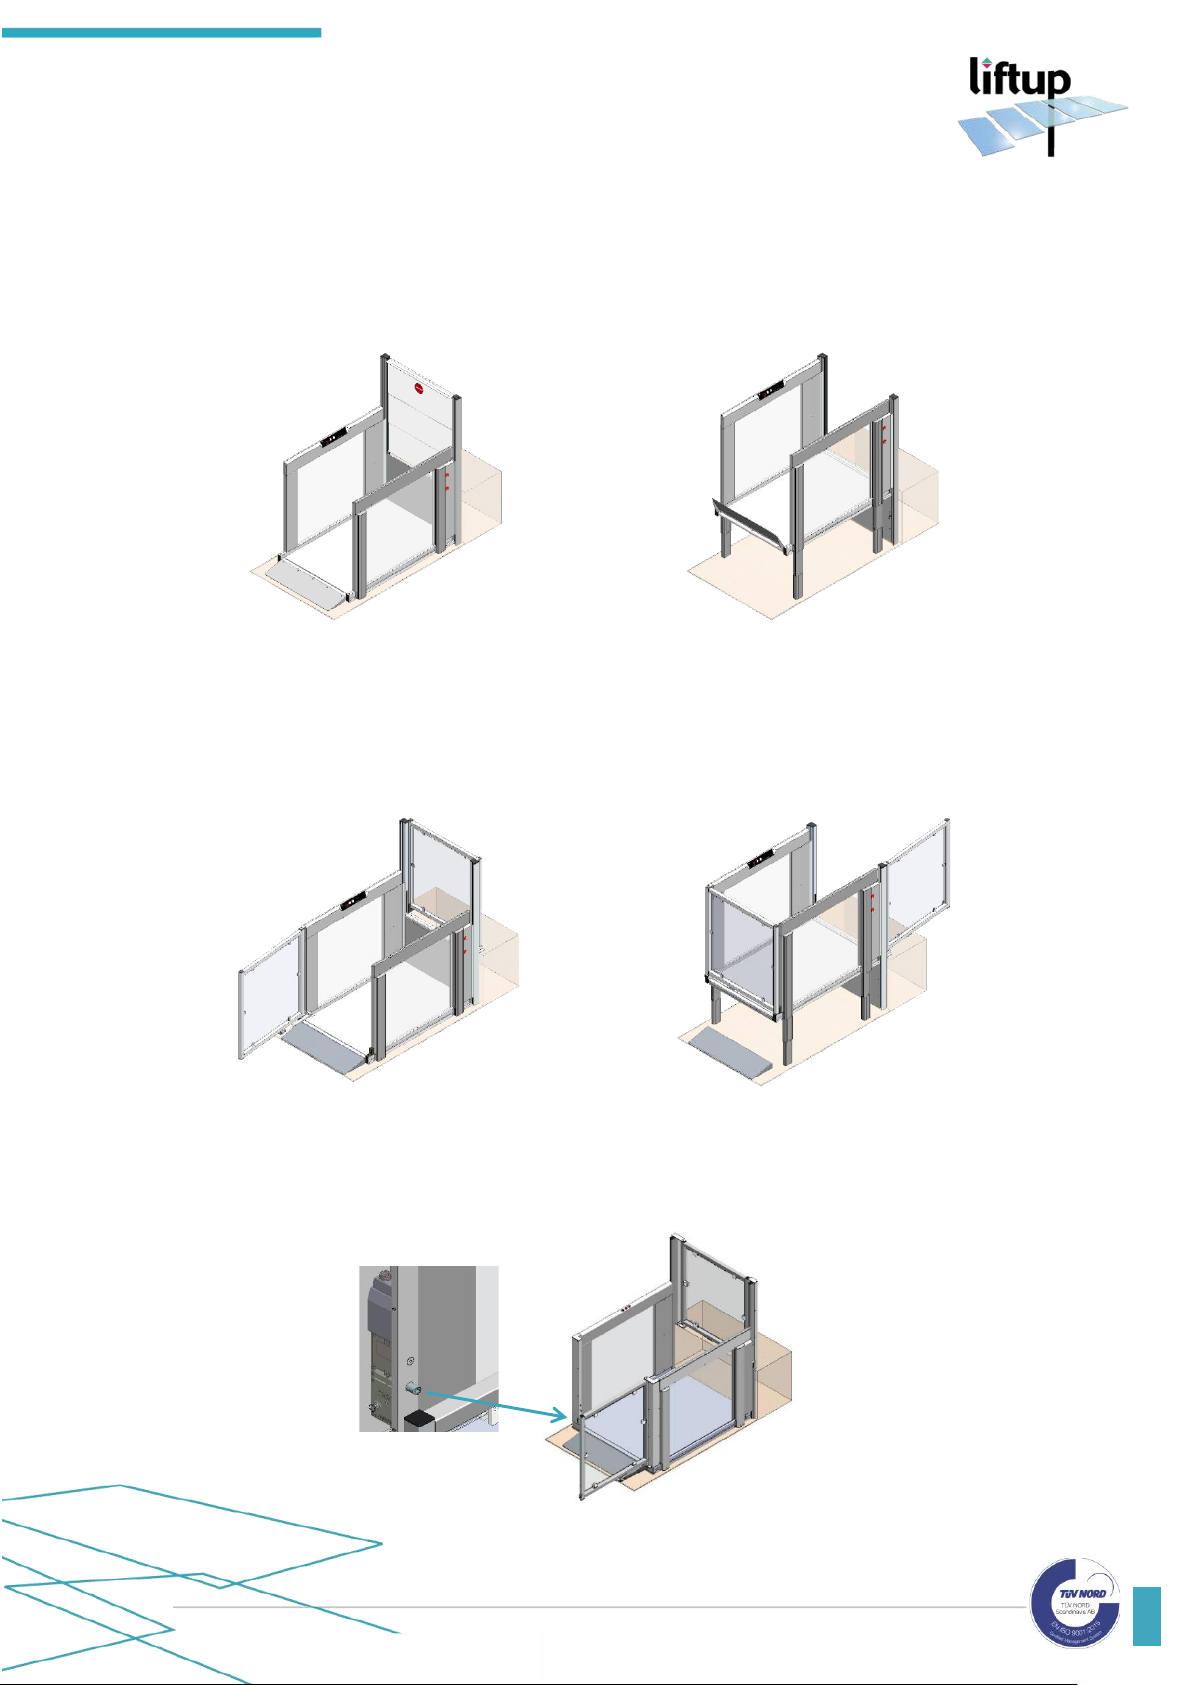
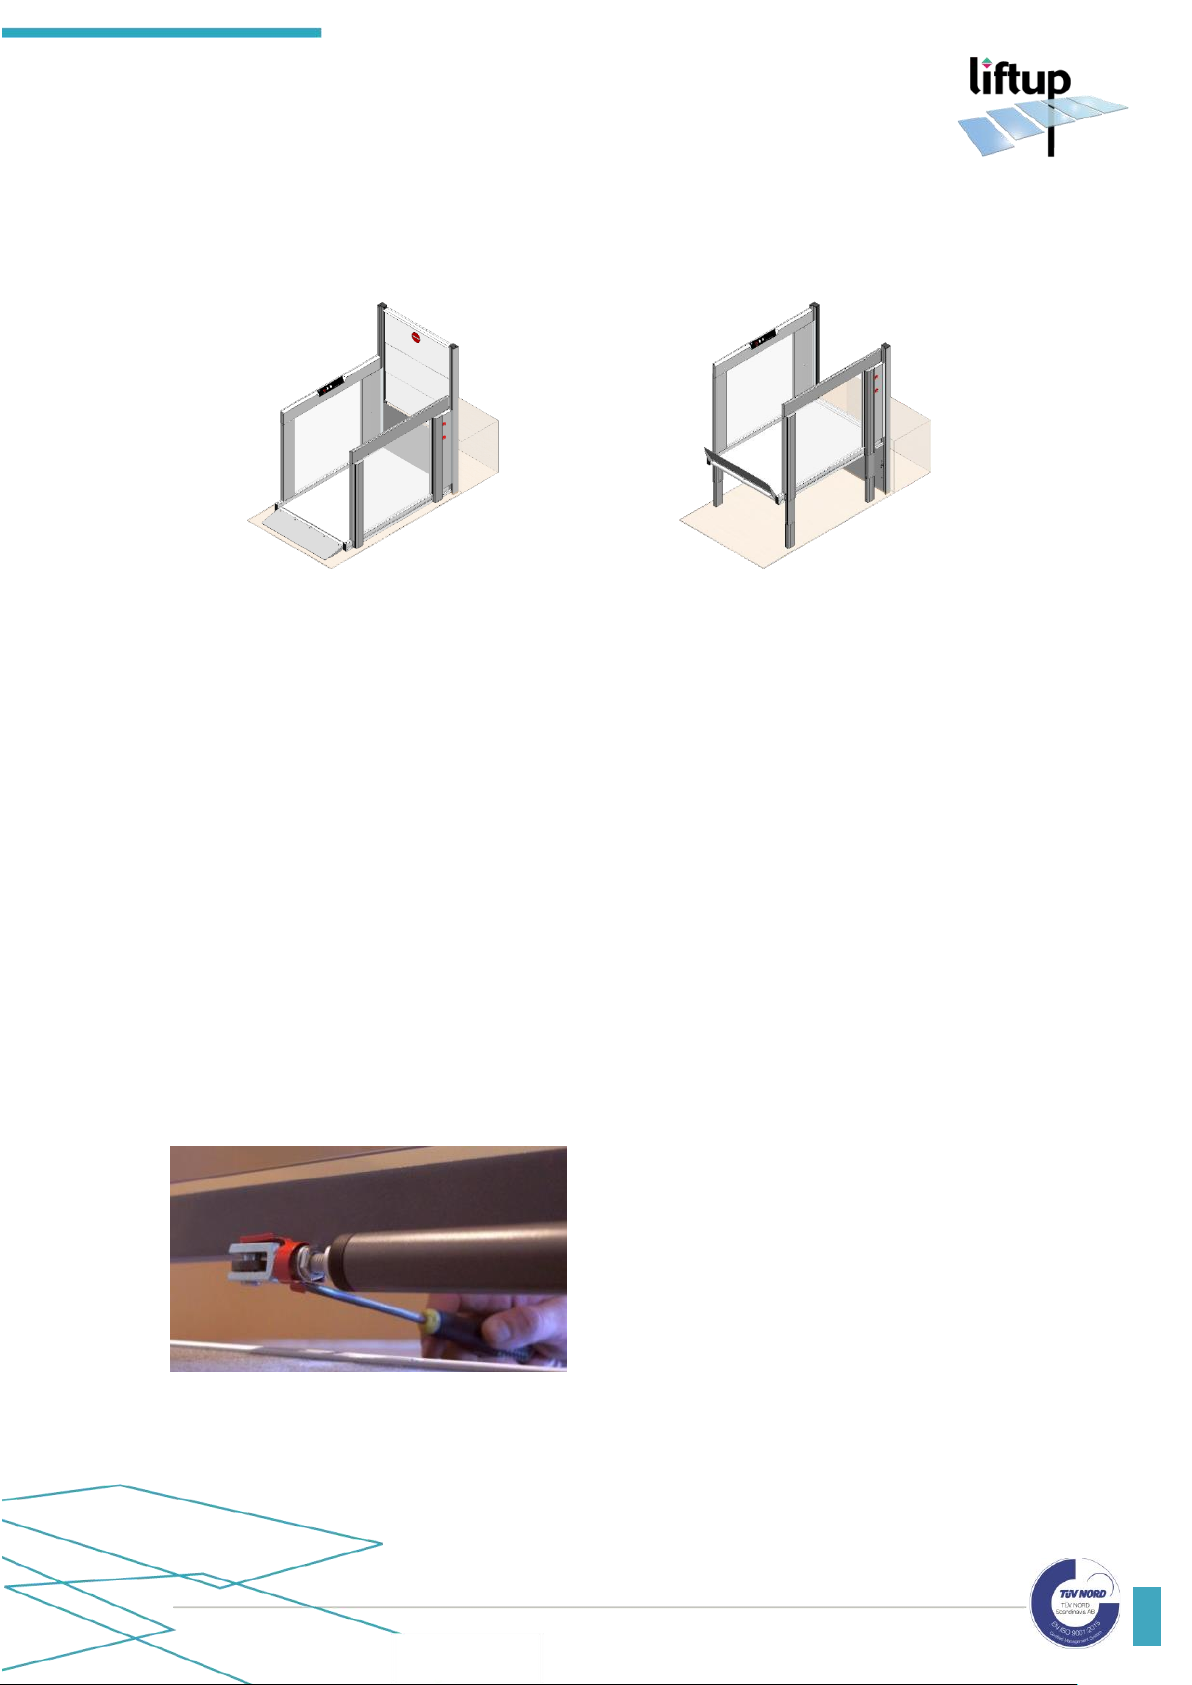
If the lift is fitted with a ramp, the ramp will first pull up and lock before the lift begins to move.
The ramp now acts as roll-off protection. When the lift returns to floor level, the ramp will
automatically lower (keep the button pressed) and act as a drive-on/drive-off ramp.
Drive-on/drive-off ramp
Ramp as roll-off protection
6.8.2 Doors as roll-off protection
If the lift is fitted with doors, they will close before it begins to move. The doors will always be
closed, when the lift has moved off ground level.
Lower level
Upper level
If the lift is fitted with doors, it can be equipped with automatic door locks (only available on
EasyLift 1100). The automatic door locks will secure that the doors are locked before the lift
begins to move.
Page 13
USER MANUAL – EASYLIFT V3 PLUS – GB VERSION 2.1
Liftup A/S | Hagensvej 21 | DK-9530 Støvring | Denmark | T: +45 96 86 30 20 | M: [email protected] | www.liftup.dk | CVR DK-1015 3964
13
6.8.3 Barrier
If the lift is fitted with a vertical safety barrier (optional equipment) at the upper level, it will
close before the lift begins to move. The vertical safety barrier will always be closed, when the
lift is not at the upper level. The ramp is raised, when the lift is not at the lower level.
Lower level
Upper level
6.9 Handling
The lift is normally supplied by your dealer, who also takes care of installation.
Do not try to move the lift manually, as this can lead to personal injury. The product should be
moved and handled using suitable lifting equipment (pallet truck, roller plate, or similar).
Do not expose the lift to heavy bumps or jolts as this can damage its functionality.
Store the accompanying remote control (optional equipment) in a dry place, and do not expose
it to heavy knocks (for example, by throwing it). Only clean using a firmly wrung cloth.
6.10 Unlocking door in case of emergency
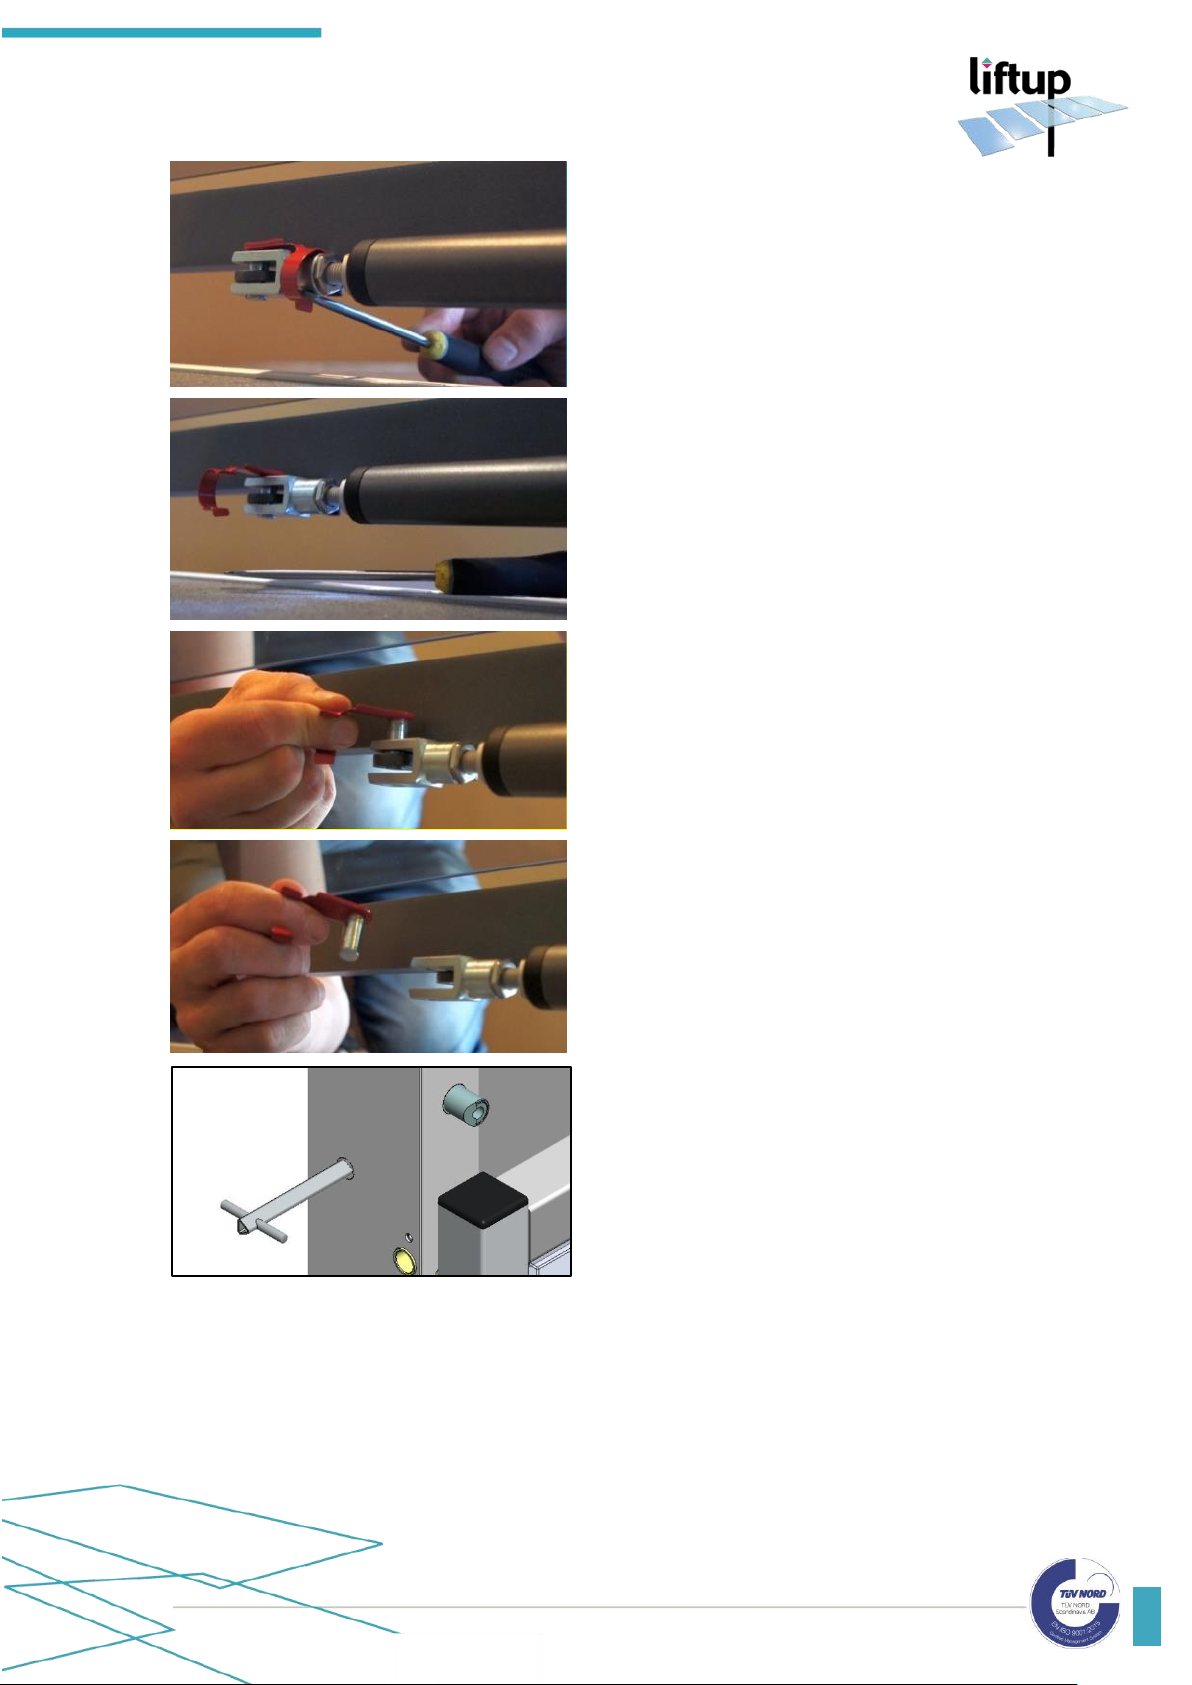
In case of emergency/malfunction: Release the folding spring bolt.
1. Pull the spring out from the shaft of the
clevis, using a suitable tool, screwdriver,
ruler, bottle-opener, etc.
Page 14
USER MANUAL – EASYLIFT V3 PLUS – GB VERSION 2.1
Liftup A/S | Hagensvej 21 | DK-9530 Støvring | Denmark | T: +45 96 86 30 20 | M: [email protected] | www.liftup.dk | CVR DK-1015 3964
14
2. From outside, you can approach the lower
side
3. The spring is released
4. When the spring is released pull out the
bolt.
Please note!
The bolt may be difficult to pull out,
because of pressure on the door actuator.
5. Now the door can be moved freely
6. If the door is equipped with an automatic
door lock, unlock it with a triangular key
(automatic door lock only available on
EasyLift 1100 doors).
When the fault has been corrected, the door can be connected again following this instruction
in reverse order.
Page 15

USER MANUAL – EASYLIFT V3 PLUS – GB VERSION 2.1
Liftup A/S | Hagensvej 21 | DK-9530 Støvring | Denmark | T: +45 96 86 30 20 | M: [email protected] | www.liftup.dk | CVR DK-1015 3964
15
7. Functionality
The EasyLift lifting platform is a so-called “dead man operated” lift, i.e. the push-buttons must
be pressed and held down for the entire motion.
The lift operation is straightforward; the user activates it, using one of the push-buttons on the
wall or by means of the remote control (optional equipment).
When the user is on the lift, it is operated from the side panel, from which the user can choose
to be transported to the upper or lower level respectively.
8. Assembly
The lift installation is undertaken by an authorized service technician*.
Do not attempt to move, disassemble or repair your lift. These actions MUST be performed by
an authorized service technician*. Improper assembly may increase the risk of user injury. Liftup
is exempt from any liability if assembly and installation are not performed by an authorized
service technician*.
For more information or materials on assembly, you may contact your dealer (cf.
https://www.liftup.dk/en/distributors/#).
*Has completed a Liftup product and service course.
9. Start-up
The lift must always be connected to a 110-240V power point and be powered on. Under normal
circumstances the lift is always in stand-by mode, i.e. it is ready for use as soon as one of the
operating buttons is pressed.
If the emergency stop has been pushed, it must be deactivated before the lift can be used (see
section 10).
Page 16
USER MANUAL – EASYLIFT V3 PLUS – GB VERSION 2.1
Liftup A/S | Hagensvej 21 | DK-9530 Støvring | Denmark | T: +45 96 86 30 20 | M: [email protected] | www.liftup.dk | CVR DK-1015 3964
16
10. Operating the lift
10.1 Daily use
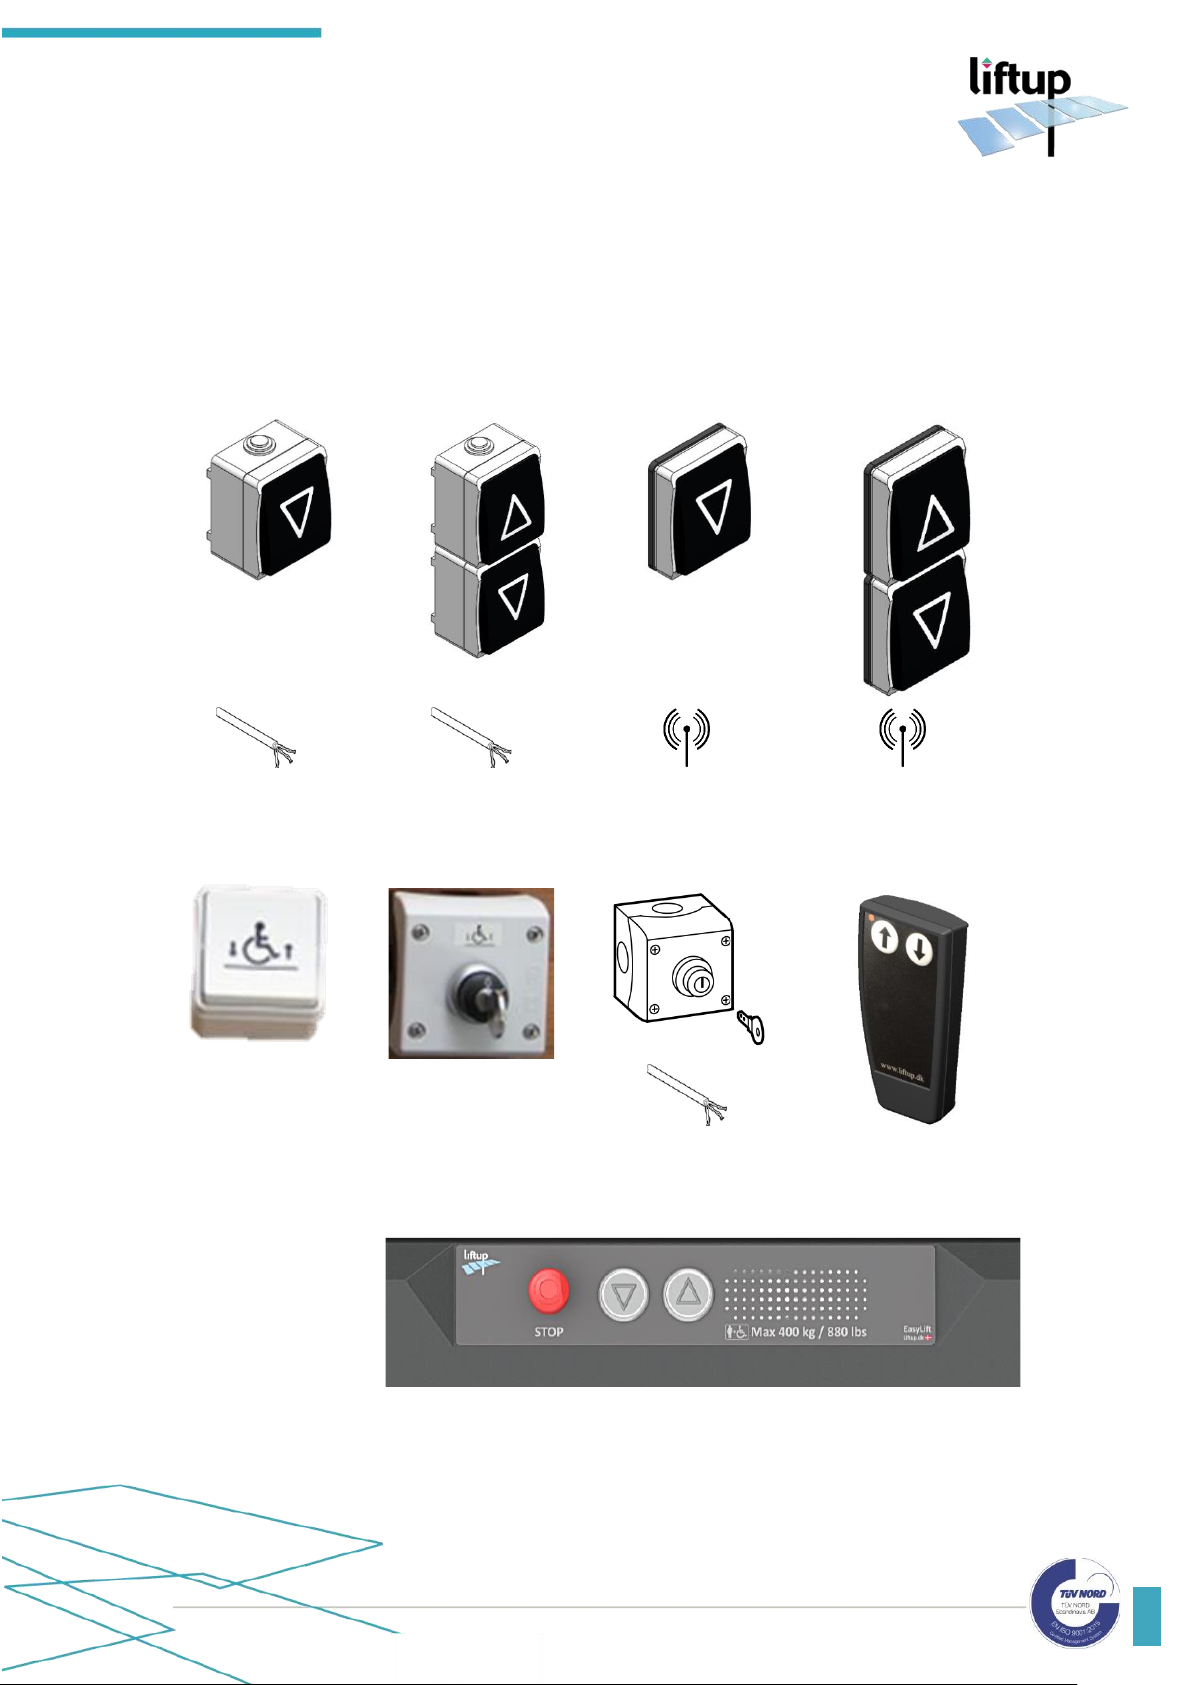
Your lift is operated by means of two operating panels: Standard (Fig.1-4), FUGA (Fig. 5) or keyoperated call station (Fig. 6) at the upper and lower levels respectively, push-buttons (Fig. 9) on
the lift or by using the remote control (optional equipment) (Fig. 8). The remote control
replaces the two operating panels.
Fig. 1: Standard call
station, with wire,
1-way
Fig. 2: Standard call
station, with wire,
2-way
Fig. 3: Standard call
station, wireless,
1-way
Fig. 4: Standard call
station, wireless,
2-way
Fig. 5: FUGA
1- or 2-way
Fig. 6: Key operated call
station
Fig. 7: Key switch on/off
Fig. 8: Remote control
Fig. 9: Push-buttons on lift (See section 10.8 for variants)
Page 17
USER MANUAL – EASYLIFT V3 PLUS – GB VERSION 2.1
Liftup A/S | Hagensvej 21 | DK-9530 Støvring | Denmark | T: +45 96 86 30 20 | M: [email protected] | www.liftup.dk | CVR DK-1015 3964
17
10.2 Operating the lift from the UPPER level
To call the lift to the upper level, press the operating panel (Fig. 1-6) sited at the upper level –
or the up arrow (↑) on the remote control (optional equipment) (Fig. 8) - until the lift has moved
completely up and come to a stop. Once the doors have fully opened, the user can enter the
lift.
10.3 Operating the lift from the LOWER level
To call the lift to the lower level, press the operating panel (Fig. 1-6) sited at the lower level or the down arrow (↓) on the remote control (optional equipment), (Fig. 8) - until the lift has
moved completely down and come to a stop. Once the ramp has lowered / the doors have fully
opened, the user can enter the lift.
10.4 Operating the lift from the platform
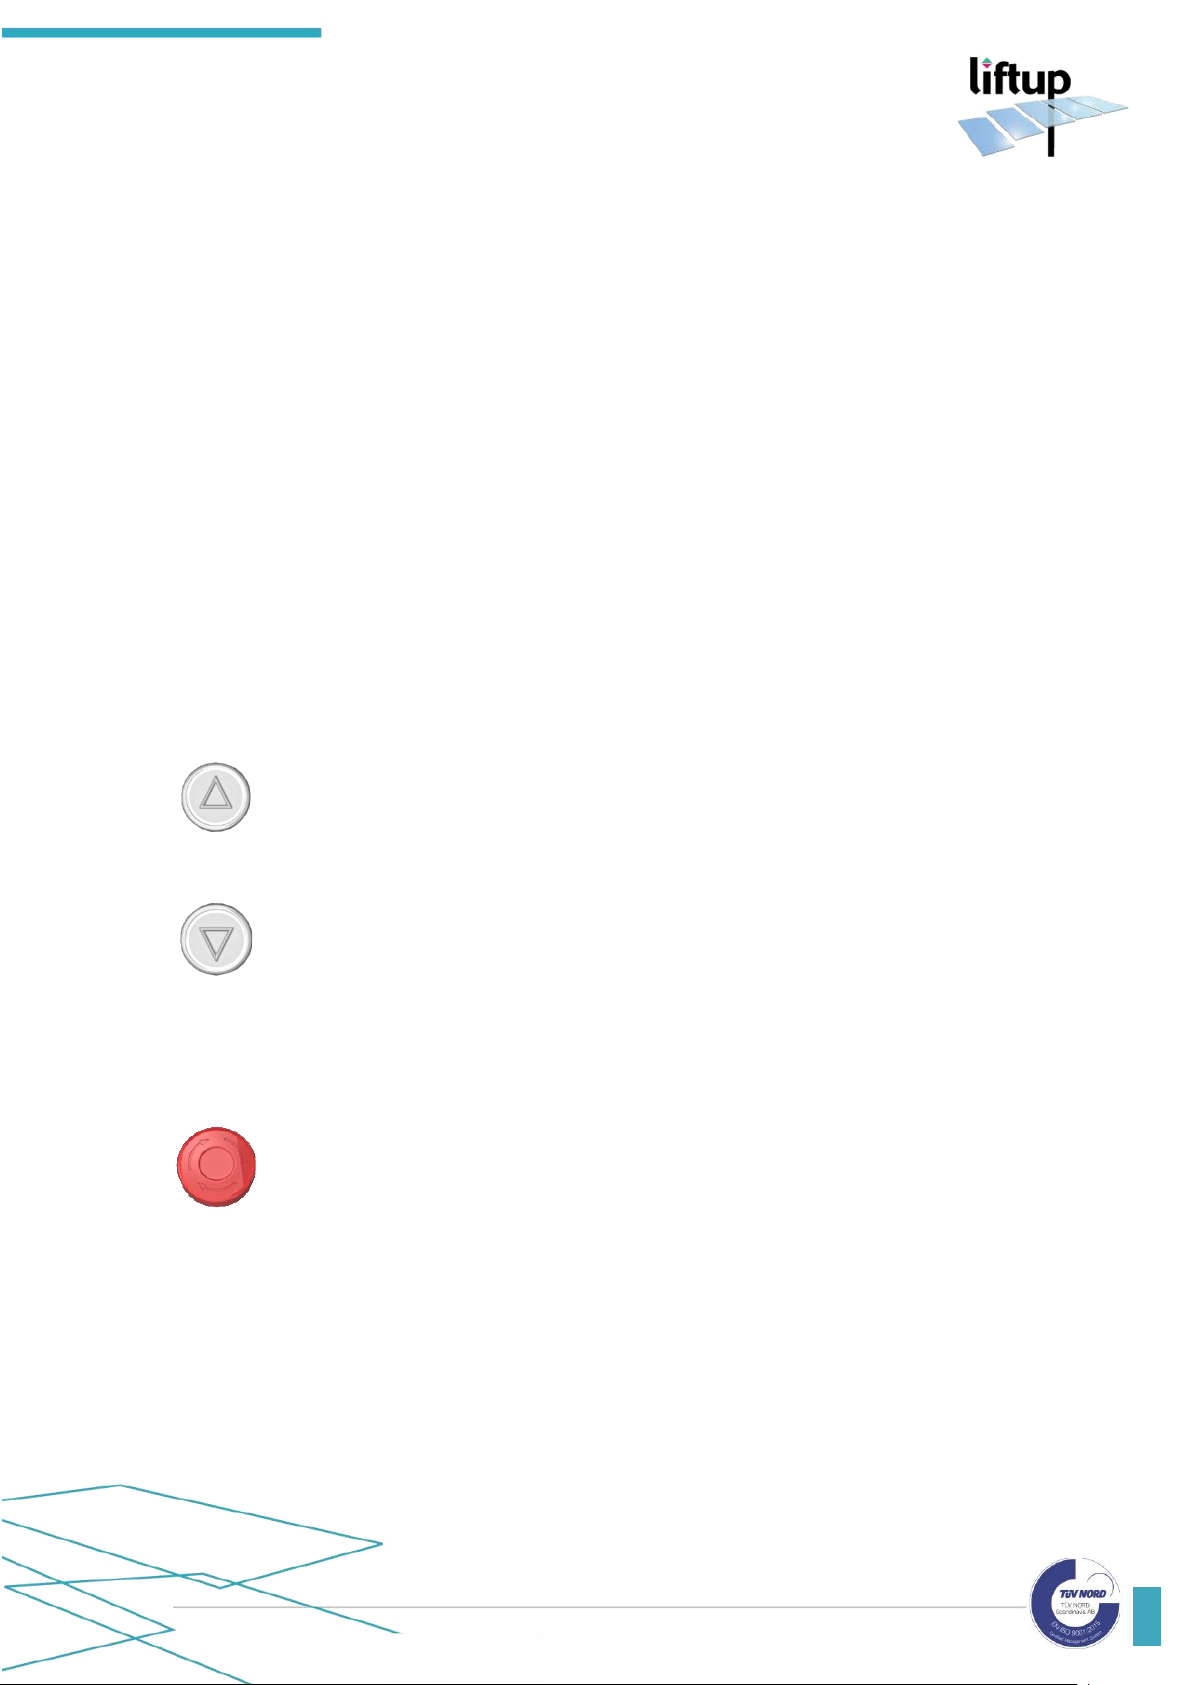
Three buttons are available on the lift (see Fig. 9) – one with an up arrow (), one with a down
arrow (), and an emergency stop (⚫).
When you are on the lift and wish to ascend to the upper level, press the up
button. The ramp or the doors will close, and the lift will start to move upward.
Hold down the button until you have reached the upper level, the lift has come
to a stop and the barrier/doors have fully opened. You can now exit the lift.
When you are on the lift and wish to access the lower level, press and hold the
down button. The doors will close, and the lift will start to move downward. Keep
the button pressed until you have reached the ground level, the lift has come to a
stop and the ramp/doors have fully opened. You can now exit the lift.
10.5 Emergency stop
If the lift makes an unintended or undesired movement, or if it must be stopped
in order to avoid potential risks, press the EMERGENCY STOP button.
To release the emergency stop, turn the button clockwise and the system is again
ready for use.
Page 18
USER MANUAL – EASYLIFT V3 PLUS – GB VERSION 2.1
Liftup A/S | Hagensvej 21 | DK-9530 Støvring | Denmark | T: +45 96 86 30 20 | M: [email protected] | www.liftup.dk | CVR DK-1015 3964
18
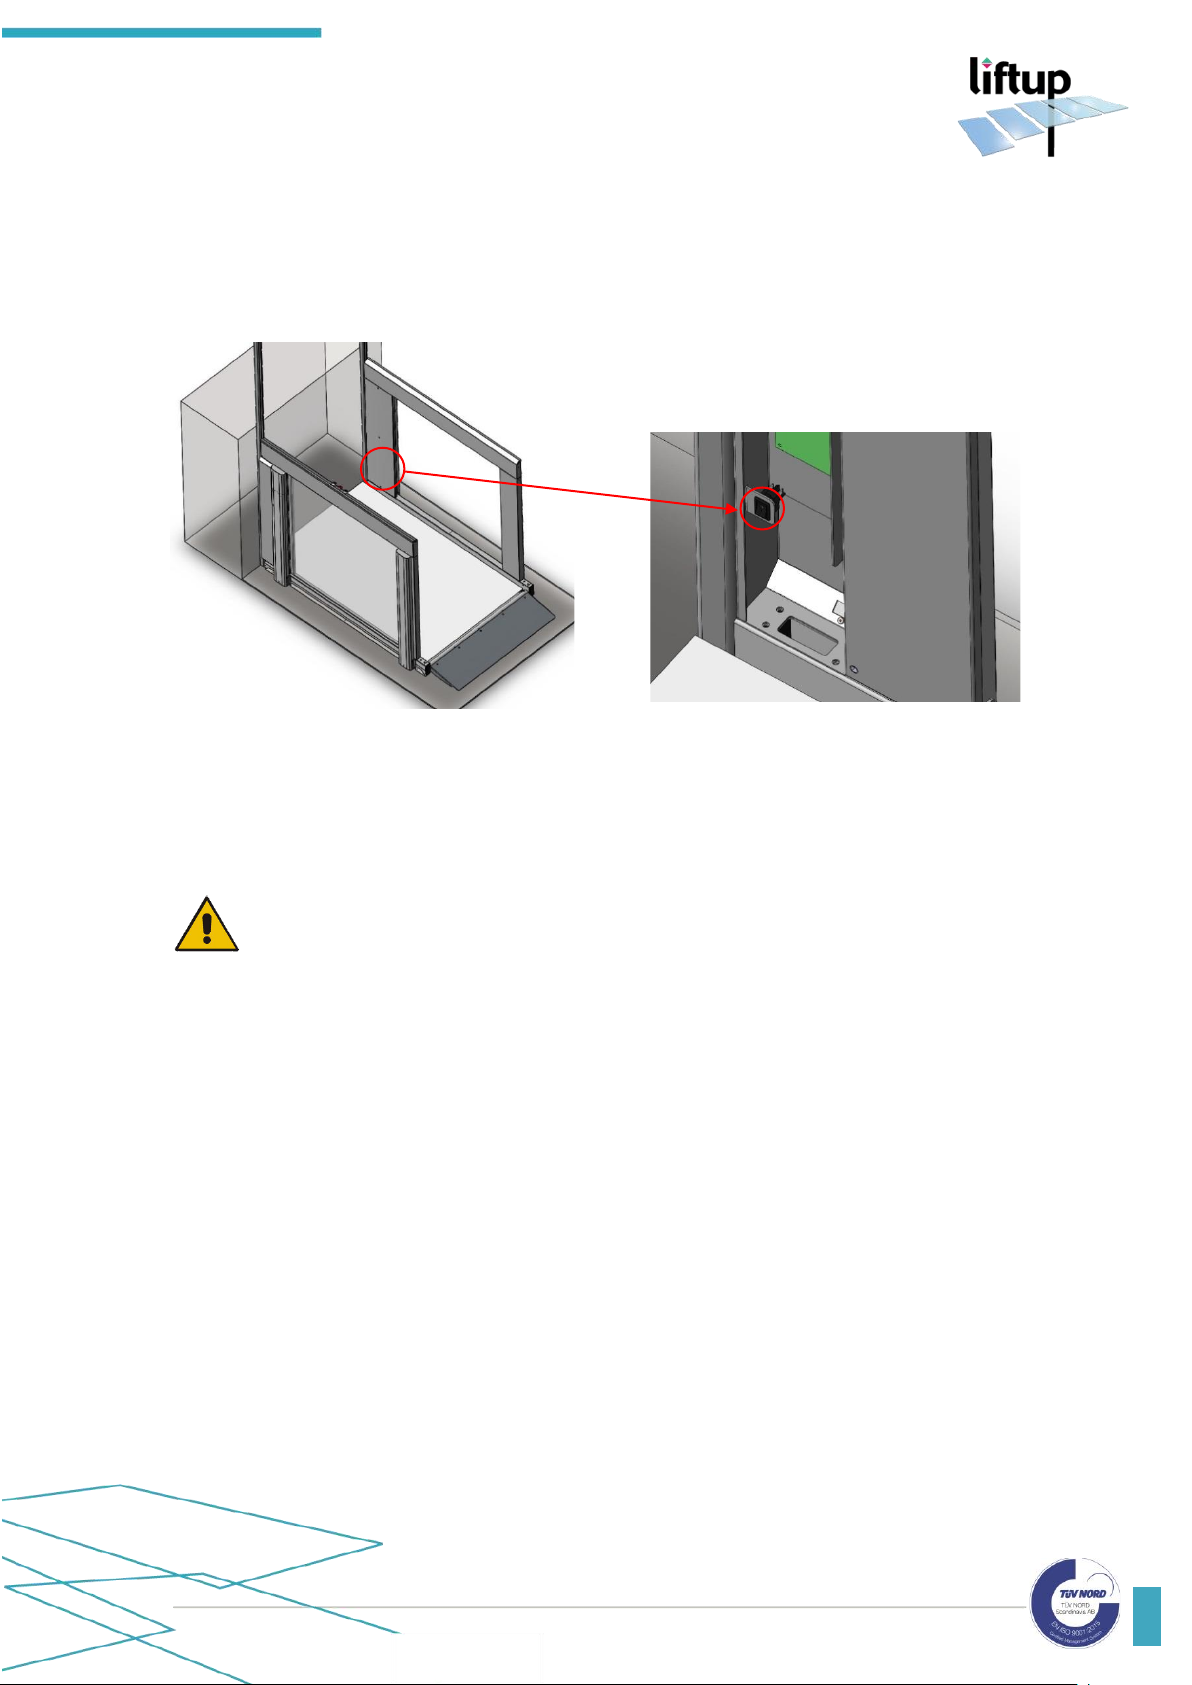
10.6 ON/OFF switch
The lift comes fitted with an ON/OFF switch. It is sited below the main board on the right-hand
side of the lift. You need to remove the cover to access the switch. This button is used to
disconnect the power supply to the lift. If the user switches this off at the same time as activating
emergency stop, the lift will be completely powered off.
The ON/OFF switch is used in the pairing of wireless call stations (see section 13). Power to
the lift is switched on/off by activating the ON/OFF switch and the emergency stop (see section
11.1). When power is again returned to the lift (and emergency stop is released), the control
system restarts (see section 11.2).
WARNING! The ON/OFF switch is for the battery charger. It is not the mains
switch. If it set to OFF for a longer period of time, it may drain and damage the
batteries on primary side.
Page 19
USER MANUAL – EASYLIFT V3 PLUS – GB VERSION 2.1
Liftup A/S | Hagensvej 21 | DK-9530 Støvring | Denmark | T: +45 96 86 30 20 | M: [email protected] | www.liftup.dk | CVR DK-1015 3964
19
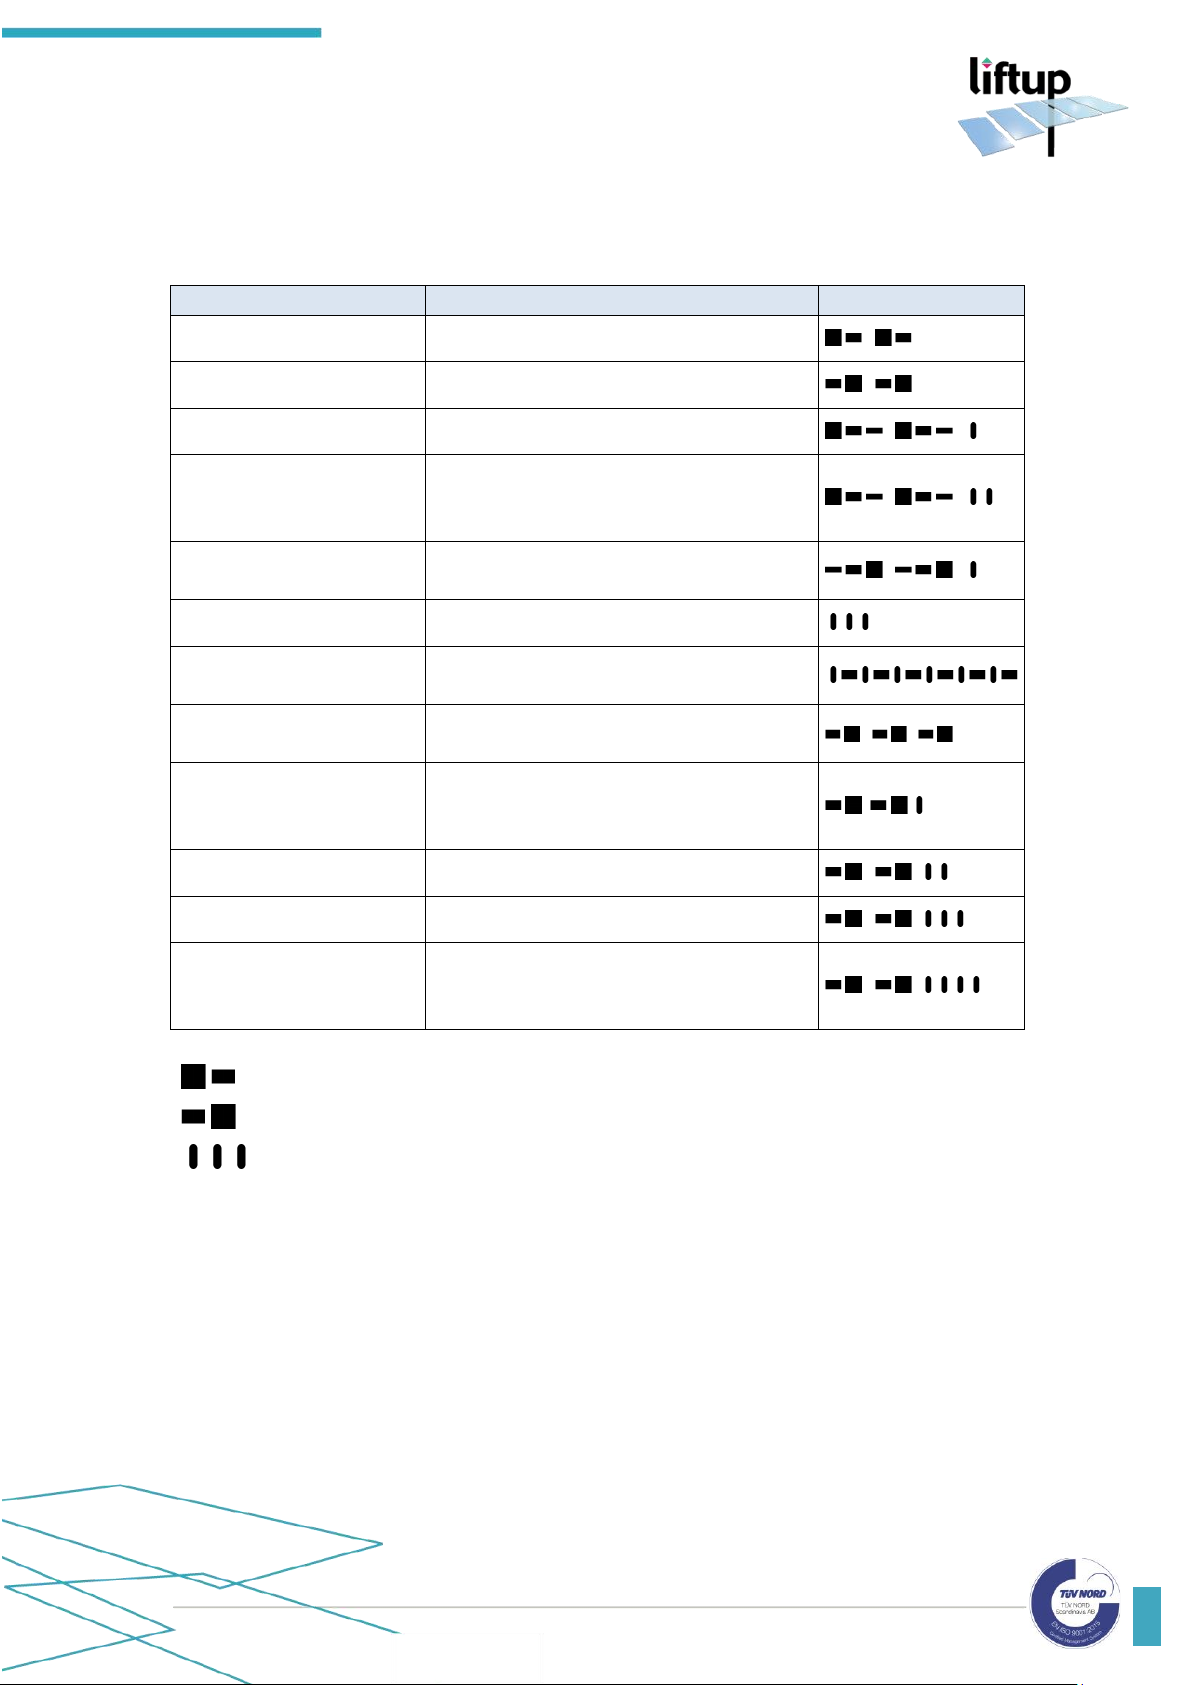
10.7 Audible alarms
If “speak” is installed on the lift, it will be activated in the event of an alarm. Otherwise an alarm
tone will sound.
Speak
Activity/warning
Opening
The vertical safety barrier is opening
Closing
The vertical safety barrier is closing
Alarm: Overload alarm
The platform is overloaded
Alarm: Battery fault – the
lift cannot be used
The battery has a fault. Inadequate power
supply. Cf. section 5 (Technical
Specifications)
Alarm: Something is under
the lift d
Remove the object under the lift which is
preventing downward movement
Ding Ding Ding
Arriving at upper/lower level
Warning
– automatic operation
A warning before the lift will run auto
return
BEEP-BEEP-BEEP…
The lift is in the process of running auto
return
…
Emergency stop pressed
The red emergency stop button has been
pressed in. This must be released in order
that the lift can function again
The lift is locked
The lift is locked with a key switch
Battery warning
Low battery level
Power supply is interrupted – connect or press
emergency stop
Connect to a power supply or activate
emergency stop in order to power off the
lift
High tone followed a deeper tone
Low tone followed by higher tone
Identical tones (3 off)
Page 20
USER MANUAL – EASYLIFT V3 PLUS – GB VERSION 2.1
Liftup A/S | Hagensvej 21 | DK-9530 Støvring | Denmark | T: +45 96 86 30 20 | M: [email protected] | www.liftup.dk | CVR DK-1015 3964
20
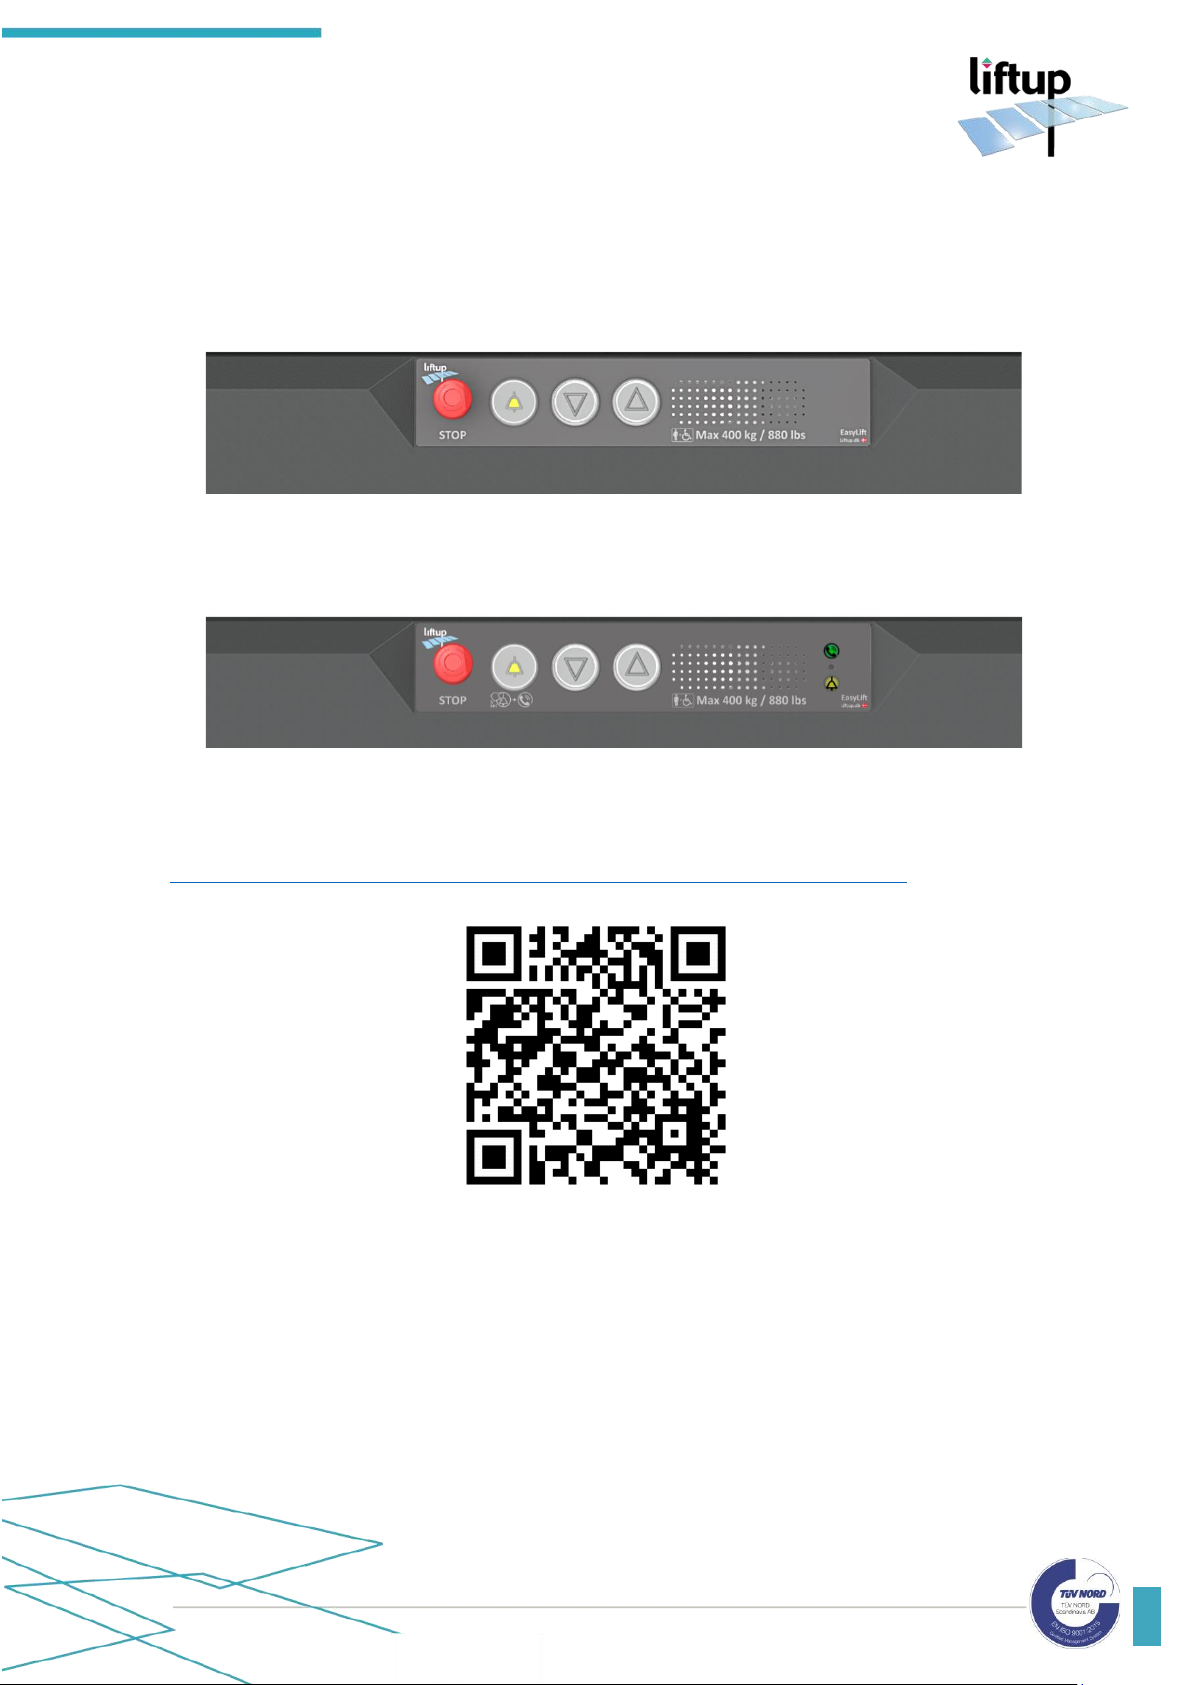
10.8 Emergency alarm devices (optional equipment)
The lift can be equipped with an alarm button (). The alarm button can be connected in two
ways.
1. The alarm button can be connected to an external alarm. To activate the alarm press and
hold the alarm button for 5 seconds.
2. The alarm button can be connected to an intercom system which allows the user to contact
external assistance in case of an emergency. To activate the alarm, press and hold the alarm
button for 5 seconds.
For detailed operation instructions for the intercom system, please consult the Safeline manual
found here:
https://www.safeline-group.com/media/4581/safeline-mx3-manual-v-2-02-en.pdf
Page 21
USER MANUAL – EASYLIFT V3 PLUS – GB VERSION 2.1
Liftup A/S | Hagensvej 21 | DK-9530 Støvring | Denmark | T: +45 96 86 30 20 | M: [email protected] | www.liftup.dk | CVR DK-1015 3964
21
11. Operation
Under normal operating conditions the lift shall always be connected to 110-240V. It is very
important that the power is not disconnected or switched off, as long-standing power outage
(10-20 hours) may result in flat batteries and thus inoperability. Thus the lift cannot be used
until the batteries have been recharged. An audible alarm will sound if the power supply is
interrupted (see section 10.7).
11.1 Battery backup
In the event of 110-240V power failure or if the control unit is for some other reason not
supplied with power, the system will automatically switch to backup mode. This means the
system will continue to function as normal since it is being powered by the battery backup.
Mains power failure will be signaled by a beeping alarm sound; as soon as the mains is
reconnected this alarm will cease. The system is now running as normal.
If it is not possible immediately to re-establish the mains supply and you wish to cancel the
alarm, press the emergency stop button. (Note that in such a case the system will need to be
calibrated, see section 11.2).
IMPORTANT! If not connected to mains and the emergency button is not pressed,
the batteries will finally be drained.
IMPORTANT! If both the power supply has been disconnected and the emergency
stop activated at the same time, the system will automatically switch to “safety mode”
and will then need calibrating, see below.
11.2 Calibration following emergency stop/power failure
If the emergency stop has been activated and the power supply has been interrupted, or if the
system registers other kinds of irregularities, it will require calibration. The lift then goes into a
special safety mode: calibration mode, which only permits it to move downwards at very low
speed until all actuators are at position 0 (on the floor).
IMPORTANT! If you notice the lift not moving as expected, or stopping after only
a few centimetres, there may be technical issues, which need to be resolved by
qualified engineers. In such a case, contact your dealer.
Page 22
USER MANUAL – EASYLIFT V3 PLUS – GB VERSION 2.1
Liftup A/S | Hagensvej 21 | DK-9530 Støvring | Denmark | T: +45 96 86 30 20 | M: [email protected] | www.liftup.dk | CVR DK-1015 3964
22
12. Maintenance
Clean the lift by wiping with a well-wrung cloth using water mixed with a mild detergent.
IMPORTANT! Do NOT use a high-pressure jet or rinse the lift directly using a
hose. Do not use aggressive cleaning agents or similar on the lift, and avoid salt or
sand coming into contact with the lift in connection with winter maintenance.
Regularly check under the lift for leaves, branches or other unwanted objects and remove them
to ensure its full and free movement.
The mechanical maintenance of the lift shall normally only be undertaken in connection with the
regular service inspections. These are to be performed by an authorized service technician*.
If any unexpected faults or abnormal sounds occur, contact your dealer at once to have them
remedied.
*Has completed a Liftup product and service course.
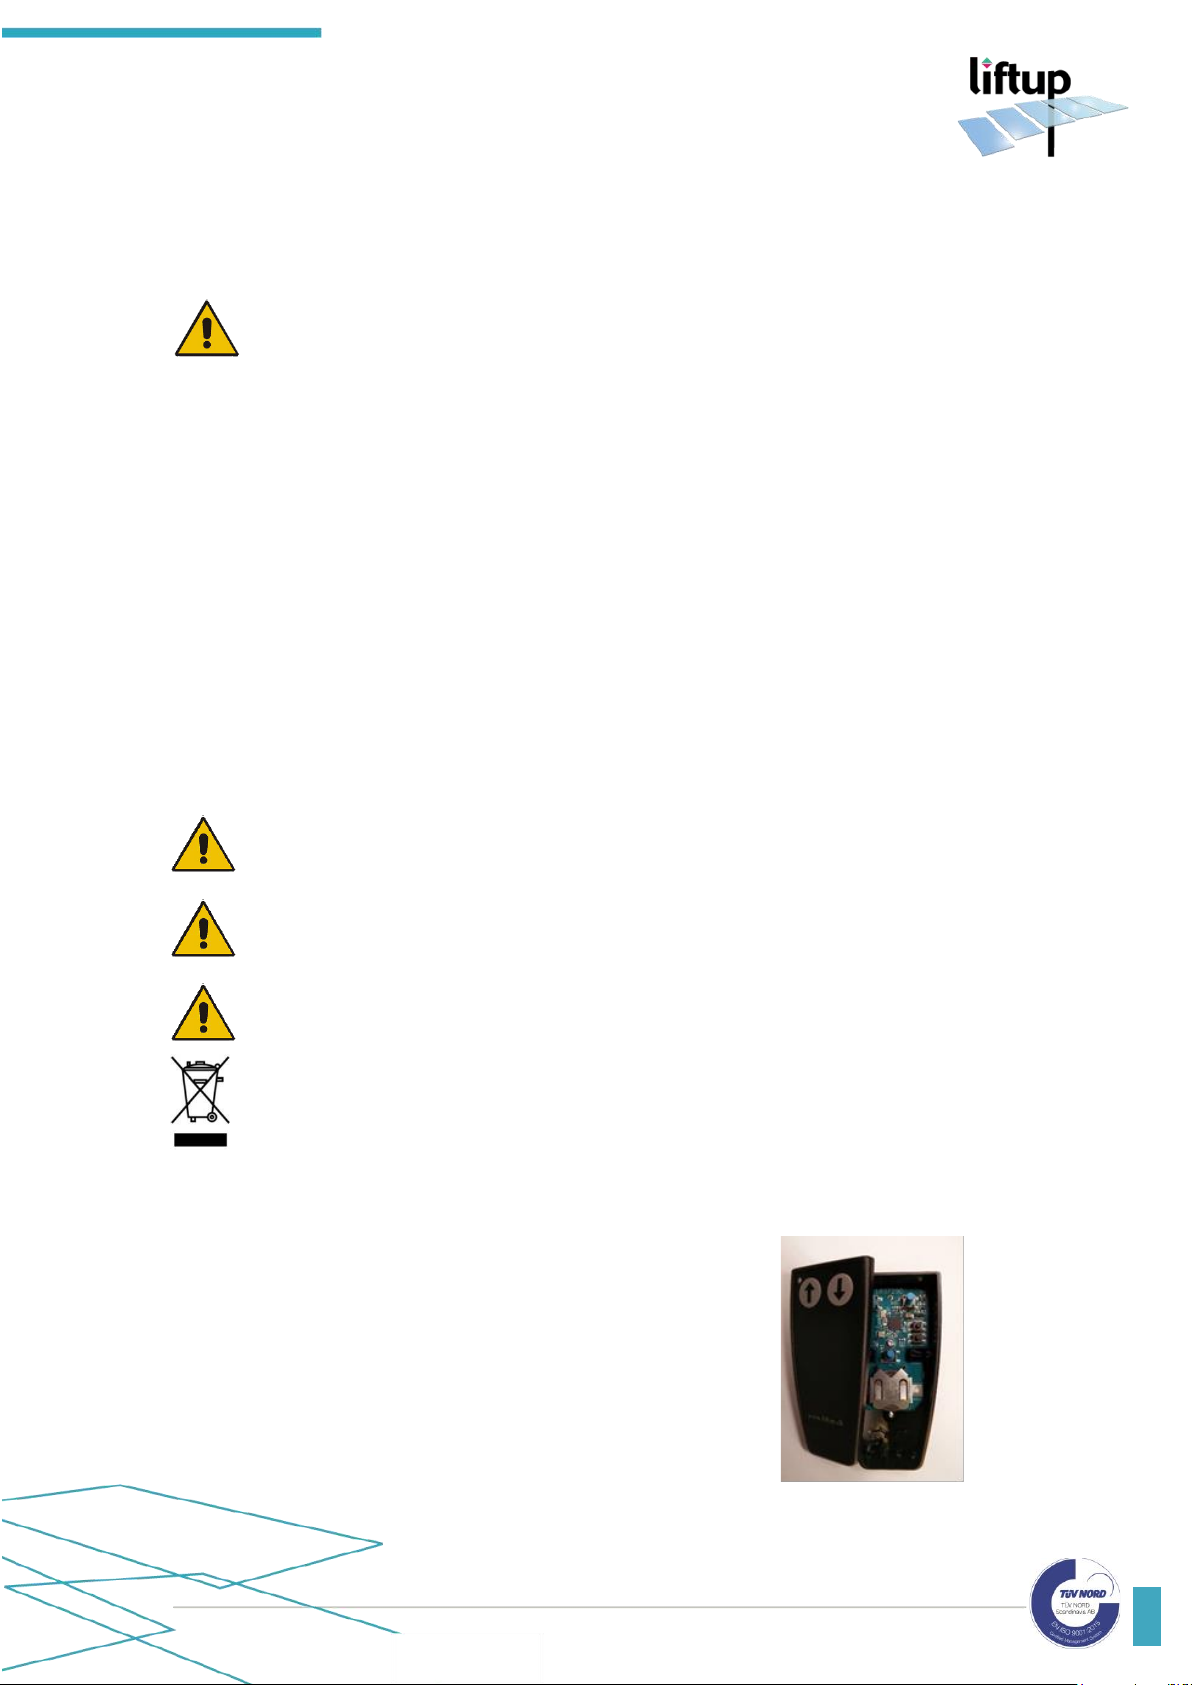
Remote controls (optional equipment)
A CR2032 battery is installed in the remote controls.
In order to ensure reliable function, swap the batteries every 2 years
DO NOT swallow coin cell batteries
Keep batteries out of reach of small children. Should a child swallow a battery,
consult a physician immediately
DO NOT put the battery in trash. When disposing, comply with local ordinances or
regulations
To swap the battery, do the following:
Handheld remote control
1. Loosen the screw on the rear of the remote control
2. Remove the back panel
3. Swap the battery
4. Refit the back panel and test
Page 23
USER MANUAL – EASYLIFT V3 PLUS – GB VERSION 2.1
Liftup A/S | Hagensvej 21 | DK-9530 Støvring | Denmark | T: +45 96 86 30 20 | M: [email protected] | www.liftup.dk | CVR DK-1015 3964
23
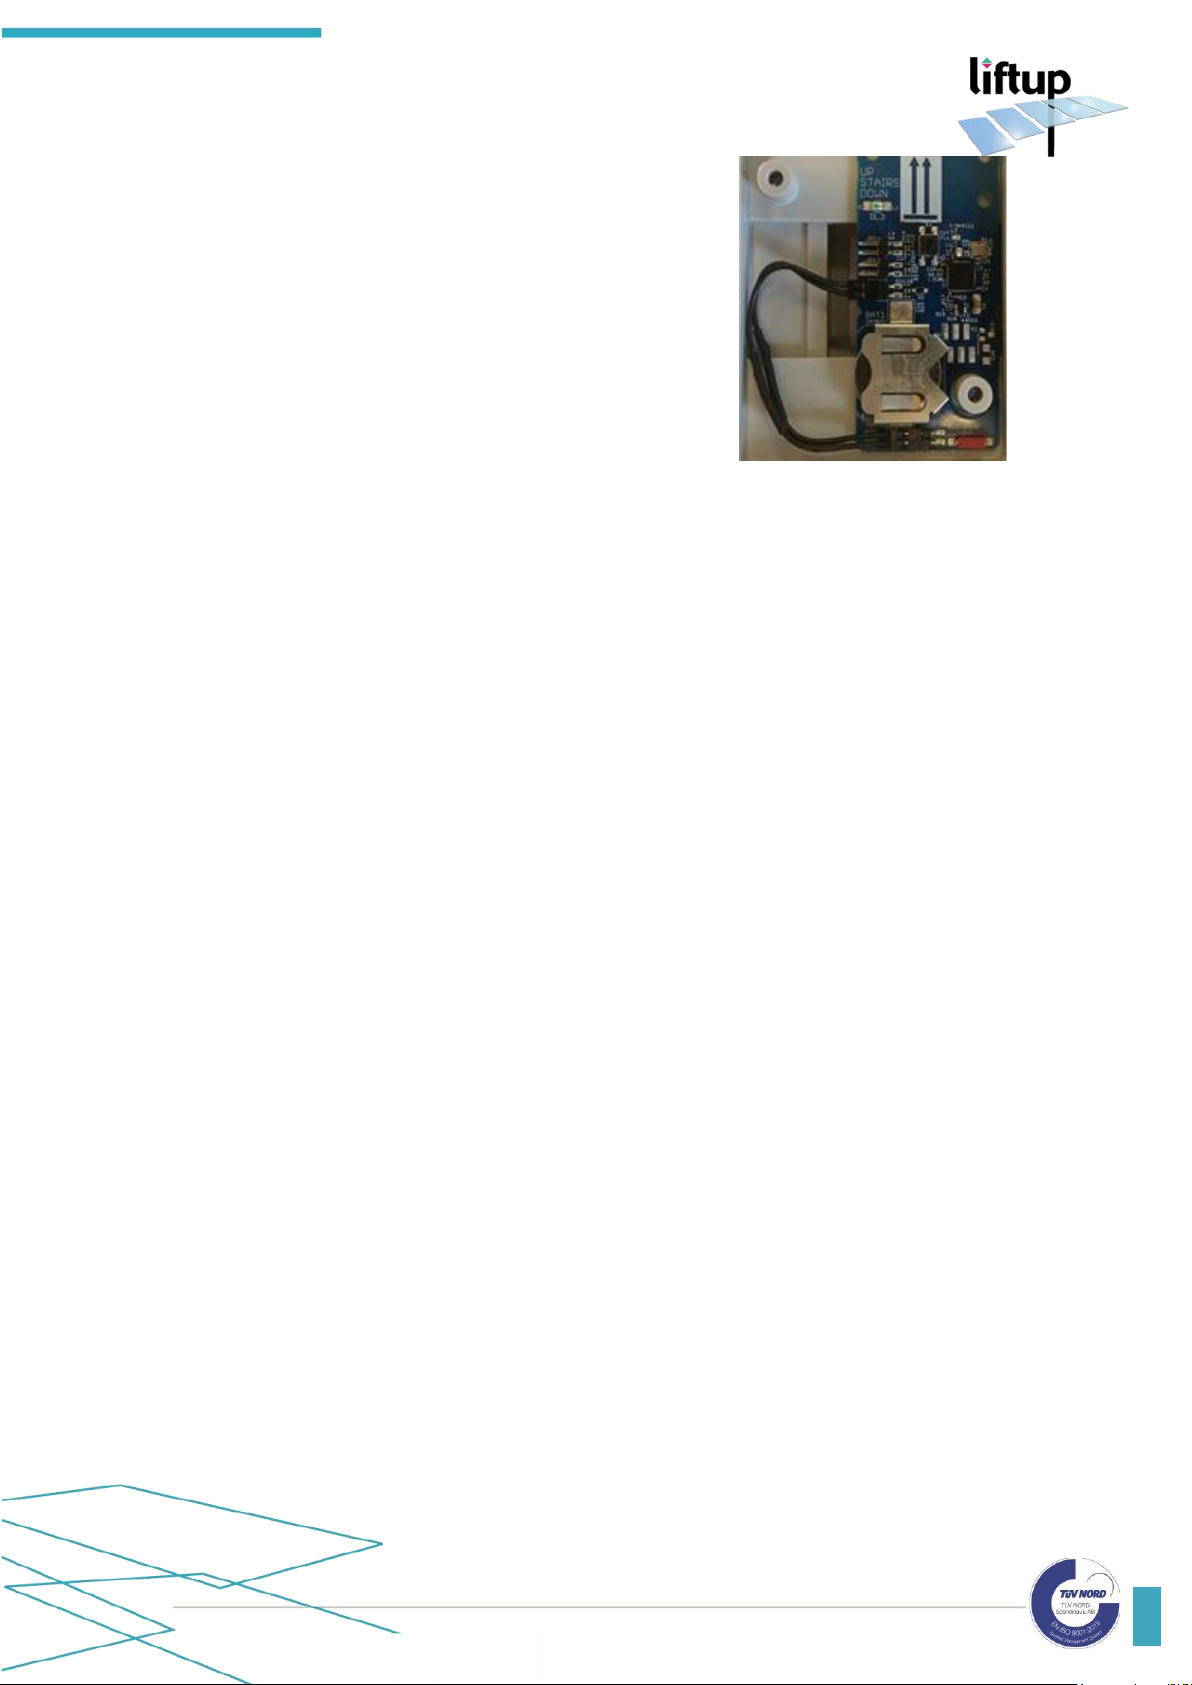
Wall mounted remote control
1. Remove the black push-button front, loosen the 2
screws (PH1), on the rear of the grey part, where the
PCB with the battery is mounted.
2. Swap the battery
3. Refit the parts and test
If the power has been disconnected from the handset or the receiver for a long period of time,
it may be necessary to calibrate the system (pair the two units), see section 13.
Page 24
USER MANUAL – EASYLIFT V3 PLUS – GB VERSION 2.1
Liftup A/S | Hagensvej 21 | DK-9530 Støvring | Denmark | T: +45 96 86 30 20 | M: [email protected] | www.liftup.dk | CVR DK-1015 3964
24
13. Pairing transmitter and receiver
13.1 Remote control and receiver of the lift
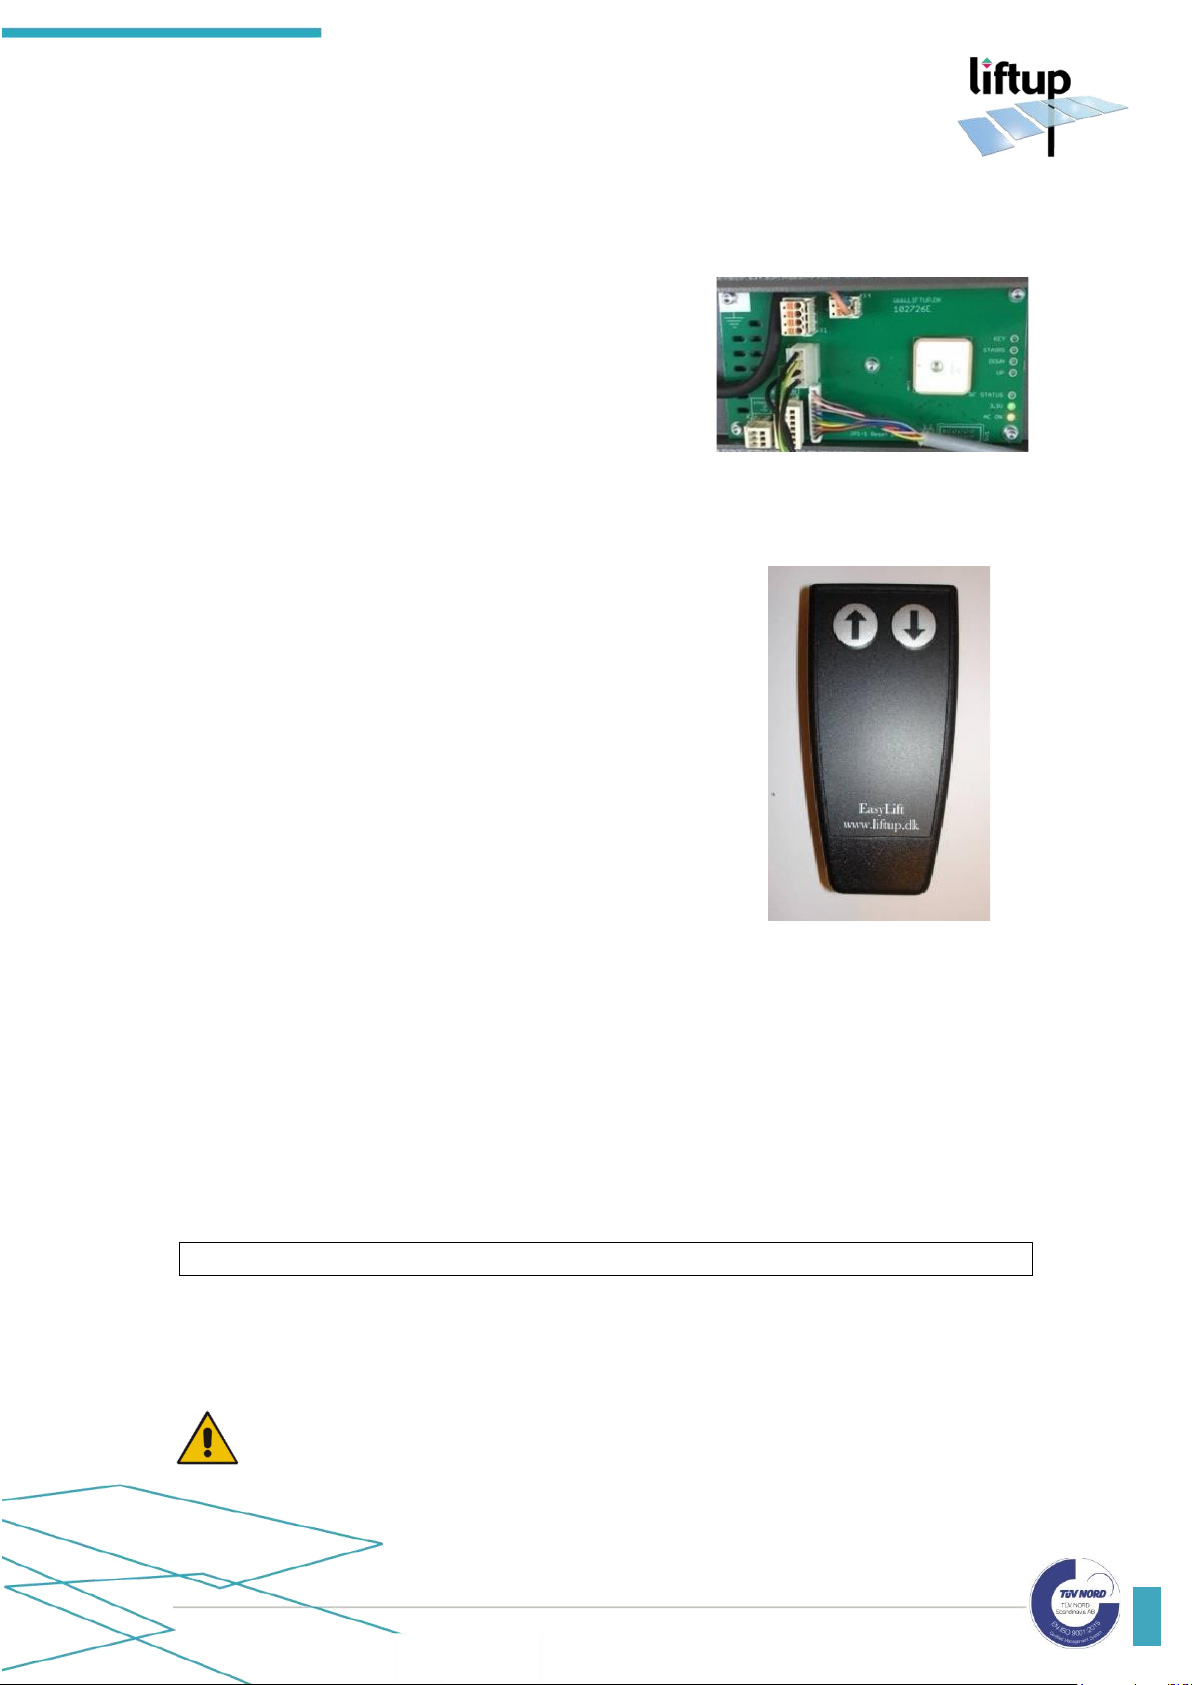
The remote control and receiver of the lift must always be
paired in order to work. The receiver will not react to a
remote control which is not paired with it. A receiver can
be paired with up to 20 remote controls.
A remote control can be paired with several receivers if
required. When a receiver is powered on (see section 10.6),
the RF-Status in the connection box will flash for 2 minutes.
Or until it is paired with a remote control.
Pairing remote control and receiver of the lift
1. Make sure that there is power to the system. Press the
emergency stop and switch off the on/off switch on the
side of the lift (see section 10.6).
2. Press the UP (↑) and DOWN (↓) buttons on the remote
control at the same time and hold them down for approx.
5 seconds until the control LED on the remote control
begins to flash slowly. The remote control is now in
installation mode for 2 minutes.
3. Within these 2 minutes, release the red emergency stop
on the lift by turning it clockwise.
4. When the control LED on the remote control stops
flashing, it is paired with the lift.
5. Test the system so as to ensure the pairing has been
performed correctly; if not, repeat 1-5 above.
6. If you need to pair several remote controls to the
receiver, repeat item 2-5 above.
7. Switch on the on/off switch on the side of the lift.
Handheld remote control
(transmitter)
Resetting remote control and receiver of the lift
1. Press the UP (↑) and DOWN (↓) buttons on the handset at the same time and hold them
down for approx. 5 seconds. Until the control diode on the handset begins to flash slowly.
The handset is now in installation mode for 2 minutes.
2. Perform the following within the 2 minutes:
Press: UP (↑), UP (↑), DOWN (↓), DOWN (↓), UP (↑), DOWN (↓), UP (↑), DOWN (↓)
3. When the control diode starts to flash quickly, the handset is no longer associated with a
particular lift.
IMPORTANT! Make sure no other receiver is in pairing mode
Page 25
USER MANUAL – EASYLIFT V3 PLUS – GB VERSION 2.1
Liftup A/S | Hagensvej 21 | DK-9530 Støvring | Denmark | T: +45 96 86 30 20 | M: [email protected] | www.liftup.dk | CVR DK-1015 3964
25
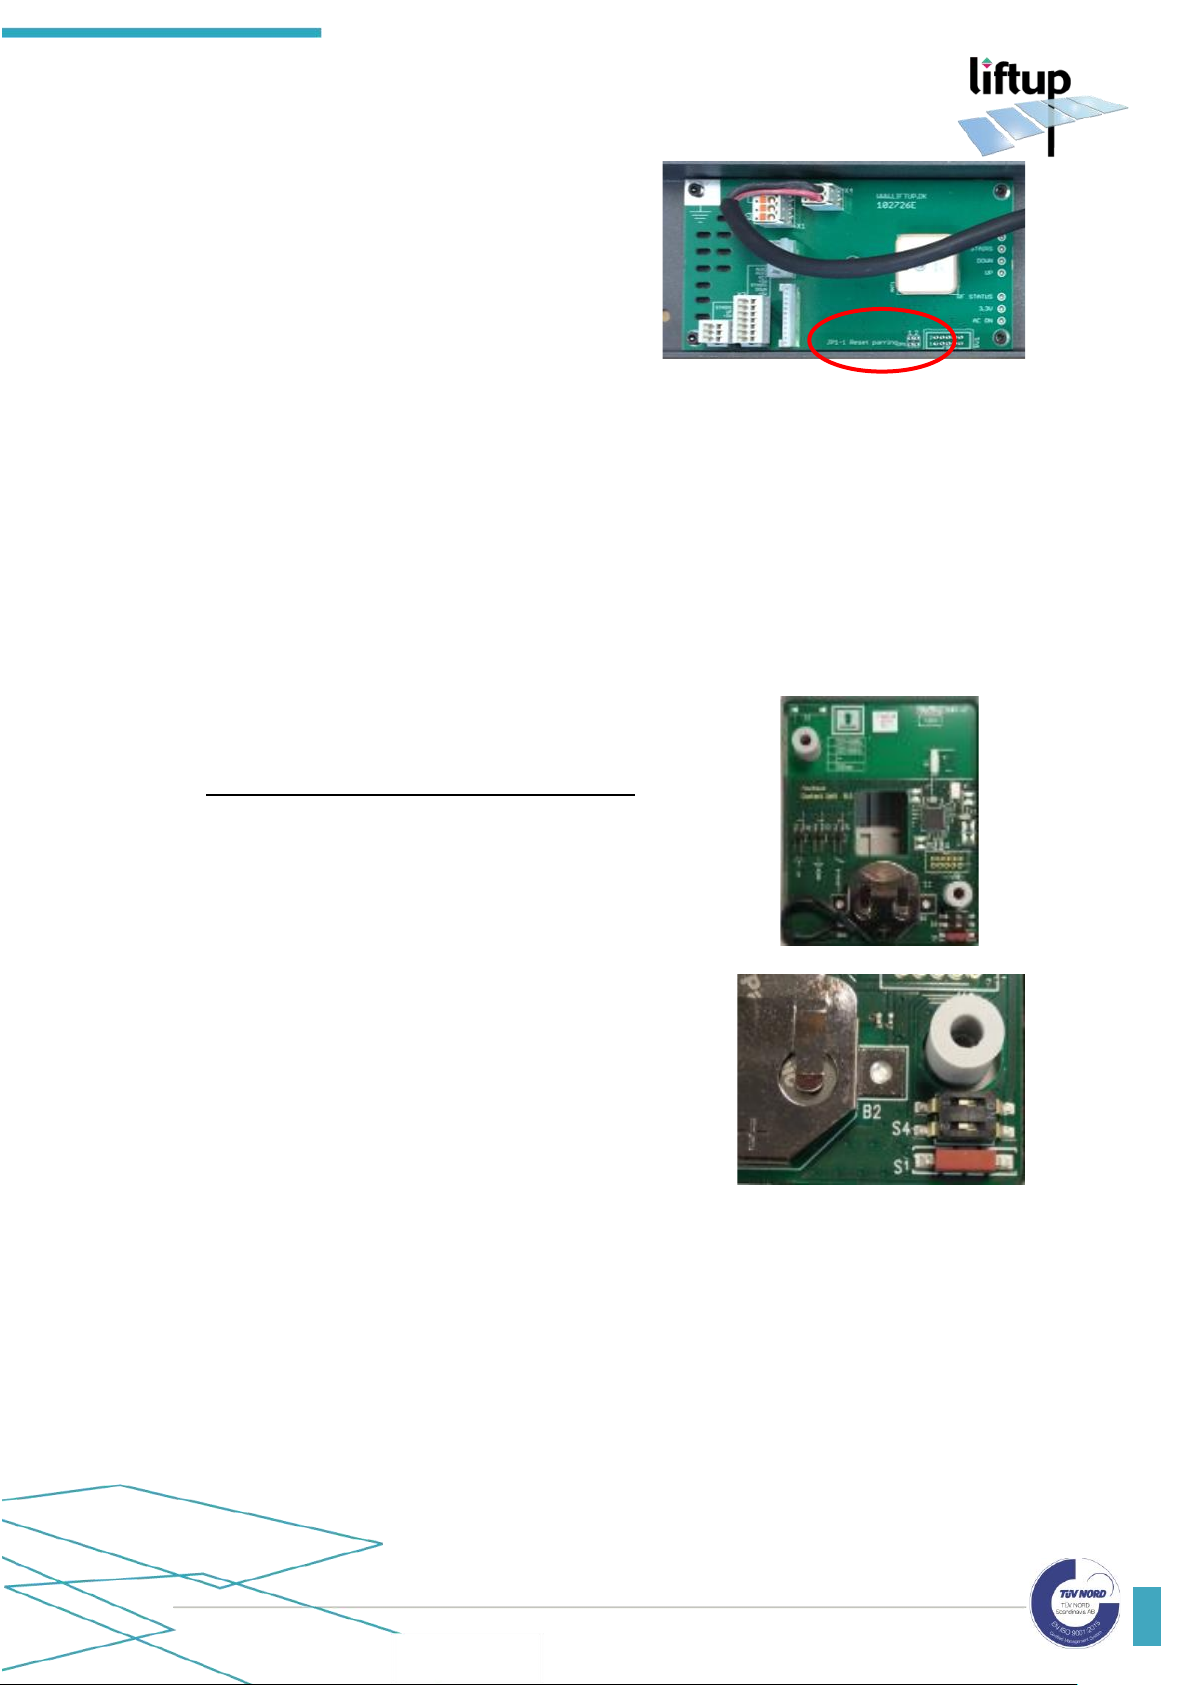
Resetting the receiver of the lift
• Switch the power to the lift on.
• Short-circuit JP1-1 on the connection box board.
• When the control LED begins to flash rapidly, the
receiver has been reset.
Should the control LED not flash rapidly, this means
that no receiver has been paired.
13.2 Wireless call station and receiver of the lift
The wireless call station and receiver must always be paired in order to work. The receiver will
not react to a wireless call station which is not paired with it. A receiver can be paired with up
to 20 wireless call stations. A wireless call station can be paired with several receivers if required.
When a receiver is powered on (see section 10.6) the RF-Status in the connection box will flash
for 2 minutes. Or until it is paired with a wireless call station.
Pairing wireless call station and receiver of the lift
1. Make sure that there is power to the system. Press the
emergency stop and switch off the on/off switch on the
side of the lift (see section 10.6).
2. Wall-mounted remote-controlled call station: Set dip
switch S4 #2 to ON and press on the contact or shortcircuit (↑) or (↓) using a metal object. The control LED
on the call station will start to flash slowly. The call station
is now in installation mode for 2 minutes.
Return S4 #2 to its starting position (off).
3. Within these 2 minutes, release the red emergency stop
on the lift by turning it clockwise.
4. The control LED on the call station is paired with the lift
when it stops flashing.
5. Test the system so as to ensure the pairing has been
performed correctly. If not, repeat 1-5 above.
If you need to pair several call stations to the receiver,
repeat items 2-5 above.
6. Switch on the on/off switch on the side of the lift.
Resetting wireless call station and receiver of the lift
• Set dip switch S4 #1 to ON and press on the contact or connect (↑) or (↓) using a metal
object. The control LED on the call station will flash rapidly.
• The pairing with the receiver has now been erased.
• Return dip switch S4 #1 to off.
Page 26
USER MANUAL – EASYLIFT V3 PLUS – GB VERSION 2.1
Liftup A/S | Hagensvej 21 | DK-9530 Støvring | Denmark | T: +45 96 86 30 20 | M: [email protected] | www.liftup.dk | CVR DK-1015 3964
26
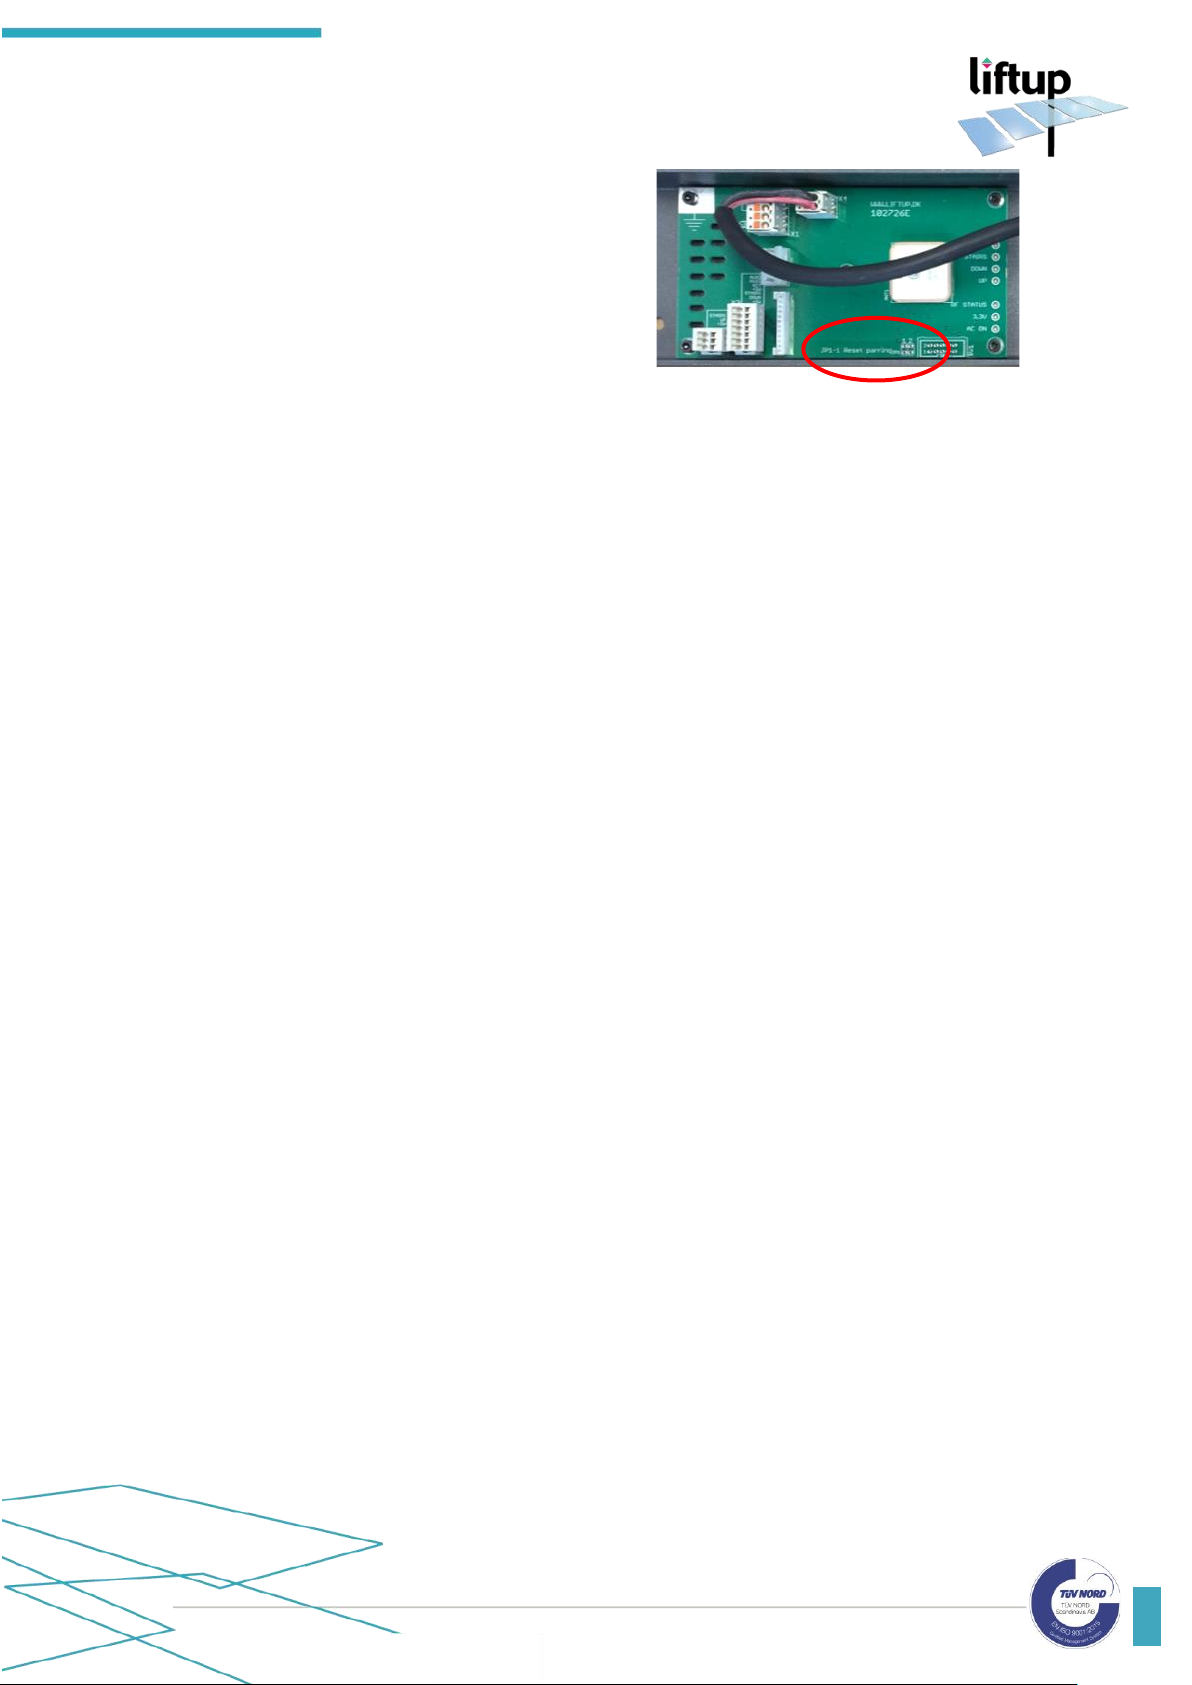
Resetting the receiver of the lift
• Switch the power to the lift on.
• Short-circuit JP1-1on the connection box board.
• When the control LED begins to flash rapidly,
the receiver has been reset.
Should the control LED not flash rapidly, this means
that no receiver has been paired.
Page 27
USER MANUAL – EASYLIFT V3 PLUS – GB VERSION 2.1
Liftup A/S | Hagensvej 21 | DK-9530 Støvring | Denmark | T: +45 96 86 30 20 | M: [email protected] | www.liftup.dk | CVR DK-1015 3964
27
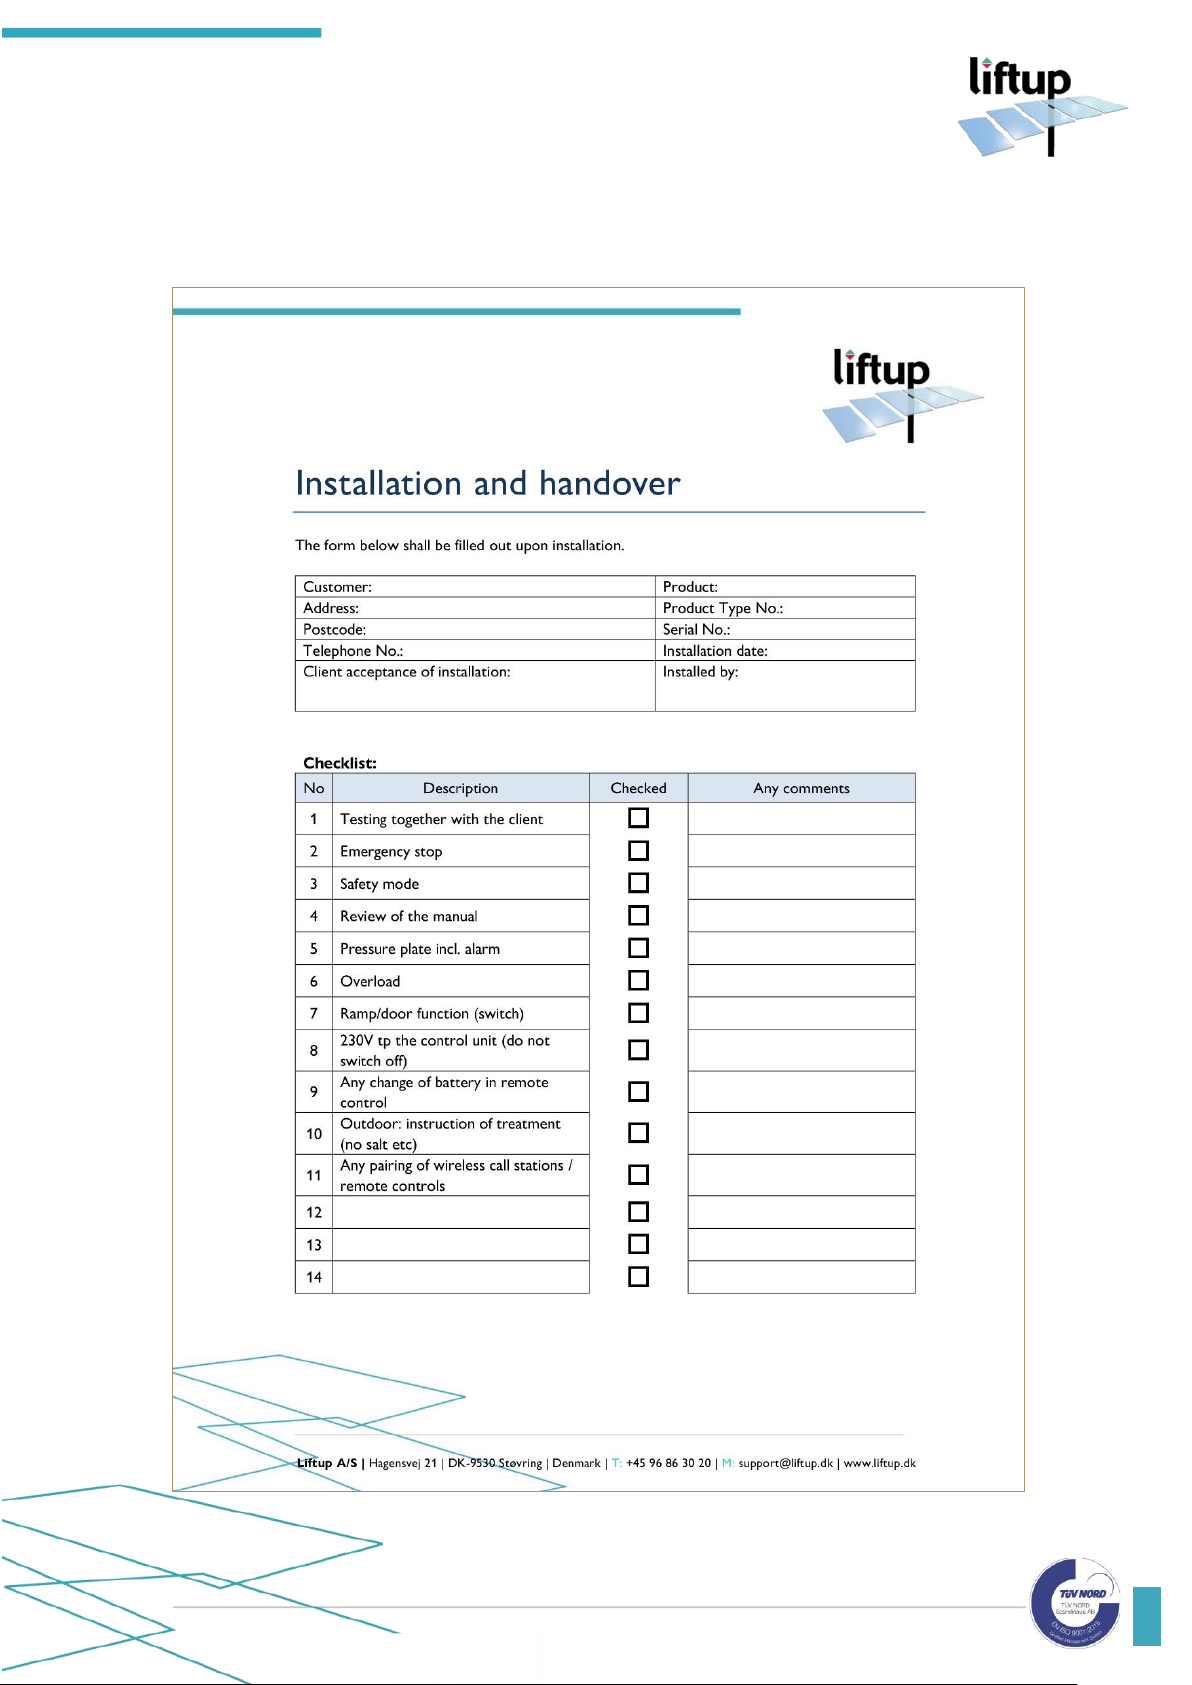
14. Installation and handover
The form below shall be filled out upon installation.
Page 28
USER MANUAL – EASYLIFT V3 PLUS – GB VERSION 2.1
Liftup A/S | Hagensvej 21 | DK-9530 Støvring | Denmark | T: +45 96 86 30 20 | M: [email protected] | www.liftup.dk | CVR DK-1015 3964
28
15. Maintenance checklist
In addition to the general maintenance described in section 12, we recommend, as the
manufacturer, that routine inspections are undertaken every 6 months by an authorized service
technician*. The dealer you have bought the product from will offer this service, but if you wish
to use another service provider, the owner of the lift is responsible for ensuring that the chosen
service technician is qualified in the product in question.
(Please also see: https://www.liftup.dk/en/distributors/# if necessary).
For safety reasons it is very important that these inspections are maintained, since lacking or
improperly performed inspections may result in personal injury.
IMPORTANT! Before servicing the lift, the emergency stop button must be
activated. This is to prevent accidental operation. It is the responsibility of the service
technician to operate the emergency stop before servicing work is begun.
NB: It is not enough to disconnect the 110-240V supply, as the system is fitted with
a battery backup.
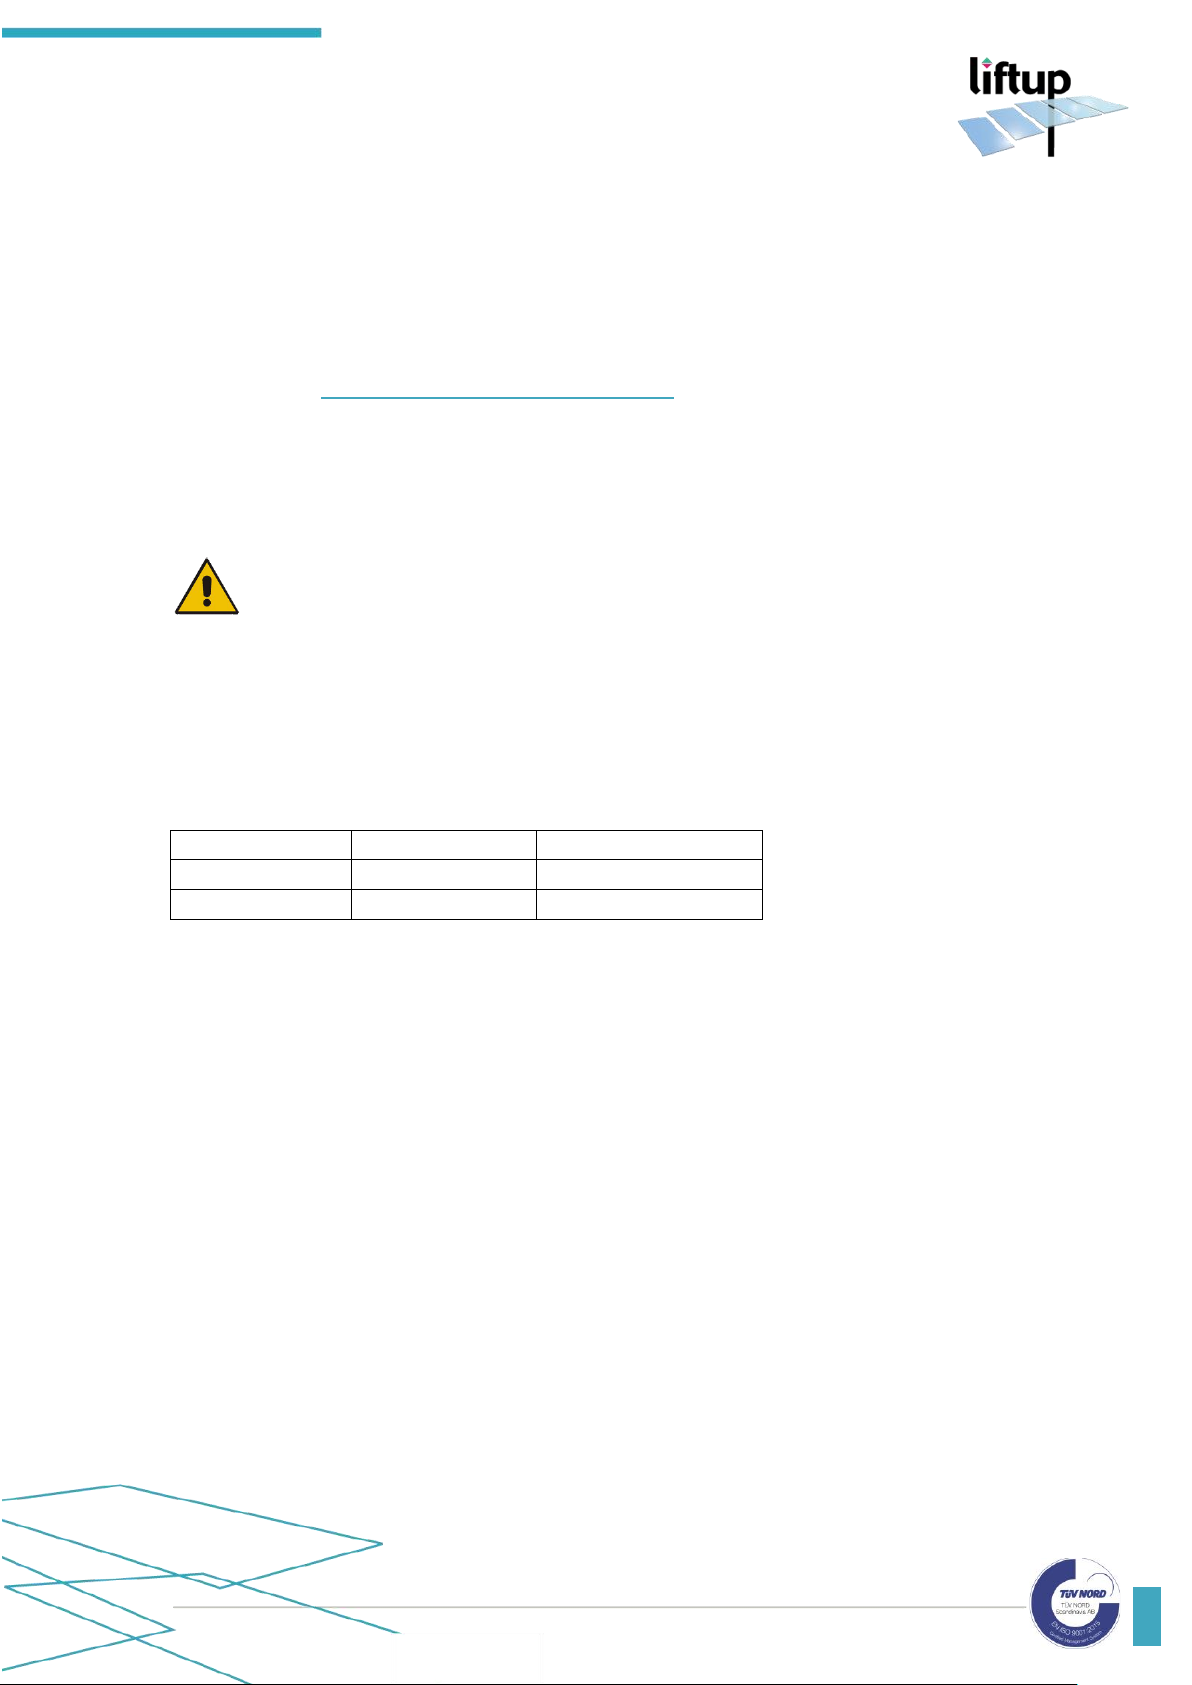
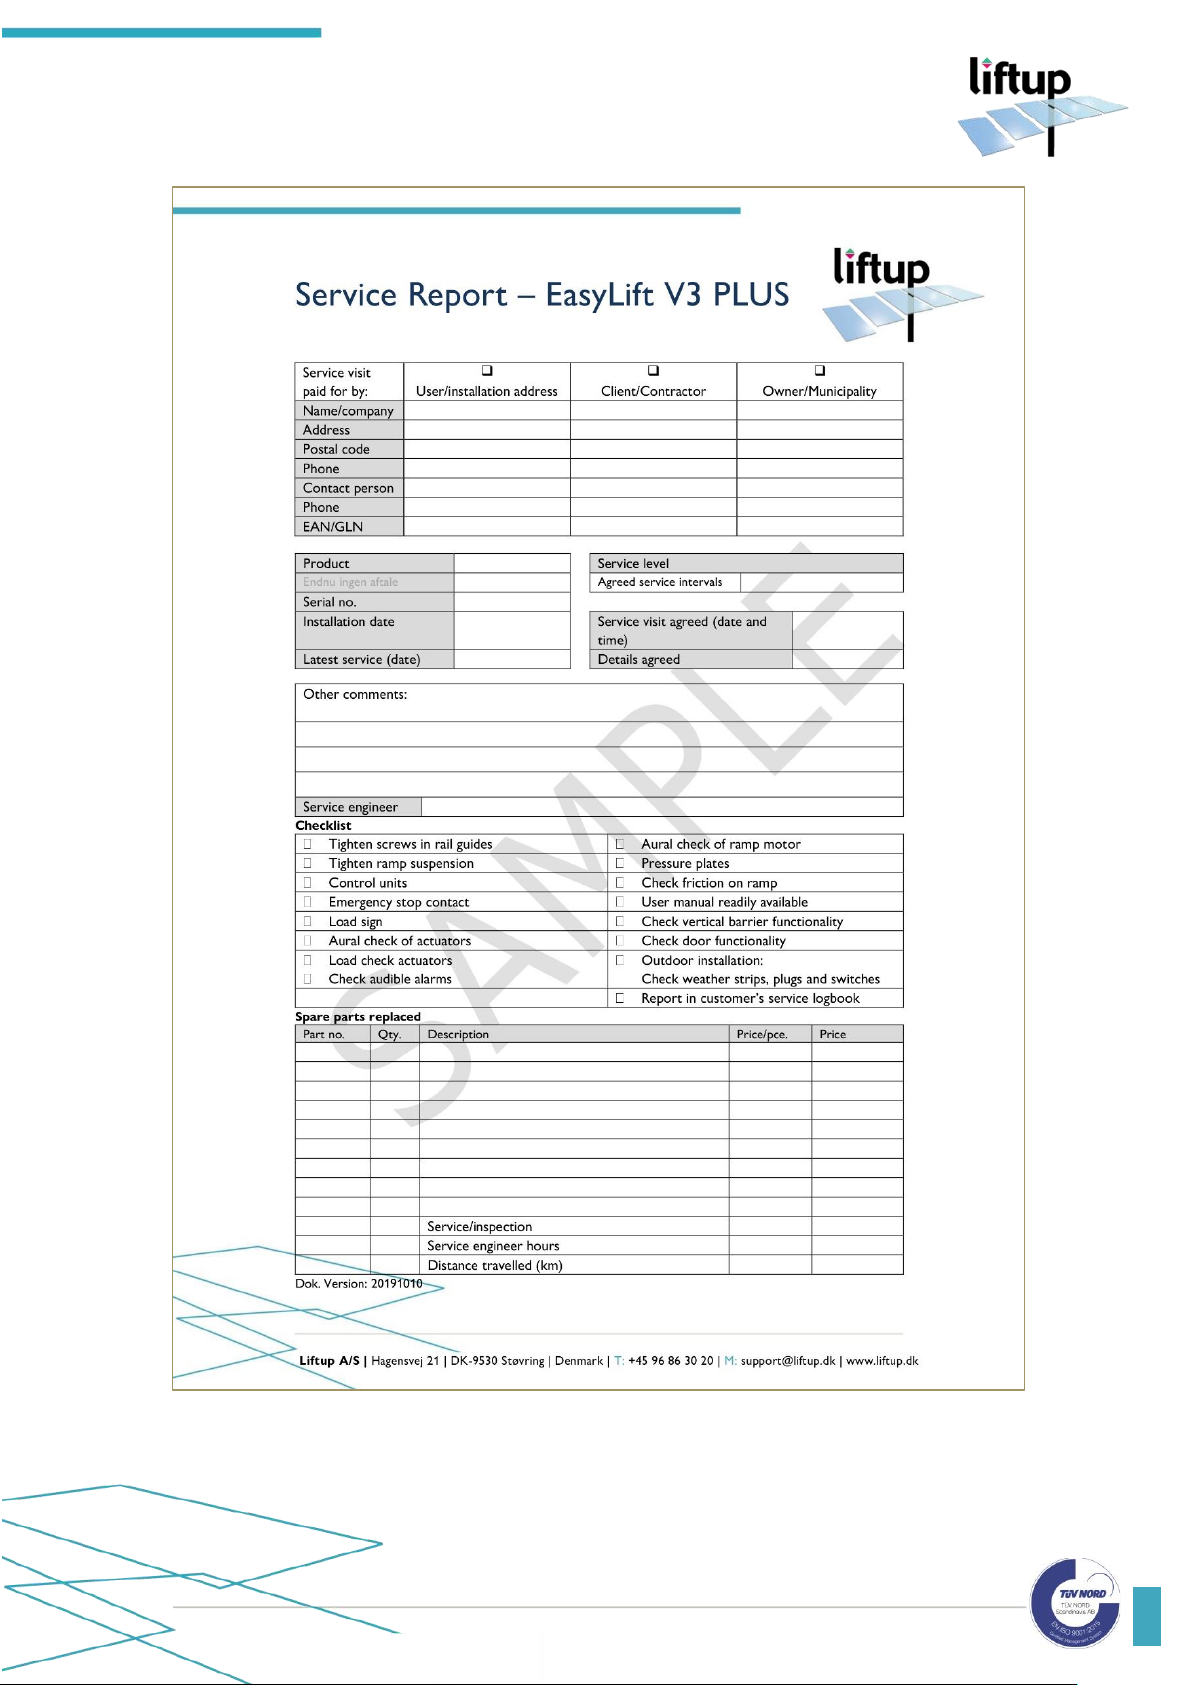
A check form like the one below shall be filled in upon each inspection. The form shall be filed
by the company which has entered into the service agreement.
Our recommendations for the number of maintenance inspections in a year:
Outdoor
Indoor
Private 2 1
Public 4 2
(Regarding local regulations)
*Has completed a Liftup product and service course.
Page 29
USER MANUAL – EASYLIFT V3 PLUS – GB VERSION 2.1
Liftup A/S | Hagensvej 21 | DK-9530 Støvring | Denmark | T: +45 96 86 30 20 | M: [email protected] | www.liftup.dk | CVR DK-1015 3964
29
Page 30
USER MANUAL – EASYLIFT V3 PLUS – GB VERSION 2.1
Liftup A/S | Hagensvej 21 | DK-9530 Støvring | Denmark | T: +45 96 86 30 20 | M: [email protected] | www.liftup.dk | CVR DK-1015 3964
30
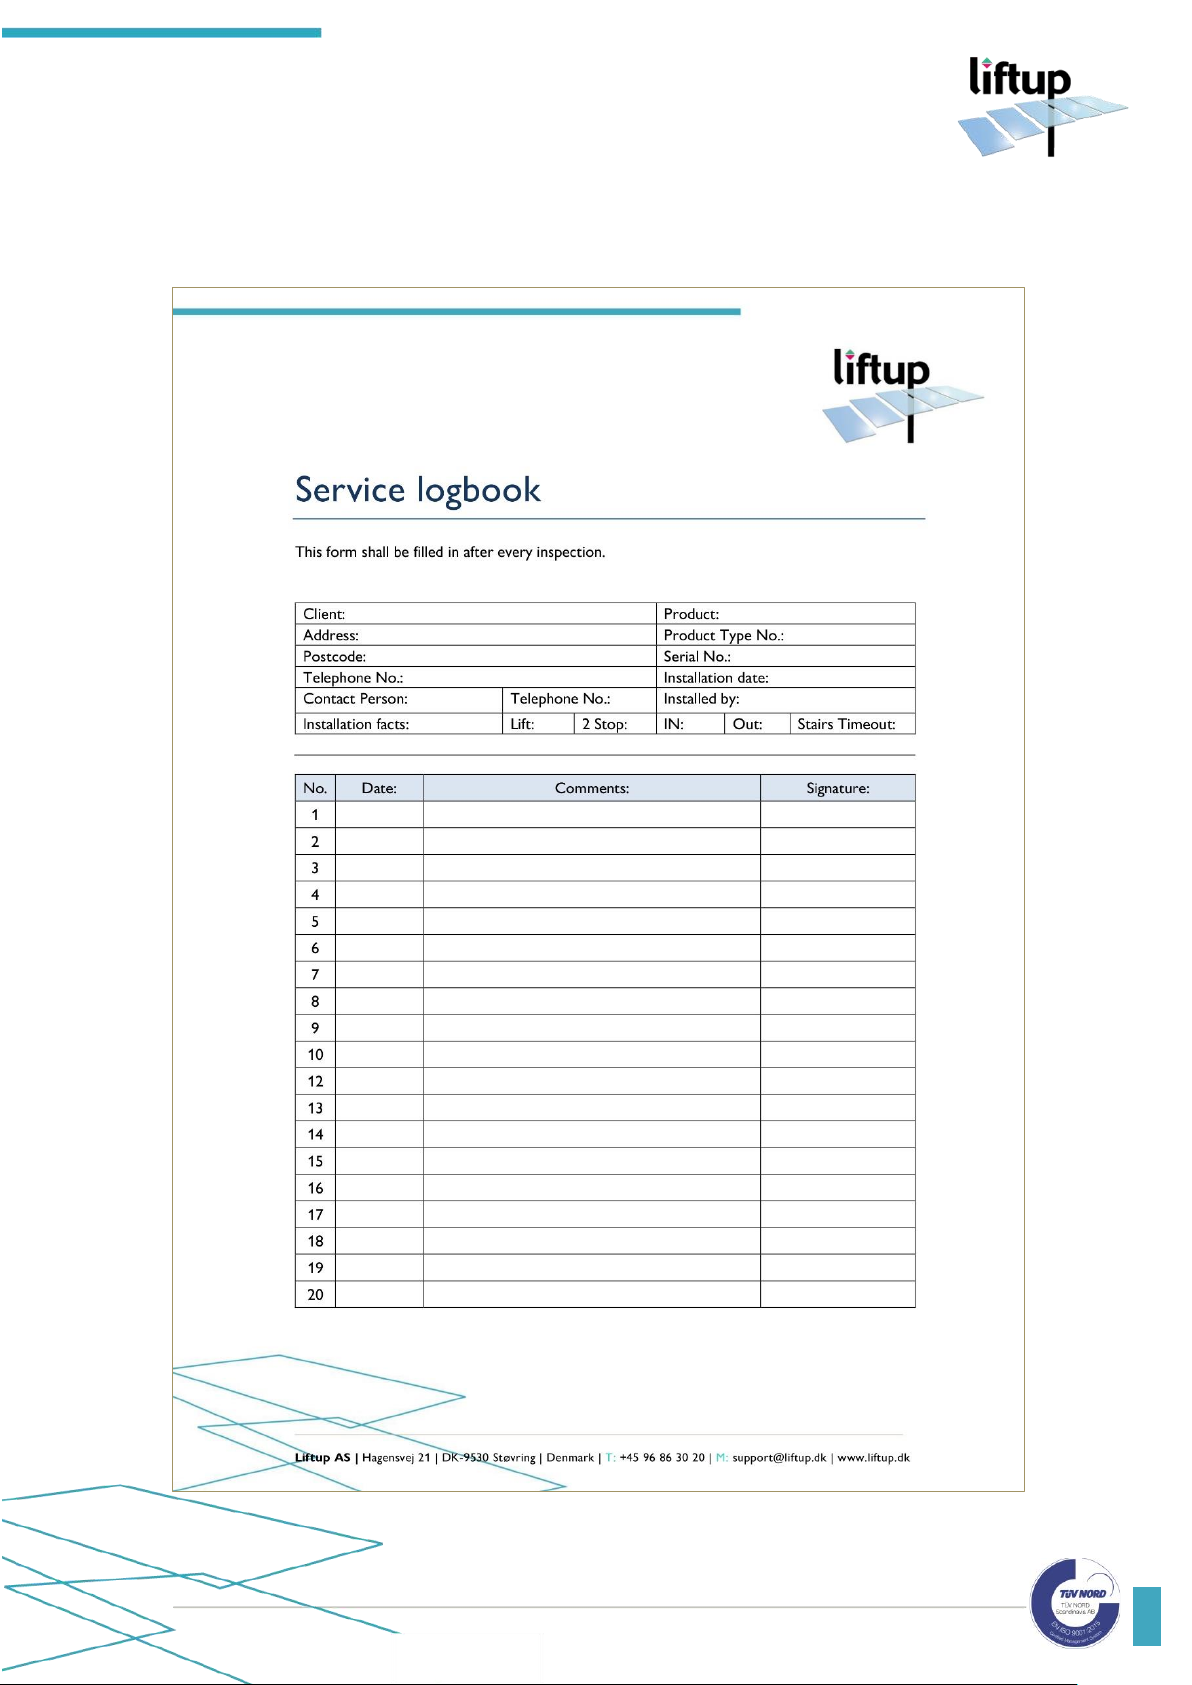
16. Service logbook
This form (like the one below), shall be filled in after each inspection. The logbook should be
kept together with the lift.
Page 31
USER MANUAL – EASYLIFT V3 PLUS – GB VERSION 2.1
Liftup A/S | Hagensvej 21 | DK-9530 Støvring | Denmark | T: +45 96 86 30 20 | M: [email protected] | www.liftup.dk | CVR DK-1015 3964
31
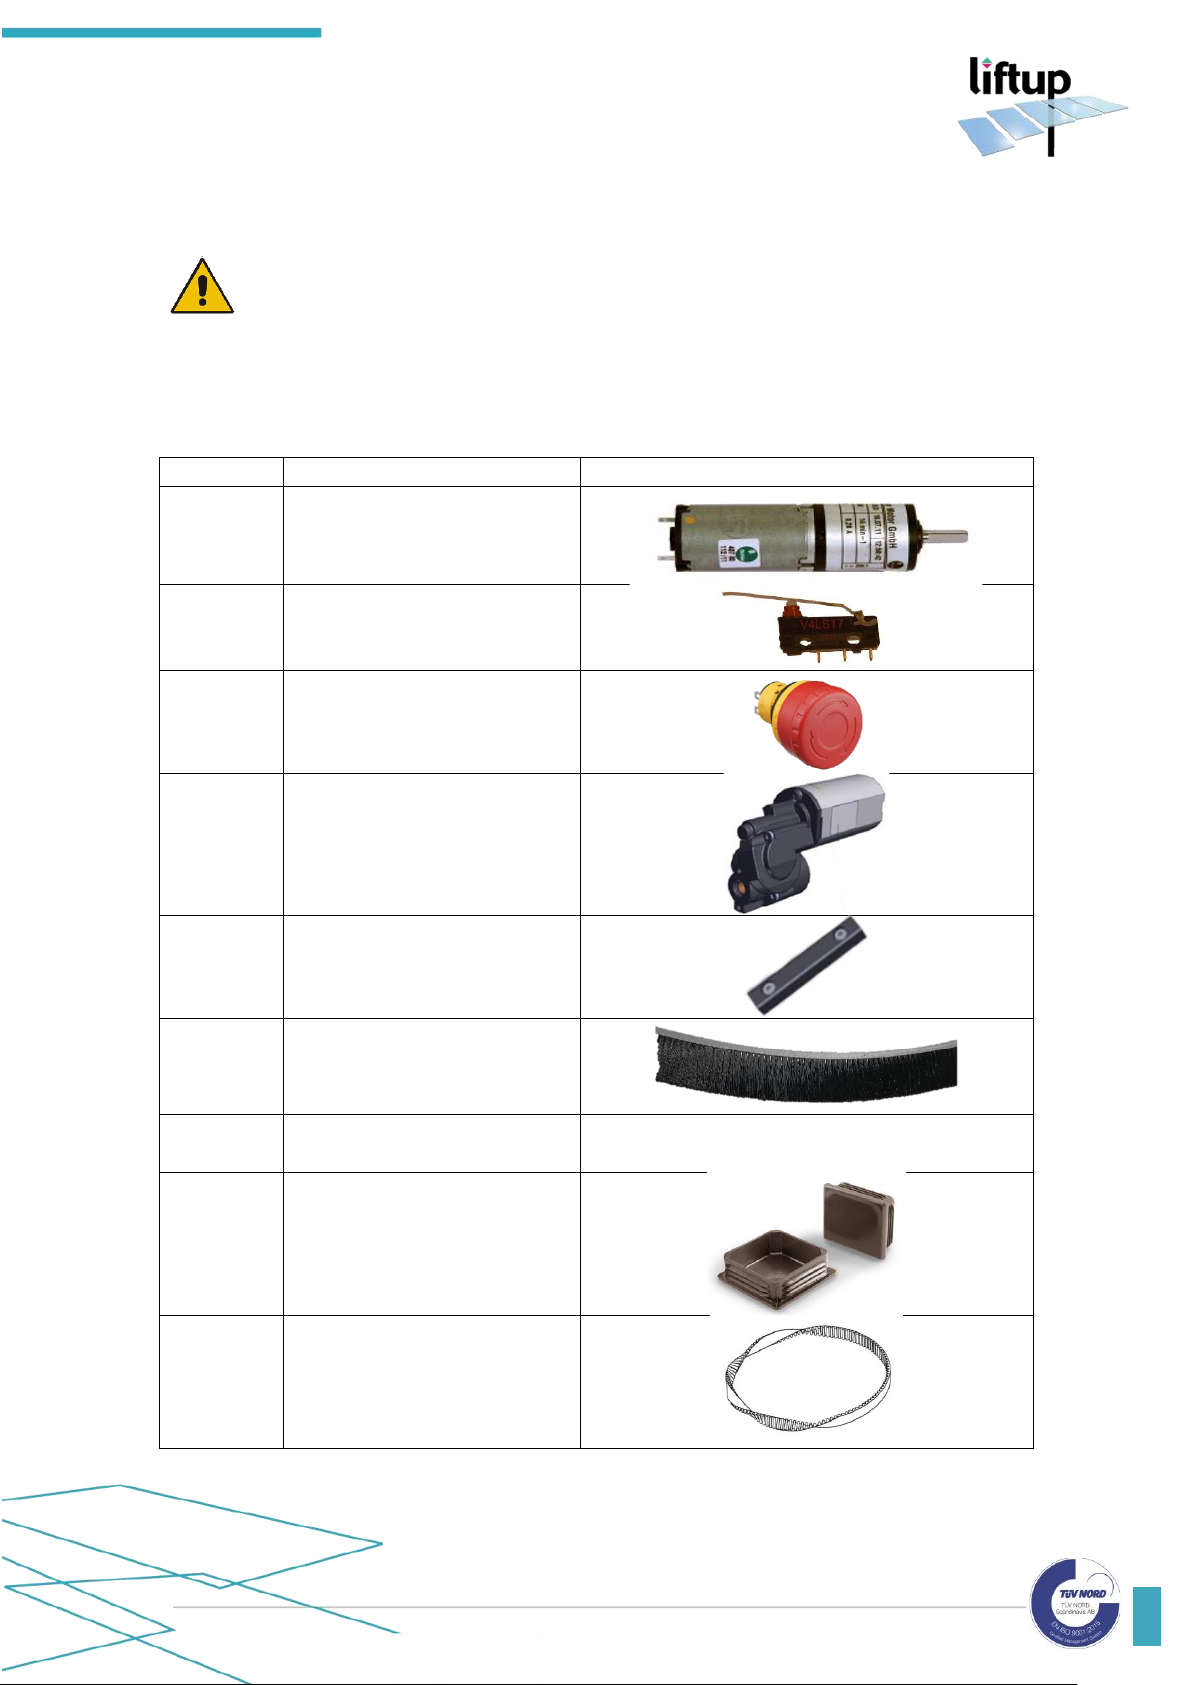
17. Spare parts and accessories
IMPORTANT! It is important to use only original spare parts. Replacement of parts
may only be undertaken by a qualified service technician. The use of non-original spare
parts may void the right of complaint. Furthermore, product safety may be compromised, which may pose a risk to personal safety.
A complete survey of spare parts for Liftups products can be found on our website
http://parts.liftup.dk/
Art. No.
Description
Illustration
100336
DC motor for Ramp
100338
Micro Switch - Safety system V4L IP67
104834
Emergency Stop Button
102744
Motor for Safety Barrier
102759
POM guide for stairs/wall
profile
102766
Brush for wall profile
102768
Spring for safety barrier
contact
100579
Plug for door 40x40
101139
Timing Belt for Vertical Barrier
(m)
Page 32
USER MANUAL – EASYLIFT V3 PLUS – GB VERSION 2.1
Liftup A/S | Hagensvej 21 | DK-9530 Støvring | Denmark | T: +45 96 86 30 20 | M: [email protected] | www.liftup.dk | CVR DK-1015 3964
32
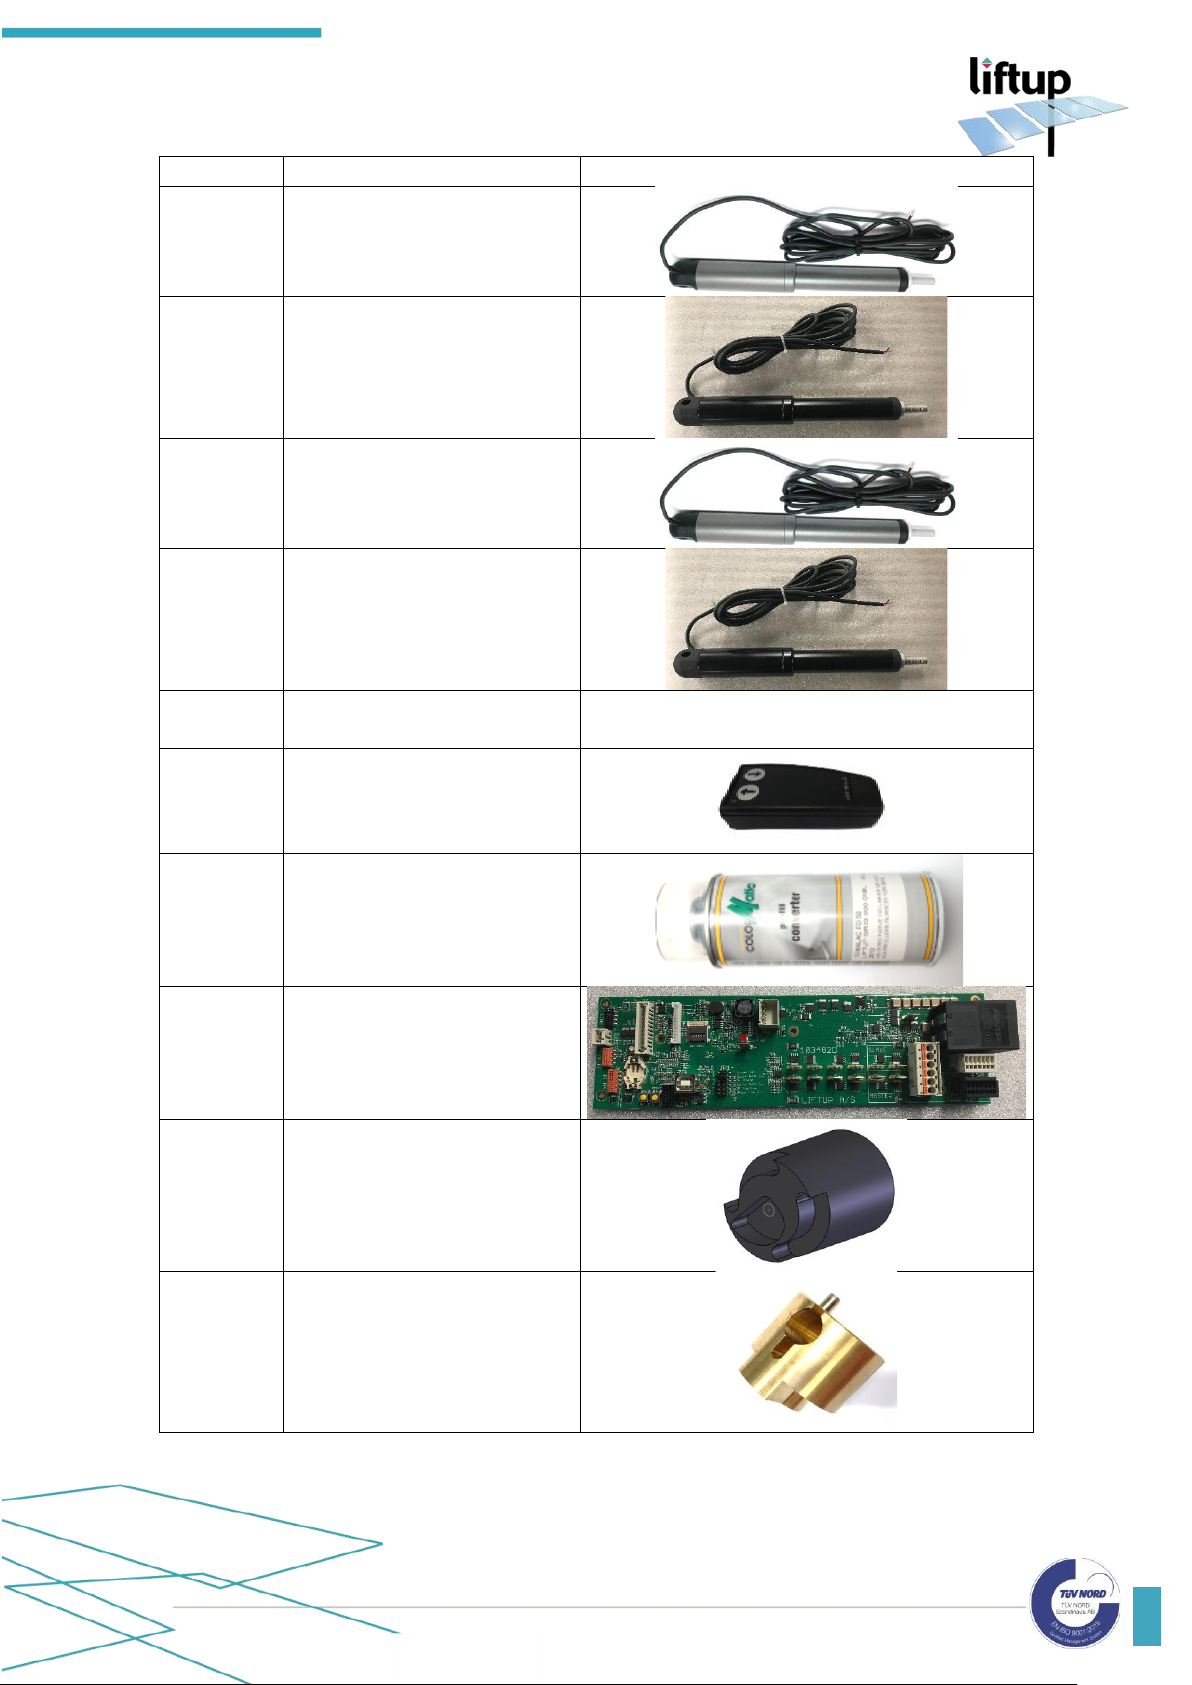
Art. No.
Description
Illustration
101326
Actuator for door
EasyLift 800/900 (grey)
102355
Actuator for door EasyLift
800/900 (black)
103679
Actuator for door EasyLift
1100 (grey)
104179
Actuator for door EasyLift
1100 (black)
101558
Cable for vertical barrier / call
station
101604
Remote control – transmitter
unit. (Accessory)
101951
Repair, spray, Color Akzo 900
/RAL7022 is close
103482
Control Board for FS2, ELV3
102556
Cam for ramp lock, FS2 &
ELV3
102557
Brass bracket for ramp lock FS2 & ELV3
Page 33
USER MANUAL – EASYLIFT V3 PLUS – GB VERSION 2.1
Liftup A/S | Hagensvej 21 | DK-9530 Støvring | Denmark | T: +45 96 86 30 20 | M: [email protected] | www.liftup.dk | CVR DK-1015 3964
33
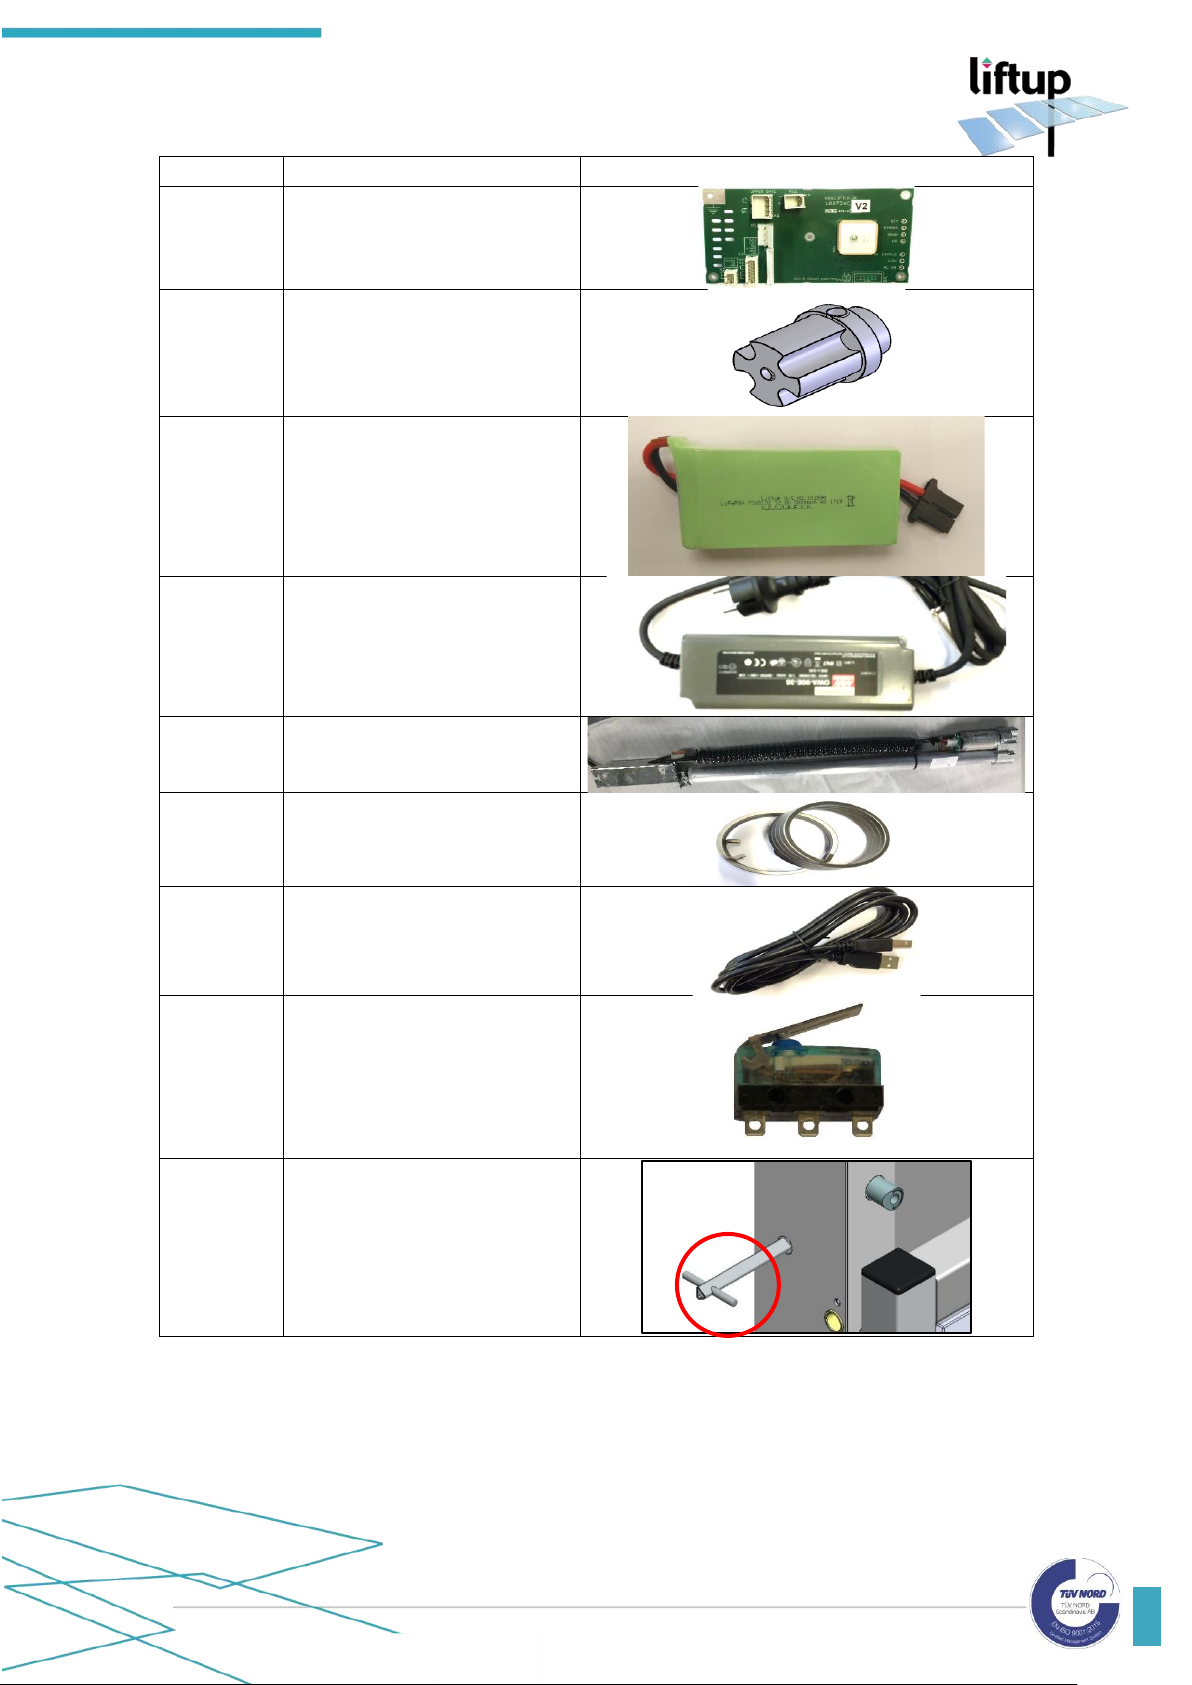
Art. No.
Description
Illustration
102726
PCB for connection box FS2 /
ELV3
102773
Friction clutch for ramp lock
102890
Battery 12V 5Ah LiFePo4
Raizer / FS2 / EL400
103080
Power supply unit 36 V EasyLift
103182
Actuator Complete, motor
EasyLift V3
103152
Spring for ramp - Friction
clutch
103333
Programming Cable USB A to
B - EasyLift
101589
Micro Switch - Safety System
Forced Break IP60
(800/900/1100)
103691
Triangular key for emergency
open of EasyLift 1100 door
Page 34

USER MANUAL – EASYLIFT V3 PLUS – GB VERSION 2.1
Liftup A/S | Hagensvej 21 | DK-9530 Støvring | Denmark | T: +45 96 86 30 20 | M: [email protected] | www.liftup.dk | CVR DK-1015 3964
34
18. Disassembly
In order to ensure correct disassembly for any re-use in another installation, we recommend
using an authorized service technician*. Contact your dealer for assistance with disassembly.
Bear in mind that there may be a risk of overturning when the lift is detached from the building
structure.
*Has completed a Liftup product and service course.
19. Disposal
It is the duty of the owner to dispose of the product in accordance with the regulations
applicable at the time.
Please note, in particular, that the control unit and remote control contain batteries, which must
be disposed of separately.
Do not put the battery in trash. When disposing of the battery, comply with local ordinances
or regulations.
Consider contacting your dealer for assistance with disposal.
20. Right of complaint
The right of complaint encompasses the at any time applicable rules regarding the right of
complaint. Please read more about this in the terms of sale and delivery:
http://www.liftup.dk/en/about-liftup/general-conditions/.
NB: If the prescribed service inspections are not maintained the right of complaint may be lost.
Failing to perform these inspections can also have serious consequences for product safety. It
rests with the customer to ensure compliance with the prescribed service inspections at all
times. Cf. Danish Working Environment Authority Executive Order 1109 §14.
Enjoy using your new EasyLift!
Best regards,
Liftup A/S
Page 35

USER MANUAL – EASYLIFT V3 PLUS – GB VERSION 2.1
Liftup A/S | Hagensvej 21 | DK-9530 Støvring | Denmark | T: +45 96 86 30 20 | M: [email protected] | www.liftup.dk | CVR DK-1015 3964
35
_____________________________________________________________________________
_____________________________________________________________________________
_____________________________________________________________________________
_____________________________________________________________________________
_____________________________________________________________________________
_____________________________________________________________________________
_____________________________________________________________________________
_____________________________________________________________________________
_____________________________________________________________________________
_____________________________________________________________________________
_____________________________________________________________________________
_____________________________________________________________________________
_____________________________________________________________________________
_____________________________________________________________________________
_____________________________________________________________________________
_____________________________________________________________________________
_____________________________________________________________________________
_____________________________________________________________________________
_____________________________________________________________________________
_____________________________________________________________________________
_____________________________________________________________________________
_____________________________________________________________________________
_____________________________________________________________________________
Page 36

USER MANUAL – EASYLIFT V3 PLUS – GB VERSION 2.1
Liftup A/S | Hagensvej 21 | DK-9530 Støvring | Denmark | T: +45 96 86 30 20 | M: support@liftup.dk | www.liftup.dk | CVR DK-1015 3964
36
 Loading...