

Page 1
1
Dear LifeWatch V owner:
Thank you for selecting the LifeWatch V mobile medical phone.
This user manual includes information and instructions for using your new LifeWatch V device. Please read
this manual carefully before you start using the device.
If you have any questions about your LifeWatch V, please contact your representative:
Illustrations included in this manual are general representations only and are not meant to
comply with specific regulatory requirements.
By default, your phone is provided with pre-set applications.
Installation of new applications may affect the performance of your phone and is the sole
responsibility of the user.
Before using the LifeWatch V medical and wellness functions please read the Warnings
and Precautions, Appendix A, thoroughly.
Page 2
2
Copyright Declaration
Copyright © 2012 LifeWatch Technologies Ltd.® All rights reserved.
LifeWatch Technologies Ltd., LifeWatch Inc., LifeWatch Inc. logo, and LifeWatch V are trademarks or registered trademarks
of LifeWatch AG®.
All other brand names and product names used in this document are trade names, service marks, trademarks, or registered
trademarks of their respective owners.
The information and screens provided in this manual are subject to change without notice.
LifeWatch Technologies Ltd. SHALL NOT BE LIABLE FOR TECHNICAL OR EDITORIAL ERRORS OR OMISSIONS
CONTAINED HEREIN; NOR FOR INCIDENTAL OR CONSEQUENTIAL DAMAGES RESULTING FROM THE
FURNISHING, PERFORMANCE, OR USE OF THIS MATERIAL.
Authorized representatives:
Europe
Obelis s.a
Boulevard Général
Wahis 53
1030 Brussels, BELGIUM
Tel: + (32) 2. 732.59.54
Fax: + (32) 2.732.60.03
E-mail: [email protected]
USA
Lifewatch, Inc.
O’Hare International Center
10255 West Higgins Road
Suite 120
Rosemont, IL 60018
Tel: 847-720 -2295
Fax: 847-720-1995
Toll Free: 800-633-3361
Fax: 800-954-2375
Email: [email protected]
Israel
LifeWatch
Technologies Ltd.
2 Pekeris St.
Rehovot 76100
Israel
Tel: 972 8 9484000
Fax: 972 8 9484044
Email: [email protected]
For self-testing
Page 3

3
LifeWatch V Kit Contents
LifeWatch V
Adapter
Earphones
User manual
Quick user guide
USB cable
Optional – LifeWatch V Gluco Accessories Kit
Contents
1 lancing device
10 lancets
Gluco strip vial
Control solution
10 Alcohol pads
Disinfection pads
Gluco strip Quick user guide
Lancer Quick user guide
Contraindications
In order to use this device, you must be able to:
Understand the operation principles as described in this manual
Operate a LifeWatch V and the LifeWatch V Application
Operate a touch screen
General contraindications for all medical modules:
The LifeWatch V is not intended for use by persons with external defibrillators
The LifeWatch V is not intended for the treatment or alleviation of disease
The LifeWatch V is not to be used in a magnetic resonance imaging (MRI) environment
Page 4

4
Warning:
Do not expose the unit to rain or moisture
Servicing of the device shall be done by qualified personnel only
The user of the LifeWatch V should not take any actions of a medical or clinical nature based on his/her
understanding or interpretation of test results without consulting a healthcare professional.
Classifications of test results obtained for medical modules or for wellness applications into categories
such as “Low”, “Normal”, “Average”, etc. are based on well-established and widely accepted clinical
sources; as other classifications may exist, the test results should not constitute the sole basis for
diagnosis or for deciding on the appropriate course of medical treatment or therapy.
Important Symbols
A number of symbols are used throughout this manual in order to draw attention to safety items and other
important information.
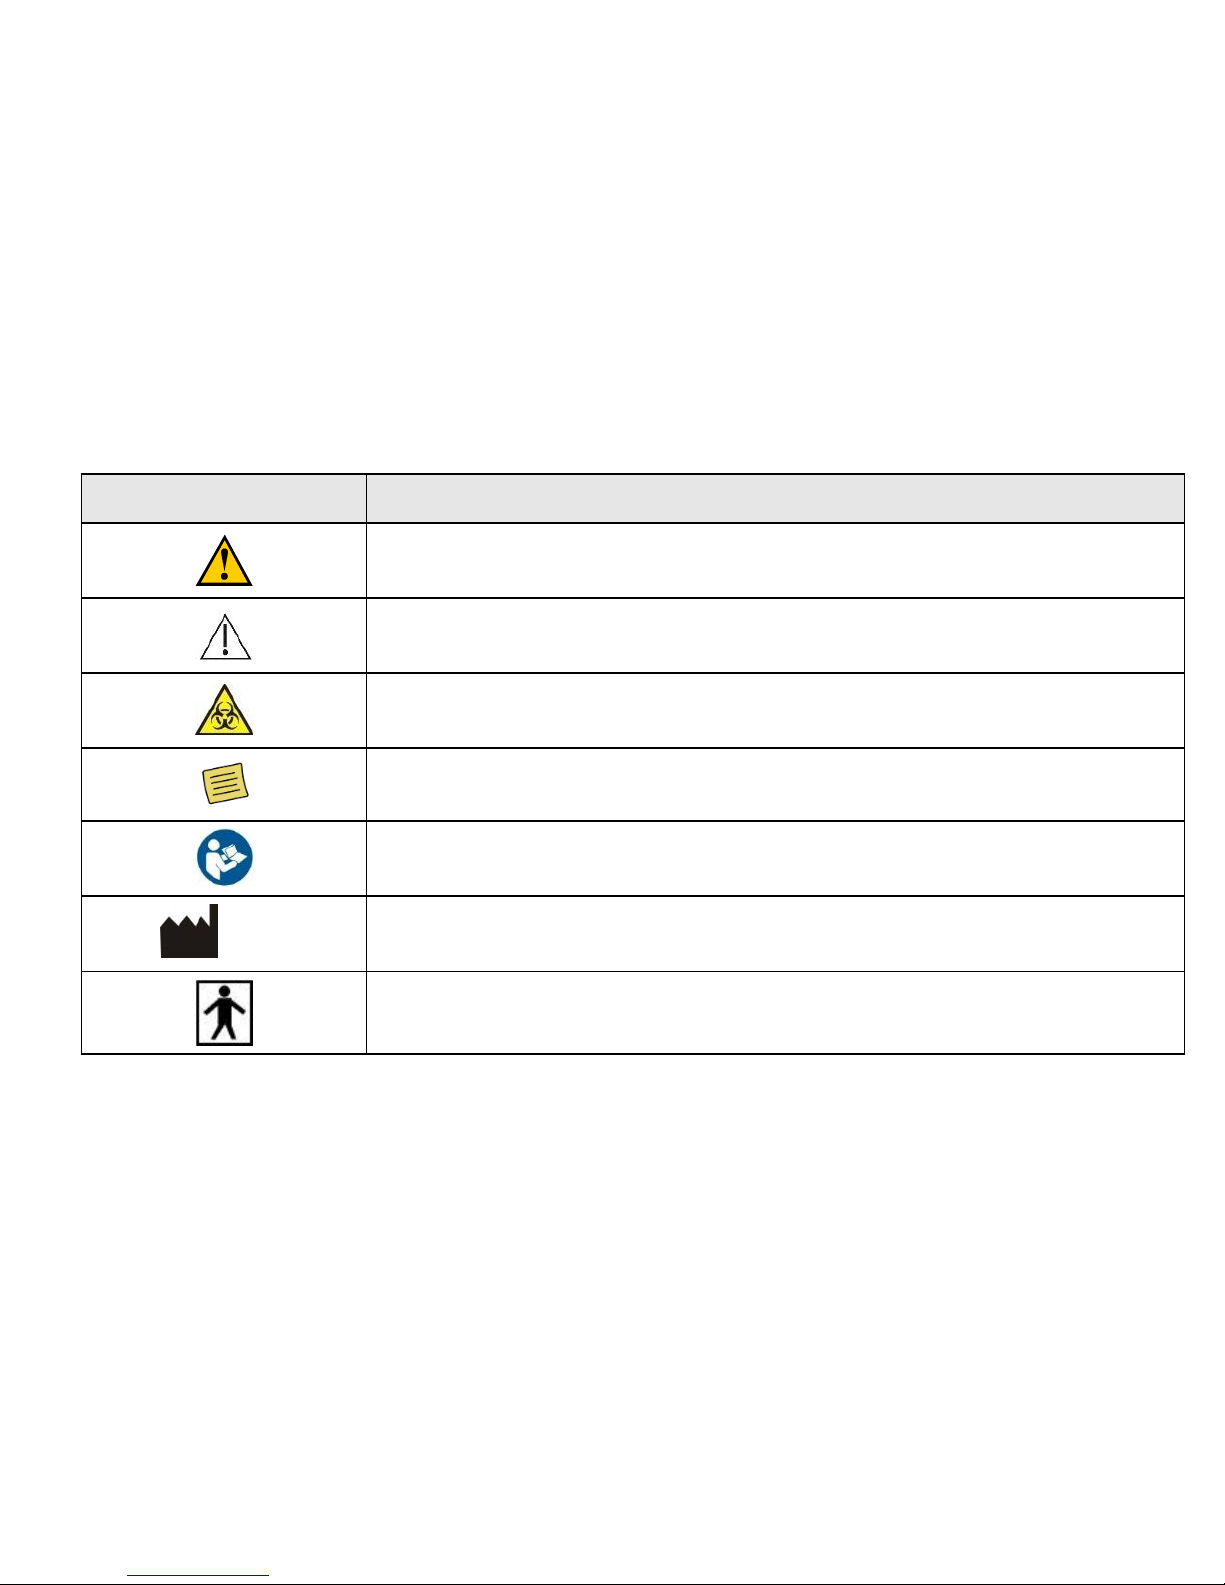
Symbols on Equipment and Labeling
The following section contains a description of symbols that may be located on either the equipment or the
documentation.
Page 5
5
Label
Description
Warning, consult accompanying text or documents
Precaution; consult accompanying text or documents
Warning, potential biohazard
Notes, indicates important general information for using the system
successfully.
Consult instructions for use
XXXX
Manufacturer and date of Manufacture
Type BF Applied Part
Page 6
6
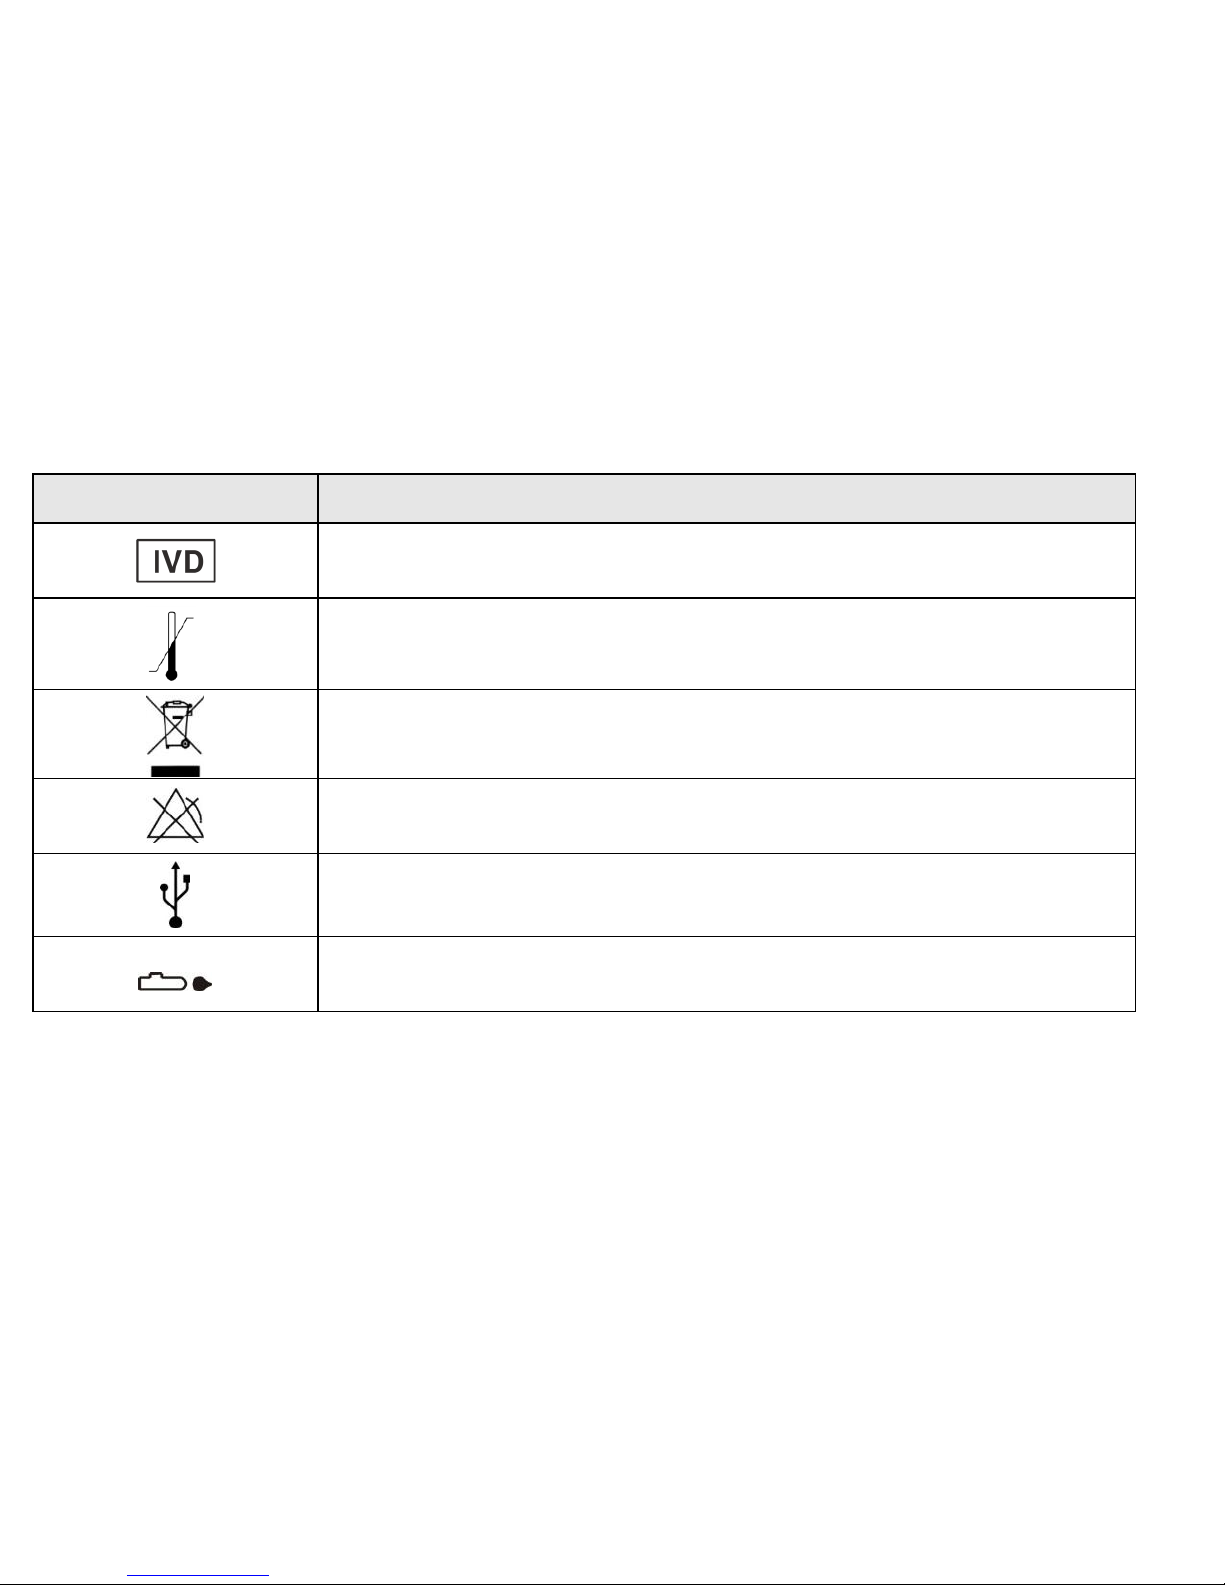
Label
Description
In vitro device
Store at specified temperatures; location of thermometer
WEEE Directive for disposal of Electrical and Electronic Equipment
Symbol for no alarms
Symbol indicating a USB connector
Symbol indicating location of glucose meter
Page 7

7
Table of Contents
LifeWatch V Basic Operation ........................................................... 20
For Your General Safety (Precautions) .................................... 20
Getting Started ............................................................................... 22
Overview ................................................................................... 22
Starting up ................................................................................ 25
Charging the Battery ................................................................. 27
Getting Around Your Device .......................................................... 29
Touch Control ........................................................................... 29
Home Screen ............................................................................ 30
Status and Notification Icons .................................................... 32
Applications and Settings .............................................................. 34
Settings ..................................................................................... 35
Phone Calls .................................................................................... 37
Page 8

8
Dialer Screen ............................................................................ 37
Making Calls ............................................................................. 37
Call Screen ............................................................................... 39
Receiving Calls ......................................................................... 40
Adjusting Your Call Settings ..................................................... 41
Contacts .................................................................................... 42
Importing/Exporting Contacts from/to the microSD Card ......... 42
Entering Text ............................................................................. 44
Messaging ................................................................................. 46
Email .............................................................................................. 48
Creating an Email Account ....................................................... 49
Receiving Emails ...................................................................... 49
Composing and Sending an Email ........................................... 50
Replying to or Forwarding an Email .......................................... 50
Page 9

9
Getting Connected to the Internet .................................................. 51
Adding a New GPRS/EDGE/3G Connection ............................ 52
Turning On Wi-Fi ...................................................................... 52
Using the Device as a Wi-Fi Hotspot ........................................ 53
Browsing the Internet ................................................................ 54
Bluetooth® ................................................................................ 57
Making the Most of Multimedia ...................................................... 59
Taking Pictures with Your Camera ........................................... 59
Sorting out Your Phone Settings .............................................. 64
Security Settings ....................................................................... 67
Protecting Your Device with a PIN or Password ...................... 68
Managing Your Device Memory .................................................... 72
Privacy: Reset to Factory Settings ........................................... 72
Managing Applications ................................................................... 73
Page 10

10
Managing Other Settings .......................................................... 73
Other Applications .......................................................................... 73
Calculator .................................................................................. 73
SIM Tool Kit .............................................................................. 73
LifeWatch V Health and Medical Functions ................................... 74
Getting Started with the LifeWatch V Medical
and Wellness Applications ............................................................. 74
License Agreement ........................................................................ 74
First Time Launch .......................................................................... 75
Login Screen .................................................................................. 76
Guest Login ............................................................................... 76
Test Application ................................................................................ 78
Test General Description ............................................................... 78
Page 11

11
Test Screens Description ............................................................... 79
History ............................................................................................ 84
Performing Tests ............................................................................ 86
Blood Glucose Test .................................................................. 86
Glucose Test Troubleshooting .................................................. 92
Alternative Site Testing (AST) .................................................. 93
Control Solution Test ................................................................ 95
Control Solution Troubleshooting ............................................. 99
ECG/HR/BFA/SP02/Stress Level Analyzer Tests .................. 100
Body Temperature Test .......................................................... 103
LifeWatchV Medical Application Settings .................................... 105
My Profile ................................................................................ 106
Sharing Permissions ............................................................... 107
Test Settings ........................................................................... 107
Page 12

12
Measurement Units ................................................................. 107
Sounds .................................................................................... 107
Diet Application ............................................................................... 108
General ........................................................................................ 108
Meal Planner .......................................................................... 108
Exercise Tracker .................................................................... 109
Weight Tracker ....................................................................... 109
Water Tracker ........................................................................ 109
Measurement Tracker ............................................................ 109
Calendar Application ...................................................................... 110
Drug Reminder ................................................................................ 111
Heart Rate Calculation Method ...................................................... 112
Introduction ............................................................................. 112
Method of Calculation ............................................................. 112
Page 13

13
Maintenance .................................................................................... 113
Conditions of Use......................................................................... 113
Caring for your LifeWatch V ......................................................... 113
Cleaning .................................................................................. 113
Disinfecting ............................................................................. 113
Environment ............................................................................ 114
Preventive Maintenance ................................................................. 115
Troubleshooting .............................................................................. 116
Specifications .................................................................................. 117
Declaration of RoHS Compliance ........................................... 122
Disposal of Your Device ......................................................... 122
Appendix A Warnings and Precautions ....................................... 123
Warnings ................................................................................. 124
Page 14

14
Radio Frequency (RF) Exposure (Precautions) ........................... 128
General Statement on RF Energy .......................................... 128
EMI Considerations................................................................. 128
Body Worn Operation ............................................................. 128
Limiting Exposure to Radio Frequency (RF) Fields (Precautions)128
Distraction .................................................................................... 129
Driving (Precautions) .............................................................. 129
Operating Machinery (Precautions) ........................................ 129
Product Handling (Precautions) ................................................... 129
General Statement on Handling and Use ............................... 129
Children ................................................................................... 130
Demagnetization ..................................................................... 130
Electrostatic Discharge (ESD) ................................................ 130
Antenna ................................................................................... 130
Page 15

15
Normal Use Position ............................................................... 130
Air Bags .................................................................................. 130
Seizures/Blackouts ................................................................. 130
Repetitive Strain Injuries ......................................................... 131
Emergency Calls ..................................................................... 131
Loud Noise .............................................................................. 131
Phone Heating ........................................................................ 131
Electrical Safety (Precautions) ..................................................... 131
Accessories ............................................................................ 131
Connection to a Car ................................................................ 131
Faulty and Damaged Products ............................................... 131
General Statement on Interference ........................................ 132
Pacemakers ............................................................................ 132
Hearing Aids ........................................................................... 132
Use of LifeWatch V with other Medical Devices ..................... 132
Page 16

16
Hospitals ................................................................................. 132
Aircraft ..................................................................................... 132
Interference in Cars ................................................................ 133
Explosive Environments (Precautions) ........................................ 133
Petrol Stations and Explosive Atmospheres ........................... 133
Blasting Caps and Areas ........................................................ 133
Index ................................................................................................. 134
Page 17

17
WARNINGS
Use the device only for the purposes described in the instructions for use.
To prevent fire, do not expose the device to moisture or excessive heat. Refer servicing to
qualified personnel only.
Do not use this device if it is not working properly, or if it has suffered any damage.
WARNING
Device not suitable for use in the presence of flammable anesthetic mixture with air or with Oxygen
or Nitrous Oxide.
WARNING
For optimal use of the LifeWatch V it should be connected to the Internet.
By default, your phone is provided with pre-set applications.
Installation of new applications may affect the performance of your phone and is the sole
responsibility of the user.”
WARNING
The user of the LifeWatch V should not take any actions of a medical or clinical nature based on his/her
understanding or interpretation of test results without consulting a healthcare professional.
Page 18
18
Intended Use
The LifeWatch V is a medical device designed for self-testing in order to measure and display blood oxygen
saturation, blood glucose, ECG (1 lead), heart rate, body fat percentage, stress level analyzer and body
temperature. The LifeWatch V is intended for use in the following population groups:
Adults
Pediatrics as defined per medical module
The following applications of the LifeWatch V as described in this User Manual, are not within the scope of
the Medical Device Directive 93/42/EEC and are therefore not considered as medical devices, nor are they
covered by the this Directive:
Stress Level Analyzer
Diet Management
Drug Management
Body Fat Analysis
Test
Age Group
Pulse oximeter
Adults, 21 years and older
Blood Glucose meter
Adults and pediatrics above 12 years
Pediatrics below the age of 12 years: under adult supervision only
Excluding neonates and infants less than one year
1 Lead ECG
Adults and pediatrics above 12 years of age
Heart Rate
Adults and pediatrics above 12 years of age
Stress Level Analyzer
Adults, 21 years and older
Page 19
19
Body Fat Analyzer
Adults, 21 years and older
Thermometer
Adults and pediatrics above 12 years
Pediatrics below the age of 12 years: under adult supervision only
Excluding neonates and infants less than one year
Device Definition
The LifeWatch V is a state-of-the-art mobile device (smartphone) with medical and non-medical capabilities
designed for the maximum convenience of its users. The LifeWatch V includes the following modules and
applications:
Pulse oximeter/SpO2 (oxygen saturation)
Blood Glucose meter
1 Lead ECG
Heart Rate
Thermometer
Body Fat Analyzer
Stress Level Analyzer
Diet Management
Drug Management
NOTE: The LifeWatch V can be used as a stand-alone device or via a subscription plan; full functionality is
available only to paying subscribers.
Page 20
20
LifeWatch V Basic Operation
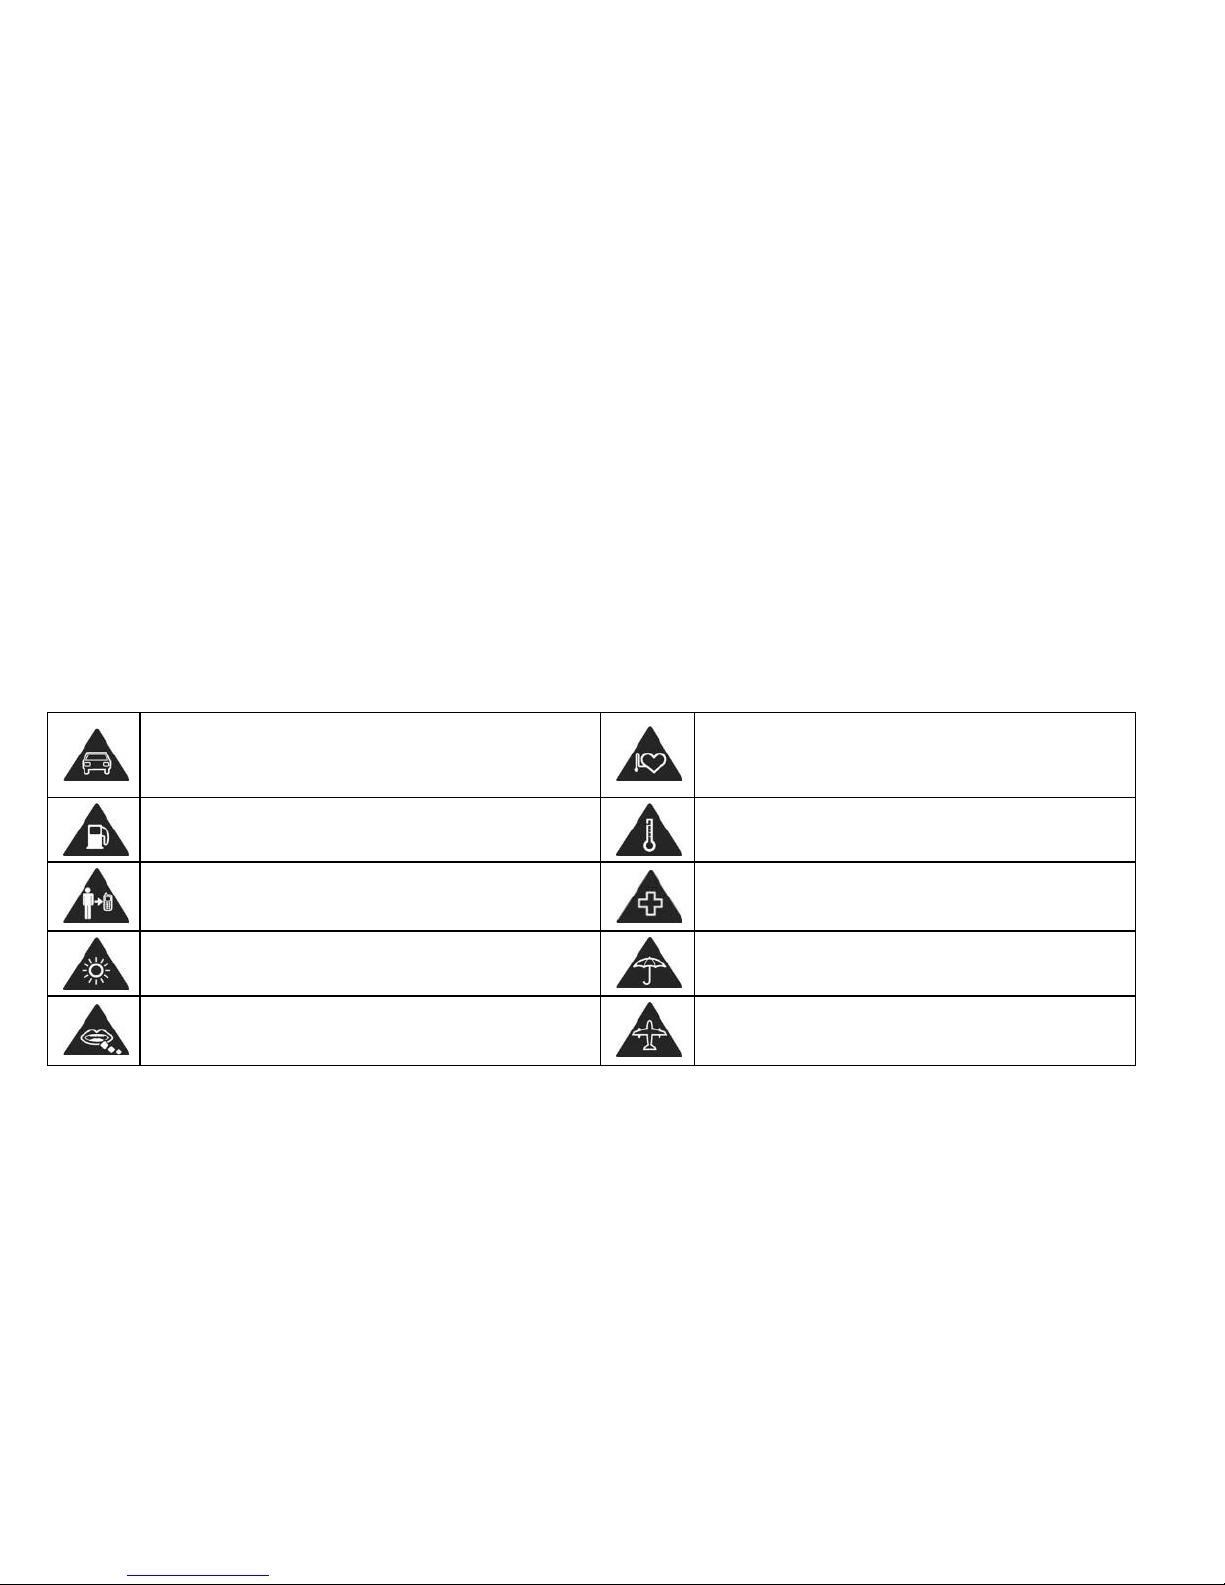
For Your General Safety (Precautions)
As the LifeWatch V device is a medical device that can be used both as a regular cell phone and as a
medical device, this manual includes both warnings and precautions relating to the use of the LifeWatch V as
a cell phone, AND warnings and precautions concerning the use of the LifeWatch V as a medical device.
Do not make or receive handheld calls while
driving; do not text while driving.
Keep the device away from pacemakers, ICDs
and other electronic medical devices (at least 6
inches/15 cm).
Don’t use the device at gas/petrol stations.
Do not expose the device to extreme
temperatures.
Keep your phone at least 15 mm away from your
ear or body while making calls.
Switch the device off when asked to in hospitals
and medical facilities.
Your phone may produce a bright or flashing light.
Avoid contact with liquids. Keep your phone dry.
Small parts may cause choking.
Switch the device off when told to in aircrafts
and airports.
Page 21
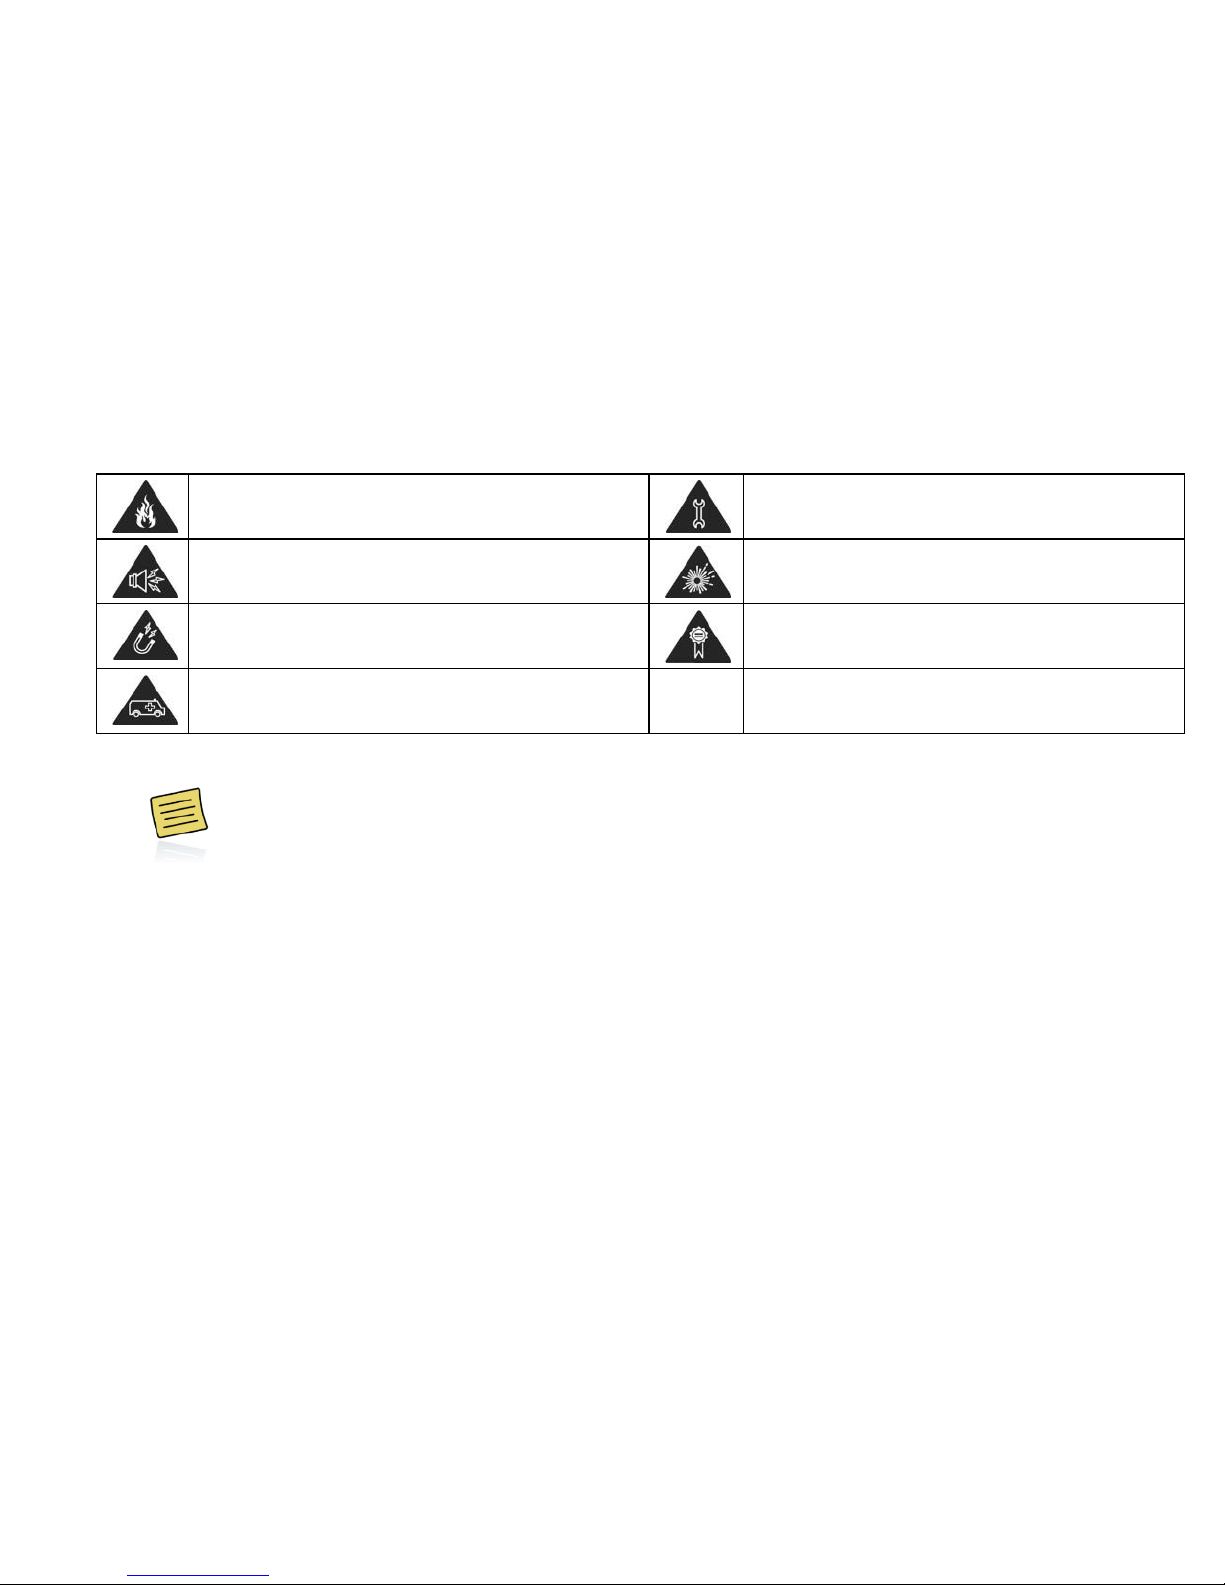
21
Don’t dispose of your device in fire.
Don’t take your device apart.
Your device can produce a loud sound.
Switch your device off when near explosive
materials or liquids.
Avoid contact with anything magnetic.
Only use approved accessories.
Don’t rely on your device for emergency
communications.
Before using the LifeWatch V medical and wellness functions please read Appendix A
Warnings and Precautions thoroughly.
Page 22
22
Getting Started
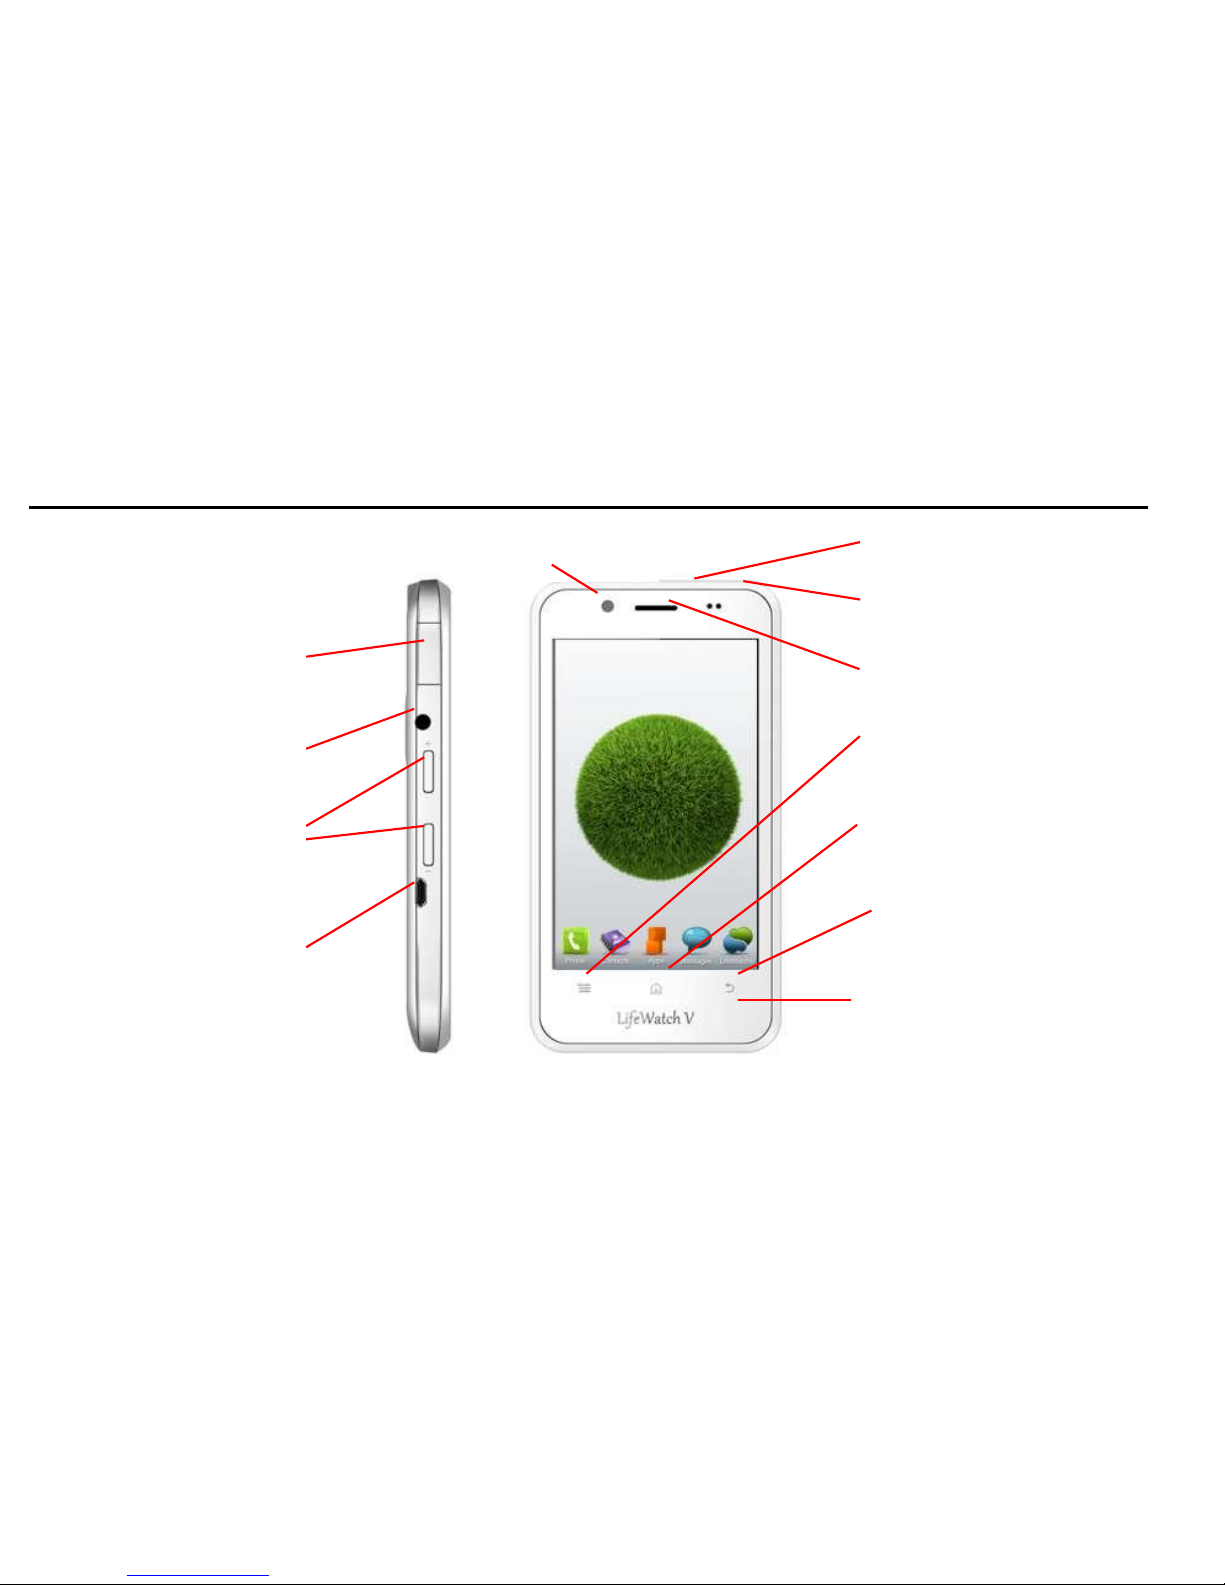
Overview
Home
Back Key
Menu
Gluco-meter slot
Speaker
USB connector
Volume +/–
Ear phone plug
Biocompatible
Electrode
Power on/off
Front camera
Microphone
Page 23
23
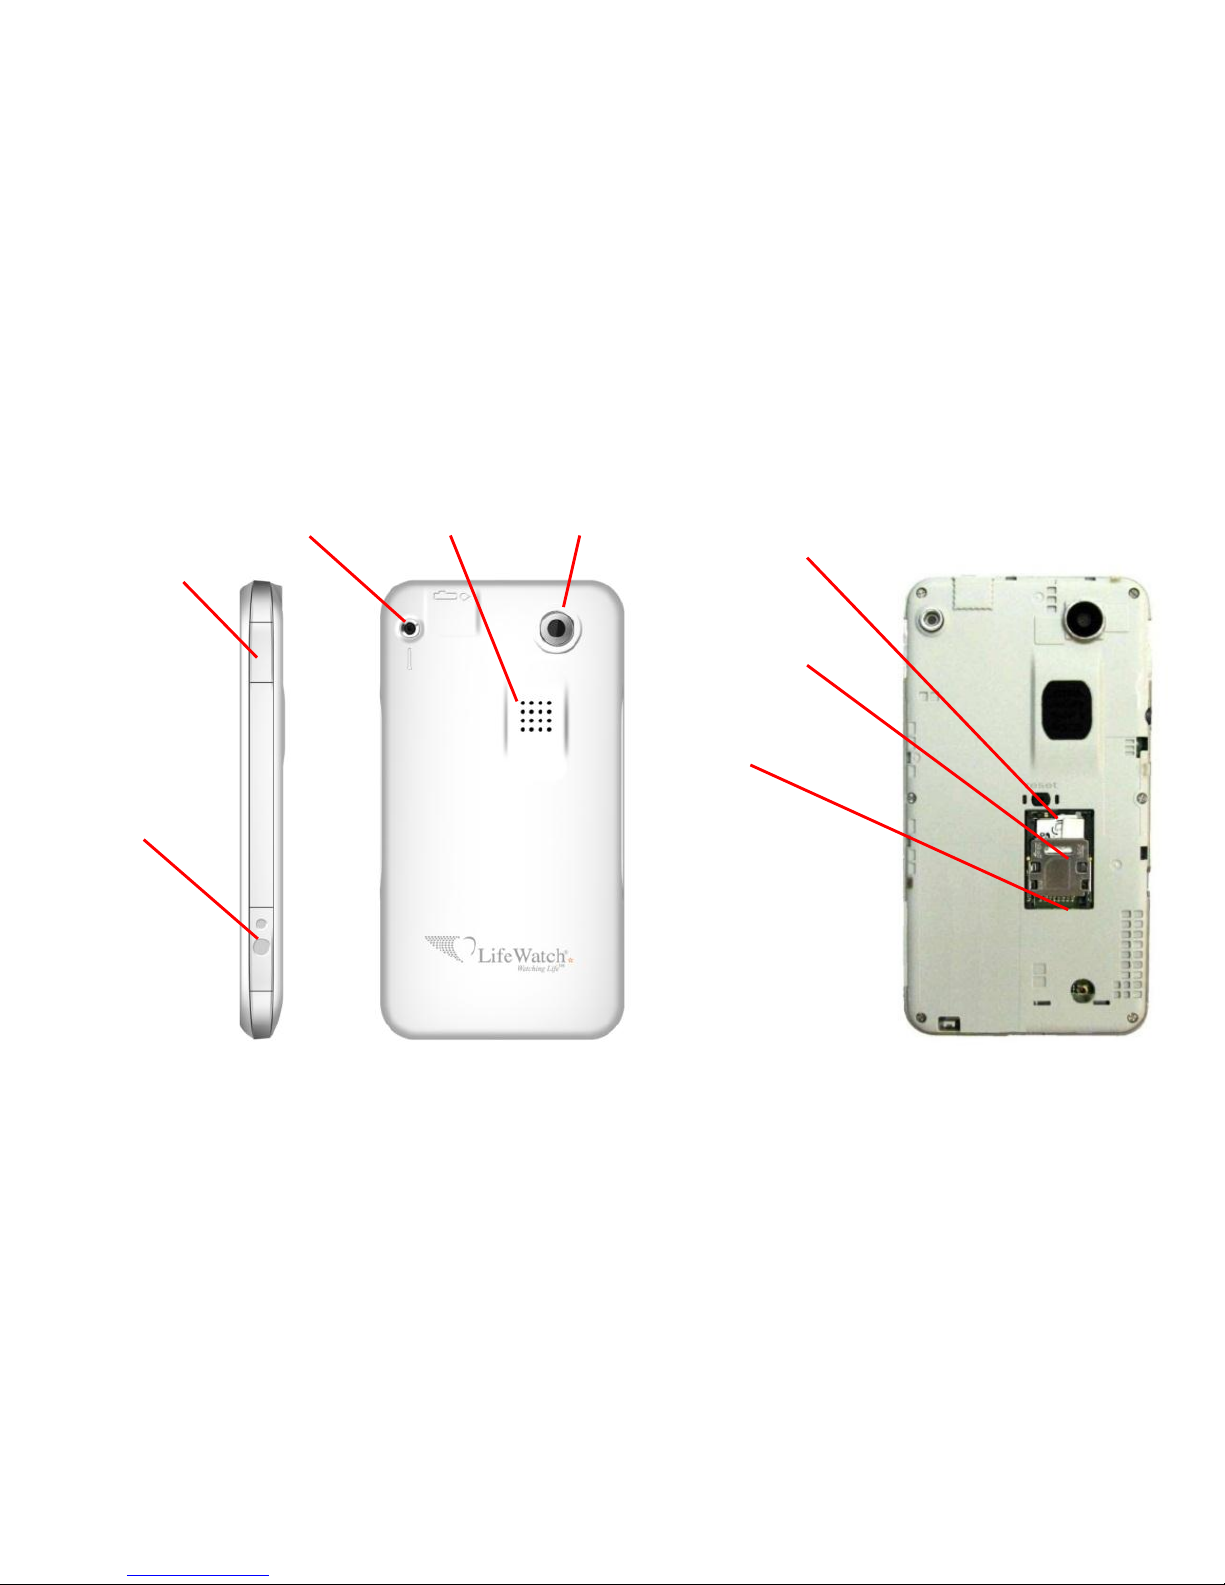
Biocompatible Thermometer Loudspeaker Camera
Electrode
Biocompatible
Electrode
with SP02
sensor
Back cover removed
Reset button
microSD card
SIM card
Page 24
24
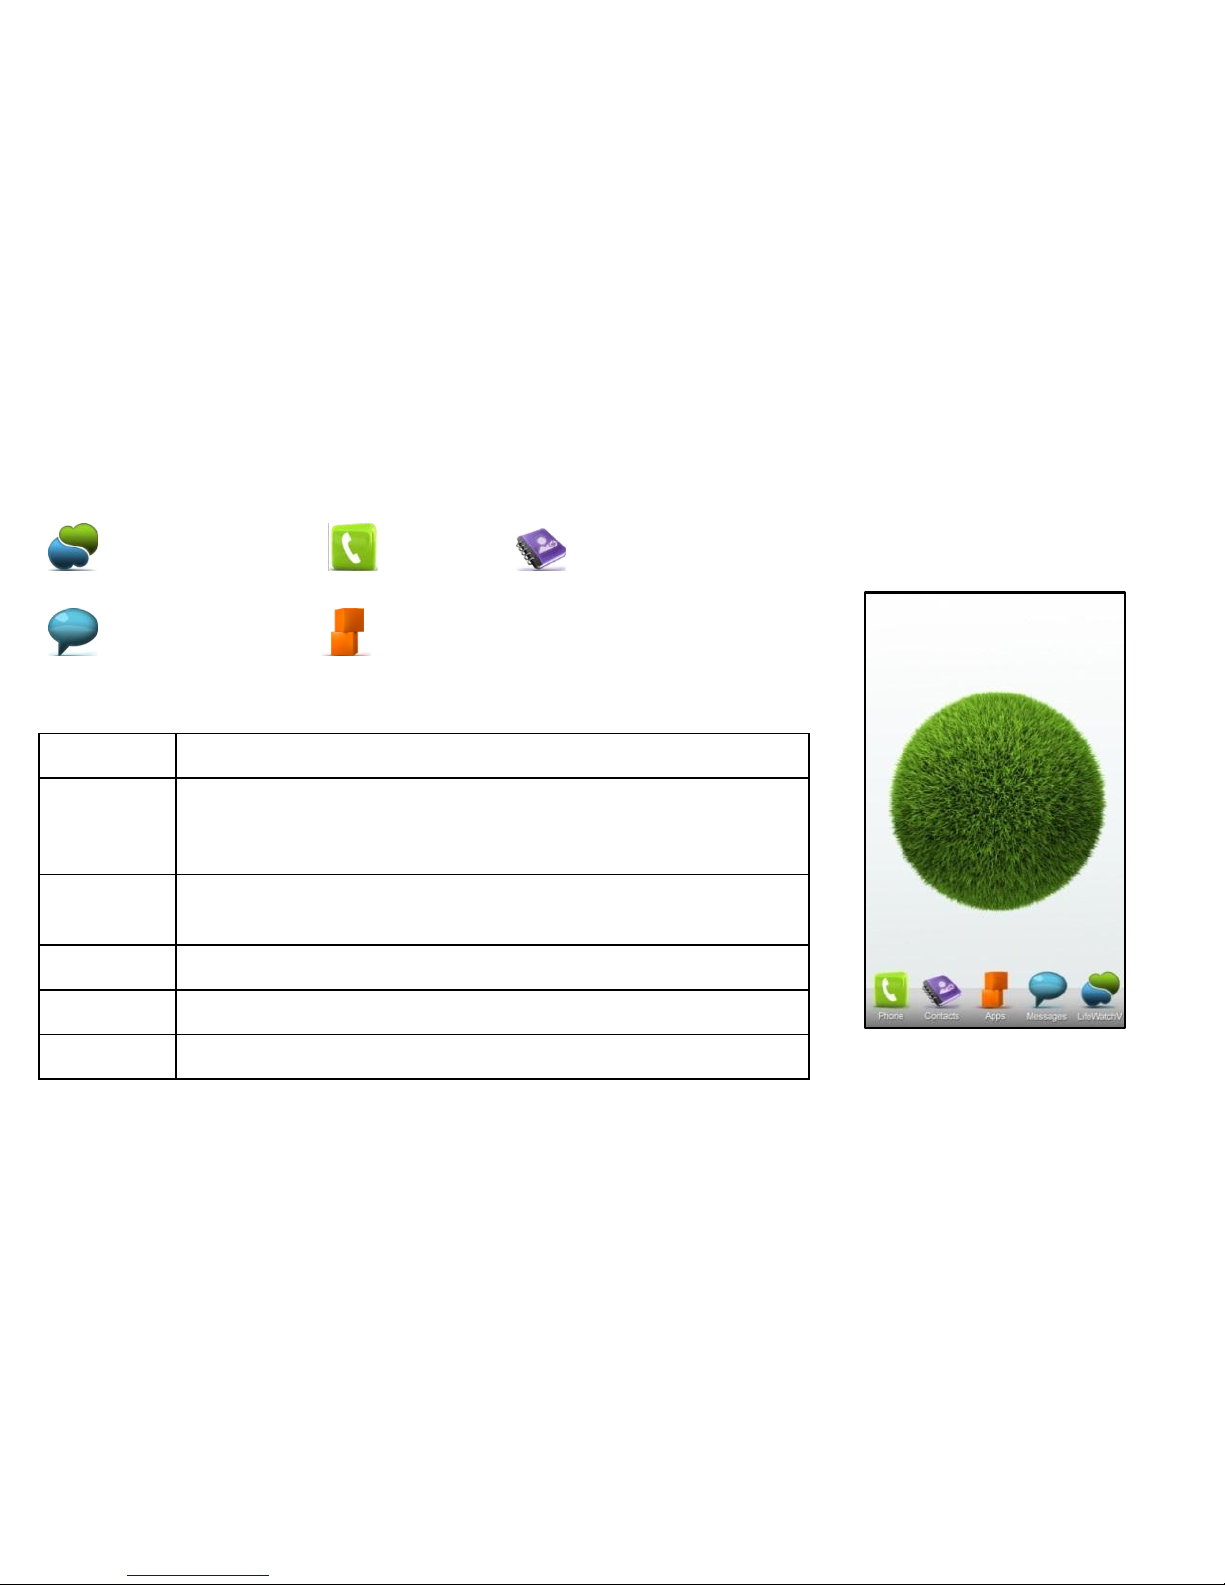
Icons
LifeWatch V icon Call icon Contacts icon
Messages icon Applications icon
Keys Explained
Key
Function
Power
• Hold to turn on or off Silent or Airplane mode, or to power off.
• Press to switch your device to Sleep mode.
• Press to wake up your device.
Home
• Press to return to the Home Screen from any application or screen.
• Hold to see recently used applications.
Menu
Press to get the options for the current screen.
Back Key
Press to go to the previous screen.
Volumes
Press or hold to turn the volume up or down.
Page 25
25
Starting up
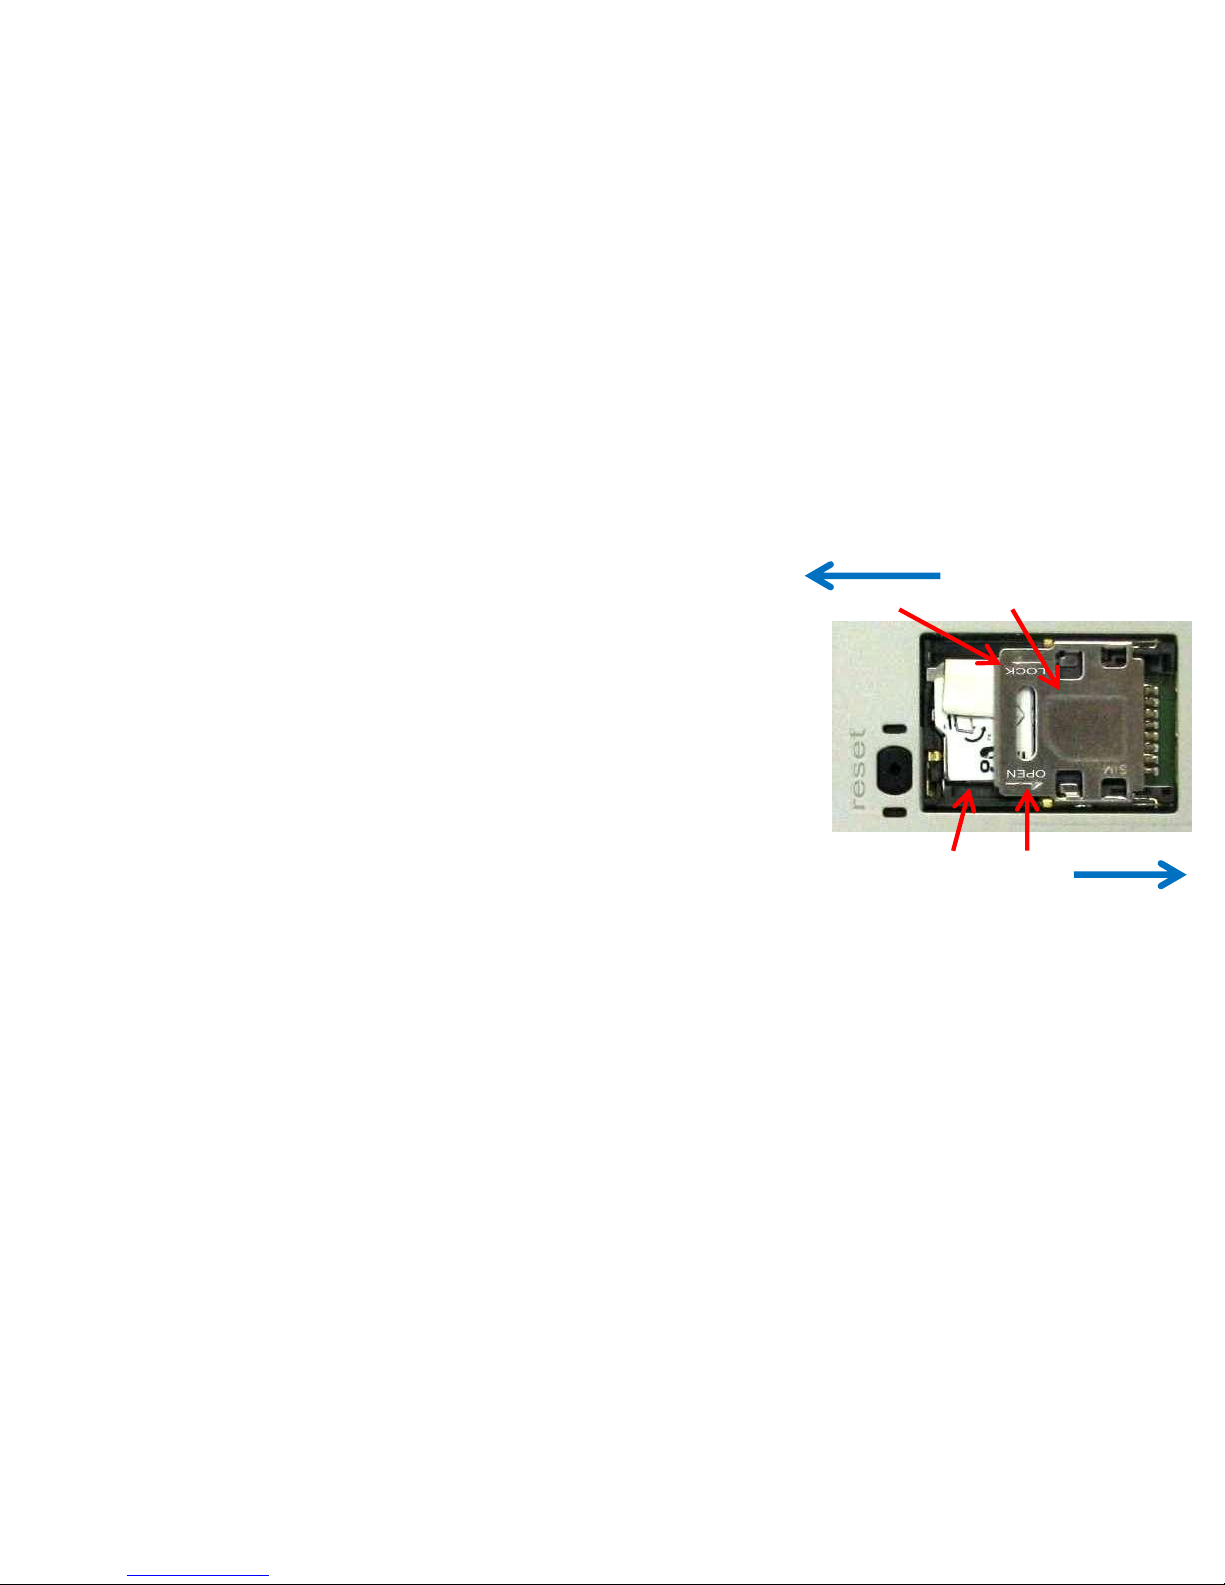
Installing the SIM/microSD Card
Switch off your device before installing, SIM, or memory card.
1. Remove the back cover.
2. Open the SIM card holder by sliding it in the direction of the
OPEN arrow.
3. Hold the SIM card by the cut corner and slip it into the card
holder.
4. Pull the microSD cover tag.
5. Hold your microSD card with the metal contacts facing down
and slide it in.
6. Press the microSD cover down.
7. Press the SIM card holder gently back into place, sliding it in
the direction of the LOCK arrow, until you hear a click.
Lock Card holder
microSD Open
Page 26

26
Removing the SIM/microSD Card
1. Switch off your device.
2. Remove the back cover.
3. Open SIM card holder by sliding it in the direction of the OPEN arrow.
4. Slide the SIM card out.
5. Pull the microSD cover tag.
6. Slide the microSD card out.
7. Press the microSD cover down.
8. Press the SIM card holder gently back into place, sliding it in the direction of the LOCK arrow, until you
hear a click.
NOTE: microSD logo is a trademark of the SD Card Association.
Page 27
27
Charging the Battery
1. Connect the supplied USB cable’s micro USB plug to the LifeWatch USB/adapter jack. Ensure that the
plug is inserted with the correct orientation. Do not force the plug into the jack.
USB input is 5 VDC: maximum 5.25VDC to minimum 4.75VDC at 1.7A max.
2. Connect the USB cable’s USB plug to the adapter.
3. Connect the adapter to a standard AC wall outlet.
4. Disconnect the adapter when the battery is fully charged.
NOTE: When you first receive your device you will need to charge the battery for 12 hours with the device
turned off.
Use only the supplied adaptor with the LifeWatch V.
Input is 100 to 240 V, ~50 to 60 Hz, 0.3A;
Output is 5 V, 0.7A, 3.5 W maximum
How much charge is in the battery?
If the battery is low, there will be a message on the screen. As you charge your device, the screen tells you
the exact battery level each time you wake up your device.
If the device is on, you can see a charging icon on the status bar. As soon as charging is finished, this icon
appears on the status bar.
Page 28

28
Switching Your Device On/Off
Hold Power to switch on your device.
To switch it off, hold Power to get the device options. Select Power off, and then tap OK.
Always place the adapter in easily accessible main plugs.
In case of electrical malfunction of device during connection to adapter, remove adapter from
main plug immediately.
Setting Up Your Device for the First Time
When you first turn on your device after you purchase it or after resetting it to factory settings, the following
should be performed:
1. If the default language needs to be changed, tap Change language and select the language you
want to use.
2. Tap the Android icon on the screen.
3. Configure the date and time options, and then tap Next.
Switching to Sleep Mode
To save battery power, Sleep Mode suspends your device setting it to a low-power-consumption state while
the display is off. Your device also goes into Sleep Mode by itself when the display is automatically turned off
after a certain amount of time. You can define the period of time in Settings > Display > Screen timeout.
Press Power to switch to Sleep Mode.
Page 29

29
Waking Up Your Device
1. Press Power to activate your screen display.
2. Drag the icon to the right.
NOTE: If you have set an unlock pattern, PIN or password for your device you’ll need to draw the pattern or
enter the PIN/password to unlock your screen.
Getting Around Your Device
Touch Control
You can use finger gestures to control your device. The controls on your touchscreen change dynamically
depending on the tasks you’re performing.
1. Tap the buttons, icons, or applications to select items or to open applications.
2. Keep your finger on an item to see the available options.
3. Flick the screen to scroll up, down, left or right.
4. Point, drag and drop to move particular items across the screen.
5. Pinch with two fingers or double-tap the screen to zoom in/out on a web page or an image. NOTE:
You can view the device screen in portrait or landscape orientation simply by holding it upright or
turning it on its side. Not all screens are viewable in landscape.
Page 30
30
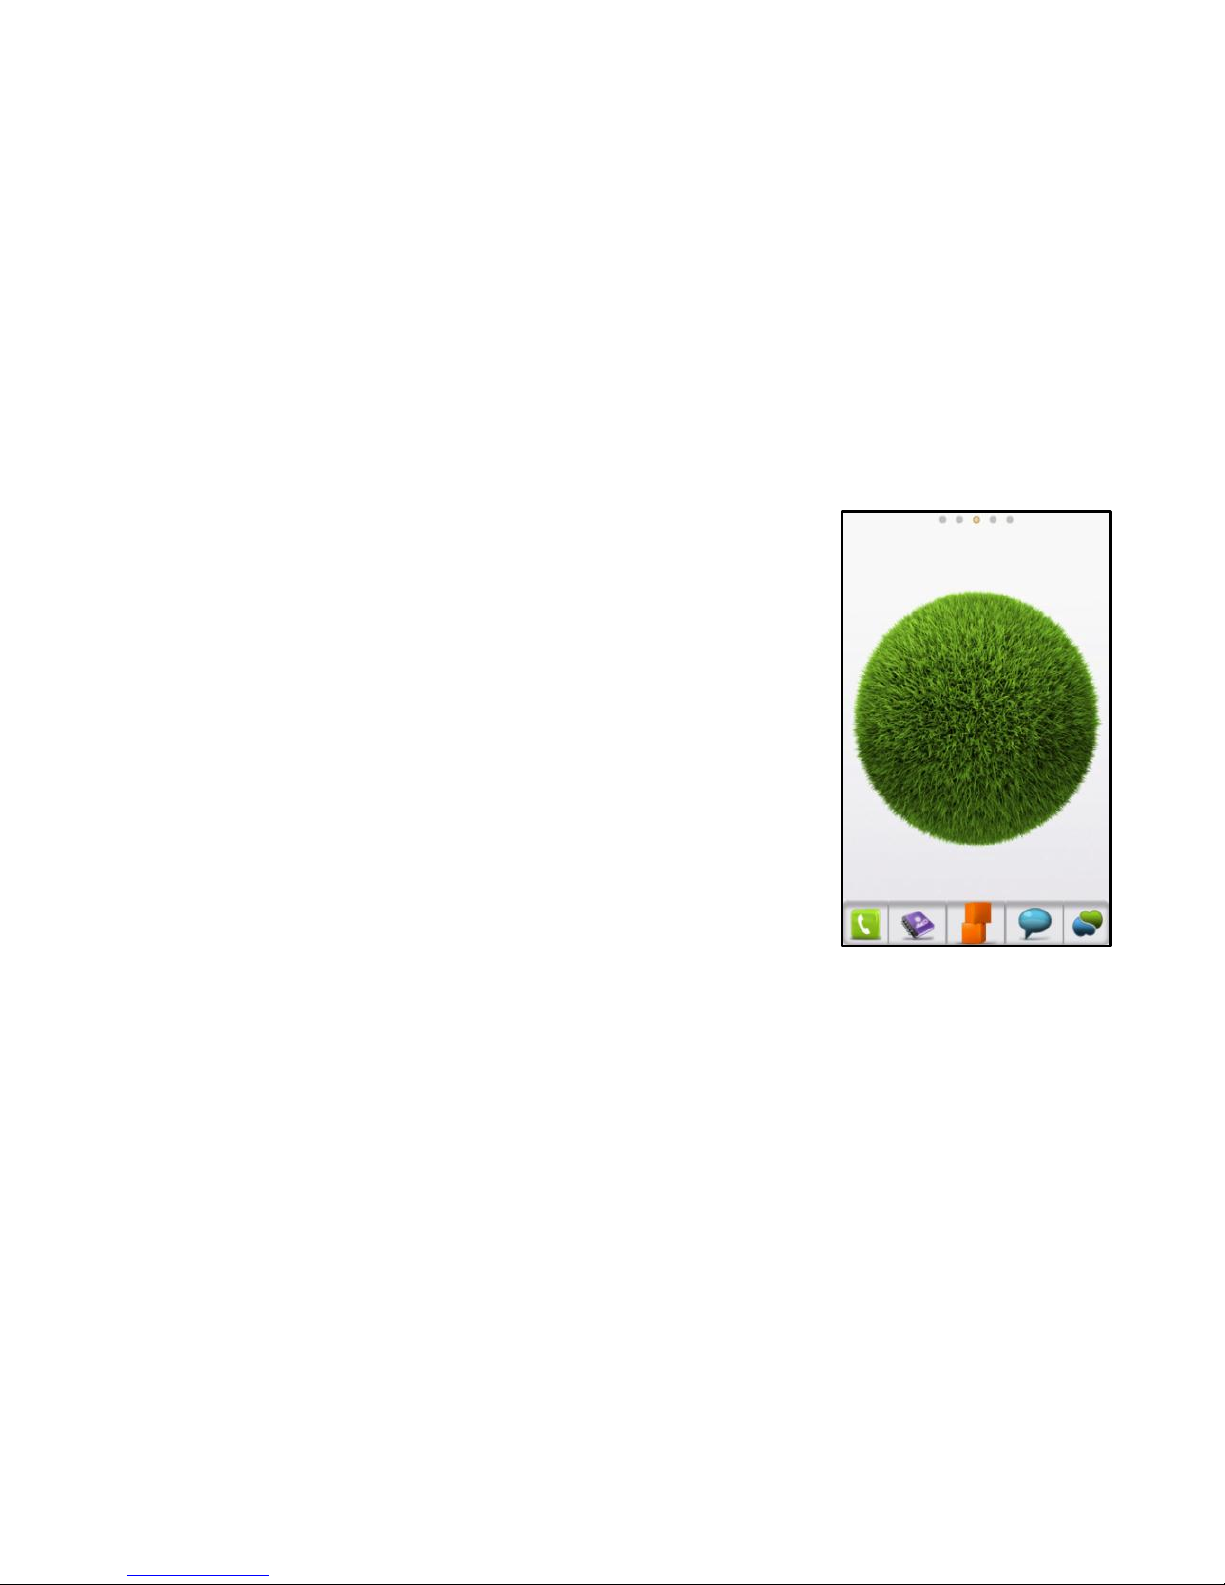
Home Screen
You can modify your Home Screen.
Set your own wallpaper, add the widgets or application shortcuts you need, or
remove them as you like.
Extended Home Screen
The Home Screen extends beyond the screen width, giving you lots more
space to add more stuff. Simply slide your finger to the left or right to see the
extended Home Screen.
Changing Your Wallpaper
1. Tap Home to return to the Home Screen.
2. Tap Menu and select Wallpaper.
3. Tap Gallery, Live wallpaper, or Wallpaper and choose the
image or animation you want to use as the wallpaper. Some
cropping may be needed for Gallery images.
4. Tap Save or Set wallpaper.
Page 31

31
Adding Items to Your Home Screen
1. Tap Home to return to the Home Screen.
2. Slide left or right to find a part of the Home Screen with free space.
3. Tap Menu and select Add.
4. You can also tap and hold the blank area of the Home Screen until the Add to Home screen
menu is displayed.
5. Select a category, either shortcuts, widgets, or folders.
6. Choose the item you want to add to the Home Screen.
Removing Items from Your Home Screen
1. Tap Home to return to the Home Screen.
2. Tap and hold the item you want to delete until the trash can appears on the screen.
3. Drag the item to the trash can .
Page 32
32
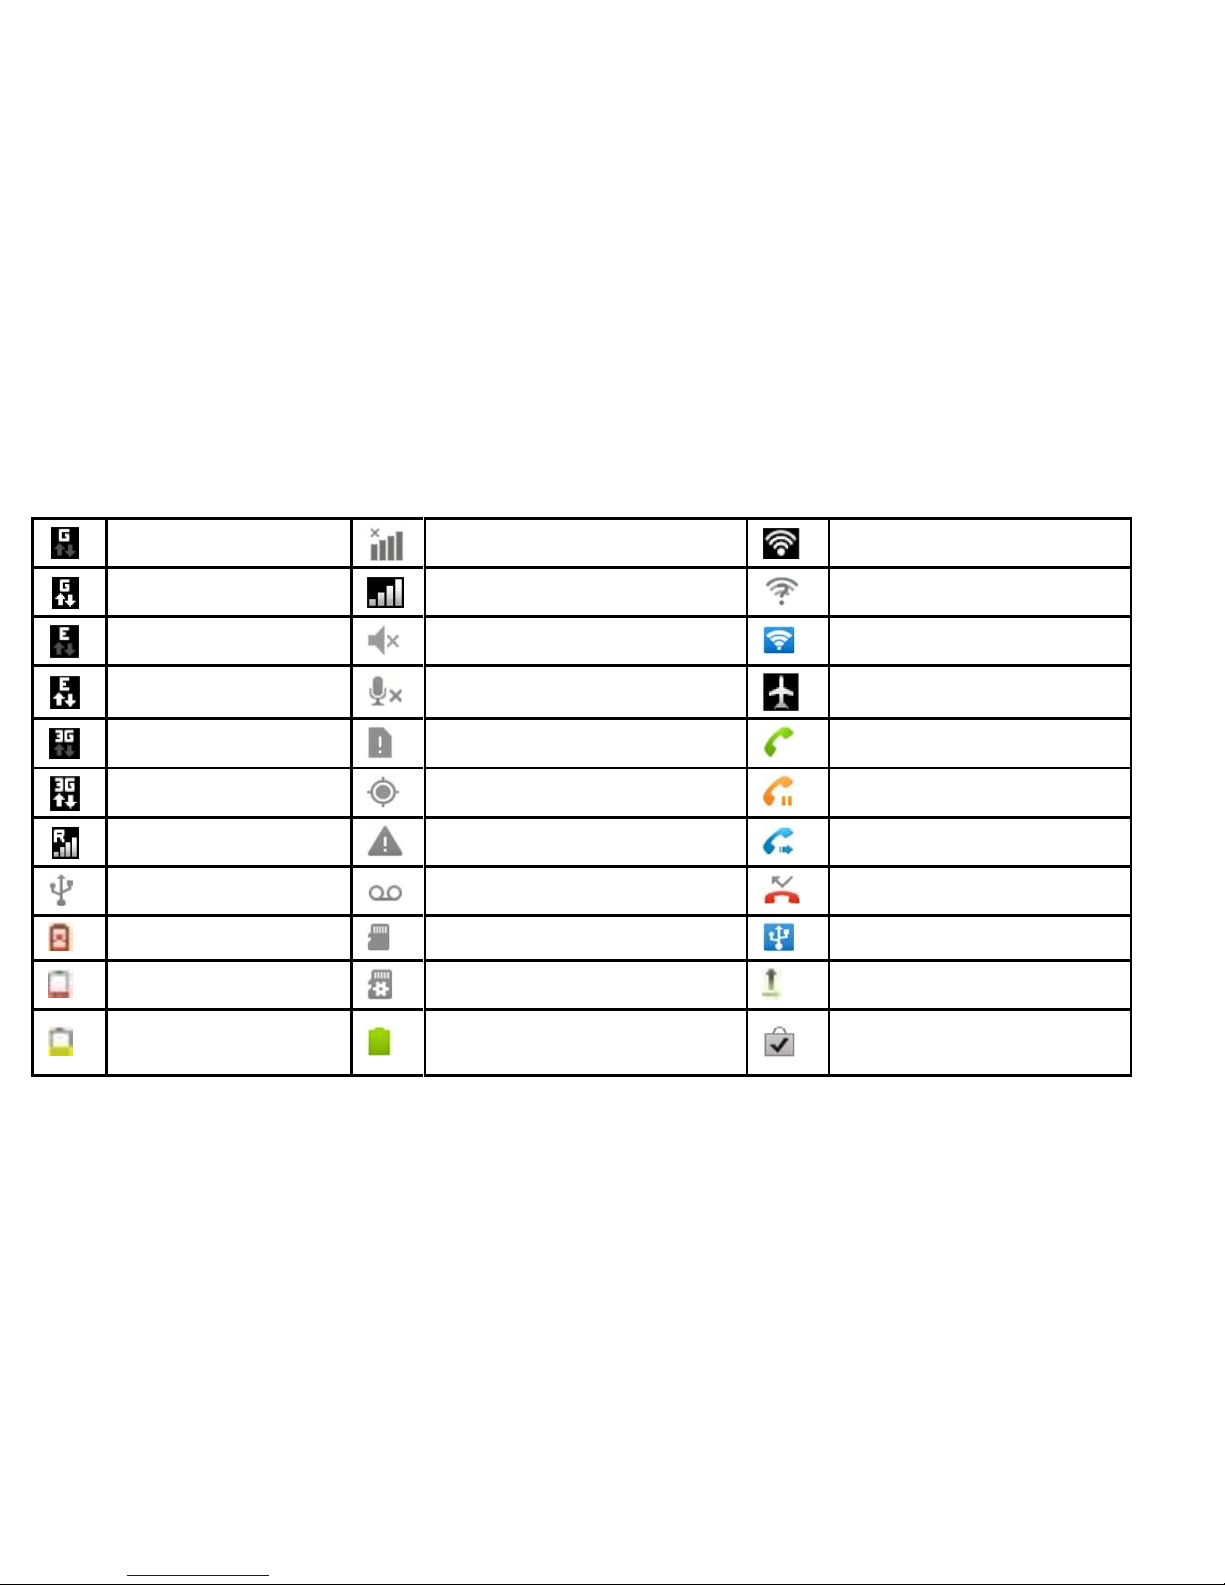
Status and Notification Icons
GPRS connected
No signal
Connected to a Wi-Fi network
GPRS in use
Signal strength
New Wi-Fi network detected
EDGE connected
Phone speaker off
Portable Wi-Fi hotspot is on
EDGE in use
Phone microphone off
Airplane mode
3G connected
No SIM installed
Call in progress
3G in use
GPS on
Call on hold
Roaming
Error or warning
Call forwarding
USB connected
Recording phone call
Missed call
Battery flat
microSD card removed
USB tethering is on
Battery very low
Preparing microSD card
Sending data
Battery low
Battery full
Content downloaded and
installed successfully
Page 33
33
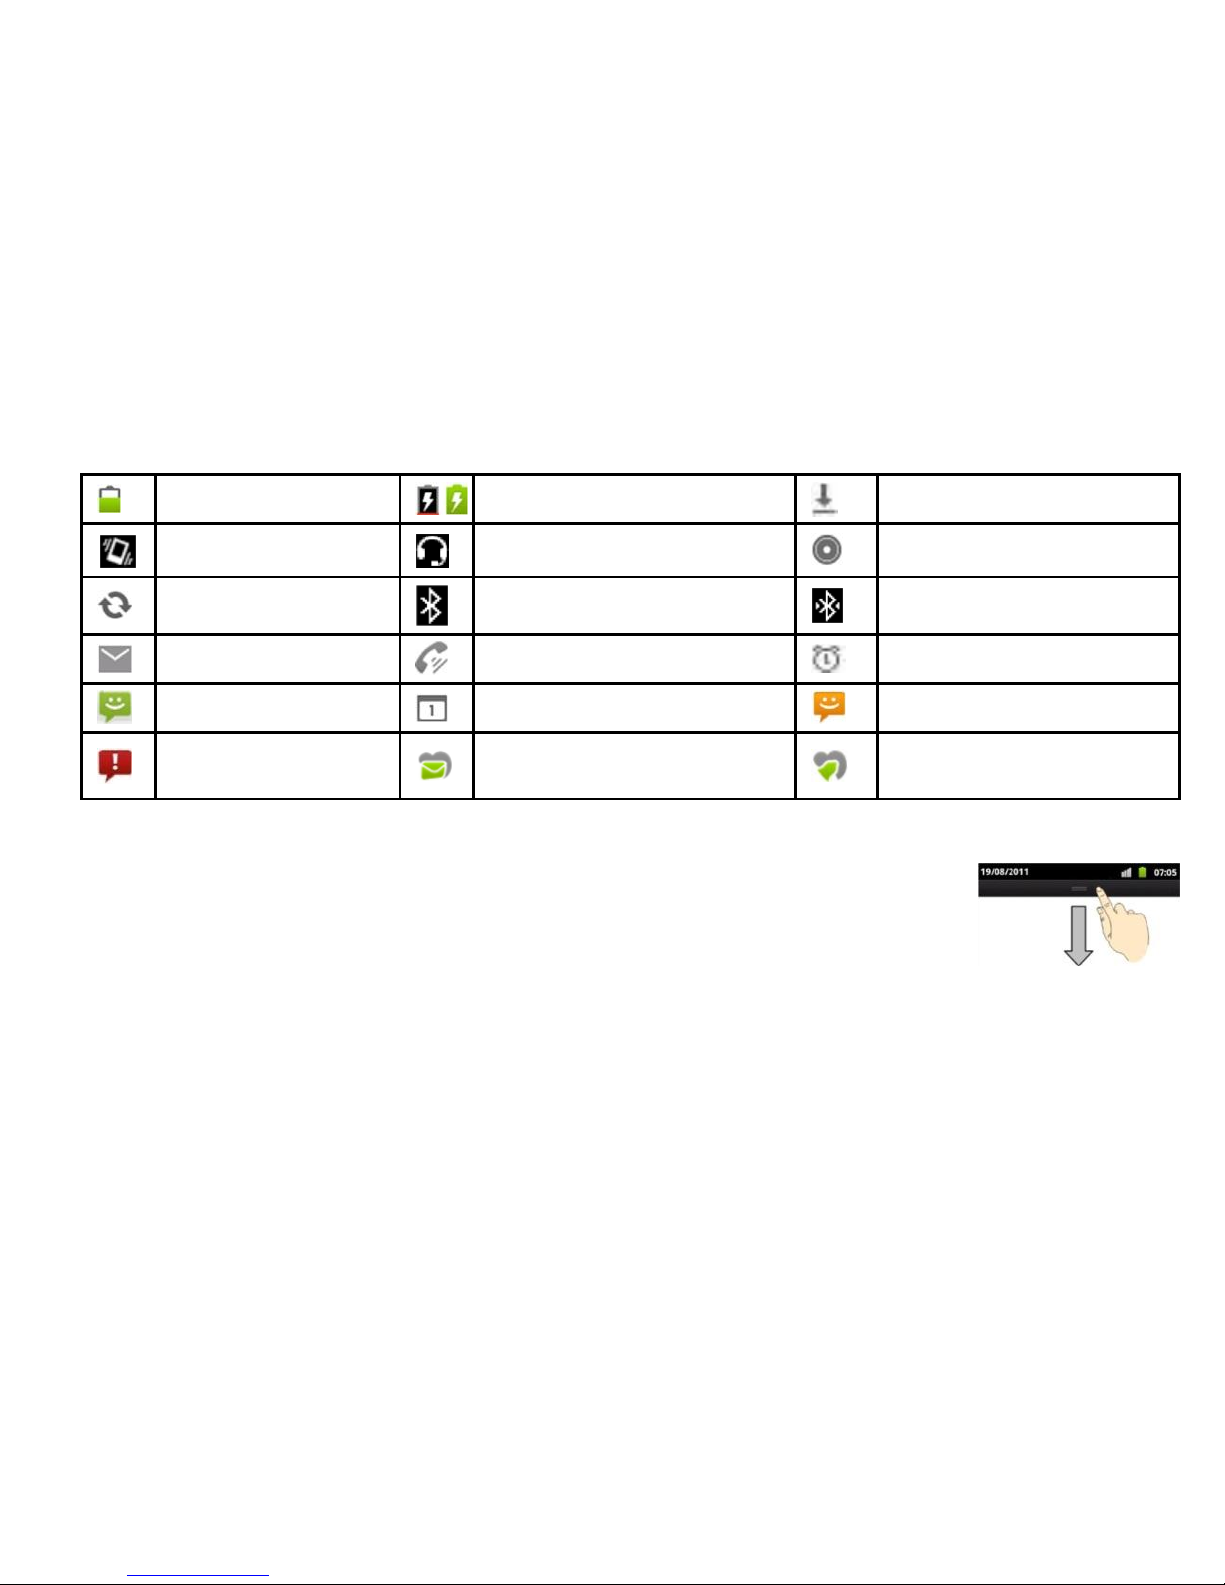
Battery partially drained
Battery charging
Downloading data
Vibrate mode
Wired headset
Song is playing
Syncing
Bluetooth on
Bluetooth connected
New mail
Speaker on
Alarm set
New MMS
Upcoming event
New SMS
Problem with
SMS/MMS delivery
ECG result notification icon
Reminder notification icon
Using the Notification Panel
Flick the status bar downwards from across the top of the screen to open the
Notification Panel, where you can see your calendar events, new messages, and
current settings – such as call forwarding or call status.
TIPS: You can also open the Notification Panel by tapping Menu > Notifications from the Home Screen.
Page 34
34
Applications and Settings
Applications
Your device has lots of functions such as shown below. Tap to see the following.
Applications
Benefit
Browser
Browse the Internet.
Calculator
Do basic calculation.
Calendar
Schedule appointments and events.
Camcorder
Shoot video clips.
Camera
Take pictures.
Contacts
Manage your contacts information.
Email
Send and receive Emails.
File Manager
Manage files on your device and microSD card.
FM Radio
Search for, listen to, and save radio channels (needs earphone).
Gallery
Manage multimedia files.
Messaging
Send and receive SMS and MMS messages.
Music
Browse your audio files and listen to them.
Places
Find restaurants, ATMs, and other businesses or attractions near you.
Page 35
35
Search
Search for information online or on your device.
Settings
Adjust device settings.
SIM Tool Kit
Appears if your SIM card provides this function.
Sound Recorder
Capture audio clips.
Videos
Browse and watch video files.
Settings
To change or view your device’s settings, tap Home > > Settings
or from the Home Screen tap Menu > Settings.
Wireless & networks
Configure and manage wireless connections, such as Wi-Fi, Bluetooth®, mobile networks,
mobile data connection sharing, and Virtual Private Networks.
Call settings
Set up fixed dialing numbers, voicemail, speed dial, call blocking, call forwarding, call
waiting, caller ID, and Internet call settings.
Sound
Set sound settings, such as ringtones and notifications.
Display
Set display settings, such as screen brightness.
Location & security
Create you screen unlock pattern, set a SIM card lock, or manage the device’s credential
storage. You can also select the sources to use when determining locations from My
Location.
Page 36
36
Applications
Manage your applications.
Accounts & sync
Manage your accounts and configure synchronization settings.
Privacy
Configure privacy settings, such as back-up and restoration, and personal data.
Storage
Check available memory on the external card and on the internal device storage.
Language & keyboard
Set operating system language, region and text input options.
Voice input & output
Set up voice recognition and text-to-speech options.
Accessibility
Set up accessibility options after installing accessibility-related applications.
Date & time
Set the date, time, time zone, and date/time format.
About phone
View device status, battery use, and legal information. You can also check for system
updates.
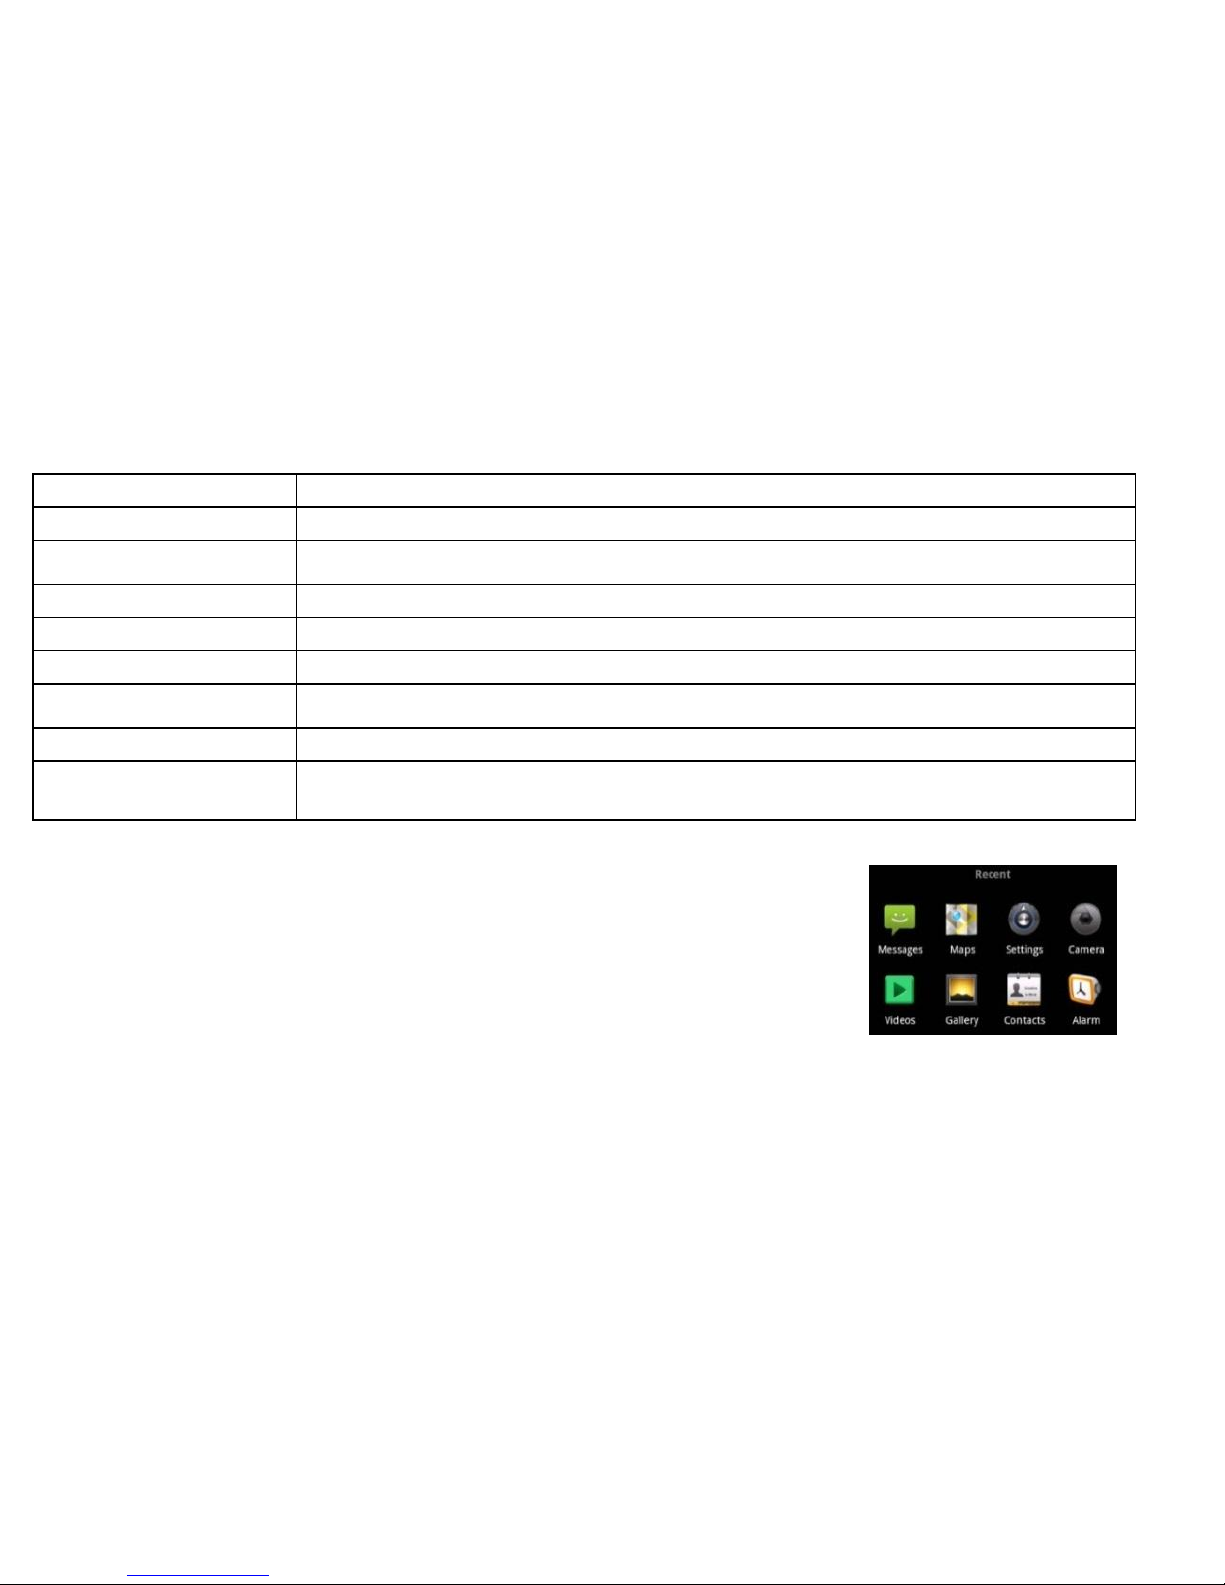
Opening Recently-Used Applications
1. Hold Home from any screen. The device displays application icons
you have recently used.
2. Tap the application you want to open.
Page 37
37
Phone Calls
Dialer Screen
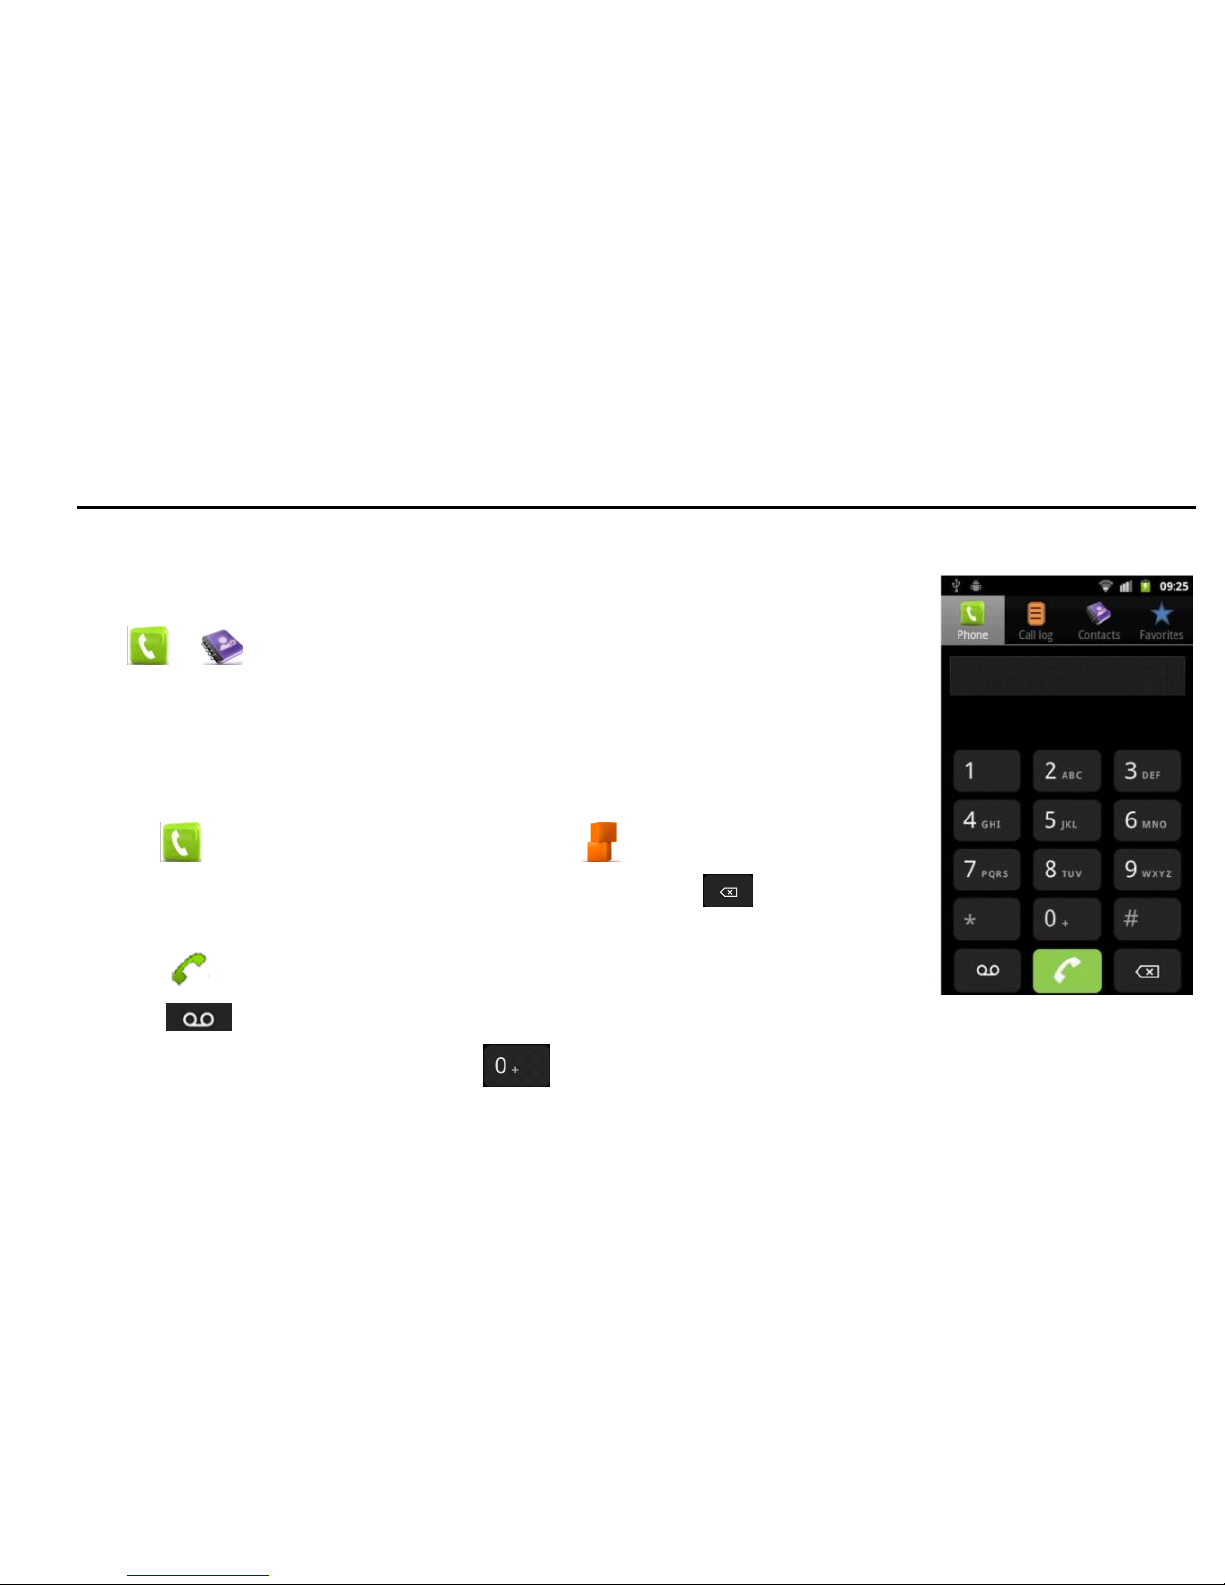
This screen is used for phone call actions.
Tap or on the Home Screen to open the dialer.
You can select dialing, check voicemail, view call log, contacts and favorite
numbers.
Making Calls
Calling from the Dialer
1. Tap on the Home Screen or tap Home > > Phone.
2. Enter the phone number with the on-screen keypad. Tap to delete
wrong digits.
3. Tap to initiate the call.
4. Tap to dial to your voicemail.
TIPS: To make international calls, hold to enter the “+”.
Page 38
38
Calling from Your Contacts
1. Tap on the Home Screen or tap Home > > Contacts.
2. Slide your finger to scroll the contacts list and tap the contact you want to call. You can search for a
contact by tapping on the bottom of the screen.
3. Tap to initiate the call.
Calling from Your Call History
1. Tap or on the Home Screen, select call log or Home > > Call log.
2. Tap next to the number you want to call.
Calling from a Text Message
You can make the call while viewing the text message.
1. Tap on the Home Screen or Home > > Messaging.
2. Tap the conversation and then the message that contains the phone number you need.
3. Tap the number.
4. Tap to initiate the call.
Page 39
39
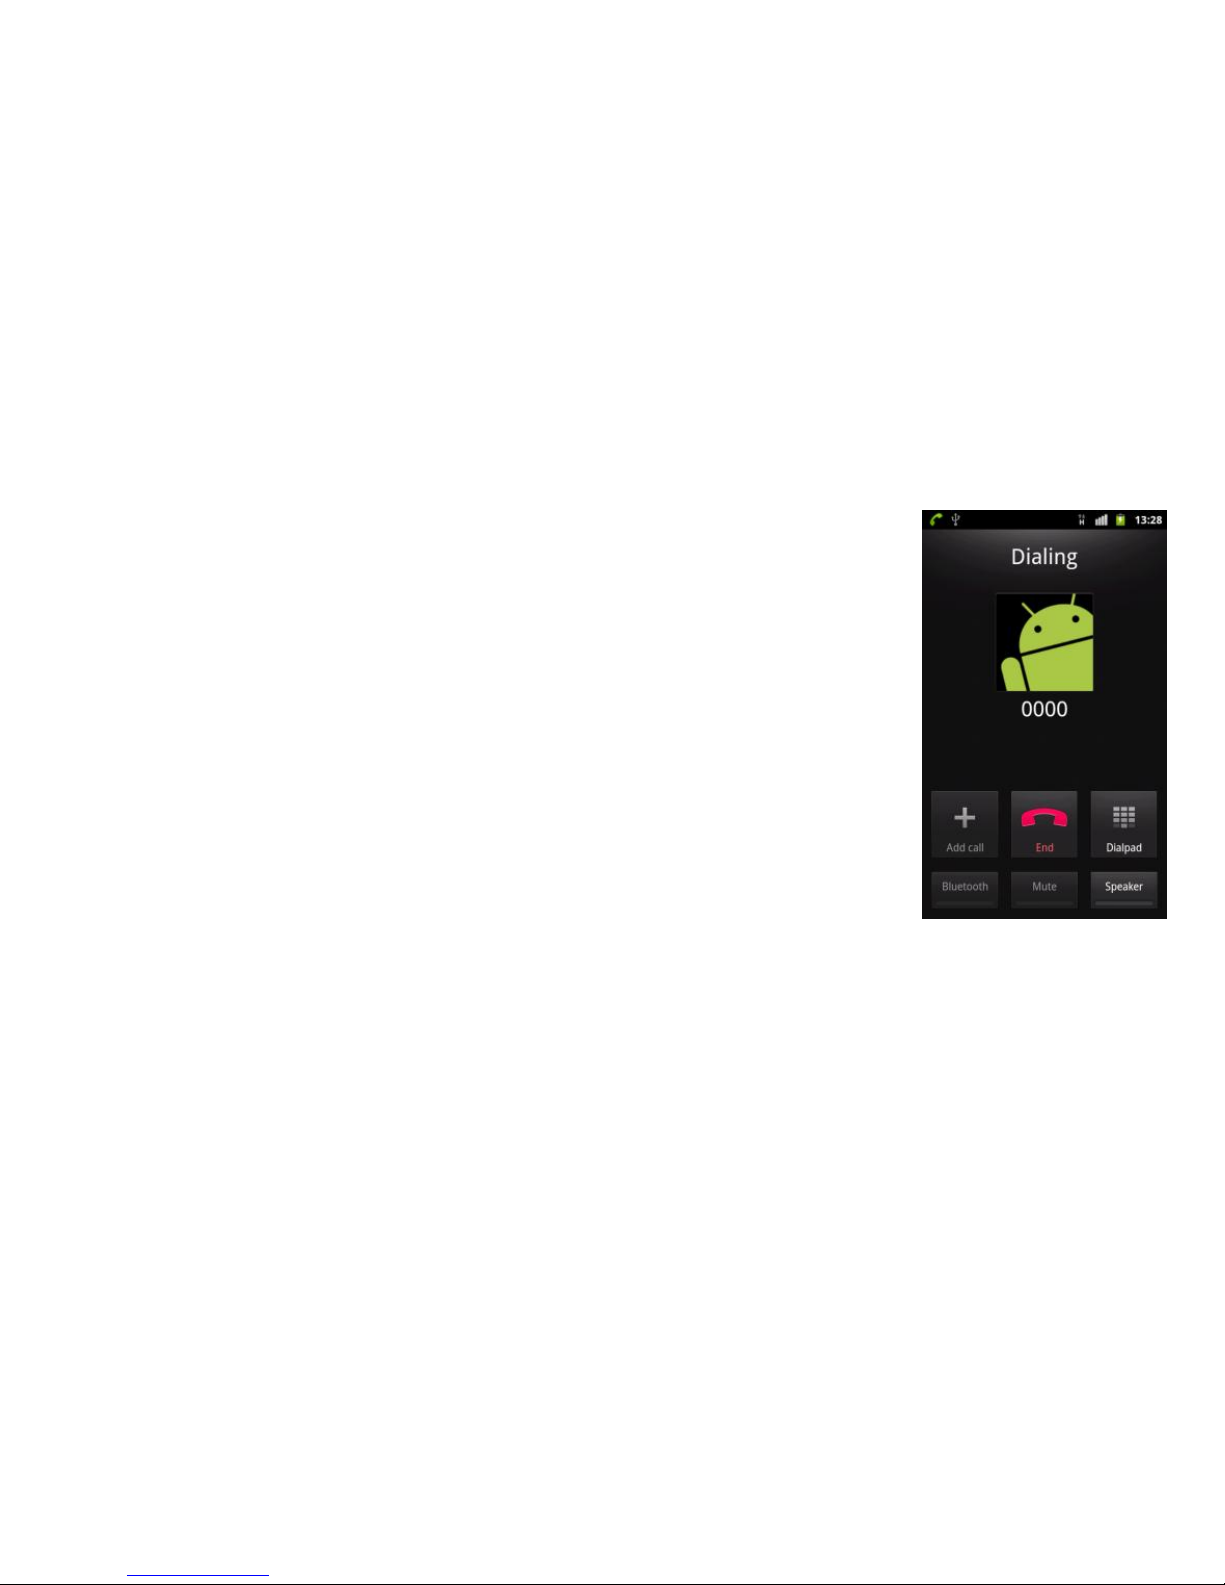
Call Screen
This appears during a call, you are able to perform the following:
Dialpad - Open dialer
End call
Add call (conference call)
Speaker – switch between speaker and loud speaker
Mute – turns off the device microphone
Bluetooth – connects to a Bluetooth handsfree or earphone device
Page 40
40
Receiving Calls
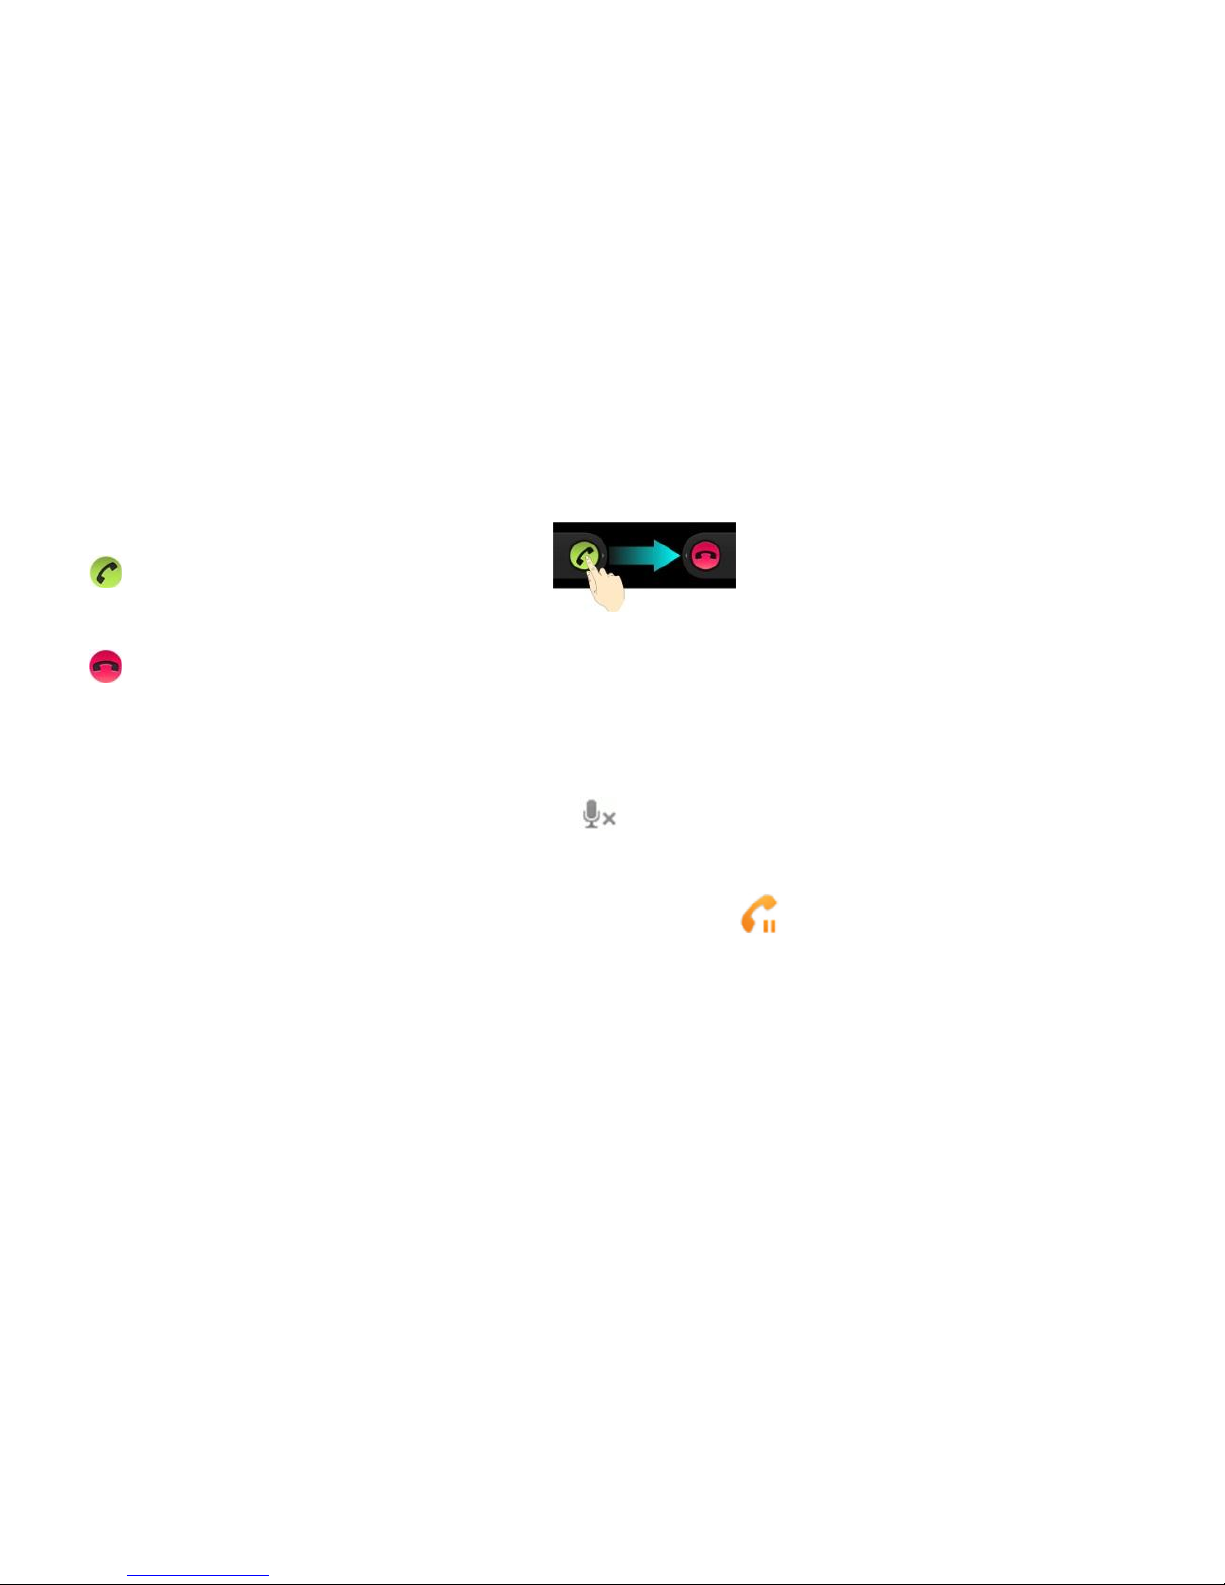
Answering a Call
Drag to the right to answer the call.
Rejecting a Call
Drag to the left to reject the call.
Muting a Call
During a call, you can mute your microphone so that the person you are speaking to cannot hear you, but
you can still hear them:
Tap Mute to turn your microphone off. The mute icon appears on the status bar. To turn your
microphone back on, tap Mute again.
Putting a Call on Hold
During a call, you can place it on hold by tapping Menu > Hold. The icon appears on the screen.
TIPS: If you accept an incoming call while you’re on another call, the first call is automatically placed on hold.
Just tap Menu > Swap calls to switch between the two callers.
Page 41
41
Turning the Speakerphone On/Off
Tap Speaker during a call to turn the speakerphone on. This icon appears in the status bar. Tap
Speaker again to turn off the speakerphone.
Ending a Call
Tap to finish a call.
Adjusting Your Call Settings
From the Home Screen, you can open the call settings menu by tapping Menu > Settings > Call settings >
Call Feature Settings.
Fixed dialing numbers
Restrict outgoing calls to a fixed set of numbers. To do this you must know your SIM’s
PIN2 code.
Voicemail service
Select a voicemail service provider.
Voicemail settings
Specify a voicemail number.
Call forwarding
Forward your incoming calls to a different number. And choose when to forward: Always
forward; Forward when busy; Forward when unanswered, or Forward when
unreachable.
Additional settings
Caller ID
Choose whether people you call can see your number.
Call waiting
See new incoming calls while you’re on another call.
Accounts
Set up Internet calling (SIP) accounts.
Use Internet calling
Choose when to use the Internet calling function.
Page 42

42
Contacts
You can add contacts to your device and synchronize them with the contacts in your account that support
contact syncing.
To see and edit your contacts, tap on the Home Screen or Home > > Contacts.
Importing and Exporting Contacts
You can import or export contacts from/to your SIM card or microSD card. This is especially useful when you
need to transfer contacts between different devices.
Importing Contacts from the SIM Card or Exporting to the Card
1. Tap Menu > More > Import/Export from the Contacts Screen.
2. Choose Import from SIM card or Export to SIM card. Your device automatically displays the contacts.
3. Tap the contacts you want to import or export.
Or, just tap Menu > Select all.
4. Tap OK.
Importing/Exporting Contacts from/to the microSD Card
1. Tap Menu > More > Import/Export from the Contacts Screen.
2. Choose Import from SD card or Export to SD card.
Page 43

43
For import, you should have vCard files saved in the microSD card. If there’s more than one vCard
file, you need to select the vCard file and tap OK.
For export, the device will prompt you with the name of the vCard file. Tap OK to create the file on
the microSD card.
Sharing Contacts Information
1. Tap Menu > More > Import/Export > Share visible contacts from the Contacts Screen. Your device
will export all the information for the contacts listed in the Contact Screen to a temporary vCard file.
2. Choose how you want to send the vCard file. You can send it via Bluetooth, mail or messages.
Creating a Contact
1. Tap Menu > New contact from the Contacts Screen.
2. Enter the Contact Name, Phone numbers, and other information.
3. Tap Done to save the contact.
Adding a Contact to Favorites
1. In the Contact Screen, tap and hold the contact you want to add to Favorites.
2. Tap Add to favorites from the pop-up menu.
TIPS: You can also tap a contact and then tap next to the contact’s name to add it to Favorites.
Page 44

44
Searching for a Contact
1. Tap Menu > Search at the bottom of the Contacts Screen.
2. Input the name you seek. The matching contact(s) are listed.
Creating a New Group
1. Tap Menu > More > Group Management from the Contacts Screen.
1. Tap Menu > New Group.
2. Enter the group name and tap Done.
3. Tap Add Member.
4. Tick the check boxes next to the contacts you want. Then tap OK.
To send messages to the group members, you can tap the group and select message recipients from the
listed group members.
Entering Text
When you need text or numbers, a keyboard automatically appears on the screen. You can also press the
Back Key or hold Menu to hide the onscreen keyboard.
Page 45
45
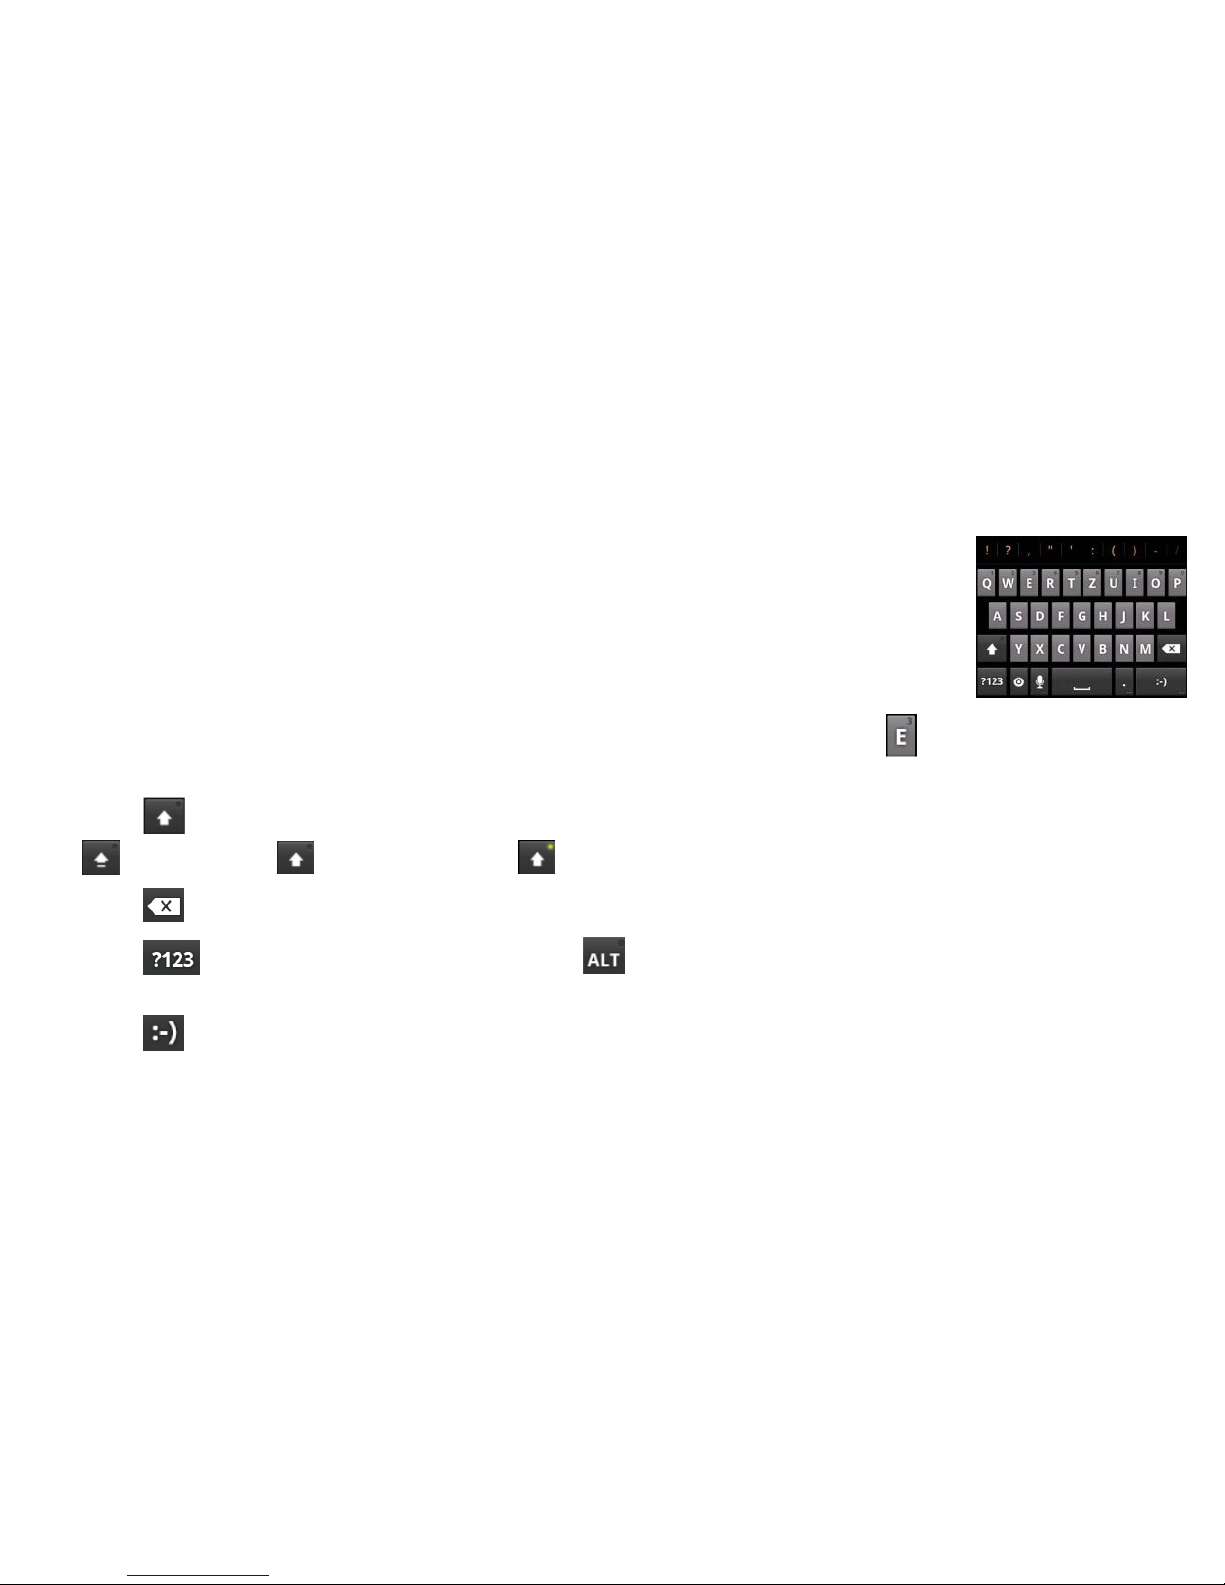
Android Keyboard
The Android Keyboard provides a layout similar to a desktop computer keyboard. Turn the device sideways
and the keyboard will change from portrait to landscape.
In order to select the keyboard type, hold the input box and select Input method
from the pop-up menu to change the input method.
To use the landscape keyboard, just tick the Auto-rotate screen check box in
Settings > Display. (The landscape keyboard is not supported in all applications.)
• Tap the alphabetic keys to enter letters. Tap and hold some specific keys to enter
associated accented letters or numbers. For example, to enter È, tap and hold and the available
accented letters and number 3 appear. Then slide to choose È.
• Tap to use uppercase or lowercase. This key also changes to indicate the current case you are using:
for lowercase, for uppercase, and when locked in uppercase.
• Tap to delete the text before the cursor.
• Tap to select numbers and symbols. Tap to see more choices. Often used symbols are
displayed on top of the keyboard. Flick left or right to find the digit/symbol you need and tap to enter.
• Tap to enter a smiley face; hold the key and swipe to choose more emoticons.
Page 46
46
• Tap to change input method or to set up the Android keyboard.
• Tap to use Google’s networked voice input.
Messaging
Your SMS (text message) and MMS (multimedia messaging service) are combined into one menu, tap
on the Home Screen or Home > > Messaging.
The Message Box
All your messages both those you have sent and those you have received are located in the Message box.
Messages with the same number are grouped into a single thread in the Messages Screen. You can tap a
thread to see the conversation you have had with someone.
Message threads are sorted in chronological order with the newest message on top.
Sending a Message
1. Tap on the Home Screen or Home > > Messaging.
2. Tap New message.
3. Enter the recipient’s number or name. As you type, matching contacts appear. Tap a suggested contact to
add as a recipient.
Page 47

47
4. Tap Type to compose and type your message.
Tap Menu to insert Quick Text, signature, smiley, or contact.
If you are sending an MMS, tap Menu to add a subject, or attach pictures, videos, audios, or
slideshows.
5. Tap Send to send your message.
NOTE: When you add an attachment to a text message it is automatically converted into an MMS. Likewise
if you remove all attachments and the subject from an MMS, it automatically becomes a text message.
Messaging Settings
The device’s message settings are pre-configured for your immediate use. To change them, tap Menu >
Settings from the Messaging Screen.
Storage settings:
Delete old messages: Select to delete old messages when you reach your storage limits.
Text message limit: Set the maximum number of text messages allowed in a single thread.
Multimedia message limit: Set the maximum number of multimedia messages allowed in a single
thread.
Text message (SMS) settings:
Delivery reports: Request a delivery report for every text message you send.
Page 48

48
Manage SIM card messages: Manage the messages saved to your SIM card.
Multimedia message (MMS) settings:
Delivery reports: Request a delivery report for every MMS message sent.
Read reports: Request a read report for each MMS message sent.
Auto-retrieve: Automatically retrieve MMS messages.
Roaming auto-retrieve: Automatically retrieve MMS messages when you’re roaming.
Notification settings:
Notifications: Show message notifications in the status bar.
Select ringtone: Choose a ringtone for your incoming messages.
Vibrate: Make your device vibrate when a new message arrives.
Cell Broadcast:
GSM/UMTS Cell Broadcast: Configure GSM/UMTS CB messages.
NOTE: Tap Menu > Restore default settings to change all the message settings back to the original.
Email
Tap Home > > Email. use the Email Screen to setup your Email account and to exchange Emails.
Page 49

49
Creating an Email Account
1. When you open Email for the first time, enter your Email address and password. Then tap Next.
2. Select your account type and tap Next.
3. Edit the settings for the incoming server and the outgoing server.
Tap Next. Your device will connect to the Internet and verify the settings before proceeding to the next
step. Please contact your mobile service provider and Email service provider for additional help.
NOTE: Your device knows the client settings for many Email service providers. If the Email you use is from
those providers, the device will automatically configure the incoming and outgoing settings after you enter
your Email address and password.
4. Set the Email checking frequency, download options, account name and other settings. Tap Done
when you finish.
Your Email account’s inbox appears and the device will download your Email messages.
TIPS: To add more Email accounts, open Email to get the Inbox screen. Then tap Menu > Accounts >
Menu > Add account.
Receiving Emails
Press Menu > Refresh to download recent Emails. Select Load more messages located at the bottom of
the Email list to download earlier messages.
Page 50

50
Composing and Sending an Email
After creating an Email account, you can compose and send Email messages.
1. Tap Menu > Compose from the Inbox Screen.
2. Tap To and enter the recipient’s address. When you start to enter an address, auto-complete suggests
matching contacts. Select one or more. Separate each recipient with a comma.
TIPS: You can also tap Menu > Add Cc/Bcc to add more recipients.
3. Enter the subject and the content of your Email. If necessary, change the email priority.
Tap Menu > Add attachment to add files to the Email.
4. Tap Send.
Replying to or Forwarding an Email
1. Open the Email you want to reply to or forward in the Inbox Screen.
2. Tap Reply to start a reply or Menu > Forward to reply to/forward the Email.
You can also tap Reply all to reply to all the email's recipients.
3. Enter/edit the contents/recipients of your Email.
4. Tap Send.
Page 51

51
Deleting an Email Account
1. Open the Email application. If there is only one account, tap Menu > Accounts to get the Accounts
list.
2. Tap and hold the account you want to delete and select Remove account from the pop-up menu.
3. Tap OK to confirm.
Email Settings
Tap the account you want to configure in the Accounts Screen and tap Menu > Account settings. You can
obtain the settings for the Email account. You can also tap Menu > System settings to set up storage,
exchange and other settings.
Getting Connected to the Internet
Your device’s impressive networking capabilities allow you to access the Internet or your corporate network
with ease. You can use the default connection settings to connect to the Internet via your mobile network
(GPRS/EDGE/3G), or via Wi-Fi.
The GPRS/EDGE/3G connection can be enabled/disabled manually. Just select Home > > Settings >
Wireless & networks > Mobile networks from the Home Screen and select or clear the Data enabled
check box.
Page 52

52
Adding a New GPRS/EDGE/3G Connection
To connect via GPRS/EDGE/3G you need a data plan with your service provider. Also if the
GPRS/EDGE/3G settings are not pre-configured on your device, please contact your provider to get the
necessary information.
1. Tap Home > > Settings > Wireless & networks > Mobile networks > Network Settings >
Access Point Names.
2. Tap Menu > New APN.
3. Tap each item to enter the information you received from your service provider.
4. Tap Menu > Save to complete.
TIPS: To set the APN to default settings, tap Menu > Reset to default.
Turning On Wi-Fi
Wi-Fi provides wireless Internet access.
1. Tap Home > > Settings > Wireless & networks.
2. Tick the Wi-Fi box to turn it on.
Page 53

53
Connecting to a Wi-Fi Network
1. Tap Home > > Settings > Wireless & networks > Wi-Fi settings.
The Wi-Fi access points, or “hotspots”, that your device has detected are displayed with their names
and security settings.
2. Tap an access point to form a connection.
If security features are implemented, you’ll need to enter a password.
Checking the Wi-Fi Network Status
You can check the Wi-Fi network by looking at the icon in the status bar.
Or tap the access point that the device is currently connected to in Wi-Fi settings. You can then check the
network status from the pop-up window.
Using the Device as a Wi-Fi Hotspot
You can use the device as a portable WLAN router, providing Wi-Fi connection for one or multiple PCs or
other devices. The function needs a data connection to a mobile network and may result in data charges.
TIPS:
The PC accesses the Internet via the device’s mobile network. Make sure to set up the
GPRS/EDGE/3G connection correctly before you try to use the device as a Wi-Fi hotspot.
Page 54

54
When the portable Wi-Fi hotspot function is enabled, you cannot access the Internet with any
application on your device via its Wi-Fi connection.
Enabling the Wi-Fi Hotspot
1. Tap Home > Menu > Settings > Wireless & networks > Tethering & portable hotspot and tick the
Portable Wi-Fi hotspot check box.
2. Tap Portable Wi-Fi hotspot settings > Configure Wi-Fi hotspot.
3. Change the name of the hotspot and its security settings, if necessary. The default hotspot is an open
one. You can tap Open and choose WPA2 PSK to set up a password. The password must have at
least 8 characters.
4. Tap Save. Now you can find the hotspot on other devices and connect to it.
Disabling the Wi-Fi Hotspot
Tap Home > Menu > Settings > Wireless & networks > Tethering & portable hotspot and clear the
Portable Wi-Fi hotspot check box.
Browsing the Internet
You can use your device to connect to the Internet via a GPRS, EDGE, 3G, or Wi-Fi connection.
Tap Home > > Browser.
There are different ways to open web pages:
Tap the address bar to enter the website you want to browse. Then tap Go.
Page 55

55
Tap beside the address bar or tap Menu > Bookmarks. Select the bookmarked webpage you want to
open.
Tap beside the address bar or tap Menu > Bookmarks. Choose an item from the Most visited tab or
History tab.
Browsing Options
Press Menu to access the following options when browsing web pages.
Open a New window for web browsing.
Access Bookmarks, most visited web sites, and browsing history.
Switch browsing Windows.
Refresh the current web page.
Tap More to forward to the next web page, add bookmarks, search for text, select text, share page
URL, check page info or download history, or configure browser settings.
Tap and hold a URL link in a web page to open, bookmark, save, share the link, or to copy the link URL.
Page 56

56
Using Bookmarks
To bookmark a web page, open it and tap or Menu > Bookmarks. Then tap Add or Add bookmark.
Give the bookmark a name and tap OK.
TIPS: You can press Menu > List view/Thumbnail view to change how you view bookmarks on your device
screen.
Editing a Bookmark
1. Open a Browser window.
2. Tap or Menu > Bookmarks.
3. Select an item you want to edit and press it until the shortcut menu pops up.
4. Select Edit bookmark.
5. Edit the name or location, and then tap OK to save.
Deleting a Bookmark
1. Open a Browser window.
2. Tap or Menu > Bookmarks.
3. Select an item you want to delete and press it until the shortcut menu pops up.
4. Select Delete bookmark and tap OK to confirm.
Page 57

57
Changing Browser Settings
Tap Menu > More > Settings from a browser window to change browser settings.
Bluetooth®
Bluetooth® is a short-range wireless communication technology. Phones or other devices with Bluetooth
capabilities can exchange information wirelessly within a distance of about 10 meters. The Bluetooth devices
must be paired before the communication is performed.
Turning Bluetooth On/Off
Tap Home > > Settings > Wireless & networks and select Bluetooth. When Bluetooth is on, the
icon appears in the status bar.
If you want to turn Bluetooth off, just clear the Bluetooth check box.
NOTE: If you switch off your device while Bluetooth is turned on, when you switch on the device again,
Bluetooth turns on automatically.
Making Your Device Visible
In order to work with other phones or devices that have Bluetooth, you need to make your device ‘visible’ to
them.
1. Tap Home > > Settings > Wireless & networks > Bluetooth settings.
Page 58

58
2. Select Bluetooth if it isn’t already selected.
3. Select Discoverable to make your device visible for 120 seconds. To make your device ‘invisible’,
simply clear the Discoverable check box.
Changing the Device Name
When your device is visible to other Bluetooth devices it listed by its name, and you can choose – for
example: ‘Ben’s Phone’.
1. Tap Home > > Settings > Wireless & networks > Bluetooth settings.
2. Select Bluetooth if it is not already selected.
3. Tap Device name.
4. Edit the name and tap OK.
Pairing With Another Bluetooth Device
To pair with another Bluetooth device, you need to turn the Bluetooth function on, for both devices and make
the other Bluetooth device visible.
1. Tap Home > > Settings > Wireless & networks > Bluetooth settings.
2. Tap Scan for devices. Your device will show all visible Bluetooth devices (in range) in its Bluetooth
devices list.
3. Select the device you want to pair with.
Page 59
59
4. If required, enter your PIN and tap OK.
If a PIN is required, the same PIN should be entered on the other device.
Making the Most of Multimedia
Taking Pictures with Your Camera
Your device has a 5-megapixel camera. Open it by tapping Home > > Camera. Tap to take a
picture. To view it, just tap the picture in the right corner of the screen. Or select Menu > Gallery to view
your pictures.
Adjusting Camera Settings
From the Camera Screen tap to set up focus mode, exposure, picture size/quality, color effect, ISO, antibanding, saturation, contrast, sharpness, and to restore camera settings.
Tap or to choose whether to save the photo’s geographic location.
Tap to change the white balance.
Tap or to turn on or off flash.
Tap 1x to zoom in or out.
TIPS: To change quickly from camera to camcorder or vice versa, use the switch icon. Use the
bar to adjust the brightness.
Page 60
60
Shooting Video with Your Camcorder
Open the camcorder by tapping Home > > Camcorder. Then tap to start shooting, and tap to
stop. Select the picture in the right corner of the screen to view the video you’ve just shot. Or tap Menu >
Gallery to see all your video clips.
Adjusting Camcorder Settings
From the Camcorder Screen, tap to adjust color effect, video quality, video/audio encoder, video
duration, and restore camera settings.
Tap to change the white balance setting.
Tap to change video quality, video/audio encoder, and video duration together, including High, Low,
MMS, YouTube, and custom mode.
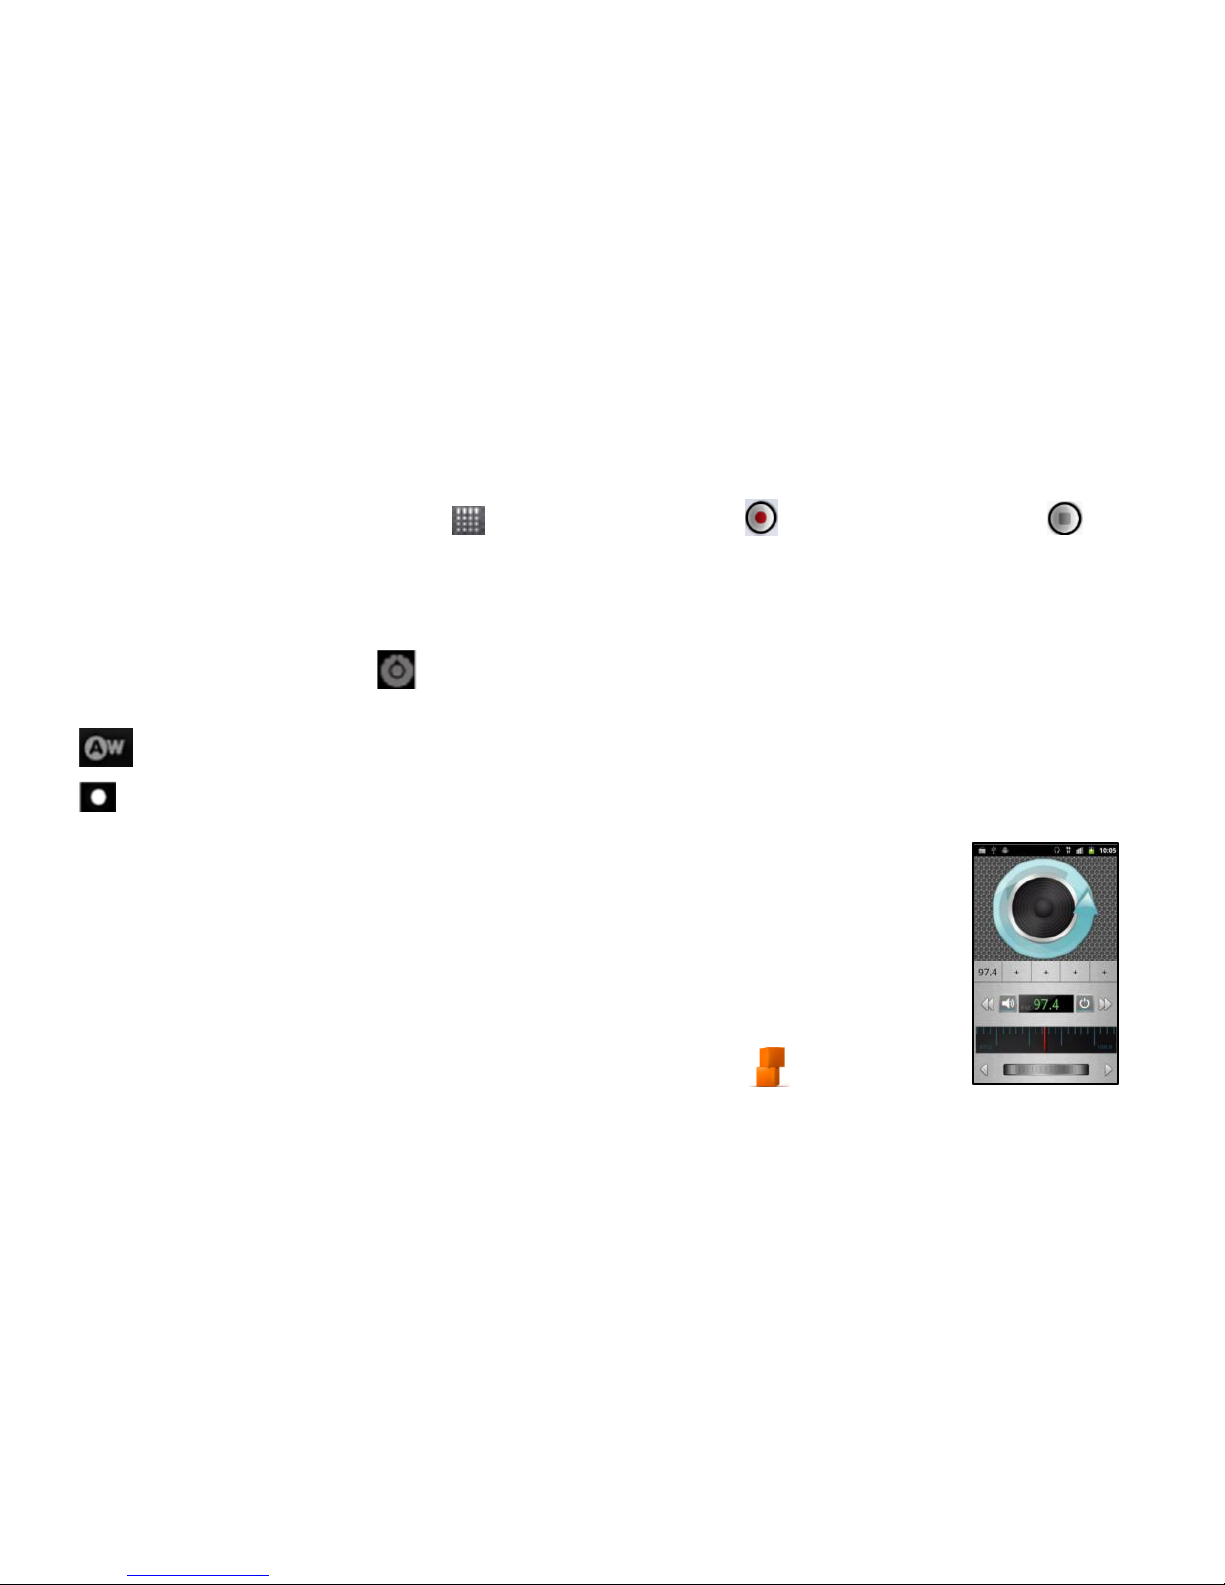
Listening to Your FM Radio
With the FM Radio, you can search for radio channels, listen to them, and save them on
your device. Note that the quality of the radio broadcast depends on the coverage of the
radio stations in your area. The wired headset that comes with your device works as an
antenna, so always connect the headset when using the radio. When you receive an
incoming call while listening to the radio, the radio will be turned off.
To tune in, plug your headset into your device. Tap Home > > FM Radio.
Page 61

61
The icon pops up in the status bar.
Tap Menu > Sleep to set the FM radio settings.
Tap to switch off the radio.
Playing Your Music
You can play digital audio files from your device’s memory card.
1. Tap Home > > Music to open the Music Screen.
2. Select Artists/Albums/Songs/Playlists to find the songs you want to play.
3. Tap an item from the list to start playing it.
4. Adjust the volume with Volumes.
Creating Playlists
Playlists help you organize your music files:
1. Select a music file that you want to add to a new playlist.
2. Tap and hold the file until a shortcut menu pops up.
3. Tap Add to playlist.
4. Tap New.
5. Type the playlist name and tap Save.
Page 62

62
Managing Playlists
1. From the Music Screen tap Playlists to see them all.
2. Hold the playlist you want to play or edit until a shortcut menu pops up.
3. Tap Play, Delete or Rename.
Adding a Song to a Playlist
1. Open Music and find the song under Artists, Albums, Songs, or Playlists.
2. Hold the song until a shortcut menu pops up.
3. Select Add to playlist.
4. Select a playlist.
Configuring a Song as a Ringtone
1. Find the music file under Artists, Albums, Songs, or Playlists.
2. Hold the song until a shortcut menu pops up.
3. Select Use as phone ringtone.
Playing Your Videos
To play a video file, tap Home > > Videos. This opens the Videos Screen and shows the video files
saved to your memory card.
Page 63
63
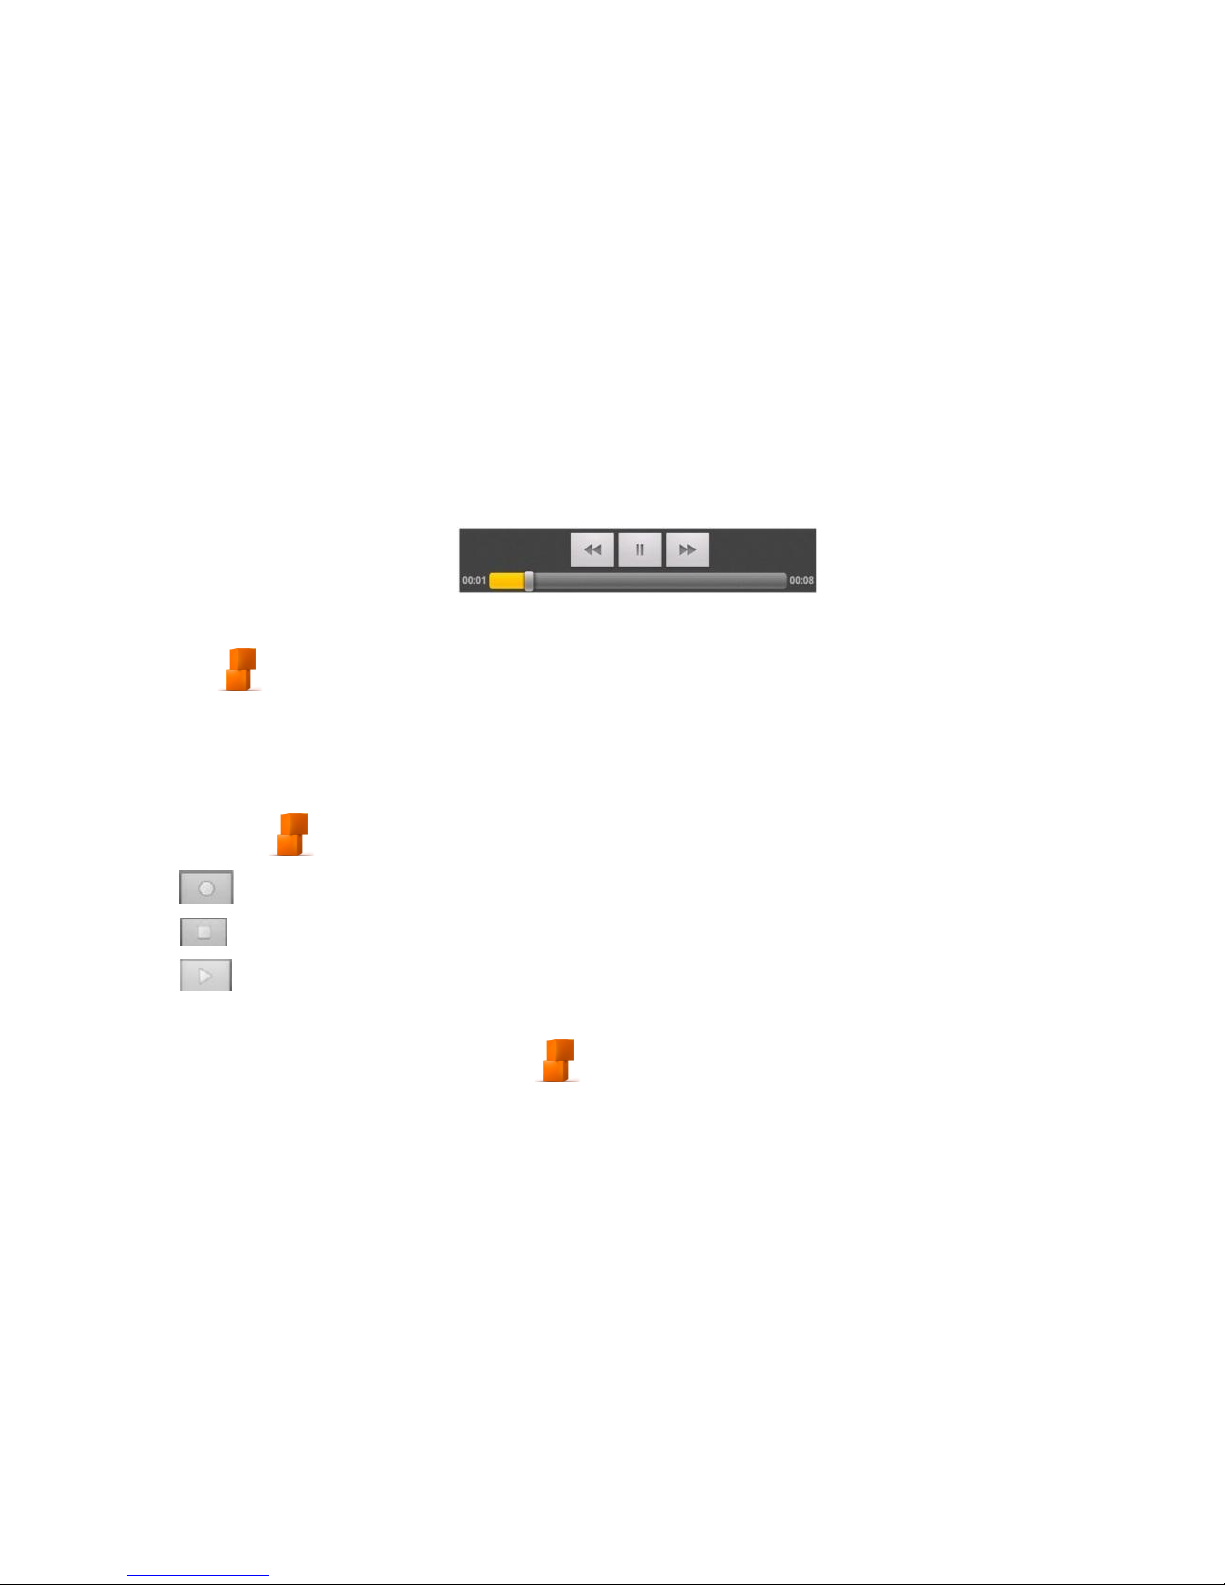
Tap a video file to start playing it. Tap on the screen and the control bar appears as seen below. You can
play, pause, fast forward, rewind, etc.
Opening Your Gallery
Tap Home > > Gallery. You can use the Gallery to view pictures and play videos. You can also do
some basic picture editing – such as setting them as wallpaper or contact icons, and sharing with friends.
Making Voice Memos
The Sound Recorder enables you to record voice memos. You need a microSD card to use it.
1. Tap Home > > Sound Recorder.
2. Tap to start recording.
3. Tap to stop recording.
4. Tap to play back the voice recording.
5. Tap OK to save the voice recording, or tap Discard to delete the recording.
TIPS: To find your recordings press Home> > Music > Playlists > My recordings.
Page 64

64
Sorting out Your Phone Settings
Setting Date and Time
1. Tap Home > Menu > Settings > Date & time.
2. Clear the Automatic check box if you want to set the time and date by yourself.
3. Configure the date, time, time zone, and date/time format.
Display Settings
Tap Home > Menu > Settings > Display, to adjust the display settings:
Brightness: Adjust the screen brightness.
Auto-rotate screen: Rotate the screen display as you rotate the device.
Animation: Choose the window animation.
Screen timeout: Set the delay for the screen to automatically turn off.
Sound Settings
Tap Home > Menu > Settings > Sound, to configure the sound settings, such as ringtones and alerts.
Silent mode: Select to mute all sounds except media and alarms.
Page 65

65
Silence Ringer When Face Down: Enable this function, to mute the incoming call ringtone by
flipping the device over.
Vibrate: Enable vibration.
Volume: Tap to adjust volume levels for ringtone, media, alarm, and notification.
Phone ringtone: Select the default ringtone for incoming calls.
Notification ringtone: Select the default ringtone for notifications.
Audible touch tones: Select to play tones when you tap the dial pad.
Audible selection: Select to play a sound when you touch the screen as you make a selection.
Screen lock sounds: Select to play a sound when you lock or unlock the screen.
Haptic feedback: Select to enable the device to vibrate when you press soft keys or on certain
user interface interactions.
To quickly switch to silent mode, hold Volume (down) or, if the screen is locked, drag to the left.
Page 66

66
Language Settings
You can change the language of your device system in two simple steps.
1. Tap Home > > Settings > Language & keyboard > Select language.
2. Select a language from the list.
Mobile Network Services
Tap Home > > Settings > Wireless & networks > Mobile networks to enable or disable a data
service, allow data services when roaming, or set access point names for data access.
Data Services When Roaming
1. Tap Home > Menu > Settings > Wireless & networks > Mobile networks.
2. Tick the Data roaming box.
IMPORTANT: Data roaming may incur significant roaming charges.
Disabling Data Services
1. Tap Home > Menu > Settings > Wireless & networks > Mobile networks.
2. Clear the Data enabled check box.
Switching Networks
1. Tap Home > Menu > Settings > Wireless & networks > Mobile Networks > Network Settings >
Network operators.
Page 67

67
2. Tap Search networks to scan for available networks, tap a network to register manually.
3. Tap Select automatically to select preferred network automatically.
Setting Access Point Names
To connect to the Internet you can use the default Access Point Names (APN). And if you want to add a new
APN, please contact the service provider to find out more instructions.
1. Tap Home > Menu > Settings > Wireless & networks > Mobile networks > Network Settings >
Access Point Names.
2. Tap Menu > New APN.
3. Set the necessary parameters.
4. Tap Menu > Save.
Security Settings
Here’s how to protect your device and SIM card from unauthorized use.
Protecting Your Device With a Screen Unlock Pattern
Creating Your Screen Unlock Pattern
1. Tap Home > > Settings > Location & security > Set up screen lock > Pattern.
2. Read the instructions and tap Next.
3. Watch the example pattern and tap Next.
Page 68

68
4. Draw your own pattern and tap Continue.
5. Draw the pattern again and tap Confirm.
6. Press Power to lock the screen.
TIPS: Clear the Use visible pattern check box if you want to hide the pattern as you draw it on the screen.
Unlocking the Screen with Your Pattern
1. Press Power to wake up the screen.
2. Draw the pattern you set for unlocking the screen. If you make a mistake, your device will ask you to try
again.
Cannot recall your screen unlock pattern?
You have up to five attempts to unlock your device. If you still cannot recall the screen unlock pattern, you
can tap Forgotten pattern? and enter your account user name and password to reset the screen-unlock
pattern.
Protecting Your Device with a PIN or Password
Creating a PIN or Password
1. Tap Home > > Settings > Location & security > Set up screen lock.
2. Tap PIN or Password.
3. Enter the numeric PIN or any password you like, and tap Continue.
Page 69

69
4. Enter it again and tap OK to confirm.
Unlocking the Screen with Your PIN or Password
1. Press Power to wake up the device.
2. Drag the icon to the right.
3. Enter the PIN or password you set.
4. Tap OK.
Disabling Screen Lock Settings
If you have created an unlock-pattern, PIN or password, you can disable it.
1. Tap Home > > Settings > Location & security > Change screen lock.
2. Draw the screen-unlock pattern or enter your PIN/ password.
3. Tap None.
Protecting Your SIM Card with a PIN
Every SIM card comes with a PIN. The initial PIN is provided by your mobile phone carrier. It’s best to lock
your SIM card as soon as you can.
1. Tap Home > > Settings > Location & security > Set up SIM card lock.
2. Select Lock SIM card.
Page 70

70
3. Enter the PIN you’ve been given and tap OK.
Changing Your SIM PIN
You can change the PIN you’ve been given to one easier for you to remember and harder for others to
guess.
1. Tap Home > > Settings > Location & security > Set up SIM card lock.
2. Make sure that Lock SIM card is enabled.
3. Tap Change SIM PIN.
4. Enter the old PIN and tap OK.
5. Enter your new PIN and tap OK.
6. Enter the new PIN again and tap OK.
Restoring a Locked SIM Card
Put all your confidential passwords in a safe place for future use. If you enter the wrong SIM PIN more times
than allowed, your SIM card will be locked and you cannot access the mobile phone network. Contact your
operator for a PIN Unlock Key (PUK) to restore the SIM card.
Setting Up Credential Storage
This lets you select applications to access secure certificates and other credentials.
Enabling Secure Credentials
Page 71

71
1. Tap Home > > Settings > Location & security.
2. Tap Set password and create a password for the credential storage.
3. Select Use secure credentials.
TIPS: You can also install encrypted certificates from your microSD card by tapping Install from SD card.
Deleting Secure Credentials
1. Tap Home > > Settings > Location & security.
2. Tap Clear storage to clear credentials.
Page 72

72
Managing Your Device Memory
Tap Home > > Settings > Storage.
You can view the microSD card and the device storage details.
Unmount/Mount SD card: You can unmount the microSD card to safely remove it, or mount the
card.
Erase SD card: Erase all data on the microSD card.
NOTE: The SD card is not accessible while connected with a USB cable to a PC.
Privacy: Reset to Factory Settings
Tap Home > > Settings > Privacy > Factory data reset > Reset phone > Erase everything.
WARNING: All your personal information and applications that you have downloaded to your device
will be erased.
Page 73
73
Managing Applications
Managing Other Settings
Search Settings
You can manage search settings and search history by opening Search and tapping Menu > Search
settings.
Searchable items: Choose what to search on the device.
Clear shortcuts: Clear shortcuts to recently chosen search suggestions.
Voice Input and Output
You can set the text-to-speech and voice recognition options by tapping Home > > Settings > Voice
Input and Output.
Other Applications
Calculator
Tap Home > > Calculator.
TIPS: Tap Menu > Advanced panel to use the scientific calculator.
SIM Tool Kit
The SIM Tool Kit appears on the screen only if your SIM card provides this
function. To use SIM services, first insert your SIM card into the device.
Tap Home > > SIM Tool Kit.
Page 74
74
LifeWatch V Health and Medical Functions
Getting Started with the LifeWatch V Medical and Wellness Applications
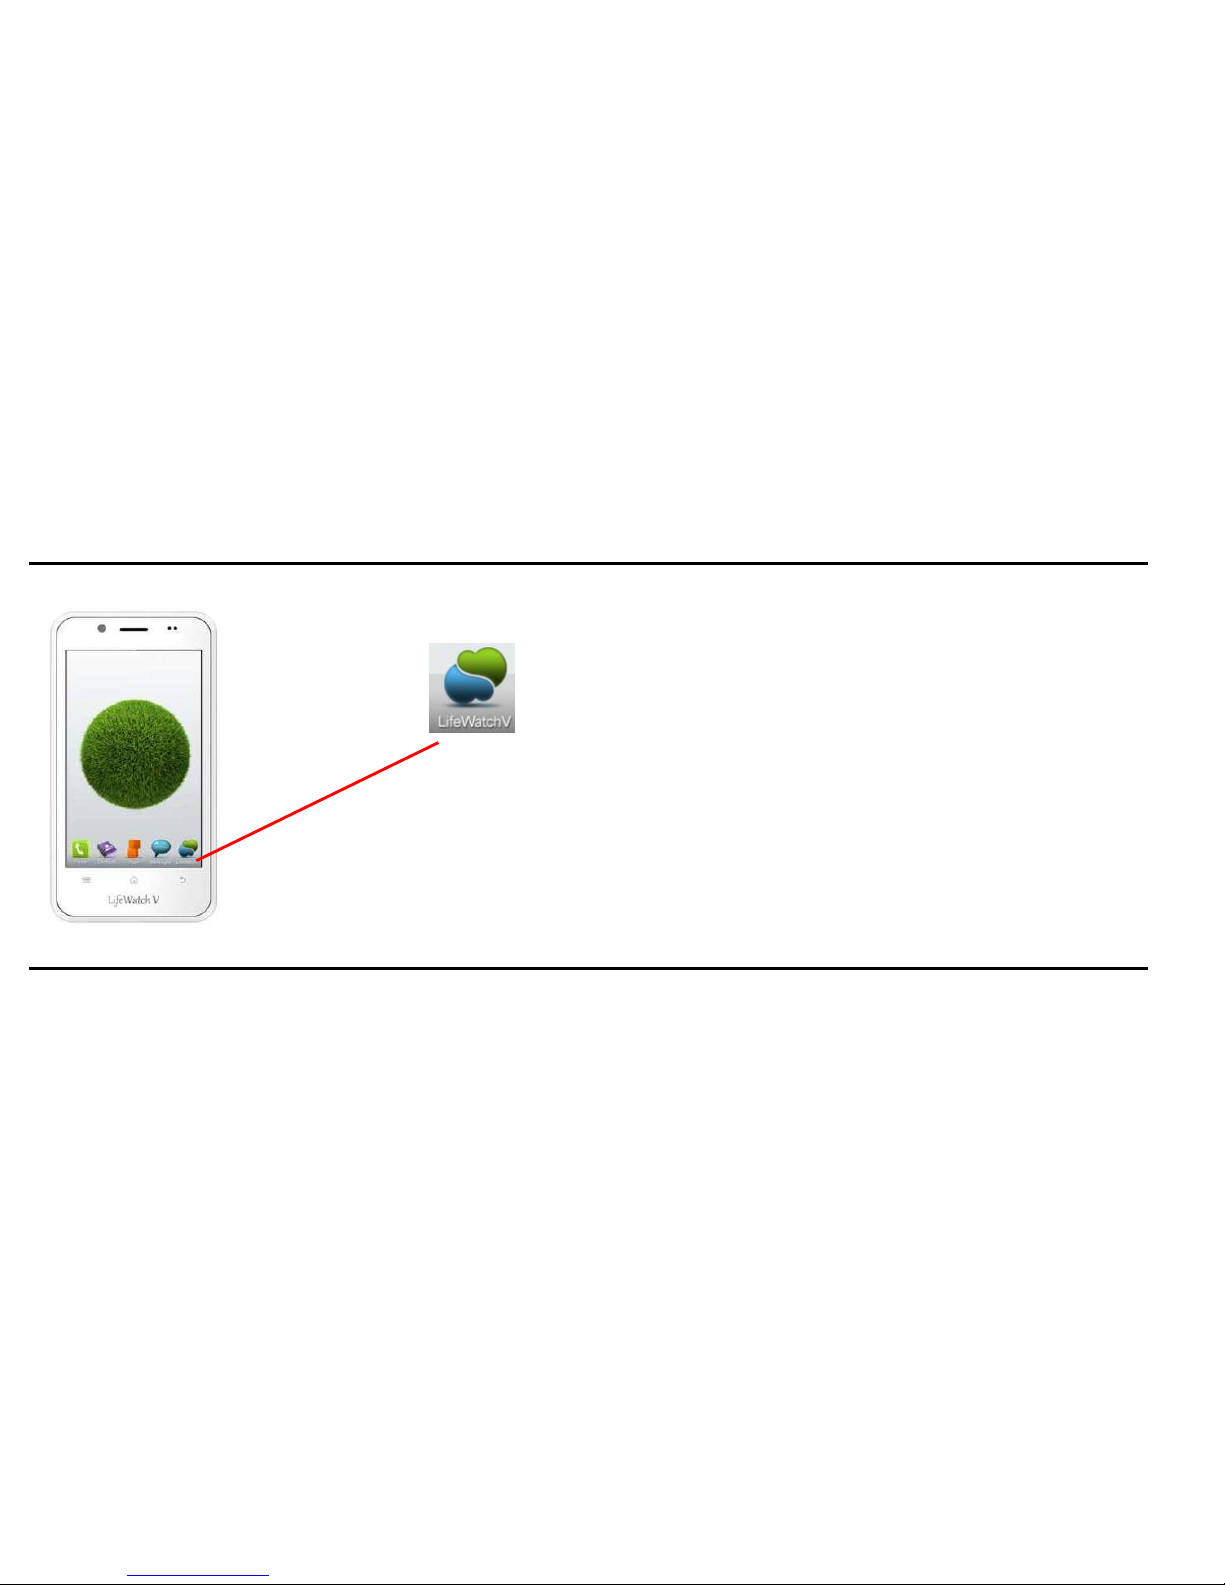
Press the LifeWatch V icon on the desktop. This activates the application and opens the license agreement.
License Agreement
Please read the license agreement. The login screen appears after accepting the terms.
Page 75
75
First Time Launch
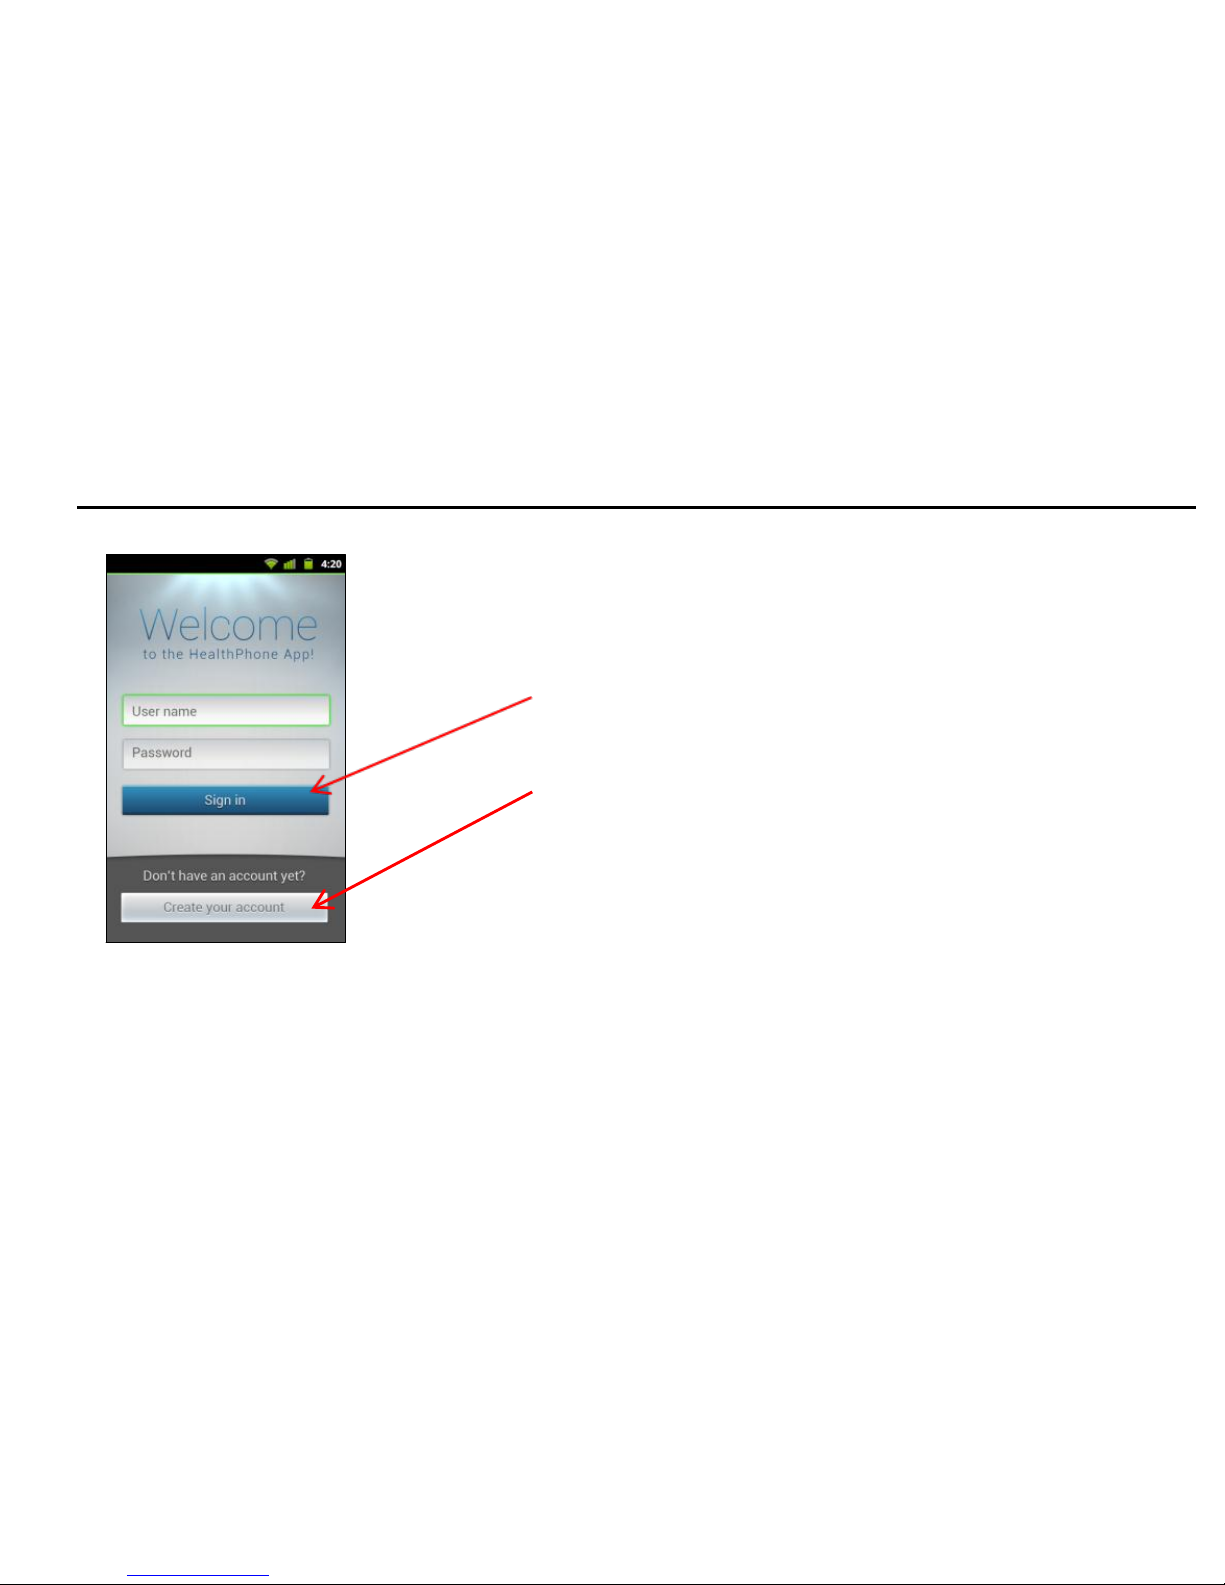
The first time you open the application the registration screens are displayed.
For registered user - enter your user name and password and
tap on the “Sign In” button.
For new user - tap on “Create Account” in order to start the
registration process.
Quick access code
Create your Quick access code by
selecting four numbers.
Quick access code confirmation
Re-enter your selected quick access code.
Page 76
76
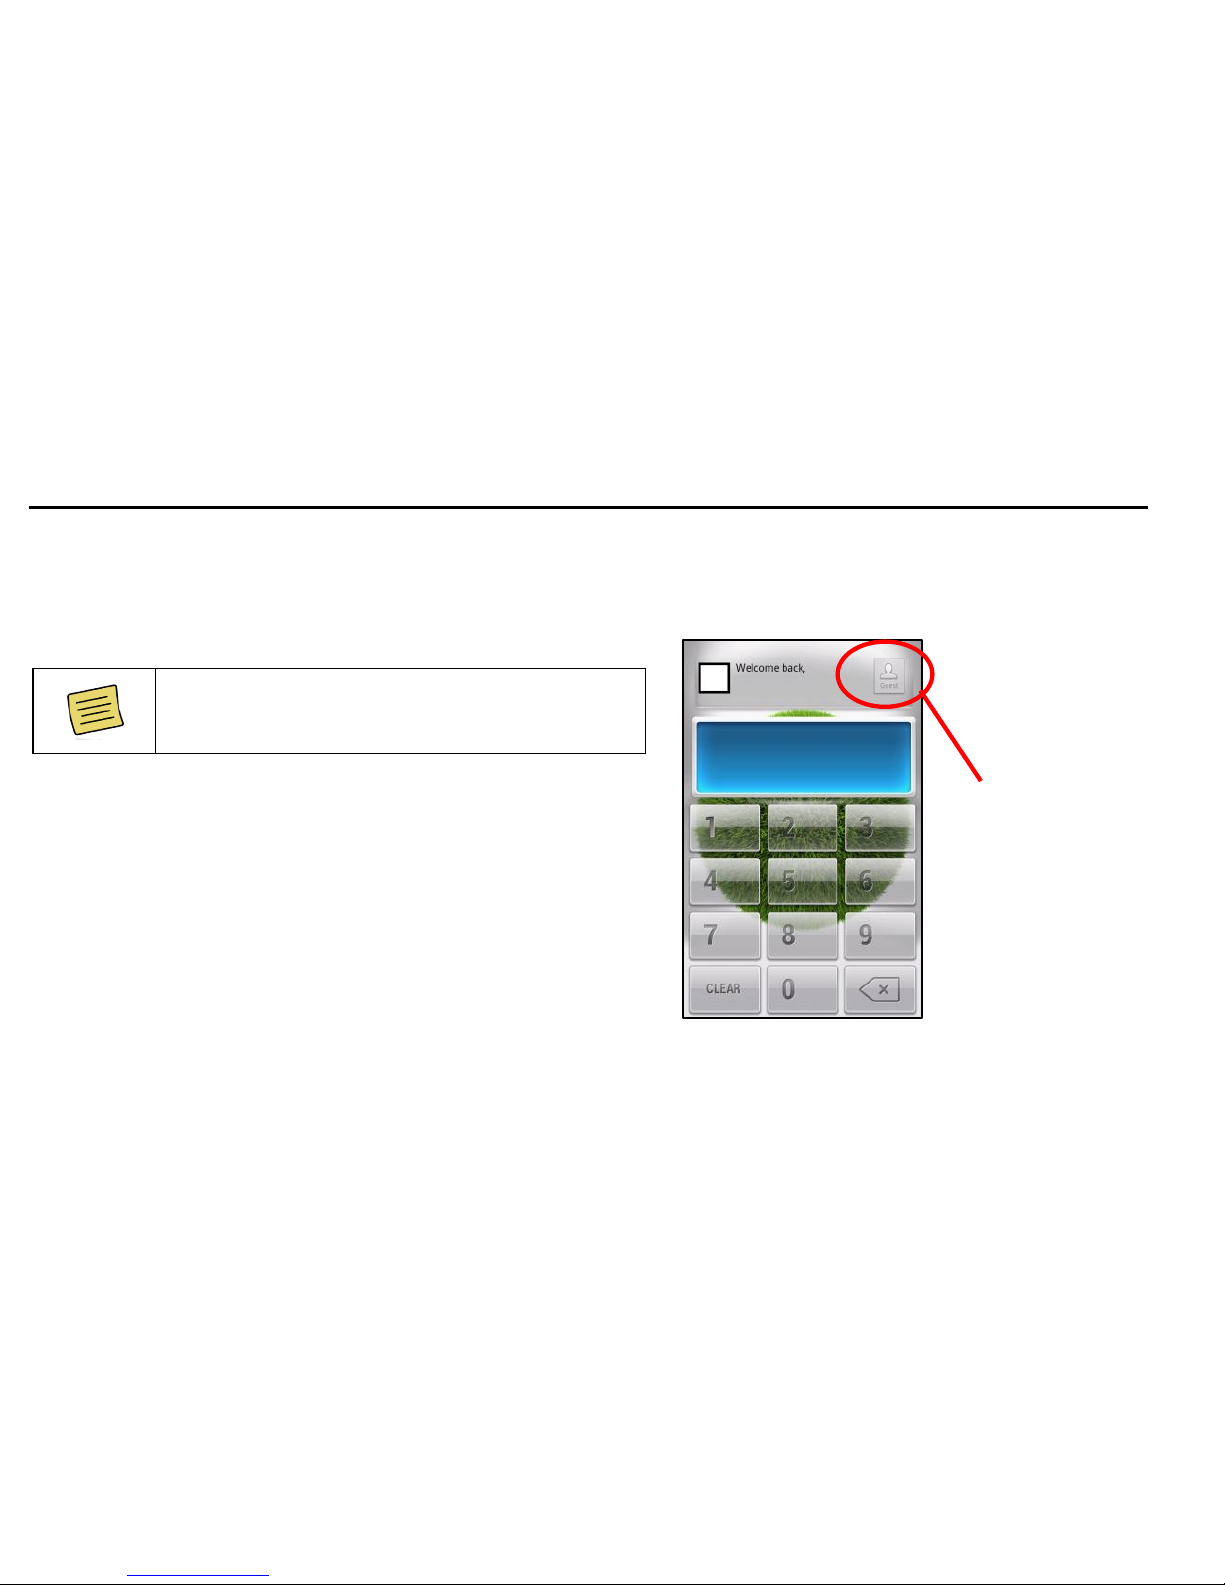
Login Screen
This is the log-in screen for LifeWatch V medical applications.
Use the keypad to enter your quick access code.
The Start screen appears.
Some LifeWatch V medical and wellness
features are available to subscribers only!
Guest Login
Select Guest Login to start Guest Mode.
The guest-login allows non-subscribed users to
perform certain tests.
The tests are not saved, there is no connection to
the remote server and the guest has a limited
amount of tests that can be performed per month.
Guest log-in
Page 77
77
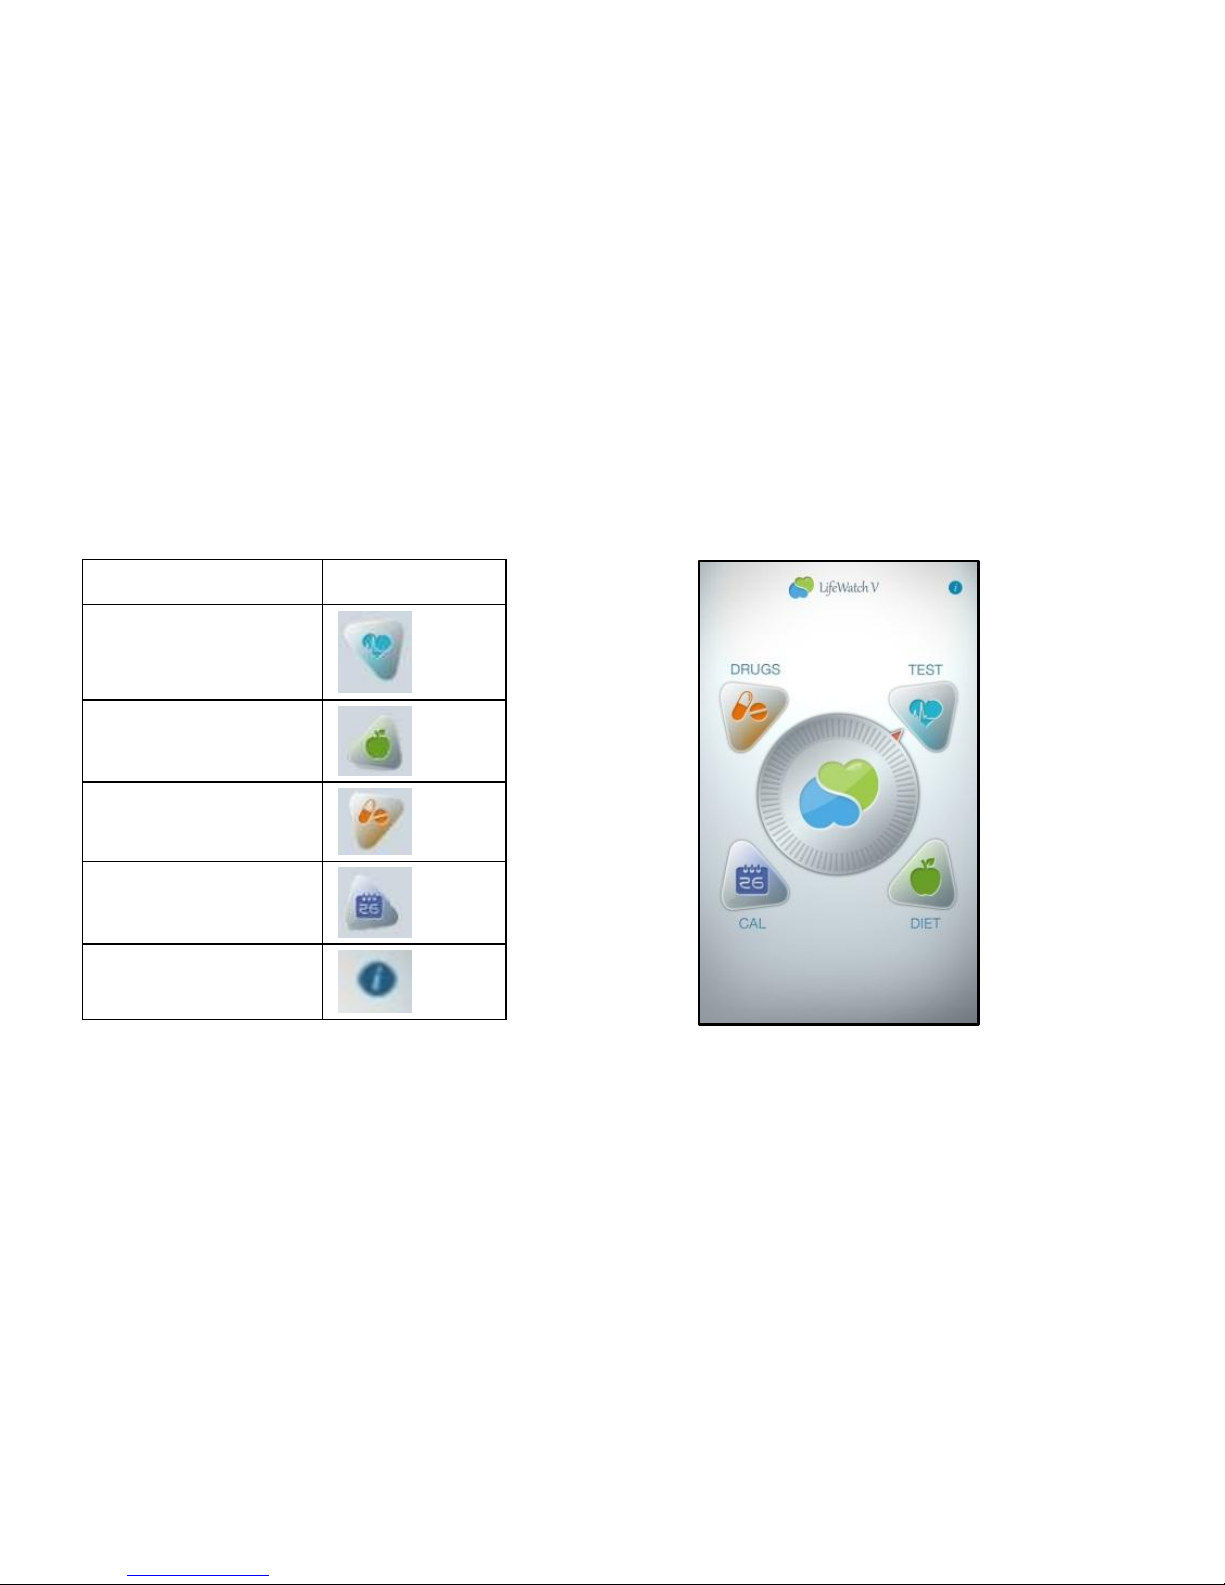
Start Screen
Select the required application to start.
Application
Icon
Test
Diet
Drug
Calendar
Information
Page 78

78
Test Application
Test General Description
The LifeWatch V implements the following test features in a single device to help you track and record your
health/wellness:
ECG - The graphical recording of your heart activity, to be used whenever you are concerned about
your heart rhythm or if you experience the following symptoms of abnormal heart rhythms:
Skipped Beats
Pounding Heart (Palpitations)
Heart Racing or Irregular Pulse
Lightheadedness or Faintness
History of Arrhythmias
HR – Measures the pulse rate (minimum, maximum and average rate that your heart beats).
Stress Level Analyzer – Analyze the pulse rate to determine the level of mental and physiological
stress.
BFA (Body Fat Analyzer) – BFA uses bioelectrical impedance to determine the body fat percentage.
Gluco meter – Measures the blood glucose level.
Body temperature – Measures the forehead’s temperature. Use to determine the body temperature.
Page 79
79
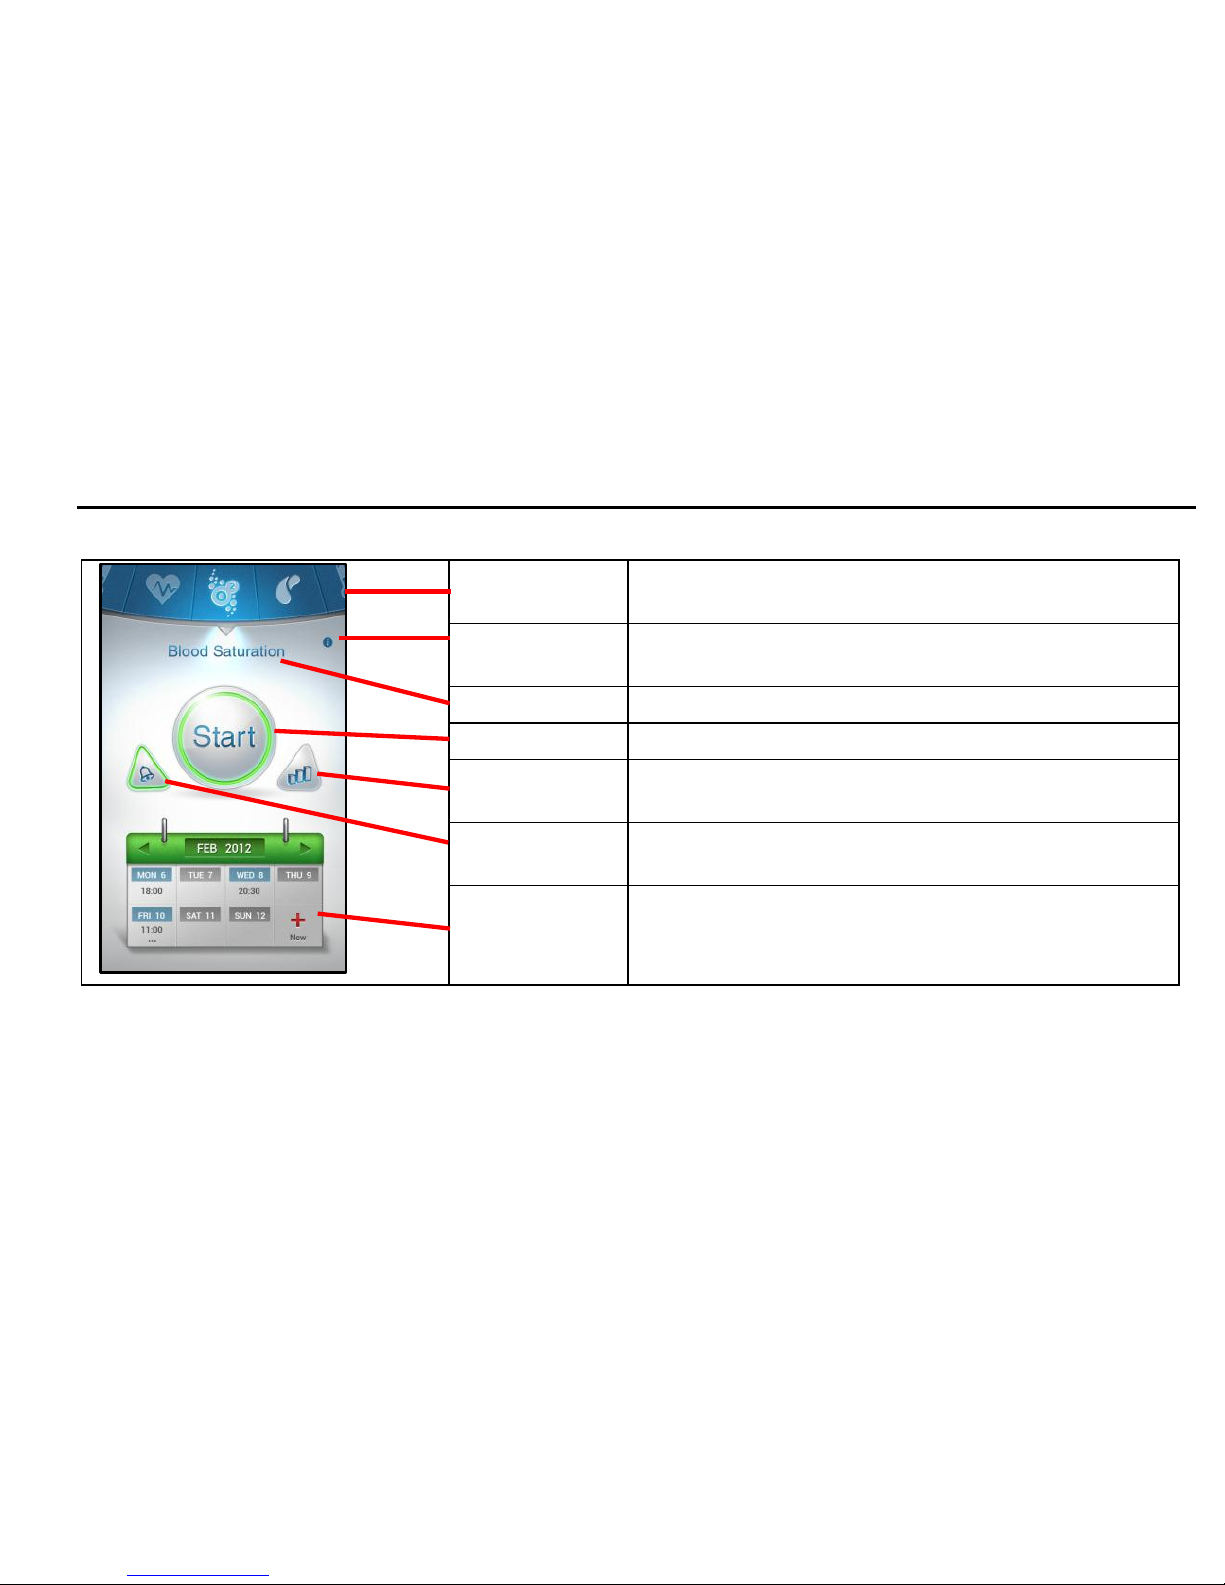
Test Screens Description
Wheel
Use to cycle between tests and select the relevant
test
Information
icon
Press to open the relevant information about the
selected test type
Test type
Displays test type
Start button
Press to start test
History
button
Press to display test history (3 last tests)
Reminder
icon
Press to display the calendar
Calendar
Displays the current week’s reminders with the test
type icon
Note: a green outline to a button means it is selected.
Press a button to change the display on the Start screen.
Page 80
80
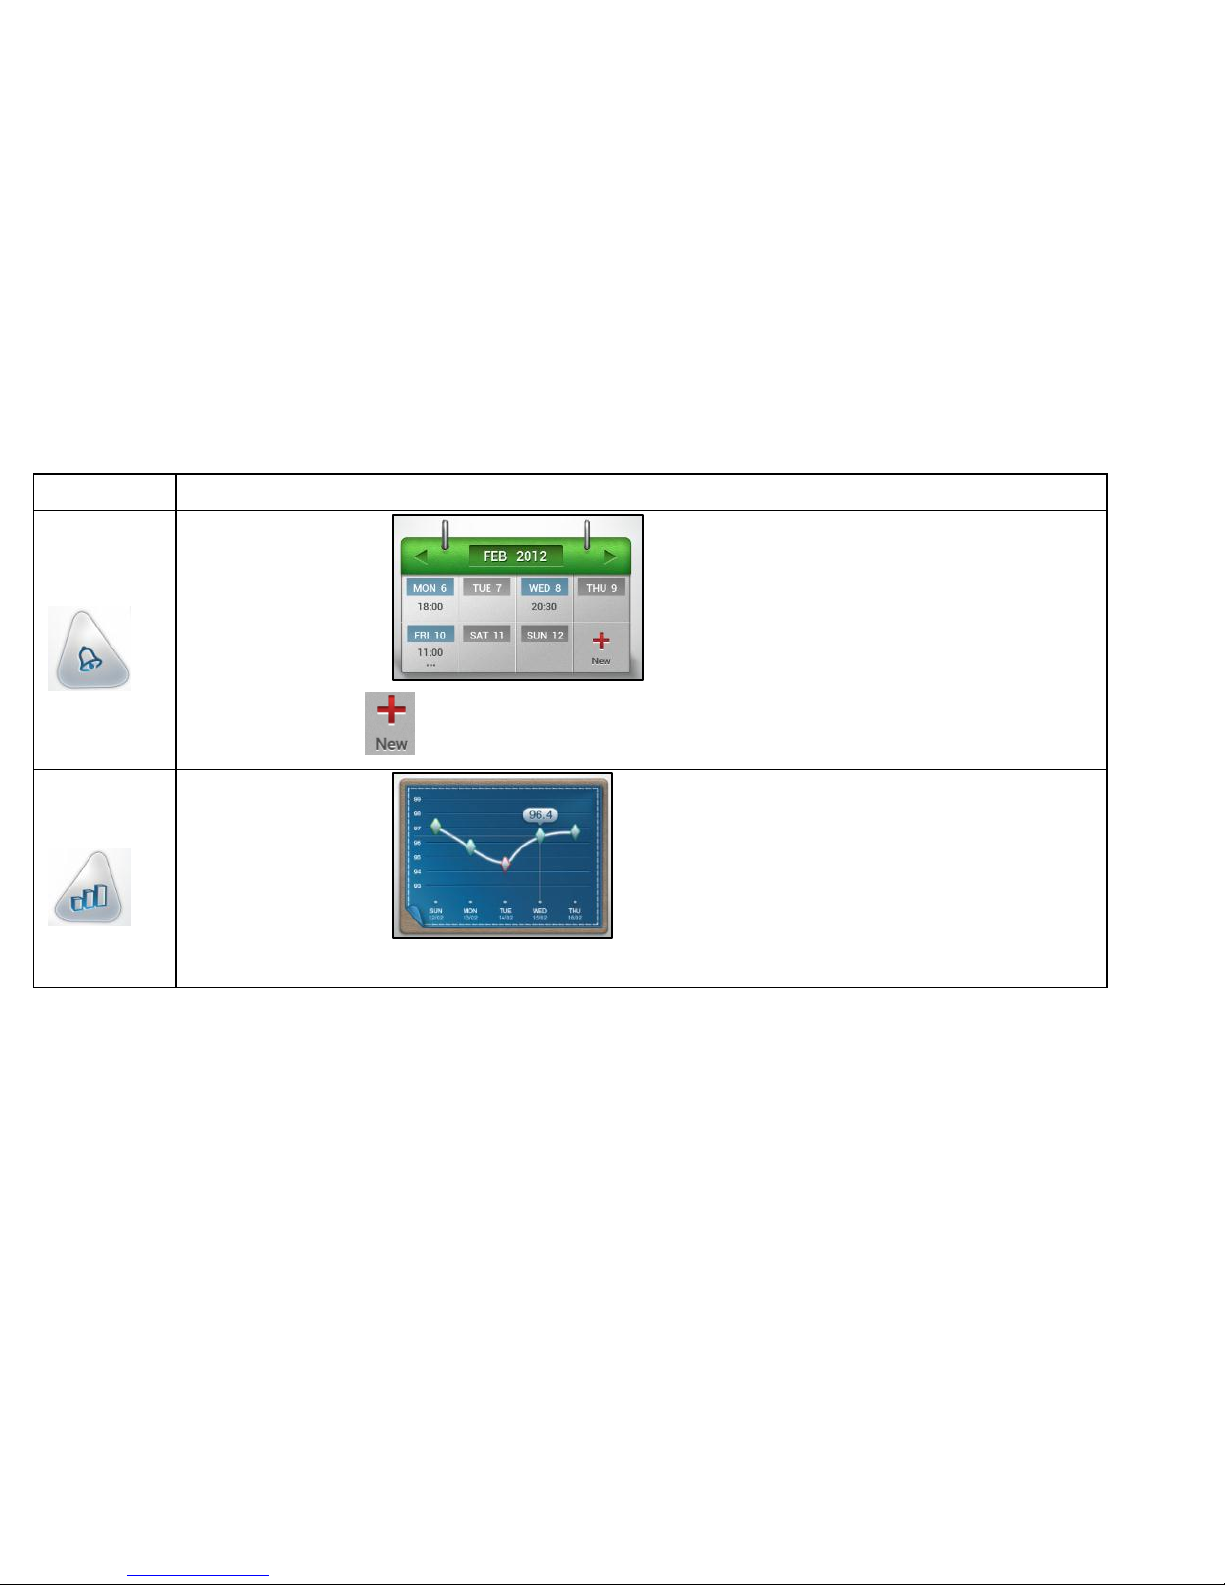
Press
To display
Reminder
NOTE: Tapping opens the Reminder Creation window for the current type of test.
History
Note: Tapping the graph opens History, see page 84.
Page 81
81
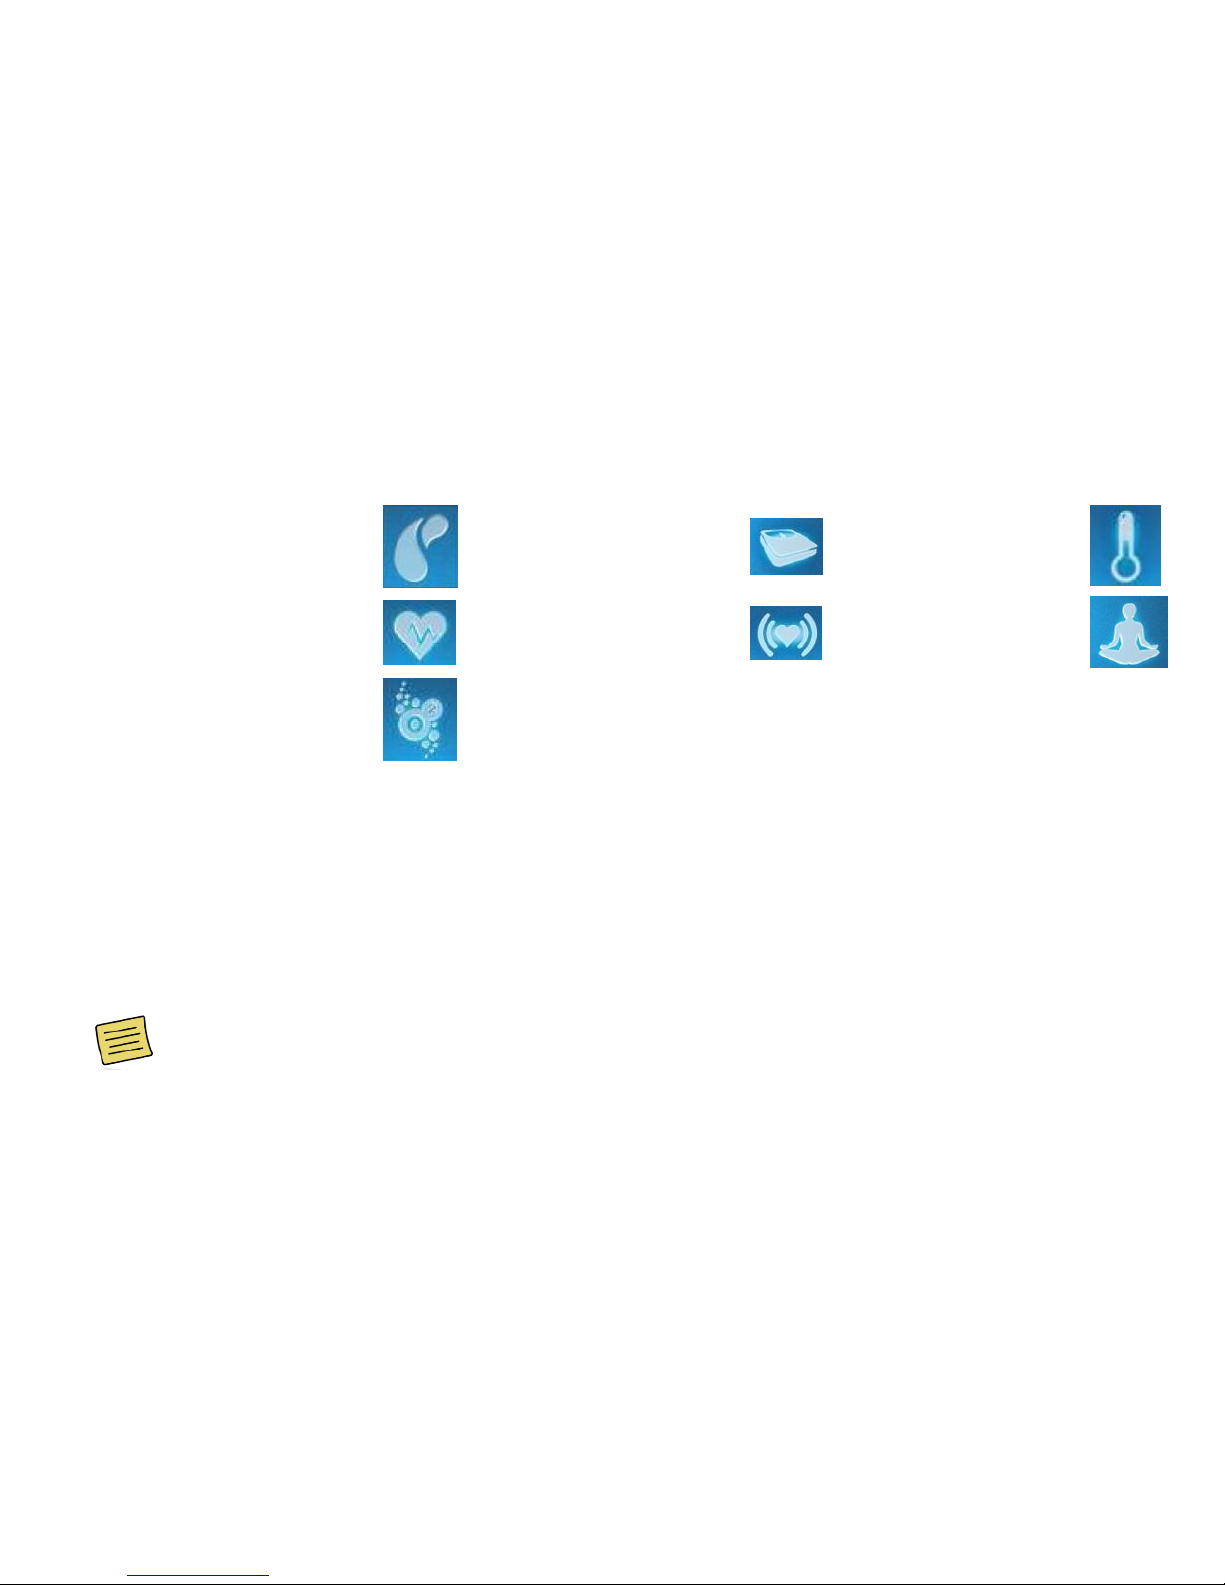
Test Wheel Icons
Glucose testing
BFA (body fat
analysis)
Temperature
ECG
(electrocardiogram)
HR (heart rate)
Stress Level
Analyzer
SP02
(blood oxygen
saturation)
NOTE:
For tests involving the use of electrodes it is important to:
a. Clean electrodes with a lint free dry cloth.
b. Clean your fingers with soap and dry them.
c. To receive accurate measurements it is important to set up all the parameters under Settings prior to
conducting the tests.
d. Sit comfortably so that you can be relaxed during the test
Before starting medical tests please disconnect the earphones/USB cable.
Page 82
82
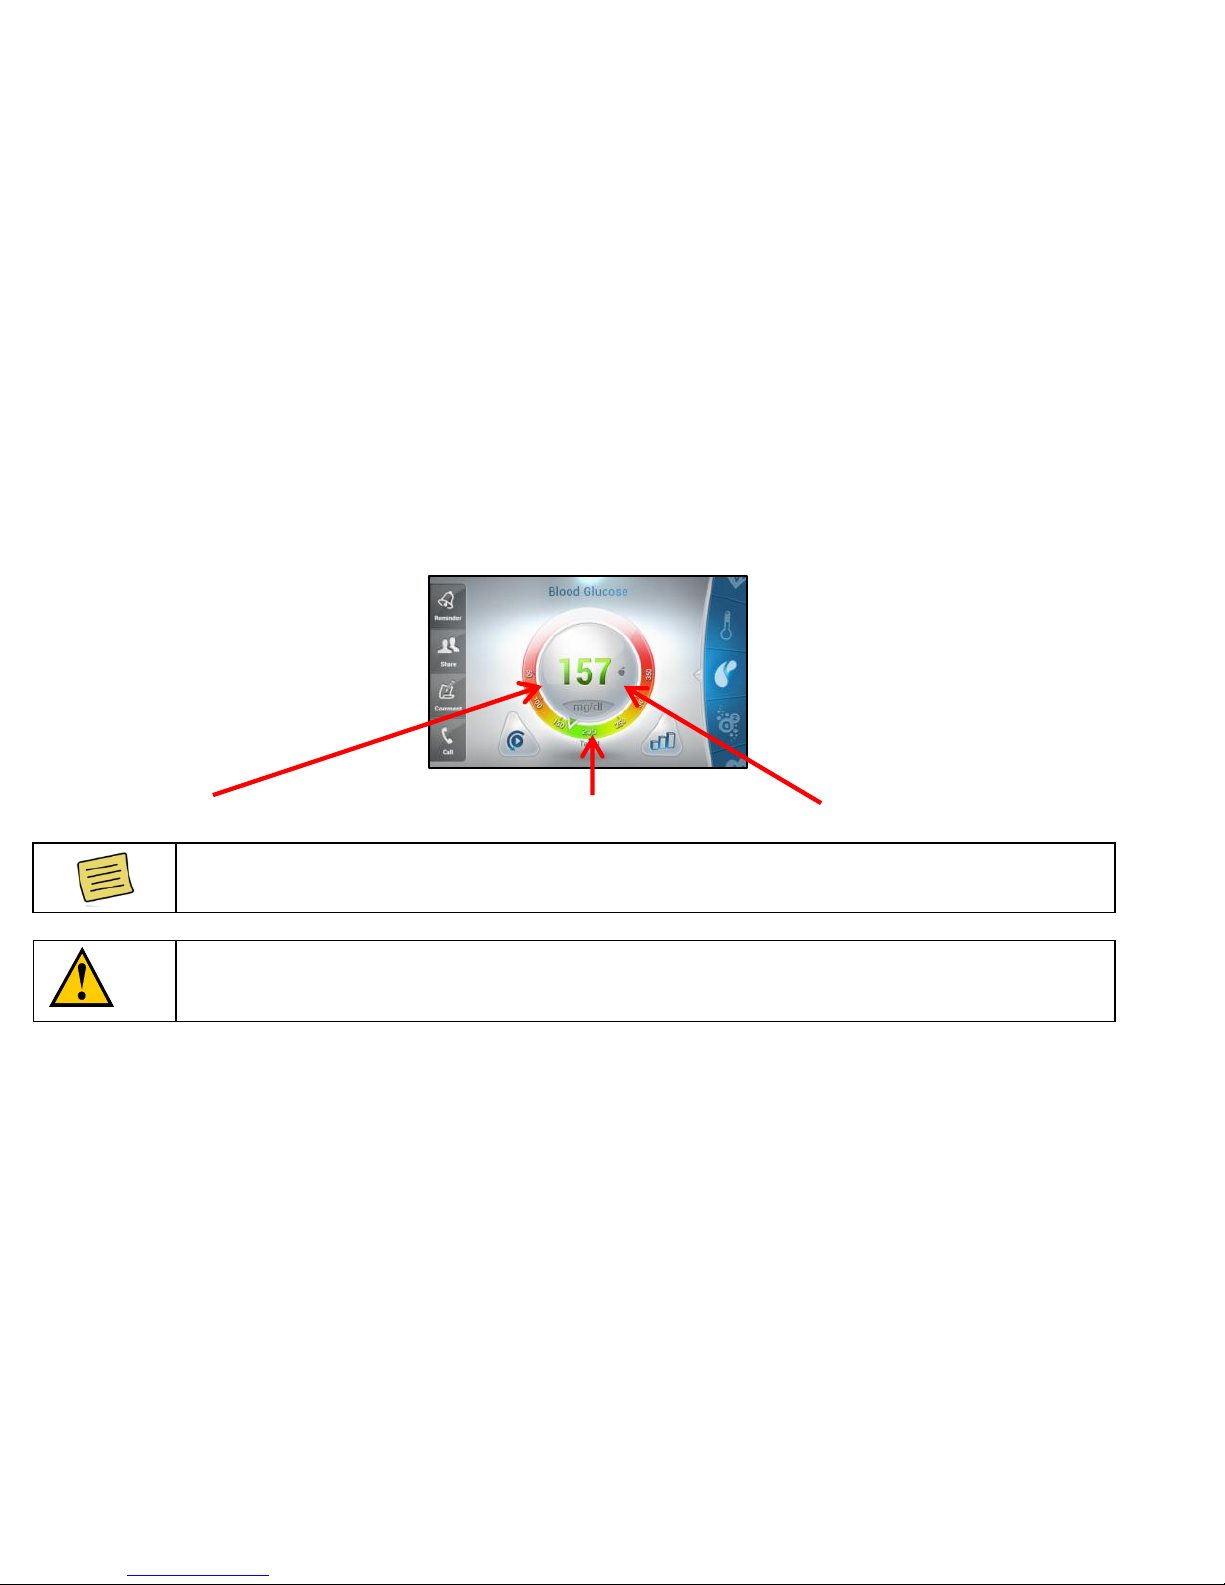
Test Results
After a test has been performed the screen displays the results and provides extra functions.
Example
Test scale
Units
Results
Each test type has its own units and scale values.
Warning - The user of the LifeWatch V should not take any actions of a medical or
clinical nature based on his/her understanding or interpretation of test results without
consulting a healthcare professional.
Page 83
83
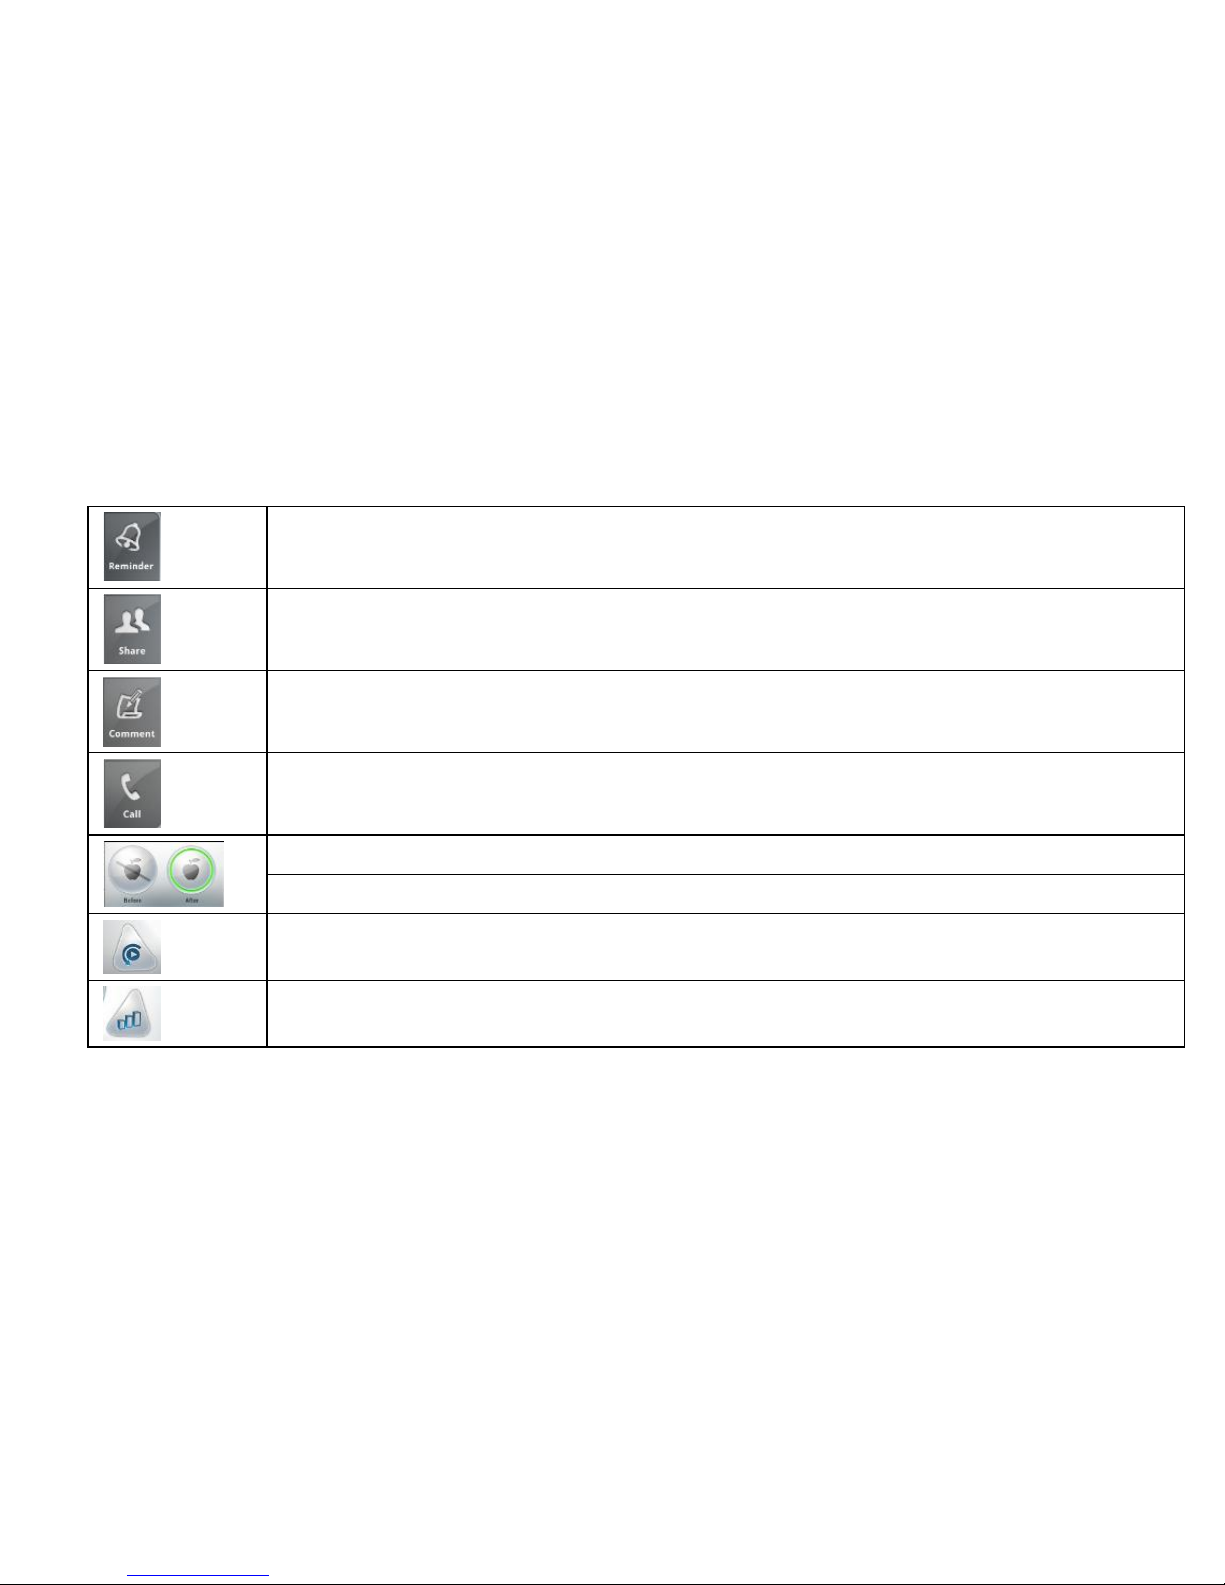
Test Results Icons
Reminder - Opens the Reminder window.
Share - Opens the Sharing Selection popup, share the results via Email or SMS.
Comment - Pop-up Notepad for commenting on results. Auto sharing results are
sent without the comments.
Call - Initiate a call to the Call Center (Premium Users).
Crossed-out apple means before meal
Apple means after meal
Retake test
History
Page 84
84
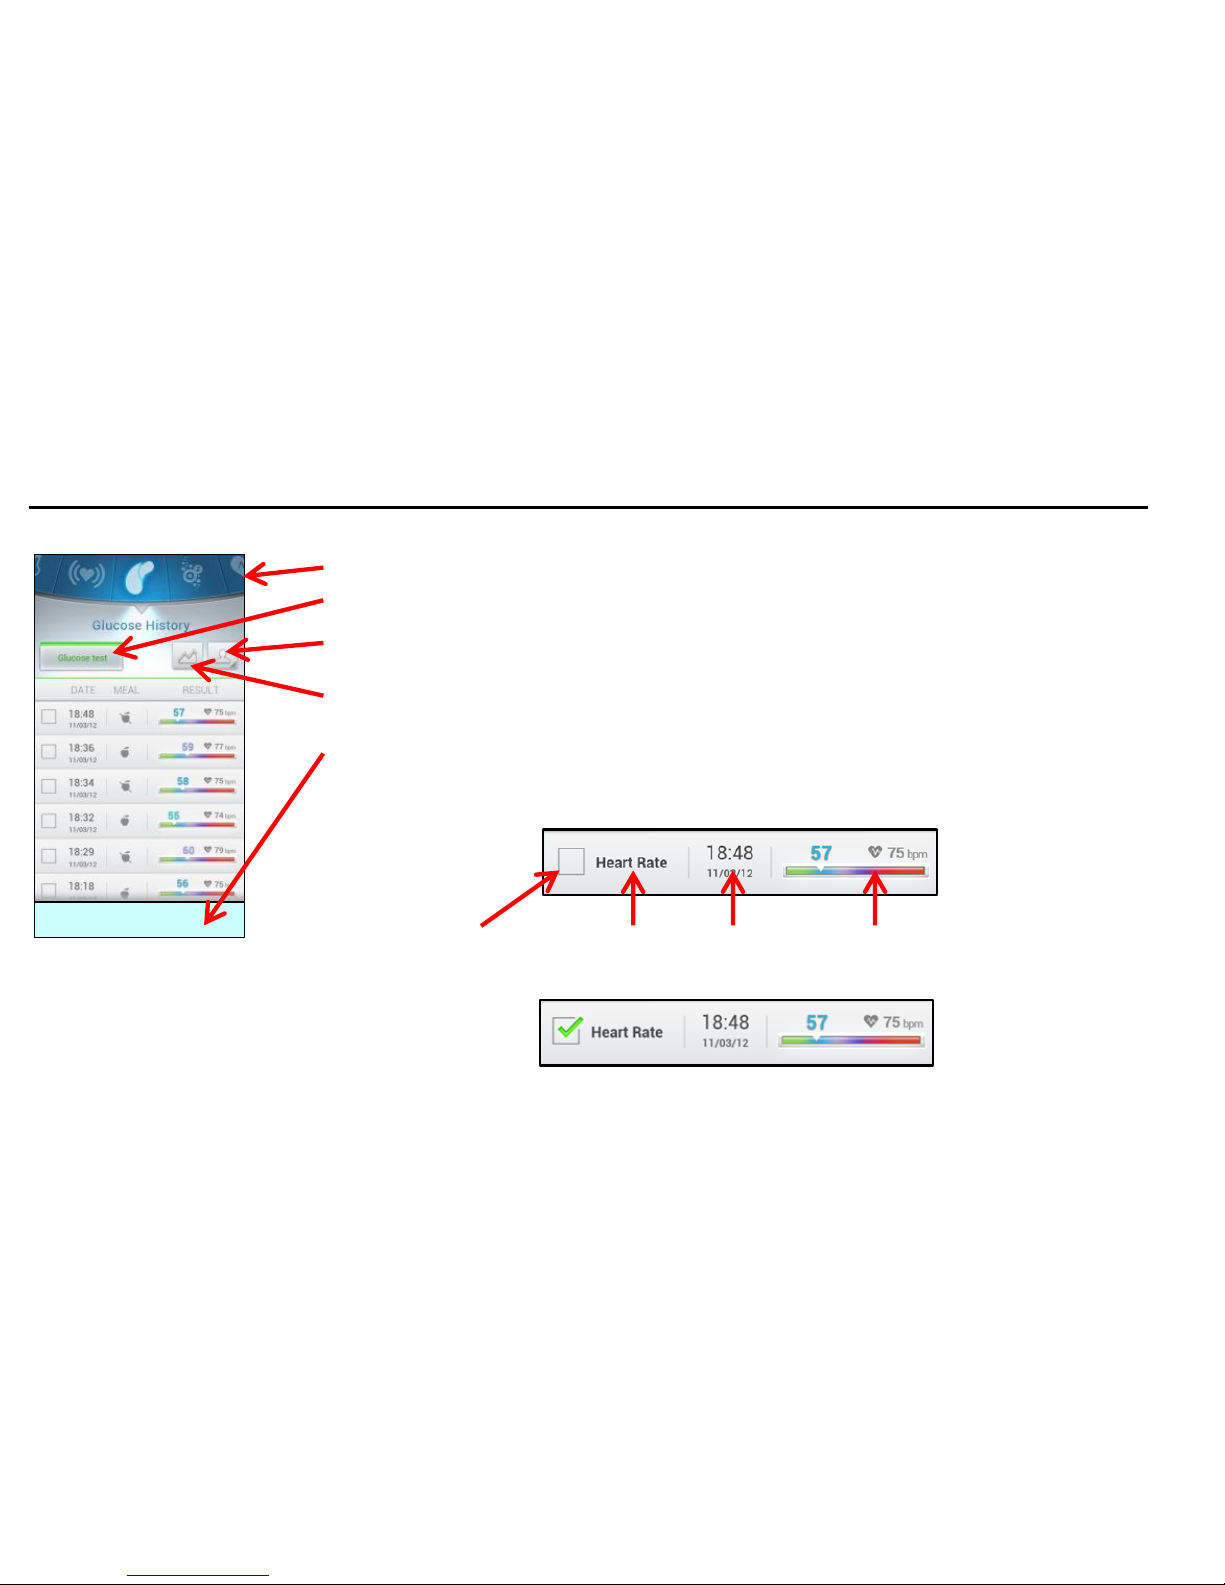
History
The screen default is to show the last test type chosen. Scroll using the wheel to change test type.
Next 25 results
Wheel – scroll to change test type
All Tests– show all tests (all types)
Other Users – displays the test results of other users that you “follow”
Graph – display the test results graph
Next 25 results – displays the next 25 test results
History displays the following for each test:
Share box Test type Date & time Result and threshold
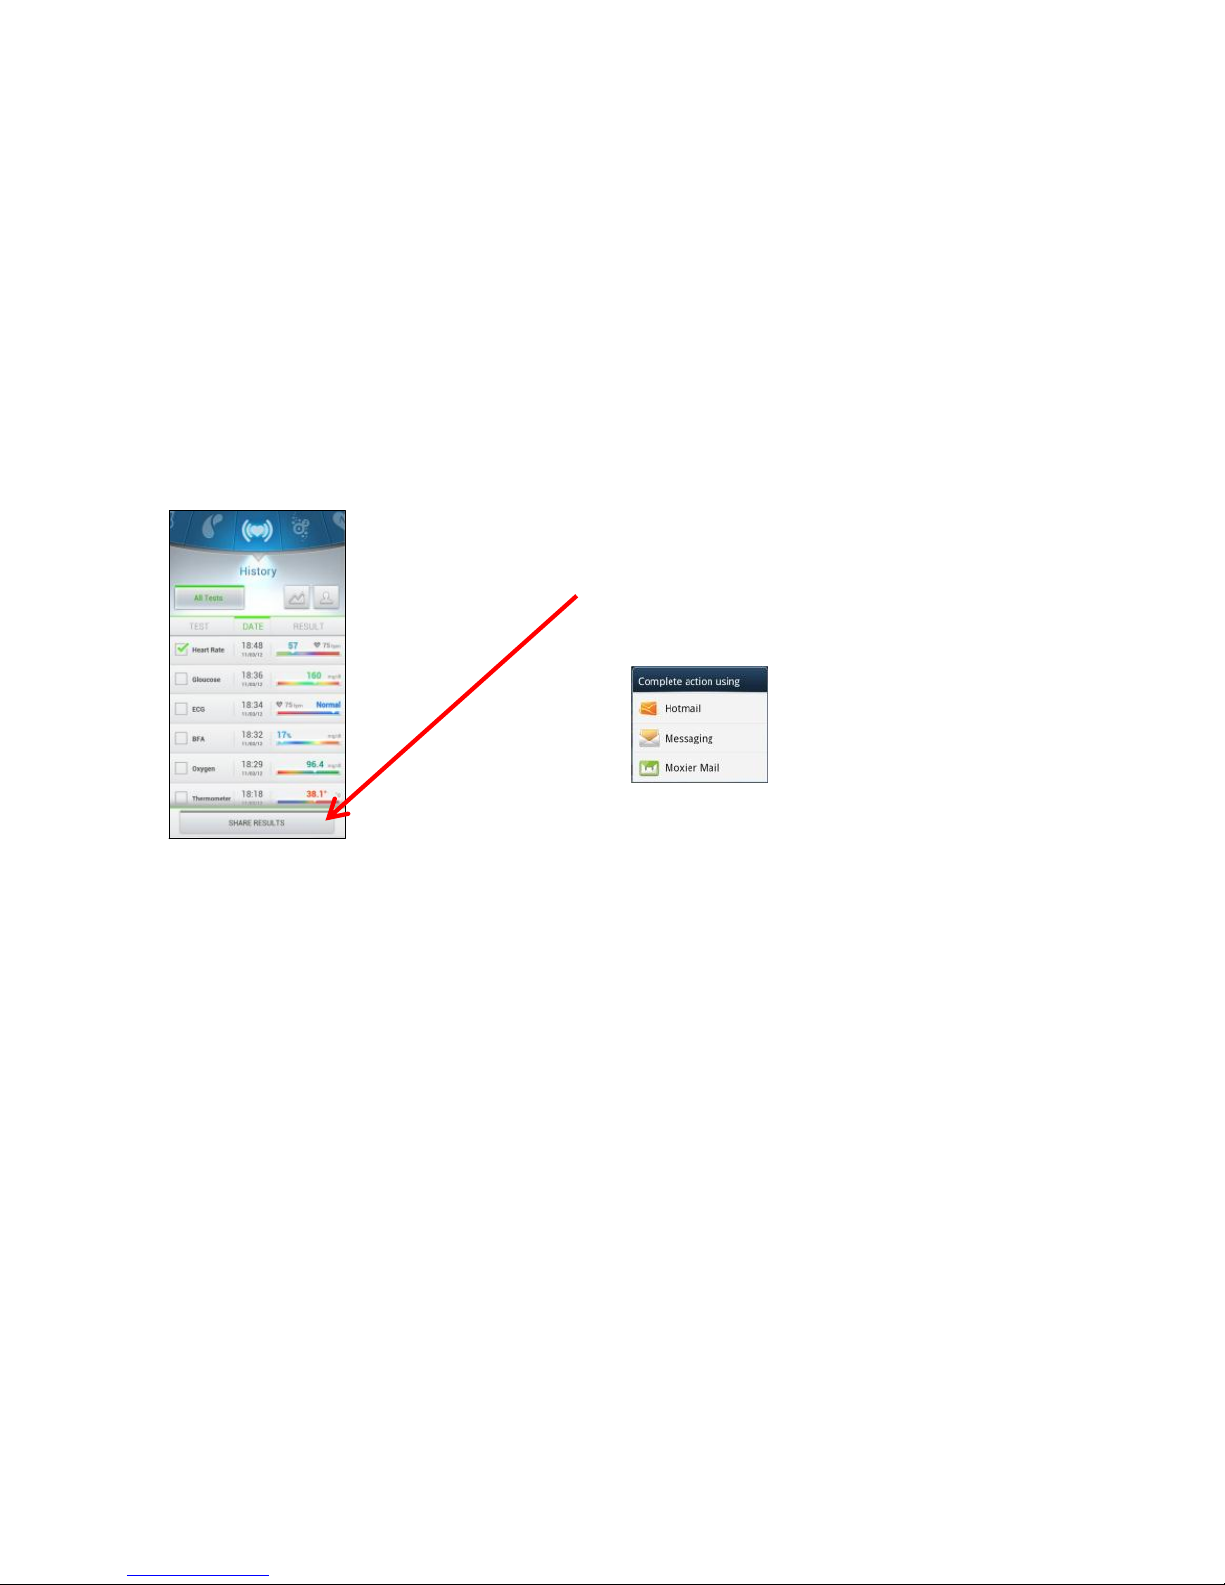
Select a test to share.
Once selected a Share button is added to the end of the test list.
Page 85
85
Share Results– select to open Sending (SMS/email)
option.
Page 86
86
Performing Tests
The screen automatically goes to the last test type. Use the scroll-wheel to cycle between the various tests.
NOTE: see page 107 for instructions on changing the glucose measurement units.
Blood Glucose Test
Be sure to read carefully this section, the test strip insert and the lancing device insert found in the Gluco kit
before testing. Make sure you have all items needed to test:
LifeWatch V, Test Strips, Lancing Device, and Sterile Lancet
Wash and dry your hands.
Use only the glucose strips provided
with the LifeWatch V device.
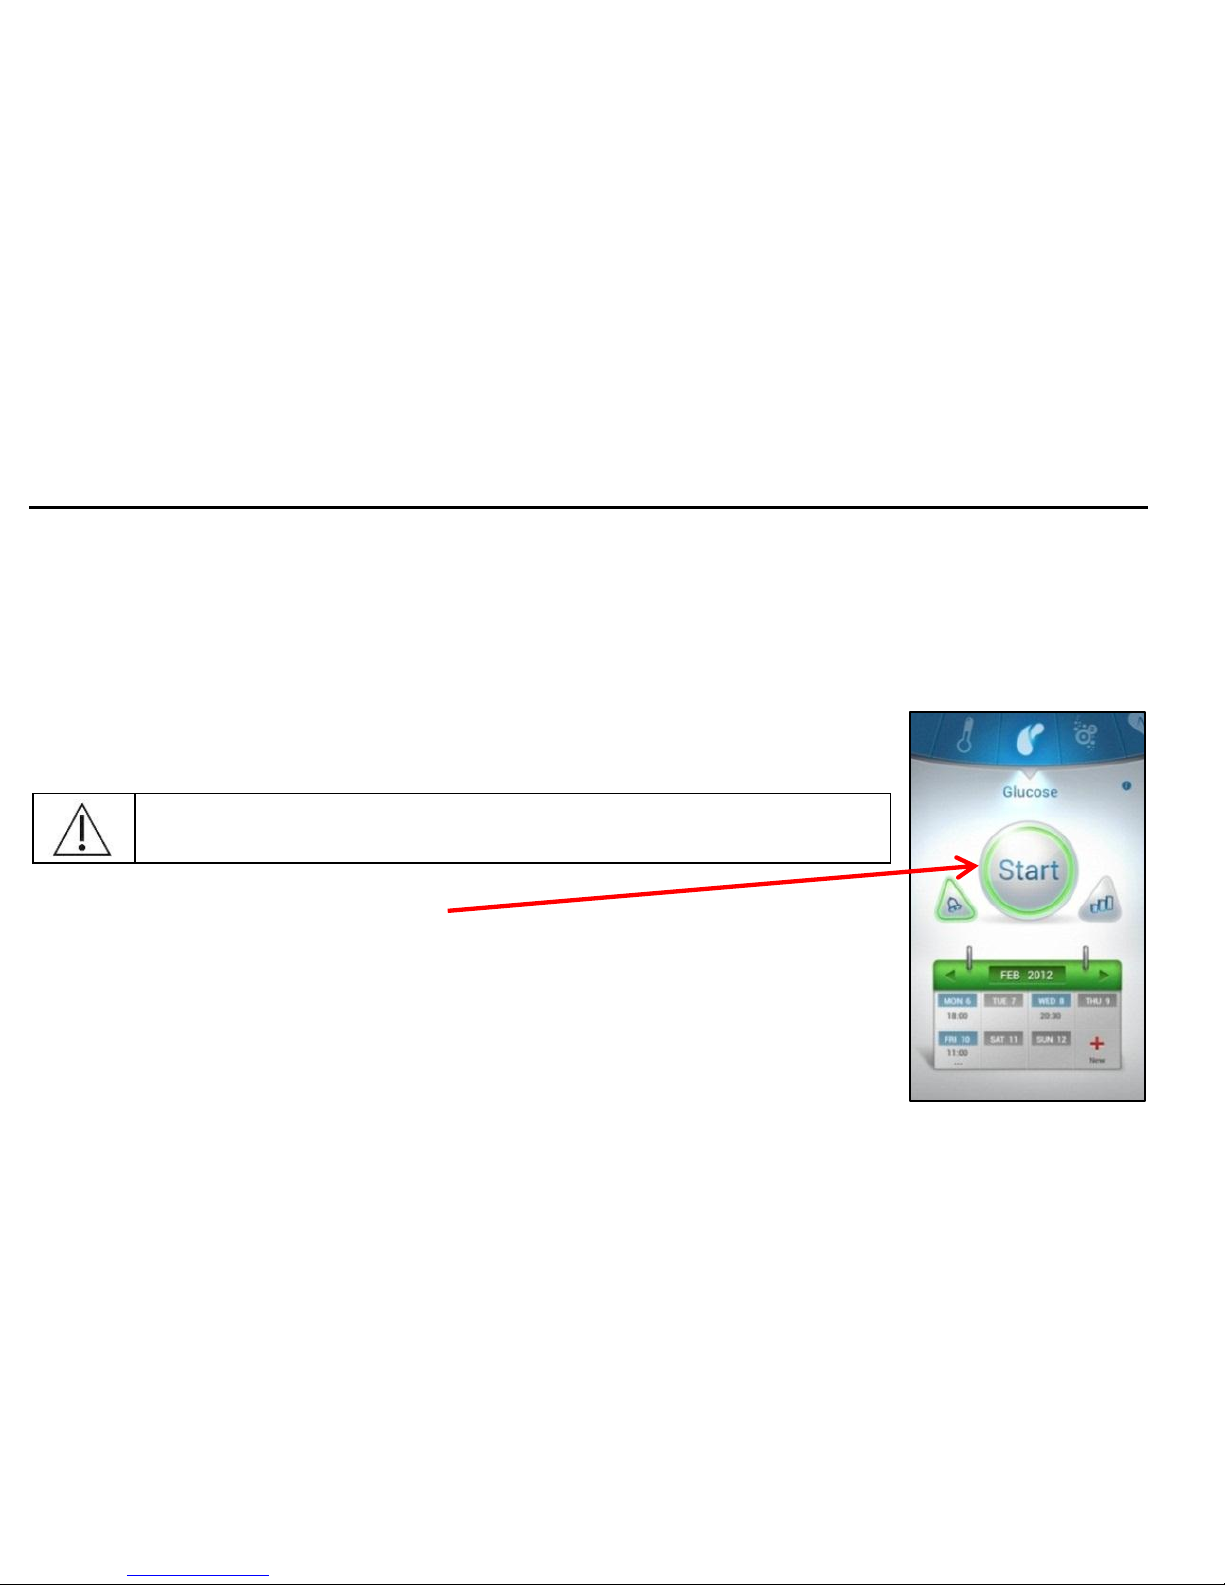
1. To start the glucose test press Start.
The screen rotates to the horizontal mode, please hold the LifeWatch V horizontally.
Page 87
87
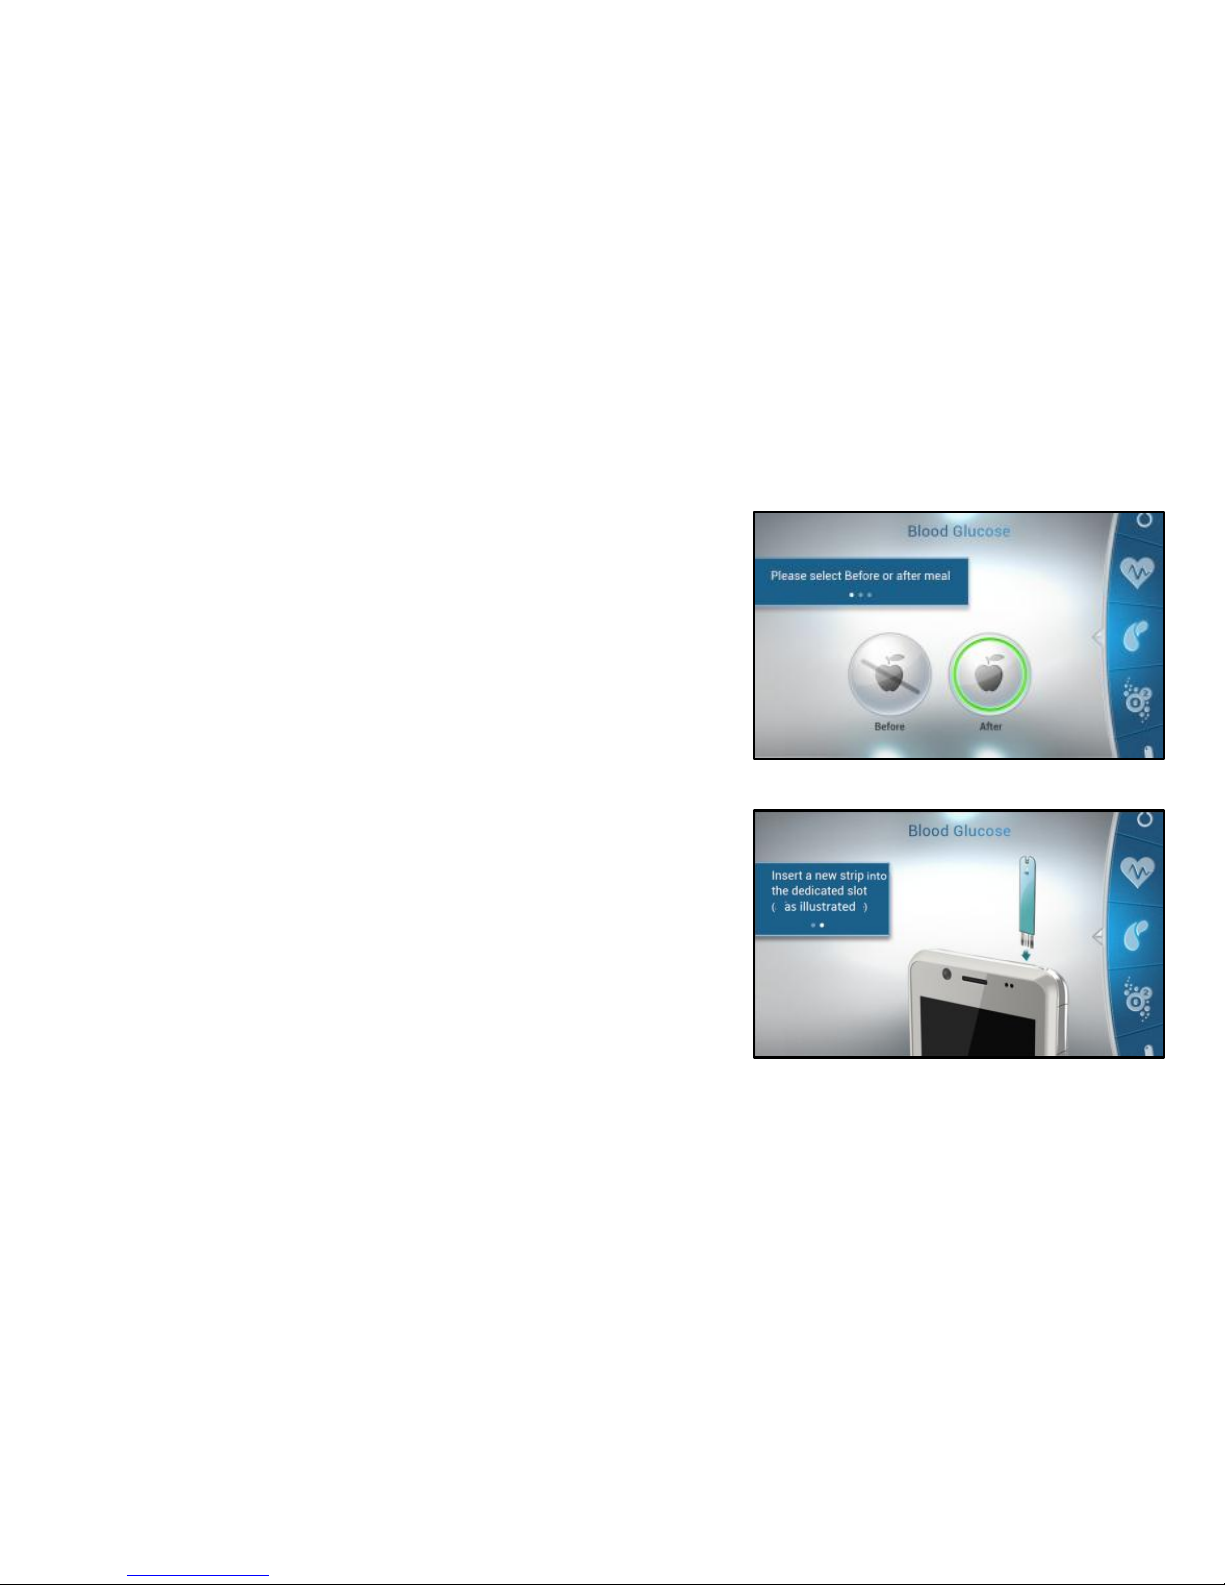
2. A new screen opens, select Before or After meal.
3. Please insert a new glucose strip into the glucose slot
when instructed.
Page 88
88
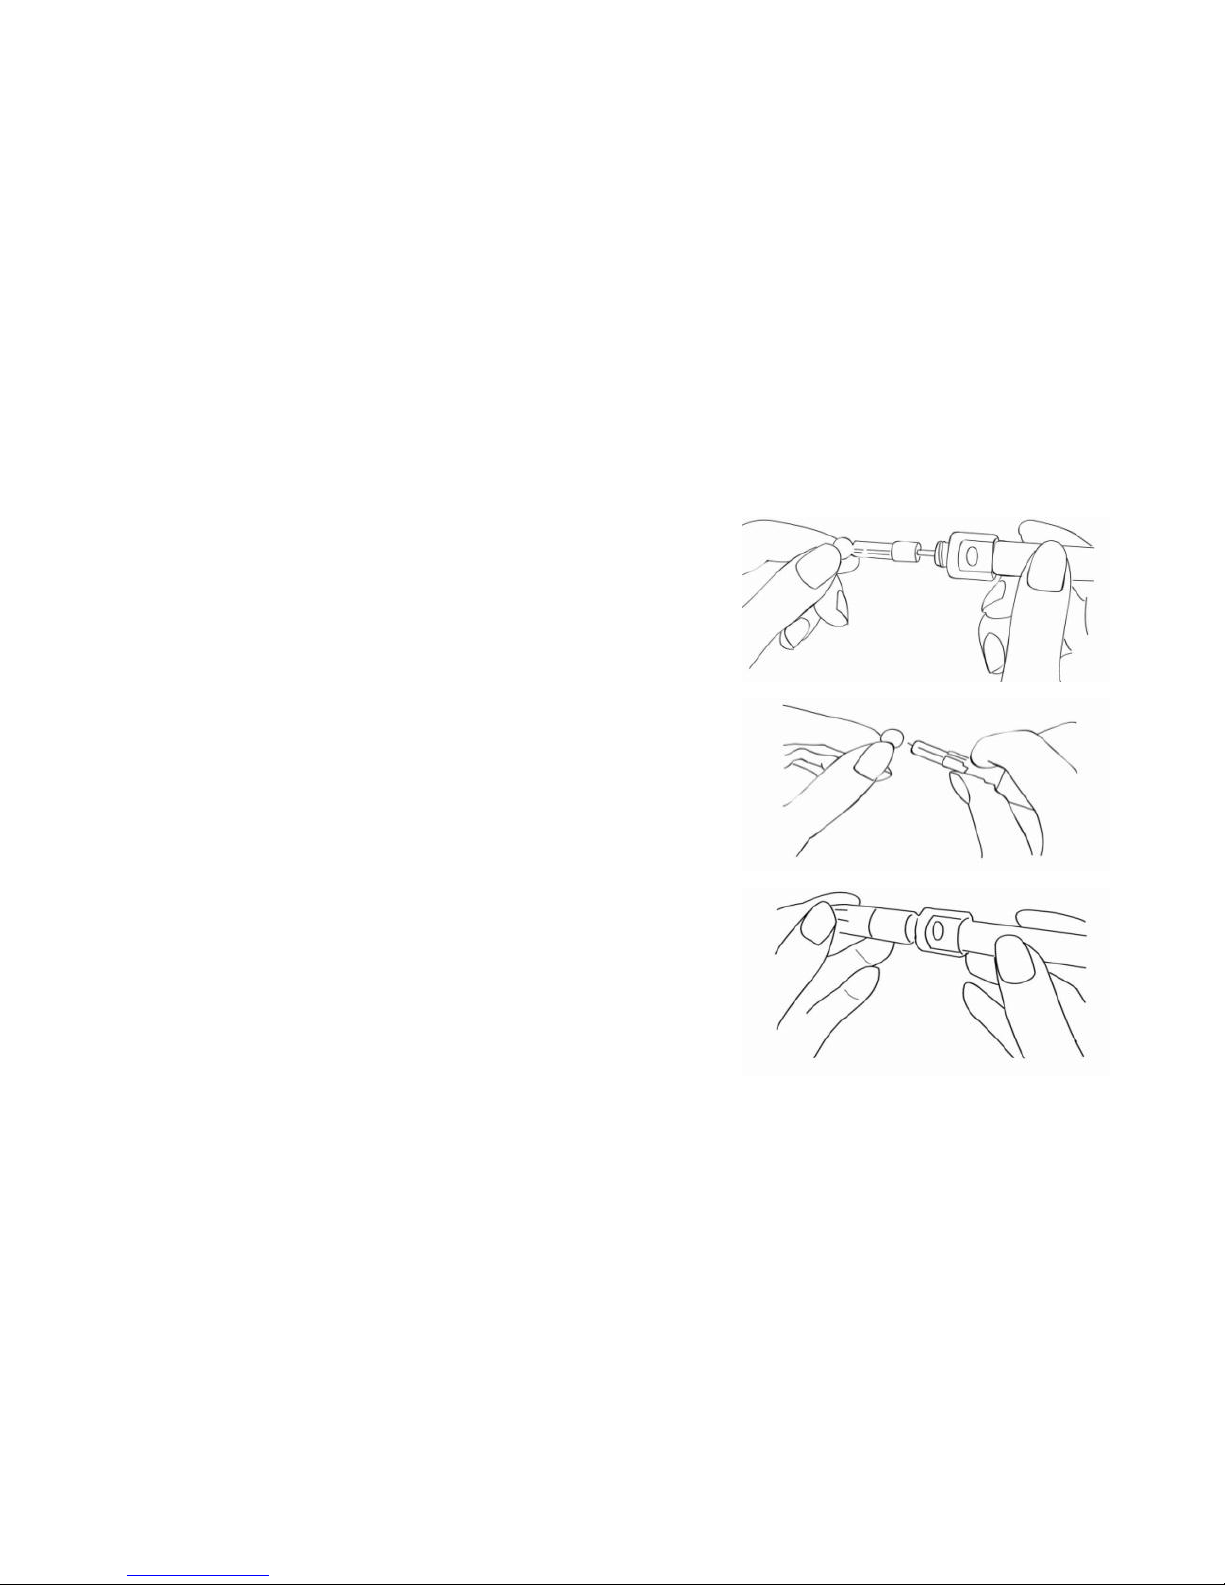
4. Prepare the lancing device:
Screw off the cap of Lancing Device. Insert a lancet into the
lancet holder and push down firmly until it is fully seated.
Twist the protective disk until it separates from the lancet.
Replace the lancet device cap. Turn the cap until it is snug
but not too tight.
Page 89

89
The adjustable tip offers 5 levels of skin penetration. Twist
the adjustable tip in either direction until the number lines up
with the Arrow:
1-2 for soft or thin skin,
3-4 for average skin,
5 for thick or calloused skin.
Please select the most suitable depth for you to avoid
unnecessary pain.
Slide the ejection/cocking control back until it clicks. If it
does not click the device may have been cocked when the
lancet was inserted.
Page 90
90
5. Take a blood sample using the lancing device (see
supplied lancing device instructions).
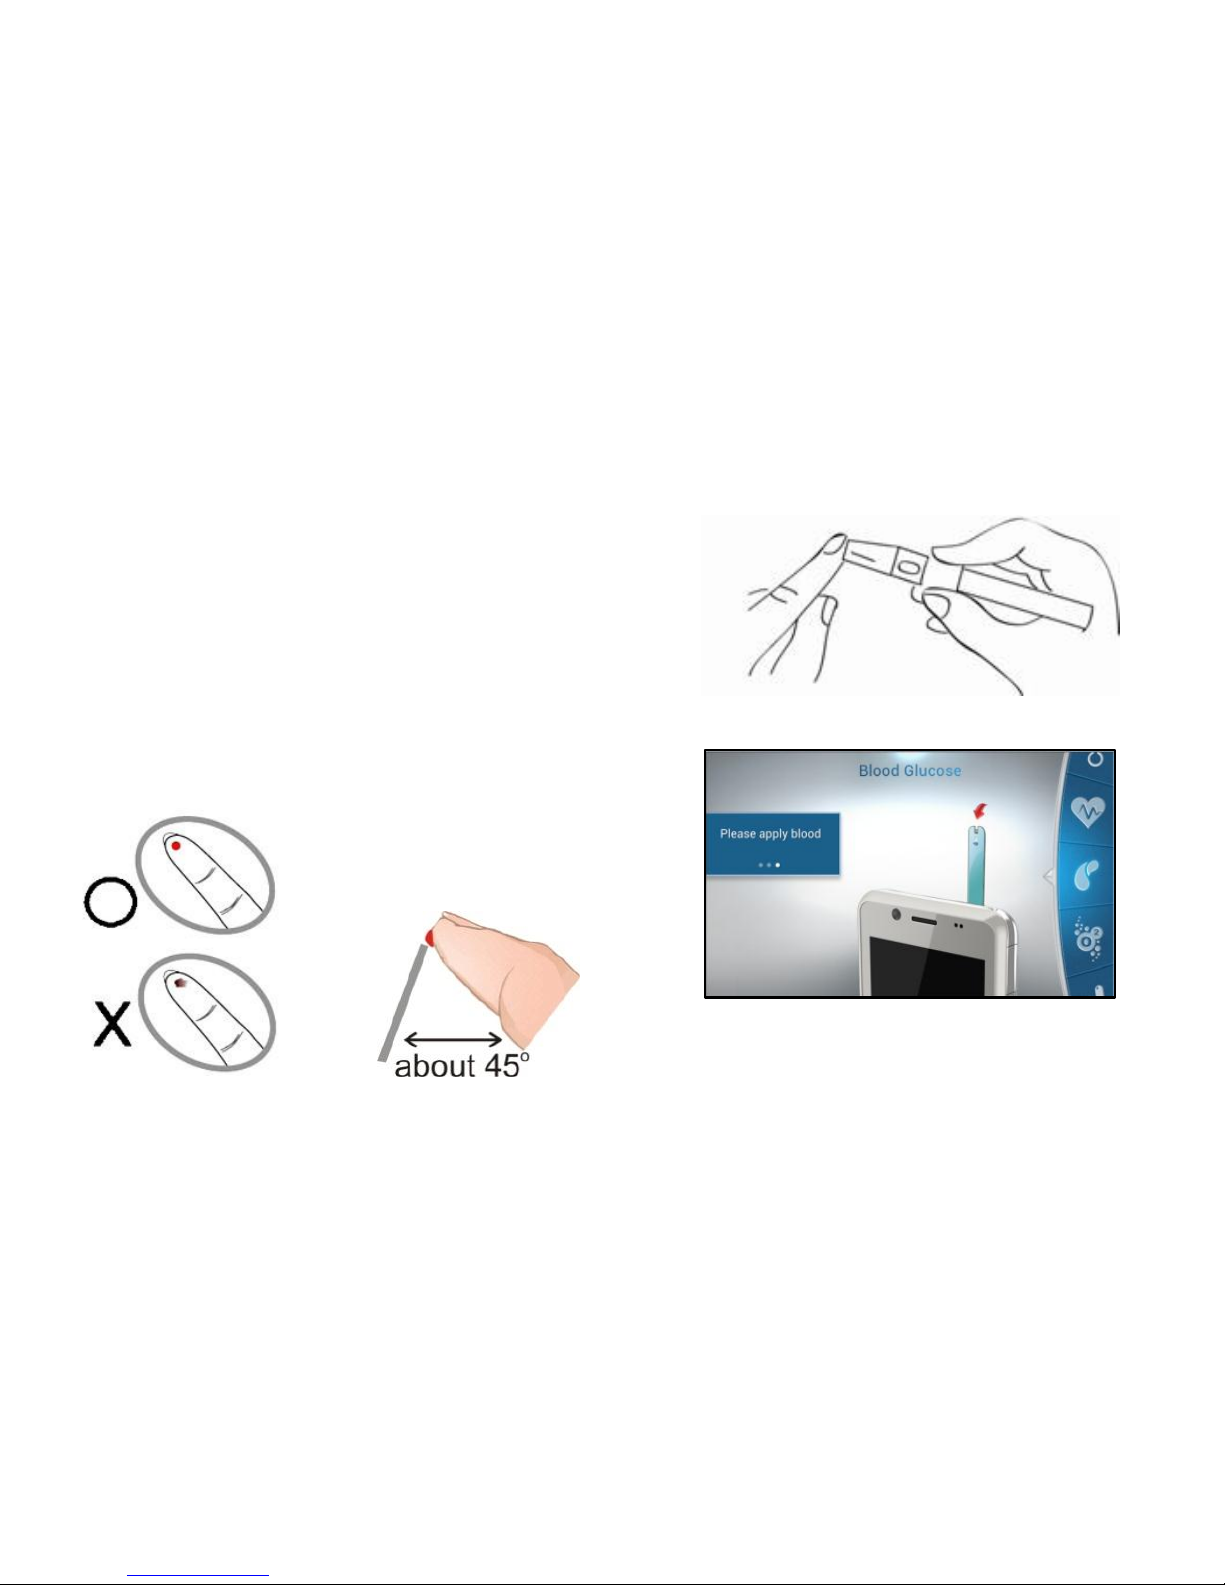
6. Place the finger with the acquired drop of blood at the tip
of the glucose strip, as shown on the screen and below.
Page 91
91
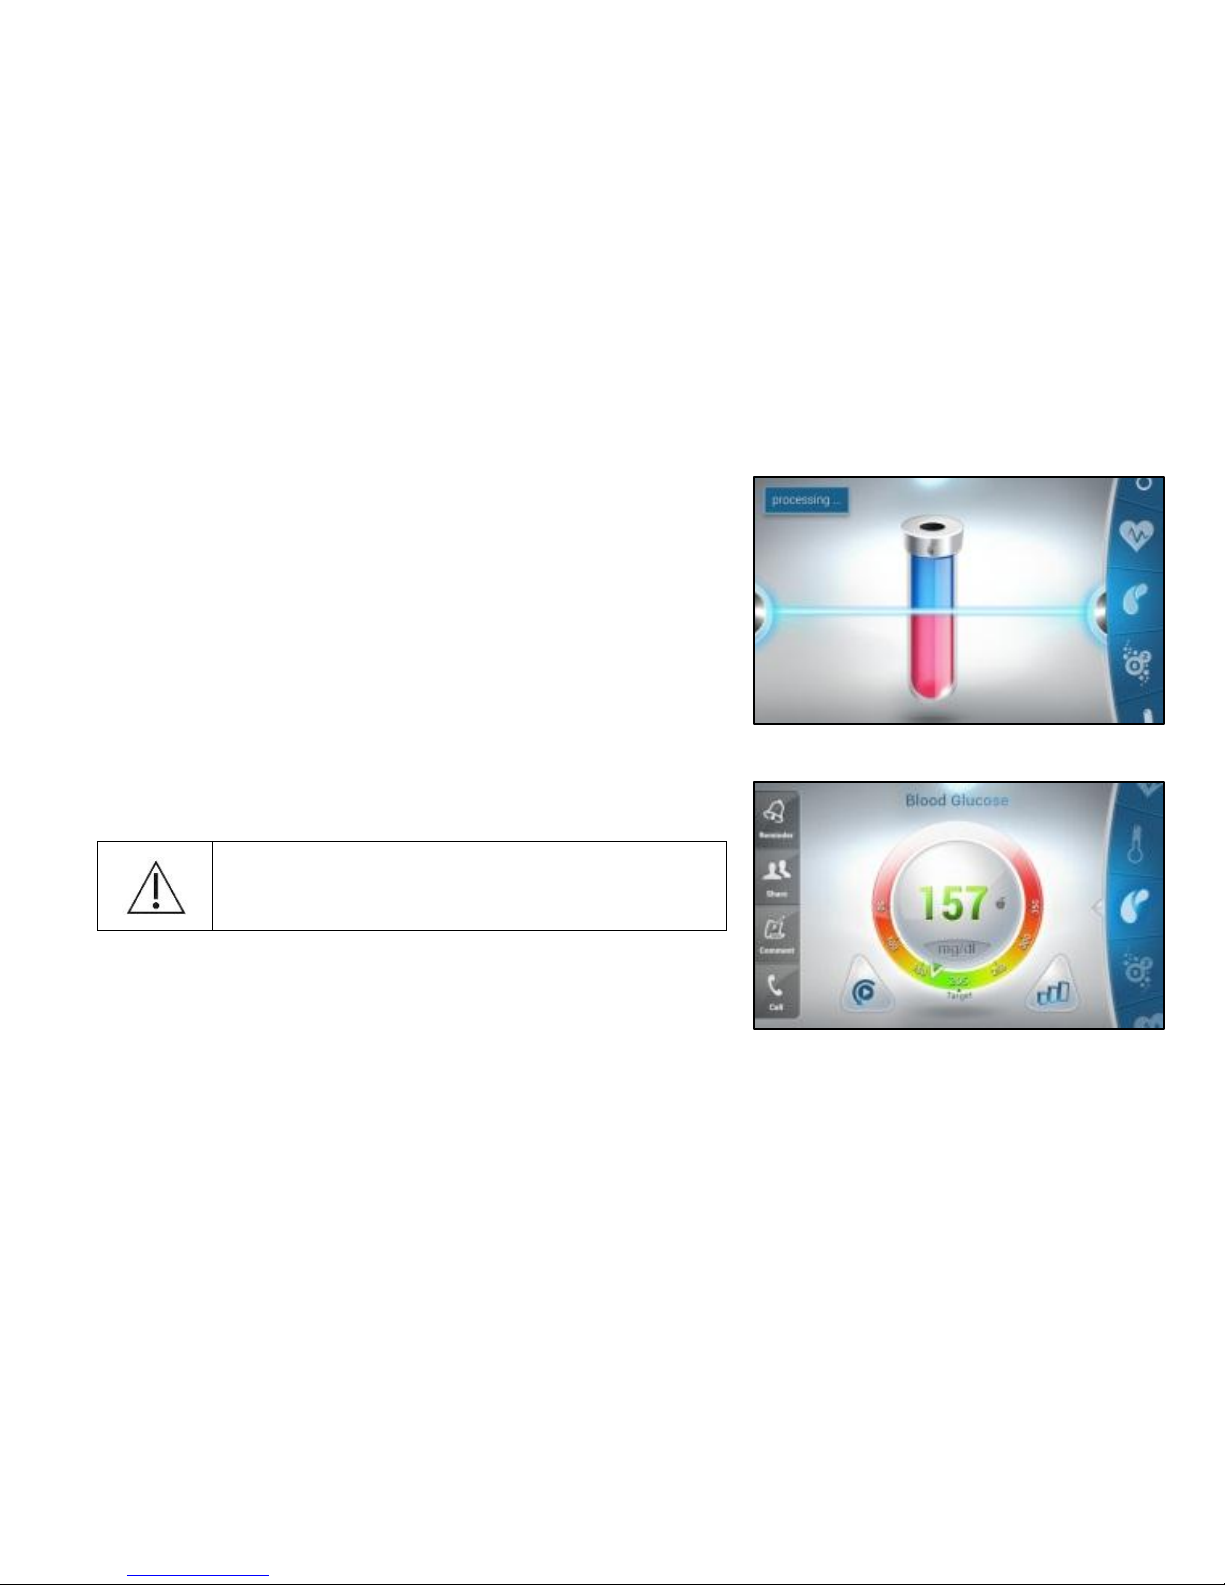
7. The Processing screen appears, after a few seconds the
results screen appears.
8. When the test is completed the results screen appears.
Remove the used test strip and lancet; dispose of them.
Glucose strips are for single use only; dispose
of used strips as per the instructions included
with the strips.
It is now possible to:
Retake the test by pressing the Retest button
Use the Scroll Wheel to scroll to another test
Display test History
Use the options available on the left bar
Page 92
92
Important Information
Severe dehydration resulting from excessive water loss may cause false low results. If you believe you are suffering from
severe dehydration, consult a healthcare professional immediately.
Test results below 70 mg/dL (3.9 mmol/L) mean low blood glucose (hypoglycemia). Test results greater than 240 mg/dL
(13.3 mmol/L) mean high blood glucose (hyperglycemia). If you get results below 70 mg/dL or above 240 mg/dL, and do not
have symptoms, repeat the test once. If you have symptoms or continue to get results that fall below 70 mg/dL or above 240
mg/dL, follow the treatment advice of your healthcare professional.
If you are experiencing symptoms that are not consistent with your blood glucose test results AND you have followed all the
instructions described in the LifeWatch V User Manual, call your healthcare professional.
A red blood cell count (hematocrit) that is either very high (above 55%) or very low (below 30%) can cause false results.
Glucose Test Troubleshooting
Problem
Possible Cause(s)
Solution
Blood glucose
results are
inconsistent.
1. Not enough blood is placed on the Test
Strip.
2. Test Strips have passed their expiration
date.
3. Deteriorated Test Strip caused by heat or
humidity.
4. Device, and/or Test Strip were not at room
temperature when used.
1. Rerun test with a new Test Strip and apply a sufficient
blood to fill the Test Strip tip.
2. Obtain new Test Strips have not yet exceeded their
expiration date.
3. Run a Control Solution Test using a new Test Strip. If
the results are still out of range, replace the Test Strip
package. See package for proper storage instructions.
4. Allow time for the Device, Control Solution and/or Test
Strips to come to room temperature before use.
Page 93
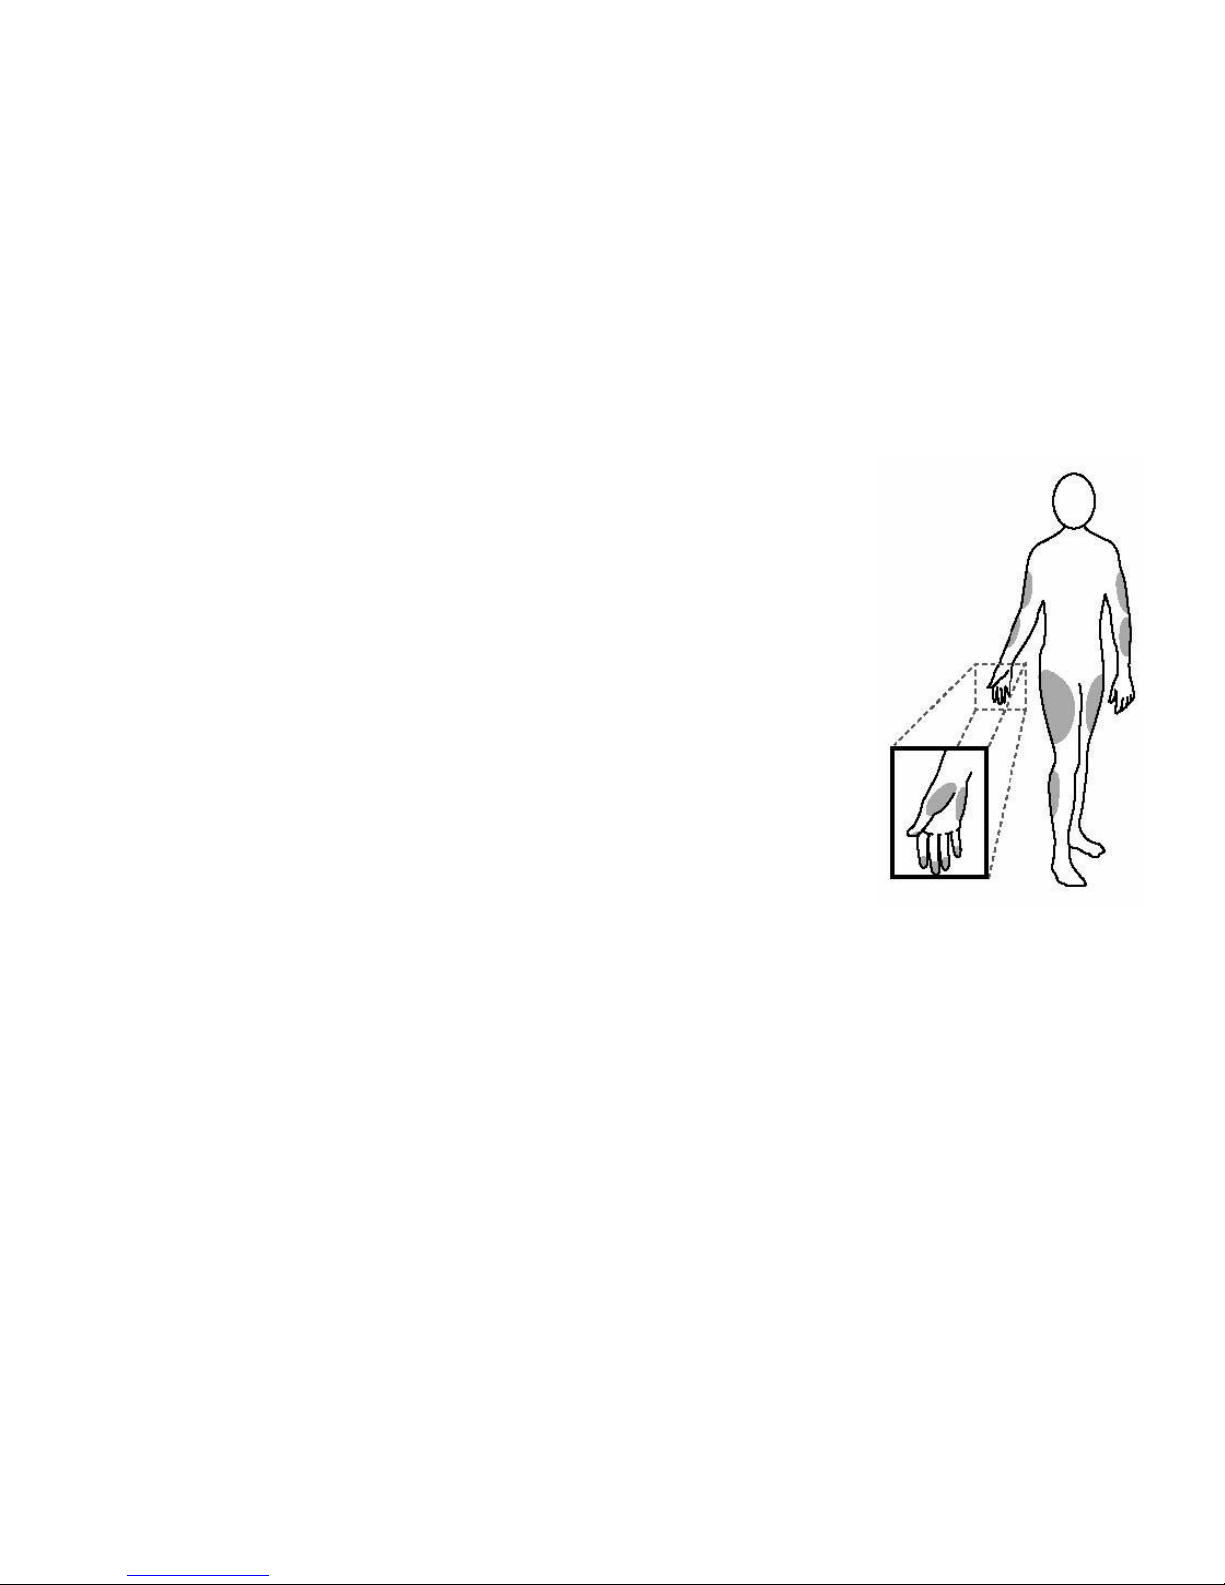
93
Alternative Site Testing (AST)
Important: There are limitations for doing AST.
Please consult your healthcare professional before you do AST.
What is AST?
Alternative site testing (AST) means that people use parts of the body other
than fingertips to check their blood glucose levels.
This system provides you to test on the palm, the forearm, the upper arm,
the calf, or the thigh with the equivalent results to fingertip testing.
What’s the advantage?
Fingertips feel pain more readily because they are full of nerve endings
(receptors). At other body sites, since nerve endings were not so condensed,
you will not feel as much pain as at the fingertip.
When to use AST?
Food, medication, illness, stress and exercise can affect blood glucose
levels.
Capillary blood at fingertip reflects these changes faster than capillary blood at other sites. Therefore when
testing blood glucose during or immediately after meal, physical exercise, or any other event, take blood
sample from your finger only.
Page 94

94
We strongly recommend you do AST ONLY in the following intervals:
In a pre-meal or fasting state (more than 2 hours since the last meal).
Two hours or more after taking insulin.
Two hours or more after exercise.
Do NOT use AST if:
You think your blood glucose is low.
You are unawareness of hypoglycemia.
Your AST results do not match the way you feel.
You are testing for hyperglycemia.
Your routine glucose results are often fluctuating.
You are pregnant.
How to increase the accuracy?
Stimulating blood perfusion by rubbing the puncture site prior to blood extraction has a significant influence
on the glucose value obtained. Blood from the site without rubbing exhibits a measurably different glucose
concentration than blood from the finger. When the puncture site was rubbed (20 seconds) prior to blood
extraction, the difference was significantly reduced.
Page 95
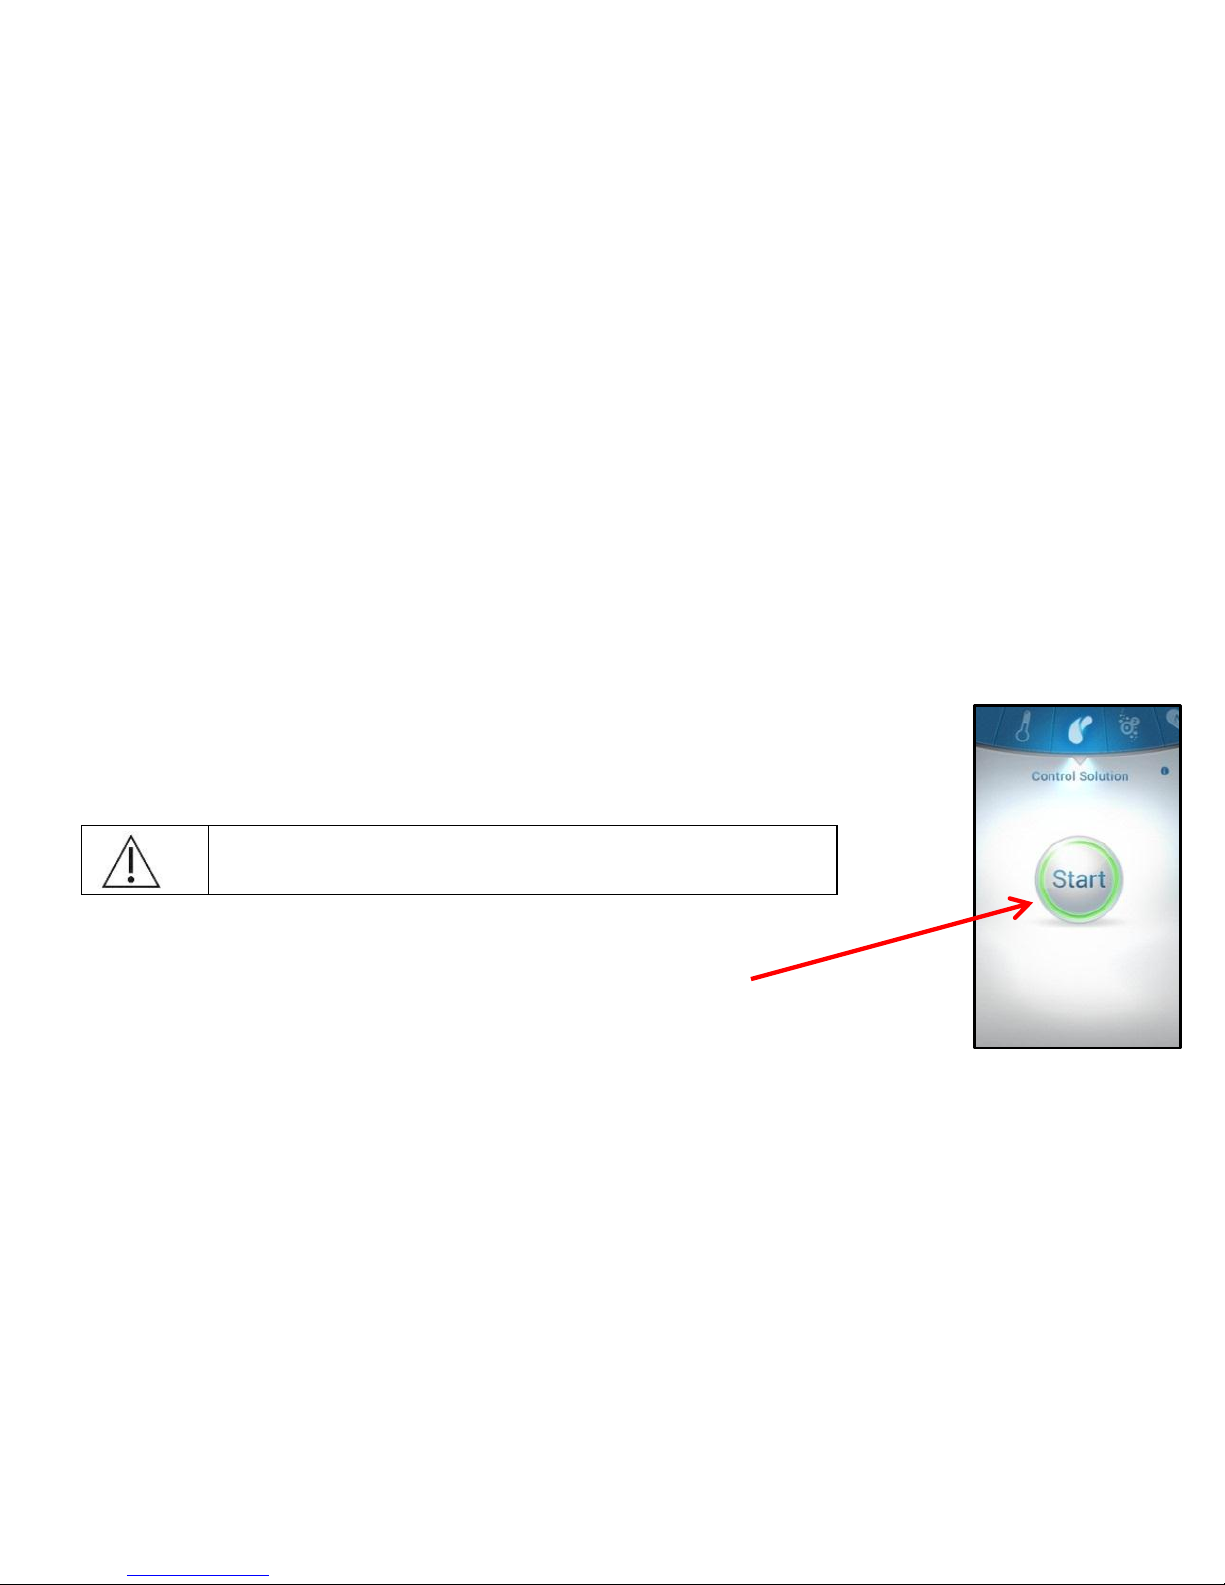
95
Control Solution Test
Why Use the Control Solution?
Ensure that your LifeWatch V and LifeWatch V Test Strips are working together properly.
Practice testing without having to use your own blood.
Perform Control solution tests when:
First receive your LifeWatch V.
You feel your LifeWatch V or test strips are not working properly.
You feel your test results are not accurate.
After dropping or damaging your LifeWatch V or exposing it to liquids.
Your healthcare professional advises you perform the test.
Perform control solution tests for any new vial or if
“abnormal” results are shown.
4. Select the Control Solution test from the options menu.
5. The following screen appears. To start the test press Start.
6. The screen rotates to the horizontal mode, please hold
the LifeWatch V horizontally.
Page 96
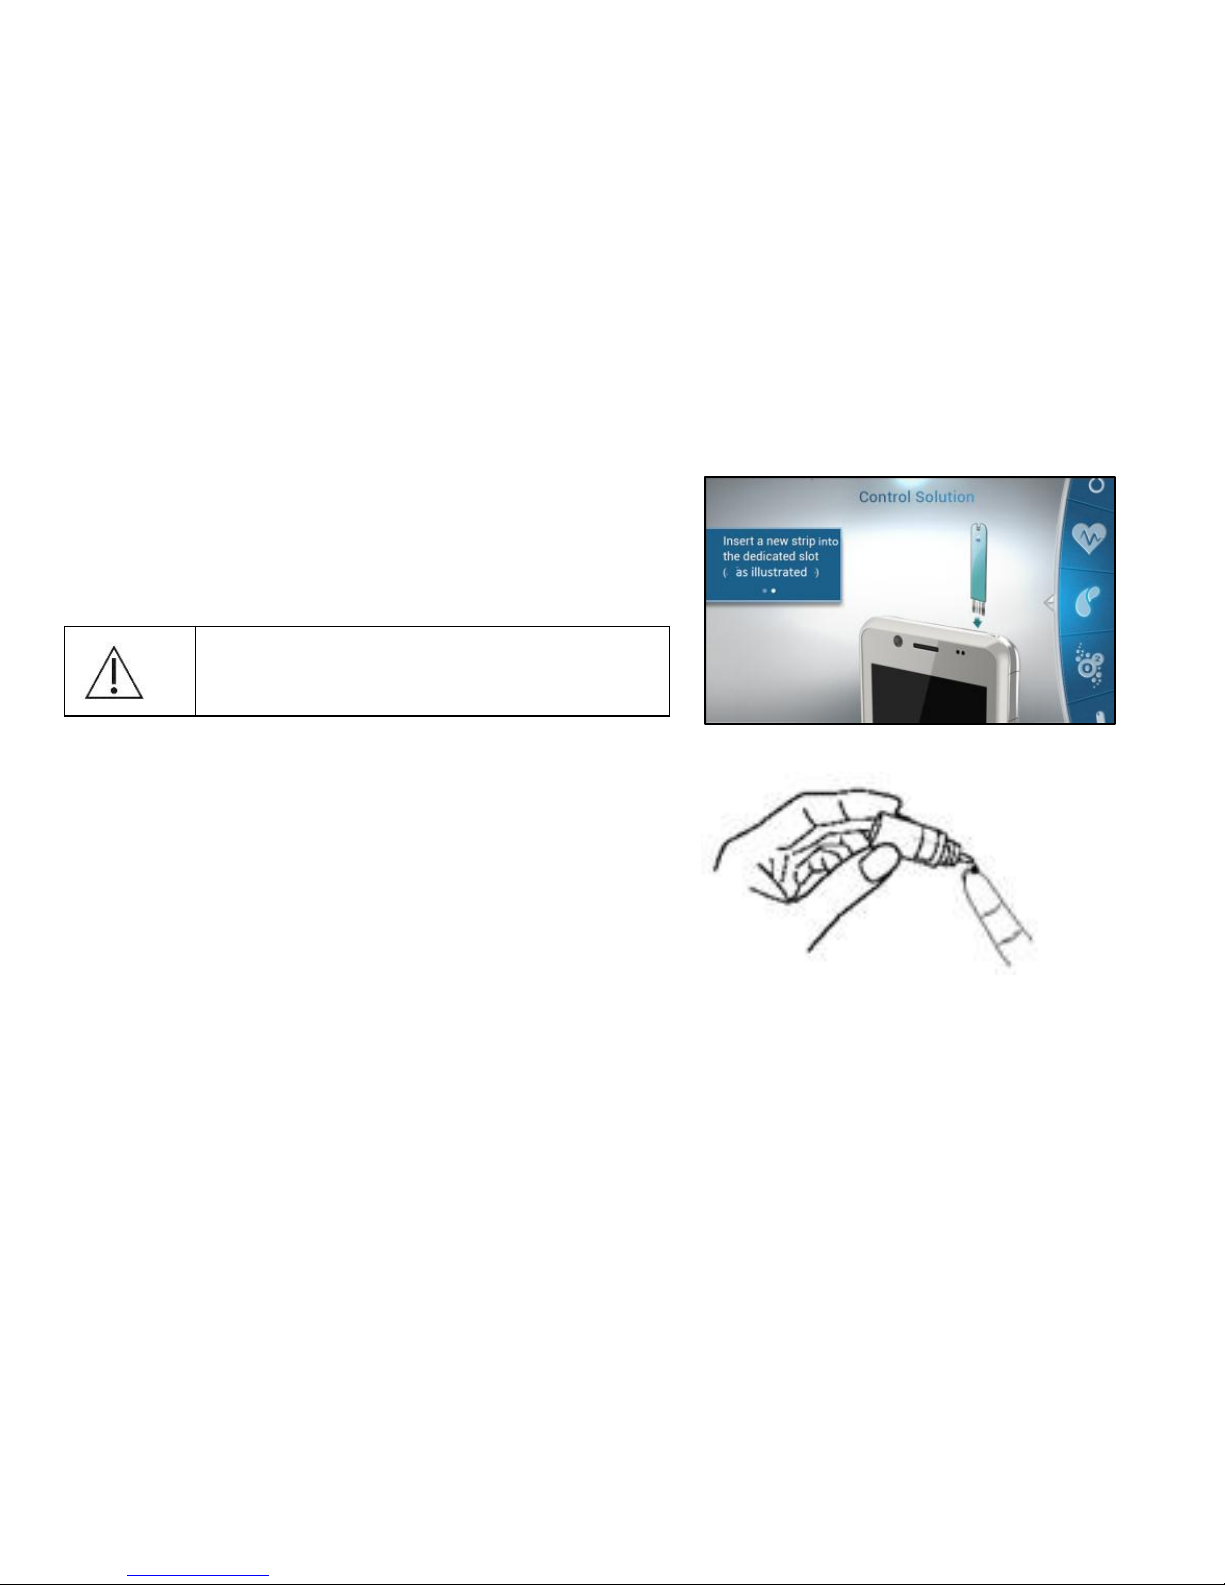
96
7. Insert the new glucose strip into the glucose slot when
instructed.
Glucose strips are for single use only;
dispose of used strips as per the
instructions included with the strips.
8. Place the Control Solution:
Shake the control solution vial.
Place the first drop of control solution in a
disposable container.
Clean the bottle tip using a tissue
or paper towel.
Place a second drop at the tip of your finger
Page 97
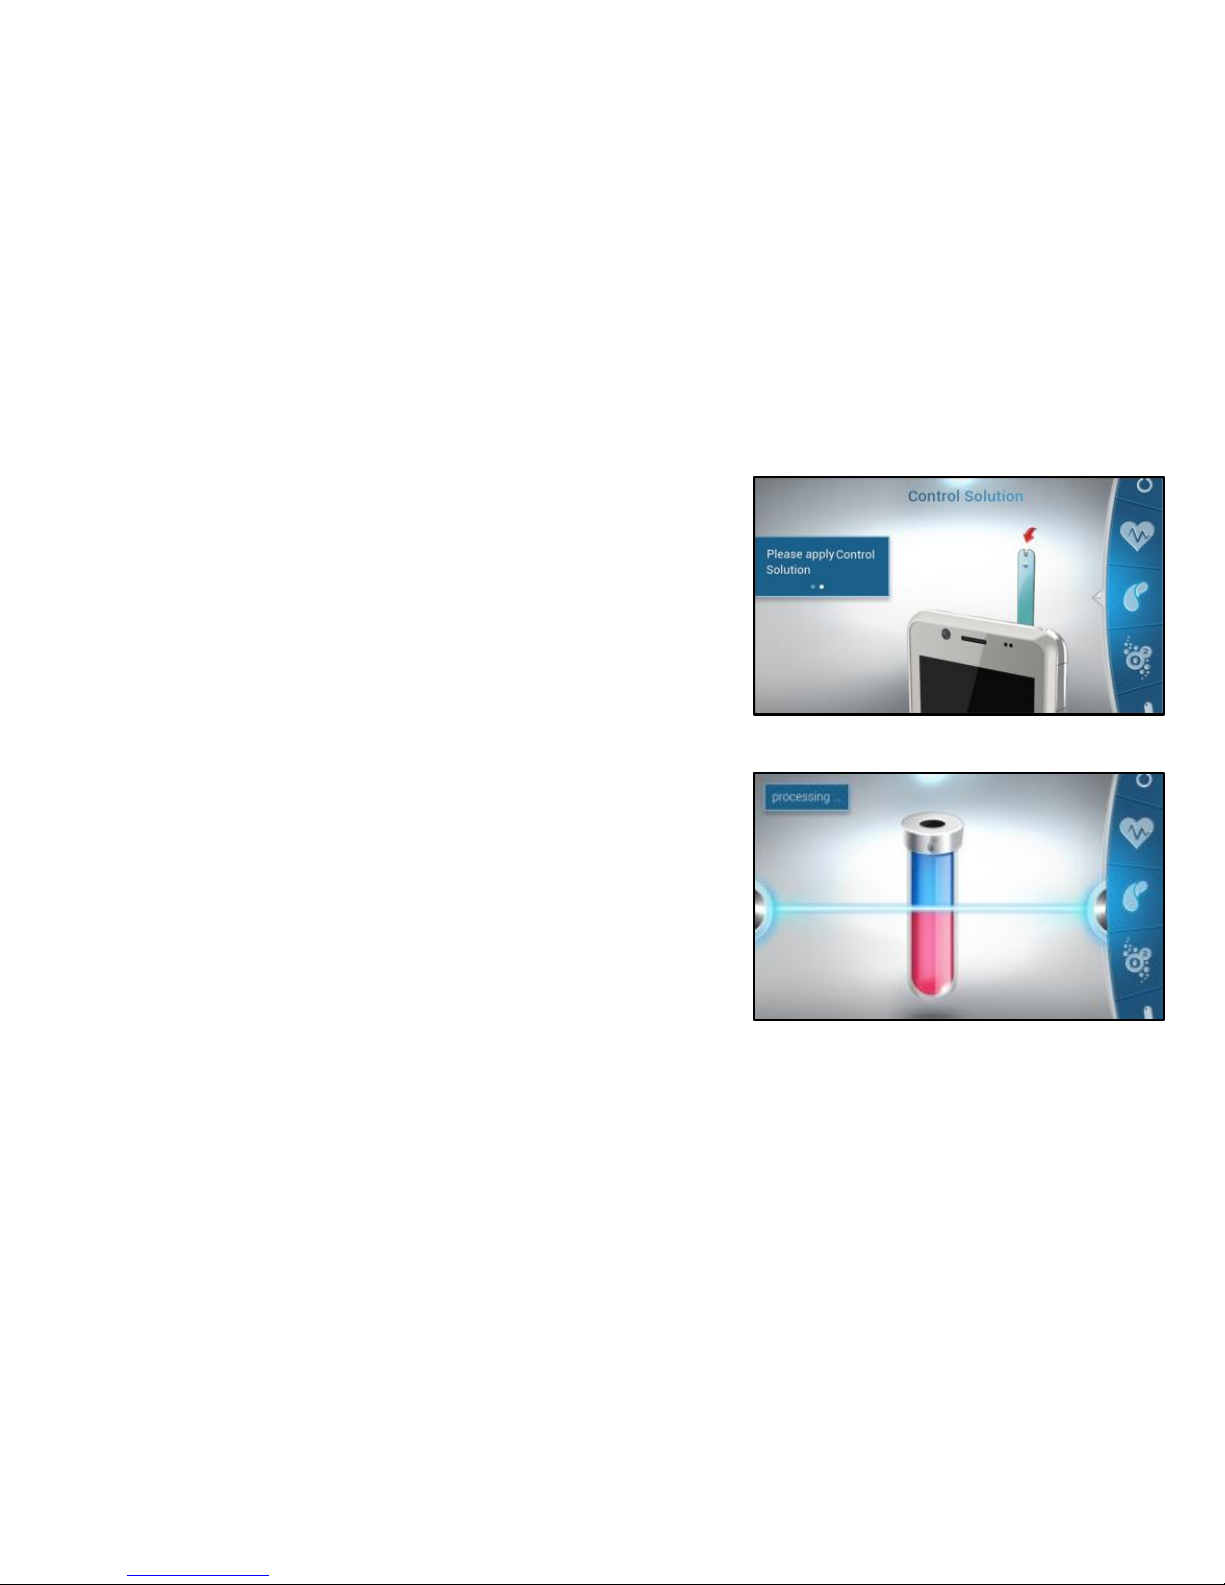
97
9. Using your finger place the drop of control solution on
the strip in the LifeWatch V as shown. The drop is
drawn into the test strip. Move your finger away when
the strip window is filled
10. The Processing screen appears, after a few seconds
the results screen appears.
Page 98
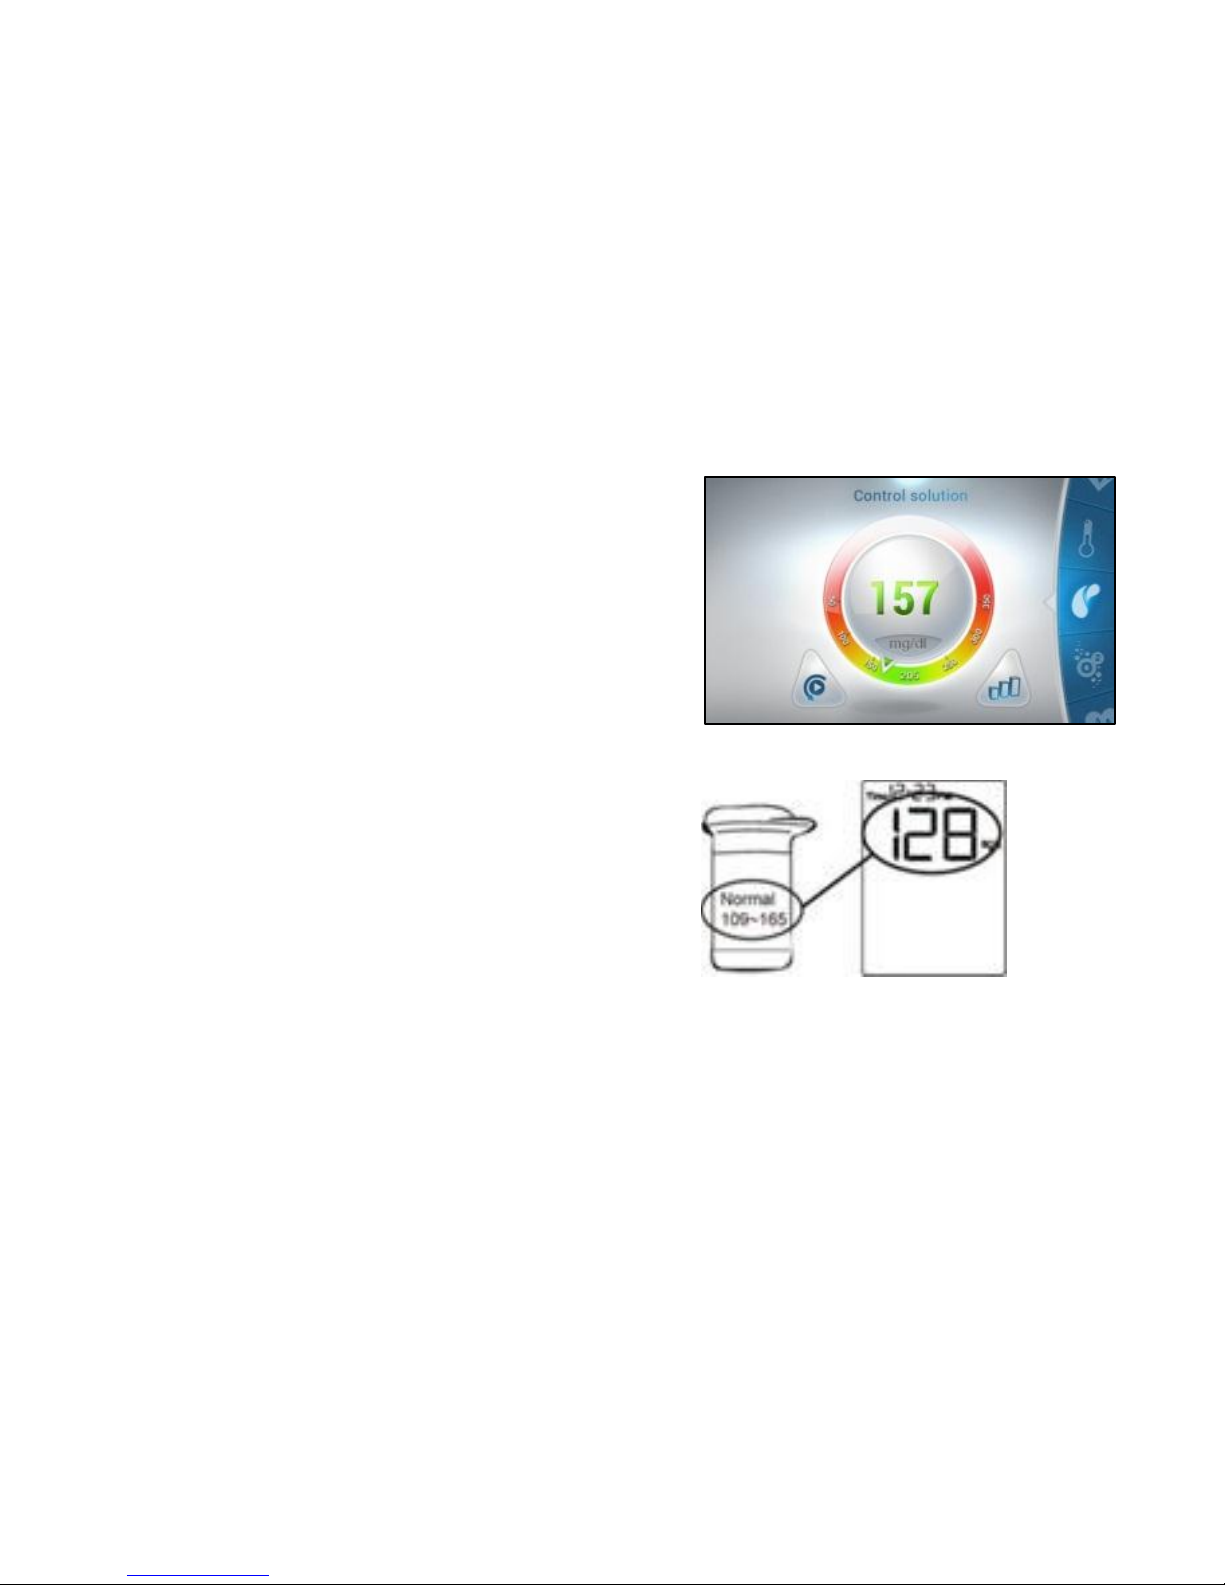
98
11. When the test is completed the results screen appears.
12. Remove the used test strip and dispose of it.
13. Compare the result of your control solution test to the
range printed on your LifeWatch V Blood Glucose Test
Strip vial label for the control solution level that you
used.
Your control solution result should fall within this range.
If your control solution test results are out of the range,
repeat the test and refer to Control Solution
Troubleshooting of this guide to see potential causes of
error.
Page 99

99
Control Solution Troubleshooting
Problem
Possible Cause(s)
Solution
Control solution
test results are
inconsistent, or
control solution
test results are
not within the
specified range.
1. Not enough control solution is
placed on the Test Strip.
2. Test Strips or control solution
have passed their expiration date.
3. Deteriorated Test Strip caused
by heat or humidity.
4. Device, Control Solution and/or
Test Strip are not at room
temperature when used.
1. Rerun the test with a new Test Strip and
apply sufficient control solution to fill Test Strip
tip.
2. Obtain new Test Strips and/or Control
Solution that have not yet exceeded their
expiration date.
3. If the results are still out of range, replace
the package of Test Strips. See package for
proper storage instructions.
4. Allow time for the Device, Control Solution
and/or Test Strips to come to room
temperature before use.
Page 100

100
ECG/HR/BFA/SP02/Stress Level Analyzer Tests
Recommended Preparations - Wash and dry your hands.
If your fingers are too dry or are extremely cool, accurate measurements may not be possible.
Condition
Actions
Hands are dry.
Slightly moisten hands with a wet towel, then measure.
Your hands are cold
Warm your hands by immersing in warm water or staying in a
warm room. Start the measurement again.
Special Instructions for BFA Test
The following physical conditions change the
water content in the body, the measured body
fat percentage may differ significantly from the
real number.
Right after vigorous exercise
Right after taking bath or sauna
When drinking large amounts of alcohol
When drinking a large amount of water or
after a meal
Exceptions for BFA Test
The measured body fat percentage may differ from the
actual body fat percentage for people with changing
amounts of water and tissue density within their bodies.
Children of growing stage
Elderly people and women after menopause
Having osteoporosis (very low bone density)
People with a fever or swelling
Bodybuilders or professional athletes
Patients undergoing dialysis
Pregnant women
 Loading...