

Page 1

TV Walker Lite
User Manual
Animation Technologies Inc.
www.lifeview.com.tw
Ver: 1.5
Page 2

Copyright and Trademark Notice
©2004 by Animation Technologies Inc. All rights reserved.
Information in this document is subject to change without notice. No part of this
document may be reproduced or transmitted in any form or by any means, electronic
or mechanical without prior written permission of Animation Technologies Inc.
Animation Technologies Inc. makes no representation or warranties with respect to
the contents hereof and specifically disclaims any implied warranties of
merchantability or fitness for any particular purpose. Animation Technologies Inc.
reserves the right to revise this manual and to make changes in its content without
obligation to notify any person or organization of such revision or change. In no event
shall Animation Technologies Inc. be liable to you or any third party for any
consequential, incidental, direct, indirect, special, punitive, or other damages
(including without limitation, damages for loss of profits, interruptions, loss of
information, pecuniary loss, etc.), even if Animation Technologies Inc. has been
advised of the possibility of such damages arising from any defect or error in this
manual or product.
Updates to this documentation can be obtained from our website:
www.lifeview.com.tw.
Windows
®
is a trademark of Microsoft Corporation. All other brand names used in this
document are registered trademarks of their respective companies.
CE Statement: This equipment has been tested and complies with EN 55022, EN
55024, EN 61000-3-2, EN 61000-3-3, EN 61000-4-2, EN 61000-4-3, EN 61000-4-4,
EN 61000-4-5, 61000-4-6, EN 61000-4-8, EN 61000-4-11 standards.
Page 3

Contents
1. TV Walker Overview .......................................................... 1
1.1 Features................................................................................................... 1
1.2 System Requirements.............................................................................. 2
1.3 Package contents ....................................................................................3
2. Getting Started ................................................................... 4
2.1 The TV Walker unit .................................................................................. 4
2.2 Software installation................................................................................. 6
2.3 Ulead Toolbox..........................................................................................7
2.4 Launching TV Walker............................................................................... 8
2.5 How to update the driver.......................................................................... 9
3. The LifeView TV Walker Lite Interface............................. 11
3.1 Moving and resizing ............................................................................... 11
3.2 Choosing your video source................................................................... 12
3.3 Channel and volume buttons .................................................................12
3.4 Info panel ............................................................................................... 12
3.5 Settings button ....................................................................................... 13
3.6 Additional settings..................................................................................18
3.7 How to record a program .......................................................................20
3.8 TimeShifting ........................................................................................... 21
3.9 The Gallery ............................................................................................22
4. Remote Control and Keyboard Shortcut Summary.......... 24
5. Contact Us ....................................................................... 26
Page 4

Page 5

TV Walker Overview
1. TV Walker Overview
Thank you for purchasing the TV Walker
Lite
USB 2.0 all-in-one system. This product
turns your PC into a powerful desktop multimedia system. Your TV Walker provides a
high-quality video-viewing experience, enabling you to watch cable TV, broadcast TV,
or video from external sources, right on your computer monitor. The high-quality
viewing experience provided by TV Walker
Lite
will not only allow you to watch cable
and broadcast TV right on your computer monitor, but also provides real-time video
recording in MPEG-1, MPEG-2, and MPEG-4 formats as well as providing other
exciting features.
1.1 Features
z Connects to your PC through a USB 2.0 interface
z Contains a Phillips 7135 chipset
z Supports TV systems including NTSC M/N/NJ, PAL BG/DK/I/M/N, and
SECAM LL DK/I
z Provides worldwide TV audio decoding, including NiCAM, A2, MTS, BTSC,
and EIAJ
z Real-time video recording to MPEG-1/2/4
z Records full motion video up to 720x480/30fps (NTSC) and 720x576/25fps
(PAL)
z Tunes in up to 125 cable or broadcast channels
z Enables input from external devices from either Composite Video or S-Video
z Pause, Rewind, and Fast Forward a live TV program through TimeShifting
z Scheduled Recording
z Captures still images from video
z Allows split-screen previewing of up to 25 channels through Multiple Channel
Preview
z Provides full-screen and resizable viewing modes
z Receives audio through the same USB cable that carries video; no need for
an additional audio cable (except when using external devices)
z Powered by the USB port; no need for an external power adapter
z Fully compatible with current versions of Windows: Windows® 2000 (SP4),
and Windows® XP (SP1)
1
Page 6
TV Walker Overview
1.2 System Requirements
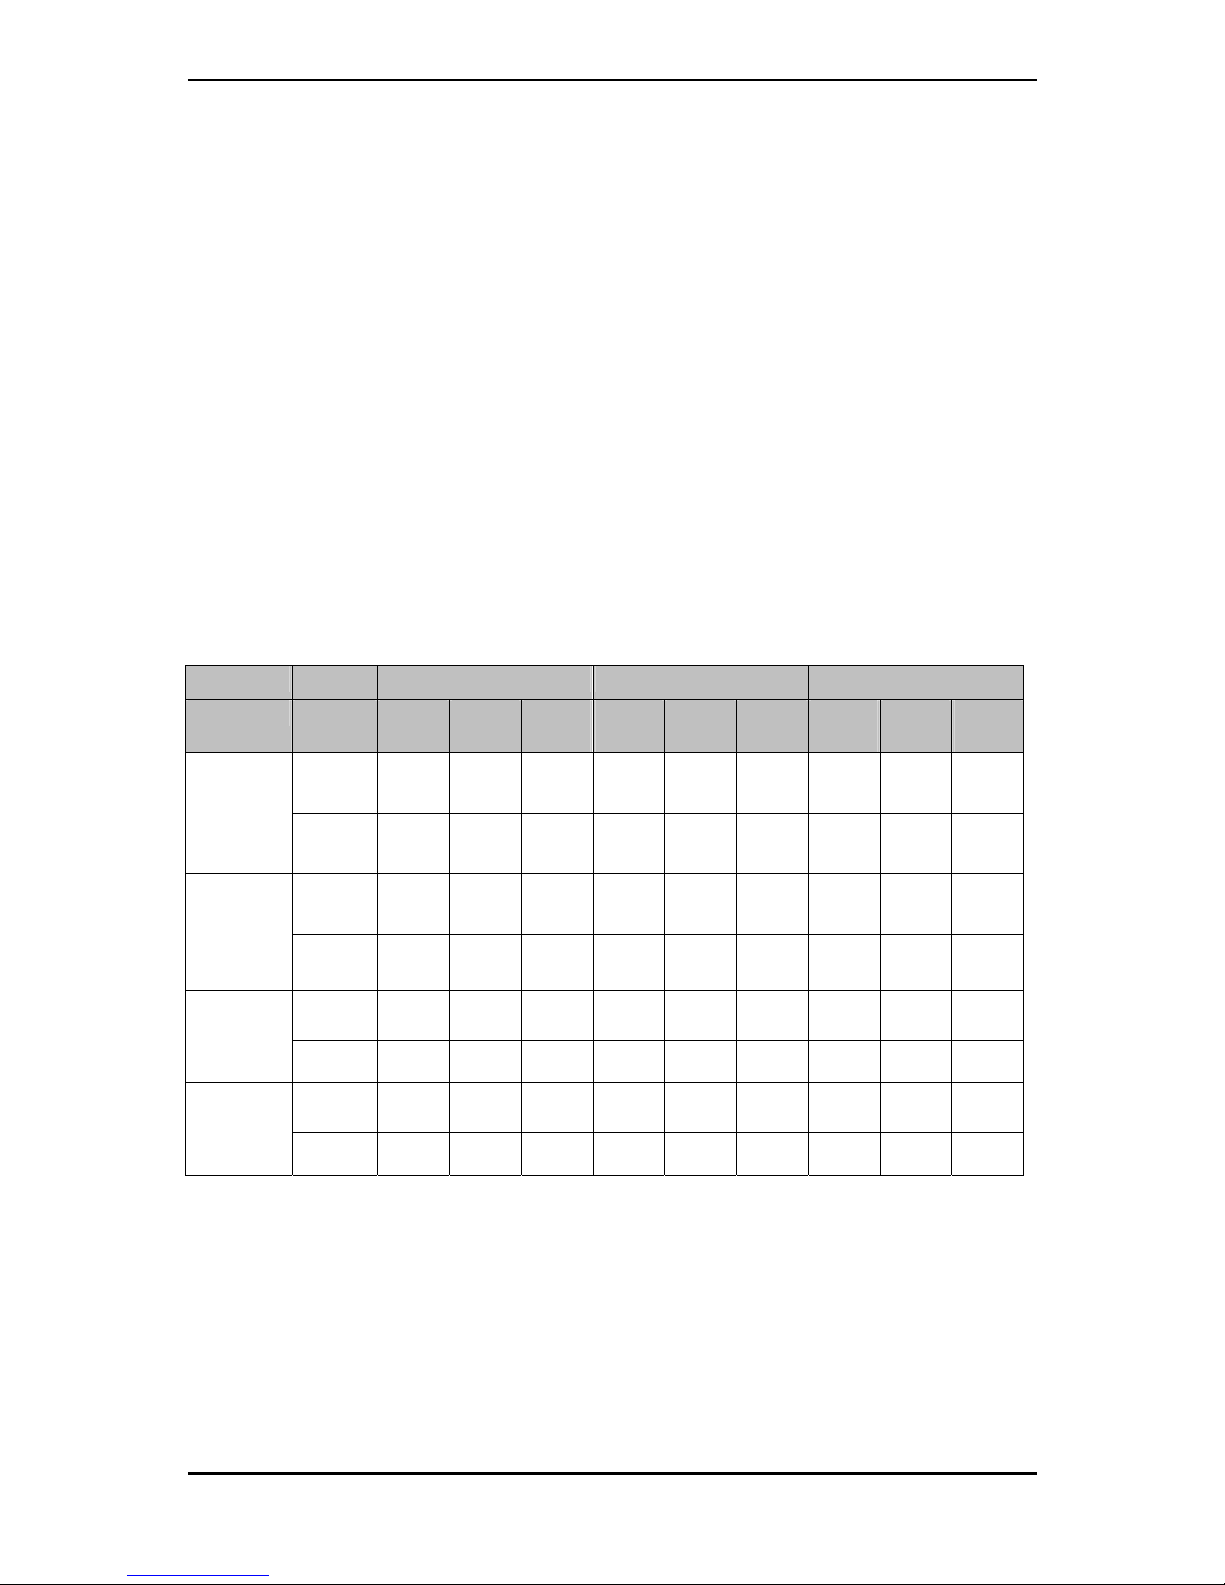
To use LifeView TV Walker, you will need to make sure that your PC meets the
following requirements:
z Pentium® 4 2GHz processor, or faster (see the following specifications)
z Minimum of 256MB RAM (512MB RAM is recommended)
z Windows® 2000 (SP4) or Windows® XP (SP1)
z 100MB hard disk space available for installation, additional space required
for recording and TimeShifting
z CD-ROM or DVD-ROM drive
z VGA card with DirectX 8.1 support
z DirectX 9.0 installed
z Sound card for audio playback
z Available USB 2.0 port
z In addition, you will need cable TV or a TV antenna
* Please always refer to your PC’s manual.
Processor 320x240 640x480 720x480
MPEG 1 MPEG2 MPEG4 MPEG1 MPEG2 MPEG4 MPEG 1 MPEG 2 MPEG
4
Preview
9 9 9
P3 800M
Record
Preview
9 9 9 9 9
9 9
P4 1.6G
PM 1.0G
Record
9 9 9
Preview
9 9 9 9 9 9 9 9 9
P4 2.4G
PM 1.3G
Record
9 9 9 9 9 9 9 9
Preview
9 9 9 9 9 9 9 9 9
P4 3.0G
PM 1.6G
Record
9 9 9 9 9 9 9 9 9
2
Page 7

TV Walker Overview
1.3 Package contents
Your LifeView TV Walker package should contain all the items listed below. Please
inspect the package to make sure that all items are present and no damage was
sustained during shipping.
z TV Walker Lite
z NTSC converter and PAL converter
z Composite Video to S-Video converter
z Audio cable for use with external devices
z USB cable
z Remote control and IR extension cable
z Installation CD with driver and application software
z User guide
z Quick Installation Guide
3
Page 8
Getting Started
2. Getting Started
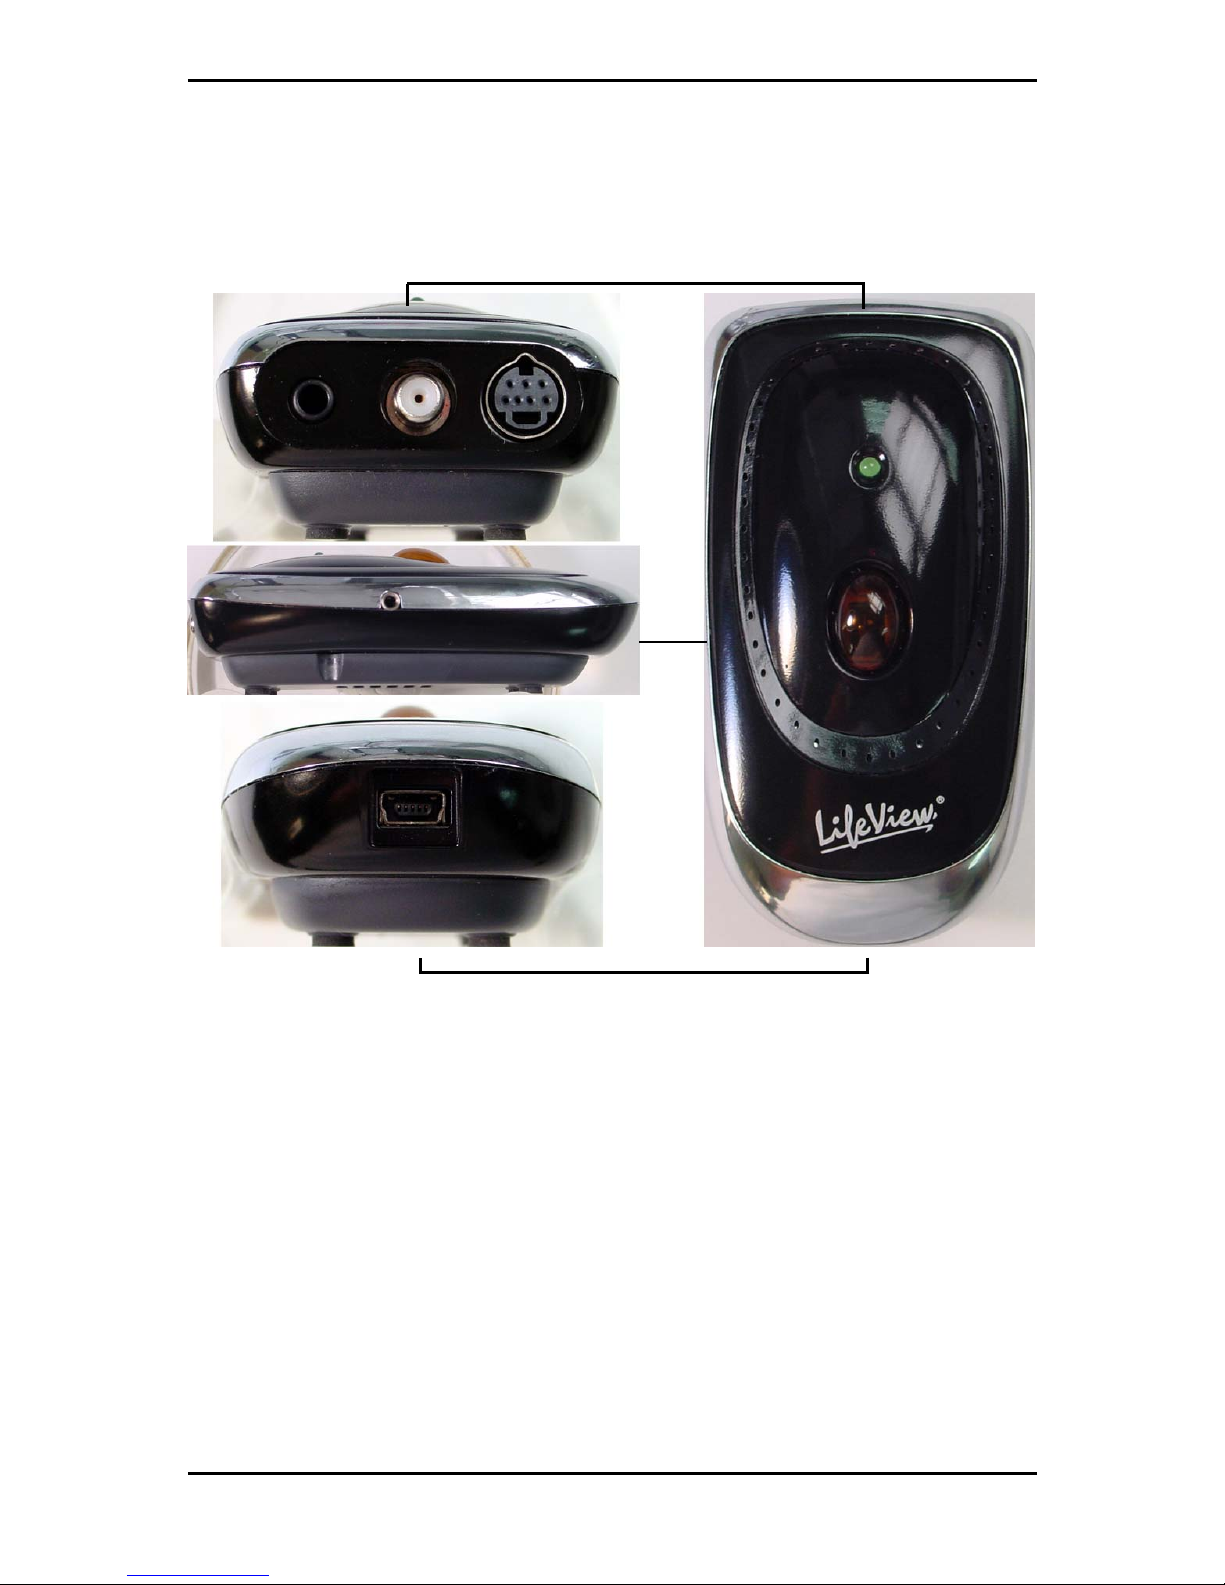
2.1 The TV Walker unit
1
6
5
4
3
2
1 Audio In: Connects external audio to unit using supplied cable.
2 TV In: Connects to provided NTSC or PAL adaptor to connect to TV source.
3 S-Video In: Connects to S-Video sources, or to composite video sources using
provided adaptor.
4 IR Sensor: Onboard IR sensor for remote control.
5 Extended IR Sensor port: Connects IR extension to TV Walker.
6 Mini USB: Connects the TV Walker to your PC.
4
Page 9
Getting Started
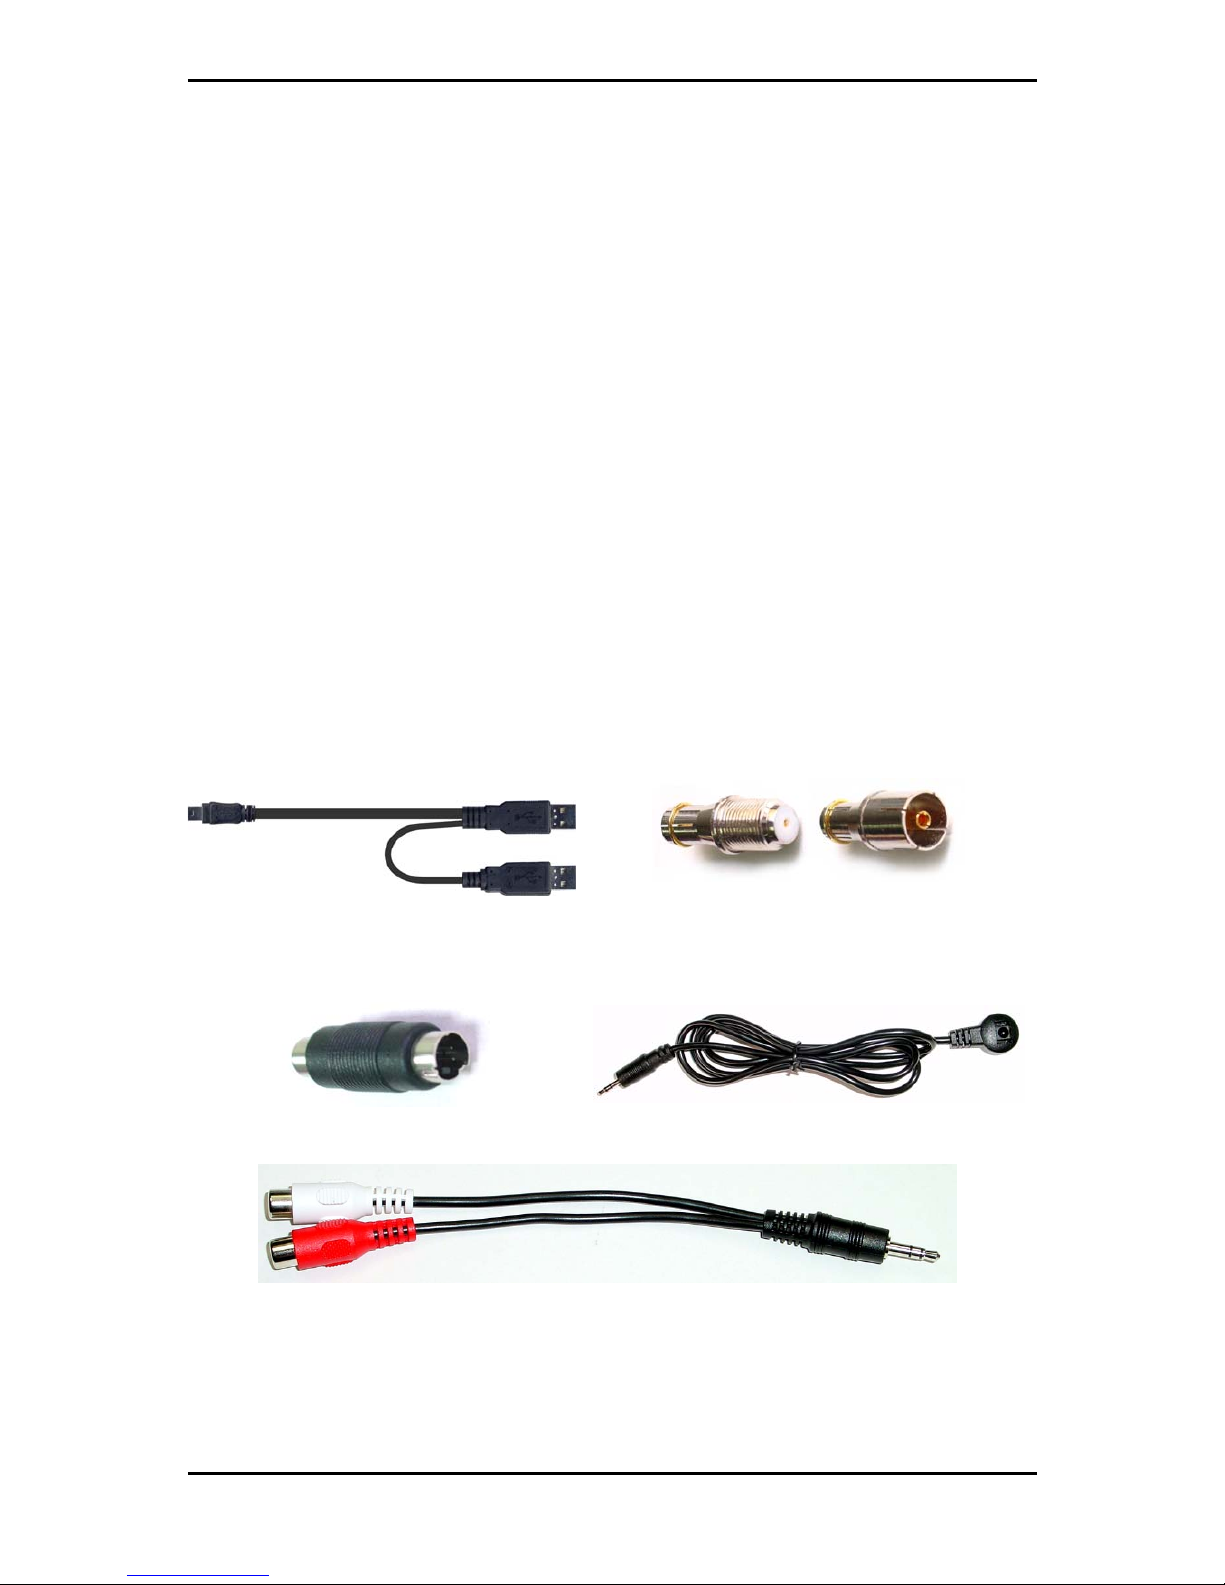
Cables:
1 Mini USB cable: Connects TV Walker to your PC's USB2.0 port (make sure that
this is connected before you install or launch the application).
* Plug in the primary USB connector to the computer; plug in the secondary USB
connector only if your PC/Notebook does not fully power the TV Walker. (See
diagram 1)
2 NTSC/PAL converters: Connects your TV cable or antenna to TV Walker (use
one of these two devices, depending on whether you have cable or broadcast TV).
(See diagram 2)
3 Composite to S-Video adaptor: Connects TV Walker to Composite
Video-format external devices, such as a DVD player or a VCR (devices that use
S-Video plug directly into TV Walker). (See diagram 3)
4 IR Extension cable: Provides an external IR sensor to use with your remote
control. (See diagram 4)
5 Audio cable: Transmits audio from external devices to TV Walker (no cable
required for audio from your TV cable or antenna). (See diagram 5)
Cable and connector diagrams:
Diagram 1 (Mini USB cable) Diagram 2 (NTSC and PAL converters)
Diagram 3
(Composite to S-Video adaptor)
Diagram 4 (IR extension)
Diagram 5 (Audio cable)
(Primary USB connector)
NTSC
PAL
(Secondary USB connector)
5
Page 10
Getting Started
2.2 Software installation
DO NOT plug in your TV Walker
Lite
, you need to install DirectX and the TV Walker
Lite
driver first.
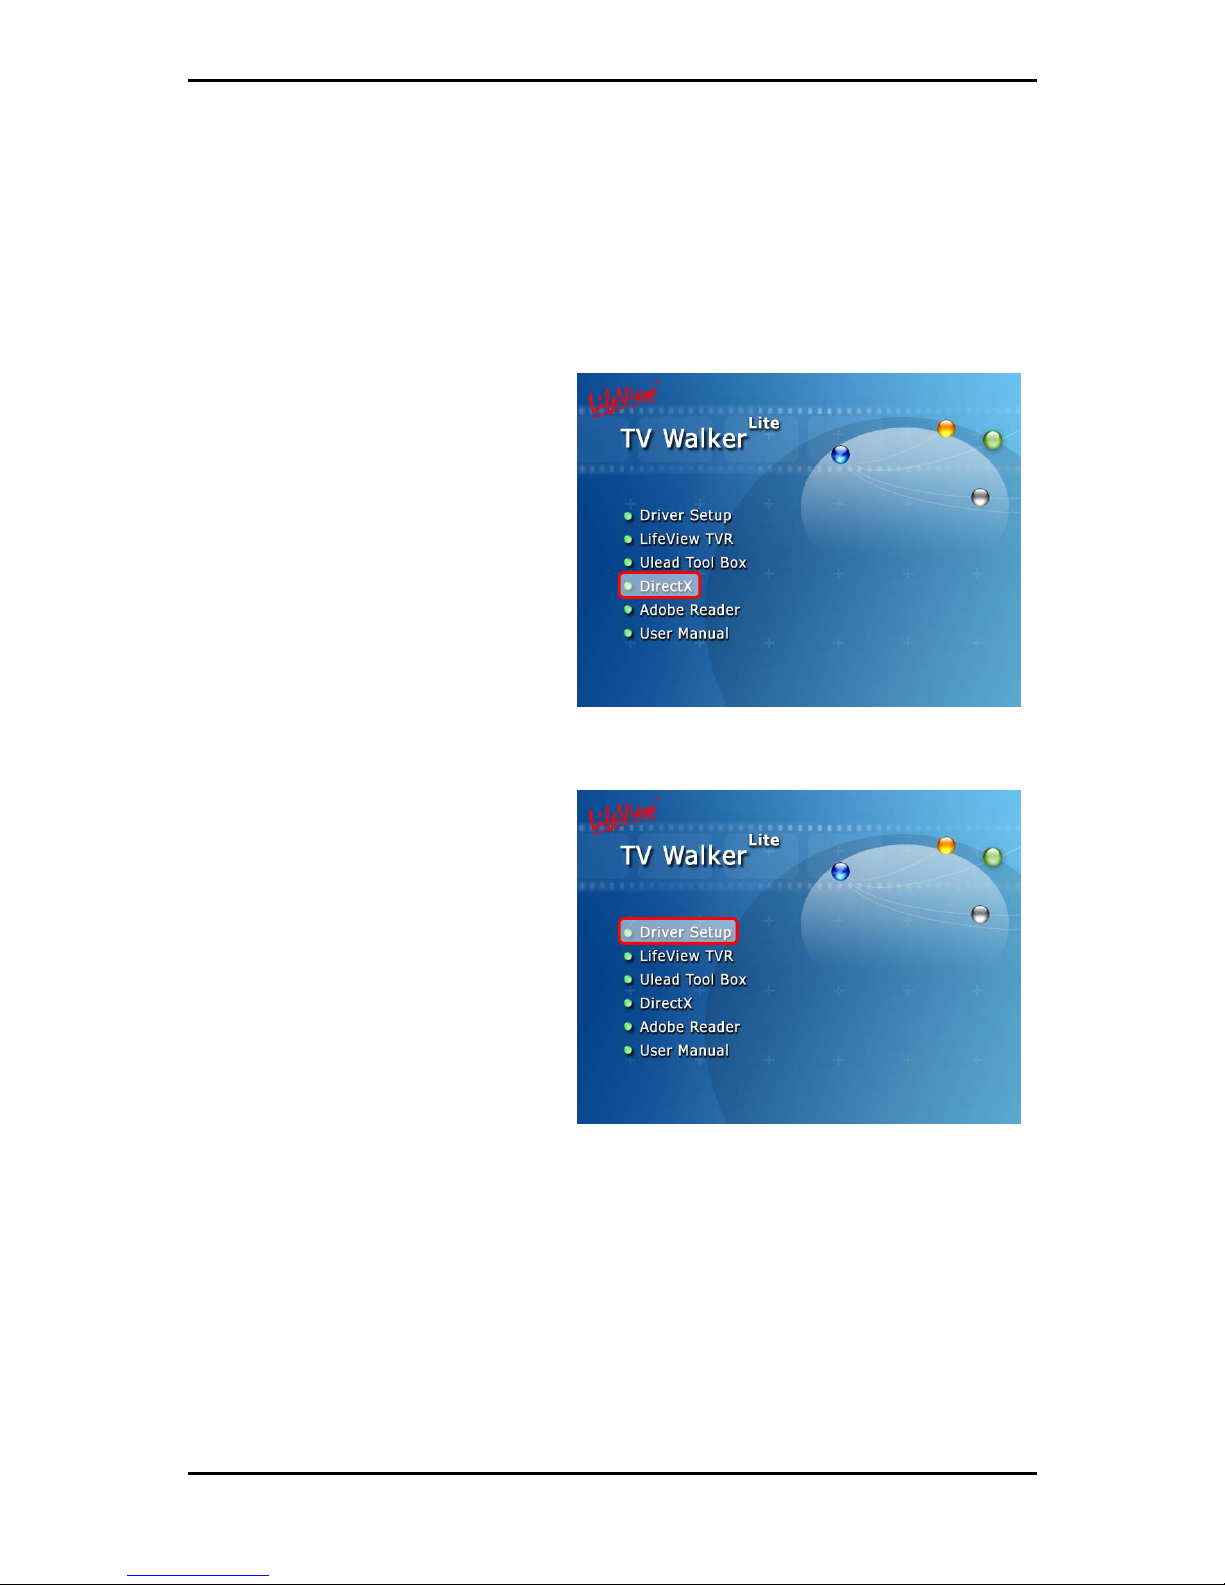
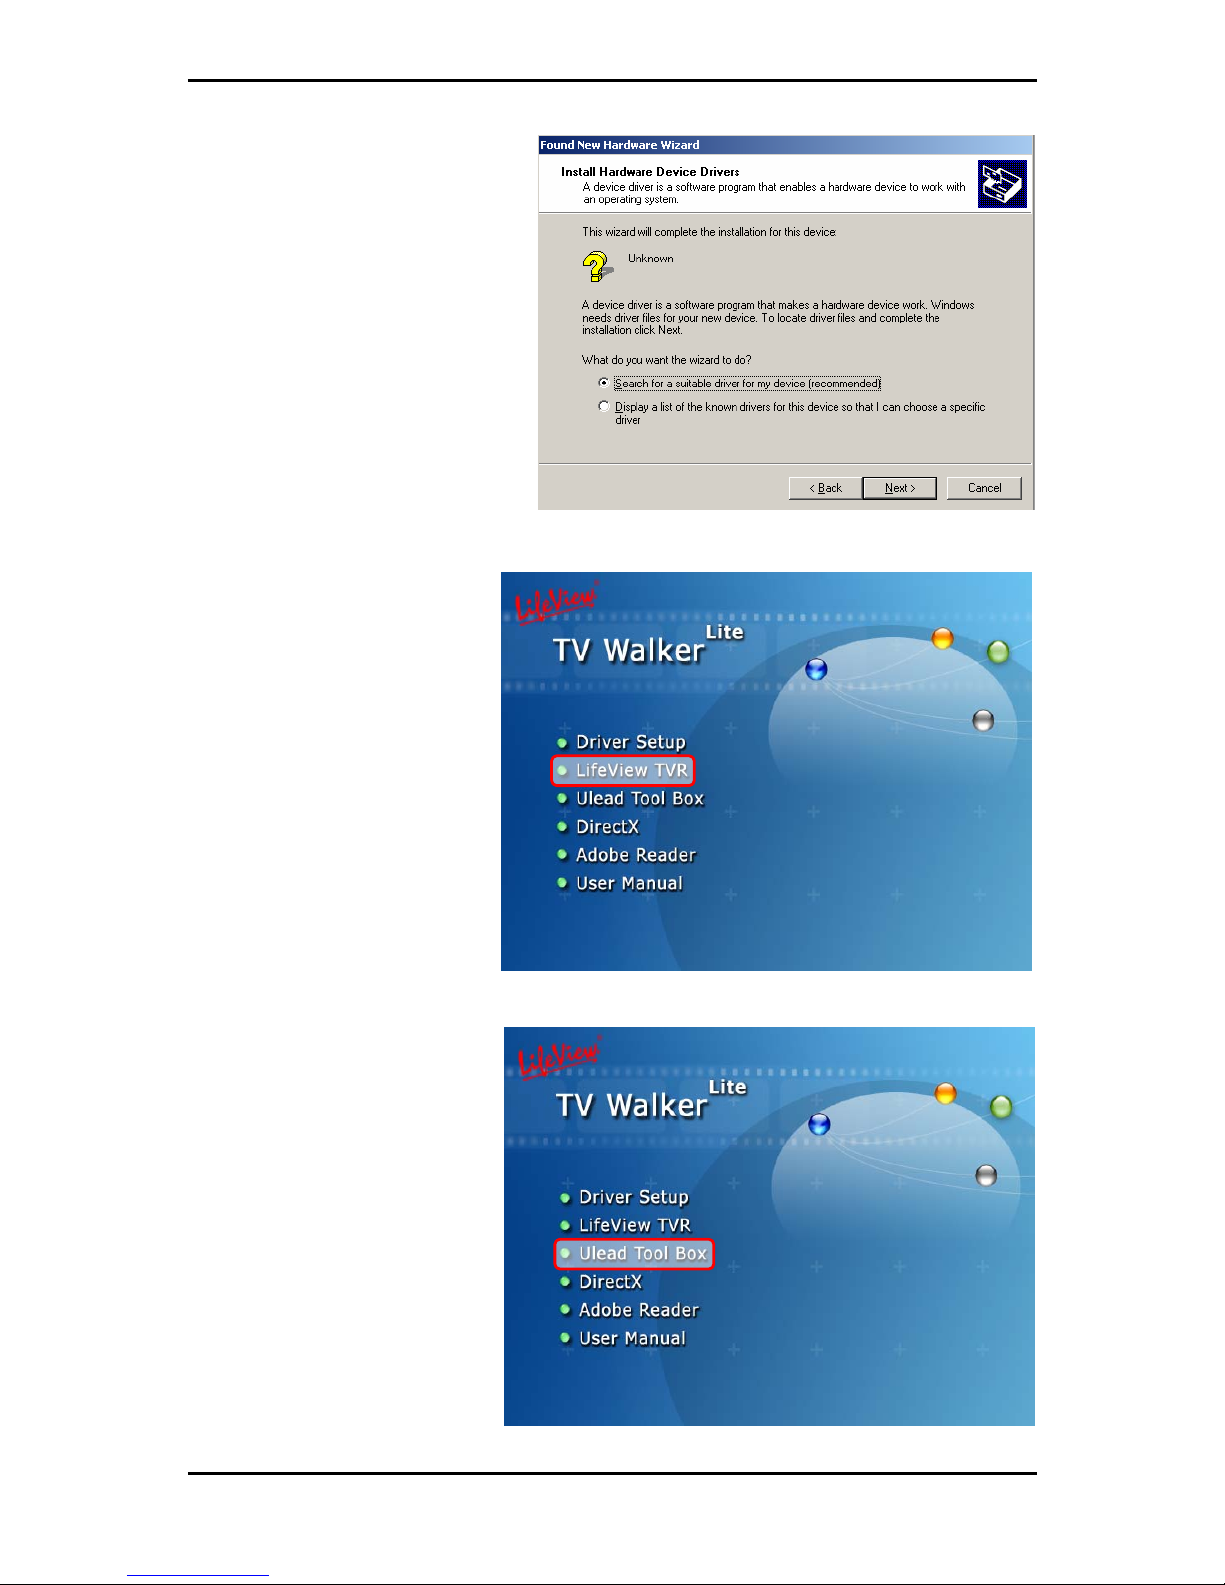
Insert TV Walker's software CD into your PC's CD-ROM drive. The CD will
automatically start and TV Walker's installation window will open on your screen.
Before you install the TV Walker, you
will need to install DirectX. Just click
on DirectX in the installation window
to begin. A series of dialog boxes will
appear; click “Next“ or “Finish“ at
each prompt.
When DirectX has finished installing,
the installation window will appear
again. Now click on DRIVER SETUP
to install the TV Walker Lite driver.
Follow the installation instructions step by step to install the driver.
When the TV Walker driver has finished installing, you will need to reboot your
computer. Next, make sure the TV cable or antenna is connected to TV Walker, and
connect TV Walker to your PC using the USB cable.
6
Page 11
Getting Started
When a dialog box called “Found
New Hardware Wizard“ opens on
your screen, choose “Search for
a suitable driver for my
device“ (recommended) and click
“Next”.
Now click on LifeView TVR to
install the TV Walker software.
Just follow the prompts to
install the software.
2.3 Ulead Toolbox
Viene fornito anche Ulead
Toolbox per catturare,
modificare e esportare filmati
usando il TV Walker. Fare clic
su Ulead Toolbox, e seguire le
istruzioni di installazione. Per
avere maggiori informazioni
sul programma, controllare la
cartella Video Toolbox nel
menu di avvio
7
Page 12
Getting Started
2.4 Launching TV Walker
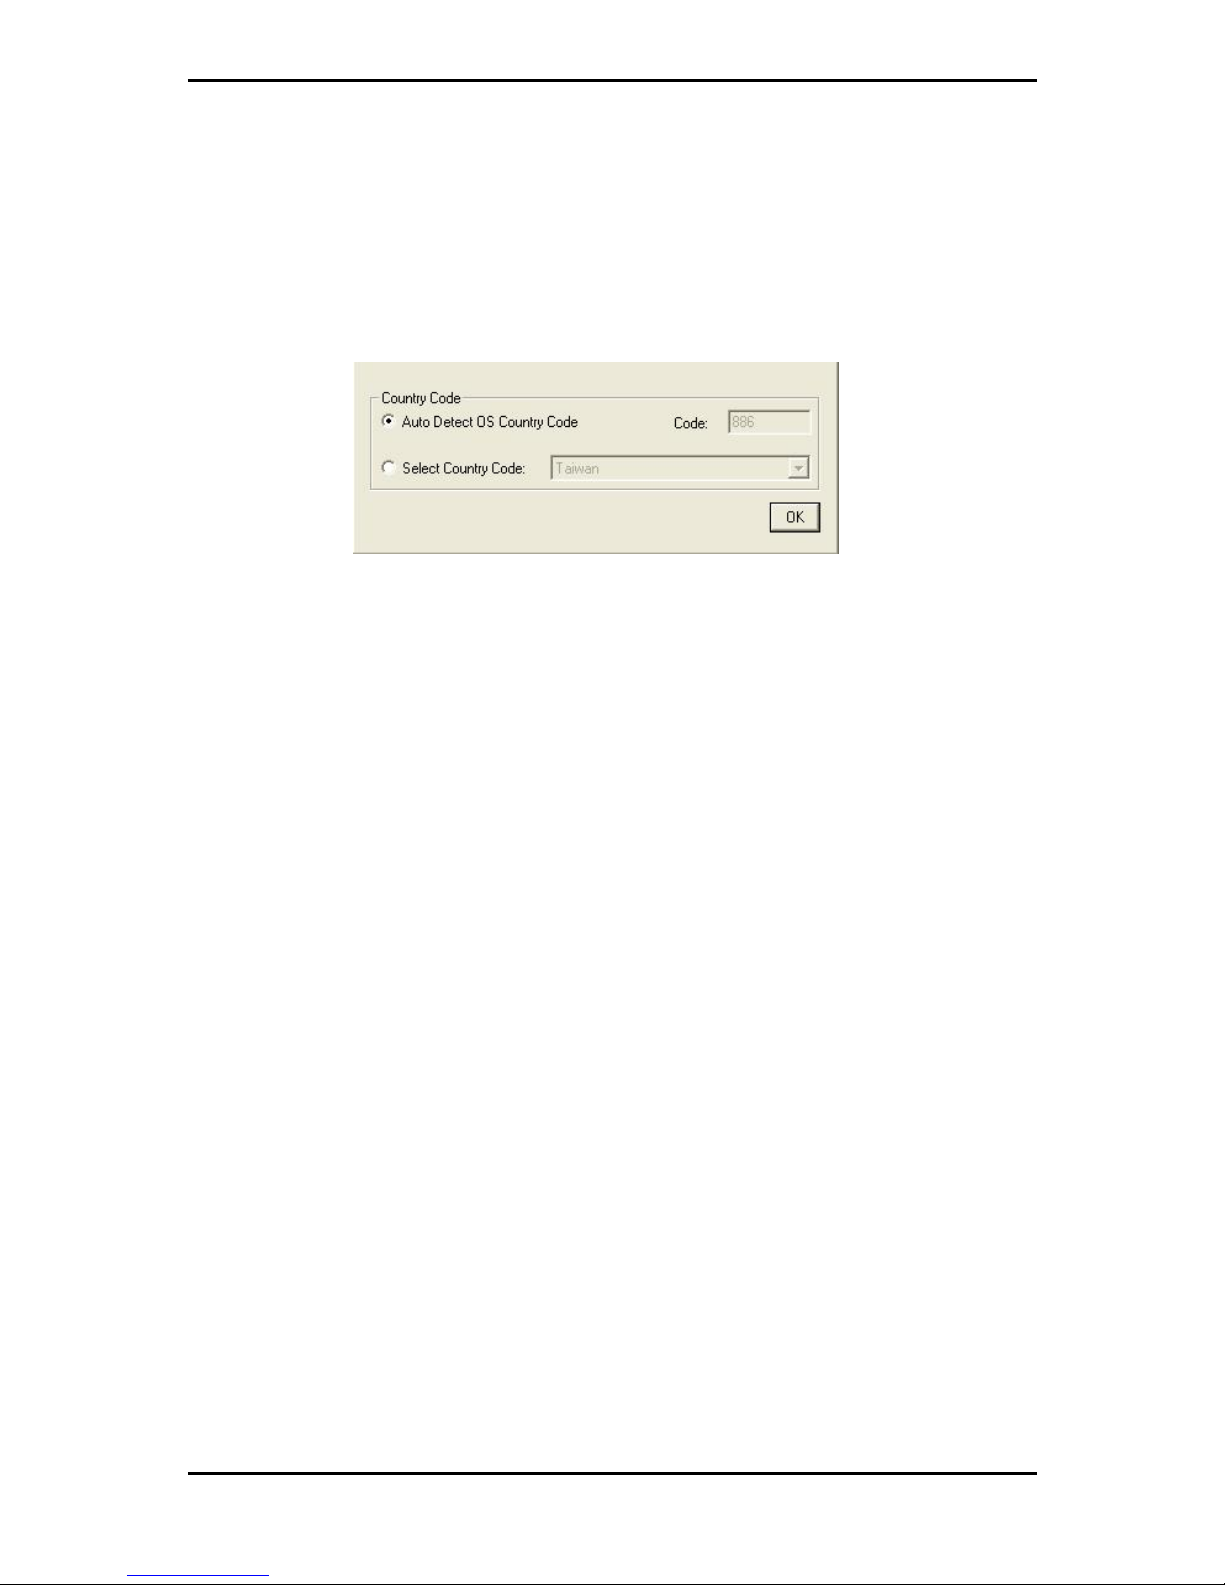
Click on the TVR icon on your desktop to launch the TV Walker. When you launch the
TVR software for the first time, a dialog box will appear that will ask you to choose the
country in which you are using your TV Walker. Just choose your country and click
'OK', or just click ‘OK’ to let the software Auto Detect your Country Code. At this point,
the software will scan for available TV channels. This will take a few minutes.
8
Page 13
Getting Started
2.5 How to update the driver
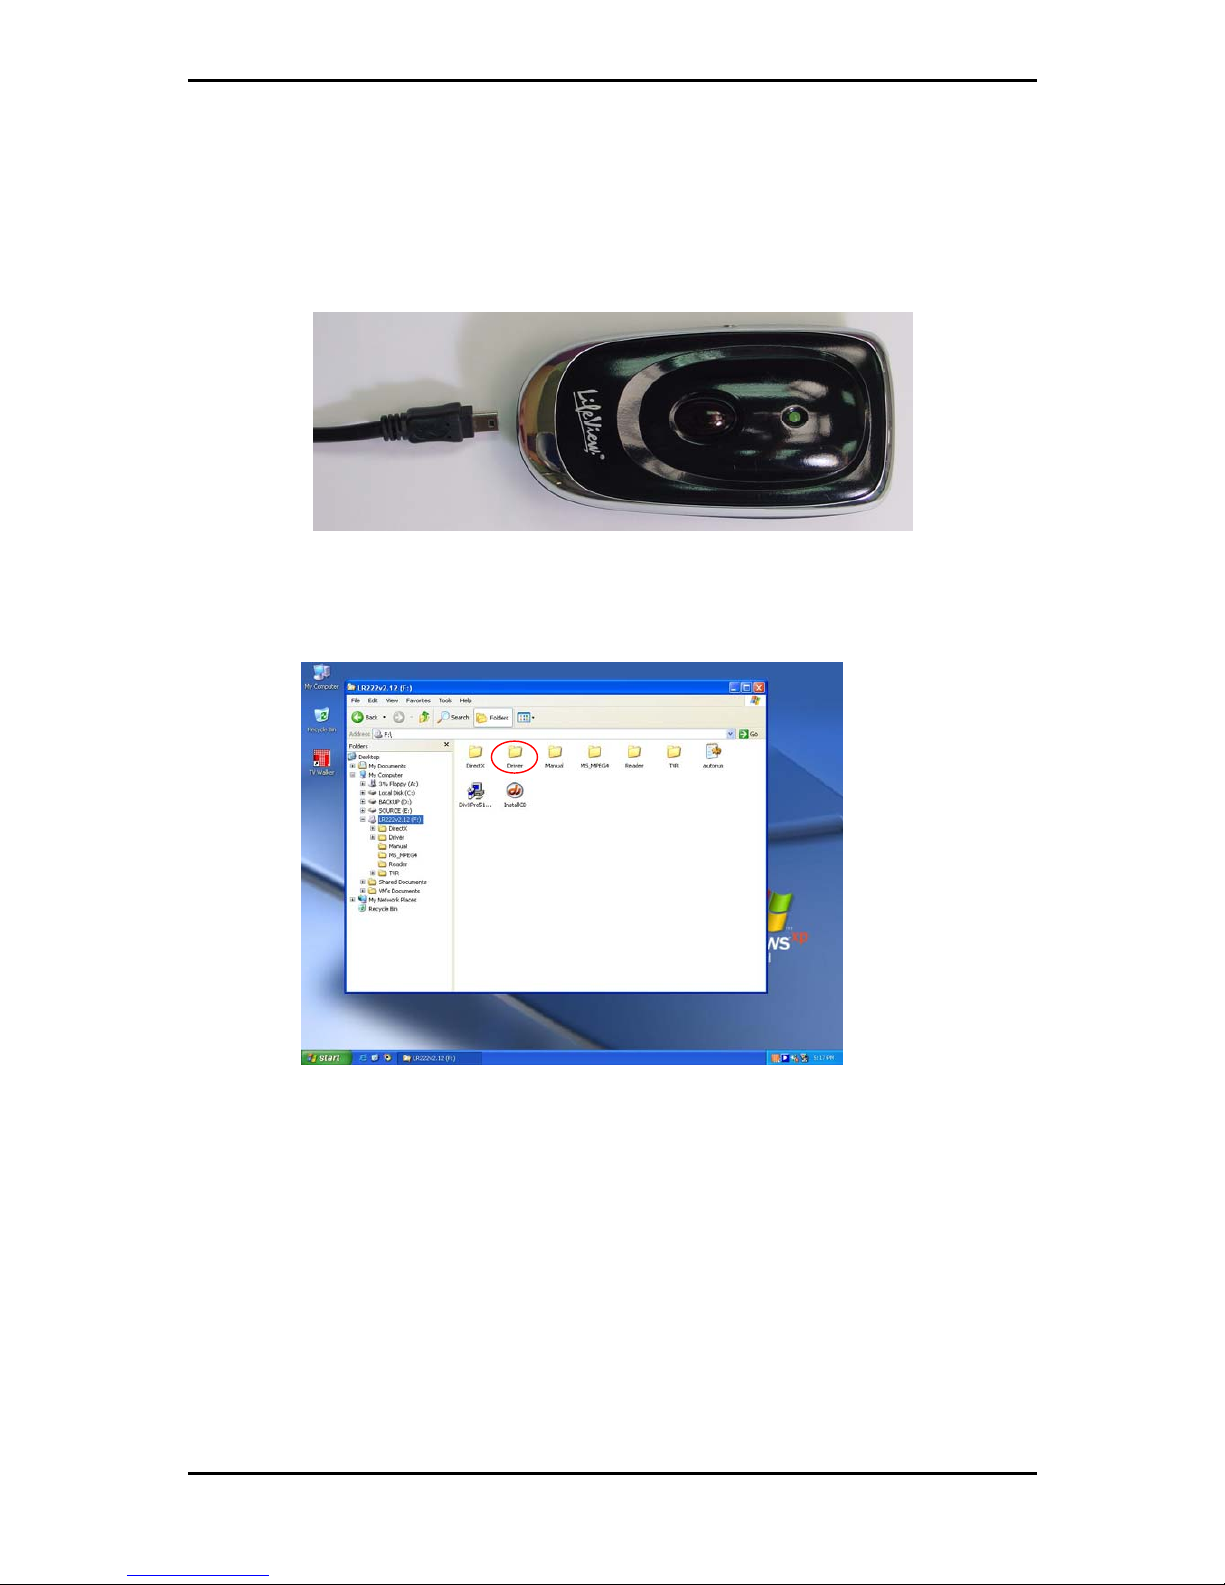
If you want to update the driver to a newer version, you will need to uninstall the TV
Walker driver before reinstalling:
1. Remove the USB cable from TV Walker.
2. Using File Manager, browse the contents of the software CD and open the
DRIVER folder. (or unzip the updated driver from the web site and then perform the
next step).
9
Page 14
Getting Started
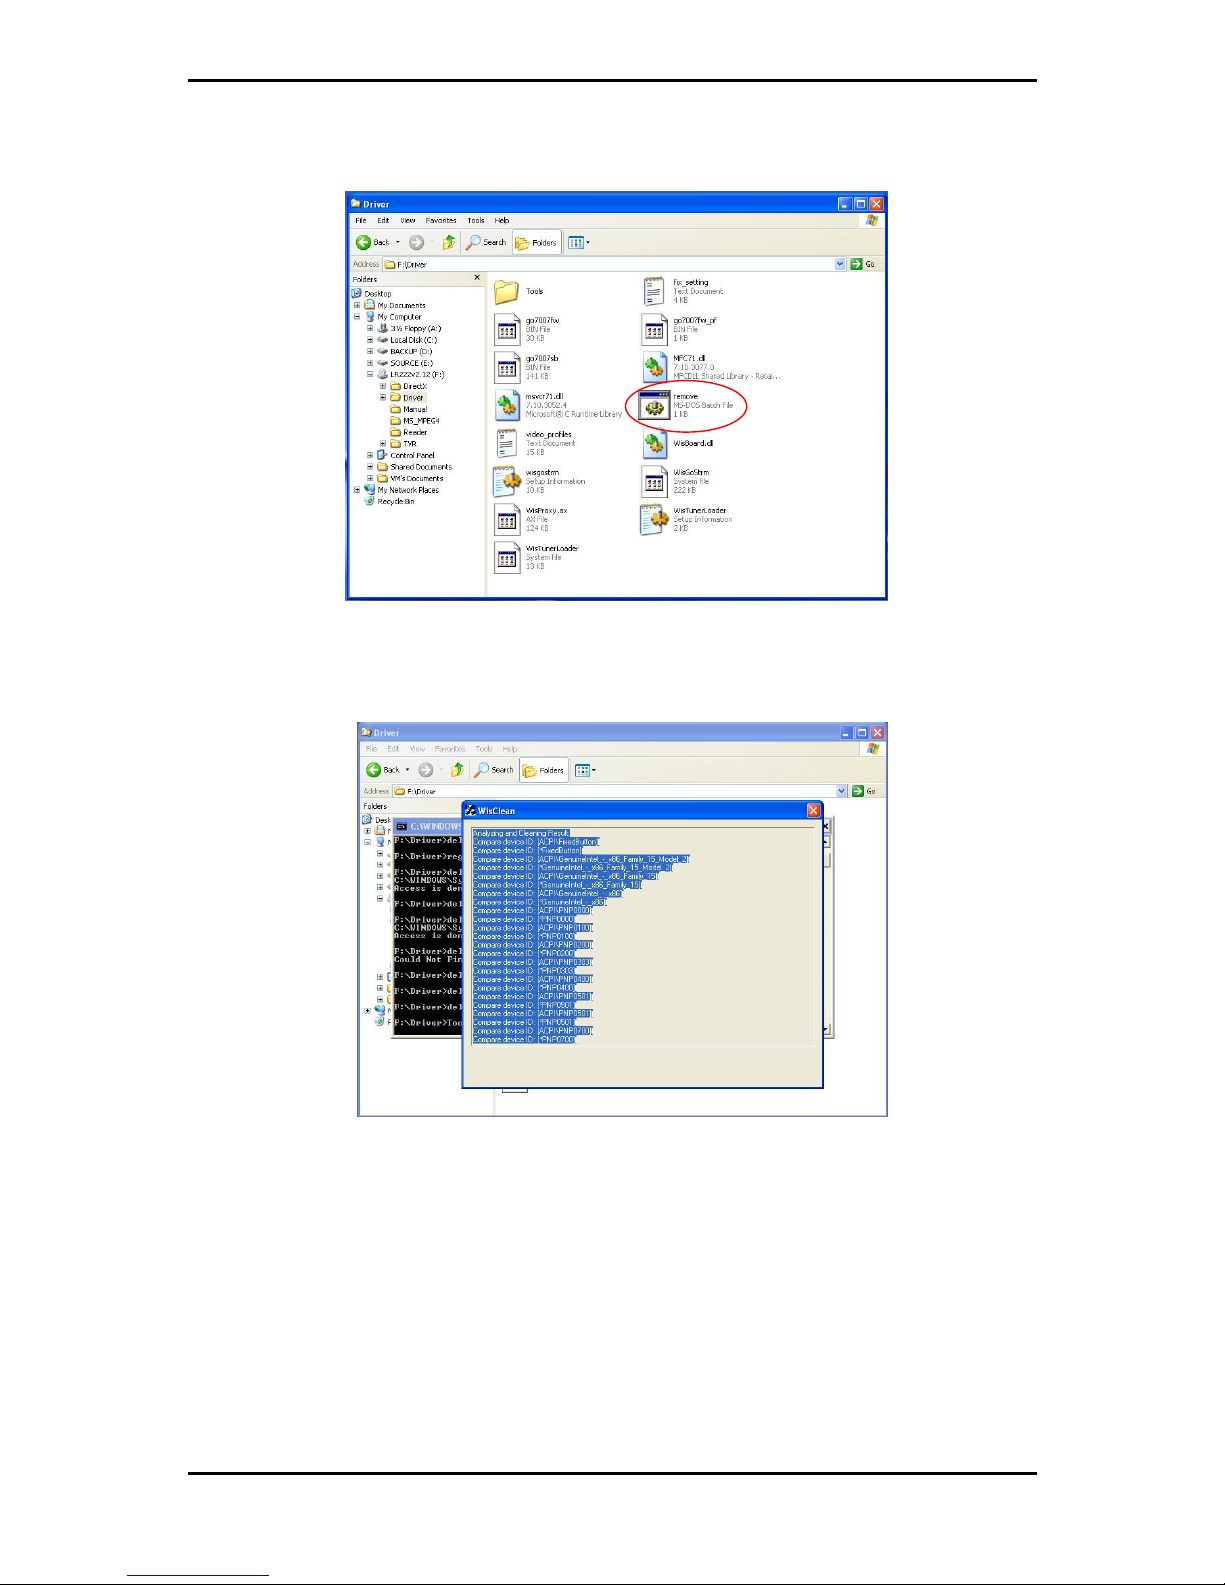
3. When this screen appears, double-click “remove.bat” to remove the driver.
4. This screen will appear and the old driver will automatically be removed
.
5. When the old driver is uninstalled, reconnect the USB cable and install the
driver again.
10
Page 15
The LifeView TV Walker Lite Interface
3. The LifeView TV Walker Lite Interface
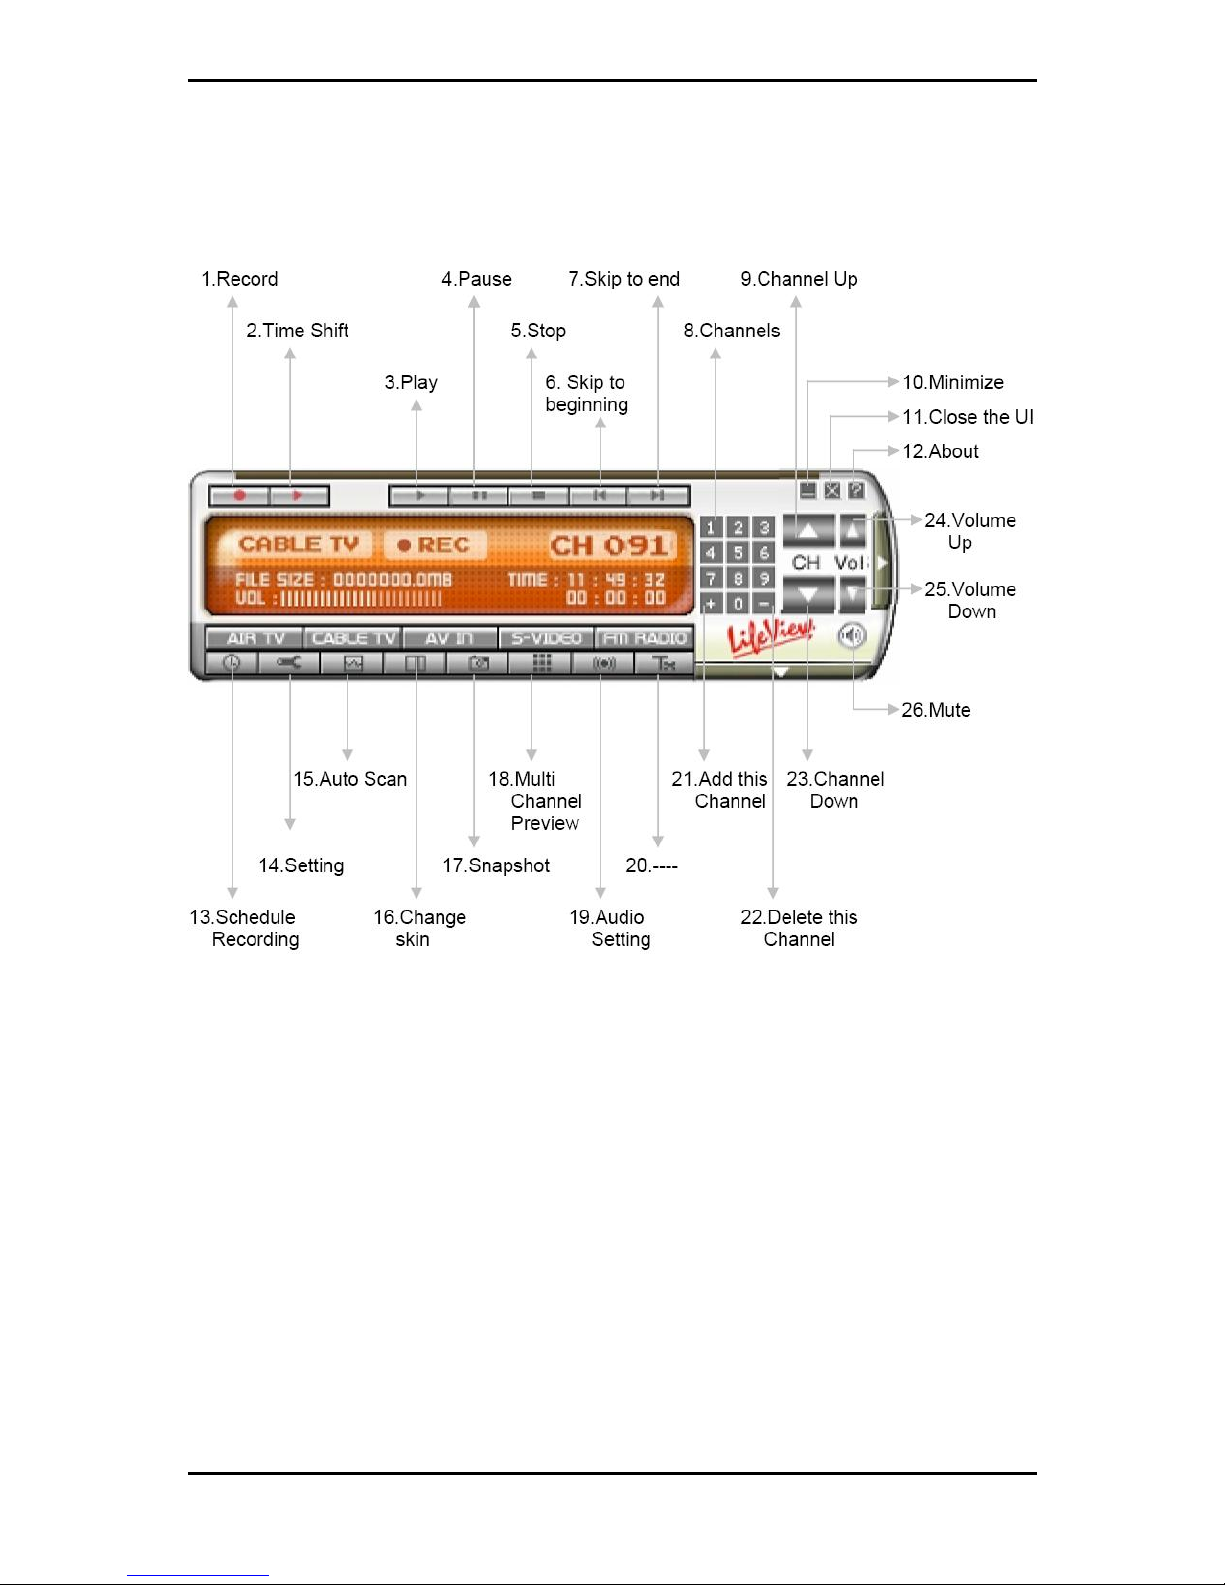
The heart of TV Walker Lite is the TV Walker Lite software interface.
3.1 Moving and resizing
You can adjust the size of the TV screen by clicking and dragging on its edges with
your mouse. You can move the interface around your screen by clicking and dragging
anywhere on the interface. To switch to a full-screen display, double-click on the TV
picture. Double click again to switch back to the previous view.
11
Page 16
The LifeView TV Walker Lite Interface
3.2 Choosing your video source
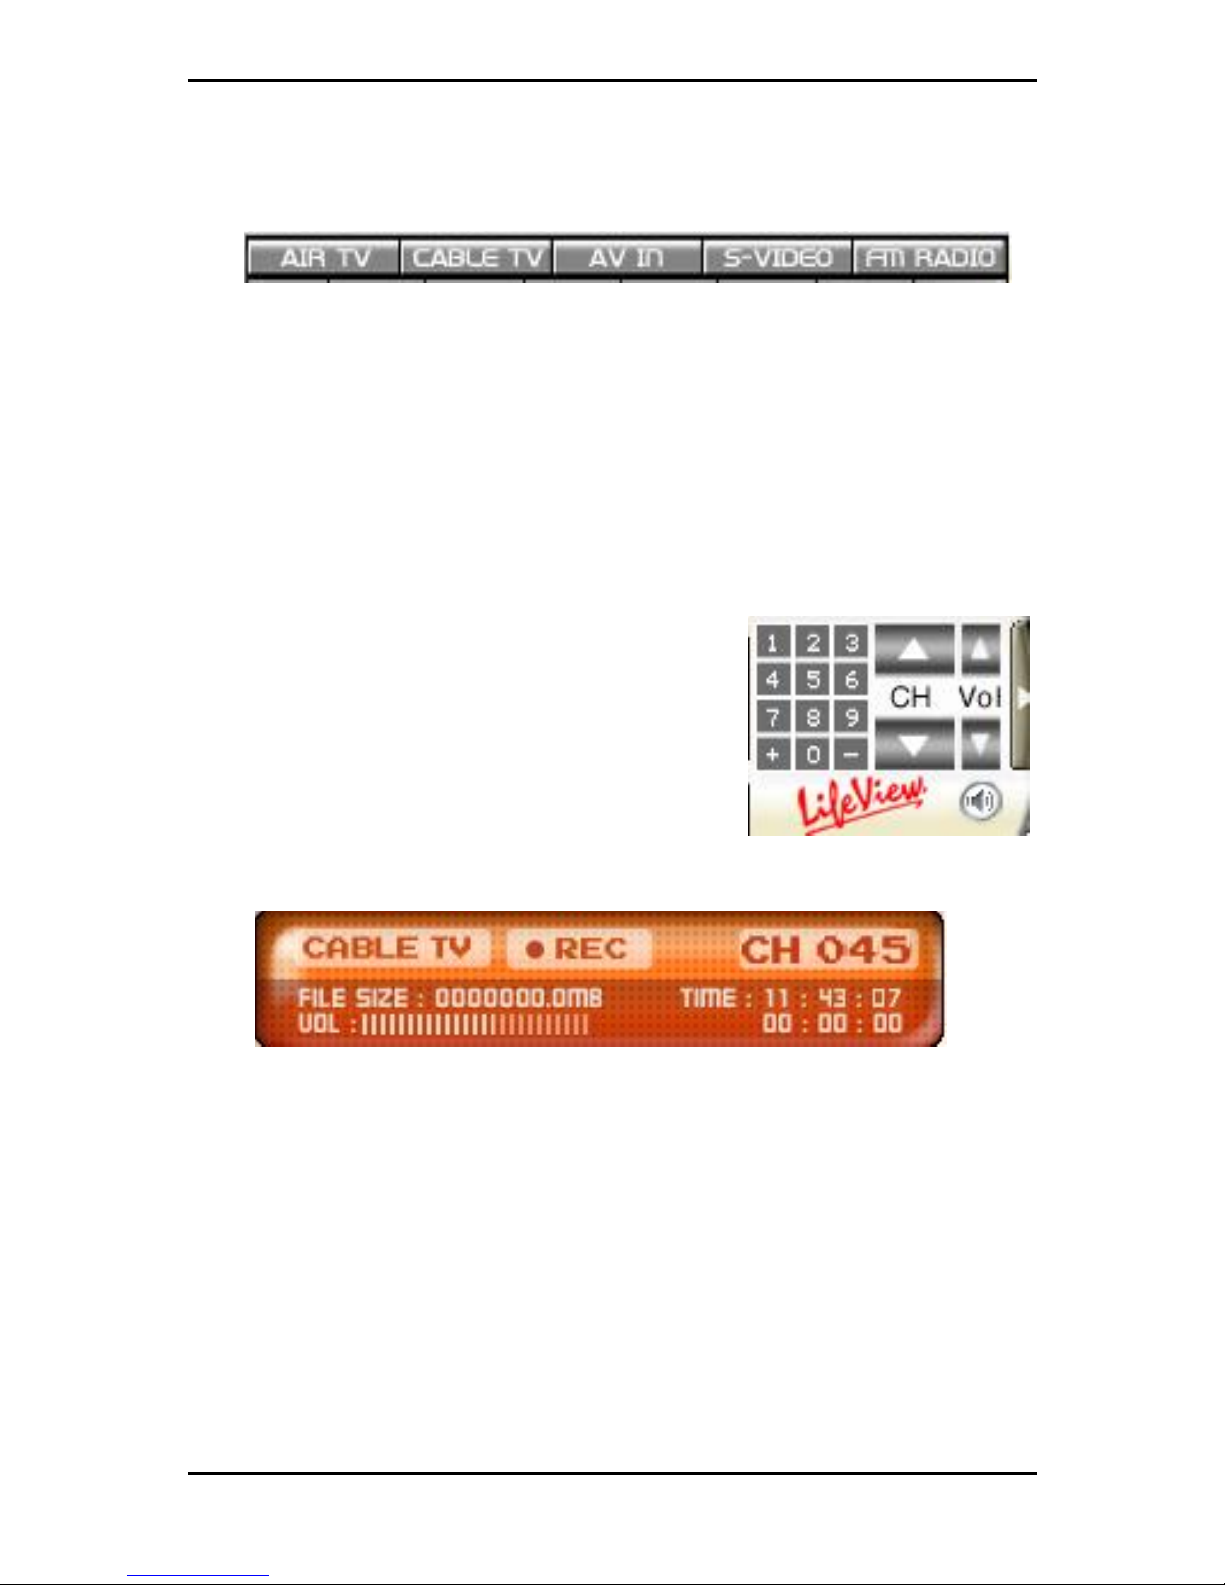
The buttons on the bottom of the interface allow you to choose your source.
Air TV: Use this to receive your TV signal through a broadcast antenna.
Cable TV: Use this to receive your TV signal via cable.
AV IN: Use this when an external device using composite video is connected to
the TV Walker Lite.
S-Video: Use this when an external device using S-Video is connected to the TV
Walker Lite.
FM Radio: (not available)
3.3 Channel and volume buttons
On the right-hand side of the interface you will find the
channel buttons; use them to change channels. With
the +/- buttons, located at the bottom of the channel
numbers panel, you can add or delete a tuned channel
from your Channel List. See sections 3.5.1 and 3.5.5.
You can also find the volume buttons here; click on
them to increase or decrease the volume. Click on the
speaker icon below it to mute the volume.
3.4 Info panel
Left of the channel buttons you will find the info panel. The top part of the info panel
shows you your current video source and the channel you are tuned in to. If you are in
record mode, the ●REC indicator will be lit.
The bottom part of the info panel shows the size of file you are recording, your volume
level, the current time, and how long you have been recording. Clicking anywhere on
the volume bar will set the volume to that level.
12
Page 17
The LifeView TV Walker Lite Interface
3.5 Settings button
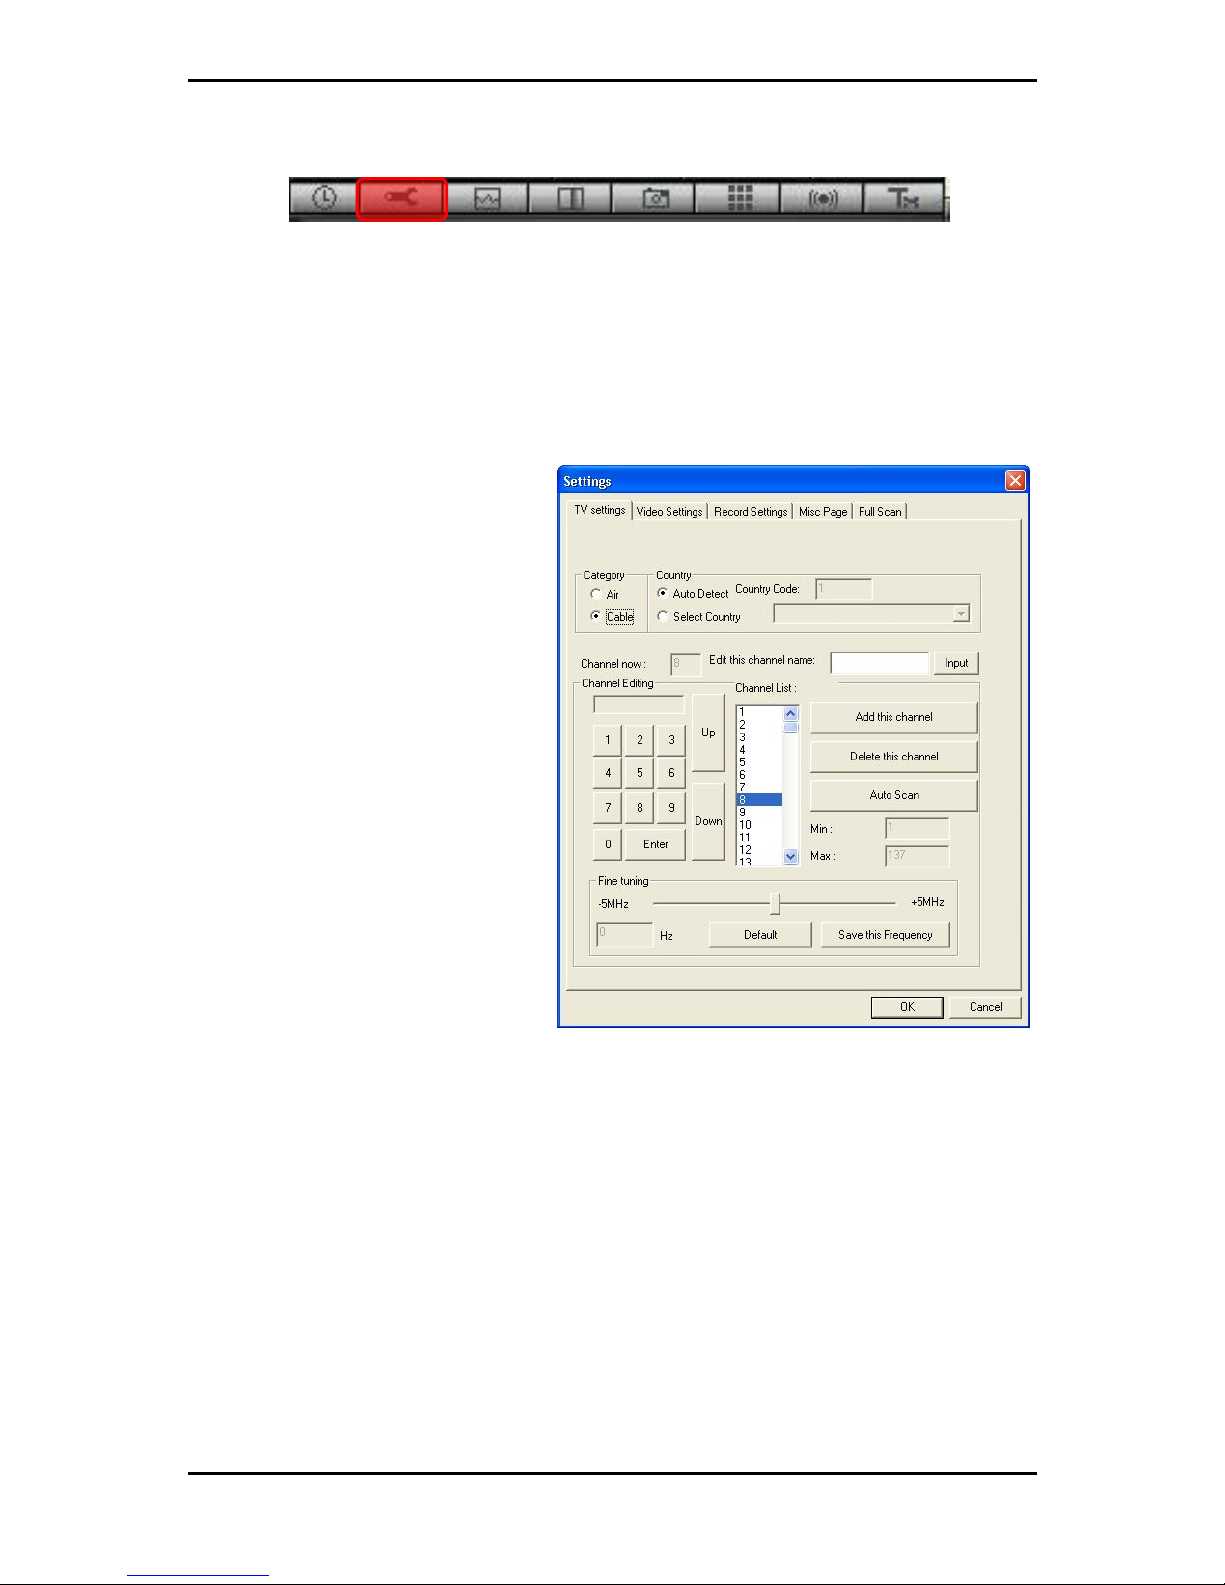
Below the info panel you will see a number of buttons. These buttons provide you with
many options for setting your preferences in TV Walker Lite. The most important
button is the Settings button, which opens the Settings dialog box.
3.5.1 TV settings tab
The first tab in the Settings dialog
box is TV settings. Here you can
select your video mode, set your
country settings, scan for channels,
and select and name your favorite
channels.
Category
This tab allows you to choose either
cable or air (broadcast) TV as your
TV source.
Country
This tab sets the TV Walker Lite to
the TV standards of the country
where you are using the TV Walker
Lite. The setting process should
happen automatically, but if it does
not, just click on Select Country and
choose your country manually.
Channel editing
This allows you to choose and name your favorite TV stations and add them to your
channel list. To add a channel, choose it and click on Add this channel; to delete a
channel, choose it and click on Delete this channel. To name a channel, choose it,
type a name in the Edit this channel name box, and click on Input.
Later, you will be able to access your favorite channels by clicking the right edge of the
TV Walker Lite interface - a list of your favorite channels will appear, and you can click
on a channel to choose it. You can also right-click on any channel listed in your
favorites to change its name.
13
Page 18
The LifeView TV Walker Lite Interface
Fine Tuning
The Fine Tuning feature allows you to fine-tune your channel frequencies. Slide the
Fine Tuning button to the left or right to make minor adjustments to the frequencies. To
save your changes, click Save this Frequency, or you can click Default to go back to
the default setting.
3.5.2 Video settings tab
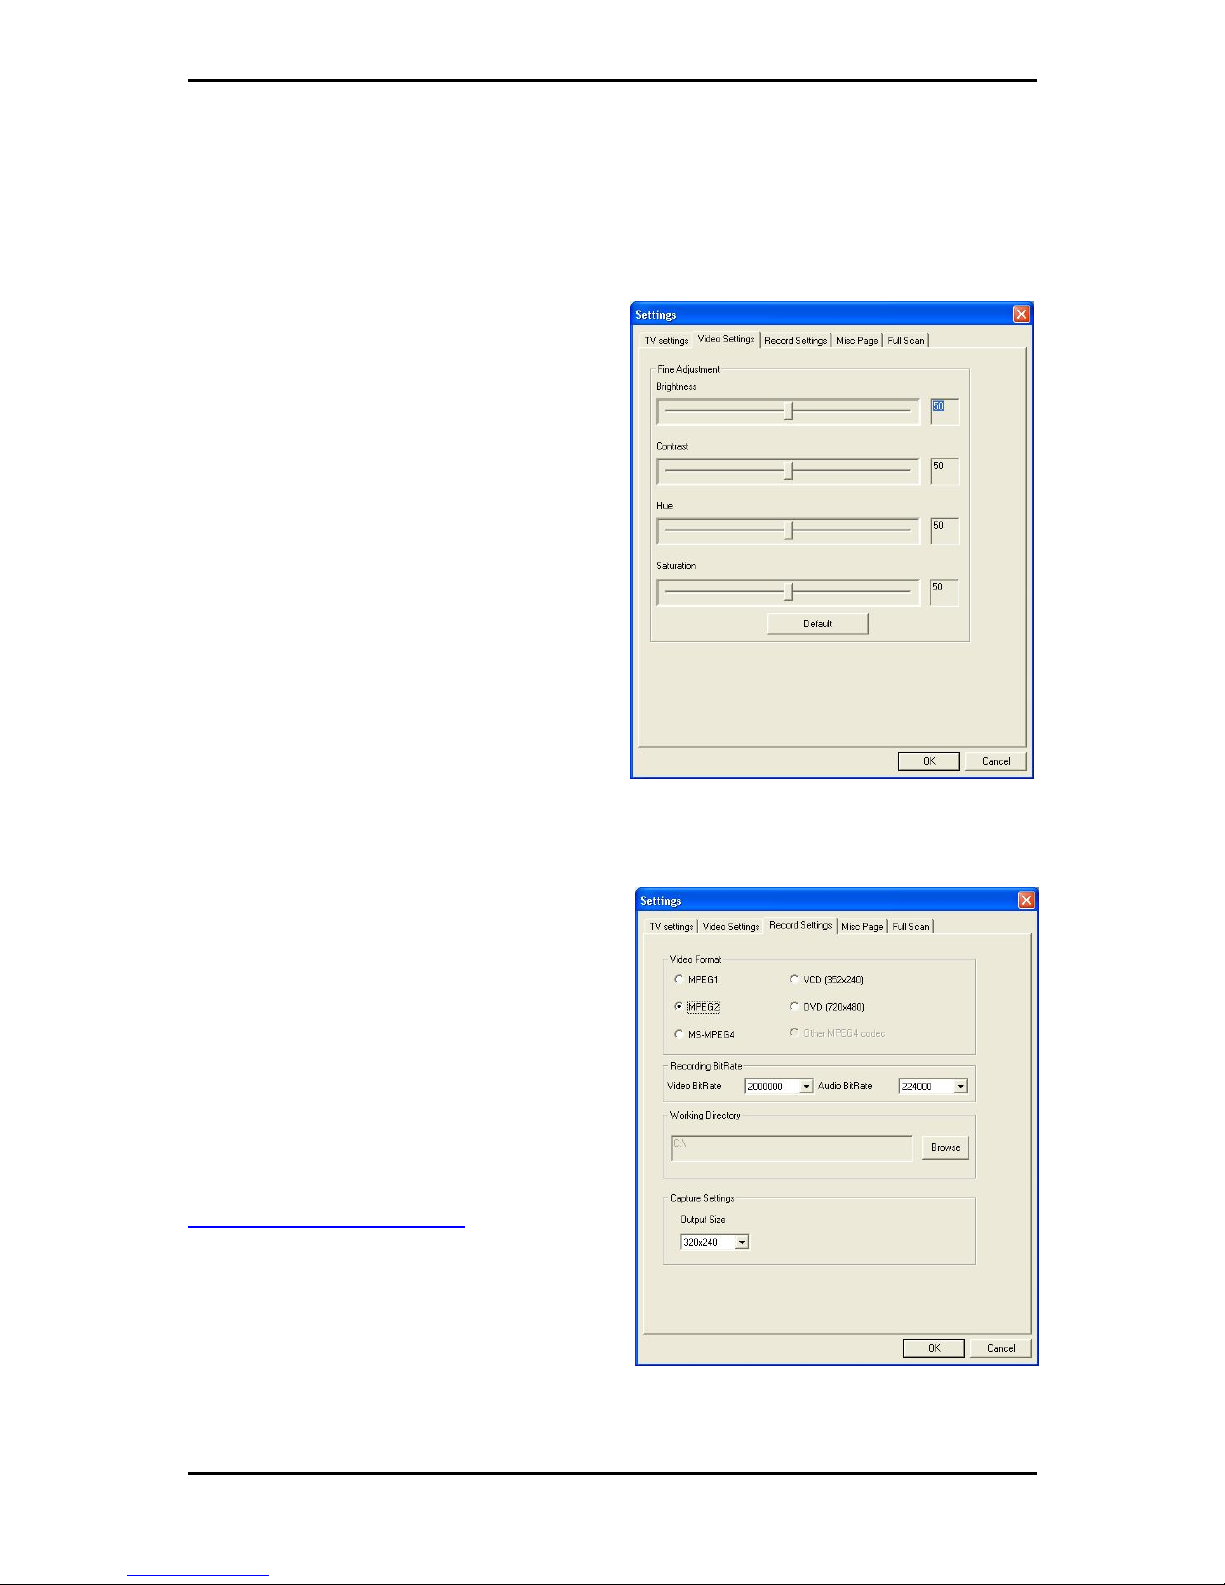
This tab allows you to set TV display
settings including Brightness, Contrast,
Hue, and Saturation. If you click on Default,
the display settings will return to their
factory settings.
3.5.3 Record settings tab
This dialog box allows you to set your
preferences for video recording. If you are
recording files that you only plan to view on
your computer, choose one of the MPEG
options. For an external device, choose the
format of that external device.
Video format
This allows you to choose whether you will
record files in MPEG-1, MPEG-2,
MS-MPEG-4, VCD, DVD, or another
MPEG-4 codec such as DivX. You can go
to the DivX website at
http://www.divx.com/divx/ to download a
free codec.
Recording BitRate
Here you can choose the BitRate of your
recording depending on which file format
has been chosen. A higher BitRate will
improve the quality of recorded files.
14
Page 19

The LifeView TV Walker Lite Interface
Working directory
This allows you to choose the location on your PC where movies and pictures are
saved. To change the location, click on Browse and select the folder you want to save
your files in.
Capture settings
Here you can choose the output size of video that you record.
Note:
MPEG-1: compressed video and audio files
MPEG-2: compressed video and audio files with better quality
MS-MPEG4: compressed video and audio files with highest quality
Other MPEG4 codec:
compressed video and audio files with highest quality
VCD format: CD-video standards (standards similar to MPEG-1)
PAL: 352x288 pixels at 25 frames per second
NTSC: 352x240 pixels 29.97 frames per second
DVD format: High quality video standards (standards similar to MPEG-2)
PAL: 720x576 pixels at 25 frames per second
NTSC: 720x480 pixels 29.97 frames per second
15
Page 20
The LifeView TV Walker Lite Interface
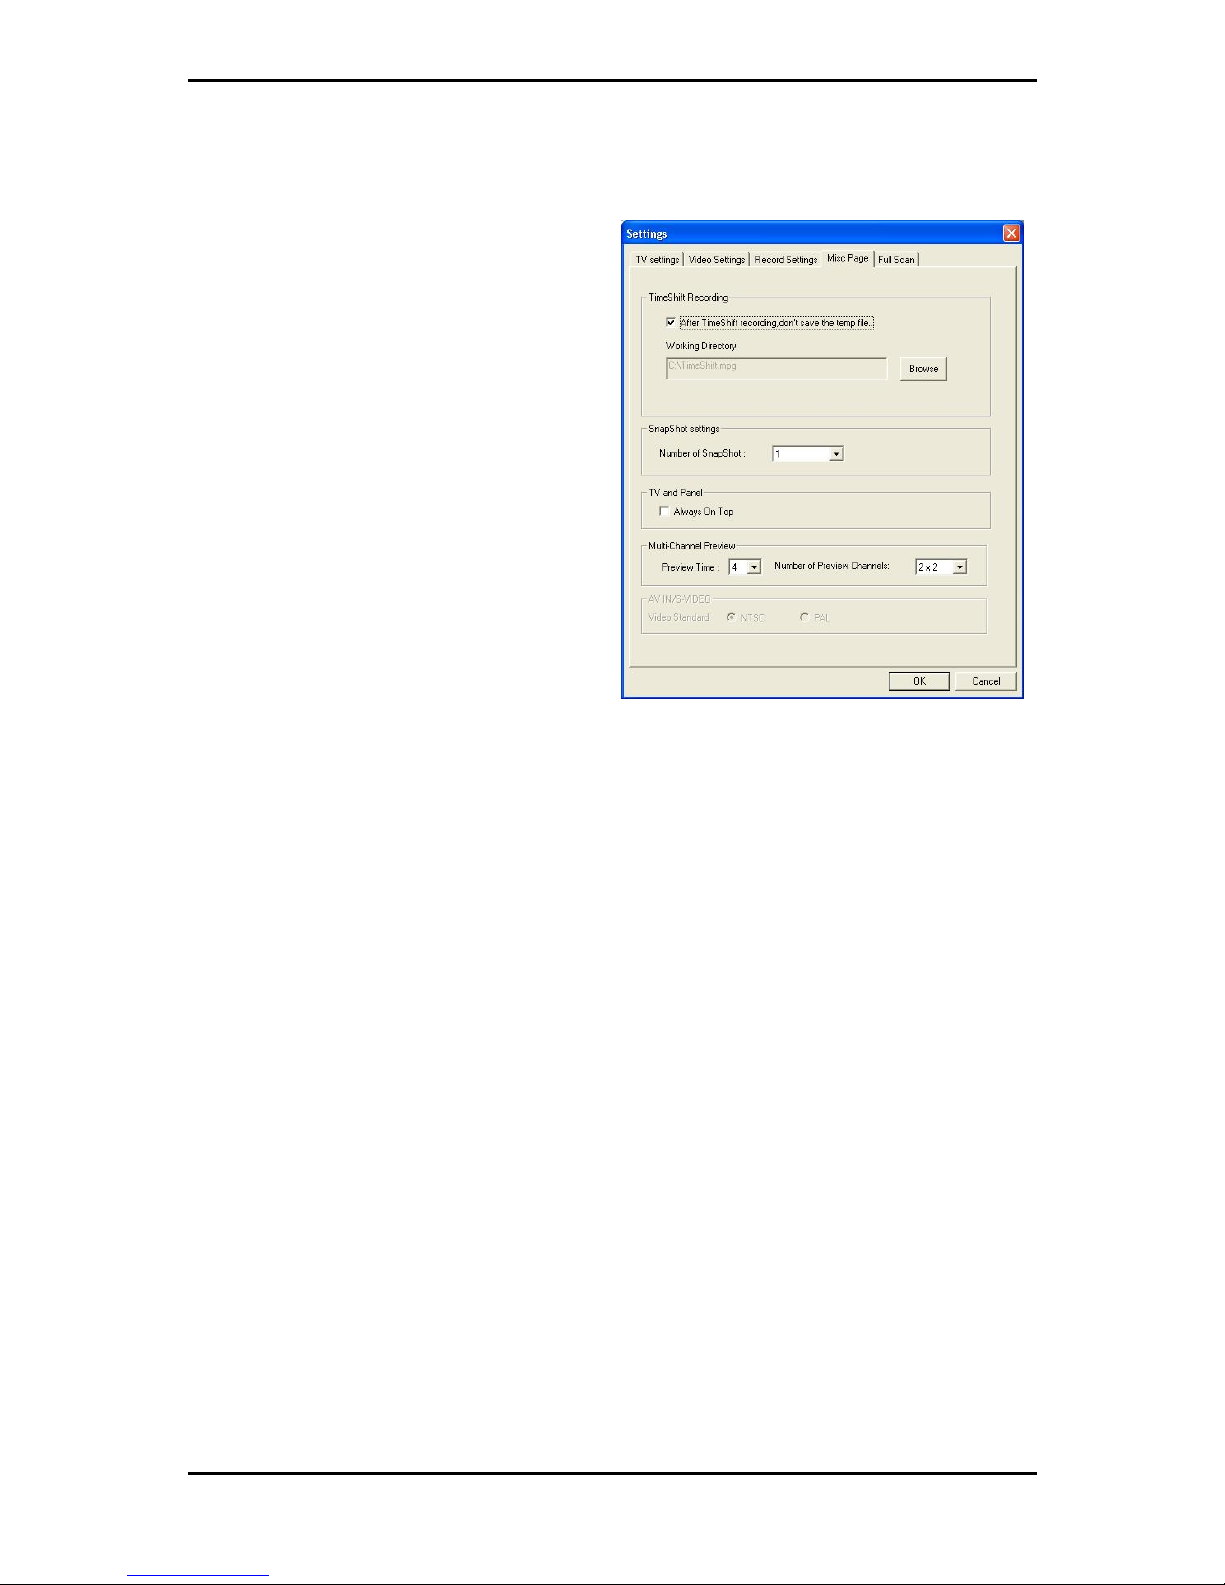
3.5.4 Misc Page tab
This box allows you to make additional
settings for recording and taking
snapshots.
TimeShift recording
When you check this box, files that you
record in TimeShift mode will not be
saved after you turn off TimeShift. See
section 3.8 for an explanation of
TimeShifting. You can also set the
directory that the software will use to hold
the TimeShift temp file. To change this,
click on Browse and select the folder you
wish to use.
Snapshot settings
This allows you to choose how many
snapshots are taken when you click the
Snapshot button. See section 3.6.4 for an
explanation of Snapshots.
TV and Panel
When you check Always on Top, the TV window will always be in front of other
applications on your screen.
Multi-Channel Preview
This allows you to preview channels, and to choose the number of channels you
preview and the length of time you preview each channel. See section 3.6.5.
16
Page 21
The LifeView TV Walker Lite Interface
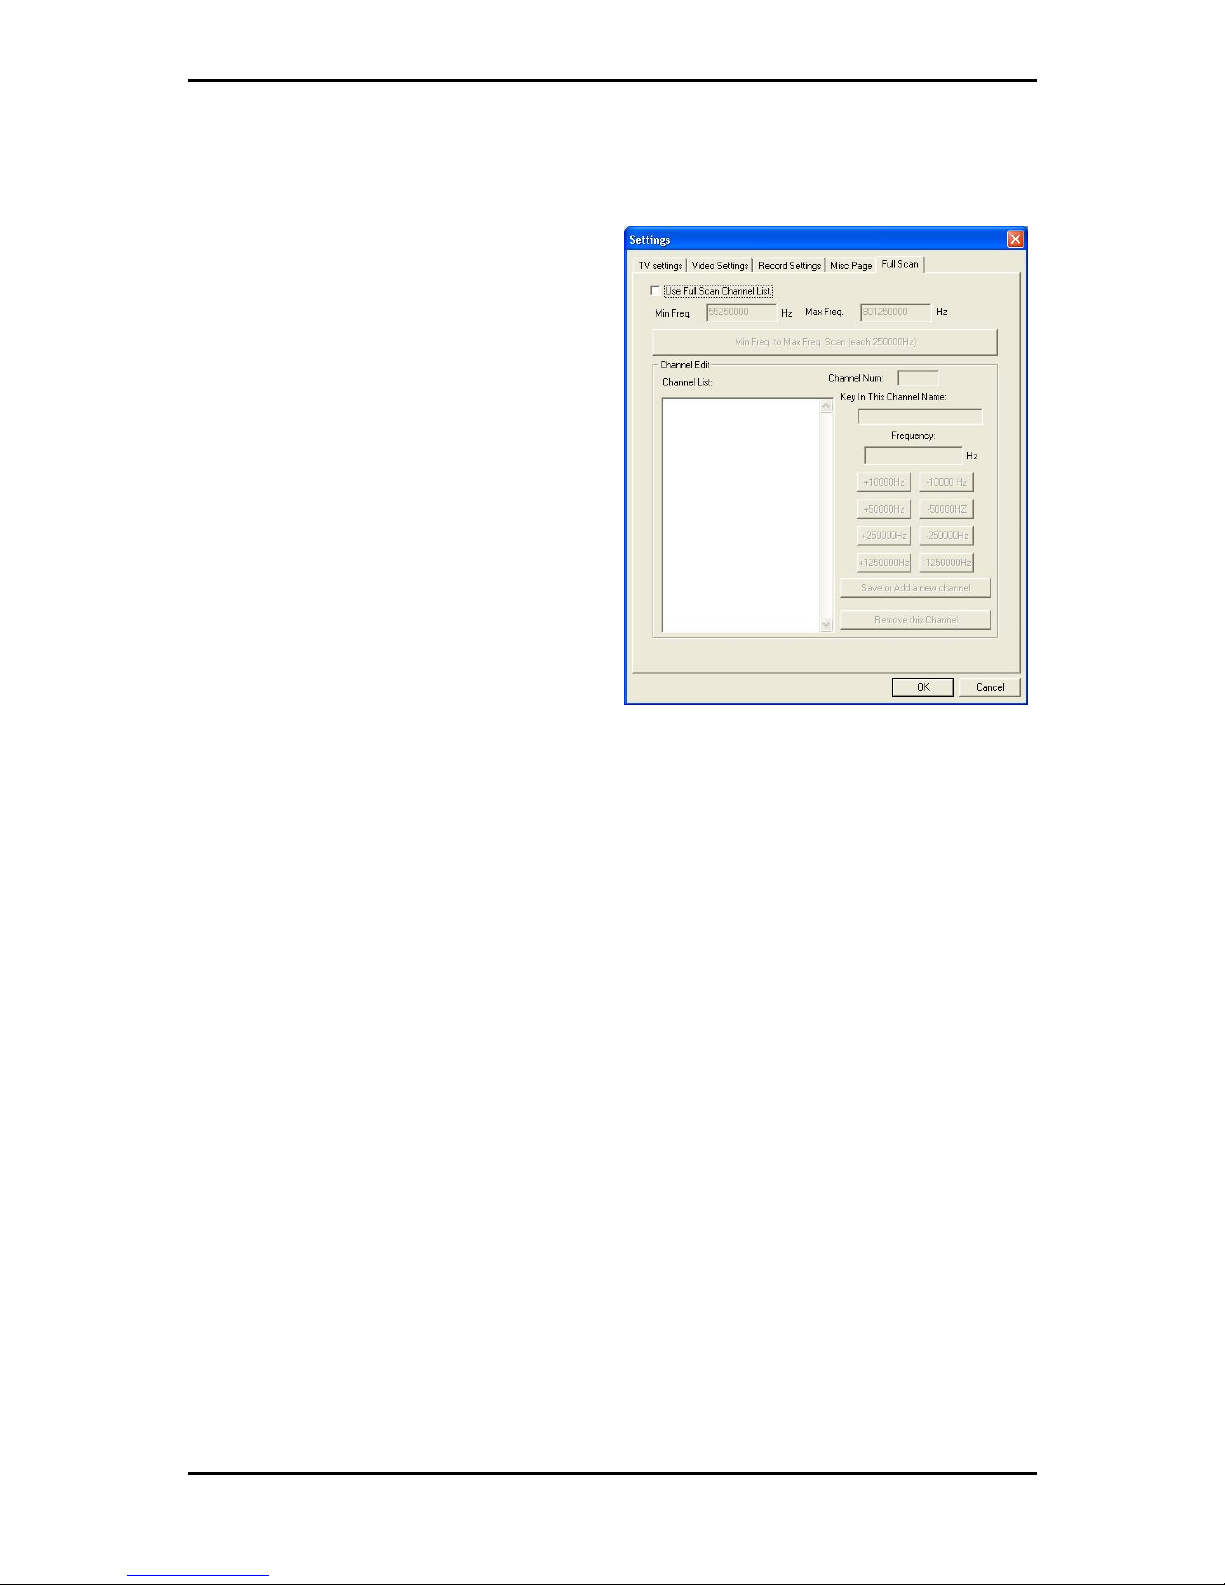
3.5.5 Full Scan tab
This box lets you do a full scan for
channels, as well as input frequencies to
create channels. If you wish to use this
option, check the Use Full Scan Channel
List checkbox.
Min Freq. To Max Freq. Scan
This will scan through all available
frequencies to detect available channels.
Click Start Scan on the box that appears
to start the full scan; click on Stop Scan to
stop scanning. The scan will take a while
to complete.
Channel Edit
Here, you can edit channels detected, or
add your own channels by entering a
frequency. To name to a channel, select it
from the Channel List, type a name into
the Key In The Channel Name box, and
click on Save or Add a new channel. To
remove a channel, enter a Frequency, or
adjust the current frequency with the +/- Hz
buttons and click Save or Add a new
channel. To remove a channel, select it
from the Channel List and click Remove
this Channel.
17
Page 22
The LifeView TV Walker Lite Interface
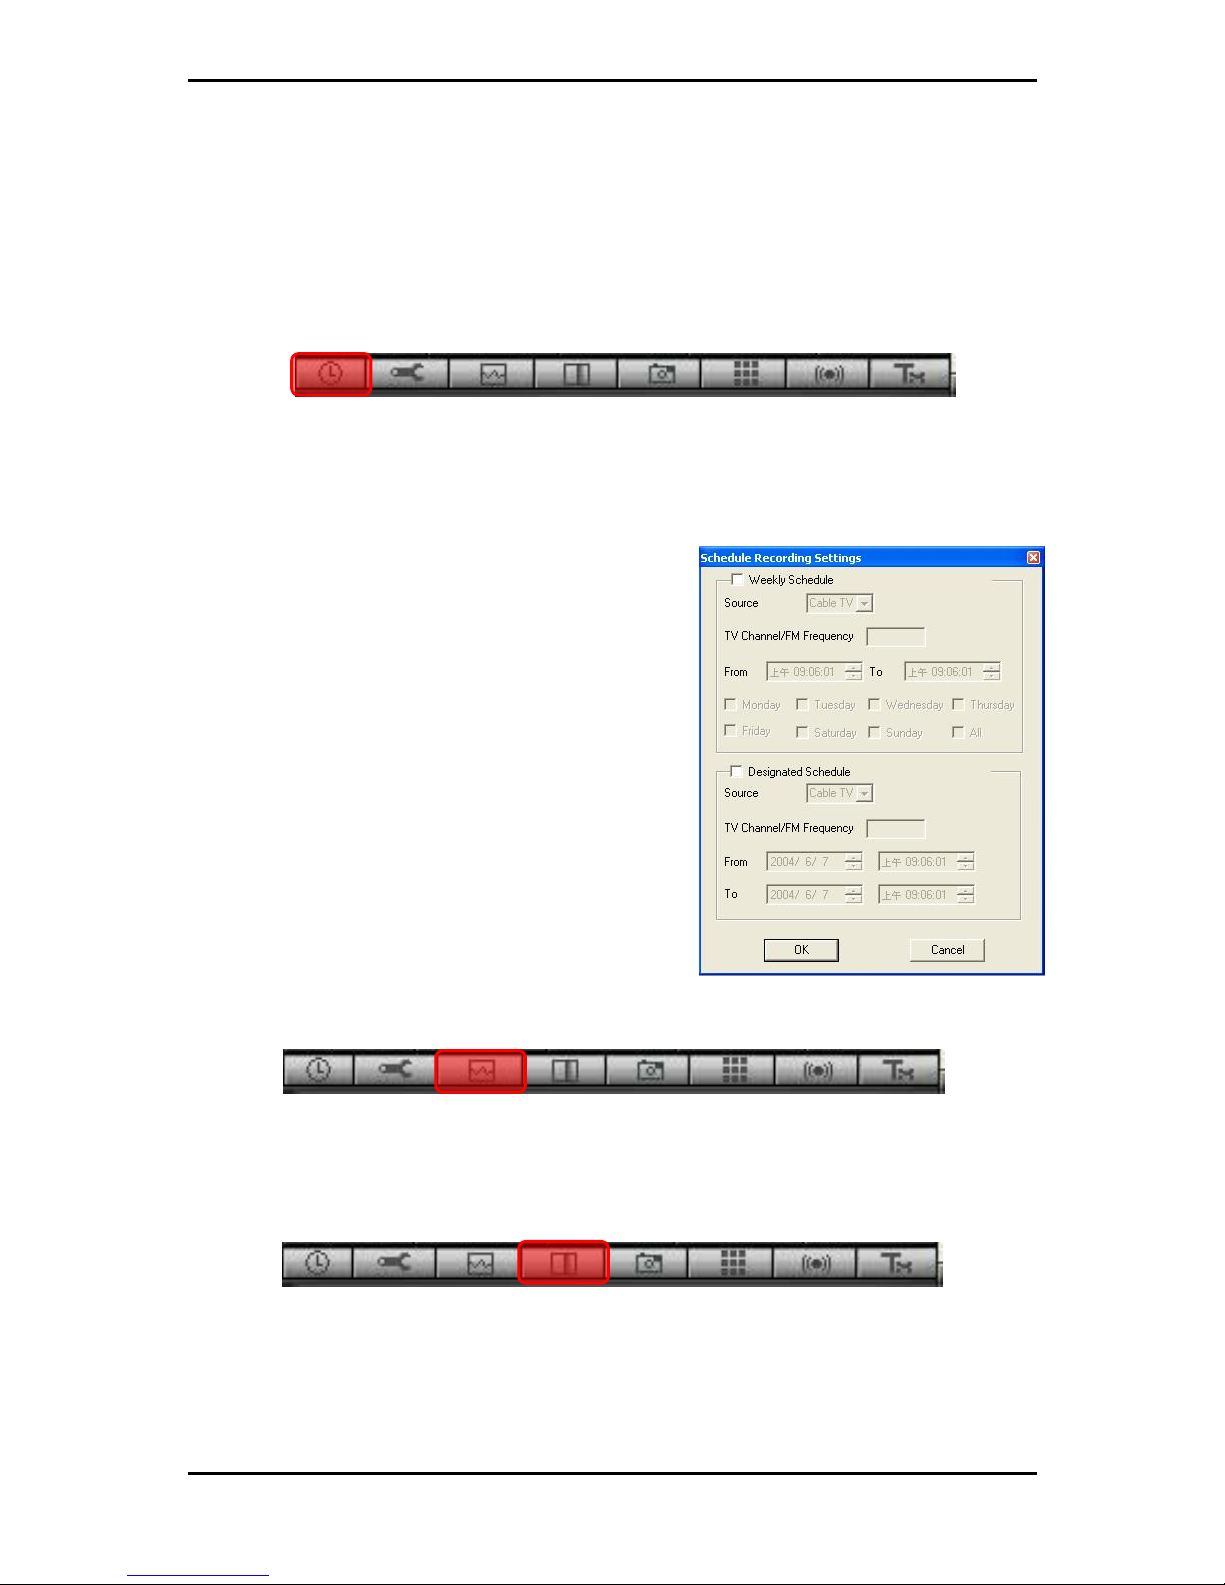
3.6 Additional settings
On the same toolbar as the settings button, you will find additional buttons that provide
options for customizing TV Walker Lite.
3.6.1 Schedule Recording button
To the left of the Settings button is the Schedule Recording button. When you click on
this button, you will see a new symbol in your taskbar. When you click on this symbol,
a window will appear that allows you to schedule recording of TV programs.
Weekly Schedule
This allows you to schedule recording of shows
that are broadcast at the same time every day or
every week.
Designated schedule
This allows you to program TV Walker Lite to
record a single show.
3.6.2 AutoScan button
Clicking AutoScan allows you to quickly scan, one at a time, the TV channels that are
currently available. To stop AutoScan, click on the button again and click OK.
3.6.3 Change Skin button
Clicking the Change Skin button gives you a different view of the TVR software.
Clicking on the button again will cycle through available views.
18
Page 23
The LifeView TV Walker Lite Interface
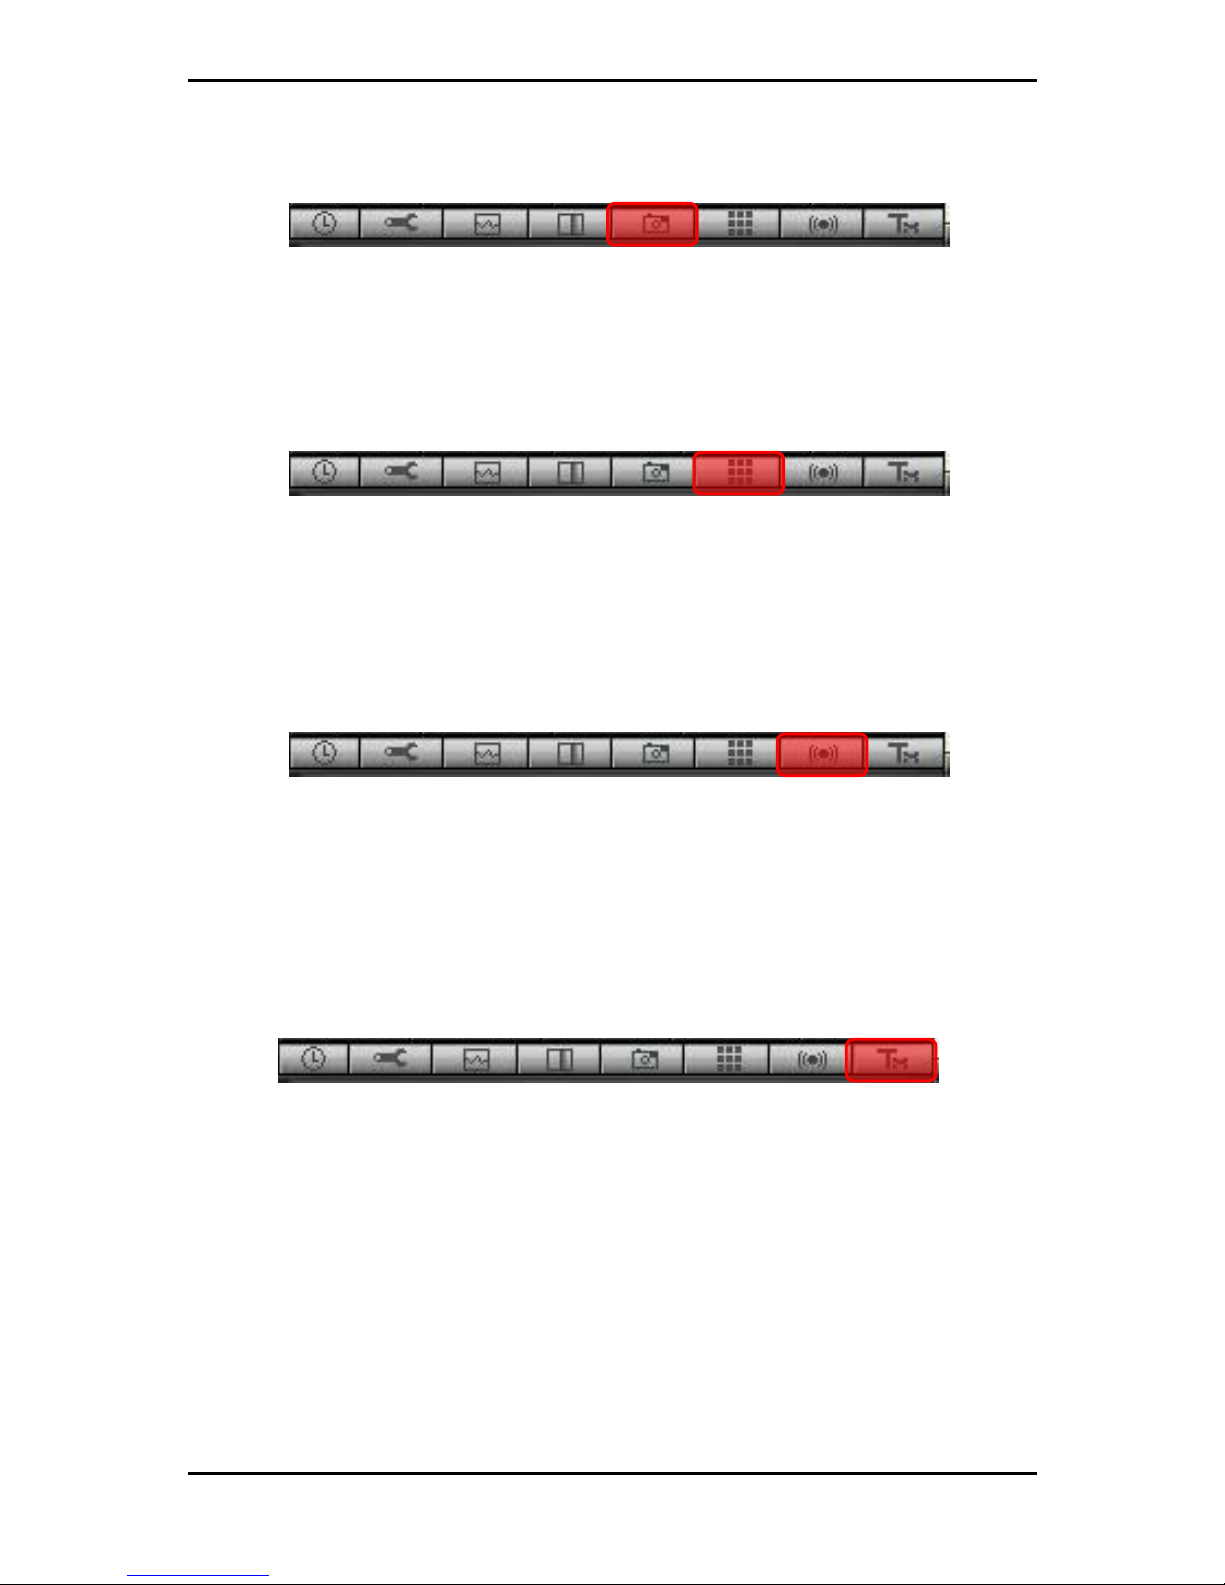
3.6.4 Snapshot button
When you click on Snapshot, TV Walker Lite will take a picture of the current frame
appearing on your monitor, and the snapshot will be saved in your Gallery. See section
3.9 for an explanation of the Gallery.
3.6.5 Multiple Preview button
When you click on the Multiple Preview button, you will be able to see an array of
thumbnail images of the TV programs currently airing. When you see a program that
you want to watch, just double click on it. The amount of time that each preview screen
is displayed, and the number of channels shown, can be selected on the Misc Page
tab (see section 3.5.4).
3.6.6 Audio settings button
When you click the audio settings button, a dialog box opens that allows you to set
your audio preferences — balance, bass, treble, and volume. Also in this dialog box,
Audio Reception allows you choose whether to play audio from TV programs in
stereo or mono. Additionally, if a TV station broadcasts its programs in more than one
language, you can use the language buttons to choose the language you prefer.
3.6.7 Reserved button
This button is reserved, and is non-functional.
19
Page 24
The LifeView TV Walker Lite Interface
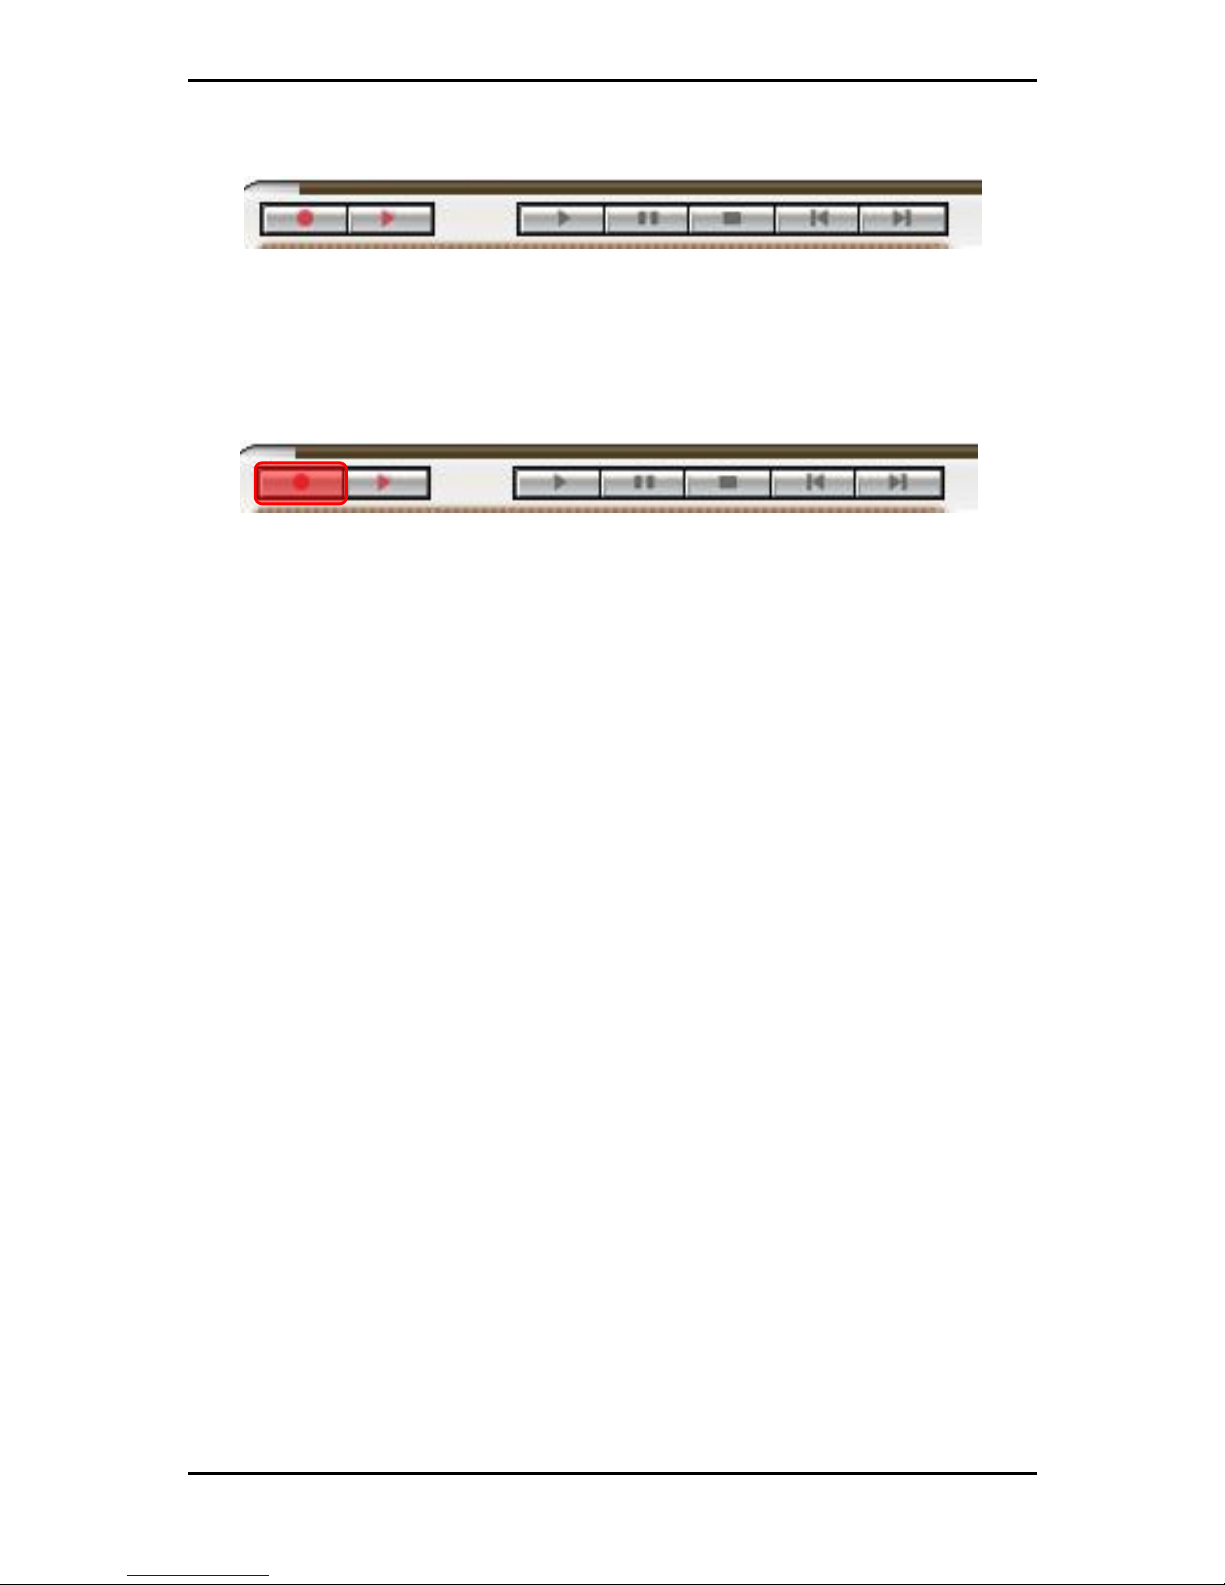
3.7 How to record a program
The top row of buttons on your TV Walker Lite TVR interface allows you to record a
program while watching it, and lets you control the TimeShifting feature.
3.7.1 Record button
By clicking this button, you can record a program while watching it. When you click
again, the recording will stop. You will find the recorded file in the Gallery (see section
3.9 for an explanation of the Gallery) in the format you chose in Record Settings/Video
Format (see section 3.5.3). You cannot change channels or sources while recording.
20
Page 25
The LifeView TV Walker Lite Interface
3.8 TimeShifting
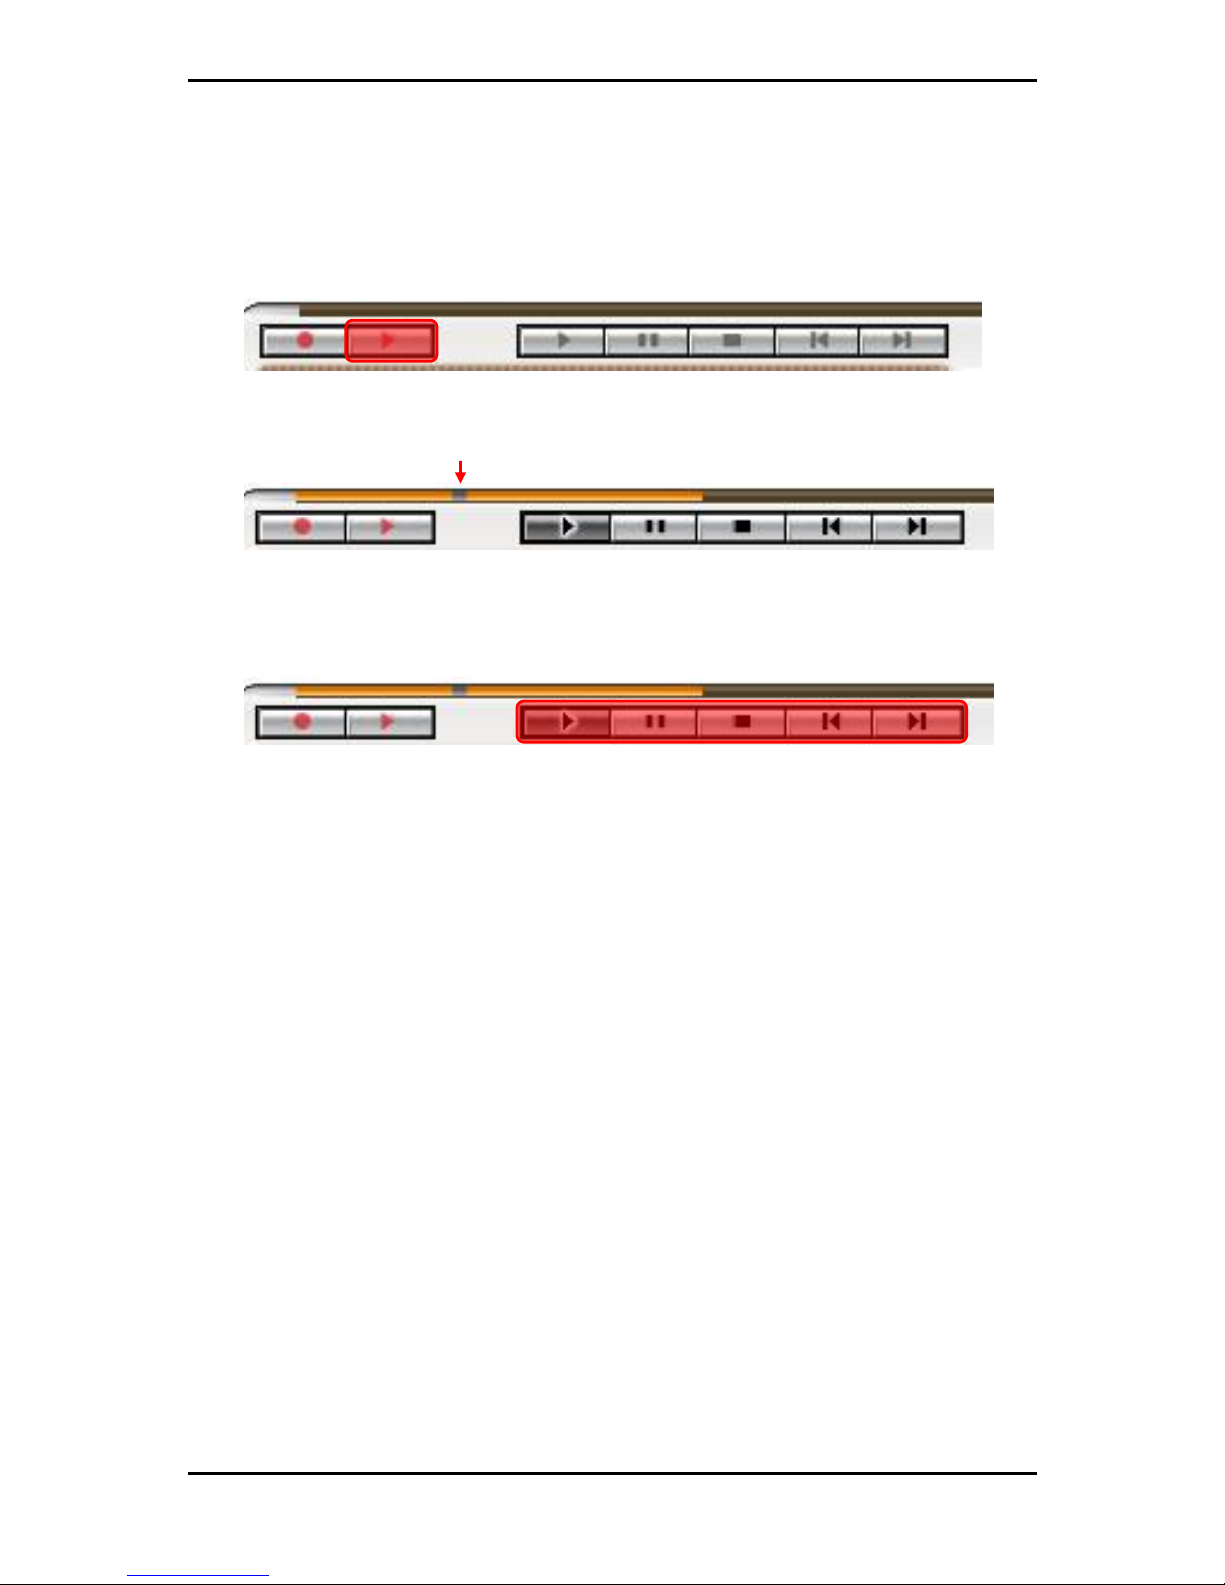
The TimeShift Function allows you to pause, fast forward, or rewind a program while
you are watching it. To start a TimeShift recording, click on the red Start/Stop
TimeShift button.
When in TimeShift mode, the Time Slider will appear in the horizontal bar above the
TimeShift button.
The orange bar shows how much video is currently recorded, and the gray square is
your current position. Dragging the slider to the left rewinds the video, dragging the
slider right fast-forwards the video up to what is currently playing.
The other controls are Play, Pause, Stop, Skip to Beginning, and Skip to End. Clicking
on Pause will pause the video, and you can resume watching by clicking on Play. Skip
to Beginning will go to the beginning of the recorded video, and Skip to End will skip to
the end of the recorded video. (what is currently playing) To stop TimeShift mode, you
can click on Stop or on the red Start/Stop TimeShift button. You cannot change
channels or sources while TimeShifting.
21
Page 26
The LifeView TV Walker Lite Interface
3.9 The Gallery
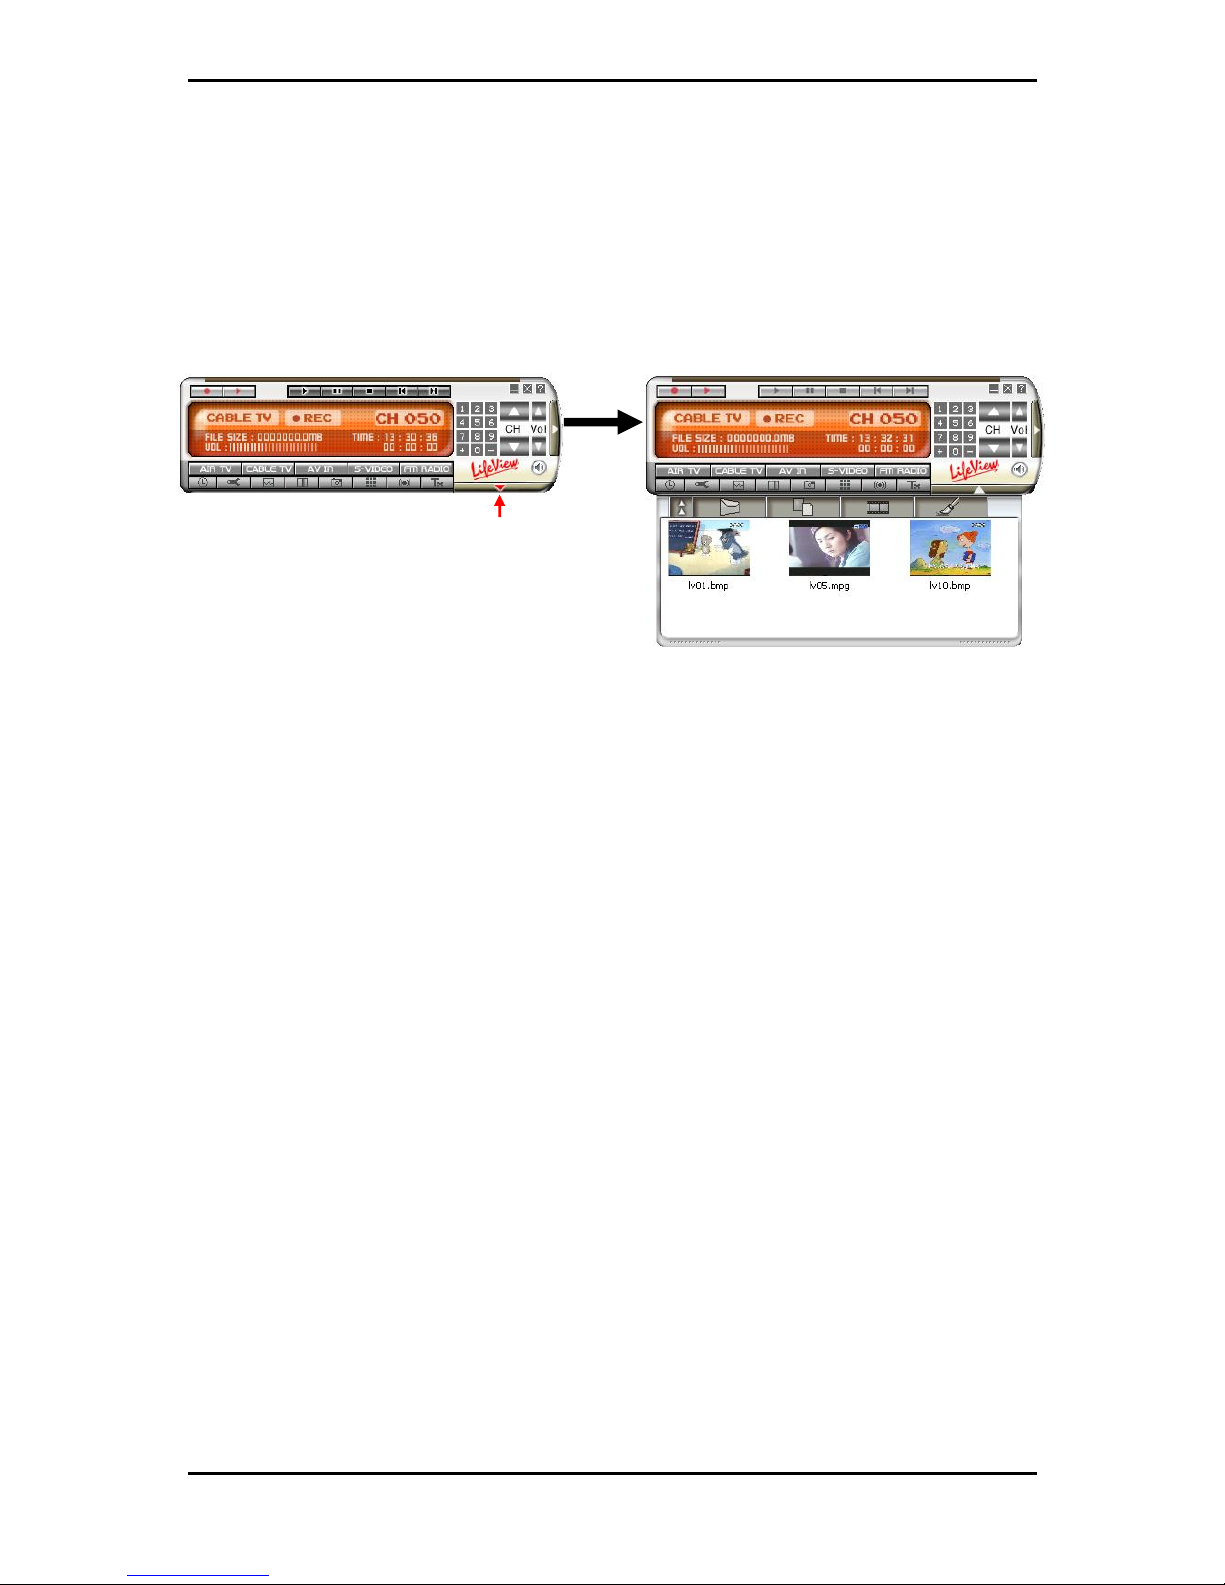
The gallery is a shortcut to the location on your hard drive where video files and
snapshots are stored. You can choose your hard drive location as explained in Record
Settings/Video Format. (see section 3.5.3)
You can open the gallery by clicking on the button located at the bottom right corner of
the LifeView TVR.
Here you can see what files you have recorded, as well as the following buttons:
Close Gallery: Closes the Gallery
Send by E-Mail: Opens your computer’s default e-mail program to e-mail the
selected file
Change List View: Toggles between Thumbnail, List, and Detailed views of your
files
Play Movie: Plays a selected movie
Paint: Opens selected image
22
Page 27
The LifeView TV Walker Lite Interface
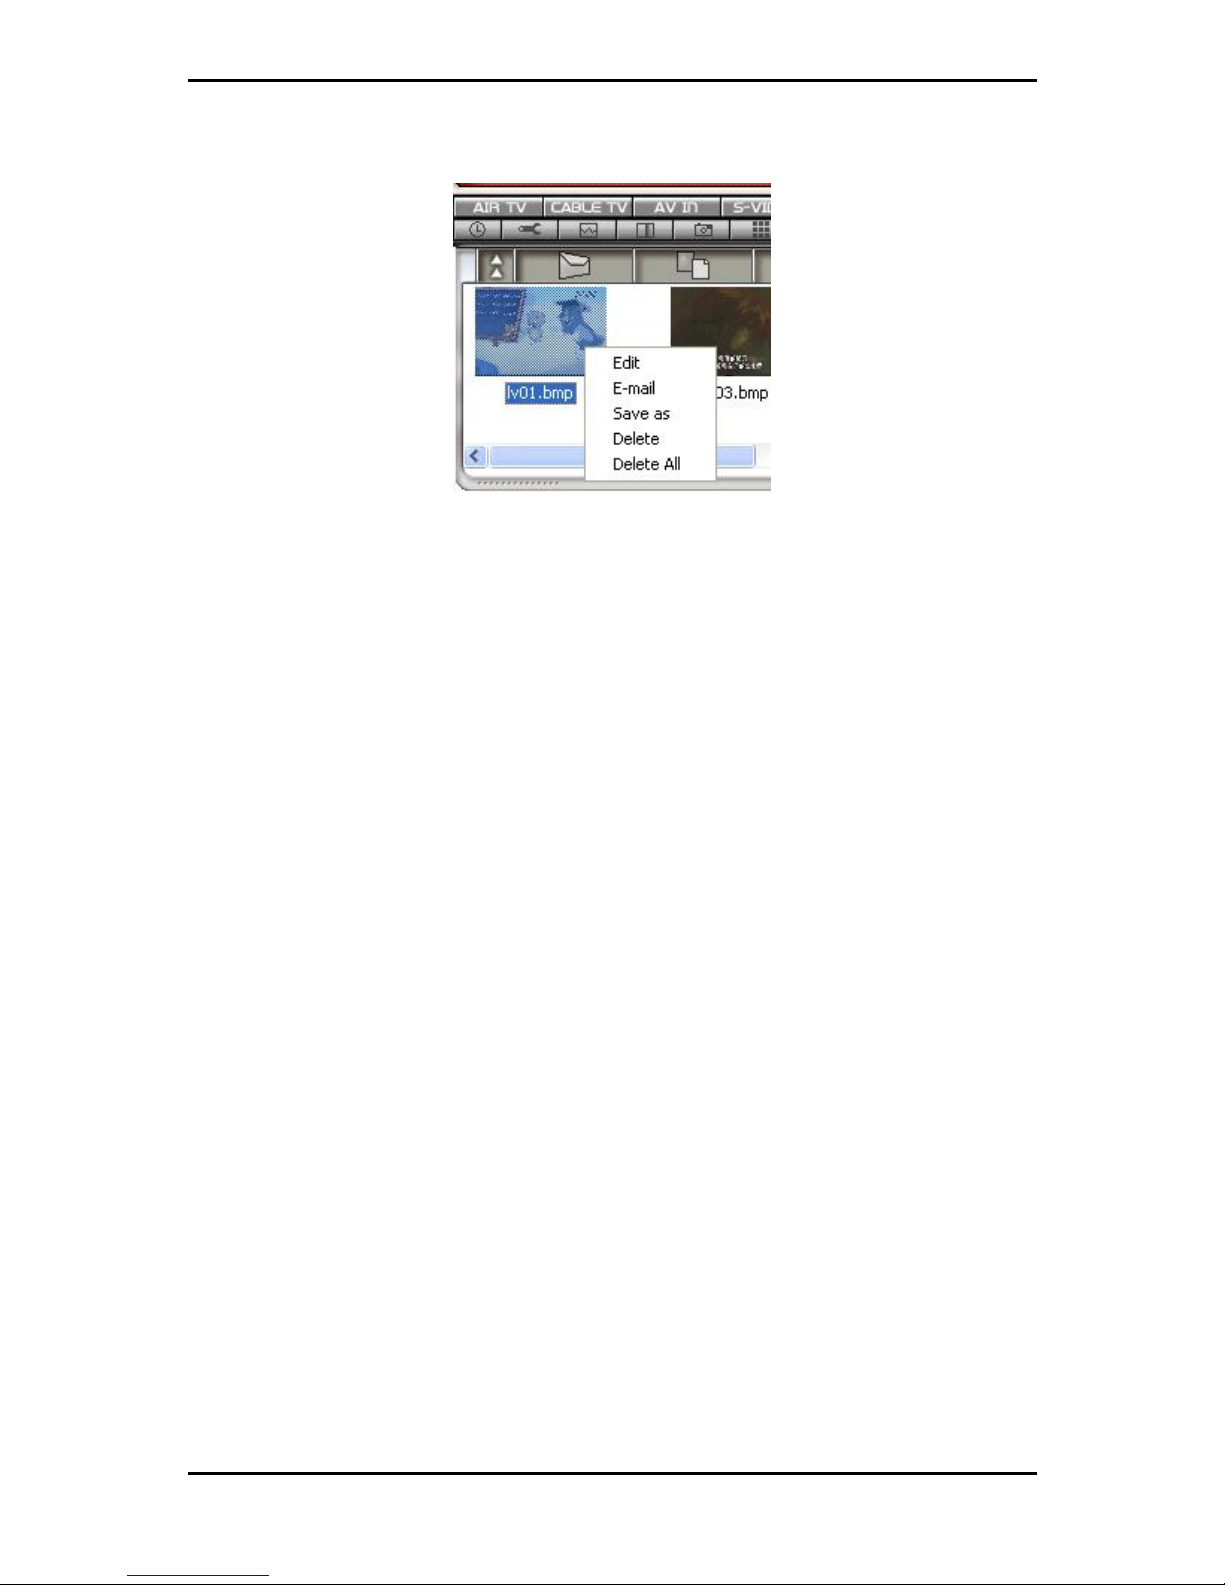
Right-clicking a file gives you a dropdown menu with the following options:
Edit: Opens the file
E-Mail: Opens your computer’s default e-mail program to e-mail the selected file
Save As: Lets you name and save the file to a selected folder
Delete: Deletes selected file
Delete All: Deletes all files in gallery
23
Page 28
Remote Control and Keyboard Shortcut Summary
4. Remote Control and Keyboard Shortcut
Summary
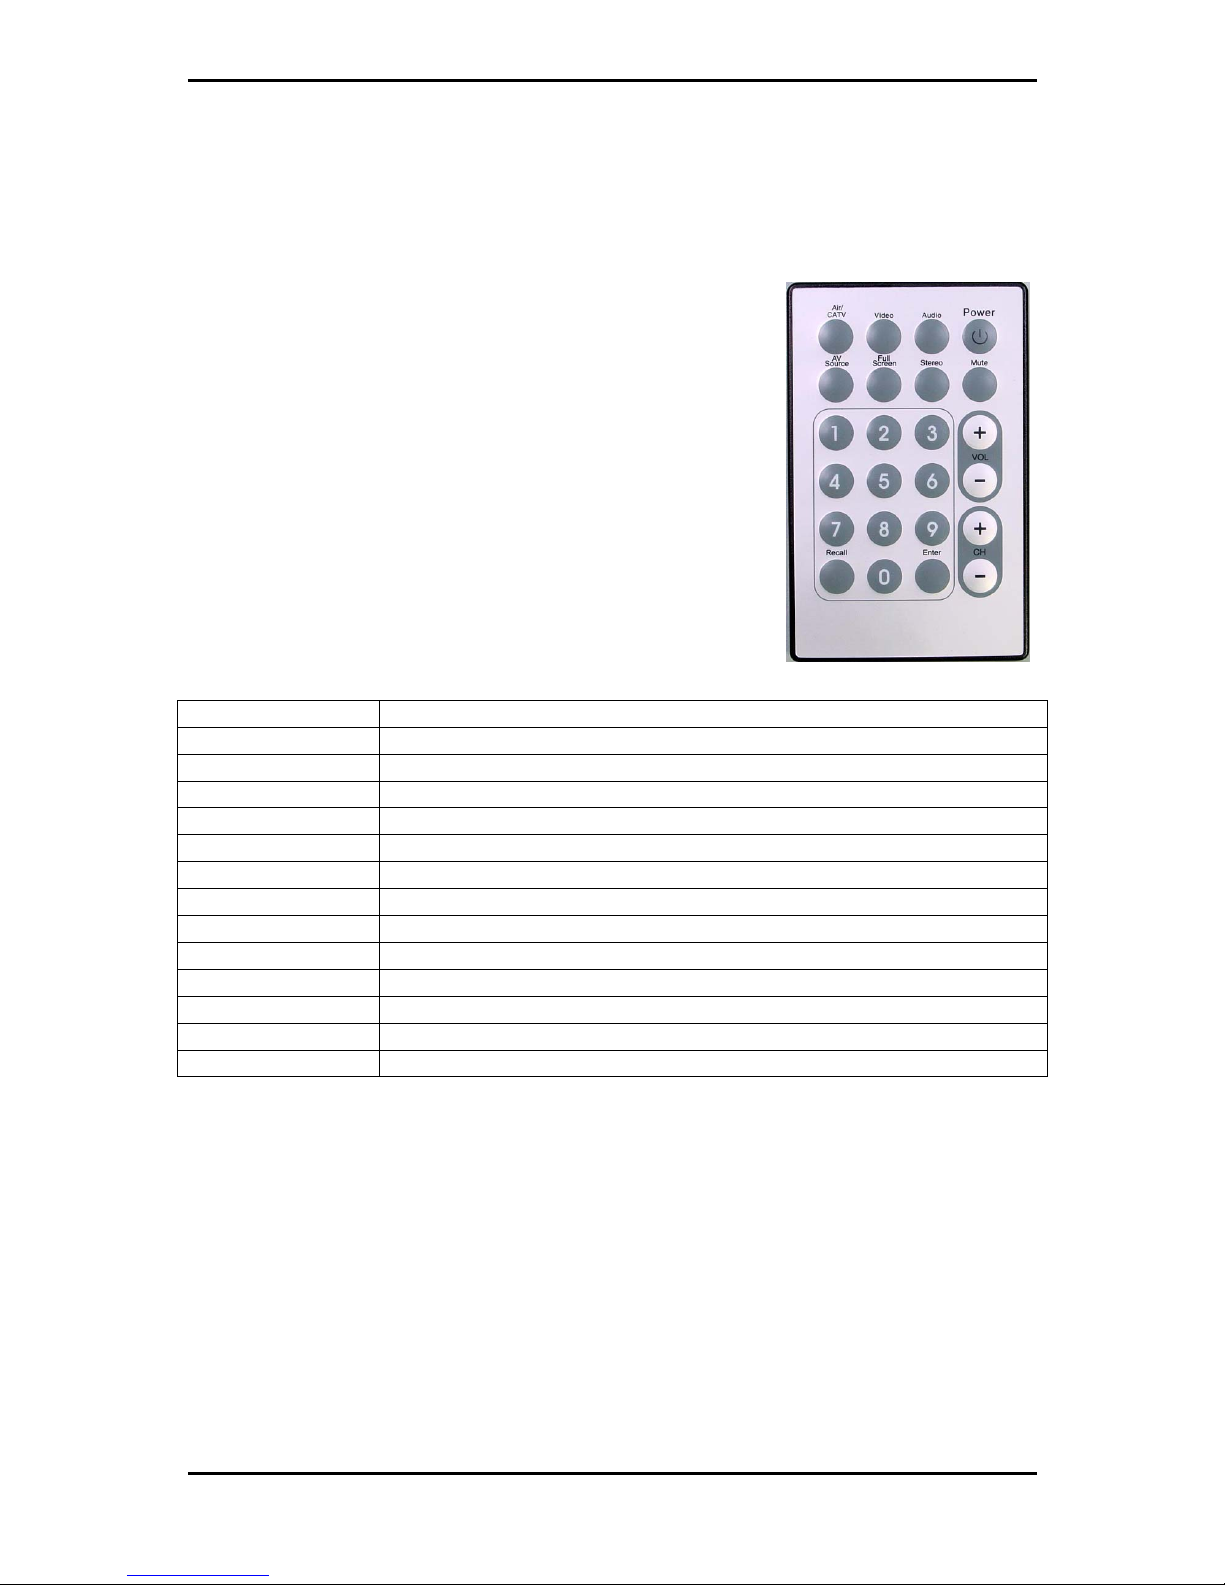
The TV Walker Lite comes with a fully functional remote
control. Make sure you aim at either the IR sensor on the
unit or the IR sensor on the extension cable. (see section
2.1)
You can use the following buttons on TV Walker Lite's
remote control to access many of TV Walker Lite's
functions.
Button Function
Air/CATV Toggles between air and cable reception.
Video Toggles between Video settings; use Volume +/- to adjust
Audio Toggles between Audio settings; use Volume +/- to adjust
Power Turns the TVR program off
AV Source Controls the input source (air, cable, AV in, S-Video in)
Full screen Turns full screen mode on or off
Stereo Toggles between stereo and mono
Mute Turns mute on or off
Numbers 0-9 Allows you to select a channel
Volume +/- Raise or lowers the volume
Channel +/- Allow you to go up or down one channel
Recall Allows you to jump to the previous channel
Enter Takes a snapshot of the current image on the screen
24
Page 29

Remote Control and Keyboard Shortcut Summary
The following table shows shortcuts that you can use to control the TV Walker Lite with
your keyboard.
Function Keyboard Shortcut
Turn the LifeView TVR program off Ctrl-Alt-F4
Choose channel Numerals
Go up one channel Page Up
Go down one channel Page Down
Recall previous channel R
Add a channel +
Delete a channel Video setting mode (Brightness, Contrast, Hue, Saturation) V
Adjust selected video setting Up or down arrow
Choose audio settings (balance, bass, treble) A
Adjust selected audio setting Up or down arrow
Raise or lower volume Up or down arrow
Turn mute on or off M
Switch between Stereo and Mono S
Choose input source (air, cable, AV in, S-Video in) I
Switch between air/cable reception C
Take a snapshot Spacebar
Turn full screen mode on or off F
Open 'About' dialog box Alt-/
25
Page 30

Contact Us
5. Contact Us
If you have attempted to resolve any problems you have with your TV Walker Lite and
still require assistance, please contact us by e-mail at:
Driver updates are available on the ”Download“ page of our website at
http://www.lifeview.com.tw.
26
 Loading...