

Page 1

FlyVideo
TV / Video Capture
Card
User’s Manual
Jan, 2000
Page 2

This equipment ha s bee n tes ted and foun d to com p ly with the
limits for a Class B computing device in accordance with the
specifications set forth in Subpart J of Part 15 of the FCC
Rules.
Animation Technologies Inc. reserves the right to make
improvements to t he p rodu ct d es crib ed i n th is m anual at any
time and without notice. Every effort has been made to ensure
against any inaccuracies or oversights in this publication.
However, Animation Technologies Inc. can not be held
responsible for any loss of information stemming from the
use of FlyVideo ser ies produc t.
LifeView is a registered trademark of Animation
Technologies Inc. IBM and IBM-PC are registered
trademarks of International Business Machines Corporation.
MS-DOS, MS-Windows and MS-Windows 95/98 are
registered trademarks of Microsoft Corporation. All other
brand names are registered trademarks of their respective
companies.
This manual is copyrighted. All rights reserved. This
document may not, in whole or part, be copied, reproduced,
reduced or translated by any means, either mechanical or
electronic, without prior consent in writing from Animation
Technologies Inc.
Page 3

Table of Contents
· Introduction 1
· Product Features 1
Chapter I - Setting up your FlyVideo Card
1.1 Package Contents 2
1.2 System Requirem e nts 2
1.3 Hardware Installation 3
1.4 Software Installation 6
1.4.1 Windows 98 Driver Installation 6
1.4.2 Windows 95 Driver Installation 10
1.4.3 Lifeview Utility I nstallation 12
Chapter II - Running FlyVideo Program
2.1 User Interface 17
2.2 Video Capture 25
2.3 Using the FlyRadio Application 29
2.4 Accelerator Keys Summary 31
Appendix A Remote Controller A-1
Appendix B Q & A B-1
Licensing and Warranties C-1
Page 4

Page 5

Introduction
1
Introduction
Welcome to the world of LifeView FlyVideo series capture
card. With this multimedia product, you can use it as a
convenient to ol for any purpose includin g video conference,
video editi ng, class presentation, or even entertainment. The
jumperless design and PnP (Plug & Play) implementation
simplify the tedious installation process. By eliminating the
VGA loop cable and feature connector (VFAC), user will be
able to enjo y a clear, a lso high qu ality TV vid eo through this
powerful product.
Product Features
•
Supports real-time desktop video conferencing and video
phone through POTS, Internet, ISDN, LAN, and
TCP/IP-based network
•
Capture and display live video from VCR, LD, or
camcorder on your computer directly
- Supports NTSC, PAL, PAL M, PAL N and SECAM
video standards
- Scales, captures, edits and stores video images
- Color control fo r brightne ss, cont rast, hu e, and satu ration
•
Watch broad cast TV or cable TV programs
- Automatic scan, preview, and memorize available TV
channels
•
Supports ITU-T H.324 and H.263
compression/decompression standard
•
Supports contin uou s A VI fi le c ap tur ing w ith up to 30 F PS
and single frame snapshot
•
Fancy scan show function provides multiple (Up to 100*)
160x120 video windows display of the same video source
•
Clever design eliminates on bo ard DRAM, provi ding a
low cost, high performance solut i o n
*In 1600✕1200 at HiColor or above mode, FlyVideo can
simultaneously display 100 windows of the same video
source.
Page 6

Chapter I Setting up your FlyVideo Card
2
Chapter I
Setting up your F l yVideo Card
1.1 Package Contents
Unpack your
FlyVideo
series package and be sure that all items
are intact. The following items should be included in your
FlyVideo series package:
•
FlyVideo TV/video capture card (FlyVideo’98 or
FlyVideo’98 FM)
•
Audio Cable
•
Remote control (optional)
•
Remote control receiver cable (optional)
•
FM Antenna (for FlyVideo’98 FM model only)
•
Quick Installation Guide or User’s Manual
•
Installation CD-ROM
1.2 System Requirements
•
IBM PC or compatible
•
133 MHz CPU or better processor
•
Minimum 16 MB on-board memory
•
Minimum 10 MB hard disk space available
•
Free PCI slot
•
VGA and with DirectDraw driver supporting 15 bit color or
higher
•
MS Windows 95/98 or Windows NT 4.0
•
TV antenna or cable from
CATV
•
Speakers for audio output
•
Sound card, PC camera, V8 or Camcorder for Video
Conferencing
•
CD-ROM drive
Page 7
Chapter I Setting up your FlyVideo Card
3
1.3 Hardware Installation
To install the FlyVideo series capture into your computer, follow
the steps below:
1. Turn off all your compute r power sources and any
connected peripherals you may have (i.e., printer, external
drivers, modem, ...etc.).
2. Select any available PCI slot and remove the slot cover, screw,
etc.
3. Press the FlyVid eo card firmly int o the sl ot until it sna ps in
place. And secure the card by replacing the screw you
remove from step 2.
4. Plug the TV cable onto FlyVideo series capture card’s antenna
adapter input.
5. Connecting video devices:
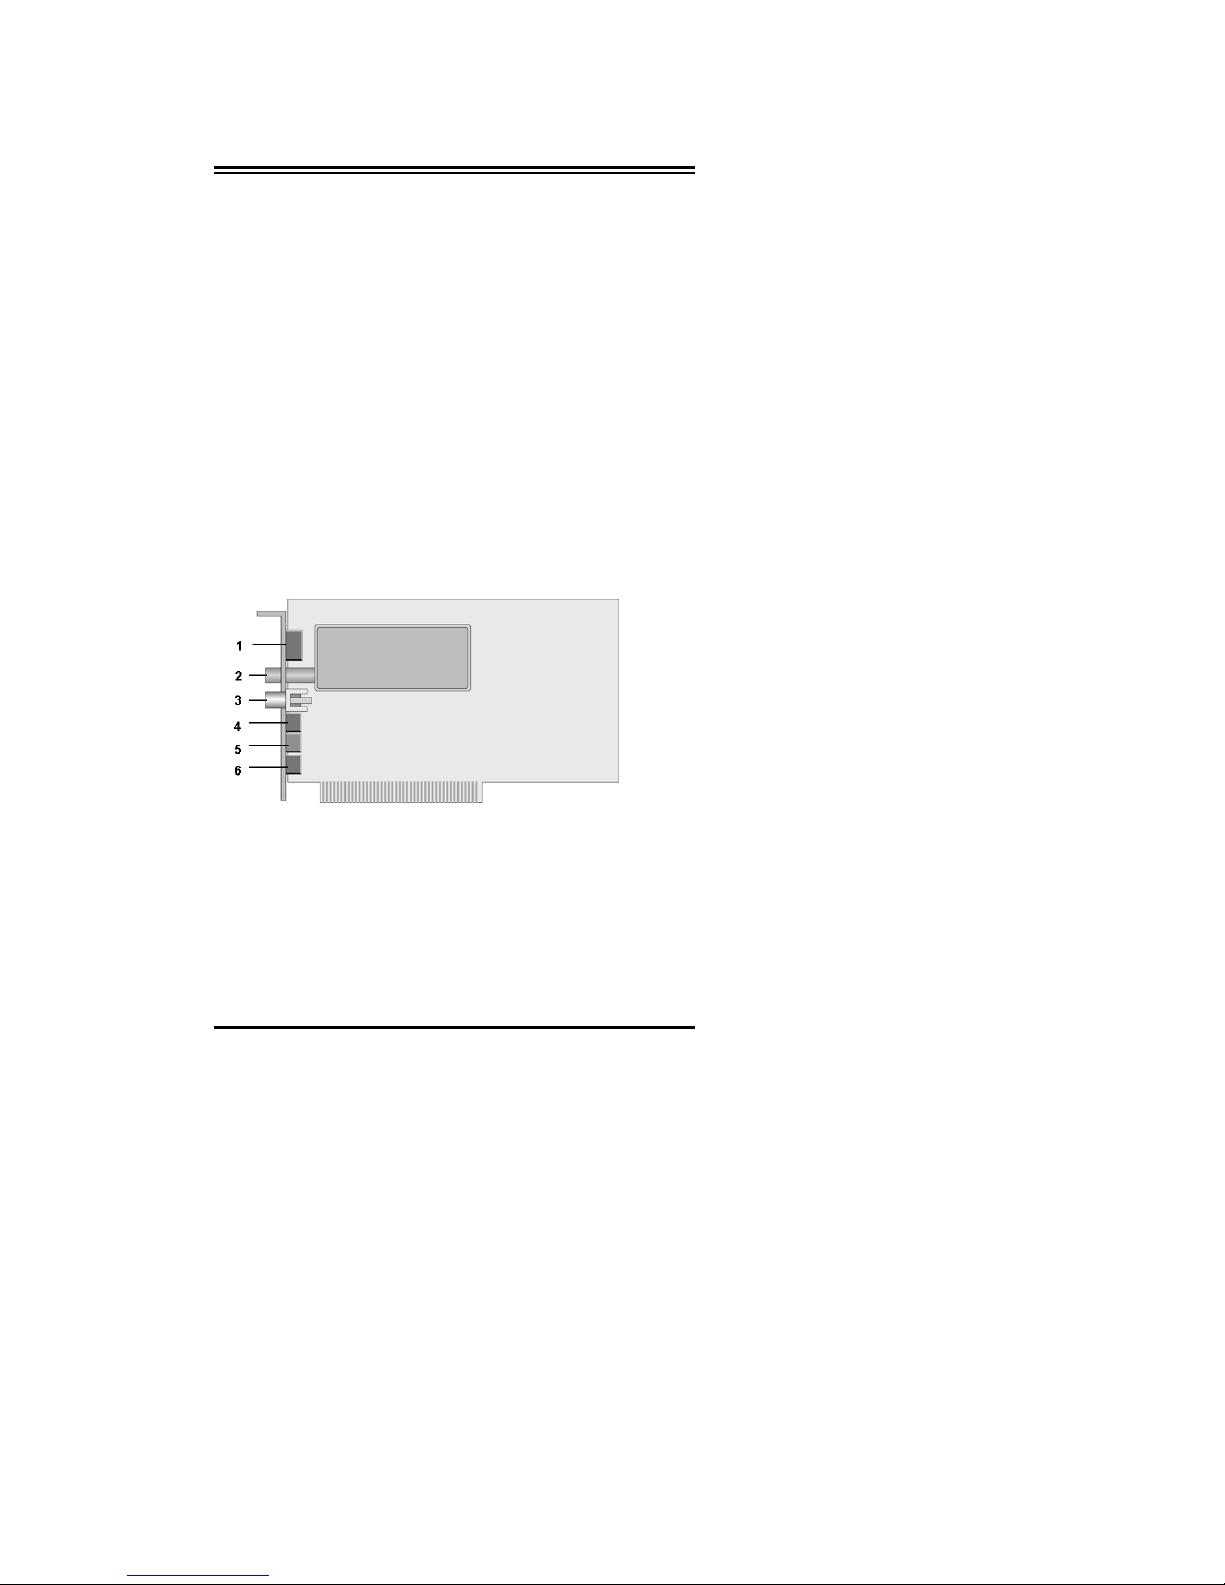
For FlyVideo’98 users:
1. SVHS Input (mini-DIN 4 pin)
2. To TV antenna
3. AV Input (RCA)
4. Audio Input (3.5″ stereo jack)
5. Remote sensor connector
6. Audio Output (3.5″ stereo jack) to speaker
Page 8
Chapter I Setting up your FlyVideo Card
4
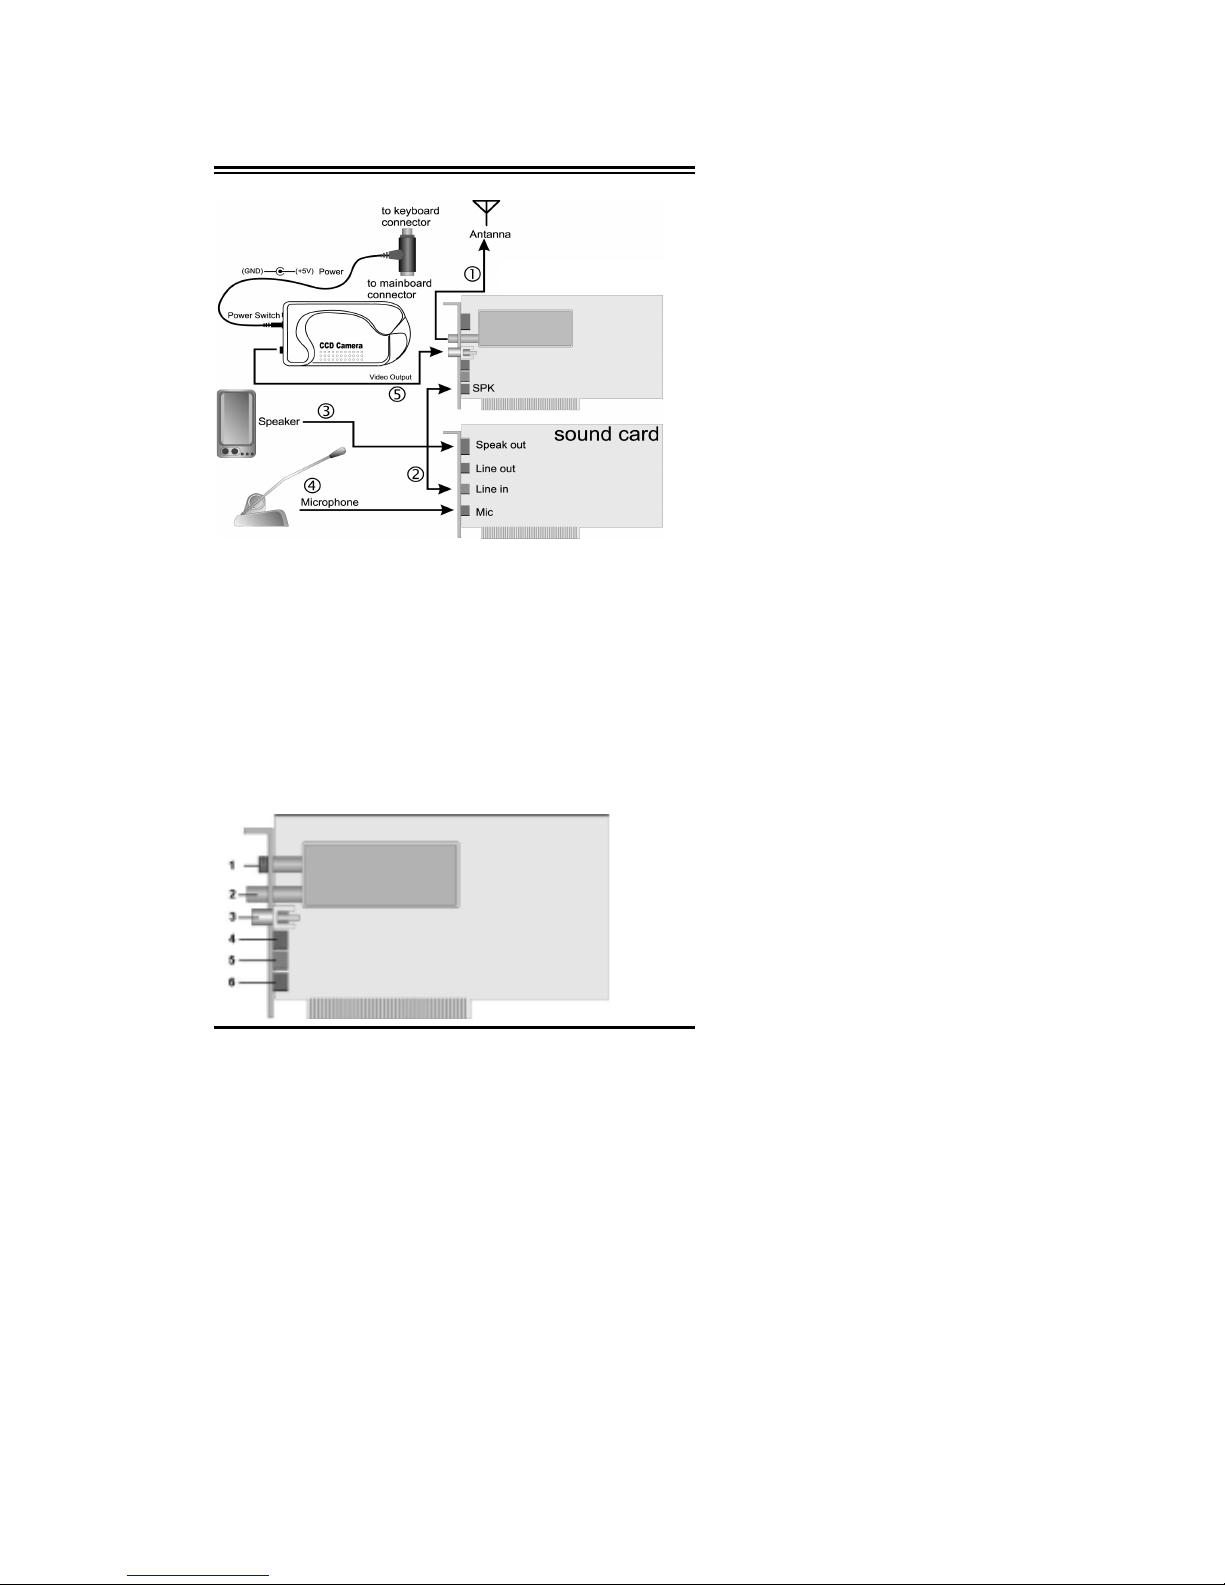
Step1. Connect the air antenna or cable to the antenna input.
Step2. Connec t the Audio ou tput of Fly Video series c apture ca rd
to the “Line in” of your sound card.
Step3. Connect the “Speak out” or “Line out” connector of your
sound card to the speaker.
Step4. Connec t the microphon e to the “Mic” input of y our sound
card. (Microphone not included)
Step5. Connect your VCR, camcorder or PC camera to the
AV-Input of FlyVideo’98 capture card .
For FlyVideo’98 FM User:
Page 9
Chapter I Setting up your FlyVideo Card
5
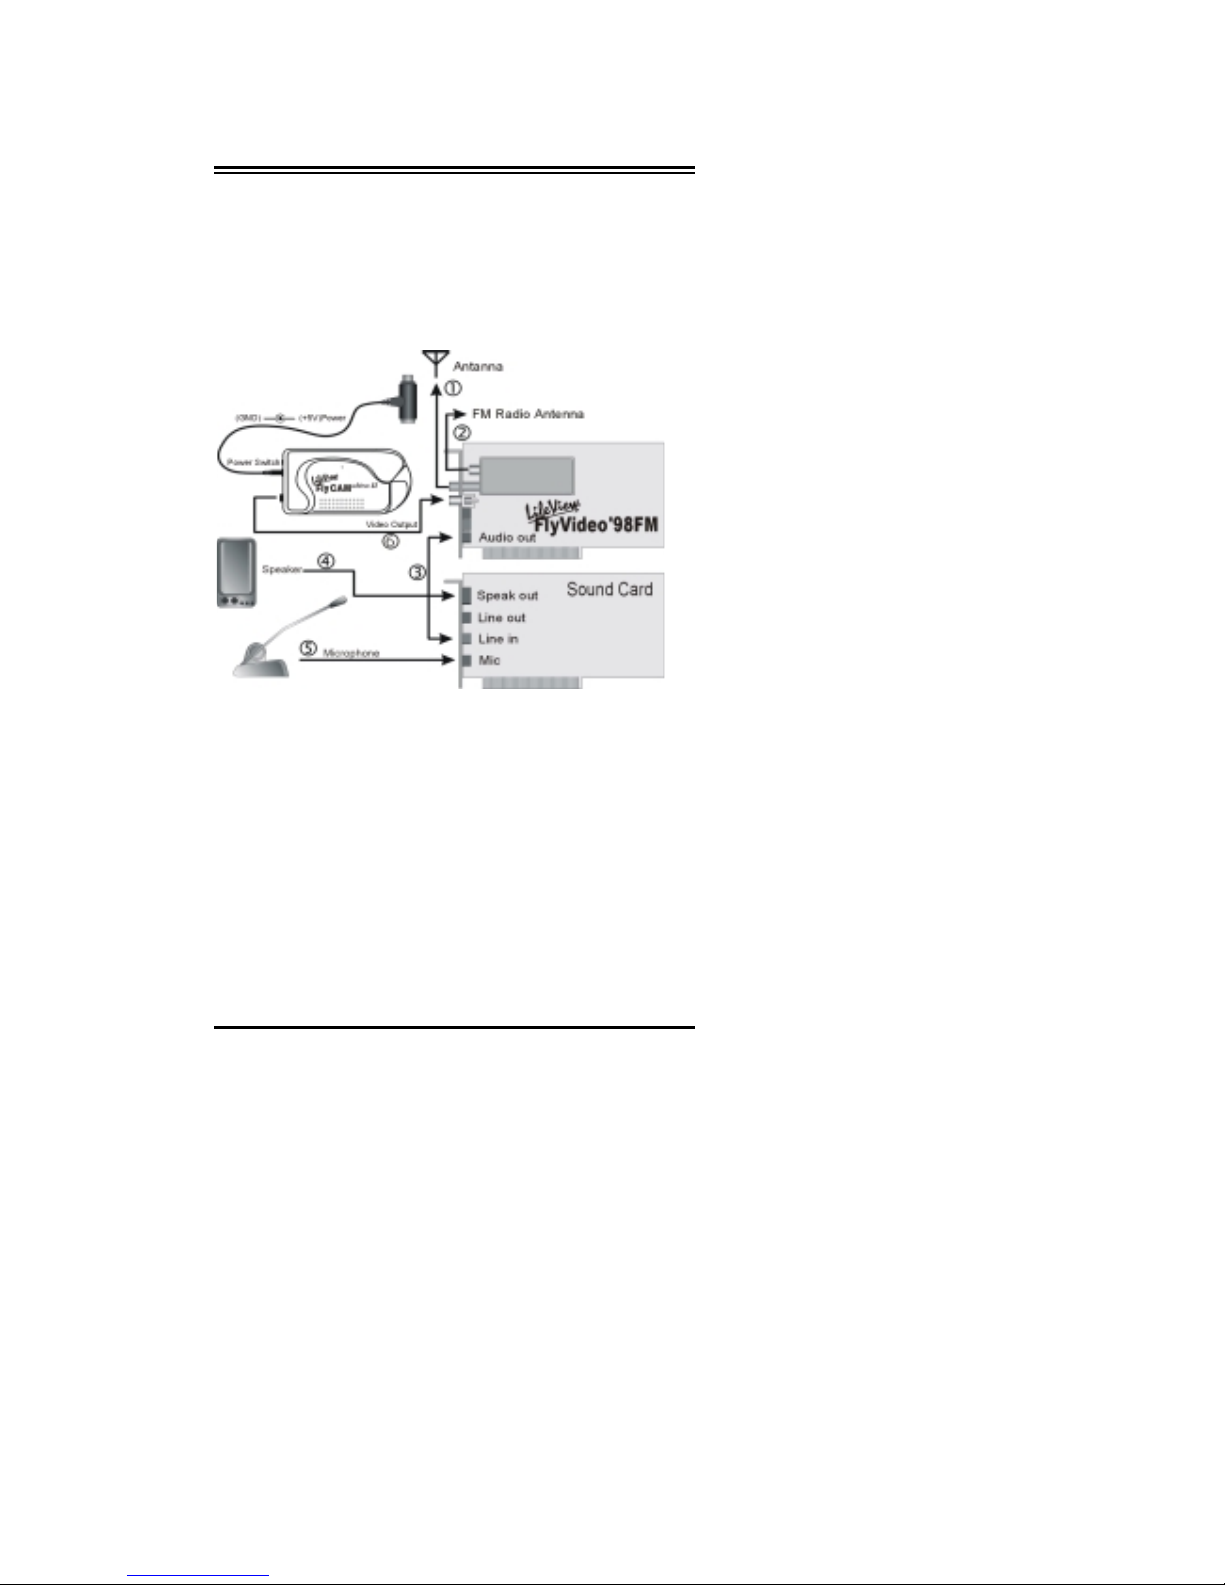
1. To FM antenna
2. To TV antenna
3. AV Input (RCA)
4. Audio Input (3.5″ stereo jack)
5. Remote sensor connector
6. Audio Output (3.5″ stereo jack) to speaker
Step1. Connect the air antenna or cable to the antenna input.
Step2. Plug the supplied Radio aerial cable into the FM
connector.
Step3. Connect the Audio out put of Fly V ideo ser ies capture c ard
to the “Line in” of your sound card.
Step4. Connect the “ Spea k ou t” or “Li ne out” co nnec tor of y our
sound card to the speaker.
Step5. Connect the microphone to the “Mic” input of your
sound card. (Microphone not included)
Step6. Connect your VCR, camcorder or PC camera to the
AV-Input of FlyVideo’98 capture card.
Page 10
Chapter I Setting up your FlyVideo Card
6
1.4 Software Installation
Your FlyVideo’98 series package comes with complete
Windows software utilities. These utilities come on a
CD-ROM included in the package. Before installati on , it i s
highly recommended that all background programs or TSRs are
disabled. This includes such applications as anti-virus software
and system monitoring applications.
1.4.1 Windows 98 Driver Installation
The installation procedures and screens of Windows 95 a nd
Windows 98 are slightly different. This section will discuss
driver installation under Windows 98. The next section will
discuss driver installation under Windows 95.
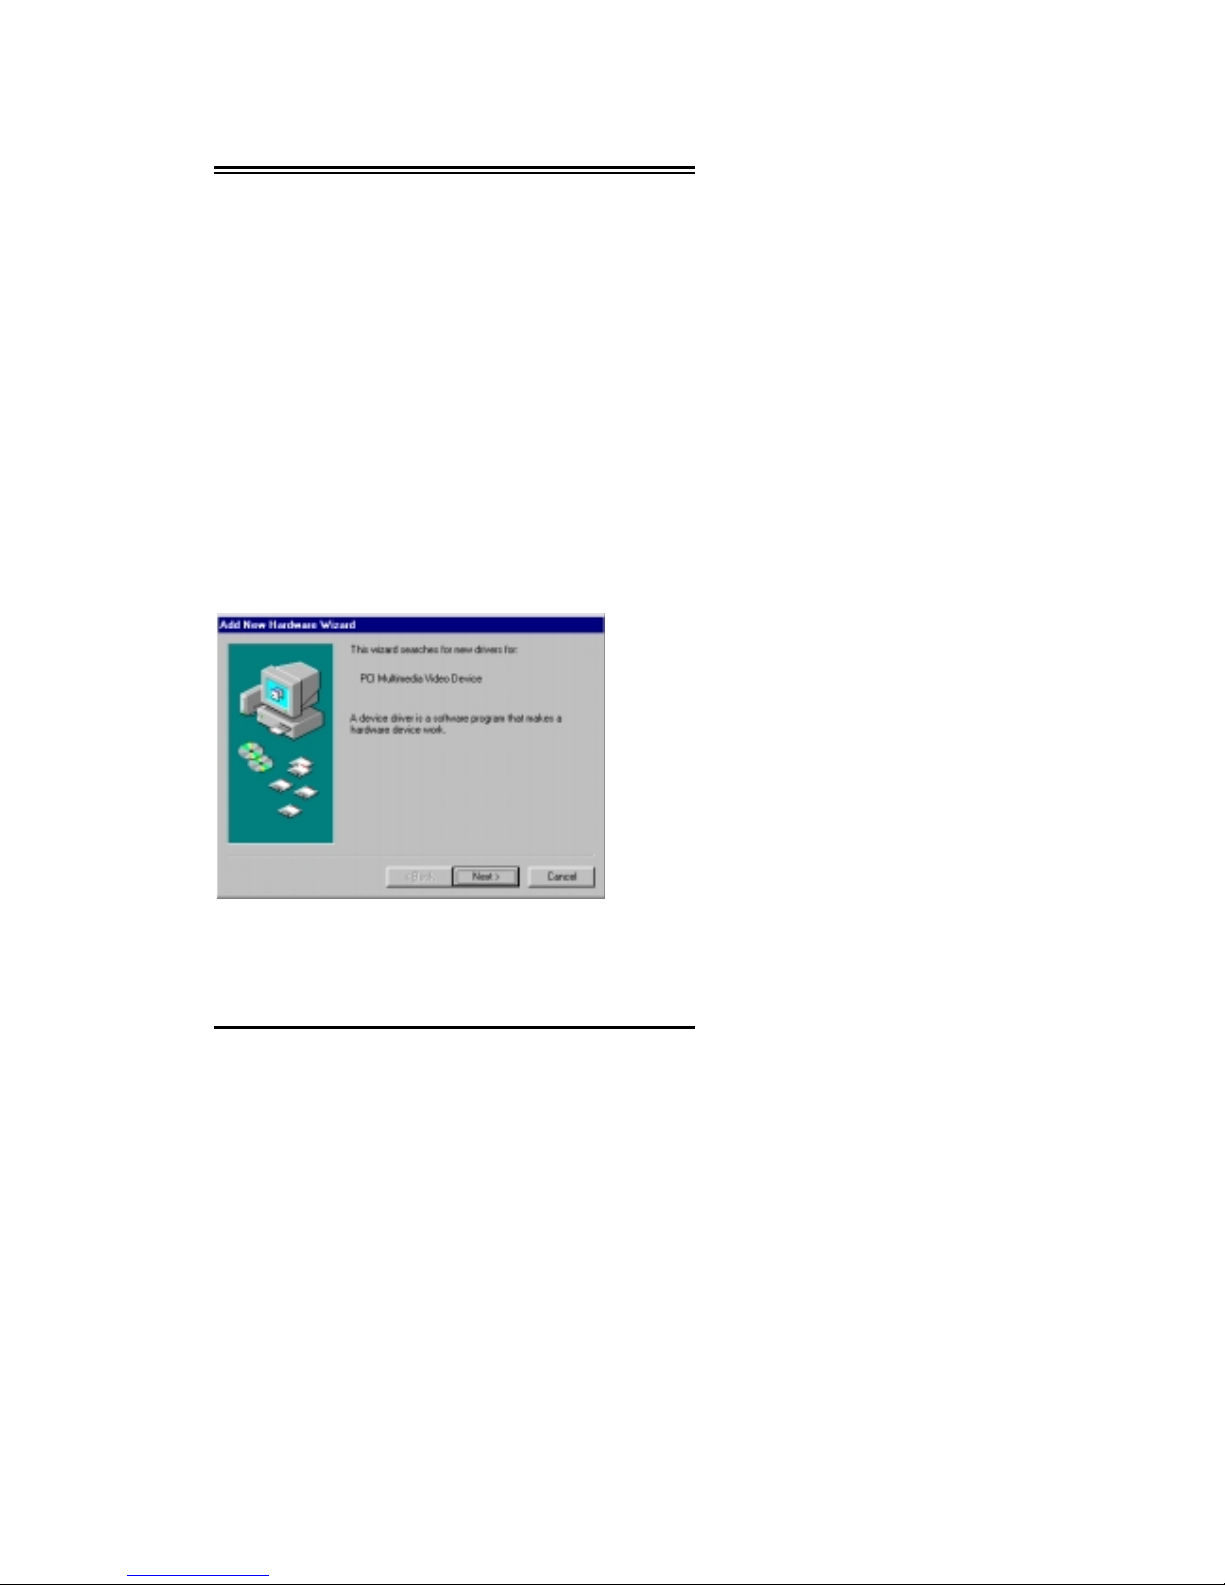
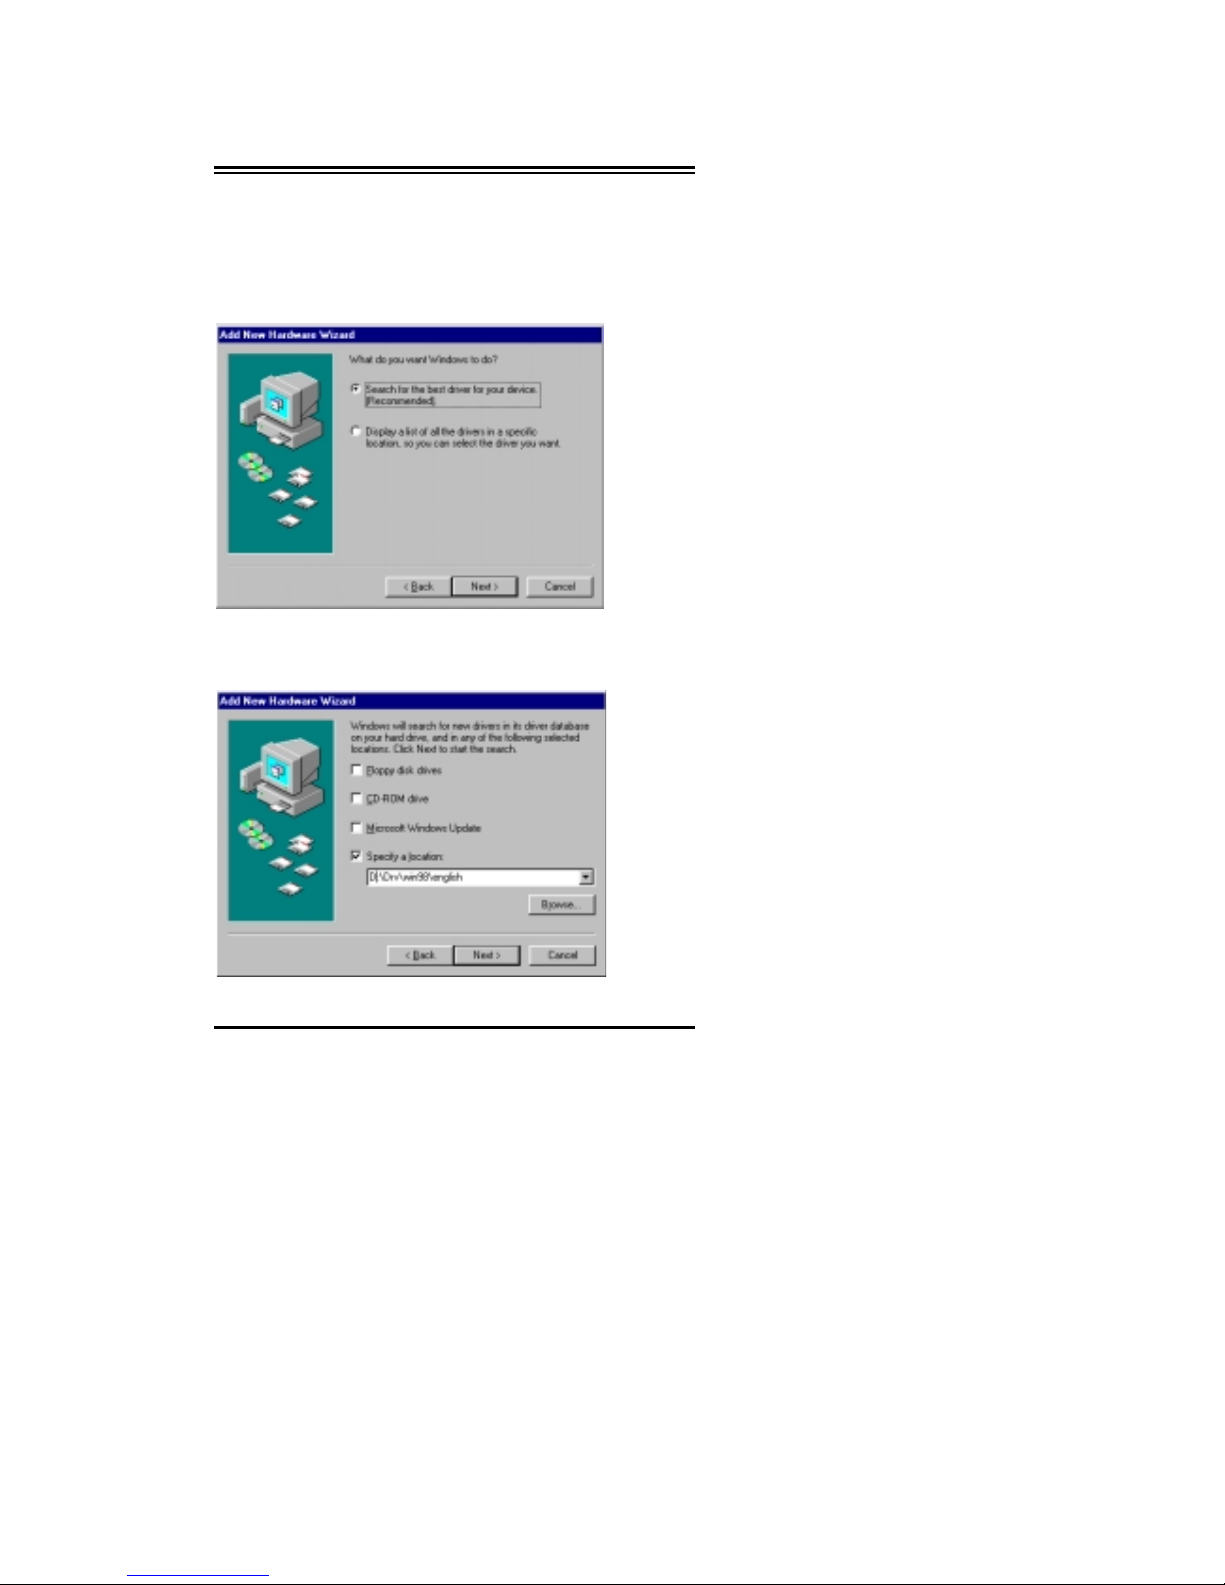
As soon as your system is done booting, the following screen
will appear:
Windows 98 has detected new hardware and started the Add
New Hardware Wi za r d . This applic a tion wil l he lp you set up
your new FlyV ideo’98 ca rd co rrectly under Windows 9 8. Clic k
Next
to begin installation.
Page 11
Chapter I Setting up your FlyVideo Card
7
The next screen that appears will ask how you would like the
drivers to be installed:
Select the first option “Search for the best driver for your device.
(Recommended)” and click the
Next
button.
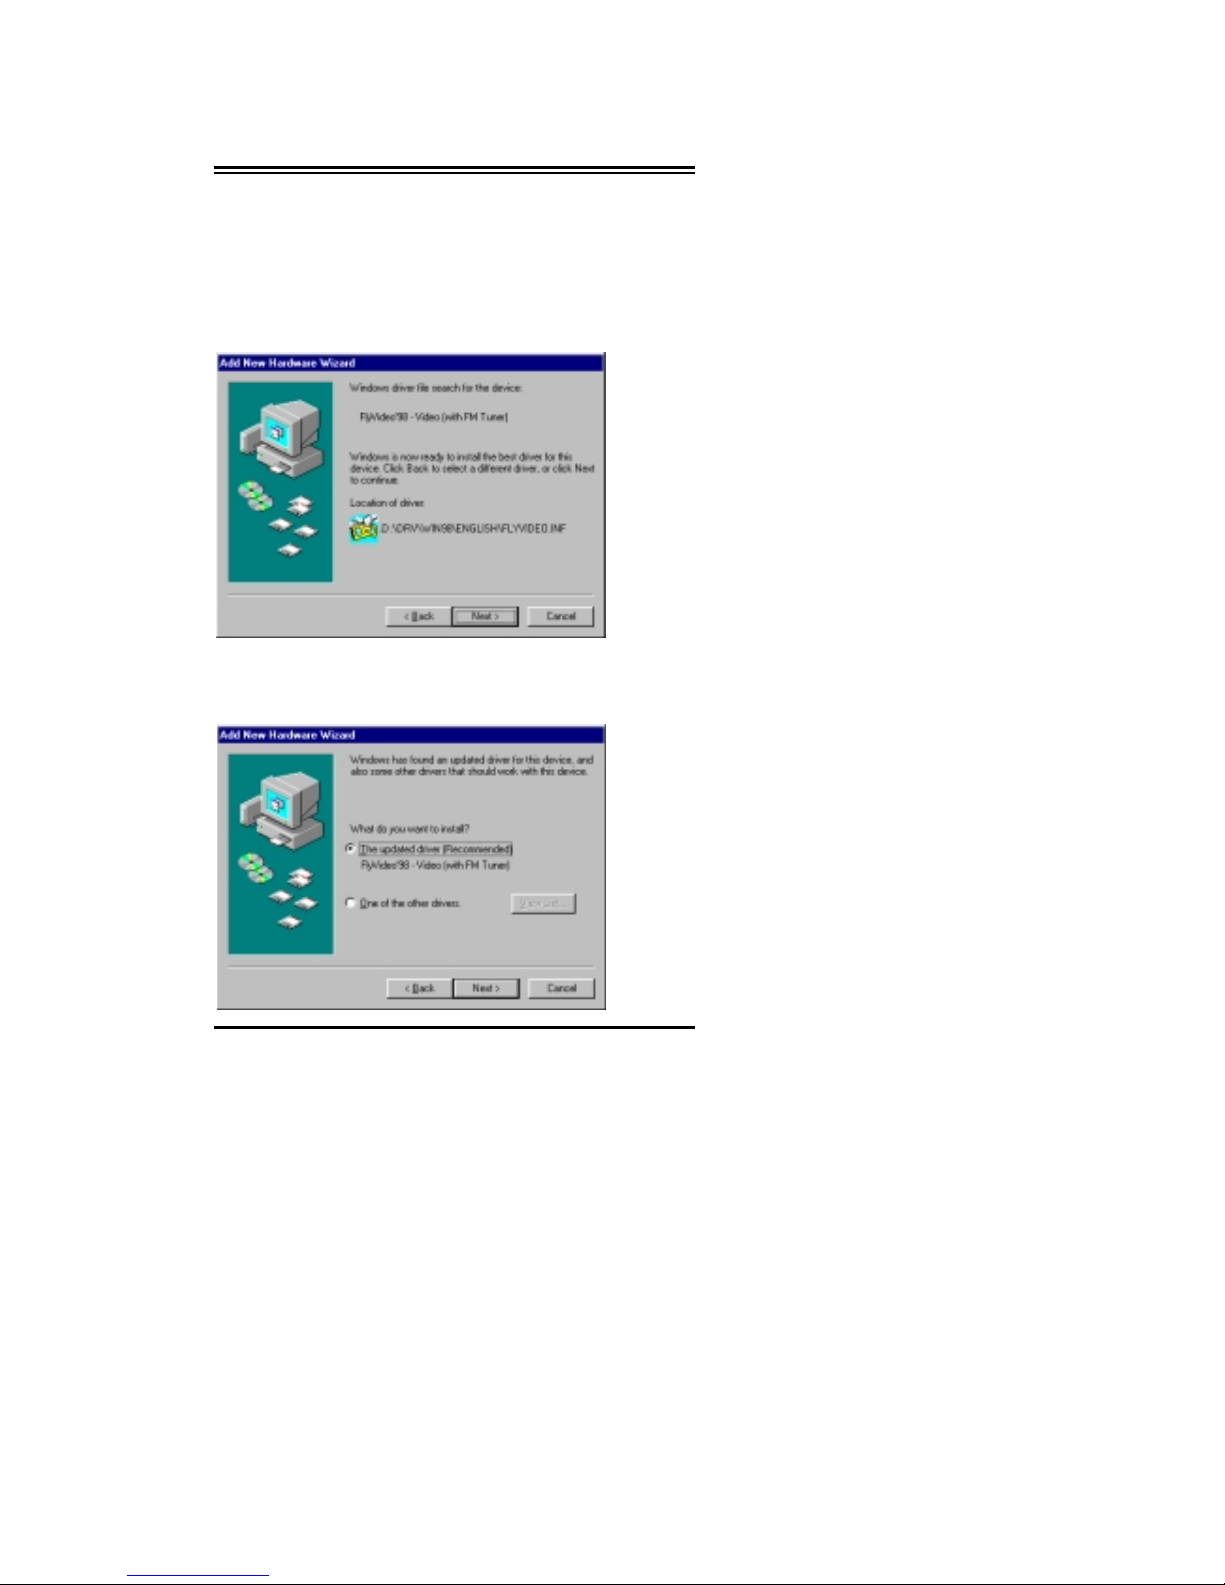
The next dialog window will ask you where the drivers are
located and present locations available:
Page 12
Chapter I Setting up your FlyVideo Card
8
Click on the option “Specify a Location” and type in
D:\Drv\win98\english
in the blank area. (replace D: with
correct CD-ROM drive if necessary). Click on
Next
when you
are ready to proceed.
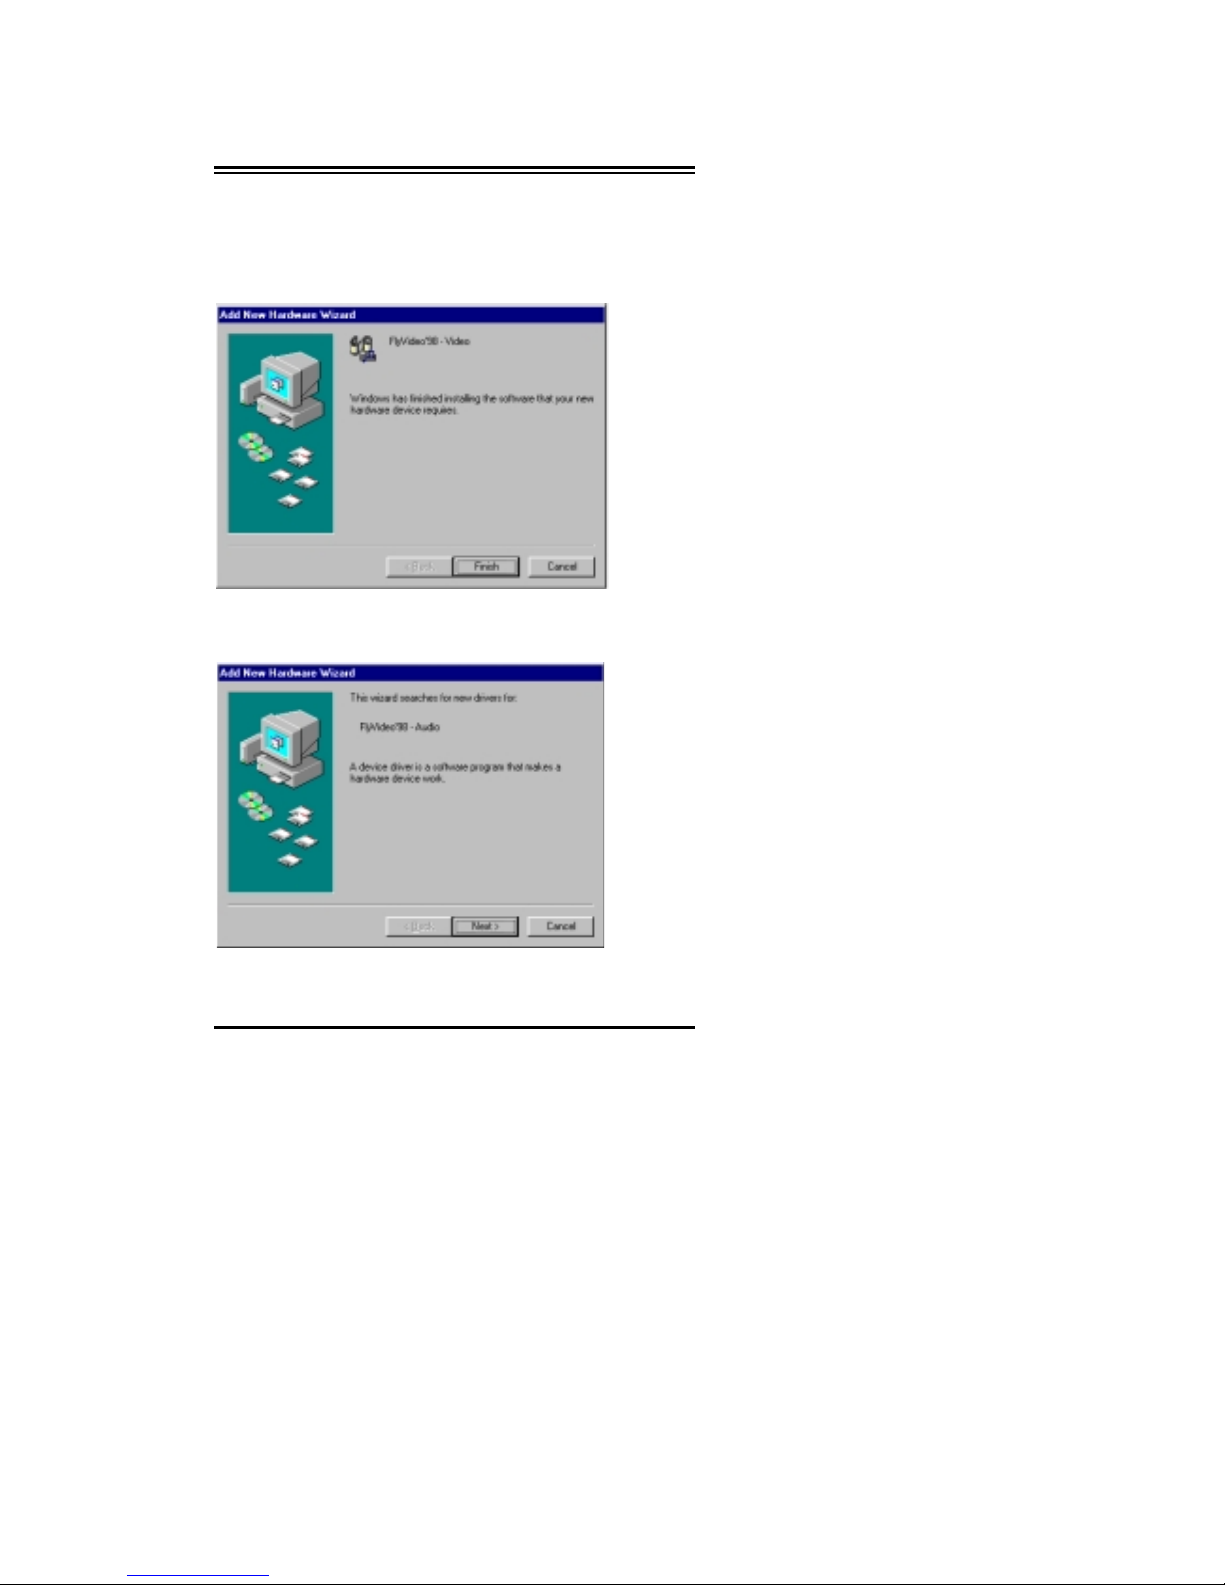
The next dialog box shows that Window 98 is ready to install
driver for FlyVideo’98-Video, click on
Next
button to start
Windows 98 will start copying files. Then the next dialog box
shows that the Window 98 is finished installing the software,
click on
Finish
button to continue.
Page 13
Chapter I Setting up your FlyVideo Card
9
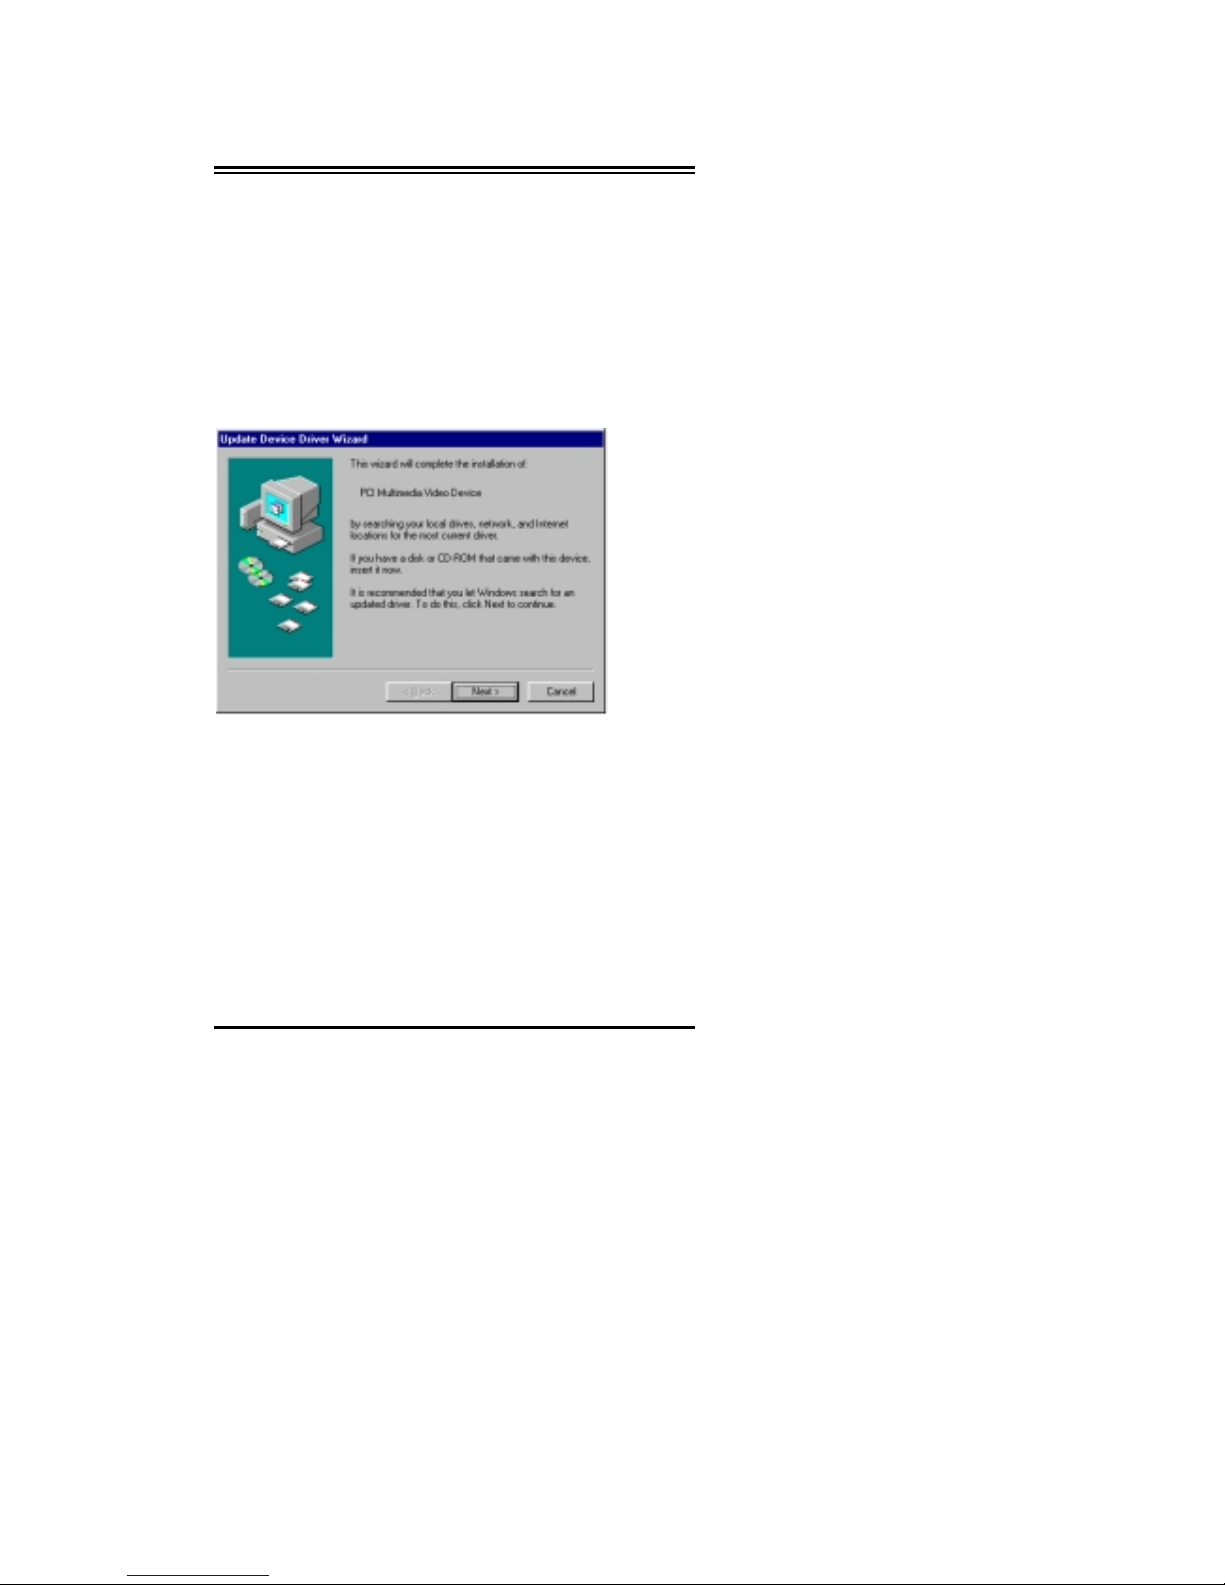
If all goes well, Windows 98 successfully installed the
FlyVideo’98 –Video driver into your system. The following
window will confirm that. Click
Finish
to complete driver
installation.
The next dialog will show to install driver for
FlyVideo’98-Audio
Repeat the step as installing driver for FlyVideo’98-Video.
Page 14
Chapter I Setting up your FlyVideo Card
1
0
After finish the installation, please continue with LifeView
Utility installation on Chapter 1.4.3
1.4.2 Windows 95 Driver Installation
As soon as your system is done booting, Windows 95 will
display a message that a “PCI Multimedia Device was found”
confirming that it found a new device previously not installed.
Windows 95 will then launch the Add New Hardwar e Wizard
and display the following scre en:
At this point, make sure you have the Lifeview Utility CD-ROM
inserted into the CD-ROM drive. Click
Next
to proceeds.
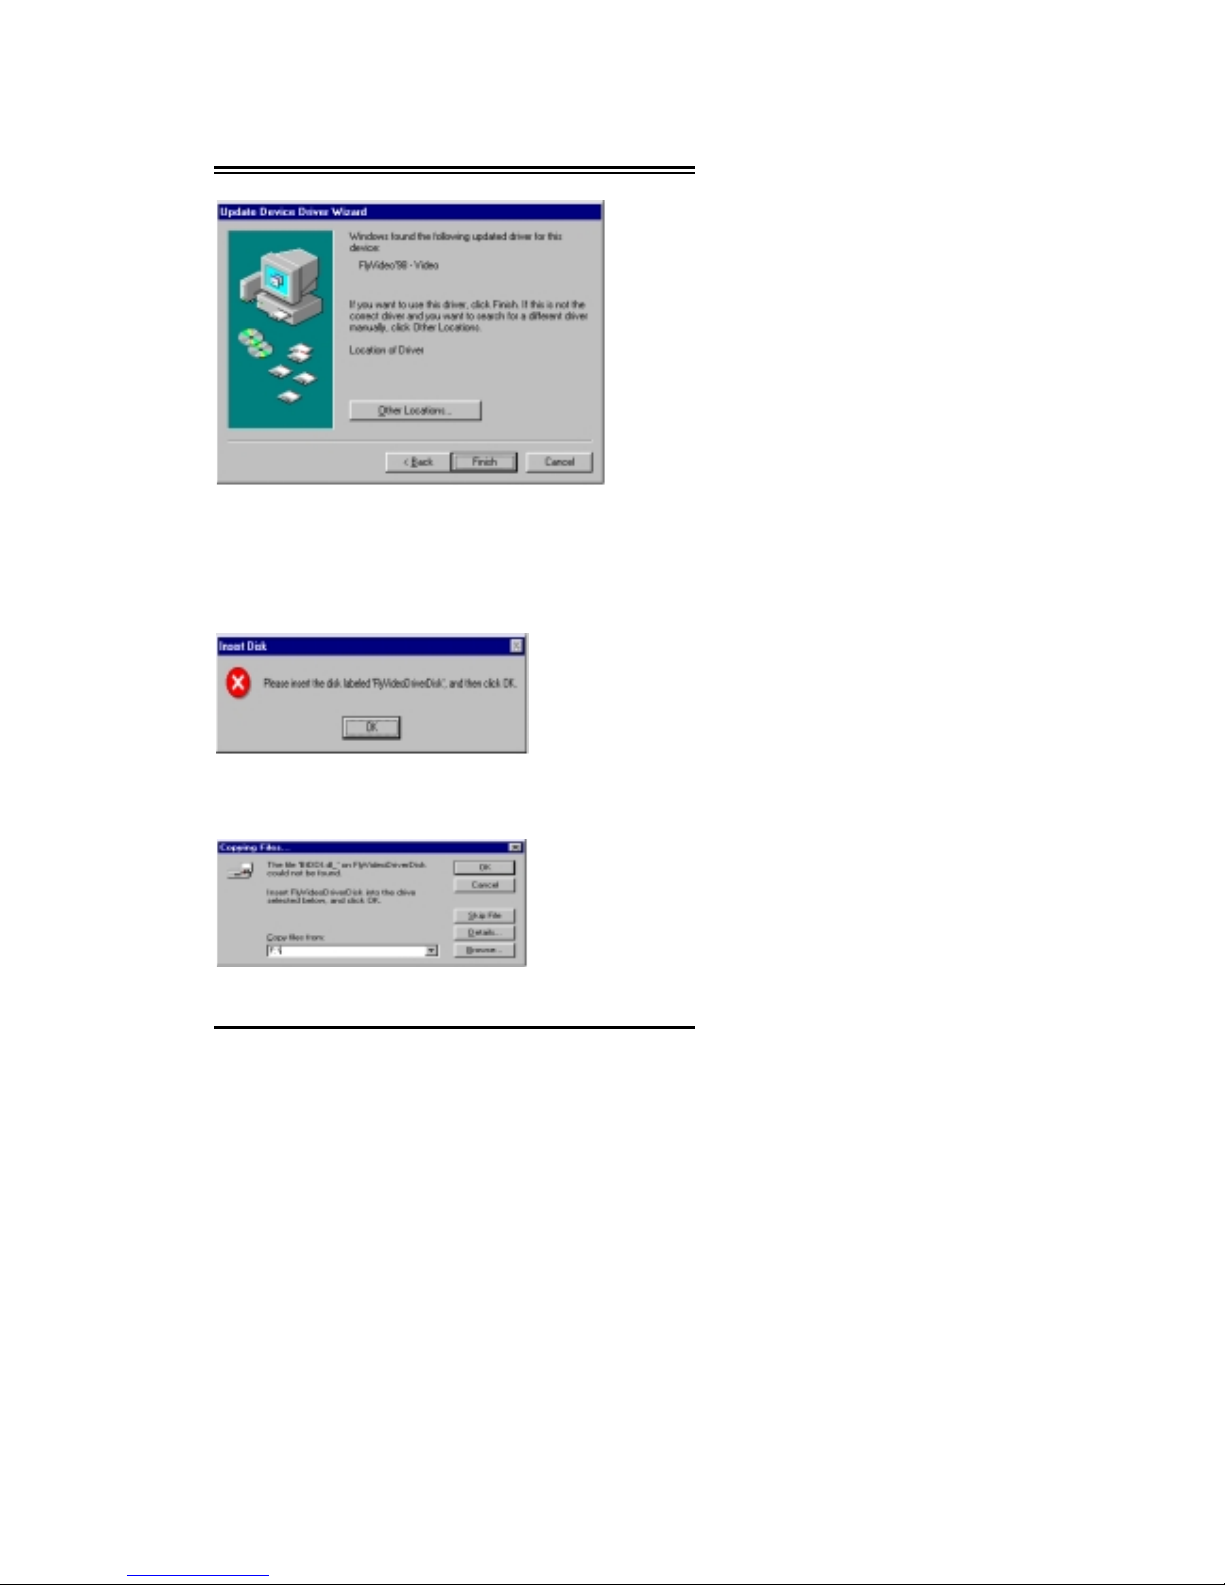
Windows will scan the floppy drive and the CD-ROM drive in
search of the drivers. If you have the Lifeview CD-ROM
inserted into the CD-ROM drive, Windows 95 will
automatically locate the driver and confirm it by displaying the
following screen:
Page 15
Chapter I Setting up your FlyVideo Card
1
1
Click
Finish
to complete the installation of the drivers. At this
point, you may get a screen displayed below if the default path
for driver in stal lation isn’ t c orr ect or doe sn’t e xi st. I f y o u do no t
get the screen below, then your default path is pointed at the
CD-ROM drive and you may skip over the next two steps.
If this is the case, click OK and set the default path to the
CD-ROM drive as shown be low.
Page 16
Chapter I Setting up your FlyVideo Card
1
2
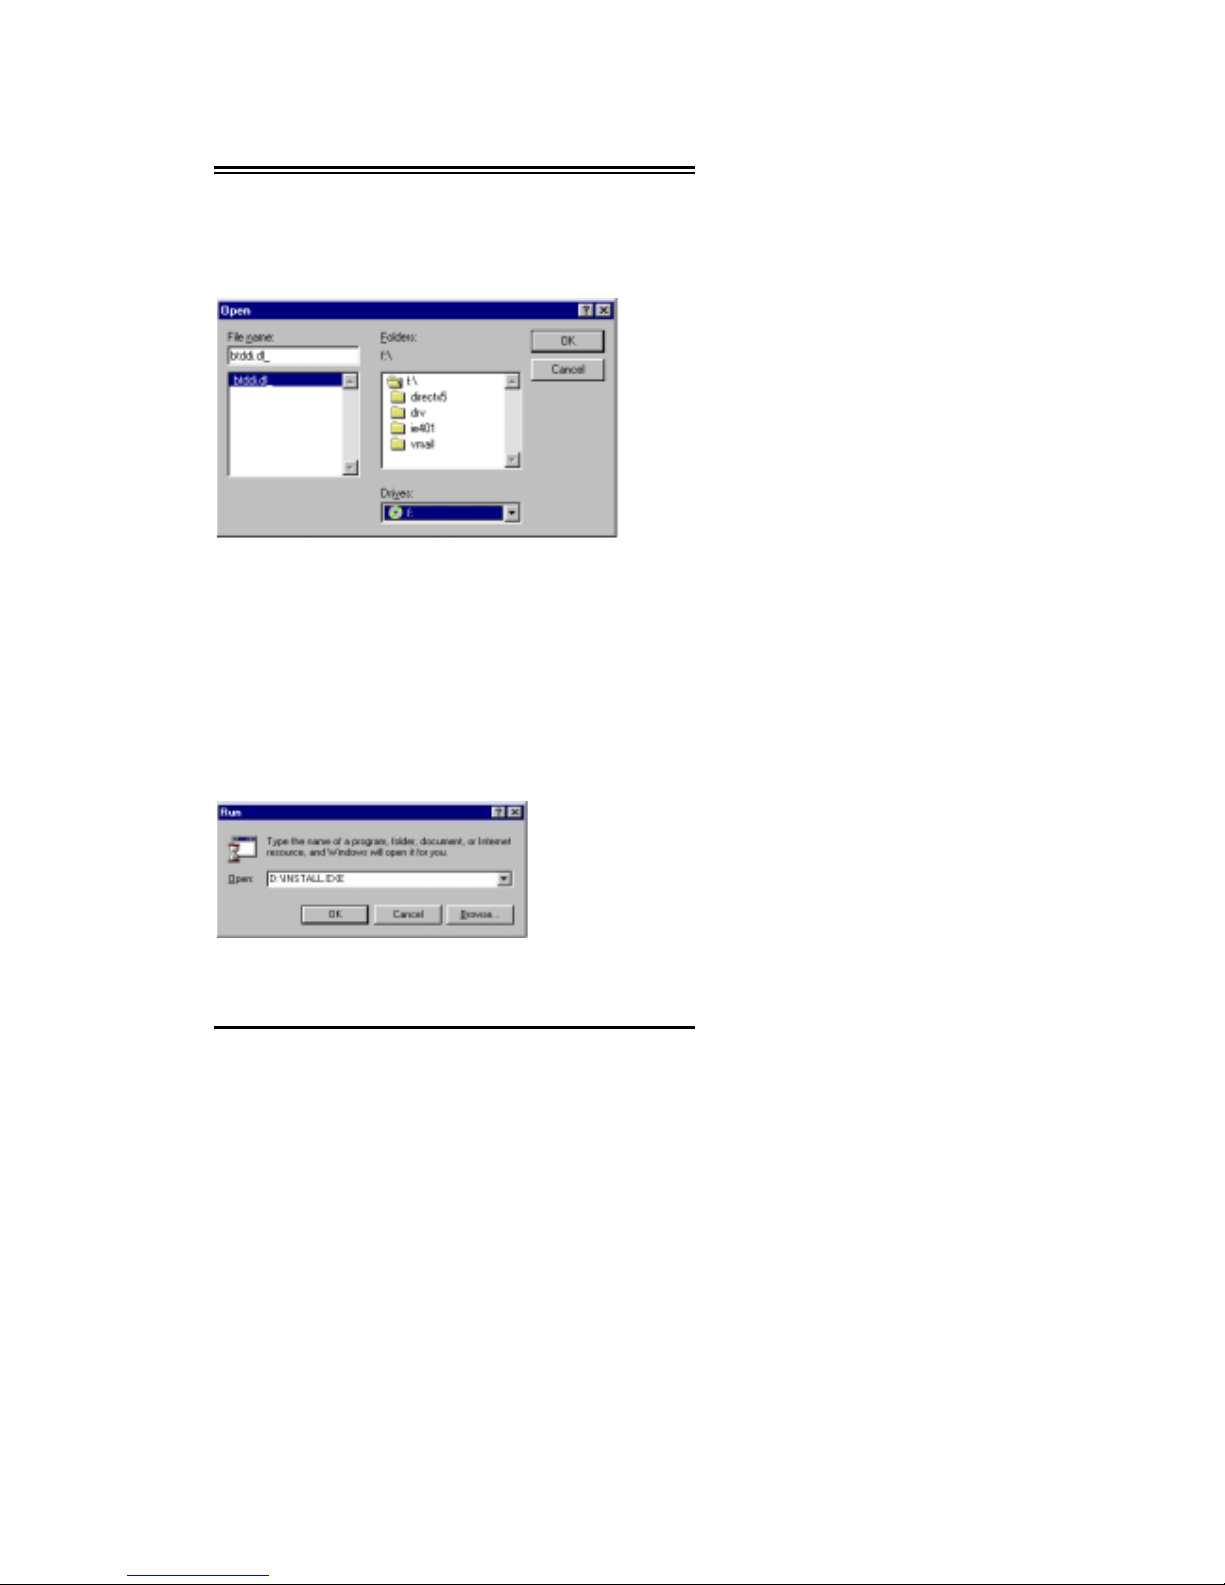
Type in the CD-ROM drive i n the space provided and click OK.
If you aren’t sure where the CD-ROM drive is located, click on
Browse
and traverse the directory tree till you find it. The
screen below is what y ou will see.
A screen similar to this should appear if you found your
CD-ROM drive correctly. Click OK to finish.
1.4.3 Lifeview Utility Installation
The drivers are now successfully installed . The next step is to
install the Lifeview Utility application. Click on Start / Run to
bring up the Run dialog box. In the Open: space, type the
following “D:\INSTALL.EXE” to access this file from the
CD-ROM. You may substitute any other drive letter for D: if
your CD-R OM drive is not assigned to D:
The following opening screen will appear once the
INSTALL.EXE file is located and executed:
Page 17

Chapter I Setting up your FlyVideo Card
1
3
Click on
Lifeview Utility Driver
to start the application
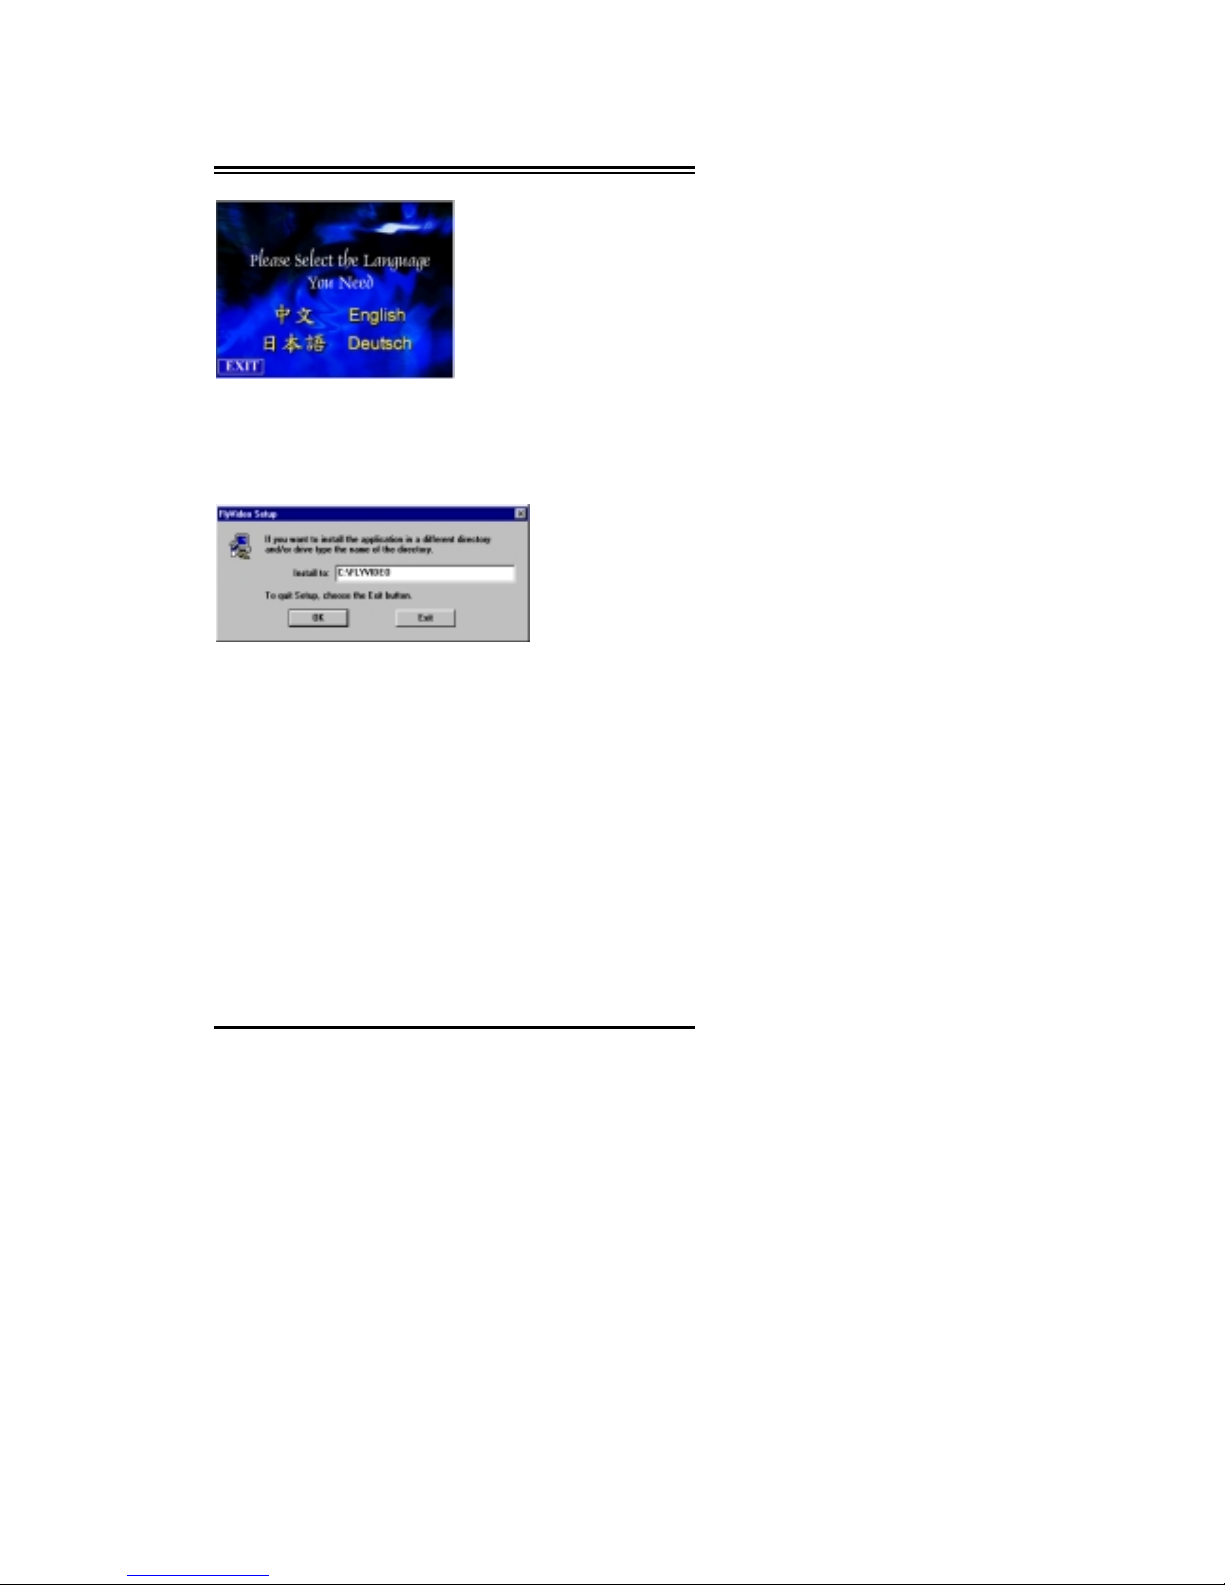
installation process. The following screen will ask you to select
which drivers to install. Select the “Windows ’95 ’98 “ to
begin.
Click on
English
to continue
Page 18
Chapter I Setting up your FlyVideo Card
1
4
The next dialog box will ask you the directory you want to
install the applic ation. Accept the default dir ect ory or type in a
different directory you want and click on OK button to
continue.
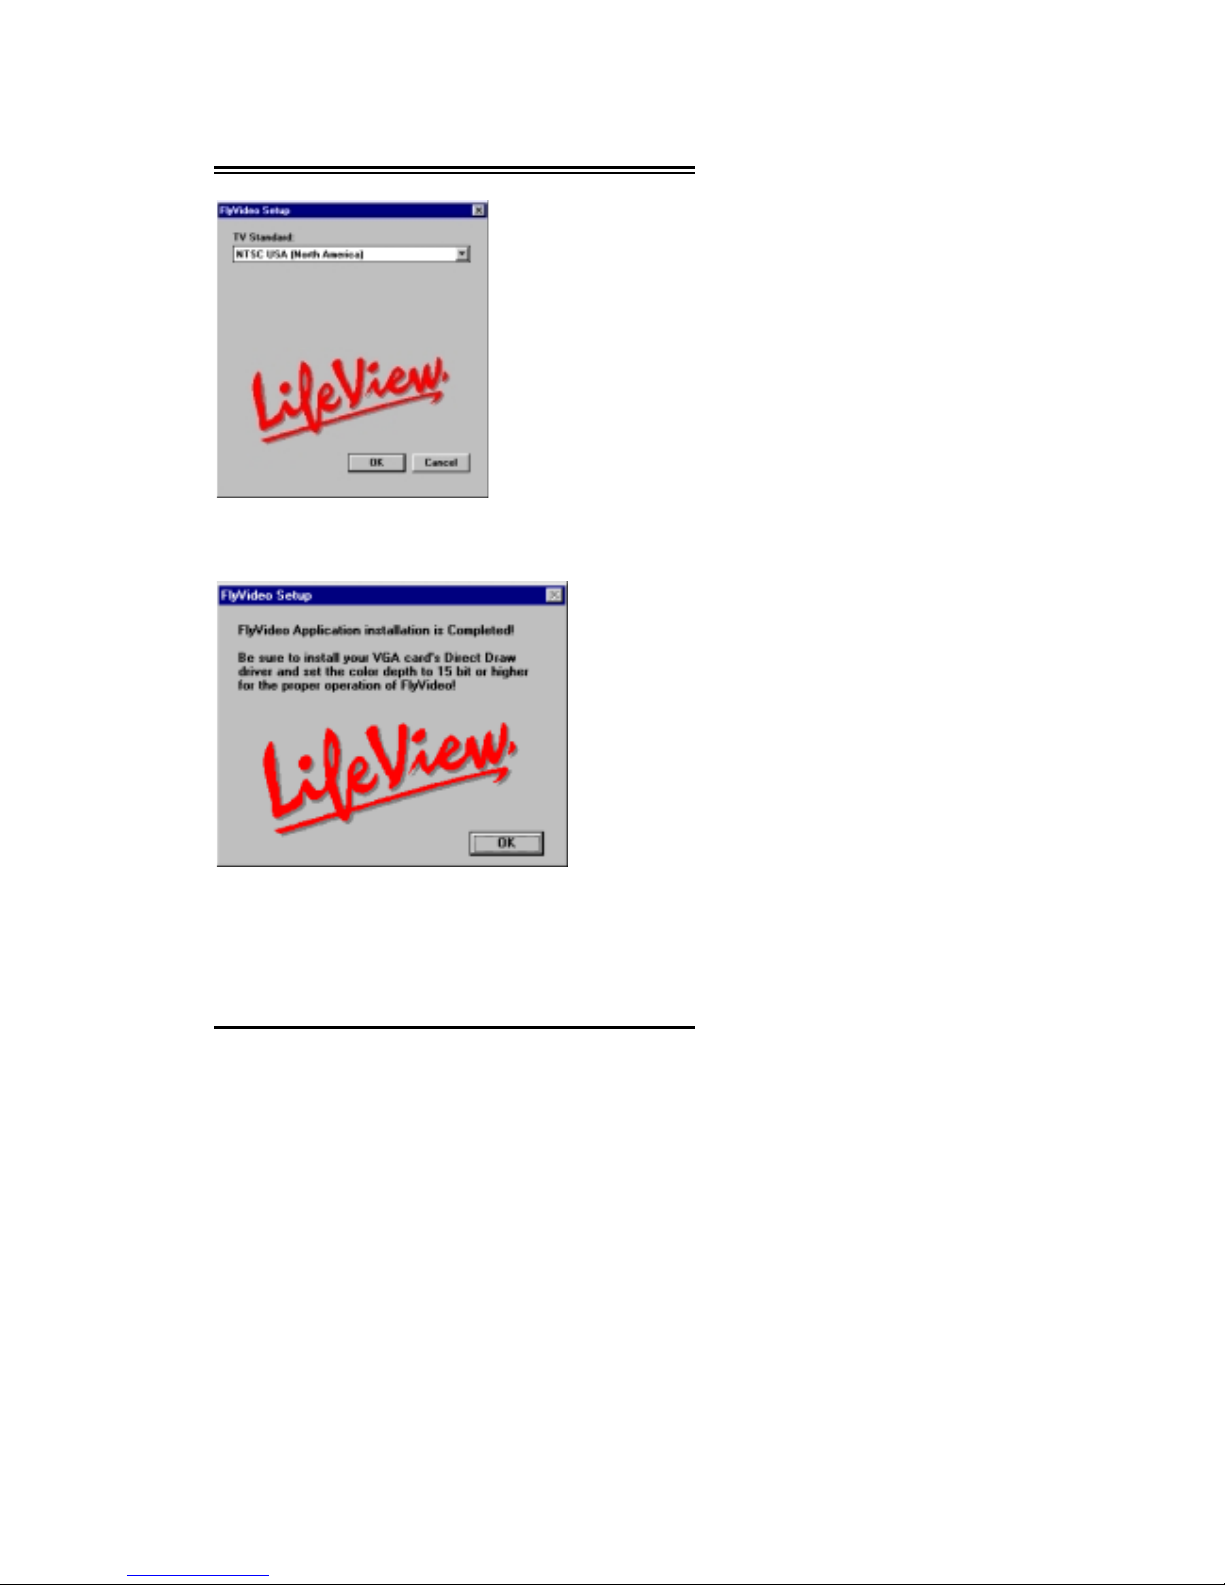
The next dialog box will ask you for TV Standard that is using
in your area. Please check with your v endor for correct TV
Standard.
Page 19
Chapter I Setting up your FlyVideo Card
1
5
The next dialog box is confirming the application installation is
completed. Click on Ok button to continue
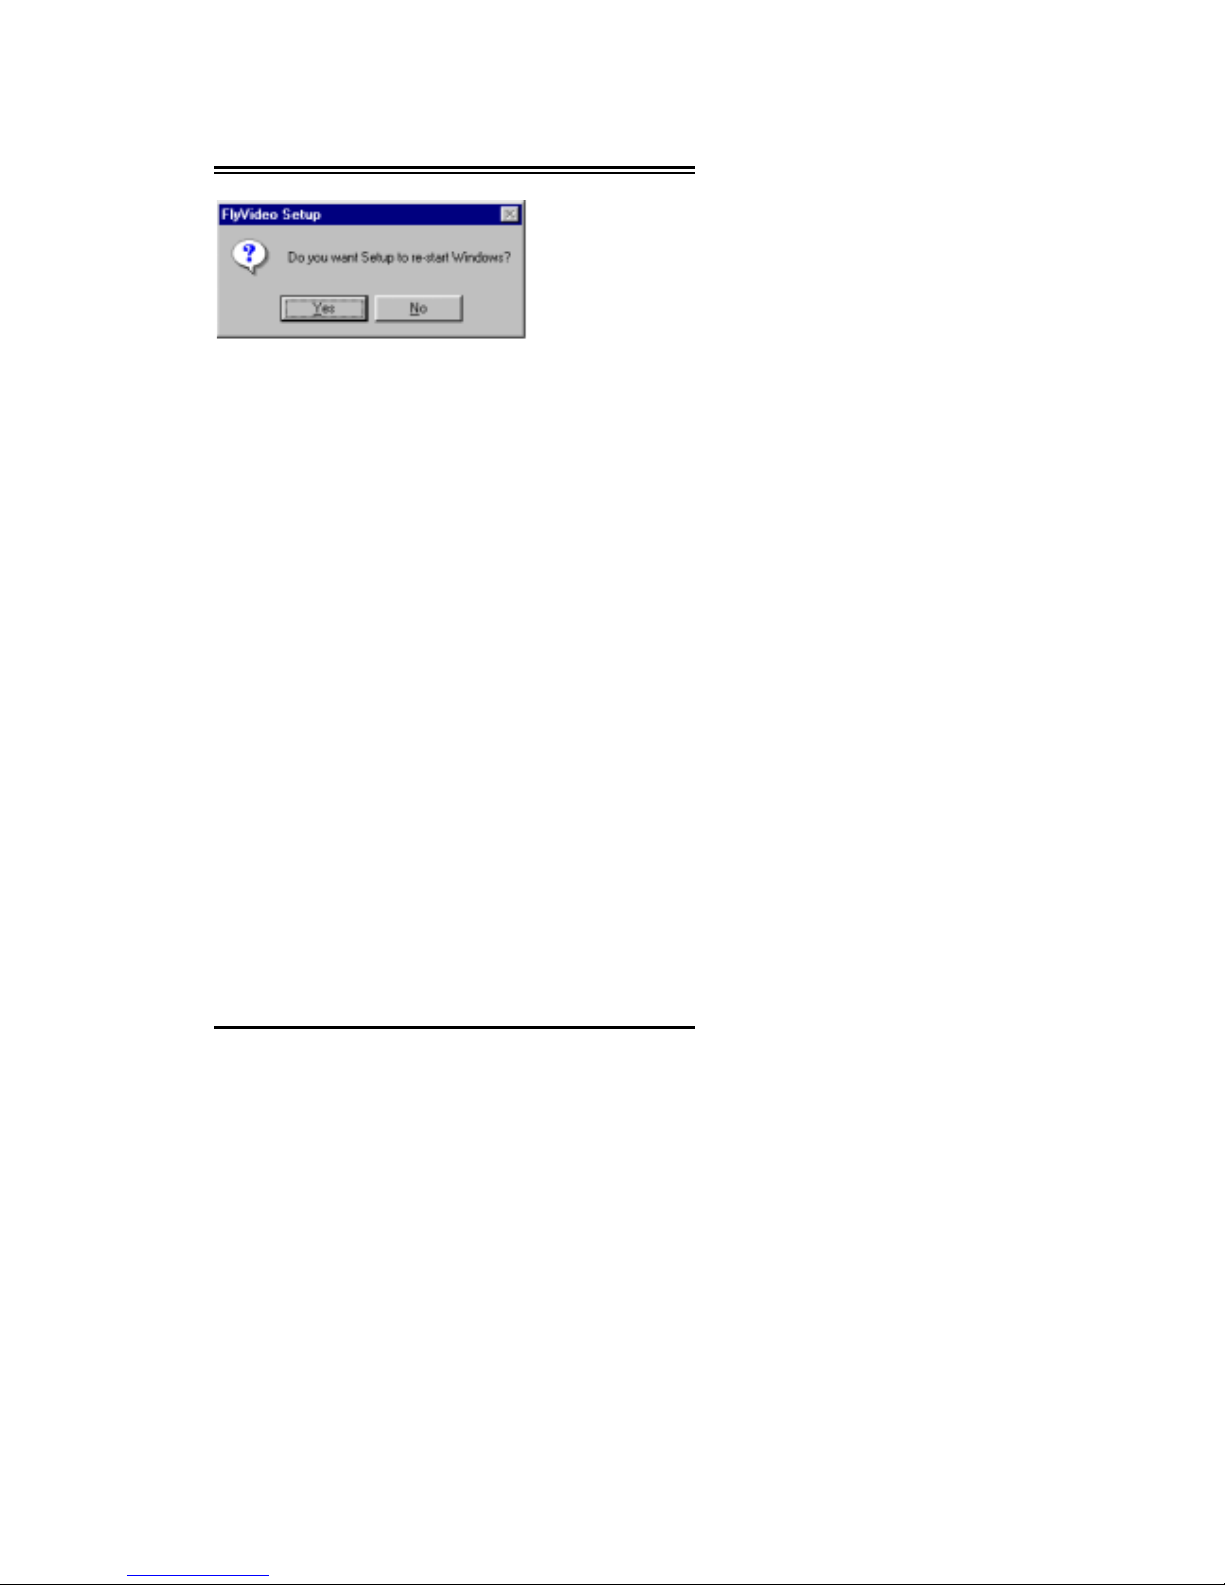
You will be prompted by Window s 98 /95 to reboot the system
so all changes may take effect. Click on
Yes
button to res tart th e
system
Page 20
Chapter I Setting up your FlyVideo Card
1
6
Congratulations! You have now successfully installed the
FlyVideo’98 drivers and application. Note that there are other
applications ava i lab le to ins ta l l off of the CD-R OM in stal la ti on
program. The one you m ay need to use is th e Direc tX 5.0 if the
FlyVideo’98 a pplication doesn’t run correctly.
Page 21
Chapter II Running FlyVideo Program
17
Chapter II
Running FlyV i d eo Program
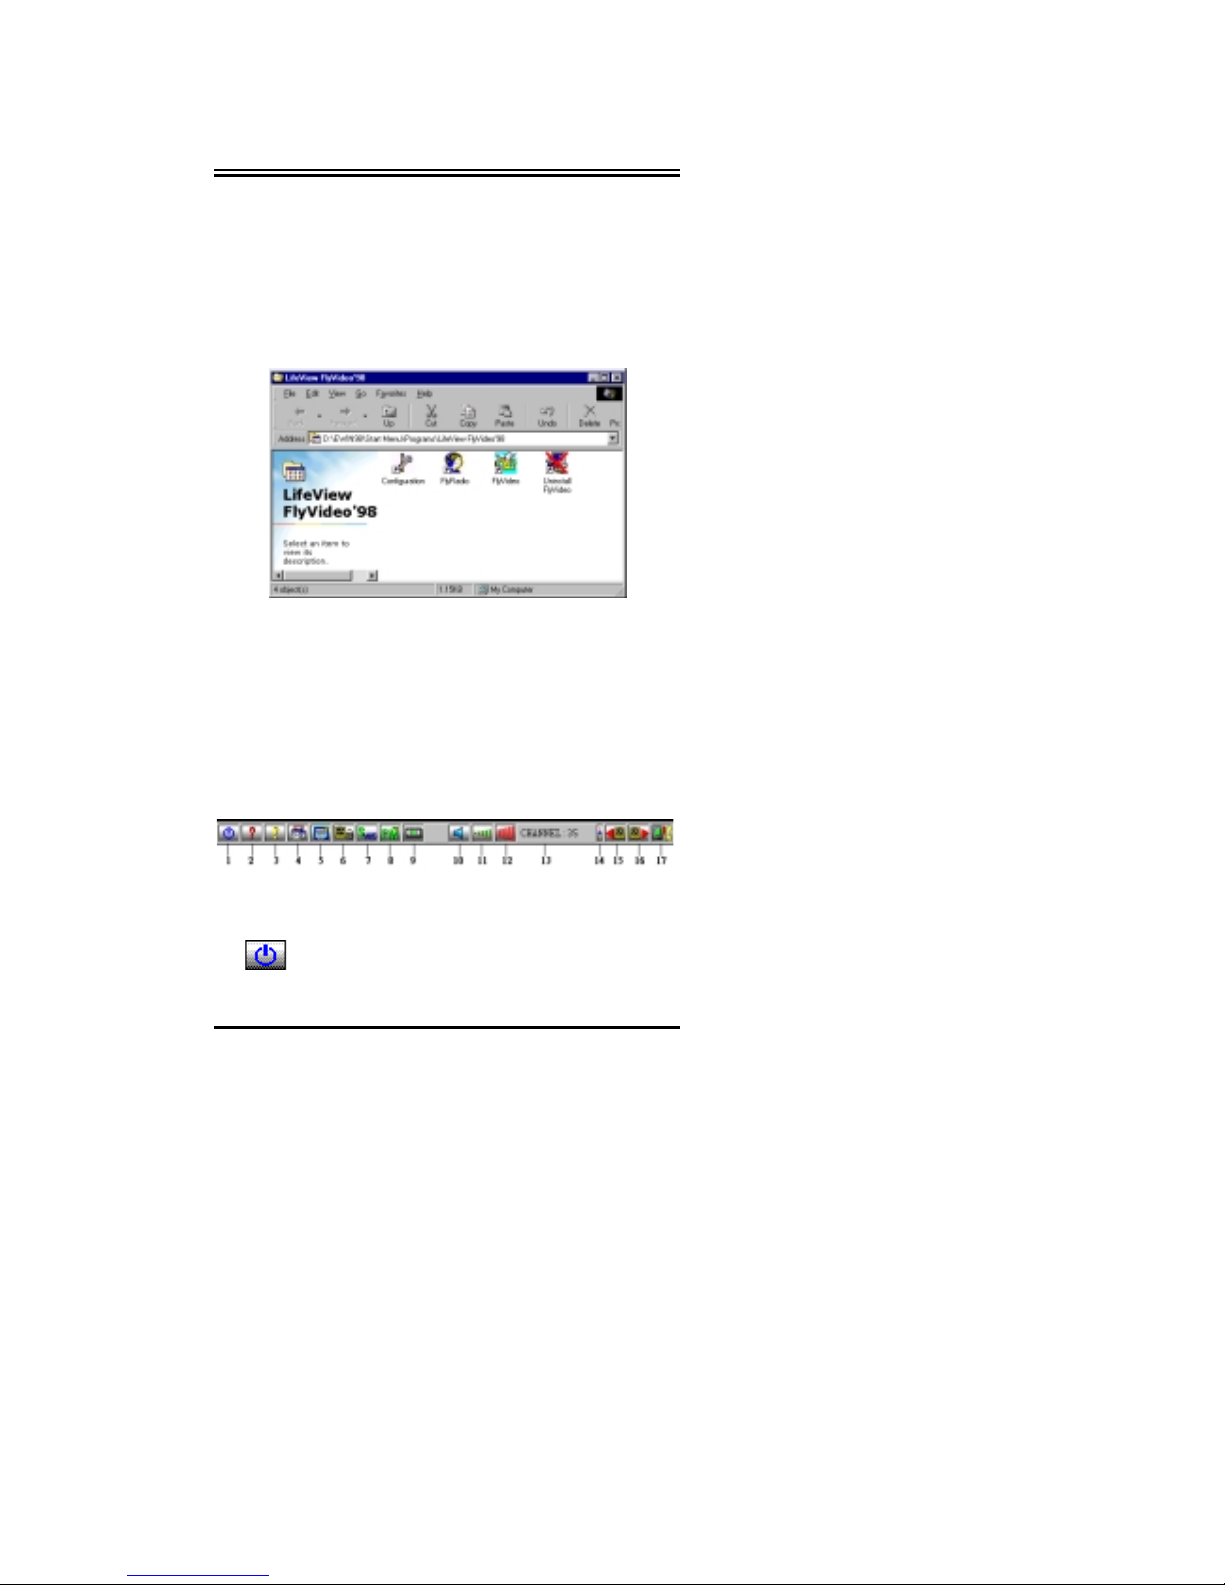
To start the FlyVi deo pr ogram, doubl e-clic k on the Fl yVideo
icon located in your FlyVideo program group window shown
as below. Or go to Start | program s | LifeVi ew FlyVideo ’98 |
FlyVideo
FlyVideo Series Program Group Window
2.1 User Interface
This section describes details on how to operate FlyVideo
efficiently. Please check the indicated button numbers below
for further description.
For FlyVideo’98 users:
Button Description:
1.
Power Off
Press this button to terminate FlyVideo progra m.
Page 22
Chapter II Running FlyVideo Program
18
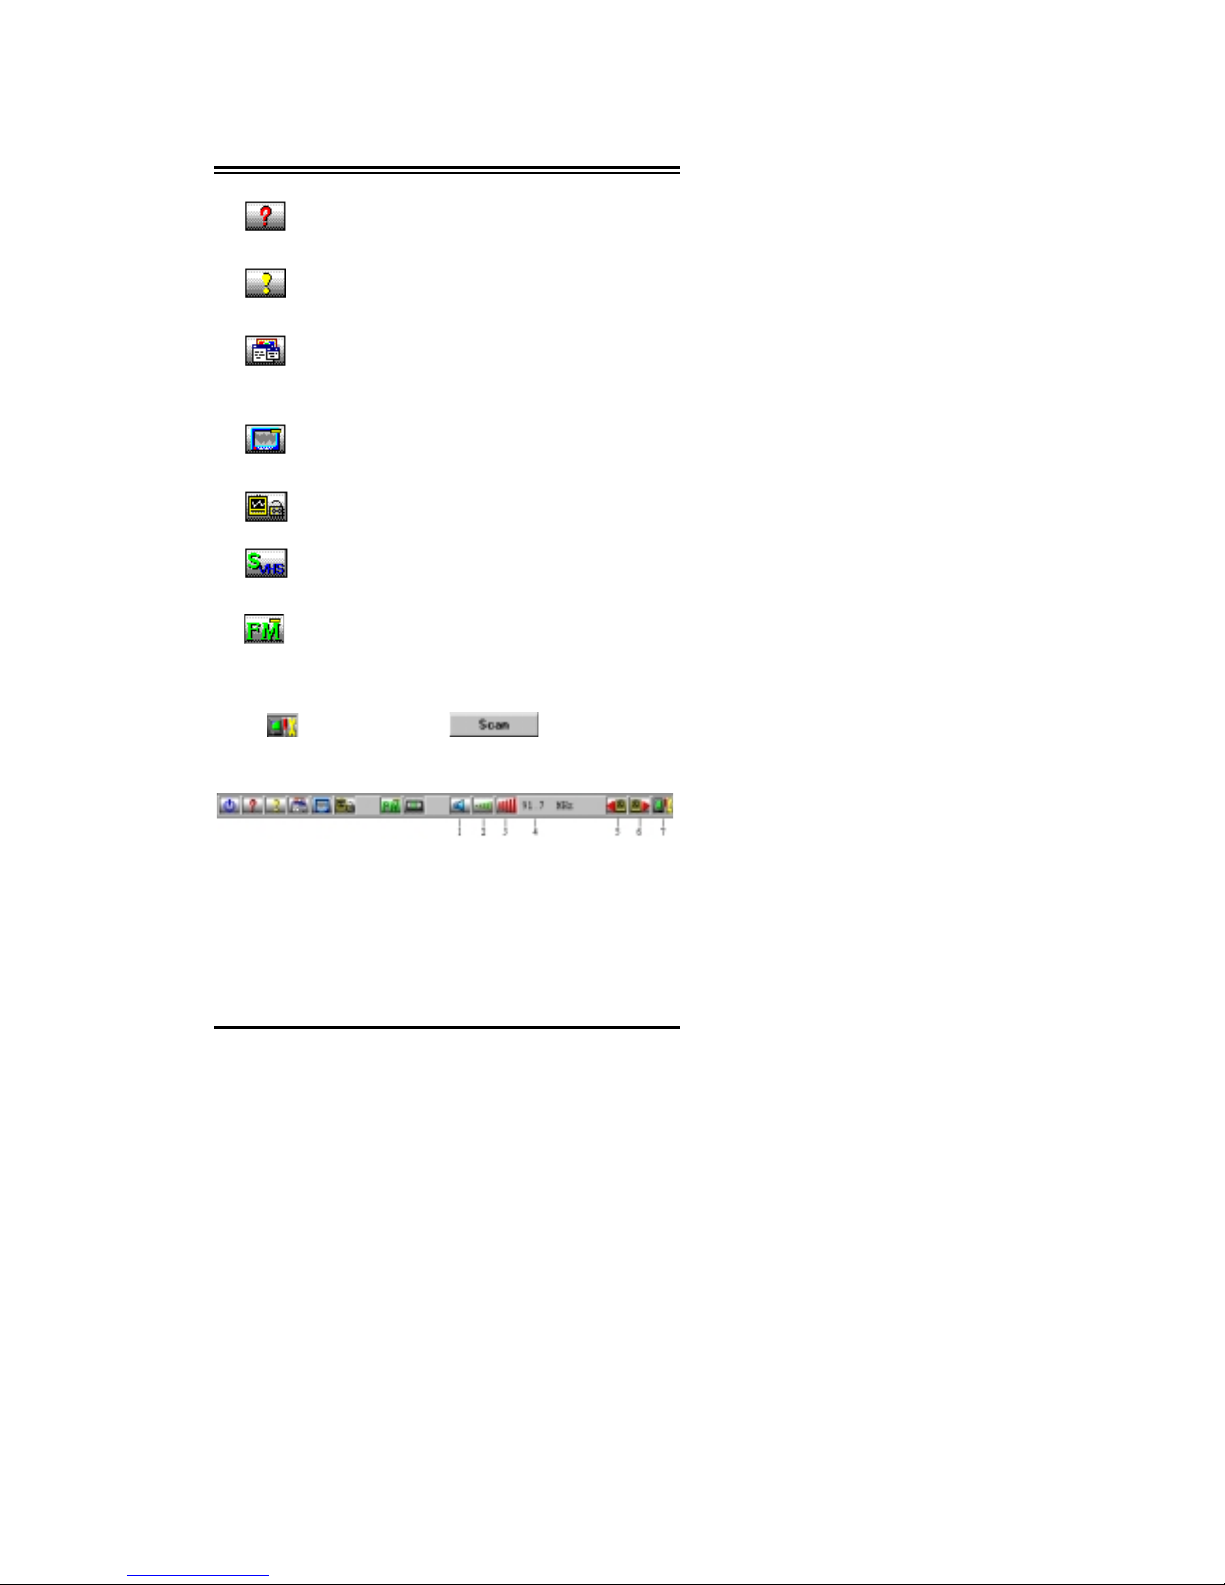
2.
Help
Press this button to activate FlyVideo on-line help menu.
3.
About
Press this button to display FlyVideo copyright information.
4.
Always on Top
This button will allow Fly Vide o progra m to be on top of all
other applications.
5.
TV
Press this button to switch to TV source.
6.
AV
Press this button to switch to AV source.
7.
SVHS
Press this button to switch to external S-Video source.
8.
FM Radio (optional)
Click on this button to start FM radio.
If you are using the FM Radio for the first time, please click
on
button and click on button. The first
10 scanned FM stations will be stored in the memory
automatically
1. Mute
2. Volume down
3. Volume up
4. FM frequency display
5. Decrease tune/previous FM station
6. Increase tune/ next FM station
7. Radio Setting
Page 23
Chapter II Running FlyVideo Program
19
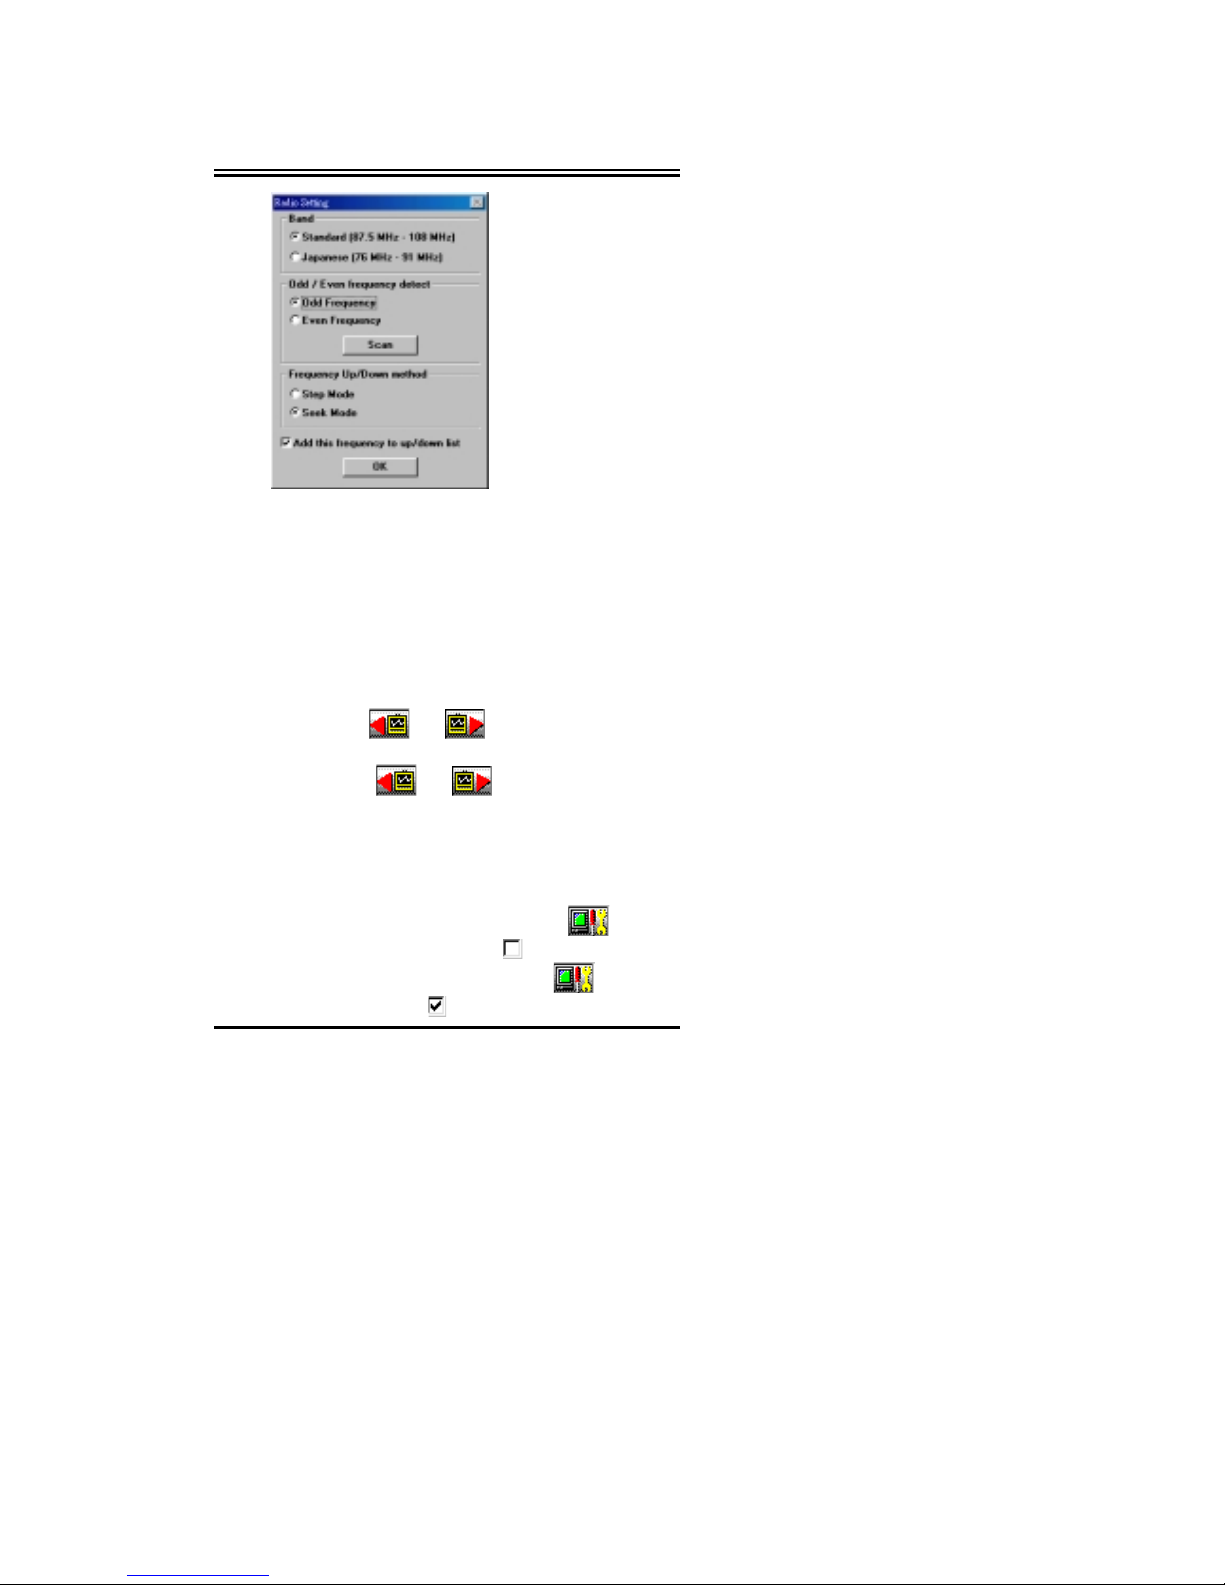
Band
- For all users other than in Japan, use Standard band
range.
Odd/Even frequency detect
-. The utility will tune to next freque ncy in odd number
(94.3, 94.5, 94,7….) or even number (94.2, 94.4. 94.6....)
if you choose Odd Fre quency option or Even F requency
option, respectively.
Frequency Up/Down method
- Step Mode - Use
and to tune to previous/next
frequency (every 0.2 MHz)
- Seek Mode - Use
and to tune to
previous/next available station (Sta tions w ill need to be
scanned through first).
Add this frequency to up/down list
- Use this check box to add or dele te a FM stat ion from the
memory.
To delete a station , tune to a sta tion, click on
,
deselect the check mark in the box
.
To add a station, tune to a sta tion, c lick on
, click on
box to add a check mark
Page 24
Chapter II Running FlyVideo Program
20
9.
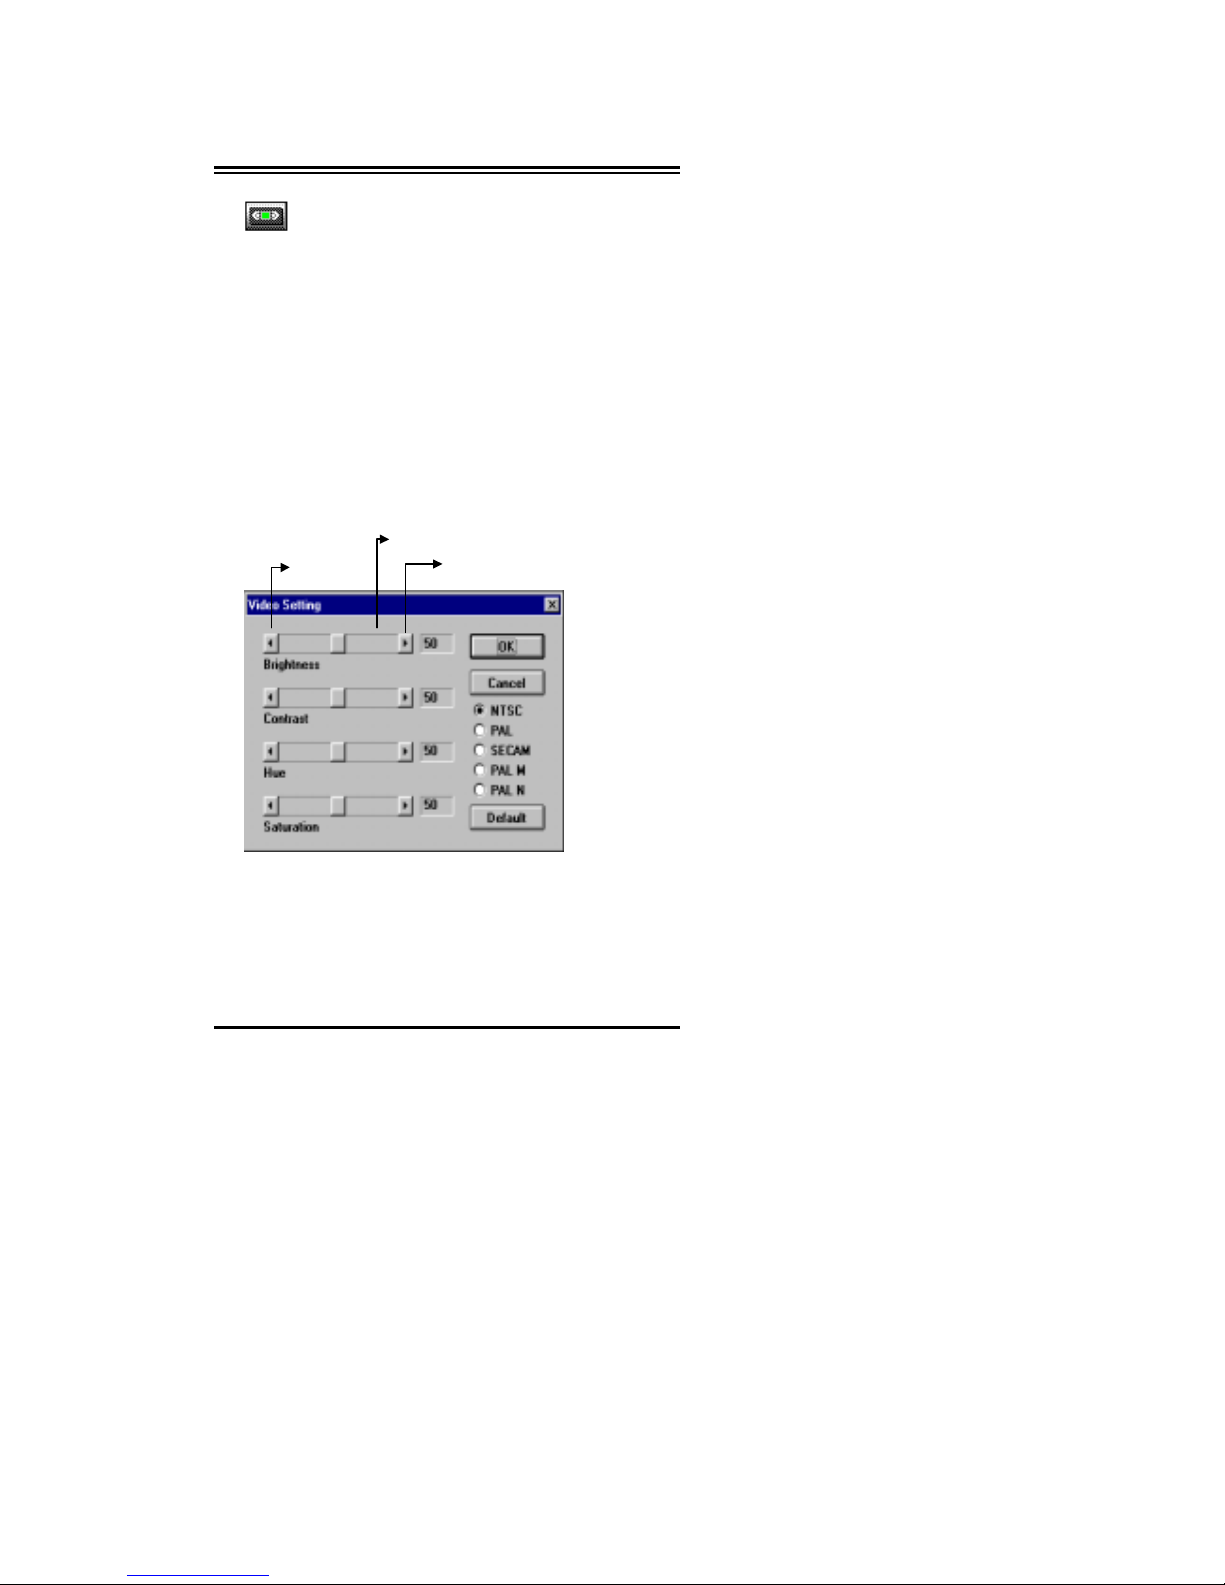
Video Setting
Click on this button to display the Video Setting scree n
(shown as Figure 2.1.1).
There are four horizontal bars that w ill allow y ou to adj ust
the video settings. Adjustments for Brightness, Contrast,
Hue, and Saturation are provided. Each has a slide pointer
that will allow you to adjust the video attribute either
positive or negative depending on which way the slide
pointer is dragged. Also, note the column down the right
side. Those are broadcast standards for the entire world.
It is defaulted for NTSC, the standard in North America.
If you reside outside of North Ame rica, choose the
broadcast standard most appropriate for your country .
Figure 2.1.1 Video Se tting Dialog Box
To exit out of this screen, click on OK to continue.
To end this video setting dialog box, click on the “OK”
button.
Left arrow
Horizontal
Right arrow
Page 25
Chapter II Running FlyVideo Program
21
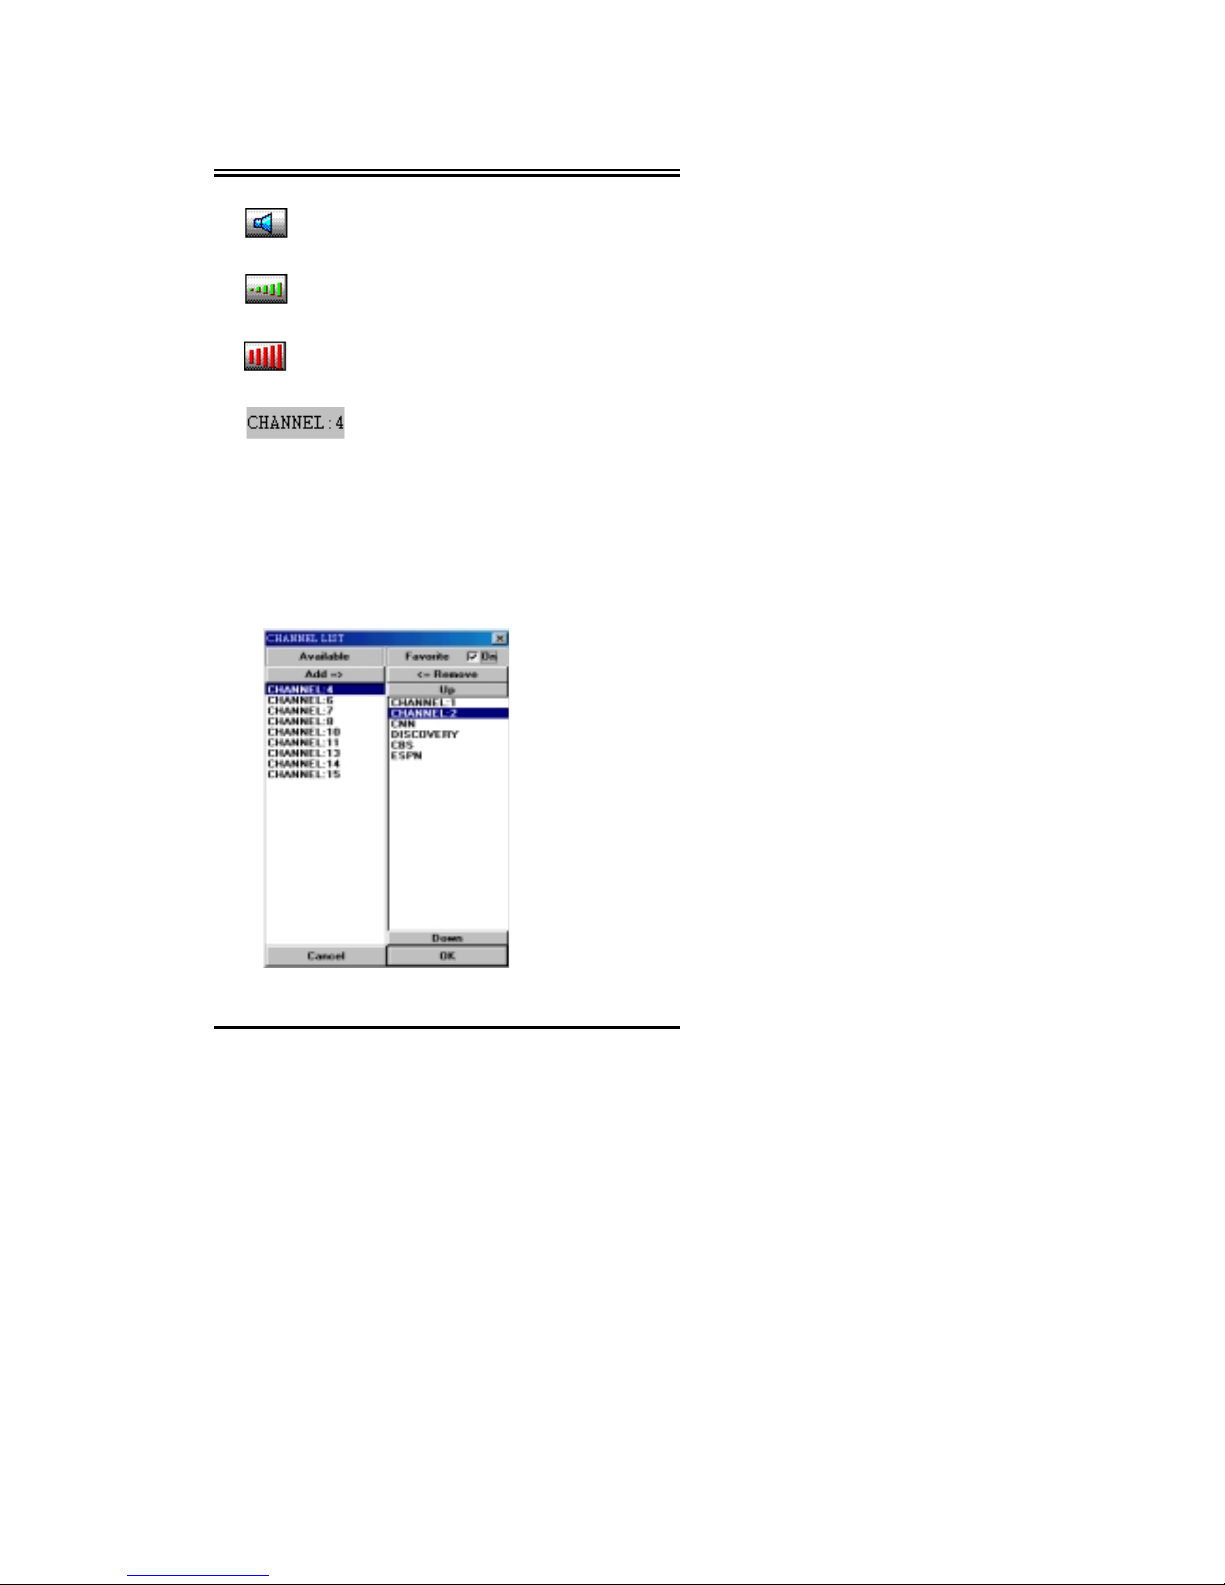
10.
Mute
Click on this button to toggle between on and off.
11.
Volume Down
Click on this button to decrease the volume.
12.
Volume Up
Click on this button to increase the volume.
13.
Channel Display
This area will display the current channel number if the
current vid eo displ a y is set t o TV. I f th e cur rent di spl a y
is set to AV or SVHS, then a Volume Display will show
in place of the Channel Display.
When you double click on this area (between
Volume
button
and Scan Sh o w
button), you will see a dialog box similar as
shown (see Figure 2.1.2)
Figure 2.1.2
Page 26

Chapter II Running FlyVideo Program
22
This function will let you make a assigned channel list that
enables you to tune in your favorite channels with Channel
Up
and
Down
button (for tho se c hannel s tha t are not a dded to
the favorite list will not be tune in).
Note
: If there is no channel number listed under
Available
column, please click on
Scan Show
button to scan all available
channels first.
Steps:
1. Add any av ailable channels from the left side to
Favorite List
on the right side by double-click on it.
2. Click on the
check box
on the upper-right hand
corner to turn on this function (click on it again to
turn off).
3. To remove the channel from favorite channel list,
double-click on it.
4. Click on Ok button to go back to TV program.
14.
Scan Show
This button will activate the Scan Show function. This
function will allow you to scan/view multiple TV
channels. The following instructions below will allow
you to get the most out of this function.
To view a particular station in the frame, move the mouse
pointer to the frame with the TV show you wish to view
and left click on it. Double clicking the left button will
show the image in a full screen mode. To go back from a
full screen to the multi screen mode, double click on the
left button to exit out.
If you click on the rig ht mouse button, a flyout menu will
appear. You can capture still images to a file or the
clipboard as shown below.
Page 27
Chapter II Running FlyVideo Program
23
If you want to exit this function, click the right mouse
button on any “non live vide o” portion of the Scan Show.
Double click the right mouse button on the live video
window to terminate the Scan Show.
Put the rest of the side notes below this (ie. Viewing in
800x600, etc. Also incomplete scans.)
15.
Channel Down
Click on this button to go down to next valid channel.
16.
Channel Up
Click on this button to go up to previous valid channel.
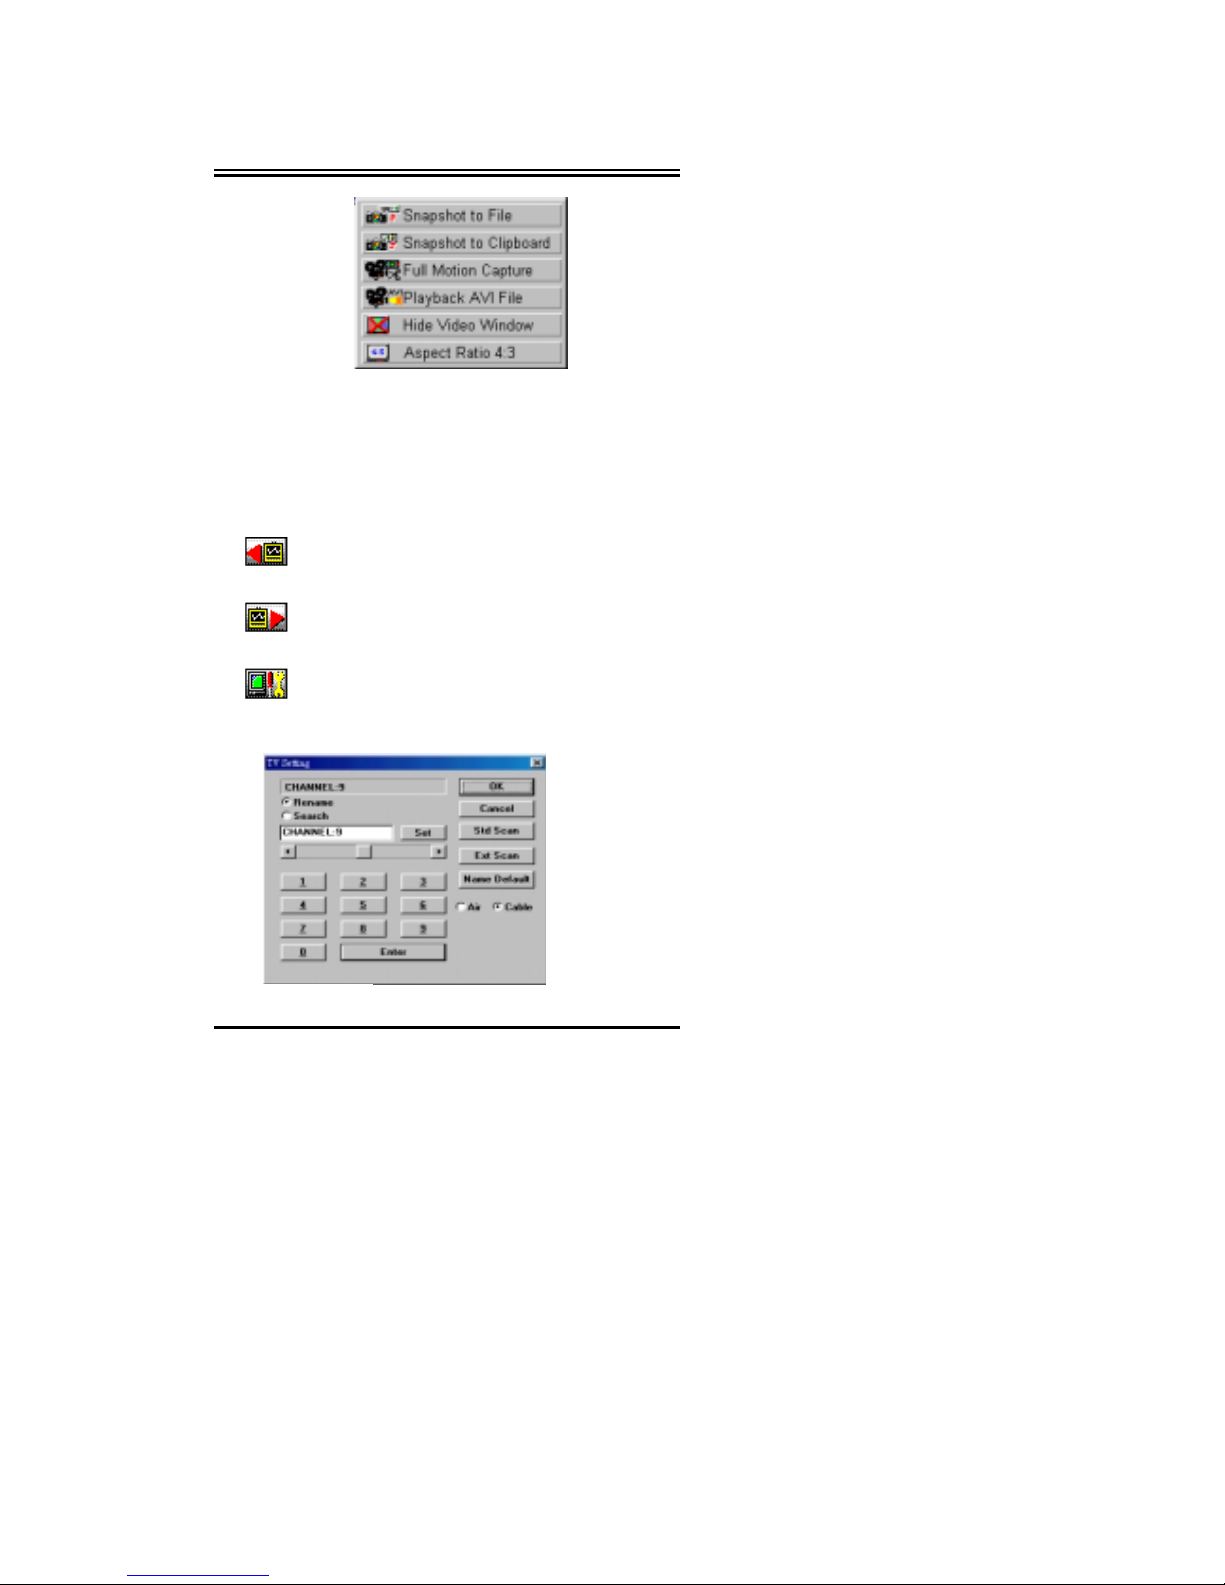
17.
TV Setting
Click on this button for TV setting. A dialog box shown
as Figure 2.1.3 will be display.
Figure 2.1.3
Page 28

Chapter II Running FlyVideo Program
24
It will allow you to make a Full Channel Scan and naming
your favorite channels.
•
Std Scan
(Standard Scan)
-
Same function as
Scan Show
button without
multi-windows display.
•
Ext Scan
(Extended Scan)
-
Use this function if some channels in your area are
not detected by using
Scan Show
button (it will
takes about 10 minutes to make a full frequency
scan). The channel number will assign in order from
CH1, CH2, CH3…
•
Name Defaul t
-
To clear all previous channel naming.
To naming chan ne ls:
1. Tune in to your desired chan nel by press number buttons
2. Type in the name (CNN, ESPN, Discovery…) in the white
blank and click on
Set
button.
3. Repeat step 1 and 2 to make another channel naming.
4. Click on OK button to finish setting.
Note:
If you have not completed a Standard scan, the channel
up/down buttons will simply increment by one through each
channel instead of skipping to the next valid channel.
It is not necessary to do a full channel scan upon first use of
FlyVideo’98 . The c hann el up/ d own butt on wi ll st ep t hro ugh
each channel even if there is no signal.
User need to s can through all the available channels at the
first time of use, otherwise, the “
Up/Down Channel
”
function will step into each chan nel even t here is n o program.
Page 29
Chapter II Running FlyVideo Program
25
2.2 Video Capture
FlyVideo series is a genuine video capture card. With
FlyVideo, you can view and capture “
live
” video from a
variety of dif ferent sources such as VCRs , television, laser
disk or camcorders.
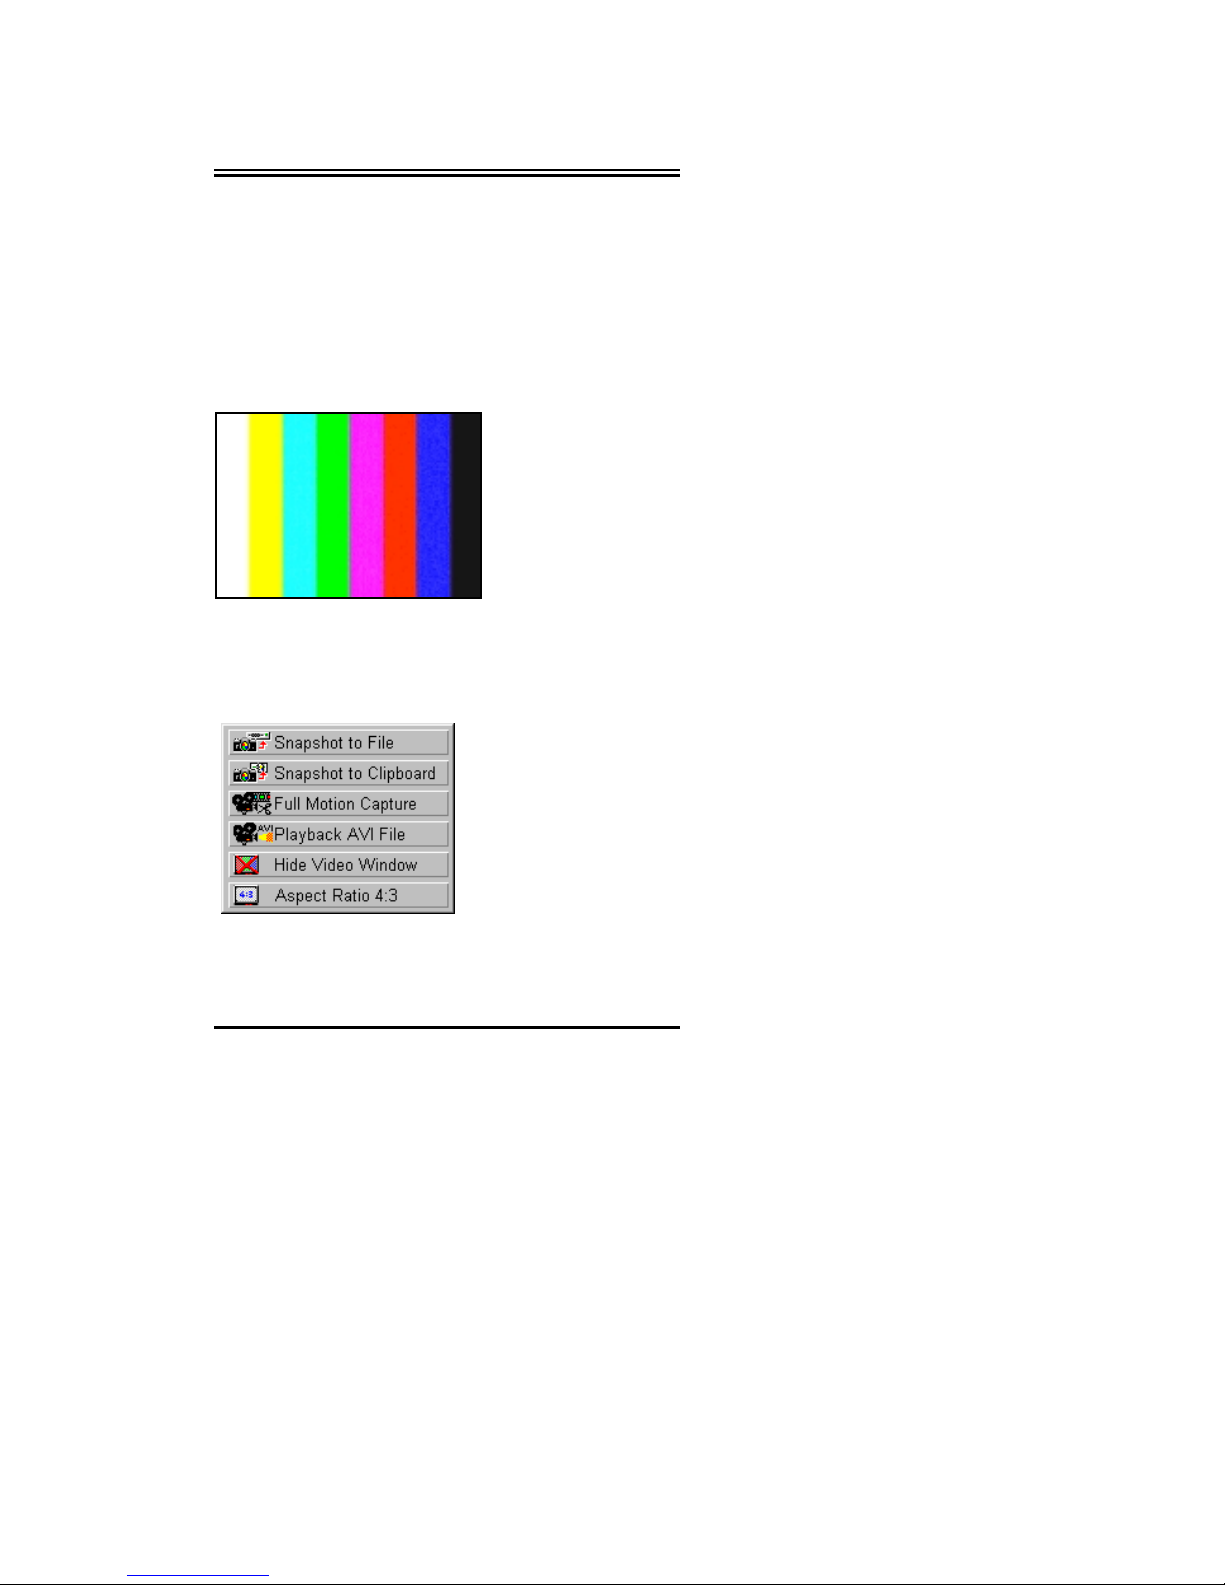
To do this, press your right mouse button anywhere inside the
video window (shown as Figure 2.2.1 below).
Figure 2.2.1 Video Window
Then it brings up a pop-up menu (Fig ure 2.2.2 below).
Please consult each indicated number below for further
explanation.
Figure 2.2.2 Pop-up Video Capture Menu
Page 30
Chapter II Running FlyVideo Program
26
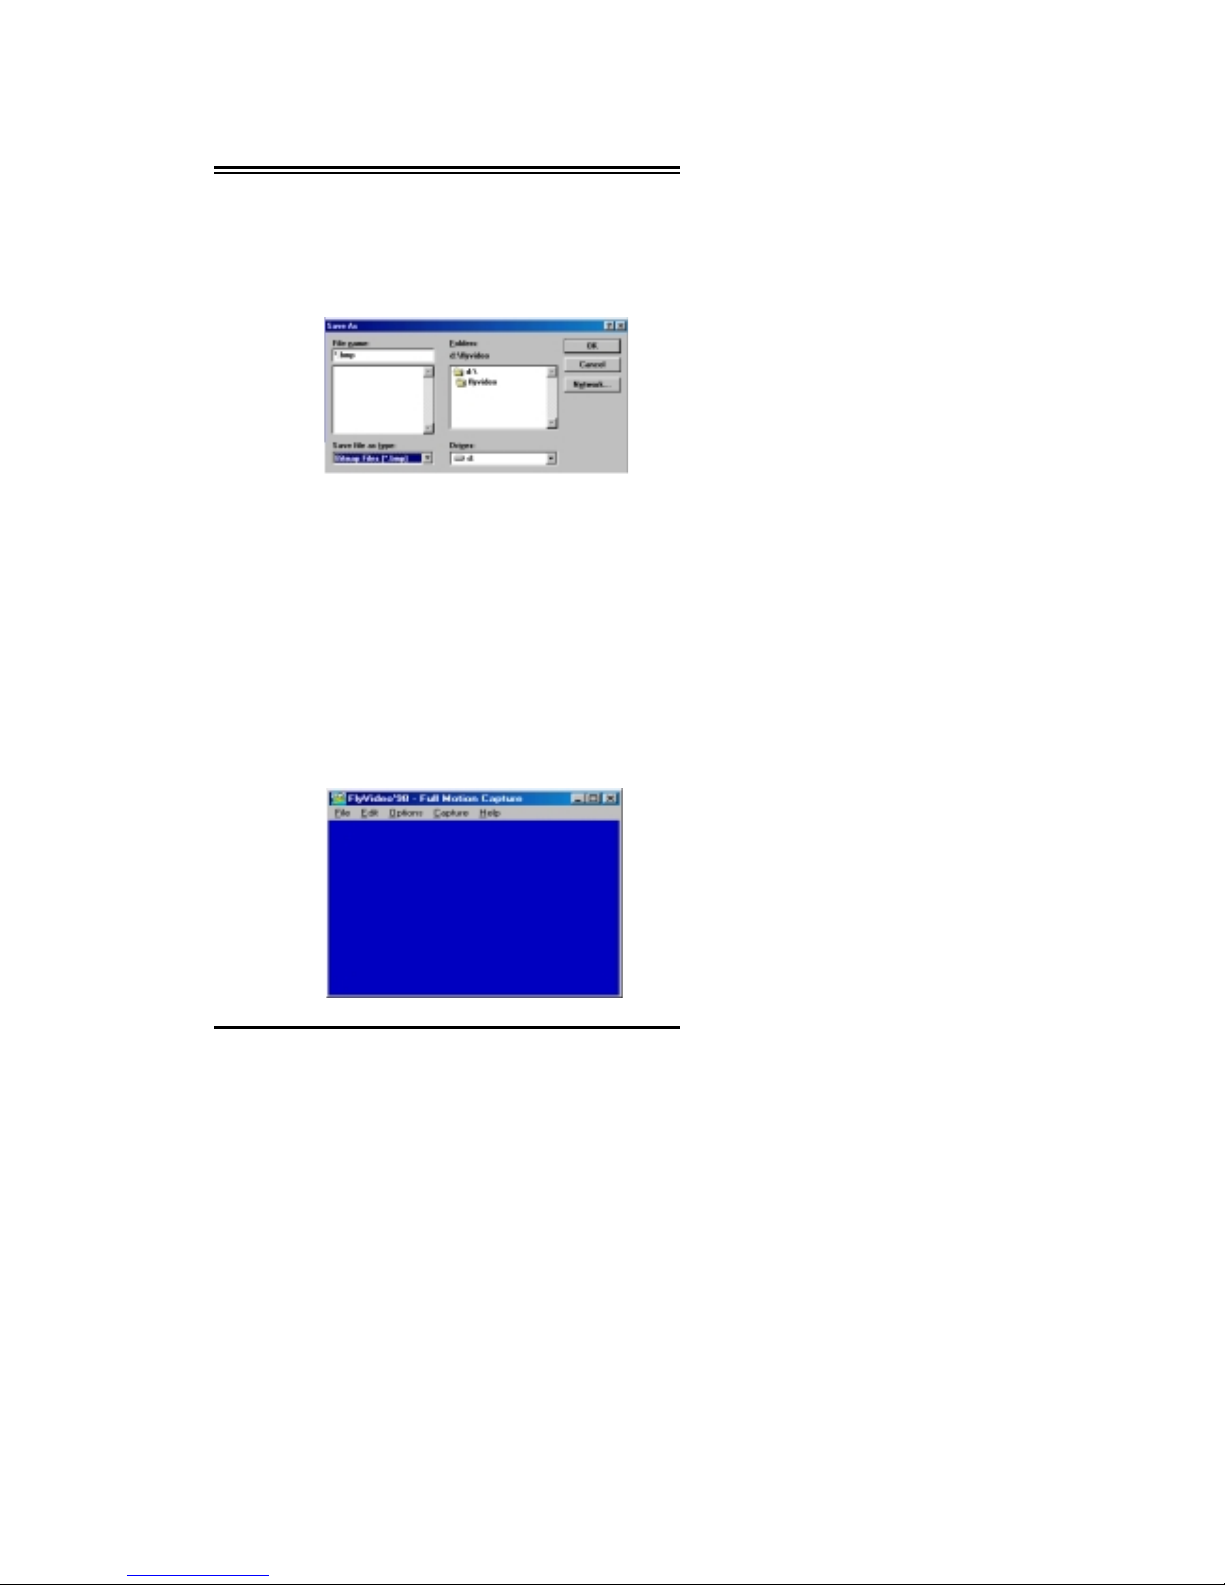
Snapshot to File
Steps:
1. Click on
Snapshot to File
button, a
Save As
dialog
box appears
2. Type in the file name, and click on
Ok
button to
save
Snapshot to Clipboard
Steps:
1. Click on
Snapshot to Clipboard
button
2. Paste the image into a running software (e.g. MS
Word, MS Excel, Adobe Photoshop….
Full Motion Capture
Steps:
1. Click on
Full Motion Capture
button, a
Full
Motion Capture
dialog box appears
Page 31
Chapter II Running FlyVideo Program
27
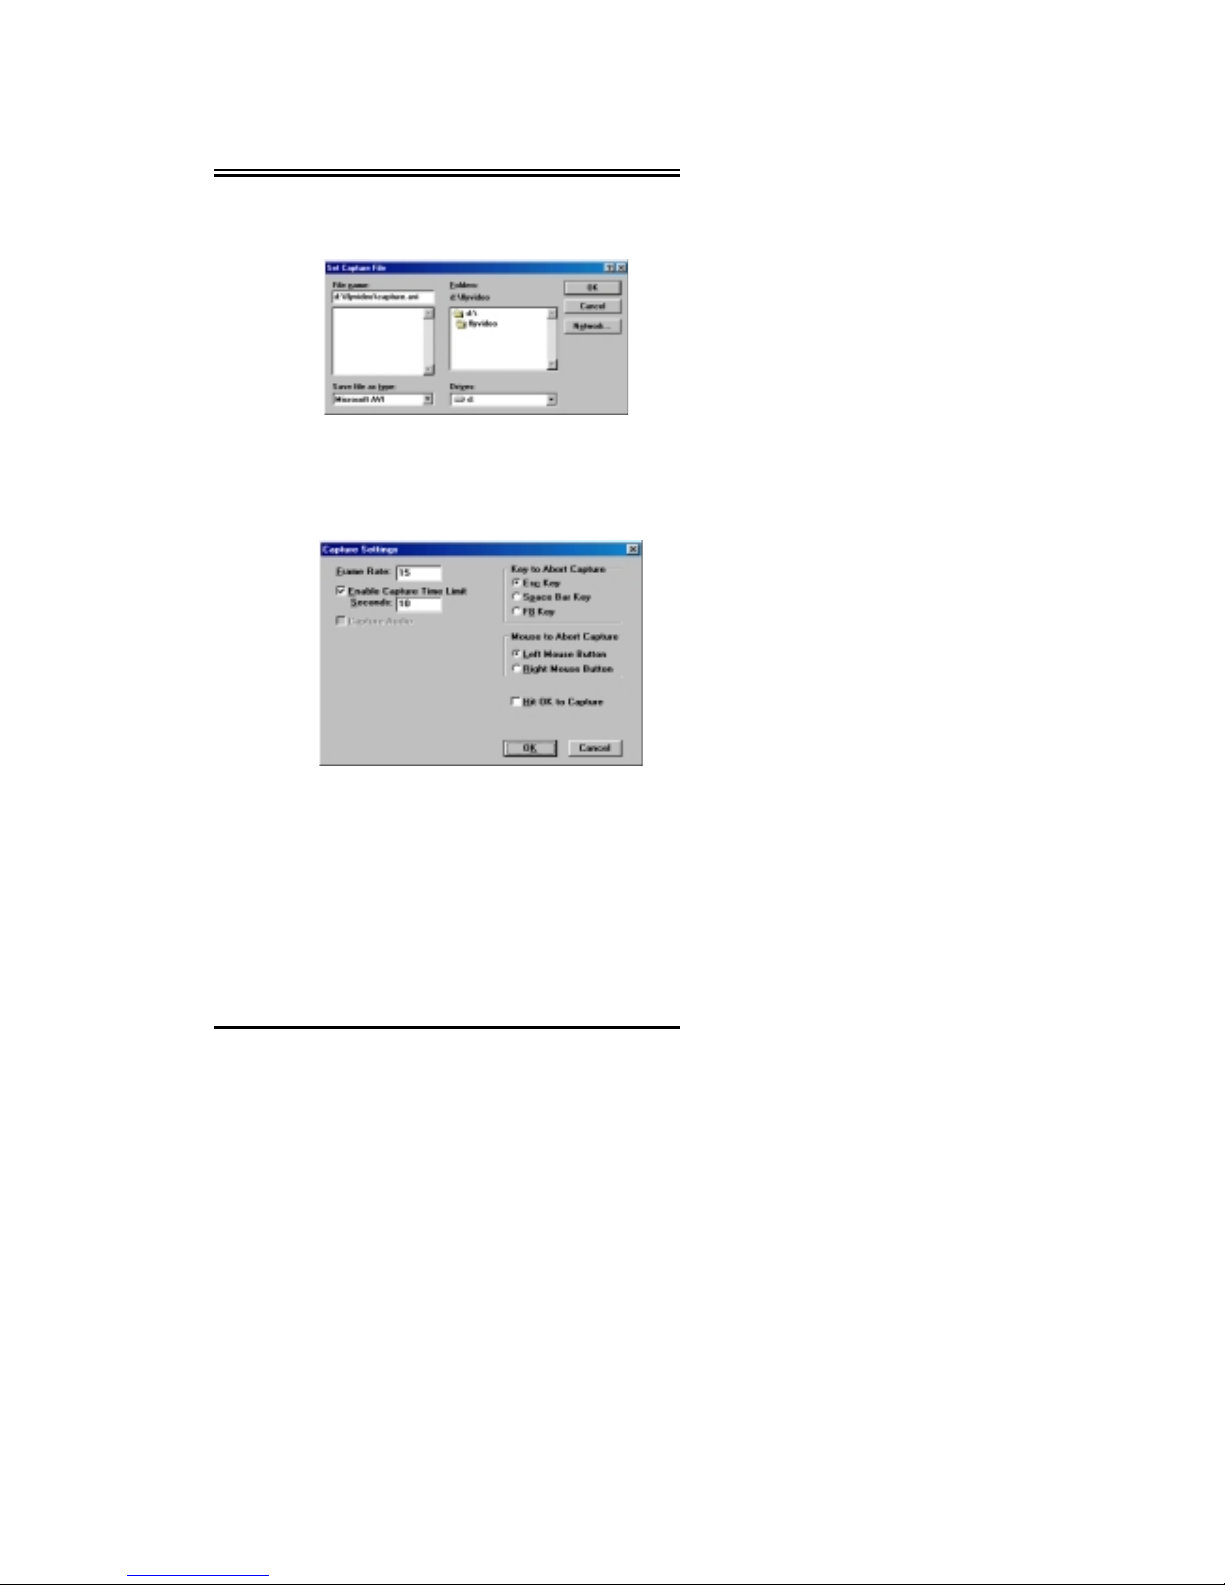
2. Click on
File
menu and select
Set Capture File
option, a dialog box will pop up as
Type in the file name you want to save and click
on OK button.
3. Click on
Capture
menu, select
Capture
Settings
option, a dialog box appears
Change the
Frame Rate
and
Enable Capture
Time Limit
as you wish. Click on Ok button to
go back to previous menu.
4. Select Capture | Capture V ideo to s tart re cord ing.
5. It will automatically end recording in which time
you set in step 3
(
Note:
Click on left button of the mouse to end
recording if you have disabled
Capture Time
Limit)
Page 32

Chapter II Running FlyVideo Program
28
Playback AVI File
Use this button to play AVI file that y ou have previously
recorded
Hide Video Window
Use this button to close the Video Display Window
Aspect Ratio 4:3
Use this button to re-size your Video Display Window with a
ratio of 4 (length) to 3 (height)
Page 33
Chapter II Running FlyVideo Program
29
2.3 Using the FlyRadio Application
(FlyVideo’98 FM model only)
1. Chose “
Start
|
Programs
|
LifeView FlyVideo’98
|
FlyRaido
” to run the FlyRadio application.
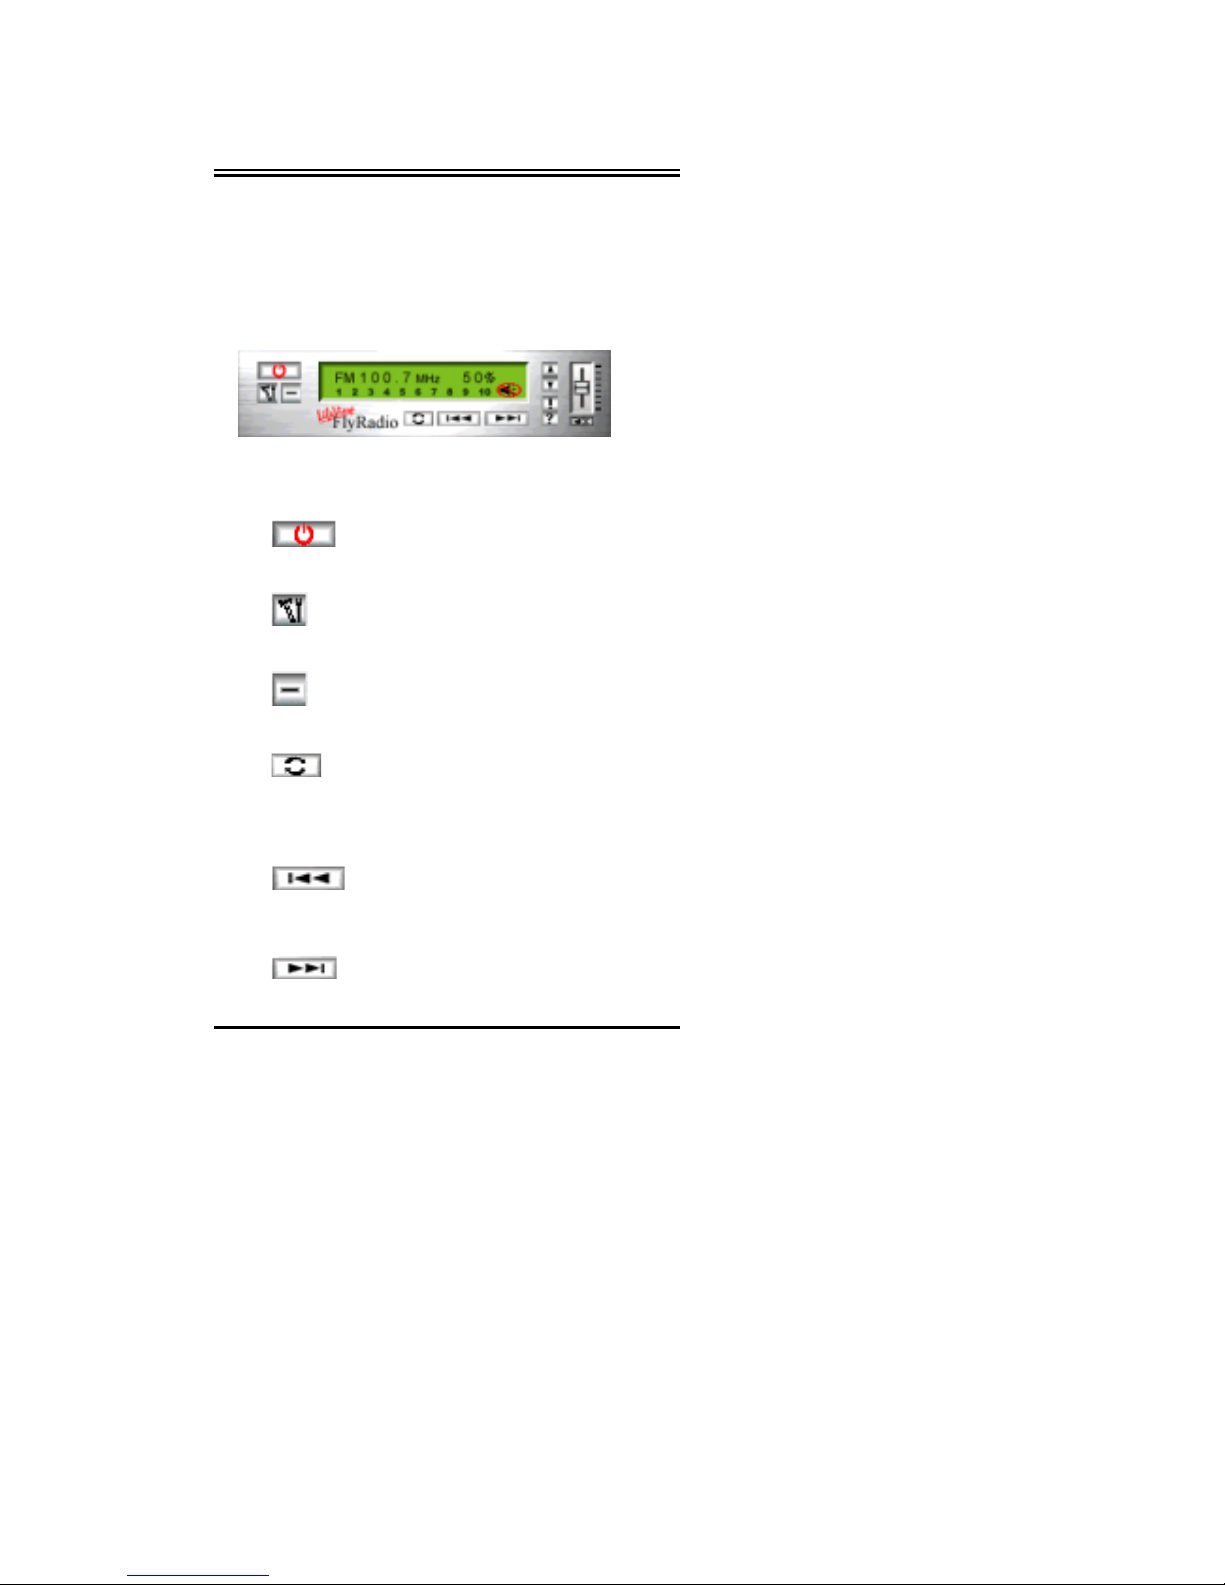
2. The FlyRadio Window
3. This section describes details on how to operate FlyRadio
efficiently. Please check the indicated button numbers
below for further description.
A. Power off
Press this button to terminate FlyRadio program .
B.
Configuration
Press this button to select Odd/Even frequency detect.
C.
Minimize
Press this button to minimize the FlyRadio front-panel.
D.
Auto preset
Press this button to auto search ten valid frequency
until ten valid frequency arrived or user press stop
button.
E.
Search previous valid frequency
Press this button to search a valid frequency by
decreasing the current frequency.
F.
Search next valid frequency
Press this button to search a Valid Frequency by
adding the current frequency.
Page 34
Chapter II Running FlyVideo Program
30
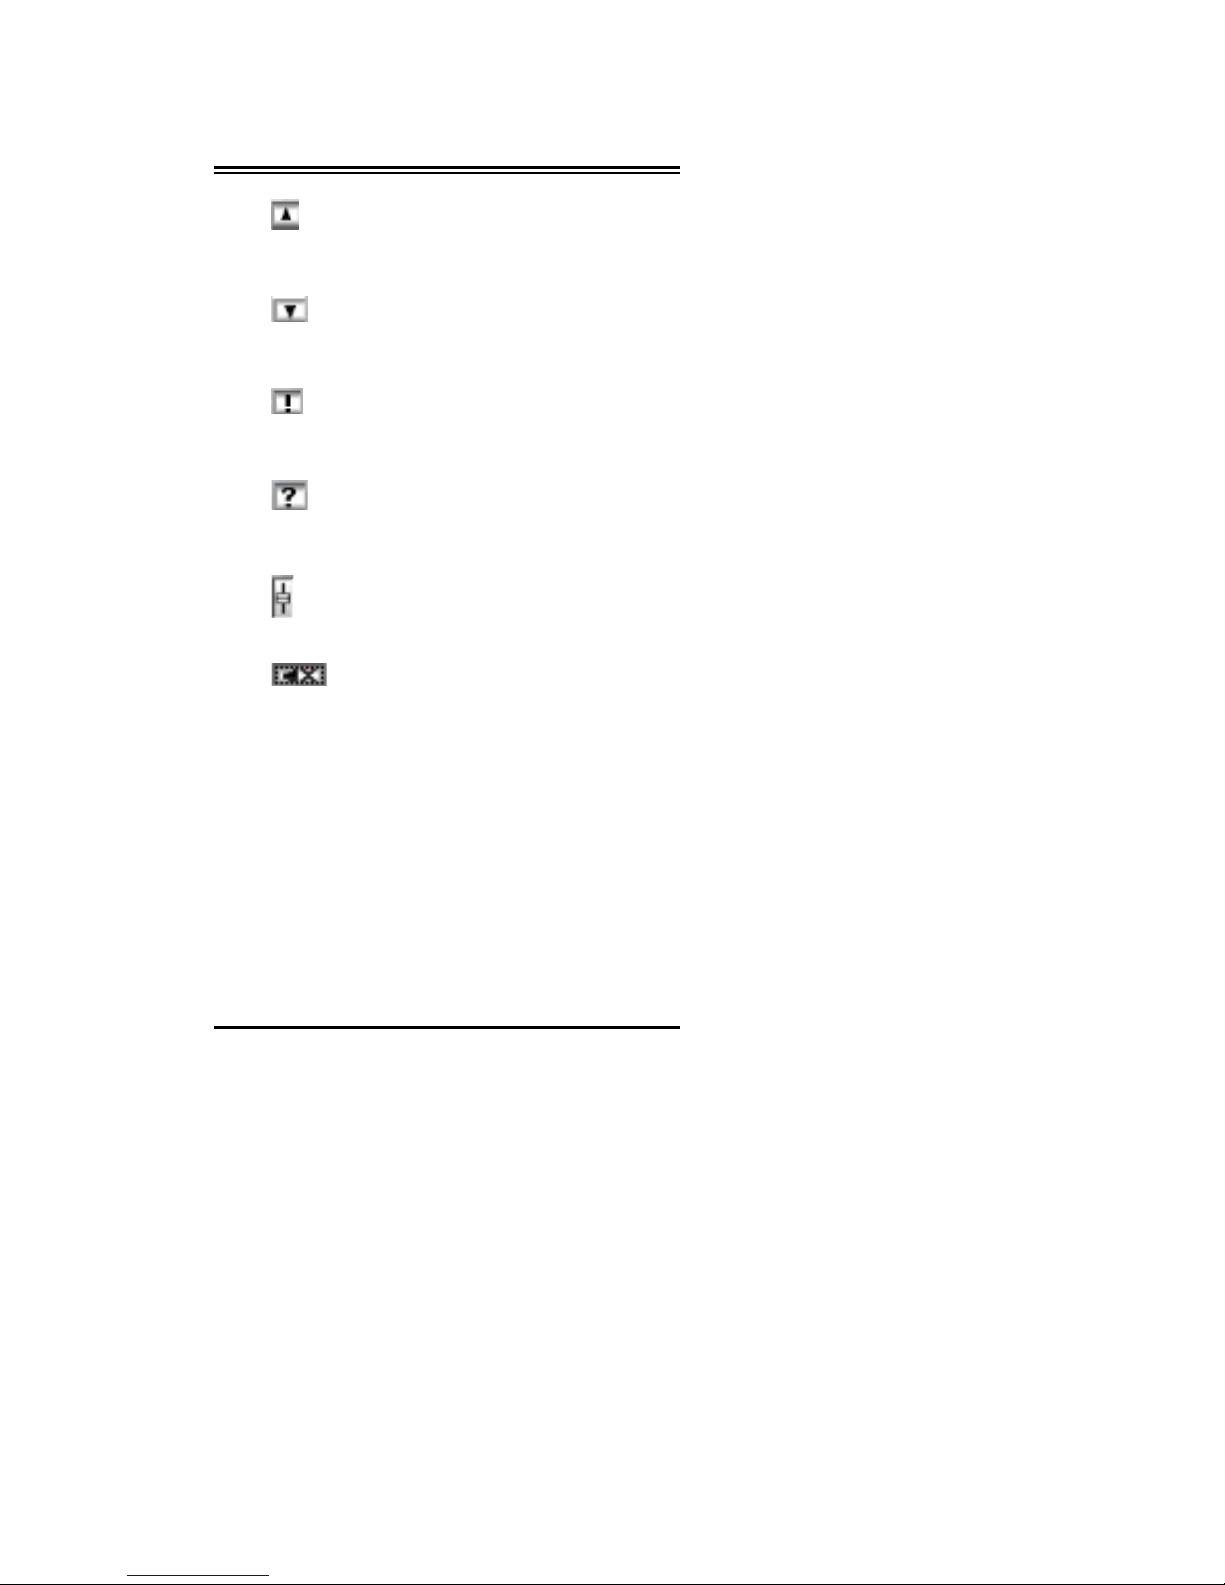
G.
Increase frequency by step
Press this button to add the frequency that step is 0.1
MHz.
H.
Decrease frequency by step
Press this button to decrease the frequency that step is
0.1 MHz.
I.
About the FlyRadio
Press this button to display FlyRadio copyright
information.
J.
Help
Press this button to activate FlyRadio on-line help
menu.
K.
Volume control
This sliding button will control the volume of sound.
L.
Mute control
Press this button to turn the sound to off or on.
Page 35

Chapter II Running FlyVideo Program
31
2.4 Accelerator Keys Su mmary
FlyVideo provides accelerator keys for easy manipulation.
Following is the list of all keystrokes, which FlyVideo
provides.
F1
Help
M
Toggle Mute on/off
C
Toggle Air/Cable TV
BackSpace
Recall Last Channel
P
Add/Clear channel
B
Snapshot to Clipboard
PageUP
Previous AV Source
PageDown
Next AV Source
Right Arrow
(
→→→→
) Next Channel
Left Arrow
(
←←←←
) Previous Channel
Up Arrow
(
↑↑↑↑
) Volume Up
Down Arrow
(
↓↓↓↓
) Volume Down
Alt + V
Video Setting
Alt + A
Audio Setting
Alt + T
TV Setting
Alt +F4
Power off
Page 36
Appendix A
A-1
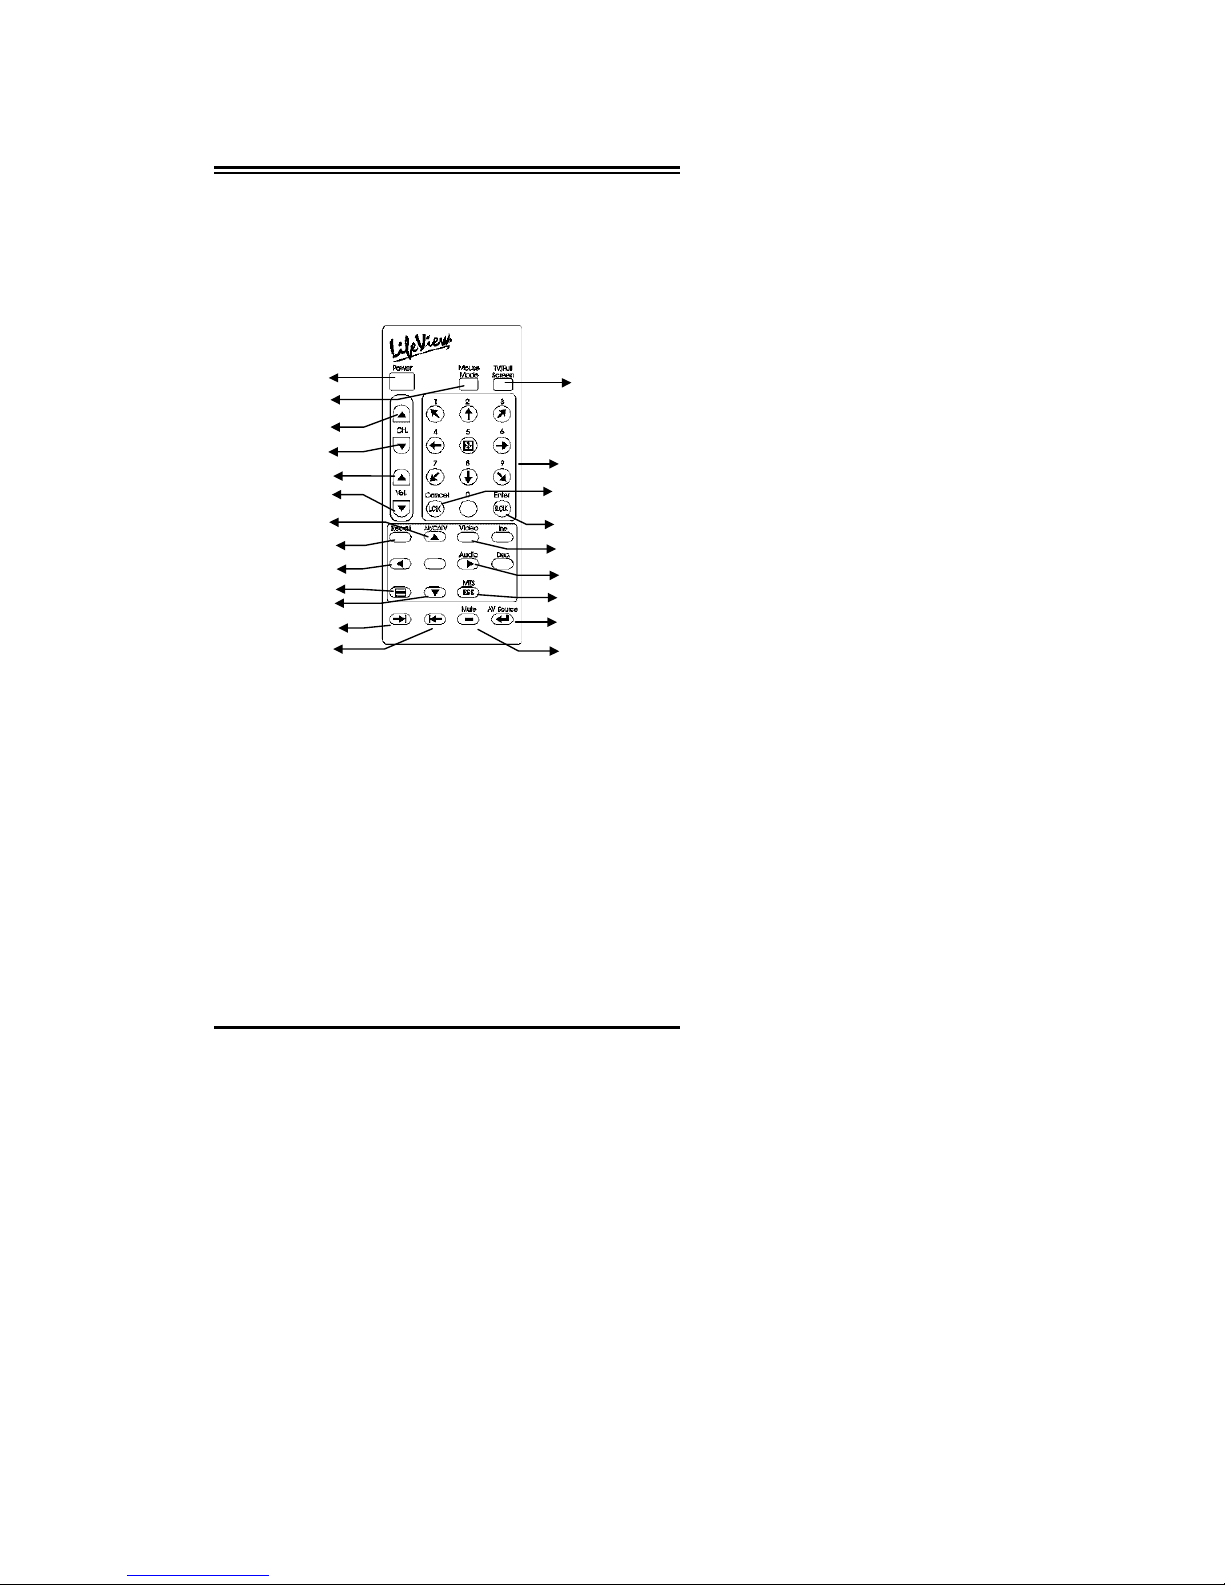
Remote Controller
FlyVideo series provides remote controllable functions for
easy access to major AV functions.
Button Description:
1. Power Off
Press this button to terminate FlyVideo progra m.
2. Mouse Mode
Press this button to toggle between control and mouse mode.
3. Full Size
C
lick this button to toggle the Video Window between full
size and the previous size.
4. Numeric Keypad
S
elect the desired channel directly.
5. Channel Up
Click this button to go to next channel.
6. Channel Down
Click this button to go to previo us channel.
1 3
9
11
5
6
7
8
10
12
13
2
4
19
20
22
21
15
14
17
16
18
Page 37

Appendix A
A-2
7. Volume Up
Click this button to increase the audio volume.
8. Volume Down
Click this button to decrease the audio volume.
9 Air/CATV
C
lick this button to toggle between Air and CATV
channels.
10 Recall
Jump to last selected TV channel.
11. Cursor Arrow Left
No functi o n
12. System Menu
C
lick this button to bring up the Capture Menu.
13. Cursor Arrow Down
No functi o n
14. Tab Next
No functi o n
15. Tab Previous
No function.
16. Cancel Button
C
lick this button to cancel channel selection.
17. Enter Button
C
lick this button to execute the current channel selection.
18. Video Setting
Press this button to adjust video settings such as
Brightness, Contrast, Saturation and Hue.
19. Audio Setting
C
lick this button to adjust audio settings such as Volume,
Balance, Bass and Treble.
20. TV Setting(M TS:Optional)
P
ress this button to select TV settings such as Air, Cable
and scan channels.
21. AV
C
lick this button to toggle between TV and AV sour ces.
22. Mute
P
ress this button to turn off the audio.
Page 38

Appendix B
B-1
Q & A
Q: I start up th e FlyVideo seri es, it give me an “Inv alid
Interrupt number...” error, what could be wrong?
A: Please refer to your mother board manual and run the
BIOS “PCI and PNP setup” or somethin g similar make sure
the PCI‘s “Auto configuration” is enabled, FlyVideo utilizes
the PCI b us’s abili ty to auto r e-route t he hardwar e resource
(
IRQ, Address, DMA...)to avoid conconfict with other
device, hence, it is necessary to enable this PCI‘s advanced
capabilities through the BIOS setup.
Q: I have installed everything including the FlyVideo
series application, the FlyVideo series hardware driver,
and the DCI driver for my VGA card, then I try to run
the FlyVideo series program, my machine just hang,
nothing appear, now what?
A: Please refer to your mother board manual to run the BIOS
“Advanced chipset setup” or something similar, there
probably hav e one or sev e ral i tems regarding the P CI “ Bur s t”
mode settings, try play with that, and it might solve the
problems. The reasons is tha t, other then the Intel chipse t, the
other mother board chipset designer might implemented the
PCI features in a non-standard way.
Q: I have installed the FlyVideo series application
program and the hardware driver, but I double-click on
the FlyVideo series icon, it give me an “unknown error...”,
what could be wrong?
A: you didn‘t install the DCI(Display Control Interface
)
driver for your VGA card. The DCI drive r is co me fro m your
VGA card manufactures, as long as the VGA chipset is the
same. For example, if your VGA chip is designed by S3, you
can use the drivers from the other manufacture’s VGA card
that also use the S3 chip. Also, many VGA chip designer
offers BBS numbers for virtually every one to download their
latest drivers.
Page 39

Appendix B
B-2
Q: I installed the FlyVideo series under Windows 95, after
re-start the Windows, fire up the FlyVideo series, then the
system just hang, nothing appears, what could be wrong?
A: After run the SETUP program to install the FlyVideo
series appl ication progra m, pleas e also us e the control Panel
to install the hardware driver. To do so, please refer to
Software Installation for instruction.
Q:I have a FlyVideo capture series card, whenever I start
the application, it give me “Current VGA mode not
suitable for video overlay!…” even though I have
installed the Direct Draw Driver for my VGA card. What
wrong with that?
A: FlyVideo 4.3 or latter, requires. Direct Draw 5.0 or latter,
make sure you have installed the latest version of the Direct
Draw Driver.
Page 40

Licensing and Warranties
C-1
Licensing and Warranties
This appendix documents the software license agreement,
hardware and software warranties, and informati o n about
FCC radio frequency interference.
Software License Agreement
Lifeview Technologies Inc. grants the original purchaser a
limited, nonexclusive license, without the rig ht to sublicense,
to use this copy of Lifeview software on a single computer at
a time. Lifeview reserves all right not expressly granted and
retains title and ownership of the software including
subsequent copies in any media. It is stri ct l y prohibi ted t o
copy this software except to load the software from the
supplied disket te(s) or CD- ROM ont o the com puter ha rd di sk.
It is solely for the purpose of executing the program and for
backup purposes in support of your use of the software on a
single computer. You are granted no other rights to copy,
duplicate, sell or otherwise distribute this software product
supplied to you by Lifeview.
Software Limited Warranty
As the only warranty under this agreement, and in the absence
of accident, abuse or misapplication, Lifeview warrants, to
the original licensee only, that the diskettes and CD-ROM of
which the software is recorded are free from defects in
material and workmanship under normal use and service for a
period of one year f rom the date of original purchase as
evidenced by a copy of the purchase receipt. Lifeview’s only
obligation unde r th is war ran ty is, at Lifev ie w’s s ole op tion, to
replace the diskette or CD-ROM that does not meet
Lifeview’s limited warranty and which is returned to
Lifeview, postage prepaid with a copy of the purchase receipt.
THIS WARRANTY GIVES YOU LIMITED SPECIFIC
LEGAL RIGHTS. YOU MAY HAVE OTHER RIGHTS,
Page 41

Licensing and Warranties
C-2
WHICH VARY FROM STATE TO STATE. EXCEPT AS
EXPRESSLY PROVIDED ABOVE. THE SOFTWAR E
AND ACCOMPANYING WRITTEN MATERIALS
(INCLUDING THE USER GUIDE) ARE PROVIDED “AS
IS” WITHOUT WARRANTY OF ANY KIND INCLUDING
THE IMPLIED WARRANTI ES OF MERCHANTABILITY
AND FITNESS FOR A PARTICULAR PURPOSE, EVEN
IF LIFEVIEW HAS BEEN ADVISED OF THAT
PURPOSE, LIFEVIEW SPECIF ICALLY DOES NOT
WARRANT THE OPERATION OF THE SOFTWARE
AND WILL NOT BE LIABLE FOR ANY DIRECT,
INDIRECT, CONSEQUENTIAL OR INCIDENTAL
DAMAGES ARISING OUT OF THE USE OR INABILITY
TO USE SUCH PRODUCT EVEN IF ATTACH HAS BEEN
ADVISED OF THE POSSIBILITY OF SUCH DAMAGES;
SOME STATES DO NOT ALLOW THE EXCLUSION OR
LIMITATION OF LIABILITY FOR CONSEQUENTIAL
OR INCIDENTAL DAMAGE, SO THE ABOVE
LIMITATION MAY NOT APPLY.
Hardware Limited Warranty
Lifeview FlyVideo’98 card is warranted to be free from
failures due to defects in material and workma nship for one
year from the date of original purchase as evidenced by a
copy of the purchase receipt. During the warranty period,
Lifeview, at Lifeview’s sole discretion, will repair or replace
at no charge, the product which, in its opinion, is defective.
The original purchaser is r esponsible for packing the product
for shipment and for the charge to ship the failed product to
Lifeview. Lifeview is responsible for charges to ship the
repaired or replaced product. If any charge to you is involved,
the replacement product will be shipped C.O.D.
If the failed product has been modified in any way without the
consent of Lifeview or if the failure is the result of misuse,
abuse, or misapplica tion, Lifev iew has no oblig ation to repa ir
or replace the failed product.
Page 42

Licensing and Warranties
C-3
EXCEPT AS EXPRESSLY PROVIDED ABOVE, THE
HARDWARE AND ACCOMPANYING WRITTEN
MATERIALS (INCLUDING THE USER’S GUIDE) ARE
PROVIDED “AS IS” WITHOUT WARRANTY OF ANY
KIND INCLUDING THE IMPLIED WARRANTIES OF
MERCHANTABILITY AND FITNESS FOR A
PARTICULAR PURPOSE. LIFEVIEW SPECIFICALLY
DOES NOT WARRANT THE OPERATION OF THE
HARDWARE AND WILL NOT BE LIABLE FOR ANY
DIRECT, INDIRECT, CONSEQUENTIAL OR
INCIDENTAL DAMAGES ARISING OUT OF THE USE
OF OR INABILITY TO USE SUCH PRODUCT EVEN IF
LIFEVIEW HAS BEEN ADVISED OF THE POSSIBILITY
OF SUCH DAMAGES. SOME STATES DO NOT ALLOW
THE EXCLUSION OR LIMITION OF LIABILITY FOR
CONSEQUENTIAL OR INCIDENTAL DAMAGE, SO
THE ABOVE LIMITAION MAY NOT APPLY.
V 5.7
 Loading...