

LifeView FlyDVB Trio User Manual

FlyDVB Trio
User Manual
Animation Technologies Inc.
www.lifeview.com
Ver: 1.9

Copyright and Trademark Notice
©2005 by Animation Technologies Inc. All rights reserved.
Information in this document is subject to change without notice. No part of this
document may be reproduced or transmitted in any form or by any means, electronic
or mechanical without prior written permission of Animation Technologies Inc.
Animation Technologies Inc. makes no representation or warranties with respect to
the contents hereof and specifically disclaims any implied warranties of
merchantability or fitness for any particular purpose. Animation Technologies Inc.
reserves the right to revise this manual and to make changes in its content without
obligation to notify any person or organization of such revision or change. In no event
shall Animation Technologies Inc. be liable to you or any third party for any
consequential, incidental, direct, indirect, special, punitive, or other damages
(including without limitation, damages for loss of profits, interruptions, loss of
information, pecuniary loss, etc.), even if Animation Technologies Inc. has been
advised of the possibility of such damages arising from any defect or error in this
manual or product.
Updates to this documentation can be obtained from our website: www.lifeview.com.
Windows® is a trademark of Microsoft Corporation. All other brand names used in this
document are registered trademarks of their respective companies.
CE Statement: This equipment has been tested and complies with EN 55022, EN
55024, EN 61000-3-2, EN 61000-3-3, EN 61000-4-2, EN 61000-4-3, EN 61000-4-4,
EN 61000-4-5, 61000-4-6, EN 61000-4-8, EN 61000-4-11 standards.

Contents
1. Getting Started ................................................................... 1
1.1 Introduction................................................................................................... 1
1.2 Features .......................................................................................................1
1.3 Package Contents ........................................................................................ 1
1.4 System Requirements ..................................................................................2
2. Input & Output Connections ............................................... 3
2.1 FlyDVB Trio Connections .............................................................................3
3. Installation .......................................................................... 4
3.1 DirectX..........................................................................................................4
3.2 Installing the FlyDVB Trio .............................................................................5
3.3 Driver Installation for Windows 2000 / Windows XP ..................................... 6
3.4 Installation of LifeView DTV.......................................................................... 7
4. LifeView DTV ..................................................................... 8
4.1 DTV Interface Overview................................................................................ 8
4.2 Scanning for TV Channels (DVB-S).............................................................. 9
4.3 Scanning for TV Channels (DVB-T)............................................................ 11
4.4 Scanning and editing channels (Analog) ....................................................13
4.5 Scanning for stations (FM Radio) (FM models only)................................... 14
4.6 Choosing your source.................................................................................15
4.7 Channel list................................................................................................. 16
4.8 Volume controls.......................................................................................... 16
4.9 Signal Strength Meter................................................................................. 16
4.10 Teletext.....................................................................................................17
4.11 EPG.......................................................................................................... 18
5. Settings ............................................................................ 19
5.1 DVB Settings .............................................................................................. 19
5.2 Analog TV/Video Settings (TV/AV-In/S-Video) ........................................... 21
6. PIP (Picture-In-Picture) and TWIN Mode......................... 26
7. Recording......................................................................... 28
7.1 The Recording Button.................................................................................28
7.2 The TimeShift Button.................................................................................. 29

7.3 Schedule Recording ...................................................................................30
7.4 Snapshots................................................................................................... 31
7.5 Play Mode................................................................................................... 31
8. The Remote Control and Keyboard Shortcuts ................. 32
8.1 Remote Control ..........................................................................................32
8.2 Keyboard Shortcuts .................................................................................... 33
9. Technical Support ............................................................ 34
9.1 Contact Us.................................................................................................. 34

Getting Started
1. Getting Started
1.1 Introduction
Thank you for choosing the FlyDVB Trio TV tuner and video capture card. This
product turns your PC into a powerful desktop multimedia system quickly and easily.
Capture video and still images and experience real-time MPEG-1/2/4 recording.
Watch both digital TV and analog TV or video at the same time, on the same screen,
thanks to LifeView’s exclusive MST technology! The FlyDVB Trio provides you with a
high quality TV viewing experience with true stereo sound!
1.2 Features
• Antenna ready DVB-T Silicon Tuner
• Universal Analog TV Silicon Tuner
• S-Video/composite video inputs
• PIP (Picture in Picture)
• Real-time recording from Digital TV, Analog TV, and Analog inputs
• LifeView’s exclusive MST lets you watch both Digital TV and Analog TV/video
simultaneously
• Watch TV in a resizable window or full-screen
• TimeShifting functions
• Capture still images
• Listen to DVB radio
• Listen to FM radio (FM models only)
• Compatible with Windows
1.3 Package Contents
When removing the contents of the package, please inspect all items to ensure no
damage was sustained during shipping. The following items should be included in the
package:
• FlyDVB Trio card
• PAL to NTSC connection adapters (x 2)
• AV-Cable
• Remote control
• IR sensor cable
• Portable antenna for DVB-T reception
• FM antenna (FM models only)
• Installation CD-ROM
• Quick Installation Guide
®
2000 and XP
1

Getting Started
1.4 System Requirements
To successfully use the FlyDVB Trio solution, please ensure that your system meets
the following requirements:
• Pentium® 4 or AMD Athlon 2.0 GHz or faster, 2.4GHz or faster recommended
• 256 MB RAM (minimum), 512 MB RAM recommended
• Microsoft Windows 2000/XP
• 100 MB available hard disk space for installation, additional space required for
recording or TimeShifting
• CD-ROM or DVD drive
• VGA chipset with full DirectX 9.0 support
• DirectX 9.0c or higher installed
• AC97 compatible sound card for audio
• Speakers for audio output
• Available IRQ
• Available PCI slot
• TV antenna or TV cable for analog TV
• TV antenna or cable for digital TV
2
Input & Output Connections
2. Input & Output Connections
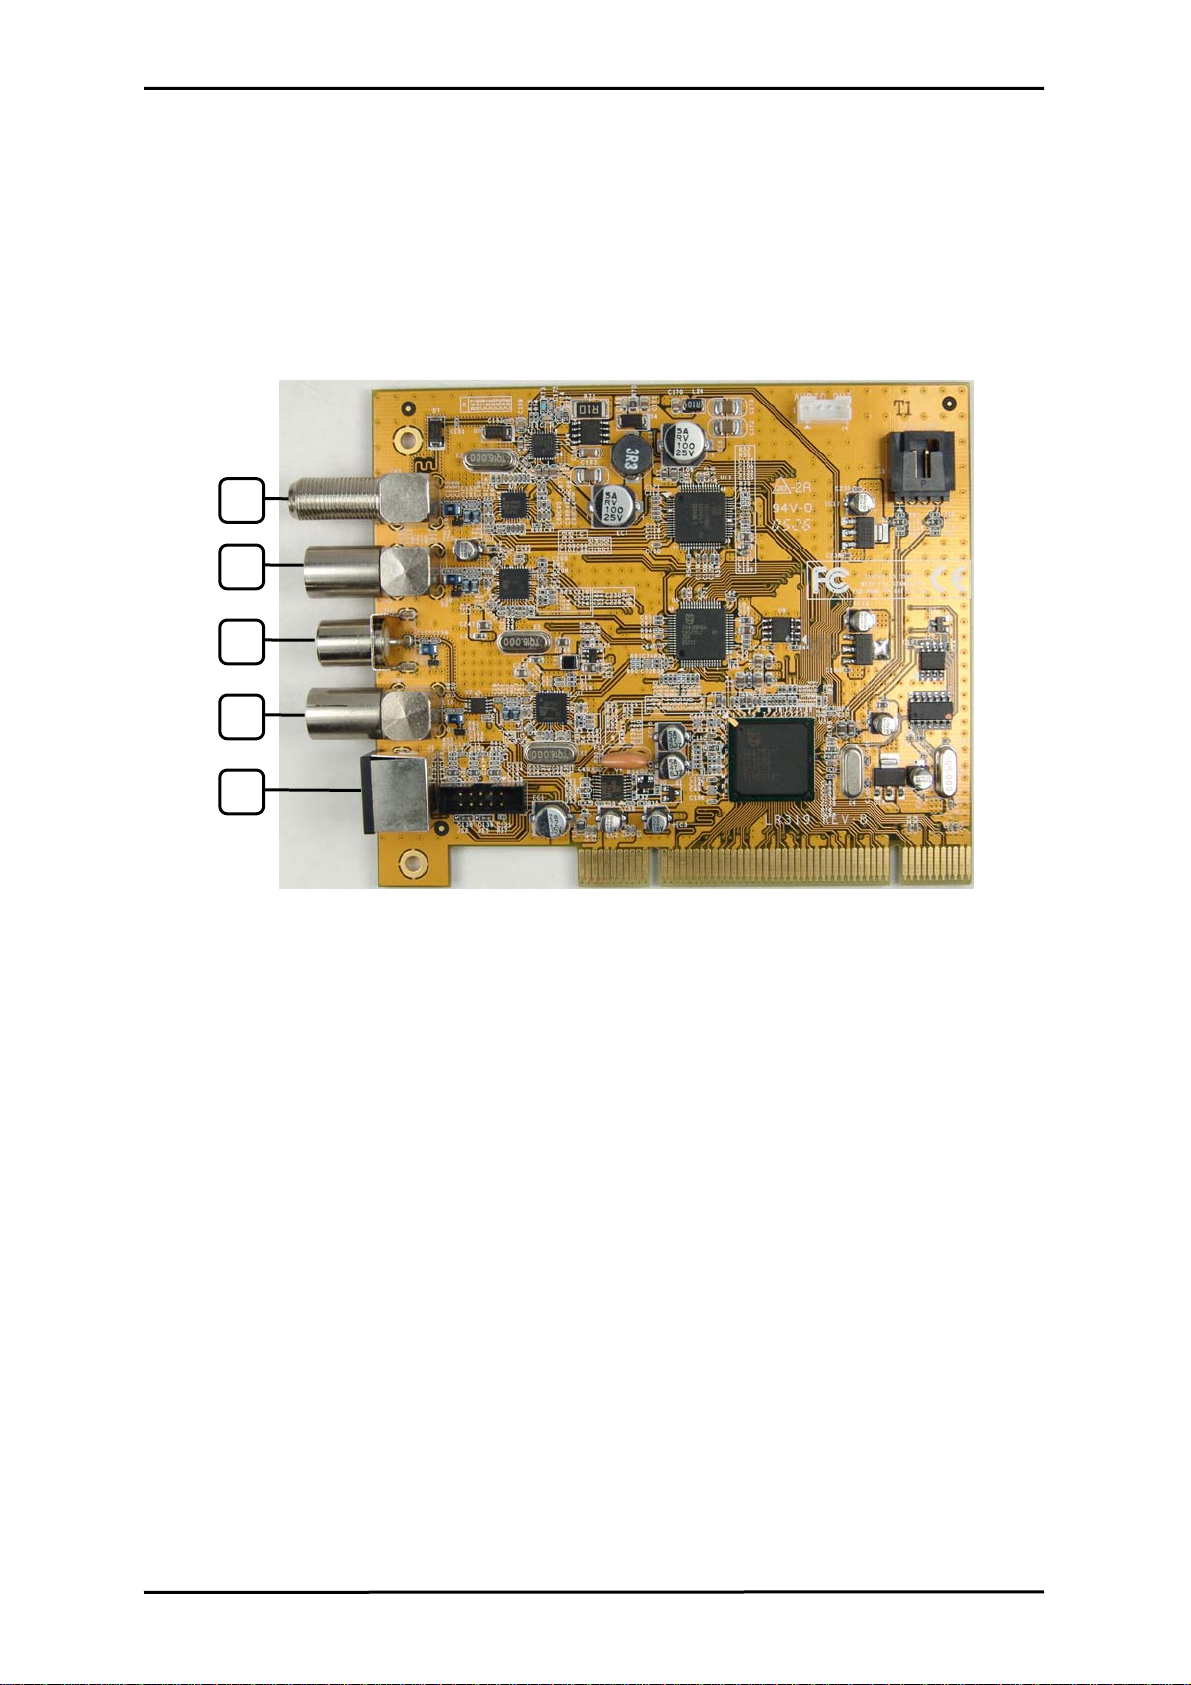
2.1 FlyDVB Trio Connections
The FlyDVB Trio card supports S-Video, Composite and Analog TV input. See the
diagram below for connection details.
1
2
3
4
5
* Actual product may vary from image shown
1. DVB-S: Connects to your satellite dish LNB
2. DVBT: Connects to your home or room antenna for Digital Terrestrial TV
3. FM: Connects to FM antenna (FM models only)
4. TV: Connects to your home antenna or cable for Analog TV
5. AV Cable: Connect the AV Cable to the 9-pin connector of the FlyDVB Trio
S-Video: S-Video input for external devices like VCRs or
camcorders
Composite Video: Composite video input for external devices like
VCRs or camcorders
Audio (R): Connects to the right audio channel of an external
audio device
Audio (L): Connects to the left audio channel of an external
audio device
Remote: Connects to the IR remote cable
3
Installation
3. Installation
The following sections provide step-by-step instructions on installing and configuring
the card, accessories and software.
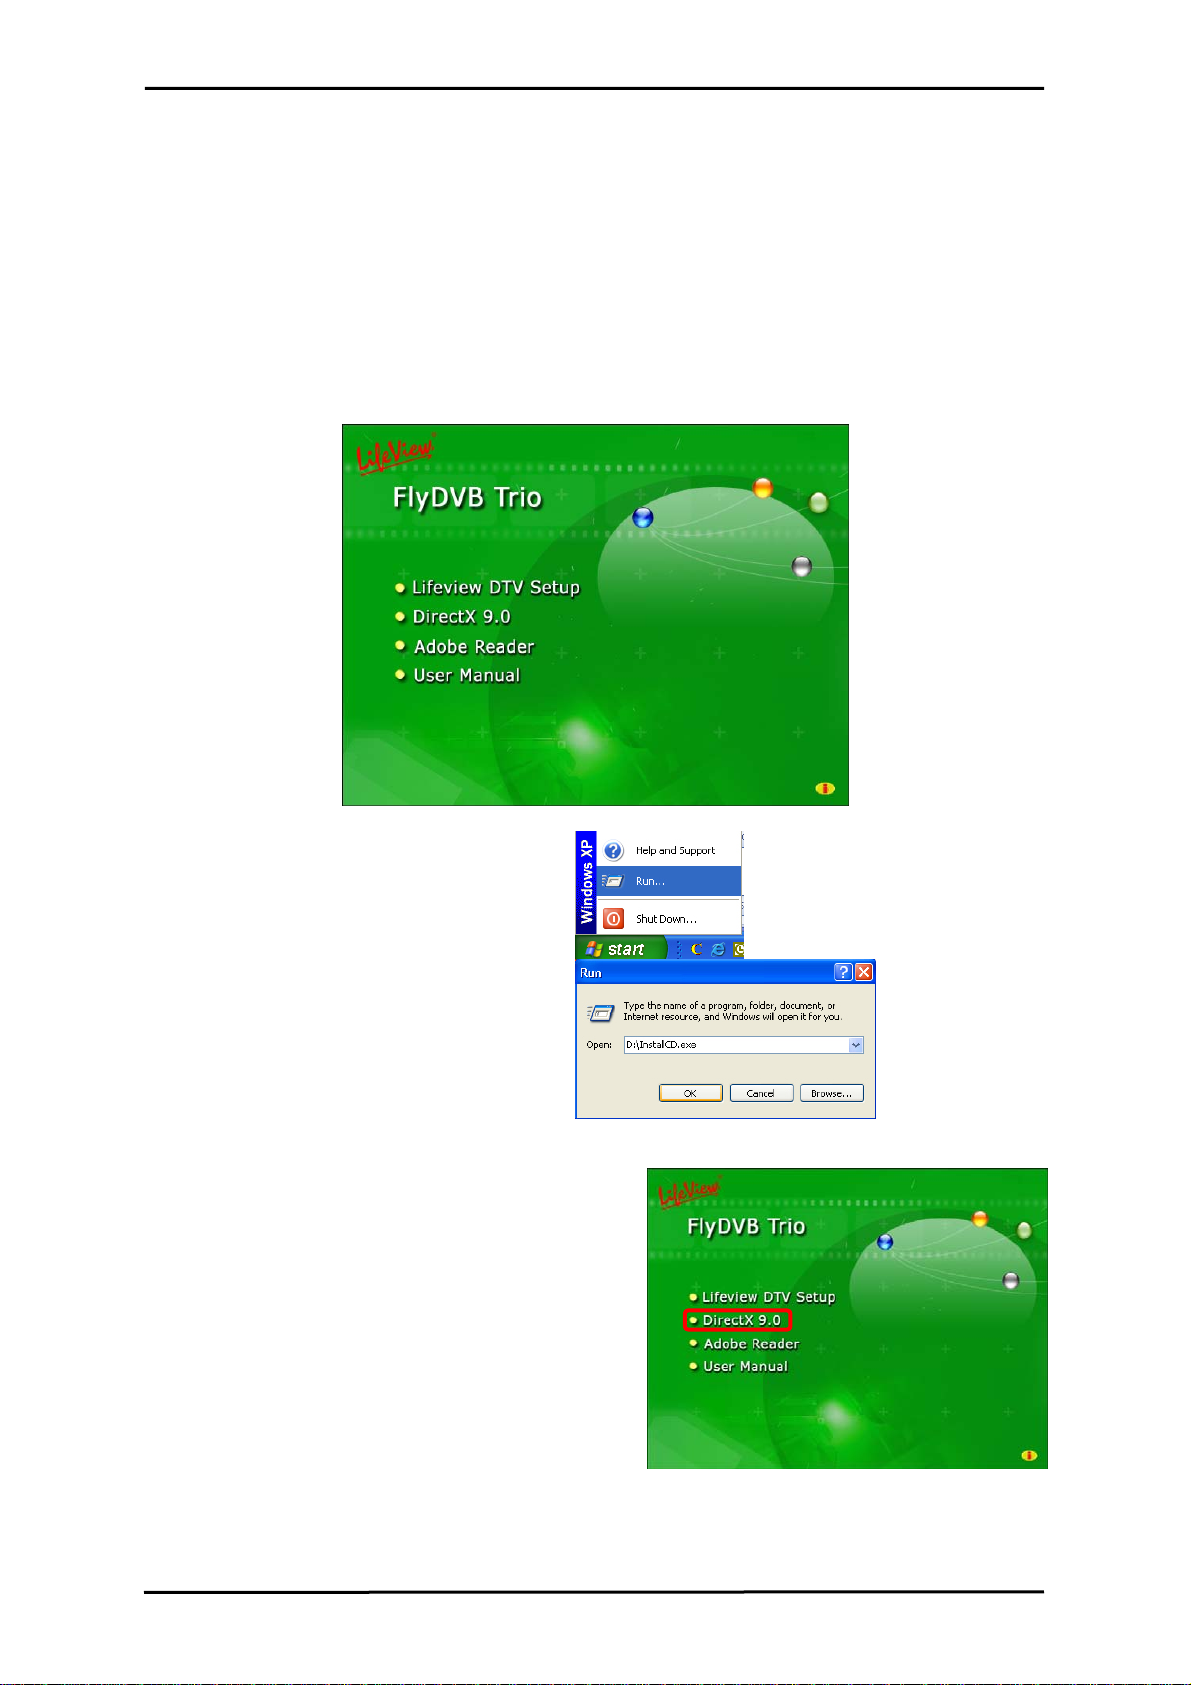
3.1 DirectX
Before installing your the FlyDVB Trio, it is necessary to install DirectX 9.0c or higher.
Insert the installation CD and an installation menu should load automatically.
If the Autostart program does not
appear automatically when you insert
your LifeView Installation CD, start it
manually by running the InstallCD.exe
file located on the LifeView Installation
CD, or by clicking the Start button,
choosing Run…, and typing in
D:\InstallCD.exe. (if D: is your
CD-ROM drive)
Click on DirectX 9.0 and follow the prompts to
install DirectX. After the installation is
completed, shut down the computer.
4

Installation
3.2 Installing the FlyDVB Trio
1. Switch off your PC and all connected peripheral devices such as your printer and
monitor. Leave the AC power cable connected for the time being, so that your
computer is still grounded.
2. Touch the metal chassis at the rear of the PC to ground and to discharge static.
Now unplug the cord from the AC power socket.
3. Remove the cover from the case of your PC.
4. Look for a free PCI expansion slot. When selecting the PCI slot, note that TV cards
should not be plugged into PCI slot 1 in conjunction with an AGP graphics card
because PCI slot 1 is very frequently assigned to the same interrupts as the AGP
slot. This would give both cards the same interrupt, which can lead to crashes
during operation!
(This is usually the PCI slot closest to the AGP slot, but always check your
mainboard manual).
5. Carefully remove the card from its packaging and pick it up by the edges with one
hand while your other hand is touching a metal part of the PC. This will ensure that
your body is completely discharged via your computer without damaging the TV
card.
6. Align the holder at the rear of the TV card in the expansion slot in such a way that
the card’s connectors are directly in line with the slot’s socket.
7. Push the TV card firmly into the slot, ensuring good contact.
8. Fasten the TV card with an appropriate screw.
9. Reinstall the cover of your PC case.
10. Connect your satellite dish LNB to the DVB-S port. Connect your digital antenna to
the DVB-T port. Connect the antenna cable (which you would normally connect to
the antenna input terminal on your television) to the TV port. Reconnect the AC
power cable as well as all other cables. Make sure that your speakers are set to
low volume.
5
Installation
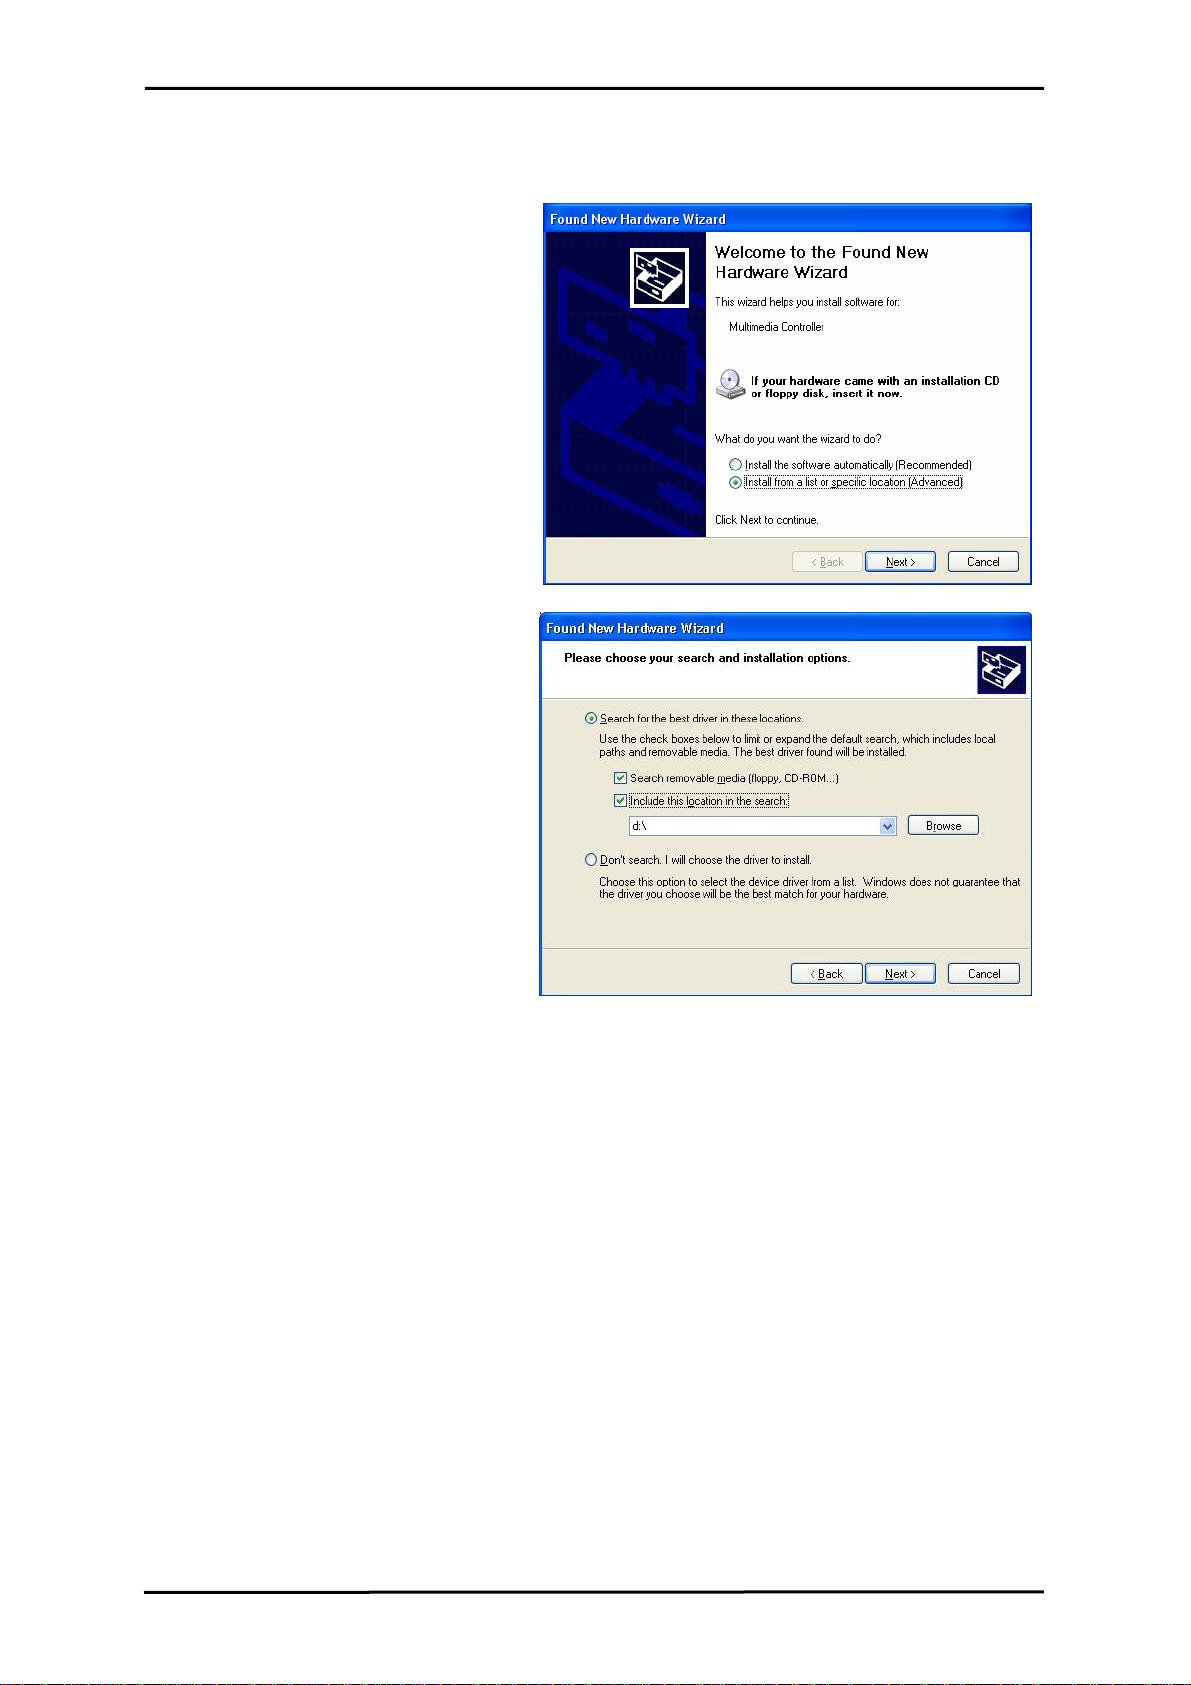
3.3 Driver Installation for Windows 2000 / Windows XP
Windows 2000 / XP will
automatically detect the FlyDVB
Trio card and brings up the Found
New Hardware Wizard window.
If you have not already done so,
place the Installation CD into your
CD-ROM drive.
Select Install from a list or
specific location (Advanced) and
click Next.
Now select Search for the best
driver in these locations, make
sure “Search removable media is
checked, and click Next.
Windows will now find the drivers on
the Installation CD and install them
automatically. After installing the
driver, Windows will inform you that
it has done so successfully. Click
Finish.
6

3.4 Installation of LifeView DTV
Install the LifeView DTV software by clicking
on LifeView DTV Setup. Just follow the
prompts to install the software.
Installation
7
LifeView DTV
4. LifeView DTV
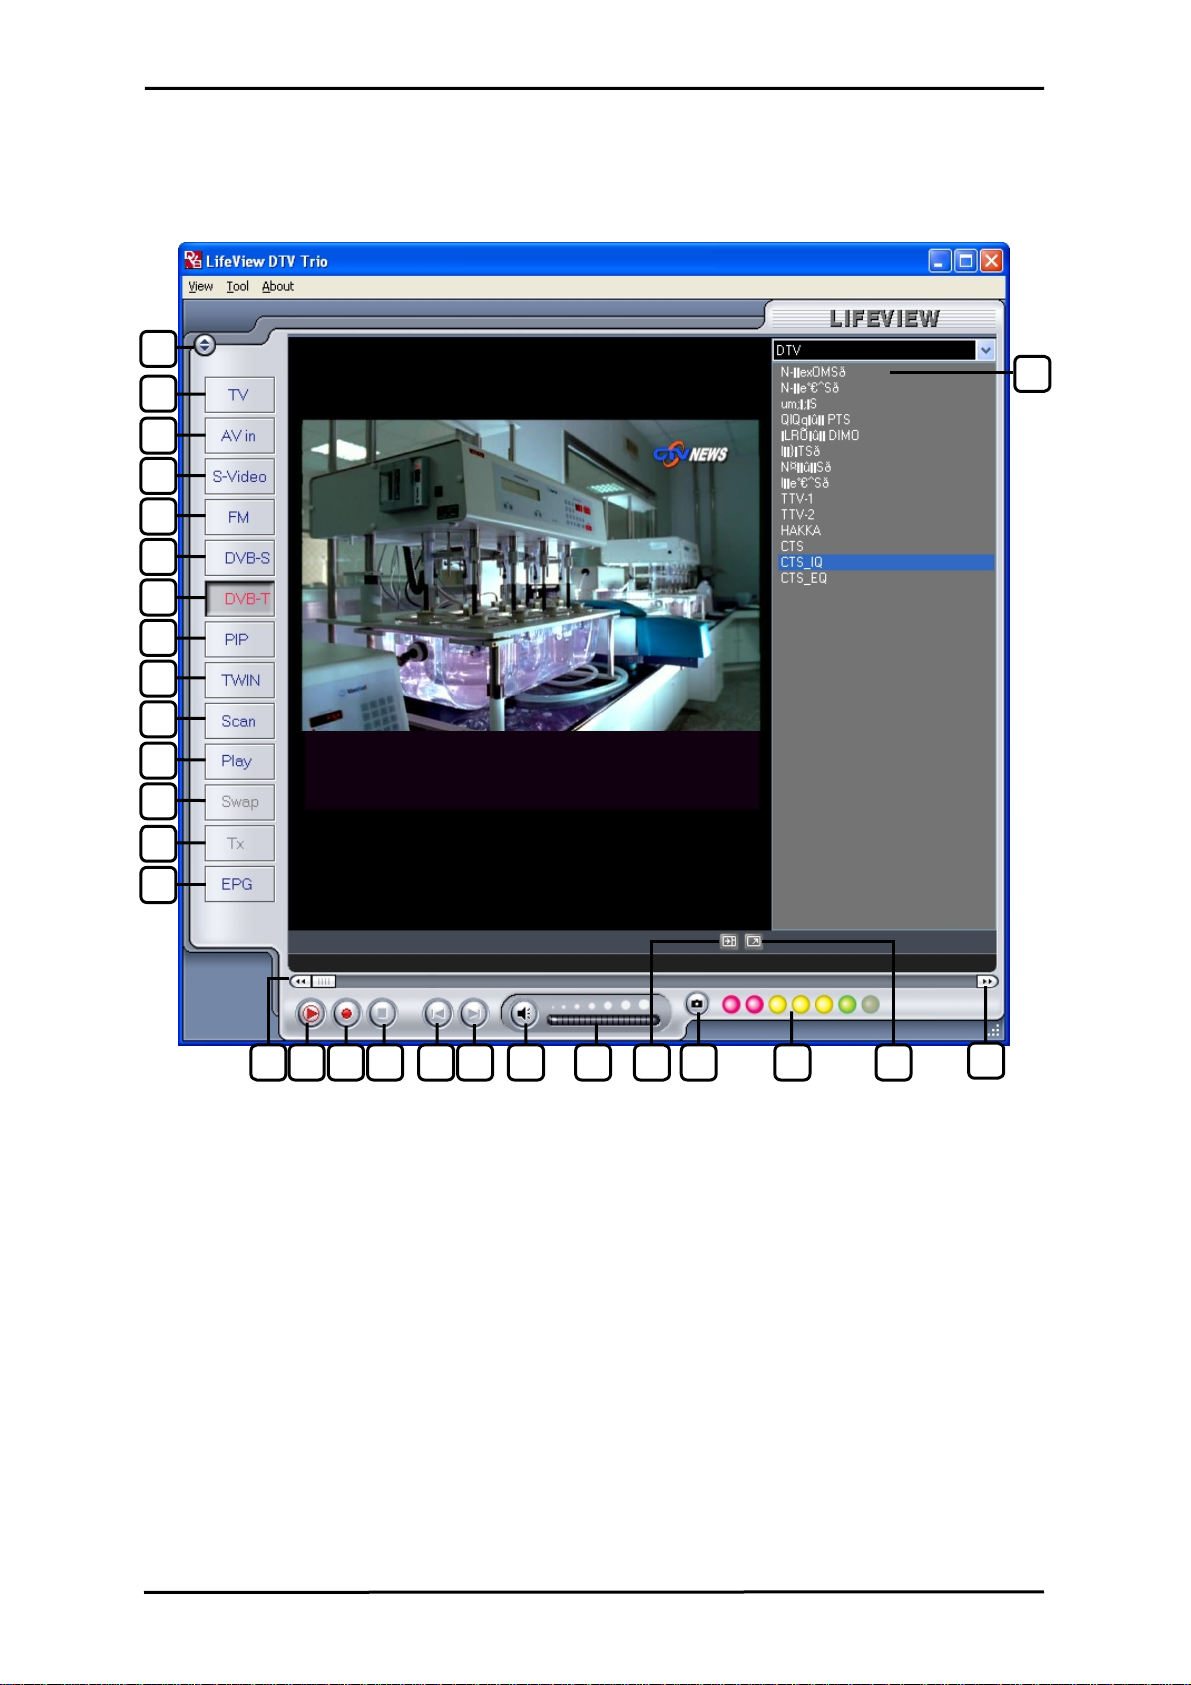
4.1 DTV Interface Overview
1
2
3
4
5
6
7
8
28
9
10
11
12
13
14
15 16 17 18 19 20 21 22 24 26 23 25
1. Change Skin 15. Rewind
2. Switch to Analog TV 16. TimeShift Start/Play/Pause
3. Switch to composite video in 17. Record Start
4. Switch to S-Video in 18. Stop
5. Switch to FM Radio (FM models) 19. Skip to beginning
6. Switch to DVB-S TV 20. Skip to end
7. Switch to DVB-T TV 21. Mute on/off
8. Start/Stop PIP mode 22. Volume bar
9. Start/Stop Twin mode 23. Show/hide channel list
10. Open Scan settings 24. Snapshot button
11. Switch to Play mode 25. Signal Strength Meter
12. Swap main and second window
(in PIP mode)
13. Teletext 27. Fast Forward
14. Open EPG window 28. Channel list
26. Toggle fullscreen/windowed viewing mode
27
8

LifeView DTV
4.2 Scanning for TV Channels (DVB-S)
Before you can watch DVB-S digital TV,
you have to scan for available channels
in your area.
First, select DVB-S as your source.
Before you can watch digital TV, you
have to scan for available channels in
your area.
On the Menu Bar, click on Tool, then click
on Scan. You can also click on the Scan
button on the left side of the screen.
4.2.1 Receiving Setup
Here you can change settings to adjust your reception of digital TV. Choose your
Satellite Position, Local Oscillator Low Frequency, Local Oscillator High
Frequency, and Local Oscillator Switch based on the specifications of your LNB.
You can find these settings either in the LNB manual, or on a sticker on the LNB itself.
You can also choose a preset LNB setting from the drop down list.
9
LifeView DTV
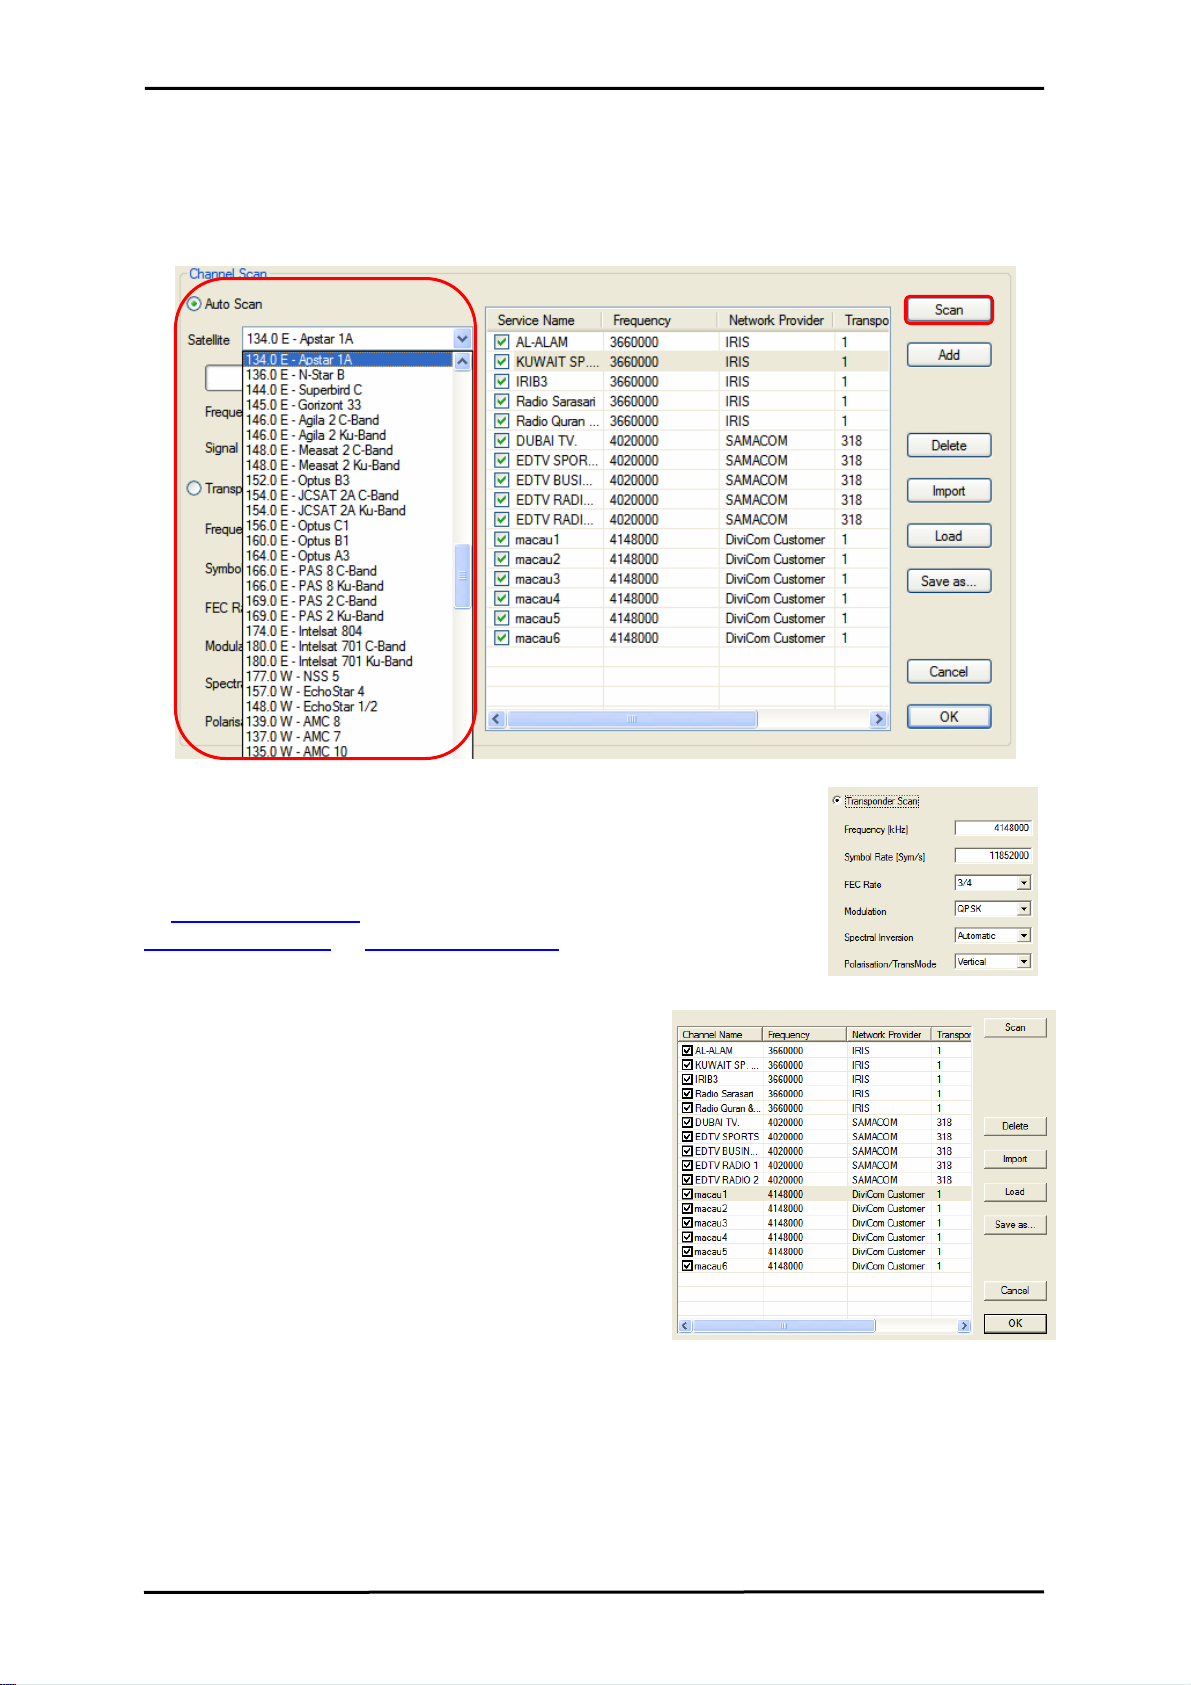
4.2.2 Channel Scanning
Select a satellite position and a corresponding satellite from the drop-down list, and
click on the Scan button.
If you have successfully scanned a satellite and wish to add
another transponder type, click on the Transponder Scan
button, enter the settings of the transponder, then click Scan.
Updated frequencies will be available regularly on our website
at www.lifeview.com. You can also find information at
www.lyngsat.com or www.satcodx.com.
Found channels will be displayed in a window,
and here you can customize your channel list.
You can sort your channel list by Channel
Name, Frequency, Network Provider,
Transponder ID, and Audio type by clicking on
the button at the top of each column. Clicking on
the name of a channel will give you the option to
rename it, and clicking on the Language (under
Audio) will let you select between available
Languages. You can uncheck a channel so it
does not appear in your channel list, or you can
select it and click Delete to remove the channel
entirely. You can also import channel lists into
your current list by clicking Import, you can load
another channel list by clicking Load, and you can
save your channel list by clicking Save As… To
save your changes, click OK. To cancel your
changes, click Cancel.
10

LifeView DTV
4.3 Scanning for TV Channels (DVB-T)
Before you can watch DVB-T
digital TV, you have to scan for
available channels in your area.
First, select DVB-T as your
source. On the Menu Bar, click
on Tool, then click on Scan.
You can also click on the Scan
button on the left side of the
screen.
Receiving Setup:
This shows the current reception standards the DTV application is set to.
Services Information:
This shows information about the currently selected channel when available. During a
scan, this will show information on the status of the scan
Channel Scan:
There are two ways to scan for available channels, Auto Scan and Transponder Scan.
1. Auto Scan:
Select Auto Scan, then select your country
from the drop-down box and click Scan.
2. Transponder Scan:
If you want to manually enter a frequency,
select Transponder Scan, type in the
Frequency in kHz and click Scan.
11

LifeView DTV
Found channels will be displayed in a
window, and here you can customize
your channel list.
You can sort your channel list by
Channel Name, Frequency, Network
Provider, Transponder ID, and Audio
type by clicking on the button at the top
of each column.
You can uncheck a channel so it does
not appear in your channel list, or you
can select it and click Delete to remove
the channel entirely. You can also import
channel lists into your current list by clicking
Import, you can load another channel list
by clicking Load, and you can save your
channel list by clicking Save As… To save
your changes, click OK. To cancel your
changes, click Cancel.
Updates for the region frequencies will be available regularly on the LifeView website
(www.lifeview.com).
12
LifeView DTV
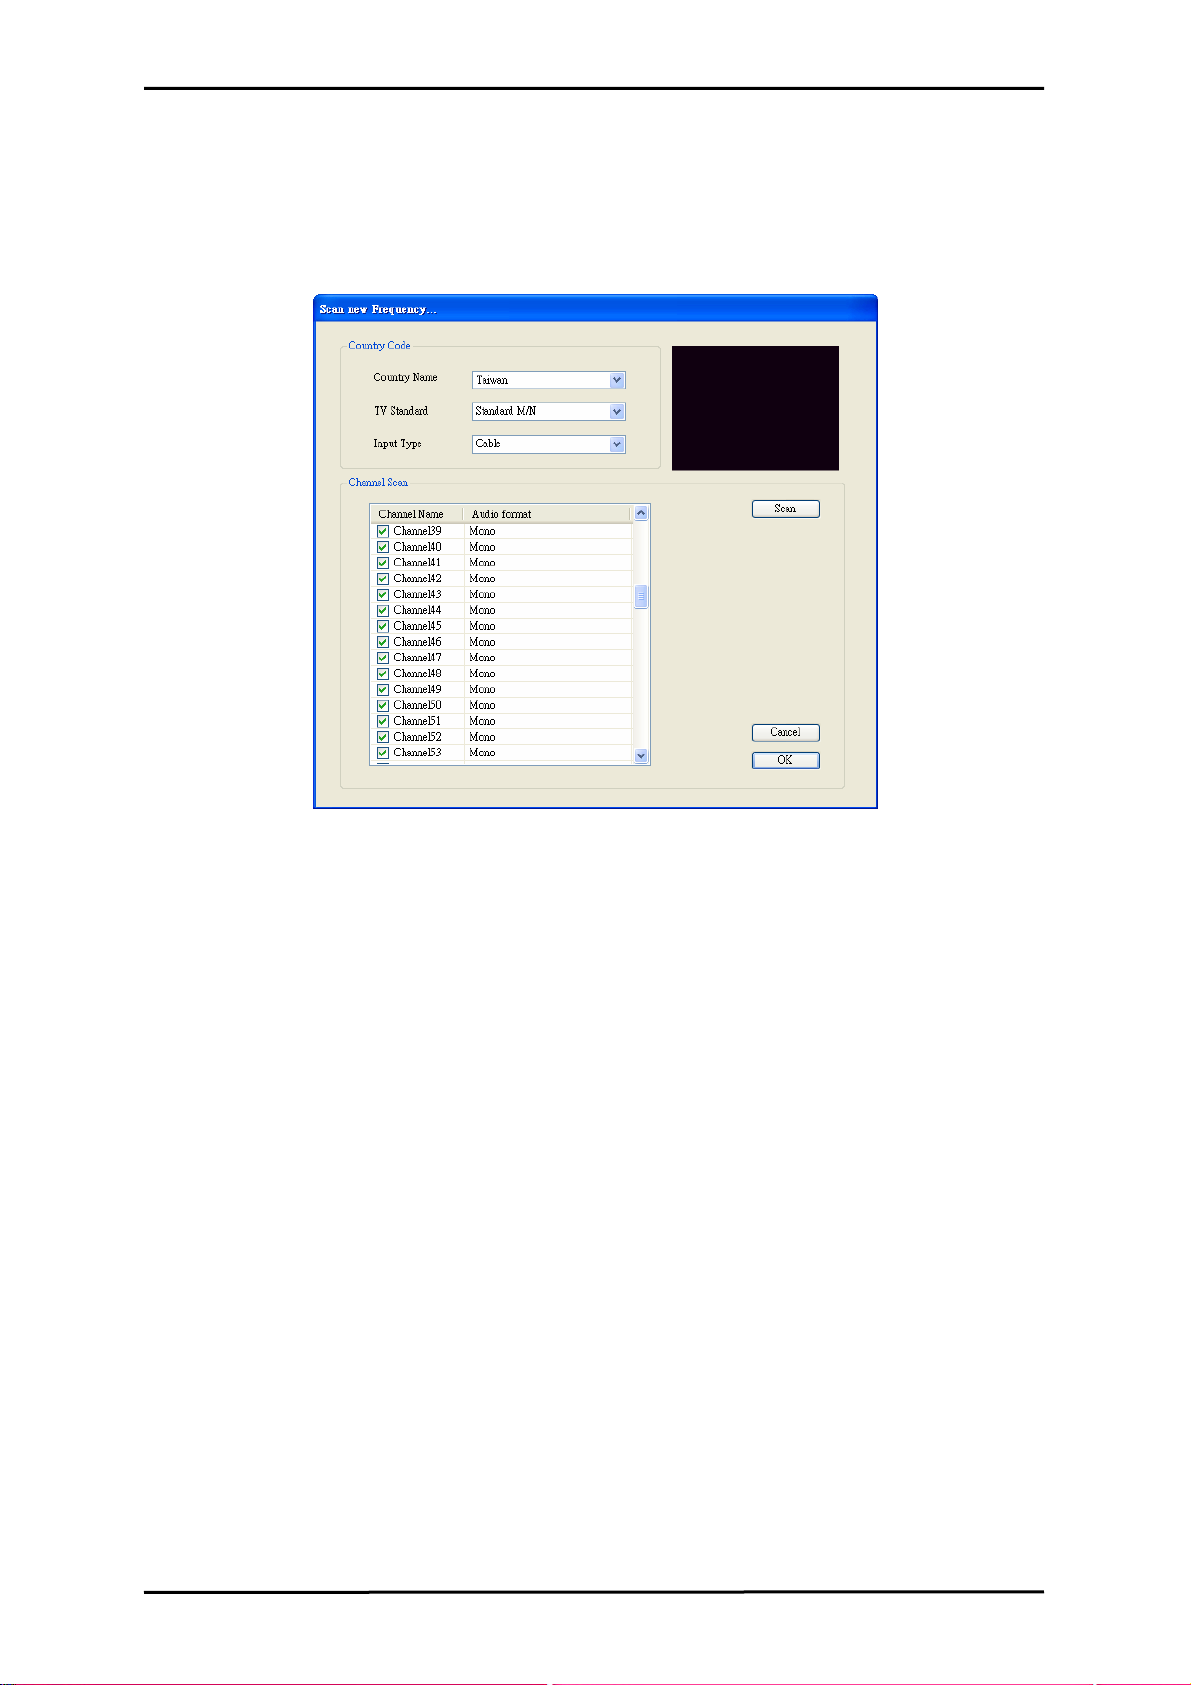
4.4 Scanning and editing channels (Analog)
When in TV mode, choosing Tool then Scan or clicking on the Scan button will open
up the following screen.
Here, click on the Scan button to automatically scan all channels for availability and
remove any bad channels. You can also change your Country to set your TV
Standard, or you can change your TV Standard directly by using the dropdown boxes.
You can also change the Input Type to designate whether you use an antenna(Air) or
cable TV(Cable).
You can also edit your channel list by using the checkboxes next to the channel name
- unchecked channels will be hidden from the channel list. (You will still be able to
switch to the channel by typing in the channel number) Click on the name of the
channel to edit the name that will appear in your channel list. You can also click on the
Audio Format of the channel to choose between MONO or STEREO sound (when
available).
13
LifeView DTV
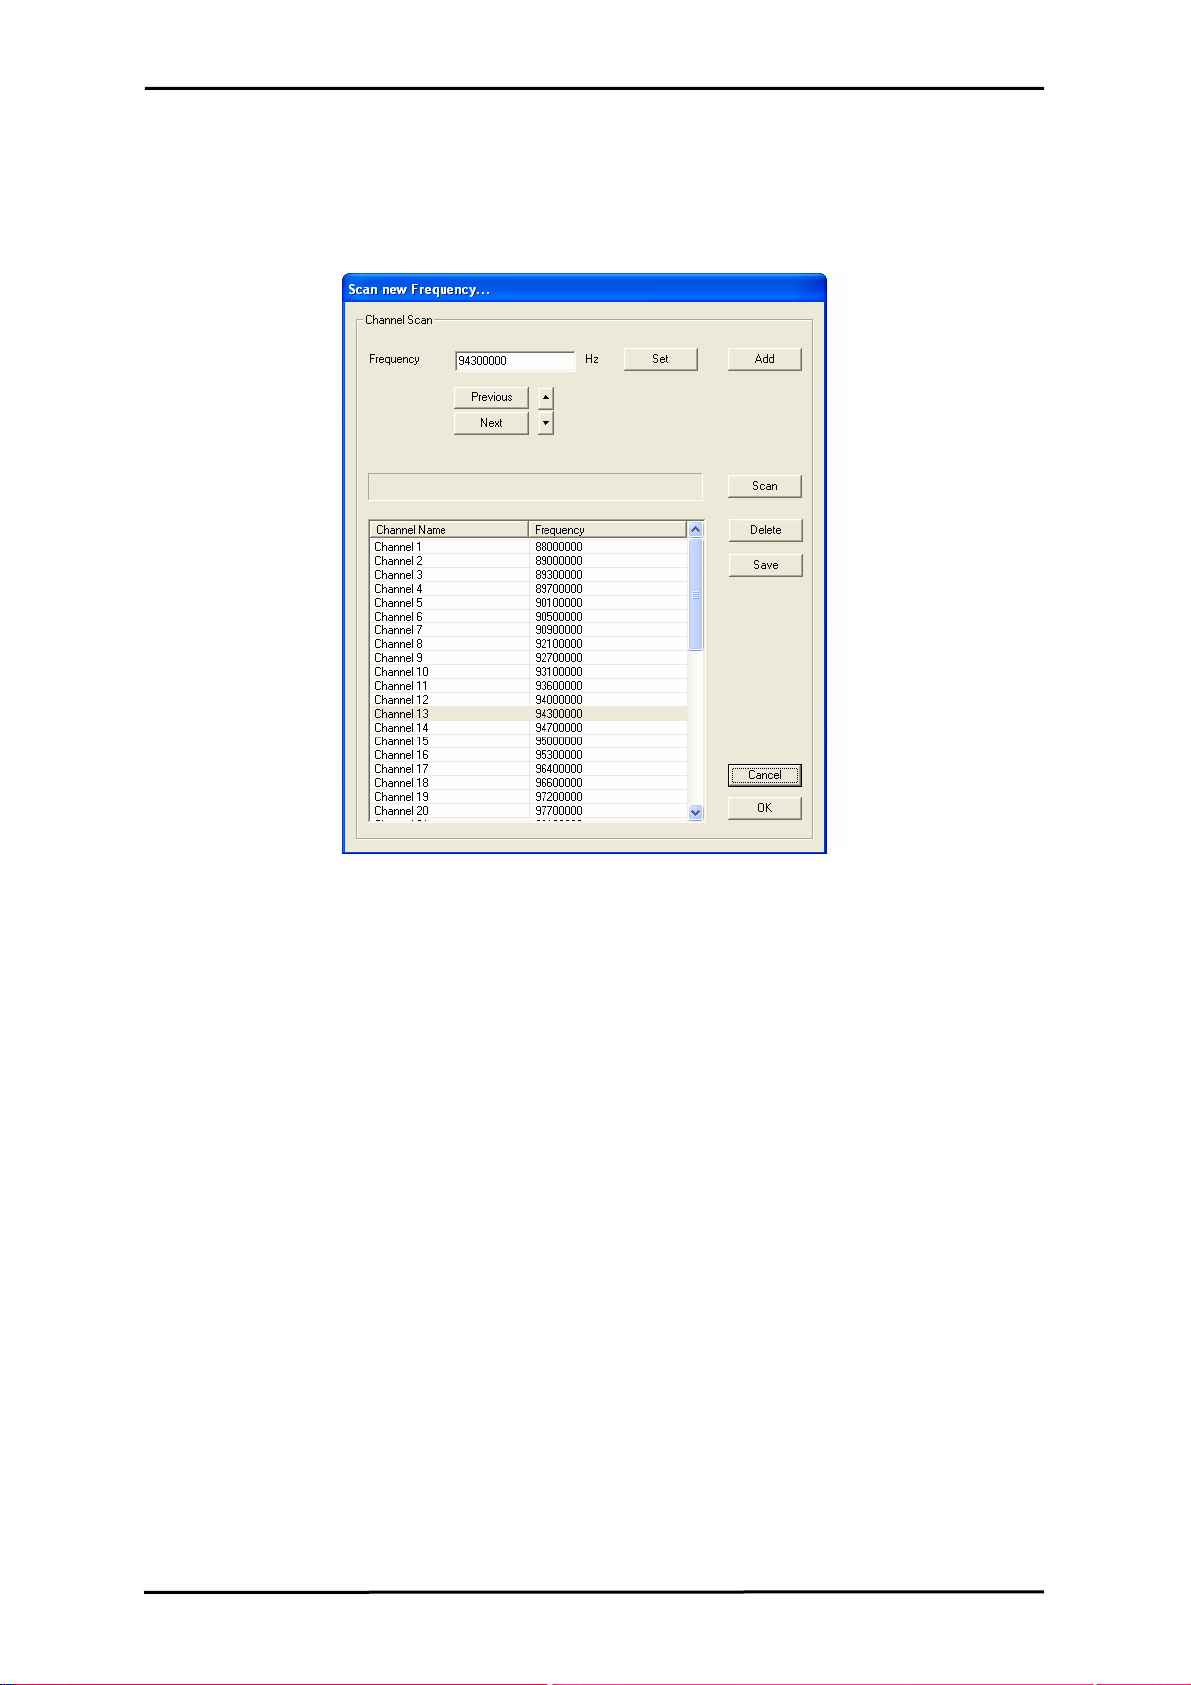
4.5 Scanning for stations (FM Radio) (FM models only)
When in FM mode, choosing Tool then Scan or clicking on the Scan button will open
up the following screen.
To begin a full autoscan for radio stations, click the Scan button. The process will take
a couple minutes; you can stop the scan by clicking Stop. You can also manually
enter a frequency by clicking on Set to tune to that frequency and then clicking on Add
to add the frequency to your station list. Clicking on Previous or Next will autoscan to
the previous or next station, and the ▲ and ▼ buttons will fine tune the frequencies.
You can rename a station by selecting it and clicking on its name. To take stations out
of your list, select it and click on Delete. To save your changes, click on Save or OK;
to cancel your changes, click on Cancel.
14
LifeView DTV
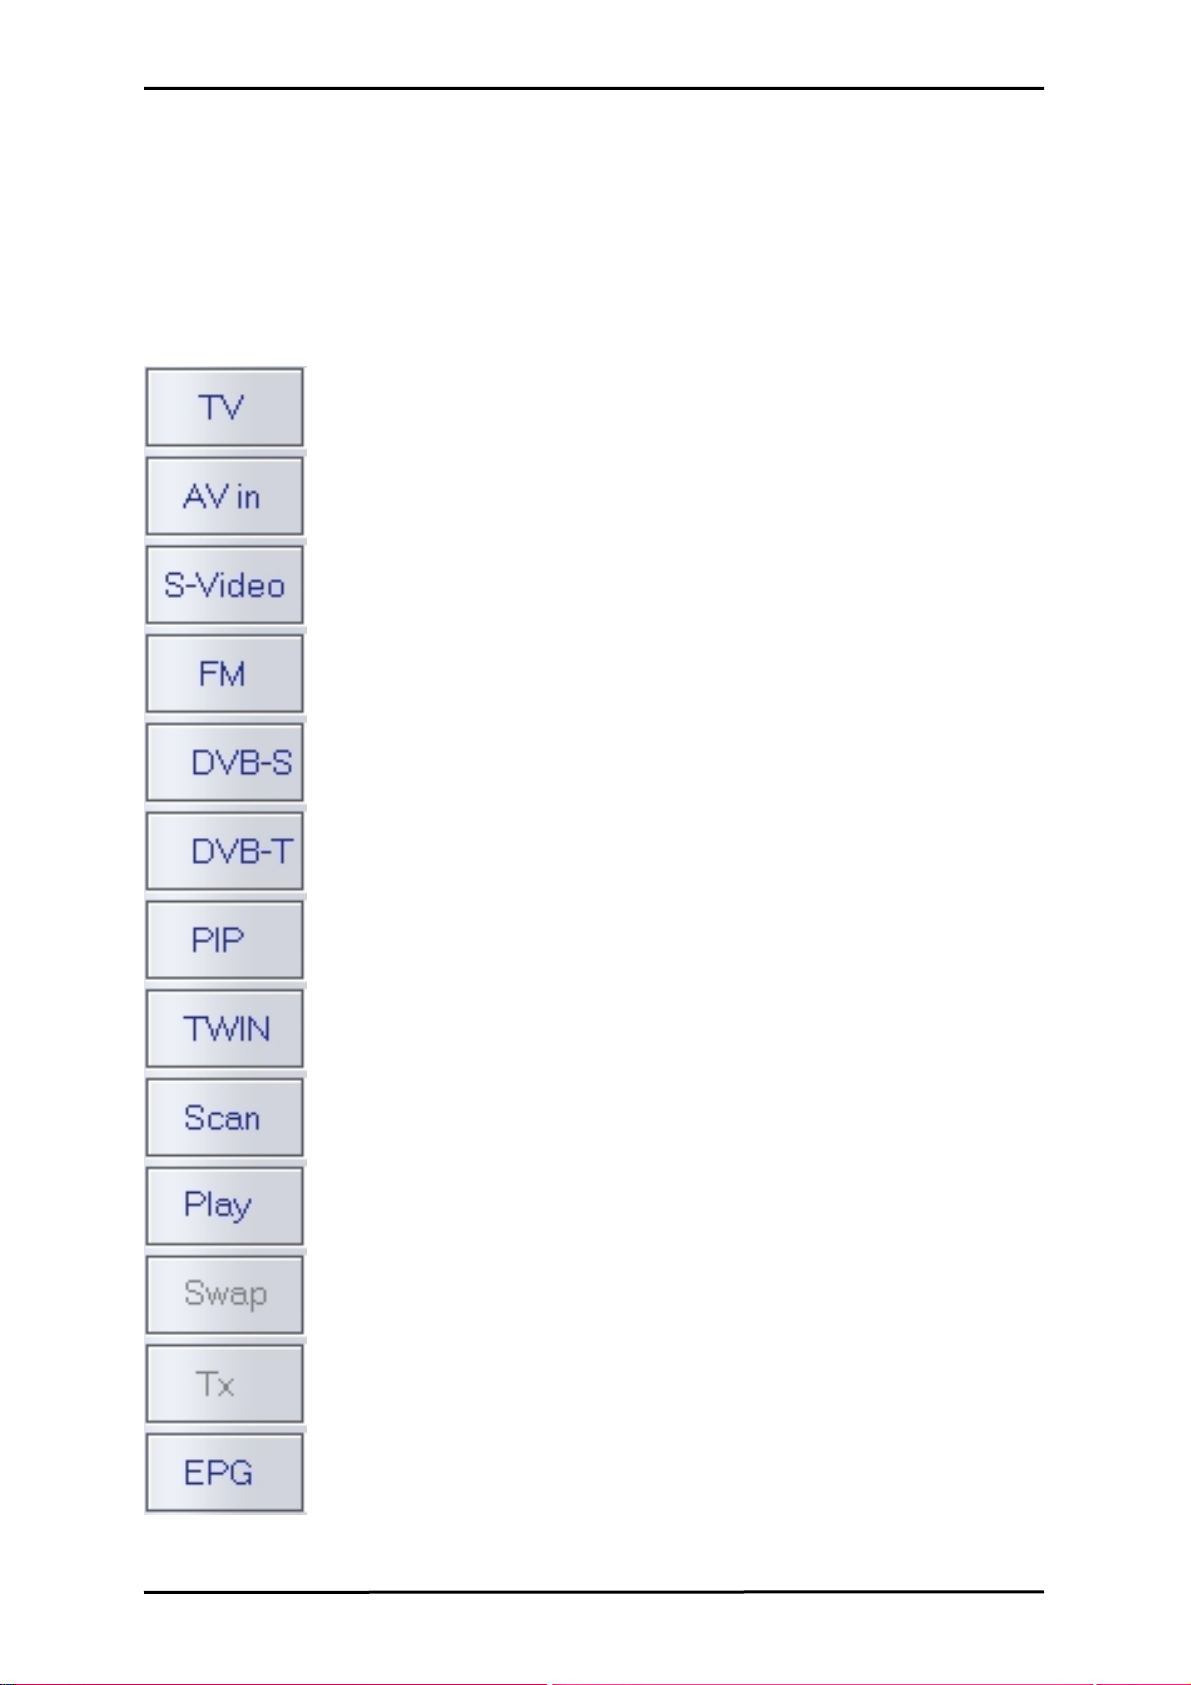
4.6 Choosing your source
Your FlyDVB Trio is not limited to digital TV reception – you can also view analog
sources.
On the left side of the interface, you will find buttons that let you access different
sources.
Switches to Analog TV reception
Switches to an external device connected to the composite video
input
Switches to an external device connected to the S-Video input
Switches to FM radio (FM models only)
Switches to digital satellite TV (DVB-S)
Switches to digital terrestrial TV (DVB-T)
Turns on and off PIP Mode, which lets you watch both digital TV and
an analog input at the same time in separate windows
Turns on and off Twin Mode, which lets you watch digital TV and an
analog input at the same time side by side
Brings up the Scan Settings dialog
Enters Play Mode, and lets you view snapshots you have taken and
watch video you have captured
Swaps video between the main window and second window (in PIP
or Twin mode)
Opens Teletext window (when available)
Opens EPG window
15
LifeView DTV
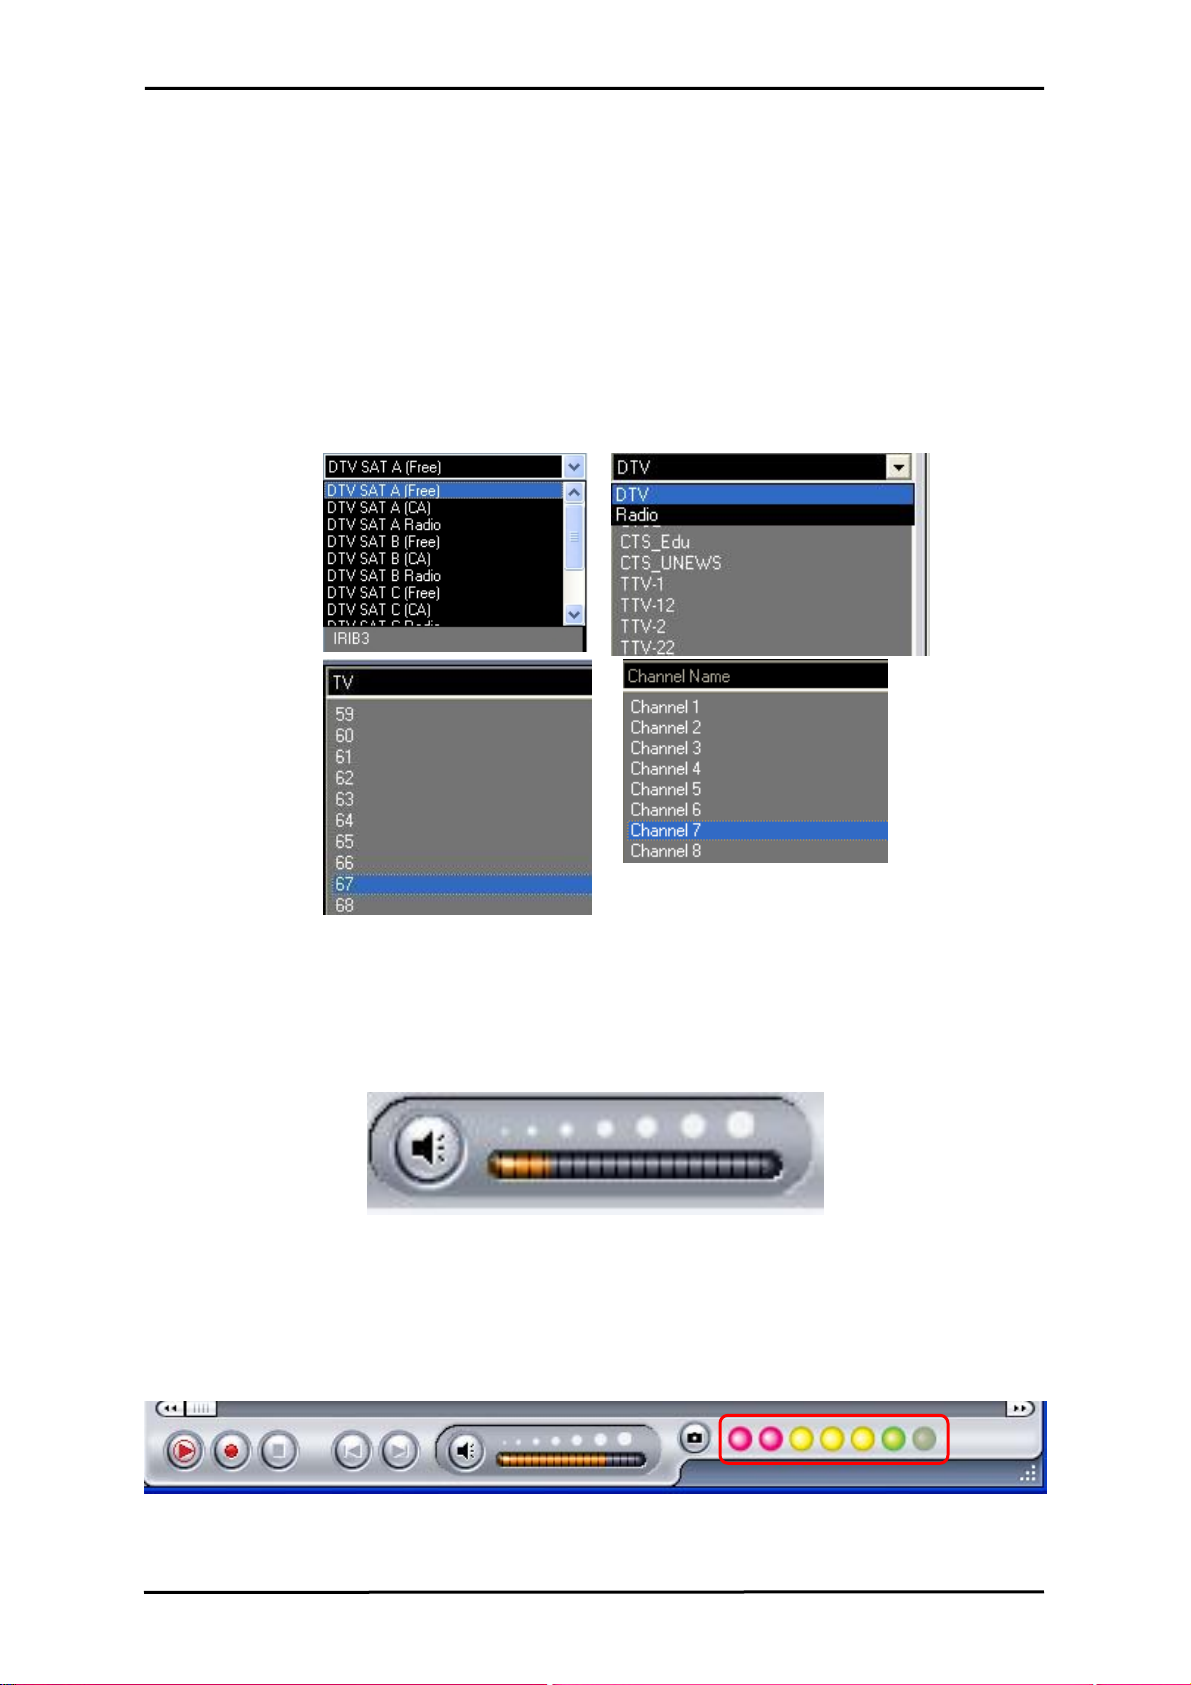
4.7 Channel list
On the right side of the interface is the channel list. Here you will see available
channels for DVB if you are in DVB mode, and TV channels if you are in TV mode.
Simply click on a channel to switch to it, or press the K or L arrow keys to switch
channels. In DVB-S mode, you can select between different satellite position lists for
Free, CA and Radio broadcasts. In DVB-T mode, you can select DVB Radio by
clicking on the dropdown box and choosing Radio. Right-clicking on a channel will
give you the option to sort the list by Name, Frequency, Network Provider, or
Transponder ID (DVB TV). In TV Mode you will see your scanned channels, and in FM
Radio mode, your radio stations will be listed. (FM models only)
4.8 Volume controls
At the bottom of the interface is the volume bar. Click on the bar to set the volume to
that level, or press the I or J arrow keys to decrease or increase the volume. Click
on the speaker icon to mute the audio.
4.9 Signal Strength Meter
The signal strength meter indicates how strong the signal is for the current channel.
Green lights indicate good reception, yellow lights indicate fair reception, and red lights
indicate poor reception.
16
LifeView DTV
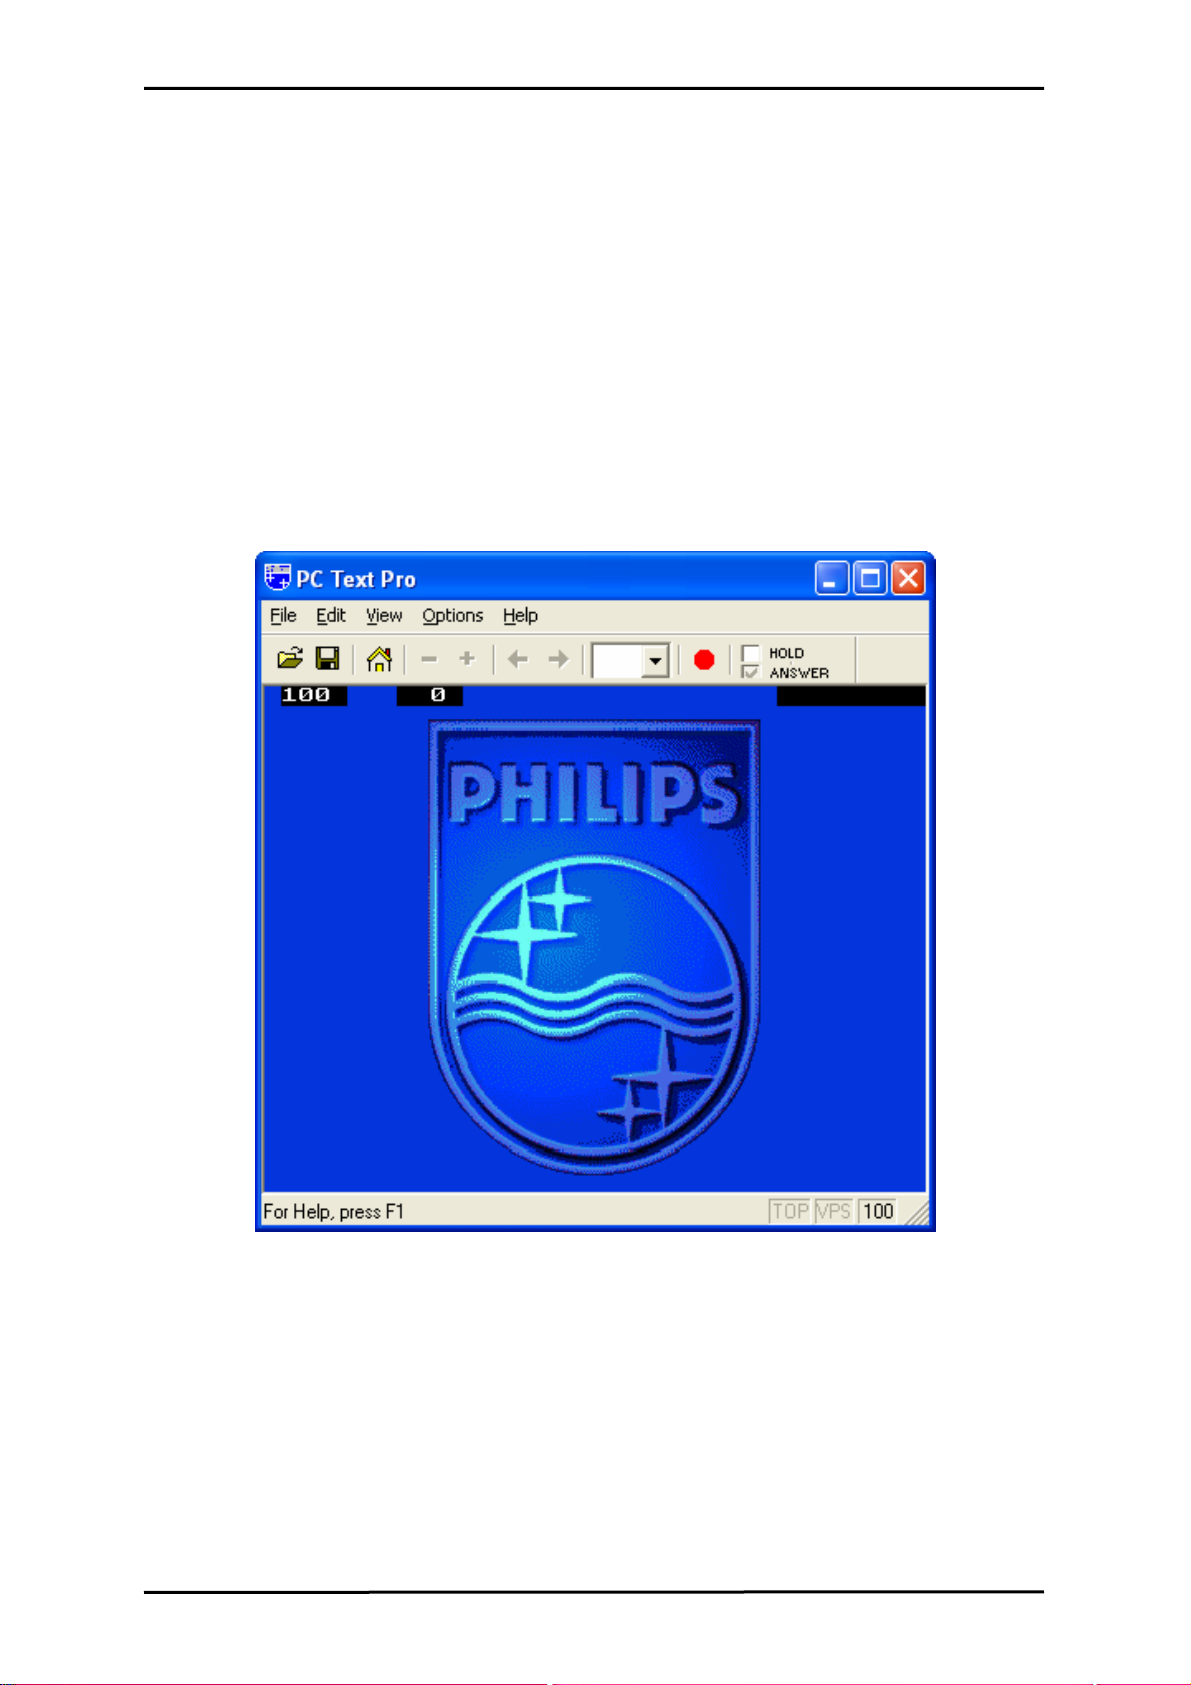
4.10 Teletext
Simply clicking the Tx button opens the Teletext window. Not all TV stations provide
Teletext service. Everyday, however, competent editorial offices provide a selection of
quickly and easily accessible information, which you can access for free, since it is
constantly transferred along with the TV picture via the so-called vertical blanking
interval of the picture signal. Surfing through the pages is conveniently easy thanks to
the preloaded text tables. Use the arrow buttons (on the software interface, the PC
keyboard or the remote control) to navigate from one page to another or enter a page
number directly. You can also click a page reference directly to call up its content,
practically with no delay.
For further information about using Teletext, click on Help at the top right of your
screen to read the Help file.
17
LifeView DTV
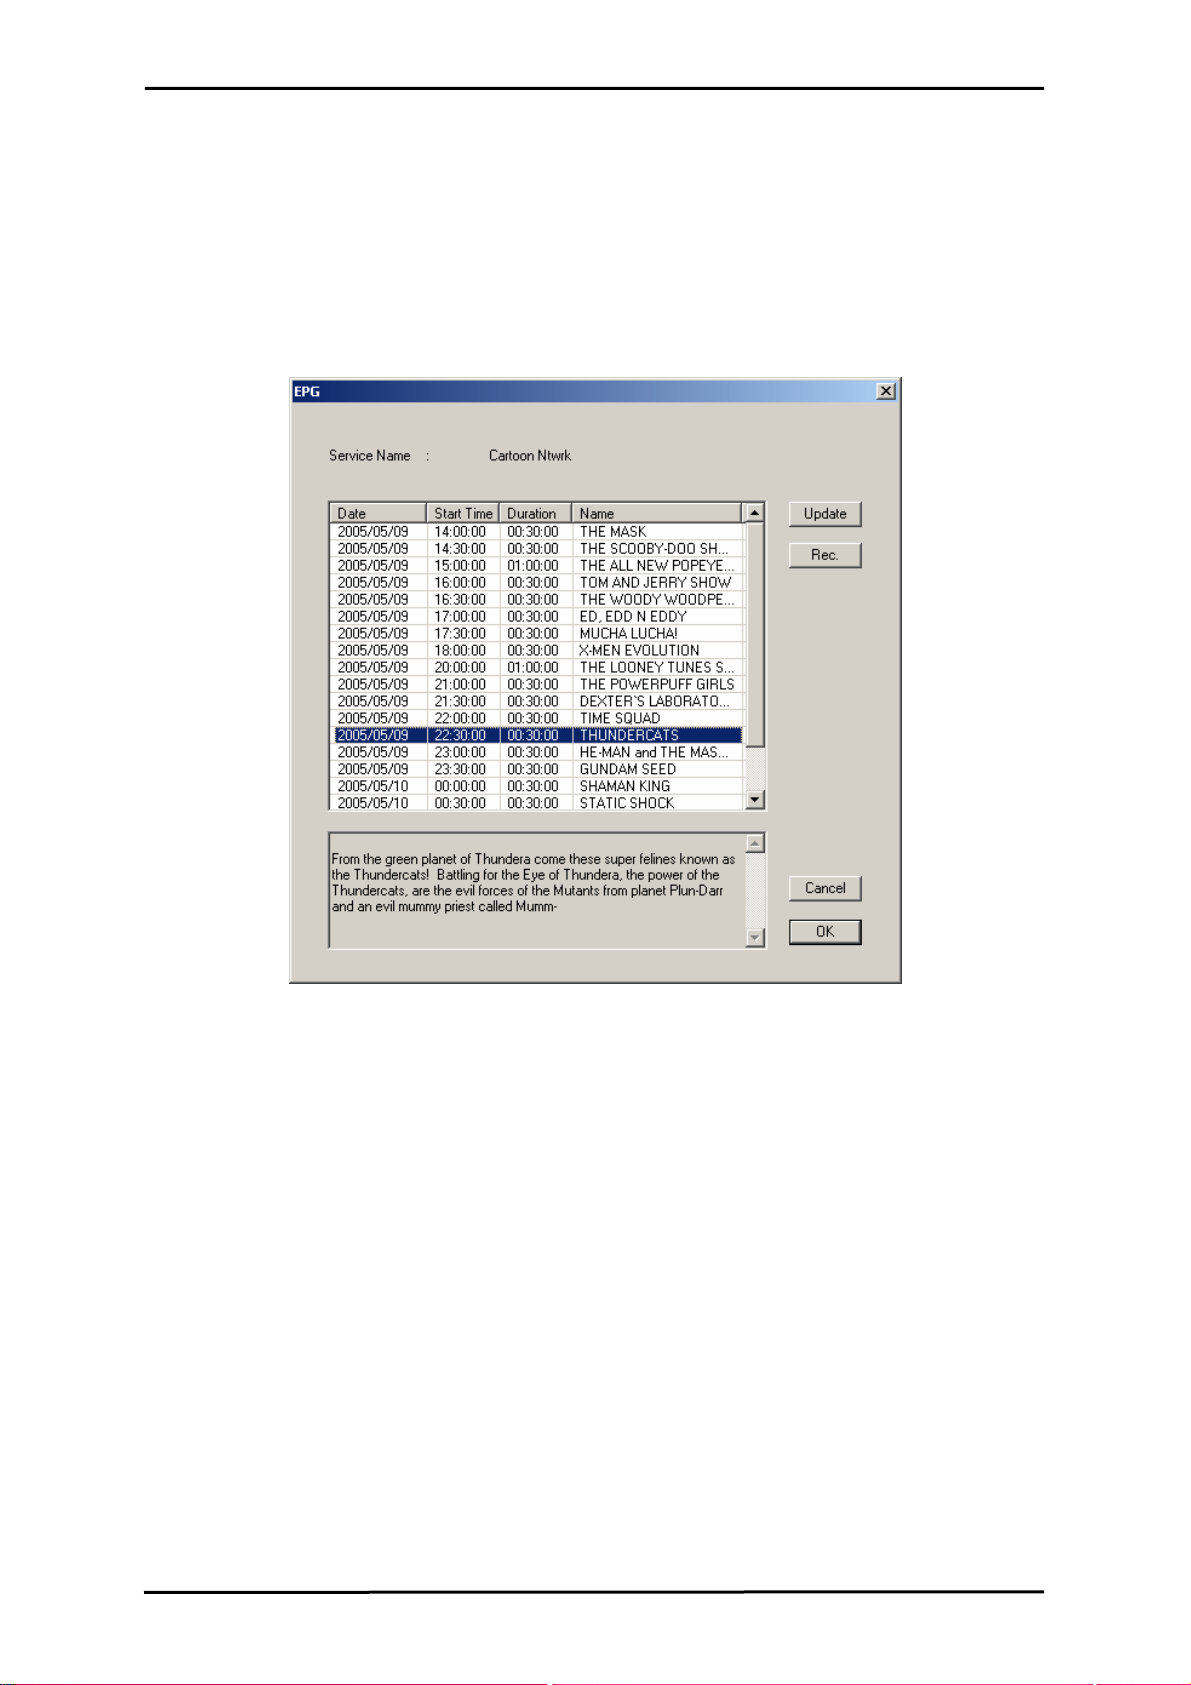
4.11 EPG
Digital TV stations often broadcast Electonic Program Guide, or EPG information.
This information includes information about upcoming programs and their playing
times, and can be used to see what shows will be playing later in the day and record
them.
Click the EPG button to open the EPG window:
Click on Update to update the EPG information. Date, start time, duration and
program name will appear in the table. Selecting an entry will show extended
information about the program(if available).
Clicking on Rec. will schedule a recording of that program automatically using the
EPG information – you can use this to easily schedule recordings of your favorite
programs.
18
Settings
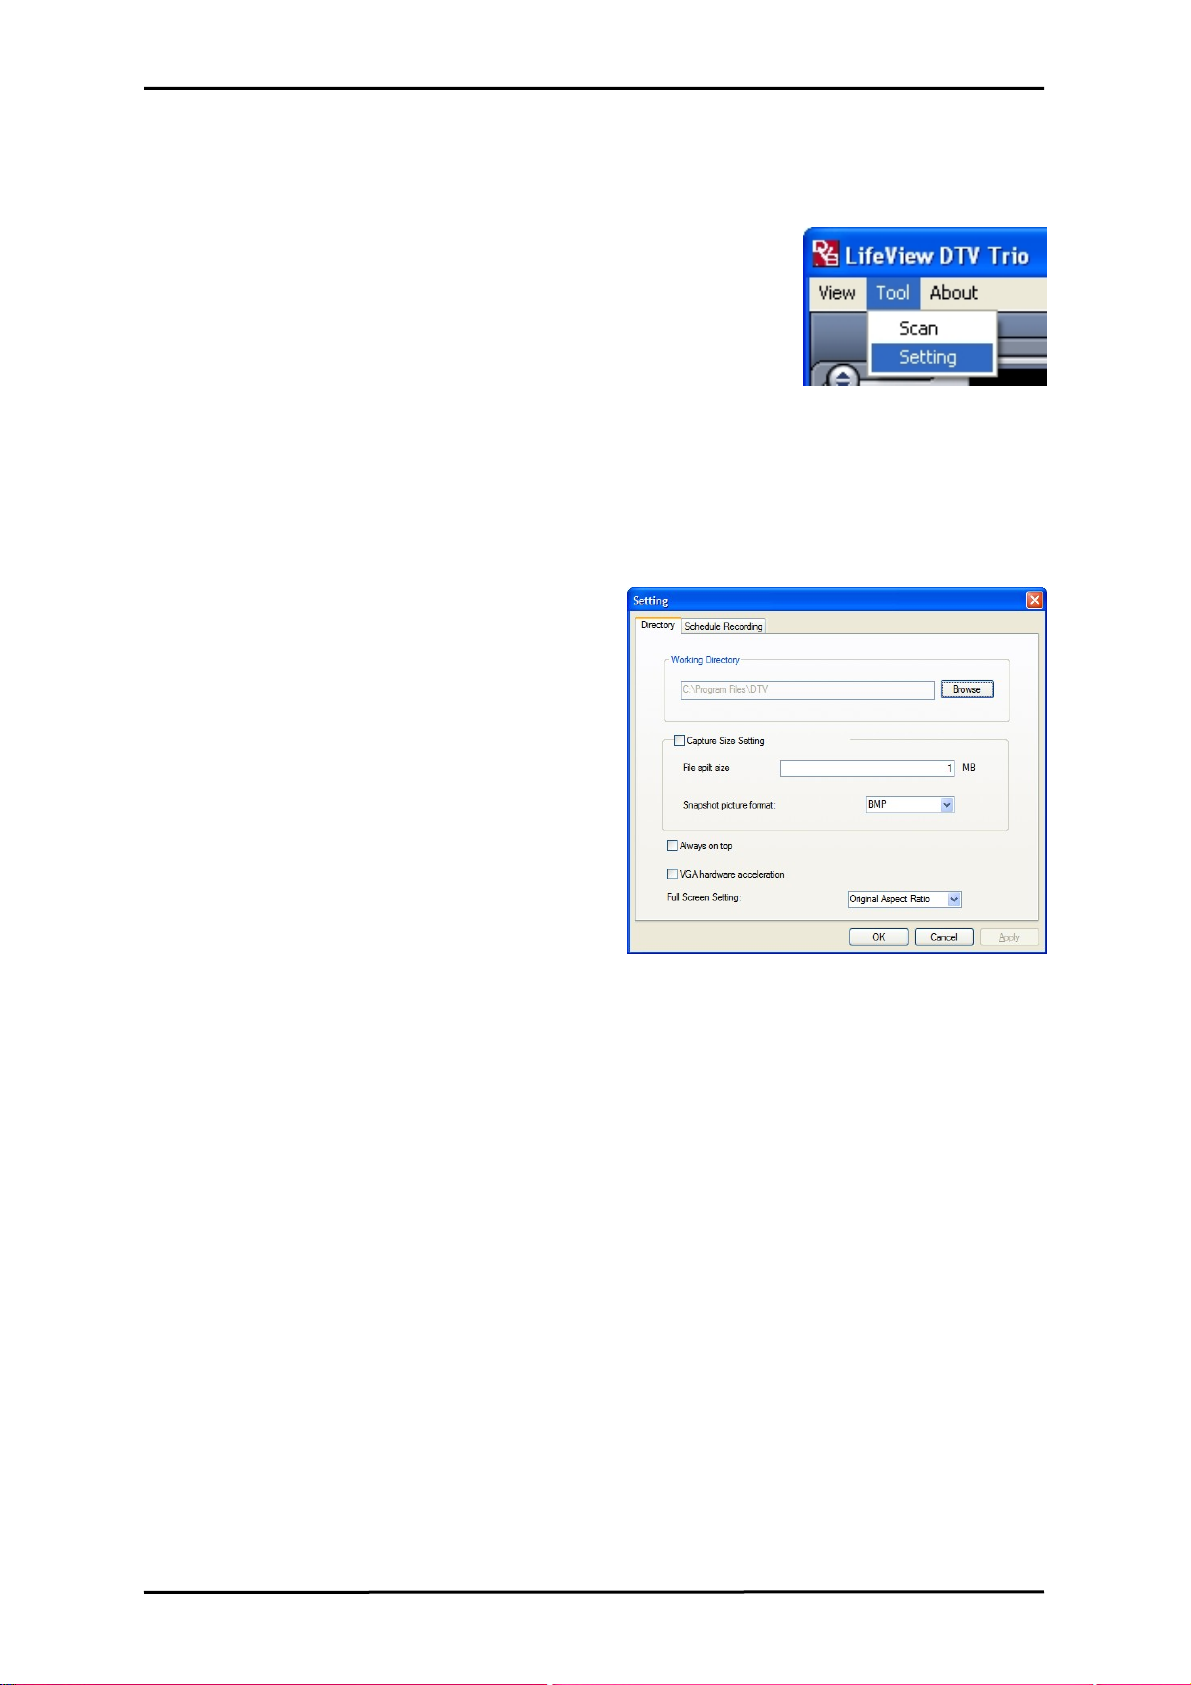
5. Settings
To access the Setting window, on the menu bar, click on
Tools -> Setting.
Depending on your current source, there will be different
settings available to you.
5.1 DVB Settings
When you have DVB-S or DVB-T as your source, you will see the following options:
5.1.1 Directory Settings
Working Directory
Here you can change the directory used for
saved files. Either type in the path, or click
“Browse”, go to the folder you want, and
click OK.
Capture Size Setting
When checked, this will split recorded files
into parts at the size entered as the File
split size. This is useful if you want to save
long recordings in more manageable files.
For example, setting the file split size to 650
MB would make the files easy to burn to
CDs.
Snapshot picture format lets you choose whether you want to save snapshots as
BMP or JPG files.
Always on top
You can also choose to always have the DTV window on top of other applications by
checking “Always on top”.
VGA hardware acceleration
This enables VGA hardware acceleration. Please note that not all graphics cards
support this feature.
Full Screen Setting
This allows you to choose whether to display video in its original aspect ratio or
stretched to fit your screen when watching TV in full screen mode.
19

Setting
5.1.2 Schedule Recording
Here you find programs scheduled to be
recorded.
Please refer to Chapter 7.3 for a description
how to use Scheduled Recording.
20
Settings
5.2 Analog TV/Video Settings (TV/AV-In/S-Video)
If your current source is TV, AV-in, or S-Video, you will see the following options:
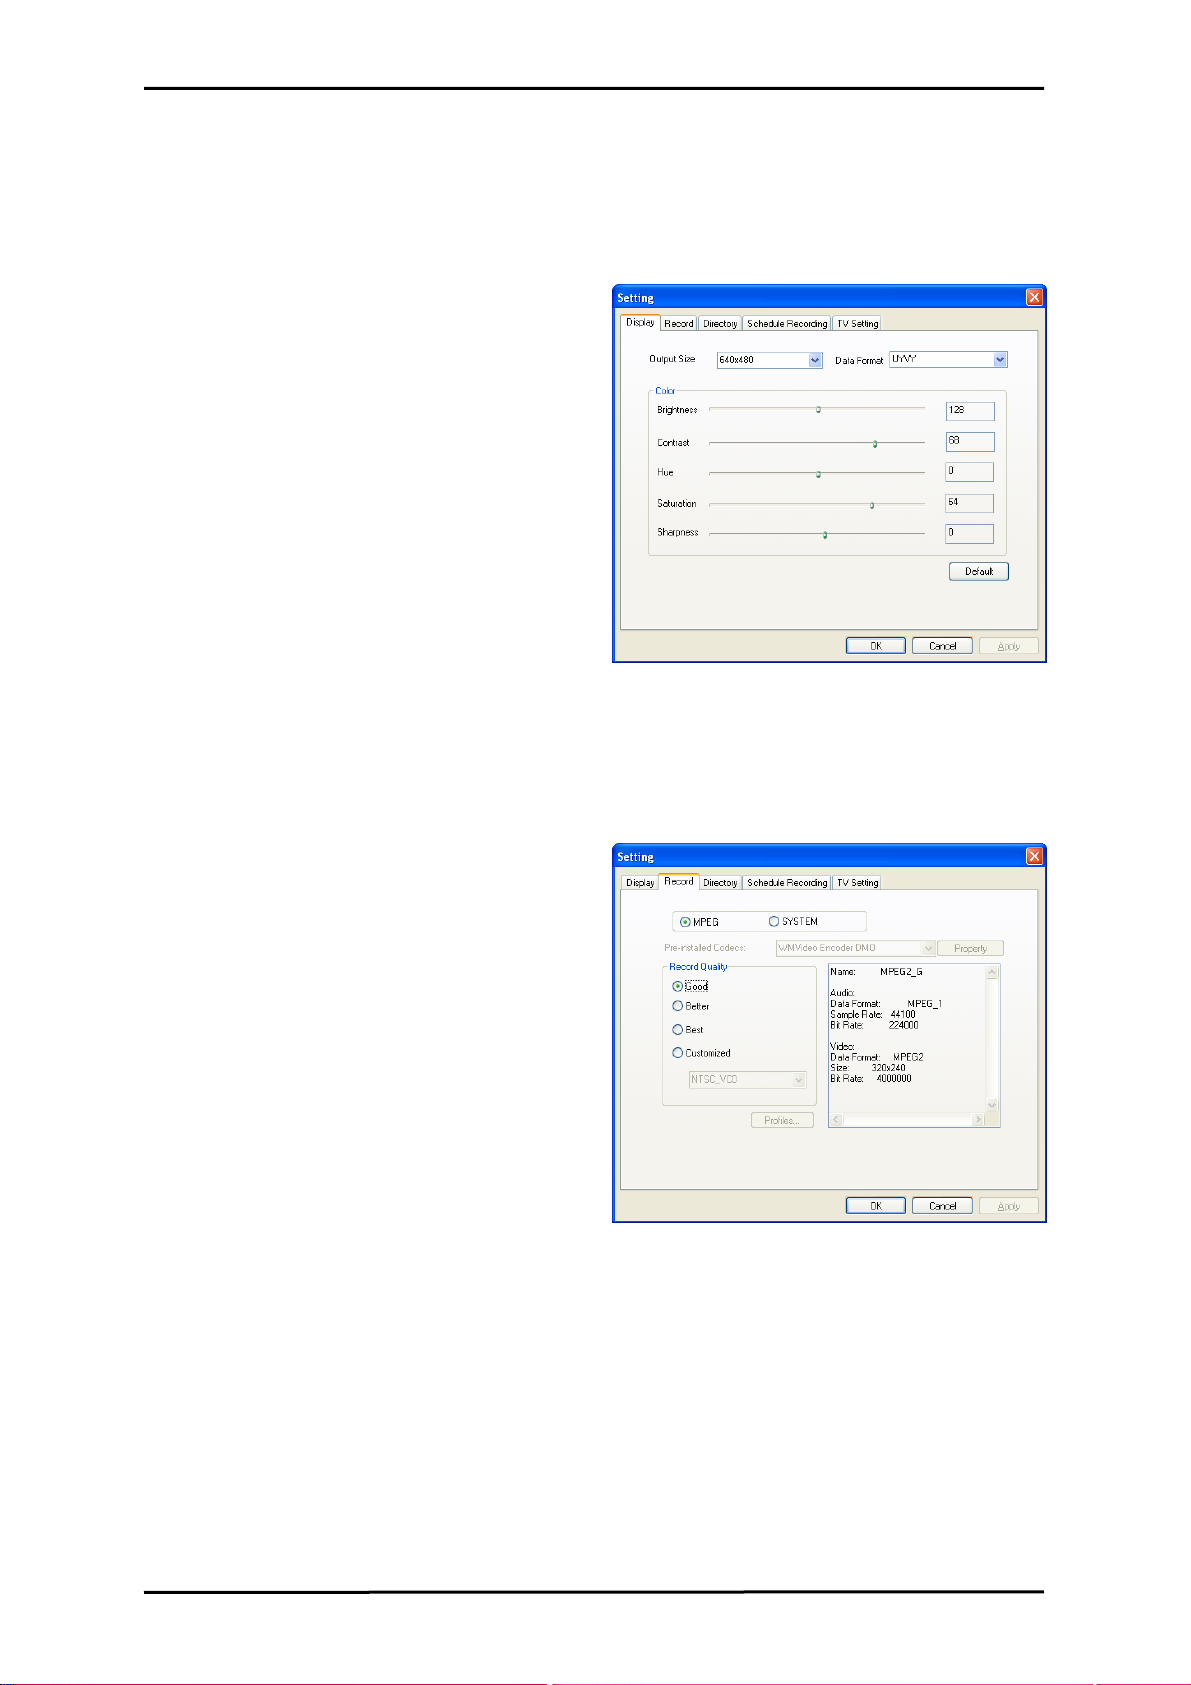
5.2.1 Display Settings
• Output Size: Here you can specify the
display size of the analog source.
• Data Format: Here you can choose the
data format to display video in.
• Color: Customize here the Color of the
display characteristics like Brightness,
Contrast, Hue, Saturation and
Sharpness.
• Clicking on “Default” will put the
settings back to the factory default.
5.2.2 Record Settings
Record Settings let you adjust how you record files from the AV-in and S-Video
sources.
Record - MPEG:
Here you can define whether you want to
record at Good, Better or Best quality
according to predefined settings.
When you choose Customized, you can
make a custom setting to record with.
You can choose between the following
formats:
• NTSC or PAL MPEG-1
• NTSC or PAL VCD
• NTSC or PAL MPEG-2
• NTSC or PAL SVCD
• NTSC or PAL DVD
21
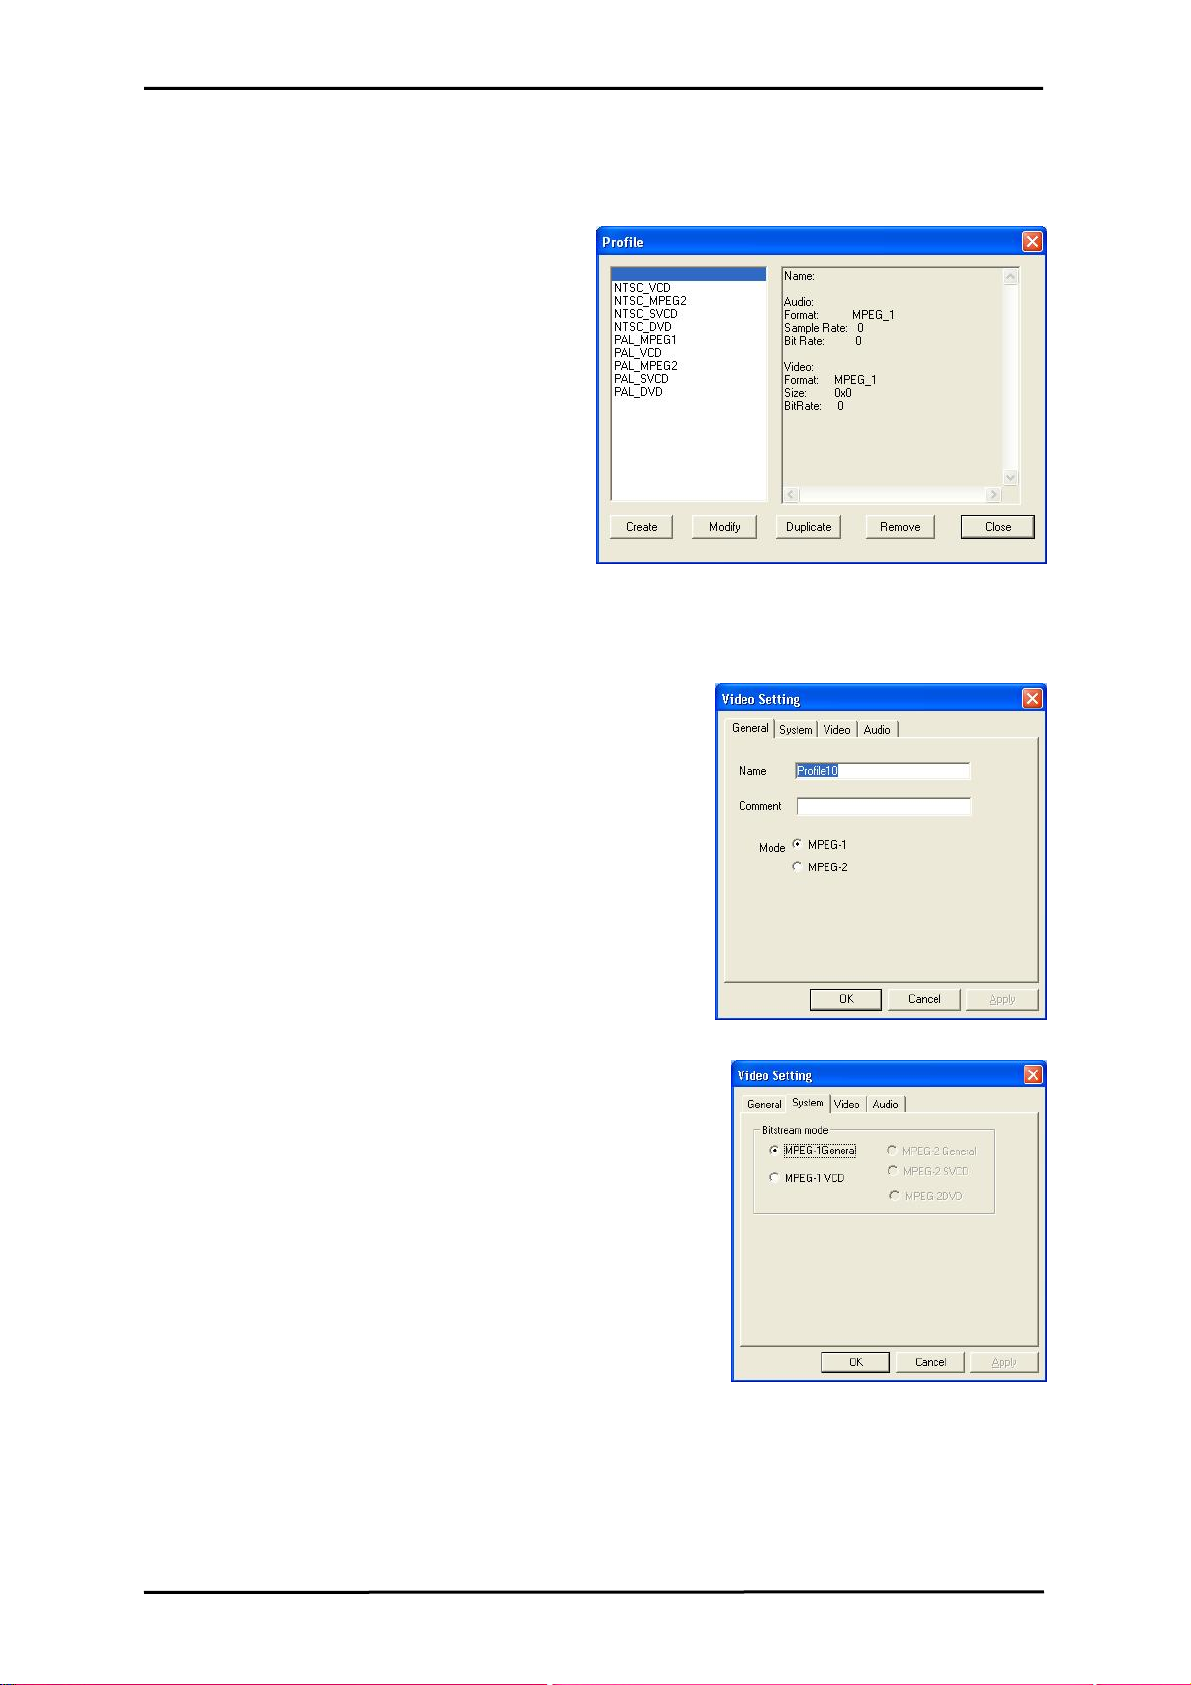
Setting
The Profiles… - Button is also available when Customized is selected, and it opens
the following screen:
Here you can Create a new profile,
Modify an existing one, Duplicate a
profile, and Remove one or all of the
existing profiles.
Create Profile
General:
Here, enter a name for the profile, and a comment to
help identify it. Select MPEG-1 or MPEG-2 to use
with the profile.
System:
Depending on the Mode selected in “General”, select
what Bitstream mode you want to use with the profile.
22
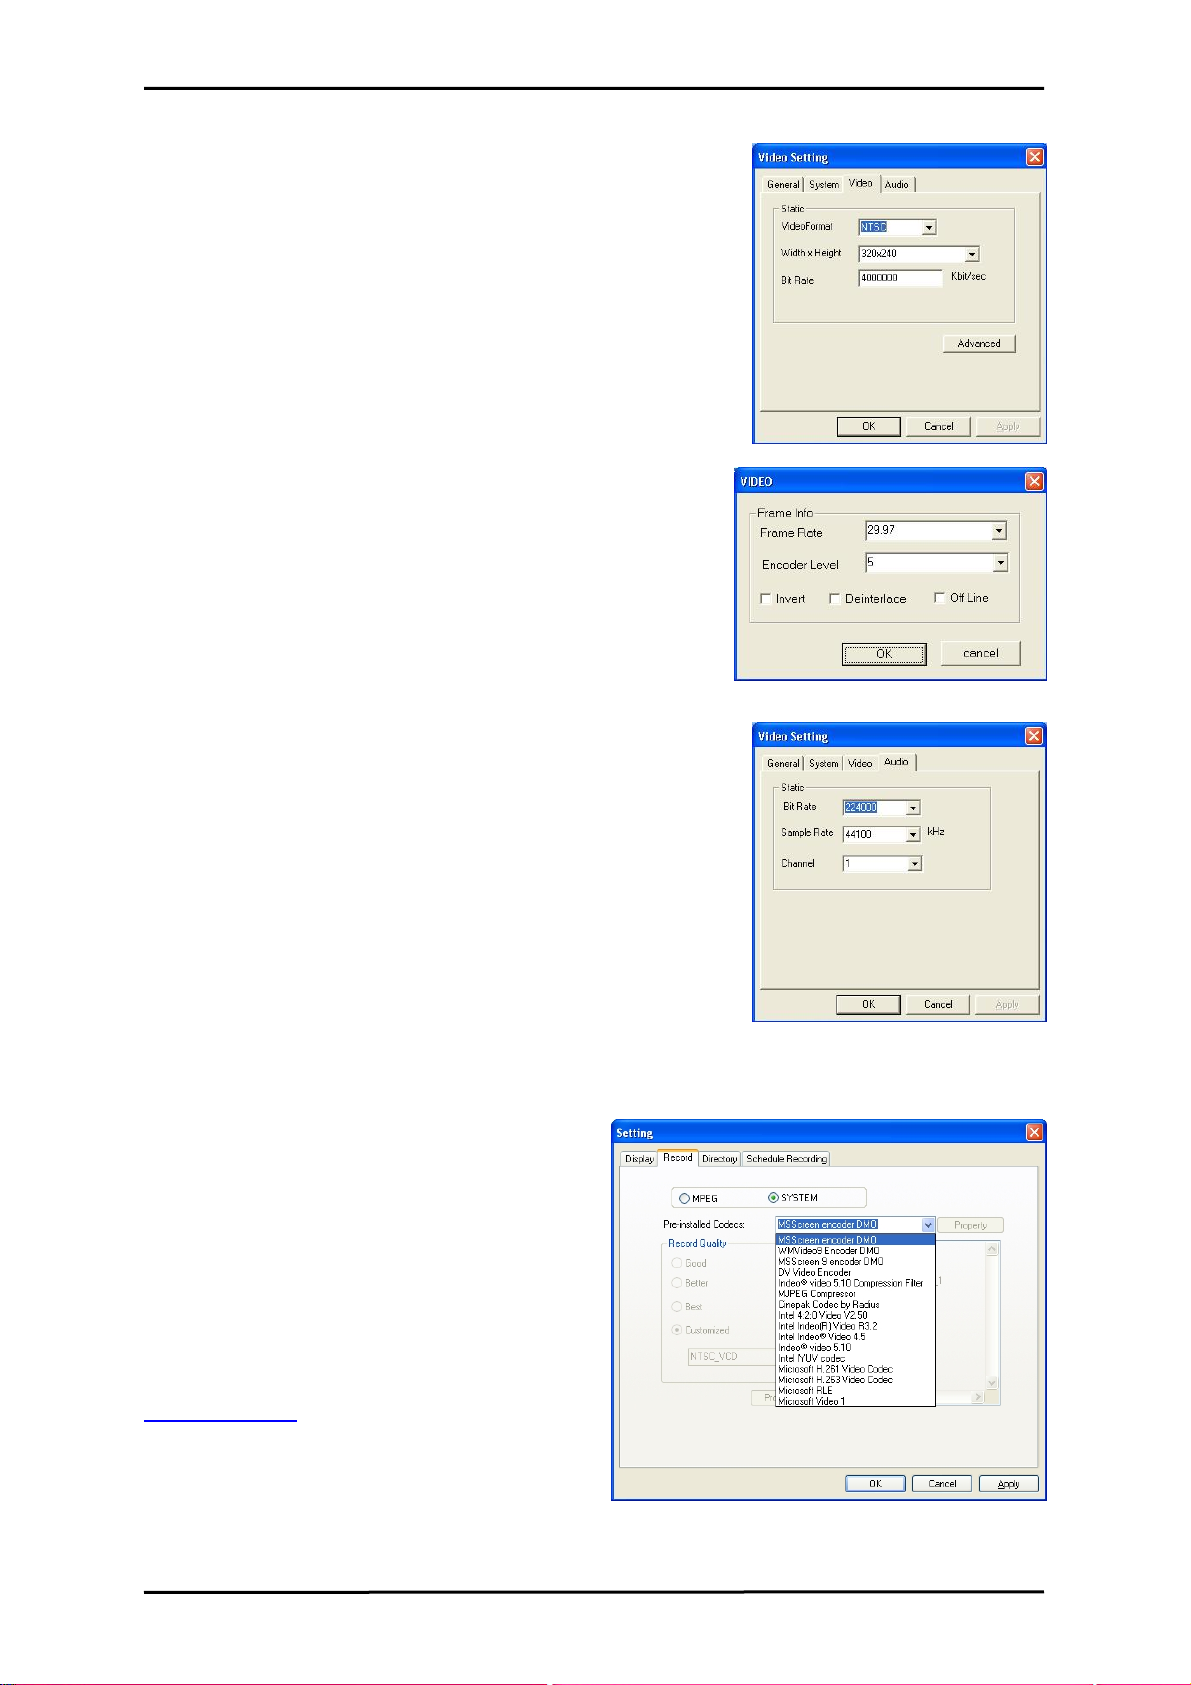
Video:
Here, choose the video format, the output size, and the
Bit Rate you wish to use.
When you click on Advanced, another window will
open where you can select the Frame Rate, the
Encoder level and whether the recording should be
Inverted, Deinterlaced and/or Off Line.
Audio:
Here you can choose the Bit Rate, Sample Rate, and
how many Channels to use for recorded audio.
(1=mono, 2=stereo)
Record – SYSTEM
By selecting SYSTEM in the Record
Setting window, you can access the
codecs already installed in your system.
Depending on the codec, you can access
the properties of the codec, and modify
their settings by clicking on the Property
button. (not available with all codecs)
You can download free codecs from the
internet, such as DivX from
www.divx.com. For support for these
codecs, please contact the codec
manufacturer or search the internet.
Settings
23
Setting
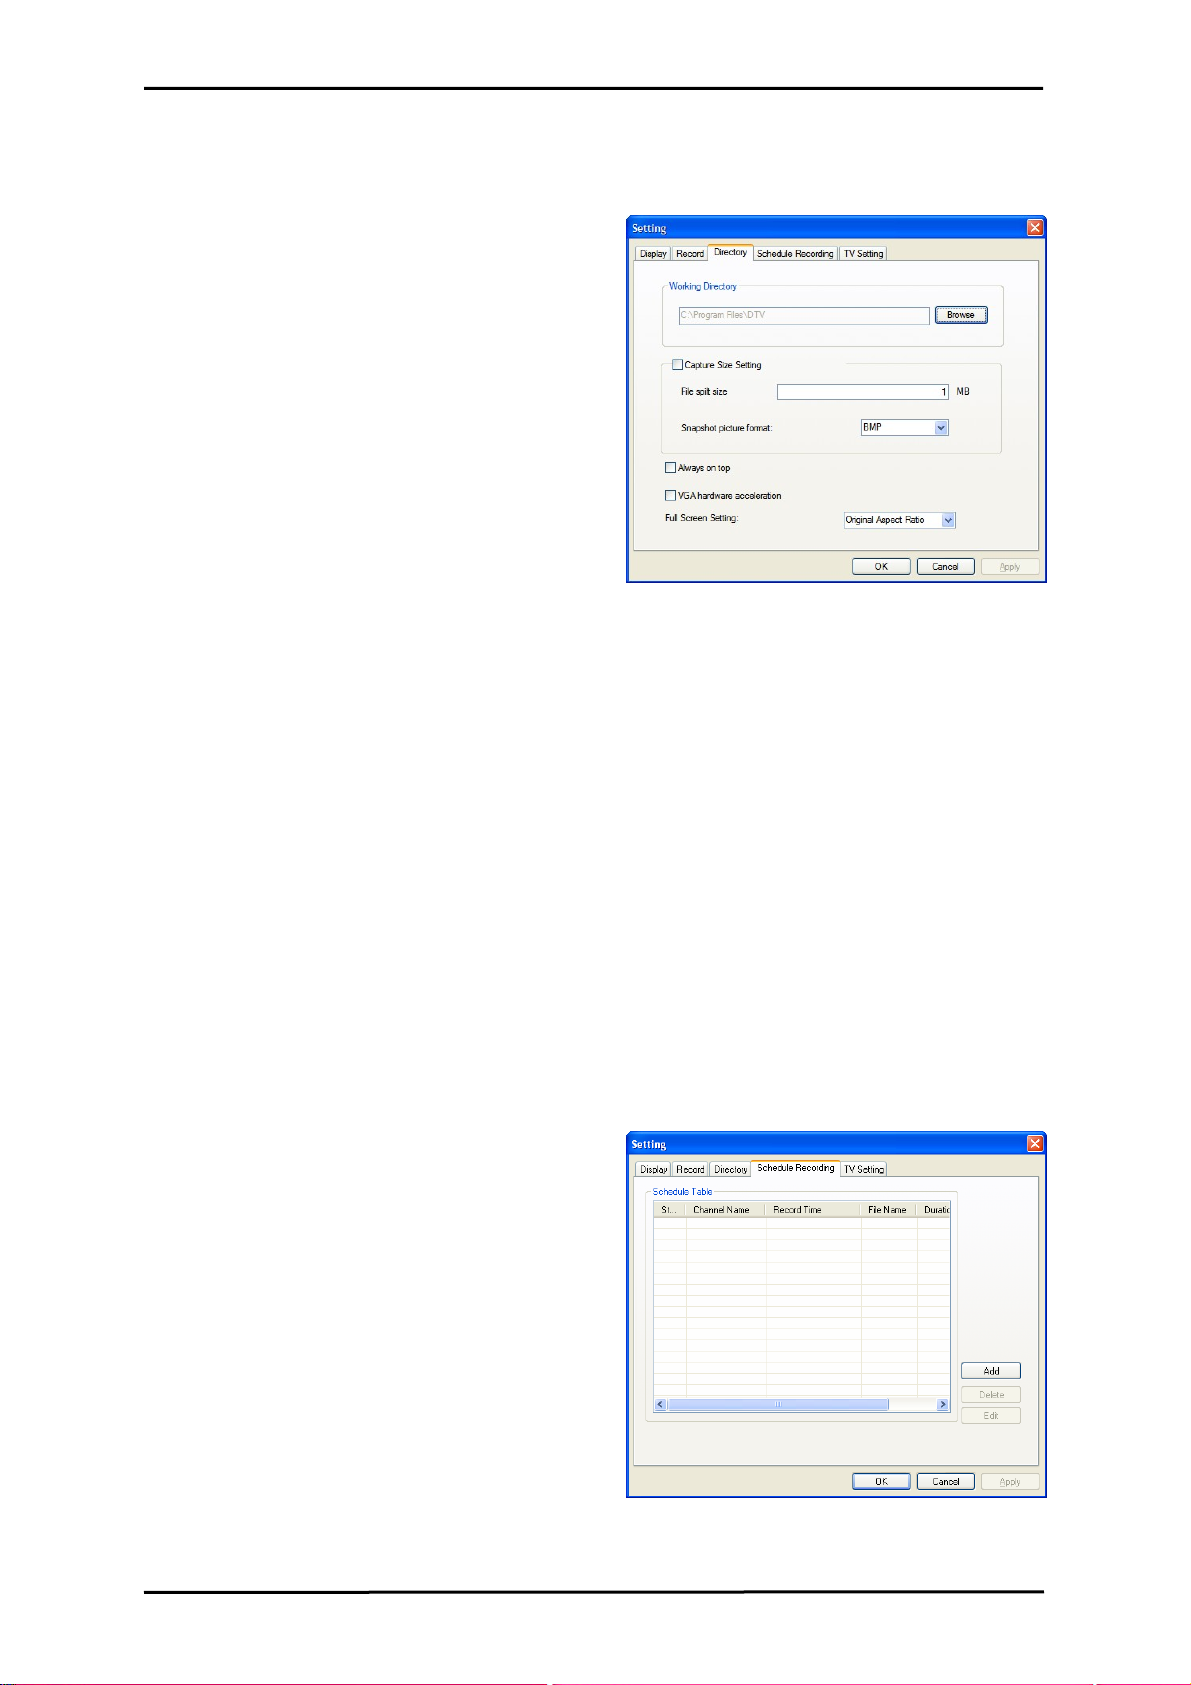
5.2.3 Directory Settings
Working Directory
Here you can change the directory used for
saved files. Either type in the path, or click
“Browse”, go to the folder you want, and
click OK.
Capture Size Setting
When checked, this will split recorded files
into parts at the size entered as the File
split size. This is useful if you want to save
long recordings in more manageable files.
For example, setting the file split size to 650
MB would make the files easy to burn to
CDs.
Snapshot picture format lets you choose whether you want to save snapshots as
BMP or JPG files.
Always on top
You can also choose to always have the DTV window on top of other applications by
checking “Always on top”.
VGA hardware acceleration
This enables VGA hardware acceleration. Please note that not all graphics cards
support this feature.
Full Screen Setting
This allows you to choose whether to display video in its original aspect ratio or
stretched to fit your screen when watching TV in full screen mode.
5.2.4 Schedule Recording
Here you find programs scheduled to be
recorded.
Please refer to Chapter 7.3 for a description
how to use the Scheduled Recording.
24
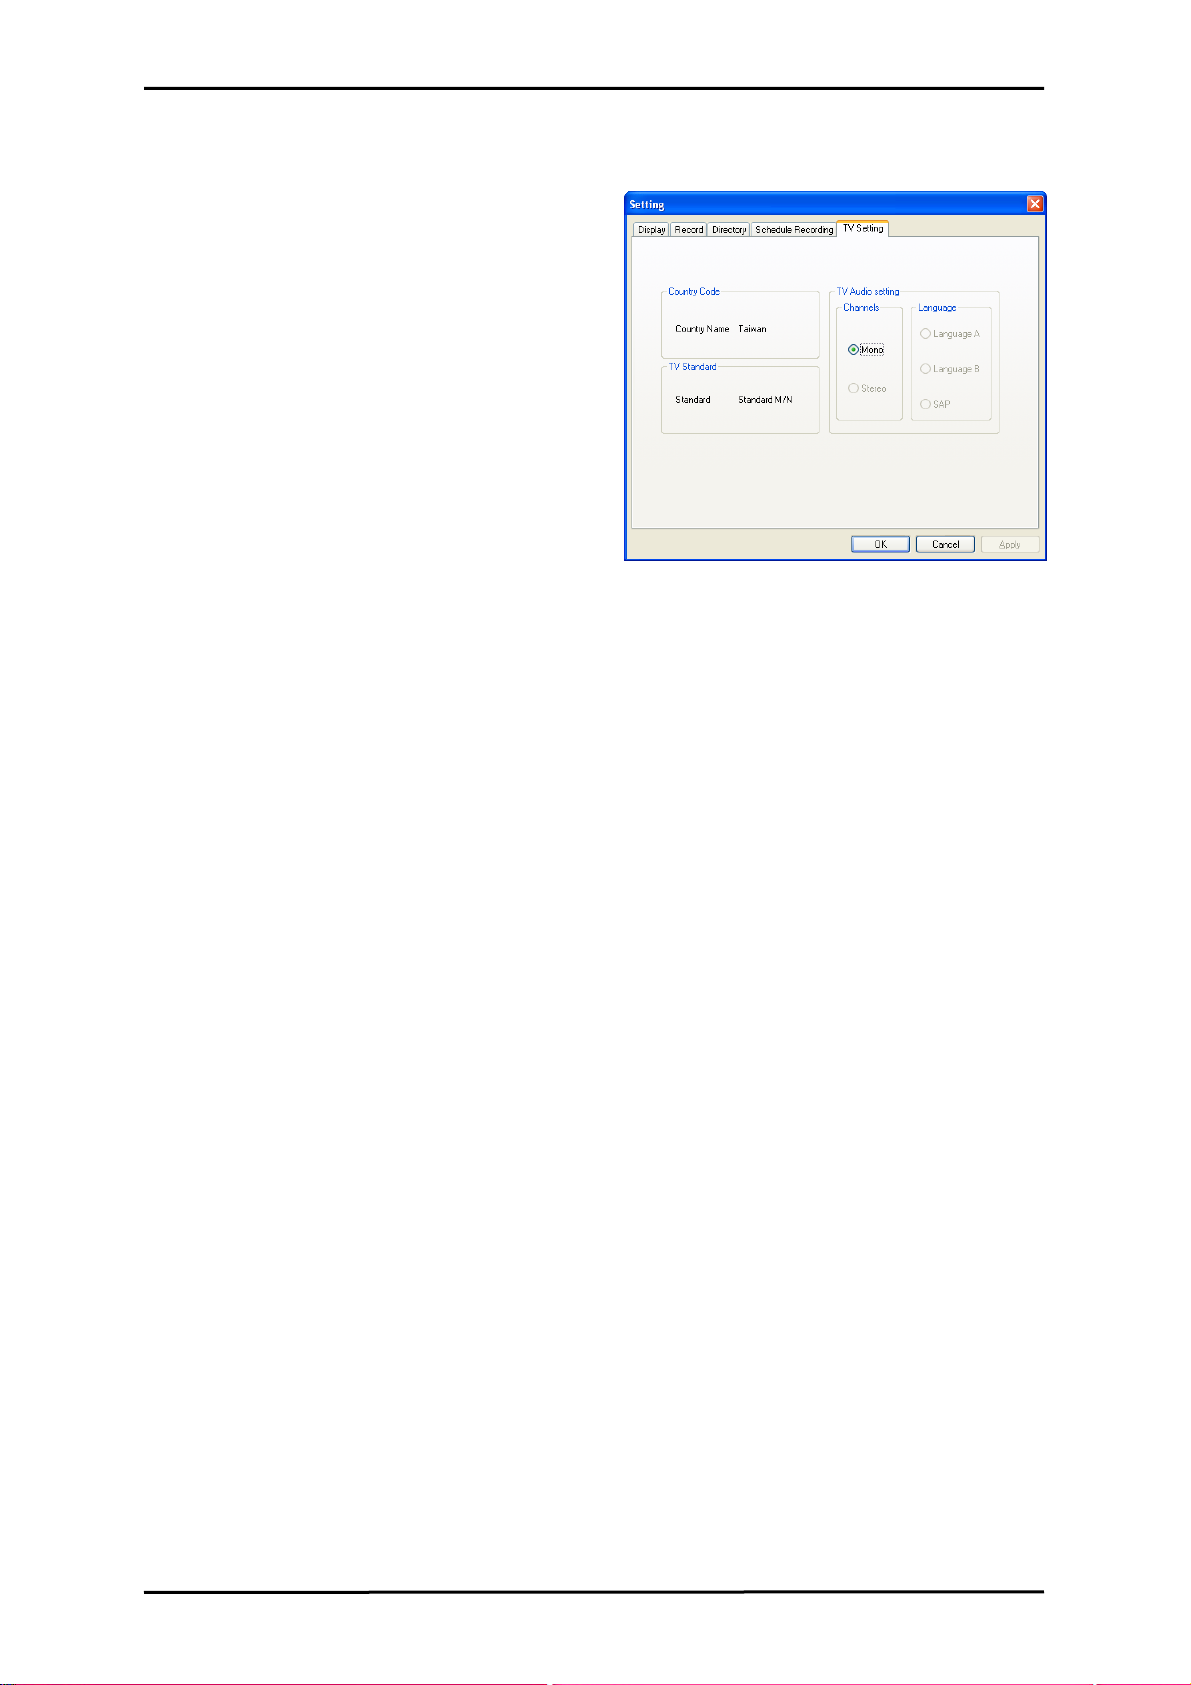
5.2.5 TV Setting
Here you can adjust some analog TV
settings. Select your country and TV
standard to get proper reception in your
area. You can also select whether to
receive Mono or Stereo for the currently
selected channel, and what Language you
wish to receive for multi-language
broadcasts. (when available)
Settings
25
PIP (Picture-In-Picture) and TWIN Mode
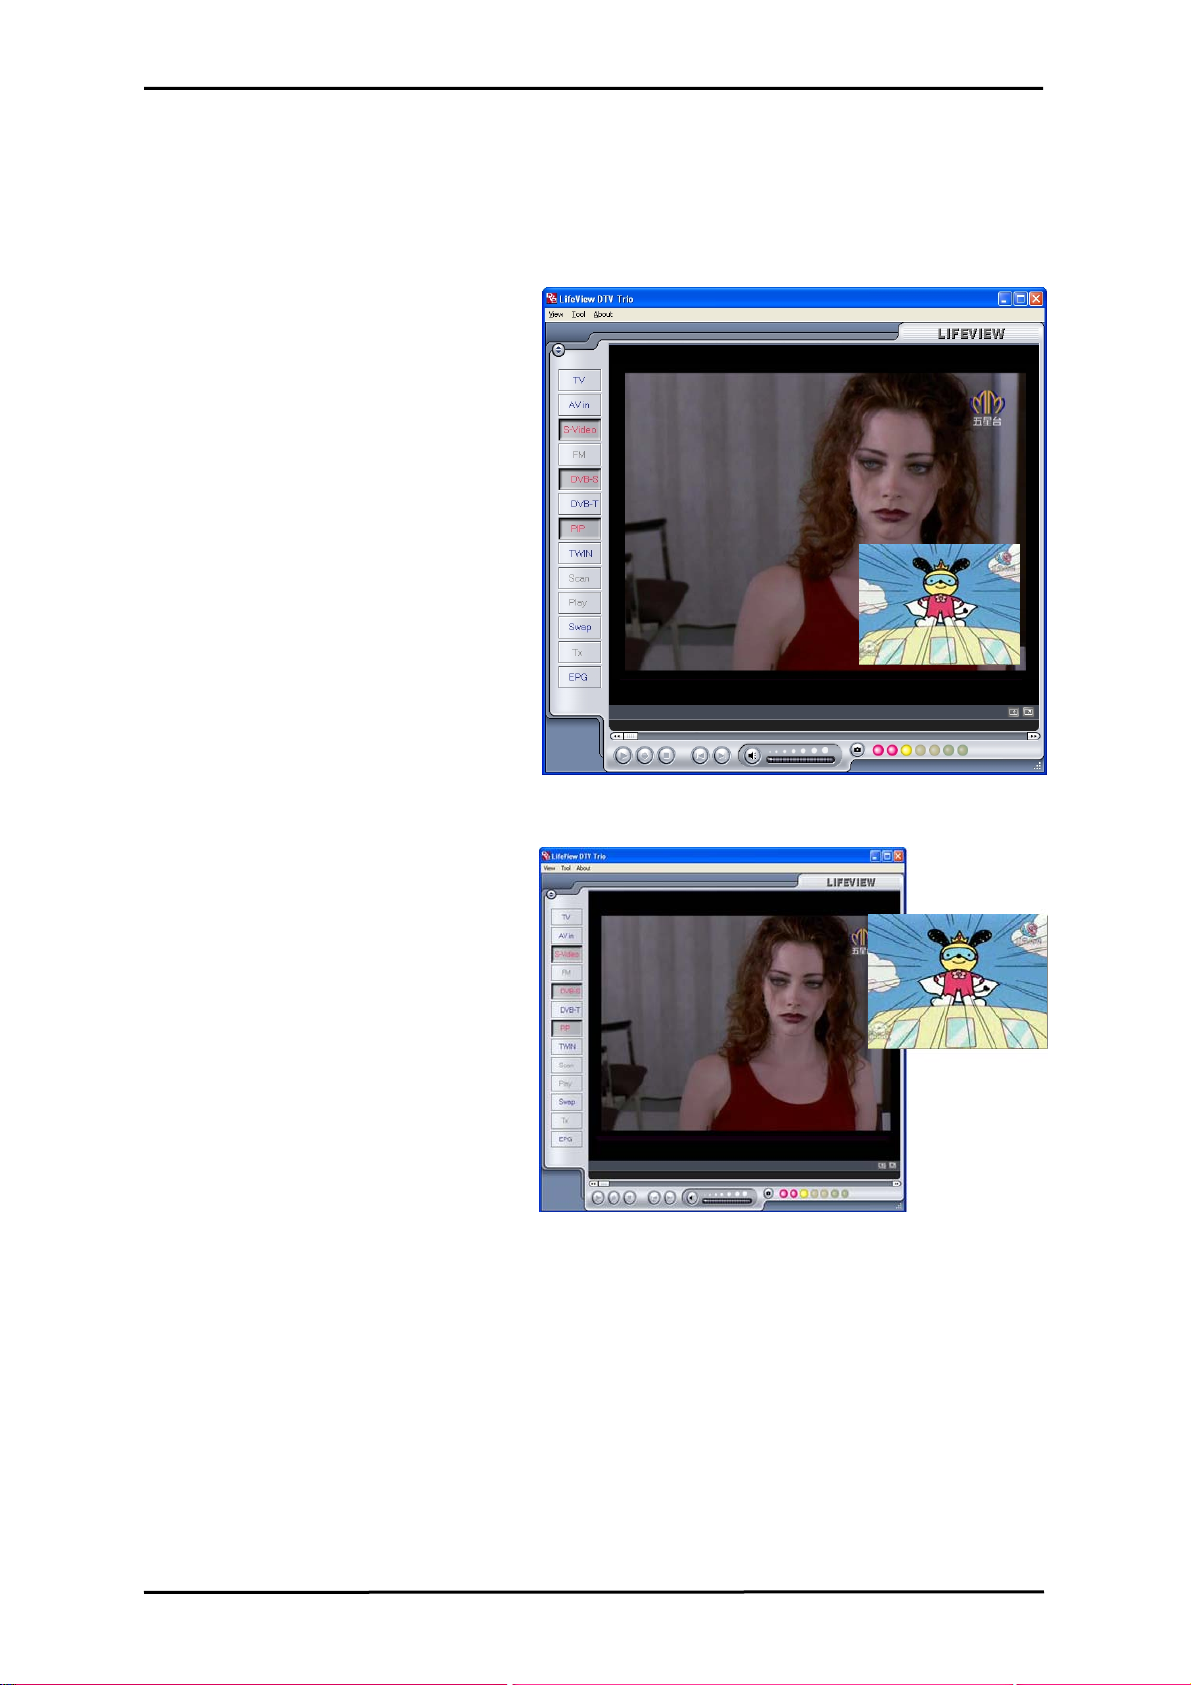
6. PIP (Picture-In-Picture) and TWIN Mode
The PIP/TWIN functions can be accessed from the toolbar on the left.
When you click on the PIP Button,
you will see a second live stream at
the bottom right. When you are in
PIP-Mode, you can switch between
DVB-S and DVB-T for your digital
source, and between analog TV,
S-Video, and AV in for your analog
source.
You can move the window
anywhere on the desktop, and you
can resize it by dragging it on its
edges.
26
 Loading...