

LifeVest WCD 3100 Training Manual
Model WCD 3100
Training Manual
Prerequisite: WCD 3000 training
Rev B

LifeVest System WCD 3100 Training Manual
Contents
1: Introduction .............................................................................................................................1-1
About this manual ............................................................................................................1-1
What you will learn...........................................................................................................1-1
What’s in this manual.......................................................................................................1-1
2: What’s new and different? .....................................................................................................2-1
Overview of the changes .................................................................................................2-1
Response buttons relocated ............................................................................................2-1
Navigation buttons new.................................................................................................... 2-1
Simplified patient interface...............................................................................................2-2
Speaker relocated............................................................................................................2-2
No way to see rate ........................................................................................................... 2-2
3: Patient training........................................................................................................................3-1
What to tell patients (and their caregivers) about the 3100 ............................................. 3-1
Main points to teach the patient .......................................................................................3-2
Summary of operating modes..........................................................................................3-3
Demonstrating the alarms................................................................................................3-4
4: New patient setup ...................................................................................................................4-1
About this section............................................................................................................. 4-1
What you need to know ...................................................................................................4-1
Menu structure ................................................................................................................. 4-2
How to put the monitor in setup mode ............................................................................. 4-3
How to program for a new patient.................................................................................... 4-5
How to baseline a patient................................................................................................. 4-6
5: Other procedures....................................................................................................................5-1
About this section............................................................................................................. 5-1
How to make a manual recording .................................................................................... 5-1
How to send data ............................................................................................................. 5-2
How to test the monitor .................................................................................................... 5-5
Appendix A: Quick charts ......................................................................................................... A-1
Appendix B: Advanced programming ..................................................................................... B-1
Index
Page ii ZOLL Lifecor internal use only

1: Introduction
About this manual
This manual:
y is for ZOLL Lifecor PSRs and Sales Representatives.
y covers the differences between the LifeVest
defibrillator system and the previous generation WCD 3000 system.
y supplements what you already know about the WCD 3000 system.
What you will learn
After completing this training, you will know:
y what’s new and different about the 3100
y what to tell patients about the 3100
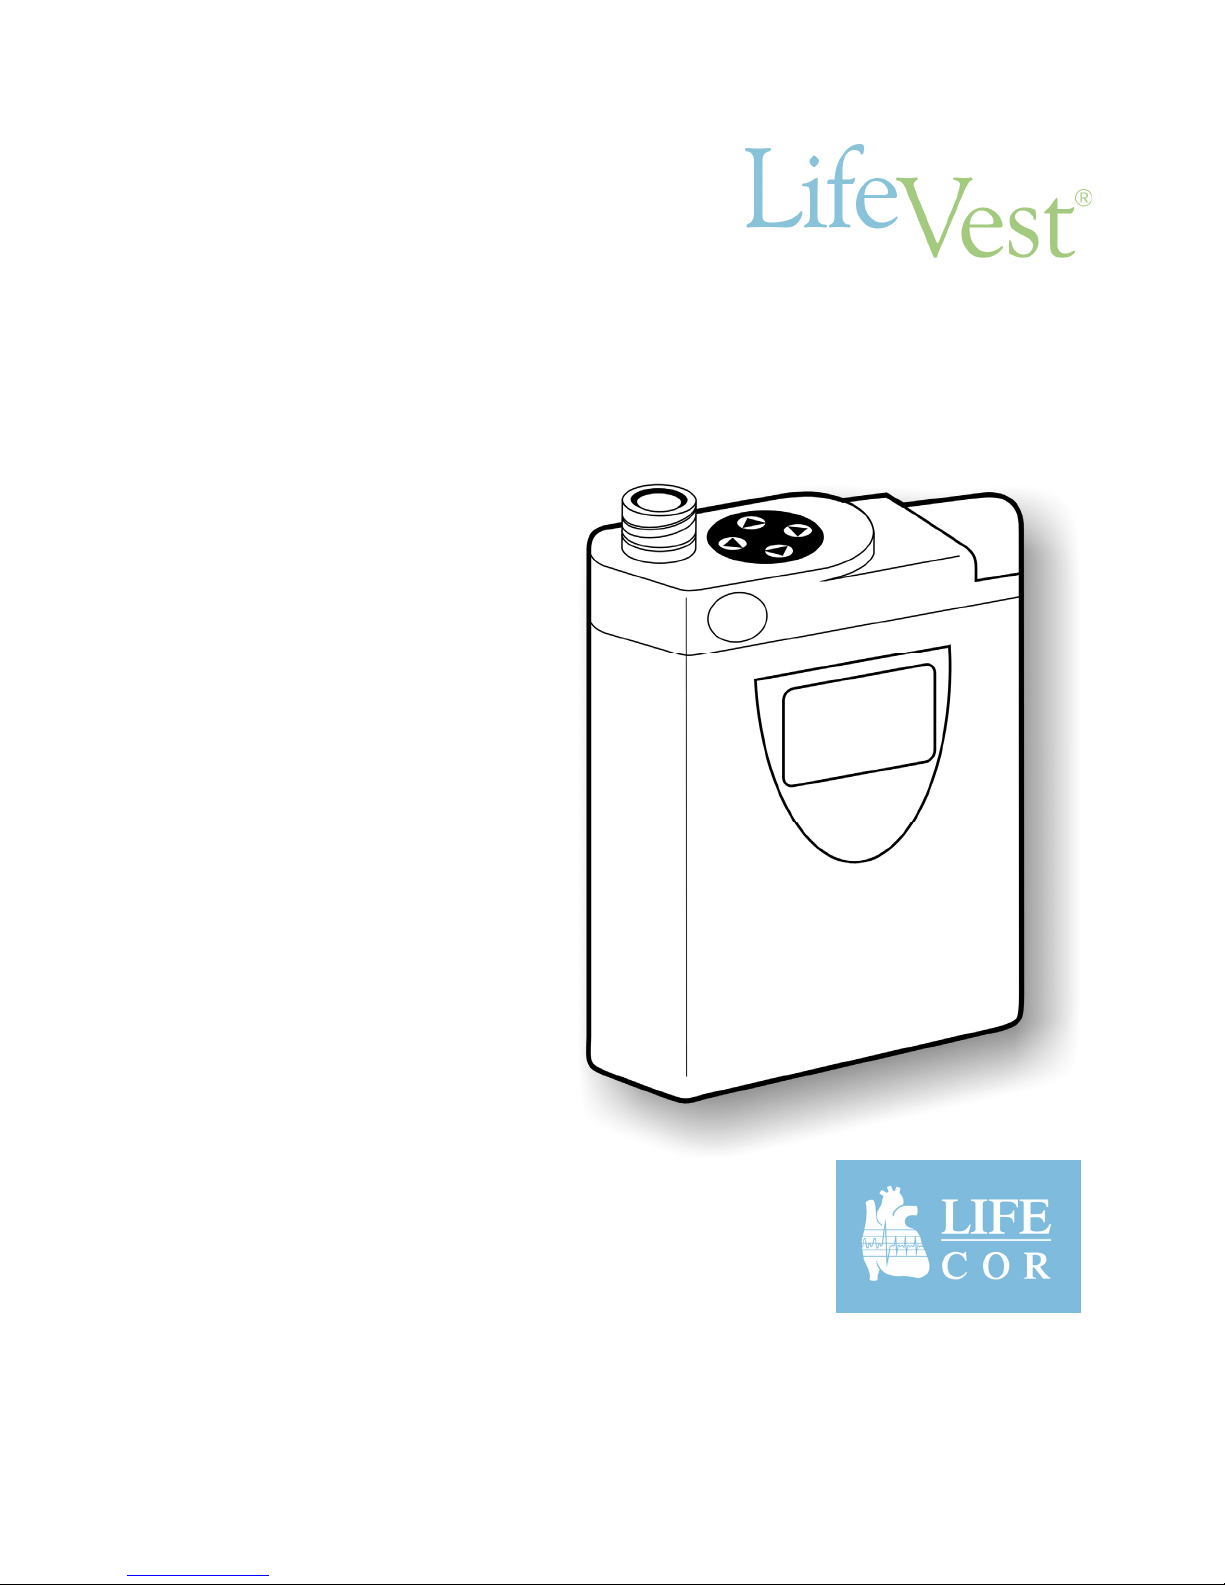
®
WCD™ 3100 wearable
Introduction
y how to program the monitor
y how to send data (download)
y how to record a manual event
y how to do a pulse test
What’s in this manual
Here’s how to use this manual:
y What’s new and different compares the 3100 to the 3000.
y Patient training tells you what to teach a patient about the 3100 system.
y New patient setup covers the basic procedure for setting up the monitor for
a new patient.
y Other procedures explains how to instruct the patient to connect the modem
and send data, and how to instruct the patient to record a manual event. This
section also tells you how to test the monitor.
y Quick charts in the back are helpful reminders of how to do things.
y Advanced programming covers programming beyond the basic monitor
setup.
y Use the Index to help you find the details later.
ZOLL Lifecor internal use only Page 1-1

LifeVest System WCD 3100 Training Manual
This page intentionally left blank.
Page 1-2 ZOLL Lifecor internal use only
2: What’s new and different?
Overview of the changes
The WCD 3100 is our next generation of wearable defibrillator. The essential
difference is that there’s no more alarm module. The functions that were on the
alarm module have either been incorporated into the monitor or eliminated.
It’s important to remember that the majority of the LifeVest device DID NOT
change from the model 3000. Specifically, the electrode belt and accessories did
not change. Beyond the differences explained below, the 3100 is identical in
function and operation to the 3000.
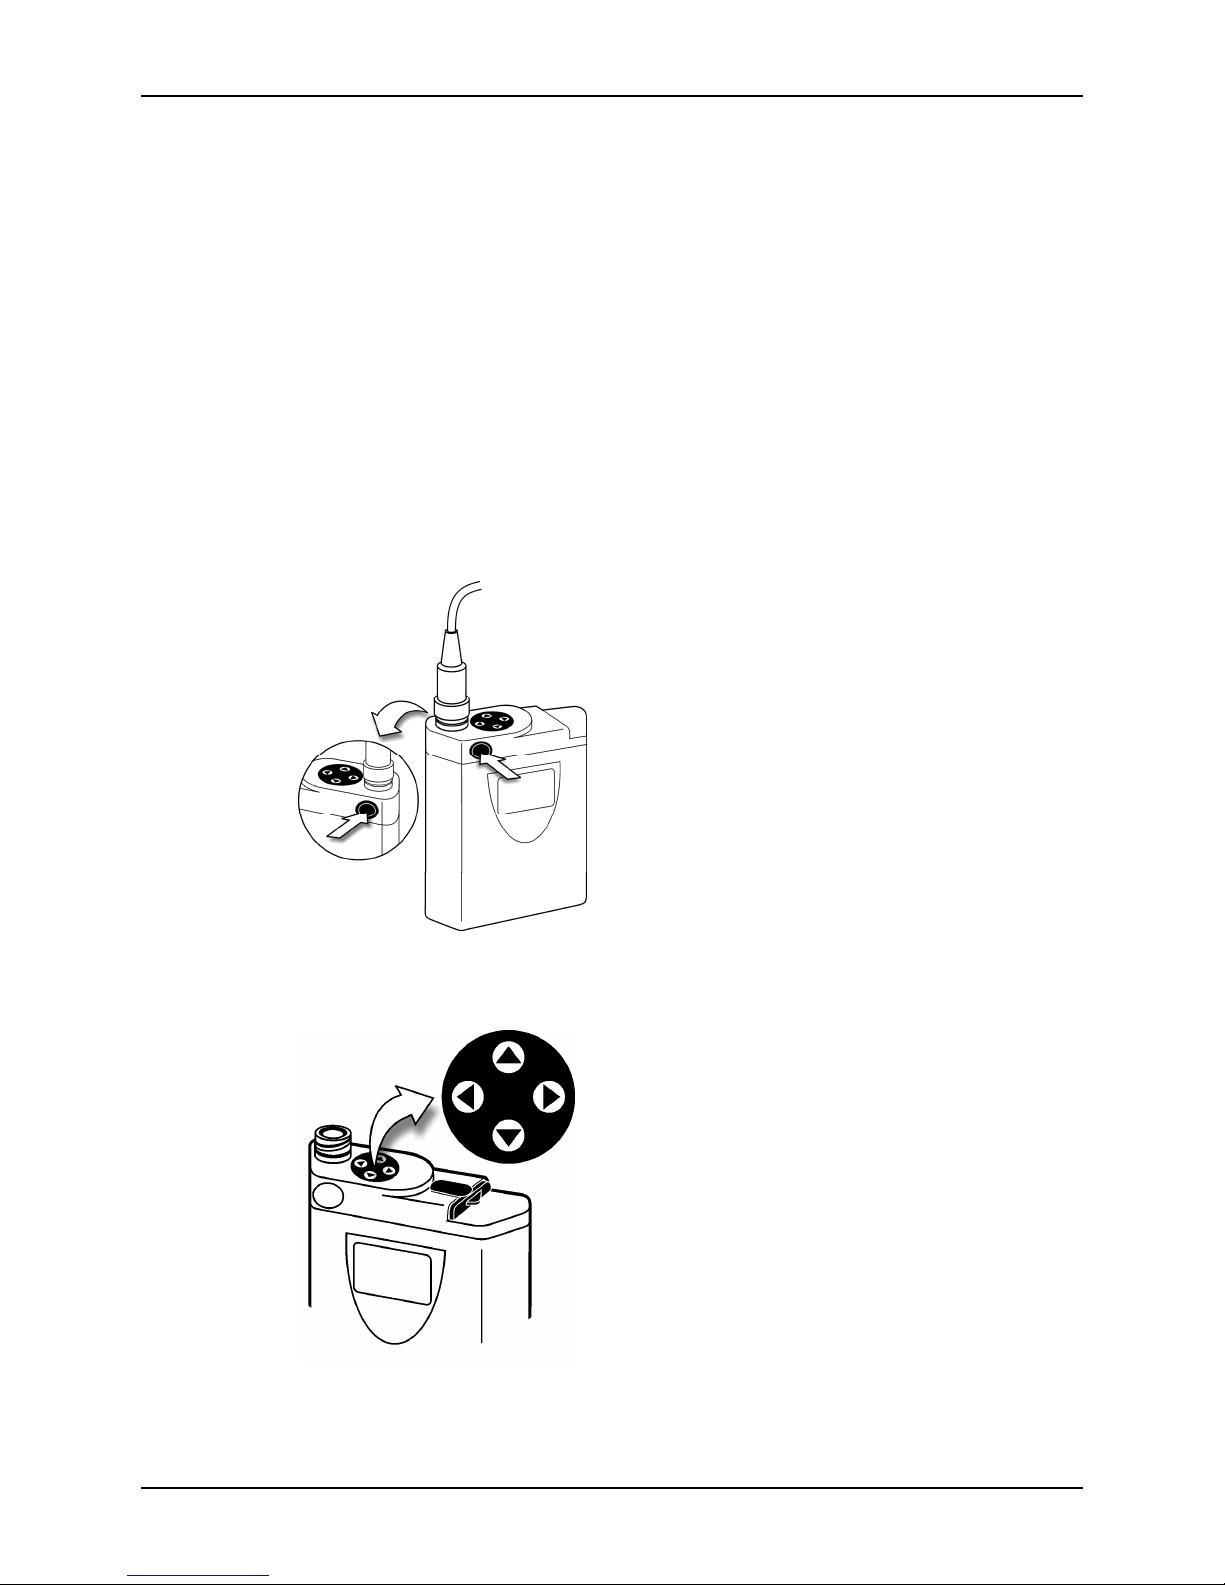
Response buttons relocated
What’s new and different?
You’ll notice that the response buttons are on
either side of the monitor near the top.
Navigation buttons new
Not only did we move them, we improved how
they work. They feel better, they click when
you press them, and they’re easier to hold for
prolonged periods.
They light red when the device detects an
arrhythmia, to make it easier to find the
response buttons in the dark.
The four buttons with arrows on them are called
the navigation buttons.
You use these buttons to program the device.
Patients do not use these buttons. Patients use
only the response buttons.
ZOLL Lifecor internal use only Page 2-1

LifeVest System WCD 3100 Training Manual
Simplified patient interface
The other controls and indicators that were on the alarm module have been
eliminated. For instance, there is no RECORD button, no TRANSMIT button, and
no OK button. These functions are handled in other ways, explained later in this
manual.
The three yellow and red lights for an ARRHYTHMIA, NOISE ALARM, and
WRENCH CODE have been eliminated because they provide no additional
information beyond what’s displayed on the monitor.
Patient interaction with the device involves the alarms, the response buttons, and
the display.
Basically this is the extent of the patient’s interactions (more about what to teach
patients is contained in section 3):
y If you get the vibration alarm or the siren alarm, press the response buttons.
y If you get the gong alarm, read the display and take the action indicated.
For the other procedures, they too have been simplified (more details are
contained in section 5):
y To manually record the ECG, just press the response buttons.
y To send data, just connect the modem. There’s no button to press.
Speaker relocated
You’ll also notice that the speaker is now in the top of the monitor. By putting it in
the monitor we think it sounds better, clearer, and is easier to understand.
No way to see rate
With the WCD 3000, you could press the response buttons to see the patient’s
heart rate. This has been eliminated from the 3100.
Page 2-2 ZOLL Lifecor internal use only

3: Patient training
This section gives guidelines for instructing the patient about the LifeVest system
and how to respond to alarms.
We suggest that you:
1 Know what to tell patients and their caregivers (see below)
2 Go over the main points on the next page.
Patient training
3 Explain the operating modes and alarms as described on page
4 Demonstrate the types of alarms that can occur as described on page 3-4.
What to tell patients (and their caregivers) about the 3100
Patients getting the 3100 need to get the same information as patients who
received the 3000 regarding:
y assembling and wearing the system
y changing and charging the batteries
y responding to alarms, and
y sending data using the modem.
This section tells you specifically what to cover about dealing with alarms and
what to do if treated. Be sure to stress that patients are to interact with only the
response buttons and the display. There is no need for the patient to press the
navigation buttons.
The key points to stress:
y If you get a siren alarm, press the response buttons. Remember the response
buttons light to help you find them, even in the dark.
3-3.
y If you get a gong alarm, look at the display and do what it says. The display
will tell you the problem, perhaps indicate what to do, including to press the
response buttons to stop the alarm after reading the display.
It’s important for anyone who lives with the patient to be instructed not to remove
the 3100 from the patient, and not to remove the battery from the device, even if
the patient appears to be unconscious. The device is still monitoring the patient.
The device should only be removed by someone who is prepared to perform
cardiopulmonary resuscitation, such as an EMS technician or hospital ER
personnel.
ZOLL Lifecor internal use only Page 3-1

LifeVest System WCD 3100 Training Manual
Main points to teach the patient
When you instruct the patient, stress the following points, explained below and
on the following page:
y If you get a siren alarm, hold the response buttons.
y If you get a gong alarm, read the message.
y If you get shocked, call your doctor and send data.
If you get a siren alarm, hold the response buttons
y The response buttons will light red when you are to press them so they will be
easy to find, even in the dark.
y As long as you are able to, hold the response buttons to stop a treatment. As
long as you remain conscious and hold the response buttons, you are in no
danger of receiving a treatment shock.
y If you lose consciousness, of course you will not be able to hold the response
buttons. In this case, and if the lethal heart rhythm continues, the device will
go through the treatment cycle and deliver a treatment shock.
y It is very important that only you (the patient) hold the response buttons. This
is how the monitor knows whether or not you are conscious. DO NOT let
anyone else hold the response buttons for you.
If you get a gong alarm, read the message
y Read the display and do what it says to fix the problem.
y Keep in mind that the monitor gives alarms, messages, and voice prompts to
guide you in what to do.
If you have an event, call your doctor and send data
y If you have any kind of cardiac event, even if you manage to stay conscious
and hold the response buttons, you should contact your physician and report
the incident.
y Any cardiac event is recorded by the monitor so you can send the data later.
y As soon as possible after any cardiac event, you should send data using the
modem.
Page 3-2 ZOLL Lifecor internal use only
Summary of operating modes
As you instruct the patient, keep in mind that the device has basically three
operating modes:
Mode Message What it means What the patient needs to do
Patient training
Normal
monitoring – no
alarms
Gong alarm Various messages can
appear, for example:
Siren alarm
Monitor is operating
normally.
Patient needs to take
action.
An arrhythmia is
being detected.
Nothing.
Read monitor and do what it
says.
Press and hold the response
buttons if conscious.
and
ZOLL Lifecor internal use only Page 3-3
LifeVest System WCD 3100 Training Manual
Demonstrating the alarms
Demonstrate the alarms to help the patient learn how to respond. Follow the
procedures below to:
y Place the system in training mode, then
y Simulate alarm conditions.
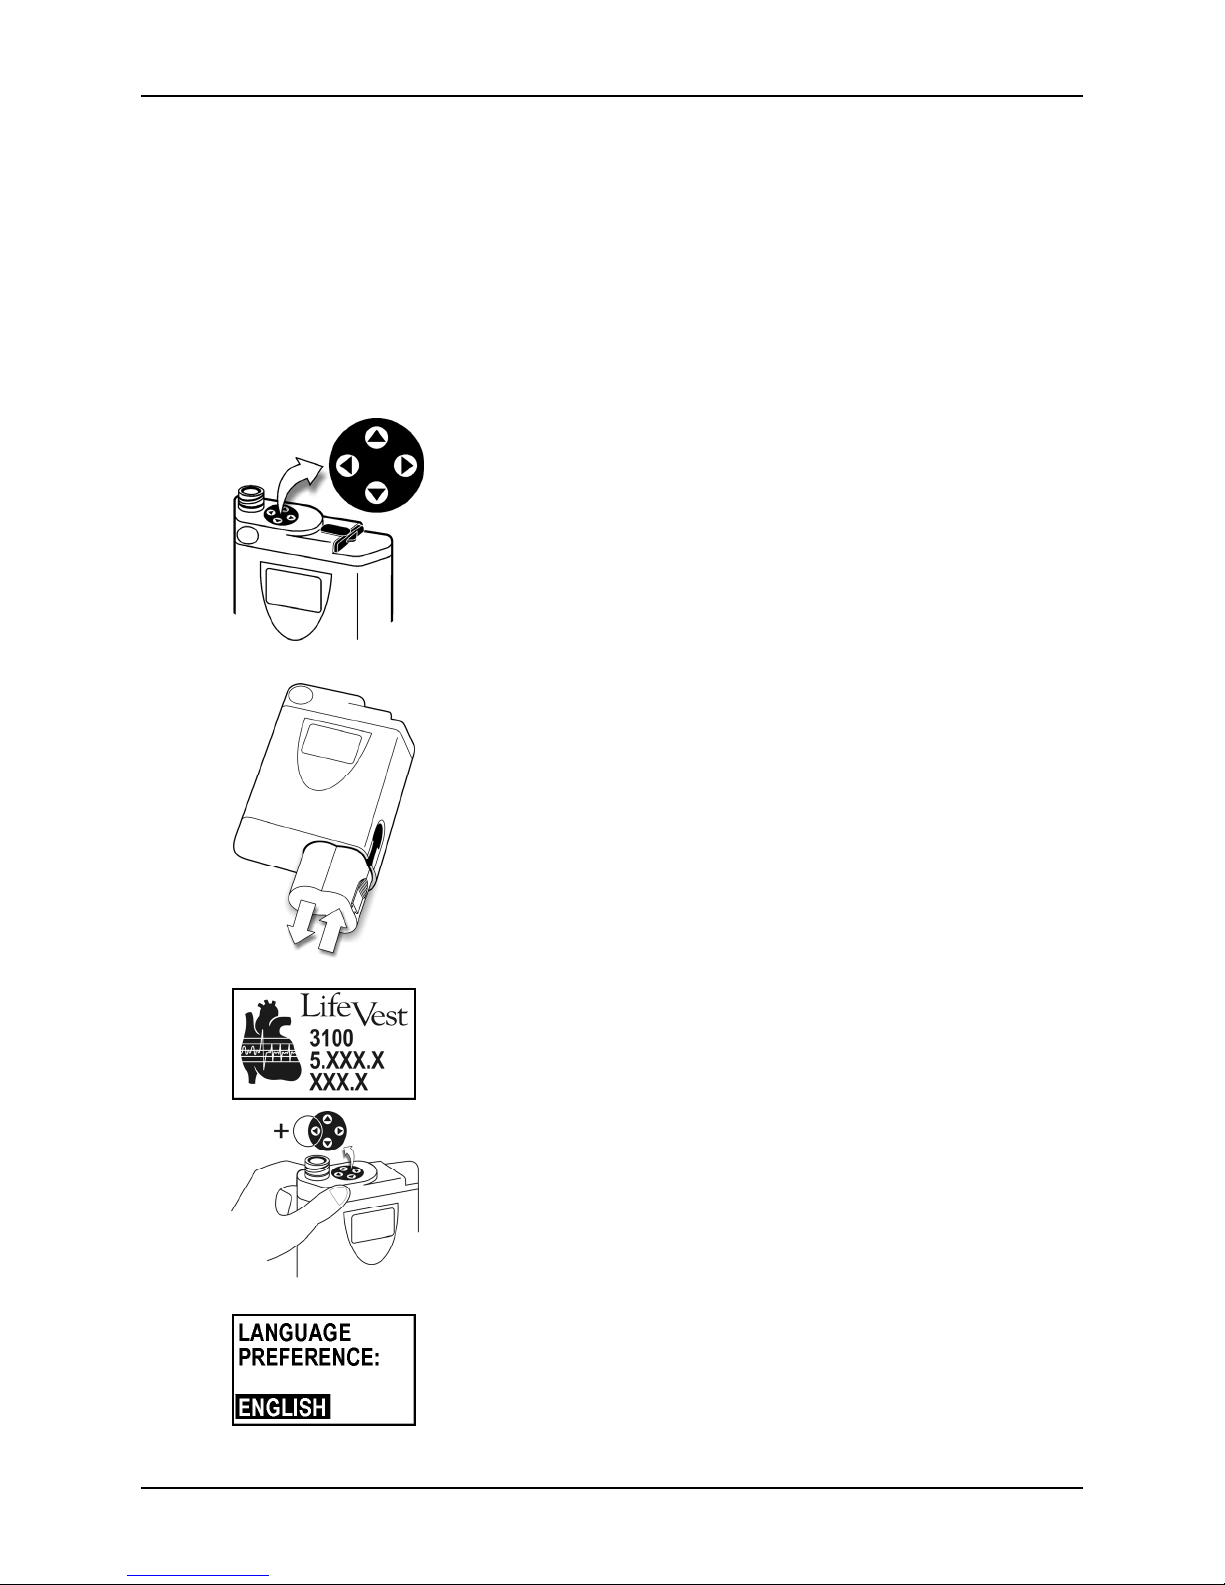
How to enter training mode
View the navigation buttons from the top of the monitor with the
display facing you.
1 Remove and reinsert the battery.
2 While the opening screen is displayed, hold the response
buttons and hold ◄ at the same time. Continue holding these
buttons until the screen changes.
This screen may be displayed for more than 10 seconds.
Page 3-4 ZOLL Lifecor internal use only
3 Press ▲ or ▼ to choose a language, then press ►.
Note: The language you choose only affects the setup
screens and will not affect the patient screens.
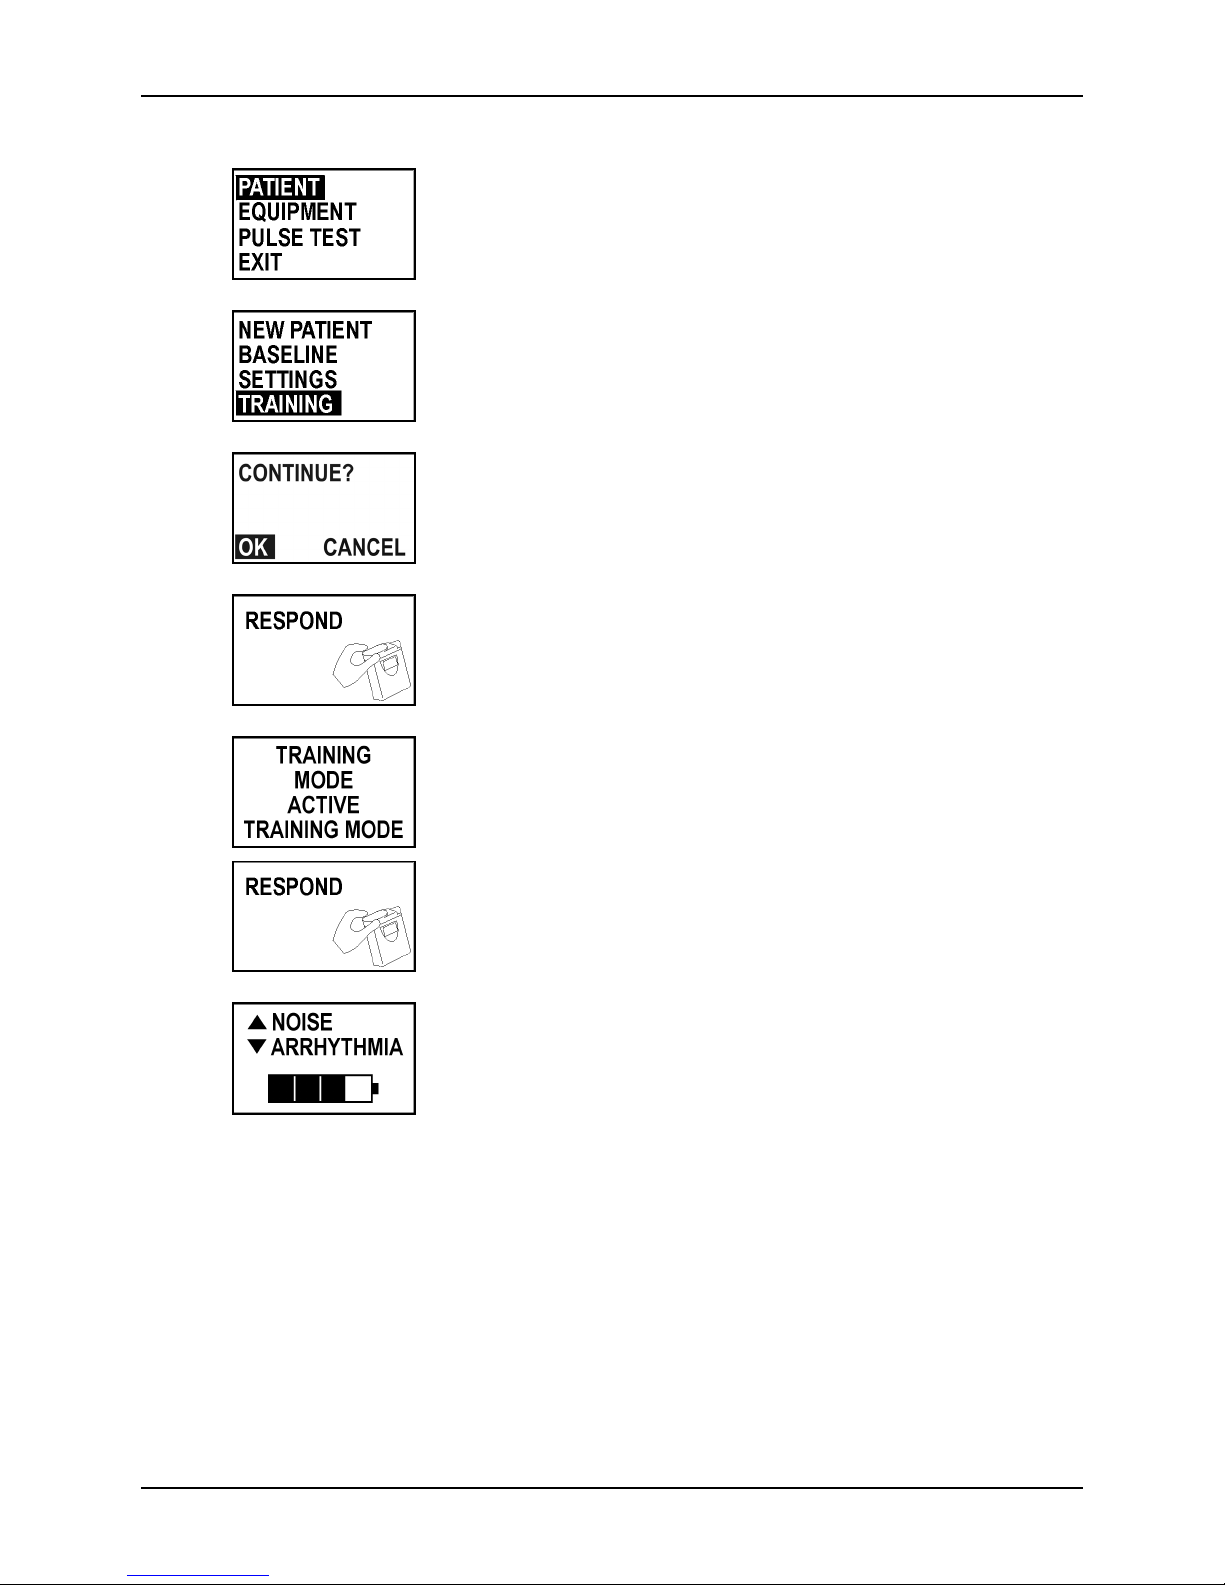
Patient training
4 With PATIENT selected, press ►.
5 Press ▲ or ▼ to select TRAINING, then press ►.
6 Press ► to select OK, then press the response buttons.
7 Press the response buttons again.
8 The monitor is now in training mode, with these messages
alternating.
Press the response buttons to silence the gong alarm.
9 The monitor is ready to demonstrate the noise and
arrhythmia alarms.
ZOLL Lifecor internal use only Page 3-5
LifeVest System WCD 3100 Training Manual
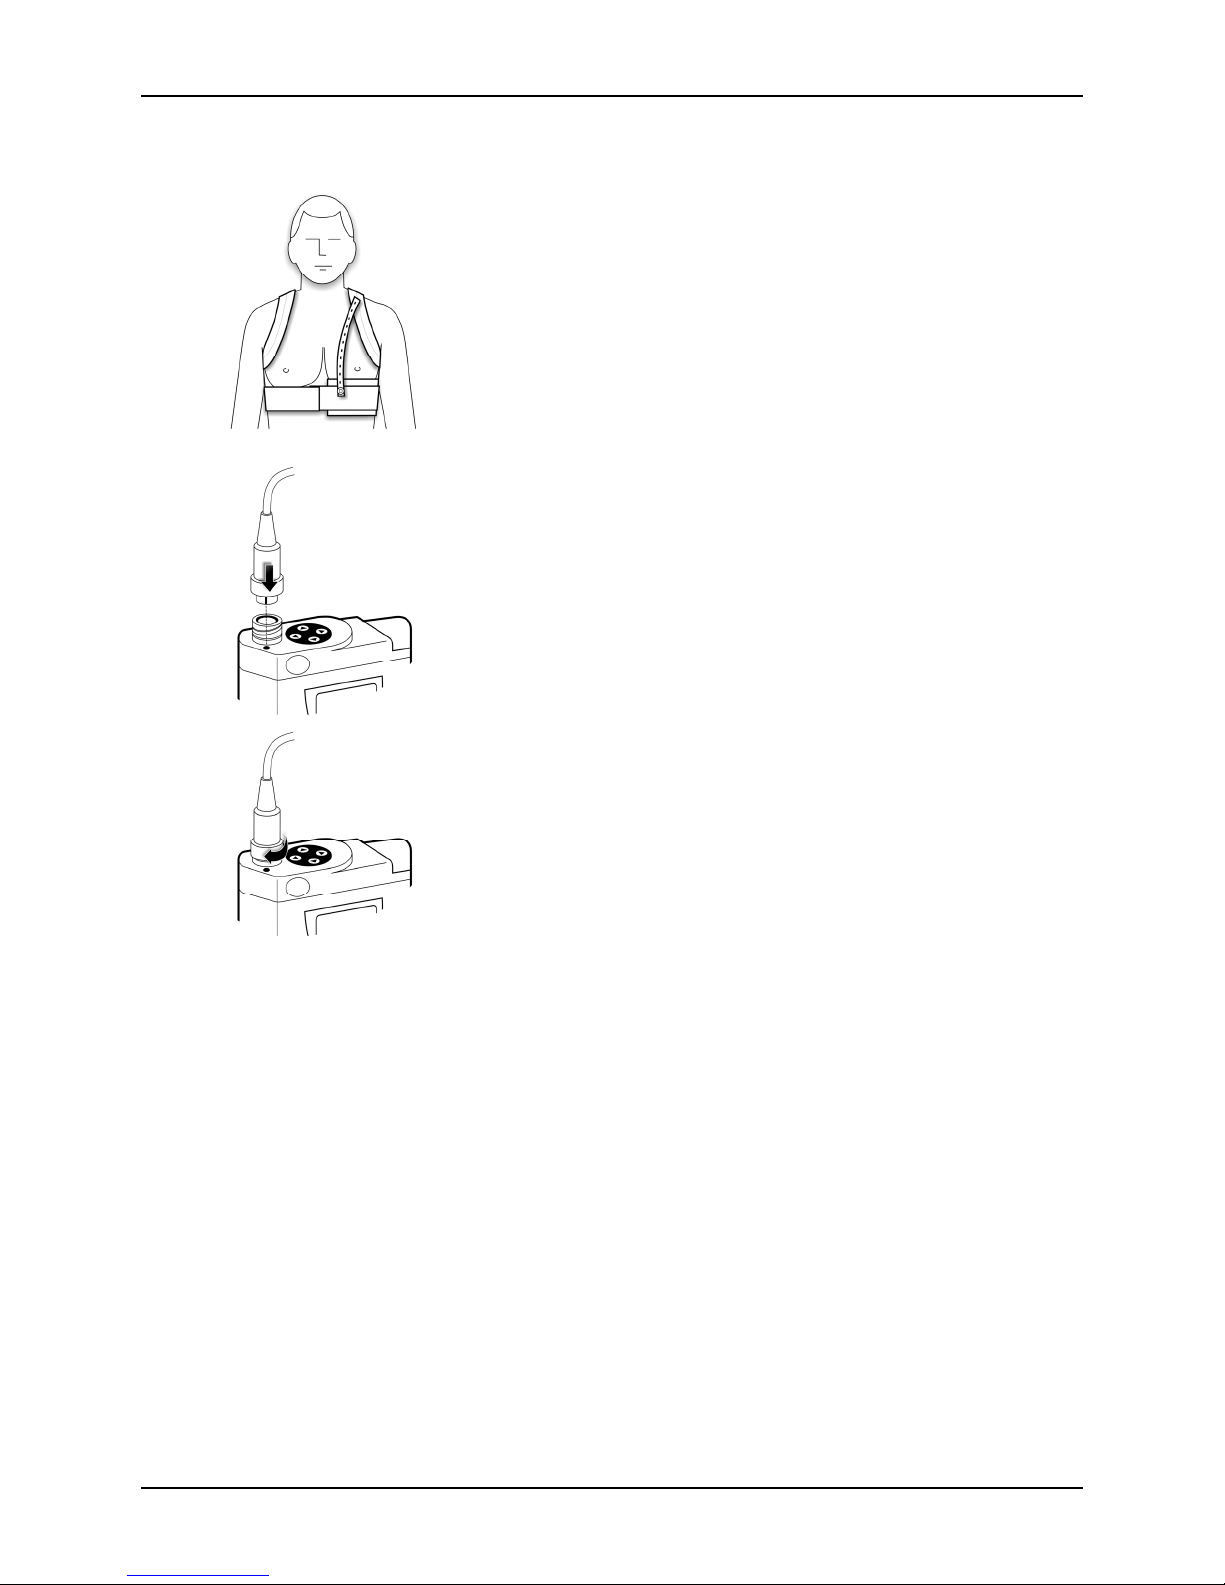
Connect patient for training mode
1 Outfit the patient with the electrode belt and garment.
2 Connect the electrode belt to the monitor.
3 Continue with the procedures on the next page.
Page 3-6 ZOLL Lifecor internal use only
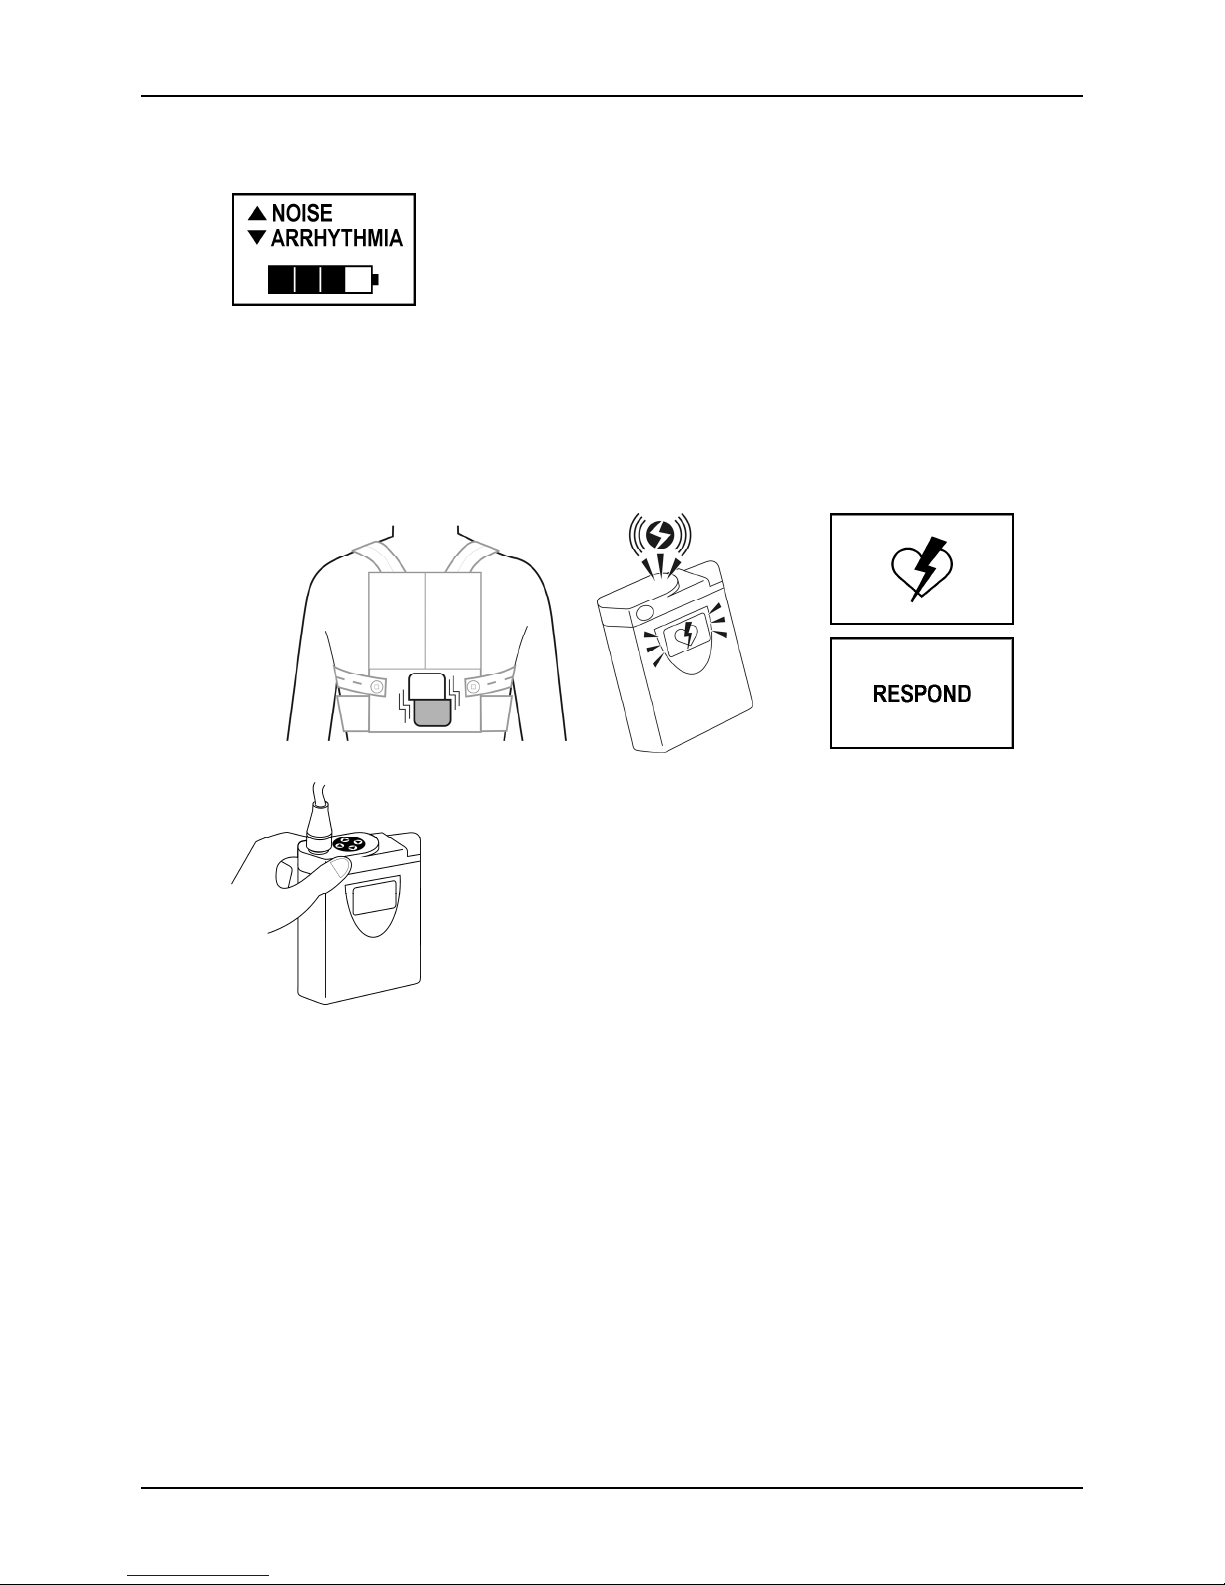
How to demonstrate the arrhythmia alarms
1 With this screen displayed, press ▼.
The device runs through the alarm sequence that will occur if
an arrhythmia is detected:
y Vibration alarm activates and response buttons light red.
y Siren alarm sounds.
y Display shows that an arrhythmia has been detected and
tells patient to press response buttons.
y Voice prompts announce to bystanders that that patient is
going to be shocked.
Patient training
2 Tell the patient to press and hold the response button during
the alarms.
The alarms stop as long as the patient holds the response
buttons.
Tell the patient to release the response buttons to show that
the alarm sequence resumes.
3 To stop the arrhythmia demonstration, press ▼.
ZOLL Lifecor internal use only Page 3-7

LifeVest System WCD 3100 Training Manual
How to demonstrate a noise alarm
1 With this screen displayed, press ▲.
2 Tell the patient what to do when the gong alarm sounds:
y Read the display. This particular message states that
y Take action to correct problem. In this case, adjust the
ECG signal is not clear. The ECG electrodes are not
sending a good signal to the monitor.
belt so that the ECG electrodes make better contact with
the skin.
y Press response buttons if display so states. This stops
the gong alarm.
3 With a noise alarm, when you press the response buttons,
the monitor checks for an improvement in the ECG signal.
For the demonstration, the ADJUST BELT message returns.
4 After three cycles, the monitor displays this message.
When this happens, the patient is expected to check the belt.
Pressing the response buttons does not make this message
go away.
5 To stop the noise alarm demonstration, press ▲.
Page 3-8 ZOLL Lifecor internal use only
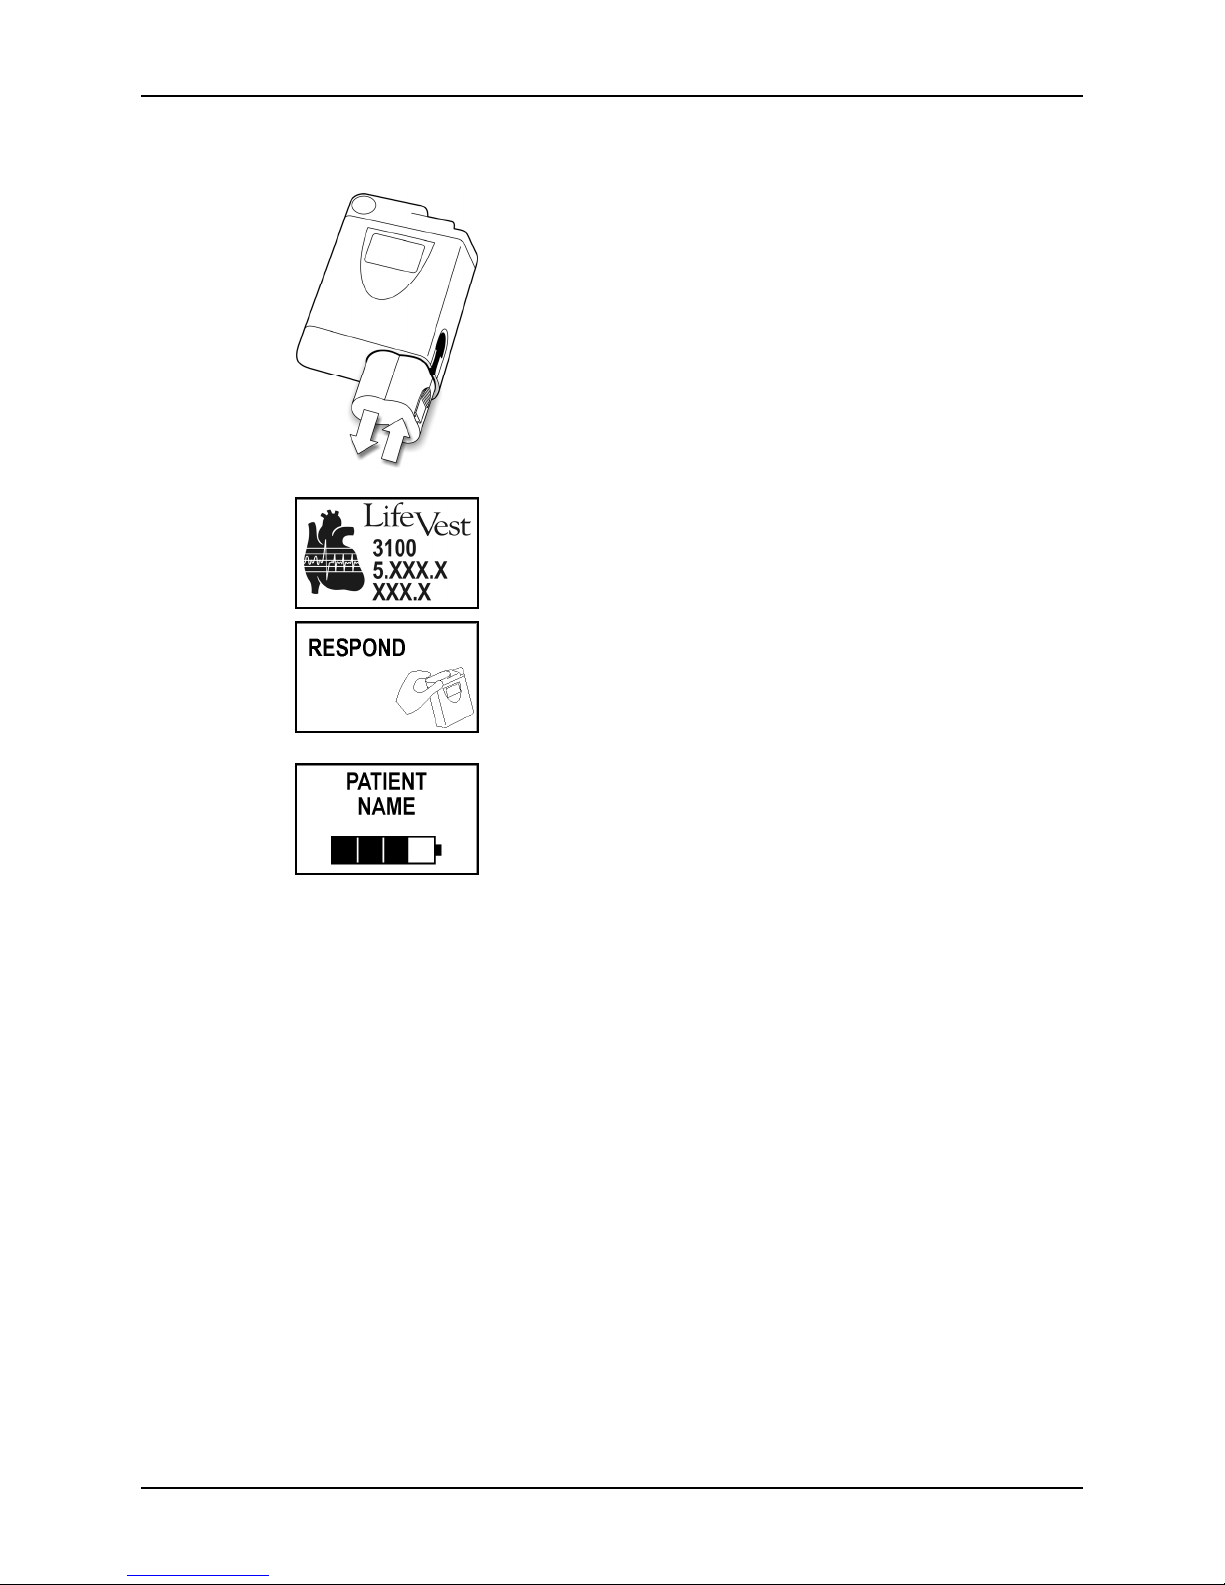
How to exit training mode
Patient training
1 Remove and reinsert the battery.
2 Press the response buttons as normal.
3 Monitor resumes normal operation.
ZOLL Lifecor internal use only Page 3-9

LifeVest System WCD 3100 Training Manual
This page intentionally left blank.
Page 3-10 ZOLL Lifecor internal use only

4: New patient setup
About this section
y This section covers the basic procedures for setting up the monitor for each
new patient.
y This section applies to the WCD 3100 equipped with software version 5.1.
y If you need to change any other settings, see Appendix B on advanced
programming.
What you need to know
Programming the WCD 3100 is almost the same as programming the 3000. The
main difference is that you use the navigation buttons to move around the menus
and options.
Each time you fit a new patient, you’ll need to program the device with basic
patient information, same as with the 3000.
New patient setup
Programming the monitor for a new patient consists of entering the patient’s
name and the rate thresholds. In most cases, that’s all you’ll need to program. In
the rare case where you need to change any other settings, you will need to go
deeper into the programming.
Step-by-step instructions are provided on the following pages for the basic setup
for a new patient. Familiarize yourself with this procedure.
Step-by-step instructions for the more advanced programming are also provided
in Appendix B. Review this information so that you are somewhat familar with the
procedure and options if you ever need to make any changes.
ZOLL Lifecor internal use only Page 4-1
LifeVest System WCD 3100 Training Manual
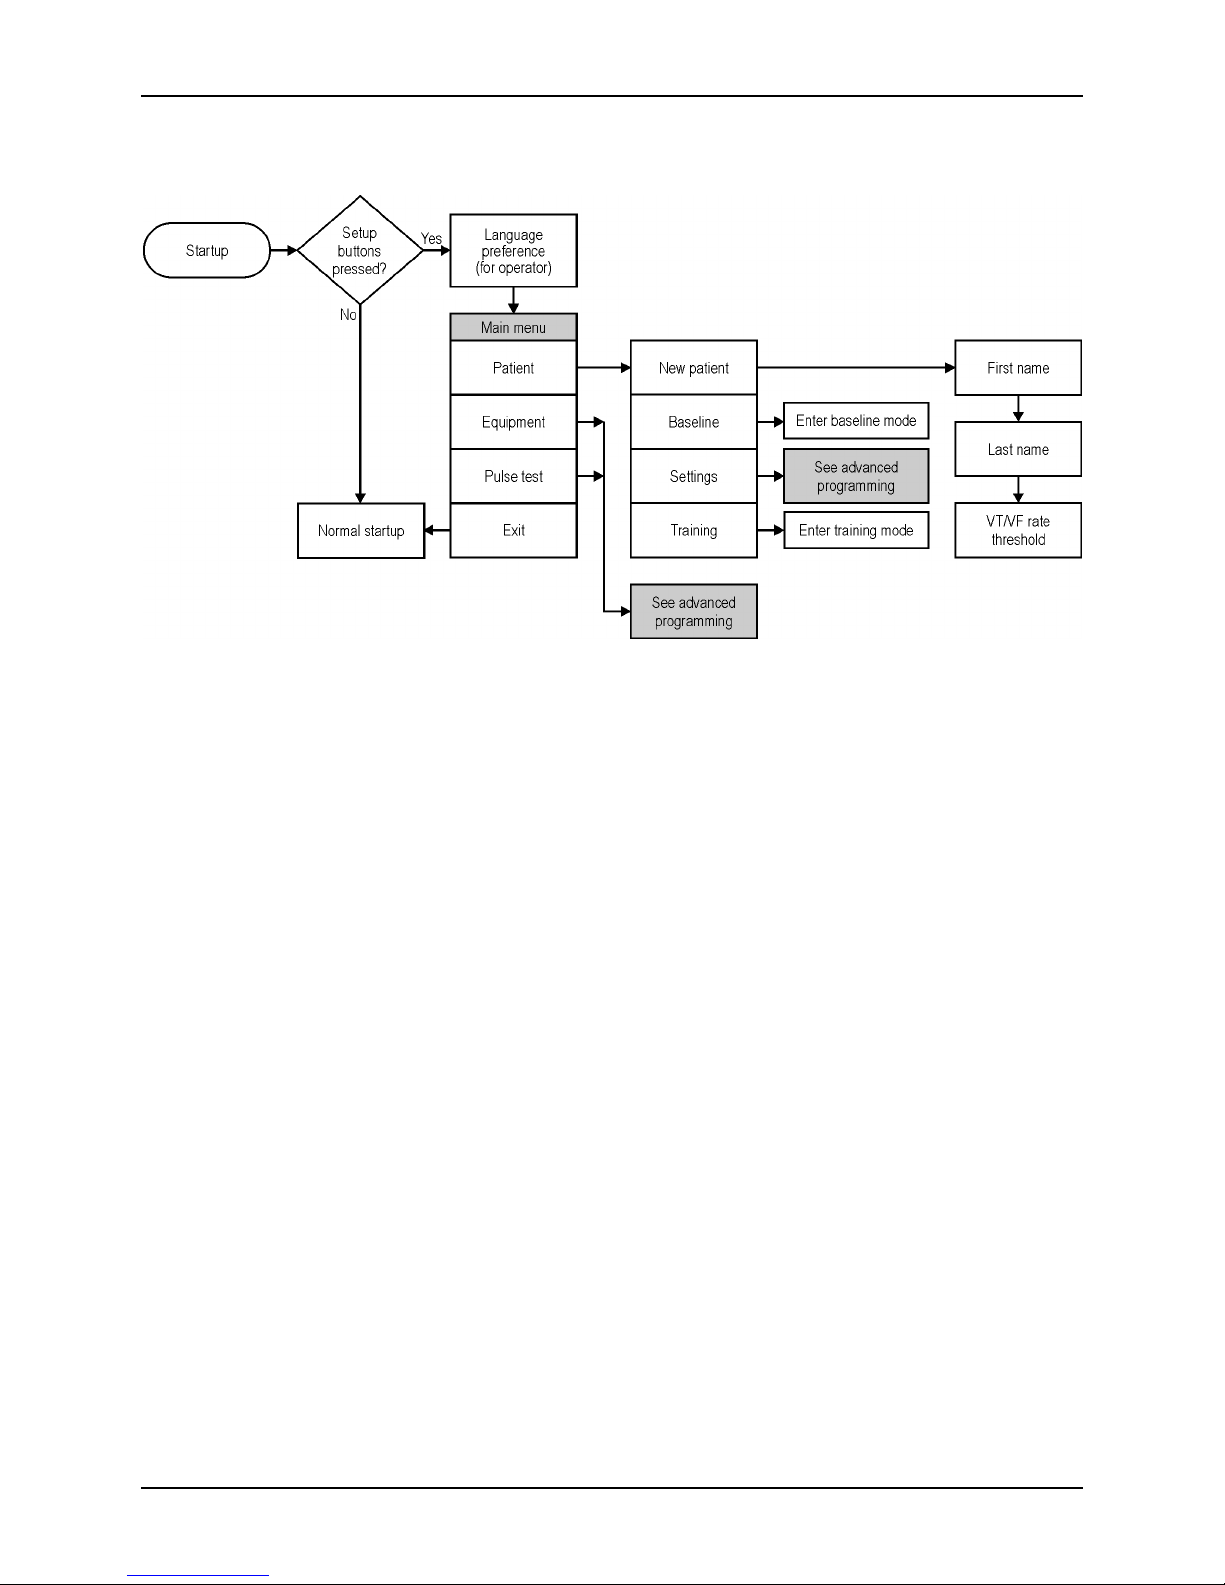
Menu structure
Page 4-2 ZOLL Lifecor internal use only
 Loading...