

Page 1
Quick Start Guide
Zone R420
®
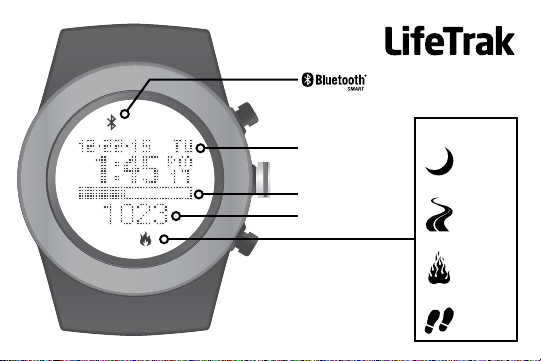
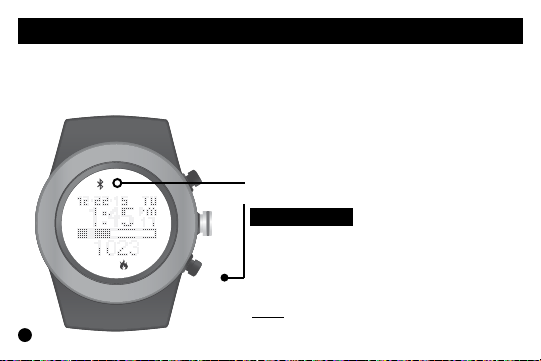
Time / Date
Goal Progress Bar
Activity Value
Activity Type
sleep
distance
calories
steps
Page 2
Welcome to LifeTrak. Let’s take a quick tour of the basic features.
• To turn on your tness tracker, press and hold any button.
Learn more
• For support, tips, product information and full instructions, please visit:
www.lifetrakusa.com/support/help-center/
NOTE: Actual model / screen images may vary from images shown.
NOTE: This is NOT a medical device. Please visit our website to view
cautions and warranty information in the full instruction manual.
CUSTOMER SERVICE
If you have questions about your
LifeTrak activity tracker, please
confact our customer service team
Copyright © 2015 LifeTrak, Inc. All rights reserved. Duplication or copying of all or part of this manual without
the express written consent of LifeTrak, Inc. is prohibited.
Website: www.LifeTrakUSA.com
Facebook: www.facebook.com/lifetrak
Twitter & Instagram: mylifetrak
Pinterest: pinterest.com/lifetrak
YouTube: www.youtube.com/lifetrakusa
Page 3
TABLE OF CONTENTS
Button Layout...........................................................................................................................................
Setting Goals...........................................................................................................................................
Setting Time.............................................................................................................................................
Setting User Info......................................................................................................................................
Sleep Tracker........................................................................................................................................
Modes of Operation : Workout.............................................................................................................
Heart Rate Monitor (Two Ways) : Finger Touch vs BLE Chest Belt..............................................
Pair Your Chest Belt..........................................................................................................................
Set HR Log Rate...............................................................................................................................
Sessions...........................................................................................................................................
View Recorded Data.........................................................................................................................
Storage Remaining...........................................................................................................................
Delete Recorded Data......................................................................................................................
Modes of Operation : Hourly Display.............................................................................................
Modes of Operation : Weekly Display................................................................................................
Advanced Settings............................................................................................................................
Sync Fitness Data / LifeTrak App......................................................................................................
Helpful Hints & FCC / IC Cautions....................................................................................................
Warnings & Cautions...............................................................................................................
17-18
20-22
23-24
25-28
Back Cover
8-10
1
2
3
4
5-6
7
11
12
13
14
15
16
19
Page 4
BUTTON
LAYOUT
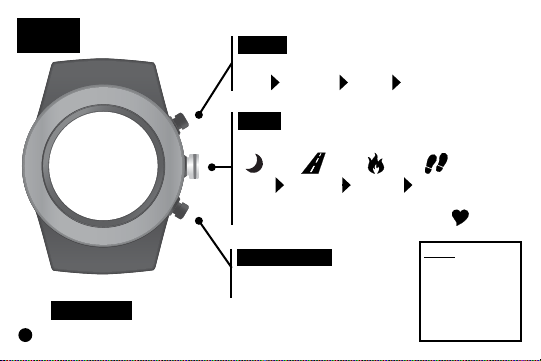
MODE
Press to change modes:
Time Workout Hourly Weekly
VIEW
Press to view:
sleep distance calories steps
Press & hold to read your heart rate
BACKLIGHT
To activate the backlight, double-click VIEW
1
START / ST OP
Press to start and stop in
Workout Mode
NOTE:
The buttons are
NOT intended for
use under water.
If used, water
could leak in and
cause damage.
Page 5
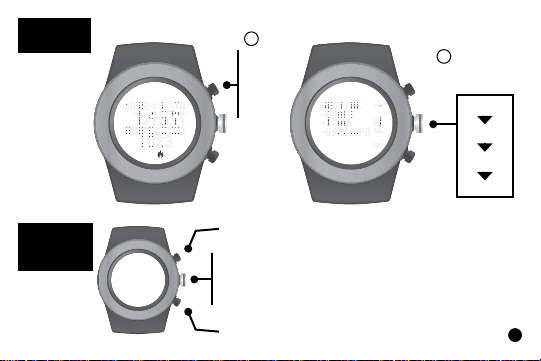
SETTING
GOALS
Goals can be
adjusted on your
tness tracker or
the LifeTrak App
(via Settings)
1
In Time,
hold
MODE
for
3 sec
Select
2
GOALS
steps
distance
calories
sleep
INSIDE
SETTING
MODE
Increase value
Press to go to next setting
Press & hold to
exit setting mode
Decrease value
2
Page 6
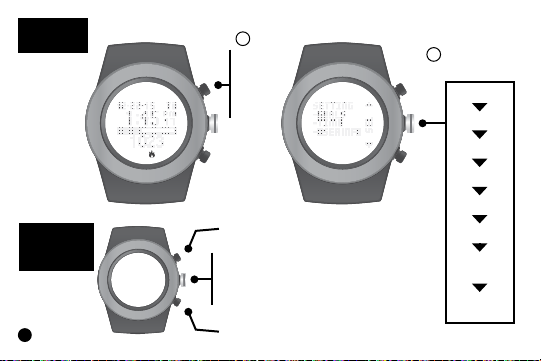
SETTING
TIME
Time Setup
can be adjusted
on your tness
tracker or the
LifeTrak App
(via Settings)
INSIDE
SETTING
MODE
3
1
In Time,
hold
MODE
for
3 sec
Increase value
Press to go to next setting
Press & hold to
exit setting mode
Decrease value
2
Select
TIME
seconds
minute
hour
year
month
day
month-day
format
12/24 hr
format
Page 7
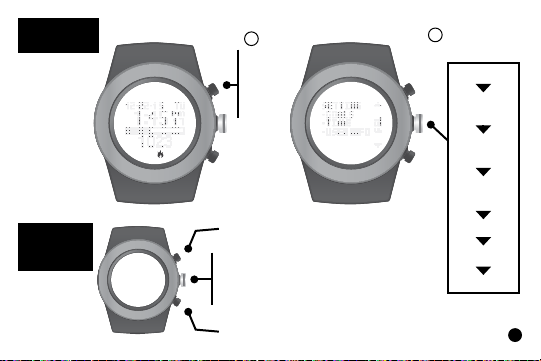
SETTING
USER INFO
User Info can be
adjusted on your
tness tracker or
the LifeTrak App
(via Settings)
INSIDE
SETTING
MODE
1
In Time,
hold
MODE
for
3 sec
Increase value
Press to go to next setting
Press & hold to
exit setting mode
Decrease value
2
Select
USER INFO
gender
birthday
(year)
birthday
(month)
birthday
(day)
unit format
weight
height
4
Page 8
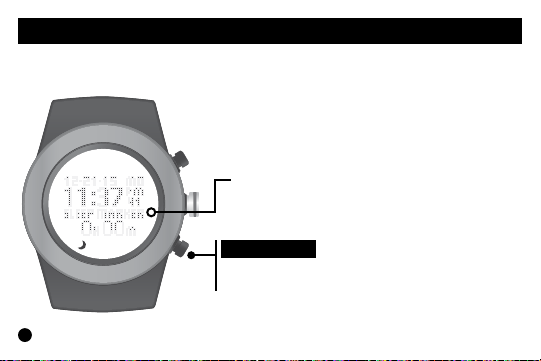
SLEEP TRACKER
The sleep tracker monitors the duration and quality of sleep. It automatically detects
the beginning and end of your sleep session.
For full control, you can also manually
operate the feature by double-clicking
START/ STOP while in Time Mode.
Sleep tracker indicator
(only in manual sleep mode)
START / ST OP
Double-click to manually start / stop the sleep
tracker (must be in Time mode)
5
Page 9
SLEEP TRACKER
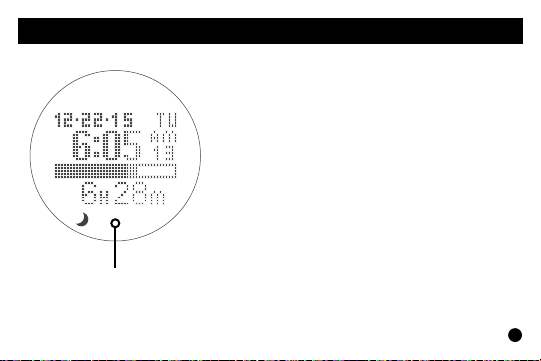
total sleep
time
Total sleep time is accumulated during all
sleep sessions that end on a particular day.
For example, if you fell asleep last night and
woke up this morning, your sleep duration will
be added to today’s total sleep time.
However, if you fell asleep last night at 10:00
p.m. and woke up at 11:00 p.m., that hour
of sleep would be added to yesterday’s total
sleep time.
NOTE: Once you wake up, the total sleep time
will update after a brief period.
NOTE: The minimum sleep time for recorded
data is 45 minutes.
6
Page 10
MODES OF OPERATION : WORKOUT
7
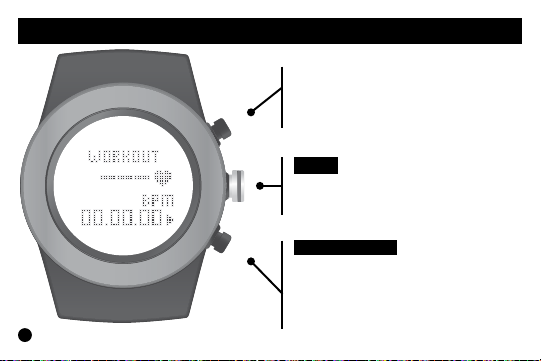
From Time Mode,
press MODE
until you reach
Workout Mode
VIEW
Press to view:
continuous heart rate (via chest belt),
distance, calories, steps
START / ST OP
Press to start / stop recording
your workout
Hold to reset and record data
(Workout mode must be stopped)
Page 11

HEART RATE MONITOR
Your heart is at the center of everything you do – fueling your life and driving your passions.
Monitoring your heart rate and using it in activity tracking is the most accurate way to set
your tness goals and help you reach them.
Why measure heart rate?
- Taking your heart rate will help you stay in your workout zones and help calculate your
calorie burn more accurately.
MEASURE YOUR HEART RATE TWO WAYS
1. VIA CHEST BELT
The Zone R420 is BLE chest belt compatible (sold separately). This additional
feature lets you record continuous heart rate readings to your watch, so you can
capture complete heart rate and calorie burn data during your workout. To help
you track your results, you can also sync your cardio data to the LifeTrak app after
your workout - so you know if you need to push harder next time.
2. VIA FINGER TOUCH
Don’t want to wear a chest belt, but you want a heart rate reading? Get your
ECG heart rate reading at the press of a button - no chest strap needed!
8
Page 12
FINGER TOUCH HEART RATE
This feature will NOT be available when you are using
your compatible BLE chest belt in Workout Mode.
9
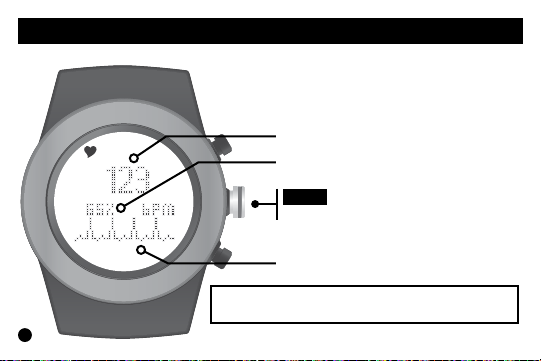
1. Wear snugly around your wrist.
2. Gently press and hold VIEW
seconds until your heart rate appears.
for 3 to 8
Heart Rate (beats per minute)
% of Maximum Heart Rate
VIEW
Press & hold to read your heart rate
Pulse Indicator
Page 13
CONTINUOUS HEART RATE (BLE CHEST BELT)
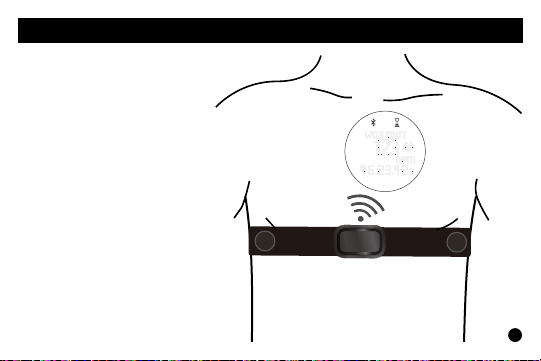
Place your compatible* Bluetooth®
chest belt (chest belt not included)
around your rib cage, just below your
pectoral muscles.
Adjust the elastic strap so it is tight
enough not to move during your
workout, but not so tight that it restricts
breathing.
For optimal results, let the chest belt
‘warm up’ for a few minutes before
starting your workout.
*Please visit the LifeTrak website
www.lifetrakusa.com for a list of compatible BLE heart rate chest
belts / transmitters.
10
Page 14
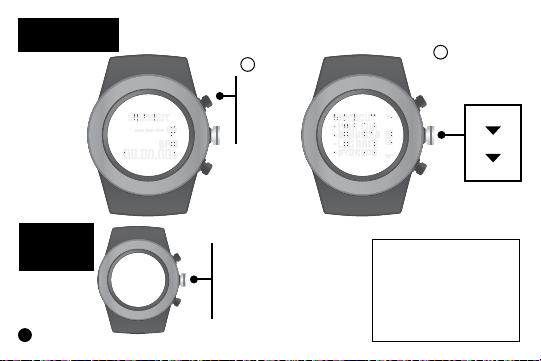
PAIR YOUR
CHEST BELT
INSIDE
SETTING
MODE
11
You must be wearing your BLE chest belt to PAIR to your Zone R420
1
In Workout,
hold
MODE
for
3 sec
Press to start the
pairing process
Press & hold to
exit setting mode
* Clear and Info will not
appear the rst time you
PAIR your BLE chest belt.
After your BLE chest belt
successfully pairs, you can
then unpair (clear) or view
chest belt (info).
2
Select
PAIR CHR
clear*
new
info*
Page 15
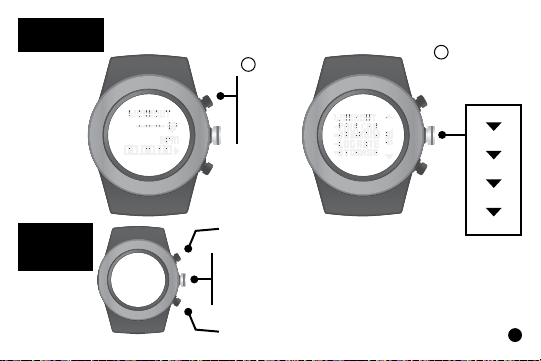
SET HR
LOG RATE
INSIDE
SETTING
MODE
This is how often your heart rate readings will be logged.
Select 1-5 seconds.
1
In Workout,
hold
MODE
for
3 sec
Increase value
Press to go to next setting
Press & hold to
exit setting mode
Decrease value
2
Select
LOG RATE
1
2
3
4
5
12
Page 16
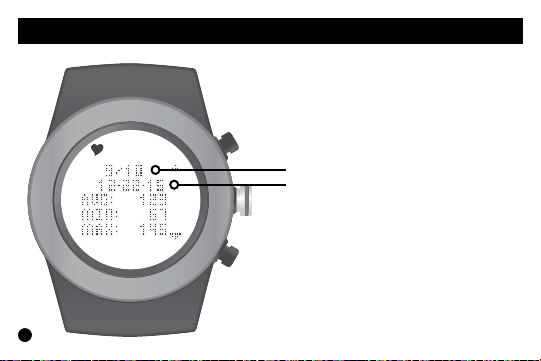
WORKOUT : SESSIONS
13
After resetting your workout data, it will be
saved automatically. You can view the last
10 workout sessions on your Zone R420.
All recorded sessions will be available for
review once uploaded to the app.
Record Number
Date Recorded
Note: Workout is automatically stopped
if there is no movement for 30 minutes.
Page 17
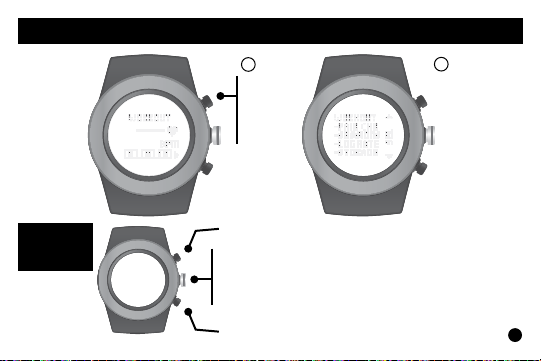
WORKOUT : VIEW RECORDED DATA
1
In Workout,
hold
MODE
for
3 sec
2
Select
SESSIONS
INSIDE
SETTING
MODE
Toggle through sessions (1-10)
Press to review workout data: Heart Rate,
Exercise Time, Steps, Distance, Calories
Press & hold to exit setting mode
Toggle through sessions (1-10)
14
Page 18
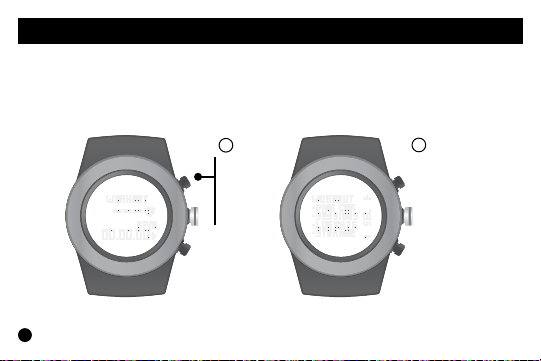
WORKOUT : STORAGE REMAINING
The R420 can store up to 10 recorded workouts. You can review your remaining
workout storage to determine if you need to sync your workouts to the LifeTrak
app & delete data from your watch before your next workout.
1
In Workout,
hold
MODE
for
3 sec
- Your workout will automatically stop if the memory becomes full (during your workout)
15
- If the memory is already full (pre-workout), the workout will not start
2
Select
STORAGE
Page 19
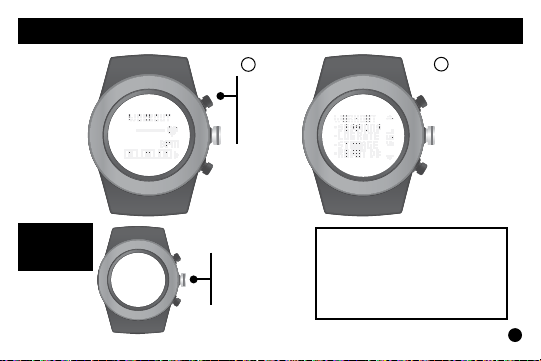
WORKOUT : DELETE DATA
1
In Workout,
hold
MODE
for
3 sec
2
Select
RESET DB
INSIDE
SETTING
MODE
Press to
delete all
recorded
workout
data.
Only your recorded workout
sessions will be deleted from
your watch. Your daily and
weekly information will NOT
be deleted.
16
Page 20
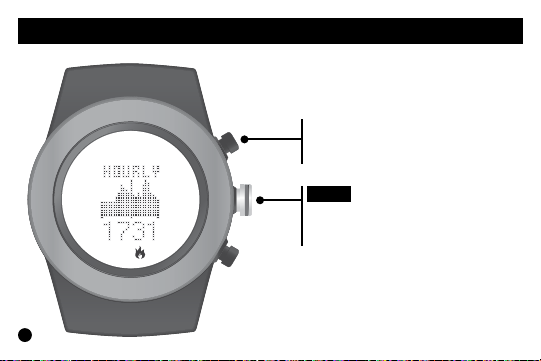
MODES OF OPERATION : HOURLY DISPLAY
Shows your progress throughout the day with
a 24-hour graph. The bars are scaled to t the
data from the 24-hour period.
From Time Mode,
press MODE until you reach
Hourly Display
VIEW
Press to view:
sleep, distance, calories, steps
17
Page 21
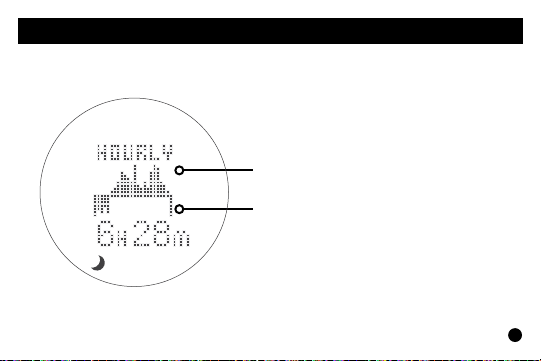
HOURLY DISPLAY : ACTIGRAPHY
The hourly actigraphy view provides a summary of your sleep and activity levels.
Active: Displays your activity levels while
awake. Bars represent three categories:
Normal, Active and Very Active.
Active graph
Sleep graph
Sleep: Displays your sleep levels.
Bars represent three categories:
Light, Medium and Deep Sleep.
18
Page 22
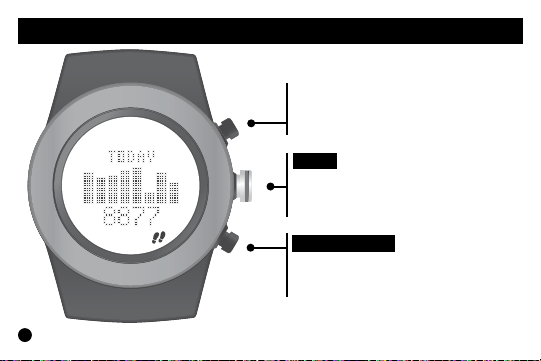
MODES OF OPERATION : WEEKLY DISPLAY
From Time Mode,
Press MODE until you reach
Weekly Display (“Today”)
VIEW
Press to view:
distance, calories, steps, sleep
START / ST OP
Press to browse through the past
7 days
NOTE: Use the LifeTrak app to see trends and insights over weeks, months and years.
19
Page 23
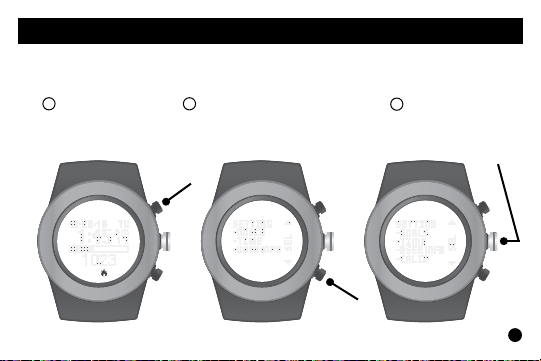
ADVANCED SETTINGS
The calibrations are already programmed with ideal settings. But if you must
adjust it, there is a setting option you can access.
In Time Mode,
1
hold MODE for
3 sec
Press & hold START / STOP
2
for 3 sec. “CALIB” will appear
in the display.
Scroll down &
3
Select CALIB
20
Page 24
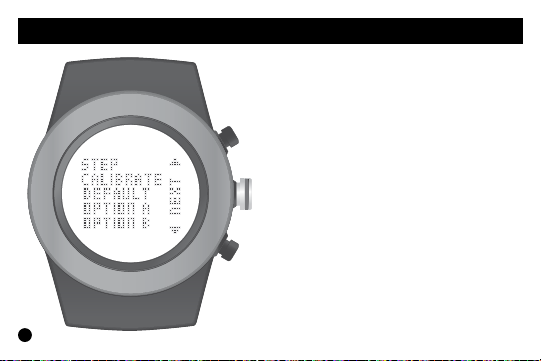
ADVANCED : STEP CALIBRATION
Advanced Settings can be adjusted on your tness tracker or the
LifeTrak App (via Settings)
21
Default: Optimal setting for most
people and conditions. This is the
recommended setting.
Option A: For those with low impact
movements
(e.g., person who treads lightly on
their feet).
Option B: For those with high impact
movements
(e.g., person who treads heavily on
their feet).
Page 25
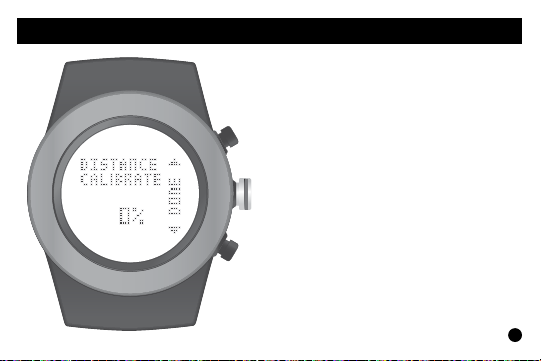
ADVANCED : DISTANCE CALIBRATION
Advanced Settings can be adjusted on your tness tracker or the
LifeTrak App (via Settings)
After selecting one of the three STEP
CALIBRATION options (Default, Option
A or Option B), you will also be able to
adjust the distance calibration, if desired.
The DISTANCE CALIBRATION
range is from -25% to +25%.
Adjust as needed and once
complete, press DONE.
22
Page 26
SYNC FITNESS DATA
1. Make sure Bluetooth is active on your smartphone / tablet.
2. Install the LifeTrak App on your compatible smartphone / tablet, then open the app.
3. Follow prompts in the LifeTrak App to connect your device
Activate the Bluetooth on your
LifeTrak Zone R420:
Bluetooth Indicator
START / ST OP
From TIME MODE, PRESS & HOLD
to begin pairing. Button can be released once
the Bluetooth icon appears in the display.
NOTE: For best results, keep your devices within
23
7 feet / 2 meters of each other when pairing.
Page 27
SYNC FITNESS DATA
Indicator
Status
(activity tracker)
Solid: Bluetooth is
on and linking to a
device
No icon: Bluetooth is
off / not working
You will need to sync your tness data manually with a simple
two-step process each time you wish to transfer the data.
To transfer your tness data, simply
1. Open your app and click on the reload button in the top right corner.
2. Press & Hold START / STOP on your Zone R420 to
activate Bluetooth and start the sync process.
Remember: Bluetooth must be active on your
LifeTrak Zone R420 and your smartphone / tablet
to complete the data transfer (sync).
24
Page 28

HELPFUL HINTS ABOUT TOUCH HEART RATE
If you are having difculty acquiring your heart rate, try the following:
Make sure your LifeTrak tness tracker is snugly strapped to your wrist.
1.
A loose t makes it more difcult to properly measure your heart rate.
2. Upon putting on for the rst time, allow a one-minute “warm up” before trying to
acquire your heart rate.
3. When touching the heart sensor button (VIEW), make sure you are using the soft,
at pads of your ngers, not the tips of your ngers.
4. Touch gently with enough pressure to activate the heart sensor button (VIEW).
Pressing too hard can make it difcult to measure your heart rate.
5. Make sure the back metal plate is lying at on your skin.
6. Make sure your wrist and ngers are clean and free from dirt, oils,
or lotions.
7. Clean the heart sensor button (VIEW) and back metal plate with a mild soap and
water, or similar cleaning solution.
8. Moisten with water the pads of the ngers you are using to contact the heart sensor
button (VIEW).
9. Moisten the surface between the back metal plate and the skin on your wrist with
water.
25
Page 29

HELPFUL HINTS ABOUT ALL-DAY CALORIE TRACKING
• Your body is always burning calories, even when sleeping or not in motion.
Our All-Day Calorie Tracker accounts for these calories burned.
• You will see calories burned even when you’re not wearing your LifeTrak.
This is normal as it is estimating the calories your body typically burns throughout
the day.
• You get more accurate calorie burn information by calculating in your heart rate
readings, so remember to take your heart rate throughout the day and more frequently
during your exercise.
26
Page 30

FCC CAUTION
§ 15.19 Labelling requirements
This device complies with part 15 of the FCC Rules.
Operation is subject to the following two conditions:
(1) This device may not cause harmful interference, and
(2) this device must accept any interference received,
including interference that may cause undesired operation.
§ 15.21 Changes or modication warning
Any Changes or modications not expressly approved by the party responsible
for compliance could void the user’s authority to operate the equipment.
*RF warning for Portable device:
The device has been evaluated to meet general RF exposure requirement.
The device can be used in portable exposure condition without restriction.
27
Page 31

IC CAUTION
This device complies with Industry Canada licence-exempt RSS standard(s).
Operation is subject to the following two conditions:
(1) This device may not cause interference, and
(2) This device must accept any interference,
including interference that may cause undesired operation of the device.
Le présentappareilestconforme aux CNR d’Industrie Canada
applicables aux appareils radio exempts de licence.
L’exploitationestautorisée aux deux conditions suivantes:
(1) l’appareil ne doit pas produire de brouillage, et
(2) l’utilisateur de l’appareildoit accepter tout brouillageradioélectriquesubi,
mêmesi le brouillageest susceptible d’encompromettre le fonctionnement.
This Class [B] digital apparatus complies with Canadian ICES-003.
Cet appareil numérique de la classe [B] est conforme à la norme NMB-003
du Canada.
28
Page 32

WARNINGS & CAUTIONS
THIS IS NOT A MEDICAL DEVICE.
WARNING: Before starting any exercise program, please visit your doctor for a
complete physical and to discuss your exercise plans.
PLEASE READ all of the information in this instruction manual before using the unit.
Make sure you fully understand the functions and limitations of this product before
using it.
NOTICE TO PEOPLE WEARING PACEMAKERS: While the heart rate monitor
is a passive system and should have no direct effect on a pacemaker, we strongly
recommend anyone tted with such a device contact their physician or cardiologist
before using this product or starting an exercise program.
NEVER expose the heart rate monitor to chemicals or cleaning solvents.
Exposure to insect repellent and sunscreen may also damage the unit.
NOTICE: While the heart rate monitor (watch) is 30M water resistant, IT IS NOT
WATERPROOF. Do NOT press buttons under water - this will cause damage.
29
Visit our website for more helpful tips: www.lifetrakusa.com
LifeTrak • 39962 Cedar Blvd • Ste 285 • Newark, CA 94560 • 1-855-903-9030
 Loading...