

Page 1
®®
User Guide
October 2014
Page 2

Table of Contents
Getting Started
Display Layout (Home Screen)
Button Layout
Mode Overview
Goal Setup
Time Setup
Advanced Setup
Bluetooth® Connection
Notications
LightTrak
SleepTrak 2.0
Heart Rate
Inactivity Alert
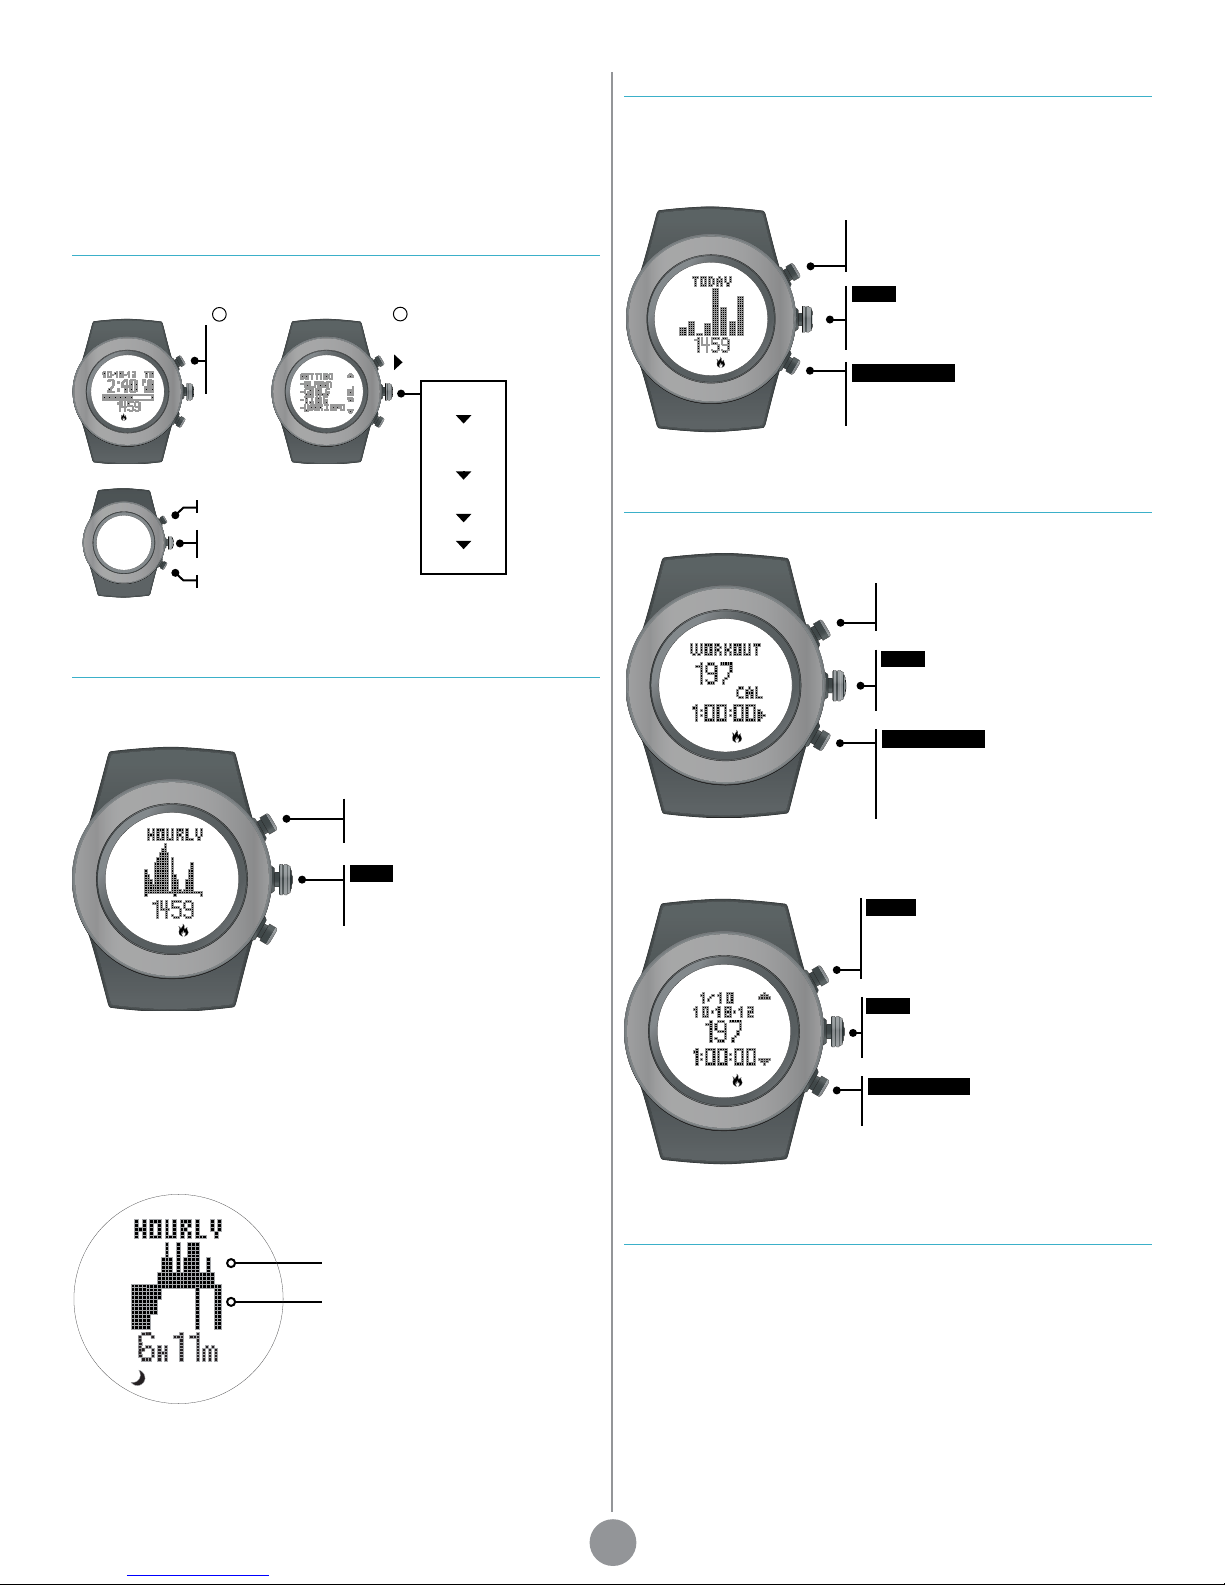
Hourly Display
TM
1
1
1
1
1
1
1
2
2
2
3
3
4
4
Weekly Display
Workout Mode
All-Day Calorie
Dynamic Distance Calibration
Step/Distance Calibration Setting
How to Change Your Bands
Care & Maintenance
Battery
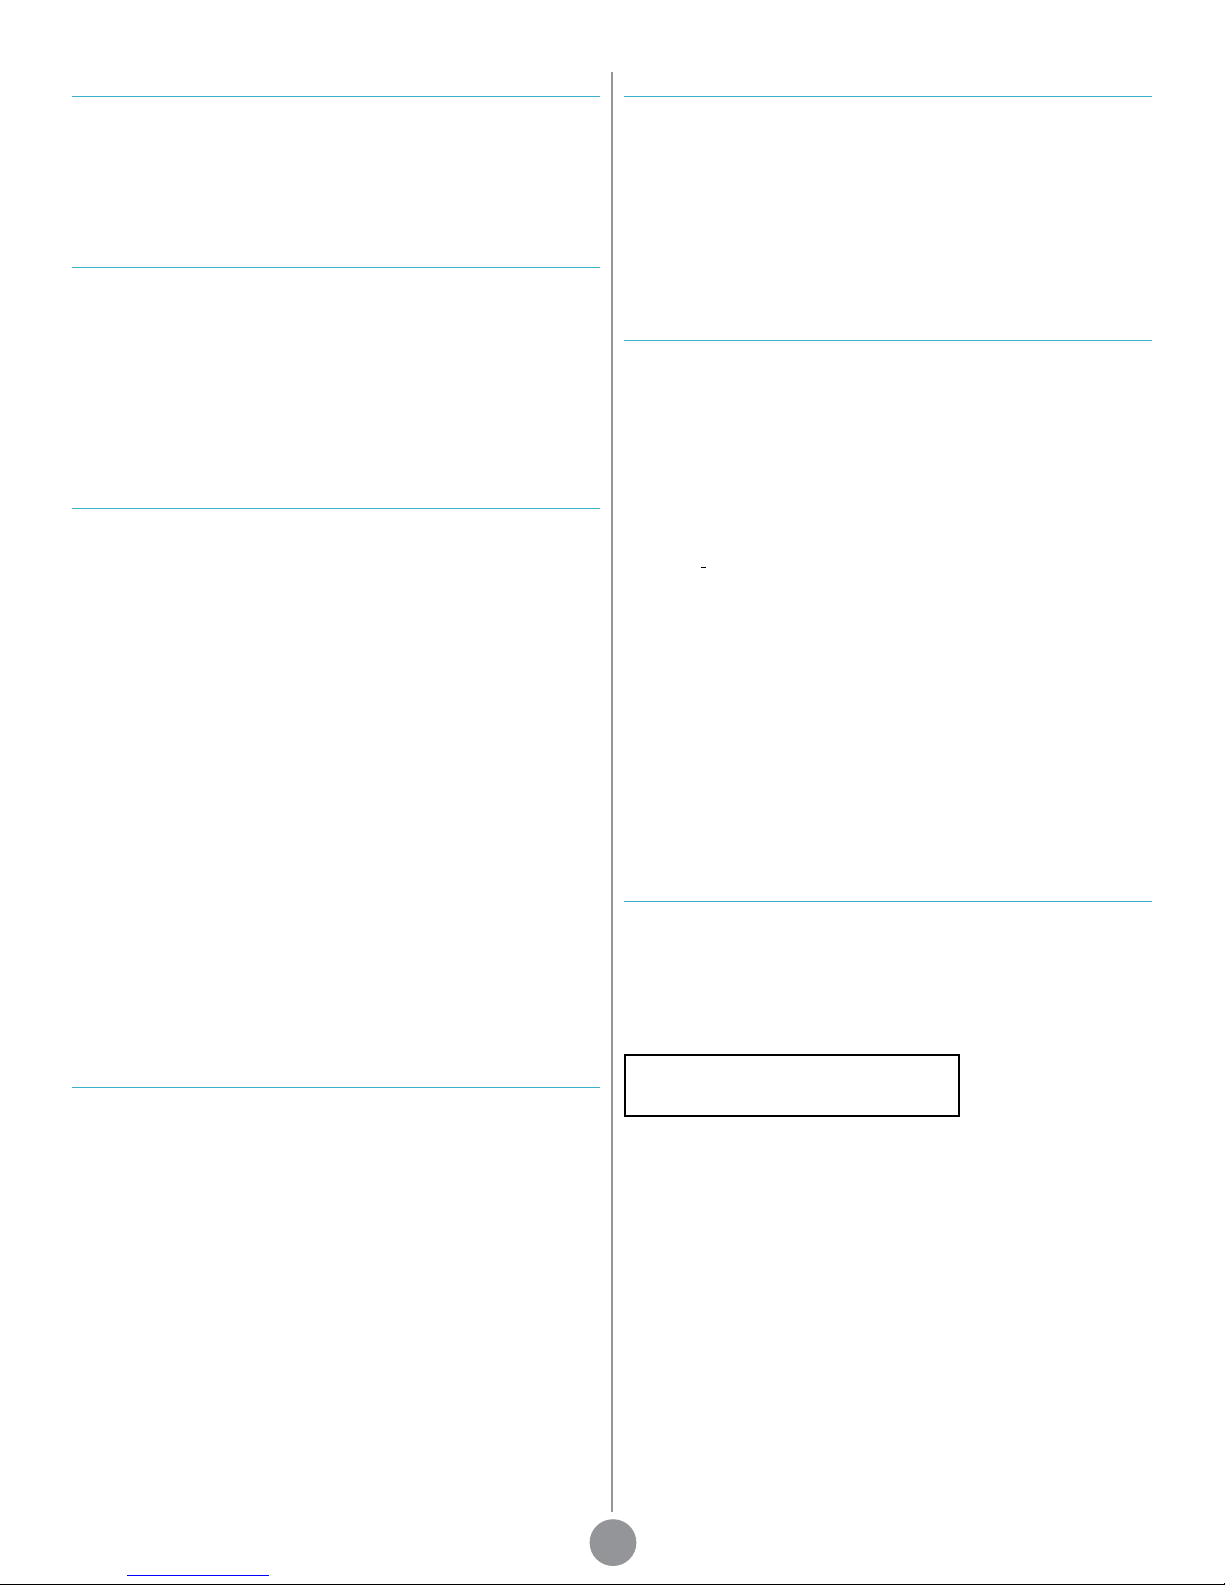
Power Save Screen
Master Reset
Patent
Limited One (1) Year Warranty
Compliance
Limitations
4
4
4
5
5
5
6
6
6
6
7
7
7
7
Disclaimer
Specications
Contact
7
7
7
Page 3
Getting Started
Goal Setup
First remove the sticker from the screen.
To turn on your life tracker, press and hold any button.
You are now ready to enjoy your LifeTrak life tracker. Here’s to a healthier
you!
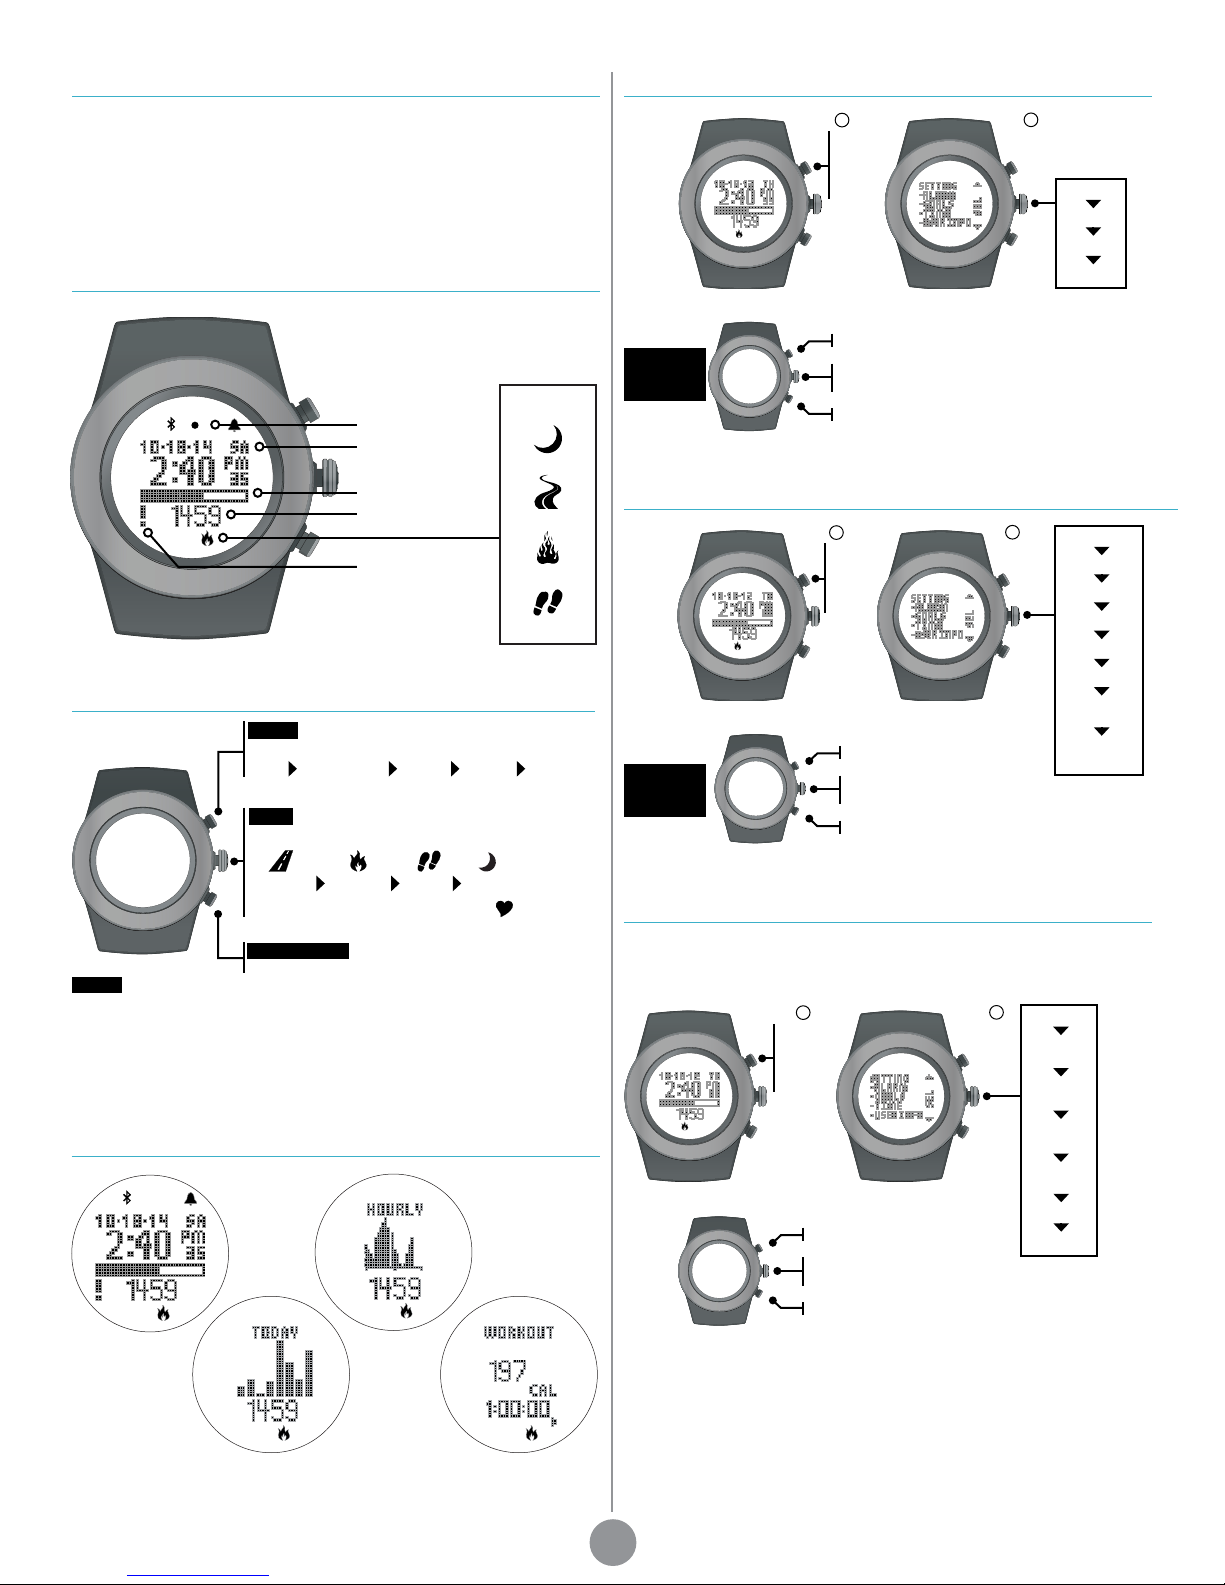
Display Layout (Home Screen)
Activity Type
LightTrak Sensor
Time/Date
Goal Progress Bar
Activity Value
Notication Alert
sleep
distance
calories
steps
Button Layout
MODE
Press to change modes:
Time Notications Hourly Weekly Workout
VIEW
Press to view:
INSIDE
SETTING
MODE
Time Setup
INSIDE
SETTING
MODE
1
In Time,
hold
MODE
for 3
sec
Increase value
Press: go to next setting
Press & hold: exit setting mode
Decrease value
1
In Time,
hold
MODE
for 3
sec
Edit/increase value
Press: go to next setting
Press & hold: exit setting mode
Edit/decrease value
2
Select
GOALS
2
Select
TIME
steps
distance
calories
sleep
seconds
minute
hour
year
month
day
month-day
format
12/ 24 hr
format
distance calories steps sleep
Press & hold to read your hear t rate
START/STOP
LIGHT
Press MODE + START/STOP,
MODE + VIEW or double-click VIEW
In the dark, pressing VIEW will also activate light
NOTE: The buttons are not intended for use under water.
Press to start and stop in Workout
Mode Overview
Time
(home
screen)
Hourly
Advanced Setup
Advanced setup uses your personal information for the distance and
calorie burn calculations, allowing you to get more out of your life tracker.
1
In Time,
hold
MODE
for 3
sec
Edit/increase value
Press: go to next setting
Press & hold: exit setting mode
Edit/decrease value
2
Select
USER
INFO
gender
birthday
(year)
birthday
(month)
birthday
(day)
unit
format
weight
height
Weekly Workout
NOTE: If there is no activity in a particular mode for 60 seconds, the screen
will return to Time.
1
Page 4
Bluetooth® Connection
Symbols
Transfer data between your life tracker and Bluetooth Smart Ready
devices. Even get notied of phone calls, emails and messages right on
your tracker.
Before you can transfer data, you must install our LifeTrak app on your
Bluetooth Smart Ready device. You will also have the ability to set up your
tracker (e.g., set user info and goals) through the app.
Visit www.lifetrakusa.com/app or your app store.
Bluetooth Smart Ready Device Setup
Once the LifeTrak app is installed, make sure Bluetooth on your device is
turned on and then open the app. Tap on “Connect a New Watch.” Locate
your LifeTrak life tracker and tap on “Connect to Device.” The device will now
attempt to pair.
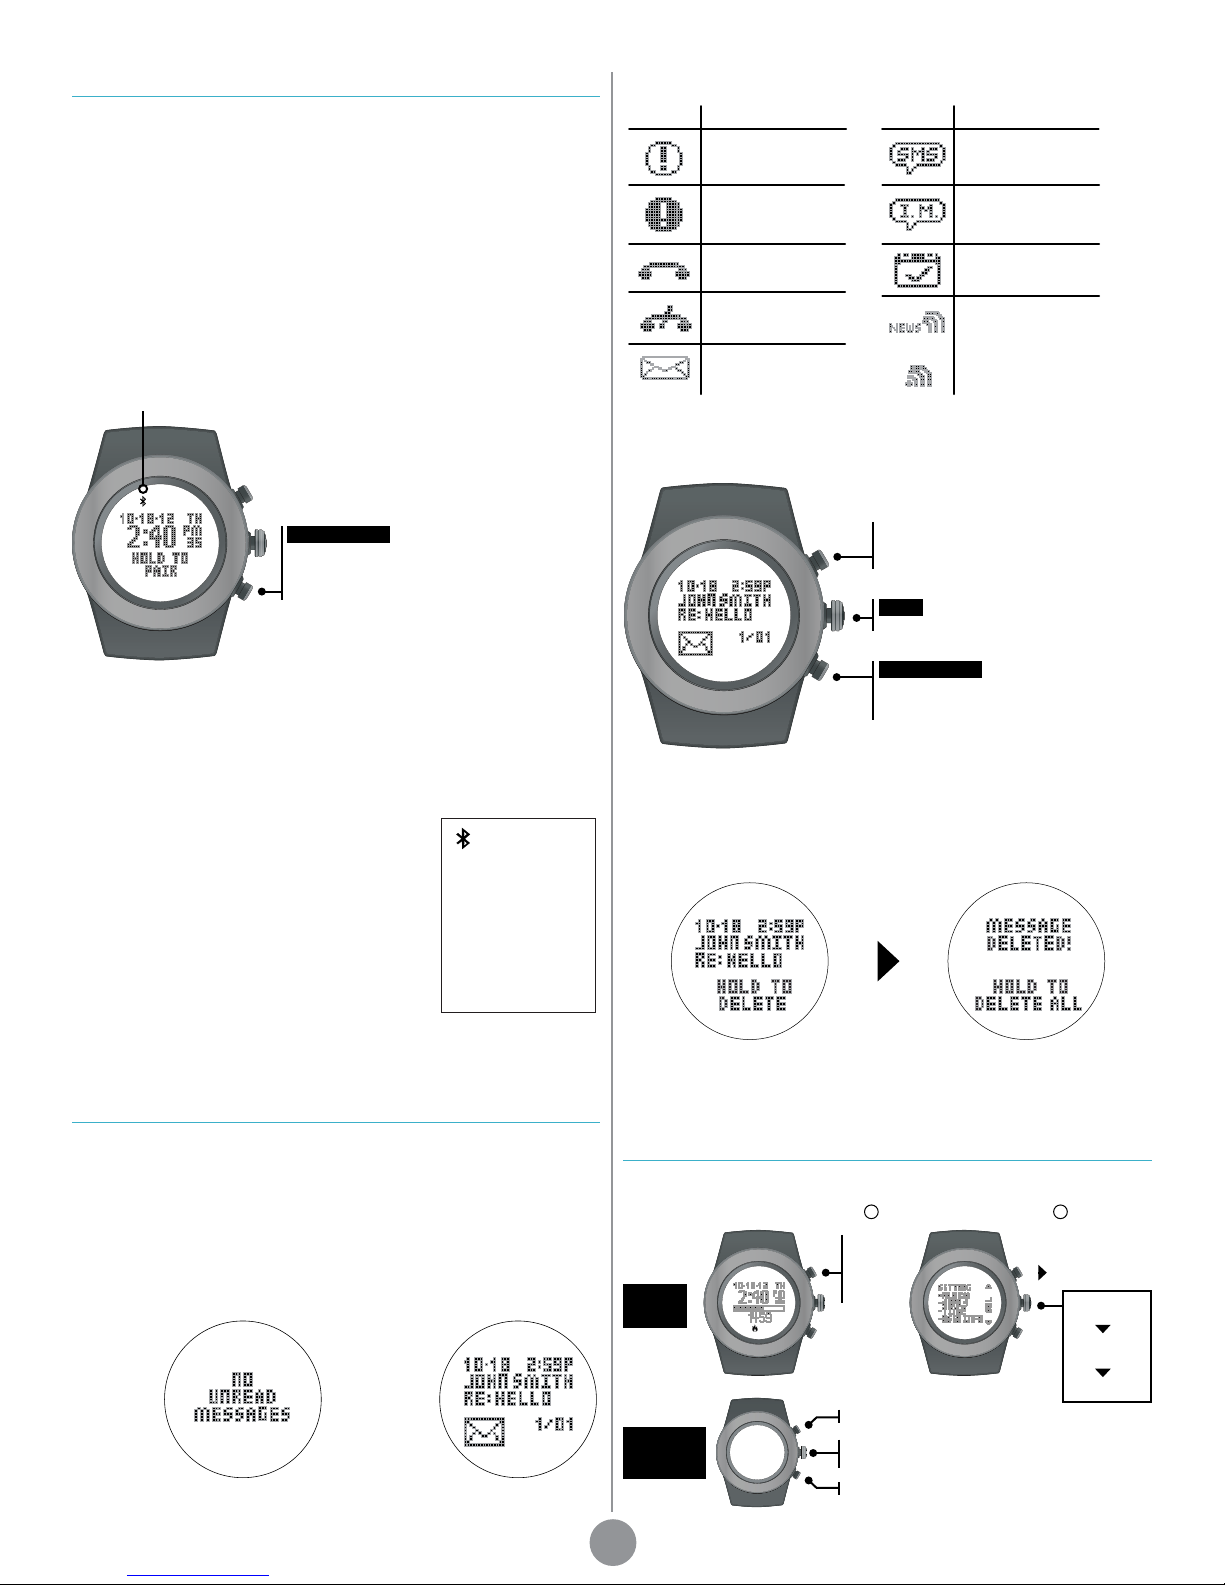
Bluetooth Indicator
START/STOP
Hold to begin pairing (must be in Time). Button
can be released once pairing action begins.
NOTE: For best results, keep your devices
within 2 meters of each other when pairing.
Next step: set up your life tracker.
Now that your device is attempting to pair, we need your life tracker to do the
same.
While in Time, press and hold START/STOP until it activates a signal animation
on the screen. Your tracker will now attempt to pair with your device.
Syncing Data
Once the life tracker and your device are paired,
you can now sync tness data and notications.
While notications will sync automatically whenever
one comes through, syncing your tness data is
done manually with a simple one-step process
each time you wish to transfer the data.
To transfer your tness data from life tracker to
device, simply open your app and click on the
Bluetooth Indicator
Status
Solid: Bl uetoot h is on
and linked to a devi ce
Flashing: Bluetooth
is trying to est ablish a
connection
No icon: Bluetooth is
inactive or off
reload button at the top-right corner.
See the Bluetooth Indicator Status on this page for detailed information.
Notications
You will be able to receive notications like phone calls, emails and messages right on your life tracker.
You must pair your tracker with our LifeTrak app to receive notications. Visit www.lifetrakusa.com/app or your app store to download.
Once paired, calls and messages from your Bluetooth Smart Ready
device will automatically be sent to your tracker.
Notications mode
Displayed if
there are no
messages
on your
tracker
NOTE: Bluetooth on your device must be turned on to receive notications.
Example
of an email
notication
on your
tracker
Symbol Notication Type
Generic/Social Alert
High Priority Alert
Incoming Call
Symbol Notication Type
SMS/MMS
Message
Instant Message
Calendar/Planner
Alert
Missed Call
or
News Feed
Email
Up to 20 notications can be stored on your life tracker. Select which types of
notications you want sent to your tracker through the LifeTrak app settings.
From Time,
press MODE until you reach
Notications
VIEW
Press & hold to delete messages
START/STOP
Press to browse through your
messages
Delete notications
You can delete a single message or all messages depending on how
long you hold VIEW.
The initial press and hold of VIEW
will delete the current message.
Once the current message is
deleted, you can continue to hold
VIEW to delete all messages.
LightTrak
TM
Will suggest during the day if you should get more light.
2
Select
ALARMS
DAY LIGHT
set alert
on/off
exposure
level
LIGHT
SETUP
1
In Time,
hold
MODE
for 3
sec
duration
Edit/increase value
INSIDE
SETTING
MODE
Press: go to next setting
Press & hold: exit setting mode
Edit/decrease value
2
Page 5
Will suggest prior to bedtime if you should reduce light exposure.
2
Select
ALARMS
NITE LIGHT
LIGHT
SETUP
INSIDE
SETTING
MODE
1
In Time,
hold
MODE
for 3
sec
Edit/increase value
Press: go to next setting
Press & hold: exit setting mode
Edit/decrease value
set alert
on/off
exposure
level
duration
Intelligent Wake-Up
Your life tracker includes Intelligent Wake-Up and a gentle vibrating alarm.
This alarm can be set to wake you at your optimal time.
The Intelligent Wake-Up feature can be adjusted in the Alarm setup (under
the “Adjust Alert Start” setting; see p.19).
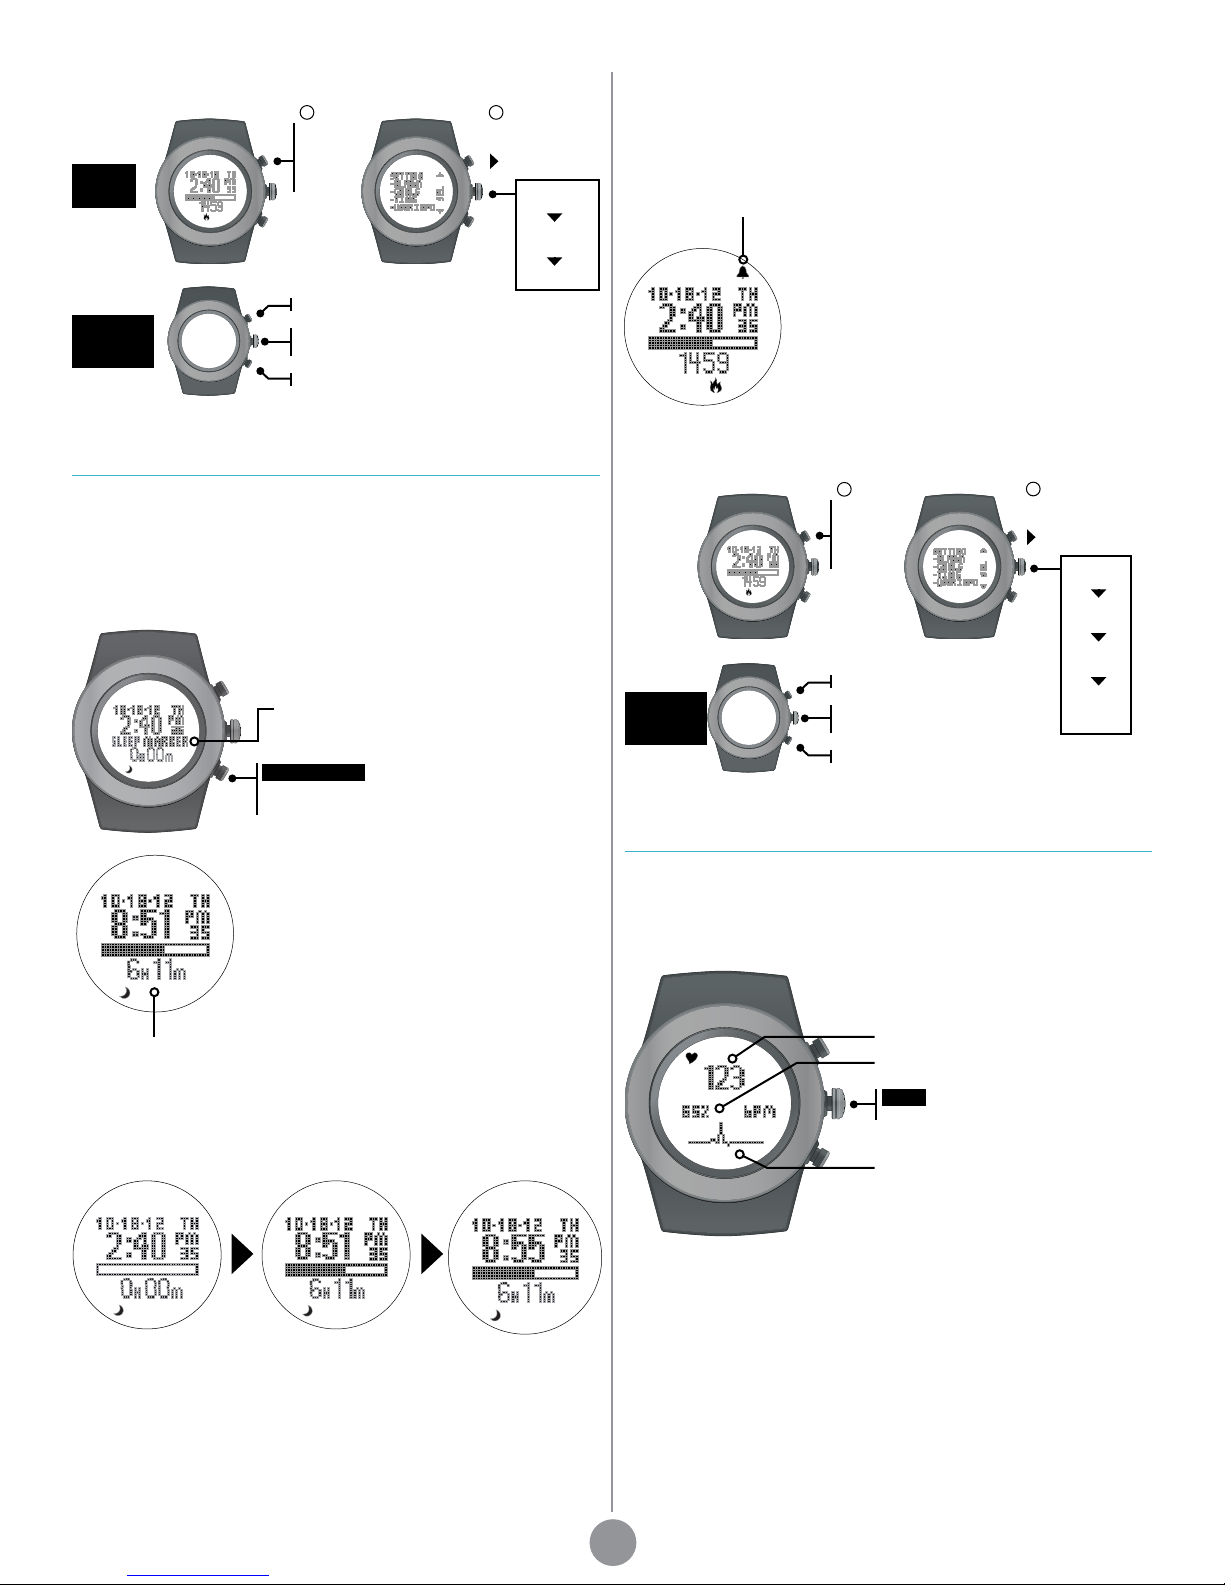
Alarm Indicator
After set ting the alarm time, you have the option
of setting an Intelligent Wake-Up window
(0-59 mins) which will activate prior to the alarm
time. During this window, the vibration alarm
will activate only if you are no longer in a deep
sleep stage.
If you are still in a deep sleep stage during
the Intelligent Wake-Up window, the vibration
alarm will activate at the set alarm time.
SleepTrak 2.0
The sleep tracker monitors the duration and quality of sleep based on motion,
arm posture and ambient light. It automatically detects the beginning and end
of your sleep session.
For full control, you can also manually operate the feature by double-clicking
START/STOP while in Time.
Sleep data collection
Sleep tracker indicator
(only in manual sleep mode)
START/STOP
Double-click to manually start/stop the
sleep tracker (must be in Time)
SleepTrak 2.0 is smart enough to distinguish if
the device is on or off your wrist. Sleep tracking
is disabled when the device is not on your wrist.
Total sleep time is accumulated during all sleep
sessions that end on a particular day. For
example, if you fell asleep last night and woke up
this morning, your sleep duration will be added to
today’s total sleep time.
However, if you fell asleep last night at 10:00 p.m.
and woke up at 11:00 p.m., that hour of sleep
Total sleep time
NOTE: Once you wake up, the total sleep time will update after a brief period.
NOTE: Minimum sleep time for recorded data is10 minutes.
would be added to yesterday’s total sleep time.
Intelligent Wake-Up Setup
2
Select
ALARMS
WAKEUP
set alert
on/off
set time
(min)
set time
(hr)
adjust
alert
start
INSIDE
SETTING
MODE
1
In Time,
hold
MODE
for 3
sec
Edit/increase value
Press: go to next setting
Press & hold: exit setting mode
Edit/decrease value
Heart Rate
Taking your heart rate will help you stay in your workout zones and help
calculate your calorie burn more accurately.
1. Wear snugly around your wrist.
2. Gently press and hold VIEW for 3 to 8 seconds until your heart rate
appears.
Heart Rate (beats per minute)
% of Maximum Heart Rate
VIEW
Press & hold to read your hear t rate
Sleep tracking sequence
Sleep tracker is on.
NOTE: In manual
sleep mode, “SLEEP
MARKER” will appear
on the screen.
After waking up,
shows pending
sleep time.
After brief period,
pending sleep time
becomes ofcial.
Final value may var y
from pending value.
Pulse Indicator
Helpful Hints
If you are having difculty acquiring your heart rate, try the following:
1. Make sure your life tracker is snugly strapped to your wrist. A loose t
makes it more difcult to properly measure your hear t rate.
2. Upon putting on for the rst time, allow a one-minute “warm up”
before trying to acquire your heart rate.
3. When touching the heart sensor button (VIEW), make sure you are
using the soft, at pads of your ngers, not the tips of your ngers.
4. Touch gently with enough pressure to activate the heart sensor
button (VIEW). Pressing too hard can make it difcult to measure
your heart rate.
5. Make sure the back metal plate is lying at on your skin.
6. Make sure your wrist and ngers are clean and free from dirt, oils,
or lotions.
3
Page 6
7. Clean the heart sensor button (VIEW) and back metal plate with a
mild soap and water, or similar cleaning solution.
8. Moisten with water the pads of the ngers you are using to contact
the heart sensor button (VIEW).
9. Moisten with water the surface between the back metal plate and the
skin on your wrist.
Weekly Display
Shows your results for the past 7 days. The bars are scaled to t the data
from the past week.
NOTE: If you want to see more than 7 days, use the LifeTrak app to see trends
and insights over weeks, months and years.
Inactivity Alert
Helps motivate with alerts if you have been inactive.
1
In Time,
hold
MODE
for 3
sec
Edit/increase value
Press: go to next setting
Press & hold: exit setting mode
Edit/decrease value
2
Select
ALARMS
INACTIVE
set alert
on/off
set inactive
time length
(min/hr)
set step
threshold
start time
end time
Hourly Display
Shows your progress throughout the day with a 24-hour graph. The bars are
scaled to t the data from the 24-hour period.
From Time,
press MODE until you
reach Hourly Display
VIEW
Press to view:
distance, calories, steps, sleep
From Time,
press MODE until you reach Weekly
Display (“Today” will be shown)
VIEW
Press to view:
distance, calories, steps, sleep
START/STOP
Press to browse through the past
7 days
Workout Mode
Records data from an individual workout.
From Time,
press MODE until you reach
Workout
VIEW
Press to view:
distance, calories, steps
START/STOP
Press to start/stop recording your
workout
Hold to reset data (Workout mode
must be stopped)
After resetting your workout data, it will be saved automatically. You can view
the last 10 workouts recorded
MODE
In Workout, hold to view past
workout records.
Press to go to next workout record
The hourly actigraphy view provides a summary of your sleep and
activity levels.
Active: Displays your activity levels while awake. Bars represent three
categories: Normal, Active and Very Active.
Sleep: Displays your sleep levels. Bars represent three categories:
Light, Medium and Deep Sleep.
Active graph
Sleep graph
NOTE: The hourly actigraphy can only be seen when viewing sleep data.
VIEW
Press to view: distance, calories,
steps. Hold to exit workout records
START/STOP
Press to go to previous workout
record
All-Day Calorie
Your life tracker provides a more comprehensive calorie count by factoring
in calories burned through ever yday living, in addition to exercise and
activity. This is a great tool to compare against your daily calorie intake!
It also provides a more accurate calorie count by calculating in your heart
rate readings. So remember to get your heart rate throughout the day and
more frequently during your exercise.
Helpful Hints
1. Your body is always burning calories, even when sleeping or not
in motion. Our All-Day Calorie tracker accounts for these calories
burned.
2. You will see calories burned even when you’re not wearing your life
tracker. This is normal as it is gauging the calories your body typically
burns throughout the day.
4
Page 7
Dynamic Distance Calibration
For a more accurate distance, your life tracker adjusts your stride length
based on how fast you are walking or running.
Helpful Hints
If you are having difculty acquiring your steps, try the following:
1. Take 30 - 40 steps before checking your step count.
2. If your steps and/or distance data are being over or undercounted,
try adjusting the calibration settings (see next section).
NOTE: Step count is determined by actual steps. Arm motion can affect
this count.
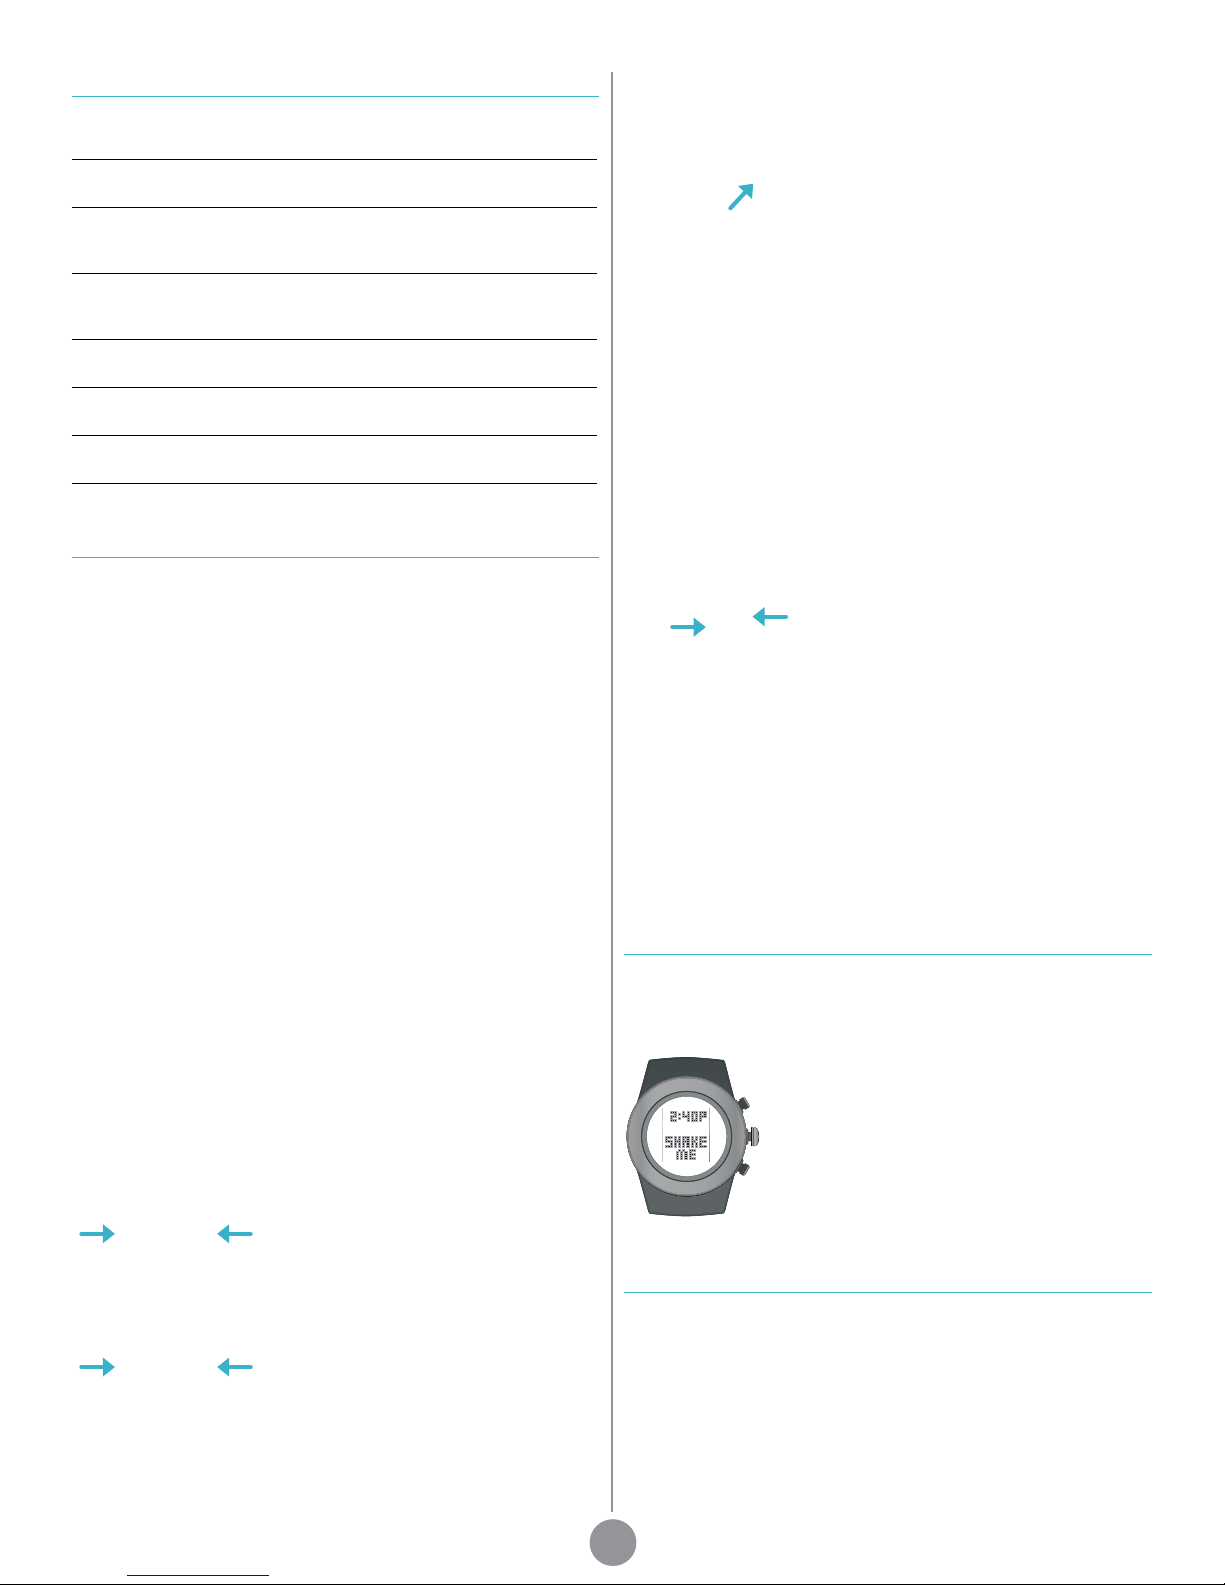
How to Change Your Bands
The bands of your life tracker are reversible and replaceable:
1. Carefully slide the bands off the case. The bands can slide in either
direction.
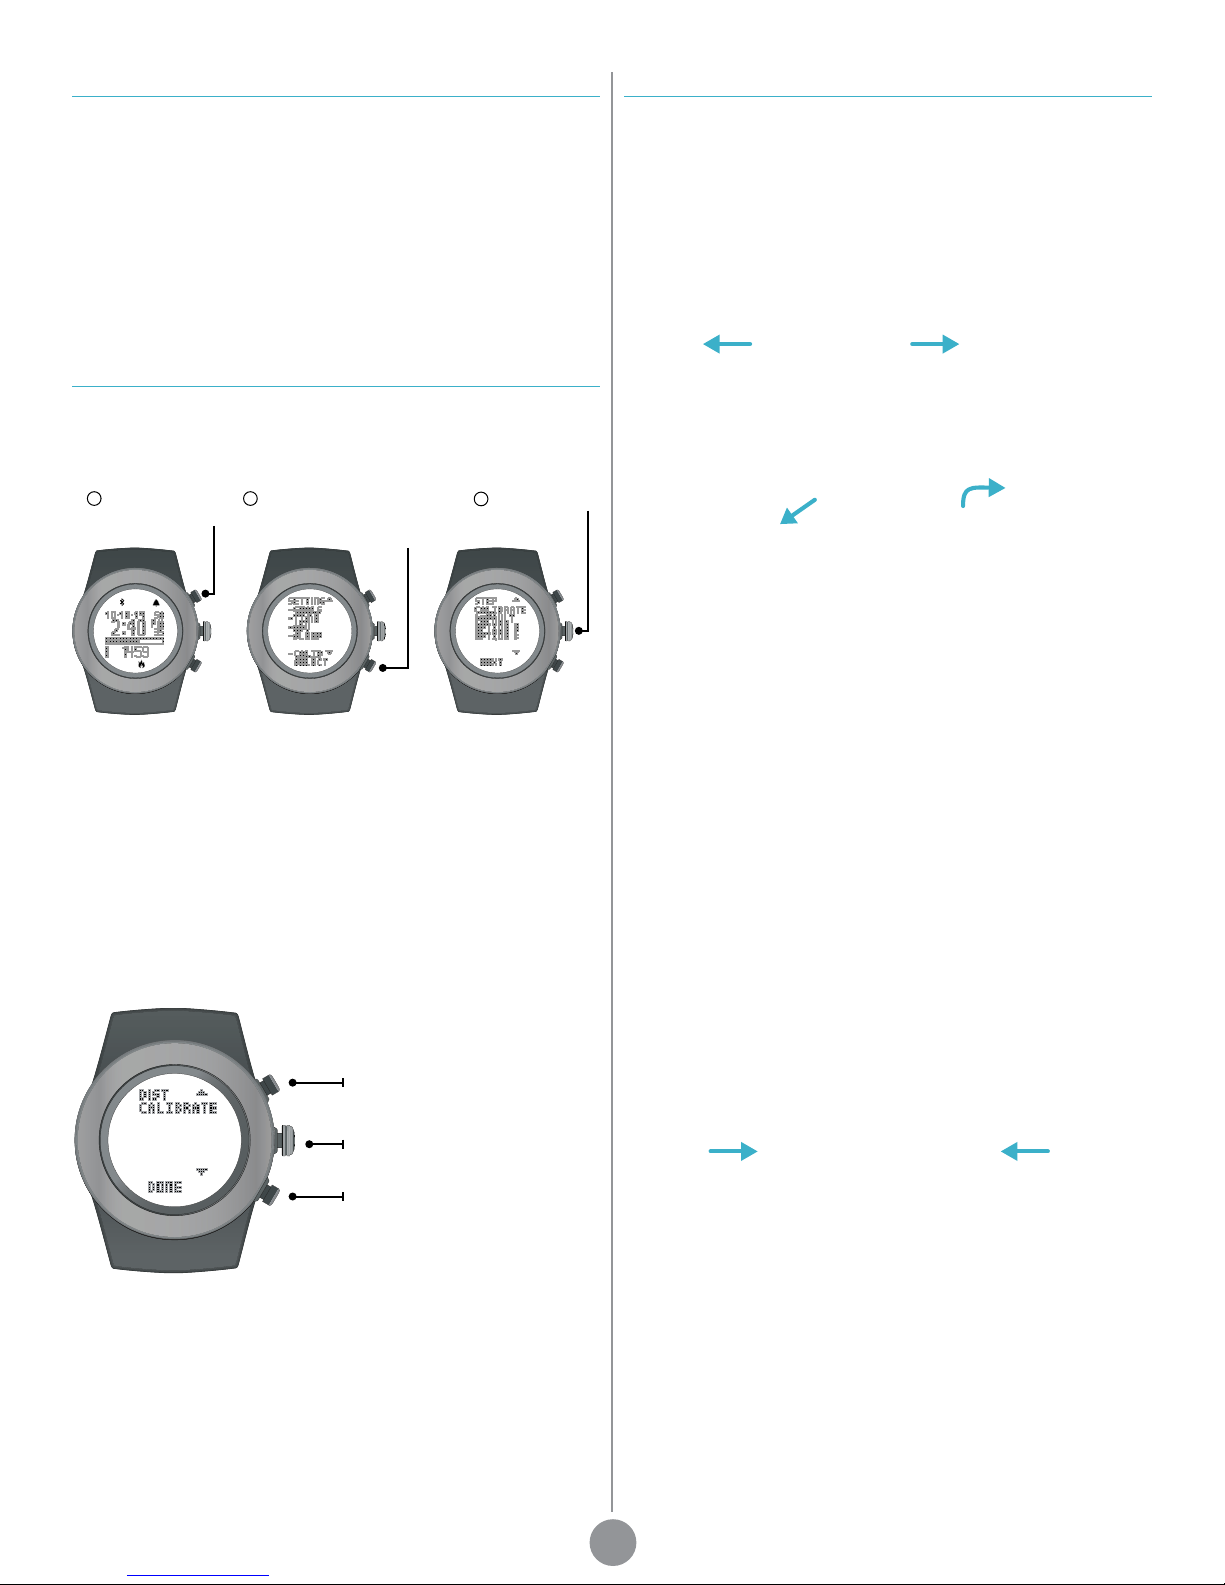
Step/Distance Calibration Setting
The calibrations are already programmed with ideal settings. But if you
must adjust it, there is a setting option you can access.
Step Calibration Setting
1
In Time,hold
MODE for 3 sec
Default: Optimal setting for most people and conditions. This is the
recommended setting.
Option A: For those with low impact movements (e.g., person who
treads lightly on their feet).
Option B: For those with high impact movements (e.g., person who
treads heavily on their feet).
Distance Calibration Setting
After selecting one of the three options (Default, Option A or Option B),
you will also be able to adjust the distance calibration, if desired.
Calibration range is from -25% to +25%.
2
In setting mode, hold
START/STOP for 3 sec
“CALIB” will appear in the menu
3
Select CALIB
Actual model may vary from images shown.
2. On the short band (top band), remove the Clasp plate by pulling up and
away from the band.
3. Place the Clasp on the reverse side of the band into the two holes. Press
r m l y a r o u n d t h e t w o h o l e s t o s e c u r e t h e C l a s p . Y o u m a y h e a r i t s n a p i n p l a c e .
Make sure the base of the Clasp pins are fully secured into the band
(see image below).
4. For a more rened t, the Clasp can be rotated before placing into
the band.
5. Carefully slide the bands back onto the case. The bands can slide in
either direction.
Increase value
Select value
Decrease value
5
Page 8
Care & Maintenance
The buttons are not intended for use in or under water as this may cause
water leakage.
Avoid rough usage or severe impacts.
Keep the heart sensor button (VIEW) and back metal plate free from dirt,
oils, or other contaminants.
2. Using your ngers (or a ne-point tweezer or similar tool), carefully pull
back the tab away from the battery. The battery should pop up or out.
Periodically clean using a soft cloth with mild soap and water, or similar
cleaning solution.
Keep out of extreme heat or cold.
Do not expose to intense direct sunlight for long periods of time.
Do not expose to chemicals such as gasoline, alcohol, or solvents.
Battery
See the replace battery video on www.lifetrakusa.com for more detailed
info. Removing the band may make replacing your battery easier to do.
Battery replacement should occur when:
• The display fades in part or completely
• The Heart Rate function will not activate
• The message LOW BATT shows up
The battery life will vary depending on usage. It is typically 6 months under
these conditions average daily conditions:
• Linked to your smartphone or tablet, via Bluetooth, for 12 hours.
• Searching for your smartphone or tablet, via Bluetooth, 1 hour.
• 20 notications received.
• Backlight used once for 3 seconds.
• Gentle vibrating alarm activates for a total of 15 seconds.
• You synchronize your tness data to your smartphone or tablet once
per day.
• Heart rate, steps, distance calories, LightTrak and SleepTrak:
unlimited.
We recommend battery replacement be done by a watch repair service center to ensure the water seals are not compromised during the
process.
Your life tracker uses one (1) standard lithium replacement battery:
CR2032
NOTE: Be careful not to move the rubber water seal in the compartment.
Also, be careful not to pull watch module out of the case.
3. Before inserting a new battery, you will need to discharge any
remaining power in your life tracker.
To do this, take a small metal object (e.g., coin) and touch the positive
(+) and negative (-) contact points at the same time. The negative
contact point is a spring.
Don’t worry, you will NOT get shocked.
NOTE: If, for any reason, the new battery touches the contact points
and is removed (i.e., installed and then taken out), Step 3 must be
repeated.
4. Install the new battery with the positive (+) side facing up.
5. Replace the back cover and the four screws.
NOTE: Make sure the rubber water seal is seated correctly in the
battery compartment before putting the back cover on.
Power Save Screen
To conserve the battery, the screen will shut off after 30 minutes of
inactivity. Only current time and the message “Shake Me” will be displayed.
To turn your screen on, simply shake it or press any button.
Replacing the Battery
NOTE: Removing the battery will erase all settings and data from your life
tracker.
1. Remove the four screws from the back cover and carefully lift it off.
Master Reset
To perform a master reset and clear all data, hold together for 3 seconds
MODE + START/STOP + VIEW. Your life tracker will reset and turn off.
To activate again, press and hold any button.
NOTE: A master reset will clear all data, settings and history records.
6
Page 9
Patent
Your life tracker and heart rate technology are a result of, and protected by, the
following patents:
US: 5,738,104 & 5,876,350
Europe: EPO 0861045B1
Limited One (1) Year Warranty
Your life tracker is warranted for a period of one (1) year from the date of
purchase from an authorized retailer.
If defective, return it with the original receipt, or copy, to your original retailer or
to LifeTrak for a replacement.
This warranty covers defects in materials and workmanship only. It does
not cover the batter y, damage due to abuse or misuse, accidents, or any
commercial use.
Compliance
This device complies with Part 15 of the FCC Rules. Operation is subject to the
following two conditions:
1. This device may not cause harmful interference, and (2) this device must
accept any interference received, including interference that may cause
undesired operation. This device and its antenna(s) must not be colocated or operating in conjunction with any other antenna or transmitter.
FCC Caution: Any changes or modications not expressly approved by the
party responsible for compliance could void the user’s authority to operate this
equipment.
IC: This Class B digital apparatus complies with Canadian ICES-003.
Cet appareil numérique de la classe Best conforme à la norme NMB-003
du Canada.
This device complies with Industry Canada licence-exempt RSS standard(s).
Operation is subject to the following two conditions: (1) this device may not
cause interference, and (2) this device must accept any interference, including
interference that may cause undesired operation of the device.
Disclaimer
Your life tracker is not a medical device, nor intended for use in medical or
patient monitoring applications. It is not intended for use in any commercial
application.
Always consult a physician before star ting any physical activity.
The features and/or images of your life tracker may vary slightly from those
described in this guide. The information in this manual is intended to be for
informational purposes only, and is subject to change without notice.
Specications
Workout
Chronograph range: 9 hr, 59 min, 59 sec
Step/Goal range: 0 - 99,999 steps
Calorie/Goal range: 0 - 99,999
Distance/Goal range: 621.3 mi / 999.9 km
Sleep
Sleep/Goal range: 1 hr 00 min - 14 hr 50 min
History
Memory: 20-day memory storage, most recent 7 days viewable on wrist
Heart Rate
Heart rate range: 30 - 240 BPM
Time
AM, PM, hour, minute, seconds
12/24 hr format
Calendar: month, day, date (w/auto leap year adjustment)
Advanced Setup
Age range: 5 - 99
Height range: 40 - 84 in / 100 - 220 cm
Weight range: 44 - 440 lb / 20 - 200 kg
Other
Backlight
Water resistant up to 30 meters / 90 feet
DECLARATION DE CONFORMITE D’INDUSTRIE CANADA
Ce périphérique a été testé et reconnu conforme auxlimites spéciées dans
RSS -210.
Son utilisation est soumise aux deux conditions suivantes:
1. il ne doit pas provoquer d’interférences gênantes et
2. il doit tolérer les interférences re.ues, notamment cellessusceptibles
d’en perturber le fonctionnement.
Limitations
The warranty stated above is the only warranty applicable to this product.
All other warranties, expressed or implied, including all implied warranties of
merchantability or tness for a particular purpose, are hereby disclaimed. No
verbal or written information given by LifeTrak, its agents or employees shall
create a guarantee or in any way increase the scope of this warranty.
Repair or replacement as provided under this warranty is the exclusive remedy
of the consumer. LifeTrak shall not be liable for incidental or consequential
damages resulting form the use of this product or arising out of any breach
of any express or implied warranty on this product. Except to the extent
prohibited by law, any implied warranty of merchantability or tness for
a particular purpose on this product is limited to the applicable warranty
period set forth above. Consumer rights may vary from state to state.
Contact
[email protected]
www.LifeTrakUSA.com
1-855-903-9030
LifeTrak
39962 Cedar Blvd, Ste 285
Newark, CA 94560
For additional band colors, accessories
and other innovative products, visit us at
LifeTrakUSA.com.
The Bluetooth® word mark and logos are registered trademarks owned by
Bluetooth SIG, Inc. and any use of such marks by LifeTrak is under license.
Other trademarks and trade names are those of their respective owners.
Copyright © 2014 Salutron, Inc. All rights reserved. Duplication or copying of
all or part of this manual without the express written consent of Salutron, Inc.
is prohibited.
7
 Loading...