

Page 1
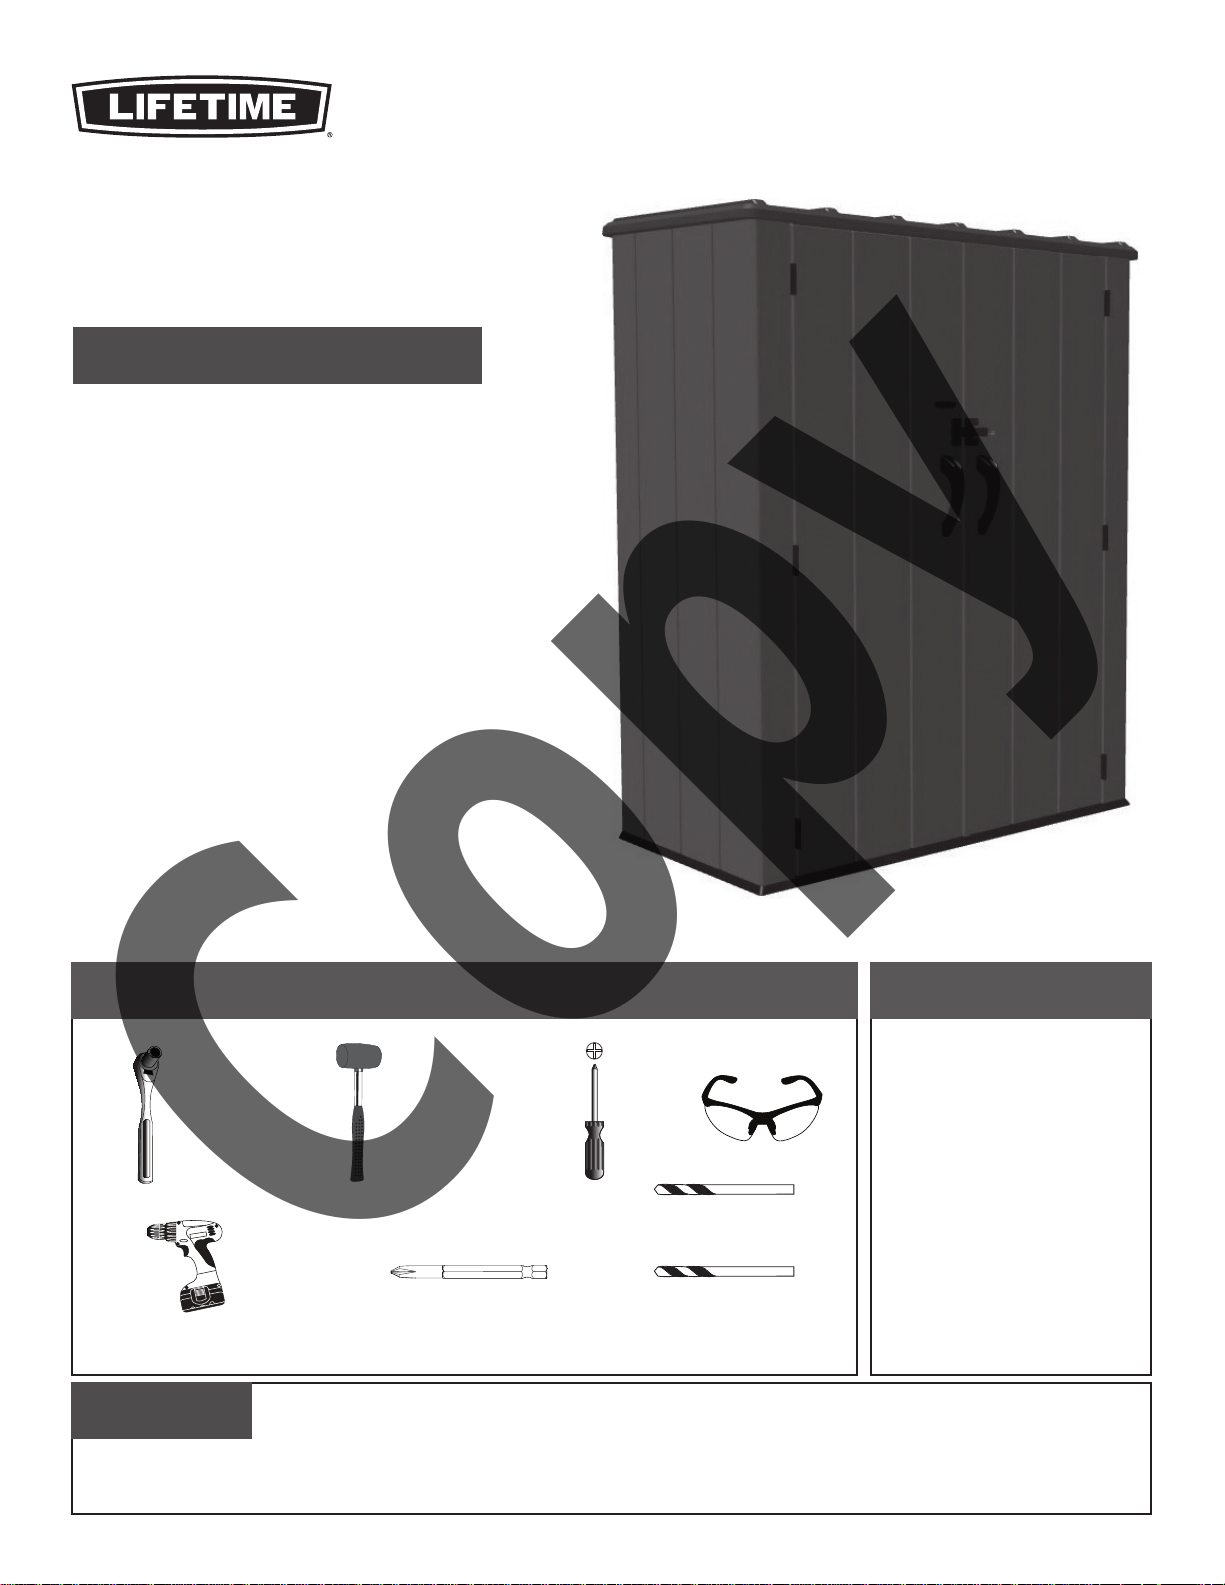
VERTICAL
Copy
STORAGE SHED
MODEL #60091
MODEL 60280
BEFORE ASSEMBLY:
• Assemble on a level surface
• 2 people are recommended for setup
ASSEMBLY INSTRUCTIONS
Pour le français, voir la page 2. Para el español, ver la página 3.
For customer service in the United Kingdom and continental Europe:
É-mail: [email protected]
FOR DOMESTIC OUTDOOR USE ONLY!
IMPORTANT, RETAIN FOR FUTURE REFERENCE: READ CAREFULLY.
TOOLS REQUIRED TABLE OF CONTENTS
Icon Legend...................................................4
Warnings & Notices......................................5
Parts Identifi er..............................................6
Floor & Wall Assembly..................................7
7/16" (11 mm)
Electric Drill
#2 Phillips Bit
(Included)
FRS 1/4" (6,4 mm) Drill Bit
(Included)
ARA 1/8" (3,2 mm) Drill Bit
(Included)
Door Assembly.............................................23
Shed Anchoring...........................................41
Cleaning & Care..........................................46
Registration..............................................47
Warranty....................................................48
QUESTIONS?
Call: 1-800-225-3865
7:00 am–5:00 pm (Monday–Friday) MST
and 9:00 am–1:00 pm Saturday MST
CONTACT LIFETIME CUSTOMER SERVICE:
Live Chat: www.lifetime.com
(click on “Ask An Expert” tab)
Video Instructions: www.youtube.com/lifetimeproducts
MODEL# AND PRODUCT ID (you will need both when contacting us)
Model Number: 60280
Product ID:
Page 2
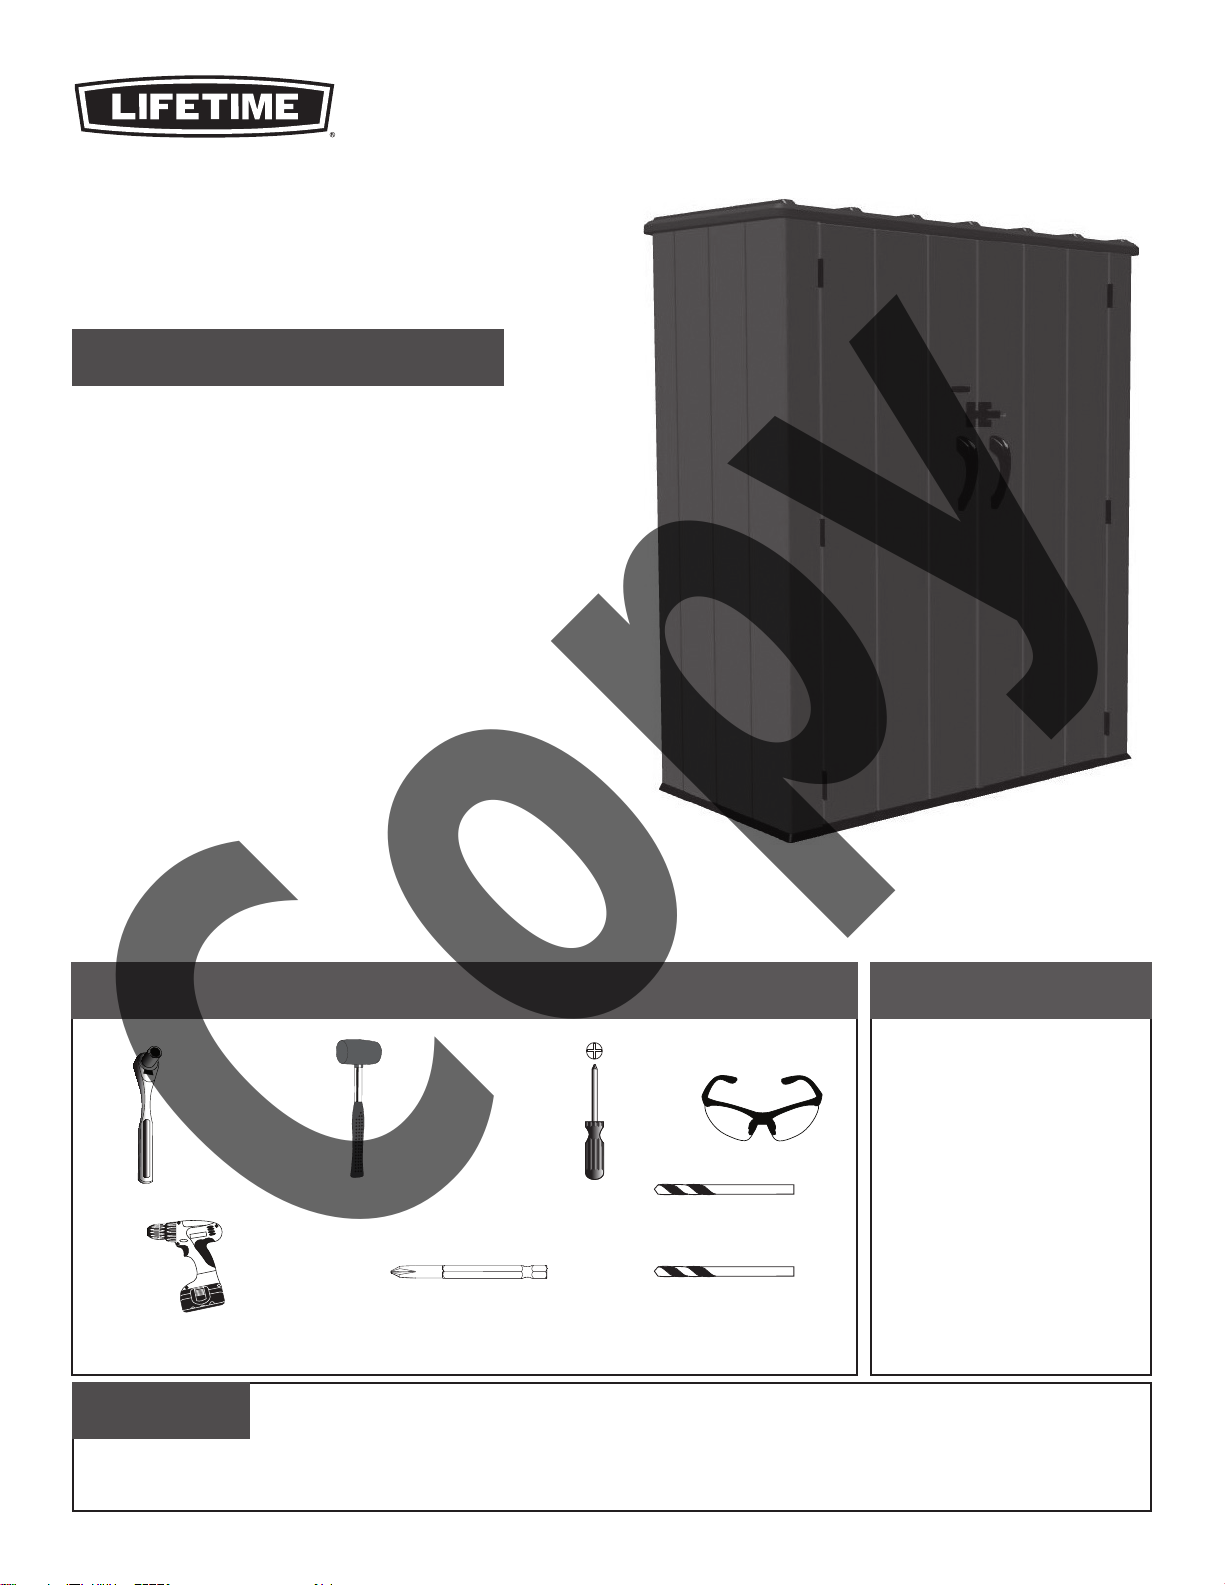
ABRI
Copy
VERTICAL
MODEL #60091
MODÈLE n° 60280
AVANT L’ASSEMBLAGE :
• Assembler sur une surface de niveau
• Nous recommendons 2 adultes pour l’assemblage
INSTRUCTIONS D’ASSEMBLAGE
For English, see page 1. Para el español, ver la página 3.
Pour les services à la clientèle au Royaume-Uni et du continent européen :
É-mail: [email protected]
POUR L’USAGE DOMESTIQUE À L’EXTÉRIEUR SEULEMENT!
IMPORTANT, CONSERVER POUR RÉFÉRENCE : LIRE AVEC PRUDENCE!
OUTILS REQUIS SOMMAIRE
Légende des icônes....................4
Avertissements et avis................5
Identifi cateur de pièces...............6
Assemblage du plancher et de
7/16 po (11 mm)
Perceuse électrique
Mèche à empreinte
Phillips n° 2
(Incluse)
FRS 1/4 po (6,4 mm) Mèche
(Incluse)
ARA 1/8 po (3,2 mm) Mèche
(Incluse)
murs........................................7
Assemblage des portes..............23
Ancrage de la remise.................41
Nettoyage et entretien...............46
Enregistrement.......................47
Garantie...................................49
QUESTIONS ?
Composer le 1-800-225-3865
Du lundi au vendredi 7:00 hr – 17:00 hr (HNR)
et samedi 9:00 hr – 13:00 hr (HNR)
CONTACTER AUX SERVICES À LA CLIENTÈLE LIFETIME® :
t’Chat en direct: www.lifetime.com
(cliquer sur la languette « Ask An Expert »)
Videos educatifs: www.youtube.com/lifetimeproducts
2
N° DE MODÈLE ET RÉFÉRENCE DU PRODUIT (il faut avoir les deux lorsque vous nous contactez)
N° de modèle : 60280
Référence du produit :
Page 3
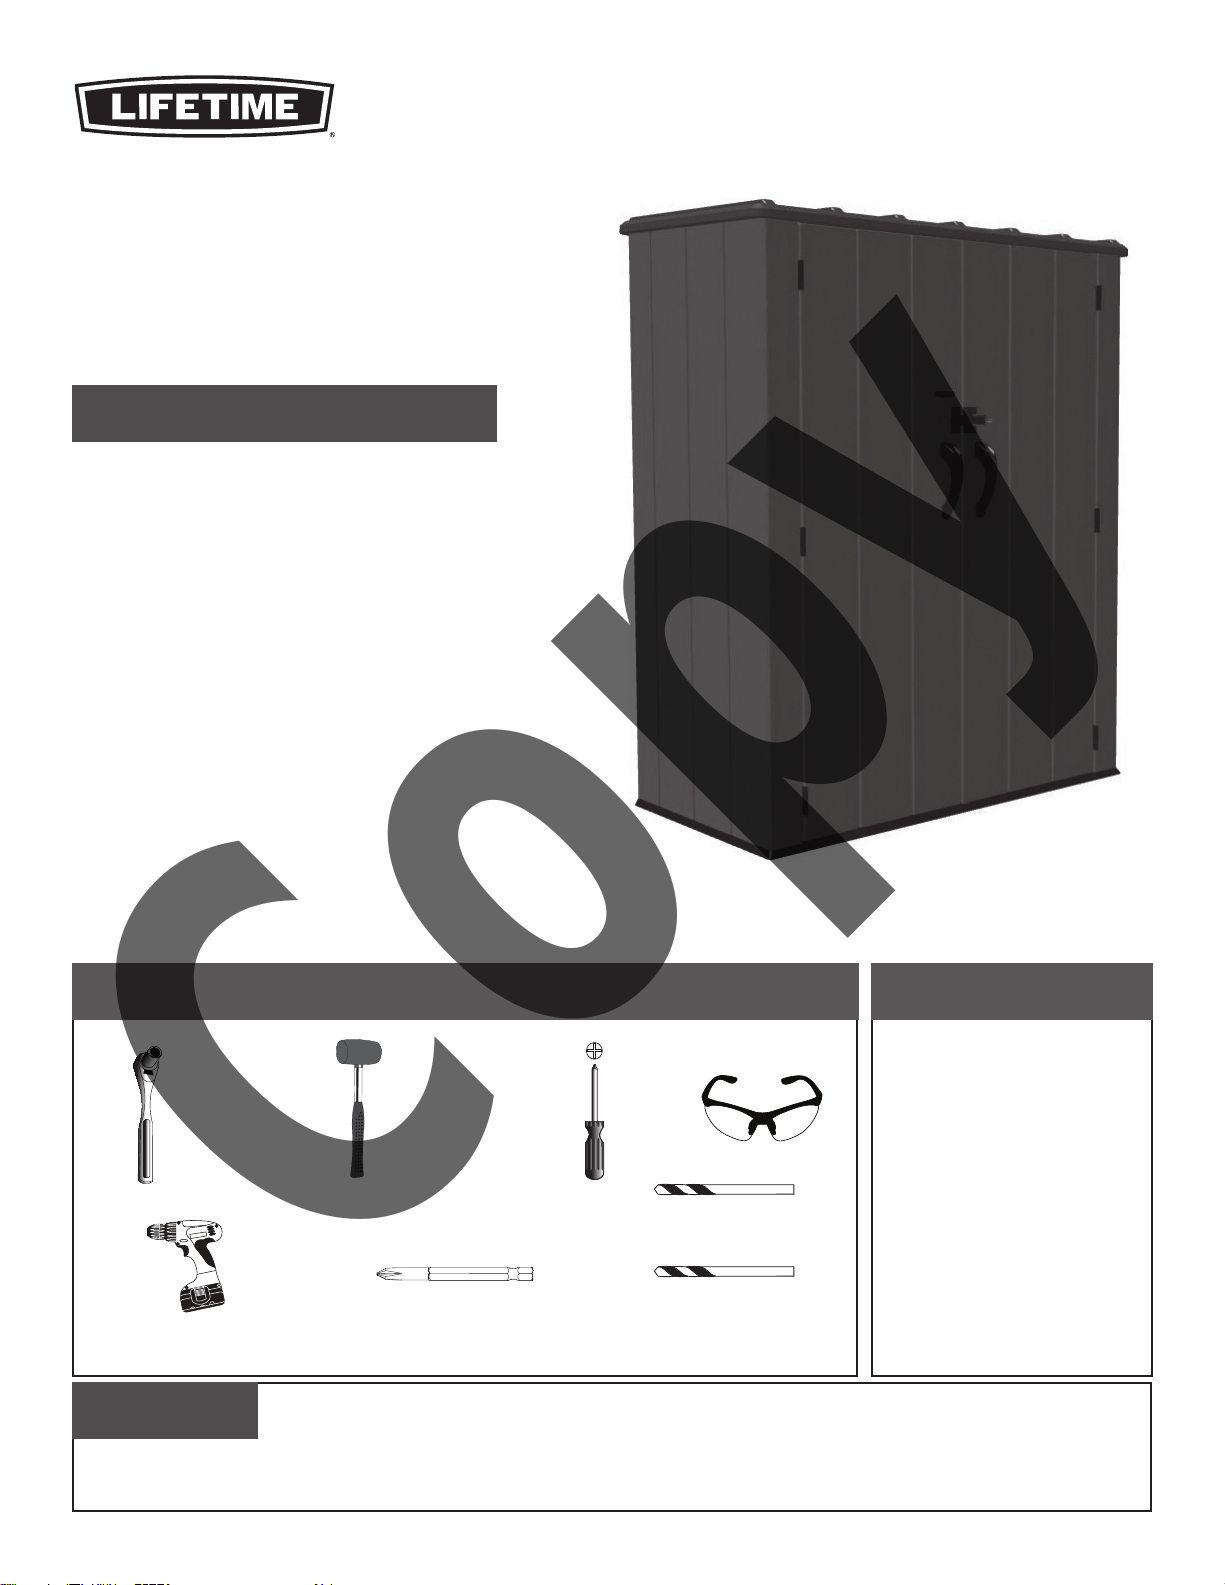
CASETA DE
Copy
ALMACENAJE
VERTICAL
MODEL #60091
MODELO n° 60280
ANTES DEL ENSAMBLE:
• Ensamblar sobre una superfi cie nivelada
• Recomendamos 2 adultos para el ensamble
INSTRUCCIONES DE ENSAMBLE
For English, see page 1. Pour le français, voir la page 2.
Para el servicio a clientes en el Reino Unido y en el continente europeo:
Correo electrónico: [email protected]
¡SÓLO PARA USO DOMÉSTICO EN LOS EXTERIORES!
¡IMPORTANTE, GUARDAR PARA FUTURA REFERENCIA: LEER CUIDADOSAMENTE!
INSTRUMENTAL REQUERIDO ÍNDICE
Leyenda de íconos......................4
Advertencias y avisos...................5
Identifi cador de piezas................6
Ensamble del piso y de los muros..7
7/16 in (11 mm)
Taladro eléctrico
n° 2 Broca Phillips
(Incluida)
FRS 1/4 in (6,4 mm) Broca
(Incluida)
ARA 1/8 in (3,2 mm) Broca
(Incluida)
Ensamble de las puertas...........23
Anclaje de la casita...................41
Limpieza y cuidado...................46
Registro...................................47
Garantía...................................50
¿PREGUNTAS?
Marcar : 1-800-225-3865
De lunes hasta viernes 7:00 hr–17:00 hr (MST)
y sábado 9:00 hr–13:00 hr (MST)
PONERSE EN CONTACTO CON LOS SERVICIOS DE CLIENTES LIFETIME®:
Chat en vivo: www.lifetime.com
(cliquear en la lengüeta «Ask An Expert»)
Instrucciones en vídeo: www.youtube.com/lifetimeproducts
3
MODEL E ID DEL PRODUCTO (necesitará los dos al contactarnos)
Número de modelo: 60280
ID del producto:
Page 4

ICON LEGEND / LÉGENDE DES ICÔNES / LEYENDA DE ÍCONOS
Copy
• Indicates special heed should be taken when reading.
• Indique qu’une attention spéciale doit être prise lors de la lecture.
• Indica que uno debe prestar atención al leer.
• Indicates the parts to be used for a section.
• Indique les pièces à utiliser pour une section.
• Indica las piezas que se usarán en una sección.
• Indicates no parts required for a specifi c section.
• Indique qu’aucune pièce n’est requise pour une section précise.
• Indica que no se necesitan partes en una sección específi ca.
• Indicates the hardware to be used for a section.
• Indique la quincaillerie à utiliser pour une section.
• Indica el herraje que se usará en una sección.
• Indicates no hardware required for a specifi c page.
• Indique qu’aucun matériel n’est requis pour une page précise.
• Indica que no se necesita herraje en una página específi ca.
• Indicates the tools to be used for a section.
• Indique les outils à utiliser pour une section.
• Indica el instrumental que se usará en una sección.
• Indicates to use/not to use an electric drill for a specifi c step.
• Indique quand utiliser ou ne pas utiliser une perceuse électrique pour une étape précise.
• Indica usar o no usar un taladro eléctrico en un paso específi co.
• These Nuts are centerlock nuts. They are designed to be tight; therefore, they will be harder to tighten. Tighten until fl ush
with the metal or plastic.
• Ces écrous son écrous de blocage central. Ils sont conçus à être serrés; ensuite, ils seront plus diffi ciles à resserrer. Serrer
jusqu’à ce qu’ils soient au ras du métal ou plastique.
• Estas tuercas son tuercas de bloque central. Ellas son diseñadas para ser apretadas; entonces, ellas serán más difícil
ajustar. Apretar hasta que ellas estén al ras del metal o plástico.
1187595
11/10/2017
4
Page 5

WARNINGS & NOTICES / AVERTISSEMENTS ET AVIS / ADVERTENCIAS Y AVISOS
TOOLS & HARDWARE REQUIRED / OUTILS ET QUINCAILLERIE REQUIS / INSTRUMENTAL Y HERRAJE REQUERIDOS
English:
• Failure to follow these warnings may result in serious injury or property damage and will void warranty.
• To ensure safety, do not attempt to assemble this product without following the instructions carefully.
• The surface on which you build and set your product must be level. If the surface is not properly leveled, the product will
not assemble correctly. Proper surface leveling will save you time in the long run—so please do not ignore this step.
• Be aware that plastic pieces can be damaged by overtightening the screws. To avoid damage, we strongly recommend
the use of a drill with a low torque setting. A #2 Phillips screwdriver may also be used.
• Two capable adults are required for assembly.
• All who participate in the assembly process should wear safety glasses throughout the assembly.
• In heavy snowfall areas, we recommend removing snow from the roof.
• Do not use or store hot objects near the product.
• Proper and complete assembly are essential to reduce the risk of accident or injury.
• Most injuries are caused by misuse and/or not following instructions. Use caution when using this product.
Français :
• Le non-respect de ces avertissements peut entraîner en conséquence des blessures sérieuses ou dommages à la propriété et annulera la
garantie.
• Pour assurer votre sécurité, ne tentez pas d’assembler ce produit sans suivre attentivement les instructions.
• La surface sur laquelle vous assemblez et posez ce produit doit être de niveau. Si la surface n’est pas correctement
nivelée, l’assemblage du produit ne se joindra pas correctement. Vous gagnerez du temps sur le long terme grâce à une
surface bien nivelée — ne négligez pas cette étape.
• Il est possible d’endommager les pièces en plastique en serrant les vis excessivement. Pour éviter d’endommager le
plastique, nous recommandons vivement l’usage d’une perceuse électrique de faible puissance. Vous pouvez aussi
utiliser un tournevis cruciforme n°. 2.
• Deux adultes capables sont requis pour assembler ce produit.
• Toutes les personnes qui participent à l’assemblage doivent porter des lunettes de sécurité tout le long de l’assemblage.
• Dans les régions de grosses chutes de neige, nous recommandons que vous enleviez la neige du toit.
• N’utilisez pas ni conservez pas les objets chauds dans/sur ce produit.
• L’assemblage correct et complet est essentiel pour réduire le risque des dangers ou des blessures.
• La plupart des blessures sont causées par l’abus et/ou par le non-respect des instructions. Faites attention lorsque vous utilisez ce produit.
Español:
• El incumplimiento de seguir estas advertencias puede resultar en lesiones graves o daño a la propiedad y anulará la garantía.
• Para asegurar la seguridad, no intente armar este producto sin seguir detenidamente las instrucciones.
• La superfi cie en la cual usted ensembla y coloca este producto debe estar nivelada. Si la superfi cie no está nivelada de
manera adecuada, el producto no podrá ensamblarse correctamente. La nivelación de la superfi cie le ahorrará tiempo de
trabajo, por lo tanto, le pedimos que no ignore este paso.
• Es posible endañar las piezas de plástico por apretar los tornillos. Para evitar dañar el plástico, recomendamos que use
un taladro eléctrico de baja potencia. Se puede usar también un destornillador de punta Phillips n°. 2.
• Dos adultos competentes son requeridos para ensamblar el producto.
• Todos los que participan en el ensamble del producto deben llevar gafas de seguridad a lo largo del ensamble.
• En las áreas de nevadas fuertes, recommendamos que quite la nieve del tejado.
• No use ni almacene objetos calientes en el producto.
• El armado propio y completo son esenciales para reducir el riesgo de accidentes y lesiones.
• La mayoría de las lesiones son causadas por el uso erróneo y/o el incumplimiento de seguir las instrucciones. Tenga cuidado al usar este
producto.
5
5
Page 6
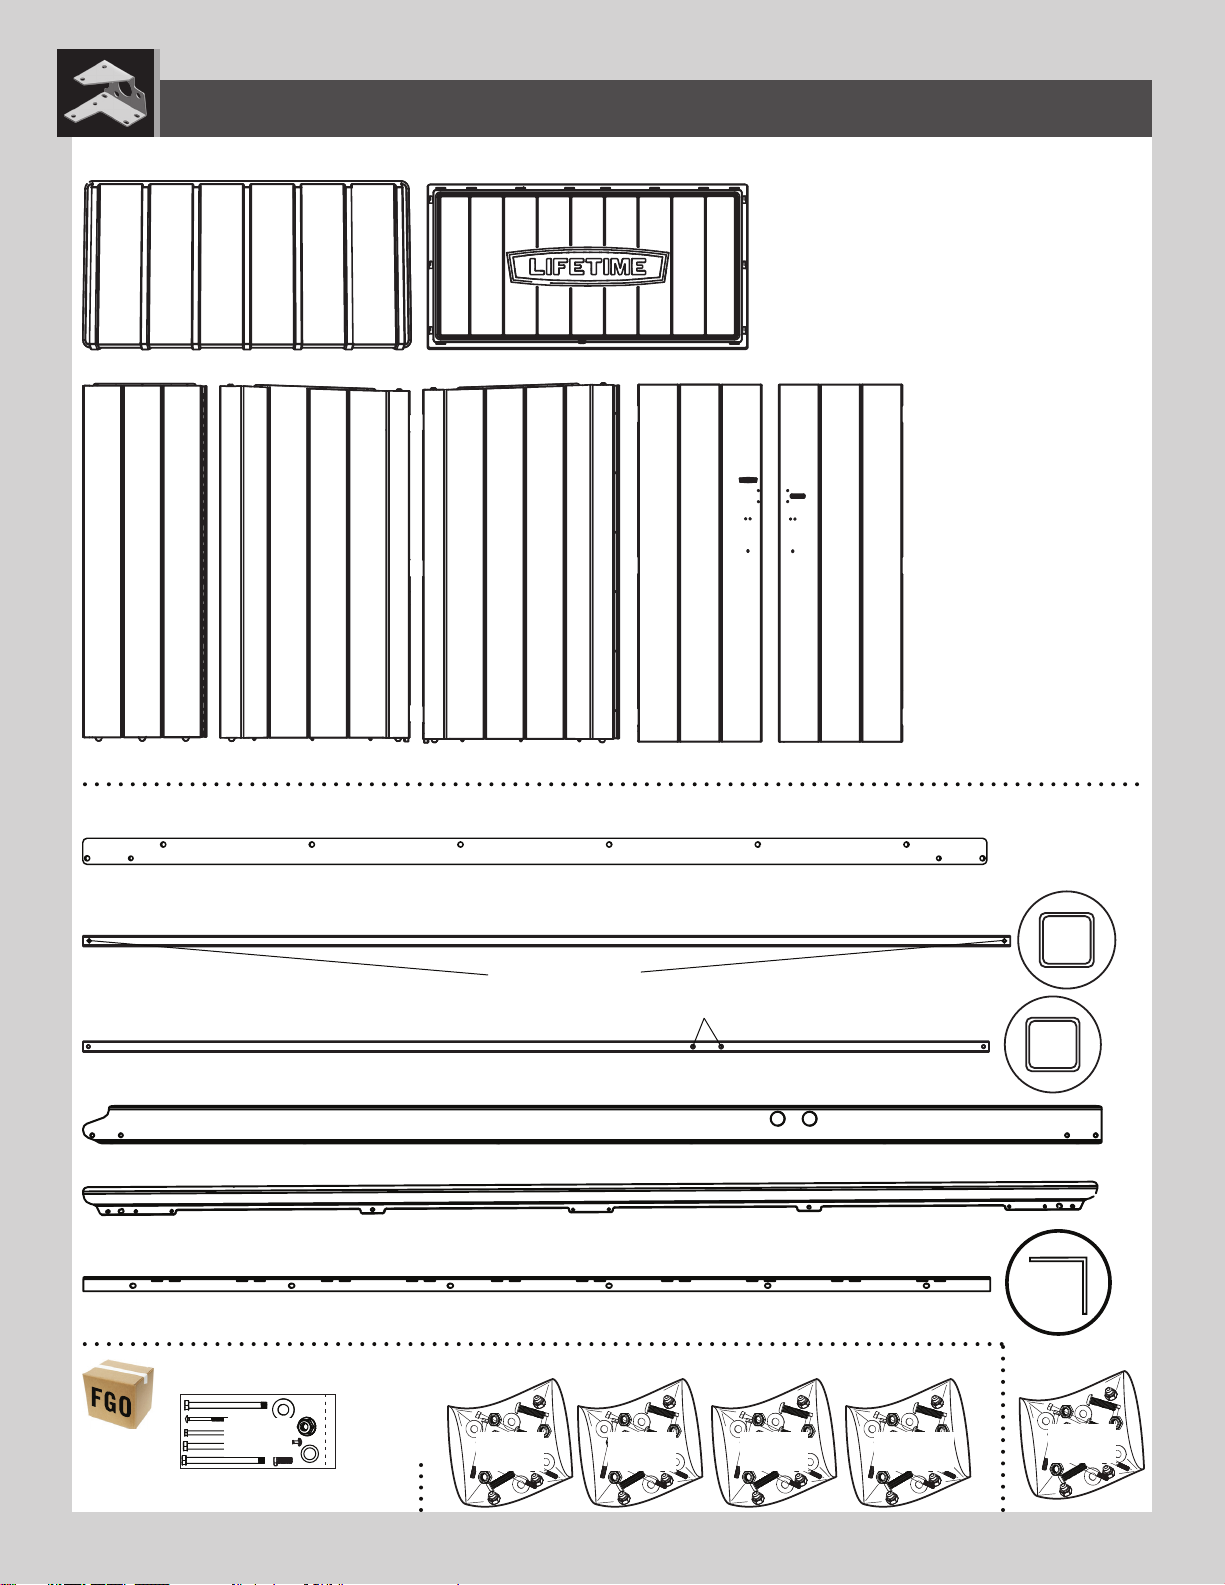
PARTS IDENTIFIER / IDENTIFICATEUR DE PIÈCES / IDENTIFICADOR DE PIEZAS
Plastic Parts / Pièces en plastique / Piezas de plástico
AGQ (x1) ANC (x1)
AGN (x1)ANA (x2)
Metal Parts / Pièces en métal / Piezas de metal
FEI (x1)
FEJ (x2)
FEK (x1)
FEL (x1)
FEM (x2)
FEF (x1)
AGY (x1)
Holes / Trous / Agujeros
AGO (x1)
Holes / Trous / Agujeros
AGZ (x1)
Blister Packs / Blisters / Blísteres Hardware Bags / Sacs de quincaillerie / Bolsas de herraje
FFH
FGI FGK FGL
6
FHR
FGJ
Page 7
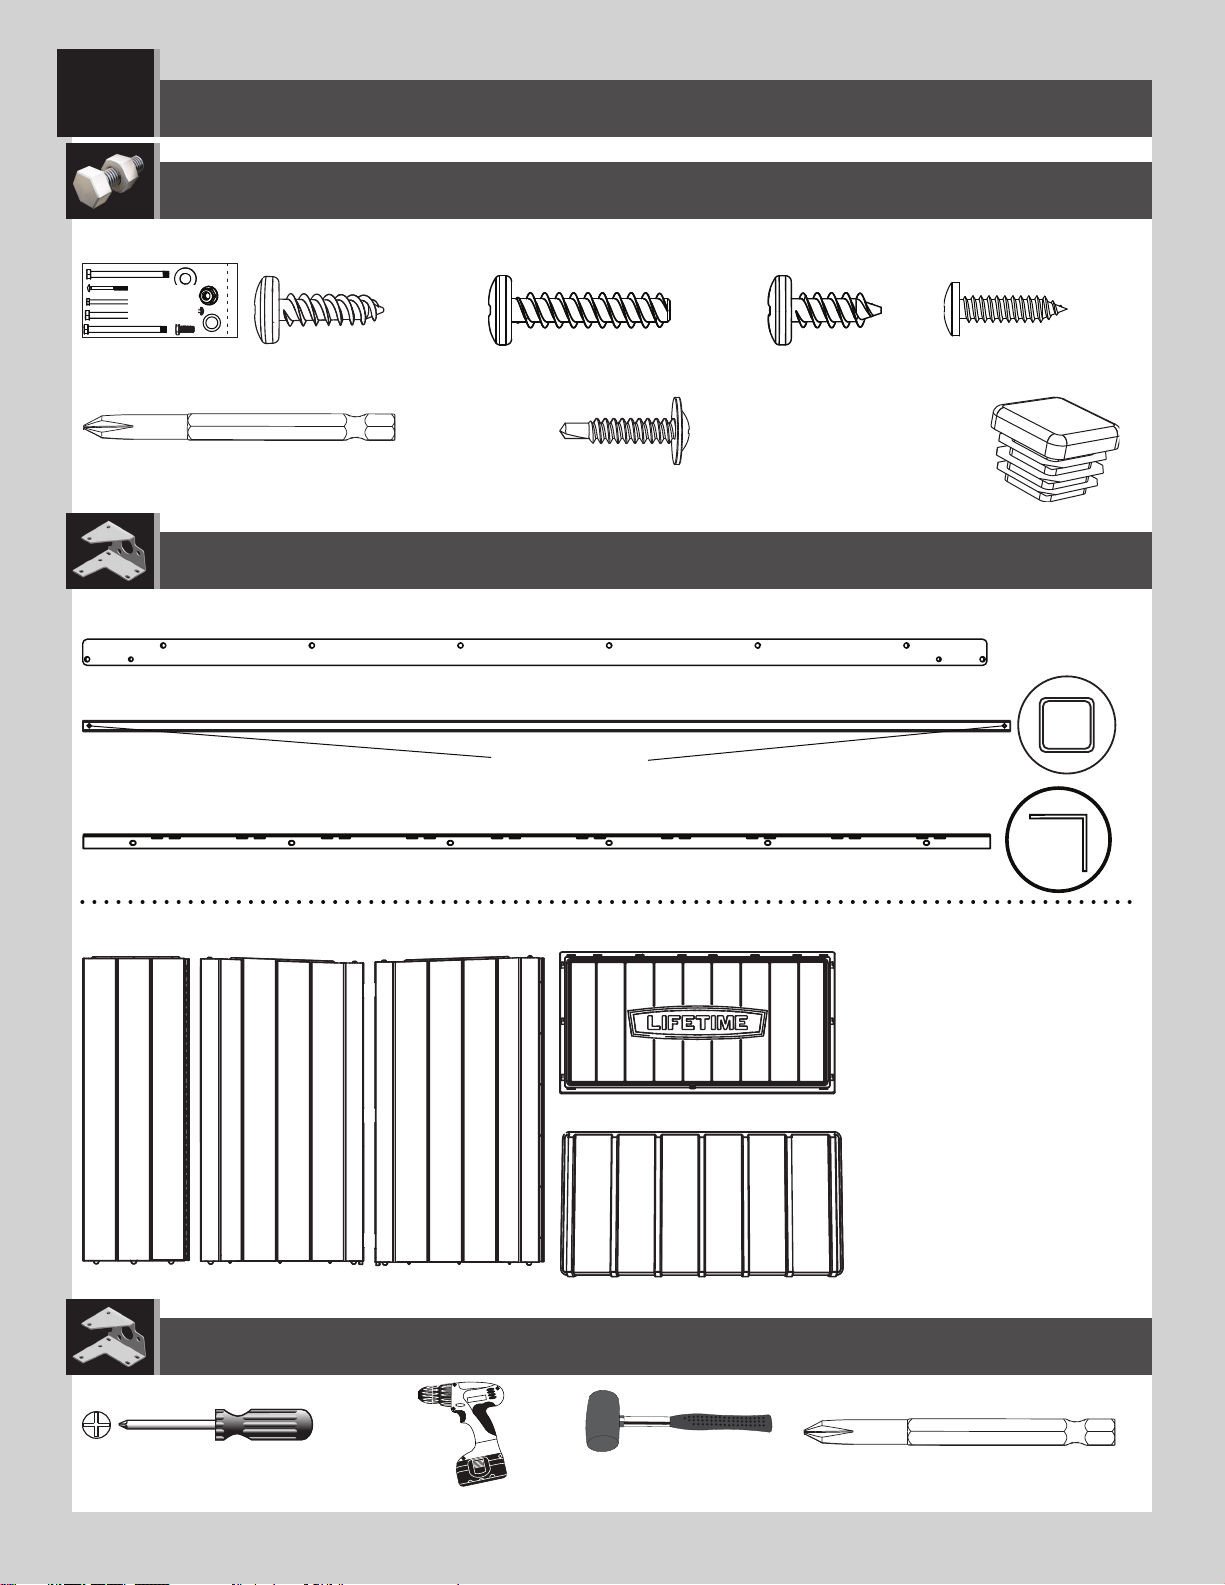
1
FLOOR & WALL ASSEMBLY / ASSEMBLAGE DU PLANCHER ET DES PORTES / ENSAMBLE DEL PISO Y LAS PUERTAS
HARDWARE REQUIRED / QUINCAILLERIE REQUISE / HERRAJE REQUERIDO
Blister Pack / Blister / Blíster
FFH
EXO (x8)
ADC (x1)
PARTS REQUIRED / PIÈCES REQUISES / PIEZAS REQUERIDAS
Metal Parts / Pièces en métal / Piezas de metal
FEI (x1)
FEJ (x2)
FEF (x1)
Plastic Parts / Pièces en plastique / Piezas de plástico
ADV (x14)
CHK (x2)
Holes / Trous / Agujeros
ADZ (x26)
ADW (x10)
AHS (x2)
ANA (x2)
ANC (x1)
AGN (x1)
AGY (x1)
AGQ (x1)
TOOLS REQUIRED / OUTILS REQUIS / INSTRUMENTAL REQUERIDO
(1) (1) (1)
7
ADC (x1)
Page 8
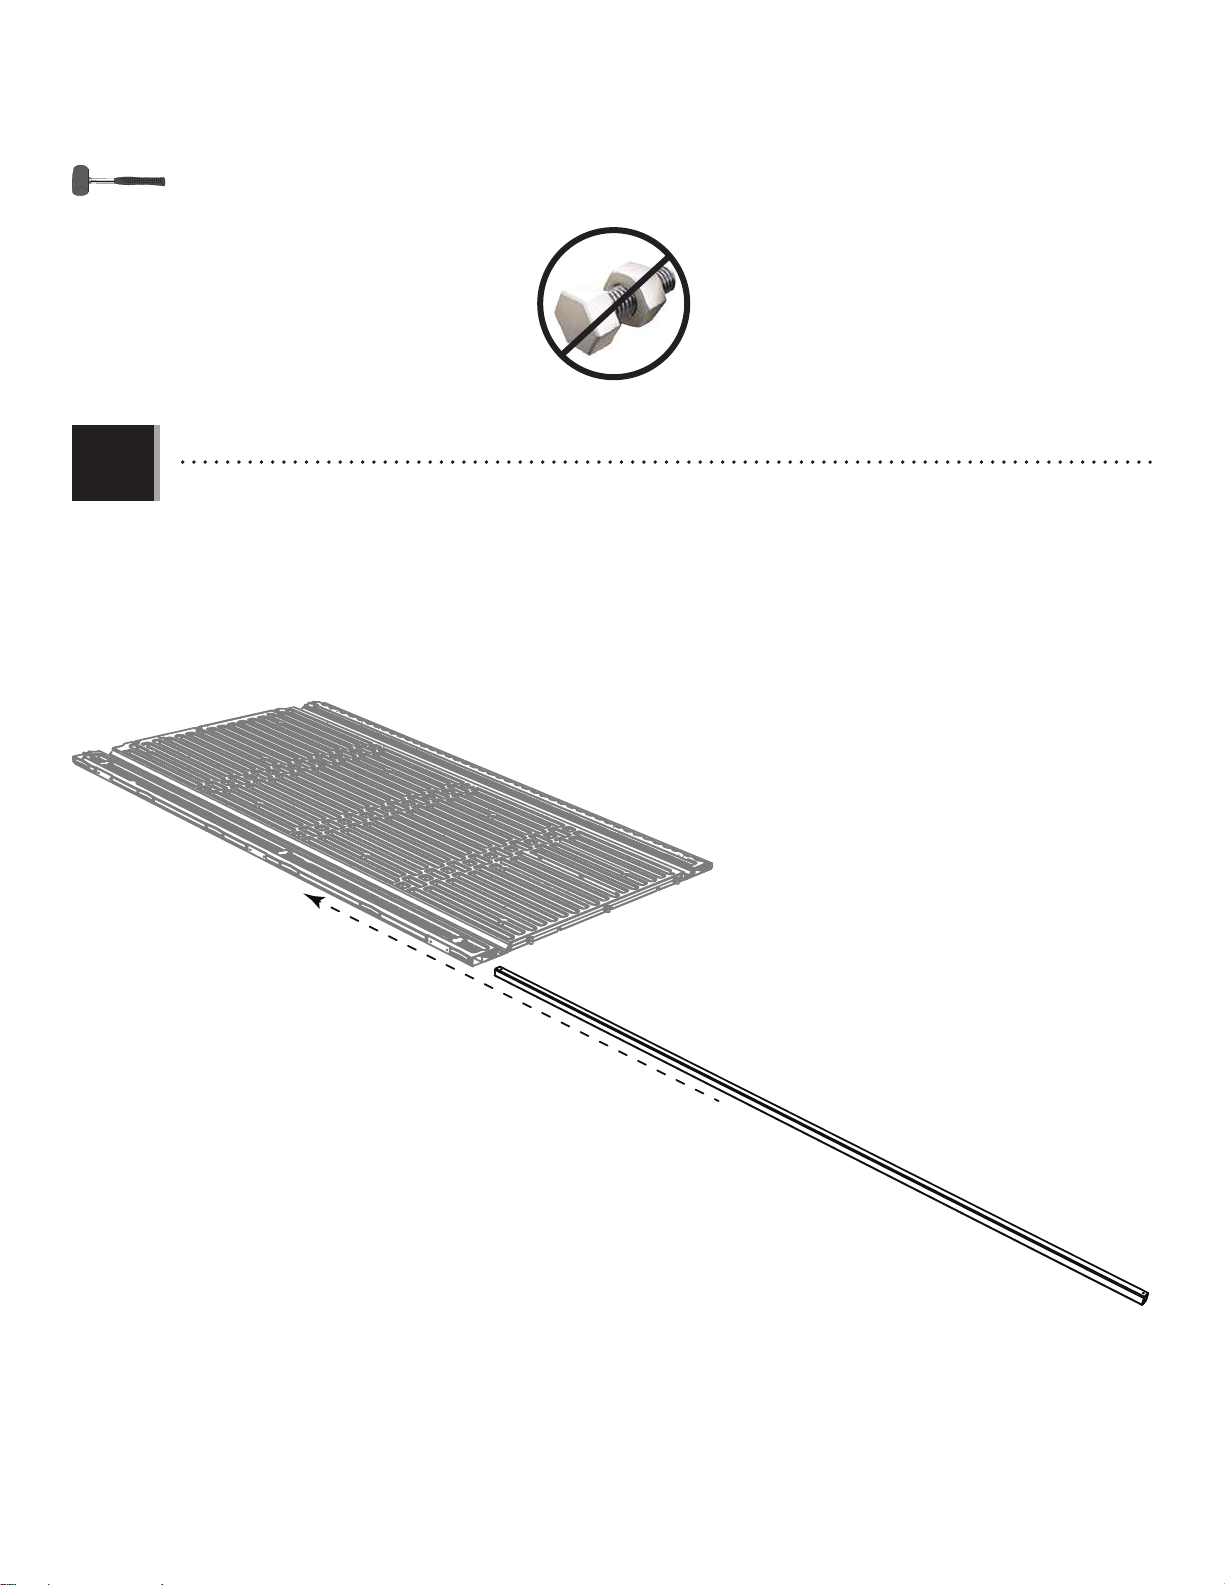
u SECTION 1 (CONTINUED) / SECTION 1 (SUITE) / SECCIÓN 1 (CONTINUACIÓN)
TOOLS & HARDWARE REQUIRED / OUTILS ET QUINCAILLERIE REQUIS / INSTRUMENTAL Y HERRAJE REQUERIDOS
1.1
• Lay the Left Side Wall Panel (AGN) face down on level ground, and insert a Wall Square Tube (FEJ) (one with just two
holes—one at each end) into the bottom of the Panel until a few inches hang out the bottom.
• Mettez le panneau mural latéral gauche (AGN) face contre terre, et insérez un tube carré pour le mur (FEJ) (le tube avec
deux trous seulement — un trou à chaque extrémité) dans la partie inférieure du panneau jusqu’à ce que quelques
centimètres dépasse le bord inférieur.
• Coloque el panel mural lateral izquierdo (AGN) boca abajo, e inserte un tubo cuadrado para el muro (FEJ) (le tube con sólo
dos agujeros, uno a cada extremo) en el agujero cuadrado en la parte inferior del panel hasta que unos centímetros
cuelguen del agujero.
AGN
FEJ
8
Page 9
u SECTION 1 (CONTINUED) / SECTION 1 (SUITE) / SECCIÓN 1 (CONTINUACIÓN)
TOOLS & HARDWARE REQUIRED / OUTILS ET QUINCAILLERIE REQUIS / INSTRUMENTAL Y HERRAJE REQUERIDOS
AHS (x2)
1.2
1.3
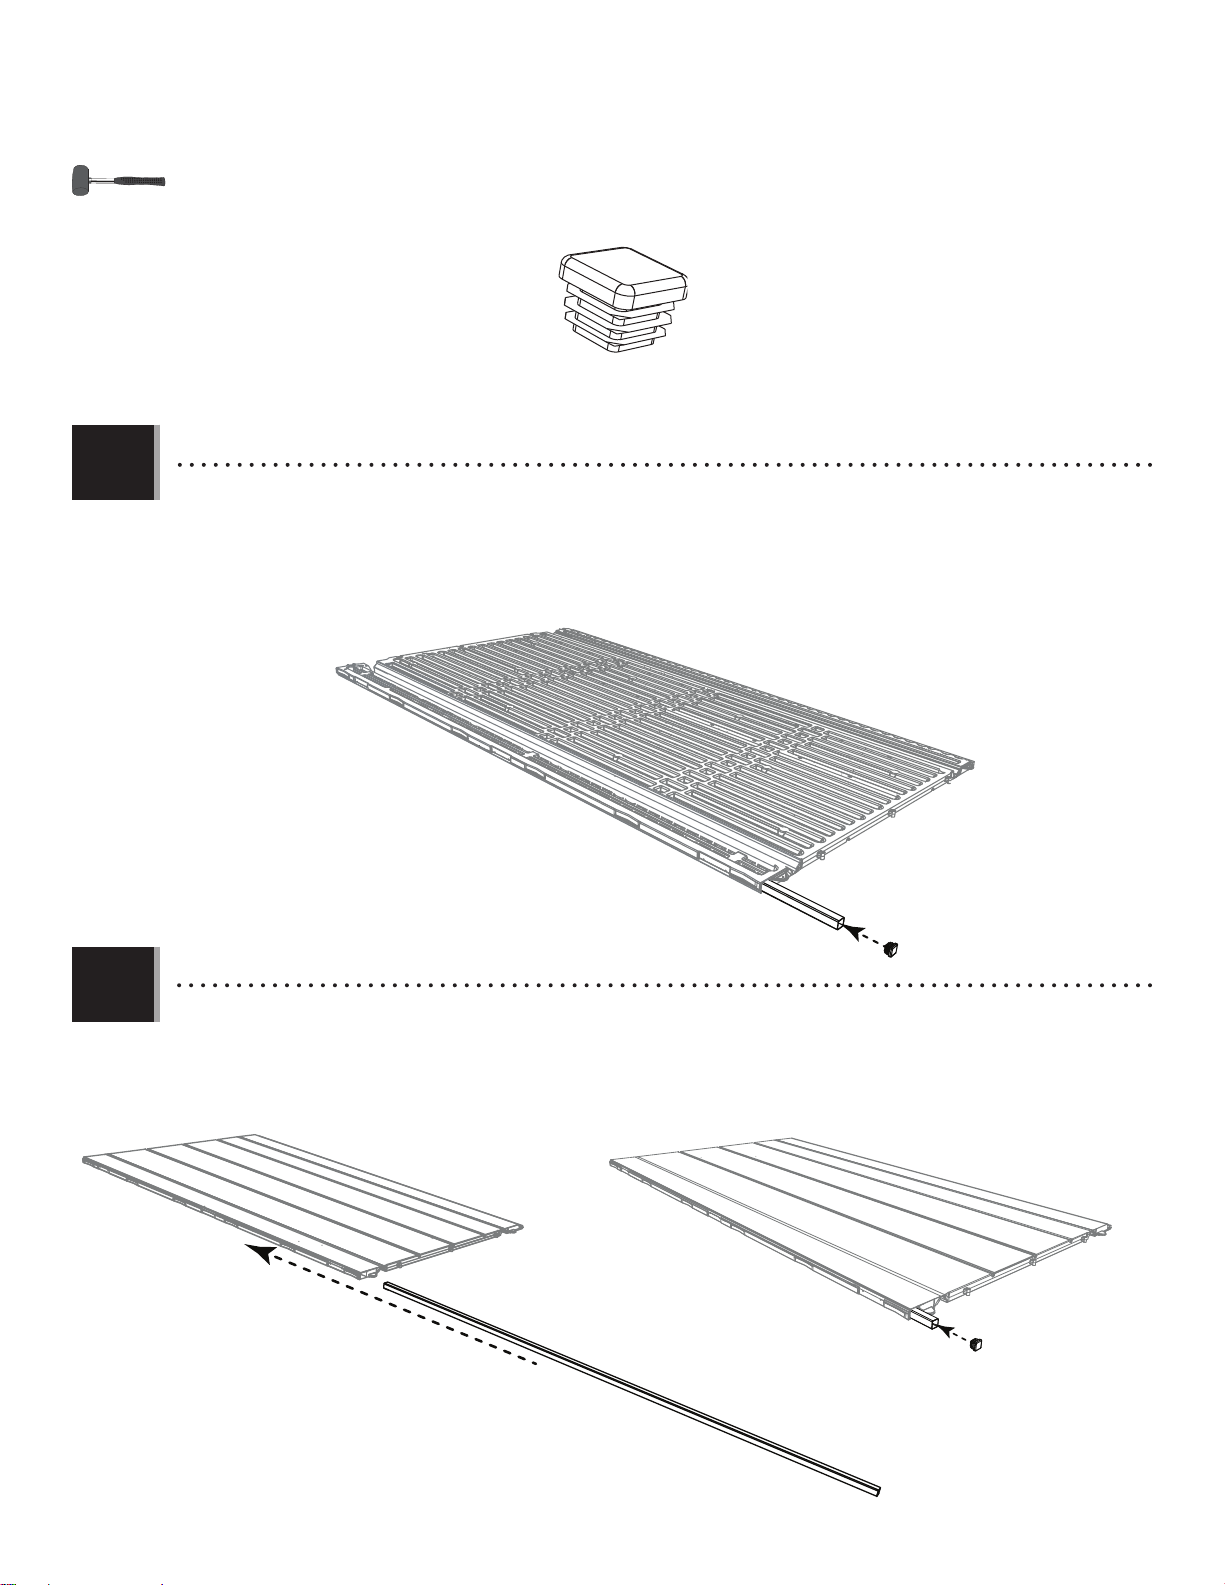
• Insert an End Cap (AHS) into the end of the Tube, and continue inserting the Tube until the Cap is flush with the
bottom of the Panel.
• Insérez un capuchon (AHS) dans l’extrémité du tube, et continuez à insérer le tube jusqu’à ce que le capuchon soit
au ras du bord inférieur du panneau.
• Inserte un tapón (AHS) en el extremo del tubo, y continue insertando el tubo hasta que el tapón esté a ras del
borde inferior del panel.
AHS
• Repeat steps 1.1–1.2 for the the Right Side Wall Panel (AGY).
• Répétez les étapes 1.1 – 1.2 pour le panneau mural latéral droit (AGY).
• Repita los pasos 1.1–1.2 para el panel mural lateral derecho (AGY).
AGY
FEJ
AHS
9
Page 10
u SECTION 1 (CONTINUED) / SECTION 1 (SUITE) / SECCIÓN 1 (CONTINUACIÓN)
TOOLS & HARDWARE REQUIRED / OUTILS ET QUINCAILLERIE REQUIS / INSTRUMENTAL Y HERRAJE REQUERIDOS
1.4
1.5
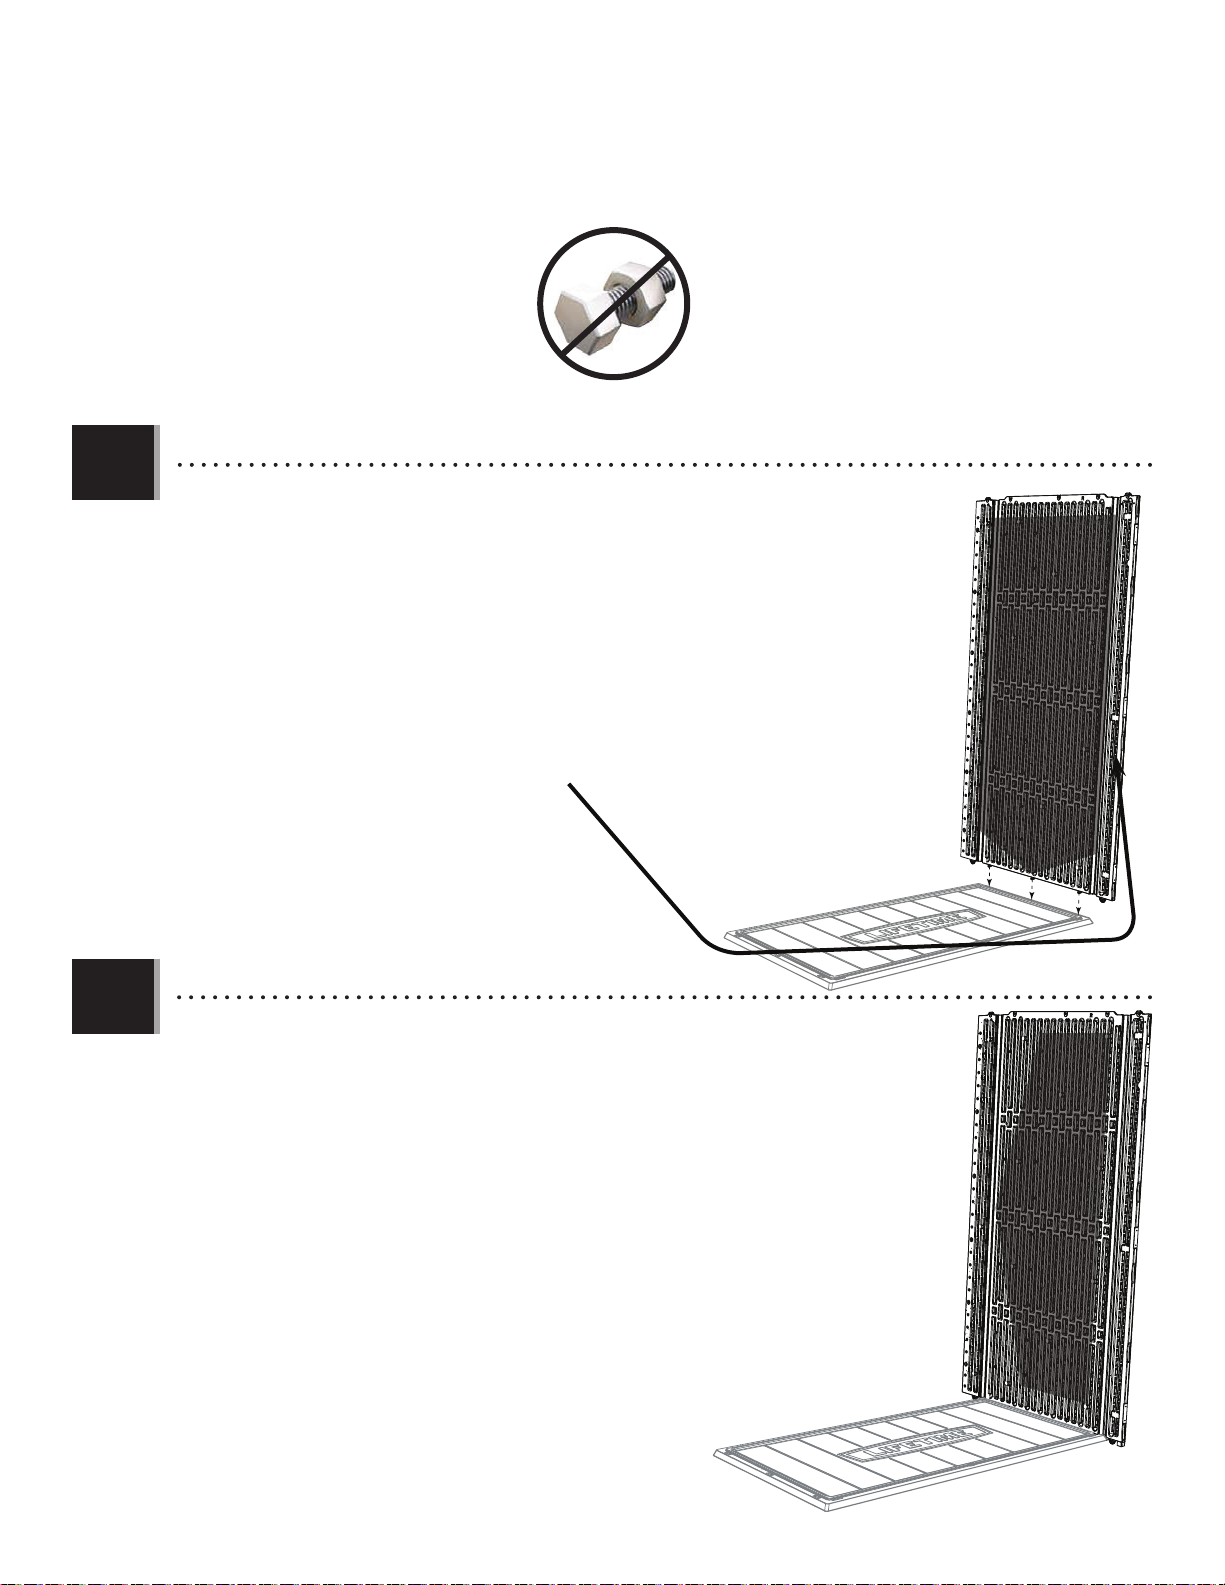
• Lay the Floor Panel (ANC) down on level ground, and insert the three center tabs at the
bottom of the Right Wall Panel (AGY) into the slots in the Floor panel.
• Mettez le panneau de plancher (ANC) sur terrain plat, et insérez les trois languettes
centrales au bord inférieur du panneau mural droit (AGY) dans les fentes dans le panneau
de plancher.
• Coloque el panel de piso (ANC) sobre terreno llano, e inserte las tres lengüetas centrales
al borde inferior del panel mural derecho (AGY) dentro de las ranuras en el panel de piso.
• The Square Tube is here.
• Le tube carré est ici.
• El tubo cuadrado está aquí.
• Slide the Panel toward the rear of the Floor Panel.
• Faites glisser le panneau vers l’arrière du panneau de plancher.
• Deslice el panel hacia el borde trasero del panel de piso.
AGY
10
Page 11
u SECTION 1 (CONTINUED) / SECTION 1 (SUITE) / SECCIÓN 1 (CONTINUACIÓN)
TOOLS & HARDWARE REQUIRED / OUTILS ET QUINCAILLERIE REQUIS / INSTRUMENTAL Y HERRAJE REQUERIDOS
1.6
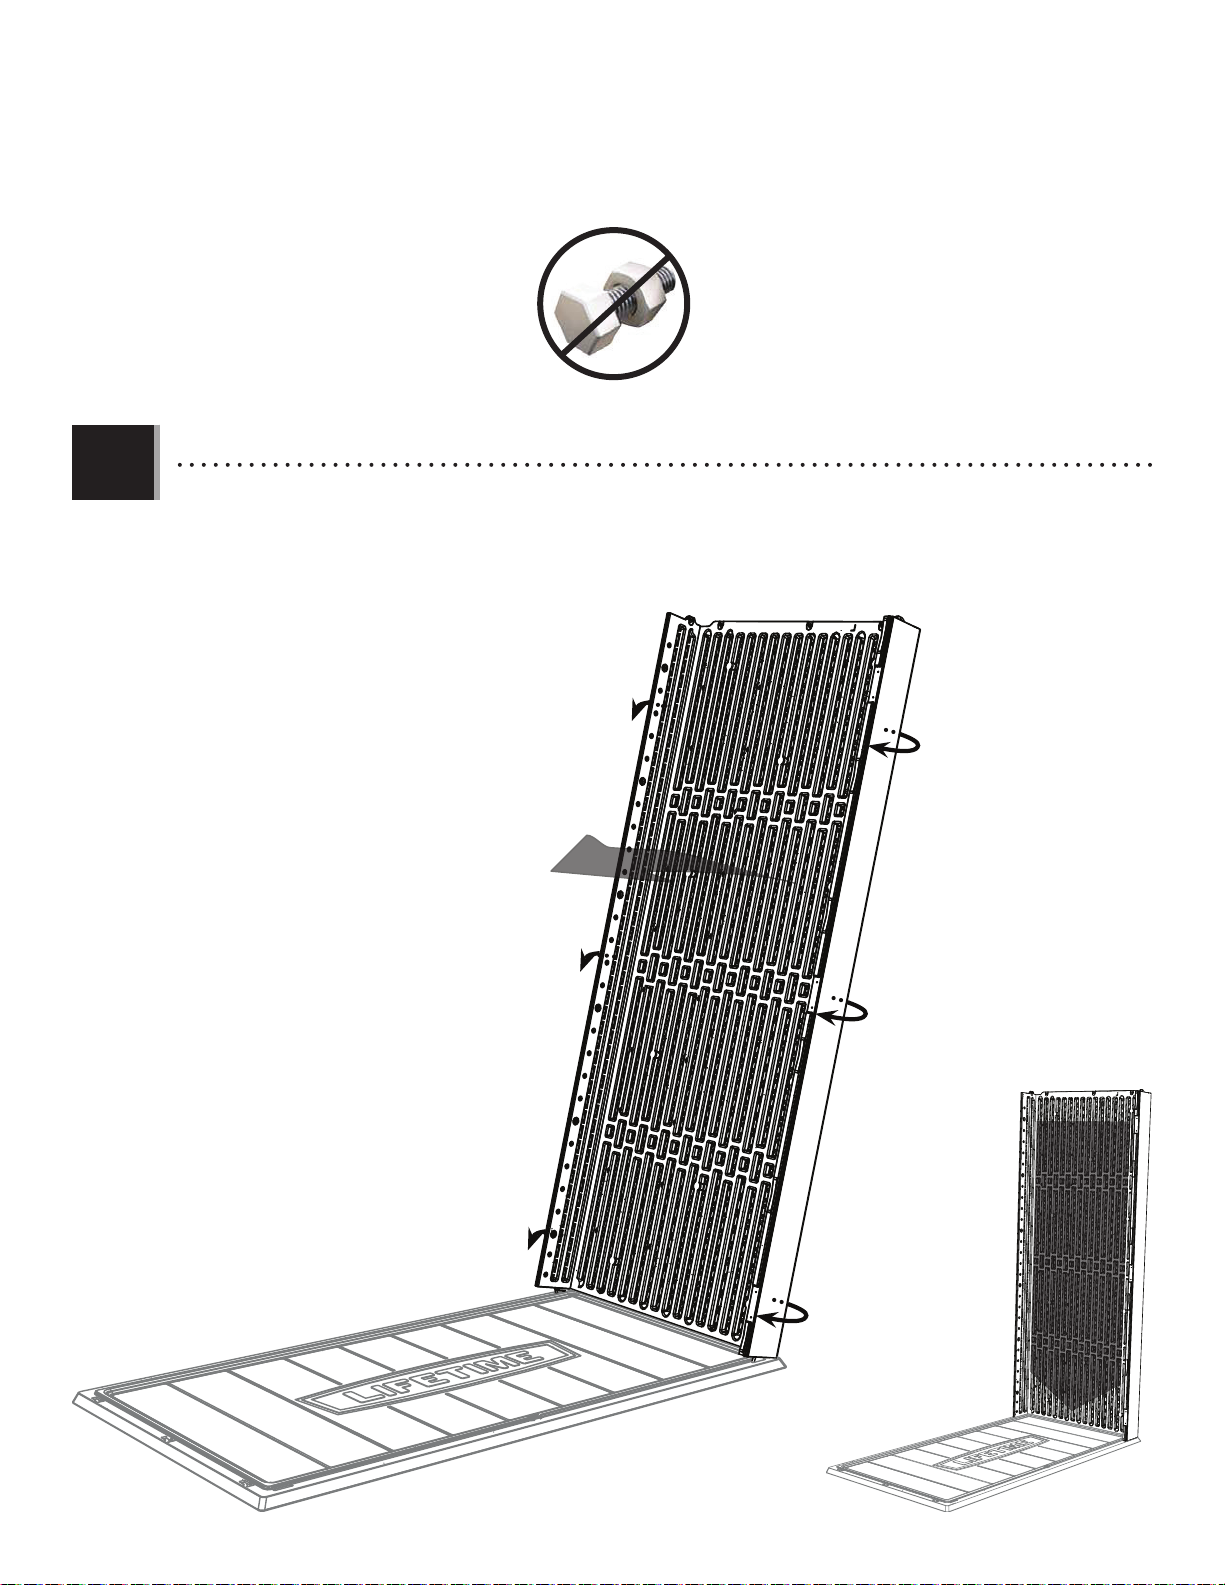
• Fold the edges of the Panel. Tilt the Panel to locate the end tabs over the slots in the Floor Panel. Insert the tabs into the
slots.
• Pliez les bords du panneau. Inclinez le panneau pour poser les languettes sur les fentes dans le panneau de plancher.
Insérez les languettes dans les fentes.
• Doble los bordes del panel. Incline el panel para ubicar las lengüetas encima de las ranuras en el panel de piso. Inserte las
lengüetas en las ranuras.
11
Page 12
u SECTION 1 (CONTINUED) / SECTION 1 (SUITE) / SECCIÓN 1 (CONTINUACIÓN)
TOOLS & HARDWARE REQUIRED / OUTILS ET QUINCAILLERIE REQUIS / INSTRUMENTAL Y HERRAJE REQUERIDOS
1.7
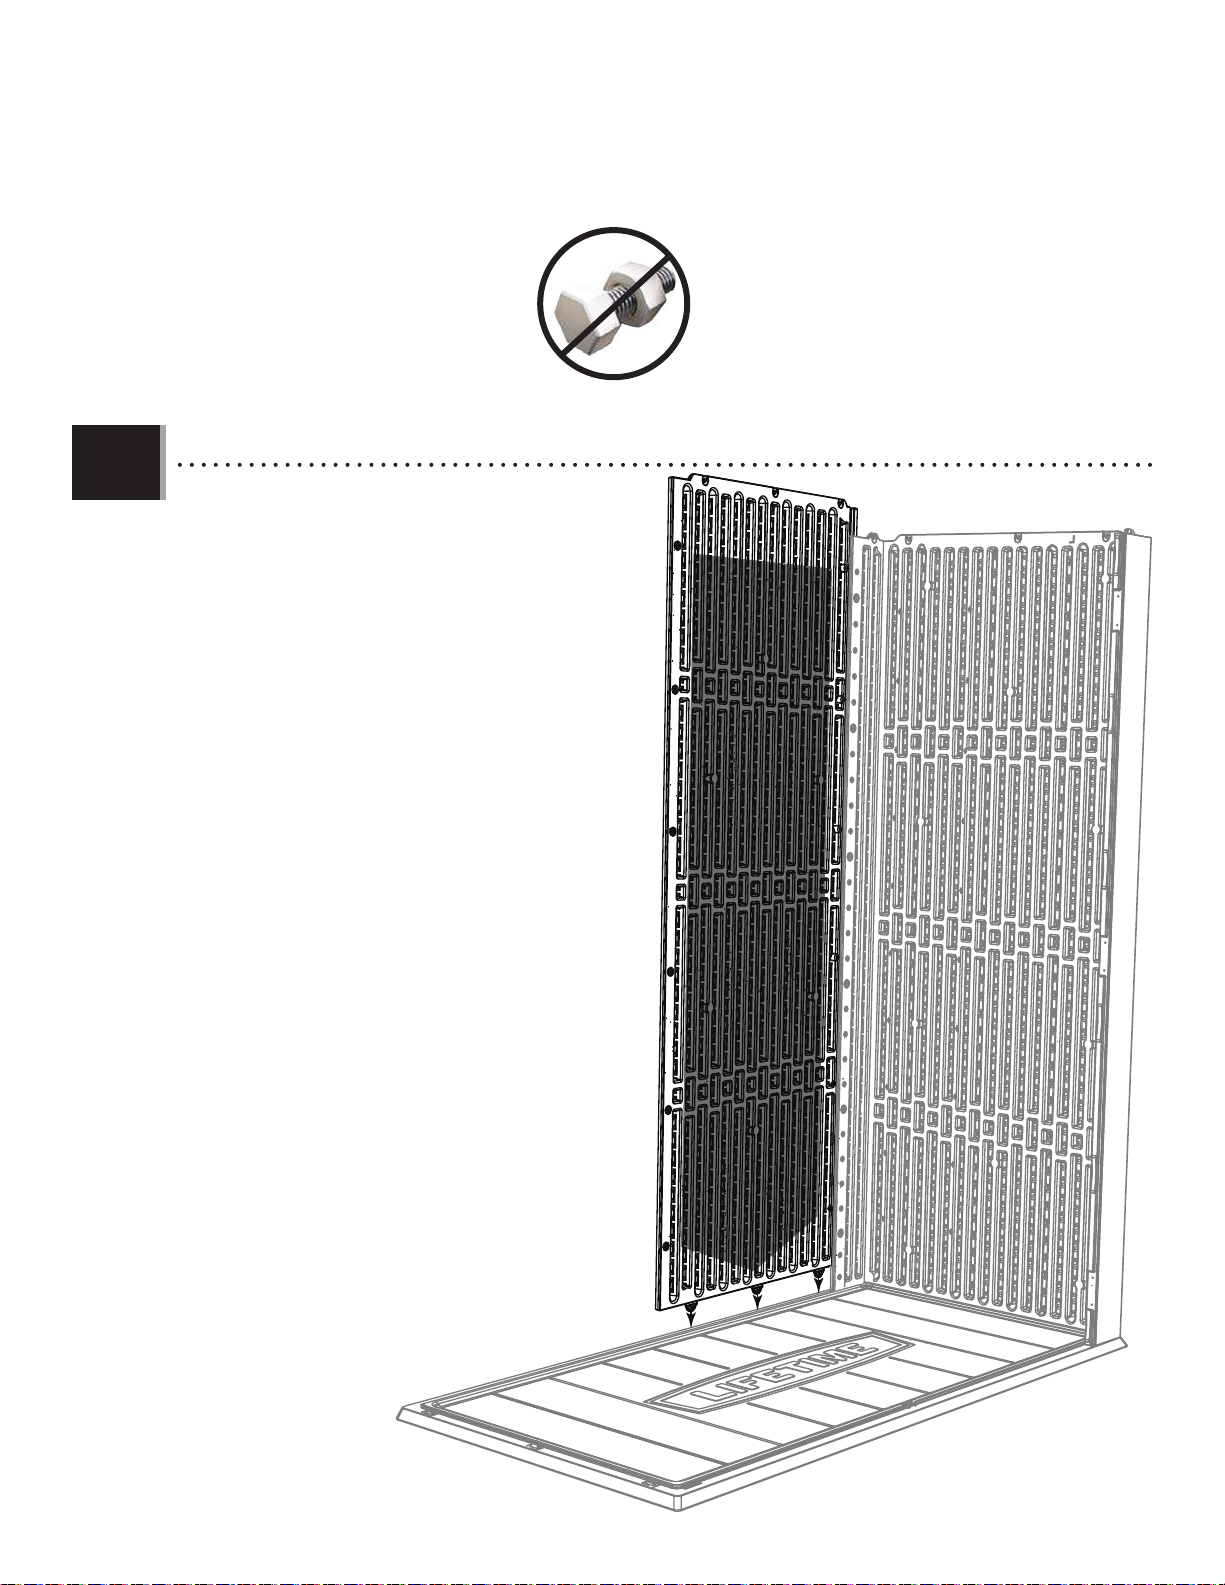
• Insert the three tabs at the bottom of the right Rear Wall
Panel (ANA) into the 2nd, 3rd, and 4th slots from the right
corner of the Floor panel. The right edge of the Rear Panel is
behind the left edge of the Right Side Panel.
• Insérez les trois languettes au bord inférieur du panneau
mural arrière (ANA) droit dans les 2e, 3e, et 4e fentes
du côté droit du panneau de plancher. Le bord droit du
panneau de plancher est arrière du bord gauche du panneau
latéral droit.
• Inserte las lengüetas al borde inferior del panel mural
trasero (ANA) derecho dentro de las 2ª, 3ª, y 4ª ranuras
del lado derecho del panel de piso. El borde derecho del
panel arrière se ubica detrás del borde izquierdo del panel lateral
derecho.
ANA
12
Page 13

u SECTION 1 (CONTINUED) / SECTION 1 (SUITE) / SECCIÓN 1 (CONTINUACIÓN)
TOOLS & HARDWARE REQUIRED / OUTILS ET QUINCAILLERIE REQUIS / INSTRUMENTAL Y HERRAJE REQUERIDOS
ADZ (x6)
1.8
• Align the six holes along the edges of the Panels,
and secure the Panels together with six (6) Screws
(ADZ).
• Alignez les six trous le long des bords des panneaux,
et fixez les panneaux l’un l’autre à l’aide de six (6) vis
(ADZ).
• Alinee los seis agujeros a lo largo de los bordes de
los paneles, y fije los paneles el uno al otro usando
seis (6) tornillos (ADZ).
ADZ
ADZ
ADZ
ADZ
13
ADZ
ADZ
Page 14
u SECTION 1 (CONTINUED) / SECTION 1 (SUITE) / SECCIÓN 1 (CONTINUACIÓN)
TOOLS & HARDWARE REQUIRED / OUTILS ET QUINCAILLERIE REQUIS / INSTRUMENTAL Y HERRAJE REQUERIDOS
ADZ (x6)
1.9
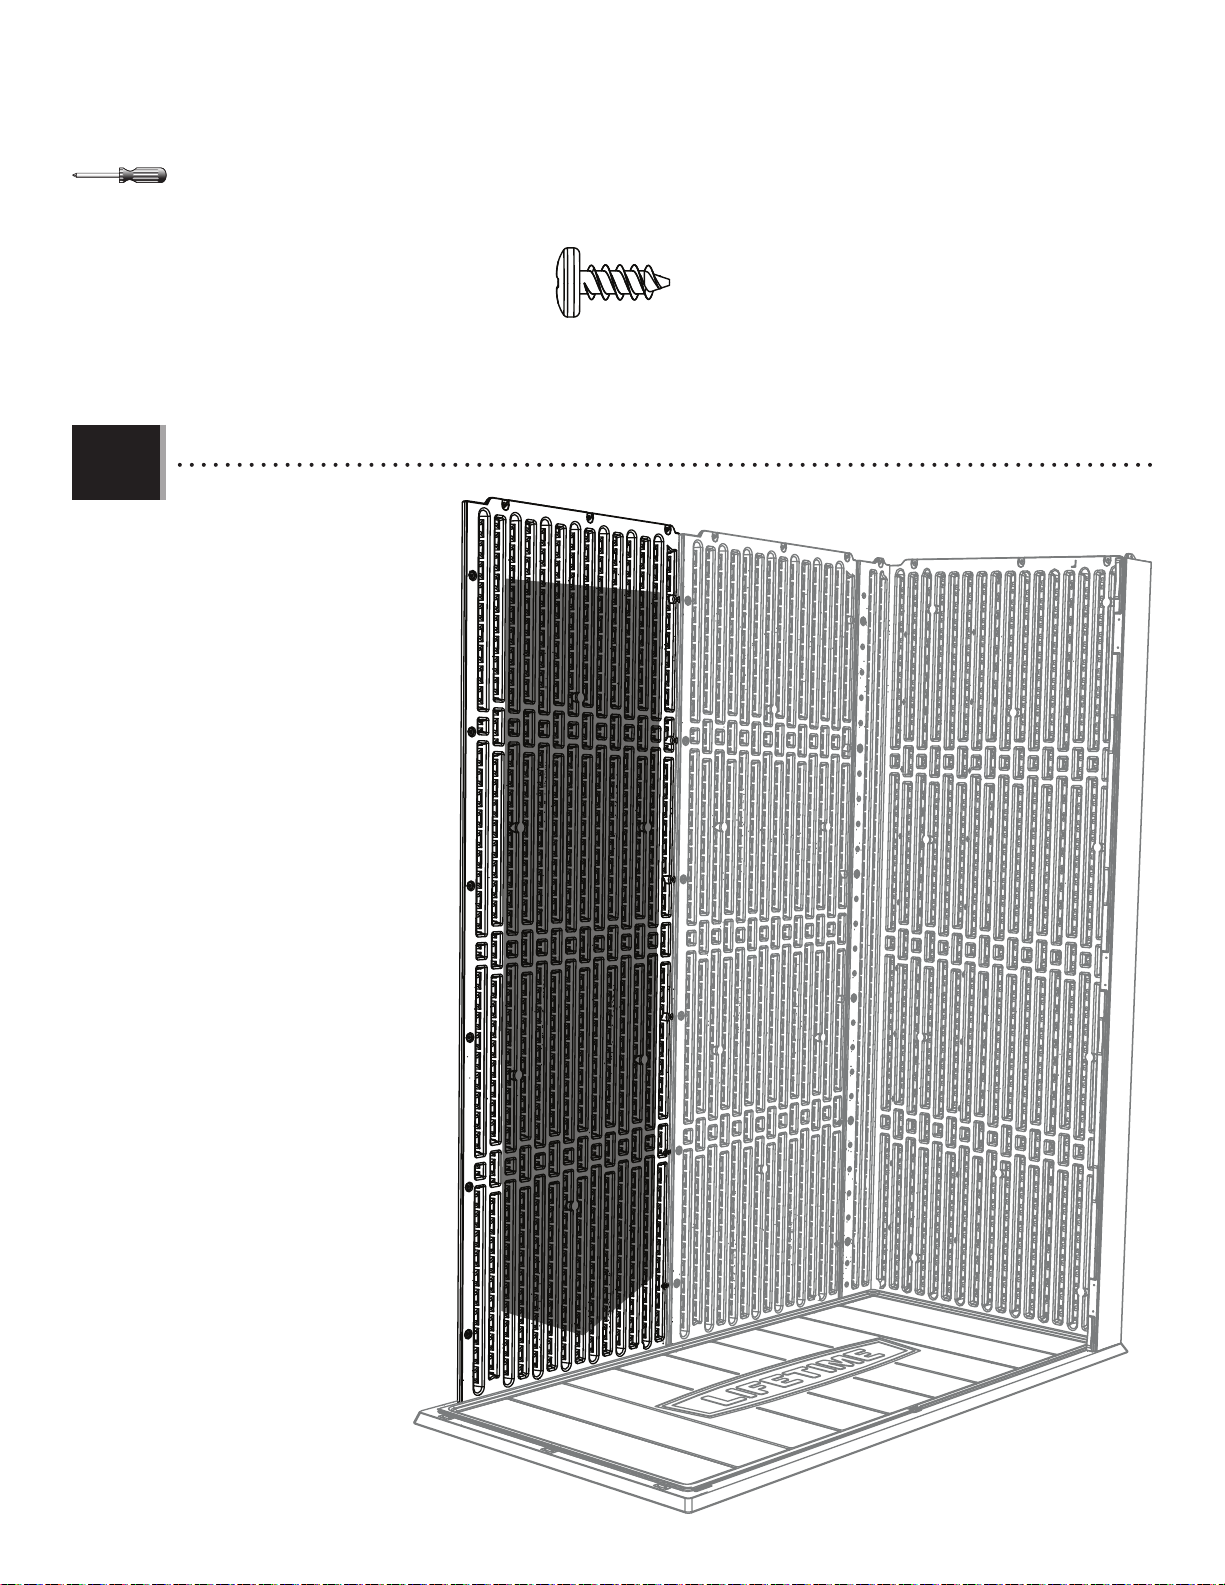
• Insert the three tabs at the
bottom of the second Rear Wall
Panel (ANA) into the 2nd, 3rd,
and 4th slots from the left
corner of the Floor panel. The
right edge of the Left Panel is behind
the left edge of the Right Panel.
Secure with six (6) Screws (ADZ).
• Insérez les trois languettes au
bord inférieur du panneau mural
arrière (ANA) dans les 2e, 3e, et
4e fentes du côté gauche du
panneau de plancher. Le bord
droit du panneau de plancher est
arrière du bord gauche du panneau
droit. Fixez avec six (6) vis (ADZ).
• Inserte las lengüetas al borde
inferior del panel mural trasero
(ANA) dentro de las 2ª, 3ª, y 4ª
ranuras del lado izquierdo del
panel de piso. El borde derecho
del panel izquierdo se ubica detrás
del borde izquierdo del panel
derecho. Fije con seis (6) tornillos
(ADZ).
ANA
14
Page 15
u SECTION 1 (CONTINUED) / SECTION 1 (SUITE) / SECCIÓN 1 (CONTINUACIÓN)
TOOLS & HARDWARE REQUIRED / OUTILS ET QUINCAILLERIE REQUIS / INSTRUMENTAL Y HERRAJE REQUERIDOS
ADZ (x6)
1.10
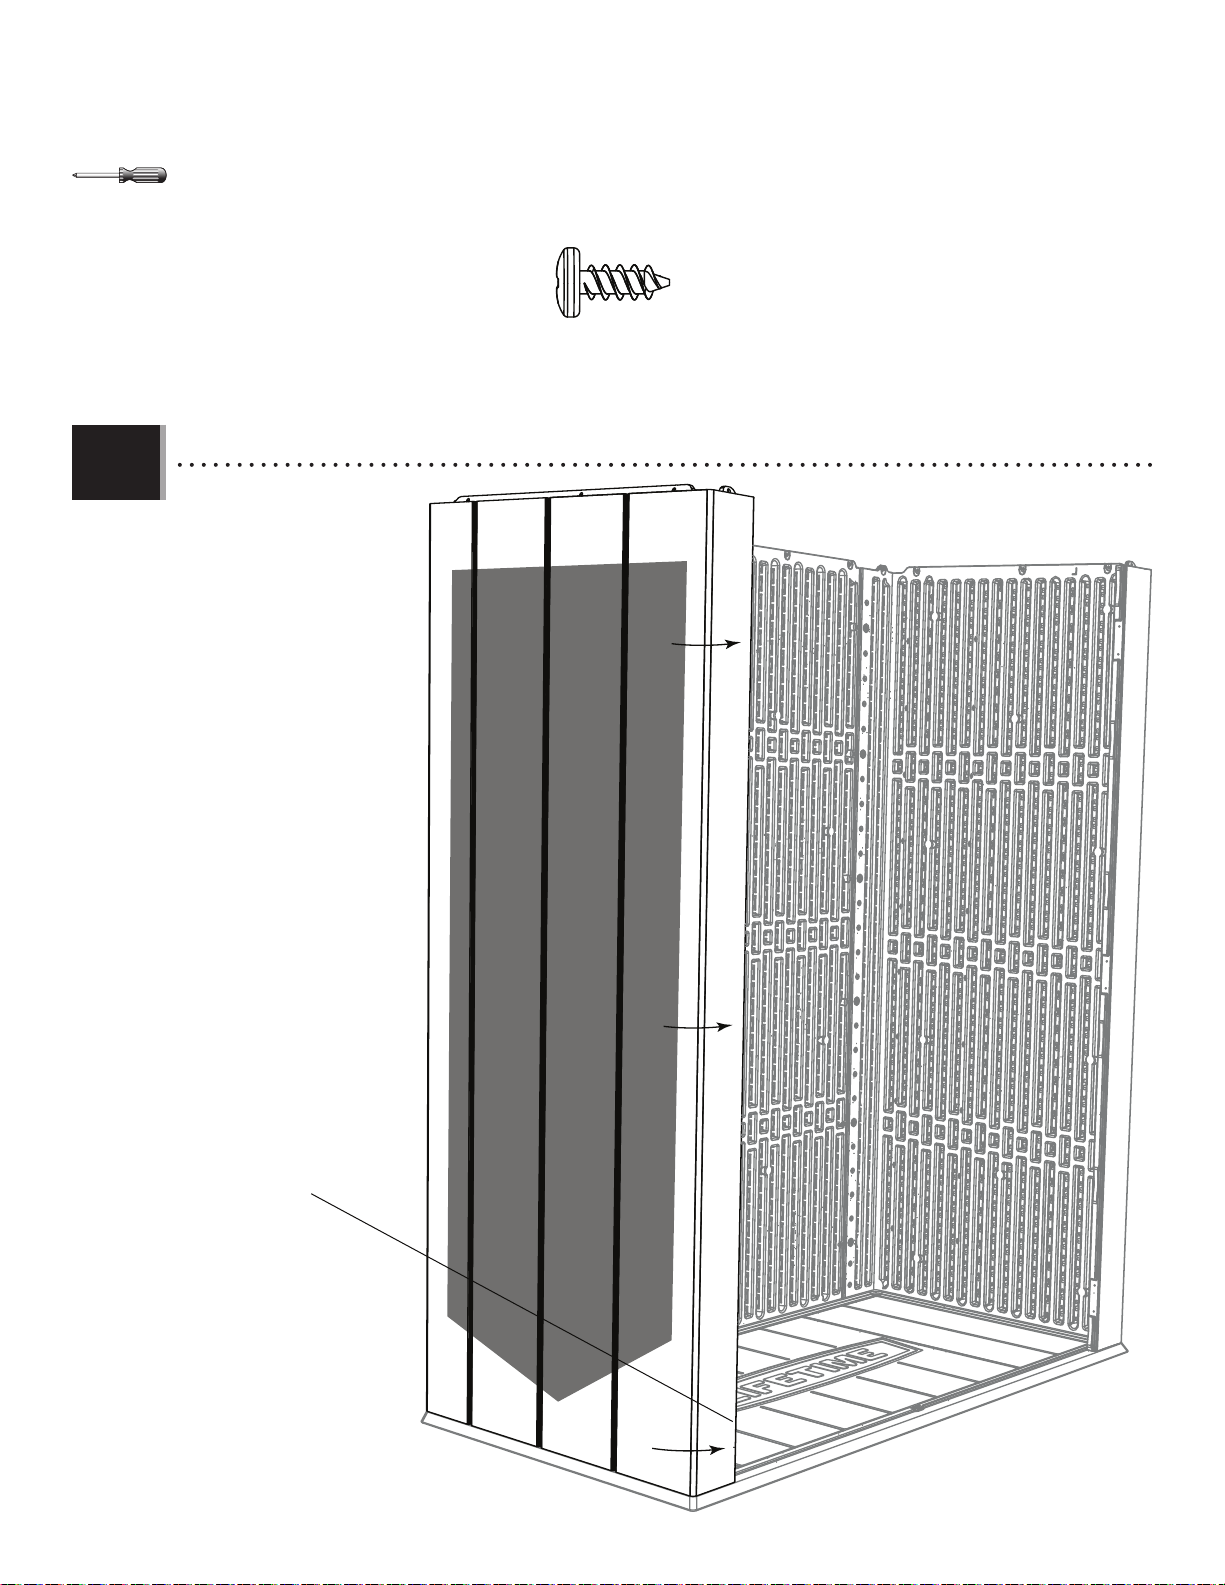
• Repeat steps 1.4–1.6 for the
Left Side Wall Panel (AGN).
• Répétez les étapes 1.4 – 1.6
pour le panneau mural latéral
gauche (AGN).
• Repita los pasos 1.4–1.6 para
el panel mural lateral izquierdo
(AGN).
AGN
• The Square Tube is here.
• Le tube carré est ici.
• El tubo cuadrado está aquí.
15
Page 16
u SECTION 1 (CONTINUED) / SECTION 1 (SUITE) / SECCIÓN 1 (CONTINUACIÓN)
TOOLS & HARDWARE REQUIRED / OUTILS ET QUINCAILLERIE REQUIS / INSTRUMENTAL Y HERRAJE REQUERIDOS
ARA (x1)
1.11
ADW (x10)
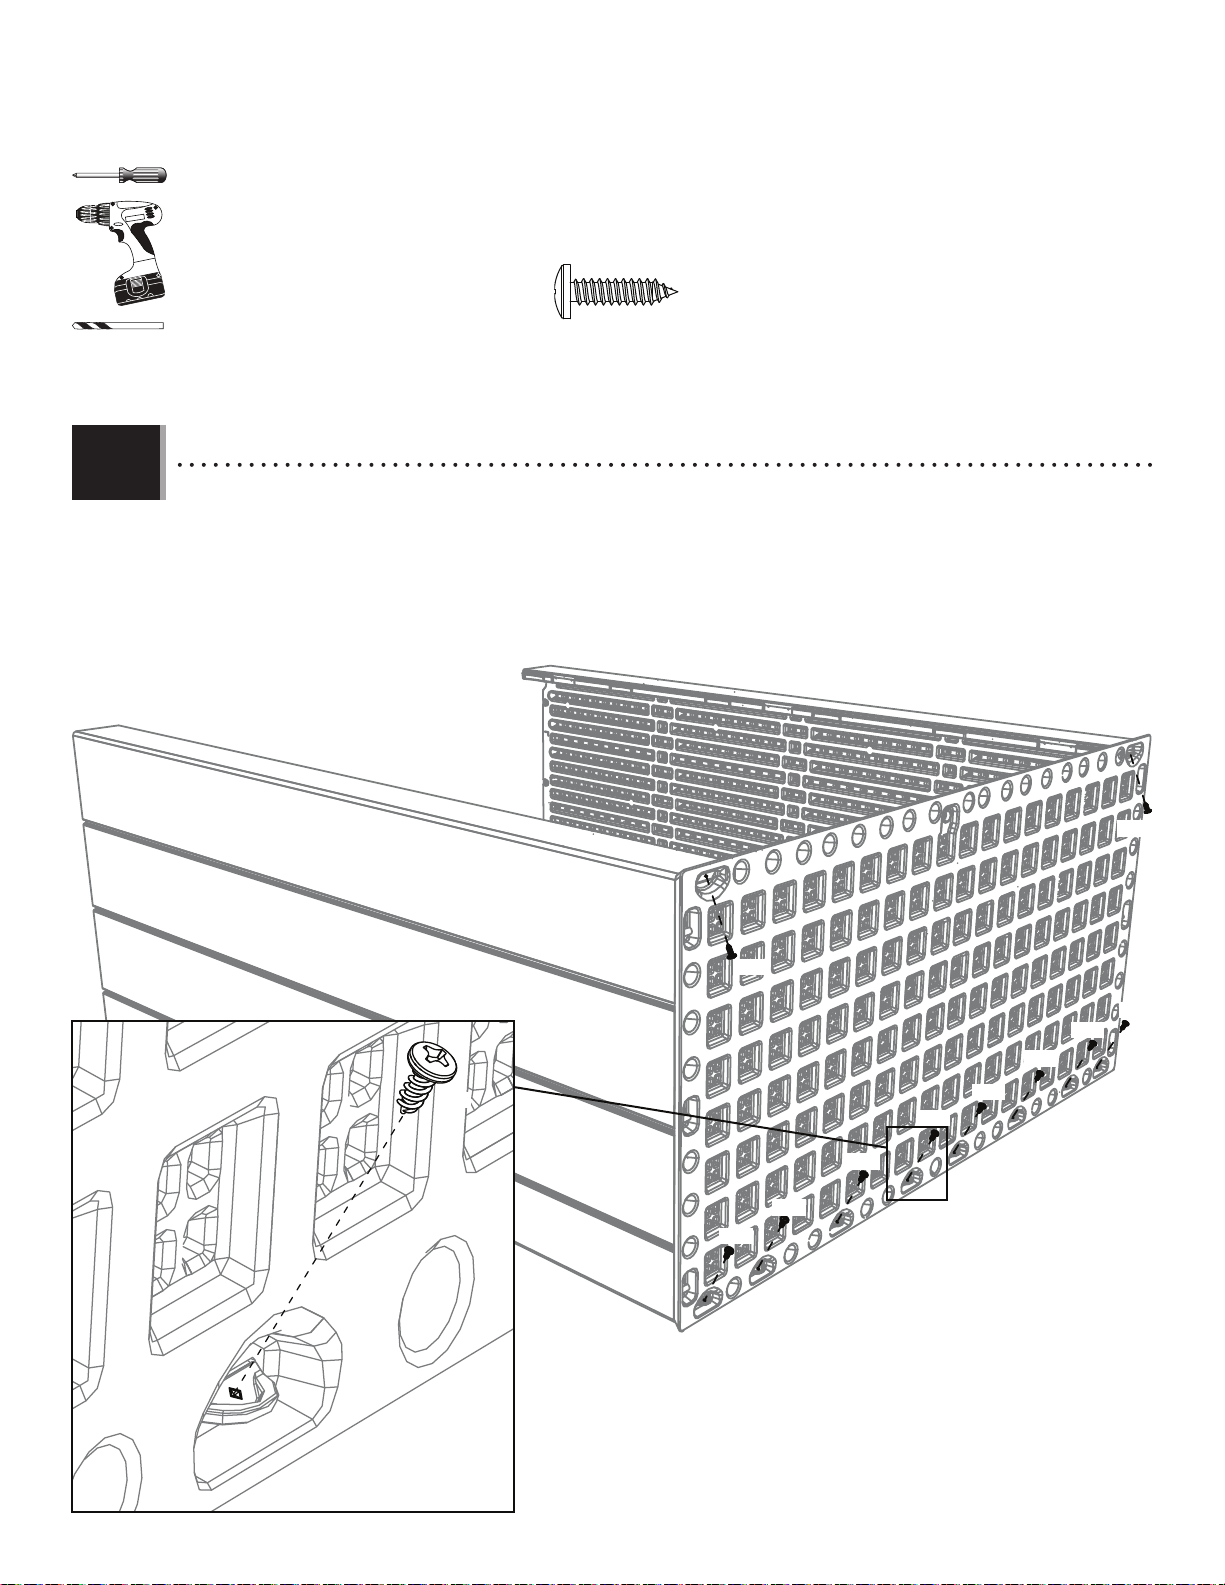
• Flip the assembly on its back, and insert a Screw (ADW) through each of the tabs underneath the Floor Panel as
shown. You can drill first and then insert the Screws.
• Tournez l’assemblage sur son dos, et insérez une vis (ADW) à travers chacune des languettes dessous le panneau
de plancher comme indiqué. On peut percer en premier et ensuite insérer les vis.
• Vuelque el ensamble en su reverso, e inserte un tornillo (ADW) por cada una de las lengüetas debajo el panel de
piso como se muestra. Se puede taladrar primero y entonces insertar los tornillos.
ADW
ADW
ADW
ADW
ADW
ADW
ADW
ADW
ADW
ADW
ADW
16
Page 17

u SECTION 1 (CONTINUED) / SECTION 1 (SUITE) / SECCIÓN 1 (CONTINUACIÓN)
TOOLS & HARDWARE REQUIRED / OUTILS ET QUINCAILLERIE REQUIS / INSTRUMENTAL Y HERRAJE REQUERIDOS
• One edge of the Roof Panel has six (6) small slits and four (4) holes along its inside as indicated below. This edge goes at the front of the cabinet,
just above the Doors. The Roof Support goes here in steps 1.14–1.15.
• Il y a six (6) petites fentes et quatre (4) trous le long de l’intérieur d’un bord du panneau de toit comme indiqué ci-dessous. Ce bord va à la partie
intérieure du meuble de rangement, juste au-dessus des portes. Le support de toit se fixe ici aux étapes 1.14 – 1.15.
• Hay seis (6) ranuras pequeñas y cuatro (4) agujeros a lo largo del borde interior del panel de techo como se muestra abajo. Este borde va a la
parte delantera del armario, apenas encima de las puertas. El soporte de techo se fija aquí en los pasos 1.14–1.15.
Front Edge of Roof / Bord avant du toit / Borde delantero del techo
17
Page 18

u SECTION 1 (CONTINUED) / SECTION 1 (SUITE) / SECCIÓN 1 (CONTINUACIÓN)
TOOLS & HARDWARE REQUIRED / OUTILS ET QUINCAILLERIE REQUIS / INSTRUMENTAL Y HERRAJE REQUERIDOS
1.12
• Flip the assembly upright, and set
the Roof Panel down onto the Wall
Panels being sure to orient the Panel
so the front edge is over the opening.
• Mettez l’assemblage vertical, et
posez le panneau de toit sur les
panneaux muraux en veillant à
orienter le panneau pour que le bord
avant est dessus de l’ouverture.
• Meta el ensamble vertical, y
coloque el panel de techo sobre los
paneles murales asegurándose que
el borde delantero está encima de la
apertura.
Front Edge of Roof / Bord avant du toit / Borde delantero del techo
18
Page 19

u SECTION 1 (CONTINUED) / SECTION 1 (SUITE) / SECCIÓN 1 (CONTINUACIÓN)
TOOLS & HARDWARE REQUIRED / OUTILS ET QUINCAILLERIE REQUIS / INSTRUMENTAL Y HERRAJE REQUERIDOS
1.13
EXO (x8)
• Secure the Roof Panel to the Wall Panels using Screws (ADV x8 & EXO x8) at the places indicated: Screws (ADV) along the sides
and front, and Screws (EXO) along the rear.
• Fixez le panneau de toit aux panneaux muraux en utilisant les vis (ADV x8 et EXO x8) aux endroits indiqués: les vis (ADV) le long
des bordes latéraux et avant, et les vis (EXO) le long du bord arrière.
• Fije el panel de techo a los paneles murales usando los tornillos (ADV x8 y EXO x8) a las ubicaciones indicadas: los tornillos
(ADV) a lo largo de los bordes laterales y delanteros, y los tornillos (EXO) a lo largo del borde trasero.
Front Edge of Roof / Bord avant du toit / Borde delantero del techo
ADV
ADV
ADV (x8)
ADV
ADV
EXO
ADV
ADV
EXO
EXO
Inside View Looking Up / Vue intérieur vers le haut / Vista interior ascendente
EXO EXO EXO EXO
19
ADV
ADV
EXO
Page 20

u SECTION 1 (CONTINUED) / SECTION 1 (SUITE) / SECCIÓN 1 (CONTINUACIÓN)
TOOLS & HARDWARE REQUIRED / OUTILS ET QUINCAILLERIE REQUIS / INSTRUMENTAL Y HERRAJE REQUERIDOS
1.14
• Slide the Roof Support (FEI) up against the Roof and Wall Panels, and align the holes in the Support with the slits in the
Roof and holes in the Walls. Be sure to note the description below the image.
• Faites glisser le support de toit (FEI) contre le panneau de toit et les panneaux muraux, et alignez les trous dans le support
avec les fentes dans le panneau de toit et les trous dans les panneaux muraux. Veillez à noter la description en-dessus l’image.
• Deslice el soporte de techo (FEI) contra el panel de techo y los paneles murales. Alinee los agujeros en el soporte con las
rendijas en el panel de techo y los agujeros en los paneles murales. Asegúrese de notar la description debajo la imagen.
FEI
Note: The image above is from the rear looking up toward the front. The Rear Wall Panels have been removed for clarity.
Remarque : L’image dessus est orientée de l’arrière en regardant vers le devant. Nos avons retiré les panneaux muraux arrières par souci de clarité.
!
Nota: La imagen arriba ha sido orientada de la parte trasera mirando arriba hacia la parte delantera. Los paneles murales traseros han sido quitados en aras de la claridad.
20
Page 21

u SECTION 1 (CONTINUED) / SECTION 1 (SUITE) / SECCIÓN 1 (CONTINUACIÓN)
TOOLS & HARDWARE REQUIRED / OUTILS ET QUINCAILLERIE REQUIS / INSTRUMENTAL Y HERRAJE REQUERIDOS
ADC
1.15
CHK (x2)
• Secure the Roof Support to the Roof and Wall Panels using the Screws indicated. Use the two (2) Self-Drilling Screws
(CHK) to secure the Support to the Square Tubes inside the Wall Panels. The Screws (ADZ) go on the ends.
• Fixez le support de toit aux panneau de toit et panneaux muraux en utilisant les vis indiquées. Employez les vis
autotaraudeuses (CHK) pour fixer le support aux tubes carrés dedans les panneaux muraux. Les vis (ADZ) vont aux extrémités.
• Fije el soporte de techo a los paneles murales y panel de techo usando los tornillos indicados. Use los tornillos autoroscantes (CHK) para fijar el soporte a los tubos cuadrados dentro de los paneles murales. Los tornillos (ADZ) van a los extremos.
ADV ADV
ADZ
CHK
ADV
ADV (x6)
ADV
ADV
ADV
ADZ (x2)
CHK
ADZ
Note: The image above is from the rear looking up toward the front. The Rear Wall Panels have been removed for clarity.
Remarque : L’image dessus est orientée de l’arrière en regardant vers le devant. Nos avons retiré les panneaux muraux arrières par souci de clarité.
!
Nota: La imagen arriba ha sido orientada de la parte trasera mirando arriba hacia la parte delantera. Los paneles murales traseros han sido quitados en aras de la claridad.
21
Page 22
u SECTION 1 (CONTINUED) / SECTION 1 (SUITE) / SECCIÓN 1 (CONTINUACIÓN)
TOOLS & HARDWARE REQUIRED / OUTILS ET QUINCAILLERIE REQUIS / INSTRUMENTAL Y HERRAJE REQUERIDOS
ADZ (x6)
1.16
Hole in Wall / Trou dans le mur / Agujero en el muro
Hole in Channel / Trou dans le canal / Agujero en el canal
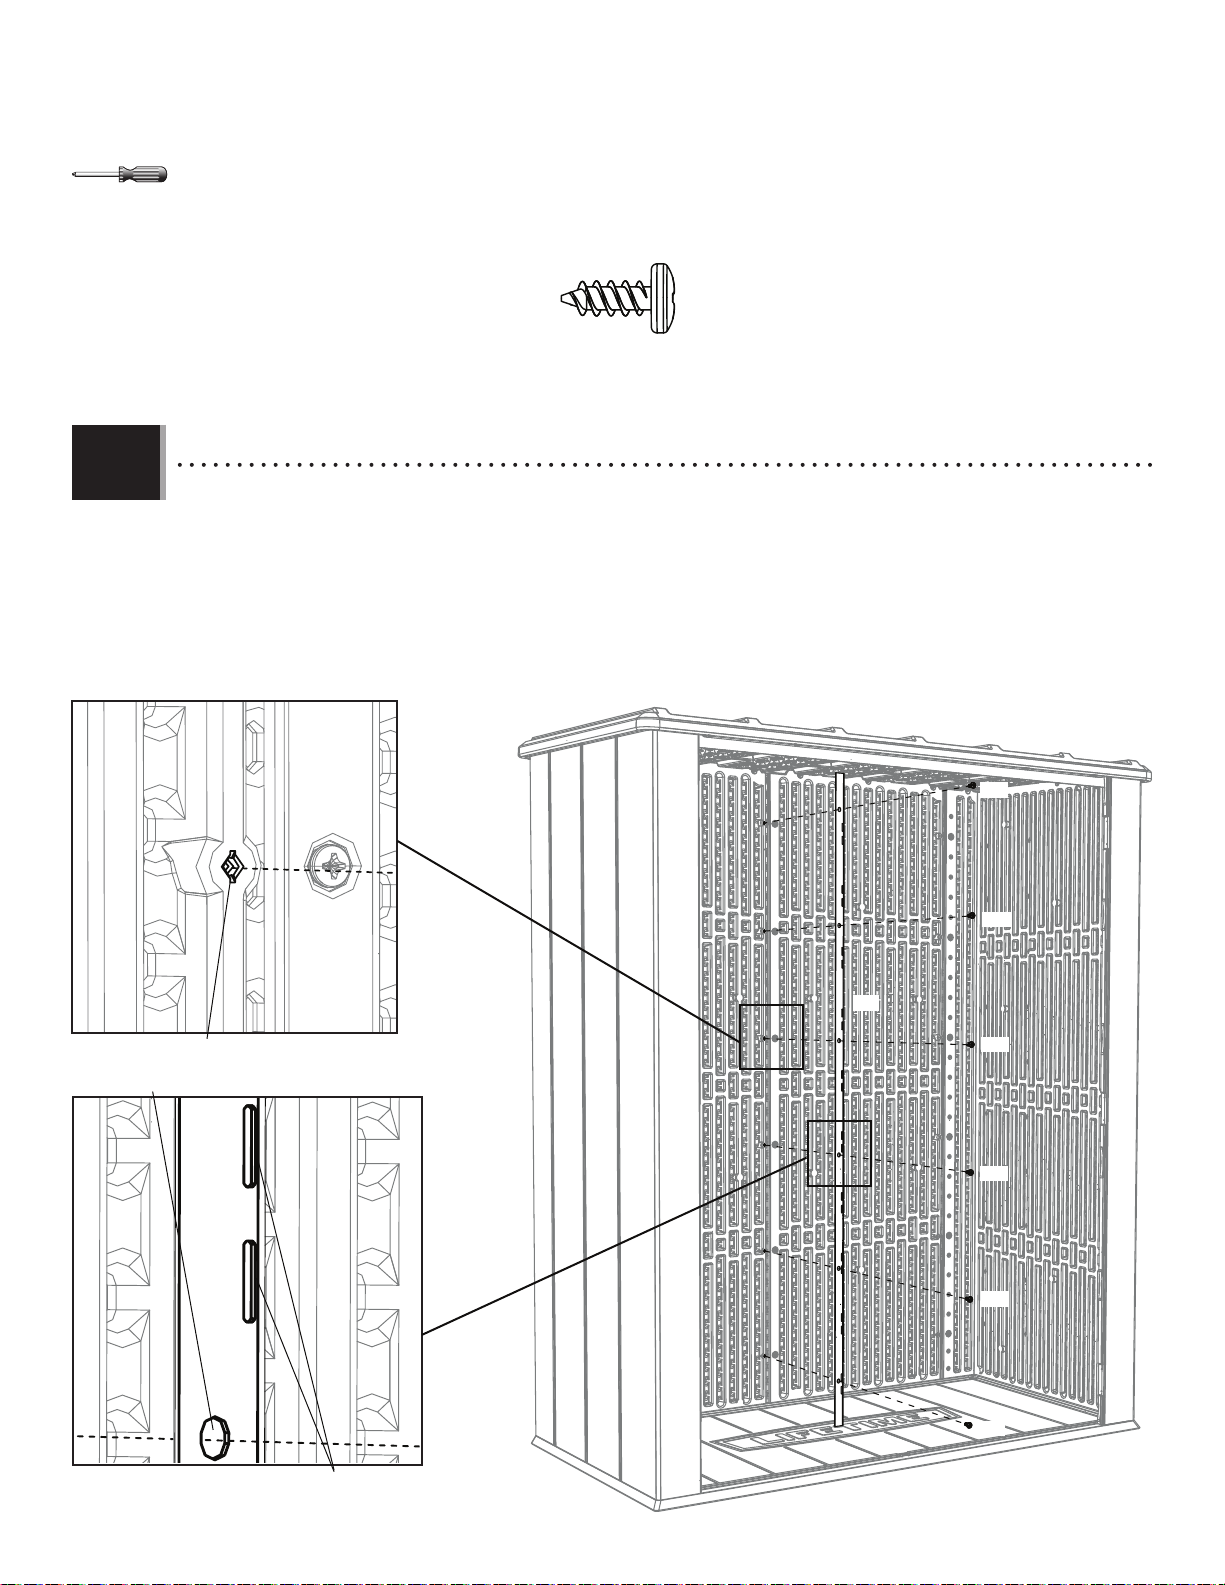
• Align the holes in the Support Channel (FEF) with those along the edge of the left Rear Wall Panel. Secure the
Channel to the Wall using six (6) Screws (ADZ). The slits should be on the right edge of the Channel.
• Alignez les trous dans le canal de support (FEF) avec ceux le long du bord du panneau mural arrière gauche. Fixez le
canal au mur à l’aide de six (6) vis (ADZ). Les fentes doivent être sur le bord droit du canal.
• Alinee los agujeros en el canal de soporte (FEF) con ellos a lo largo del borde del panel mural trasero izquierdo. Fije
el canal al muro usando seis (6) tornillos (ADZ). Las rendijas deben estar en el borde derecho del canal.
ADZ
ADZ
FEF
ADZ
Slits on the right edge of the Channel / Fentes sur le bord
droit du canal / Rendijas en el borde derecho del canal
ADZ
ADZ
ADZ
22
Page 23

2
DOOR ASSEMBLY / ASSEMBLAGE DES PORTES / ENSAMBLE DE LAS PUERTAS
HARDWARE REQUIRED / QUINCAILLERIE REQUISE / HERRAJE REQUERIDO
Hardware Bag / Sac de quincaillerie / Bolsa de herraje
FGJ
BYR (x2)
BYS (x2)
AEE (x6)
ADW (x2)
BYZ (x4)
Hardware Bag / Sac de quincaillerie / Bolsa de herraje
FGL
DGS (x1) DGR (x1)
Small Parts & Hardware Box / Boîte de petites pièces et quincaillerie / Caja de piezas pequeñas y herraje
Blister Pack / Blister / Blíster
Hardware Bag / Sac de quincaillerie / Bolsa de herraje
FFH
FGK
ADZ (x14)
AHS (x1)
ARA (x1)
Hardware Bag / Sac de quincaillerie / Bolsa de herraje
DUL (x12)
DXW (x12)
DWJ (x6)
FRS (x1)
FGI
BQP (x2)
ACA (x4)
AEB (x6)
CHK (x4)
PARTS REQUIRED / PIÈCES REQUISES / PIEZAS REQUERIDAS
Metal Parts / Pièces en métal / Piezas de metal
FEK (x1)
FEL (x1)
FEM (x2)
AAB (x6)
Holes / Trous / Agujeros
FGM (x1)
Top End / Extrémité supérieure / Extremo superior
FGN (x1)
23
EDA (x1)
Page 24

2
DOOR ASSEMBLY / ASSEMBLAGE DES PORTES / ENSAMBLE DE LAS PUERTAS
PARTS REQUIRED / PIÈCES REQUISES / PIEZAS REQUERIDAS
Plastic Parts / Pièces en plastique / Piezas de plástico
AGO (x1)
AGZ (x1)
TOOLS REQUIRED / OUTILS REQUIS / INSTRUMENTAL REQUERIDO
(1)
(1)
7/16 in/po
11 mm
(1)
24
ADC (x1)
FRS (x1)
ARA (x1)
Page 25

u SECTION 2 (CONTINUED) / SECTION 2 (SUITE) / SECCIÓN 2 (CONTINUACIÓN)
TOOLS & HARDWARE REQUIRED / OUTILS ET QUINCAILLERIE REQUIS / INSTRUMENTAL Y HERRAJE REQUERIDOS
7/16 in/po
11 mm
2.1
ACA (x2)
LEFT DOOR ASSEMBLY / ASSEMBLAGE DE LA PORTE GAUCHE / ENSAMBLE DE LA PUERTA IZQUIERDA
• Flip the Left Door (AGO) upside down, and secure the locking hardware to the Door as shown.
• Retournez la porte gauche (AGO), et fixez la quincaillerie de verrouillage à la porte comme illustré.
• Vuelque la puerta izquierda (AGO), y fije el herraje de cierre a la puerta como se muestra.
AAB (x2)
AEB (x2)
FGM (x1)
AGO
AAB
AAB
AEB
AEB
FGM
ACA
ACA
25
Page 26

u SECTION 2 (CONTINUED) / SECTION 2 (SUITE) / SECCIÓN 2 (CONTINUACIÓN)
TOOLS & HARDWARE REQUIRED / OUTILS ET QUINCAILLERIE REQUIS / INSTRUMENTAL Y HERRAJE REQUERIDOS
2.2
• Set the Left Door Inner Channel (FEL) onto the edge of the Door, and align the two holes at each end with the holes in
the Door.
• Mettez le canal intérieur de la porte gauche (FEL) sur le bord de la porte, et alignez les deux trous à chaque extrémité
avec ceux dans la porte.
• Meta el canal interior de la puerta izquierda (FEL) sobre el borde de la puerta, y alinee los dos agujeros a cada extremo
con ellos en la puerta.
FEL
26
Page 27

u SECTION 2 (CONTINUED) / SECTION 2 (SUITE) / SECCIÓN 2 (CONTINUACIÓN)
TOOLS & HARDWARE REQUIRED / OUTILS ET QUINCAILLERIE REQUIS / INSTRUMENTAL Y HERRAJE REQUERIDOS
ADZ (x6)
2.3
• While holding the Channel tight against the Door, insert six (6) Screws (ADZ) to secure the Channel in place.
• Gardez bien le canal contre la porte, et insérez six (6) vis (ADZ) pour fixer le canal en place.
• Mantenga bien el canal contra la puerta, e inserte seis (6) tornillos (ADZ) para fijar el canal en su lugar.
ADZ
ADZ
ADZ
ADZ
ADZ
ADZ
27
ADZ
Page 28

u SECTION 2 (CONTINUED) / SECTION 2 (SUITE) / SECCIÓN 2 (CONTINUACIÓN)
TOOLS & HARDWARE REQUIRED / OUTILS ET QUINCAILLERIE REQUIS / INSTRUMENTAL Y HERRAJE REQUERIDOS
ADC (x1)
CHK (x4)
ARA (x1)
2.4
CHK
CHK
DGS (x1)
• Secure a Deadbolt (DGR & DGS) to the top and bottom of the Door at the locations shown. You can drill first and then insert
the Screws.
• Fixez bien un verrou (DGR et DGS) a la partie supérieure et inférieure de la porte aux endroits indiqués. On peut percer
en premier et ensuite insérer les vis.
• Fije bien un cerrojo (DGR y DGS) a la parte superior e inferior de la puerta a las ubicaciones indicadas. Se puede taladrar
primero y entonces insertar los tornillos.
DGR
DGR (x1)
CHK
CHK
DGR
DGS
CHK
CHK
CHK
CHK
DGS
DGS
28
Page 29

u SECTION 2 (CONTINUED) / SECTION 2 (SUITE) / SECCIÓN 2 (CONTINUACIÓN)
TOOLS & HARDWARE REQUIRED / OUTILS ET QUINCAILLERIE REQUIS / INSTRUMENTAL Y HERRAJE REQUERIDOS
ADZ (x4)
2.5
2.6
• Set the Lateral Door Channel (FEM) into the groove along the edge of the Door.
• Mettez le canal latéral de la porte (FEM) dans la rainure le long du bord de la porte.
• Meta el canal lateral de la puerta (FEM) en la ranura a lo largo del borde de la puerta.
FEM
• While holding the Channel tight against the Door, insert four (4) Screws (ADZ) to secure the Channel in place.
• Gardez bien le canal contre la porte, et insérez quatre (4) vis (ADZ) pour fixer le canal en place.
• Mantenga bien el canal contra la puerta, e inserte cuatro (4) tornillos (ADZ) para fijar el canal en su lugar.
ADZ
ADZ
ADZ
ADZ
ADZ
29
Page 30

u SECTION 2 (CONTINUED) / SECTION 2 (SUITE) / SECCIÓN 2 (CONTINUACIÓN)
TOOLS & HARDWARE REQUIRED / OUTILS ET QUINCAILLERIE REQUIS / INSTRUMENTAL Y HERRAJE REQUERIDOS
AEE (x3)
2.7
2.8
BYZ (x2)
• Connect two Handle Pieces (BYS & BYR) together.
• Joignez deux pièces de la poignée (BYS et BYR) l’une l’autre.
• Conecte dos piezas del picaporte (BYS y BYR).
• Secure the Handle to the Door using the hardware indicated.
• Fixez bien la poignée à la porte à l’aide de la quincaillerie indiquée.
• Fije bien el picaporte à la puerta usando el herraje indicado.
ADW (x1)
BYR
BYS
BYZ
AEE
BYZ
AEE
ADW
AEE
30
Page 31

u SECTION 2 (CONTINUED) / SECTION 2 (SUITE) / SECCIÓN 2 (CONTINUACIÓN)
TOOLS & HARDWARE REQUIRED / OUTILS ET QUINCAILLERIE REQUIS / INSTRUMENTAL Y HERRAJE REQUERIDOS
DXW (x6)
DWJ (x3)
2.9
DXW
DXW
• These Screws (DXW) go through the Hinge, Door, and through the holes in the Channel. Start with the center Hinge.
• Ces vis (DXW) vont à travers la charnière, la porte, et les trous dans le canal. Commencez avec la charnière centrale en premier.
• Estos tornillos (DXW) atravesan la bisagra, la puerta, y los agujeros en el canal. Comience con la bisagra central primero.
DXW
DXW
DXW
DXW
DXW
DXW
Note: Start with the center Hinge.
Remarque : Commencez avec la charnière centrale.
!
Nota: Comience con la bisagra central.
Note: Chamfered side faces away from Door.
Remarque : Le côté chanfreiné doit être opposé à la porte.
!
Nota: El lado biselado debe dar la espalda a la puerta.
DXW
DXW
DWJ
31
Page 32

u SECTION 2 (CONTINUED) / SECTION 2 (SUITE) / SECCIÓN 2 (CONTINUACIÓN)
TOOLS & HARDWARE REQUIRED / OUTILS ET QUINCAILLERIE REQUIS / INSTRUMENTAL Y HERRAJE REQUERIDOS
ADZ (x4)
2.10
2.11
RIGHT DOOR ASSEMBLY / ASSEMBLAGE DE LA PORTE DROITE / ENSAMBLE DE LA PUERTA DERECHA
• Set the Lateral Door Channel (FEM) into the groove along the edge of the Door.
• Mettez le canal latéral de la porte (FEM) dans la rainure le long du bord de la porte.
• Meta el canal lateral de la puerta (FEM) en la ranura a lo largo del borde de la puerta.
FEM
• While holding the Channel tight against the Door, insert four (4) Screws (ADZ) to secure the Channel in place.
• Gardez bien le canal contre la porte, et insérez quatre (4) vis (ADZ) pour fixer le canal en place.
• Mantenga bien el canal contra la puerta, e inserte cuatro (4) tornillos (ADZ) para fijar el canal en su lugar.
32
Page 33
u SECTION 2 (CONTINUED) / SECTION 2 (SUITE) / SECCIÓN 2 (CONTINUACIÓN)
TOOLS & HARDWARE REQUIRED / OUTILS ET QUINCAILLERIE REQUIS / INSTRUMENTAL Y HERRAJE REQUERIDOS
FRS
2.12
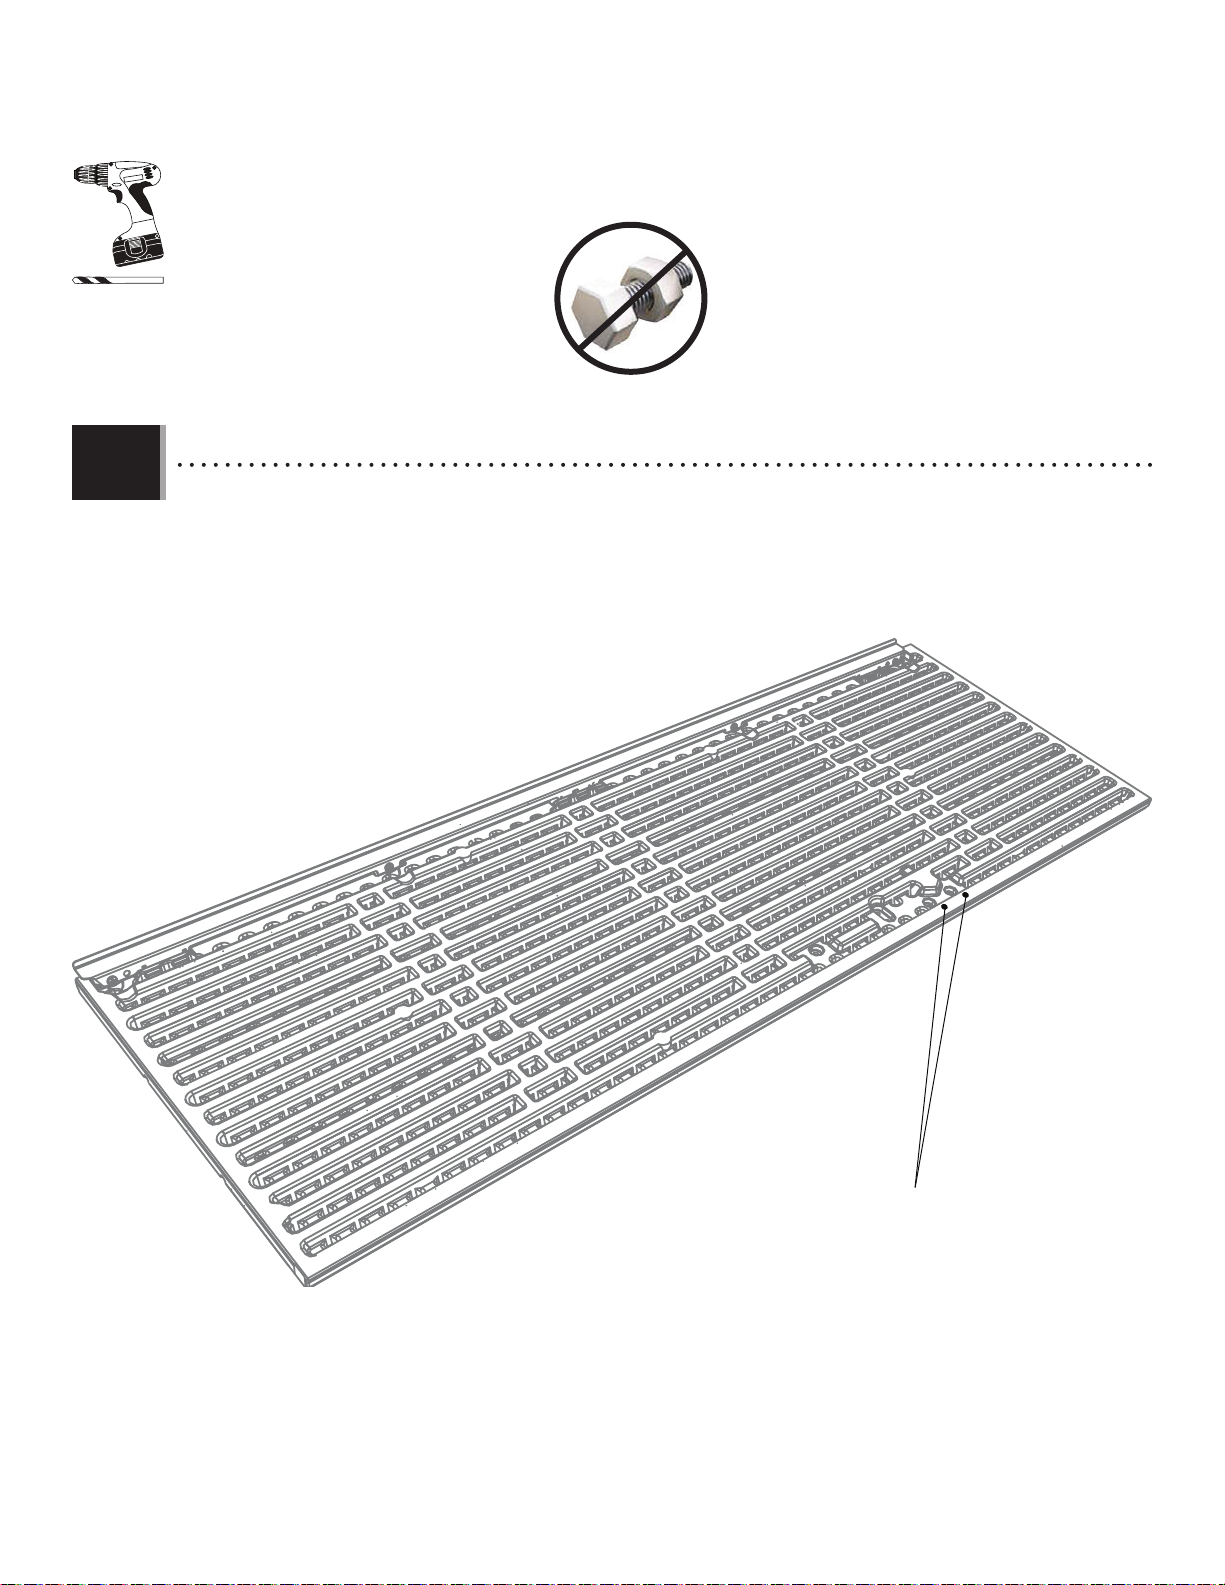
• Using a 1/4" (6,4 mm) bit, drill into these two divots, but not all the way through the Door.
• En utilisant une mèche de 6,4 mm (1/4 po), percez les deux marques indiquées, mais de pas de part en part la porte.
• Usando una broca de 6,4 mm (1/4 in), taladre las dos marcas indicadas, mas no atraviese la puerta por completo.
33
• Divots
• Marques
• Marcas
Page 34

u SECTION 2 (CONTINUED) / SECTION 2 (SUITE) / SECCIÓN 2 (CONTINUACIÓN)
TOOLS & HARDWARE REQUIRED / OUTILS ET QUINCAILLERIE REQUIS / INSTRUMENTAL Y HERRAJE REQUERIDOS
AHS (x1)
2.13
2.14
• Insert a Square Tube (FEK) into the hole at the bottom of the Door until it hangs out a few inches.
• Insérez un tube carré (FEK) dans le trou au coin inférieur de la porte jusqu’à ce qu’il hangs out quelques centimètres.
• Inserte un tubo cuadrado (FEK) en el agujero a la esquina inferior de la puerta hasta que se cuelgue unos centímetros.
FEK
• Insert an End Cap (AHS) into the Tube, and continue inserting the Tube until the two holes in the Tube are
aligned with those in the Door.
• Insérez un capuchon (AHS) dans le tube, et continuez à insérer le tube jusqu’à ce que les deux trous dans
le tube s’alignent avec ceux de la porte.
• Inserte un tapón (AHS) en el tubo, et continue insertando el tubo hasta que los dos agujeros estén
alineados con ellos en la puerta.
34
AHS
Page 35

u SECTION 2 (CONTINUED) / SECTION 2 (SUITE) / SECCIÓN 2 (CONTINUACIÓN)
TOOLS & HARDWARE REQUIRED / OUTILS ET QUINCAILLERIE REQUIS / INSTRUMENTAL Y HERRAJE REQUERIDOS
FRS
2.15
• Using a 1/4" (6,4 mm) bit, drill completely through the Door at these two divots. Use the holes in the Square Tube as a
guide.
• En utilisant une mèche de 6,4 mm (1/4 po), percez complètement la porte à ces deux marques. Employez les trous
dans le tube carré comme référence.
• Usando una broca de 6,4 mm (1/4 in), taladre por completo la puerta a estas dos marcas. Use los agujeros en el tubo
cuadrado como una guía.
35
• Drill completely through these two divots.
• Percez complètement ces deux marques.
• Taladre por completo estas dos marcas.
Page 36
u SECTION 2 (CONTINUED) / SECTION 2 (SUITE) / SECCIÓN 2 (CONTINUACIÓN)
TOOLS & HARDWARE REQUIRED / OUTILS ET QUINCAILLERIE REQUIS / INSTRUMENTAL Y HERRAJE REQUERIDOS
7/16 in/po
11 mm
2.16
ACA (x2)
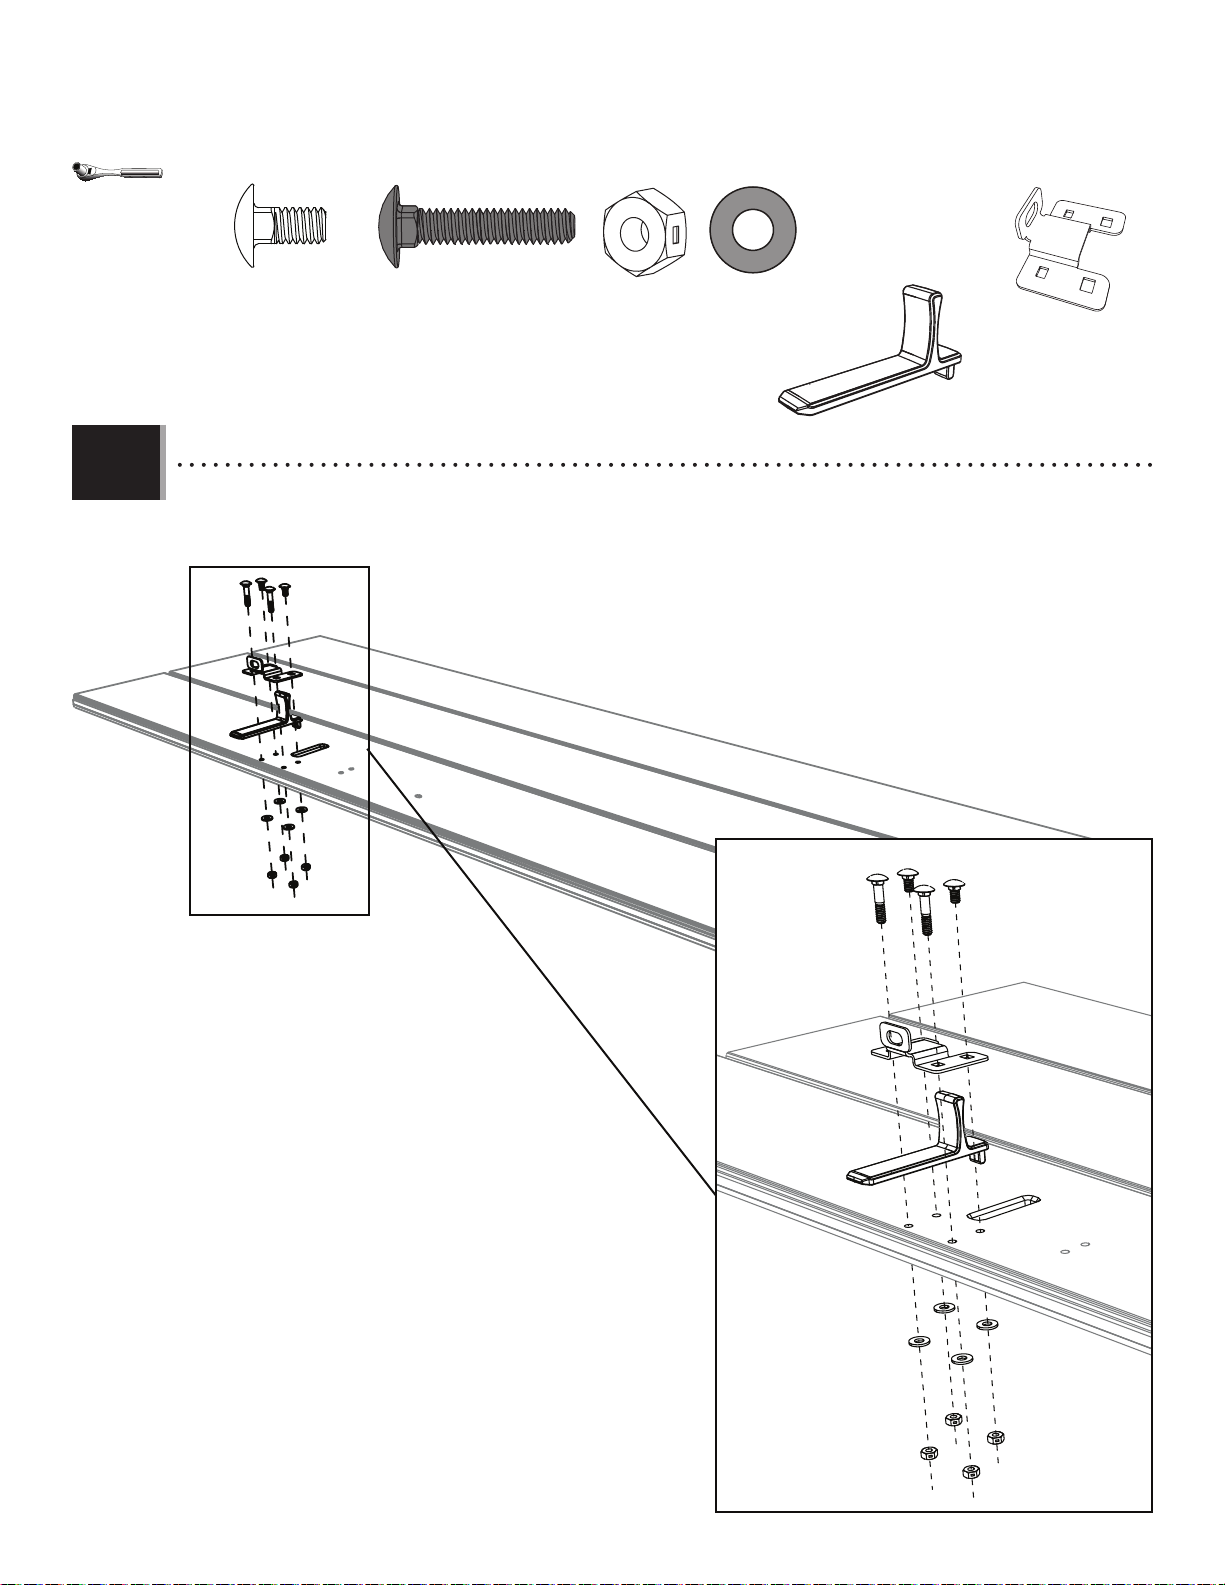
• Secure the locking hardware to the Door as shown.
• Fixez la quincaillerie de verrouillage à la porte comme illustré.
• Fije el herraje de cierre a la puerta como se muestra.
BQP (x2)
AAB (x4)
AEB (x4)
FGN (x1)
EDA (x1)
ACA
BQP
EDA
AEB
AAB
ACA
BQP
FGN
AEB
AEB
AEB
AAB
AAB
AAB
36
Page 37
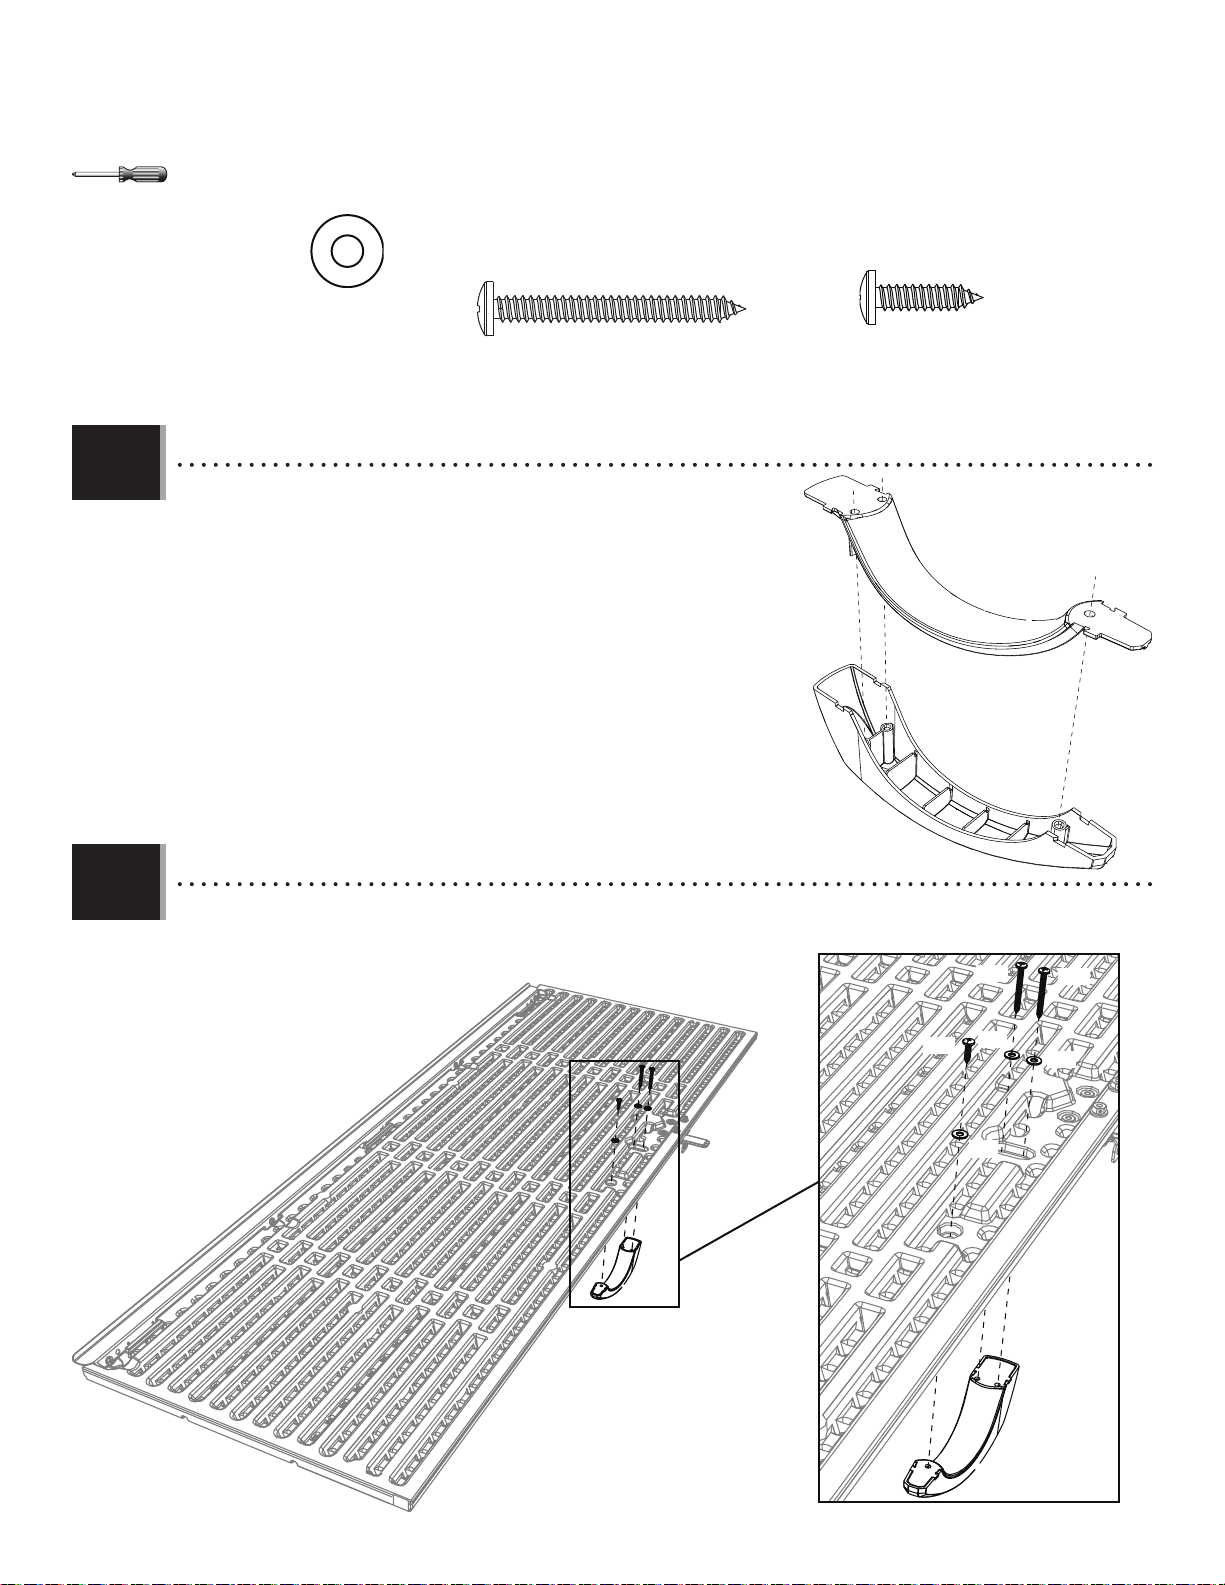
u SECTION 2 (CONTINUED) / SECTION 2 (SUITE) / SECCIÓN 2 (CONTINUACIÓN)
TOOLS & HARDWARE REQUIRED / OUTILS ET QUINCAILLERIE REQUIS / INSTRUMENTAL Y HERRAJE REQUERIDOS
AEE (x3)
2.17
2.18
BYZ (x2)
• Connect two Handle Pieces (BYS & BYR) together.
• Joignez deux pièces de la poignée (BYS et BYR) l’une l’autre.
• Conecte dos piezas del picaporte (BYS y BYR).
• Secure the Handle to the Door using the hardware indicated.
• Fixez bien la poignée à la porte à l’aide de la quincaillerie indiquée.
• Fije bien el picaporte à la puerta usando el herraje indicado.
BYS
ADW (x1)
BYR
BYZ
BYZ
37
ADW
AEE
AEE
AEE
Page 38

u SECTION 2 (CONTINUED) / SECTION 2 (SUITE) / SECCIÓN 2 (CONTINUACIÓN)
TOOLS & HARDWARE REQUIRED / OUTILS ET QUINCAILLERIE REQUIS / INSTRUMENTAL Y HERRAJE REQUERIDOS
DXW (x6)
DWJ (x3)
2.19
DXW
DXW
• These Screws (DXW) go through the Hinge, Door, and through the holes in the Channel. Start with the center Hinge.
• Ces vis (DXW) vont à travers la charnière, la porte, et les trous dans le canal. Commencez avec la charnière centrale en premier.
• Estos tornillos (DXW) atravesan la bisagra, la puerta, y los agujeros en el canal. Comience con la bisagra central primero.
DXW
DWJ
DXW
DXW
DXW
DXW
DXW
Note: Start with the center Hinge.
Remarque : Commencez avec la charnière centrale.
!
Nota: Comience con la bisagra central.
Note: Chamfered side faces away from Door.
Remarque : Le côté chanfreiné doit être opposé à la porte.
!
Nota: El lado biselado debe dar la espalda a la puerta.
DXW
DXW
DWJ
38
Page 39

u SECTION 2 (CONTINUED) / SECTION 2 (SUITE) / SECCIÓN 2 (CONTINUACIÓN)
TOOLS & HARDWARE REQUIRED / OUTILS ET QUINCAILLERIE REQUIS / INSTRUMENTAL Y HERRAJE REQUERIDOS
ADC (x1)
DUL (x6)
2.20
• Align the holes in the hinges on the Right Door with the divots on the Right Wall Panel, and secure the Door to the
Cabinet using six (6) Screws (DUL).
• Alignez les trous dans le charnières sur la porte droite avec les marques sur le panneau mural droit, et fixez la
porte au meuble à l’aide de six (6) vis (DUL).
• Alinee los agujeros en las bisagras en la puerta derecha con las marcas en el panel mural derecho, y fije la puerta
al mueble usando seis (6) tornillos (DUL).
39
DUL
DUL
Page 40

u SECTION 2 (CONTINUED) / SECTION 2 (SUITE) / SECCIÓN 2 (CONTINUACIÓN)
TOOLS & HARDWARE REQUIRED / OUTILS ET QUINCAILLERIE REQUIS / INSTRUMENTAL Y HERRAJE REQUERIDOS
DUL (x6)
2.21
• Repeat the last step for the Left Door.
• Répétez l’étape précédente pour la porte gauche.
• Repita el paso anterior para la puerta izquierda.
40
Page 41

3
SHED ANCHORING / ANCRAGE DE LA REMISE / ANCLAJE DE LA CASITA
HARDWARE REQUIRED / QUINCAILLERIE REQUISE / HERRAJE REQUERIDO
Hardware Bag / Sac de quincaillerie / Bolsa de herraje
FHR
COB (x2)
ADW (x2)
ACB (x2)
FHK (x2)
PARTS REQUIRED / PIÈCES REQUISES / PIEZAS REQUERIDAS
TOOLS REQUIRED / OUTILS REQUIS / INSTRUMENTAL REQUERIDO
ARA (x1)
ADC (x1)
41
Page 42

u SECTION 3 (CONTINUED) / SECTION 3 (SUITE) / SECCIÓN 3 (CONTINUACIÓN)
TOOLS & HARDWARE REQUIRED / OUTILS ET QUINCAILLERIE REQUIS / INSTRUMENTAL Y HERRAJE REQUERIDOS
ADW (x2)
FHK (x2)
3.1
• Attach the Wall Brackets to the back of the Roof at the following locations:
• Fixez les supports muraux à la partie arrière du toit aux endroits indiqués :
• Fije los soportes murales a la parte trasera del tejado a las ubicaciones indicadas:
FHK
ADW
3.2
• Stand the Cabinet upright, and mark the walls through the holes in
the Brackets.
• Mettez l’armoire verticale, et marquez les murs à travers les trous
dans les supports.
• Ponga el armario vertical, y marque los muros por los agujeros en los
soportes.
42
Page 43
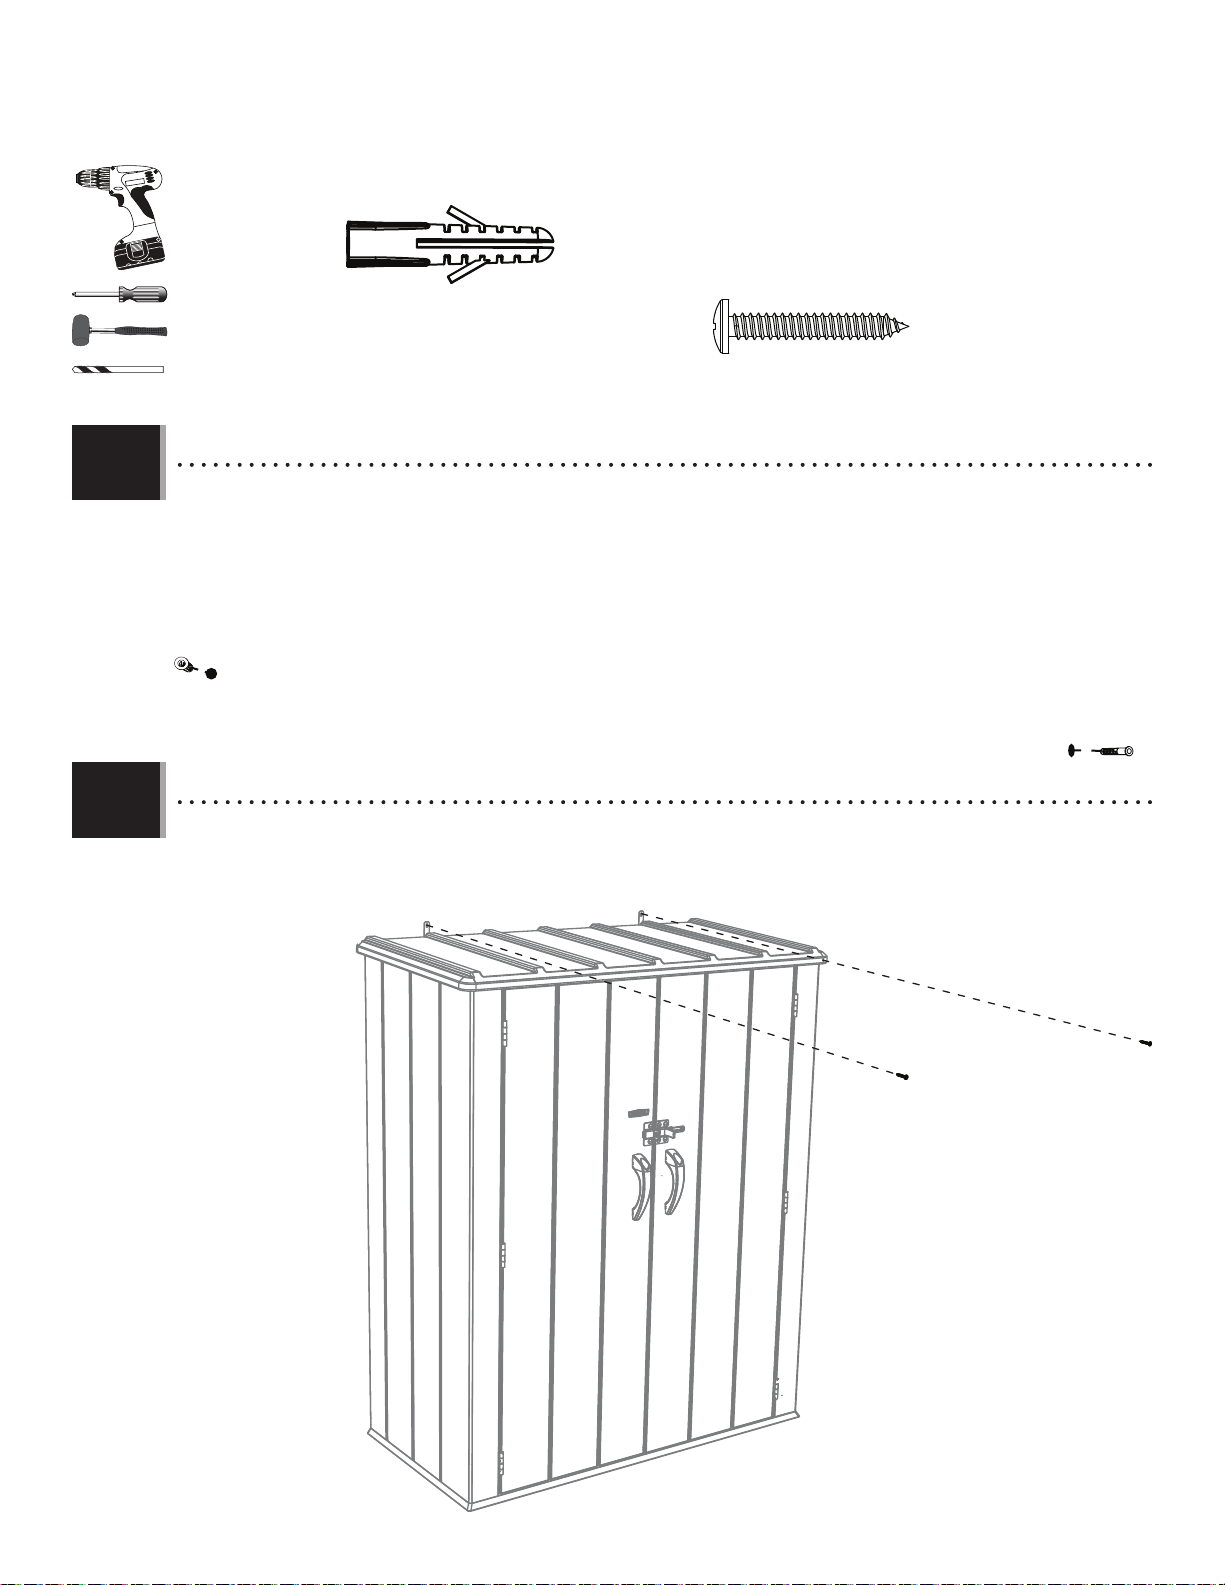
u SECTION 3 (CONTINUED) / SECTION 3 (SUITE) / SECCIÓN 3 (CONTINUACIÓN)
TOOLS & HARDWARE REQUIRED / OUTILS ET QUINCAILLERIE REQUIS / INSTRUMENTAL Y HERRAJE REQUERIDOS
COB (x2)
ARA (x1)
3.3
3.4
ACB (x2)
• Drill holes in the wall, and gently tap the Screw Anchors (COB) into the holes until flush with the wall. If drilling directly into
studs, do not use the anchors.
• Percez les murs, et insérer gentiment les ancrages de fixation (COB) dans les trous jusqu’à ce qu’ils soient au ras du mur.
En perçant les poteaux muraux, ne pas employer les ancrages.
• Taladre los muros, y golpear ligeramente las anclas para tornillos (COB) en los agujeros hasta que estén a ras del muro. Al
taladrar directamente en los travesaños murales, no usar las anclas.
COB
COB
• Move the Cabinet back into position, and secure it to the wall.
• Mettez l’armoire en place, et fixez-le au mur.
• Ponga el armario en su lugar, y fíjelo al muro.
43
ACB
ACB
Page 44

NOTES / REMARQUES / NOTAS
44
Page 45

NOTES / REMARQUES / NOTAS
45
Page 46

CLEANING & CARE
Congratulations on your Lifetime® product purchase. By following the instructions below, your new Lifetime product should provide you with years
of service and enjoyment.
The polyethylene panels are stain and solvent resistant. Most stains can be removed using a mild soap and a soft-bristled
brush. Abrasive cleaning materials may scratch the plastic and are not recommended. Repair scratches or rust spots on the
metal by sanding the affected area lightly; using a rust preventative spray primer; and fi nally, spraying with a high-gloss spray
enamel paint. Avoid placing a direct heat source on or near surfaces unless using a heat barrier.
NETTOYAGE ET ENTRETIEN
Nous vous félicitons d’avoir acheté ce produit Lifetime®. En suivant les instructions ci-dessous, votre nouveau produit Lifetime devrait vous
fournir des années de service et de plaisir.
Les murs et les étagères en polyéthylène sont résistants aux taches et solvants de nettoyage. Pour les nettoyer, servez-vous
d’un savon doux et d’une brosse douce. Les produits abrasifs de nettoyage risquent d’égratigner le plastique et ne sont pas
recommandés. Pour réparer les égratignures ou taches de rouille sur le métal, frottez légèrement l’endroit affecté au papier
de verre, puis passez un couche de produit vaporisant préventif et enfi n vaporisez une peinture émail ultrabrillante. Évitez de
placer une source de chaleur directe sur ou près des surfaces, ou protégez-les à l’aide d’une protection contre la chaleur.
LIMPIEZA Y CUIDADO
Felicidades por la compra de su producto Lifetime®. Al seguir las siguientes instrucciones, su nuevo producto Lifetime le brindará años de servicio
y satisfacción.
Los paneles de polietileno son resistentes a las manchas y solventes. La mayoría de las manchas puede removerse usando un
jabón suave y un cepillo de cerdas suaves. Los materiales abrasivos para limpieza pueden rayar el plástico y no se recomiendan. Repare rayones o manchas de óxido en el metal, lijando suavemente la parte afectada; usando un aerosol preventivo de
óxido y fi nalmente, rociando con una pintura de esmalte brillante. Evite poner una fuente de calor directa en o cerca de las
superfi cies a menos que utilice una barrera de calor.
46
Page 47

REGISTER YOUR PRODUCT ONLINE AT WWW.LIFETIME.COM
At Lifetime®, we are committed to providing innovative and quality products. While registering, you will have the opportunity to give us your feedback. Your input is
valuable to us.
• You can also opt in to receive new product notifi cations or promotions.
• In the unlikely event of a product recall or safety modifi cation, your registration provides the information we need to notify you directly.
• Registration is fast, easy, and completely voluntary.
LIFETIME’S PROMISE TO YOU:
Maintaining your privacy is our long-standing policy at Lifetime
personal data to other third parties, or allow them to use your personal data for their own purposes.
We invite you to read our privacy policy at www.lifetime.com
®
. And you can rest assured that Lifetime® will not sell or provide your
REGISTER today!
ENREGISTREZ VOTRE PRODUIT EN LIGNE À WWW.LIFETIME.COM
Chez Lifetime®, nous nous engageons à fournir des produits innovateurs de qualité. Lors de votre inscription, vous aurez l’occasion de nous faire parvenir vos
commentaires. Votre opinion est importante pour nous.
• Vous pouvez également choisir de recevoir des avis ou des promotions dans le cadre de nouveaux produits.
• Dans l’éventualité improbable d’un rappel ou d’un avis de sécurité, votre inscription fournit les renseignements nécessaires nous
permettant de communiquer avec vous.
• L’inscription est rapide, facile et complètement volontaire.
LA PROMESSE DE LIFETIME :
Conserver votre confi dentialité est notre politique de longue date chez Lifetime®. Vous pouvez donc être rassuré par le fait que Lifetime®
ne vendra pas ou ne fournira pas vos données personnelles à des tiers, et ne leur permettra pas d’utiliser vos données personnelles à leurs
propres fi ns.
Nous vous invitons à lire notre politique de confi dentialité à www.lifetime.com
ENREGISTREZ VOTRE PRODUIT aujourd’hui!
REGISTRE SU PRODUCTO EN LÍNEA EN WWW.LIFETIME.COM
En Lifetime®, estamos comprometidos a ofrecer productos innovadores y de calidad. Al registrarse, usted tendrá la oportunidad de darnos su retroalimentación.
Su información es valiosa para nosotros.
• También puede optar por recibir nuestras notifi caciones o promociones.
• En el caso improbable de que el producto tenga que salir del mercado o que sufra alguna modifi cación, su registro provee la
información que necesitamos para notifi carle directamente.
• El registro es rápido, fácil y completamente voluntario.
LA PROMESA DE LIFETIME® PARA USTED:
Mantener su privacidad es nuestra política permanente en Lifetime
personales a terceros, ni les permitirá usar sus datos personales para fi nes propios.
Lo invitamos a leer nuestra política de privacidad en www.lifetime.com
¡REGÍSTRESE hoy mismo!
®
. Y puede estar seguro que Lifetime® no venderá ni dará sus datos
47
Page 48

T
WARRANTY
N
Y
A
R
R
A
W
Y
T
N
A
R
R
A
W
5-YEAR LIMITED FACTORY WARRANTY
THE MANUFACTURER RESERVES THE RIGHT TO MAKE SUBSTITUTIONS TO WARRANTY CLAIMS IF PARTS ARE UNAVAILABLE OR OBSOLETE.
1. Lifetime vertical storage sheds are warranted to the original purchaser to be free from defects in material or workmanship
for a period of fi ve years from the date of original retail purchase. The word “defects” is defi ned as imperfections that
impair the use of the product. Defects resulting from misuse, abuse or negligence will void this warranty. This warranty
does not cover defects due to improper installation, alteration or accident. This warranty does not cover damage caused
by vandalism, rusting, “acts of nature” or any other event beyond the control of the manufacturer.
2. This warranty is nontransferable and is expressly limited to the repair or replacement of defective product. If the
product is defective within the terms of this warranty, Lifetime Products, Inc. will repair or replace defective parts at
no cost to the purchaser. Shipping charges to and from the factory are not covered and are the responsibility of the
purchaser. Labor charges and related expenses for removal, installation or replacement of the product or its components
are not covered under this warranty.
3. This warranty does not cover scratching or scuffi ng of the product that may result from normal usage. In addition,
defects resulting from intentional damage, negligence, unreasonable use will void this warranty.
4. Liability for incidental or consequential damages is excluded to the extent permitted by law. While every attempt is made
to embody the highest degree of safety in all equipment, freedom from injury cannot be guaranteed. The user assumes
all risk of injury resulting from the use of this product. All merchandise is sold on this condition, and no representative
of the company may waive or change this policy.
5. This product is not intended for institutional or commercial use; Lifetime Products, Inc. does not assume any liability for
such use. Institutional or commercial use will void the warranty.
6. Our goods come with guarantees that cannot be excluded under the Australian Consumer Law. You are entitled to a
replacement or refund for a major failure and for compensation for any other reasonably foreseeable loss or damage.
You are also entitled to have the goods repaired or replaced if the goods fail to be of acceptable quality and the failure
does not amount to a major failure.
7. This warranty is expressly in lieu of all other warranties, expressed or implied, including warranties of merchantability
or fi tness for use to extent permitted by Federal and state law. Neither Lifetime Products, Inc., nor any representative
assumes any other liability in connection with this product. This warranty gives you specifi c legal rights, and you may
also have other rights which vary from state to state
(or province to province, as applicable in Canada).
PLEASE INCLUDE YOUR DATED SALES RECEIPT AND PHOTOGRAPHS OF DAMAGED PARTS.
REPORT PRODUCT DEFECTS IN WRITING TO:
Lifetime Products, Inc., PO Box 160010 Clearfi eld, UT 84016-0010
or call 1-800-225-3865 M-F 7 a.m. to 5 p.m. MST.
REGISTER YOUR PRODUCT FOR QUICKER CUSTOMER SERVICE.
Visit www.lifetime.com or call 1-800-225-3865 to register your product today.
FOR INTERNATIONAL WARRANTY CLAIMS:
All warranty claims must be accompanied by a sales receipt. Report all warranty claims in writing to your regional sales
support representative. Please include your dated sales receipt and photographs of damaged parts.
To Identify the representative for your region, please visit: www.lifetime.com/international
www.lifetime.com
48
Page 49

E
GARANTIE
I
T
N
A
R
A
G
E
I
T
N
A
R
G
A
GARANTIE LIMITÉE DE 5 ANS
LE FABRICANT SE RÉSERVE LE DROIT DE FAIRE DES SUBSTITUTIONS EN CAS DE RECOURS EN GARANTIE SI LES PIÈCES NE SONT PAS
DISPONIBLES OU SONT OBSOLÈTES
1. L’armoire de rangement verticale Lifetime est garanti à l’acheteur d’origine contre tous défauts de matériau ou de fabrication
pendant une durée de cinq ans à partir de la date d’achat d’origine. Le mot « défauts » signifi e des défectuosités qui empêchent
l’utilisation du produit. Les défauts résultant de mauvais usage, d’abus ou de négligence annulent cette garantie. Cette garantie
ne couvre pas les dommages causés par le vandalisme, la rouille, « les calamités naturelles » ou tout autre événement en dehors
du contrôle du fabricant.
2. Cette garantie n’est pas transférable et est expressément limitée à la réparation ou au remplacement du produit défectueux.
Si le produit est déclaré défectueux selon les termes de cette garantie, Lifetime Products, Inc. réparera ou remplacera les parties
défectueuses gratuitement pour l’acheteur. Les frais d’expéditions aller et retour de l’usine ne sont pas couverts et sont à la
charge de l’acheteur. Les frais de main-d’œuvre et frais associés à l’enlèvement, au montage ou au remplacement de l’abri ou
de ses composantes ne sont pas couverts par cette garantie.
3. Cette garantie ne couvre pas les égratignures ou éraillements du produits résultant d’une utilisation normale. Par ailleurs, les
défectuosités résultant de dommages intentionnels, négligence, utilisation abusive annulent cette garantie.
4. Toute responsabilité pour dommages incidents ou conséquents est exclue dans la mesure permise par la loi. Bien que toutes
les mesures aient été prises pour intégrer le plus haut degré de sécurité dans l’ensemble du matériel, l’impossibilité de blessure
ne peut pas être garantie. L’utilisateur assume tous les risques de blessure résultant de l’utilisation de ce produit. L’ensemble
de la marchandise est vendu en vertu de cette condition et aucune personne représentant la société ne peut déroger à cette
politique, ni la modifi er.
5. Ce produit n’est pas prévu pour l’usage institutionnel ni commercial; Lifetime Products, Inc. n’assume aucune responsabilité
pour tel usage. L’utilisation institutionnelle ou commerciale annulera cette garantie.
6. Cette garantie remplace expressément toutes autres garanties, expresses ou tacites, y compris les garanties de commercialisation
ou d’adaptation à un but particulier dans la mesure permise par les lois fédéraux et des états. Ni Lifetime Products, Inc. ni
aucun de ses représentants n’assure aucune autre responsabilité concernant ce produit. Cette garantie vous accorde des droits
particuliers, et vous aurez peut-être d’autres droits qui varient d’un état à l’autre (ou d’une province à l’autre, selon le cas au
Canada).
TOUS LES RECOURS EN GARANTIE DOIVENT ÊTRE ACCOMPAGNÉS DU REÇU DE VENTE.
FAIRE PARVENIR UN RAPPORT PAR ÉCRIT DE DÉFECTUOSITÉ DU PRODUIT A :
Lifetime Products, Inc., PO Box 160010 Clearfi eld, UT 84016-0010
ou appelez-nous au 1.800.225.3865 lundi à vendredi 0700 - 1700 (HNR)
ENREGISTREZ VOTRE ARTICLE À :
www.lifetime.com, ou appelez-nous au 1.800.225.3865 pour enregistrer votre article aujourd’hui.
POUR RECOURS EN GARANTIE INTERNATIONAUX:
Tous les recours en garantie doivent être accompagnés du reçu de vente. Faire parvenir un rapport par écrit de
défectuosité du produit à votre représentant régional de ventes. Veuillez inclure votre reçu de vente daté et photographies
des pièces endommagées. Pour identifi er votre représentant régional — visitez www.lifetime.com/international
www.lifetime.com
49
Page 50

A
GARANTÍA
Í
T
N
A
R
A
G
A
Í
T
N
A
R
G
A
GARANTÍA DE FÁBRICA LIMITADA POR 5 AÑOS
EL FABRICANTE SE RESERVA EL DERECHO DE HACER SUSTITUCIONES EN LOS ELEMENTOS REEMPLAZADOS BAJO GARANTÍA SI LAS PIEZAS
NO ESTÁN DISPONIBLES O SON OBSOLETAS.
1. El comprador original recibe la garantía de que los casetas/cobertizos de almacenamiento Lifetime® estarán libres de
defectos de material o de mano de obra por un período de cinco años a contar desde la fecha de la compra original. La palabra
“defectos” se defi ne como imperfecciones que perjudican el uso del producto. Los defectos emergentes de un mal uso, abuso
o negligencia invalidarán esta garantía. Esta garantía no cubre defectos debidos a una instalación o alteración incorrecta o a
un accidente. Esta garantía no cubre daños causados por vandalismo, oxidación, “actos de la naturaleza” u otros eventos que
estén más allá del control del fabricante.
2. Esta garantía es intransferible, y queda expresamente limitada a la reparación o reemplazo de los productos defectuosos. Si
el producto se encuentra defectuoso dentro de los términos de esta garantía, Lifetime Products, Inc. reparará o reemplazará
las piezas defectuosas sin costo alguno para el comprador. Los gastos de envío hacia y desde la fábrica no están cubiertos, y
quedan bajo la responsabilidad del comprador.
3. Esta garantía no cubre raspaduras ni marcas en el producto que pueden resultar de su uso normal. Además, los defectos
causados por daños intencionales, negligencia, uso irrazonable invalidarán esta garantía.
4. La responsabilidad por daños incidentales o consecuentes queda excluida hasta el punto en que lo permita la ley. Si bien se
hace el mayor esfuerzo posible para lograr el más alto grado de seguridad en todos nuestros equipos, no puede garantizarse la
libertad de cualquier tipo de lesión. El usuario asume todos los riesgos de lesiones emergentes del uso de este producto. Toda
nuestra mercadería se vende bajo esta condición, y ningún representante de la compañía puede anular ni cambiar esta política.
5. Este producto no está pensado para el uso institucional ni comercial; Lifetime Products, Inc. no asume ninguna otra
responsabilidad en conexión con este producto. El uso institucional o comercial invalidará la garantía.
6. Esta garantía se otorga en reemplazo expreso de toda otra garantía, expresa o implícita, incluidas las garantías de
comercialización o adaptación para el uso en la medida permitida por las leyes federales y estatales. Ni Lifetime Products, Inc.,
ni ninguno de sus representantes asume ninguna otra responsabilidad en conexión con este producto. Esta garantía le otorga
derechos legales específi cos, y usted puede tener otros derechos que varían de estado a estado (o de una provincia a otra,
según corresponda en Canadá).
NINGUNA GARANTÍA OFRECIDA POR EL FABRICANTE ES VÁLIDA EN MÉXICO.
TODOS LOS RECLAMOS DE GARANTÍA DEBEN ESTAR ACOMPAÑADOS POR UN RECIBO DE COMPRA
INFORME POR ESCRITO LOS DEFECTOS EN EL PRODUCTO A:
Por favor, incluya el recibo de compra fechado y fotografías de las piezas dañadas.
Lifetime Products, Inc., PO Box 160010 Clearfi eld, UT 84016-0010,
o llame al 1.800.225.3865 de lunes a viernes de 0700 hasta 1700 (Hora de las Montañas)
REGISTRE SU PRODUCTO
Visite nuestra página en Internet www.lifetime.com, o llame al 1.800.225.3865 para registrar su producto hoy.
PARA RECLAMOS DE GARANTÍA INTERNACIONALES:
Todos los reclamos de garantía deben estar acompañados por un recibo de compra. Informe por escrito todos los
reclamos de garantía a su representante regional de ventas. Favor de incluir su recibo de compra fechado y fotografías
de las piezas dañadas.
Para identifi car el representante de su región, visite www.lifetime.com/international
www.lifetime.com
50
Page 51

®
IMPORT INFORMATION / IMPORTATIONS / INFORMACIÓN DE IMPORTACIONES
Distributed by:
Costco Wholesale Corporation
P.O. Box 34535
Seattle, WA 98124-1535
USA
1-800-774-2678
www.costco.com
Importado por:
Importadora Primex S.A. de C.V.
Blvd. Magnocentro No.4
San Fernando La Herradura
Huixquilucan, Estado de México
C.P. 52765
RFC: IPR-930907-S70
(55)-5246-5500
www.costco.com.mx
Imported by:
Costco Wholesale UK Ltd /
Costco Online UK Ltd
Hartspring Lane
Watford, Herts
WD25 8JS
United Kingdom
01923 213113
www.costco.co.uk
Imported and Distributed by:
Costco Wholesale Korea, Ltd.
40, lljik-ro
Gwangmyeong-si
Gyeonggi-do, 14347, Korea
1899-9900
www.costco.co.kr
Imported by:
Costco Wholesale Japan Ltd.
3-1-4 lkegami-Shincho
Kawasaki-ku, Kawasaki-shi,
Kanagawa 210-0832 Japan
044-281-2600
www.costco.co.jp
Distributed by:
Costco Wholesale Iceland ehf.
Kauptún 3-7, 210 Gardabaer
Iceland
www.costco.is
Imported by / Importé par :
Costco Wholesale Canada Ltd.*
415 W. Hunt Club Road
Ottawa, Ontario
K2E 1C5, Canada
1-800-463-3783
www.costco.ca
* faisant affaire au Québec sous le nom Les Entrepôts Costco
Imported by:
Costco Wholesale Australia Pty Ltd
17-21 Parramatta Road
Lidcombe NSW 2141
Australia
www.costco.com.au
Importado por:
Costco Wholesale Spain S.L.U.
Polígono Empresarial Los Gavilanes
C/ Agustín de Betancourt,17
28906 Getafe (Madrid) España
NIF : B86509460
900 111 155
www.costco.es
Imported by / Manufactured for:
Costco President Taiwan, Inc.
No. 656 Chung-Hwa 5th Road
Kaohsiung, Taiwan
Company Tax ID: 96972798
0800-885-889
www.costco.com.tw
Distribué par :
Costco France
1 avenue de Bréhat
91140 Villebon-sur-Yvette
France
01 80 45 01 10
www.costco.fr
Made in China
Fabriqué en Chine
Hecho en China
51
Page 52

ENHANCE YOUR LIFETIME® PURCHASE BY ADDING ACCESSORIES OR OTHER GREAT PRODUCTS
To purchase accessories or other Lifetime® products, visit us at:
www.lifetime.com
Or call 1-800-424-3865
7:00 am–5:00 pm (M–F) MST and 9:00 am–1:00 pm Saturday MST
AMÉLIOREZ VOTRE ACHAT LIFETIME® EN AJOUTANT DES ACCESSOIRES OU DES AUTRES PRODUITS
Pour acheter des accessoires ou des autres produits Lifetime®, rendez-vous à :
www.lifetime.com
Ou appelez-nous au 1-800-424-3865
Du lundi au vendredi 7 h – 17 h (HNR) et samedi 9 h – 13 h (HNR)
MEJORE SU COMPRA LIFETIME
Para comprar accesorios u otros productos Lifetime
®
Y AÑADA ACCESORIOS U OTROS PRODUCTOS EXCELENTES
www.lifetime.com
O llame al 1.800.424.3865
De lunes hasta viernes 7:00 h–17:00 h (HNR) y sábado 9:00 h–13:00 h (HNR)
®
EUA, visítenos en:
Made in China / Fabriqué en Chine / Hecho en China
52
 Loading...