

Page 1
5
EVOS® FL
EVOS
®
FLColor
For Research Use Only. Not for use in diagnostic procedures.
QUICK REFERENCE
Limited Product Warranty
Life Technologies Corporation and/or its affiliate(s) warrant their products as set forth in the Life Technologies’ General Terms and
Conditions of Sale found on Life Technologies’ website at www.lifetechnologies.com/termsandconditions. If you have any questions,
please contact Life Technologies at www.lifetechnologies.com/support.
DISCLAIMER
LIFE TECHNOLOGIES CORPORATION AND/OR ITS AFFILIATE(S) DISCLAIM ALL WARRANTIES WITH RESPECT TO THIS DOCUMENT,
EXPRESSED OR IMPLIED, INCLUDING BUT NOT LIMITED TO THOSE OF MERCHANTABILITY, FITNESS FOR A PARTICULAR
PURPOSE, OR NON-INFRINGEMENT. TO THE EXTENT ALLOWED BY LAW, IN NO EVENT SHALL LIFE TECHNOLOGIES AND/OR
ITS AFFILIATE(S) BE LIABLE, WHETHER IN CONTRACT, TORT, WARRANTY, OR UNDER ANY STATUTE OR ON ANY OTHER BASIS
FOR SPECIAL, INCIDENTAL, INDIRECT, PUNITIVE, MULTIPLE OR CONSEQUENTIAL DAMAGES IN CONNECTION WITH OR ARISING
FROM THIS DOCUMENT, INCLUDING BUT NOT LIMITED TO THE USE THEREOF.
Limited Use Label License: Research Use Only
The purchase of this product conveys to the purchaser the limited, non-transferable right to use the purchased amount of the product
only to perform internal research for the sole benefit of the purchaser. No right to resell this product or any of its components
is conveyed expressly, by implication, or by estoppel. This product is for internal research purposes only and is not for use in
commercial applications of any kind, including, without limitation, quality control and commercial services such as reporting the
results of purchaser’s activities for a fee or other form of consideration. For information on obtaining additional righs, please contact
[email protected] or Out Licensing, Life Technologies Corporation, 5791 Van Allen Way, Carlsbad, California 92008.
Trademarks
The trademarks mentioned herein are the property of Life Technologies Corporation and/or its affiliate(s) or their respective owners.
© 2013 Life Technologies Corporation. All rights reserved.
Headquarters
5791 Van Allen Way | Carlsbad, CA 92008 USA | Phone +1 760 603 7200 | Toll Free in USA 800 955 6288
For support visit lifetechnologies.com/support or email [email protected]
lifetechnologies.com
18 March 2013
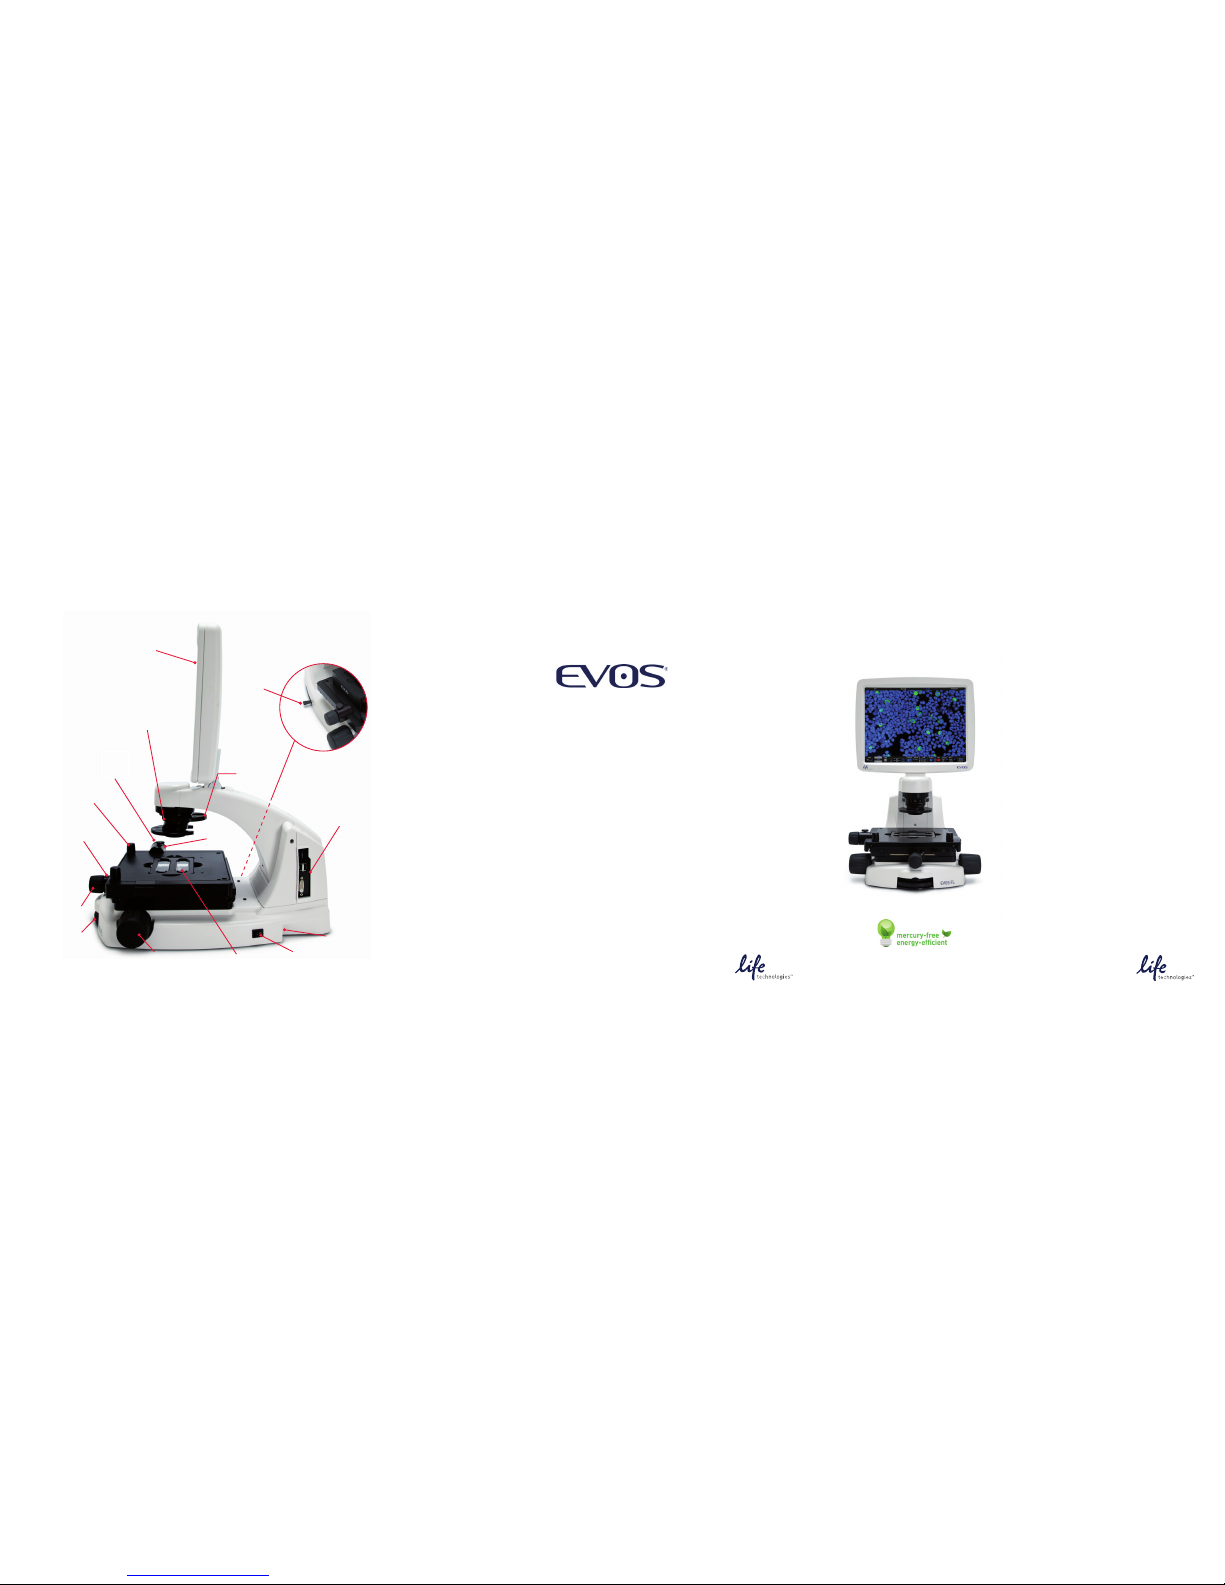
Focusing
knobs
Power
switch
Objective
selection
wheel
Condenser
slider slot
Power
input jack
Phase
annulus
selector
Stage
X-axis
knob
USB and
DVI ports
Coarse stage
positioning
knobs
X-axis
stage
brake
Stage
Y-axis
knob
Y-axis
stage
brake
Light cube
selection
lever
Vessel
holder
LCD
screen
Imaging Systems
for Fluorescence and TransmittedLight
Applications
Catalog Numbers AME4300, AMEFC4300
Doc. Part no. ZP-PKGA-0494
Pub. no. MAN0007717
Rev. 2.0
Page 2
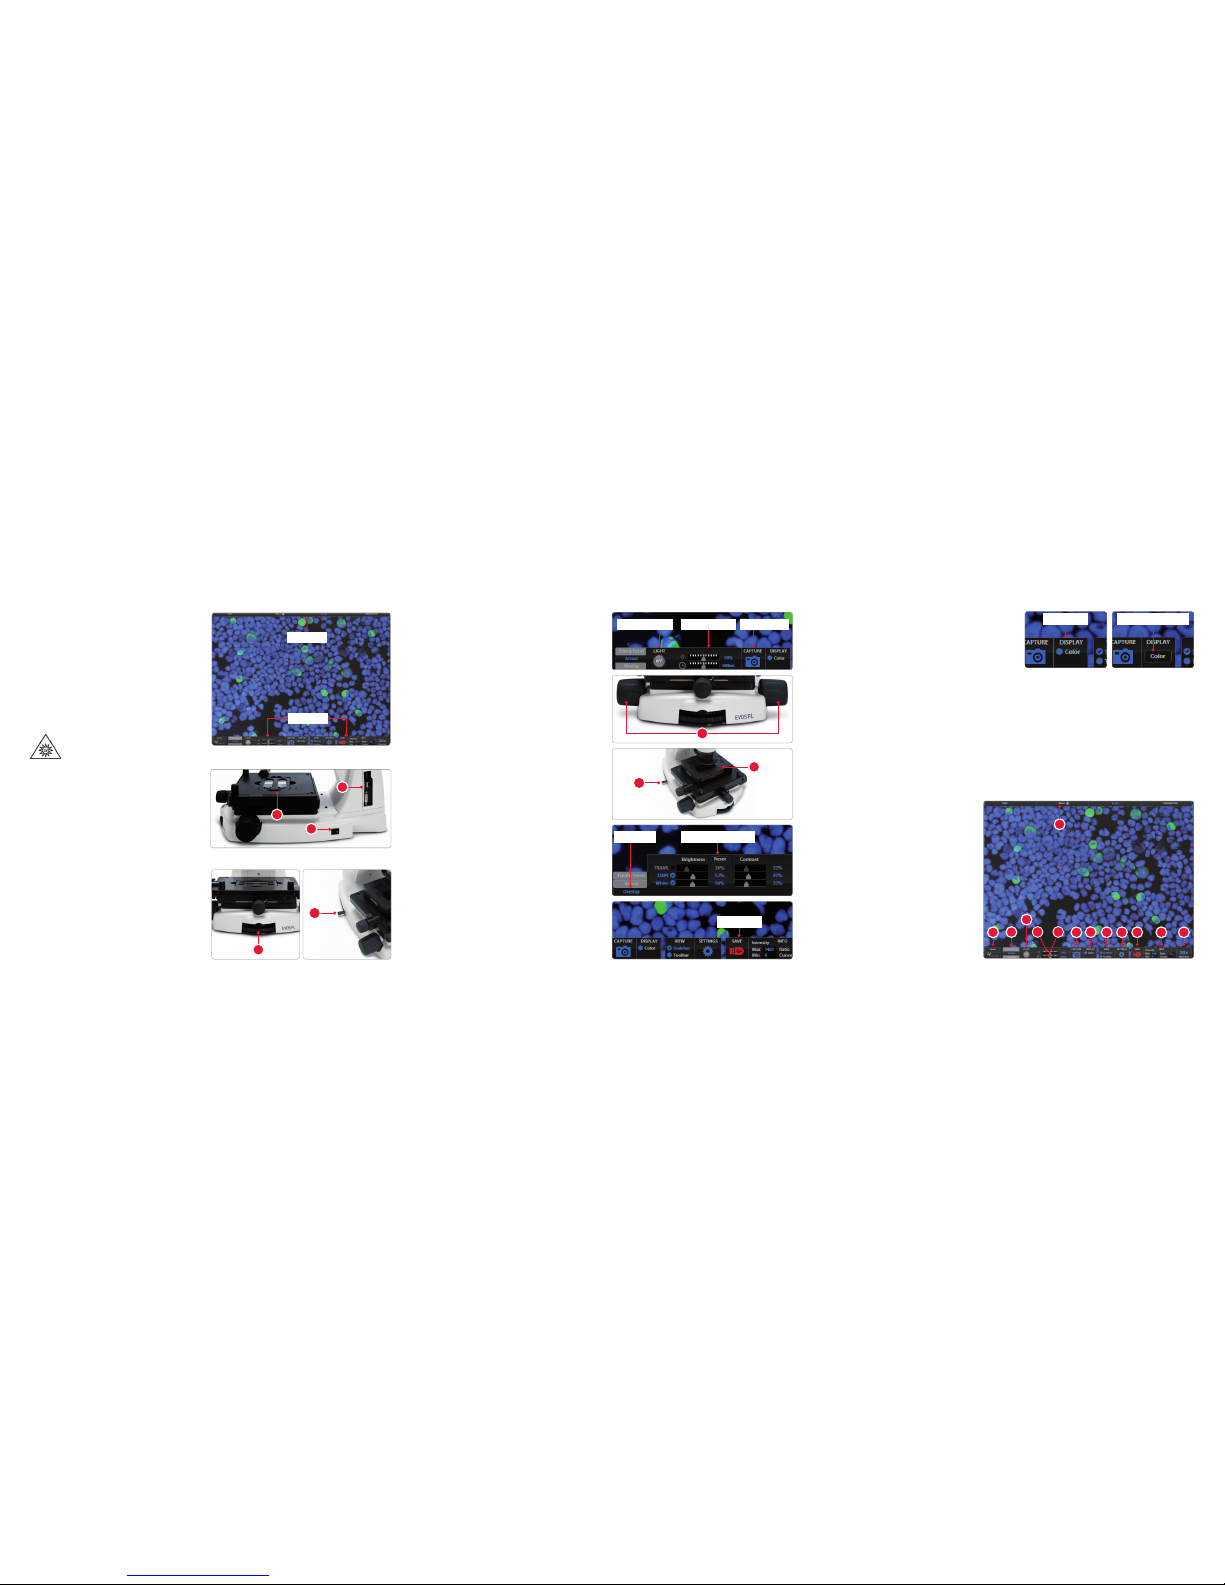
6. Turn on illumination with the LIGHT ON
button located on the left side of the
control bar.
7. Focus the sample with focusing knobs
.
8. Optional: To take a picture of the transmitted
light image, click the Capture button on
the control bar.
9. Place the light shield box
on the stage,
over the sample.
10. Move the light cube selection lever
to the
desired fluorescence channel (the Channel
Bar will highlight the selected light cube).
11. With the Find & Focus tab active, turn on
fluorescence illumination using the LIGHT
ON button.
12. Adjust the focus as necessary.
13. Adjust the Illumination Intensity slider on
the control bar as needed.
14. Click the Capture button.
15. Repeat steps 10–14 to acquire each
fluorescence channel.
16. Click the Overlay tab to show all channels
in color overlay mode.
17. Adjust Brightness and Contrast for each
channel to bring them into desired balance.
18. Click the Save button to save the color
image (refer to the EVOS
®
FL Imaging
SystemUser Guide).
Overview
The EVOS® FL and EVOS® FL Color Imaging
Systems have two types of controls: manual
and onscreen. Manual controls include the the
stage X–Y axis knobs, focusing knobs, objective
selection wheel, phase annuli selector, and the
light cube selection lever. Onscreen controls are
located in the control bar at the bottom of the
display screen. The channel bar at the top of the
display screen shows the selected light cube or
transmitted light position.
2
Helpful Tips
In Find & Focus or Actual Mode, the Color option
(for EVOS
®
FL, Cat. no. AME4300) can be turned
off to display a grayscale image. This often shows
more details than a color image.
3
Control bar
Channel bar
Basic Operation
Note: For detailed instructions, refer to the EVOS®
FL Imaging SystemUser Guide, which is provided
on the USB flash drive. You can also dowload it from
the EVOS
®
FLImaging System product page at
www.lifetechnologies.com.
1. Turn on the instrument using the power
switch
on the right side of the base.
2. Plug a USB flash drive into one of the USB
ports
on the right side of the instrument.
3. Place the sample
on the stage, using a
vessel holder if needed.
4. Set magnification with the objective selection
wheel
on the front of the instrument.
5. Pull the light cube selection lever
(left
side of base) all the way toward the front of
the instrument (the Channel Bar will
highlight the “Transmitted” position).
CAUTION! UV HAZARD. Avoid exposure
to beam and use protective shields.
NEVER look directly at UV light!
4
Onscreen Controls
1. Active Channel (highlighted)
2. Login Button
3. Control Bar Tabs
• Find & Focus
• Actual
- Exposure Time Slider
• Overlay
- Overlay Color Dialogue Box
4. Light ON/OFF Button
5. Illumination Slider
6. Exposure Time Slider
7. Image Capture Button
8. Color Option
9. Scalebar/Toolbar Options
10. Setting Control Button
11. Save Image Button
12. Info Display Bar
13. Selected Objective
For EVOS
®
FL Color (Cat. no. AMEFC4300), use the Color Adjustment button to fine tune your live
image Brightness, Contrast, Saturation, and Hue prior to capture.
In Find & Focus Mode, the exposure time is set to 100 ms to assist real-time focusing, moving the
stage, etc. The illumination level is approximately 60% of the amount used for image capture, in
order to minimize photobleaching and phototoxicity. Clicking Capture results in brighter illumination
and a longer exposure time during image capture to provide a high-quality image.
In Actual Mode, turning on the illumination results in full-powered illumination and actual exposure
times for live viewing of the sample. With longer exposure times (more than 200 ms) there will be a
lag between moving the focus knob and seeing the focus change onscreen.
1
4
9
10 116512
13
8
7
3
2
1
2
3
5
6
LIGHT ON button Illumination slider Capture button
7
5
Overlay tab Brightness and Contrast
Save button
Color option Color Adjustment button
4
 Loading...