

Amber 1 GPS Watch User
Manual
Note: Please read this manual carefully before attempting installation.
LIFESPEED PVT. LTD
Website: http://www.life-speed.com
1

1. Hardware introduction
Touch screen
GPS+WIFI+GPRS+AGPS location
GPRS real time positing, tracking,
Phone book
Talkback
Health
History route
Alarm clock
Geo-fence
SOS for help
Remove alarm
Lowe power alarm
Remote power off
1.1 production summary
ways
monitoring
2
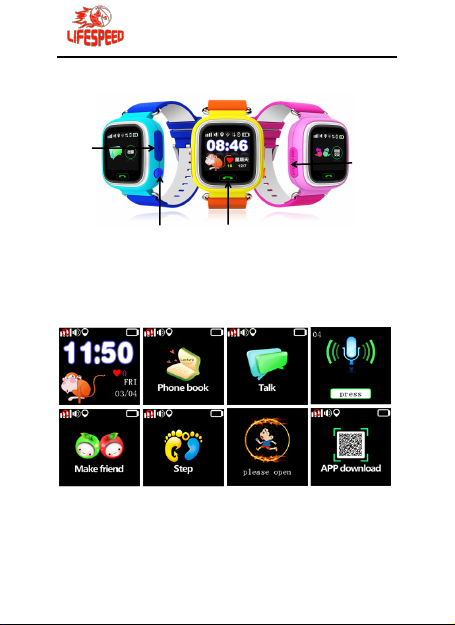
1.2 Watch introduction
USB port
The return key
Phone answer key
Power on/SOS
1.3 Display and instruction
1.3.1 Main Interface: The menu show
GPS signal, ring mode, network icon,
3
SIM cart slot

location indicate, voice icon, light sensitive
icon, battery icon, time and date.
1.3.2 Phone book: 10 numbers you can
see the ten number which you setting in
the APP, and click the number foe dialing.
1.3.3 Voice chatting: Enter the menu you
can send the voice message to the APP.
1.3.4
interface
releas
1.3.5
closed, you need start it from the APP, the
watch will count the step automatic when
the pedometer is begin, you can click the
menu and see the steps after it had record.
recording
Voice
,
push
long
e
sending.
for
Pedometer: The pedometer default
:
In the voice
recordin
for
4
g
record
and
1.4 Charging
Enough balance of the SIM card
The 2G GPRS function
The caller ID display function
The voice call function.
·Connect GPS watch to charger with USB
cable. It needs 2~3 hours to charge.
·The watch can work well during charging.
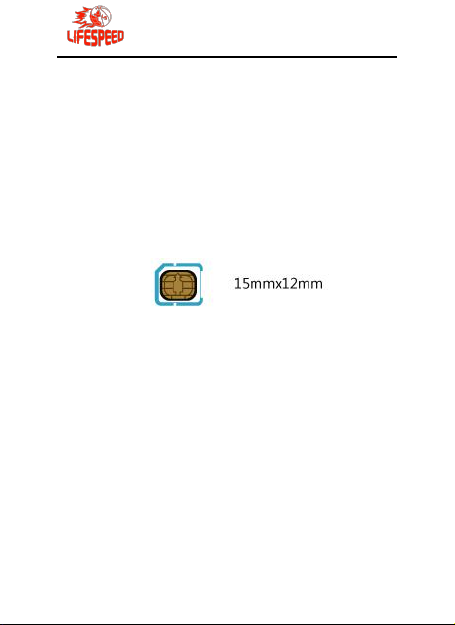
1.5 Install SIM card
Notice: The toll free numbers
(888)-9watchme or (888)-992-8246 to get
instructions on acquiring a sim card.
Only micro SIM card accepted:
Note: Make sure the GSM SIM card
supplies all of the functions as blow :
1.6 Accessories
Please check the accessories:
GPS watch 1pc, User manual 1pc, USB
cable 1pc .
5

2. Quick Start
3. Software APP introduction
2.1 Set APN
Normally, the watch can search and set
the APN automatically, or it can be set
manually.
Command format
pw,password,apn,apn-name,apn-usernam
e,apn-password,MCCMNC#
Example:pw,123456,apn,wap.tmobil.cl,wa
p,wap,73002#
2.2 Set Server
To connect tracking platform, please send
the SMS command to set the server.
Command format:
pw,password,ip, x.x.x.x,port #
Example:pw,123456,ip,198.11.183.28,508
8#
2.3 Login
Login mobile app to register and tracking
the watch. Details refer to user manual of
mobile APP.
(All characters in English)
6
:
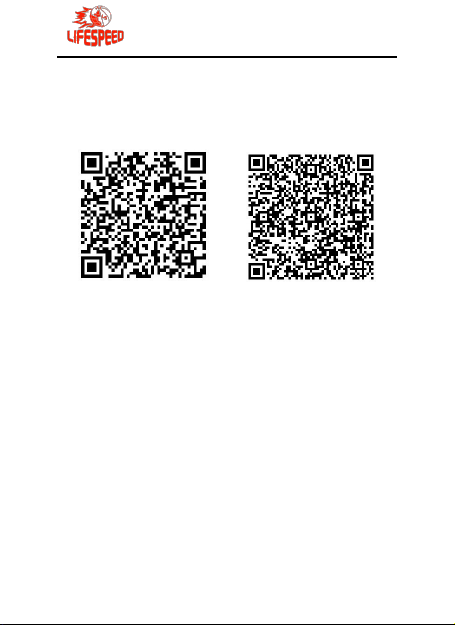
3.1 Download APP
3.1.1 Please search “LifeSpeed” APP on
Apple store/Google Play or scan here for
download QR-Code:
IOS APP ANDROID
(1) Connect the supplier if you can’t
download by scanning QR code.
(2) Choose “Trust” in iOS system by the
steps: Setting-general-profile.
3.2 User registration
The guardian need to register or get the
account from supplier before use the App.
7

Fill the registration info and click “√” on the
top to submit the registration.
8
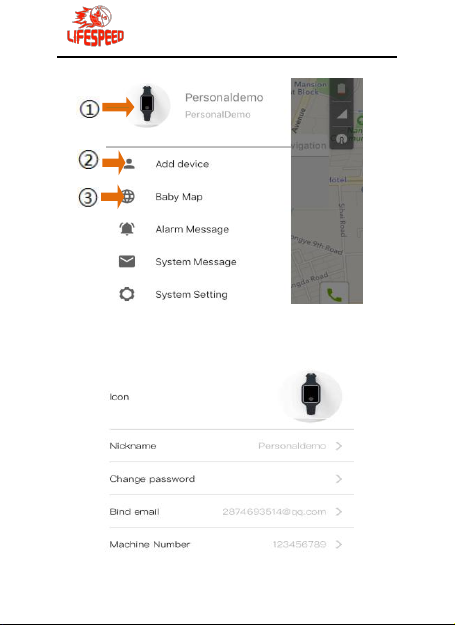
3.3 Account setting
Set the profile of guardian’s account here.
Click to change your profile settings.
9

Click ② ’Add device’ to add protection
objects’ devices.
Click ③ ’Baby map’ to check the location
of the device with the protection object.
3.4 Add device
Please scan the Barcode/QR code or
input IMEI number of the device.
3.5 Role option
Choose a role for the protection object.
Create new role for it by press ‘Other’
.
3.6 Device information
10

Set the nickname, height, weight and
birthday for the protection object.
3.7 Baby map
① Nickname of the protection object.
② The clock of last location.
③ Panorama and satellite map option .
④ Check the location of the mobile.
⑤ Protection object list.
⑥ Voict Monitor,monitor the environment
sound of the device.
⑦ Make a phone call to the device.
⑧ Locating method:GPS/LBS/WIFI,etc.
⑨ Navigation to the protection object.
11

The color circle shows the device is
online and grey shows
12

offline:
3.8 Alarm message
3.9 System message
Choose one and slide right to delete
13

3.10 System setting
Choose “Notification Center” to change
system setting
Choose ‘Switch map’ to switch Apple map
or Google map.
14

3.11 Device’s function
① Account setting
② Strength of GSM signal
③ Strength of GPS signal
④ Remaining power
⑤ Menu list
3.12 Menu list
15

This guide can not cover all the new
features of the App.
Please contact the supplier to get the
latest version of the electronic guide
maunal.
3.13 Location
Press to make device locate by GPS at
once .It’ll reply ’Instruction successfully’.
16

3.14 Setting
17

3.15 Function
18

3.15.1 Track
① Setting time period to query the
tracking history.
② Play speed.
19

③ Pause /Play control.
④ Display settings as belo
Tracking history playback settings
① Choose from three models of display
model:line, dot, line&dot.
② Choose display the info of every dot.
③ Choose load LBS data or not.
3.15.2 Safety area
Set the safety area for the device.
20
w.

A alarm message will be sent if the device
enter /leave the safety zone.
21

3.15.3 Chat
1 Choose to play the voice message.
2 Long press to send a voice message.
3 Press button to delete the messages.
The red dot shows Unread messages.
3.15.4 Step account
Steps will be cleared at 00:00.
22

3.15.5 Health
Heartbeat will be cleared at 00:00.
23

4. Command List
g
p
g
p
Server settin
Format
Example
Expecte
d Result
Format
Example
Expecte
d Result
Format
Examplepw,666999#
Expected
Result
Format
Examplepw,666999,center,18682470883#
pw,password,ip, x.x.x.x,port #
The x.x.x.x is i
of the server.
pw,password,ip,198.11.183.28,50
88#
[surl,198.11.183.28,port,5088#]
ok!
APN Settin
pw,password,apn,apn-name,apnusername,apn-password,
MCCMNC#
pw,123456,apn,wap.tmobil.cl,wap
,wap,73002#
apn:wap.tmobil.cl;user:wap;pass
work:wap;userdata:73002.
ModifyPassword
pw,updated-password#
The initial
assword is 123456
[pw,666999#] ok!
Set center number
pw,password,center,sosnumber#
24

Expected
pw,p
p
y
p
p
Result
Format
Examplepw,666999,center,d#
Expecte
d Result
Setu
Format
Example
Expecte
d Result
Format
Exam
Expecte
d Result
Formatpw,password,sos1#&sos2,d#
Examplepw,666999, 666134#&664214,d#
Expecte
d Result
center:18682470883.ok!
Delete center number
assword,center,d#
Center,del!
all the SOS nubmer simultaneousl
pw,password,sos,sos-number1,so
s-number2,sos-number3#
pw,666999,sos,667062,666134,6
64214#
[sos,667062,666134,664214#] ok!
Setu
the first/second SOS number
pw,password,sos1/2,sos-number
#
lepw,666999,sos1,667062#
[sos1,667062#] ok!
Delete SOS number
[sos1/2,#] ok!
25

Formatpw,password,where#
p
y
pw,p
y
pw,p
Exam
Expecte
d Result
Formatpw,password,url#
Examplepw,666999,url#
Expecte
d Result
Formatpw,password,123#
Examplepw,666999,123#
Expecte
d Result
Format
Examplepw,666999,reset#
Expecte
d Result
Format
Examplepw,666999,factory#
Querythe location
lepw,666999,where#
Miller Rd,Richmond,BC,Canada
the maplink of location
Quer
url:http://maps.google.com/maps?
q=N22.506620,E113.915558
Locate date:2016-5-20
Locatetime:10:15:9
or ‘no locate’.
Querythe location
Miller Rd,Richmond,BC,Canada
Reset the device
assword,reset#
reset..
Restore factor
assword,factory#
settings
26

Expecte
y
p
guag
)
y p
p
d Result
Format
Exam
Expecte
d Result
Format
Examplepw,123456,lz,0,8#
Expecte
d Result
Formatpw,password,ts#
Examplepw,666999,ts#
Expecte
d Result
factory ok,reset.
It will restart automaticall
Set upload time interval
pw,password,upload,time
(second)#
The time ranges is from 10s to
1800s
lepw,666999,upload,300#
[upload,300#] ok!
Set lan
pw,password,lz,x,y#
(‘x’=0&1 stands for language,1 for
Chinese,0 for English.’y’ for
timezone
[lang,0,zone,8#] ok!
Quer
ver:G69_A9_V1.00_2016.02.20_
10.53.08;
ID:4700233055;
imei:013347002330553;
ip_url:198.11.183.28;
ort:5088;
e and time zone
arameters
27

center:18682470883;
p
p
slave:18682470883;
sos1:;
sos2:18682470883;
sos3:18682470883;
profile:1;
upload:60S;
bat level:32;
language:0;
zone:8.00;
GPS:NO(0);
GPRS:OK(100);
w:123456;
Set monitor number
Format
Exam
Expecte
d Result
pw,password,monitor,monitornumber#
lepw,666999,monitor, 667062#
monitor ok!The watch will call the
monitor number automatically.
Appendix
4.1Battery security
Please use the original battery.
The warranty will be invalid by using any
other accessory. The manufacturer will not
take any responsibility for any damage
caused by not using the original battery.
The new battery will achieve the optimal
28

performance by fully-charging for 2 to 3
times.
The battery can be used for hundreds of
times, yet it will wear out eventually. When
its talking time and standby time shrinks
sharply, you need a new one.
Cut off power supply when not using the
charger. Don’t charge the battery for more
than one week, since over charging will
reduce its using time.
Do not short-circuit the battery with metal
stuff (such as the key in your pocket)
Do not bend or open the battery.
Do not put the battery into water or fire.
The battery should never be charged at
temperature below 0 degrees or above 45
degrees Celsius.
29

FCC RF Exposure Information and Statement
This watch meets the government's requirements for exposure to radio waves. The guidelines are based
on standards that were developed by independent scientific organizations through periodic and thorough
evaluation of scientific studies. The standards include a substantial safety margin designed to assure the safety of
all persons regardless of age or health. The SAR limit of USA (FCC) is 1.6 W/kg averaged over one gram of
tissue for body, and 4 W/kg averaged over ten gram of tissue. Device types: GPS Smart Watch (FCC ID:
2ALOCAMBER1) has also been tested against this SAR limit. SAR information on this and other pad can be
viewed on‐line at http://www.fcc.gov/oet/ea/fccid/. Please use the device FCC ID number for search. This
device was tested simulation typical 0mm wear on wrist and 10 mm to mouth. To maintain compliance with FCC
RF exposure requirements, use accessories should maintain a separation distance between the user's bodies
mentioned above, the use of belt clips, holsters and similar accessories should not contain metallic components in
its assembly, the use of accessories that do not satisfy these requirements may not comply with FCC RF exposure
requirements, and should be avoided.
FCC Warning
This device complies with Part 15 of the FCC Rules. Operation is subject to the following two conditions:
(1) This device may not cause harmful interference, and (2) this device must accept any interference received,
including interference that may cause undesired operation.
NOTE 1: This equipment has been tested and found to comply with the limits for a Class B digital device,
pursuant to part 15 of the FCC Rules. These limits are designed to provide reasonable protection against harmful
interference in a residential installation. This equipment generates, uses and can radiate radio frequency energy
and, if not installed and used in accordance with the instructions, may cause harmful interference to radio
communications. However, there is no guarantee that interference will not occur in a particular installation. If this
equipment does cause harmful interference to radio or television reception, which can be determined by turning
the equipment off and on, the user is encouraged to try to correct the interference by one or more of the following
measures:
- Reorient or relocate the receiving antenna.
- Increase the separation between the equipment and receiver.
-Connect the equipment into an outlet on a circuit different from that to which the receiver is connected.
-Consult the dealer or an experienced radio/TV technician for help.
NOTE 2: Any changes or modifications to this unit not expressly approved by the party responsible for
compliance could void the user's authority to operate the equipment.
 Loading...