

Page 1

OWNER’S MANUAL
Page 2
Welcome
Congratulations on Purchasing Your LifeSpan Rower!
At LifeSpan we take pride in the quality, safety, and reliability of our products
as well as the professionalism of our sales support and customer service teams.
Making it our number one priority that you have an exceptional experience using
our products.
In support of this quality focus we pre-assemble parts on the manufacturing line
whenever possible to reduce the number of steps and complexity of customer
assembly, independently certify our products to comply with the latest industry
Safety Standards, and use state of the art production processes and quality
components.
Then we back LifeSpan products with excellent warranties and a responsive
customer service department making it simple and easy to get assistance should
the need arise.
This attention to quality, our high standard for customer service and focus on
innovation has earned LifeSpan numerous awards and consistent praise from
independent review groups, industry authorities and you the consumer.
Thanks for choosing LifeSpan.
Purchaser's Reference
Information:
IT IS IMPERATIVE THAT YOU FILL IN
THE FOLLOWING INFORMATION AND
REFER TO IT SHOULD THE NEED FOR
SERVICE ARISE.
Product Name:
RW7000 Rowing Machine
Serial Number:
Date of Purchase:
Please thoroughly read this manual before you assemble or operate your rower.
Neither LifeSpan nor its representatives can accept responsibility for any damages or injury incurred as
a result of information presented in this manual except under the terms of the product warrant
Serial
Number
y.
3
Page 3

Welcome
Contents
About Your Rower
Warranty / Registration
Important Safety Notes and Warning
Safety Instructions
Product Safety Instructions
Children and Pets
Overview
Console Overview
Specications
Heart Rate Monitoring
Chest Strap
Assembling Your Rower
Exploded View & Hardware
Assembly Instructions - Setting Up
Setting Up Your Rower
Mounting Your Rower
Heel Rest Adjustment
6
9
12
18
24
Console Operation Instructions
Display Window
Programs
High Intensity Interval Training
Maintenance and Tips
Rowing Guide
Transportation
Storage
Power
Care and Maintenance
26
38
5
Page 4

About Your Rower
Warranty
This LifeSpan rower comes with the following limited warranty valid in North
America. If you are outside of these areas contact your local distributor for
warranty information or visit www.LifeSpanFitness.com.
Warranty Item
Frame
Parts
Labor
Residential
Lifetime
5 Years
2 Years
Commercial (6 Hrs/Day)
10 Years
3 Years
1 Year
LifeSpan warrants that the equipment it manufactures is free from defects in
materials and workmanship under normal use and services. The periods above
are based on the date of purchase. During these periods, LifeSpan will repair
or replace any defective part. Free labor is included on all parts that are not
normally assembled or replaced by the customer within the labor period.
If within the time frames specied above, any part fails to operate properly,
login to our website at www.LifeSpanFitness.com, click on “Customer Service”
and complete the form to request assistance or call 877.654.3837 option 4 for a
Customer Service Agent (please note that certain kinds of service should only
be performed by a qualied service technician).
LifeSpan reserves the right to make changes and improvements to our products
without incurring any obligations to similarly alter any product purchased.
In order to insure our product warranty and to ensure the safe and ecient
operation of your LifeSpan product, only authorized parts can be used. The
warranty is void if any parts other than those provided by LifeSpan are used.
Exclusions and Limitations:
• This warranty does not apply to any defects caused by negligence, misuse,
improper assembly, or maintenance, accident, or “act of God.”
• This warranty does not apply to discoloration of paints or plastics.
• LifeSpan shall not be responsible for incidental or consequential damages.
• This warranty is non-transferable form the original owner.
6
Page 5

About Your Rower
Registration
Should you need to process a warranty claim make sure you retain your
purchase receipt to verify the date of purchase and register your LifeSpan
product online. To complete the registration go to www.LifeSpanFitness.com
and select “Product Registration”.
7
Page 6

Important Safety Notes and Warnings
Basic precautions should always be followed, including the following safety
instructions before using this equipment:
READ ALL INSTRUCTIONS BEFORE USING THIS EQUIPMENT.
WARNING: There is a risk assumed by individuals who use this type
!
of equipment. Before beginning this or any other exercise program
consult your physician. This is especially important for individuals
over the age of 35, pregnant women, or person with pre-existing
health problems. LifeSpan assumes no responsibility for personal
injury or property damage sustained by or through incorrect use of
this product.
Health Safety Instructions:
1. It is recommended that you perform warm up exercises before using
this equipment.
2. It is important to consult your physician before beginning any exercise
program.
3. Start your exercise program gradually. Exercise only for a few minutes
on the rst day to let your body adjust to the new exercise.
4. Slowly increase your exercise time and intensity over the rst two
weeks. If you increase your intensity too rapidly, or fail to warm up
properly, you can increase the risk of injury.
5. If you experience dizziness, nausea, chest pains or other abnormal
symptoms during exercise, stop the exercise session immediately.
Consult your physician before continuing your exercise.
6. Always wear proper clothing and shoes when exercising. Drink plenty
of uids when exercising.
7. WARNING! Incorrect or excessive training may cause serious health
issues.
8. WARNING! Heart rate monitoring systems may be inaccurate. Over
exercising may result in serious injury or death. If you feel faint stop
exercising immediately.
9
Page 7
Important Safety Notes and Warnings
Product Safety Instructions:
1. WARNING: Use of this machine with worn or weakened parts, may
result in injury to the user. We strongly suggest replacing worn or
damaged parts immediately. Use only the accessory attachments
recommended by the manufacturer.
2. Never operate this unit if it is damaged or broken. Contact your
authorized dealer for parts/service.
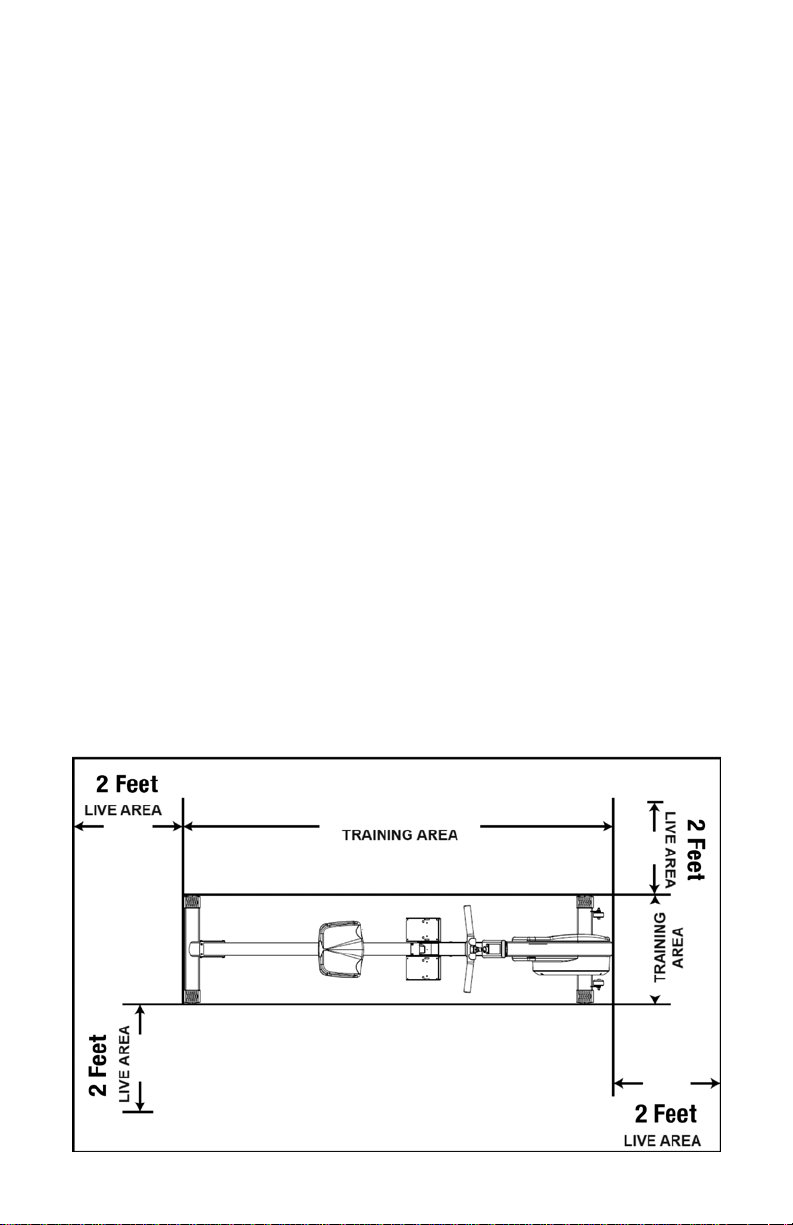
3, Place your equipment on an at oor with enough operating area.
The recommended free area is at least 2 feet on every side of the rowing
machine. Where equipment is positioned adjacent to each other the
value of the free area may be shared.
4. Never operate this rower if it has been damaged or partially submersed
in water.
5. To reduce the risk of electric shock, unplug the rower from the wall outlet
when not in use, before performing any maintenance, or before moving
the rower.
6. Do not use outdoors or in areas of high humidity or extreme temperature
changes.
7. Never place the power cord under carpeting or place any object on top
of the cord, this may pinch or damage the cord causing re damage or a
personal injury.
10
TRAINING AREA REQUIREMENT
Page 8

Important Safety Notes and Warnings
8. Use this exercise product for its intended use as described in this Owner’s
Manual. Do not use attachments that are not recommended by LifeSpan.
9. Make sure all components are fastened securely at all times.
10. Maximum user weight limit is 350 lbs.
11. No more than one person should ever use the product at a time.
12. Do not place machine in an area of high voltage or electromagnetic
elds.
13. This equipment must be assembled and placed on a at surface while
in use. Using a mat or other material on the ground is recommended.
14. Make sure that all components are fastened securely including but not
limited to seat, pedals, handlebar, or any electric components.
15. Never place any open containers or bottles of any type directly on
the unit.
16. Keep machine clear of any obstructions, heavy machinery, and never
place objects on or against machine.
17. Failure to follow these instructions will void the units warranty and
the manufacturer or distributor assumes no responsibility for personal
injury or property damages related to the product if unit is used
incorrectly or for reasons other than exercise.
18. Perform proper maintenance as recommended in this manual.
Children and Pet Safety
1. When in use children and pets should be kept at least 10 feet (3m) away.
2. Keep children from playing on your rower at all times.
3. Pets should never be allowed near unit.
4. Keep children away from the equipment. Hands and feet may get in
moving parts, which could result in serious injury.
5. This rower can be used by children ages 12 years and above and
persons with reduced physical, sensory or lack of experience and
knowledge if they have been given supervision or instruction
concerning use of the appliance in a safe way and understand the
hazards involved.
6. Cleaning and user maintenance shall not be made by children without
supervision.
NOTE: Read all instructions and save for future reference.
11
Page 9

About Your Rower
Console Overview
High intensity Interval Training (HIIT) program Indicator
Stroke Rate
Exercise Window
Exercise
Force Curve
Bar Chart
Dot Matrix Prole Window
Zero Rate
Slow Stroke Rate
12
Moderate Stroke Rate
Quick Stroke Rate
Data Display Window
Watt Average
Time/500m Average
Pulse (Heart Rate)
Time
Calories
Resistance Level
Distance
Page 10
About Your Rower
Touch DialDisplay Reset
13
Page 11

About Your Rower
Specications
Mechanical and Drive System
Resistance System Magnetic Hybrid Fan/Eddy Current System
Resistance Levels 16
Step Height 19"
Seat Travel 38” Max user height: 6’ 8”
Length x Width x
Height
Transport 2 Front Wheels
Maximum User
Weight
Product Weight Gross: 118 lbs Net: 98 lbs
Seat Travel 38” Max height user: 6’ 8”
Heart Rate Polar Chest Strap Compatible. Recommended
98.4” x 24.7” x 48”
350 lbs
using the Polar T34 transmitter for long distance
transmitting
14
Page 12

About Your Rower
Heart Rate Monitoring
Seeing your heart rate
while exercising will
help you understand the
intensity of your exercise
and corresponding heart
rate training zone, and
predict health benets
found through repeated
bouts of exercise. Refer to
the information below to
understand your heart rate
training zones:
Zone 5 — Performance Redline Zone: 90% - 100% of your Max HR
The performance zone involves extreme eort, requiring the heart to beat
at or near maximum capacity. Training bouts include intense resistance or
sprinting, beneting speed, power, and anaerobic performance competency.
Zone 4 — Threshold Zone: 80% - 90% of your Max HR
The threshold zone involves intense jogging or sub-maximal sprinting,
typically unsustainable for long periods of time. Benets include highlyelevated calorie burn, speed and power performance enhancement,
improved lactate removal capabilities, and enriched heart health.
Zone 3 — Aerobic Zone: 70% - 80% of your Max HR
The aerobic zone is ideal for cardiovascular training. Workouts in this zone
are more intense, involving moderate jogging. Long-term benets are
improved heart health and cardiovascular performance, reductions in blood
pressure and cholesterol, and increased calorie burn.
Zone 2 — Temperate Zone: 60% - 70% of your Max HR
The temperate zone consists of moderate-intensity exercise, typically as fast
walking to slow jogging. Speaking is more dicult and breathing is elevated.
Benets are similar to those of the healthy heart rate zone, though caloric
expenditure is higher.
Zone 1 — Healthy Heart Zone: 50% - 60% of your Max HR
The healthy heart zone involves safe, low-intensity activity, like mediumto-brisk walking. Full conversations can be held, despite a gentle increase
in respiration. Benets include reduced risk of heart and vascular disease,
moderated blood pressure and cholesterol, and improved insulin sensitivity.
16
Page 13

About Your Rower
Chest Strap
The RW7000 Rower has an integrated Polar heart rate receiver built into the
console. It is recommended to use a Polar T34 heart rate strap to transmit
over the longer distance experienced on a rower.
The chest strap should be worn as shown.
When using a chest strap you may need to
warm up rst to increase the moisture in
your skin. If this doesn’t work use aloe or
another moisturizer where the sensors on
the chest strap are making contact with
your skin.
Note: The heart rate monitoring system will vary due to your age,
method of use, physiology and other factors. LifeSpan cannot
guarantee the accuracy of the heart rate readings.
17
Page 14

Assembling Your Rower
Exploded View
Prior to starting the assembly process, take all of the parts out of the box. Remove plastic bags and lay the parts out on the oor to become familiar with
the components.
Since your rower is a heavy piece of equipment it is recommended you use
two people during assembly and follow these assembly instructions to reduce
any problems that could occur.
Lock Handle
Monorail
Seat Assembly Console
18
Power
Adapter
Main Frame
Assembly
Seat
Stop
Front
Rear Base Foot
L R
Rear Left
Monorail
Corner
Base Foot
NOTE
If you seem to be missing a part,
do not worry, it likely has been
pre-installed for quality
control purposes.
Rear Right
Monorail
Cover
Page 15

Assembling Your Rower
NOTE: To ease the assembly process. Do not tighten any bolts until
instructed.
Step 1: Rear Stabilizer & Monorail Assembly
A. Attach Rear Base Foot(1) to the Monorail(2) using four M6 X 16L Dome
Head Screws(80) and two M6 Nylon Nuts(101). Tighten all bolts.
B. Slide the Seat Assembly(29) onto the Monorail Assembly(2).
C. Attach Left Rear Monorail Cover(30L) & Right Rear Monorail Cover(30R)
using four M4 X 12L Screws(90). Do not tighten screws.
D. Loosely attach Seat Stop(47) to the Monorail(2) using two M6 X 16L Dome
Head Screws(80). Make sure both Left Rear Cover(30L) & Right Rear Cover(30R) are correctly aligned. Tighten all screws from Steps C and D.
A
C
90
90
80
30L
B
2
80
2
101
29
1
D
80
47
30R
2
90
2
19
Page 16

Assembling Your Rower
Step 2: Front Base Foot & Console Assembly
A. Attach Front Base Foot(5) to the Main Frame(4) using two 3/8" Spring
Washers(94) and two 3/8" Acorn Nuts(103). Tighten the two acorn nuts.
B. Connect the wire harness from the Console(32) to the harness coming
from the Main Frame(4).
C. Remove the pre-installed 3/16" X 16L Screws(87).
D. Slide Console(32) into the Main Frame(4). Re-install the two 3/16" X 16L
Screws(87) removed in Step C.
A B
4
103
94
4
5
C D
4
87
32
20
32
4
78
Page 17

Connecting the Main Frame to the Monorail
Assembling Your Rower
WARNING:
!
Never attempt to connect or disconnect the monorail
by yourself. Ask for additional help if needed and never attempt
to lift the main frame assembly if you have any medical issues. To
avoid serious injury, keep ngers and
hands away from the connection area.
Support Main Frame
or it may fall forward
Monorail
Main Frame
Assembly
!
WARNING:
When connecting or disconnecting the Monorail(2) to
the Main Frame(4) it is important to support the Main Frame by holding
onto the footstrap or holding the Main Frame from beneath before
pressing the Lock Handle to lock or release both pieces.
Failure to do so could result in serious injury.
Pedal Strap
Lock Handle
Lock Handle
Lock Pin
Mounting Slot
21
Page 18

Assembling Your Rower
Step 3: Connecting the Rail
1. Lift the Main Frame Assembly(4) up by holding the foot strap. Align the
slot in the Monorail(2) with the mounting pin on the Main Frame(4).
2. Push the Monorail(2) down into the
Main Frame(4) until the Lock Handle is
over the Lock Pin and release
the Lock Handle.
Support Main Frame(4) to prevent it from
falling forward when connecting
1
22
2
WARNING:
!
Lock Handle is fully engaged with
Lock Pin so Monorail and Main Frame cannot come apart.
Make sure
Page 19

Assembling Your Rower
Step 4: Disconnecting the Rail
1. Hold the Main Frame(4) up by holding the foot strap.
2. Push the Lock Handle to unlock the
Monorail(2) from the Main Frame(4).
3. Slowly lift the Monorail up and away
from the Main Frame.
Support Main Frame(4) to prevent it from
falling forward when disconnecting
1
Push
2
Pull
23
Page 20

Setting Up Your Rower
Mounting Your Rower
1. Position yourself in the middle of the aluminum monorail, and move the
seat to comfortable position.
2. Sit down slowly.
Computer viewing angle adjustment
1. Tilt console forward or backward to adjust to a comfortable
viewing angle.
24
Page 21

Setting Up Your Rower
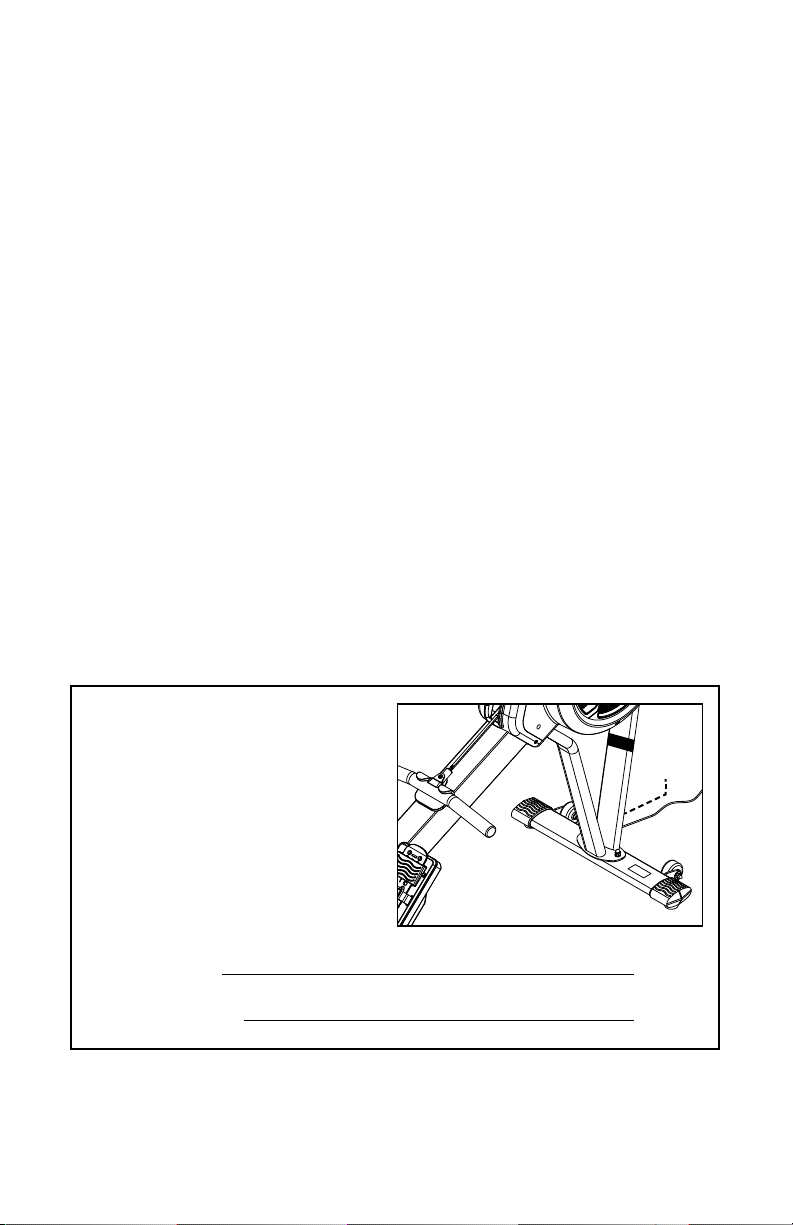
Heel Rest Adjustment
1. Raise the position of your heel rest up to raise foot position.
2. Push heel rest down to lower the position of your foot.
Foot Strap Adjustment
1. Tighten foot strap by pulling foot strap toward the Monorail on
both sides.
2. Loosen foot strap by pulling buckle away from the Monorail.
25
Page 22

Console Operational Instructions
1
2
3
5 6 7
4
High intensity Interval Training
(HIIT) program Indicator:
Represents target
value of stroke rate for HIIT
workout program.
Stroke Rate: Stroke per minute.
Exercise window: Press Display
key to switch between Exercise,
Force curve, and Bar chart
Exercise Windows as well as other
console functions.
Dot Matrix prole window: For
program selections from P1-P9.
Data Display window: Press
display button to switch
between present workout value
and average workout value.
Data Display Readouts:
1. Time/500m (AVG): A
measurement of speed known
as split time. It shows time
needed at current (AVG) pace
to complete 500 meters in
distance. The smaller this value
is, the faster your performance
time to complete 500 meters.
2. Watt (AVG): Displays estimated watts per stroke during a workout.
3. Pulse (Heart rate): Display Heart Rate requires a wireless heart rate
strap to function. Recommend Polar T34 heart rate transmitter for long
distance transmitting.
4. Time: Measures time in minutes and seconds from the very rst stroke.
5. Calories (Calories per hour): Displays estimated kilocalories burned
during workout and/or calories burned per hour.
6. Resistance Level (1-16): Level of resistance.
7. Distance: Displays distance traveled during workout in meters.
26
Page 23

Console Operation Instructions
IMPORTANT NOTE! If you choose to use a heart rate chest strap
sensor for rowing due to the long distance from the chest strap to
the (inside of console), it is suggested to use the Polar T34 heart rate
transmitter or other long signal transmitting heart rate transmitter.
Function Buttons:
1. Touch Dial: Turn this dial to
highlight selections as well as
increase or decrease workload.
Press dial to conrm your selection.
(Tips: Hold back of console and use
thumb to easily control Touch Dial)
2. Display: Press Display button to
toggle through exercise and other
display options.
3. Reset: Press to go back to previous
option or window. Press and
Display
Reset
hold for 3 seconds to go back to
program selection mode.
Touch Dial
27
Page 24

Console Operational Instructions29Console Operational Instructions
Display Window Rotation
Exercise:
Shows your force and power of your stroke
using 1 of 4 graphs indicating which range your
eorts fall into: Zero Stroke, Slow Stroke Rate,
Moderate Stroke Rate, Quick Stroke Rate.
Zero Stroke
Moderate Stroke Rate
Slow Stroke Rate
Quick Stroke Rate
Force Curve:
Will show a graphic of a curve based on the
power of your stroke. A stronger initial stroke
eort will show a curve shorter in length when
compared to a curve of longer length indicating
a weaker stroke eort.
Short Strong Force Curve Long Weak Force Curve
28
Page 25

Bar Chart:
Shows your force or power measured
in bars. A taller bar indicates more
power being exerted when compared
to a smaller bar showing less power in
stroke.
Less Power More Power
Page 26

Console Operational Instructions
Programs:
Quick Start
Simply start rowing to start console and turn the touch dial to adjust
resistance to the desired level. Pressing the display key during exercise
will change the dot matrix window. Press and hold the reset button to
return to program selection window at any time.
P1 (Manual Mode)
To select P1 in the
dot matrix window
press the enter
button. Adjust the
resistance level by
rotating the touch
dial and press
enter to conrm
selection. Start
rowing to begin
the program. To
terminate and go
back to program
selection window
press the reset
button and hold for
3 seconds.
20 25
15
10
STROKE
RATE
FORCE
EXERCISE
CURVE
WATT
AVG
PULSE
CAL. LEVEL DIST. K
BAR
CHART
30
35
s
m
HIIT/RACE
/ 500m
TIME CYCLE
40
AVG
mcal/hr
30
Page 27

P2 (Time Goal)
Turn the touch dial
until P2 shows in the
dot matrix window
and press the enter
button. Adjust time
and resistance level
by rotating the touch
dial and press enter to
conrm selection. Start
rowing to begin the
program. To terminate
and go back to program
selection window press
the reset button and
hold for 3 seconds.
.
P3 (Calorie Goal)
Turn the Touch Dial
until P3 shows in the
dot matrix window
and press the enter
button. Adjust calorie
and resistance level
by rotating the touch
dial and press enter to
conrm selection. Start
rowing to begin the
program. To terminate
and go back to program
selection window press
the reset button and
hold for 3 seconds.
Console Operational Instructions
When the goal has been obtained
(time, calories, distance) the arrival ag appears
When the goal has been obtained
(time, calories, distance) the arrival ag appears
31
Page 28

Console Operational Instructions
P4 (Distance Goal)
Turn the Touch
Dial until P4 shows
in the dot matrix
window and press
the enter button.
Adjust distance and
resistance level by
rotating the Touch
Dial and press enter
to conrm selection.
Start rowing to
begin the program.
To terminate and
go back to program
selection window
press the reset
button and hold for
3 seconds.
(time, calories, distance) the arrival ag appears
When the goal has been obtained
P5 (Race)
Turn the Touch Dial
until P5 shows in the
dot matrix window and
press the enter button.
Adjust competing
distance and resistance
level by rotating the
Touch Dial and press
enter to conrm
selection. Start rowing
to begin the program.
To terminate and
go back to program
selection window press
the reset button and
hold for 3 seconds.
32
Exercise Window
Computer Boat
Your Boat
Page 29

Console Operational Instructions
P6 (High intensity Interval Training - HIIT)
P6 is a 20 minute beginner training program which helps you get
comfortable with rower training. During the warm up phase, row at
a comfortable pace, and nd a suitable resistance level that you can
manage for the entire workout. During the one minute count down, you
are encouraged to go as fast as you can. Resting is 2 minutes for catching
your breath and preparing for the next high frequency phase. (Please
note: Do not push yourself too hard during the high frequency phase,
and if you feel faint or dizzy, stop your workout immediately and contact
your physician.)
P7 (High intensity Interval Training - HIIT)
P7 is a 20 minute standard training program for individuals who are
familiar with rowing.
P8 (High intensity Interval Training - HIIT)
P8 is a 30 minute standard training program.
P9 (High intensity Interval Training - HIIT)
P9 is a 30 minute advance level training program, with high stroke rates
in speed up phase.
33
Page 30

Console Operational Instructions
High intensity Interval Training (HIIT)
Warm Up Phase: Warm up and adjust to a comfortable resistance level.
HIIT phase: Encourage user to go as fast as they can.
(Warning: Beware do not exceed your tness ability.)
Rest phase: Slow frequency of stroke rate to catch your breath and recover for
next phase.
Cool down phase: The program is about to end and gives you time to recover
from the entire workout.
34
1
3
5 5
2
1
4
2
1. Minimum goal of Stroke rate
2. Current performance
3. Warm up phase
4. Cool down phase
5. Time: Count down
Page 31

Console Operational Instructions
1
2
1. Minimum goal of Stroke rate
2. Current performance
3
During the one minute count down, HIIT program encourages you to go as
fast as you can so that you can reach the goal of a complete pyramid.
When it comes to the two minute count down, you are encourage to slow
down the frequency of stroke rate to catch your breath and recover for the
next high frequency workout.
3. Fail. Not in target range
4. Time: Count down
4
1
1. Minimum goal reduced greatly
during rest zone phase
2. During Rest Zone, time count
2
down from two minutes
3. Time: Count down
3
35
Page 32

High intensity Interval Training (HIIT)
Build Your Pyramid
Program target
Real time Stroke rate
Good Job. In target standard
36
Excellent. Above average
Pyramid completed.
You are PRO.
Page 33

Maintenance and Tips
Rowing Guide
Correct
1. To start, legs are vertical to the
oor, and arms are straight.
Incorrect
1. Torso's out of position.
2. Push against foot pedal to
extend legs.
2. Pulled with arms prior to
straightening legs.
38
Page 34

Maintenance and Tips
3. Pull handle bar towards middle
of torso, wrists and fore arms
are parallel to the ground.
3. Incorrect wrist position which
may cause sore wrists in long
term exercise.
4. During recovery phase, straighten
arms prior to bending knees to
return to the start up phase.
4. Knees bent before arms are
straight, may hit knees and cause
injury.
39
Page 35

Maintenance and Tips
Transportation
Lift the machine up from Rear Base Foot. Make sure the front wheel touches
the ground before moving to desired location.
Storage
Store in a clean, dry
and level area.
40
Page 36

Maintenance and Tips
Power Adapter
Connect power adapter to the main frame assembly before use.
Always unplug power adapter after every workout.
Care and Maintenance
1. It is important to spend some time for simple maintenance before and
after use. This rower is only for indoor use and should not be stored in
damp, extremely cold or hot areas as this could damage the unit voiding
the warranty.
2. For safety reasons, inspect your rower before every use by checking all
nuts, bolts and screws and make sure they are all tight.
3. Clean seat rollers and aluminum rail with moist cloth with clean water
or light soapy water before and after every use. Make sure the seat is
moving smoothly and no black spots are on the rail and seat rollers.
4. Do not use harsh or abrasive chemicals on this equipment.
5. Dry the unit o with a clean towel to remove left over moisture and sweat
after every use.
It is important to spend some time for
simple maintenance before and after use.
41
Page 37

LifeSpan Fitness
785 West 1700 South Suite 1
Salt Lake City, UT. 84104
Phone: 877.654.3837
www.LifeSpanFitness.com
RW7000
Version 1.0
Commercial Rower
 Loading...