

Page 1

Page 2

Table of Contents
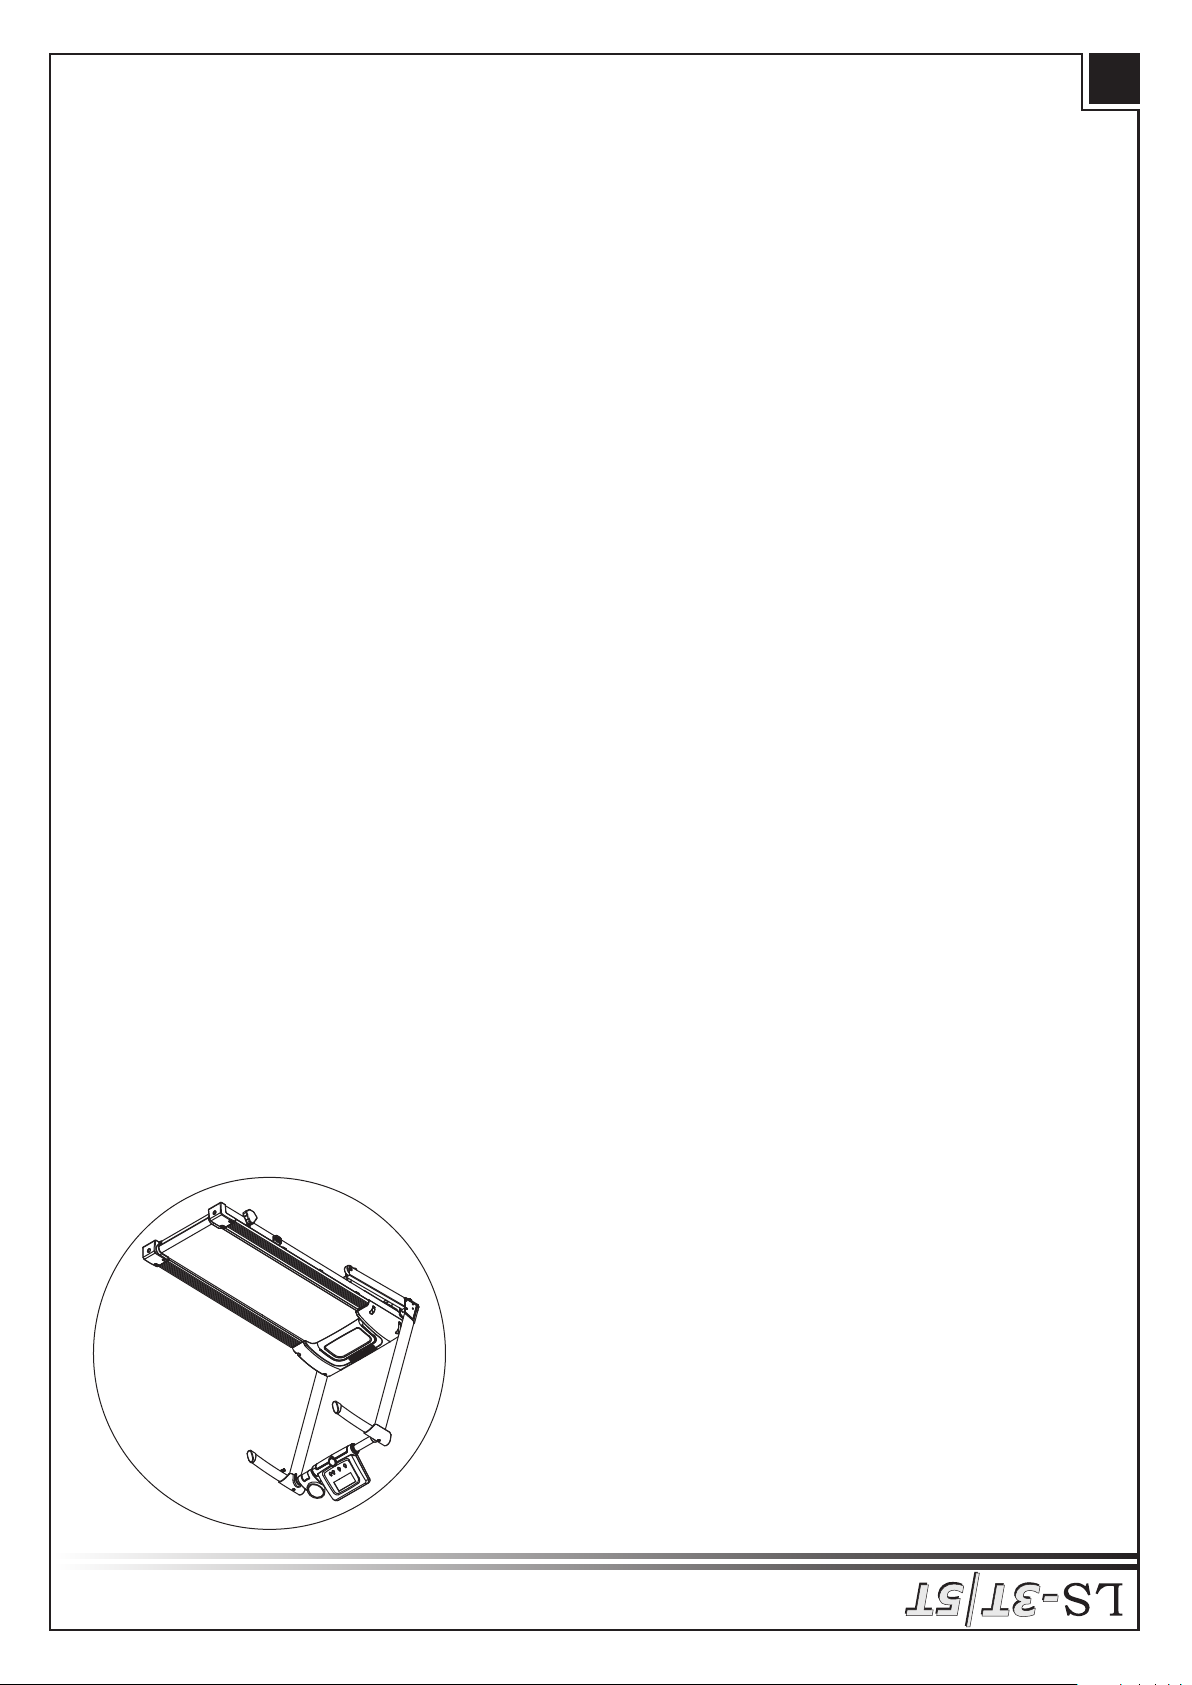
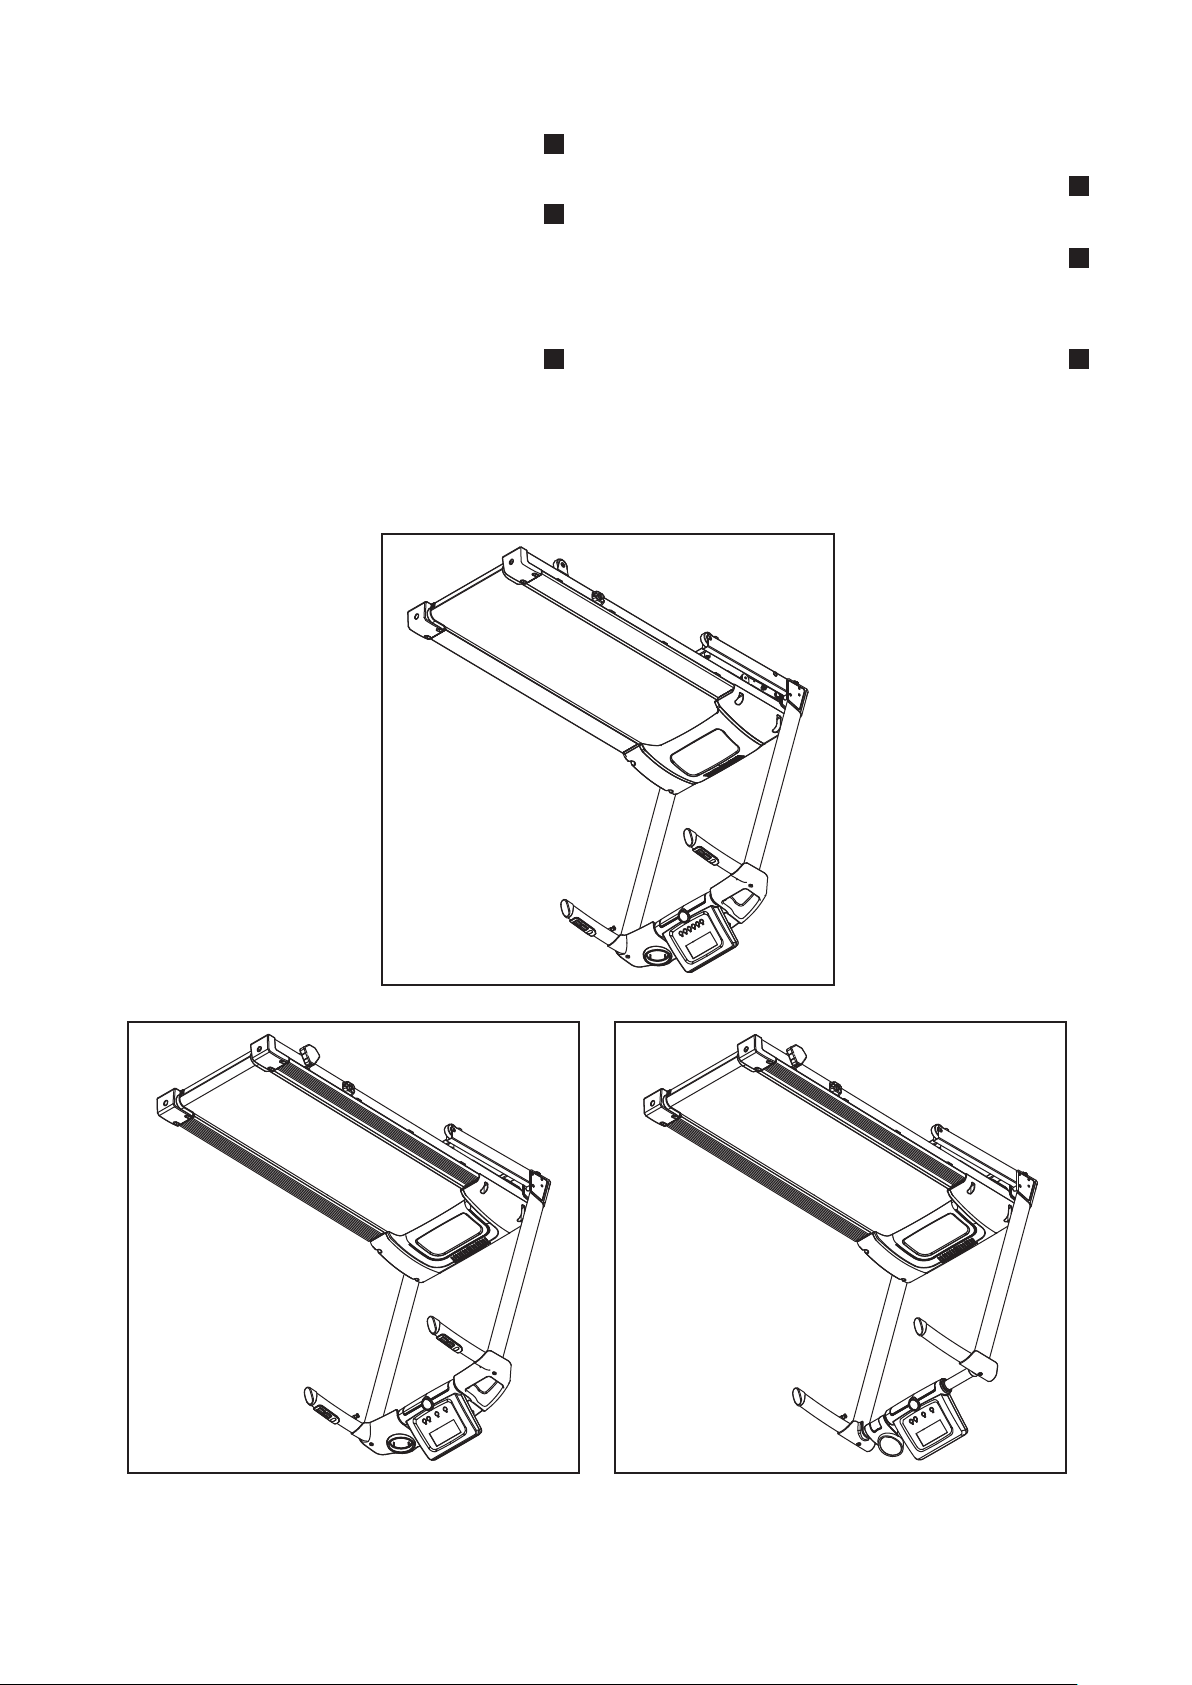
LS-3T LS-5T
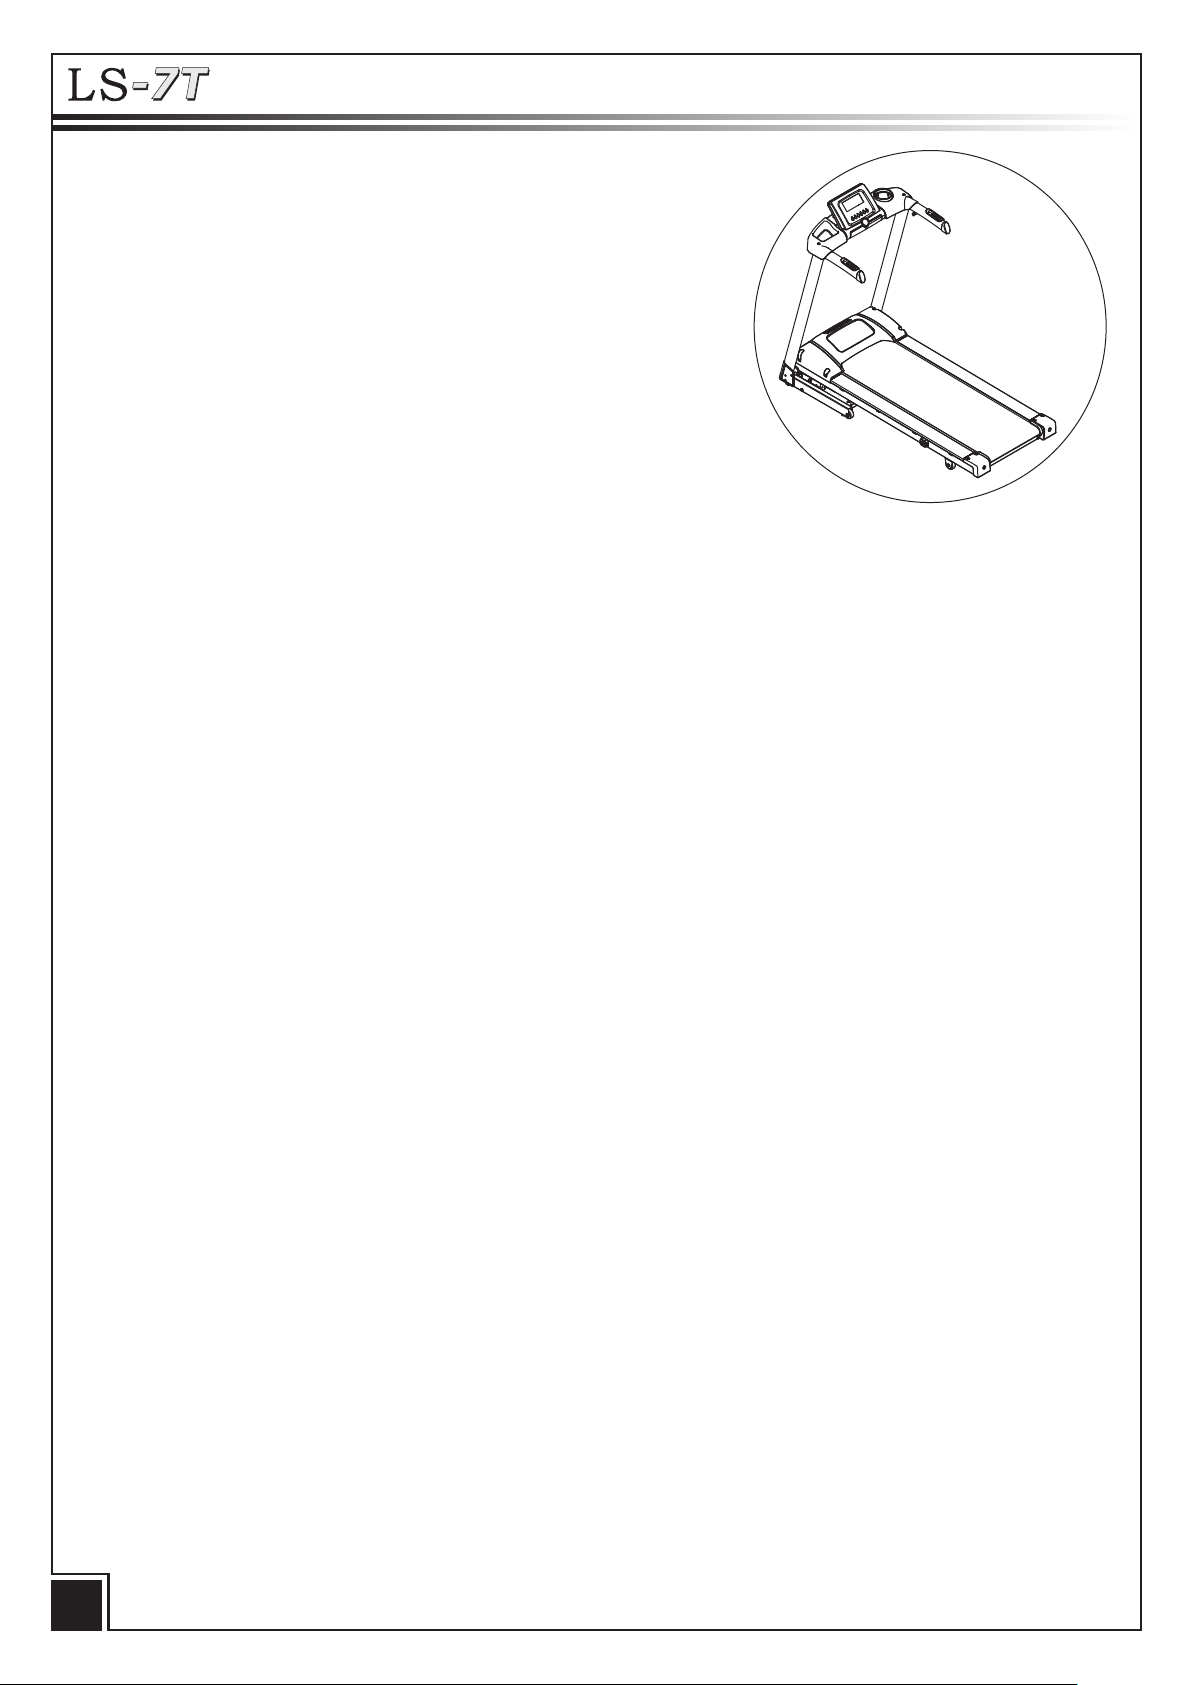
LS-7T
Congratulations on the purchase of your new motorized treadmill. To help ensure an enjoyable
and trouble-free operation of your new treadmill, we strongly suggest you read this manual carefully
and follow its recommendations.
Important Safety and
User Instructions
Assembly Instructio sn
Console Operation
LS-3T / LS-5T ................................6
LS-7T..............................................8
......................3
.....................1
Preset Program
LS-3T / LS-5T ................................10
LS-7T..............................................11
Maintenance .................................12
Warranty .......................................14
Page 3

IMPORTANT SAFETY INSTRUCTIONS
DANGER
unplug this appliance from the electrical outlet before cleaning.
♦
Use this appliance only for its intended use as described in this manual.
♦
Do not use attachments not recommended by the manufacturer.
♦
To disconnect, turn all the controls to the off position, then remove the
plug from the outlet.
♦
Connect this appliance to a proper grounded outlet only.
See Grounding Instructions.
♦
This appliance is intended for household use.
♦
When you are not going to use your treadmill, or when finished, please
remove the safety key from the console. Then always place the safety
key where children can not reach.
♦
Do not use outdoors.
♦
Always unplug the treadmill from the outlet before cleaning,
assembling or servicing.
♦
Never leave treadmill unattended when plugged in. Disconnect by
turning off the master power switch and unplug from the outlet.
♦
Never operate this treadmill if it has any damage to the lead or plug.
Also if it is not operating correctly, has been dropped, damaged or if it
has been exposed to water.
♦
Do not operate where aerosol products are being used or where
oxygen is being administered.
♦
Don’t pull the treadmill by its power cord or use the cord as a handle.
♦
Keep close supervision if the treadmill is being used by or near
children, persons with disabilities or pets.
♦
Keep dry. Do not operate this treadmill in wet or moist conditions.
♦
Never insert any objects into any openings.
♦
To prevent injuries, always warm up your muscles before using the
treadmill.
♦
Always attach the safety key clip to your clothing before inserting
safety key. Always wear safety key in ca
♦
MAX user weight: Please refer to the maximum user weight
information on the treadmill before using.
To reduce the risk of electrical shock, always
se of an accident.
♦
Keep electrical cord away from heated surfaces.
♦
Keep hands clear of all moving parts. Never place hands or feet under
the treadmill.
♦
Each time you use the treadmill, check that the running belt is aligned
and centered on the treadmill base and all visible fasteners on the
treadmill are sufficiently tightened and secured.
♦
Be sure that the area around the treadmill remains clear during use and
has adequate clearance. Keep the treadmill on a solid, level surface.
At least 1000 mm/2 feet from any wall on either side.
1000mm
2 FEET MIN
LEFT
SIDE
NOTE:
Failure to follow this instruction may lead to personal injury or injury to
others. It could also cause damage to the treadmill. To reduce the risk of
burns, fire or
electric shock, please
FRONT
TOP
VIEW
4 FEET MIN
2000mm
follow these instructions.
1000mm
2 FEET MIN
RIGHT
SIDE
ELECTRICAL GROUNDING INSTRUCTIONS
This product must be grounded. If it is malfunctioning or it breaks down,
grounding provides the path of least resistance for the electrical current
to reduce the risk of electrical shock. This treadmill is equipped with a
cord having equipment grounding connector and a grounding plug. The
plug must be plugged into an appropriate outlet that is properly installed
and grounded in accordance with all local codes and ordinances.
DANGER
Improper connection of the treadmill grounding connector can result in
the risk of electrical shock. Check with a qualified electrician, if you are in
doubt as to whether the product is properly grounded. Don’t modify the
plug provided with the treadmill. If it won’t fit your outlet, have a properly
grounded outlet installed by a qualified electrician.
1
WARNING
Never use extension cords between the treadmill and the wall outlet.
If there is any damage to the cables, please contact the service center.
Parts should be replaced by an authorized technician.
Figure
Grounding methods
GROUNDING
PIN
GROUNDED
OUTLET
Page 4

USER PRECAUTIONS
Read the following carefully before using your treadmill
♦
Always stretch your muscles before commencing any exercise
program. Warm up slowly by walking at a slow speed. Increase
workout intensity gradually until you reach your desired workout
pace. Decrease workout intensity gradually to an easy walk.
Allow your heart rate to decrease to a normal rate.
♦
When starting the treadmill, always stand with both feet on the
side rails.
♦
When finishing, allow the running belt to slow down and come to
a complete stop before stepping off.
♦
Wear comfortable nonrestrictive clothing when using the
treadmill. Never wear anything loose, such as baggy sweat
pants, necklaces, loose socks or jewelry. Never drape towels on
or around the treadmill during use.
♦
Always use the handrail when stepping on or off the treadmill
and when changing incline or speed.
♦
This treadmill is equipped with a safety key – Always clip the
cord attached to the safety key to a part of your clothing so the
safety key will properly detach from the console, therefore
stopping the treadmill.
♦
Wear running or walking shoes with high traction soles. To avoid
injury and unnecessary wear on your treadmill, be sure your
shoes are free of any debris such as gravel or small rocks.
WARNING
If you feel dizzy, nausea, chest pain or other abnormal symptoms,
STOP immediately. Consult a physician before continuing use.
Before completing an ex ercise
session always...
1. Allow time to slow your pace, cool down, reduce your hear rate
to a normal level before completing your workout.
2. Grasp the handlebars and press the speed “
your pace to an easy walk.
3. Ensure the running belt has come to a complete stop before
exiting the treadmill.
WARNING
Turn off and unplug the treadmill before proceeding with any
maintenance or visual inspections. Failure to do so may result in
serious injury.
NOTE: Failure to perform this required periodic and
preventativ e maintenance can void y our warranty .
>
” button. Slow
At the end of every exercise
session always...
1. Remove the safety key from the console.
2. Use the master power switch to turn the treadmill off. The master
power switch is located on the right-hand side of the frame, next
to the power cord.
3. Always position and store the electrical cord where it is clear of
all pathways.
4. Unplug the electrical cord from the outlet. This is especially
important if you are not going to use your treadmill for extended
time period.
5. Wipe all treadmill surfaces with a dry cloth or towel especially
perspiration on the handlebars, control panel, running belt or any
other treadmill components.
2
Page 5

ASSEMBLY INSTRUCTIONS
After unpacking the fitness equipment, examine it carefully for possible damage. If there is any damage or there are missing parts,
please contact your retailer or an authorized repair facility for assistance.
1. Since your treadmill is a heavy piece of equipment, we recommend that after removing the box top, you slit the corners of the lower
carton and fold down the sides. This will eliminate the need to pick the treadmill over the sides of the box.
2. Prior to starting the assembly process take all the parts out of the box, remove all plastic bags, and lay them out on the floor to
become familiar with the components. Make sure that you remove all parts packaged underneath the treadmill. You may need to
slightly pick the back of the treadmill up to get better access to the parts on the bottom. You will notice that the treadmill is completely
assembled except for the handle bars and the display window. ( See FIG.1 of page 5)
34
31
33
30
32
31
35
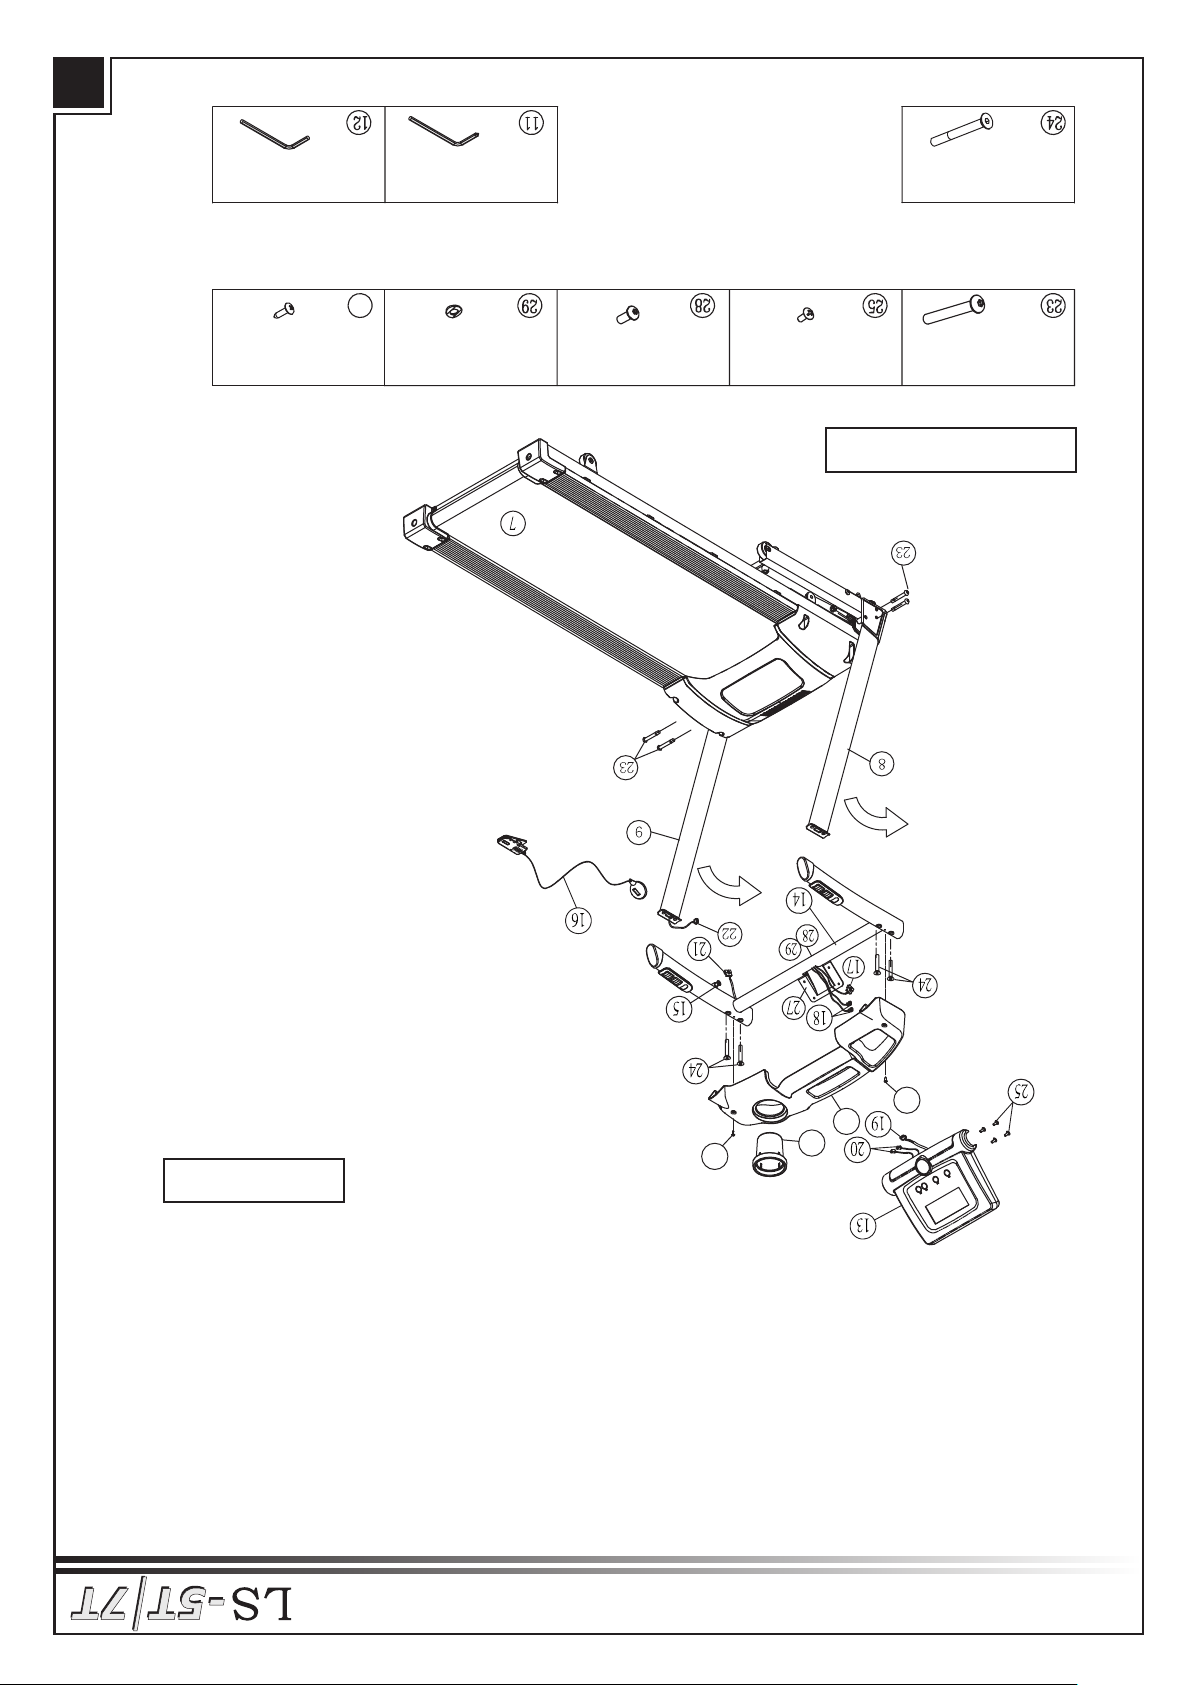
Parts
7. Frame
8. Support post - left
9. Support post - right
10. Base frame
13. Console.
14. Complete handlebar set
15. Locking knob for folding
16. Safety key
17. PCB cable middle
18. Hand pulse cable lower
19. PCB cable upper
20. Hand pulse cable lower
21. PCB cable middle
22. PCB cable lower
23. Base frame screws x 4
24. Handlebar screws x 4
25. Console screws x 4
26. Elevation block.
27. Console bracket.
28. Screws for console position
adjustment
29. Washers for console position
adjustment
30. Water bottle screws x 2
31. Handrail decorating screws x 2
32. Water bottle rack
33. Water bottle holder
34. Handrail decorating cover left
35. Handrail decorating cover right
Hardware
Screws already in place on the treadmill:
M8*45L(4PCS) M4*10L(4PCS) M8*15L(2PCS) M8(2PCS) #8*15L(4PCS)
Screws in the plastic bag: Tools:
M5(1PCS) M6(1PCS)M8*70L(4PCS)
3
30 31
Page 6

ASSEMBLY INSTRUCTIONS
After unpacking the fitness equipment, examine it carefully for possible damage. If there is any damage or there are missing parts,
please contact your retailer or an authorized repair facility for assistance.
1. Since your treadmill is a heavy piece of equipment, we recommend that after removing the box top, you slit the corners of the lower
carton and fold down the sides. This will eliminate the need to pick the treadmill over the sides of the box.
2. Prior to starting the assembly process take all the parts out of the box, remove all plastic bags, and lay them out on the floor to
become familiar with the components. Make sure that you remove all parts packaged underneath the treadmill. You may need to
slightly pick the back of the treadmill up to get better access to the parts on the bottom. You will notice that the treadmill is completely
assembled except for the handle bars and the display window. ( See FIG.1 of page 5)
30
31
32
30
Parts
7. Frame
8. Support post - left
9. Support post - right
10. Base frame
13. Console
14. Complete handlebar set
15. Locking knob for folding
16. Safety key
17. PCB cable middle
18. Hand pulse cable lower
19. PCB cable upper
20. Hand pulse cable lower
21. PCB cable middle
22. PCB cable lower
23. Base frame screws x 4
24. Handlebar screws x 4
25. Console screws x 4
27. Console bracket
28. Screws for console position
adjustment
29. Washers for console position
adjustment
30. Handrail decorating screw x 2
31. Compartment rack
32. Water bottle holder
Hardware
Screws already in place on the treadmill:
M8*45L(4PCS) M4*10L(4PCS) M8*15L(2PCS) M8(2PCS) #8*15L(2PCS)
30
Screws in the plastic bag: Tools:
M5(1PCS) M6(1PCS)M8*70L(4PCS)
4
Page 7

FIG4
FIG3
FIG5
ASSEMBLY INSTRUCTION
FIG2FIG1
Upright Assembly
1. Carefully lift (as shown in Fig 2) the frame (#7) from the rear.
Remove console (#13), handlebars (#14) first then remove the
styrofoam (#3 & 4) from underneath.
2. Lower the frame carefully.
3. Remove screws (#23) from the left and right of the base frame (Fig 3).
4. Raise the left and right support bars (#8 & 9) to the upright position.
5. Refit the screws (#23) but do not tighten yet.
Handlebar Assembly
1. Reinstall the handlebar assembly (#14) onto the support bars (8 and 9).
Connect the PCB upper cables (#21) and the lower PCB
cables (#22) together and tuck cables into the tube.
2. Secure the handlebar set to the support bars with 4 screws
(#24) as shown (Fig 4).
3. Tighten the screws (#23) of the base frame (Fig 3).
5
Console Attachment
1. Remove the screws (#25) from the back of the console (Fig 5).
2. Connect PCB cable lower (#17) and PCB cable upper (#19).
3. Connect hand pulse cable lower (#18) and hand pulse cable upper (#20).
4. Fit console to console bracket and tighten the screws (#25).
Note: You can adjust the position of the console by loosening and
tilting the console foward or back. When adjusted, tighten screw (#28).
33
32
31
34
14
30
32
31
30
14
31
35
FIG6
30
FIG7
LS-3T:
1. Remove screws (#31) from the handrails (#14), secure the Left and
Right handrail covers (#34) (#35) on the sides of handrails (Fig 6).
2. Remove screws (#30) from the water bottle holder and place the
water bottle holder on the water bottle holder support piece (#32),
use screws (#30) to secure them tightly.
LS-5T/7T:
1. Place the water bottle holder (#32) onto the compartment rack (#31).
Gently press down until it snaps into place (Fig 7).
2. Remove two screws (#30) from the handrail set (#14), place the
compartment rack (#31) and the water bottle holder (#32) onto the
handrail set (#14). Make sure the holes are in position and tighten it
with screws (#30).
Page 8

CONSOLE OPERATION
Button description Display
ST ART / ST OP :
This will “ST ART” and “ST OP” the treadmill.
Display : The console is One (1) large LCD
with Five (5) separate windows for data
There is also an Emergency “STOP” switch the (SAFETY KEY).
Data :
SPEED up>:
This will select program and level in set up mode before starting.
This will increase the speed in increments of 0.1 km/h or 0.1 mph.
Time : 88:88
Distance : 888.8
Cal : 8888
Lap / Pulse : 888
SPEED down>:
Speed : 88.8
This will select program and level in set up mode before starting.
This will decrease the speed in increments of 0.1 km/h or 0.1 mph.
MODE :
This will accept program and level selections.
This will switch display LAP or PULSE on data window during your exercise.
.
PRUDENCE
CAUTION
Pour éviter tout risque de blessure,
debout sur le côté des rails avant
de tapis roulant. Lire le manuel du
propriétaire avant de. l'utiliser.
To avoid risk of injury, stand on the
side rails before starting treadmill.
Read owner’s manual before using.
1. Insérez la clé de sécurité
2. Sélectionnez le programme à l'aide des flèches et appuyez sur
la touche « mode ».
3. Choisissez le niveau et appuyez sur la touche «mode ».
4. Sélectionnez le temps à l’aide des flèches et appuyez sur la
touche « mode »
5. Appuyez sur Start pour commencer l'entraînement.
1. Insert safety key
2. Selet program using arrows, press mode.
3. Choose level using arrows, press mode.
4. Select time using arrows, press mode.
5. Press start to begin workout.
INSTRUCTIONS
AVERTISSEMENT
WARNING
Suppression de la clé de
sécurité lorsqu'il n'est pas
utilisé et de stocker hors de
portée des enfants.
Remove the safety key when
not in use and store out of
reach of children.
6
Page 9

CONSOLE OPERATION
Introduction :
To start treadmill, first ensure power cord is plugged in, the power switch is
turned to the “ON” position and the “Safety Key” is attached to your
clothing and to the console.
Do not stand on the running belt at this time. Stand on the side rails.
The treadmill has one (1) manual and five (5) preset programs (P1 – P5).
Each preset program has three (3) different levels for the user to choose
from. While running in the preset programs, the treadmill automatically
changes the speed. However you can still change the speed manually at
anytime you desire.
Quick Start :
When the main power switch is in the “ON” position and the “Safety Key” is inserted into the console, the monitor
window will display a flashing “0:00” Press the “START” button to begin in the “Manual Mode”.
Program Operation :
After you have turned on the power, inserted “Safety Key” the monitor will display 0:00 on all the separate LCD windows.
1. Select Programs: Press “>” or “>” arrows to choose from the programs P1 ~ P5. Then press the “MODE” button.
2. Set the level: Press “>” or “>” arrows to choose from the workout level you desire. Then press the “MODE” button.
3. Set Time: Choose how long you want to workout for by pressing the “>” or “>” arrows. All programs will default to
thirty (30) minutes if no adjustment is made. Once completed, press the “START” button to begin your workout.
The Pause Function :
You can pause your treadmill at any time during your workout by pressing the “STOP” button once. To resume your
workout just press the “START” button.
The Reset Function :
You can reset your workout program and the time by holding the “STOP” button for a few seconds until the program
window displays “0:00”. Repeat the above steps to reset your desired program, level and workout time.
NOTE:
1. When the time reads 99:59 or 00:00, a series of beeps will sound, and last for five (5) seconds and then the
motor will stop.
2. When the “Safety Key” is pulled out in any situation the motor will stop immediately and the console is
reset.
3. The graphics of the workout profiles are printed on the console. Each overall workout time will be
segmented into ten (10) sections. Segment time = overall workout time / 10.
e.g. : If overall workout time is set at ten (10) minutes, each segment will last for one (1) minute.
7
Page 10

CONSOLE OPERATION
Button description Display
ST ART / ST OP :
This will “ST ART” and “ST OP” the treadmill.
There is also an Emergency “STOP” switch the (SAFETY KEY).
Display : The console is One (1) large LCD
with Five (5) separate windows for data
.
SPEED up>:
This will select program and level in set up mode before starting.
This will increase the speed in increments of 0.1 km/h or 0.1 mph.
SPEED down>:
This will select program and level in set up mode before starting.
This will decrease the speed in increments of 0.1 km/h or 0.1 mph.
INCLINE up>:
This will select program and level in set up mode before starting.
This will increase the elevation in increments of one (1).
INCLINE down>:
This will select program and level in set up mode before starting.
This will decrease the elevation in increments of one (1).
MODE :
This will accept program and level selections.
This will switch display LAP or PULSE on data window during your exercise.
Data :
Time : 88:88
Distance : 888.8
Cal : 8888
Lap / Pulse : 888
Speed : 88.8
PRUDENCE
CAUTION
Pour éviter tout risque de blessure,
debout sur le côté des rails avant
de tapis roulant. Lire le manuel du
propriétaire avant de. l'utiliser.
To avoid risk of injury, stand on the
side rails before starting treadmill.
Read owner’s manual before using.
1. Insérez la clé de sécurité
2. Sélectionnez le programme à l'aide des flèches et appuyez sur
la touche « mode ».
3. Choisissez le niveau et appuyez sur la touche «mode ».
4. Sélectionnez le temps à l’aide des flèches et appuyez sur la
touche « mode »
5. Appuyez sur Start pour commencer l'entraînement.
1. Insert safety key
2. Selet program using arrows, press mode.
3. Choose level using arrows, press mode.
4. Select time using arrows, press mode.
5. Press start to begin workout.
INSTRUCTIONS
AVERTISSEMENT
WARNING
Suppression de la clé de
sécurité lorsqu'il n'est pas
utilisé et de stocker hors de
portée des enfants.
Remove the safety key when
not in use and store out of
reach of children.
8
Page 11
CONSOLE OPERATION
Introduction :
To start treadmill, first ensure power cord is plugged in, the power switch is turned
to the “ON” position and the “Safety Key” is attached to your clothing and to the
console. Do not stand on the running belt at this time. Stand on the side rails.
The treadmill has one (1) manual and five (5) preset programs (P1 – P5). Each
preset program has three (3) different levels for the user to choose from. While
running in the preset programs, the treadmill automatically changes the speed.
However you can still change the speed manually at anytime you desire.
Quick Start :
When the main power switch is in the “ON” position and the “Safety Key” is inserted into
the console, the monitor window will display a flashing “0:00” . Press the “START” button to begin in “Manual Mode”.
Program Operation :
After you have turned on the power and inserted the “Safety Key”, the monitor will display 0:00 on all the separate LCD windows.
P1 – P2 = Speed programs. P3 – P4 = incline programs. P5 = HRC program.
Select Speed or Incline program (P1 – P4) :
1. Select Program: Press “
2. Set Level: Press “
3. Set Time: Choose how long you want to workout by pressing “
adjustments are made. Once complete, press the “START” button to begin the workout.
Select HRC program :
1. Select program: Press Speed “
Then press the “MODE” button.
2. Select Age: Press Speed “
3. Set Target Heart Rate: Press Speed “
After a warm-up period, the program will automatically adjust the speed to maintain the target Heart Rate (Range 60 – 180 bpm).
4. Set Target Max. Speed: Press Speed “
speed even though pulse has not reached the target Heart Rate yet.
5. Enter program time: Press Speed “
The Pause Function :
You can pause your treadmill at any time during your workout by pressing the “STOP” button once. To resume your workout just press the
“START” button.
The Reset Function :
You can reset your workout program and the time by holding the “STOP” button for a few seconds until the program window displays
“0:00”. Repeat the above steps to reset your desired program, level and workout time.
” or “>” arrows to choose from the programs P1 – P5. Then press the “MODE” button.
>
” or “>” arrows to choose the workout level you desire. Then press the “MODE” button.
>
” or “>” arrows. All programs will default to thirty (30) minutes if no
>
” or “>” arrows to choose program P5.
>
” or “>” arrows to enter the users age. Then press the “MODE” button.
>
” or “>” arrows to set the target Heart Rate. Then press the “MODE” button.
>
” or “>”arrows to set the target max.speed. The speed will not increase over the max.
>
” or “>” arrows to enter the program workout time. Then press the “START” button.
>
NOTE:
1. When the time reads 99:59 or 00:00, a series of beeps will sound, and last for five (5) seconds and then the motor will stop.
2. When the “Safety Key” is pulled out in any situation the motor will stop immediately and the console will reset.
3. The graphics of the workout profiles are printed on the console. Each overall workout time will be segmented into ten (10)
sections. Segment time = overall workout time / 10.
e.g. : If overall workout time is set at ten (10) minutes, each segment will last for one (1) minute.
9
Page 12

PRESET PROGRAM
Each program is divided into ten (10) segments and has three (3) different levels. The preset workout time is
thirty (30) minutes.
km/h Speed program
MPH Speed program
10
Page 13

PRESET PROGRAM
Each program is divided into ten (10) segments and has three (3) different levels. The preset workout time is
thirty (30) minutes.
km/h Speed program Incline program
MPH Speed program Incline program
11
Page 14

Aligning the running belt
Ensure the running belt is centered on your treadmill at all times.
Running style and a non-level surface are two instances that may
cause the belt to drift off center. Minor adjustments to the two
bolts at the rear of the treadmill are necessary when the belt has
drifted off center.
1. Press “START” to begin running belt, then increase the treadmills
speed to 5 km/h (3mph).
2. Stand at the rear of the treadmill to determine which direction the
belt is drifting.
3. If the belt drifts to the left, turn the left adjustment bolt with 6 mm
Allen wrench 1/4 of a turn clockwise. (FIG. C)
4. If the belt drifts to the right, turn the right adjustment bolt with 6 mm
Allen wrench 1/4 of a turn clockwise. (FIG. D)
5. Observe the tracking of the belt for about 30 seconds. Repeat
previous steps if needed.
Belt lubrication
MAINTENANCE
To move belt to the Right
FIG C.
To move belt to the Left
FIG D.
Use only 100% Silicone and avoid using aerosol silicone sprays which include additives and petroleum distillates.
One ounce of Silicone should be used for each application. LifeSpan offers 100% silicone lubricant that can be ordered at
www.lifespanfitness.com.
The running belt should be lubricated every 3 months (regardless of use) or every 50 hours of use, whichever comes first.
Even if the treadmill is not being used, silicone will dissipate over time and the belt will dry out.
Note: Even though the running belt is lubed from the manufacturer, it is not a bad idea to lubricate the running belt when first
using the treadmill in case the belt has dried some between the dates the unit was manufactured and when it was purchased.
Apply the silicone to the underside of the treadmill belt. Do ot apply to the walking surface.This may be accomplished by
folding the treadmill and applying the silicone to the back of the belt from each back corner. Spray the silicone down and
across the belt from each corner. Rotate the belt 1/2 of the circumference and repeat from each corner.
Note: When lubricating the belt, make sure the treadmill is located on a surface that can be easily cleaned. After lubricating
your treadmill running belt, clean any excess silicone off the belt and frame.
Cleaning
It is recommended to wipe the treadmill down after each use to keep the treadmill clean and dry. A mild detergent may be used
at times to help remove all dirt and salt from the belt, painted parts and the display.
Cleaning would include removing the motor cover and cleaning around the motor and electronics. It is recommended to clean
the motor compartment if the treadmill is in an area where there might be a lot of pet hair or plush carpet fibers that could get
pulled up into the motor compartment. It is a good idea at this time to check and tighten all assembly hardware as well.
Warning: Unplug the Power Cord Before Removing the Motor Cover.
12
Page 15
MAINTENANCE
WARNING
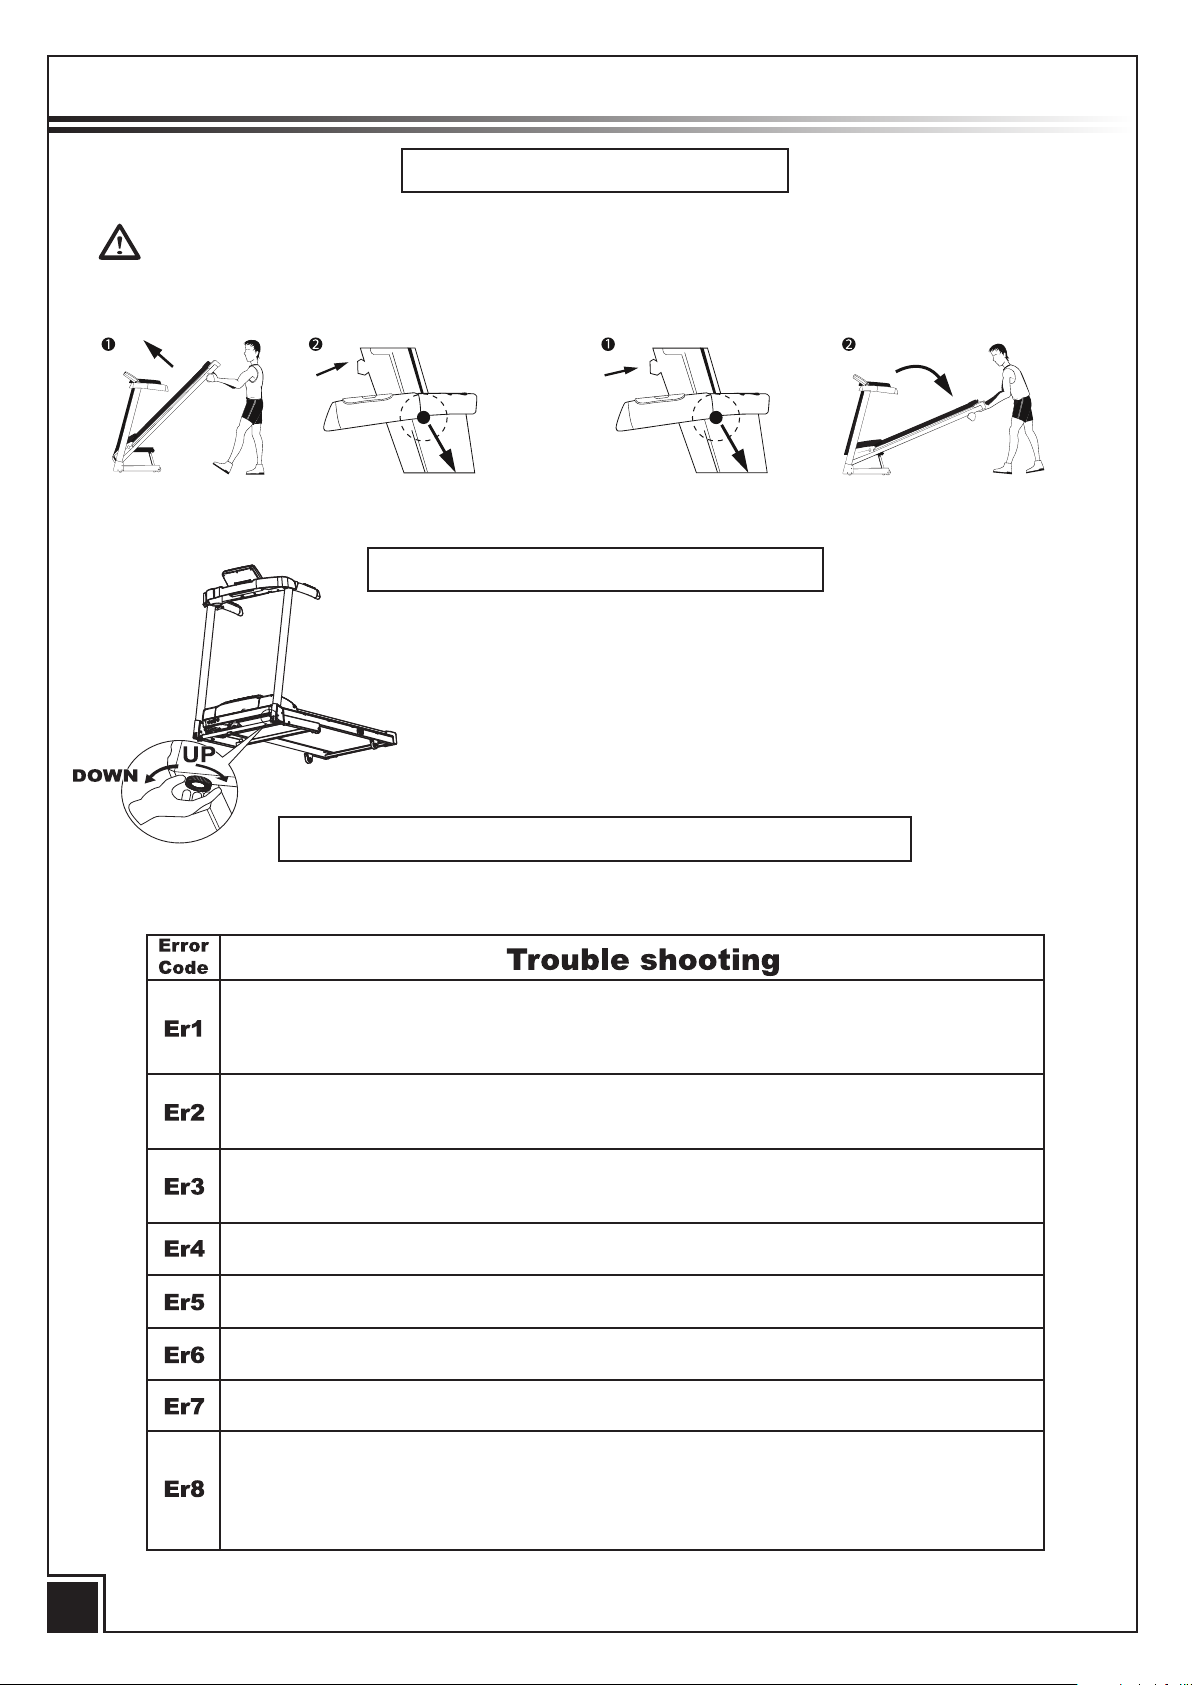
Folding/Unfolding
LS-7T:
Before folding, please put the incline value to zero (0) level.
Fold up:
1. Raise the frame.
Release to unfold:
On right side
of handlebar
1. Pull out the knob for locking.
On right side
of handlebar
1. Push the deck forward.
2. Pull out knob for releasing.
Treadmill Leveling
To stabilize the treadmill on the floor, you can adjust the two screws located under the front
of the base frame.
1. Lift the machine on one side and then turn the screw under the front
of the base frame.
2. Turn the screws clockwise to make it screw up.
3. Turn the screw counterclockwise to make it screw down.
Trouble shooting with error codes
1. Lower the deck with hand support.
The electronics are continuously running self checks. If it finds an irregularity, the console will display an “Error” code and stop the
normal operation of the treadmill for safety purposes.
Speed sensor error :
1. Please check if there is anything stuck inside.
2. Please check if the speed sensor is loose or defective.
3. Please contact your after-service center.
Motor connection error :
1. Please check cable connection to motor are not loose or damaged.
2. Please contact your after-service center.
PCB panel control board and MCB motor control board connection error :
1. Please check all cables connected to the console PCB and motor controller MCB are not loose or damaged.
2. Please contact your after-service center.
Controller protection error :
Please contact your after-service center.
Motor protection error :
Please contact your after-service center
Motor controller (MCB) protection error :
Please contact your after-service center
Incline error (only MI150) :
Please contact your after-service center
HRC program error (only MI150) :
1. Please make sure that the hands are placed on the hand pulse grips or the chest strap is worn.
(Chest strap is an optional function.)
2. Please check if the wiring of the hand pulses are not loose or damaged.
3. Please contact your after-service center.
13
PLEASE REMOVE THE SAFETY KEY AND TURN OFF THE POWER SWITCH.
THEN TURN THE POWER SWITCH BACK ONTO SEE IF THE ERROR CODE HAS CLEARED
IF THERE IS STILL AN ERROR CODE PLEASE CONTACT YOUR AFTER-SERVICE CENTER.
Page 16

LIMITED WARRANTY
LS Series Folding Treadmills
Treadmill
Motor:
90 Days
90 Days
90 Days
90 Days
Contact 877-204-1009.
After the 90 Day Warranty period, please go to www.LifeSpanFitness.com and click online customer
support or call 801-973-9913 ext 4.
14
Page 17

14
lorsque la fiche est correctement complétée et acheminée dans un délai de 30 jours.
afin de rendre la garantie du produit active. Les garanties de produit ne sont uniquement valides que
Les fiches d’inscription doivent être remplies et postées à PCE Fitness dans les 30 jours suivant l’achat
Enregistrer votre produit ou remplissez la bon de garantie fourni et acheminez-nous-le immédiatement.
compléter l’enregistrement en ligne, visitez le site Internet www.LifeSpanfitness.com et cliquez sur
Vous devez enregistrer votre produit LifeSpan avant qu’une réclamation ne puisse être traitée. Afin de
Enregistrement
• Cette garantie du propriétaire initial est non-transférable.
• PCE Health and Fitness ne doit être tenu responsable des dommages indirects ou consécutifs.
• Cette garantie ne s’applique pas à la décoloration de la peinture ou des pièces en plastique.
assemblage ou un entretien inappropriés, accidentellement ou en raison d’une « calamité naturelle ».
• Cette garantie ne s’applique pas aux défauts causés par négligence, par un mauvais usage, par un
Exclusions et restrictions :
par PCE Health and Fitness sont utilisées.
sées peuvent être utilisées. La garantie de ce produit est nulle si des pièces autres que celles fournies
d’assurer le fonctionnement sécuritaire et efficace de l’équipement LifeSpan, seules des pièces autorimodifier de façon similaire les produits déjà vendus. Afin d’assurer la garantie de notre produit et
PCE Health and Fitness se réserve le droit de modifier ou d’améliorer nos produits sans être astreint à
801-973-9913 Poste 4.
www.LifeSpanFitness.com et cliquez sur Service à la clientèle en ligne ou composez le
posez le 877-204-1009. Après une période de garantie de 90 jours, consultez le site Internet
Si au cours des périodes susmentionnées, un fonctionnement inadéquat des pièces est observé, com-
ront être portés à la charge du client.
ments du technicien de service pour des déplacements sur des distances supérieures à 20 miles pourremis par le client seront gratuitement réparées au cours de la première année. Les horaires de déplaceréparera et remplacera toute pièce défectueuse. Toutes les pièces étant normalement assemblées ou
susmentionnées se fondent sur la date d’achat. Au cours de ces périodes, PCE Health and Fitness
construction, si utilisé conformément aux conditions standards d’utilisation et de service. Les périodes
PCE Health and Fitness garantit que l’équipement fabriqué est exempt de tout défaut de matériel et de
Service : 90 jours
Pièces: 90 jours
Moteur : 90 jours
Cadre : 90 jours
commerciales.
s’applique uniquement à l’utilisation du tapis roulant à domicile ou à des fins résidentielles et nonLes tapis roulants pliants LS Series de LifeSpan sont couverts par une garantie restreinte suivante qui
Garantie d’utilisation à domicile restreinte
GARANTIE LIMITÉE
Page 18

CODE D’ERREUR S’AFFICHE TOUJOURS, CONT ACTEZ VOTRE SER VICE DE SOUTIEN TECHNIQUE À LA CLIENTÈLE.
D’ALIMENT ATION À NOUVEAU EN MARCHE AFIN DE VERIFIER SI LE CODE D’ERREUR S’EST EFFACÉ. SI T OUTEFOIS UN
RETIRER LA CLÉ DE SÉCURITÉ ET DÉBRANCHER L ’INTERRUPTEUR D’ALIMENTATION. METTRE L ’INTERRUPTEUR
3.Veuillez contacter votre service de soutien technique à la clientèle.
2. Vérifier si les câbles des poignées du cardio-fréquencemètre ne sont pas lâches ou endommagées.
poitrine est endommagé. (Le sangle de poitrine est une fonction optionnelle).
1.Assurez-vous que les mains sont placées sur les poignées du cardio-fréquencemètre ou si le sangle de
Programme HRC (erreur) (MI150 uniquement) :
Veuillez contacter votre service de soutien technique à la clientèle.
Inclinaison (erreur) (MI150 uniquement) :
Veuillez contacter votre service de soutien technique à la clientèle
Protection de la commande moteur (erreur) :
Veuillez contacter votre service de soutien technique à la clientèle
Protection du moteur (erreur) :
Veuillez contacter votre service de soutien technique à la clientèle.
Protection du régulateur (erreur) :
lâches ou endommagés. 2. S'il vous plaît contactez votre centre de service après.
1.Vérifier tous les câbles raccordés à la console PCI et là a commande moteur afin s’assurer qu’ils ne sont pas
Panneau de commandes PCI et panneau de la commande moteur (erreur) :
2. Veuillez contacter votre service de soutien technique à la clientèle.
1. Veuillez vérifier tous les câbles raccordés au moteur afin de s’assurer qu’ils ne sont lâches ou endommagés.
Bornes du moteur (erreur) :
3. Veuillez contacter votre service de soutien technique à la clientèle.
2. Vérifier si le capteur de vitesse est lâche ou défectueux.
1. Vérifier si quelque chose est resté coincé à l’intérieur.
Capteur de vitesse (erreur) :
Difficulté à tirer
d'erreur
Code
affichera un code « d’erreur » et interrompra le fonctionnement normal du tapis roulant pour des raisons de sécurité.
Les composantes électroniques requièrent continuellement des auto-vérifications. Si des irrégularités sont détectées, la console
13
la plate-forme
1. Abaisser manuellement
3. Tourner les vis dans le sens contraire des aiguilles d’une montre pour les dévisser.
2. Tourner les vis dans le sens des aiguilles d’une montre afin de les visser.
1. Soulever l’appareil d’un côté et tourner la vis située sous la partie frontale de la plate-forme.
la partie frontale avant de la plate-forme.
Afin de maintenir le tapis roulant stable sur le sol, vous pouvez ajuster les deux vis situés sous
Réglage du niveau du tapis roulant
.
pour le relâcher.
2. Appuyer sur le bouton
1. Pousser la plate-forme en avant.
Relâcher pour déplier:
Dépannage par le biais de code d’erreurs
élever
de verrouillage.
1. Appuyer sur le bouton
gauche du guidon
Sur le côté
faible
1. Soulever la plate-forme.
Pliage:
Avant de plier le tapis roulant, définir la valeur d’inclinaison à zéro (0).
LS-7T:
AVERTISSEMENT
Pliage/ Dépliage
ENTRETIEN
Page 19

12
Mise en garde : Débrancher le cordon d’alimentation avant de retirer le couvercle du moteur.
aussi une bonne idée à ce moment de vérifier et de viser tous les pièces d’assemblage.
y avoir des poils d’animaux ou des fibres de tapis à poils longs pouvant s’insérer dans le compartiment du moteur. C’est tout
pièces électroniques. Il est recommandé de nettoyer le compartiment du moteur si le tapis roulant est dans endroit où il pourrait
L’opération de nettoyage comprend aussi le retrait du couvercle du moteur ainsi que le nettoyage autour du moteur et des
l’écran d’affichage.
peut de temps à autre être utilisé afin de retirer toutes les saletés ou impuretés et le sel de la bande, des parties peintes et de
II est recommandé de nettoyer le tapis roulant après chaque utilisation afin de le conserver propre et sec. Un détergeant doux
Entretien
cadre. Pivotez la bande d’1/2 de circonférence et répétez l’opération de chaque côté.
nettoyable. Après avoir lubrifié la bande d’entraînement du tapis roulant, nettoyez le silicone excédentaire de la bande et du
Remarque : Lors de la lubrification de la bande, assurez-vous que le tapis roulant est placé sur une surface facilement
silicone en-dessous et autour de chaque côté de la bande.
effectué en pliant le tapis roulant et en appliquant du silicone au dos de la bande de chaque côté du dos. Vaporisez le
Appliquez le silicone en dessous de la bande du tapis roulant. Ne l’appliquez pas sur la surface de marche. Ceci peut être
FIG D.
vers la gauche
Pour déplacer la bande
FIG C.
vers la droite
Pour déplacer la bande
de l’utiliser au cas où elle se serait asséchée entre la date de fabrication et la date d’achat.
Remarque : Même si la bande est lubrifiée par le fabricant, il est toujours préférable de lubrifier la bande d’entraînement avant
bande s’assèchera.
selon ce qui s’applique en premier lieu. Même si le tapis roulant n’est pas utilisé, le silicone se dissipera avant le temps et la
La bande d’entraînement devrait être lubrifiée tous les 3 mois (quelque soit l’usage) ou toutes les 50 heures d’utilisation,
offre un lubrifiant renfermant à 100 % du silicone qui peut être commandé à l’adresse suivante www.lifespanfitness.com.
substances additives et des distillats du pétrole. Une once de silicone devrait être utilisée lors de chaque usage. LifeSpan
Utilisez uniquement du silicone 100% et évitez d’utiliser les vaporisateurs de silicone à base d’aérosol qui renferment des
Lubrification de la bande
les étapes précédentes au besoin.
5. Observez le roulement de la bande pendant 30 secondes. Répétez
montre. (FIG. D)
vis Allen de 6mm à ¼ de tour dans le sens des aiguilles d’une
4. Si la bande bascule vers la droite, ajustez-la vers la droite avec une
montre. (FIG. C)
vis Allen de 6 mm à ¼ de tour dans le sens des aiguilles d’une
3. Si la bande bascule à gauche, ajustez-la vers la gauche l’aide d’une
quelle direction la bande bascule.
2. Restez sur l’extrémité arrière du tapis roulant afin de voir dans
à 5 km/h (3 MPH).
bande d’entraînement, augmentez ensuite la vitesse du tapis roulant
1. Appuyez sur “START (DÉMARRAGE)” afin de mettre en marche la
ENTRETIEN
sont nécessaires lorsque la bande a basculé au centre.
centre. Des réglages mineurs des deux vis au dos du tapis roulant
non nivelée sont deux facteurs pouvant faire basculer la bande au
temps sur votre tapis roulant. Le type de course et une surface
Assurez-vous que la bande d’entraînement est centrée en tout
Réglage de la bande d’entraînement
Page 20

11
Programme de vitesse (MPH) Programme d’inclinaison
Programme de vitesse (km/h) Programme d’Inclinaison
Le temps d’entraînement prédéfini est de trente (30) minutes.
Chaque programme est subdivisé en dix (10) segments et comporte trois (3) niveaux distincts.
PROGRAMME PRÉRÉGLÉS
Page 21

10
Programme de vitesse (MPH)
Programme de vitesse (km/h)
Le temps d’entraînement prédéfini est de trente (30) minutes.
Chaque programme est subdivisé en dix (10) segments et comporte trois (3) niveaux distincts.
PROGRAMMES PRÉRÉGLÉS
Page 22

>
”afin de sélectionner la durée de
” afin de définir la fréquence
>
” ou “
>
>
”afin de définir la vitesse maximale cible.
>
” ou “
” ou “
>
” afin de définir l’âge de l’utilisateur.
>
>
” ou “
” afin de sélectionner le programme P5.
>
>
” ou “
9
la durée de chaque segment sera d’une (1) minute..
Par exemple : Si la durée totale d’exercice est définie à (10) minutes,
Chaque durée totale d’exercice sera segmentée en (10) sections. Temps de segmentation = durée totale d’exercice/10.
3. Les images graphiques des profils d’exercice sont affichées sur la console.
2. Lorsque vous retirez la “clé de sécurité” en toute circonstance, le moteur s’arrêtera et la console sera réinitialisée.
seront émis et le moteur s’arrêtera par la suite.
1. Lorsque le temps affiché indique 99:59 ou 00:00, une série de bips sonores durant au maximum (5) secondes
REMARQUE :
réinitialiser le programme que vous avez choisi ainsi que le niveau et la durée de l’exercice.
enfoncée quelques secondes jusqu’à ce que la fenêtre du programme affiche “0:00”. Répétez les étapes susmentionnées afin de
Vous pouvez réinitialiser votre séance d’exercice ainsi que la durée en maintenant quelques secondes la touche “ STOP (ARRÊT)”
Touche Réinitialiser :
Pour reprendre votre entraînement, appuyez simplement sur la touche “START (DÉMARRAGE)”.
Vous pouvez en tout temps faire une pause durant la séance d’exercice en appuyant une fois sur la touche “STOP (ARRÊT)”.
Touche Pause :
l’exercice du programme. Appuyez ensuite sur la touche “START (DÉMARRAGE)”.
5.Sélection de la durée du programme : Appuyez sur les touches fléchées de vitesse “
la fréquence cardiaque cible.
La vitesse ne sera pas supérieure à la vitesse maximale même si la fréquence (cardiaque) n’a pas encore atteint
4.Choix de la vitesse max. cible : Appuyez sur les touches fléchées de vitesse “
vitesse afin de maintenir la fréquence cardiaque cible (60 – 180 bpm).
cardiaque cible. Appuyez ensuite sur la touche “MODE”. Après un temps de réchauffement, le programme réglera automatiquement la
3.Sélection de la fréquence cardiaque cible : Appuyez sur les touches fléchées de vitesse “
Appuyez ensuite sur la touche “MODE”.
2.Choix de l’âge : Appuyez sur les touches fléchées de vitesse “
Appuyez ensuite sur la touche “MODE”.
1.Sélection du programme: Appuyez sur les touches fléchées de vitesse “
Sélection du programme HRC :
>
>
” ou “
” Tous les programmes
>
>
” ou “
” afin de choisir le niveau d’exercice souhaité.
>
>
” ou “
” afin sélectionner les programmes P1 – P5.
“ START (DÉMARRAGE) ” afin de débuter votre séance d’entraînement.
sont définis par défaut à trente (30) minutes si aucune modification n’est effectuée. Une fois l’opération complétée, appuyez sur la touche
3.Sélection de la durée : Sélectionnez la durée de votre séance d’exercice en appuyant sur les flèches “
Appuyez ensuite sur la touche “MODE”.
2.Choix du niveau : Appuyez sur les touches “
Appuyez ensuite sur la touche “MODE”.
1.Sélection du programme : Appuyez sur les touches “
Sélection du programme de vitesse ou d’inclinaison (P1 – P4) :
P1 – P2 = programmes de vitesse P3 – P4 =programmes d’inclinaison. P5 =programmes HRC
le moniteur affichera 0:00 sur toutes les fenêtres ACL distinctes
Après avoir appuyé sur le bouton de mise en marche et inséré la “clé de sécurité”,
Fonctionnement du programme :
Appuyez sur la touche “START (DÉMARRAGE)” pour débuter “en mode manuel”.
de sécurité est insérée sur la console, la fenêtre du moniteur affichera un message clignotant “0:00”
Lorsque l’interrupteur principal d’alimentation est en position “MARCHE (ON)” et que la “clé
Démarrage rapide :
possible de modifier en tout temps la vitesse manuellement
préréglés, le tapis roulant modifie automatiquement sa vitesse. Il est toutefois
l’utilisateur peut sélectionner. Lorsqu’on court conformément aux programmes
(P1 – P5). Chaque programme préréglé comporte trois (3) niveaux distincts que
Le tapis roulant est doté d’un (1) manuel et de (5) programmes préréglés
console. Restez sur les traverses latérales
“MARCHE (ON)” et que la ”clé de sécurité” est fixée sur votre vêtement et sur la
d’alimentation est branché, que l’interrupteur d’alimentation est en position
Afin de mettre en marche le tapis roulant, assurez-vous que le cordon
Introduction :
CONSOLE OPERATION
Page 23

8
WARNING
reach of children.
not in use and store out of
Remove the safety key when
portée des enfants.
utilisé et de stocker hors de
sécurité lorsqu'il n'est pas
Suppression de la clé de
AVERTISSEMENT
5. Press start to begin workout.
4. Select time using arrows, press mode.
3. Choose level using arrows, press mode.
2. Select program using arrows, press mode.
1. Insert safety key
5. Appuyez sur Start pour commencer l'entraînement.
touche « mode »
INSTRUCTIONS
Read owner’s manual before using.
side rails before starting treadmill.
To avoid risk of injury, stand on the
propriétaire avant de. l'utiliser.
4. Sélectionnez le temps à l’aide des flèches et appuyez sur la
3. Choisissez le niveau et appuyez sur la touche «mode ».
la touche « mode ».
2. Sélectionnez le programme à l'aide des flèches et appuyez sur
1. Insérez la clé de sécurité
de tapis roulant. Lire le manuel du
debout sur le côté des rails avant
Pour éviter tout risque de blessure,
CAUTION
PRUDENCE
Vitesse : 88.8
Tour (s) / Fréquence : 888
Cal.: 8888
Distance : 888.8
Durée : 88:88
Données :
de (5) fenêtres distinctes pour l’affichage des données.
Affichage : La console est UN écran ACL doté
en une fenêtre de données durant votre exercice.
L’af fichage T OUR (S) ou FRÉQUENCE CARDIAQUE sera permutée
Touche de validation des choix de programmes et de niveaux.
MODE :
pour diminuer l’inclinaison par incréments d’un (1)
« initialisation » avant le début de l’exercice. Utilisez cette touche
Touche de sélection du programme et du niveau en mode
TOUCHES D’INCLINAISON (VERS LE BAS) :
pour accroître l’inclinaison par incréments d’un (1)
« initialisation » avant le début de l’exercice. Utilisez cette touche
Touche de sélection du programme et du niveau en mode
TOUCHES D’INCLINAISON (VERS LE HAUT) :
pour décélérer la vitesse en incréments de 0.1 km/h ou 0.1 MPH.
« initialisation » avant le début de l’exercice. Utilisez cette touche
Touche de sélection du programme et du niveau en mode
TOUCHE DE DÉCÉLÉRATION (VITESSE) :
pour accélérer la vitesse en incréments de 0.1 km/h ou 0.1 MPH.
« initialisation » avant le début de l’exercice. Utilisez cette touche
Touche de sélection du programme et du niveau en mode
TOUCHE D’ACCÉLÉRATION (VITESSE) :
Bouton d’ “ARRET” d’urgence pour (CLÉ DE SÉCURITÉ) aussi fourni.
Touche de “DÉMARRAGE” ou d’“ARRÊT” du tapis roulant.
DÉMARRAGE / ARRËT :
Description des touches Affichage
FONCTIONNEMENT DE LA CONSLOE
Page 24
7
la durée de chaque segment sera d’une (1) minute.
Par exemple : Si la durée totale d’exercice est définie à (10) minutes,
d’exercice sera segmentée en (10) sections. Temps de segmentation = durée totale d’exercice /10.
3. Les images graphiques des profils d’exercice sont affichées sur la console. Chaque durée totale
réinitialisée.
2. Lors du retrait de la “clé de sécurité” en toute circonstance, le moteur s’arrêtera et la console sera
secondes seront émis et le moteur s’arrêtera par la suite.
1. Lorsque le temps affiché indique 99:59 ou 00:00, une série de bips sonores durant au maximum (5)
REMARQUE :
susmentionnées afin de réinitialiser le programme que vous avez choisi ainsi que le niveau et la durée de l’exercice.
enfoncée pendant quelques secondes jusqu’à ce que la fenêtre du programme affiche “0:00”. Répétez les étapes
Vous pouvez réinitialiser votre séance d’entraînement ainsi que la durée en maintenant la touche “STOP (ARRÊT)”
Touche Réinitialiser :
STOP (ARRÊT)”. Pour reprendre votre entraînement, appuyez simplement sur la touche “ START (DÉMARRAGE)”.
Vous pouvez en tout temps faire une pause durant la séance d’entraînement en appuyant une fois sur la touche “
Touche Pause :
>
” ou
>
>
” ou “
” afin de sélectionner les
l’opération complétée, appuyez sur la touche “START (DÉMARRAGE)” afin de débuter votre séance d’entraînement.
“
”. Tous les programmes sont définis par défaut à (30) minutes si aucune modification n’est effectuée. Une fois
>
3. Sélection de la durée : Sélectionnez la durée de votre exercice en appuyant sur les flèches de défilement “
sur la touche “MODE”.
>
>
” ou “
” afin de définir le niveau d’exercice souhaité. Appuyez ensuite
2. Choix du niveau : Appuyez sur les fleches “
programmes P1 ~ P5. Appuyez ensuite sur la touche “MODE”.
1. Sélection des programmes : Appuyez sur les flèches de défilement “
les fenêtres ACL distinctes.
Après avoir appuyé sur le bouton de mise en marche et insérer la “clé de sécurité”, le moniteur affichera 0:00 sur toutes
Fonctionnement du programme :
(DÉMARRAGE)” pour débuter “en mode manuel”.
la console, la fenêtre du moniteur affichera un message clignotant “0:00” Appuyez sur la touche “START
Lorsque l’interrupteur principal d’alimentation est en position “MARCHE (ON)” et que la “clé de sécurité est insérée sur
Démarrage rapide :
manuellement.
vitesse. Il est toutefois possible de modifier en tout temps la vitesse
aux programmes préréglés, le tapis roulant modifie automatiquement sa
distincts que l’utilisateur peut sélectionner. Lorsqu’on court conformément
(P1 – P5). Chaque programme préréglé comporte trois (3) niveaux
Le tapis roulant est doté d’un (1) manuel et de (5) programmes préréglés
Placez-vous sur les traverses latérales.
sur la console. Ne restez pour l’instant pas sur la bande d’entraînement.
“MARCHE (ON)” et que la ”clé de sécurité” est fixée sur votre vêtement et
d’alimentation est branché, que l’interrupteur d’alimentation est en position
Afin de mettre en marche le tapis roulant, assurez-vous que le cordon
Introduction :
FONCTIONNEMENT DE LA CONSOLE
Page 25

6
WARNING
reach of children.
not in use and store out of
Remove the safety key when
portée des enfants.
utilisé et de stocker hors de
sécurité lorsqu'il n'est pas
Suppression de la clé de
AVERTISSEMENT
5. Press start to begin workout.
4. Select time using arrows, press mode.
3. Choose level using arrows, press mode.
2. Select program using arrows, press mode.
1. Insert safety key
5. Appuyez sur Start pour commencer l'entraînement.
touche « mode »
INSTRUCTIONS
Read owner’s manual before using.
side rails before starting treadmill.
To avoid risk of injury, stand on the
propriétaire avant de. l'utiliser.
4. Sélectionnez le temps à l’aide des flèches et appuyez sur la
3. Choisissez le niveau et appuyez sur la touche «mode ».
la touche « mode ».
2. Sélectionnez le programme à l'aide des flèches et appuyez sur
1. Insérez la clé de sécurité
de tapis roulant. Lire le manuel du
debout sur le côté des rails avant
Pour éviter tout risque de blessure,
CAUTION
PRUDENCE
permutée en une fenêtre de données durant votre exercice.
L’affichage TOUR (S) ou FRÉQUENCE CARDIAQUE sera
Touche de validation des choix de programmes et de niveaux.
MODE :
de 0.1 km/h ou 0.1 MPH.
Utilisez cette touche pour décélérer la vitesse en incréments
« initialisation » avant le début de l’exercice.
Touche de sélection du programme et du niveau en mode
TOUCHE FlÉCHÉE DE DÉCÉLÉRATION (VITESSE) :
Vitesse : 88.8
Tour (s) / Fréquence cardiaque : 888
Cal : 8888
Distance : 888.8
Durée : 88:88
Données :
des données.
doté de (5) fenêtres distinctes pour l’affichage
La console est UN écran ACL
Affichage :
de 0.1 km/h ou 0.1 MPH.
Utilisez cette touche pour accélérer la vitesse en incréments
« initialisation » avant le début de l’exercice.
Touche de sélection du programme et du niveau en mode
TOUCHE FlÉCHÉE D’ACCÉLÉRATION (VITESSE) :
Bouton d’ “ARRET” d’urgence pour (CLÉ DE SÉCURITÉ) aussi fourni.
Touche de “DÉMARRAGE” ou d’“ARRÊT” du tapis roulant.
DÉMARRAGE/ ÀRRÊT :
Description des touches Affichage
FONCTIONNEMENT DE LA CONSOLE
Page 26

FIG7
FIG4
FIG3
FIG5
5
14
Assurez-vous que les trous sont alignés et viser l’ensemble (#30).
compartiments (#31) et le porte-bouteille (#32) sur le jeu de poignées (#14).
2. Retirer les deux vis (#30) du jeu de poignées (#14); placer le support à
doucement une pression jusqu’à ce qu’il s’y fixe (Fig.7).
1. Placer le porte-bouteille (#32) sur le rack à compartiments (#31). Exercer
LS-5T/7T:
FIG6
30
32
30
14
pièce la soutenant (#32); fixez-le fermement à l’aide de vis (#30).
2. Retirer les vis (#30) du porte-bouteille et placer le porte-bouteille sur la
de la poignée (#34) (#35) sur les côtés des poignées (Fig. 6).
1. Retirer les vis (#31) de la poignée (#14); fixer les couvercles gauche et droit
LS-3T:
35
31
32
33
relâchant et en la basculant vers l’avant ou l’arrière. Une fois la
Remarque : Vous pouvez ajuster la position de la console en la
4. Fit console to console bracket and tighten the screws (#25).
supérieur à actionnement manuel (#20).
3. Raccorder le câble inférieur à actionnement manuel (#18) au câble
PCI supérieur (pour circuits imprimés) (#19).
2. Raccorder le câble PCI inférieur (pour circuits imprimés) (#17) au câble
1. Retirer les vis (#25) du dos de la console (Fig. 5).
30
31
34
31
Fixation de la console
3. Tighten the screws (#23) of the base frame (Fig 3).
qu’indiqué sur l’image (Fig. 4).
2. Fixer les poignées sur les barres de soutien à l’aide de 4 vis (#24) tel
dans le tube.
câbles PCI supérieurs (pour circuits imprimés) (#22) et insérer les câbles
Raccorder les câbles PCI inférieurs (pour circuits imprimés) (#21) aux
1. Réinstaller la poignée (#14) sur les barres de support (8 and 9).
Assemblage de la poignée
6. Replacer les vis (#23) mais ne pas les serrer tout de suite.
5. Soulever les barres de soutien gauche et droit (#8 & 9) en position verticale.
4. Retirer les vis (#23) de cadre de base gauche et droit (Fig. 3).
3. Abaisser attentivement la plate-forme.
de polystyrène (#3 & 4) qui s’y trouve en- dessous.
2. Retirer tout d’abord la console (#13), les poignées (#14); retirer ensuite la mousse
1. Soulever attentivement la plate-forme (voir Fig.2) à partir de l’extrémité arrière.(#7).
Assemblage en position verticale
FIG2FIG1
INSTRUCTIONS D’ASSEMBLAGE
Page 27
4
30
32. Porte-bouteille
31. Rack à ccompartiments
30. Vis décoratives pour poignées x 2
position de la console
29. Rondelles pour réglage de la
console
28. Vis pour réglage de la position de la
27. Crochet pour console
25. Vis pour console x 4
24. Vis pour poignées x 4
23. Vis pour cadre de base x 4
22. Câble PCI inférieur
21. Câble PCI-milieu
manuel
20. Câble inférieur à actionnement
19. Câble PCI- supérieur
manuel
18. Câble inférieur à actionnement
17. Câble PCI- milieu
16. Clé de sécurité
15. Bouton de verrouillage pour pliage
14. Jeu de poignées
13. Console
10. Cadre de base
9. Montant de soutien- droit
8. Montant de soutien- gauche
7. Base/ Plate-forme
Pièces
M5(1PCS) M6(1PCS)M8*70L(4PCS)
Vis contenus dans le sac en plastique : Outils :
M8*45L(4PCS) M4*10L(4PCS) M8*15L(2PCS) M8(2PCS) #8*15L(2PCS)
Vis déjà montés sur le tapis roulant :
Matériel
30
31
30
32
que le tapis roulant est entièrement assemblé, à l’exception des poignées et de la fenêtre d’affichage (voir figure1 - page 5)
être amenés à soulever légèrement la partie arrière du tapis roulant afin de mieux accéder aux pièces du dessous. Vous remarquerez
familiariser avec les accessoires. Assurez-vous d’avoir retiré toutes les pièces emballées en-dessous du tapis roulant. Vous pourriez
2. Avant de commencer l’assemblage, retirez toutes les pièces du carton, tous les sacs en plastique et posez-les sur le sol afin de vous
inférieur et de plier les côtés. Ceci vous épargnera de soulever le tapis roulant au-dessus des angles du carton.
1. Puisque votre tapis roulant est un appareil lourd, il est recommandé, une fois l’emballage retiré, de sectionner les angles du carton
réparation accrédité afin d’obtenir de l’aide.
Si vous y décelez des dommages ou remarquez qu’il y a des pièces manquantes, veuillez contacter votre détaillant ou un service de
Après avoir déballé votre appareil de conditionnement physique, examinez-le attentivement afin d’y déceler d’éventuels dommages.
INSTRUCTIONS D’ASSEMBLAGE
Page 28

30 31
Pièces
M5(1PCS) M6(1PCS)M8*70L(4PCS)
35. Couvercle décoratif droit pour poignées
poignées
34. Couvercle décoratif gauche pour
33. Porte-bouteille
32. Support pour bouteille d’eau
31. Vis décoratives pour poignées x 2
30. Vis pour bouteille d’eau x 2
la console
29. Rondelles pour réglage de la position de
console
28. Vis pour réglage de la position de la
27. Crochet pour console.
26. Bouton de réglage de la hauteur.
25. Vis pour console x 4
24. Vis pour poignées x 4
23. Vis pour cadre de base x 4
22. Câble PCI- supérieur
21. Câble PCI- milieu
20. Câble inférieur à actionnement manuel
19. Câble PCI- supérieur
18. Câble inférieur à actionnement manuel
17. Câble PCI- milieu
16. Clé de sécurité
15. Bouton de verrouillage pour pliage
14. Jeu de poignées
13. Console.
10. Cadre de base
9. Montant de soutien - droit
8. Montant de soutien - gauche
7. Bande/ Plate-forme
35
31
32
30
33
3
Vis contenus dans le sac en plastique : Outils :
M8*45L(4PCS) M4*10L(4PCS) M8*15L(2PCS) M8(2PCS) #8*15L(4PCS)
Vis déjà montés sur le tapis roulant :
Matériel
34
31
(voir figure1 - page 5)
remarquerez que le tapis roulant est entièrement assemblé, à l’exception des poignées et de la fenêtre d’affichage
pourriez être amenés à soulever légèrement la partie arrière du tapis roulant afin de mieux accéder aux pièces du dessous. Vous
vous familiariser avec les accessoires. Assurez-vous d’avoir retiré toutes les pièces emballées en-dessous du tapis roulant. Vous
2. Avant de commencer l’assemblage, retirez toutes les pièces du carton, tous les sacs en plastique et posez-les sur le sol afin de
inférieur et de plier les côtés. Ceci vous épargnera de soulever le tapis roulant au-dessus des angles du carton.
1. Puisque votre tapis roulant est un appareil lourd, il est recommandé, une fois l’emballage retiré, de sectionner les angles du carton
réparation accrédité afin d’obtenir de l’aide.
vous y décelez des dommages ou remarquez qu’il y a des pièces manquantes, veuillez contacter votre détaillant ou un service de
Après avoir déballé votre appareil de conditionnement physique, examinez-le attentivement afin d’y déceler d’éventuels dommages. Si
INSTRUCTIONS D’ASSEMBLAGE
Page 29

2
antes du tapis roulant.
contrôle, la bande d’entraînement ou tout autre pièces constitu
marques de transpiration sur les poignées, le panneau de
chiffon sec ou d’une serviette pour notamment essuyer es
5. Essuyer toutes les surfaces de votre tapis roulant à l’aide d’un
votre tapis roulant pendant une période de temps prolongée.
d’autant plus important surtout si vous n’envisagez pas utiliser
4. Débrancher le cordon électrique de la prise murale. Ceci est
voies d’accès.
3. Toujours placer et ranger le cordon électrique loin de toutes les
d’alimentation.
roulant qui est situé à droite de la plate-forme, près du cordon
2. Utiliser l’interrupteur général d’alimentation pour arrêter le tapis
1. Retirer la clé de sécurité de la console.
manière périodique et préventive.
vous n’effectuez pas cette maintenance requise de
REMARQUE : Votre garantie peut être annulée si
consigne pourrait causer des lésions sévères.
entretien ou inspections visuelles. Le non-respect de cette
Arrêtez et débranchez votre tapis roulant avant d’effectuer tout
WARNING
avant de descendre du tapis roulant.
3. Vérifier que la bande d’entraînement soit complètement arrêtée
normalement.
” Abaissez votre rythme jusqu’à ce que vous marchiez
“
>
2. Tenir les poignées et appuyer sur la touche fléchée de vitesse
physique.
normale avant de terminer votre séance de conditionnement
récupérer, ramener votre fréquence cardiaque à une fréquence
1. Vous accorder quelques minutes pour réduire votre vitesse,
d’entraînement, toujours…
À la fin de toute séance
de reprendre.
CESSEZ immédiatement l’exercice. Consultez un médecin avant
thoraciques ou éprouvez d’autres symptômes anormaux,
Si vous vous sentez étourdi, avez des nausées, des douleurs
A VERTISSEMENT
ment aucun débris tels que du gravier ou de petites pierres.
votre tapis roulant, assurez-vous que vos chaussures ne renferhaute traction. Afin d’éviter des lésions ou une usure inutile de
♦
Porter des chaussures de course ou de marche à semelles
pour effet d’arrêter votre tapis roulant.
sinon elle se détachera probablement de la console, ce qui aura
corde suspendue à la clé de sécurité à un bout de votre vêtement
♦
Ce tapis roulant est muni d’une clé de sécurité - Toujours fixer la
la vitesse.
roulant ou en descendez et lorsque vous modifiez l’inclinaison ou
d’ entraînement, toujours…
Av ant de terminer une séance
♦
Toujours utiliser la poignée lorsque vous montez sur le tapis
sur ou autour du tapis roulant lors de son utilisation.
chaussettes lâches ou des bijoux. Ne jamais poser des serviettes
tels que des pantalons d’entraînement flottants, des colliers, des
utilisez le tapis roulant. Ne jamais porter des vêtements lâches,
♦
Porter de vêtements confortables non restrictifs lorsque vous
de la courroie jusqu’à son arrêt total sont observés.
bande d’entraînement que lorsque un ralentissement de la vitesse
♦
À la fin de votre séance d’entraînement, ne descendre de la
pieds sur la traverse latérale.
♦
Lors de l’utilisation du tapis roulant, toujours maintenir les deux
Ramenez votre fréquence cardiaque à une fréquence normale.
votre entraînement jusqu’à ce que vous marchiez normalement.
d’entraînement souhaitée. Diminuez graduellement l’intensité de
votre entraînement jusqu’à ce que vous atteigniez la vitesse
en marchant à pas lents. Accentuez graduellement l’intensité de
débuter toute séance d’entraînement. Échauffez-vous doucement
♦
Toujours faire des exercices d’étirement musculaire avant de
l’utilisation de votre tapis roulant
Lire attentivement les directives suivantes avant
PRÉCAUTIONS D’UTILISATION
Page 30

1
MISE À LA TERRE
PRISE DE
À LA TERRE
FICHE DE MISE
Procédés de mise à la terre
correctement mise à la terre par un électricien qualifié.
Si celle-ci n’est pas adaptée à votre prise murale, faire poser une prise
de l’appareil. Ne pas altérer la fiche fournie avec le tapis roulant.
Adressez-vous à un électricien qualifié en cas de doute sur la mise à la terre
tapis roulant peut engendrer un risque de décharge électrique.
Un raccordement inapproprié du connecteur de mise électrique à la terre du
DANGER
Les pièces doivent être remplacées par un technicien accrédité.
contactez le service de soutien technique à la clientèle.
et la prise de courant murale. Si les câbles sont endommagés,
Ne jamais utiliser de rallonges électriques entre le tapis roulant
AVERTISSEMENT
conformément aux codes et règlements locaux.
à une prise murale appropriée, correctement installée et mise à la terre
conducteur et d’une fiche de mise à la terre. Le fiche doit être branchée
décharge électrique. Ce tapis roulant est muni d’un cordon doté d’un
de résistance moindre pour le courant électrique et réduit le risque de
défaillance du tapis roulant, le processus de mise à la terre assure un trajet
Ce produit doit être mis à la terre. En cas de dysfonctionnement ou de
INSTRUCTIONS DE MISE À LA TERRE
de décharge électrique, veuillez suivre ces consignes.
d’accident.
votre tapis roulant. Afin de réduire le risque de brûlures, d’incendie ou
ou des lésions à d’autres personnes. Ceci pourrait aussi endommager
Le non-respect de ces consignes peut causer des préjudices corporels
REMARQUE:
2000mm
4 PI MIN
DROIT
CÖTÉ
2 PI MIN
DESSUS
VUE DE
A VANT
VUE
GAUCHE
CÔTÉ
2 PI MIN
1000mm 1000mm
courant.
courant.
♦ Au moins à 1000 mm/2 pi de chaque côté du mur.
roulant sur une surface solide ou de niveau.
lors de son utilisation et qu’il soit suffisamment dégagé. Placez le tapis
♦ Assurez-vous qu’il n’y ait aucun encombrement autour du tapis roulant
suffisamment serrées et sécuritaires.
tous les pièces de fixation visibles sur le tapis roulant sont
d’entraînement est alignée et centrée sur la base du tapis roulant et si
♦ Chaque fois que vous utilisez le tapis roulant, vérifiez si la bande
ou les pieds sous le tapis roulant.
♦ Gardez vos mains loin des pièces mobiles. Ne jamais placer les mains
♦ Gardez le cordon électrique loin des surfaces chauffées.
l’utiliser.
d’utilisation maximale indiqué sur le tapis roulant avant de
♦ Poids d’utilisation maximale: Veuillez vous référer au poids
Afin de réduire le risque de choc électrique
de l’insérer. Gardez toujours sur vous la clé de sécurité en cas
♦ Toujours fixer la pince de la clé de sécurité sur votre vêtement avant
musculaire avant d’utiliser le tapis roulant.
♦ Afin d’éviter des blessures, toujours faire des exercices d’étirement
♦ Ne jamais insérer d’objets dans les ouvertures.
roulant sur des surfaces humides.
♦ Conservez-le dans un endroit sec. Ne pas faire fonctionner ce tapis
d’enfants, de personnes handicapées ou d’animaux.
♦ Restez vigilent lorsque le tapis roulant est utilisé par ou près
pas le cordon comme poignée.
♦ Ne tirez pas sur le cordon d’alimentation du tapis roulant ou n’utilisez
d’aérosol ou là où il y a eu usage d’oxygène.
♦ N’utilisez pas le tapis roulant en présence de produits à base
contact avec de l’eau.
correctement, s’il s’est renversé, a été endommagé ou s’il est entré en
endommagés. De même, ne pas l’utiliser s’il ne fonctionne pas
♦ N’utilisez jamais ce tapis roulant si la tête ou la prise sont
l’interrupteur général d’alimentation et débranchez-le de la prise de
lorsque celui-ci est branché. Déconnectez-le en éteignant
♦ Ne jamais laisser le tapis roulant fonctionner automatiquement
avant de le nettoyer, de l’assembler ou d’effectuer son entretien
♦ Débranchez toujours le tapis roulant de la prise de courant
♦ Ne pas utiliser ce tapis roulant à l’extérieur.
placer la clé de sécurité loin de la portée des enfants.
séance d’entraînement, retirez la clé de sécurité de la console. Toujours
♦ Si vous n’utilisez pas votre tapis roulant ou si vous avez terminé votre
♦ Cet appareil a été conçu aux fins d’utilisation à domicile.
à la terre.
♦ Raccordez uniquement cet appareil à une prise correctement mise
instructions de mise à la terre.
position arrêt, retirez ensuite la fiche de la prise de courant. Voir
♦ Afin de le débrancher, tournez toutes les commandes de contrôle en
♦ Ne pas utiliser d’attaches non recommandées par le fabricant.
ce manuel.
♦ Utiliser cet appareil uniquement aux fins prévues tel que décrit dans
toujours débrancher cet appareil de la prise électrique avant de le nettoyer.
DANGER
CONSIGNES DE SÉCURITÉ IMPORTANTES
Page 31
LS-3T LS-5T
LS-7T
Instructions de sécurité et
d’utilisation importantes
............1
Instructions d’assemblage
................3
Fonctionnement de la console
LS-3T / LS-5T ................................6
LS-7T..............................................8
Programmes préréglés
LS-3T / LS-5T ................................10
LS-7T..............................................11
Entretien .........................................12
Garantie..........................................14
Félicitations pour l’achat de votre nouveau tapis roulant motorisé. Afin que l’utilisation de votre nouveau
tapis roulant soit une expérience agréable et aisée, nous vous recommandons fortement de lire
attentivement ce manuel et d’y suivre les recommandations.
Table des matières
Page 32

 Loading...