

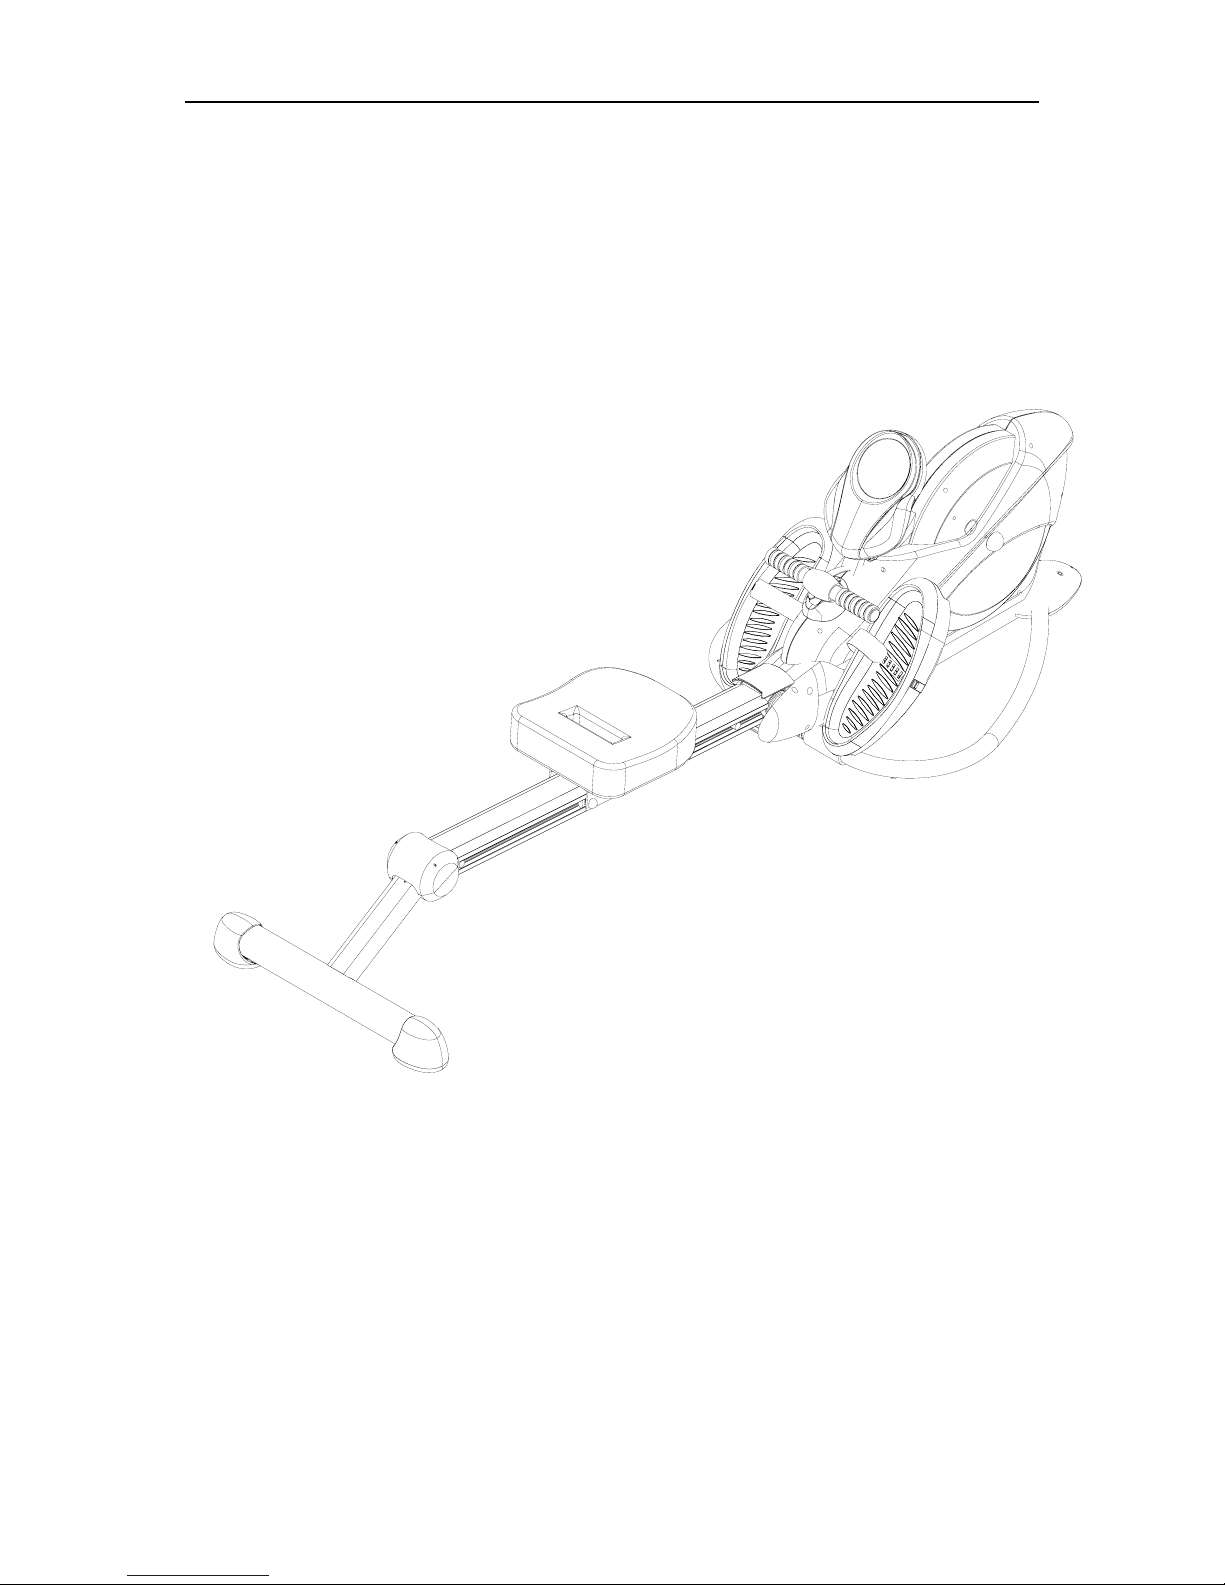
JS-6.6D Rowing Machine User’s Guide
www.lifespanfitness.com.au
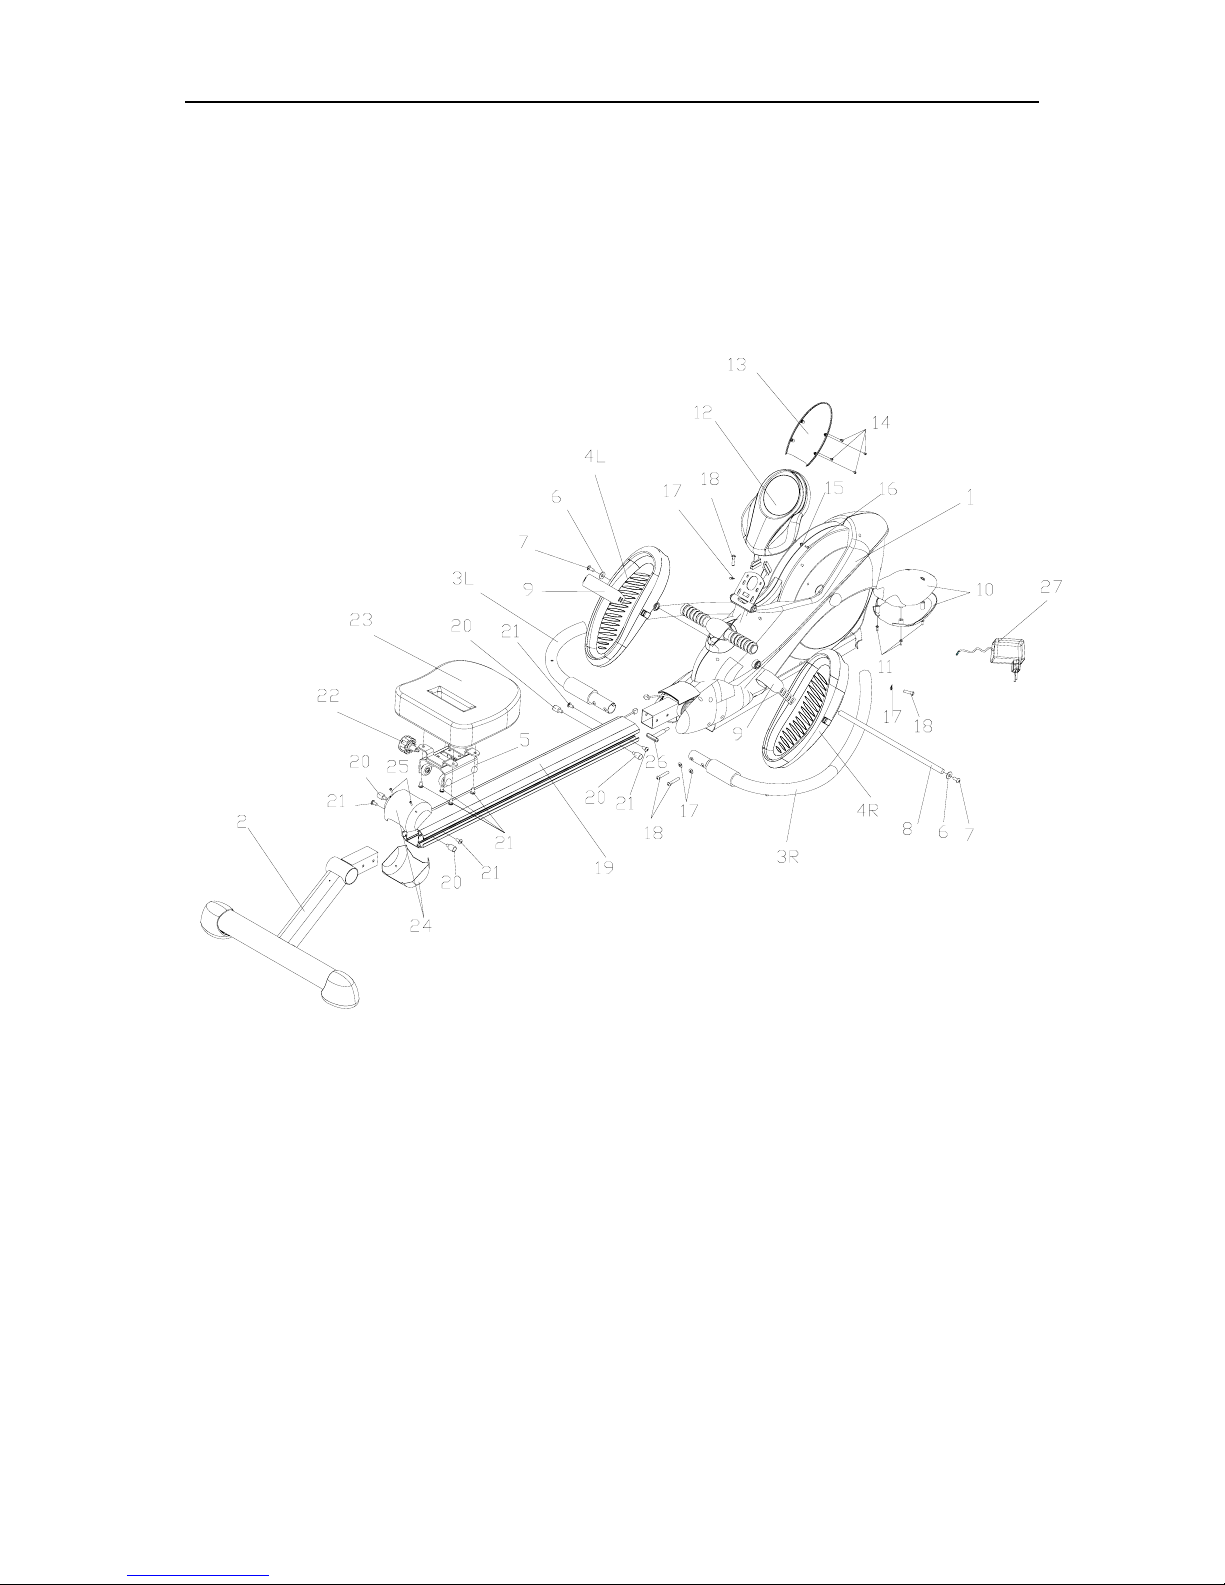

List of Components
SN. Name Qty Specification
1 Combination of Bicycle frame 1
2 Combination of rear bottom tube 1
3R Combination of front right bottom tube 1
3L Combination of front left bottom tube 1
4R Combination of right pedal 1
4L Combination of left pedal 1
5 Combination of seat frame 1
6 D- washer 2
7 Hexagonal recessed pan bolt 2 M8×20 , S6
8 Pedal shaft 1
9 Pedal guard strip 2
10 Front bottom tube guard shield 1 Pair
11 Cross recessed pan head tapping bolt 4 ST4.2×18 head Φ8
12 Electronic meter 1
13 Electronic meter guard shield 1
14 Cross recessed pan head bolt 4 ST4.2×10 head Φ8
15 Washer 2 D4
16 Cross recessed pan head bolt 2 M4
17 Cambered washer 4 ΦOutside20×Φ inner 8×t1.5×R19

18 Hexagonal recessed pan bolt 4 M8×50 tooth length 22 , S6
19 Aluminum alloy rail
20 Limit bolt 4 M8×14 φ18 Total height H=35
21 Hexagonal recessed pan bolt 4 M8×16 , S6
22 Elastic plug pin 1
23 Seat cover 1
24 Aluminum alloy guard shield 1 Pair
25 Cross recessed pan head tapping bolt 2 ST4.2×14 head φ7
26 T bolt 1
27 Transformer 1
Tool List:
Title Type Quantity
28
Hexagon ring spanner
S6
1
29
Cross-head multi-purpose
spanner
S=13.1 14.1 15.1 17 Ф5
1
2829

Directions for Use
Cautions:
This rowing machine has a maximum service area of greater than 2350X740X610mm, gross
weight of 41kgs and net weight of 36kgs. It is for one person at a time and any abnormal use may cause
damage to the user and machine.
Safety is the element to be taken into account in the sport. Before using, please inspect each
part for operation, and spend a little time in reading this User’s Guide.
This User’s Guide contains important matters such as installation and warm-up, and helps
you avoid injury and maximize the service effect of the exercise bike.
Before using, please check the list.
z
Before installation or sport, read this Guide.
z Please put the exercise bike on an even ground.
z
Make sure that the fasteners are tightened and each part is in normal condition.
z In exercise, please wear sport shoes or rubber shoes. Never seat yourself on the
Exercise bike bare footed.
z Before exercise, please conduct warm-up.
z When using the machine, please follow “Start Exercise” in the User’s Guide.
z Keep the exercise bike in a cool and dry place, which is beyond the reach of
children or pets.
Notice:
z Exercises should stop in event of any uncomfortable phenomenon of dizziness,
chest distress, and so on.
z Training volume should be decided in accordance with one’s own physical
performance.
z When using the Exercise bike, please observe the human biomechanics principle,
and excessive sport may cause damage to your health.
z This exercise bike is only applicable for households.
z Special care must be given to components, in which the foam and foot cover are
wearing parts.
z Regularly inspect the entire performance and each part of the exercise bike to
ensure the safety of product.
z In case parts are damaged, stop using and repair them properly.
The exercise bike does not serve as a toy:
Parents and other guardians of children should bear the responsibility to take care of
children.

Installation Directions:
Step 1: With the hexagonal recessed pan bolt (18) and arc gasket (17), attach the
front bottom tubes (3L) and (3R) to the frame combination (1), with the
result as shown in the top right drawing.
Step 2: With the cross recessed pan head tapping
bolt (11), attach the bottom tube guard
shield (10) to the frame combination (1),
with the result as shown in the bottom
right drawing.

Step 3: With the hexagonal recessed pan bolt (7), D washer (6) and pedal shaft (8),
connect the left pedal combination (4L) and right pedal combination (4R) to
the frame combination (1), and then mount the pedal guard strips (9) to the
left pedal combination (4L) and right pedal combination (4R), with the
result as shown in the top right drawing.

Step 4: first connect the sensor joint (A) of the frame combination (1) to the sensor
joint (B) of the aluminum rail (19); insert the aluminum rail (19) in the frame
combination (1); then lock the hexagonal recessed pan bolt (21) and limit bolt (20);
and finally lock the T bolt (26), with the result as shown in the top left drawing.
Step 5: With the Hexagonal recessed pan bolt
(21), connect seat cover (23) and seat
frame combination (5), with the result
as shown in the bottom right drawing.
Step 6: Insert the seat frame combination (5) installed in Step (5) to the
aluminum alloy rail (19), and then lock the elastic plug pin (22), with the
result as shown in the top left drawing.

Cautions:
User’s Guide and assembly tools for the use in adjustment or repair of
2. lete installation, carry out a thorough inspection of connections to ensure
3. ire machine is unsteady due to the uneven ground or any other reason, please
1. Keep the
reference.
After comp
safety.
If the ent
adjust the regulating screw on the rear bottom tube until the entire machine is stable.
Step 7: first insert the combination of rear
bottom tube (2) in the aluminum rail (19);
then lock the hexagonal recessed pan bolt
(21) and limit bolt (20); and finally using the
cross recessed pan head tapping bolt (25),
lock the aluminum alloy guard shield (24) to
the combination of rear bottom tube (2),
with the result as shown in the bottom left
drawing.
Step 8: first connect the joint (A) of the
electronic display (12) to the joint (B) of
frame combination (1); using the cross
recessed pan head bolt (16) and plain
cushion (15), lock the electronic display
(12) to the frame combination (1);
finally, using the cross recessed pan
head tapping bolt (14), lock the
electronic meter guard shield (13) to the
electronic display (12), with the result
as shown in the top right drawing.

Warm-up
Warm-up is a necessary item before s ur heart to experience a gradually
ll tricks for warm-up:
z breathes with the nose but not mouth.
kward respectively. Such
z upward and downward
z warm-up.
Exercising on 6.6D Rowing Machine
Resistance Control:
The resi ng machine is unrelated to speed, whose load is adjusted
: suitable for juniors and new users
z your hands on the handle.
and pull
z Level 2 and
z in on the rowing machine.
n enter
r seniors
z Sit on the rowing machine, putting your hands on the grip.
g machine by degrees to reach the maximum.
port. It enables yo
increasing load and circulating system to go through a gradually quickening process. The
temperature of your muscles is made by warm-up to increase, which can increase your
muscular elasticity and reduce the fatalness of injury. Therefore, never use the rowing
machine without warm-up.
Following are some sma
Slowly move about your body, take three times of deep
z At the beginning, slowly walk forward while stretching arms.
z Do some head-shaking motion, 5 minutes forward and bac
motion should not be so intense so as to avoid injury of neck.
Do some simple twisting motion of shoulders, 5 times
respectively, and then forward and backward respectively.
Finally, take another three times of deep breathes to end the
stance system in 6.6D rowi
through the electronic display. For the sport, start with little action, and then increase
resistance by degrees.
One-level training
Seat yourself on the rowing machine and put
z Via the electronic display, adjust the magnetic control to the lightest,
back slowly in the whole process; let it slide down automatically.
It is important to pay attention to your gesture. Before reaching
grasping the handle, pose properly.
Note to complete the whole course of 20-30 m
z Once this step is finished and you feel that you are familiar with it, you ca
into two-level training then.
Two-level training: suitable fo
z Increase the speed little by little.
z Enhance the resistance of the rowin

PROGRAMMABLE COMPUTER
MJ-04
USING THE COMPUTER
The programmable rowing machine is equipped with a programmable computer to help you reach
your fitness goals. The computer provides different programs designed to meet your exercise
requirements. In addition, the computer has a wide variety of modes that enable you to monitor
your performance as you exercise.
The computer is powered from the mains supply via
a mains adapter.
MAINS ADAPTER
Plug the Mains Adapter into the DC IN jack at the
back of the programmable rowing machine. Connect
the 3 pin plug to the mains socket and switch on .
If held, the LOAD and LOAD
buttons will switch between the
MANUAL(M) and PROGRAM (P)modes
automatically.
SWITCHING ON
Switch on the mains supply.The computer will emit
a BEEP and reset itself
SWITHCING OFF
If the computer is not used for several minutes,it
switches off automatically. Press any button to
switch the computer back on again.
To switch the computer off ,switch off and unplug
the adaptor from the mains supply.
TRAINING WITH NO PRESET
FUNCTION
Press the MODE button for more than 2 seconds to clear the previous program.
The lower display will show `M` and ` ` will indicate at `M` position
NOTE
STOP
SCAN TMR
P1
LOWER DISPLAY
M P
LEVEL
CPM
SCAN

The lower display will show '1'and the corresponding resistance row pattern will be displayed.
Whilst you are training you can change the resistance level using the LOAD / LOAD
buttons.
When you start training ,the main screen will be set to SCAN mode.To select a particular
function use the MODE button.The lower display will show LEVEL and CPM in cycle.
During traning, the upper display will show ` STOP` if receiving no signal in 5 seconds.
To start a new training program, press the MODE button for more than 2 seconds to clear the
previous program.
TRAINING WITH MANUAL PRESET FUNCTION
Press the MODE button for more than 2 seconds to clear the previous program.
The lower display will show `M` and icon` ` indicate at M position. Press the LOAD /LOAD
buttons to select `M` and then press the ENTER button to confirm the selection.
The lower display will show '1'and the corresponding resistance row pattern will be displayed.
Press the LOAD button to increase the resistance level and press the ENTER button to
confirm . The resistance levels go from 1(lowest) to 8 (highest).
Press MODE to show TMR in the upper display. Press the SET /SET buttons to set the
target time and press the MODE button to enter. Yon can set the COUNTS(CNT),Calories
(CAL), as required, in the same way. Press the MODE button to move to the next function.
To start training, the preset functions, will either count down from the preset(time) or up from
zero (counts and calories).
During training, pressing the LOAD / LOAD buttons will change the resistance level.
During training, the upper display will show STOP if receiving no signal in 5 seconds.
During training, when a preset target is reached, the computer will beep and begins to count up
when reach to zero. The non preset functions will show the accumulated data for the session.
TRAINING WITH PROGRAM FUNCTION
Press the MODE button for more than 2 seconds to clear the previous program.
The lower display will shwo `M` and the icon will indicate at M positon.Press the LOAD
/ LOAD button to select `P` and icon will indicate at `P` positon.Press the ENTER
button to confirm.
P2

The lower display will show P1 and the corresponding resistance row pattern will be displayed.
Press the LOAD /LOAD buttons to select a program profile between P1 and P6.
Press the ENTER button to confirm.
Press the LOAD /LOAD buttons will change the resistance level.
Press the MODE button to show TMR in the upper display.Press the SET /SET buttons to
set the target time and press the MODE button to enter.You can set the Counts,Calories , as
repuired,in the same way. Press the MODE button to move to the next function.
To start training, the preset functions will either count down from the preset(time) or up from
zero (counts and calories).
During training, pressing the LOAD /LOAD buttons will change the resistance level.
During training,the upper display will show `STOP` if receiving no signal in 5 seconds.
During training, when a preset target is reached, the computer will beep and begins to count up
from zero. The non preset function will show the accumulated data for the session.
To clear the program ,press the ENTER button for more than 2 seconds and you will return to
the initial screen with `M` showing.
SELECTING MODES
The computer's mode function enables you to monitor you performance as you exercise and input
values for specific exercise parameters.
P1 P2 P 3
P4 P5 P 6
P3

During training, the lower display will display LEVEL and COUNT / MINUTE in cycle
each 4 seconds.
When stop, icon will indicate LEVEL position.
Press the MODE button to display the following modes. The mode name will show on the
display to indicate that it is the selected mode.
If not already selected,press the MODE button until SCAN appears on the display,to scan
the modes automatically as you exercise.
COUNT / MINUTE (CPM)
CPM mode in lower display show the rowing speed in strokes per minute.It will only be
shown at lower display.
TIME(TMR)
Time mode displays the elapsed work-out time in minutes and seconds.The computer
automatically counts up from 0:00 to 99:00 in one second intervals.Yon can set the time to
count down from a preset value to zero. Refer to 'Training with program function' for how
to enter preset time.
COUNT(CNT)
COUNT mode displays the cumulative rowing strokes during each work-out .You can set
the count to count down from preset value to zero . Refer to 'Training with program function
for how to enter preset count.
CALORIES(CAL)
Calories mode displays the estimated number of calories burned at any given time during
your work-out.The computer counts up in increments of 1. After the computer reaches 9999,
it resets to zero and starts counting up again.
You can set the calories to count down from preset value to zero. Refer to 'Training with
program function 'for how to enter preset calories.
TOTAL COUNT(TOTAL CNT)
TOTAL COUNT mode displays the cumulative rowing strokes during all work-outs. The
data can be recorded if turned off automatically.Only when cut off the power, it will reset
to zero.
EXPLAINING RPOGRAM PROFILES
The program profiles illustrate how the work resistance changes during the program.
The more black blocks the higher for work resistance.
If you have a preset count target or no target set ,each column of the program profile lasts
for 8 counts(rowing strokes).
P4
 Loading...