

Page 1

Owner’s Manual
E2i / E3i Elliptical Cross Trainers
Page 2

Welcome
Congratulations on Purchasing Your LifeSpan Elliptical!
At LifeSpan we take pride in the quality, safety, and reliability of our products
as well as the professionalism of our sales support and customer service teams.
Making it our number one priority that you have an exceptional experience using
our products.
In support of this quality focus we pre-assemble parts on the manufacturing line
whenever possible to reduce the number of steps and complexity of customer
assembly, independently certify our products to comply with the latest industry
Safety Standards, and use state of the art production processes and quality
components.
Then we back LifeSpan products with excellent warranties and a responsive
customer service department making it simple and easy to get assistance should
the need arise.
This attention to quality, our high standard for customer service and focus on
innovation has earned LifeSpan numerous awards and consistent praise from
independent review groups, industry authorities and you the consumer.
Thanks for choosing LifeSpan.
Neither LifeSpan nor its representatives can accept responsibility for any damages or injury incurred as a
Please thoroughly read this manual before you assemble or operate your elliptical.
result of information presented in this manual except under the terms of the product warranty.
3
Page 3

Welcome
Contents
Safety First
Safety First
About Your Elliptical
Specications
Unique Features
Console Overview
Heart Rate Monitoring
Programs
Warranty / Registration
Grounding
Assembling Your Elliptical
Exploded View & Hardware
Assembly Instructions
Console Basics
Readout Display
Operating Keyboard
Date / Time / Quickstart
Using Programs
Preset Programs
Custom User
Using Heart Rate Control Programs
7
10
22
36
40
Saving Your Results
LifeSpan Club
Bluetooth / USB Plus
Maintenance and Tips
Personal Settings
General Maintenance
Moving
Troubleshooting
46
48
5
Page 4

Safety First
When using exercise equipment, basic precautions should always be followed,
including:
• Never drop or insert any object into any opening. If an object falls into an
opening, turn the power o and unplug the power cord from the outlet.
Remove the object or call customer service at 877.654.3837 option 4.
• Never operate this elliptical if it has been damaged or partially
submersed in water.
• To reduce the risk of electric shock, unplug the elliptical from the wall
outlet when not in use, before performing any maintenance, or before
moving the elliptical.
• Do not use outdoors or in areas of high humidity or extreme temperature
changes.
• Do not operate where aerosol spray products are being used or where
oxygen is being administered.
• Never place the power cord under carpeting or place any object on top
of the cord, this may pinch or damage the cord causing re damage or
personal injury.
• Use this exercise product for its intended use as described in this Owner’s
Manual. Do not use attachments that are not recommended by LifeSpan.
• Keep hands away from all moving parts
• Keep your elliptical on a solid, level surface. Do not operate elliptical
on deeply padded, plush or shag carpeting. Damage to carpeting may
occur.
Children and Pets
• When in use children and pets should be kept at least 10 feet (3m) away.
• This elliptical can be used by children ages 12 years and above and
persons with reduced physical, sensory or lack of experience and
knowledge if they have been given supervision or instruction concerning
use of the appliance in a safe way and understand the hazards involved.
• Cleaning and user maintenance shall not be made by children without
supervision.
• Keep children away from the elliptical. There are many pinch points and
other caution areas that can cause harm and injury.
7
Page 5

Safety First
Safety Tips While in Use
• Always consult a physician before beginning an exercise program.
• If you experience chest pains, nausea, dizziness or shortness of
breath, stop exercising immediately and consult your physician before
continuing. Do not wear clothing or jewelry that might catch on any
part of the elliptical.
• Wear shoes with high traction rubber soles. Do not wear shoes with
heals, leather soles, cleats or spikes.
• Use caution while participating in other activities while using your
elliptical such as watching television or reading. These distractions may
cause you to lose balance which may result in injury.
• Heart Rate monitoring systems may be inaccurate. Various factors,
including the user’s movement may aect the accuracy of the heart
rate readings. The pulse sensors are intended only as exercise aids in
determining heart rate trend.
• Over exercising may result in serious injury or death. If you feel faint
stop exercising immediately.
Note: Read all instructions and save for future reference.
9
Page 6

About Your Elliptical
Specications
Mechanical and Drive System
Flywheel E2i - 29 lb (13 kg)
E3i - 34 lb (15 kg)
Resistance System Frictionless Magnetic Resistance
Resistance Levels 20
Incline Ramp Levels 20
Stride Length 20” ( 50.8 cm )
Roller Wheels E2i - Single Roller Wheel Per Pedal
E3i - Dual Roller Wheels Per Pedal
Transport 2 Front Wheels
Maximum User
Weight
Console Features
Readouts E2i/E3i: Time, Speed, Calories, Heart Rate, Watts,
E2i: 350 lb (159 kg)
E3i: 375 lb (170 kg)
Stride(step) Count, Ramp and Resistance Level,
Date and Clock, and Core Balance
E3i Only: Average Watts, Stride Count Per Minute
(CPM), Calorie Burn Rate Per Hour, Distance
Programs 2 Heart Rate, 2 User Setup and 17 preset programs
Display 6” Blue Backlit LCD (E2i)
7.5” Blue Backlit LCD (E3i)
Heart Rate Contact Heart Rate Sensors / Chest Strap
Compatible
Quickset™ 4 Buttons for Ramp and Resistance Control
Advanced Audio Audio-in Port and Dual Speakers
USB Plus Charges Mobile Devices and Saves Exercise Results
Accessory Support Water Bottle Holder
Tablet Holder / Reading Rack
10
Page 7

About Your Elliptical
Unique Features
As a leader in the tness industry, LifeSpan has developed a number of
unique features that make our products more engaging and easier to use.
You can learn more about how to use these features throughout this Owner’s
Manual.
Intelli-Key™
Console operation is simplied with sequential button illumination
prompting you through program selection and setup.
Core Balance
Load Sensors built into the pedals identify the amount of weight and
power coming from each leg to help you focus on equally balancing
your weight distribution and eort level applied to each leg.
Club Membership
Every elliptical comes with a full membership in the Club, LifeSpan’s
award-winning health and tness software. Keep track of all your
activity and information in one secure location.
USB Plus
Dual-purpose USB port charges most of your mobile devices* and saves
your exercise results for upload into your free Club account.
Bluetooth
Optional Bluetooth adapter allows for wireless data sync with the
LifeSpan Active Trac™ and Train & Trac™ apps to get the most out of
your workout and capture your exercise results.
* Does not charge iPad 1, iPad 2, and iPad 3.
11
Page 8

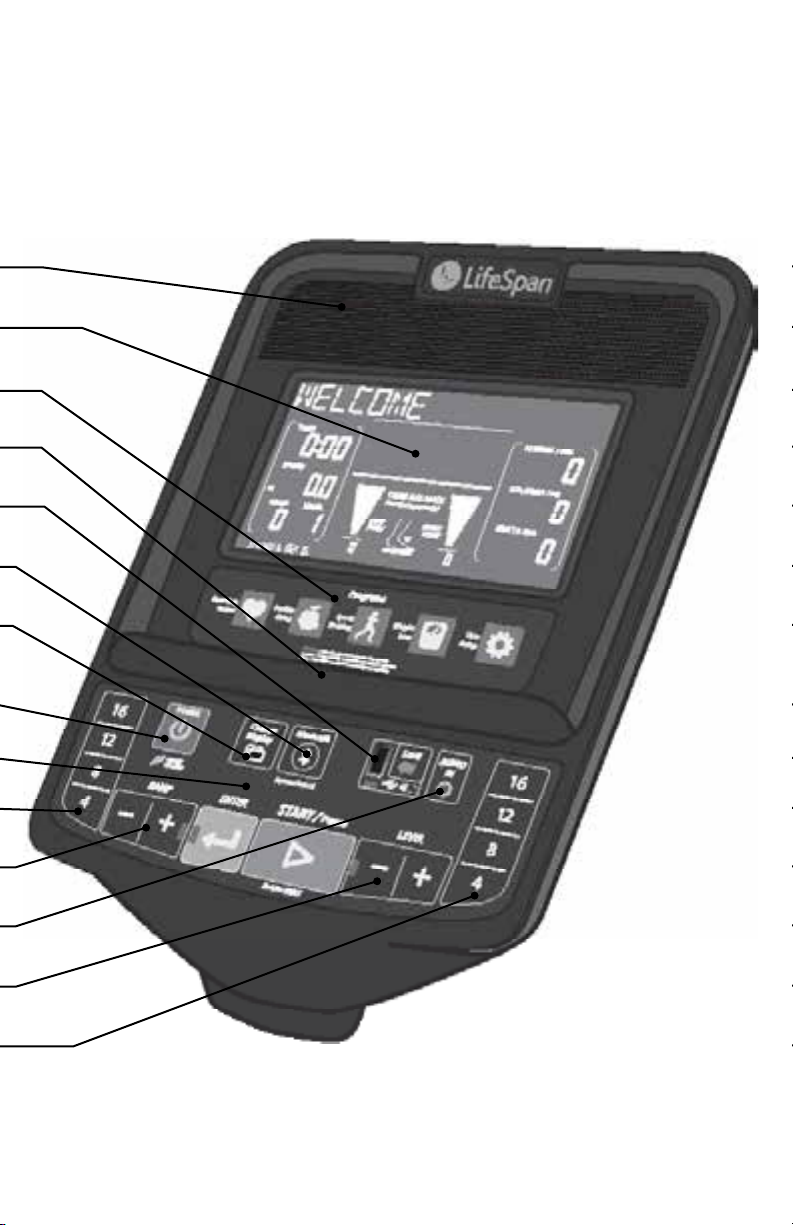
About Your Elliptical
Console Overview
Built-in Speakers
Readout Display
Preset Programs (E3i)
Media Holder
USB Plus
Bluetooth Pairing (optional feature)
Alternate Readouts (E3i)
12
Power Button
Operating Keyboard
Quickset™ Ramp Controls
Incline Ramp Level
Audio Input
Resistance Level
Quickset™ Resistance Controls
Page 9
About Your Elliptical
13
Page 10

About Your Elliptical
Heart Rate Monitoring
Seeing your heart rate
while exercising will
help you understand the
intensity of your exercise
and corresponding heart
rate training zone, and
predict health benets
found through repeated
bouts of exercise. Refer to
the information below to
understand your heart rate
training zones:
Zone 5 — Performance Redline Zone: 90% - 100% of your Max HR
The performance zone involves extreme eort, requiring the heart to beat
at or near maximum capacity. Training bouts include intense incline or
sprinting, beneting speed, power, and anaerobic performance competency.
Zone 4 — Threshold Zone: 80% - 90% of your Max HR
The threshold zone involves intense jogging or sub-maximal sprinting,
typically unsustainable for long periods of time. Benets include highlyelevated calorie burn, speed and power performance enhancement,
improved lactate removal capabilities, and enriched heart health.
Zone 3 — Aerobic Zone: 70% - 80% of your Max HR
The aerobic zone is ideal for cardiovascular training. Workouts in this zone
are more intense, involving moderate jogging. Long-term benets are
improved heart health and cardiovascular performance, reductions in blood
pressure and cholesterol, and increased calorie burn.
Zone 2 — Temperate Zone: 60% - 70% of your Max HR
The temperate zone consists of moderate-intensity exercise, typically as fast
walking to slow jogging. Speaking is more dicult and breathing is elevated.
Benets are similar to those of the healthy heart rate zone, though caloric
expenditure is higher.
Zone 1 — Healthy Heart Zone: 50% - 60% of your Max HR
The healthy heart zone involves safe, low-intensity activity, like mediumto-brisk walking. Full conversations can be held, despite a gentle increase
in respiration. Benets include reduced risk of heart and vascular disease,
moderated blood pressure and cholesterol, and improved insulin sensitivity.
14
Page 11

About Your Elliptical
Hand Pulse Sensors
To use, grasp the sensors with a comfortable
grip, with the palms of your hands placed
over the sensors. If the sensors are having
diculty picking up your heart rate, use aloe
or a moisturizer on your hands or further
warm up as you exercise to increase the
moisture in your hands. Dry hands do not
transfer your pulse as eectively as moist
hands.
Chest Strap
The E2i and E3i elliptical models have integrated heart rate receivers built
into the console. To purchase a heart rate chest strap go to
www.LifeSpanFitness.com.
The chest strap should be worn as shown.
When using a chest strap you may need to
warm up rst to increase the moisture in
your skin. If this doesn’t work use aloe or
another moisturizer where the sensors on
the chest strap are making contact with
your skin.
Note: The heart rate monitoring system will vary due to your age,
method of use, physiology and other factors. LifeSpan cannot
guarantee the accuracy of the heart rate readings.
15
Page 12

About Your Elliptical
Preset Programs
Preset programs automatically change the resistance or ramp level during a
workout according to a preset pattern called a prole. This provides a better
workout, since it uses a wider range of muscles and dierent intensities, a
well-known benet in the cross-training and interval-training world.
Each preset program can be set to change resistance level only, ramp level
only, or both. Each has a suggested duration, but this can be adjusted to
anywhere from 10 to 99 minutes. Two overall levels may be selected, which
raises or lowers the program prole.
Changing the ramp level changes which muscles are used. Adjust the ramp
level to your personal preferences, or to target dierent muscles.
Long Slow Distance
(40 minutes default)
This prole has small changes,
allowing for a more consistent style of eort, maximizing the duration of
your workout.
Short Interval
(20 minute default)
This has the widest variation of
resistance level and ramp level, and has the shortest default duration.
Moderate Interval
(30 minute default)
Smaller resistance and ramp
changes than Short Interval, but greater overall duration, resulting in a
longer workout.
Long Interval
(40 minute default)
The smallest resistance and ramp
alterations of any of the interval workouts, allowing a longer overall duration.
16
Page 13

About Your Elliptical
Negative Interval 1
(30 minute default)
A good choice for someone new to
interval training. Resistance and ramp levels decrease in the second half of
the workout.
Negative Interval 2
(30 minute default)
A slightly higher-intensity version
of Negative Interval 2.
Fartlek
(30 minute default)
A Fartlek is a Swedish workout that
inspires improved levels of tness
through unpredictable changes in programming. This prole purposefully
has no predictable pattern to its prole.
Uphill Climb
(30 minute default)
A gradual increase, then
corresponding decrease, of
resistance and ramp level.
Pyramid Climb
(30 minute default)
Similar to Uphill Climb but with
less frequent changes.
Plateau Climb
(40 minute default)
A higher-intensity version of Long
Slow Distance, with a steady level
of eort comprising the majority of the prole.
17
Page 14

About Your Elliptical
Ladder
(30 minute default)
A form of interval training with
longer, increasingly-intense
intervals. Each unique, altering level is designed to mimic a higher rung on a
ladder. This is the most dicult of the preset programs.
Uphill Interval
(20 minute default)
Similar to Short Interval, but with
more pronounced changes in
intensity.
Steady Pace
(40 minute default)
Similar to Long Slow Distance, but with a lower intensity, steady prole. This
is the easiest of the preset programs.
Long Slow Distance 2
(40 minute default)
Similar to Long Slow Distance, but
reaches maximum intensity more rapidly.
Cardio Run
(20 minute default)
A short, continuous workout with
consistently high intensity.
Short Interval 2
(20 minute default)
Similar to Short Interval, but with a
more rapid buildup to the initial interval.
18
Page 15

About Your Elliptical
Uphill Walk
(30 minute default)
Gradually increases intensity
throughout the entire workout.
Custom User Programs
There are two user programs that provide you with the ability to build
custom program proles for your specic workout requirements. In Custom
User Programs you set the workout time and then for each of the 20 program
segments you set the resistance level and ramp level. This program is
dierent than our preset programs in that both resistance level and ramp
level can be controlled simultaneously. As such, the program matrix display
readout will show both resistance level and ramp level at the same time with
the ramp on the left portion of the matrix and the resistance level on the
right portion of the matrix.
Heart Rate Control Programs
Constant Heart Rate
The Constant Heart Rate is a steady state program that lets you select a
single heart rate to maintain throughout your workout. The elliptical will
adjust the resistance level every 10 seconds during the workout to maintain
your heart rate close to the target you’ve selected.
Interval Heart Rate
The Interval Heart Rate is designed to help you increase aerobic endurance
and improve heart rate recovery. This program lets you select a LOW or
recovery target heart rate and a High target. After the 3 minute warm-up the
console will adjust the resistance level every 10 seconds to maintain your
LOW target for 2 minutes. Then the console will adjust the resistance level to
raise your heart rate to the high target selected and once again keep it at this
level for 2 minutes. The process will repeat until the end of the workout. It is
recommended that you set the workout time to 30 minutes or higher to use
this program eectively.
Note: Remember that the console needs to receive your heart
rate through the grip pulse or a heart rate chest strap during the
course of the workout.
19
Page 16

About Your Elliptical
Warranty
This LifeSpan elliptical comes with the following limited warranty valid in North
America and the United Kingdom. If you are outside of these areas contact your
local distributor for warranty information or visit www.LifeSpanFitness.com.
Warranty Item
Elliptical Frame
Parts
Labor
E2i
Lifetime
3 Years
1 Year
E3i
Lifetime
5 Years
2 Years
LifeSpan warrants that the equipment it manufactures is free from defects in
materials and workmanship under normal use and services. The periods above
are based on the date of purchase. During these periods, LifeSpan will repair
or replace any defective part. Free labor is included on all parts that are not
normally assembled or replaced by the customer within the labor period.
If within the time frames specied above, any part fails to operate properly,
login to our website at www.LifeSpanFitness.com, click on “Customer Service”
and complete the form to request assistance or call 877.654.3837 option 4 for a
Customer Service Agent (please note that certain kinds of service should only
be performed by a qualied service technician).
LifeSpan reserves the right to make changes and improvements to our products
without incurring any obligations to similarly alter any product purchased.
In order to insure our product warranty and to ensure the safe and ecient
operation of your LifeSpan product, only authorized parts can be used. The
warranty is void if any parts other than those provided by LifeSpan are used.
Exclusions and Limitations:
• This warranty does not apply to any defects caused by negligence, misuse,
improper assembly, or maintenance, accident, or “act of God.”
• This warranty does not apply to discoloration of paints or plastics.
• LifeSpan shall not be responsible for incidental or consequential damages.
• This warranty is non-transferable form the original owner.
Registration
Should you need to process a warranty claim make sure you retain your
purchase receipt to verify the date of purchase and register your LifeSpan
product online. To complete the registration go to www.LifeSpanFitness.com
and select “Product Registration”.
20
Page 17

About Your Elliptical
Proper Grounding
LifeSpan equipment must be grounded. Improper connection of the
equipment’s grounding conductor can result in the risk of electric shock.
Check with a qualied electrician or service person if you are in doubt as to
whether the outlet is properly grounded. Do not modify the plug provided
with the product or use a ground plug adapter to adapt to a non-grounded
outlet. If the plug will not t in the outlet, have the proper outlet installed by a
qualied electrician.
Power Cord Options
This elliptical should only be used with the proper power cord and power
outlet. Several power cord options (shown below) are available from LifeSpan.
We do our best do include the correct power cord with the elliptical for your
area. In the event that the correct power cord is not included in the packaging
please contact your local distributor.
Elliptical Outlet
Do not use extension cords between the elliptical and power outlet.
!
Do not plug into a GFI outlet or circuit as it may trip the breaker.
!
CORD SOCKET
SWITCHAC POWER
Power Cord Options
OVERLOAD
SWITCH
21
Page 18

Assembling Your Elliptical
Exploded View
Prior to starting the assembly process take all of the parts out of the box.
Remove plastic bags and lay them out on the oor to become familiar with
the components.
Since your elliptical is a heavy piece of equipment it is recommended you use
two people during assembly and follow these assembly instructions to reduce
any problems that could occur.
6
10 A
10 B
8
9
4
5
1
3
19
7
9
10 A
10 B
2
22
Page 19

Assembling Your Elliptical
Hardware Included
Item# Part Description Item# Part Description
1 Main Base 6 Console
2 Ramp Base 7 Right Arm Assembly
3 Base Connection Cover 8 Left Arm Assembly
4 Console Mast 9 Mid Arm Joint Covers
5 Base Top Cover
10A
Lower Arm Joint Covers
10B
Hardware Bag Contents
Item # Qty. Hardware
Description
N/A 2 13/17mm Wrench
N/A 1 6mm Allen Wrench
N/A 1 5mm Allen
Wrench w/Phillips
Screwdriver
N/A 1 4mm Allen Wrench
Item # Qty. Hardware
Description
11 2 M8 x 45L Bolt
12 2 M8 Nylock Nut
13 8 M8 Washer
14 2 M8 x 35L Bolt
15 6 M4 x 10L Screw
16 4 M8 x 20L Bolt
13/17mm
Wrench (x2)
M8 Nylock Nut
(x2)
6mm Allen
Wrench
M8 Washer
(x8)
5mm Allen
Wrench w/
Phillips
M8 x 35L
Pre-installed Hardware (not shown)
Item # Pre-Installed Hardware
17 M8 x 20L Bolt
18 M8 Washer
19 Console Mast Cover
20 M4 x 10L Screw
M8
Washer
M4x10L
Screw
M8x15L
Bolt
M5 x 10L
Bolt
4mm Allen
Wrench
(x2)
M4 x 10L Screw
(x6)
Item # Pre-Installed Hardware
21 M8 x 15L Bolt
22 M8 x 30L Bolt
23 M4 x 50L Screw
24 Wave Washer
25 M3.5 x 10L Screw
M8x30L
Bolt
M4x50L
Screw
M8 x 45L
(x2)
M8 x 20L Screw
(x4)
Wave
Washer
M3.5x10L
Screw
23
Page 20

Assembling Your Elliptical
Step 1: Unpacking Elliptical
A. Cut tape around the bottom edge of the box.
B. Lift top of box up and o.
A B
C. Remove all separate parts from outside styrofoam packaging material.
D. Remove parts in layers working your way down to Main Base (1).
24
D
C
Page 21

Assembling Your Elliptical
E. Cut the corners of the bottom box and remove all packaging.
F. Place Ramp Base (2) in position to Main Base (1).
2
F
E
1
Step 2: Hardware Loss Prevention Sheet
A. The Main Base (1) has the Hardware Loss Prevention Sheet draped around
the Console Mast Support. The purpose of this paper is to act as a shield
to prevent bolts, washers and screws from falling into the Main Base
during assembly. Do not remove until assembly is complete. The paper
tears o quite easily when done and can be thrown away.
A
Hardware Loss
Prevention Sheet
Do Not Remove Until
Assembly is Complete
25
Page 22

Assembling Your Elliptical
Step 3: Base Assembly
A. Slide the Ramp Base (2) into the Main Base (1) and bolt together using
two M8x35L Bolts (14), Washers (13) and two M8x45 bolts (11), Washers
(13), and Nylock Nuts (12). Help the bolt on the wire side of the frame go
easily through by pushing the wires partially back into the frame of the
Ramp Base (2) and using a 6mm Allen wrench to help push the cable
inside frame away from the hole. See illustration below.
M8 X 35L
Main Base
M8 Nylock
Nut
6mm Allen
Wrench
A
Ramp Base
Wiring
runs inside
this side of
frame
Use allen
wrench to
help push
wiring out
of way for
bolt
13/17mm
Wrench
M8 x 35L
(x2)
26
M8 X 45L
M8 x 45L
(x2)
M8 Nylock Nut
(x2)
M8 Washer
(x4)
Page 23

Assembling Your Elliptical
Step 3: Base Assembly (continued)
B. Connect ground wire, small
3-pin, and large 3 pin. Keep
wires in groove to avoid
damage. Tuck wires in
covered space
between rails.
C. Remove 2 pre-installed
screws then attach Base
Connection Cover (3) with
four M4x10L screws (15) and
Phillips head screwdriver.
M3.5x10L M4x10L
C
B
M3.5x10L Screw
(x2)
PRE-INSTALLED
M4 x 10L Screw
(x2)
5mm Allen
Wrench w/
Phillips
27
Page 24

Assembling Your Elliptical
Step 4: Attaching Console Mast
A. Remove the Console Mast Cover (18) rst, then slip the Base Top Cover
(5) onto the Console Mast (4) before installation.
A
28
Base
Top Cover
Console
Mast Cover
5mm Allen
Wrench w/
Phillips
M4 x 10L Screw
(x4)
PRE-INSTALLED
Page 25

Assembling Your Elliptical
Step 4:
Attaching Console
Mast (continued)
B. Slide Console
Mast (4) onto
support and
attach M8x20L
bolts (16) and
M8 washers (13)
with 6mm Allen
wrench.
B
Console
Mast
Support
View from behind
6mm Allen
C
Wrench
M8 x 20L
(x4)
C. Connect two 6-pin wire harnesses
at base of Console Mast (4).
M8 Washer
(x4)
29
Page 26

Assembling Your Elliptical
Step 5: Arm Attachment
A. Remove pre-installed M8x15L bolt, at washer and 2 wave washers
from handlebar post on Console Mast (4).
B. Attach Right Arm Assembly (8) to Console Mast (4). Once installed
use 13mm wrench to tighten M8x15 bolt.
C. Connect wire harness from Right Arm Assembly (8) handlebar to
Console Mast (4). Do not remove zip tie holding wire harness to
Right Arm Assembly (8)
A
Right Arm Assembly
Remove
pre-installed
bolt and
washers
Console Mast
M8 x 15L
PRE-INSTALLED
M8 Washer
PRE-INSTALLED
Wave Washer
(4)
PRE-INSTALLED
B
13/17mm
Wrench
D. Remove M4x10L screws from pre-assem-
bled Mid Arm Joint Cover (9). Place both
halves around arm assembly connection
to post. Keep wires on underside of pivot
post to prevent pinching them when
attaching cover. Re-attach with Phillips
head screwdriver.
E. Repeat steps A – D for left
arm assembly.
M4 x 10L Screw
(x2)
Wave Washers
C
View from behind
D
5mm Allen
Wrench w/
Phillips
30
PRE-INSTALLED
Page 27

Assembling Your Elliptical
F
G
Insert wire harness
connection into tube and
gently push past bolt hole
M8 x 30L
Wrench (x2)
PRE-INSTALLED
Step 5: Arm Attachment (continued)
F. Using both 13mm wrenches remove pre-installed bolt and nut.
Attach lower arm bracket to pedal arm bearing with bolt and nut.
G. Connect pedal arm wire harness to lower arm wire harness.
13/17mm
31
Page 28

Assembling Your Elliptical
H
5mm Allen
Wrench w/
Phillips
H. The Lower Arm Joint Cover (10) comes in two parts. Remove
M4 x 50L
PRE-INSTALLED
M4x50L screws from pre-assembled Lower Arm Joint Cover (10A). Place
both halves, shown above, around joint. Re-attach joint cover with
Phillips head screwdriver and 13mm wrench, making sure nut is seeded
in plastic recess. Make sure wires are not pinched and stay in open end in
front of cover.
5mm Allen
Wrench w/
Phillips
M4 x 50L
I
I. Remove M4x50L screws from pre-assembled Lower Arm Joint
Cover (10B). Place both halves Joint Cover (10B), as shown above, over
exposed wiring. This will overlap the front part of Joint Cover (10A) just
completed in step H. Make sure to keep wiring inside. Use the Phillips
head screwdriver, M4x50L screws and bolts to nish attaching.
J. Repeat steps F – I for other side.
32
PRE-INSTALLED
Page 29

Assembling Your Elliptical
Step 6: Console Attachment
A
A. Remove pre-installed
M5x10L bolts and M5
washers from the back
of Console (6) with 4mm
Allen Wrench.
4mm Allen
Wrench
B. Connect two 6-pin wire harnesses and
M5 x 10L
(x2)
PRE-INSTALLED
Remove pre-installed
bolts and washers
one 7-pin wire harness from mast to console.
Connect two 2-pin pulse grip wires. The E3i model has two additional
ramp and level 3 pin wires to connect marked “R” and “L”.
C. Connect optional Bluetooth Module (sold separately) using
instructions supplied.
B
Optional
Bluetooth
Module
C
33
Page 30

Assembling Your Elliptical
Step 6: Console Attachment
(continued)
D. Tuck wires inside Console
(6) and Console Mast (4).
E. Slide Console (6) upwards
so hook on back of console
slides under holding plate
to lock into position.
F. Attach Console (6) by using
4 mm Allen
wrench and
the two
M5x10L
bolts and
M5 washers
(that were
pre-installed
on back of
console)
through
slots in
upper mast.
I
E
Slide
Lock
D
F
M5 x 10L
(x2)
4mm Allen
Wrench
34
Console
Mast Cover
M4 x 10L Screw
(x4)
5mm Allen
Wrench w/
Phillips
M4 x 10L Screw
(x4)
PRE-INSTALLED
PRE-INSTALLED
G. Tear o Hardware Loss Prevention
Sheet.
H. Push Base Top Cover down into
position.
I. Attach Console Mast Cover (18) with
the four M4x10L screws removed in
step 4A and four more in the hardware bag for a total of eight. Tools
needed: Phillips head screwdriver.
J. Inspect unit for excess packing
material and check that the roller
wheels are on the ramp rails.
Page 31

Assembling Your Elliptical
Leveling
LifeSpan elliptical trainers come with ve leveling feet - two in the front
and two in the back. Locate your elliptical trainer on a solid, level surface.
Make sure that the center adjustable foot, located on the center frame
brace sits level on the oor. The Base Connection Cover (3) might need to be
removed rst to adjust and lock the center feet. Try to rock the elliptical in all
directions to see if any of the feet are not touching the oor. If the elliptical
rocks, adjust the feet that are not touching the oor upward to eliminate
any rocking. Once the frame is completely stable, secure the feet in place by
tightening the lock nut on each foot.
Adjustable Feet Adjustable FeetAdjustable Feet
SAFETY TIP: Always keep feet fully inside the pedals. This will prevent
!
the user from falling or a wheel from coming o a rail.
35
Page 32

Console Basics
Readout Display
A blue backlit LCD display (E2i - 6", E3i - 7.5") provides all the information you
need to monitor your exercise results and get the most out of your exercise
program.
A. Message Window - This 16-character window helps step you through
program setup, then displays the program selected while you exercise.
B. Program Matrix - Divides the workout programs into 20 segments
with varying intensity levels. These programs can be viewed in levels of
incline or speed.
C. Time - The workout time elapsed or the workout time remaining.
D. Speed - Estimated ground speed based on your stride rate and a 20-inch
stride length.
D2. Distance - Estimated ground covered based on your stride count and a
20-inch stride (E3i only).
E. Ramp - Level of the pedal ramp, ranging from 0 to 20.
F. Level - Level of resistance on the pedals, ranging from 1 (180 watts at
60 rpm) to 20 (200 watts at 60 rpm).
G. Core Balance - A measurement of the total force you are placing on the
pedals, based on a total of 100%. The ideal is 50% for your left foot and
50% for your right foot.
36
Page 33

Console Basics
H. Strides - A count of your strides.
H2. Strides/Min - The rate of your pedaling.
I. Calories - An estimate of total calories burned.
I2. Calories/HR - An estimated rate of your calorie burn.
J. Watts - An estimate of the power you are putting into the elliptical.
J2. Watts Ave - The average power over the duration of your exercise
session.
K. Date - The date is presented as the month/day/year below the program
matrix.
L. Time - The time of day is shown below the program matrix using a 24-
hour reading.
M. Indicator icons:
HRC - This icon ashes when your pulse is being taken.
Bluetooth - Flashes when pairing with a mobile device.
USB - This will light up when your exercise data is being transferred
to a USB ash drive.
37
Page 34

Console Basics
Main Keyboard
A. Power – This button can be used to turn the console “on” from Energy
Saving mode and to turn the console “o” when in Standby mode.
B. Change Display - Change the type of data displayed in some of the
readouts (E3i only).
C. Bluetooth - Pairs Bluetooth to your mobile device.
D. Exercise Data Save - This saves your workout results to a USB ash drive.
E. Audio In - Audio-in port and dual speakers.
F. QuicksetTM Ramp - Select an ramp setting of 4, 8, 12 or 16.
G. Ramp - Raise and lower the ramp.
H. Enter - Conrm a selection.
I. Start/Pause - Start the elliptical/Pause the elliptical.
J. Resistance Level - Adjust the resistance on the pedals.
K. QuicksetTM Resistance - Select a resistance setting of 4, 8, 12, or 16.
Top Keyboard
A. Program Group - Choose from HRC (Heart Rate Control), Healthy Living,
Sport Training, Weight Loss, and User Set Up (Not on E2i).
38
Page 35

Console Basics
Setting the Date and Time
Before getting started using your elliptical make sure the date and time are
properly set on the console to ensure that your exercise data is properly
recorded.
To set the date and time in your console follow these steps:
A. Pull and re-install the safety key.
B. Press and hold the Quick Speed 10 button. Clock illuminates in the
display after 3 seconds. Now press the Quick Speed 10 button again.
C. Press the +/- buttons to set the correct Year. Press Enter.
D. Press the +/- buttons to select the correct Month. Press Enter.
E. Press the +/- buttons to select the correct Day. Press Enter.
F. Press the +/- buttons to set the Hour. Press Enter.
G. Press the +/- buttons to set the Minute. Press Enter.
QuickSTART
The quickest way to get started with a workout is to press the START button.
This will start the elliptical in manual mode with the time counting up from
00:00. You can also set a desired workout Time and update your Weight in
the console for more accurate calorie calculation by following these steps:
A. Press ENTER to select manual mode.
B. Select the amount of time (in minutes) you want to use the manual
program by pressing the resistance +/- buttons. Press ENTER.
C. Use the resistance +/- buttons to set your weight. Your weight is used to
more accurately calculate calories burned. Press ENTER.
D. Press START and the elliptical will start with the time counting down
from the preset time.
E. To increase resistance press the + button.
39
Page 36

Using Programs
Preset Programs
There are numerous programs available to help you add structure and
variety to your exercise program. For more information about these
programs please refer to the About Your Elliptical section of this Owner’s
Manual. To use one of the Preset Programs follow the steps below:
A. Select Program – Press the Level + / - buttons on the keyboard to cycle
through the program list, or use the Program Buttons to nd your desired program then press Enter to complete the selection.
B. Select Level or Ramp Mode – You can choose to run each program in
either Level or Ramp mode. Press the +/- buttons on the keyboard to
make your selection and then press Enter.
C. Set Program Level – There are 2 levels of intensity with each preset pro-
gram (1 being the easiest and 2 being the most dicult). Press the Level
+/- buttons to select the desired level then press Enter.
D. Set Time – Set the program Time of your workout by pressing the Level
+/- buttons then press Enter.
E. Set Weight – Set your Weight in the console for more accurate calorie
calculation by pressing the Level +/- buttons then press Enter.
F. Press the Start button to begin your workout.
Custom User Set-up Programs
There are 2 user programs that provide you with the ability to establish
customized program proles specic to your workout requirements. Once
these programs are completed they are saved by the console and can be
selected like any other preset program. Complete the following steps to set
up a user program:
A. Select USER1 or USER2 Programs – Press the Level +/- buttons to select
the USER1 or USER2 programs then press Enter.
40
Page 37

Using Programs
B. Set Time – Set the program Time of your workout pressing the Level +/-
buttons then press Enter.
C. Set Weight – Set your Weight in the console for more accurate calorie
calculation by pressing the Level +/- buttons then press Enter.
41
Page 38

Using Programs
D. Set Level – Use the Ramp up/down buttons to set the Ramp level of the
rst program segment and the Level +/- buttons to set the desired Level
of the rst program segment. You can also use the Quickset™ buttons for
Ramp and Level to expedite the process. Press Enter.
E. Repeat – Repeat Step D until the 20 segments are complete. The twenti-
eth segment will be shown in the Time window as shown below.
42
Page 39

Using Programs
Once the program has been set up, simply scroll to the USER1 or USER2
program and press Start. Both Ramp and Level are shown in the program
matrix with the Ramp on the left and the Level on the right.
43
Page 40

Using Programs
Using Heart Rate Control Programs
Two heart rate control programs are available
on your console: Constant and Interval. When
using these programs the console will need
to receive your heart rate throughout the
entire workout. Please review the Heart Rate
Monitoring section of this Owner’s Manual for
more information.
HRC – Constant
The Constant program lets you select a single heart rate that you want to
maintain throughout your workout and the elliptical will maintain this heart
rate for you by either adjusting the Level or Ramp.
To use this program:
A. Select HRC Constant – Press the Level +/- buttons to select the HRC
Constant program, then press Enter.
B. Set Time – Set the program Time by pressing the Level +/- buttons then
press Enter. The program will include 3-minutes of warm up.
C. Set Weight – Enter Weight by pressing the Level +/- buttons, then
press Enter.
D. Set Age – Enter Age by pressing the Level +/- buttons, then press Enter.
E. Set Target Heart Rate – Set your target heart rate by pressing the Level
+/- buttons then press Enter.
F. Press the Start button to begin your workout.
44
Page 41

Using Programs
HRC – Interval
The Interval program is designed to help you increase your aerobic endurance
and improve heart rate recovery. This program lets you select a Low (or
recover target heart rate) and a High target. After a 3-minute warm-up the
console will adjust the Level every 10 seconds to maintain your Low target for
2 minutes. Then the console will adjust the Level to raise your heart rate to the
High target that you selected and once again keep it at this level for 2 minutes
and then repeat the process until the end of the workout. It is recommended
that you set the workout time to 20 minutes or higher to use this program
eectively.
To use this program:
A. Select HRC Interval – Press the Level +/- buttons to select the HRC
Interval program then press Enter.
B. Set Time – Set the program Time by pressing the Level +/- buttons then
press Enter. The program will include 3 minutes of warm-up.
C. Set Weight – Enter Weight by pressing the Level +/- buttons, then press
Enter.
D. Set Age – Enter Age by pressing the Level +/- buttons, then press Enter.
E. Set High Target Heart Rate – Set your High Interval training rate by
pressing the Level +/- buttons, then press Enter.
F. Set Low Target Heart Rate – Set your Low Interval training rate by press-
ing the Level +/- buttons, then press Enter.
G. Press the Start button to begin your workout.
WARNING: Heart rate monitoring may be inaccurate. Over exercising
!
may result in serious injury or death. If you feel faint stop exercising
immediately.
45
Page 42

Saving Your Results
There are 2 ways to save your exercise results when using your elliptical. The
rst is using the USB port built into your console and your own USB drive and
the second is using the Bluetooth adapter and either the Active Trac or Train
& Trac app. Once Saved, use the LifeSpan Club to consolidate and compare all
your results.
LifeSpan Club
Your elliptical includes a free membership to the LifeSpan Club. This
membership number is located on the front cover of this Owner’s Manual.
With this account you can consolidate all your exercise results in one place,
track your weight and other metrics and get more information about your
health and tness.
If you plan on using:
• A USB drive to save your exercise results, download the IDC app from
your LifeSpan Club account. This app works with your Windows or Mac
computer letting you upload your exercise results from your USB ash
drive into your LifeSpan Club account.
• A LifeSpan app visit www.LifeSpanFitness.com for a list of the available
apps and which mobile devices are supported.
Bluetooth Adapter
When paired with LifeSpan’s optional Bluetooth adapter, your elliptical
can connect with your mobile device to wirelessly sync all of your exercise
history to your LifeSpan Club account. To learn more about which apps are
available and mobile devices supported visit www.LifeSpanFitness.com.
To enable this feature, go to LifeSpanFitness.com
to purchase the Bluetooth Adapter.
46
Page 43

Saving Your Results
USB Plus
Your LifeSpan elliptical saves a record of your exercise for up to 2 hours. All
you need is a standard USB drive. Almost any brand or model will work.
Remember, it’s important that you Set the Date and Time (page 33) on your
elliptical console rst so your exercise results are accurately date and time
stamped.
You can insert the USB drive, into the USB Plus port anytime during your
workout or after you’ve stopped or paused the elliptical. Just insert a drive
and press the “save” button. You can also charge your phone or other mobile
device while you exercise and then remove the device you’re charging and
replace it with the USB drive to save your data.
When you Stop or Pause a workout or when your workout time ends, the
console will prompt you to “Insert Drive” if you haven’t already done so.
If there is already a USB drive installed or if you install a USB drive after
stopping the elliptical, the console will automatically save your workout
data and a message “Workout Saved” will show on the display. You can also
press the “Save” button anytime and any data currently saved in the console’s
internal memory will be saved to the USB drive.
If however, the elliptical goes into Energy Savings mode at any time without,
your exercise results rst being saved onto a USB drive your exercise data will
be cleared from the console’s internal memory.
*Charging feature does not work with the iPad 1, iPad 2, or iPad 3.
USB drive not included.
47
Page 44

Maintenance and Tips
Personal Settings
The E2i and E3i come with the ability for you to personalize several console
settings including:
English or Metric - Used for both Speed and Distance in miles or kilometers
shown on the display.
Calendar - Date and Time are shown on the display readouts, but can be
turned o with this setting. We recommend you keep date and time turned
on to accurately track your results.
Energy Savings - Turn the Energy Saving feature ON or OFF.
Audible Beep - Turns o the audible alert that beeps for speed and incline
changes or when the elliptical is starting or stopping.
WARNING: The audible alert is turned on from the manufacturer to warn the
user that the elliptical is starting or the speed is changing. Turning this alert
!
o is done at the sole discretion of the user.
48
Page 45

Maintenance and Tips
Personal Settings
Follow the steps below to make changes to the Personal Settings options.
Conguration Steps Information Displayed
Press and hold START and then LEVEL + for 3 seconds
to enter Personal Settings Mode. The rst screen shows
Load Cell Feature. (Do not modify)
Press ENTER to continue
Press LEVEL + / - to change from English (EN) to Metric
(SI).
Press ENTER to continue.
Press LEVEL +/- or to turn Energy Saving mode on or o.
Press ENTER to continue
This screen shows the Total Distance exercised in miles
or kilometers.
Press ENTER to continue
This screen shows Total Hours of use.
Press ENTER to continue
Roller Size is displayed. (Do not modify)
Press ENTER to continue
Press LEVEL +/- to turn Calendar on or o.
(Do not modify)
Press ENTER to continue
Press LEVEL +/- to turn Audible Beep on or o.
Press ENTER to continue
Engineering Mode
10 49
15
17. 7.2014
Select the units
EN or SI
Power Saving On or O
Total Distance
0 000
Total Hours
0 000
Roller
600
Set Calendar On or O
Beep On or O
49
Page 46

Maintenance and Tips
General Maintenance
1. Keep the elliptical clean and dry. It is a good idea to wipe the elliptical
down after each workout.
2. Make sure the ramp rails are clean. Even if you can’t see anything on
them, wipe the rails with a clean dry cloth about once a week.
Moving the Elliptical
1. Make sure the ON/OFF switch is turned OFF and the power cord is removed from the wall.
2. Make sure nothing is on or near your elliptical which might spill, be
knocked o, or prevent the elliptical from moving.
3. Place both hands under the support bar located under the back of the
elliptical to make sure you have a solid lifting point.
4. Lift the back of the elliptical and roll to the desired location.
CAUTION: When lifting, use proper safety precautions and lifting
techniques. Bend your knees and elbows, keep your back straight
and pull up evenly with both arms.
50
Page 47

Maintenance and Tips
Troubleshooting
If you have a question that isn’t answered in this Owner’s Manual, visit our website
at www.LifeSpanFitness.com or call us at 877.654.3837 option 4.
The elliptical is designed and manufactured to be reliable and easy-to-use.
However, if you have a problem, these troubleshooting steps may help you
nd the cause.
Problem: Elliptical is unstable or rocks while in use.
Solution: Make sure the elliptical is on a solid, level surface. Adjust the front,
rear, and middle feet until all 5 feet are sitting solid on the oor.
Problem: No lights on the console.
Solution: Make sure both ends of the power cord are solidly plugged in. Press
the Power key on the console. If the console still does not light up, contact
LifeSpan Customer Service.
Problem: Rough feeling in pedals.
Solution: Clean the ramp rails with a clean, dry cloth. Any debris on the rails
will give a rough feeling during use.
51
Page 48

LifeSpan Fitness
785 West 1700 South Suite 1
Salt Lake City, UT. 84104
Phone: 877.654.3837
www.LifeSpanFitness.com
E2i/E3i
Version 1.4
Elliptical Cross Trainers
 Loading...