

Page 1

Treadmill/Bike Desk
Owner’s Manual
DT5, DT7
Page 2

Welcome
Getting Started
Welcome
Warranty
Table of Contents
5
DT5 Desk Assembly
Assembly Instructions
Desk Leveling and Height Adjustment
DT7 Desk Assembly
Assembly Instructions
Desk Leveling and Height Adjustment
DT5 Manual Treadmill Desk Assembly
DT7 Electric Treadmill Desk Assembly
Treadmill Desk Operations
Specications
Setting the Clock
Starting the Treadmill Desk
Console Overview
Preset Button & Bluetooth
Innovative Features
Troubleshooting
Personal Settings
Display Details
8
16
25
26
27
Bike Desk Operations
Specications
Setting the Clock
Starting the Bike Desk
Console Overview
Bluetooth & Innovative Features
Troubleshooting
Personal Settings
Display Details
39
3
Page 3

Welcome
Congratulations on choosing the LifeSpan Workplace™ line of products. These
products give you the opportunity to remain productive while taking care of
yourself as you integrate movement with normally sedentary tasks.
The average American now spends eleven hours, ve days a week, sitting, and
burns one-hundred fewer calories each day than they did a few decades ago.
Sitting for long periods slows your metabolism, reduces calories burned, and
increases your risk for heart disease and diabetes.
Whether you plan on placing this product in a TV room, replace your desk at
home or are adding another workspace in the oce, LifeSpan Workplace™
products are a great way to add movement to an otherwise sedentary activity.
Before you assemble or operate your product, please read this manual
thoroughly. Important information, including safety precautions, ongoing
product maintenance, assembly instructions, and information on proper
operation are included.
If you need to contact LifeSpan customer service, visit our website at
www.LifeSpanFitness.com and select customer service. Complete the
information requested and we will respond to your inquiry within one
business day. In the United States and Canada you can also call
(877) 654-3837 and choose option 4.
Neither LifeSpan Fitness nor its representatives can accept responsibility for any damages or
injury incurred as a result of information presented in this manual except under the terms
of the product warranty.
5
Page 4

Warranty
Your LifeSpan treadmill/bike desk comes with the following limited warranty
valid in North America and the United Kingdom. If you are outside of these
areas contact your local distributor for warranty information or visit
www.LifeSpanFitness.com.
Warranty
Frame
Parts
Labor
DT5
Lifetime
2 Years
1 Year
DT7
Lifetime
2 Years
1 Year
LifeSpan warrants the equipment it manufactures is free from defects in
materials and workmanship under normal use and services. The periods above
are based on the date of purchase. During these periods, LifeSpan will repair
or replace any defective part. Free labor is included on all parts that are not
normally assembled or replaced by the customer within the labor period.
If within the time frames specied above, any part fails to operate properly,
login to our website at www.LifeSpanFitness.com, click on “Customer Service”
and complete the form to request assistance or call 877.654.3837 option 4 for a
Customer Service Agent (please note that certain kinds of service should only
be performed by a qualied service technician).
LifeSpan reserves the right to make changes and improvements to our products
without incurring any obligations to similarly alter any product purchased.
In order to insure our product warranty and to ensure the safe and ecient
operation of your LifeSpan product, only authorized parts can be used. The
warranty is void if any parts other than those provided by LifeSpan are used.
Exclusions and Limitations:
• This warranty does not apply to any defects caused by negligence, misuse,
improper assembly, or maintenance, accident, or “act of God.”
• This warranty does not apply to discoloration of paints or plastics.
• LifeSpan shall not be responsible for incidental or consequential damages.
• This warranty is non-transferable form the original owner.
Registration
Should you need to process a warranty claim make sure you retain your
purchase receipt to verify the date of purchase and register your LifeSpan
product online. To complete the registration go to www.LifeSpanFitness.com
and select “Product Registration”.
7
Page 5
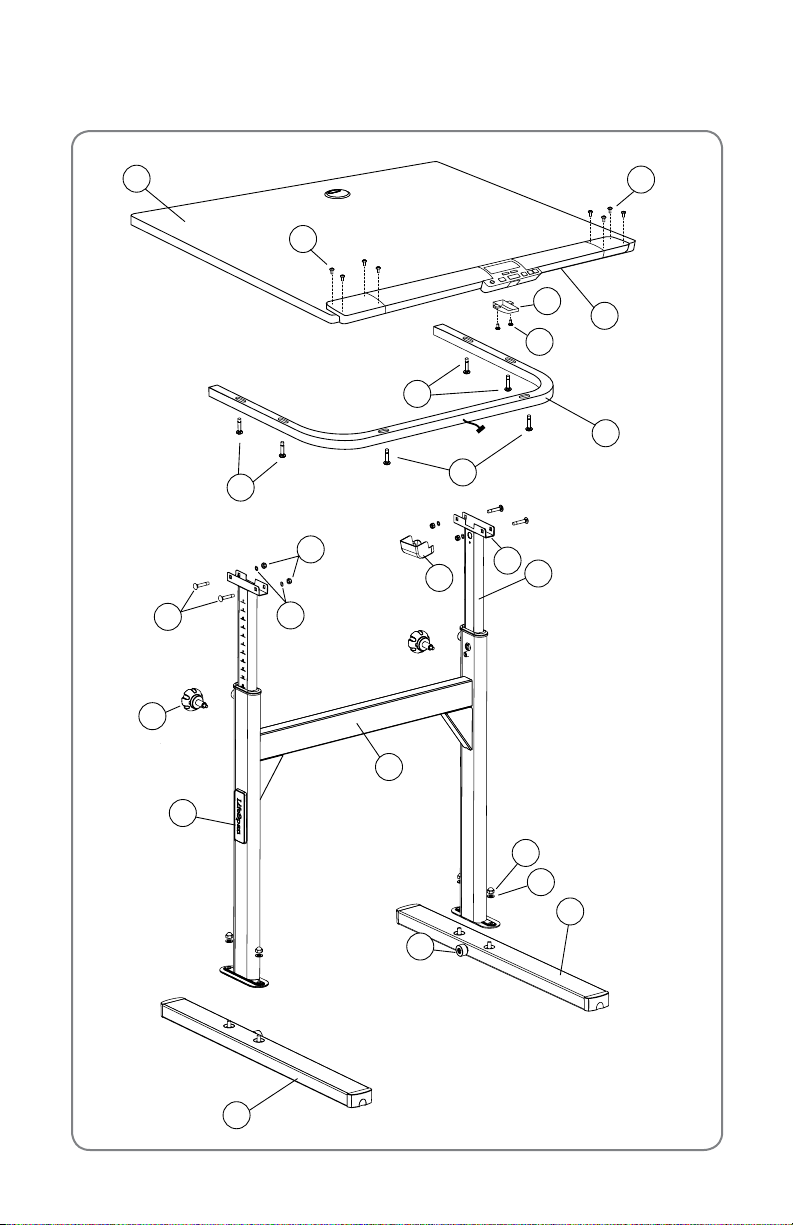
DT5 Desk: Assembly Instructions
Boxed Separately
2
16
15
16a
17
16
14
13
15
10
9
7
8
5
1
15
C
11
A
B
6
12
4
3
8
Page 6

DT5 Desk: Assembly Instructions
At LifeSpan we strive to make our equipment easy to assemble and start
using. Parts that can be pre-assembled are always assembled and tested on
the product line.
Prior to starting the assembly process, take all the parts out of the box,
remove plastic bags and lay everything out on the oor to become familiar
with the components.
Since your desk is a heavy piece of equipment, it is recommended that you
use two people during assembly and follow these assembly instructions to
reduce any problems that may occur.
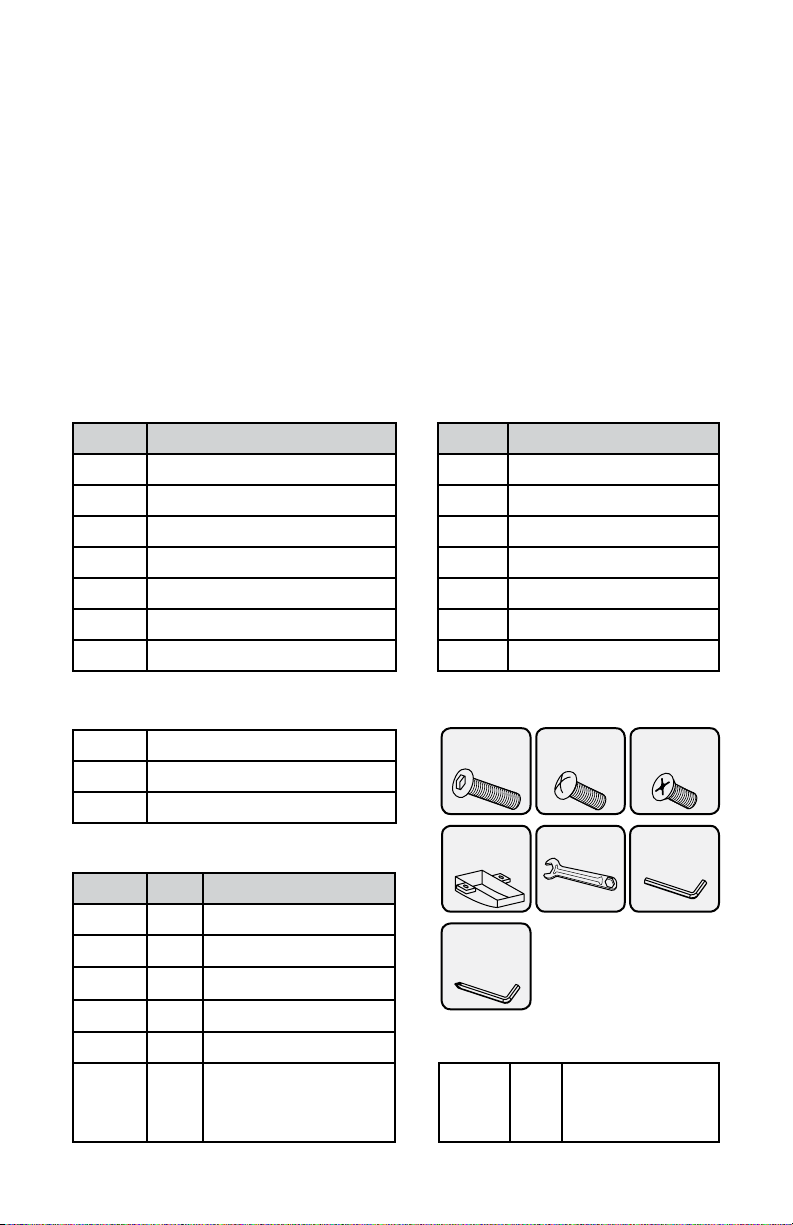
Hardware Included
Item# Part Description Item# Part Description
1 Lift Frame 8 LifeSpan Placard **
2 Desktop 9 M8x45L Bolt **
3 Left Base Foot 10 M8 Nuts **
4 Right Base Foot 11 Wire Cover
5 M8 Washer ** 12 M10 Washer **
6 M10 Acorn Nut ** 13 U-Shape Frame
7 Height Ad. Knob 14 Console
**Pre-installed
A Desk Position Bumpers
M6x40L
Screw
B Extension Tube
C Desktop Mounting Bracket
Hardware Bag Contents
Wire Harness
Cover
Item # Qty. Part Description
15 6 M6x40L Screw
16 8 #8x5/8L Screw
16a
2 #8x1/2L Screw
5mm Allen
Wrench w/
Phillips
17 1 Wire Harness Cover
18 1 Wrench - 17mm
19 1 4mm Allen Wrench 20 1
Table corresponds to the diagram on the left
#8x5/8L
Screw
Wrench
#8x1/2L
Screw
4mm Allen
Wrench
5mm Allen
Wrench w/Phillips
Screwdriver
9
Page 7
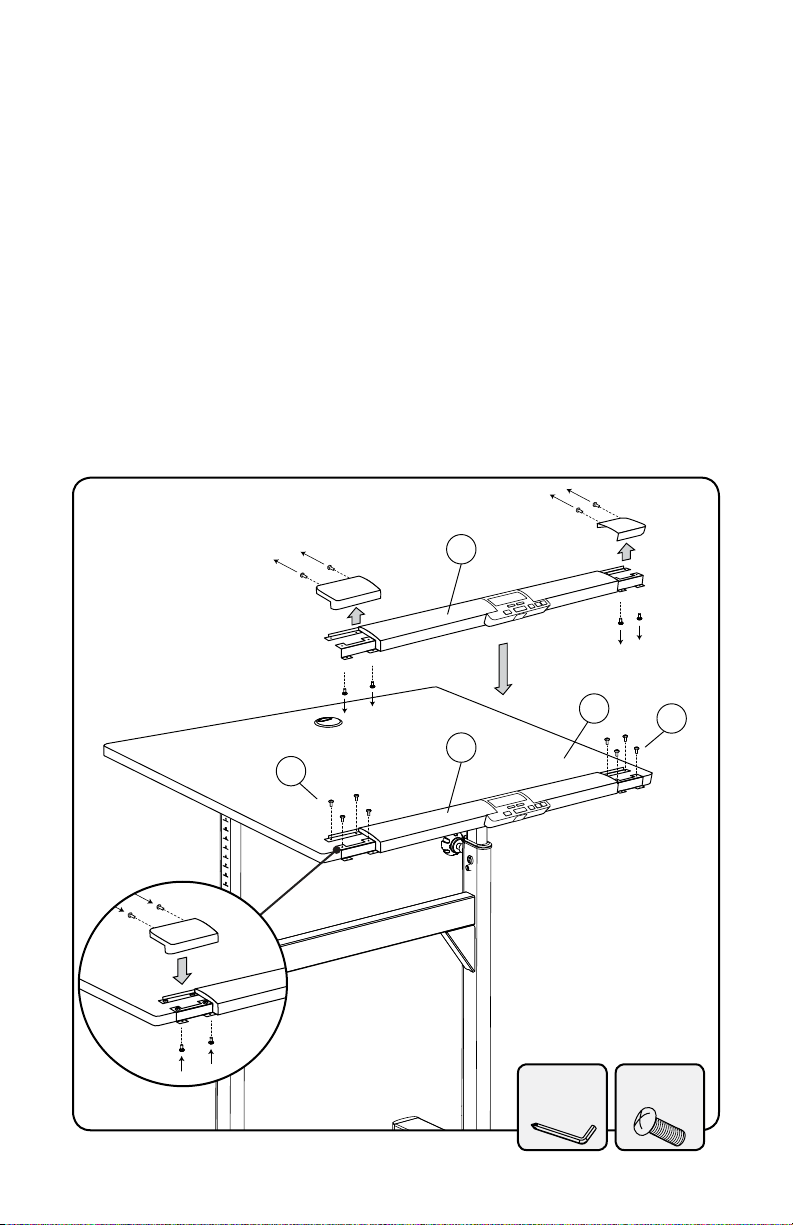
DT5 Desk: Assembly Instructions
4
3
6
12
A
1
8
7
7
9
B
C
10
5
11
2
14
16
16
13
15
15
15
17
16a
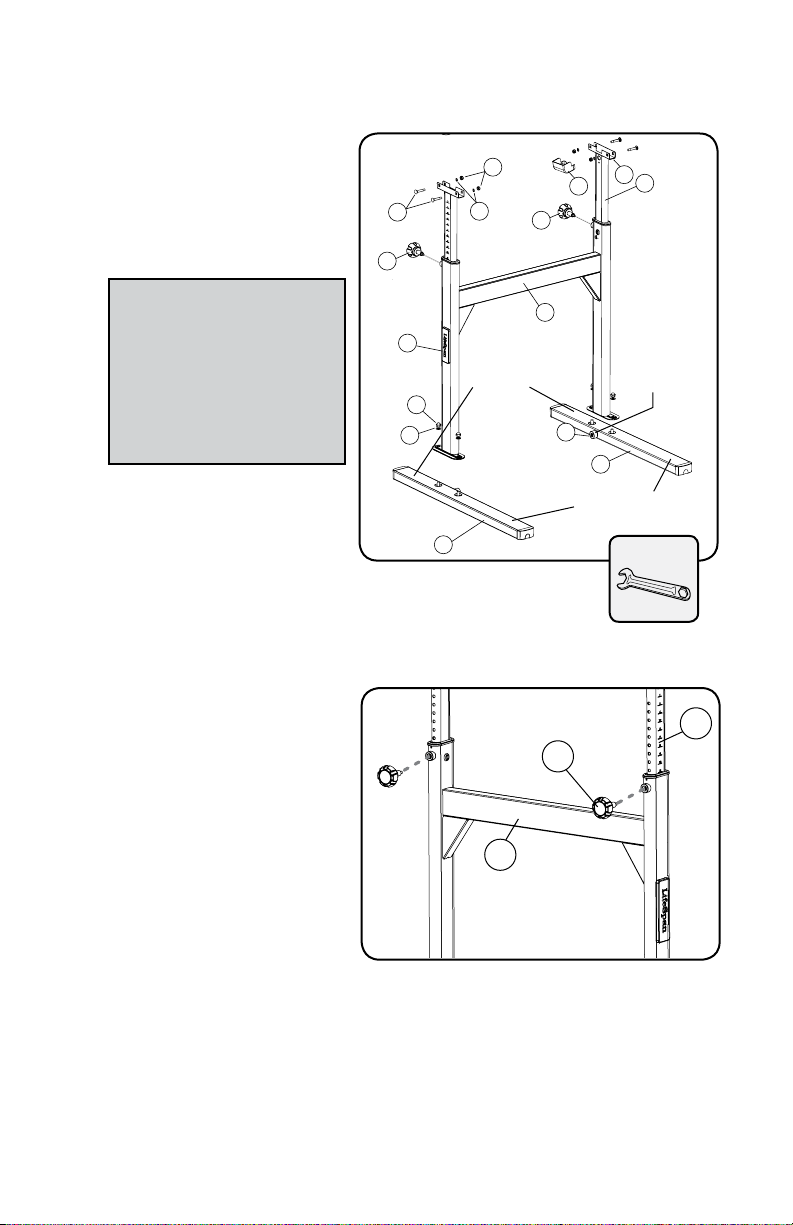
Step 1: Lift Frame Assembly
A. Position the Lift Frame (1),
Left Base Foot (3) and Right
Base Foot (4) as shown in
the gure to the right.
NOTE: The position of the
Desk Position Bumpers (A)
face inward, and the
long side of the Right and
Left Base Feet (3, 4) are
Short
Side
opposite of the Height
Adjustment Knobs (7)
B. Place the Lift Frame onto
the left and right Base Feet
mounting bolts and install
the M10 washers (5) and
M10 acorn nuts (6).
C. Tighten the four mounting
nuts.
Step 2: Install the Height
Adjustment Knobs
A. Locate the Height
7
Adjustment Knobs (7).
B. Screw the Height
Adjustment Knobs into the
Lift Frame (1) uprights as
shown in the gure to the
right.
C. Raise each Extension Tube
(B) to level 15 and tighten
the Height Adjustment
1
Knobs (7).
Desk
Position
Bumpers
face
inward
Long Side
Wrench
B
10
Page 8
DT5 Desk: Assembly Instructions
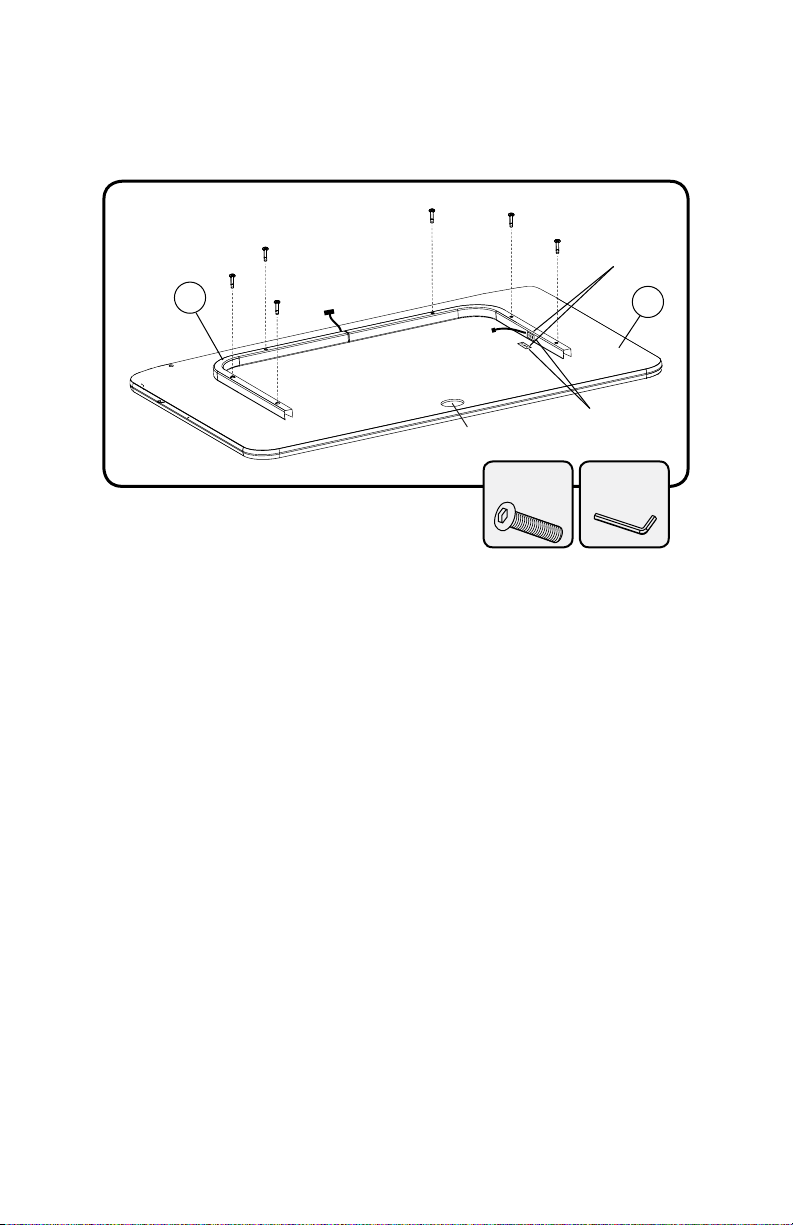
Step 3: Attach U-Frame to Underside of Desk
"RRR"
Stickers
13
Cable Hole
"RRR"
Stickers
M6x40L
Screw
2
4mm Allen
Wrench
A. Lay the Desktop (2) face down on a smooth clean surface to attach the
U-Frame (13).
B. Position the U-Frame (13) as shown to the underside of the Desktop (2).
Be sure the open part of the frame faces toward the Cable Hole. The
stickers labeled "RRR" on the Desktop and U-Frame should be matched
together when assembled.
C. Attach the U-Frame to the Desktop using the six M6x40L Screws (15) using
the 4mm Allen Wrench (19).
11
Page 9
DT5 Desk: Assembly Instructions
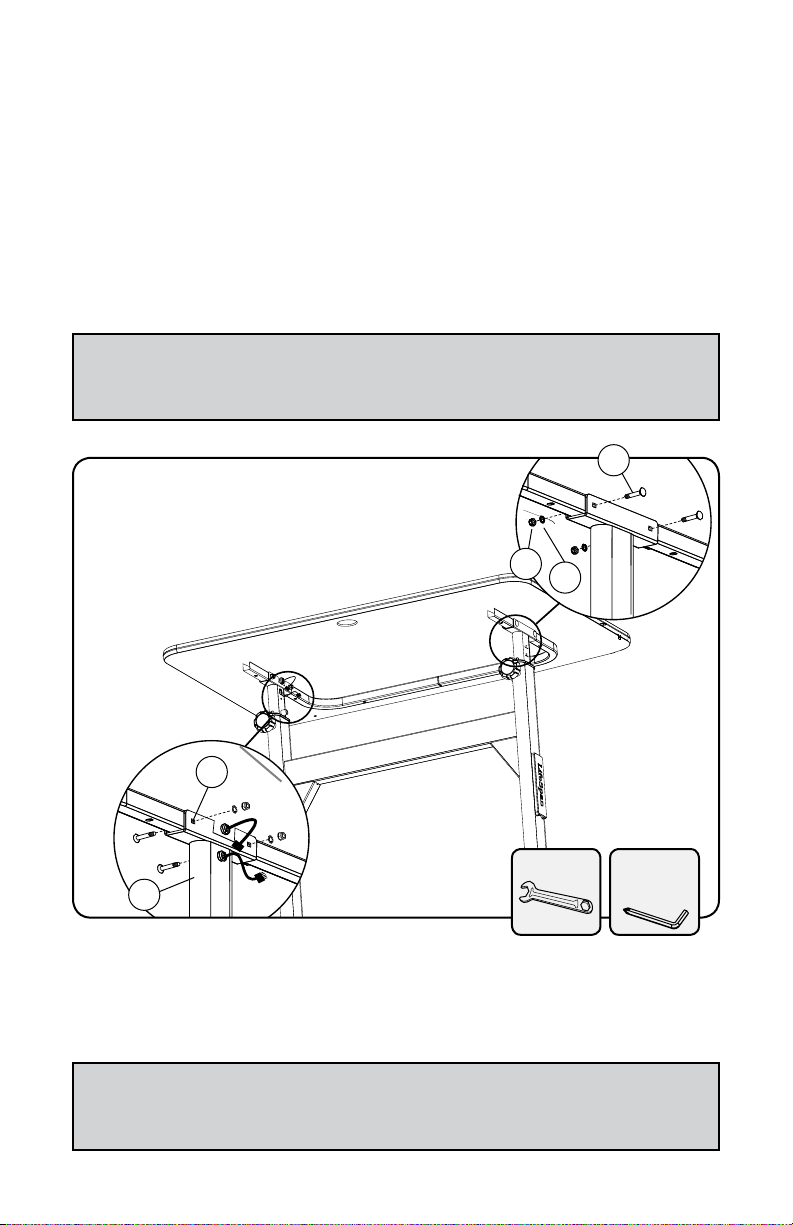
Step 4: Desktop Assembly
A. Make sure the Extension Tube (B) is at level 15 (done in step 2C).
B. Align the Desktop on top of the Extension Tubes (B) so the wire harness
from the Desktop U-Frame is on the same side as the wire harness
coming from the right extension tube. Gently lower the desktop support
frame onto the Desktop Mounting Bracket (C).
NOTE: Make sure the console wire harness or connector does
not get caught or pinched between the mounting bracket
and desktop frame.
9
Step 4C
10
5
C
Step 4D
B
Step 4C
Wrench
5mm Allen
Wrench w/
Phillips
C. Insert four M8x45L carriage bolts (9) through the Mounting Brackets.
Install four M8 washers (5) and nuts (10). Securely tighten the four M8 nuts.
D. Connect the two wire harness connectors.
NOTE: If the desktop tilts up and down slightly, re-tighten the four
bolts/nuts inserted in step 4C.
12
Page 10
DT5 Desk: Assembly Instructions
Step 5: Console Assembly
A. Using the 5mm Allen Wrench with Screwdriver (20) take out the two pre-
installed screws from the back and two screws from the bottom of each
console end cap so you can remove the end caps. Notice the dierence in
the screws from the back and bottom as you will be replacing them back
into their proper place.
B. Align the screw holes in the Console Bracket (14) with the pre-drilled holes
in the Desktop (2).
C. Using eight #8x5/8L Screws (16) attach the Console (14) to the Desktop (2).
D. Re-install the end caps with the pre-installed screws you removed in
Step A.
Step 5A:
Remove End
Caps
Step 5B & C:
Attach Console
14
Step 5D:
Re-Install
End Caps
16
14
5mm Allen
Wrench w/
Phillips
2
16
#8x5/8L
Screw
13
Page 11

Step 6: Connecting the Wires
B
11
D
17
2
16a
From Console
From U-Frame
under Desktop
A. Underneath the front of the Desktop(2) connect the two 7-pin wire
harnesses together for console operation.
B. Attach the Console Wire Harness Cover (17) to the underside of the
Desktop(2) using two #8x1/2L Screws (16a). Push all the extra cable back
into U-Frame to help t cover in place.
Step 6A
Step 6B:
Step 6B:
Attach Wire
Attach Wire
Harness
Harness
Cover
Cover
5mm Allen
Wrench w/
Phillips
#8x1/2L
Screw
Wire Harness
Step 7: Attach the Wire Cover to the Right Extension Tube
A. Simply snap the Cover (11) over the Right Extension Tube (B). The
bottom of the cover will be resting on top of the Stop Bumper (D).
Cover
14
Page 12

DT5 Desk: Desk Leveling and Height Adjustment
Desk Leveling
The desk needs to be leveled
prior to use. The desk comes
with two Adjustable Feet that
can be used to level the desk
and eliminate rocking. If the
desk is rocking on two of the
feet, adjust the two front feet
until all four feet are sitting
securely on the oor.
Desk Height Adjustment
A. Loosen the Adjustment Knobs (A)
on each upright by turning it no
more than two turns counterclockwise.
B. While rmly holding each
side of the Desktop, pull both
Adjustment Knobs out and slowly
raise or lower the desktop.
C. Release the Adjustment Knob as
the desired level is reached. The
Adjustment Knob will click into
place.
D. Check to make sure the desk
height is set at the same level on
both sides. Turn the Adjustment
Knobs clockwise to lock in place.
Desk Adjustment Feet
15
Page 13

DT7 Desk: Assembly Instructions
Boxed Separately
2
16
16
12
11
17
16a
15
15
C
B
1
6
15
8
7
5
10
5
4
14
13
9
16
A
3
Page 14
DT7 Desk: Assembly Instructions
At LifeSpan we strive to make our equipment easy to assemble and start
using. Parts that can be pre-assembled are always assembled and tested on
the product line.
Prior to starting the assembly process, take all the parts out of the box,
remove plastic bags and lay everything out on the oor to become familiar
with the components.
Since your desk is a heavy piece of equipment, it is recommended that you
use two people during assembly and follow these assembly instructions to
reduce any problems that may occur.
Hardware Included
Item# Part Description Item# Part Description
1 Lift Frame 8 M8 Lock Nut **
2 Desktop 9 M8x15L Bolt **
3 Left Base Foot 10 Accessory Tray
4 Right Base Foot 11 M10 Washer **
5 M8 Washer ** 12 LifeSpan Placard
6 M10 Acorn Nut ** 13 U-Shape Frame
7 M8x45L Bolt ** 14 Console
**Pre-installed
A Desk Position Bumpers
M6x40L
Screw
B Extension Tube
C Desktop Mounting Bracket
Hardware Bag Contents
Wire Harness
Cover
Item # Qty. Part Description
15 6 M6x40L Screw
16 8 #8x5/8L Screw
16a
2 #8x1/2L Screw
5mm Allen
Wrench w/
Phillips
17 1 Wire Harness Cover
18 1 Wrench - 17mm
19 1 4mm Allen Wrench 20 1
Table corresponds to the diagram on the left
#8x5/8L
Screw
Wrench
#8x1/2L
Screw
4mm Allen
Wrench
5mm Allen
Wrench w/Phillips
Screwdriver
17
Page 15

DT7 Desk: Assembly Instructions
1
6
11
3
4
A
2
14
13
15
16
16
17
16a
Step 1: Lift Frame Assembly
A. Position the Lift Frame (1),
Left Base Foot (3) and Right
Base Foot (4) as shown in
the gure to the right.
NOTE: The position of the
Desk Position Bumpers (A)
face inward, and the
long side of the Right
and Left Base Feet (3, 4)
are opposite of the
Access Panel
B. Place the lift frame
onto the left and right
base feet mounting
bolts and install the M10
washers (11) and M10
acorn nuts (6).
C. Tighten the four mounting
nuts.
Step 2: Accessory Tray Assembly
A. Remove the four
Screws (9) preinstalled in the
bottom of the
Upright Assembly
Crossbar.
B. Line the holes in
the accessory tray
(10) with the holes
in the Crossbar.
C. Install four M8
washers and
M8x15 bolts (9) and
tighten.
Access
Panel
Desk
Position
Bumpers
face
inward
Short
Side
Long Side
Wrench
10
9
18
Page 16

DT7 Desk: Assembly Instructions
Step 3: Attach U-Frame to Underside of Desk
"RRR"
Stickers
13
Cable Hole
M6x40L
Screw
2
4mm Allen
Wrench
A. Lay the Desktop (2) face down on a smooth clean surface to attach the
U-Frame (13).
B. Position the U-Frame (13) as shown to the underside of the Desktop (2).
Be sure the open part of the frame faces toward the Cable Hole. The
stickers labeled "RRR" on the Desktop and U-Frame should be matched
together when assembled.
C. Attach the U-Frame to the Desktop using the six M6x40L Screws (15) using
the 4mm Allen Wrench (19).
19
Page 17

DT7 Desk: Assembly Instructions
Step 4: Desktop Assembly
NOTE: It is a good idea to use two people for this portion of the
assembly in order to be sure wires are properly routed and do not
get pinched while installing the desktop.
2
Console
Wires
C
8
Desk Height Control
Wire Harness
Console Wire
Harness
7
5
1
A. Remove the Bolts (7), Washers (5), and Nuts (8) pre-installed in the upright
assembly posts.
B. Hold the Desktop (2) over the Lift Frame (1) and place the Desk Height
Control Wire Harness and the Console Wire Harness into the center of the
Lift Frame (1). Place the connector ends towards the center of the tray for
easy access in the next steps of the assembly.
C. Set the Desktop down into the Mounting Brackets (C) on the extension
tubes, align the mounting holes and re-install the hardware removed in
step A.
D. Tighten the Desktop Mounting Bolts/Nuts.
20
Page 18

DT7 Desk: Assembly Instructions
2
14
14
16
16
Step 5: Console Assembly
A. Using the 5mm Allen Wrench with Screwdriver (20) take out the two pre-
installed screws from the back and two screws from the bottom of each
console end cap so you can remove the end caps. Notice the dierence in
the screws from the back and bottom as you will be replacing them back
into their proper place.
B. Align the screw holes in the Console Bracket (14) with the pre-drilled holes
in the Desktop (2).
C. Using eight #8x5/8L Screws (16) attach the Console (14) to the Desktop (2).
D. Re-install the end caps with the pre-installed screws you removed in
Step A.
Step 5A: Remove End Caps
Step 5B & C:
Attach Console
Step 5D:
Re-install
End Caps
5mm Allen
Wrench w/
Phillips
#8x5/8L
Screw
21
Page 19

DT7 Desk: Assembly Instructions DT7 Desk: Desk Leveling and Height Adjustment
17
16a
2
From
Console
From
U-Frame
under
Desktop
Step 6: Connecting the Wires
A. Underneath the front of the Desktop(2) connect the two 7-pin and the
two 5-pin wire harnesses together for console and height adjustment
operation.
B. Attach the Console Wire Harness Cover (17) to the underside of the
Desktop(2) using two #8x1/2L Screws (16a). Push all the extra cable back
into U-Frame to help t cover in place.
Step 6A
Step 6B:
Attach Wire
Harness
Cover
22
5mm Allen
Wrench w/
Phillips
#8x1/2L
Screw
Wire Harness
Cover
Page 20

DT7 Desk: Desk Leveling and Height Adjustment
Step 7: Height Adjustment/Console Harness Connections
A. Remove the two Upper
Screws (21) attaching
the Access Panel for
the Height Adjustment
Control Unit.
B. Tilt down and pull
the Access Panel out
several inches. There
are harnesses preinstalled to the Height
Controller, so do not
try to fully remove.
C. Attach the Round
Connector (23)
(placed in the center
tray during desktop
assembly) to the Height
Controller Port (24).
D. Connect the 7-pin
Rectangular Connectors
(22) (one is placed in
the center tray during
desktop assembly
and the other is preinstalled at the factory).
E. Re-attach the Access
Panel to the Center
Tray and tighten the
two screws removed in
step A.
F. Plug the Power Cord
into the Receptacle (25).
23
21
Do Not
Remove Screws
22
24
25
NOTE: Check to be sure all wires are carefully tucked into the
center tray prior to tightening access panel screws to
prevent harness damage.
23
Page 21

DT7 Desk: Desk Leveling and Height Adjustment
Desk Leveling
The desk needs to be leveled
prior to use. The desk comes
with two Adjustable Feet that
can be used to level the desk
and eliminate rocking. If the
desk is rocking on two of the
feet, adjust the two front feet
until all four feet are sitting
securely on the oor.
Desk Adjustment Feet
Desk Height Adjustment
A. To raise the desk, press the
up or down arrow until the
desk is at the desired height.
B. To save a height press and
hold the memory preset,
one or two, button for three
seconds. This will save the
current height into memory.
C. The next time the desk
is used, simply press the
memory preset to adjust
the desk height to the
previously saved setting.
24
Desk Height
Preset
1 2
Desk Height Memory Pre-Sets
Page 22

Treadmill To Desk: Assembly Instructions
Treadmill to DT5 Desk Assembly
A. Position the pre-assembled treadmill as shown below.
B. Lift the rear of the treadmill and roll it forward under the desk until the
Positioning Bumpers (D) located on the treadmill are centered over the
Treadmill Position Bumper (A) at the base of the uprights.
Roll Forward
Lift
C. Plug the Console Connector from the desk into the Treadmill Console Port
and tighten the thumb screws on the connector.
D. Plug the Power Cord into the Treadmill Power Receptacle and turn
the Power Switch on. Be sure all connectors are plugged in prior to
connecting the Power Cord.
D
D
A
Console Connector
Power Switch
Power Receptacle
Console Port
25
Page 23

DT7 Electric Treadmill Desk: Assembly Instructions
Treadmill to DT7 Desk Assembly
A. Position the pre-assembled treadmill as shown below.
B. Lift the rear of the treadmill and roll it forward under the desk until the
Treadmill Positioning Bumper (D) located on the treadmill are centered
over the Desktop Positioning Bumper (A) at the base of the uprights.
Roll Forward
Lift
C. Plug the Console
Electronics Cable into the
desk D-Connector and
treadmill Console Port and
tighten the thumb screws.
D. Plug the Power Cord into
the desk Power Receptacle
and into a wall outlet.
E. Plug the Power Cord
into the treadmill Power
Receptacle and wall outlet.
NOTE: Be sure all
connectors are plugged
in prior to connecting the
power cord
D
Console
Connector
D
A
Treadmill Connections
Power Switch
Power Receptacle
Console Port
D-Connector
Desk Power Receptacle
F. Turn the treadmill Power
Switch on.
26
Desk Connections
Page 24

Treadmill Desk
Operations
27
Page 25

Treadmill Desk Specications
COMPARE CONSOLES
Readouts
Display
Bluetooth
Buttons
MECHANICS & PERFORMANCE
Speed Range
Dimensions
Desktop Height
Adjustment Range
User Height Range
DT5
Time, Steps, Calories,
Distance, Speed
White LED
Yes
Power, Start, Stop,
Pre-Set Speed, Up/Down,
Change Display
DT5
0.4 - 4.0 mph*
0.6 - 6.4 kph
Two Optional
47.5” w x 29” d – (120.65 cm w x 73.66 cm d)
Sizes:
38” w x 29” d – (96.52” cm w x 73.66 cm d)
41” to 55”
104 cm to 140 cm
4’10” to 6’8”
147 cm to 203 cm
DT7
Time, Steps, Calories,
Distance, Speed
White LED
Yes
Power, Start, Stop,
Pre-Set Speed, Up/Down,
Change Display
DT7
0.4 - 4.0 mph*
0.6 - 6.4 kph
40” to 53”
101.6 cm to 134.6 cm
4’10” to 6’8”
147 cm to 203 cm
Height Adjustment Method
Desktop Material
Desktop Surface
Maximum Load on Desktop
Desk Lift Speed
Desk Height Memory
Manual
1” (2.54 cm) thick HD
Composite Board
Durable Laminate
180 lbs
82 kg
N /A
N /A
* Can be changed to max speed of 2 mph/3.2 kph in personal setting
28
Electric
1” (2.54 cm) thick HD
Composite Board
Durable Laminate
180 lbs
82 kg
38 mm/second
2 Pre-Sets
Page 26

Treadmill Desk Setting The Clock
To accurately track your activity with apps or other computer systems, the console’s
clock must be set.
Follow these steps:
Press and hold Speed Up and Speed Down for one second.
Display shows:
Display shows:
Display shows: Y
Display shows: H
D
TH
Press Change Display to move to month setting; after
three seconds, display changes automatically.
Use Speed Up or Speed Down arrows to change
month
Press Change Display
Press Change Display to move to day setting; after
three seconds, display changes automatically.
Use Speed Up or Speed Down arrows to change day
Press Change Display
Press Change Display to move to year setting; after
three seconds, display changes automatically
Use Speed Up or Speed Down arrows to change year
Press Change Display
Press Change Display to move to hour setting; after
three seconds, display changes automatically.
Note: the clock uses the 24-hour format, such as 16:25
for 4:25 p.m.
Use Speed Up or Speed Down arrows to change hour
Display shows: N
Press Change Display To Move To Normal Standby Mode.
Press Change Display
Press Change Display to move to minutes setting; after
three seconds, display changes automatically.
Use Speed Up or Speed Down arrows to change
minutes.
29
Page 27

Starting the Treadmill Desk
1. Turn the On/O toggle switch located on the front right corner of the
treadmill to the on position. If this is already On, press the On/O button
to turn on the console.
2. Make sure the Safety Key is engaged in the console.
NOTE: The display will show "–––" if the Safety Key is not engaged.
Please make sure that the Safety Key is fully engaged. It is possible
the display will not show "–––" when just partially engaged.
3. Press the Start button to start the treadmill belt. The console will start
counting up from 0:00.
4. Press the Up/Down buttons to adjust speed, or use the Preset button to
go directly to your preferred speed (which defaults to 1.5 mph). See the
separate section on Preset, as well as the section on Settings, for more
details.
30
Page 28

Treadmill Desk Console Overview
Speed
Bluetooth
Preset
Change
Display
Power
Stop
Reset
Start
Bluetooth
Speed
Bluetooth
Preset
Change
Display
Power
Stop
Reset
Start
Bluetooth
Preset
Desk Height
1 2
Desk Height
Preset
1 2
Power
DT7 only
Console Buttons
1. On/O: Turns on the console. When pressed again, turns o the console;
the console must be in standby mode (displaying the current time) for
the power o function to work.
2. Start: Starts the treadmill belt. Performs other functions in Settings.
3. Stop: Stops the treadmill belt, Pausing your use. If pressed for one second,
resets the console (all data readouts are reset to zero).
4. Preset: When the treadmill belt is moving, changes the speed to 1.5
mph, or to a custom speed that is set in Settings. See separate section on
Preset, as well as the section on Settings.
5. : Increases or decreases speed by 0.1 mph.
6. Change Display: Changes the data readout between Time (the default),
Distance, Steps, Calories, and Speed. Press and hold for one second to
automatically change readouts every ve seconds; press again to stop
this automatic change.
7. Bluetooth: Turns on Bluetooth communications. Phone apps available
from LifeSpan can use this system to track your activity. See the Bluetooth
section for more details. You can change the function of this button in
Settings.
Bluetooth
Change
Bluetooth
Display
Speed
Start
Stop
Preset
Reset
DT7 and DT5
31
Page 29

Treadmill Desk Console Overview
Preset (speed) Button
Out of the box, the Preset button activates 1.5 mph with a treadmill.
Change the speed or resistance in Personal Settings.
This feature may be disabled in Settings, setting Preset to OFF. Default is ON.
Bluetooth Operation
To sync your activity data with your LifeSpan app, press the Bluetooth button,
go to the Sync screen on the app, and hold your phone a couple of inches
from the console. Syncing will take only a few seconds.
Treadmill Desk Innovative Features
Bluetooth – The Bluetooth communications system in this Workplace
Solutions console can send activity information to LifeSpan apps. Your phone
must be equipped with Bluetooth 4.0 or later, also known as Bluetooth Low
Energy. All iPhones and most Android phones have this.
Intelli-StepTM – LifeSpan treadmill desks come with Intelli-Step our exclusive
step counting feature that senses each time your foot lands on the walking
belt and counts your step total on the display console. If you’re in the habit of
counting daily steps or want to incorporate a daily or weekly step count goal
this feature will provide more accurate step counting than using a smartwatch
or other wearable step counting device on your wrist. Accuracy does
require that the treadmill desk is able to detect your steps and will be less
accurate for those who walk lightly including those individuals under a 100
pounds (45.5 KG).
Intelli-Guard™ - This unique safety feature is engaged when the treadmill belt
speed reaches 1.0 MPH (1.6 KPH) or faster and automatically pauses the belt
20 seconds after you stop walking, ensuring that no one else steps on the
treadmill desk without noticing that its already running. When Intelli-Guard
senses that the treadmill is no longer being used, after 20 seconds the audible
beep will rst notify you that the treadmill belt is going to pause. This feature
can be controlled in Personal Settings.
32
Page 30

Treadmill Desk Innovative Features
Personal Settings – there are several features that can be set using our
Personal Settings feature to tailor LifeSpan treadmill desks to your specic
preferences. These include:
• Maximum Speed: Select 2MPH (3.2KPH) or 4MPH (6.4 KPH)
maximum speed options.
• Intelli-Guard Selection: On / O setting
• Resume Speed: after pressing pause and returning to the treadmill
desk the default belt speed will be .4 MPH (.6 KPH) which is the
normal starting speed. The resume starting speed can be modied
to default to return to the previous running speed.
In addition, the following features are applicable to both treadmill desk and
bike desk users.
• Audible Safety Beep: On / O setting. Each time the control buttons
on the console are depressed an audible beep is used as an alert
that a change was made. This is designed to prevent accidental
speed adjustments being made without users being aware that they
may be accidentally depressing a button.
• Bluetooth Pairing: Manual or Automatic. The Bluetooth feature can
be set to automatically sync with your phone, if used by more than
one person we suggest setting it to manual mode and only sync
your results when the Bluetooth button is depressed.
• Metric versus Standard Readouts: Change the display readouts for
speed and distance to Metric or back to standard readouts.
Interlocking Frames – Since the DT5 and DT7 are designed specically to be
used for walking with our treadmills we design them with an extra-large base
for added stability and we interlock our desks and treadmills together so they
are virtually impossible to pull over should you need to rely on the desk to
keep your balance.
Arm Rest – Foam padding on the front of the desk give you a comfortable
place to rest your arms and provide a location to hold onto the desk to keep
you located when actively engaged in other activities like walking meetings.
33
Page 31

Treadmill Desk Troubleshooting
The LifeSpan Treadmill Desk is designed and manufactured to be reliable and
easy to use. However, if you have a problem, these troubleshooting steps may
help you nd the cause.
Problem: The console is erratic or not lighting up.
Solution: Check to make sure the treadmill desk is properly plugged in.
Turn the power switch o and back on again and make sure the Safety Key
is in place. Make sure the connectors located in the front of the treadmill
and under the desktop are fully plugged in. If the problem persists contact
LifeSpan customer service.
Problem: The treadmill motor seems strained or E1 comes up after several
minutes of use.
Solution: The silicone lubricant that is applied to the deck and belt is wearing
down and the belt needs to be lubricated with 100% silicone spray (nonaerosol).
Problem: The treadmill automatically pauses during a workout.
Solution: The treadmill is not picking up the step count. Go into the Personal
Settings section (page 36) to turn the Intelli-Guard feature o.
Problem: The treadmill speed doesn’t feel right (either too fast or too slow).
Solution: Go into the Personal Settings section (page 36) and check if you are
in Metric or English mode. If you are in the correct mode, contact LifeSpan
customer service.
Problem: “UART” appears in the display.
Solution: Turn the treadmill desk power switch o. Unplug and re-plug the
connections made in Step C on page 25 (DT5) on page 26 (DT7). Make sure
the thumb screws are properly tightened. Turn the treadmill desk power back
on and check to see if it functions properly.
34
Page 32

Treadmill Desk Troubleshooting
Problem: “dc-6” appears in the display.
Solution: Turn the treadmill desk power switch o. Unplug and re-plug the
connections made in Step C on page 25 (DT5) on page 26 (DT7). Make sure
the thumb screws are properly tightened. Turn the treadmill desk power back
on and check to see if it functions properly.
Problem: The console isn’t connecting to the app via Bluetooth.
Solution: Go to lifespantness.com/support, and click to the Apps section of
FAQs.
If further assistance is needed, please email coordinator@LifeSpanFitness.
com.
Problem: The desktop surface is not level.
Solution: Check to make sure the base feet are on a level surface. For a DT5,
make sure each extension tube is raised to the same height number as shown
on the extension tube. For a DT7, run calibration by pressing and holding the
height adjustment buttons simultaneously for three seconds
Problem: The treadmill belt is beginning to slip and needs to be tensioned.
Solution: Refer to the owners manual included with the treadmill base.
Problem: The treadmill belt is beginning to drift to the left or right and
needs to be aligned.
Solution: Refer to the owners manual included with the treadmill base.
35
Page 33

Treadmill Desk Personal Settings
Press and hold Change Display for one second to enter Settings mode.
Press the up or down arrows to move through the various settings. Press Start
to choose a setting to change.
Press the up or down arrows to move through the various choices for that
setting.
Press Start to select a choice. This takes you back to settings mode, where you
can move through the other settings.
Press Stop to exit Settings mode.
Intelliguard — Intelliguard ON/OFF.
Speed Reset — Controls whether, after a Pause, the treadmill resumes the
most recent walking speed, or resets to 0.5 mph. If ON, the speed resets to 0.5
mph.
Beep — Turns o the normal treadmill beep that happens at every button
press.
Speed Limit — The maximum speed of the treadmill.
Pre Set — Turns on and o the Preset feature. Turning this o is desirable in a
group environment.
Preset Speed — Changes the preset speed from something other than the
default of 1.5.
Weight — Changes the default bodyweight from something other than the
default of 150 pounds / 70 kilograms.
Units of measure — Choose English (Imperial) or Metric.
Multi-User — Choose yes if more than one person will be using the
treadmill desk.
Bluetooth-Auto — Choose whether to automatically pair. Optimized safe
operation for either single or mulitple users.
36
Page 34

Display Details
Setting
Enter Settings
mode:
Intelliguard GUARD ON OFF
Speed Reset: RESET OFF ON
Beep: BEEP ON OFF
Speed Limit: L 2 4
Pre Set: SET ON OFF
Preset Speed SPEED 1.5 +/- 0.1
User Weight: T 150/70 +/- 1
Units of measure: UNITS ENGL (M)TRIC
Setting
Displayed
SET TG n/a n/a
Choice 1
(Default)
Choice 2
Multi-User: USER NO YES
Bluetooth-Auto: BT-A OFF ON
37
Page 35

Bike Desk
Operations
39
Page 36

Bike Desk Specications
COMPARE CONSOLES
Readouts
Display
Bluetooth
MECHANICS & PERFORMANCE
Resistance Level
Dimensions
Height Adjustment
Height Adjustment Method
Desktop Material
Desktop Surface
DT5
Time, Revolutions, Calories,
Distance, Speed
LED
Yes
DT5
16 Levels
Two Optional
47.5” w x 29” d – (120.65 cm w x 73.66 cm d)
Sizes:
38” w x 29” d – (96.52” cm w x 73.66 cm d)
41” to 55”
104 cm to 140 cm
Manual
1” (2.54 cm) thick HD
Composite Board
Durable Laminate
DT7
Time, Revolutions, Calories,
Distance, Speed
LED
Yes
DT7
16 Levels
40” to 53”
101.6 cm to 134.6 cm
Electric
1” (2.54 cm) thick HD
Composite Board
Durable Laminate
Maximum Load on Desktop
Desk Lift Speed
Desk Height Memory
40
180 lbs
82 kg
N /A
N /A
180 lbs
82 kg
38 mm/second
2 Pre-Sets
Page 37

Bike Desk Setting The Clock
To accurately track your activity with apps or other computer systems, the console’s
clock must be set.
Follow these steps:
Press and hold Speed Up and Speed Down for one second.
Display shows:
Display shows:
Display shows: Y
Display shows: H
D
TH
Press Change Display to move to month setting; after
three seconds, display changes automatically.
Use Speed Up or Speed Down arrows to change
month
Press Change Display
Press Change Display to move to day setting; after
three seconds, display changes automatically.
Use Speed Up or Speed Down arrows to change day
Press Change Display
Press Change Display to move to year setting; after
three seconds, display changes automatically
Use Speed Up or Speed Down arrows to change year
Press Change Display
Press Change Display to move to hour setting; after
three seconds, display changes automatically.
Note: the clock uses the 24-hour format, such as 16:25
for 4:25 p.m.
Use Speed Up or Speed Down arrows to change hour
Display shows: N
Press Change Display To Move To Normal Standby Mode.
Press Change Display
Press Change Display to move to minutes setting; after
three seconds, display changes automatically.
Use Speed Up or Speed Down arrows to change
minutes.
41
Page 38

Bike Desk Innovative Features
Starting the Bike Desk
1. Press the On/O button to turn on the console.
2. Press the Start, and start pedaling. The console will start counting up from
0:00.
3. Press the Up/Down buttons to adjust resistance.
42
Page 39

Bike Desk Console Overview
Speed
Bluetooth
Preset
Change
Display
Power
Stop
Reset
Start
Bluetooth
Speed
Bluetooth
Preset
Change
Display
Power
Stop
Reset
Start
Bluetooth
Preset
Desk Height
1 2
Desk Height
Preset
1 2
Power
DT7 only
Console Power Buttons
1. On/O: Turns on the console. When pressed again, turns o the console;
the console must be in standby mode (displaying the current time) for
the power o function to work.
2. Start: Starts the bike. Performs other functions in Settings.
3. Stop: Stops the bike, Pausing your use. If pressed for one second, resets
the console (all data readouts are reset to zero).
4. Preset: This feature is used in a treadmill desk setting and is not
applicable to a bike desk.
5. : Increases or decreases resistance by one level.
6. Change Display: Changes the data readout between Time (the default),
Distance, Steps (Pedal Revolutions), Calories, and Speed. Press and hold
for one second to automatically change readouts every ve seconds;
press again to stop this automatic change.
7. Bluetooth: Turns on Bluetooth communications. Phone apps available
from LifeSpan can use this system to track your activity. See the Bluetooth
section for more details. You can change the function of this button in
Settings.
Bluetooth
Change
Bluetooth
Display
Speed
Start
Stop
Preset
Reset
DT7 and DT5
43
Page 40

Bike Desk Console Overview
Bluetooth Operation
The Bluetooth communications system in this Workplace Solutions console
can send activity information to LifeSpan apps. Your phone must be equipped
with Bluetooth 4.0 or later, also known as Bluetooth Low Energy. All iPhones
and most Android phones have this.
To sync your activity data with your LifeSpan app, press the Bluetooth button,
go to the Sync screen on the app, and hold your phone a couple of inches
from the console. Syncing will take only a few seconds.
Bike Desk Innovative Features
Bluetooth – The Bluetooth communications system in this Workplace
Solutions console can send activity information to LifeSpan apps. Your phone
must be equipped with Bluetooth 4.0 or later, also known as Bluetooth Low
Energy. All iPhones and most Android phones have this.
In addition, the following features are applicable to both treadmill desk and
bike desk users.
• Audible Safety Beep: On / O setting. Each time the control buttons
on the console are depressed an audible beep is used as an alert
that a change was made. This is designed to prevent accidental
speed adjustments being made without users being aware that they
may be accidentally depressing a button.
• Bluetooth Pairing: Manual or Automatic. The Bluetooth feature can
be set to automatically sync with your phone, if used by more than
one person we suggest setting it to manual mode and only sync
your results when the Bluetooth button is depressed.
• Metric versus Standard Readouts: Change the display readouts for
speed and distance to Metric or back to standard readouts.
44
Page 41

Bike Desk Troubleshooting
This bike desk has been designed and manufactured to be reliable and easy
to use. However, if you have a problem, these troubleshooting steps may help
you nd the cause.
Problem: The console is erratic or not lighting up.
Solution: Check to make sure the bike is properly plugged in. Make sure the
connectors on the bike and under the desktop are fully plugged in. If the
problem persists contact LifeSpan customer service.
Problem: “UART” appears in the display.
Solution: Turn the bike desk power switch o. Unplug and re-plug the
connections made in Step C on page 25 (DT5) on page 26 (DT7). Make sure
the thumb screws are properly tightened. Unplug the bike and plug it back in
and check to see if it functions properly.
Problem: “dc-6” appears in the display.
Solution: Turn the bike desk power switch o. Unplug and re-plug the
connections made in Step C on page 25 (DT5) on page 26 (DT7). Make sure
the thumb screws are properly tightened. Unplug the bike and plug it back in
and check to see if it functions properly.
Problem: The console isn’t connecting to the app via Bluetooth.
Solution: Go to lifespantness.com/support, and click to the Apps section
of FAQs. If further assistance is needed, please email coordinator@
LifeSpanFitness.com.
Problem: The desktop surface is not level.
Solution: Check to make sure the base feet are on a level surface. For a DT5,
make sure each extension tube is raised to the same height number as shown
on the extension tube. For a DT7, run calibration by pressing and holding the
height adjustment buttons simultaneously for three seconds
45
Page 42

Bike Desk Personal Settings
Press and hold Change Display for one second to enter Settings mode.
Press the up or down arrows to move through the various settings. Press Start
to choose a setting to change.
Press the up or down arrows to move through the various choices for that
setting.
Press Start to select a choice. This takes you back to settings mode, where you
can move through the other settings.
Press Stop to exit Settings mode.
Beep — Turns o the normal treadmill beep that happens at every button
press.
Weight — Changes the default bodyweight from something other than the
default of 150 pounds / 70 kilograms.
Units of measure — Choose English (Imperial) or Metric.
Multi-User — Choose yes if more than one person will be using the
bike desk.
Bluetooth-Auto — Choose whether to automatically pair. Optimized safe
operation for either single or mulitple users.
Sleep Function — Choose whether the console has a Sleep, or Auto-PowerO function when the console is paused. The default function is No Sleep. If
you choose to enable the Sleep function, you can choose to wait 10 minutes
before sleep, or 20 minutes.
46
Page 43

Display Details
Setting
Enter Settings
mode:
Beep: BEEP ON OFF
User Weight: T 150/70 +/-1
Units of measure: UNITS ENGL (M)TRIC
Multi-User: USER NO YES
Bluetooth-Auto: BT-A OFF ON
Sleep SLEEP NO 10/20
Setting
Displayed
SET TG n/a n/a
Choice 1
(Default)
Choice 2
47
Page 44

LifeSpan Fitness
P.O. Box 981316
Park City, Utah 84098-1316
Phone: 877.654.3837
www.LifeSpanFitness.com
DT5/DT7
Version 6.3
Treadmill/Bike Desk
 Loading...