

lifeSMART LS-8PAC, LS-10PAC, LS-12PAC Owner's Manual
I
N
T
R
O
D
U
C
T
I
O
N
This Instruction Manual is universal for portable air conditioners manufactured
by lifesmart.The appearance of your unit might be slightly different than the
one described in this manual. Operation and usage of your air conditioner
should not vary. In order to ensure your safety,
Please carefully read the sections that correspond with your unit.
Also, keep the manual in a safe place for future reference.
Introduction
1
2
3
5
7
8
10
11
12
Table of Contents:
Introduction
Parts
Control Panel
Remote Control
Water Drainage
Maintenance/Service
Safety
Troubleshooting
Installation
Warning:
(1) This appliance is not intended for use by children or invalid persons without
supervision.
(2) The plug should be accessible after installation of the device.
(3) Do not install unit in laundry room.
(4) Do not use if power cord is damaged.
(5) Please wait three minutes before restarting unit after a power outage.
(6) The unit needs a minimum clearance of three feet from any combustible materials.
This symbol refers to a hazard or unsafe practice which can result
in severe personal injury or death.
This symbol refers to a hazard or unsafe practice which can result
in personal injury or product or property damage.
!
WARNING
CAUTION
!
Warranty
16
INTRODUCTION
This Portable Air Conditioner is a small size appliance that has multiple functions.
Some functions of this unit are that it can adjust the temperature and humidity in
a room, cool, dehumidify, and fan. The unit was designed to be used in home
and office environments with a compact design compared to others.
PORTABLE AIR CONDITIONER
1
Other air conditioning patterns are recommended when the ambient temperature
is either below 180C(650F) or above 35
0
C(950F).
CAUTION
!
Please read this instruction manual carefully to get optimum usage from your unit.
This instruction manual is used for guidance and does not form part of a
contract.We reserve the right to make technical changes without prior notice.
ATTENTION
There might be some water saved on the bottom of the base. Please push the Air
Conditioner gently and cautiously to prevent water from splashing out.
2
FRONT
BACK
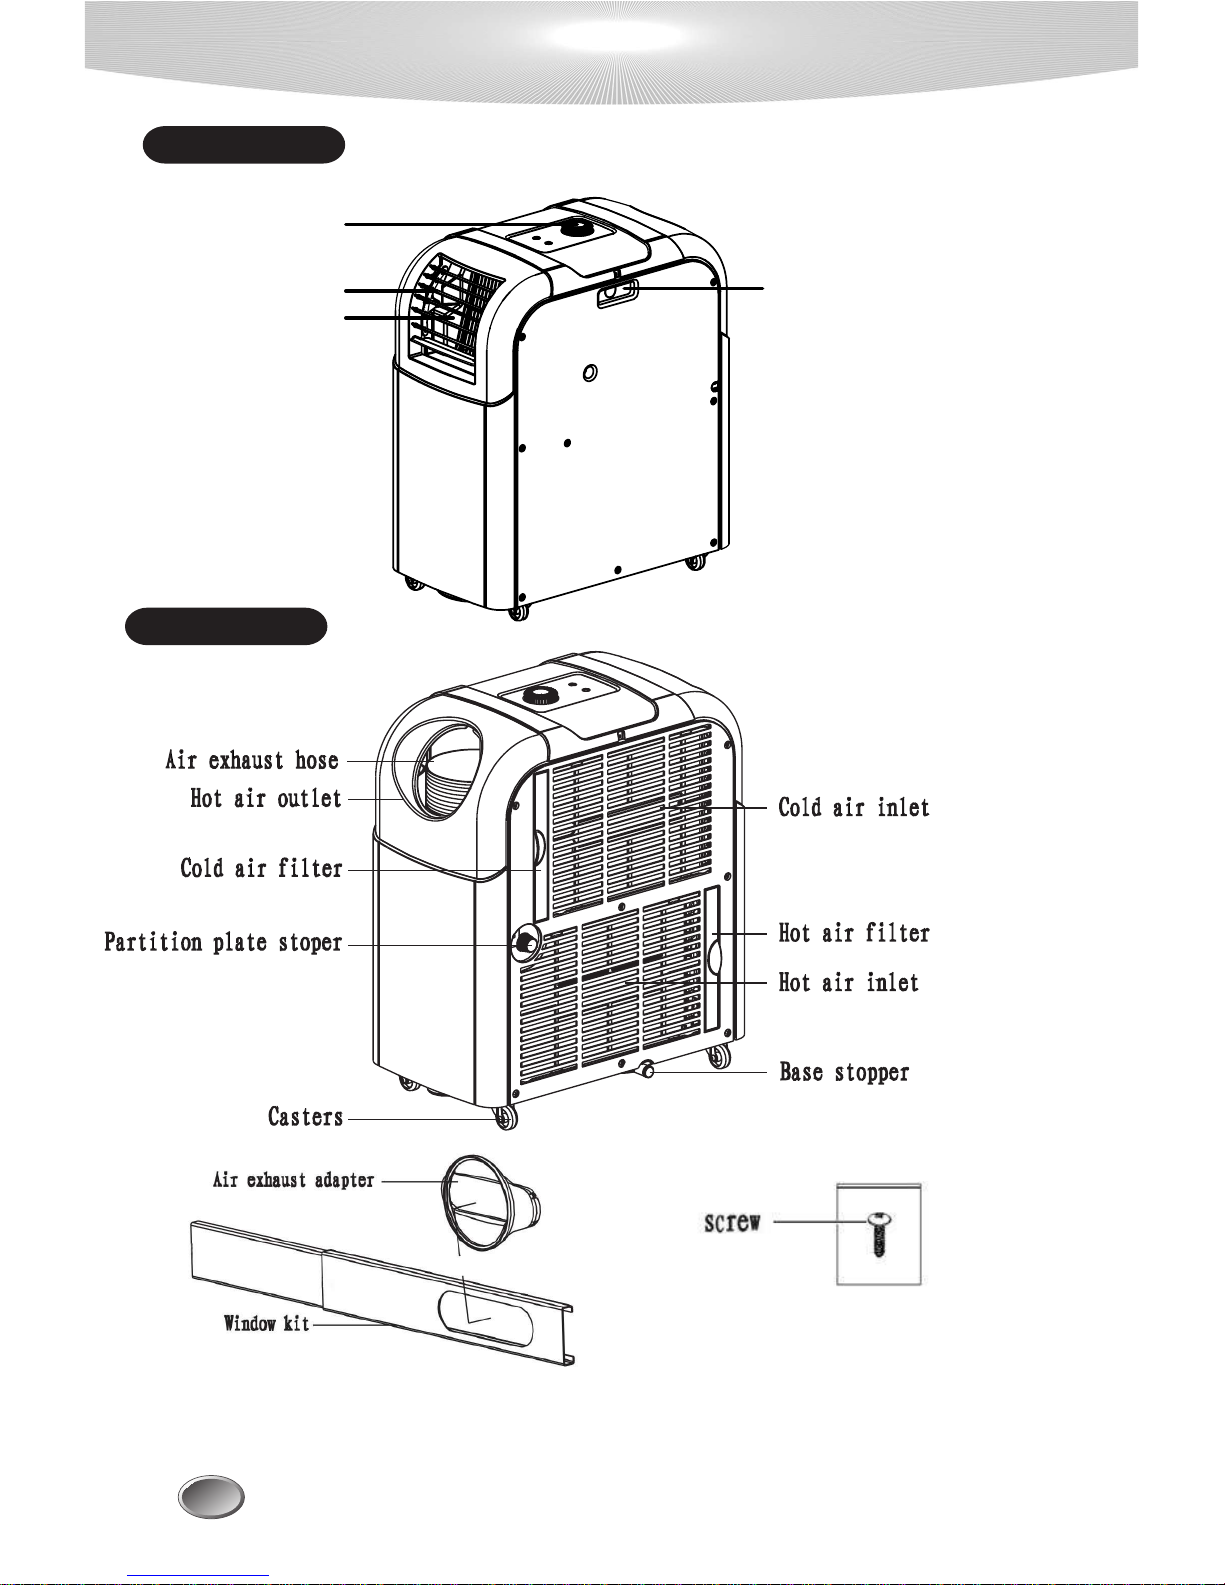
PARTS
Note:Features and appearance may vary depending on your air conditioner model.
Handle
Control knob
Adjustable air fins
Cold air outlet
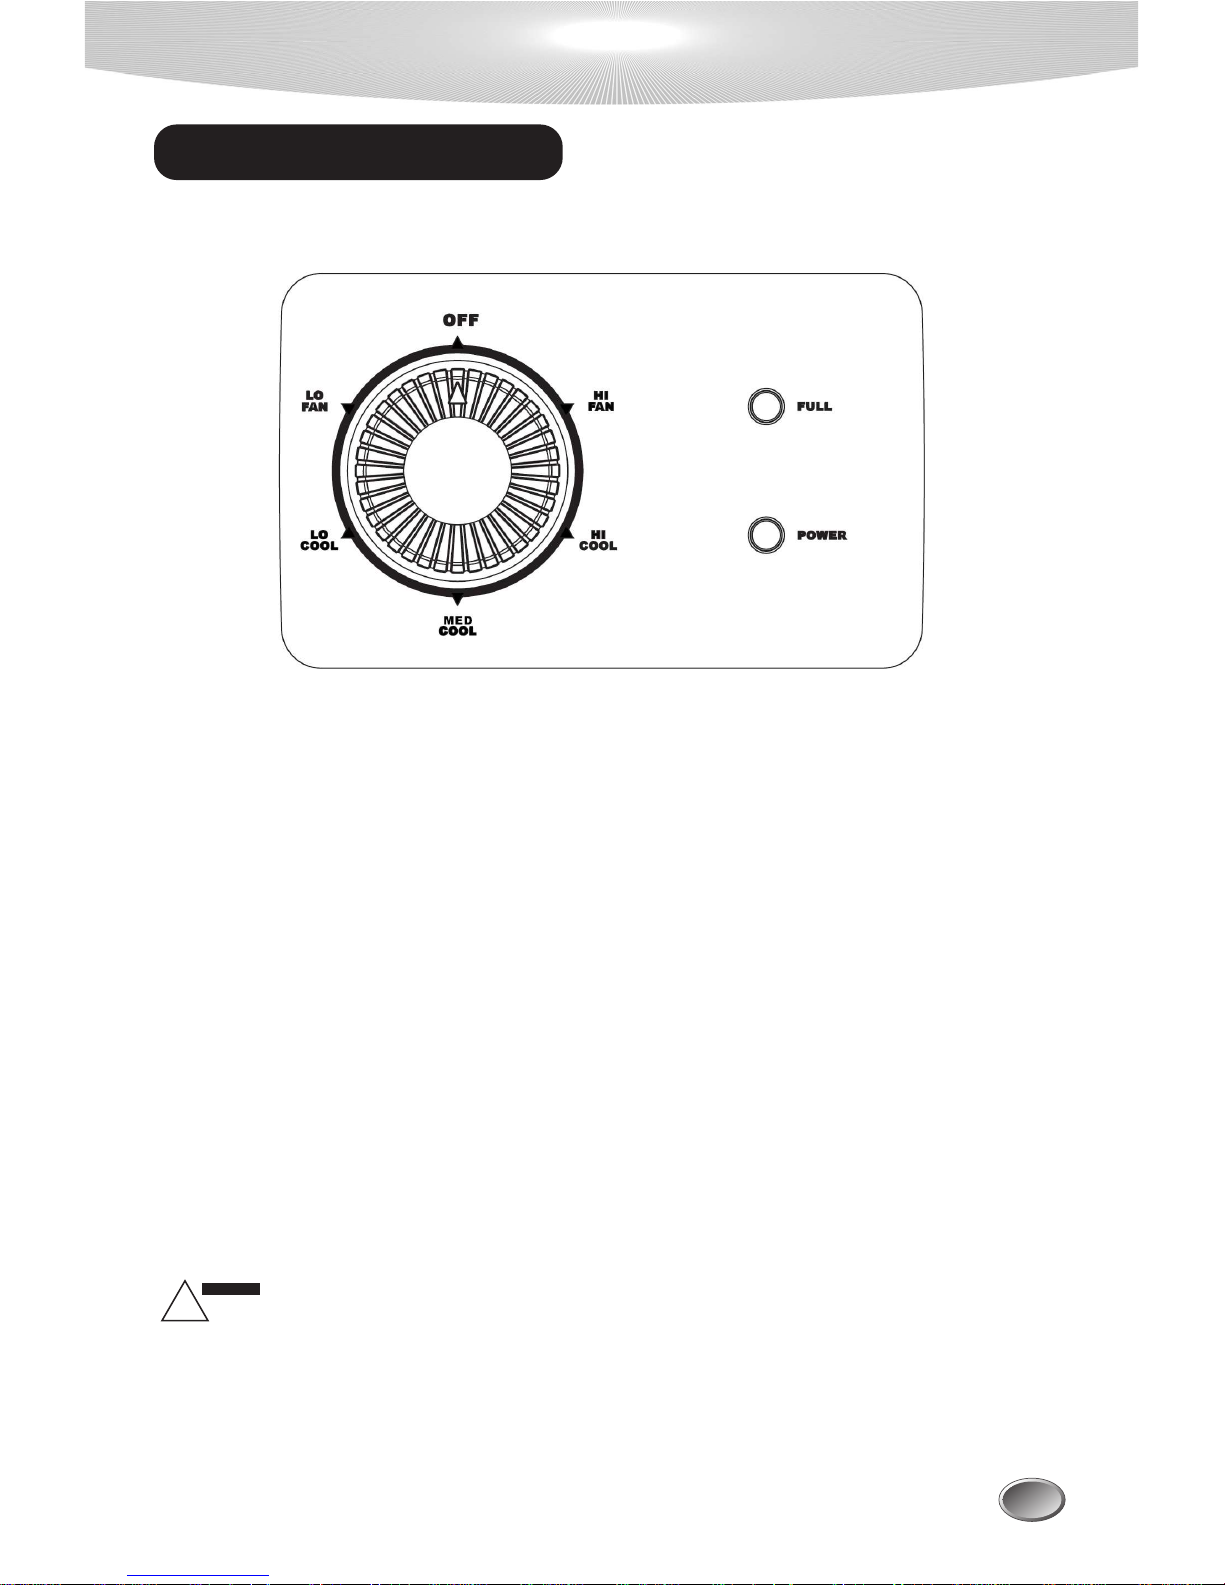
CONTROL PANEL
3
CONTROL PANEL 1
*The AC socket must be firm and reliable.
*Do not connect portable air conditioner to a power strip/surge protector, or extension cord.
OFF:When the knob is turned to "OFF",the air conditioner will stop operation.
LO FAN: When the knob is turned to "LO FAN",the air conditioner will be in low fan operation
mode to delivery weak airflow.
HI FAN: When the knob is turned to "HI FAN",the air conditioner will be in high fan operation
mode to delivery strong airflow.
LO COOL:When the knob is turned to"LO COOL",the air conditioner will be in low cooling
operation mode to delivery weak airflow.
MED COOL: When the knob is turned to "MED COOL", the air conditioner will be in medium
cooling operation mode to delivery medium airflow.
HI COOL:When the knob is turned to "HI COOL",the air conditioner will be in high cooling
operation mode to delivery strong airflow.
Power: When the compressor is working, the "POWER" lamp will illuminate.
FULL:When the internal water tank is full, the "FULL"lamp
will illuminate and the unit will stop
running until the tank is emptied.
POWER SOURCE
!
WARNING
Before you insert the plug,please make sure the knob is turned to the "OFF" position.
Before you insert the plug,please make sure the knob is turned to "OFF".
CONTROL PANEL
4
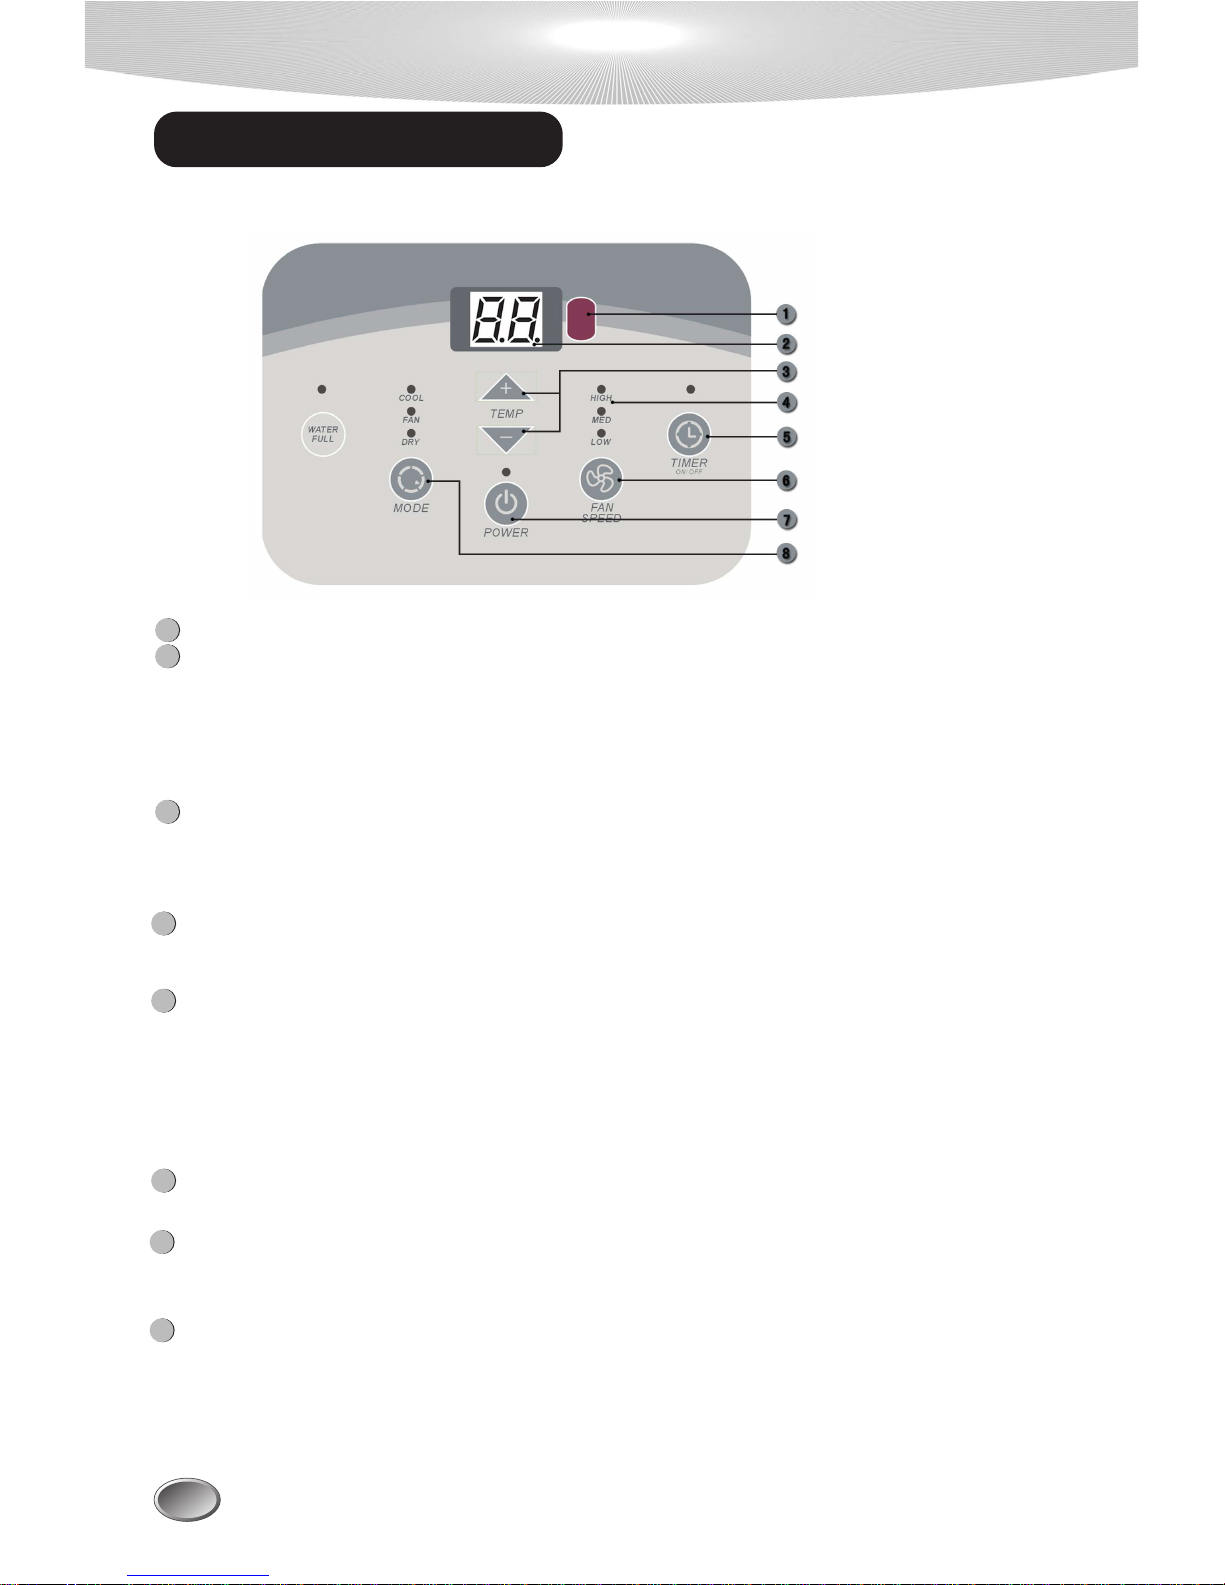
CONTROL PANEL 2
1
REMOTE CONTROLLER SIGNAL RECEIVER
TEMP button
Press this button to adjust setting the temperature within the range of 63F/17C to 88F/31C.
When in the TIMER mode (press and release the TIMER button to enter this status) use
TEMP + or - buttons to set the TIMER time range between 1-12 hours.
2
DIGITAL DISPLAYER
FAN Mode: Indicates room temperature.
COOL or DRY Mode: Indicates setting the temperature.
TIMER Operation: When pressing the TIMER button, this indicates timer time.
If the time has not been adjusted, after 5 seconds the temperature will appear.
ROOM TEMP SENSOR Failure: Display indicates temperature at 77F/25C.
7
POWER button
To turn the air conditioner ON, press the button and the power indicator will light.
To turn the air conditioner OFF,press the button again.
Press this button to set the air speed you desire: High/Low/Med.
UNIT INDICATION button
Allows you to choose between the operation modes: COOL, DRY, FAN, HEAT (heat for the
cooling and heating model).
5
8
MODE button
When selected the corresponding operation mode or fan speed, or the water full, the light will be
on.
6
FAN SPEED button
TIMER button
The TIMER has two modes Switch-ON and Switch-OFF. If the unit is running, pressing the
timer button will enter you into the Switch-OFF mode. If the unit is off, pressing the timer
button will enter you into Switch-ON mode. Pressing this button again will cancel the timer
option. To set the TIMER time use the + or - buttons accordingly. The time can be set
between 1-12 hours.
4
Note:Features and appearance may vary depending on your air conditioner model.
3
 Loading...