

•
important safety information
•
assembly instructions
•
use and care
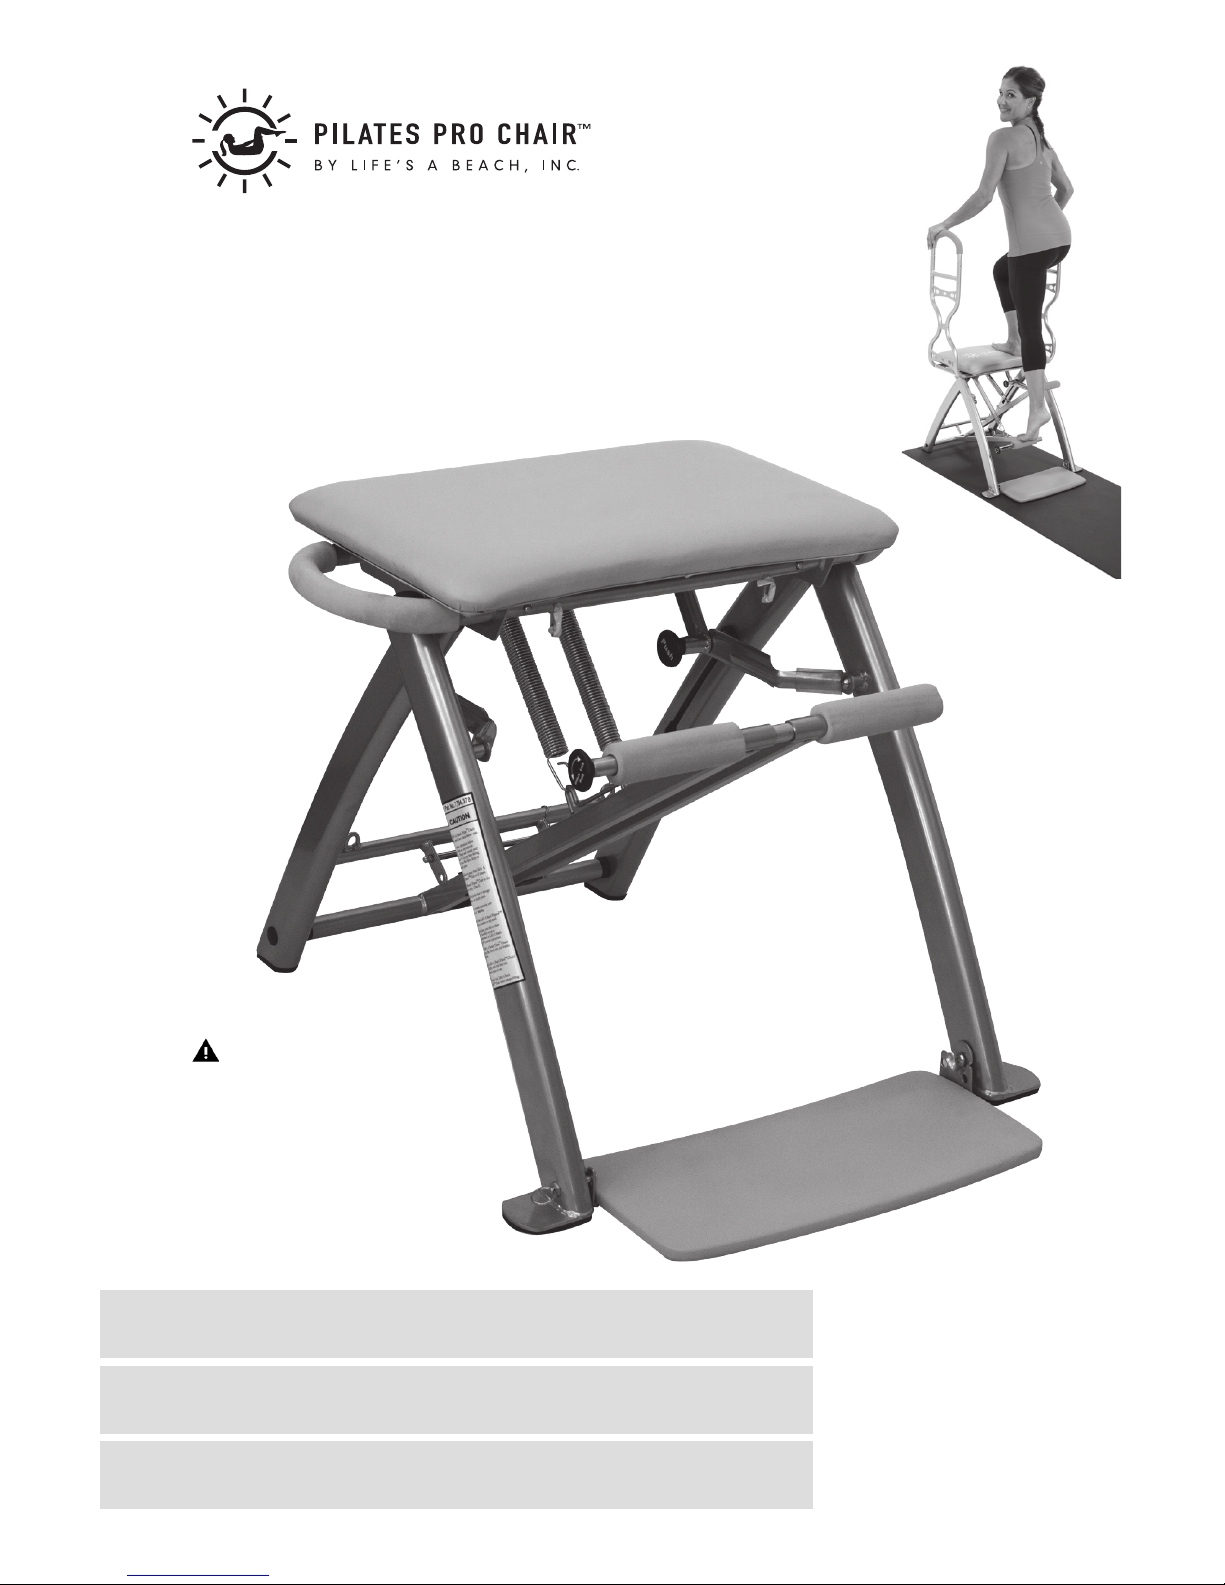
CHAIR ASSEMBLY
& CARE GUIDE
For maximum effectiveness
and safety, read instructions
and important tips before
using the Pilates PRO
Chair™.

2

3
CAUTION: To avoid injury, follow the safety information in this document.
To reduce the risk of product damage, imbalance, pinch points, choking, and
strain due to misuse, follow these instructions.
• Consult your physician before starting this or any exercise program. Stop
and consult your physician if at any time during exercise you feel faint,
dizzy, or experience pain.
• Do NOT use the Pilates PRO Chair™ as a toy. Keep it and all accessory
pieces away from children at all times. The Pilates PRO Chair™ contains
small parts that could cause choking.
• Do not exceed the maximum user weight of 300lbs.
• Inspect the Pilates PRO Chair™ for damage before use. If you find any
missing or damaged parts, discontinue use.
• Use the Pilates PRO Chair™ for home exercise only. It is NOT intended for
commercial use.
• Use only the exercises described in the Pilates PRO Chair™ exercise
instructions.
• Avoid straining your neck during workouts. Do not turn your head to look
at the Pilates PRO Chair™ DVD on your TV screen. Keep your head facing
forward at all times, and listen for the cues; or turn your chair to face the
screen.
• Control the springs. Maintain constant tension on the springs of your Pilates
PRO Chair™ when exercising so that the work out foot pedals do not snap
back into place or crash to the floor and cause bodily injury.
• Be aware of your foot placement. Never place your feet under the pedals,
where they could be crushed.
• Keep fingers, loose clothing, and hair away from all moving parts.
• Do all workouts in bare feet to avoid injury due to slipping and to avoid
possible damage to the Pilates PRO Chair™ unit. Do not use while wearing
socks or shoes.
• Use the Pilates PRO Chair™ only on stable and even surfaces.
• Use the arm handles only when seated.
• Open the Pilates PRO Chair™ legs fully, and lock them into position prior
to use.
• Fold and lock the Pilates PRO Chair™ before transporting it.
IMPORTANT SAFETY INFORMATION

4
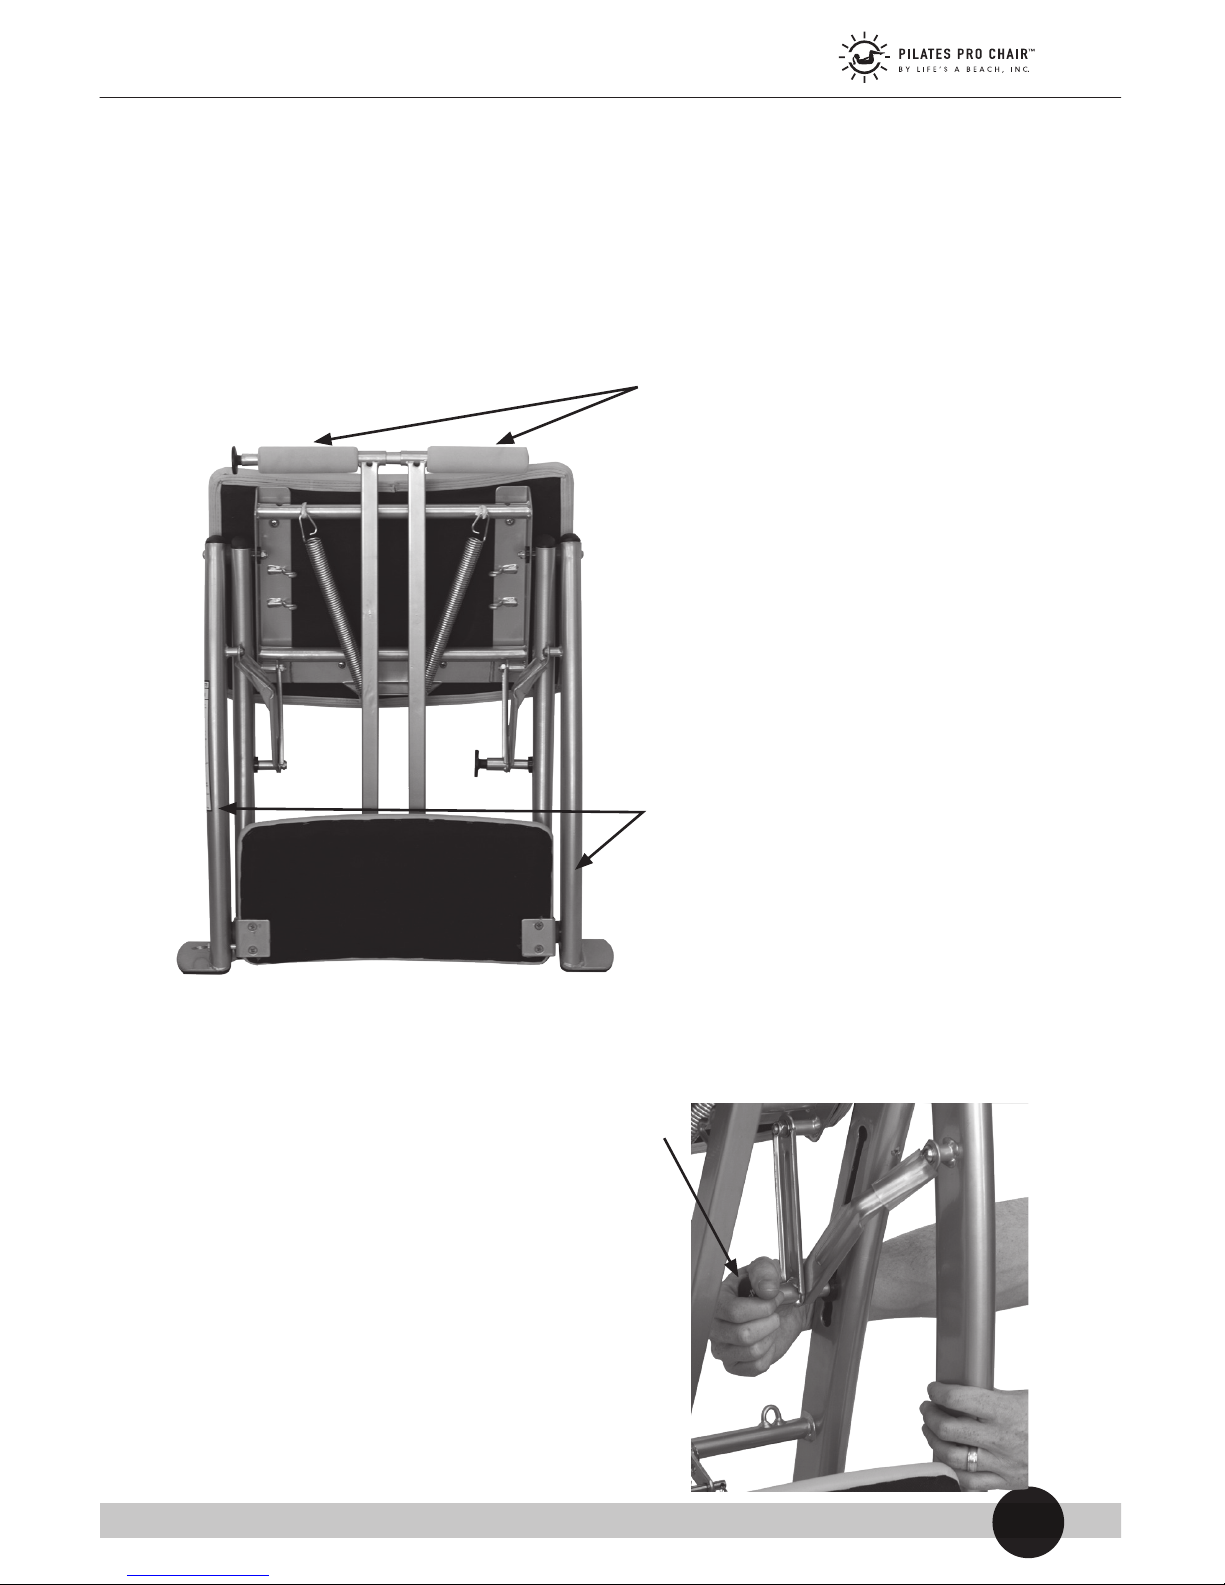
The Pilates PRO Chair™ comes partially assembled (Figure 1):
USE/ASSEMBLY INSTRUCTIONS
• Pilates PRO Chair™ base (A)
• 2 Arm handles (B)
• 2 Springs (C)
• Foot board (D)
• Pedal locking pin (E)
• Leg safety lock (F)
• Bracket curves (G)
• Workout foot pedal (H)
• Foot board pin (I)
• Toggle (J)
figure 1
CAUTION: To avoid breakage
and possible injury, use only
manufacturer-supplied parts
with the Pilates PRO Chair™.
A
B B
To complete the assembly of the Pilates PRO Chair™, you will need the
following items, which are all included in your shipment (see Figure 2):
figure 2
B
C
J
I
B
F
H
A
D
E
G
5
NOTICE: Do not use sharp objects to cut through the plastic bags. Doing so may
cause damage to the Pilates PRO Chair™ parts.
ASSEMBLING THE PILATES PRO CHAIR™ BASE
STEP 1
Carefully remove the Pilates PRO Chair™ parts from the plastic bags.
STEP 2
Stand the Pilates PRO
Chair™ base (A) in an
upright position with
the workout foot pedals (H) facing toward
you (Figure 3).
STEP 3
Push in the Leg Safety Lock (F).
Grasp the legs closest to the
foot board, and pull them away
from the opposite legs until
they lock into place (Figure 4).
figure 3
(H) Workout Foot Pedals
figure 4
(A) Chair Base
6
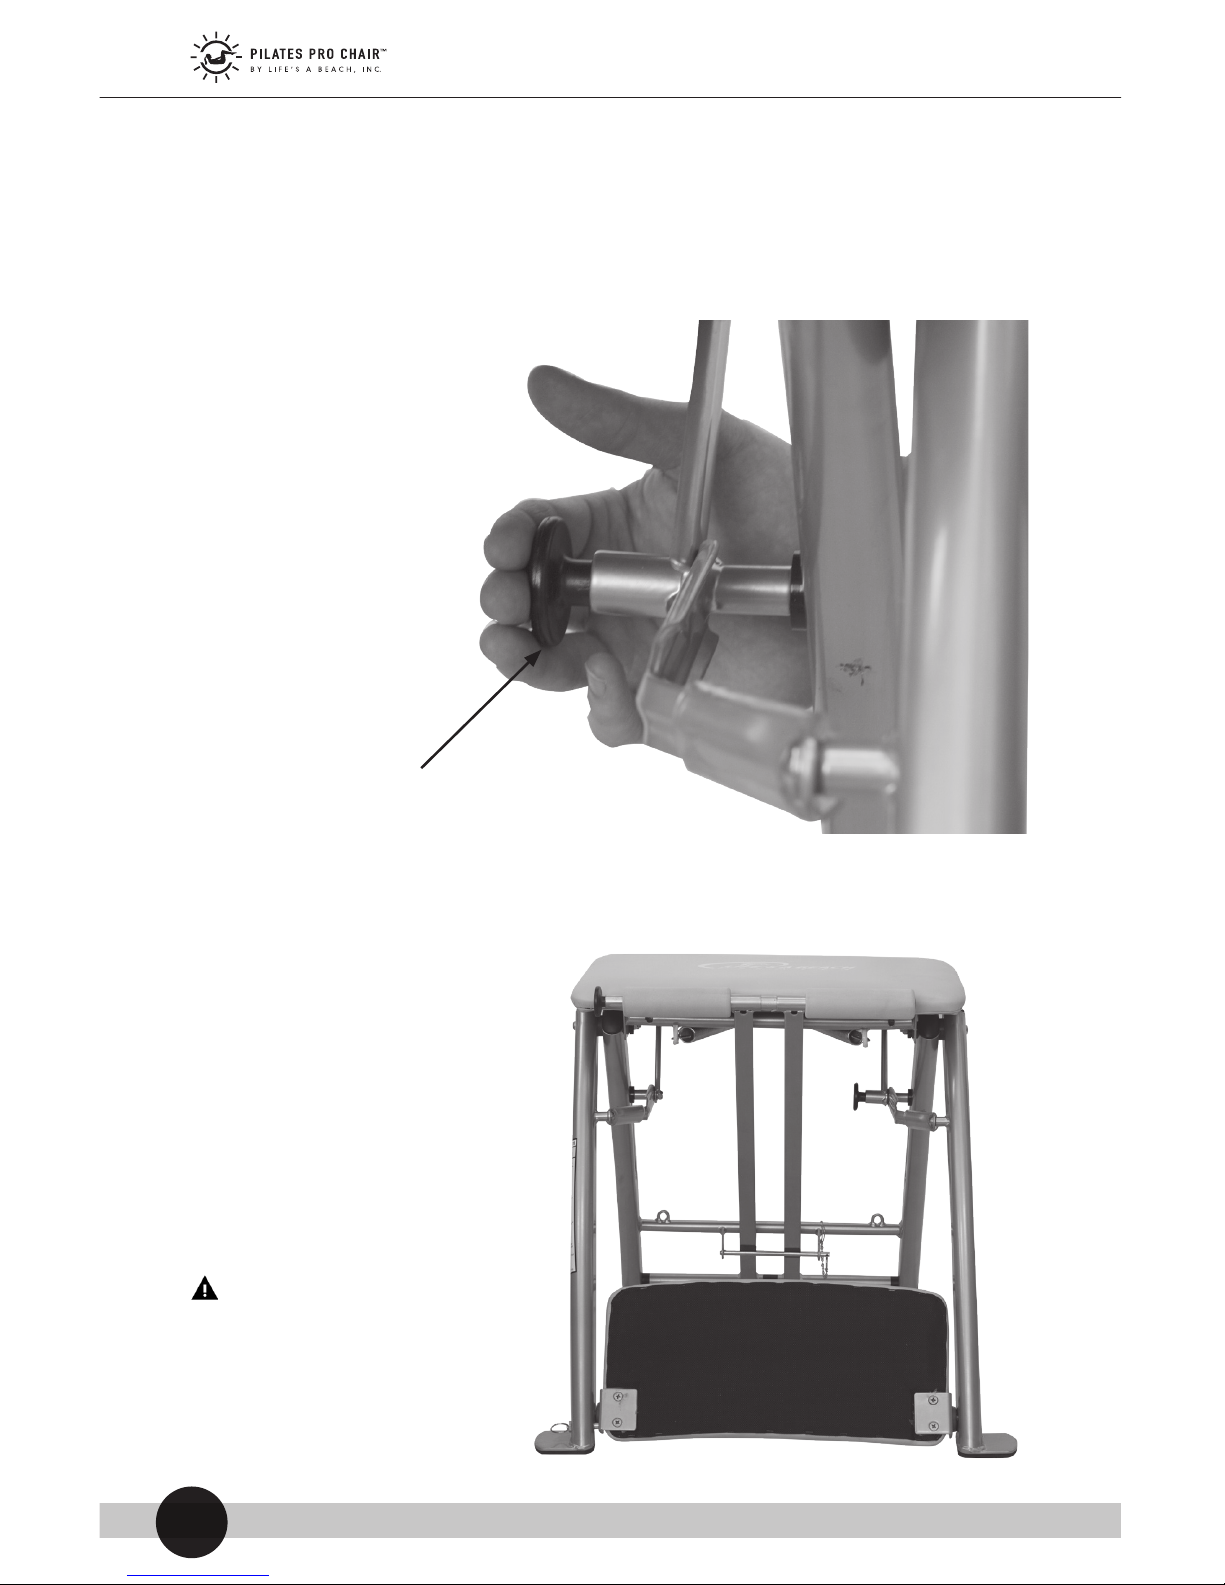
STEP 4
Make sure the leg safety lock (F) is secure (Figure 5).
CAUTION: Open the legs of
the Pilates PRO Chair™ fully
and lock them into position
prior to use, (Figure 6).
figure 5
(F)
Leg Safety Lock
figure 6
7
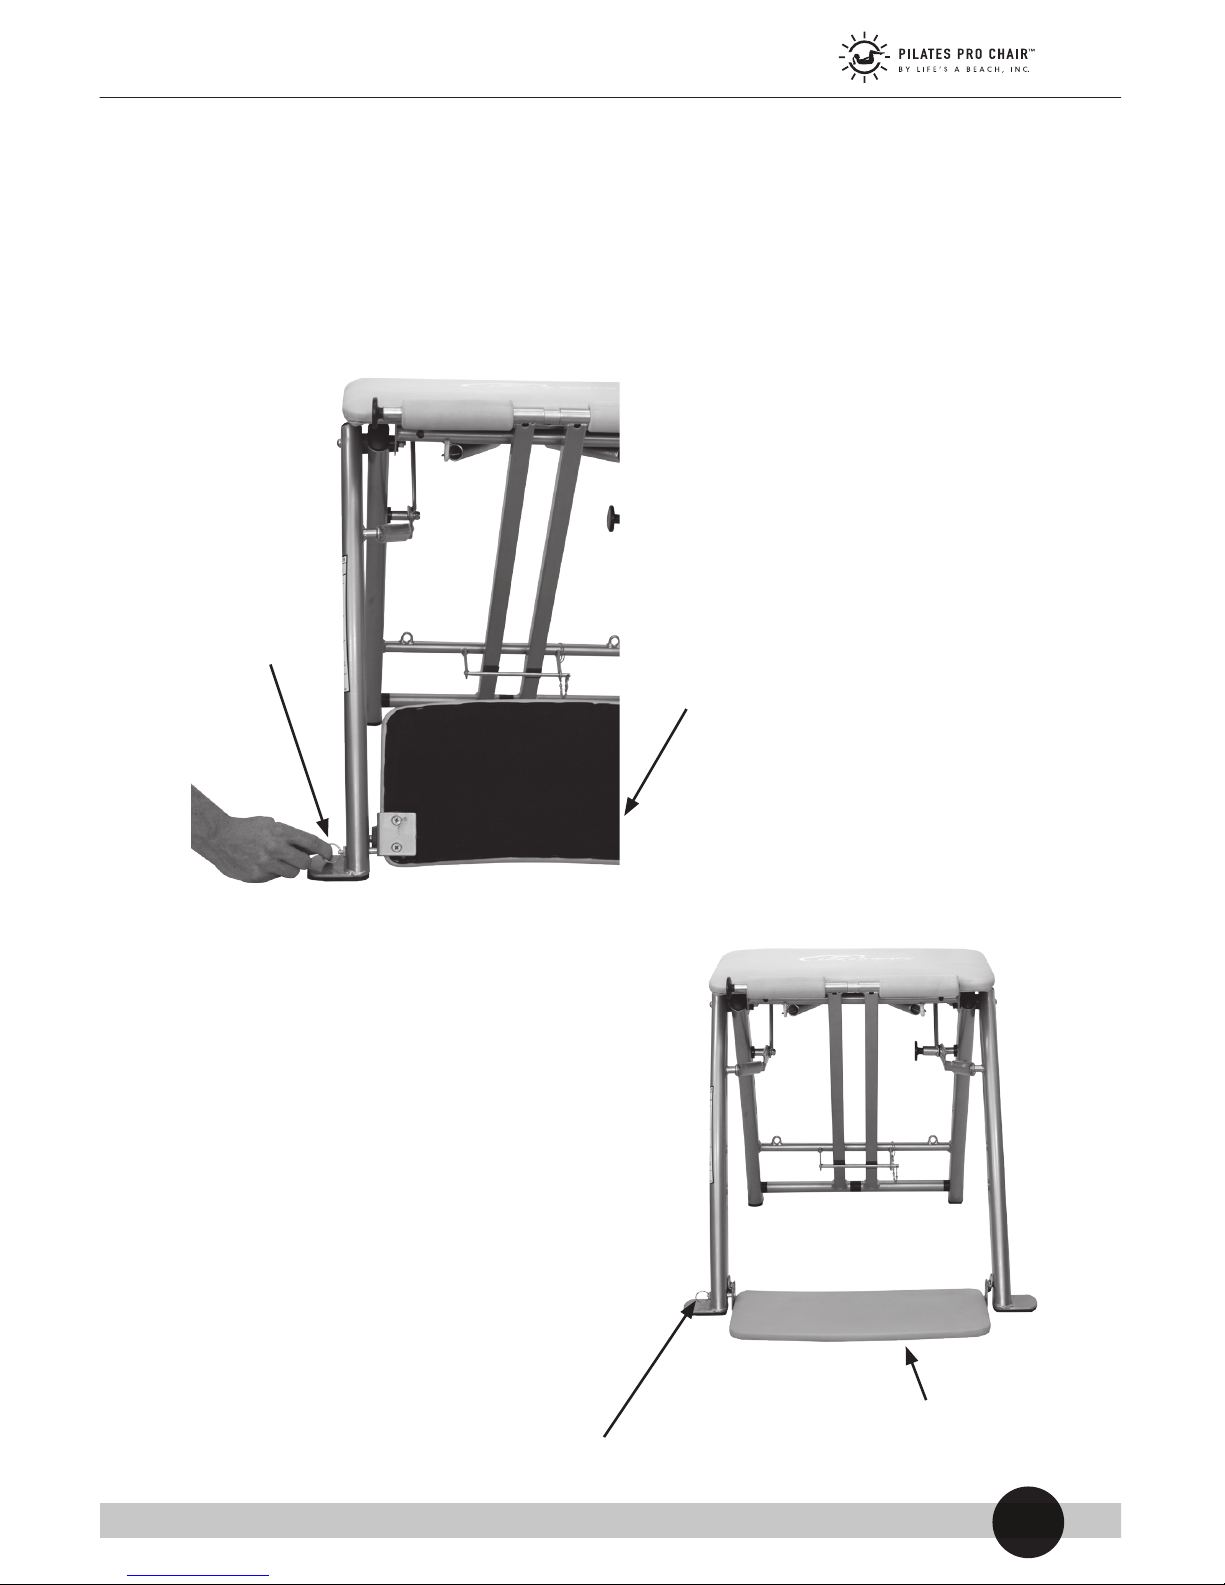
The Pilates PRO Chair™ comes with the foot board (D) locked in the up
position (Figure 7).
FOLDING THE FOOT BOARD DOWN
figure 7 STEP 1
Pull the foot board pin (I)
out, (Figure 7), and fold the
foot board down.
(I)
Foot
Board
Pin
figure 8
STEP 2
Release the foot board pin
(I). The foot board (D) is now
locked into the down position
(Figure 8).
(I) Foot Board Pin
(D) Foot Board
(D) Foot Board
8
FOLDING THE PEDALS DOWN
STEP 1
Remove the pedal locking pin (E) from the bracket on the crossbar at the back of the workout foot pedals (H), as shown in
Figure 9, and release the foot pedals (H) down (Figure 10).
STEP 2
Place the pedal locking pin
(E) in the top holder of
the bracket on the crossbar at the back of the foot
pedals (H) for safe keeping
(Figure 11).
figure 9 figure 10
(E) Pedal Locking Pin
(H) Workout
Foot Pedals
figure 11
(E) Pedal Locking Pin
9
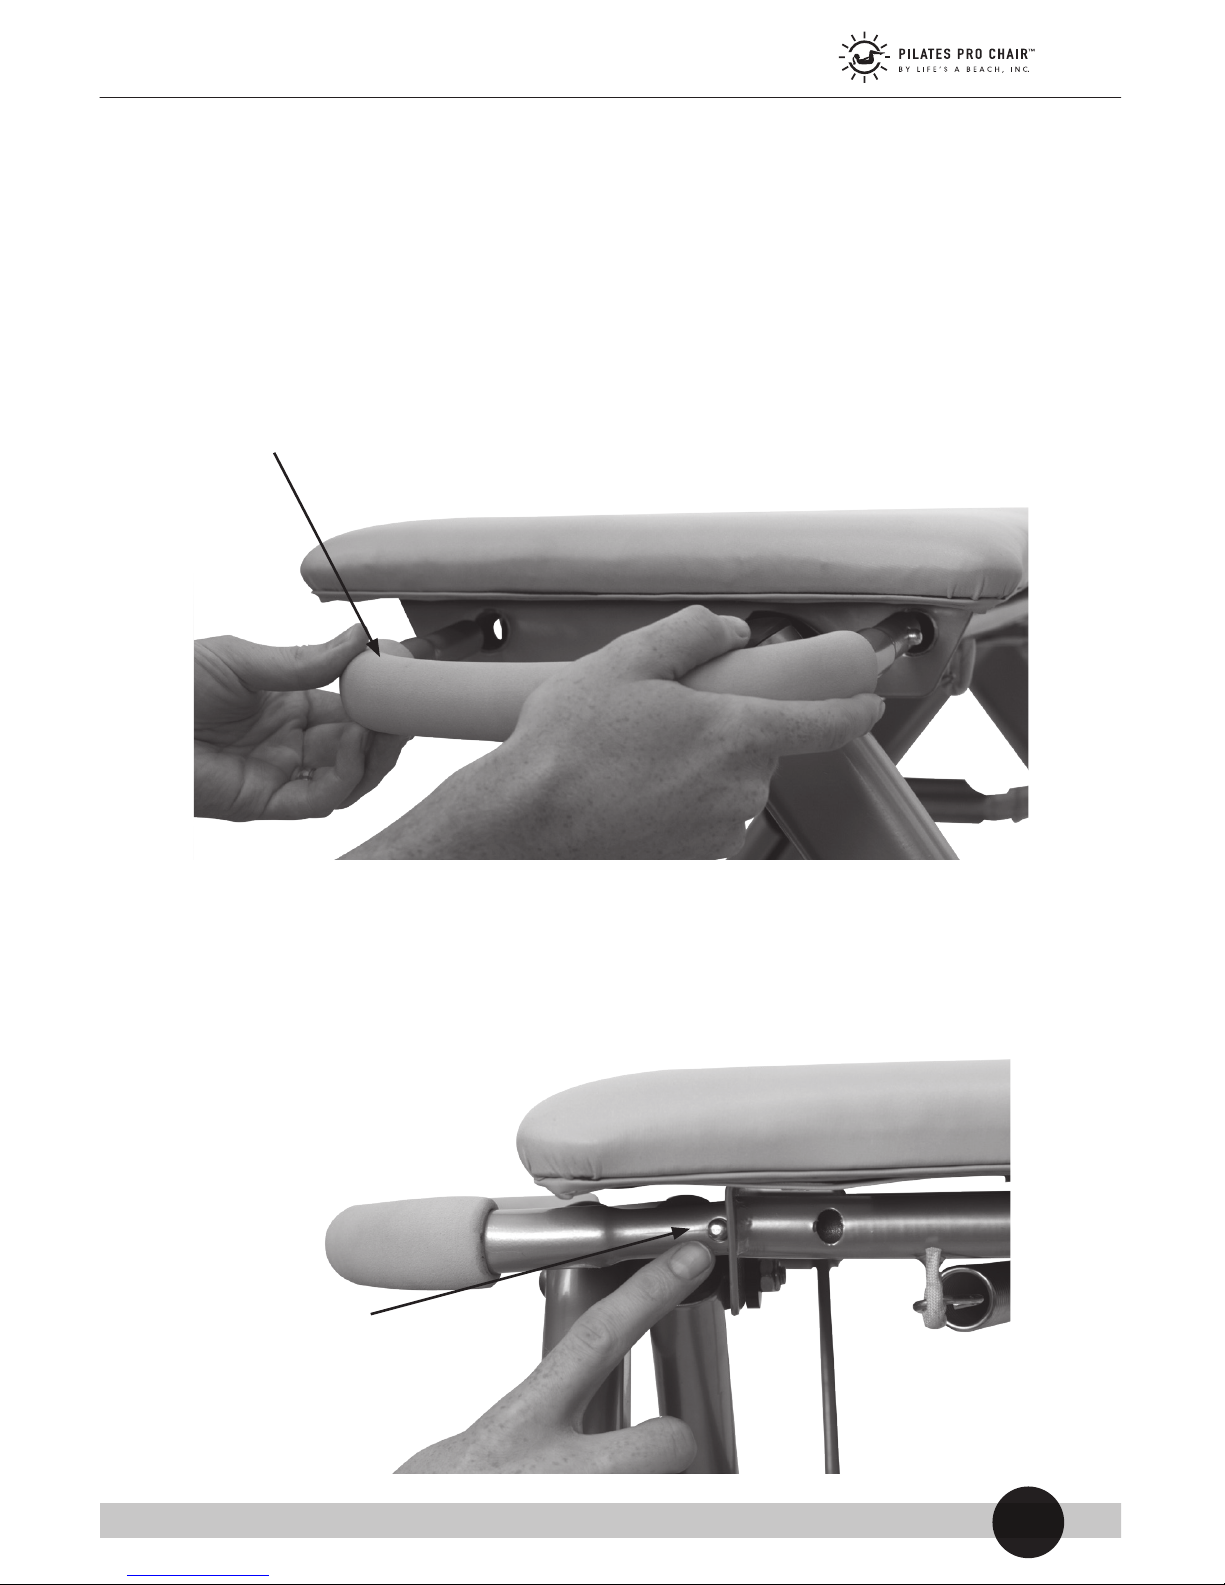
ATTACHING THE ARM HANDLES
STEP 1
Hold one arm handle (B) at the curved end, and align the straight
ends with the chair seat holes (Figure 12).
figure 12
(B) Arm Handle
STEP 2
Push in the round button on the arm handle’s (B) straight end as
you slide the handle into the chair seat holes (Figure 13).
figure 13
Round button

10
STEP 3
Continue pushing the arm handle (B) in until you hear a click and
the round button pops out of the adjoining hole (Figure 14). The
arm handle is now securely in position.
figure 14
Round button
STEP 4
Repeat Steps 1-3 with the second arm handle.

11
ATTACHING THE SPRINGS
STEP 1
Unhook both springs (C) from the stored position underneath the
chair seat (Figure 15).
figure 15
Housing Position
(C) Springs
Stored Position
NOTICE: When the Pilates PRO Chair™ is not in use, return the springs (C) to the
stored position (Figure 15).
NOTICE: Never detach the springs (C) from the housing position (Figure 15) on the
Pilates PRO Chair™. Doing so may cause damage to the chair.
STEP 2
Locate the two thin, curved brackets (G), one on each workout
foot pedal (Figure 16).
figure 16
(G) Bracket
Curves

12
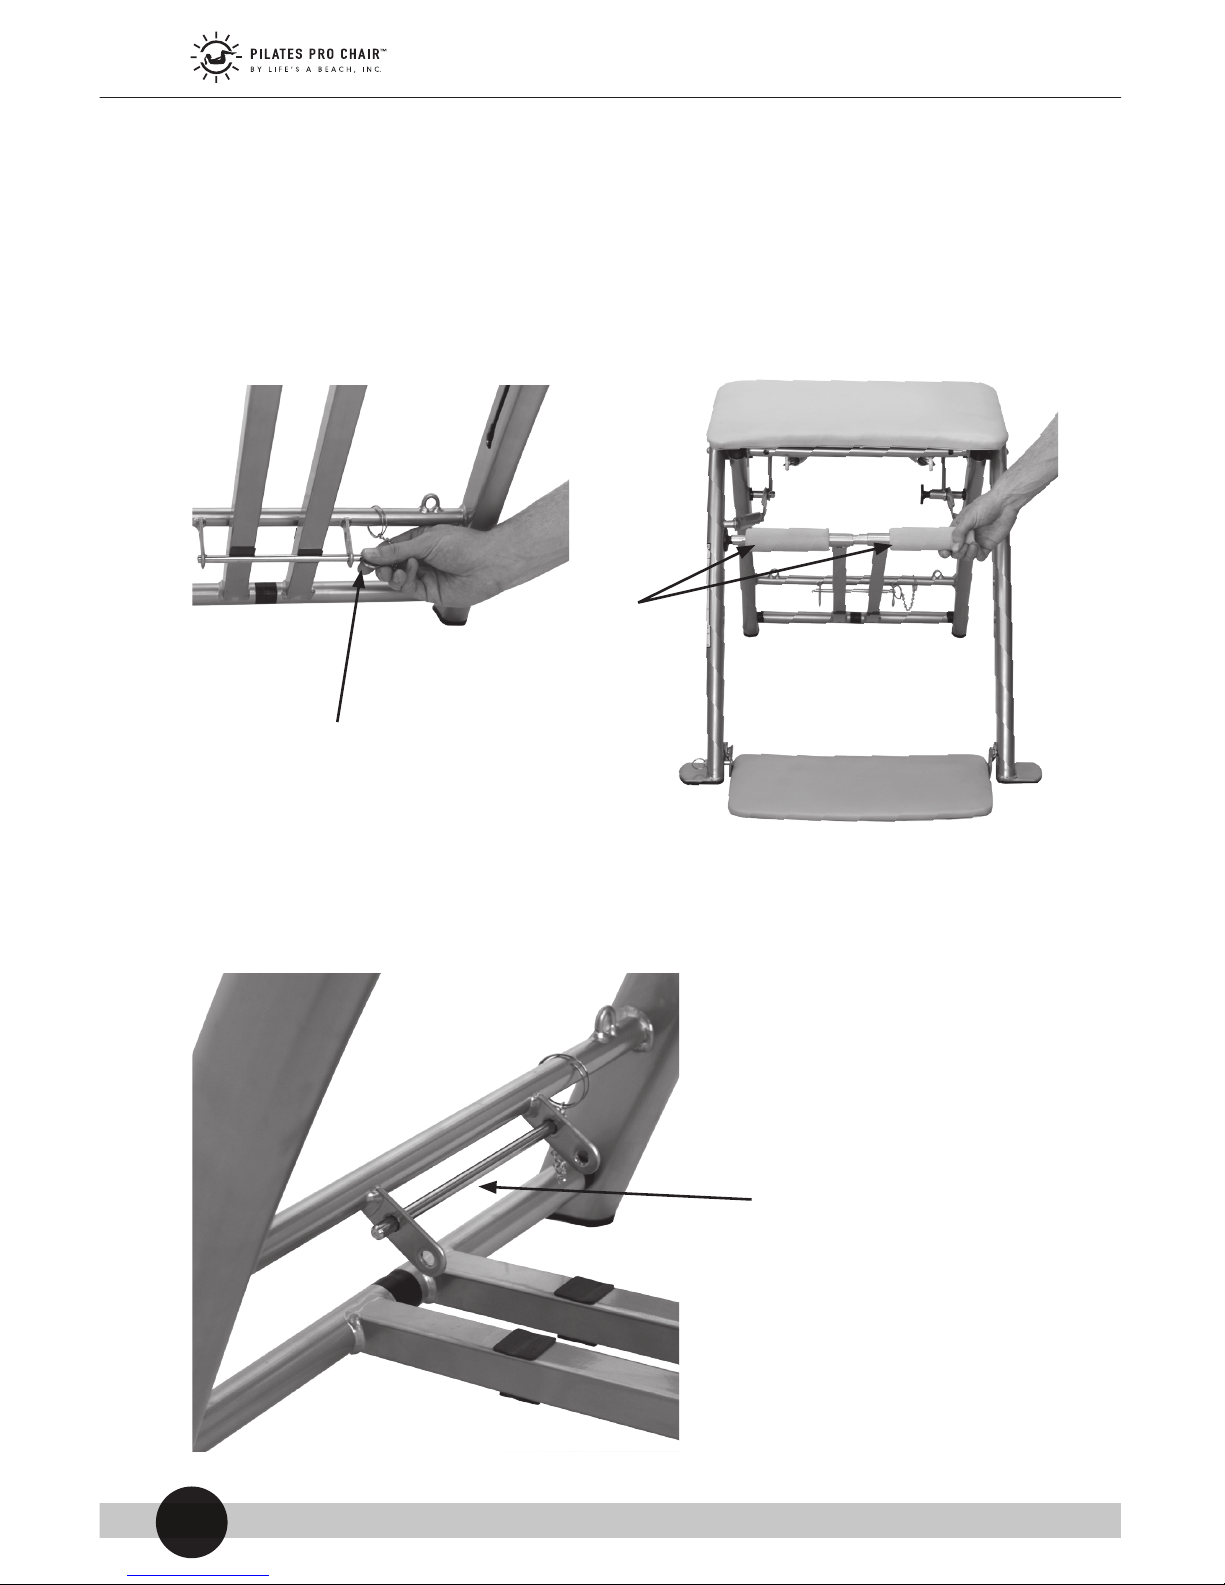
STEP 3
Put one springs (C) triangular hook in the bracket curve
(G) closest to the pedal locking pin (E) (Figure 17).
NOTICE: Do not rotate the spring when attaching it to the bracket curve, to avoid
damage to the spring.
figure 17
(G) Bracket
Curves
(E) Pedal
Locking Pin
STEP 4
If the exercise instructions tell you to use only one spring (C), do
not proceed to Step 5.
STEP 5
Repeat Step 3 with the second spring (C), on the opposite foot
pedal (H), putting it in the bracket curve (G) closest to the pedal
locking pin (E). See Figure 18.
figure 18
NOTICE: When both springs (C) are attached to the brackets closest to the side of the
chair with the pedal locking pin (E), you are operating at the Low Resistance Level.
When both springs (C) are attached to the brackets closest to the side of the chair
with the foot board (D), you are operating at he High Resistance Level.
NOTICE: To learn how to change resistance levels, see the section “Adjusting the
Springs for Low Resistance and High Resistance.”
High Resistance
Bracket Curve
Low Resistance
Bracket Curve
(E) Pedal
Locking Pin
(H) Foot Pedal

13
SPLITTING THE WORKOUT FOOT PEDALS FOR
SPECIFIC PILATES PRO CHAIR™ EXERCISES
STEP 1
Push in the toggle (J) on the workout foot pedal (H).
CAUTION: Before proceeding with Step 1, make sure the springs (C) are attached
to both workout foot pedals (H). See the section “Attaching the Springs.”
STEP 2
Pull the toggle (J) counterclockwise (Figure 19) and then release it.
The workout foot pedal (H) is now split into two pedals (Figure 20).
figure 19 figure 20
(J) Toggle
RECONNECTING THE WORKOUT FOOT PEDALS
STEP 1
Align the workout foot pedals (H) together and push in the toggle (J) (Figure 21).
STEP 2
Turn the toggle (J) clockwise. The pedals are now reconnected
(Figure 22).
figure 21 figure 22
(J) Toggle
(H) Foot
Pedals

14
ADJUSTING THE SPRINGS FOR LOW
RESISTANCE AND HIGH RESISTANCE
STEP 1
To adjust the springs (C) from one resistance level to another,
unhook one spring at a time (Figure 23), and hook the springs
(C) into the opposite bracket curves (G) (Figure 24). Make sure
both springs (C) are secure.
figure 23
(C) Spring
figure 24
Low Resistance
Bracket Curve
High Resistance
Bracket Curve
(E) Pedal
Locking Pin
NOTICE: When both springs (C) are attached to the brackets (G) furthest from the side
of the chair with the workout foot pedal (H), you are operating at the Low Resistance
Level. When both springs (C) are attached to the brackets (G) closest to the side of the
chair with the workout foot pedal (H), you are operating at the High Resistance Level.
NOTICE: When the Pilates PRO Chair™ is not in use, return the springs to the stored
position (Figure 25).
NOTICE: Never detach the springs (C) from the housing position (Figure 25) on the
Pilates PRO Chair™. Doing so could cause damage to the chair.

15
FOLDING AND STORING THE CHAIR
STEP 1
Unhook both springs (C) from the bracket curves (G), and return
them to their original stored position underneath the chair seat
(Figure 25).
figure 25
Housing Position
(C) Springs
Stored
Position
NOTICE: When the Pilates PRO Chair™ is not in use, return the springs (C) to the
stored position (Figure 25).
NOTICE: Never detach the springs (C) from the housing position (Figure 25) on the
Pilates PRO Chair™. Doing so could cause damage to the chair.
STEP 2
Remove the pedal locking pin (E) from the storage in the bracket.
(Figure 26).
figure 26
(E) Pedal
Locking Pin

16
STEP 3
Raise the workout foot pedals (H) up, and insert the pedal
locking pin (E) into the second hole of the bracket so that
the legs are stored securely (Figure 27).
CAUTION: To avoid pinch points, make sure the pedal locking pin (E) is in
the locked position, as shown in Figure 27, before moving or storing the
Pilates PRO Chair™.
Both legs are now secure (Figure 27).
figure 27
(H) Workout
Foot Pedals
(E) Pedal Locking Pin in Locked Position

17
FOLDING AND STORING THE CHAIR (continued)
Pull the foot board pin (I) out (Figure 28) and fold the foot
board (D) up. Release the foot board pin (I) so that the foot
board (D) is locked into the storage position (Figure 29).
STEP 4
figure 28
(D) Foot Board
(I) Foot Board Pin
figure 29
(I) Foot Board in Storage Position

18
Push in the leg safety lock (F) (Figure 30).
STEP 5
figure 30
(F) Leg Safety Lock

19
FOLDING AND STORING THE CHAIR (continued)
Keep pushing in the leg safety lock (F) while slowly folding both
sets of chair legs together (Figure 31). Make sure the legs are
fully closed and the leg safety lock (F) is secure.
(F) Leg
Safety Lock
STEP 6
figure 31
NOTICE: The Pilates PRO Chair™ is meant to be stored in a flat position, as shown in
Figure 32.
The chair is now in the full
storage position (Figure 32).
figure 32

20
SCULPTING HANDLES ASSEMBLY GUIDE
(OPTIONAL EQUIPMENT)
The Pilates PRO Chair™ Sculpting Handles come partially assembled
(Figure 33).
figure 33
NOTICE: You will need to remove the arm handles (B) from Pilates PRO Chair™
base (A).
To order the Pilates PRO Chair Sculpting Handles, please contact a Customer
Service Representative by calling the telephone number listed on your invoice.
CAUTION: To avoid breakage and possible injury, use only manufacturer-supplied
parts with the Pilates PRO Chair™.

21
To complete the assembly of the Pilates Pro Chair™ with the Sculpting
Handles, you will need the following items (Figure 34).
figure 34
• Pilates PRO
Chair™ base
(A) with 2
Arm handles
(B)
• 2 Sculpting
handles (C)
(B)
(C)
(A)

22
REMOVING THE ARM HANDLES
STEP 1
Push the round button on the straight end of one arm handle
(B) as you slide the arm handle out of the Pilates PRO Chair™
seat base (A) holes (Figure 35A and 35B).
figure 35A
(A)
Round
Button
(B)
STEP 2
Repeat Step 1 with the second arm handle (B).
figure 35B
(B)

23
ATTACHING THE SCULPTING HANDLES
STEP 1
STEP 2
STEP 3
STEP 4
STEP 5
Hold one Sculpting Handle
(C) vertically with the
L-shape at the bottom
facing the Pilates PRO
Chair™ seat base (A).
Align the straight ends of
the Sculpting Handle (C)
with the chair seat holes
(Figure 36A).
Push in the round button
of the Sculpting Handle
(C) and slide the Sculpting Handle into the chair
seat holes.
Continue sliding in the
Sculpting Handle (C)
until you hear a click and
the round button pops
out of the adjoining hole
(Figure 36B).
The Sculpting Handle is
now securely in position.
Repeat Steps 1-4 with the
second Sculpting Handle.
figure 36A
(A)
(C)
figure 36B
Round
Button

24
ATTACHING THE ARM HANDLES TO
THE SCULPTING HANDLES
STEP 1
STEP 2
STEP 3
STEP 4
STEP 5
Hold one arm handle (B)
vertically with the curved
end at the top.
Align the straight ends
of the arm handle (B)
with the top holes of the
Sculpting Handle (C).
Slide the arm handle (B)
into the Sculpting Handle
(C).
Continue sliding in the
arm handle (B) until the
round button fits securely
in the adjoining hole of
the Sculpting Handle (C)
(Figure 37).
figure 37
(B)
(C)
NOTICE: If the arm handle does not slide into place and the round button does not
align with the adjoining hole of the Sculpting Handle, then turn the arm handle
180-degrees clockwise or counter-clockwise and repeat Steps 1 through 4.
Repeat Steps 1-4 with the second arm handle and the Sculpting
Handle.

25
REMOVING THE SCULPTING HANDLES
STEP 1
STEP 2
STEP 3
STEP 4
Push the round button on
the arm handle (B)
as you pull firmly up on
the curved end. The arm
handle should disengage
from the Sculpting Handle
(C). (Figure 38A).
Repeat with other arm
handle.
Push the the round buttons on the Sculpting
Handle (C) as you slide
the Sculpting Handle out
of the Pilates PRO Chair
seat base.
Repeat with other
Sculpting Handle.
figure 38A
(B)
(C)
figure 38B
(A)
(C)
NOTICE: Sculpting Handles must be removed from the Pilates PRO Chair before folding
and storing the chair.

26
CARING FOR YOUR PILATES PRO CHAIR
™
Clean the Pilates PRO Chair™ with a soft, damp cloth only. Do not use
soap or harsh chemicals.
•
TIPS FOR MAXIMUM BENEFITS
Perform the exercises slowly and with control.
Use the Pilates PRO Chair™ only as intended and demonstrated in the
Pilates PRO Chair™ exercise instructions.
The training provided in the exercise instructions is in no way intended
as a substitute for medical counseling.
•
•
•

27

© 2016 Life’s A Beach, Inc.
™
All Rights Reserved.
www.pilatesprochair.com
LAB03018
 Loading...