

Page 1

LABEL PRINTER INSTALLATION GUIDE
VERSION 1.2
Confidential
Page 2

Label Printer Installation Guide, Version 1.2
Copyright Notice
Lifepoint Informatics, Glen Rock, New Jersey 07452
Copyright 1999 - 2011 Lifepoint Informatics. All rights reserved.
This document is protected by the copyright laws as an unpublished work.
Confidentiality and Proprietary Rights
This document is the confidential property of Lifepoint Informatics. It is furnished under an agreement with
Lifepoint Informatics and may only be used in accordance with the terms of that agreement. The use of this
document is restricted to customers of Lifepoint Informatics and their employees. The user of this document
agrees to protect Lifepoint Informatics’ proprietary rights as expressed herein. The user further agrees not to
permit access to this document by any person for any purpose other than as an aid in the use of the associated
system. In no case will this document be examined for the purpose of copying any portion of the system described
herein or to design another system to accomplish similar results. This document or portions of it may not be copied
without written permission from Lifepoint Informatics.
Revision History
December 12, 2007 Version 1.0 Original Document
April 9, 2008 Version 1.1 Updated with new functionality
May 12, 2011 Version 1.2 Updated for Lifepoint Version 11.1 (clc)
OVERVIEW:
This document contains the steps necessary to set up a label printer for Lifepoint.
PURPOSE:
This document is to be referenced for the steps necessary to download and install the label printer, and to setup the label
printing function for the user.
Copyright 1999 - 2011 Lifepoint Informatics. All rights reserved. Page 2 of 8
Confidential
Page 3

Label Printer Installation Guide, Version 1.2
Table of Contents
Copyright Notice .............................................................................................................................................. 2
Confidentiality and Proprietary Rights ............................................................................................................ 2
Revision History ............................................................................................................................................... 2
OVERVIEW: ...................................................................................................................................................... 2
PURPOSE: ......................................................................................................................................................... 2
I. About the Label Printing Function: .......................................................................................................... 4
II. Install the Label Printer on the Client’s Workstation ............................................................................... 4
III. Setup User for Label Printing ................................................................................................................... 4
IV. Additional Steps Required to Setup Seiko Printers .................................................................................. 6
Copyright 1999 - 2011 Lifepoint Informatics. All rights reserved. Page 3 of 8
Confidential
Page 4
Label Printer Installation Guide, Version 1.2
I. About the Label Printing Function:
The label printing function is used to print labels when an order is submitted.
Lifepoint will accept many brands of label printers including, but not limited to; Seiko Smart Label, Dymo
and Zebra. The Seiko brand will require additional steps for setup which are included in this document.
Once the label printer has been installed on the client’s workstation the user will need to be setup for label
printing.
II. Install the Label Printer on the Client’s Workstation
1. Install the label printer using the CD that was provided with the printer.
2. Each printer’s installation instructions will be different, please follow the manufacturers’ recommended
procedure.
III. Setup User for Label Printing
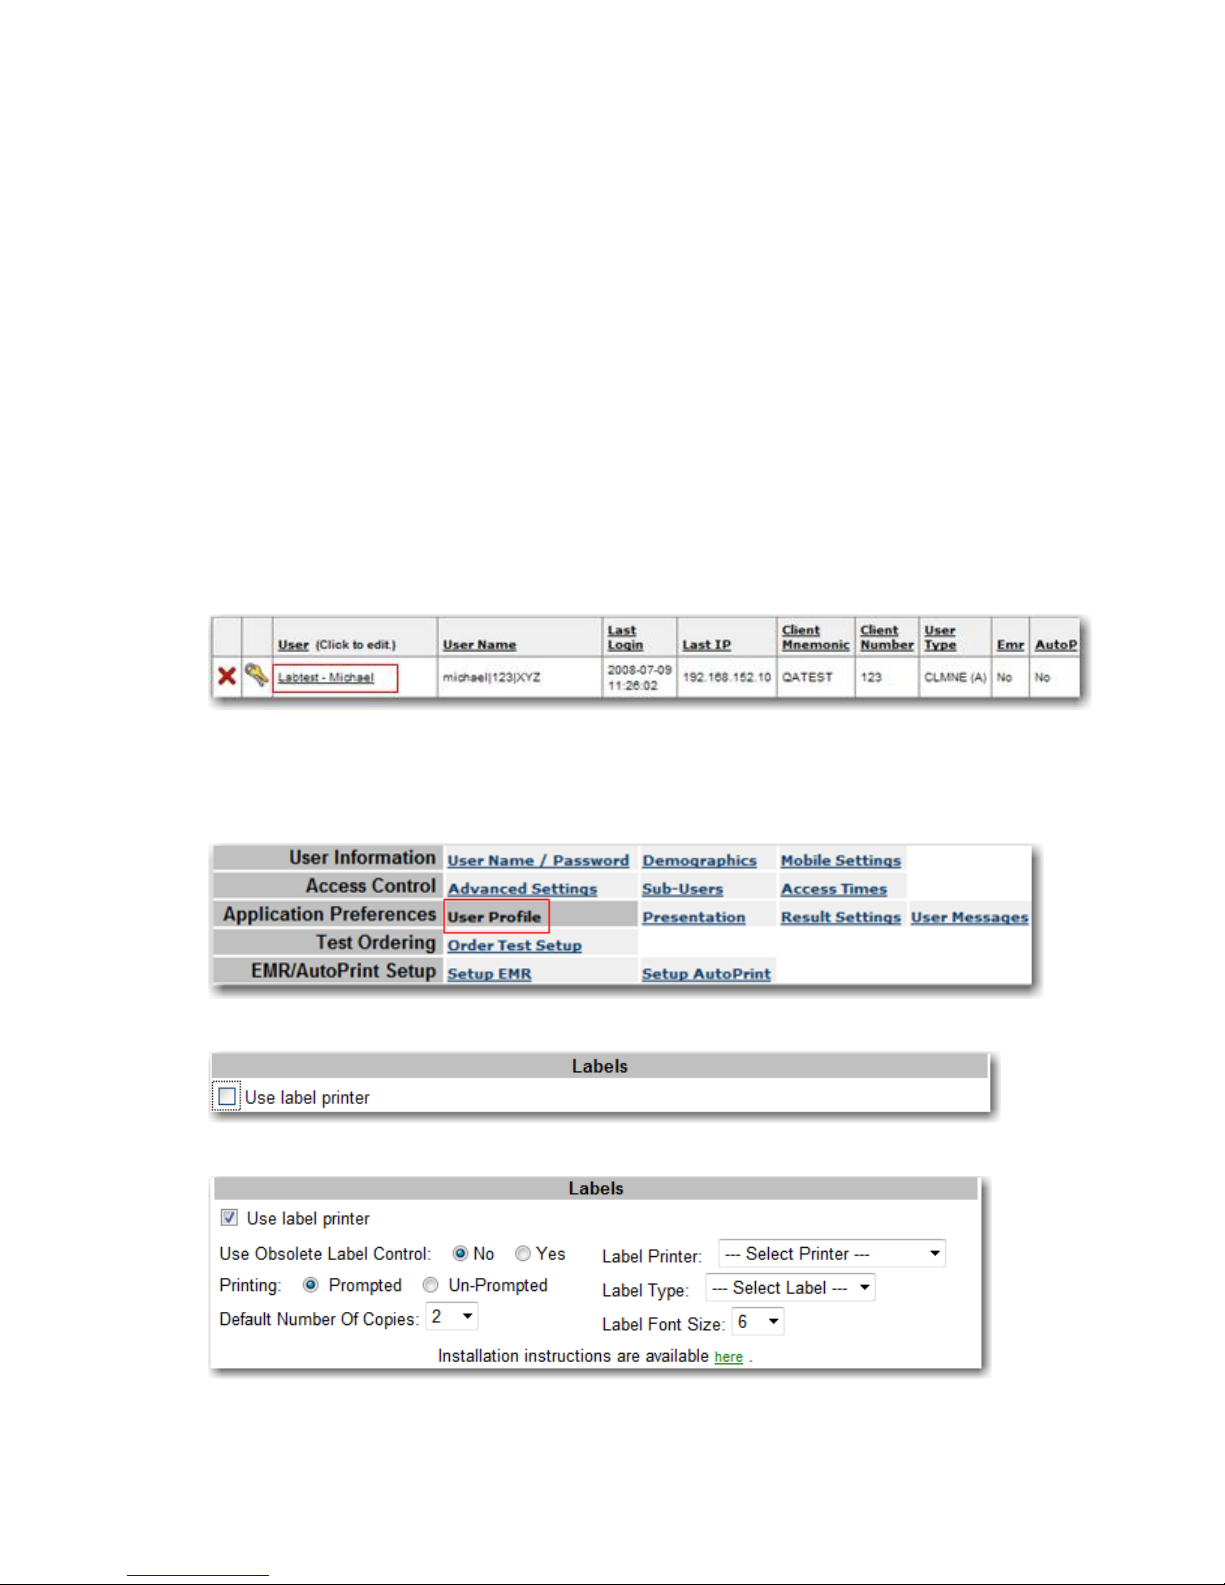
1. In Admin Mode select the user or sub-user you wish to setup label printing for.
(If you need to set up label printing for multiple sub-users in an account you can set it up first for the user
and then copy the settings to the sub-users using the Admin Mode / Access Control / Sub-Users / Copy
Setting to Selected Sub-Users function.)
2. Select the User Profile Tab.
3. Scroll down to the Labels section, under the Order Printing Options.
4. Check the ‘Use Label Printer’ checkbox. Additional fields will then display.
Copyright 1999 - 2011 Lifepoint Informatics. All rights reserved. Page 4 of 8
Confidential
Page 5
Label Printer Installation Guide, Version 1.2
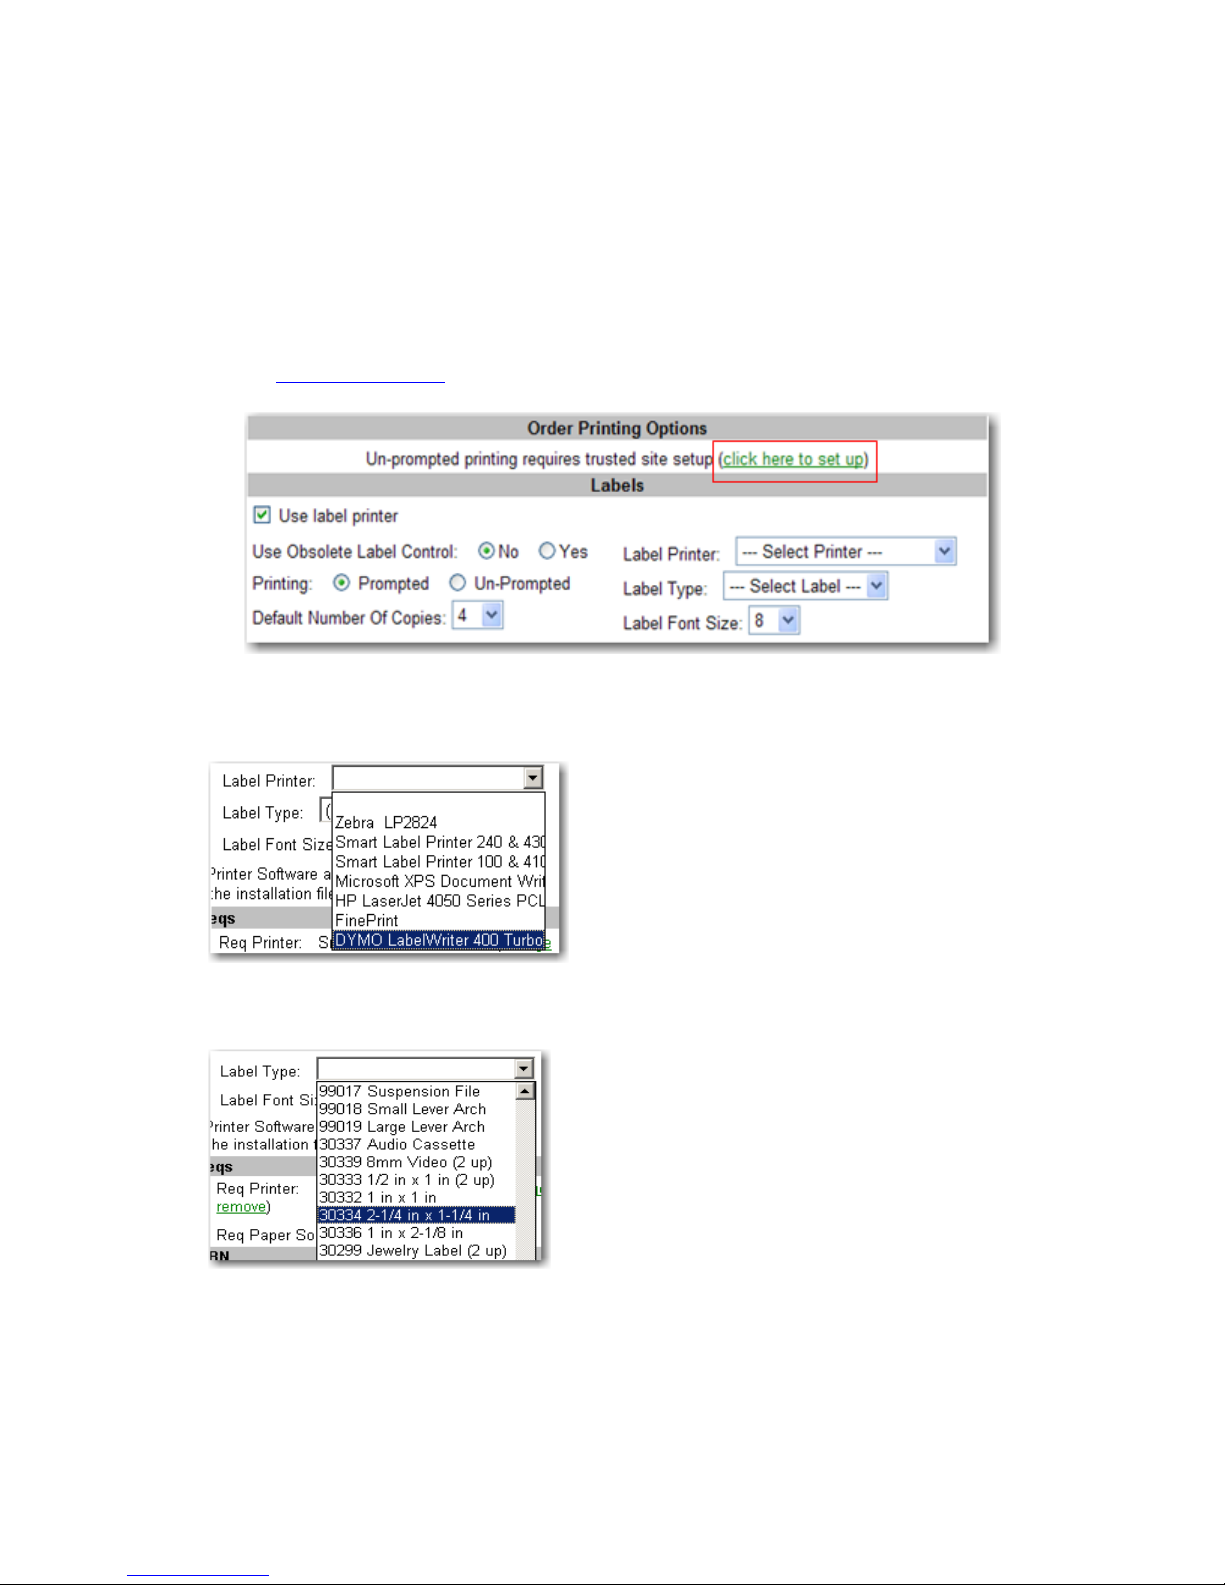
5. For the ‘Use Obsolete Label Control’ field the “No” radio button is selected by default. Leave this
selected. This is present only for clients using deprecated versions of label printing.
6. For ‘Printing’ option:
a. Select the “Prompted” radio button if you want the user to be prompted for the # of labels to be
printed.
b. Select the “Unprompted” radio button if you want the “Default” number of labels to always print. If
“Unprompted” is selected you will need to setup Lifepoint as a trusted site for the user by selecting
the click here to set up hyperlink. This will need to be done for every user who will be placing orders
and therefore printing labels.
7. Select the ‘Default Number of Copies’ from the drop-down box provided.
8. Select the ‘Label Printer’ for the user from the drop-down box.
9. Once the label printer has been selected, the ‘Label Type’ selection box will be populated with label styles
available for the selected printer. Select the label type from the list provided.
10. From the ‘Label Font Size’ drop-down box select the font size to be used.
11. After all steps have been completed select the ‘Update’ button to save your settings.
Copyright 1999 - 2011 Lifepoint Informatics. All rights reserved. Page 5 of 8
Confidential
Page 6
Label Printer Installation Guide, Version 1.2
IV. Additional Steps Required to Setup Seiko Printers
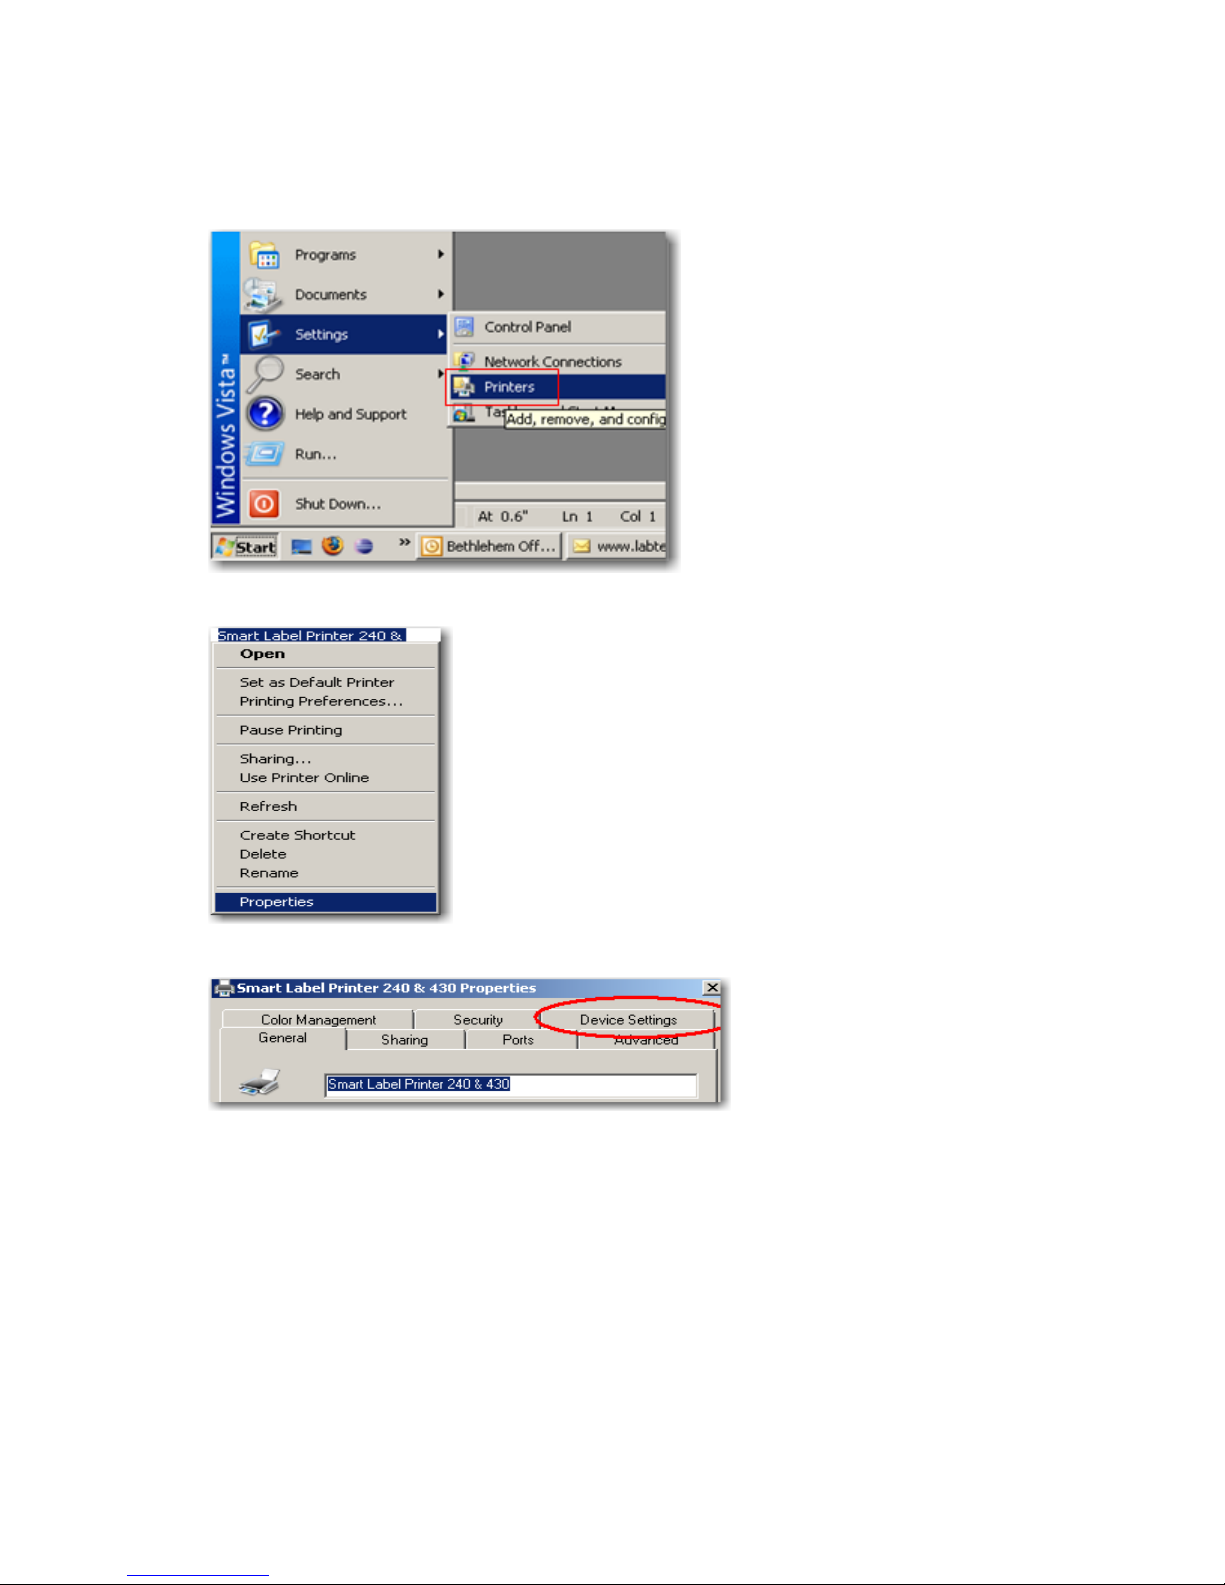
1. Select Start / Control Panel / Printers and Faxes
2. Right click on the label printer and select ‘Properties’.
3. Select the ‘Device Settings’ tab.
4. Click on the link next to ‘Auto’ and select the type of label you are using from the list.
Copyright 1999 - 2011 Lifepoint Informatics. All rights reserved. Page 6 of 8
Confidential
Page 7
Label Printer Installation Guide, Version 1.2
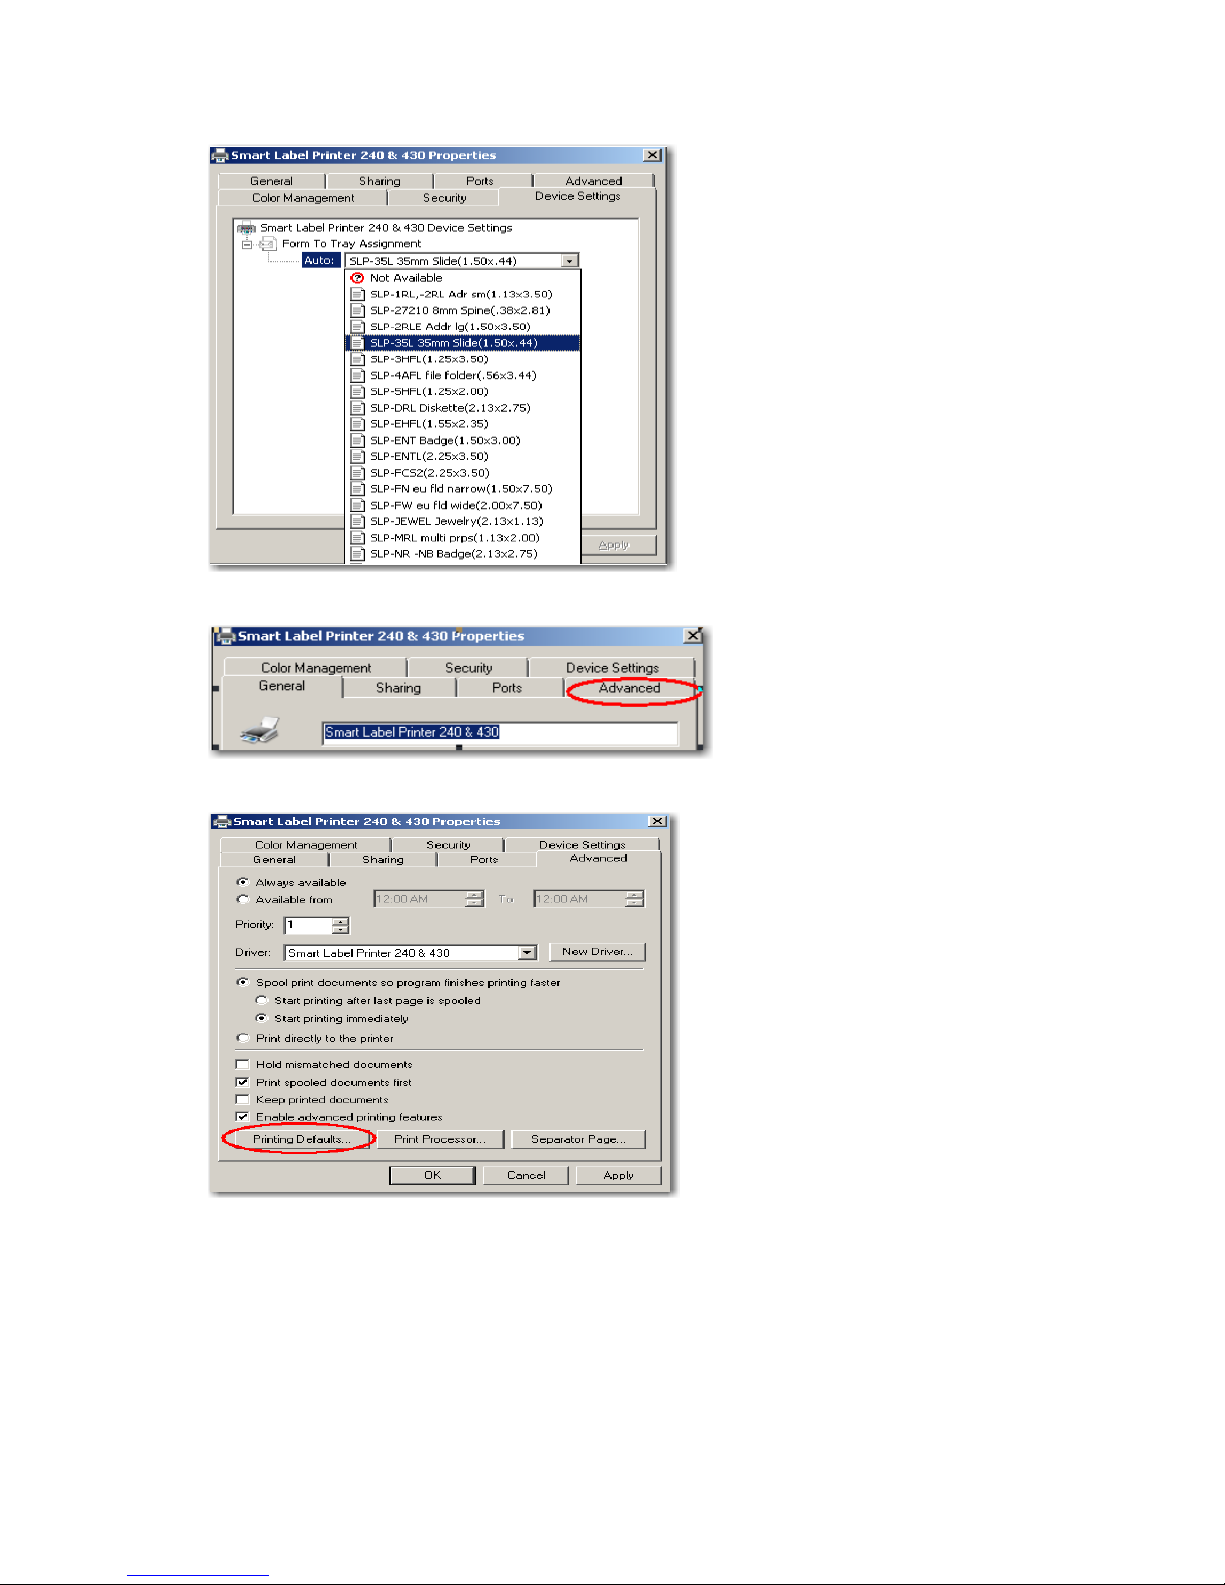
5. Select the ‘Advanced’ tab.
6. Select the ‘Printing Defaults’ button.
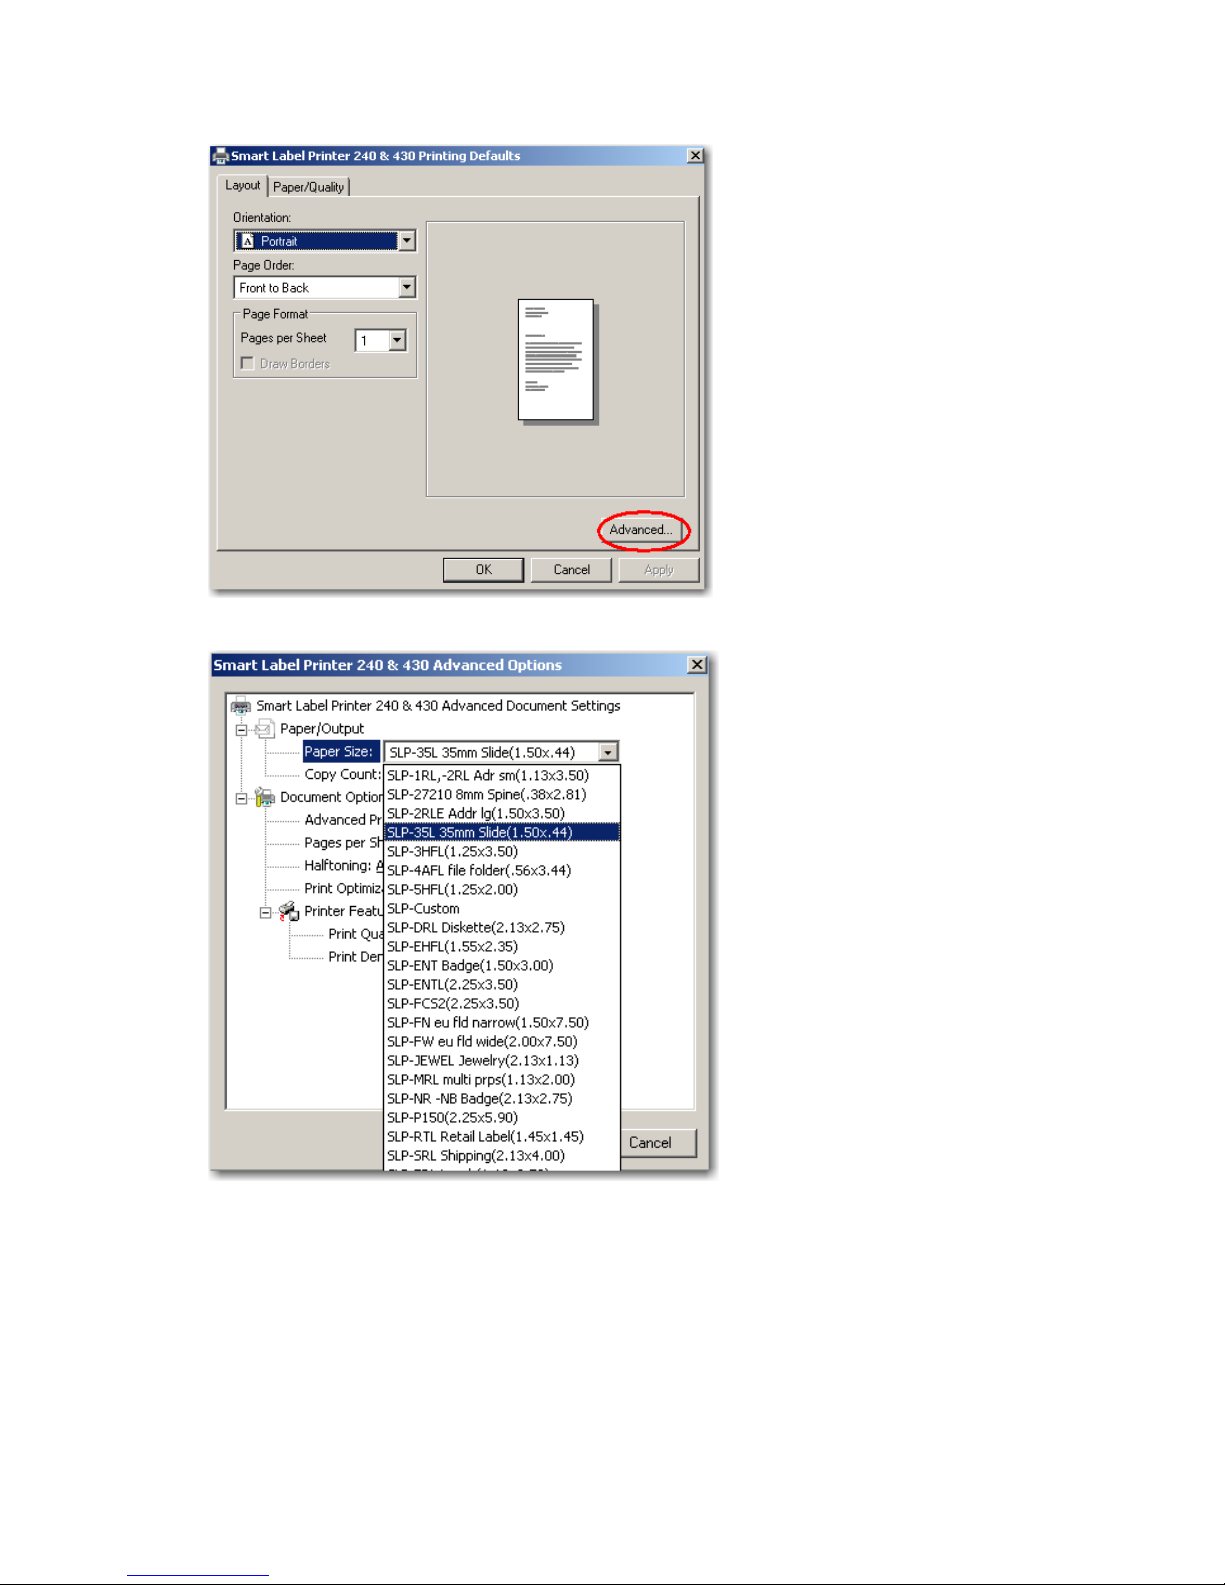
7. Select the ‘Advanced’ button.
Copyright 1999 - 2011 Lifepoint Informatics. All rights reserved. Page 7 of 8
Confidential
Page 8
Label Printer Installation Guide, Version 1.2
8. Select your label type from the list. Select ‘OK’ to save your settings.
Copyright 1999 - 2011 Lifepoint Informatics. All rights reserved. Page 8 of 8
Confidential
 Loading...