

Page 1
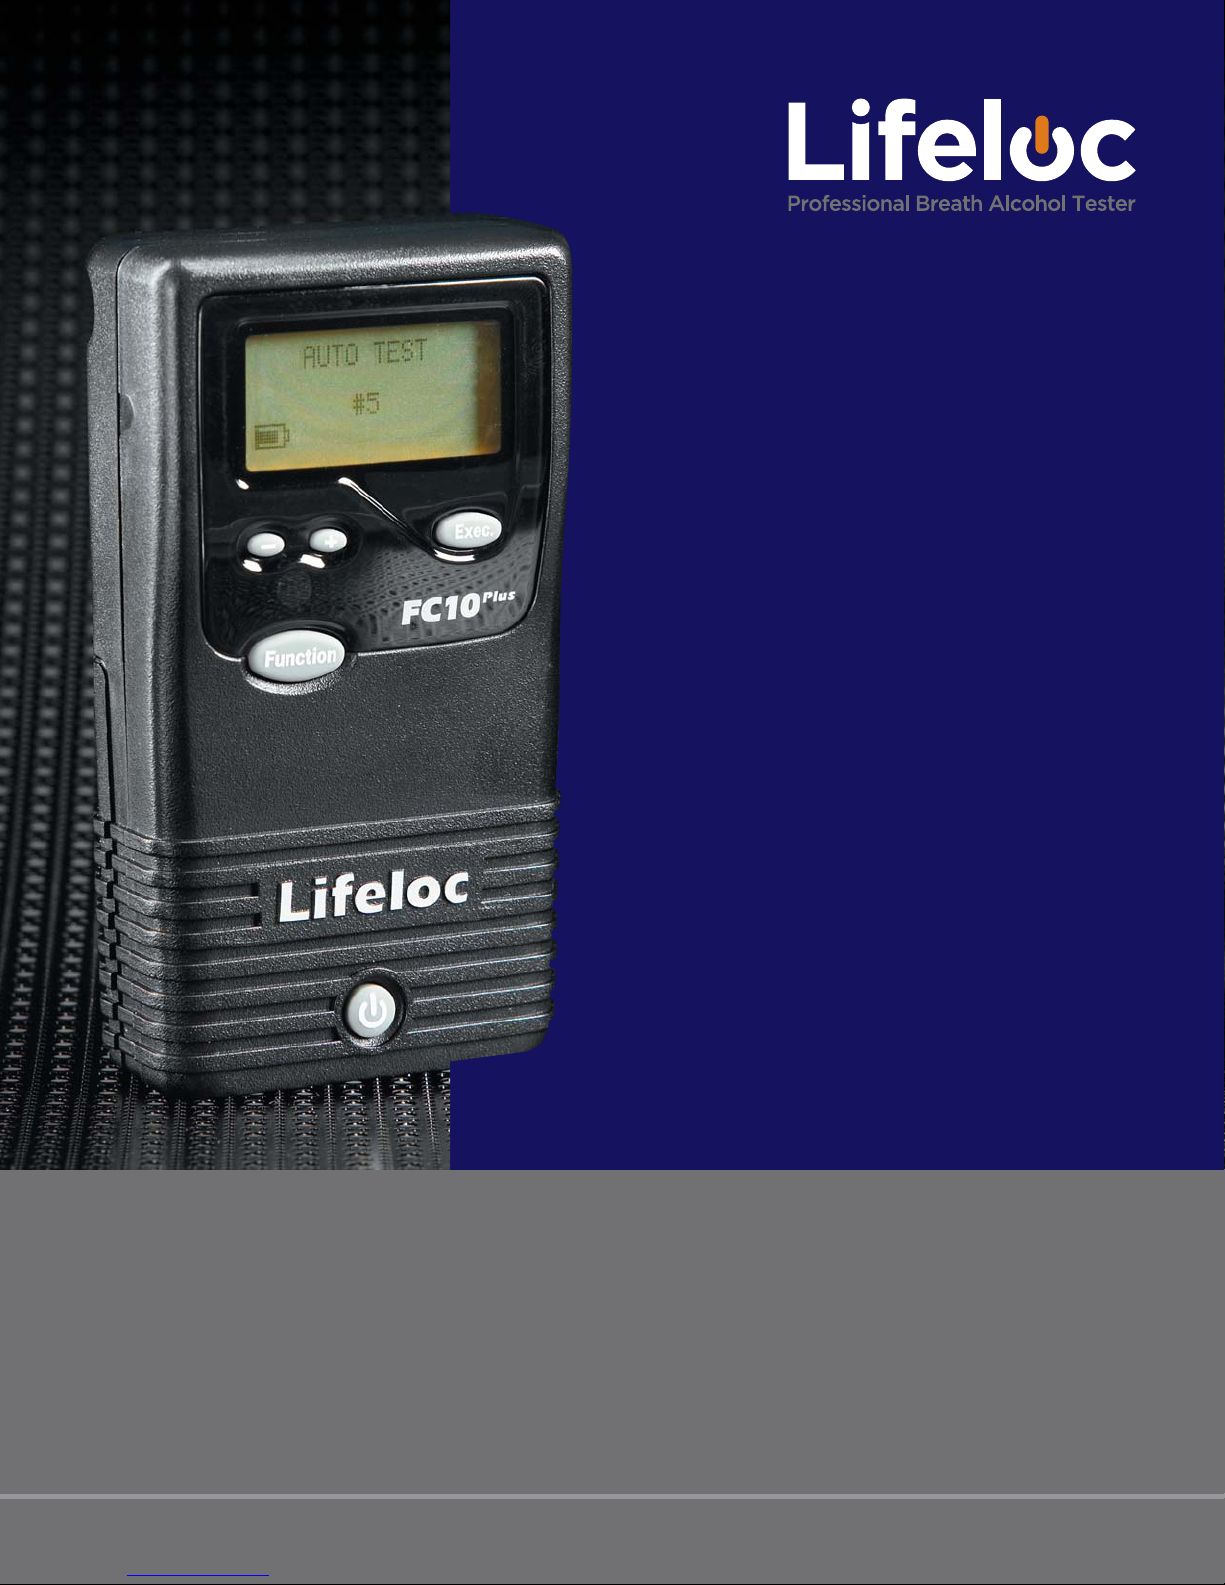
Plus
Lifeloc FC10
Operations Manual
Unlock the Power
of Alcohol Testing
Page 2

Lifeloc FC10
Introduction
Congratulations ................................................................................................................................................4
Front View ..........................................................................................................................................................5
Features ...............................................................................................................................................................6
Preparation
Installing Batteries ...........................................................................................................................................7
Turning the FC On and Off ........................................................................................................................... 7
Observing the Subject ...................................................................................................................................8
Attaching a Mouthpiece ................................................................................................................................8
Breath Testing Modes
Testing Modes Explained .............................................................................................................................. 9
End of Breath & Precise Volume Explained ...........................................................................................9
Conducting an Automatic Test ................................................................................................................. 10
Manual Override During an Automatic Test ........................................................................................10
Conducting a Manual Test ............................................................................................................................11
Conducting a Passive Test ............................................................................................................................11
Plus
Table of Contents
2
Operation
Breath Flow .......................................................................................................................................................12
Alcohol Curve ...................................................................................................................................................12
Test Results .......................................................................................................................................................12
Viewing Previous Test Results ....................................................................................................................12
Removing the Mouthpiece ..........................................................................................................................12
User Settings
Changing the Time .........................................................................................................................................13
Changing the Date ..........................................................................................................................................13
Setting the Trigger Mode ............................................................................................................................ 14
Security Settings Explained ....................................................................................................................... 14
Setting Up Security Password .................................................................................................................. 14
Using Security Password ..............................................................................................................................15
Removing Security Password .....................................................................................................................15
Adjusting LCD Contrast ............................................................................................................................... 16
Setting the Default Test Order .................................................................................................................. 16
Results Format Explained ............................................................................................................................17
Setting Results Format .................................................................................................................................17
Setting the Pass/Warn/Fail Levels .......................................................................................................... 18
www.Lifeloc.com | 303-431-9500
Page 3

Lifeloc FC10
Calibration Settings
Wet Bath and Dry Gas Explained ............................................................................................................ 18
Selecting the Calibration Standard ......................................................................................................... 19
Calibration/Cal Check Explained ....................................................................................................19 - 20
Selecting the Standard Type .................................................................................................................... 20
Calibration/Cal Check Lock-out Explained ......................................................................................... 20
Setting the Calibration Lock-out Type ...................................................................................................21
Setting the Cal Check Lock-out Type .....................................................................................................21
Wet Bath Calibration
Wet Bath Simulator Set-Up ........................................................................................................................22
Wet Calibration ......................................................................................................................................22 - 23
Wet Calibration Check ....................................................................................................................... 23 - 24
Dry Gas Calibration
Dry Gas Tank Set-Up .................................................................................................................................... 24
Dry Gas Calibration .............................................................................................................................. 24 - 25
Dry Gas Calibration Check ......................................................................................................................... 26
Plus
Table of Contents
3
Maintenance
How to Check Status ................................................................................................................................... 26
Fuel Cells ...........................................................................................................................................................27
Cleaning .............................................................................................................................................................27
Batteries ............................................................................................................................................................27
On-Screen Messages
Messages Explained ......................................................................................................................................28
Service
Lifeloc Factory Warranty ........................................................................................................................... 29
Extended Service Plans .............................................................................................................................. 29
Service ............................................................................................................................................................... 29
General Usage
Notice ................................................................................................................................................................ 29
Specifi cations ................................................................................................................................................. 30
Plus
FC10
Menu Charts
Supplies
Accessories and Supplies .......................................................................................................................... 30
User Settings Chart ........................................................................................................................................31
Calibration Display Chart ............................................................................................................................32
www.Lifeloc.com | 303-431-9500
Page 4

Lifeloc FC10
Plus
Introduction
4
Attention FC10
Congratulations on your purchase of a Lifeloc FC10
For over 25 years, Lifeloc Technologies has been providing advanced alcohol testing
equipment & training to Law Enforcement and Corrections Professionals. We are the
leader in product innovation, precision instruments, ease of use & Five Star Customer Care.
The FC10
Technologies, Inc. Lifeloc offers premium quality products combined with exceptional
service and technical support.
The FC10
rates unique cutting edge technologies. Because of the advanced FC10
• Results on a positive test register in 10 seconds.
• You can take another test 30 seconds after a positive. Repeatability is not
compromised.
• Your FC10
delivered.
• Your FC10
even provide suggestions on how to proceed to complete an accurate test on your
subject.
Plus
breath alcohol tester is manufactured in Wheat Ridge, Colorado, by Lifeloc
Plus
is a state-of-the-art breath alcohol tester that is software based and incorpo-
Plus
Plus
Plus
Operator:
Plus
.
Plus
design:
will automatically take the test when it senses a deep lung sample is
will provide an accurate test, or else explain to you why it cannot, and
• AA or NiMH batteries last for about 160 “on” hours or up to 6000 tests.
Plus
The following pages will explain in detail the operation of your FC10
breath tester.
Series portable
Unlock the Power of Alcohol Testing
www.Lifeloc.com | 303-431-9500
Page 5
Plus
Lifeloc FC10
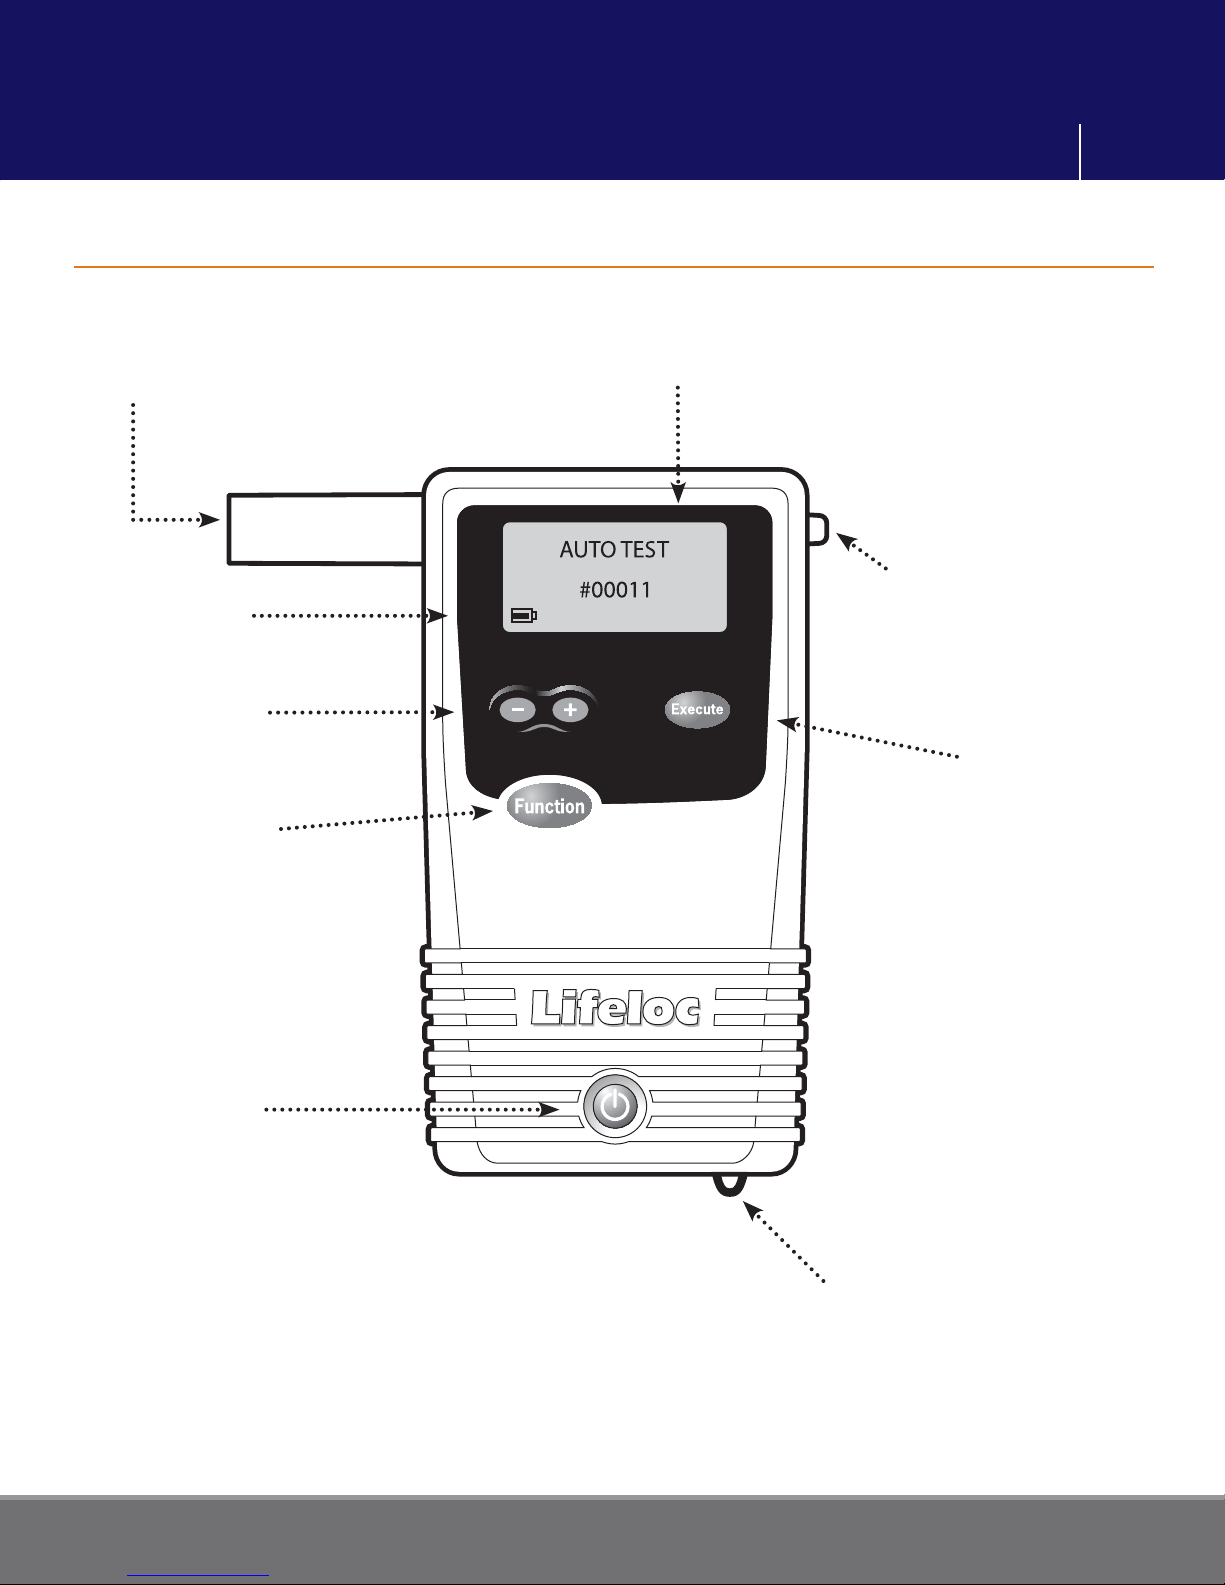
Front View (with Mouthpiece)
Mouthpiece
Introduction
Large Graphic LCD Screen
displays functions and results
5
Battery Icon indicates
battery level
+/- Buttons set
calibration standard
Function Button
scrolls through menus
and saves changes
Power Button
turns unit on and off;
also returns you to
main testing mode
Mouthpiece Removal Tab
Execute Button
enables you to perform
the function
www.Lifeloc.com | 303-431-9500
Wrist Strap
Attachment Loop
Page 6

Plus
Introduction
Lifeloc FC10
Features
• Large Graphic LCD Display: Capable of showing numbers, letters, icons and plain
English text messages.
• Automated Calibration: Software-controlled adjustments; no tools necessary.
• Auto Test Mode: The easiest way to take a test. Tester automatically takes deep lung
sample when subject is at end of breath.
• Manual Test Mode: Enables operator to control exact point of breath sample.
• Passive Test Mode: Checks for the presence of alcohol in the breath or in an open
container, without using a mouthpiece.
• On Board Memory: Stores the last 10 tests.
• Real Time Clock: Stores time and date information with test results as well as
calibration and cal check results.
6
• User-Selectable Test Order: Allows choice of either Auto Test or Passive Test default
mode.
• Calibration Reminder with Lockout: Prevents you from using an FC10
due for calibration.
• Auto Shut-Off: Preserves battery life.
• Fast, Simple Operation: While the FC10
use.
• Automatic Backlight: Easy viewing of test results either day or night.
• Exceptional Battery Life: Up to 160 hours or 6000 test operation using four AA or
NiMH rechargeable batteries.
Plus
contains a host of features, it is still easy to
Plus
when it is
www.Lifeloc.com | 303-431-9500
Page 7
Lifeloc FC10
Installing Batteries
Plus
Preparation
7
Press in and down on the battery door located on the back of the FC10
Install the four AA Alkaline batteries in the direction of the symbols in the battery case.
Close the case by pushing up on the battery door until it locks shut.
See page 27 for directions on using rechargeable batteries.
Turning the FC10
Plus
On and Off
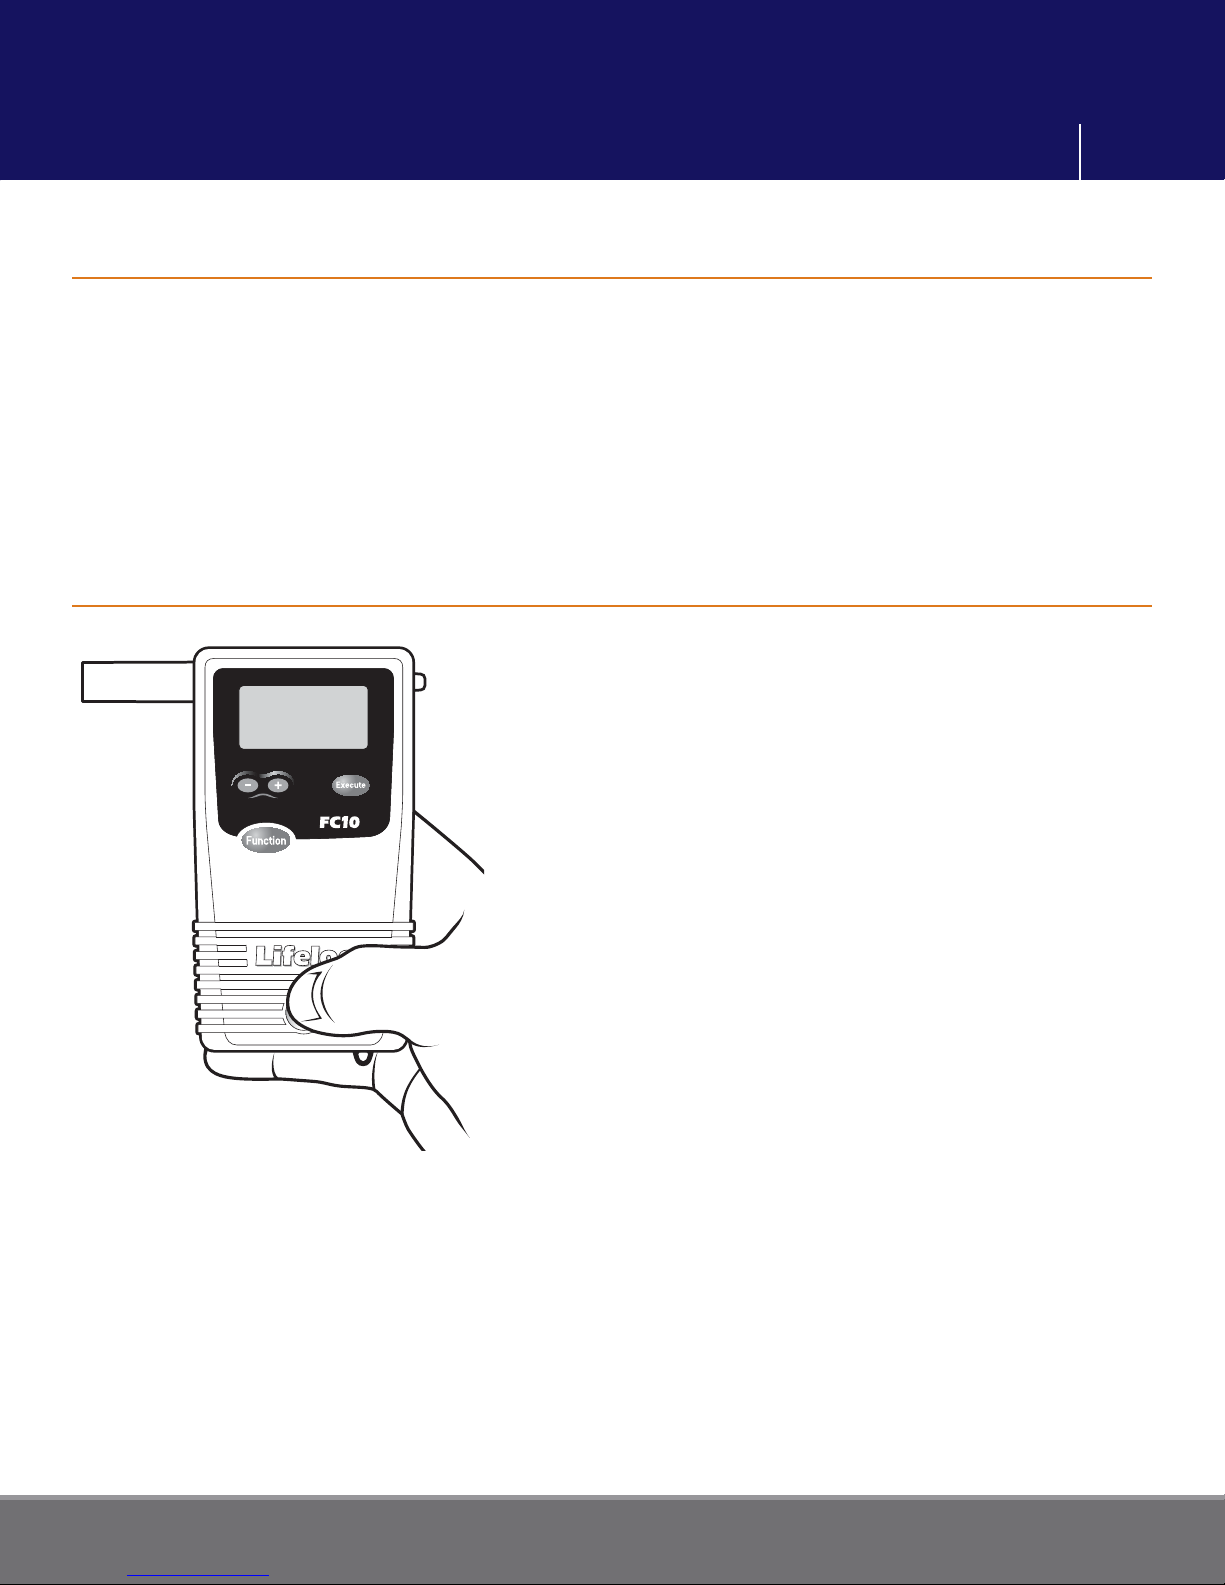
Press and hold the Power button on the bottom
of the front of the unit until it beeps. The FC10
performs an automatic internal diagnostics
check.
To turn the unit off, press and hold the Power
button until it beeps twice. The unit will shut
down.
Note: Momentarily pressing the Power button,
when the unit is on, will return you to the main
menu.
Plus
.
Plus
www.Lifeloc.com | 303-431-9500
Page 8
Lifeloc FC10
Observing the Subject
Plus
Preparation
8
The FC10
deep lung air. Readings will also detect residual mouth alcohol.
To prevent mouth alcohol from affecting a test, make certain that the subject is not
allowed to put anything in their mouth for 15 minutes prior to taking a test.
If the subject just took a drink, a 15 minute observation period in which they are not
permitted to put anything in their mouth should be observed before testing. This will
ensure all residual alcohol from any source is completely dissipated and test results will
be valid.
Plus
provides a highly accurate reading of breath alcohol acquired by sampling
Attaching a Mouthpiece
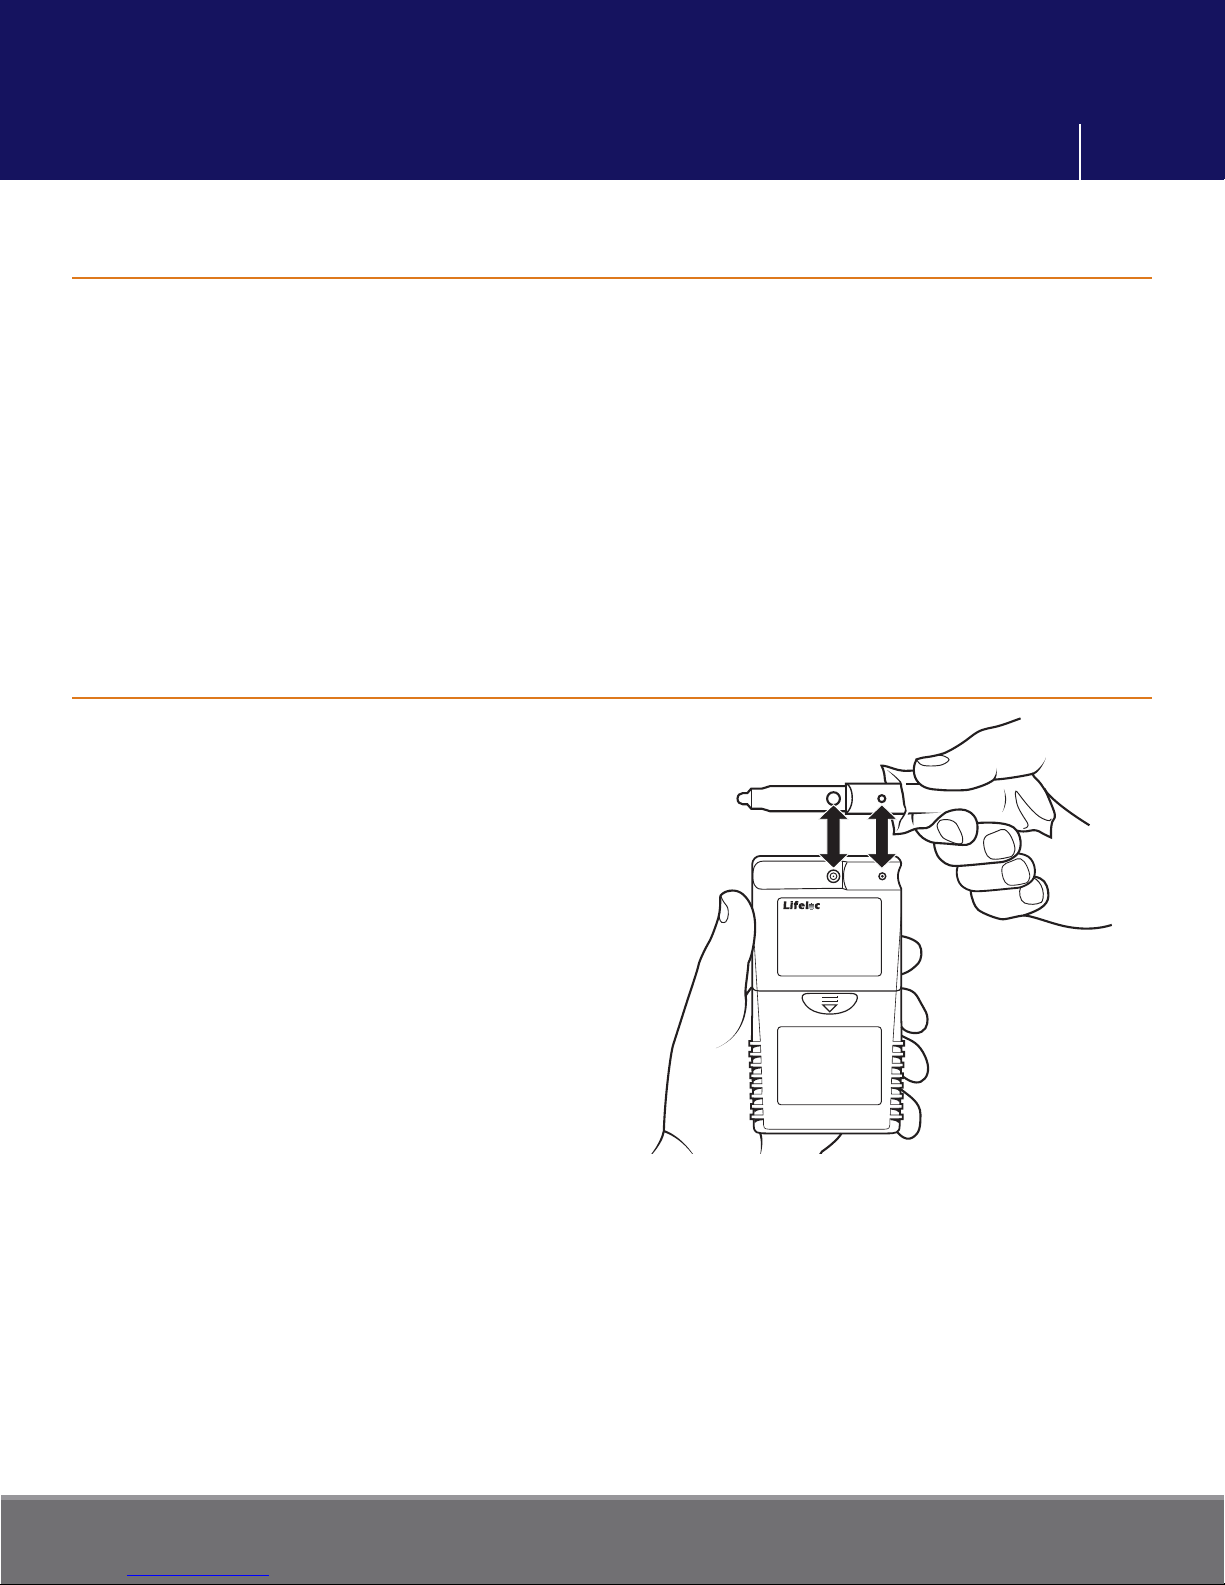
Remove the mouthpiece from its wrapper,
making sure not to touch the end which
the subject will be blowing into.
Attach the mouthpiece to the port on the
back of the FC10
Plus
.
Line up the mouthpiece port over the
holes in the back of the mouthpiece. Press
in place.
Ensure it is securely attached.
www.Lifeloc.com | 303-431-9500
Page 9

Plus
Lifeloc FC10
Breath Testing Modes Explained
Breath Testing Modes
9
The FC10
•
Automatic Test is the easiest way to achieve a deep lung sample. The FC10
the subject’s breath and automatically takes the sample near the end of the breath
fl ow.
•
Manual Test is normally used only when the subject is unable to provide a suffi cient
breath sample for the automatic test.
•
Passive Test is a quick screen to detect alcohol but is not designed to quantify the
results. Passive results are reported as “POS” if alcohol is detected, “NEG” if alcohol is
not detected. In this mode, no mouthpiece is required.
Plus
is capable of conducting Automatic, Manual, and Passive tests.
Plus
monitors
End of Breath and Precise Volume Explained
In Auto Test mode, the unit can be set to take a sample either:
•
When the subject nears the end of the exhalation (End of Breath)
— or —
•
Both will give accurate results. Precise Volume may work better with uncooperative
subjects.
(To select “END OF BREATH” or “PRECISE VOLUME” mode, see Trigger Mode
instructions on p.14)
When it detects 1.5L of breath (Precise Volume)
www.Lifeloc.com | 303-431-9500
Page 10
Plus
Lifeloc FC10
Conducting an Automatic Test
Breath Testing Modes
10
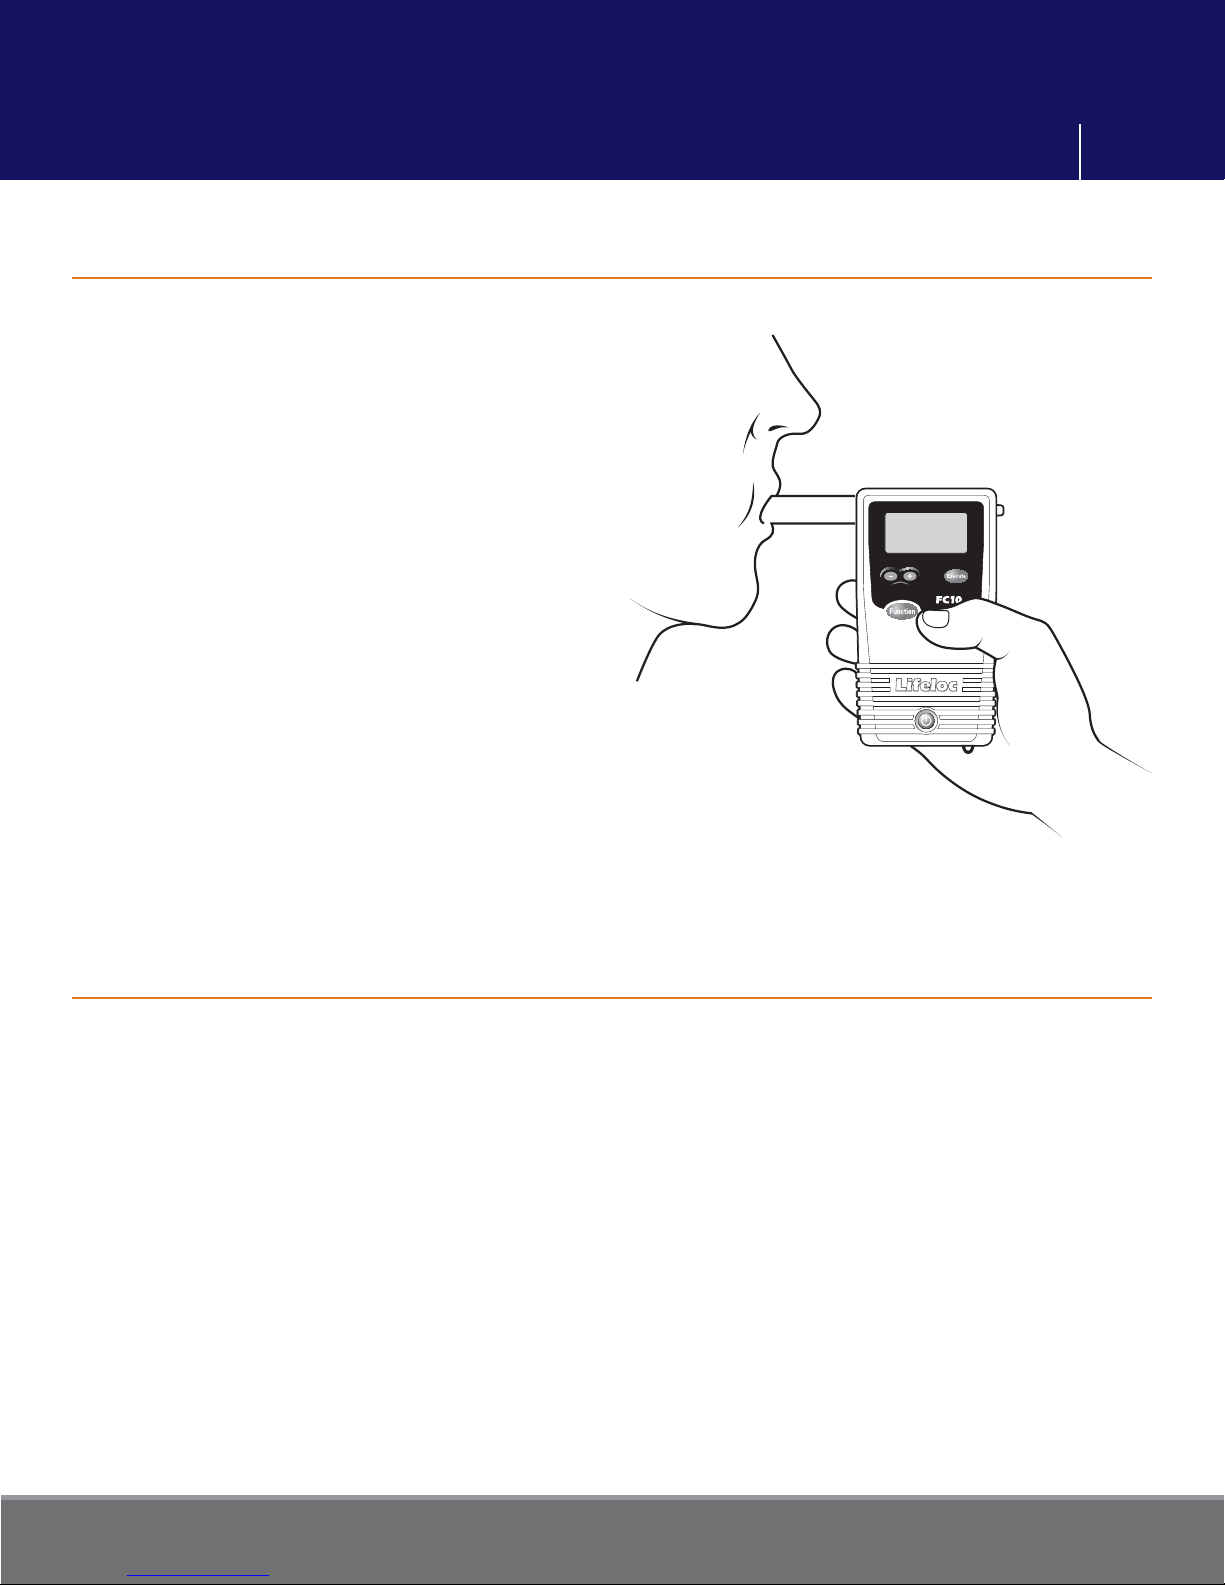
Turn the FC10
Verify the display reads “AUTO TEST”.
Attach the mouthpiece to the back of the
unit.
Instruct the subject to blow into the
mouthpiece fi rmly and steadily for as long
as they can. (But not necessarily as hard
as they can.) The unit calculates volume
and will give an error message if the
subject cannot reach 1.3 liters.
Read the result.
After taking a test, the FC10
the results in large numbers on the display.
Press the Function button to return to the
test mode.
Plus
on.
Plus
will display
Manual Override during an Automatic Test
Note: This feature allows the completion of a test in the occasional instance when the
subject may have diminished lung capacity and cannot activate the Auto Test.
Plus
Turn the FC10
Attach a mouthpiece to the back of the unit and verify the display reads “AUTO TEST”.
Instruct the subject to blow into the mouthpiece fi rmly and steadily for as long as they
can.
When they are near the end of their breath, press the Execute button.
Read the result.
on.
www.Lifeloc.com | 303-431-9500
Page 11
Lifeloc FC10
Conducting a Manual Test
Plus
Breath Testing Modes
11
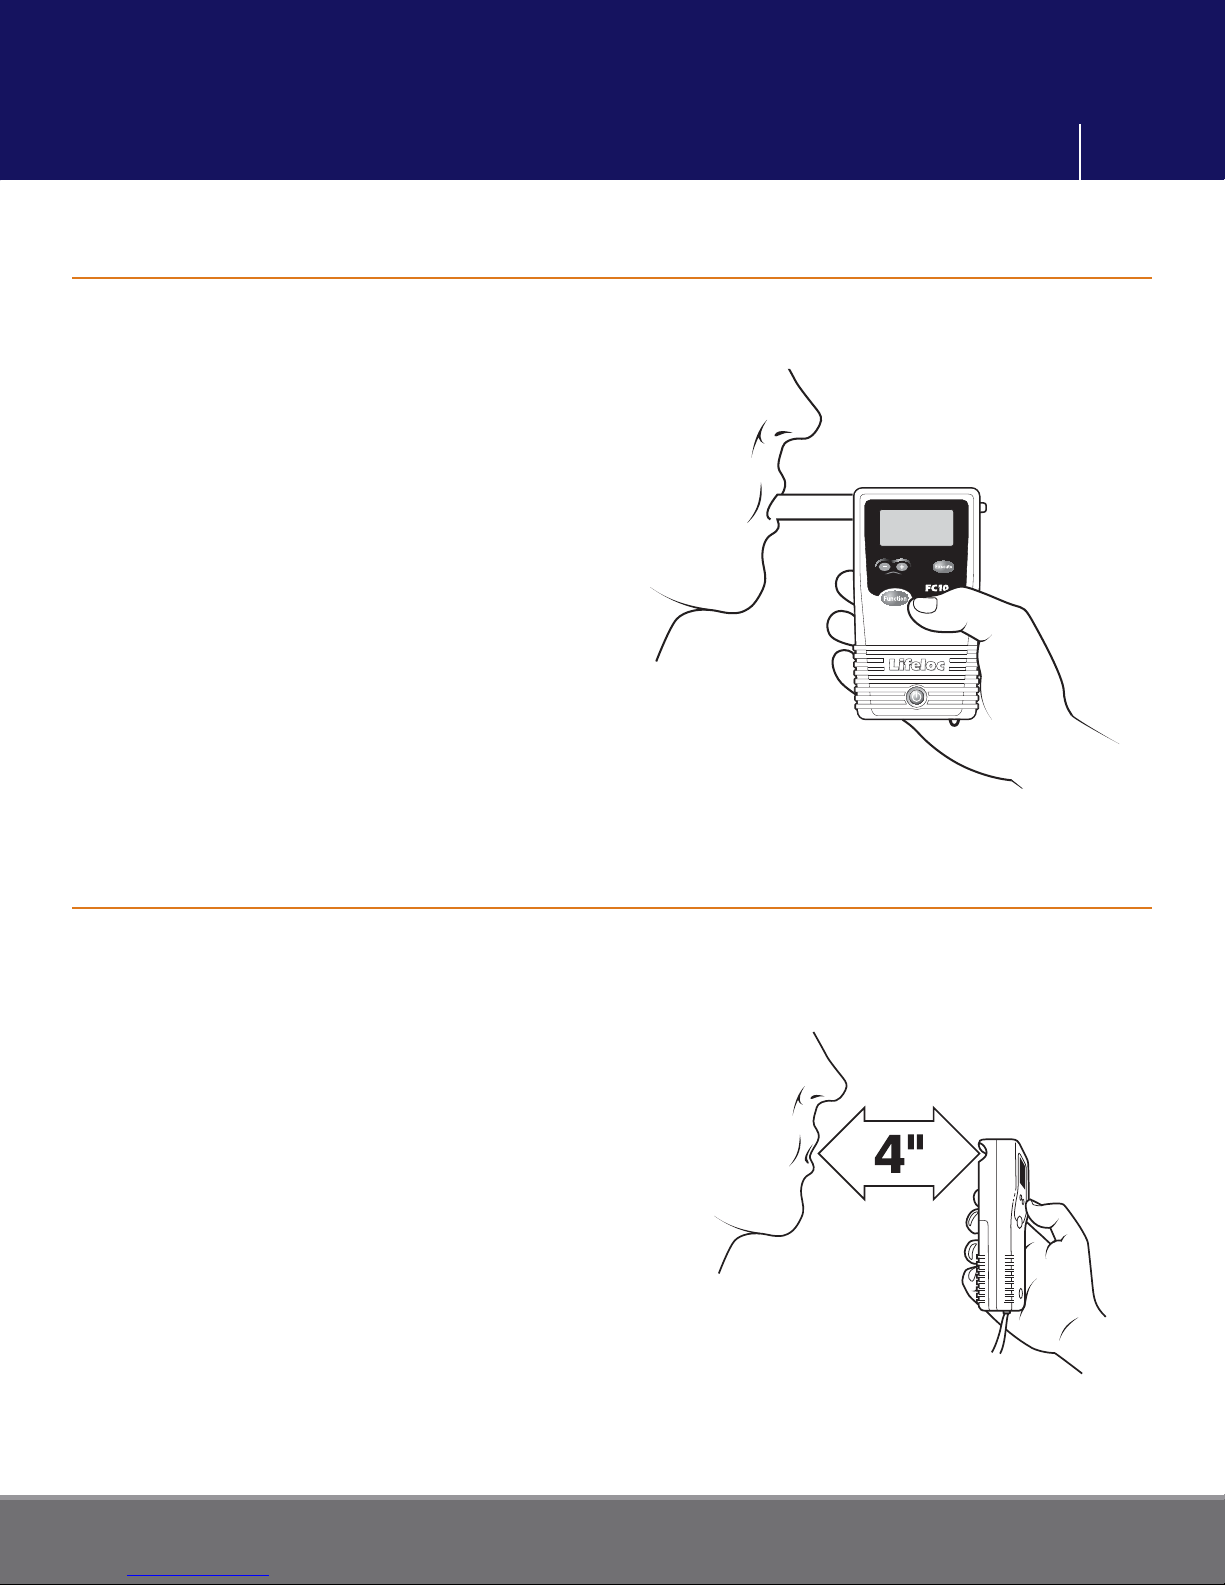
Turn the FC10
Attach the mouthpiece to the back of the
unit.
Press the Function button until the display
reads “MANUAL TEST”.
Instruct the subject to blow into the
mouthpiece fi rmly and steadily for as long
as they can.
When they are near the end of their
breath, press the Execute button.
Read the result.
Please note, manual test mode is pressure
activated. If the subject does not blow air
into the mouthpiece, the test can not be
conducted.
Conducting a Passive Test
Plus
on.
(No Mouthpiece)
Turn the FC10
Press the Function button, if necessary,
until the display reads “PASSIVE TEST.”
Hold the FC10
colored opening labeled “Port” on the
back of the FC10) about 4 inches from the
subject’s mouth.
Have the subject blow toward the port.
Press the Execute button while the subject
is blowing.
Read the result. The unit will only display
“POS” or “NEG.” It will not display the
actual numerical result.
Note: A passive test can also be done over
an open container to detect the presence
of alcohol.
Plus
on.
Plus
sample port (orange-
www.Lifeloc.com | 303-431-9500
Page 12
Lifeloc FC10
Plus
Operation
12
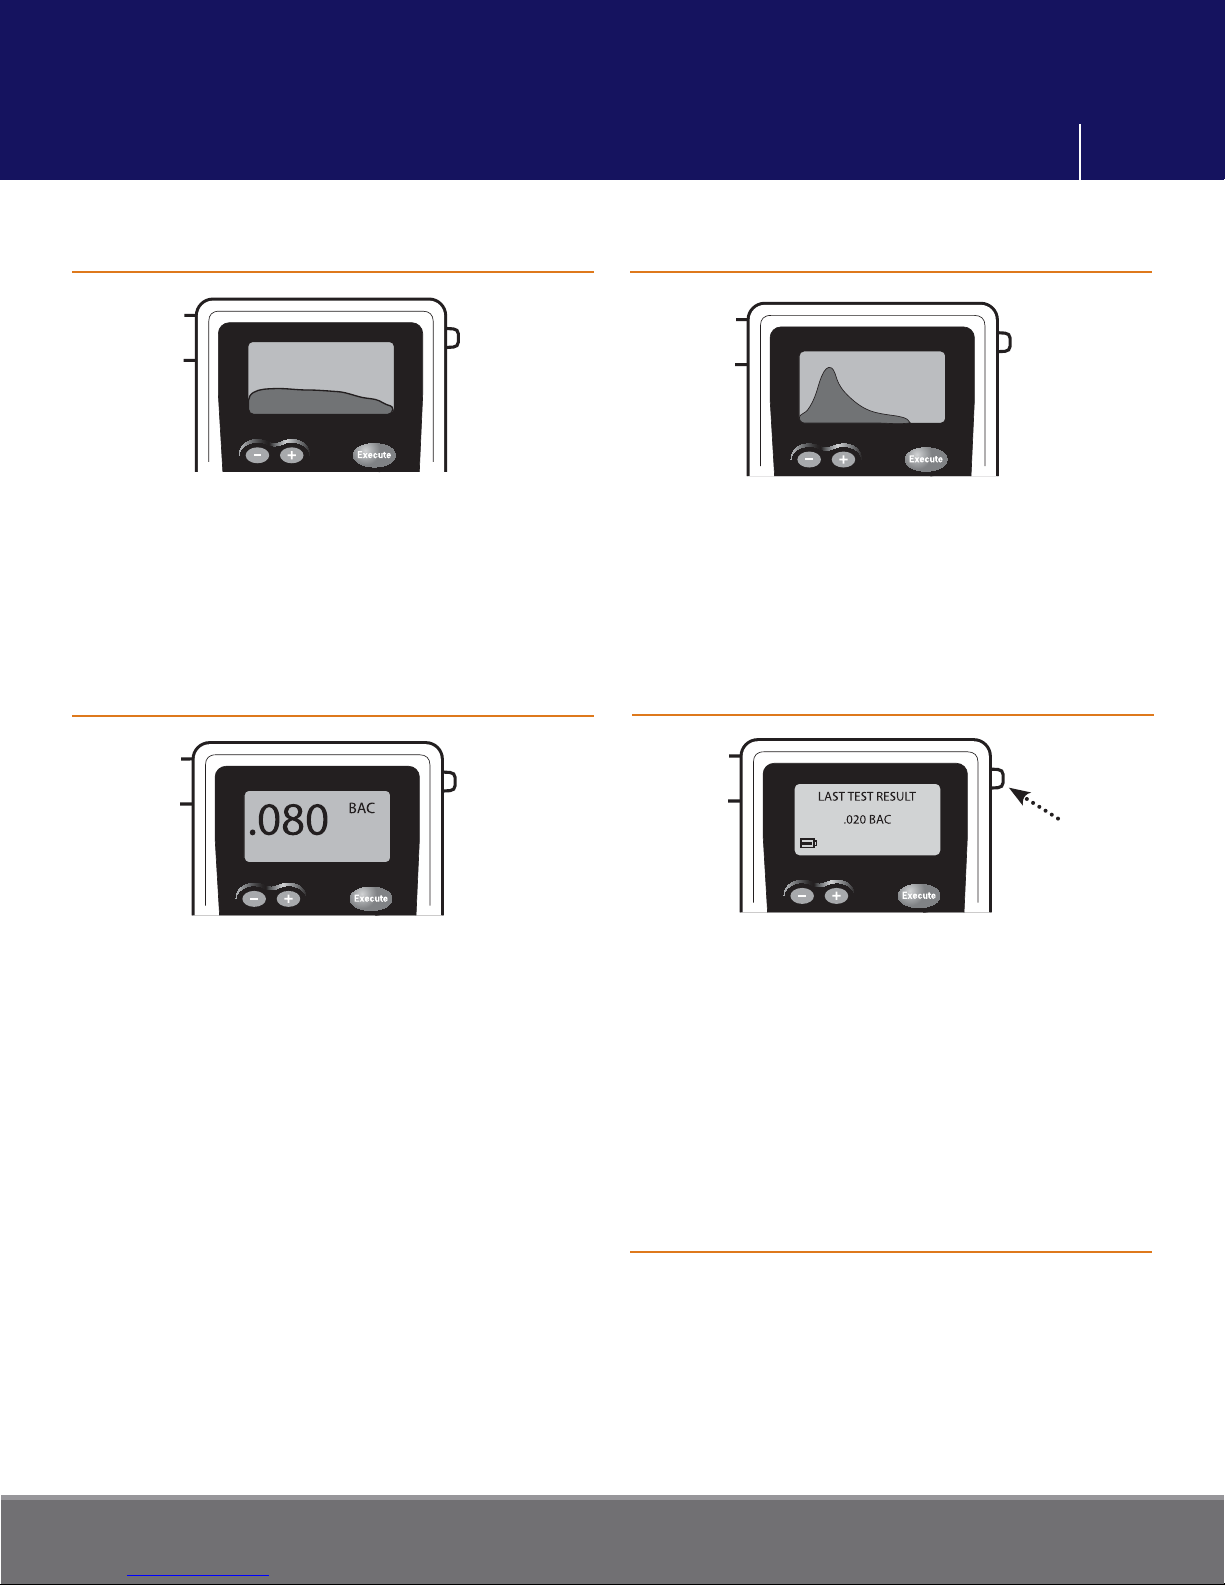
Breath Flow
As the subject blows into the mouthpiece,
the FC10
fl ow on the display, as well as showing the
amount of liters. Liters are shown in the
upper left corner.
Plus
will show a graph of the breath
Test Results
Alcohol Curve
If the FC10
level is graphed and will be displayed
before the result.
Plus
detects alcohol, the alcohol
Viewing Previous Test Results
After the alcohol is graphed, the test result
is displayed.
The result will remain on the screen until
the Function or Power button is pressed.
The last 10 test results are retained in
memory.
Press to remove
mouthpiece
Press the Function button until “LAST
TEST RESULT” is displayed. The results of
the last test will be displayed.
To view any of the last 10 tests use the + or
- buttons to scroll through.
Momentarily press the Power button to
return to the testing mode.
Removing the Mouthpiece
Remove the mouthpiece by pushing
straight down on the tab at the right of the
display screen. DO NOT BEND the tab.
www.Lifeloc.com | 303-431-9500
Page 13
Plus
User Settings
Lifeloc FC10
Changing the Time
Press the Function button until the display reads “SETTINGS”.
Press the Execute button.
Display reads “TIME” with the hour digits fl ashing.
Press the + or – button to change the hour.
Press the Execute button to save your changes and move to minutes.
Press the + or – button to change the minutes.
Press the Function button to save your changes.
Momentarily press Power to return to the testing mode.
13
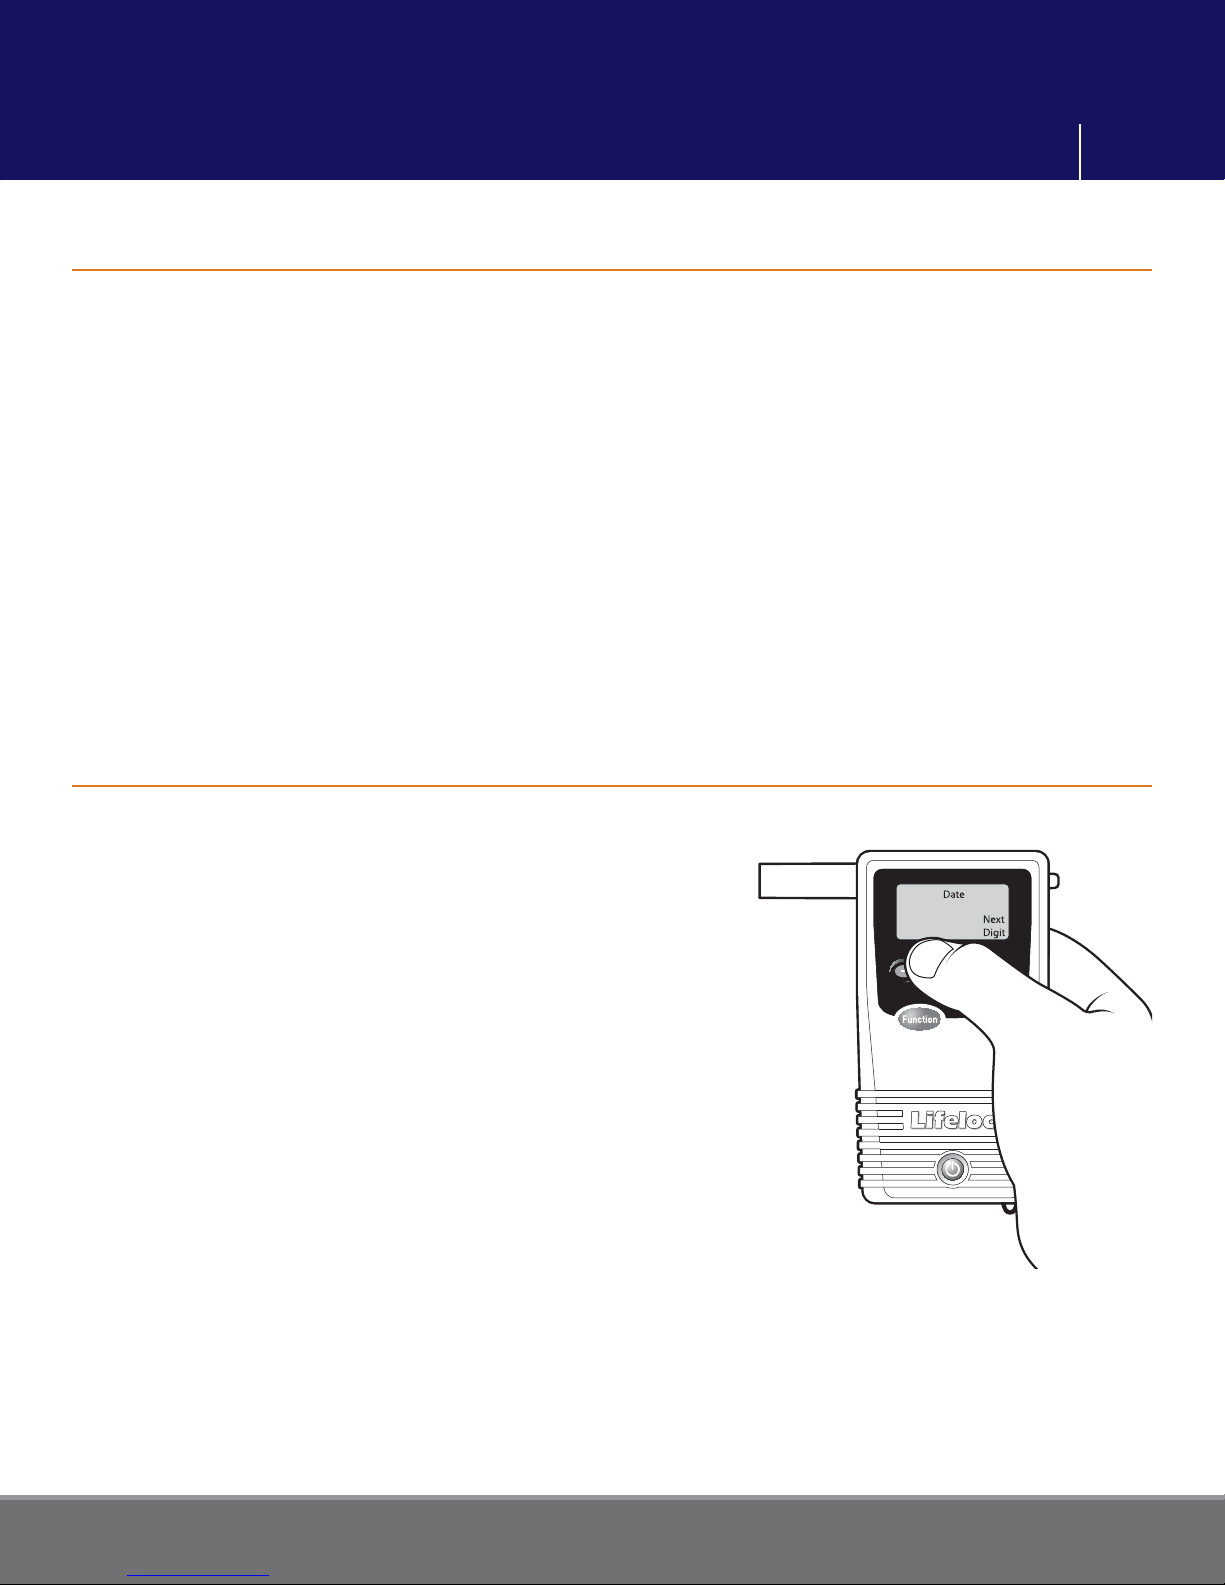
Changing the Date
Press the Function button until the display reads “SETTINGS”.
Press the Execute button. Display reads “TIME”.
Press the Function button until the display reads “DATE”
with the month digits fl ashing.
Press the + or – button to change the month.
Press the Execute button to save the month and move
to the day.
Press the + or – button to change the day.
Press the Execute button to save the day and move to
the year.
Press the + or – button to change the year.
Press the Function button to save your changes.
Momentarily press Power to return to the testing mode.
02/24/2008
www.Lifeloc.com | 303-431-9500
Page 14

Plus
User Settings
Lifeloc FC10
Setting Trigger Mode
From the “SETTINGS” display, press the Execute button.
Press the Function button until the display reads “TRIGGER MODE”.
Press the Execute button to select between “END OF BREATH” and “PRECISE VOLUME”.
Press the Function button to save the setting. Momentarily press Power to return to the
testing mode.
(User settings fl ow chart is shown on p. 32)
Security Settings Explained
14
Password can be set to protect access to calibration, calibration check, calibration
settings and user settings.
Without a password, users are still able to conduct Automatic, Manual and Passive tests;
print test results; and check battery status and temperature.
Setting Up Security Password
Press the Function button until the display reads “SETTINGS”.
Press the Execute button. Display reads “TIME”.
Press the Function button until the display reads “SECURITY SETTINGS”.
Press the Execute button. The unit is now ready to accept a password. Use the + or -
buttons to enter a number or letter.
Use the Execute button to move to the next digit. Password is limited to 8 characters.
Press the Function button to save your password. Momentarily press Power to return to
the testing mode.
Note: Record and store your password in a safe place. Lifeloc does not have access to
your password. If password is lost, you will need to contact Lifeloc to restore a default
via remote diagnostics or by returning the unit to the factory.
www.Lifeloc.com | 303-431-9500
Page 15

Plus
User Settings
15
Lifeloc FC10
Using Security Password
For access to Calibration, Calibration Check, Calibration Settings or User Settings.
Press the Function button until the display reads “CALIBRATION” or “SETTINGS”. Select
the one you would like to access. You are limited to one at a time.
Press the Execute button. Display reads “SECURITY CODE”.
Enter your password using the + or - buttons. Use the Execute button to move to the next
digit.
Press the Function button to gain access. You now have access to all menus and settings.
Removing Security Password
Press the Function button until the display reads “SETTINGS”.
Press the Execute button. Display reads “SECURITY CODE”.
Enter your password using the + or - buttons.
Press the Function button until the display reads “SECURITY SETTING”.
Press the Execute button. Display reads “SECURITY SETTING” and shows your password
in the lower left corner.
Clear your password using the + or - buttons to change the letters or numbers to blank
spaces. Use the Execute button to move to the next digit.
Press the Function button to clear the password.
Momentarily press Power to return to the testing mode.
www.Lifeloc.com | 303-431-9500
Page 16

Plus
User Settings
16
Lifeloc FC10
Adjusting LCD Contrast
Press the Function button until the display reads “SETTINGS”.
Press the Execute button. Display reads “TIME”.
Press the Function button until the display reads “DISPLAY SETTINGS”.
Press the Execute button. Display reads “LCD CONTRAST”.
Press the + or - buttons to adjust the contrast of the text.
(0 = lightest; 10 = darkest)
Press the Function button to save your adjustment. Momentarily press Power to return to
testing mode.
Setting the Default Test Order
Test Order 1 (Default) Test Order 2 Test Order 3
Auto Test Passive Test Auto Test
Manual Test Auto Test Manual Test
Passive Test Manual Test
Press the Function button until the display reads “SETTINGS”.
Press the Execute button. Display reads “TIME”.
Press the Function button until the display reads “DISPLAY SETTINGS”.
Press the Execute button. Display reads “LCD CONTRAST”.
Press the Function button. Display reads “TEST ORDER”.
Press the Execute button to toggle between Test Order 1, 2, and 3 above.
Press the Function button to save the changes.
Momentarily press Power to return to the testing mode.
Please note: By selecting Test Order 3 you will disable passive testing.
(User settings fl ow chart is shown on p. 32)
www.Lifeloc.com | 303-431-9500
Page 17
Plus
User Settings
Lifeloc FC10
Results Format Explained
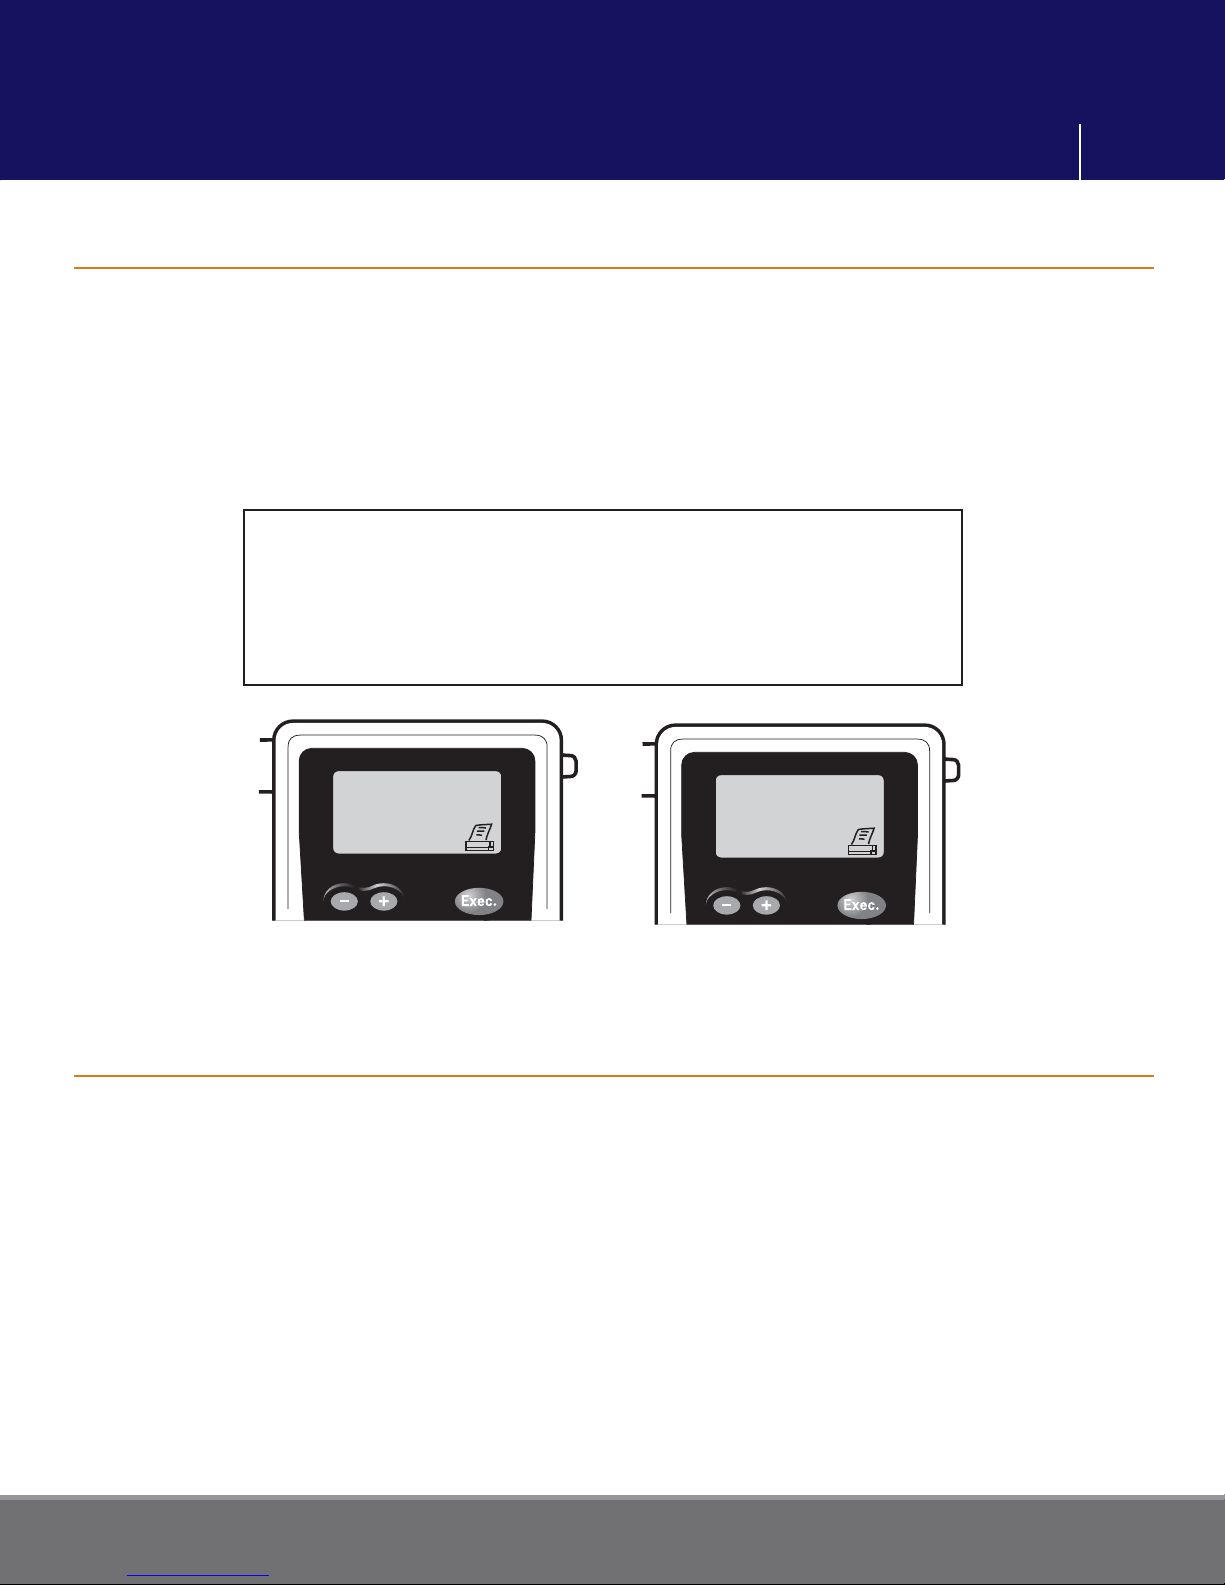
Results for Auto and Manual tests can be displayed in a “NUMERIC” or “PASS/WARN/
FAIL” (PWF) format. Passive test results, however, can only be displayed as “POS” &
“NEG”.
NUMERIC results are in a 3-digit BAC format.
PASS/WARN/FAIL results require setting specifi c levels for Pass and Fail.
For example, if Pass is set at .040 and Fail is set at .080
(default settings on your FC10
Plus
), then:
17
Pass = .000 - .040
Warn = .041 - .079
Fail = .080 and above
PASS
Sample settings only. See
page 18 for instructions on
setting the Pass/Warn/Fail
levels.
FAIL
Setting Results Format
Press the Function button until the display reads “SETTINGS”.
Press the Execute button. Display reads “TIME”.
Press the Function button until the display reads “DISPLAY SETTINGS”.
Press the Execute button. Display reads “LCD CONTRAST”.
Press the Function button until the display reads “RESULTS FORMAT”.
Press Execute to toggle between “NUMERIC” and “PWF”.
Press the Function button to save your setting.
Momentarily press Power to return to the testing mode.
www.Lifeloc.com | 303-431-9500
Page 18

Plus
User Settings
Lifeloc FC10
Setting the Pass/Warn/Fail Levels
Press the Function button until the display reads “SETTINGS”.
Press the Execute button. Display reads “TIME”.
Press the Function button until the display reads “DISPLAY SETTINGS”.
Press the Execute button. Display reads “LCD CONTRAST”.
Press the Function button until the display reads “PASS LEVEL”.
Press the + or – button to set the BAC Pass level.
Press the Function button. Display reads “FAIL LEVEL”.
Press the + or – button to set the BAC Fail level.
Press the Function button to save your settings.
Momentarily press Power to return to the testing mode.
Note: An alcohol reading between the PASS and FAIL levels will read WARN.
18
Wet Bath and Dry Gas Explained
You can calibrate and check your FC10
Plus
Plus
to recognize which method or which ‘Standard Type’ you
.
You must fi rst set your FC10
will be using.
Once you choose the Standard Type, the FC10
and you do not have to set it again unless you change to a different method of
performing a calibration/calibration check.
Dry Gas Calibration requires that, prior to calibration, you enter the Corrected Standard
Value based on your altitude or elevation. Using the chart on the outside of the canister,
multiply the number next to your elevation by the standard.
Example:
• Denver, Colorado’s elevation is 5200 ft. above sea level and dry gas standard = .100
BAC.
• Correction factor from tank is .820
• Corrected Standard = .100 x .820 = .082
If you move to a signifi cantly different altitude before calibrating, you will have to change
the standard in the FC10
Plus
using either the wet bath or dry gas method.
Plus
will store that information in memory
Wet Bath Calibration does not require altitude correction.
Note: The FC10
Standard.
Plus
comes from the factory set for Wet Bath type and .100 BAC Calibration
www.Lifeloc.com | 303-431-9500
Page 19
Plus
Calibration Settings
Lifeloc FC10
Selecting the Calibration Standard
Press the Function button until the display reads “CALIBRATION”.
Press the Execute button. The display reads either “WET CHECK” or ” DRY CHECK”.
Press the Function button until the display reads “CAL SETTINGS”.
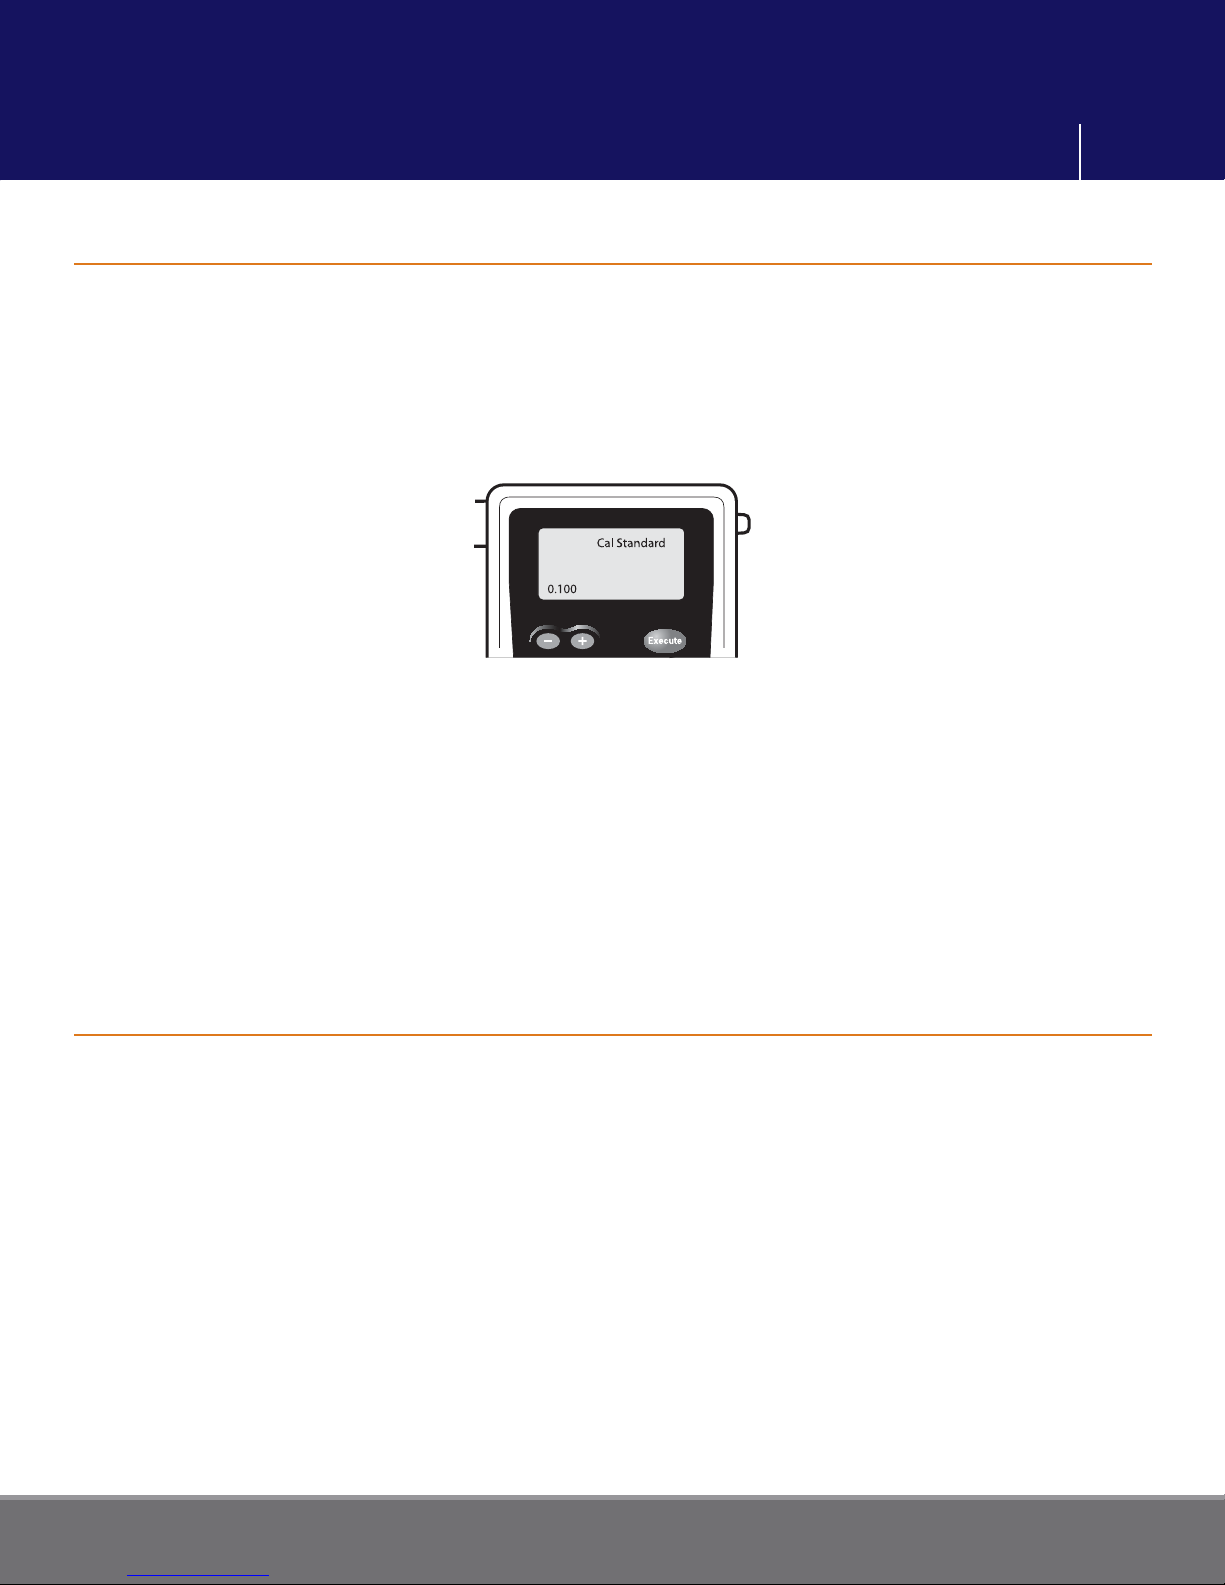
Press the Execute button. The display reads “CAL STANDARD”.
Use the + or – button to change the number to the BAC level of standard you will be
calibrating to. It should be the same as on the bottle of certifi ed solution or as your
altitude corrected standard, if using a dry gas tank. (See p. 18)
19
Press the Function button to save the settings. Momentarily press Power to return to the
testing mode.
Once you set the standard, you do not have to set it again unless you change solutions or
elevation (dry gas only).
Calibration/Cal Check Explained
Calibration of an FC10
accurate BAC (Breath Alcohol Concentration) results.
You can use dry gas or wet bath solution to calibrate your FC10
solutions are .100, .080 or .040 BAC.
Plus
The FC10
Lifeloc recommends you calibrate your FC10
Once every 12 months, regardless of how many tests you have performed
Or, at intervals specifi ed by your Internal Policies, Quality Assurance Plan, or State
Regulations
must be between 68° and 95° F (20° - 35° C) to calibrate.
Plus
sets your unit to a known alcohol concentration to enable
Plus
. Most commonly used
Plus
:
Or, after two failed Calibration Checks.
www.Lifeloc.com | 303-431-9500
Page 20
Lifeloc FC10
Standard Type
Wet Bath
Change
Plus
Calibration Settings
20
A Calibration Check simply verifi es the FC10
acceptable accuracy range. Calibration check is also referred to as “External Calibration
Check,” “Accuracy Check,” “Verifi cation” and “Cal Check.”
Lifeloc recommends you perform a calibration check on your FC10
Once every 30 days
Or, at intervals specifi ed by your Internal Policies, Quality Assurance Plan, or
State Regulations.
Plus
was calibrated correctly and is within the
Plus
:
Selecting the Standard Type
Press the Function button until the display
reads “CALIBRATION”.
Press the Execute button. The display reads
either “WET CHECK” or “DRY CHECK.”
Press the Function button until the display
reads “CAL SETTINGS”.
Press the Execute button. The display reads
“CAL STANDARD”.
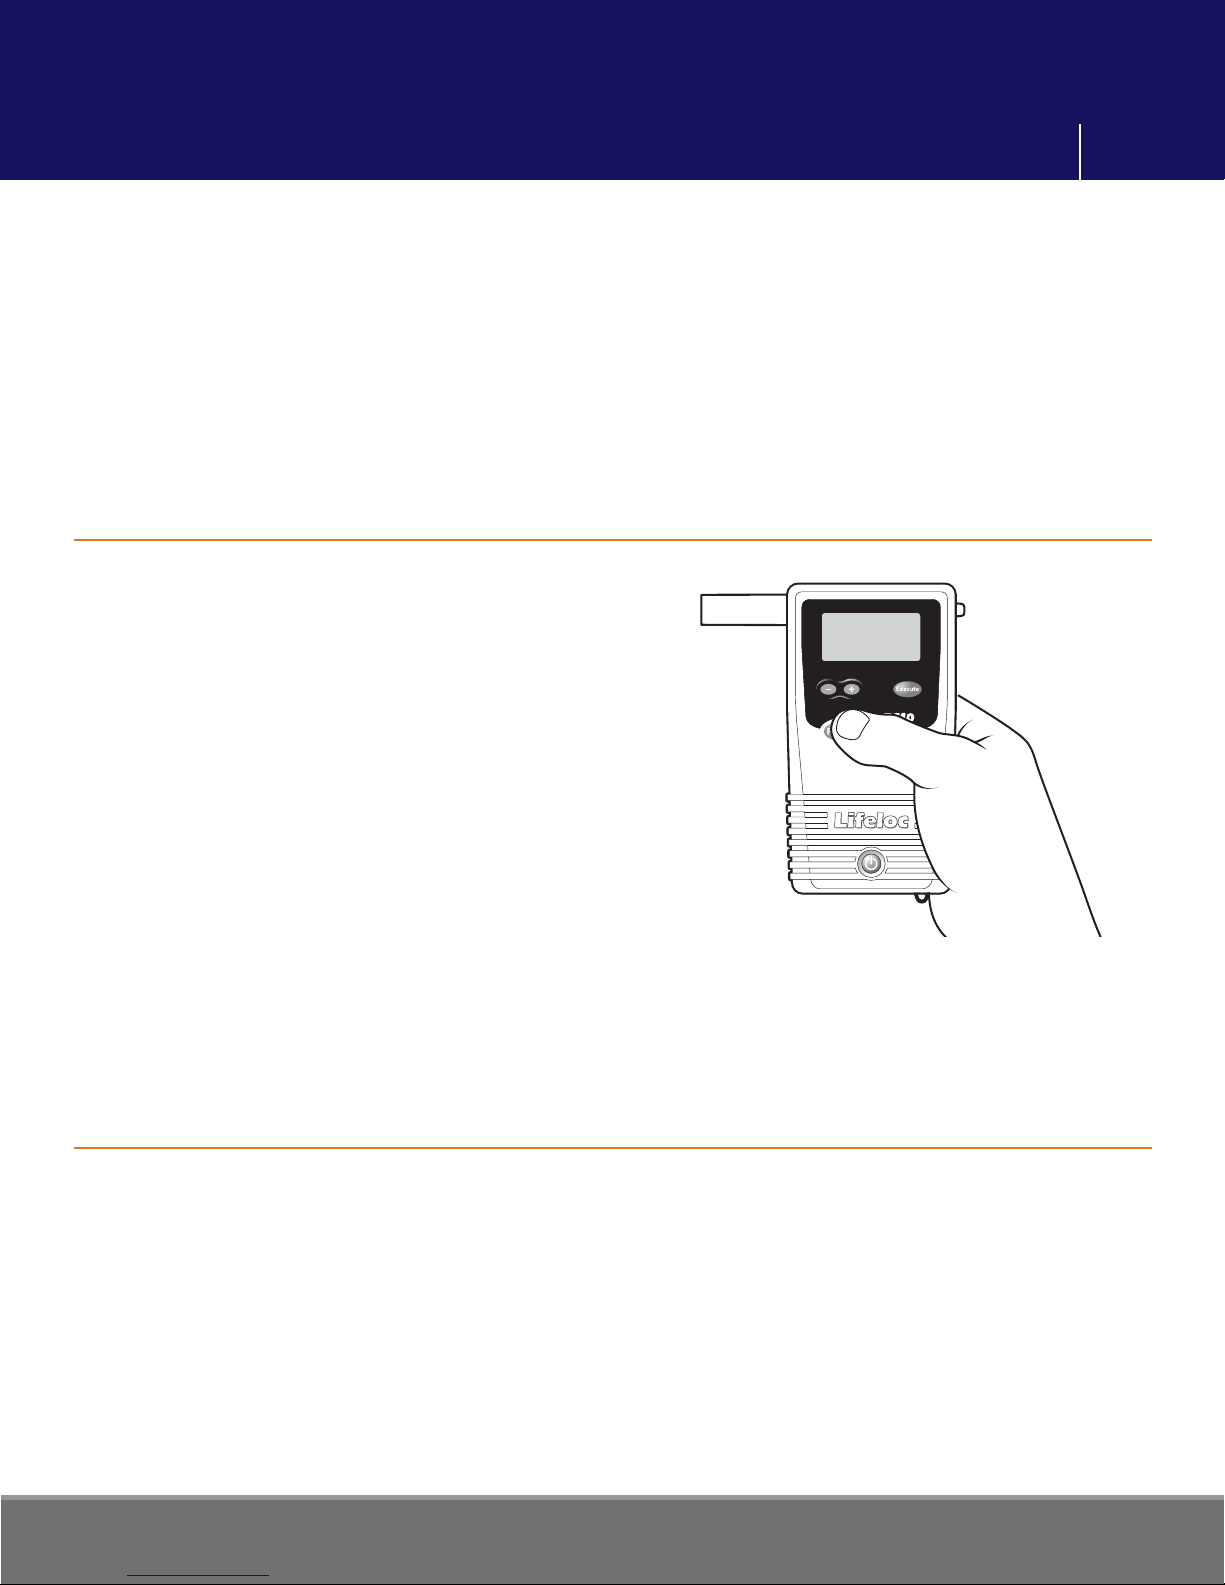
Press the Function button until the display
reads “STANDARD TYPE”.
Press the Execute button to choose between
“DRY GAS” and “WET BATH”.
Press the Function button to save settings. Momentarily press Power to return to the
testing mode.
Calibration/Cal Check Lock-out Explained
The calibration/cal check lock-out allows you to prevent usage of your FC10
calibrated or cal checked in a specifi ed time period. Time can be registered as days or
number of tests.
Beginning 48 hours before the specifi ed lock-out time, the unit will display “WARNING
CAL EXPIRING,” “WARNING CHECK EXPIRING” or both.
When the time period has elapsed, the unit will display “CAL EXPIRED,” “CHECK
EXPIRED” or both and not allow testing until it is calibrated and/or cal checked.
You can specify time periods up to 999 days or 9999 tests between calibrations or cal
checks. You can also disable the calibration/cal check lock-out feature. (See p.21)
Plus
if it is not
www.Lifeloc.com | 303-431-9500
Page 21

Plus
Calibration Settings
Lifeloc FC10
Setting the Calibration Lock-out Type
Press the Function button until the display reads “CALIBRATION”.
Press the Execute button. Display reads either “WET CHECK” or “DRY CHECK”.
Press the Function button until the display reads “CAL SETTINGS”.
Press the Execute button. Display reads “CAL STANDARD”.
Press the Function button until the display reads “CAL TIME TYPE”.
Press the Execute button to select “DAYS” or “TESTS”.
Press the Function button to save your setting.
Display will now read “CAL TIME”, or “CAL NUM TESTS”.
Press the + or - button to set the number of days or tests between calibrations. The time
starts counting from your last calibration date, not from the date you set it. Choosing
“DISABLED” turns this setting off.
21
Press the Function button to save your setting.
Momentarily press Power to return to the testing mode.
Setting the Cal Check Lock-out Type
Press the Function button until the display reads “CALIBRATION”.
Press the Execute button. Display reads either “WET CHECK” or “DRY CHECK”.
Press the Function button until the display reads “CAL SETTINGS”.
Press the Execute button. Display reads “CAL STANDARD”.
Press the Function button until the display reads “CHECK TIME”, or “CHECK NUM TESTS”.
Press the + or - button to set the number of days between calibration checks. The days
start counting from your last calibration check date, not from the date you set it.
Press the Function button to save your settings.
Momentarily press Power to return to the testing mode.
www.Lifeloc.com | 303-431-9500
Page 22
Plus
Wet Bath Calibration
22
Lifeloc FC10
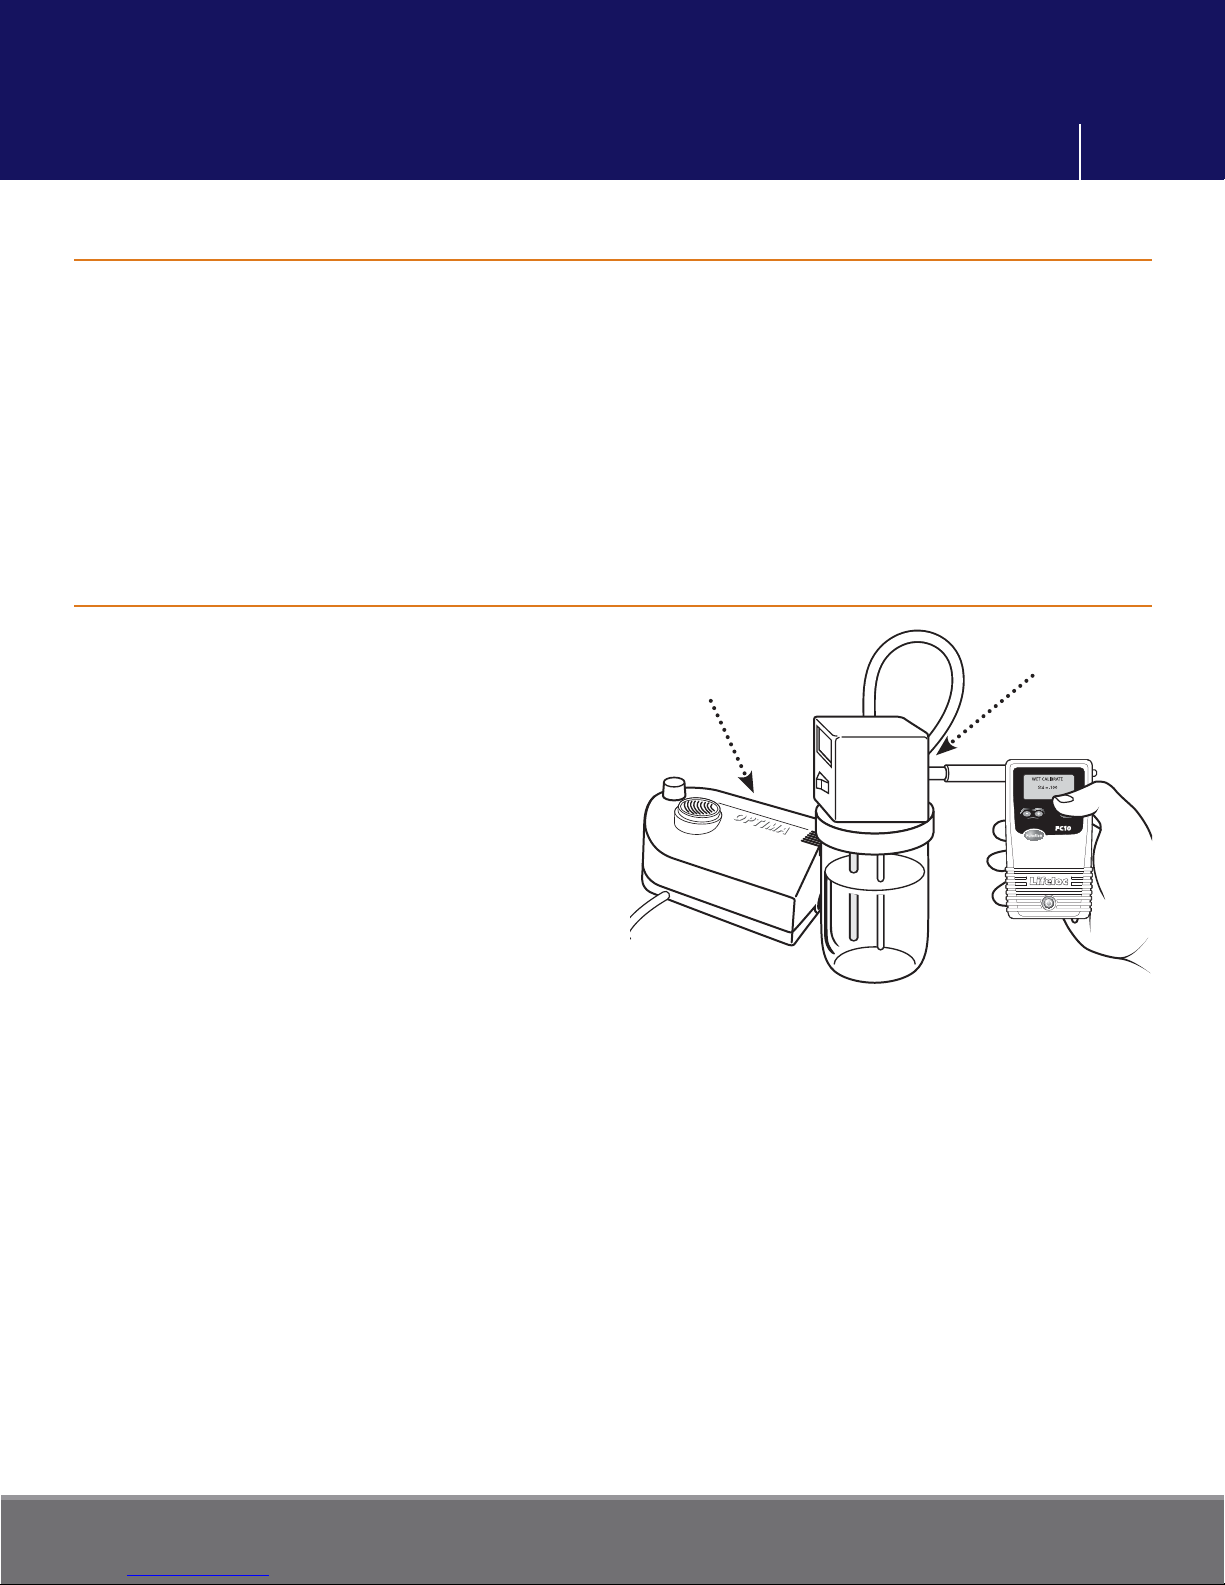
Wet Bath Simulator Set-Up For Calibration & Calibration Check
Pour a bottle of certifi ed alcohol solution into the simulator jar and hand tighten lid.
Connect long tube from input port to output port so no alcohol escapes while simulator
heats up.
Plug in the simulator and turn it on.
The simulator automatically heats the solution to 34° C (93.2° F) in about 5 to 10 minutes.
Proper operating temperature is important for accuracy so be certain to check
temperature before proceeding.
Performing a Wet Bath Calibration
Prepare the wet bath simulator according to
its instructions above.
Disconnect long tube from the output port.
Attach a mouthpiece adapter securely to the
output port on the simulator lid. Refer to your
simulator manual for location.
Calibration
Pump
Simulator
Plus
Turn the FC10
the back of the unit.
Press the Function button until the display
reads “CALIBRATION”, then press the
Execute button. Display reads “WET CHECK”.
Press the Function button until the display
reads “WET CALIBRATE”.
Verify the “CAL STANDARD” is set to the concentration of certifi ed alcohol solution you
will be using when you calibrate. To select a new Calibration Standard, see page 24.
Slide the FC10
Be prepared to blow into the tube for up to 10 seconds.
Start blowing
• Blow through the input tube (or use a calibration pump) to create and maintain 1/2" of
bubbles on the surface of the solution.
• Press Execute to proceed and start a 3 second countdown.
• Press Execute to take a sample.
on. Attach a mouthpiece to
Plus
mouthpiece over the mouthpiece adaptor on the simulator.
• Continue blowing for another 3 seconds.
Stop blowing
www.Lifeloc.com | 303-431-9500
Page 23

Plus
Wet Bath Calibration
23
Lifeloc FC10
If successful, the display will read “CAL COMPLETE”.
If no alcohol is detected, display reads “INVALID CALIBRATION”. Please repeat
calibration setup and test, starting with wet bath simulator setup.
Disconnect the unit and wait at least two minutes before conducting a Cal Check to verify
the accuracy of your calibration.
Note: Following calibration, a Cal Check is required before the unit allows you to conduct
any tests.
(Calibration display fl ow chart is shown on p. 33)
Performing a Wet Calibration Check
Prepare the wet bath simulator according to its instructions on page 22.
Disconnect long tube from the output port. Attach a mouthpiece adapter securely to the
output port on the simulator lid. Refer to your simulator manual for location.
Plus
Turn the FC10
Press the Function button until the display reads “CALIBRATION”, then press the Execute
button. Display reads “WET CHECK”.
Verify the “CAL STANDARD” is set to the concentration of certifi ed alcohol solution you
will be using when you check the calibration. To select a new Calibration Standard, see
page 19.
Slide the FC10
Be prepared to blow into the tube for up to 10 seconds.
Start blowing
• Blow through the input tube (or use a calibration pump) to create and maintain 1/2"
of bubbles on the surface of the solution.
• Press Execute to proceed and start a 3 second countdown.
on. Attach a mouthpiece to the back of the unit.
Plus
mouthpiece over the mouthpiece adaptor on the simulator.
• Press Execute to take a sample.
• Continue blowing for another 3 seconds.
Stop blowing
www.Lifeloc.com | 303-431-9500
Page 24
Plus
Dry Gas Calibration
Lifeloc FC10
Read the result. It should be within +/- .005 BAC of the standard used. If your solution is
greater than .100 BAC, accurate results will be within +/- 5%.
Example:
• A .100 BAC solution should read between .095 and .105 BAC.
• A .200 BAC solution should read between .190 and .210 BAC.
If no alcohol was detected, the display will read “INVALID CHECK”. Repeat wet bath
calibration check instructions.
(Calibration display fl ow chart is shown on p. 33)
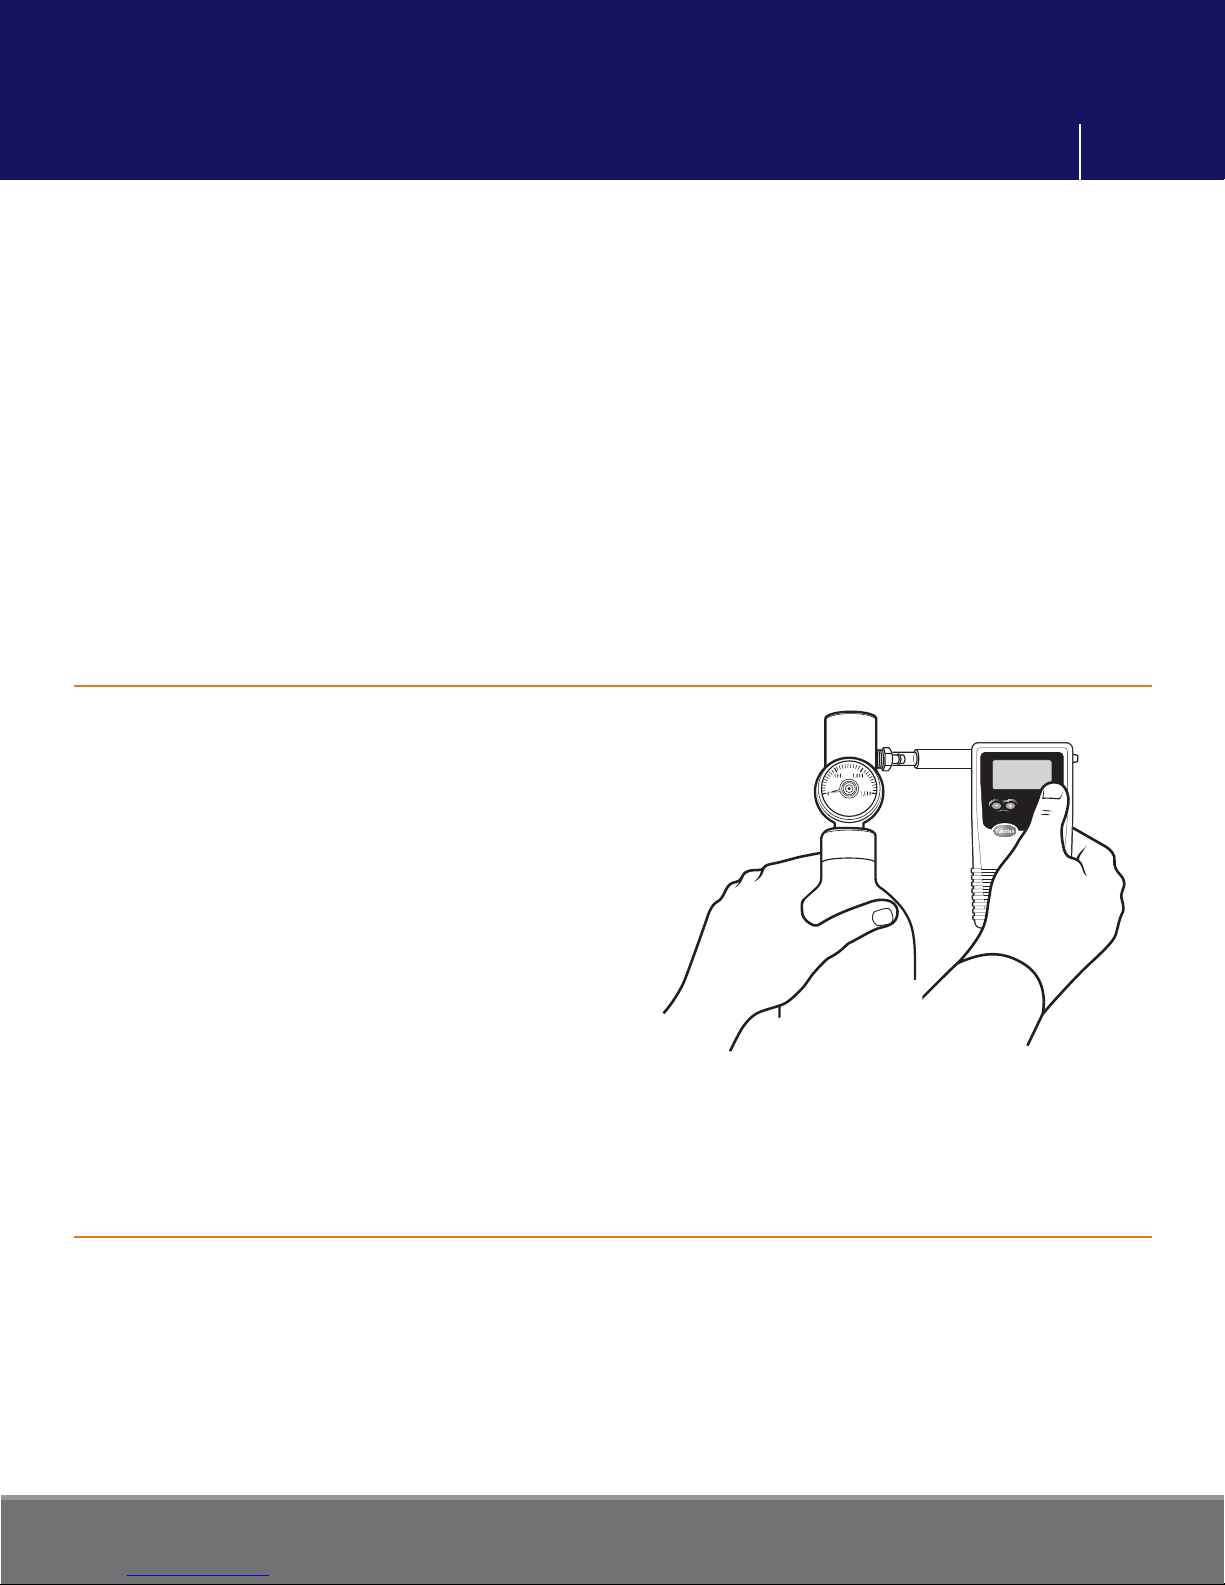
Dry Gas Tank Set-Up
24
Attach the regulator to the dry gas tank.
Attach the small tube to the output port
on the regulator.
Securely fi t the mouthpiece adaptor to the
small tube on the regulator.
Note: Do not store the dry gas tank with
the regulator attached. The regulator
is not designed as the primary sealing
mechanism. Leaving the regulator
attached may result in a leak.
Performing a Dry Gas Calibration
Prepare the dry gas tank according to its instructions above.
Plus
Turn FC10
Press the Function button until the display reads “CALIBRATION”.
Press the Execute button. Display reads “DRY CHECK”.
Press the Function button until the display reads “DRY CALIBRATE”.
on. Attach a mouthpiece to the back of the unit.
www.Lifeloc.com | 303-431-9500
Page 25

Plus
Dry Gas Calibration
Lifeloc FC10
Verify the Calibration Standard is set to the corrected BAC.
Using the Altitude Correction Factor (ACF) chart on the dry gas tank, calculate the
corrected BAC.
Corrected Standard = (tank BAC) x (ACF)
To select a new Calibration Standard, see page 19.
Plus
Attach the FC10
ensuring a snug fi t.
Be prepared to press the Gas Tank Regulator button for up to 10 seconds.
Start pressing (gas fl ow will start)
• Press the Execute button to proceed and start a 3 second countdown.
• Press the Execute button again to take a sample.
• Continue holding the Regulator button for another 3 seconds.
mouthpiece to the regulator by sliding it over the mouthpiece adaptor,
25
Stop pressing (gas fl ow will stop)
If successful, the display will read “CAL COMPLETE”.
If no alcohol is detected, display reads “INVALID CALIBRATION”. Please check gas level
on your tank regulator and replace tank if empty. Repeat dry gas calibration instructions
on page 24.
Plus
Disconnect the FC10
Note: Following calibration, a Cal Check is required before the unit allows you to conduct
any tests.
(Calibration display fl ow chart is shown on p. 33)
and wait at least two minutes before conducting a Cal Check.
www.Lifeloc.com | 303-431-9500
Page 26

Plus
Dry Gas Calibration
Lifeloc FC10
Performing a Dry Gas Calibration Check
Prepare the dry gas tank according to its instructions on page 24.
Plus
Turn the FC10
Press the Function button until the display reads “CALIBRATION”.
Press the Execute button. Display reads “DRY CHECK”.
Verify the Calibration Standard is set to the corrected BAC.
Using the Altitude Correction Factor (ACF) chart on the dry gas tank, calculate the
corrected BAC.
Corrected BAC = (tank BAC) x (ACF)
To select a new Calibration Standard, see page 19.
Attach the FC10
ensuring a snug fi t.
on. Attach a mouthpiece to the back of the unit.
Plus
mouthpiece to the regulator by sliding it over the mouthpiece adapter,
26
Be prepared to press the Gas Tank Regulator button for up to 10 seconds.
Start pressing (gas fl ow will start)
• Press the Execute button to proceed and start a 3 second countdown.
• Press the Execute button again to take a sample.
• Continue holding the Regulator button for another 3 seconds.
Stop pressing (gas fl ow will stop)
Read the result. It should be within +/- .005 BAC of the corrected standard used. If your
solution is greater than .100, accurate results will be within +/- 5%.
Example: A .082 BAC corrected standard should read between .077 and .087 BAC.
If no alcohol is detected, display reads “INVALID CHECK”. Please check gas level on your
tank regulator and replace tank if empty. Repeat dry gas calibration check instructions.
(Calibration display fl ow chart is shown on p. 33)
How to Check Status
This function allows you to check the status and internal conditions of your FC10
Press the Function button until display reads “STATUS”.
Press the Execute button. Display shows Model, Serial Number, Software Version, and
Software Release Date.
www.Lifeloc.com | 303-431-9500
Plus
.
Page 27

Plus
Maintenance
27
Lifeloc FC10
Fuel Cells
Fuel cells are highly durable sensors that are capable of providing accurate breath alcohol
results for years. There are, however, a few precautions you should take to make certain
that these devices perform for the longest period of time possible.
Use the device. Fuel cells like moisture, so it is a good idea to take tests periodically
to provide needed moisture to the fuel cell, especially in dry climates. You do not need
alcohol, just breath.
Avoid cigarette smoke! Make certain no one is permitted to blow cigarette smoke into
the unit. This can damage or destroy the fuel cell.
Cleaning
Use of a mild disinfectant cleaner and a soft cloth on the outside of the case is
recommended periodically to keep your unit clean. Do not use alcohol to clean the unit.
Lifeloc offers alcohol free cleaning wipes specifi c for your unit. See page 31 for more
details.
Batteries
Your FC10
use NiMH rechargeable batteries as well.
To use NiMH, insert the batteries as directed and power on the unit.
Press the Function button until the display reads “SETTINGS”.
Press the Execute button. Display shows “TIME”.
Press the Function button until the display shows “BATTERY TYPE”.
Press the Execute button to change your battery settings.
Plus
default setting is for four AA batteries. However, you do have the ability to
Press the Function button to save your settings.
Momentarily press the Power button to return to the testing mode.
The four AA batteries in your FC10
6000 tests. It is recommended you use high-quality alkaline batteries with your unit.
www.Lifeloc.com | 303-431-9500
Plus
should last for about 160 hours of “on” time or up to
Page 28

Plus
On-screen Messages
28
Lifeloc FC10
Messages Explained
Message Explanation
<1.3L Retest or Try Manual Test Breath fl ow ended before the subject blew
1.3 liters of breath. Instruct subject to try
again or use manual test mode.
>0.6 BAC is unusually high and above 0.6 BAC.
Subject may require medical attention.
Calibration/Cal Check Expired Calibrate or Cal Check the unit.
Calibration/Cal Check Expiring The unit is within 48 hours of the
Calibration or Cal Check lockout time.
External Interference External interference has been detected.
Move to a different location and try again.
Flow Error - Retry & Blow Steadily Exhalation not complete or interrupted.
Instruct subject to blow steadily as long as
they can.
Invalid Calibration/Cal Check No alcohol was detected. Repeat setup,
then retest.
Log Empty There are no results in the memory.
Low Battery Battery voltage is too low to take a test.
Replace batteries.
Low Li Battery The internal clock battery is low. Contact
Lifeloc Technical Support.
Pump Reset Needed The pump needs to be reset. Follow
onscreen instructions.
Temperature When calibrating or taking a test, unit is
outside of temperature limits.
Calibration range = 68
Testing range = 32
Timeout User blew for > 15 seconds.
Try again, blow harder.
o
- 95o F (20o - 35o C)
o
- 130o F (0o - 55o C)
www.Lifeloc.com | 303-431-9500
Page 29

Plus
Lifeloc FC10
Lifeloc Factory Warranty
The FC10
of purchase by the end-user.
The Warranty covers:
•
Parts and labor on covered repairs
•
Software updates, as applicable
•
Air freight back to the customer after the unit is repaired (U.S. only)
The Warranty does not cover:
•
Freight to the Lifeloc factory
•
Misuse, abuse, negligence or accidents
Plus
comes with a one year limited parts and labor warranty, effective on the date
Service
29
Extended Service Plans
Extended Service Plans are available for your FC10
for an additional year at a reasonable cost and include free factory diagnostic checks. Call
Lifeloc for details or purchase online at www.lifeloc.com/technical/service.html.
Plus
. These provide complete coverage
Service
If your FC10
or phone call will put you in contact with our technical support personnel. Many minor
adjustments can be made over the phone.
Repairs are completed within 5 days for up to 5 units or it’s free.
Plus
should require repairs or maintenance, Lifeloc is here for you. Just an email
www.Lifeloc.com | 303-431-9500
Page 30

Lifeloc FC10
............................................................................
Notice
Plus
FC10
Plus
Supplies
30
The FC10
conjunction with a specifi ed, periodic maintenance and calibration/calibration check
regimen. Use by untrained operators or without periodic calibration or calibration
checks may result in invalid results or incorrect interpretation of results. FC10
to be used by children under 12 years of age.
DO NOT DRINK AND DRIVE. Lifeloc strongly recommends that no vehicle or machinery
be operated after alcohol consumption. Even small quantities of alcohol can result in
driving impairment.
The FC10
water. The FC10
FC10
If instrument will not be used for more than 6 months remove battery to avoid damage to
the instrument caused by leaking battery acid.
Disposal of Instrument
Plus
is a professional device designed to be used by trained operators in
Plus
is not waterproof and should not be immersed in or exposed to excessive
Plus
is not suitable for use in a potentially explosive environment. The
Plus
cannot be used inside an oxygen tent.
At the end of the instrument’s service life:
• Do Not dispose of the FC10
• Dispose of the FC10
regulations.
Plus
Plus
is not
Plus
as unsorted municipal waste.
in accordance with national waste disposal
Specifi cations
Size .................................................................... 2.6" x 5" x 1.25" (66 x 127 x 32 mm)
Weight [w/ batteries] ................................ 9 oz. (255 grams)
Measurement Range .................................. .000 to .600 BAC
Accuracy ......................................................... +.005 BAC up to .100 BAC
Battery Life .................................................... Approximately 160 hours or up to 6000 tests
We recommend storing the FC10
............................................................................ +5% for .100 - .400 BAC
www.Lifeloc.com | 303-431-9500
Plus
in temperatures between 32o - 130o F (0o - 55o C)
Page 31
Lifeloc FC10
Accessories & Supplies
Plus
Menu Charts
31
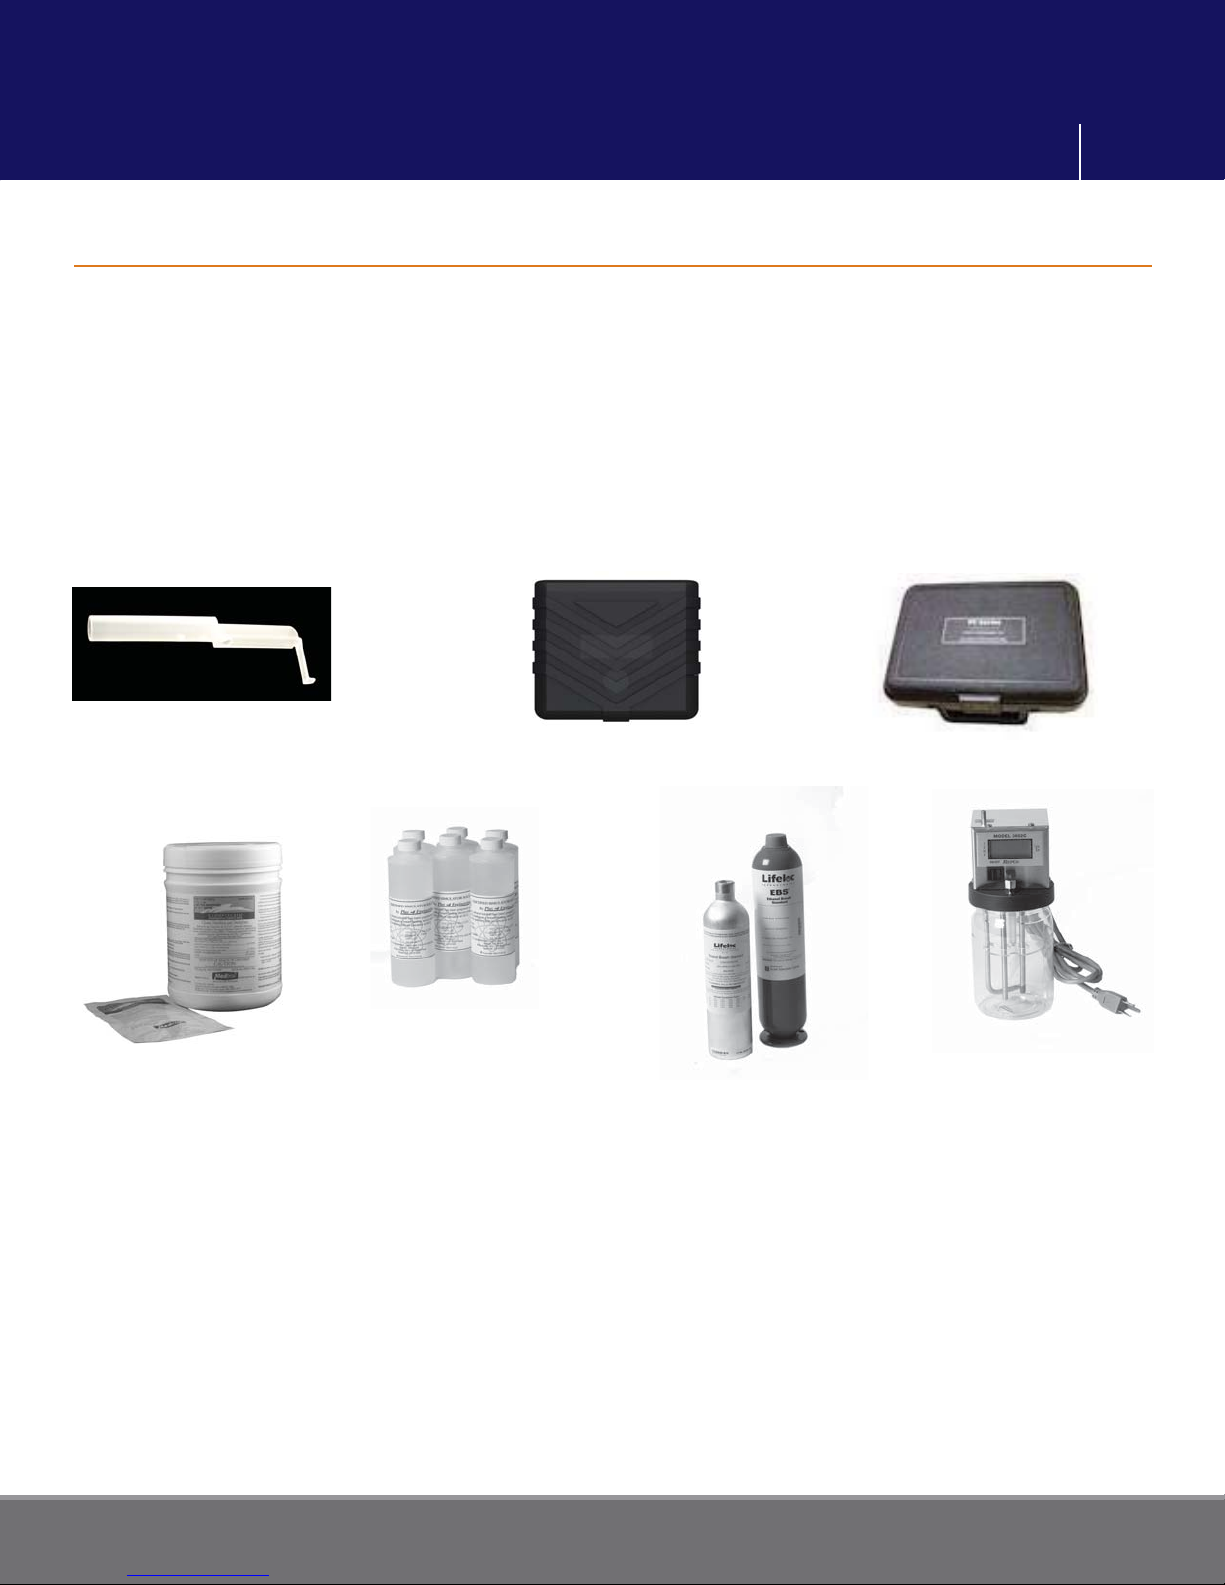
Lifeloc offers a complete line of accessories and supplies for your FC10
For the most current listing of supplies for your FC10
• www.lifeloc.com. Click on Supplies>FC Series
– or –
• www.lifeloc.com/store/supplies-fcseries.html
You can place your order online or call Customer Service at 303-431-9500 or
800-722-4817.
Mouthpieces
Rubber Grip
Plus
, go to:
Plus
, including:
Carrying Cases
Certifi ed
Simulator
Cleaning Wipes
Solutions
www.Lifeloc.com | 303-431-9500
Dry Gas Standards
Wet Bath
Simulators
Page 32
Lifeloc FC10
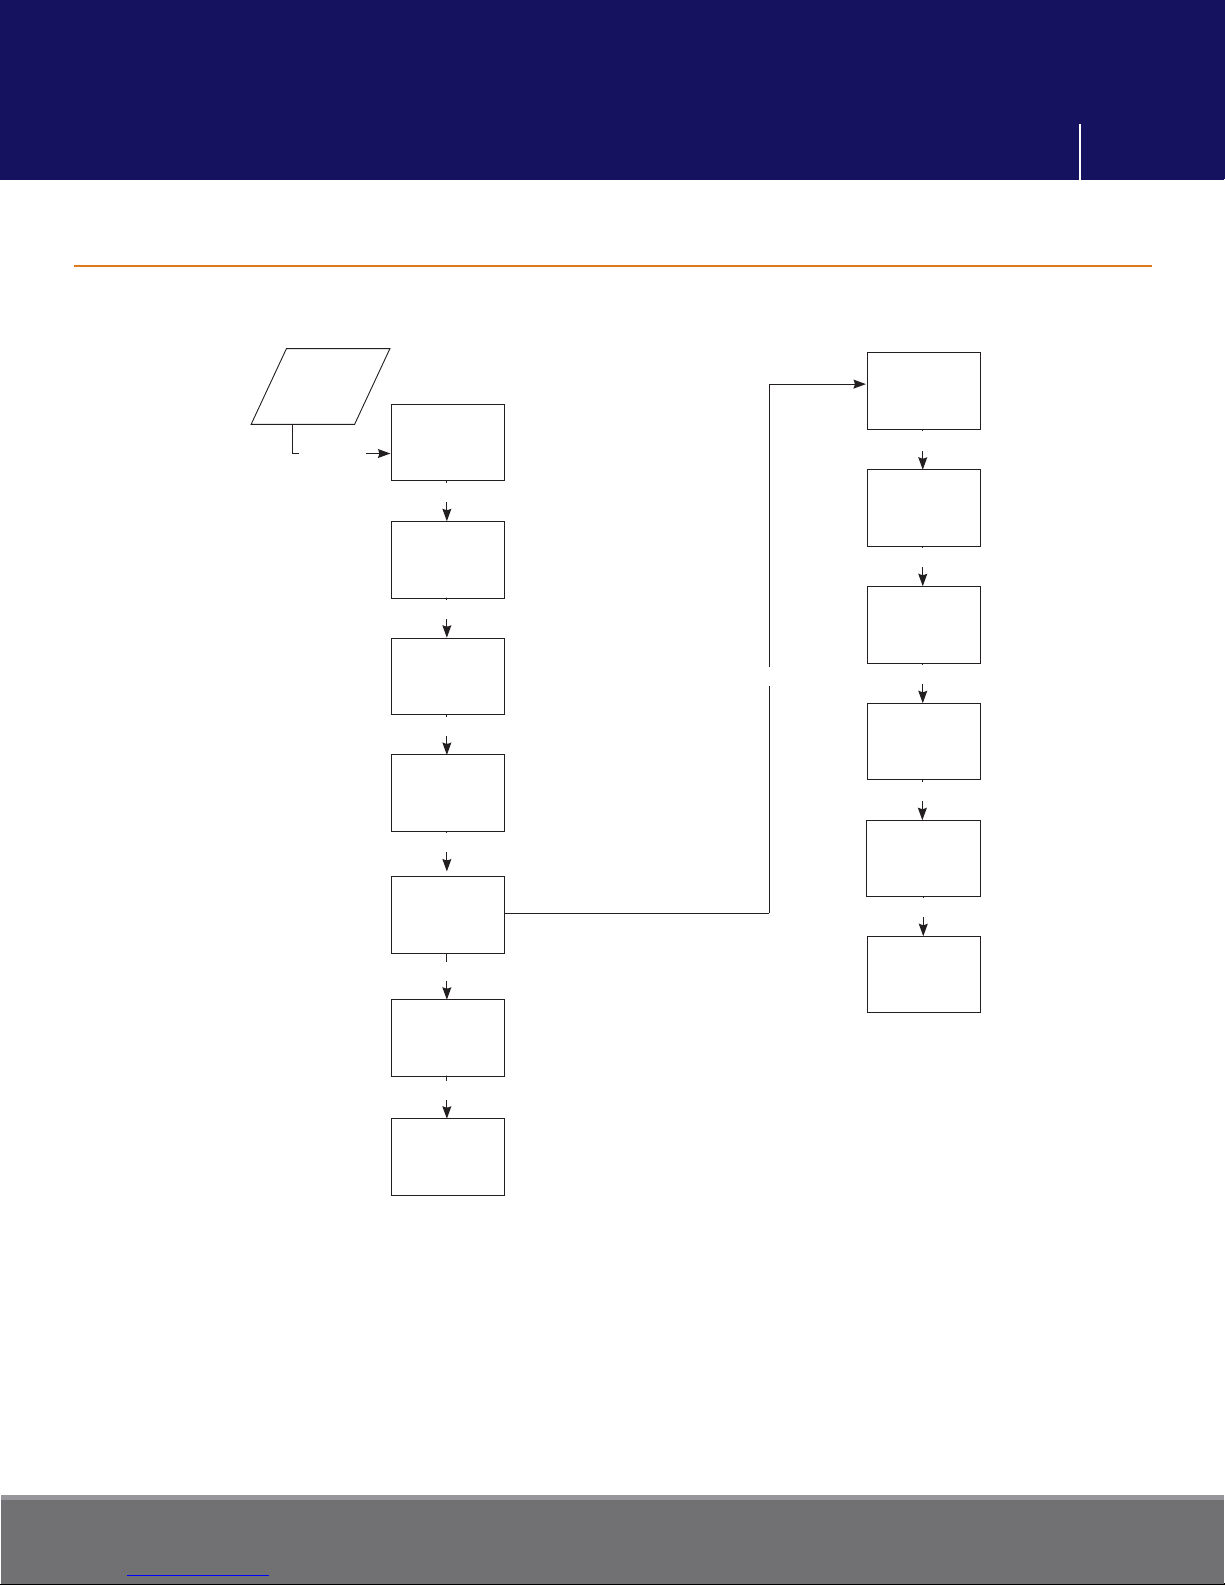
User Settings Chart
Plus
Menu Charts
32
Settings
Execute
Time
Function
Date
Function
Trigger
Mode
Function
Security
Settings
Function
Display
Settings
Execute
LCD
Contrast
Function
Test
Order
Function
Results
Format
Function
Pass
Level
Function
Fail
Level
Function
Function
Battery
Type
Function
Exit
www.Lifeloc.com | 303-431-9500
Exit
Page 33
Lifeloc FC10
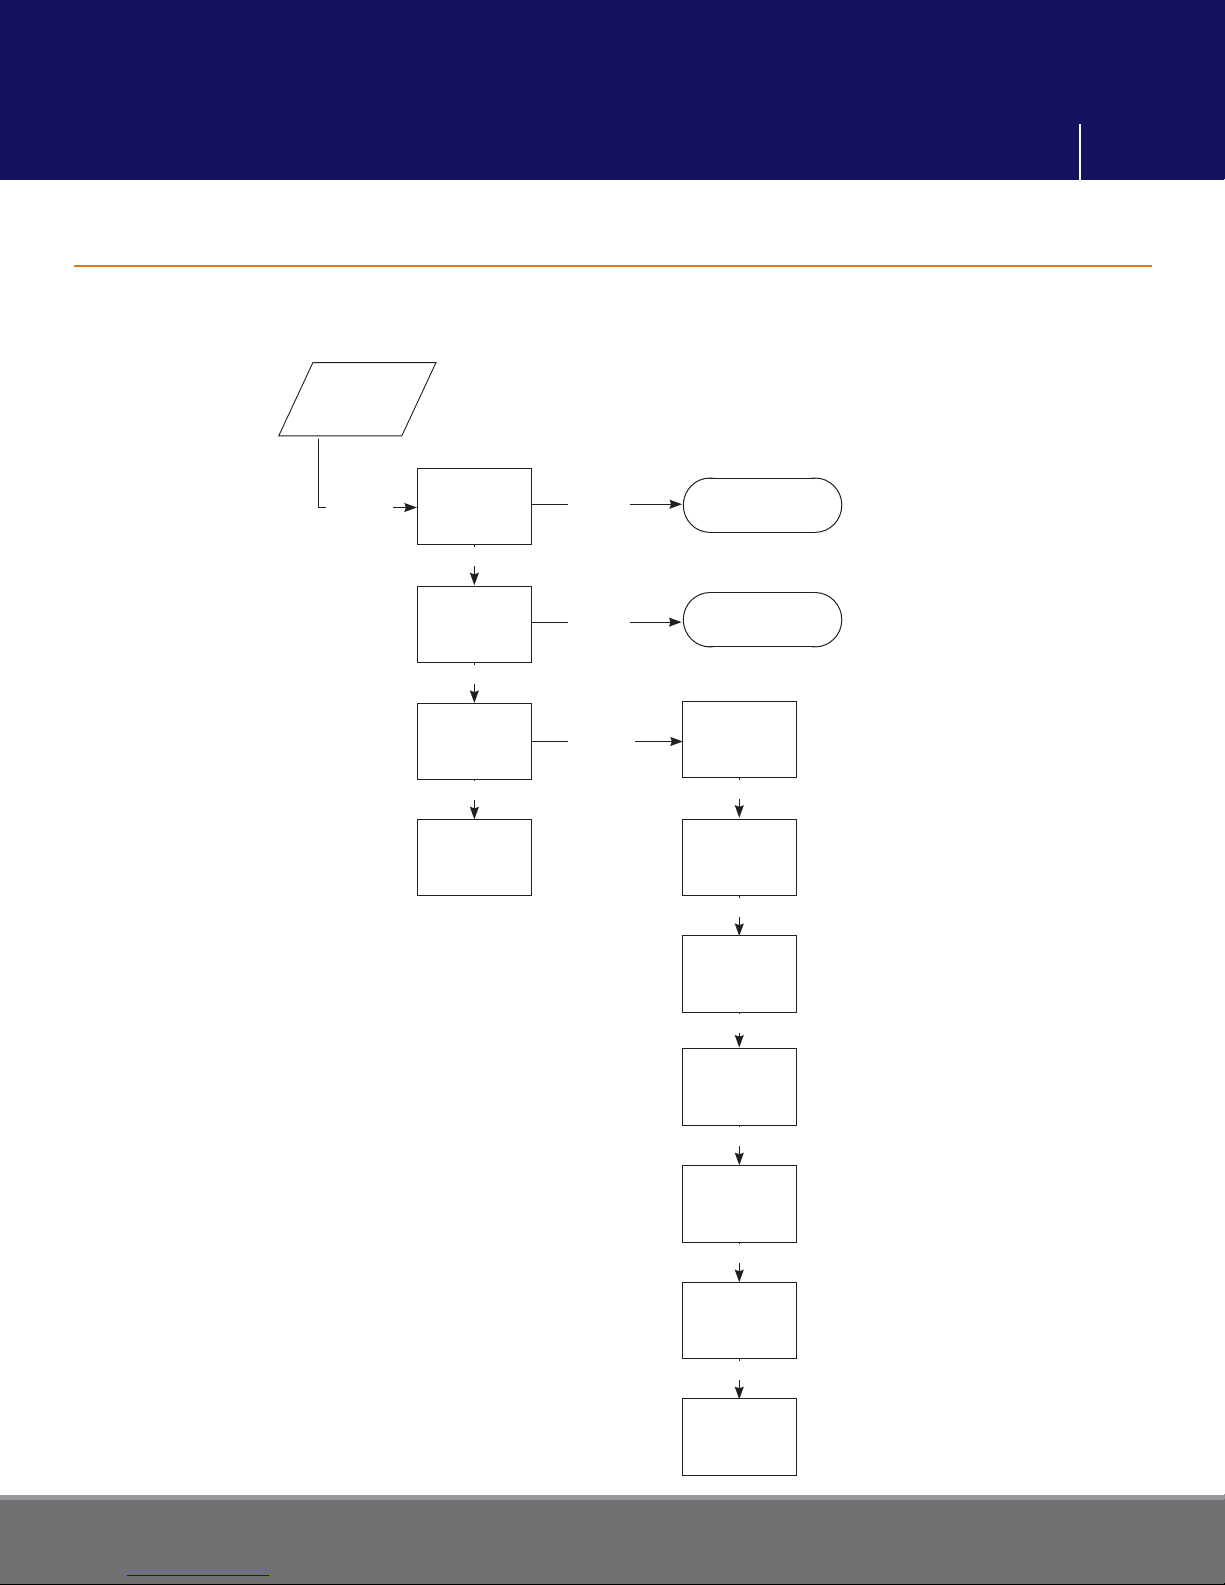
Calibration Display Chart
Calibration
Plus
33
Execute
XXX
Check
Function
XXX
Calibration
Function
Cal
Settings
Function
Exit
Execute
Execute
Execute
Perform a
Cal Check
Perform a
Calibration
Cal
Standard
Function
Standard
Type
Function
Cal Time
Type
Function
www.Lifeloc.com | 303-431-9500
Cal Time
Function
Check
Time
Function
Lockout
Type
Function
Exit
Page 34

Unlock the Power of Alcohol Testing
12441 West 49th Avenue, Suite 4
Wheat Ridge, CO 80033
303.431.9500 | 800.722.4872
fax: 303.431.1423
www.lifeloc.com
Hours of Operation: 7:30 am - 4:30 pm MST
If you are calling outside of these hours, please leave us a voice
message. We will contact you the following business day!
From our single location in Wheat Ridge, Colorado, we manufacture and
service our products with you in mind. Every product is designed with
quality and ease-of-use as our priorities. And our 5 Star Service is the
fastest in the industry.
Lifeloc breath testers are used across the US and in over 35
countries. We carry all of the accessories and supplies for your
breath test equipment. Please call us to reorder supplies and
accessories or for information on purchasing additional testers.
Lifeloc FC10
Operations Manual
Part #: 51035 Rev. 1.0 | ©2010 Lifeloc Technologies, Inc.
Plus
 Loading...