

Lifeline freedom 2 User Manual
LIFELINE FREEDOM 2 INFRARED AMPLIFICATION SYSTEM USER GUIDE
2 Enjoy Your Freedom 2
Infrared Amplification
System
2 Equipment List, Warranty,
Repair Work and Cleaning
Information
3 IRB-10 Infrared Transmitter
4 RR-20 Infrared Receiver
5 Lifeline Amplifier
6 Setting Up Your Freedom 2
Infrared Amplification
System
9 Troubleshooting Guide
For The Teacher: Important
Things to do and Remember
12
TABLE OF CONTENTS
41 MEANS DRIVE ❚ SUITE A ❚ PLATTEVILLE, WISCONSIN 53818
800.236.4327 PHONE
❚ 608.348.7918 FAX ❚ INFO@LIFELINEAMP.COM
WWW.LIFELINEAMP.COM
UserGui de

T
he Freedom 2 Infrared Amplification
System is one of the best infrared sound
amplification systems available today. No
matter the application, the Freedom 2 Infrared
Amplification System is a welcome addition to
your classroom. At Lifeline, we know your
school will see the benefits of this system from
the first day you turn it on. Students will hear
the clarity and volume of the teacher’s voice.
Their ability to concentrate will increase.
This means on-task behavior will increase
as well. And that translates into a better
learning environment.
This manual has been designed to provide
clear, step-by-step instructions for setting up
the system for the first time, as well as for
troubleshooting potential problems. Simply
follow the directions and use the photographs
and diagrams as a guide.
An equipment checklist is provided noting
the pieces included in the Freedom 2 Infrared
Amplification System and any additional
equipment needed for set-up.
Each piece of equipment in the system is
detailed in a separate section. This is done
to familiarize both the set-up person and the
teacher with the components. This manual
also provides information to help users
understand how the pieces fit together to
complete the system.
At the end of the manual, there is a
section entitled “Troubleshooting.” This
section is designed to help solve the most
common system problems associated with
set-up and usage.
EQUIPMENT
• 1 Wireless Infrared Transmitter and Receiver
w/Lapel Microphone, Mic Clip and Mic Cable
• 1 Lifeline Amplifier
• 4 Lifeline Speakers with Mounting Brackets
• 150 Feet of Speaker Cable (provided in bulk
for easy cutting to desired lengths)
• 1 Three-Foot Lifeline Patch Cable
• 32 Heavy-Duty Mounting Snaps
(if mounting brackets are not used)
• 2 AA Nickel Metal Hydride
Rechargeable Batteries
• 1 AA Battery Charger
• 1 Charging Cable
• 1 Neckloop
• 1 Lanyard w/Emitter
• 1 External Sensor
OTHER EQUIPMENT NECESSARY TO
SET UP THE FREEDOM 2 INFRARED
AMPLIFICATION SYSTEM:
Two separate electrical outlets in each room
(for two pieces of equipment)
A pair of wire strippers
WARRANTY
All items in the Freedom 2 Infrared Amplification
System (including parts, labor, accessories, batteries
and cables) are under a full one-year warranty.
Lifeline Amplification Systems, Inc. will repair
and/or replace, at our option, any unit that does not
function properly within the warranty time period.
Units under warranty needing repair work or
replacement should be returned to Lifeline
Amplification Systems freight prepaid. All units
under warranty will be returned (freight prepaid)
to the customer.
Product misuse, neglect or abuse is not
covered under warranty terms.
REPAIR/CLEANING
Most simple repair work can be done by the
customer using Lifeline’s exclusively designed,
field-replaceable parts. Any additional problems
can be solved by Lifeline’s trained technicians via
telephone. Call for more information on the repair
of any part or component.
Lifeline Amplification Systems Inc. suggests
that the Infrared Wireless System be cleaned a
minimum of every two years. Please contact us for
a price quote and shipping instructions.
INTRODUCTION
2
Enjoy Your Freedom 2 Infrared Amplification System
LIFELINE AMPLIFICATION SYSTEMS ❚ 41 MEANS DRIVE ❚ SUITE A ❚ PLATTEVILLE, W
If you have questions
at any time about your
Freedom 2 Infrared
Amplification System,
please call us toll-free at:
1- 800 -23 6- 4327

6. POWER LED
When the on/off switch is
in the “ON” position the
power LED should glow
red. If it does not glow red
this typically means a low
battery.
7. EMITTER
The emitter must be plugged into the IRB-10 transmitter and either attached to the clothing via the
clip or worn around the neck with the lanyard.
8. EXT. MIC
The provided microphone cable and mic must be
plugged into the IRB-10 transmitter. Multiple different microphone options are available from
Lifeline Amplification Systems including collar and
headset mics.
9. CHARGING JACK
The charging jack is used to charge the battery.
The WH-1 charging cable, rechargeable batteries,
and battery charger are included in with your
Freedom 2 Infrared System.
TRANSMITTER
3
1. FREQUENCY SELECTION
The IRB-10 can be set to transmit on either one of
two preset frequencies. This is so that two different
teachers can teach in the same room (team teaching). It is also so that you can use a lapel mic and
handheld mic in the same room. While it does not
matter which frequency is chosen, two wireless
systems (microphones) can NOT be on the same
frequency at the same time. To select the desired
frequency (channel) slide the switch (1) as shown
on the back of the battery door. All systems come
pre-set to channel 1 for ease of use.
2. POWER MODE SELECTION
The IRB-10 has two power modes- “LO” and “HI”.
These modes can be selected via a power switch (2)
inside the battery compartment. The system comes
factory pre-set to the “HI” position. The only reason
to turn the power mode switch to the low position is
if the range you need is less than 15 feet or you are
experiencing low battery problems.
3. MICROPHONE GAIN
The microphone gain (volume) can be adjustable if
you experience a lower volume level than desired.
The microphone gain control is found on the inside
of the battery compartment (3). A tool has been
provided(inside the battery compartment) to adjust
the gain if necessary. Adjustment of gain control
should only be necessary if you have already tried
to adjust the volume on the amplifier and you are
still experiencing low volume.
4. BATTERY COMPARTMENT
Two AA Nickel Metal Hydride rechargeable
batteries have been included with your Freedom 2
Infrared System. These batteries should last
several hours per day for a period of at least one
year. The number one cause of battery problems is
overcharging a battery. Be sure to never charge
your battery over 72 hours. Always use Lifeline
Amplification Systems rechargeable batteries
for best results.
5. ON/OFF SWITCH
Turns the transmitter “ON” and “OFF”. If you are
not going to use the unit for more than 15 minutes,
turn the unit “OFF” to conserve battery life.
IRB-10 Infrared Transmitter
ISCONSIN 53818 ❚ 800.236.4327 ❚ 608.348.7918 FAX ❚ INFO@LIFELINEAMP.COM
1 342
5 768
9
LIFELINE AMPLIFICATION SYSTEMS ❚ 41 MEANS DRIVE ❚ SUITE A ❚ PLATTEVILLE, W
4
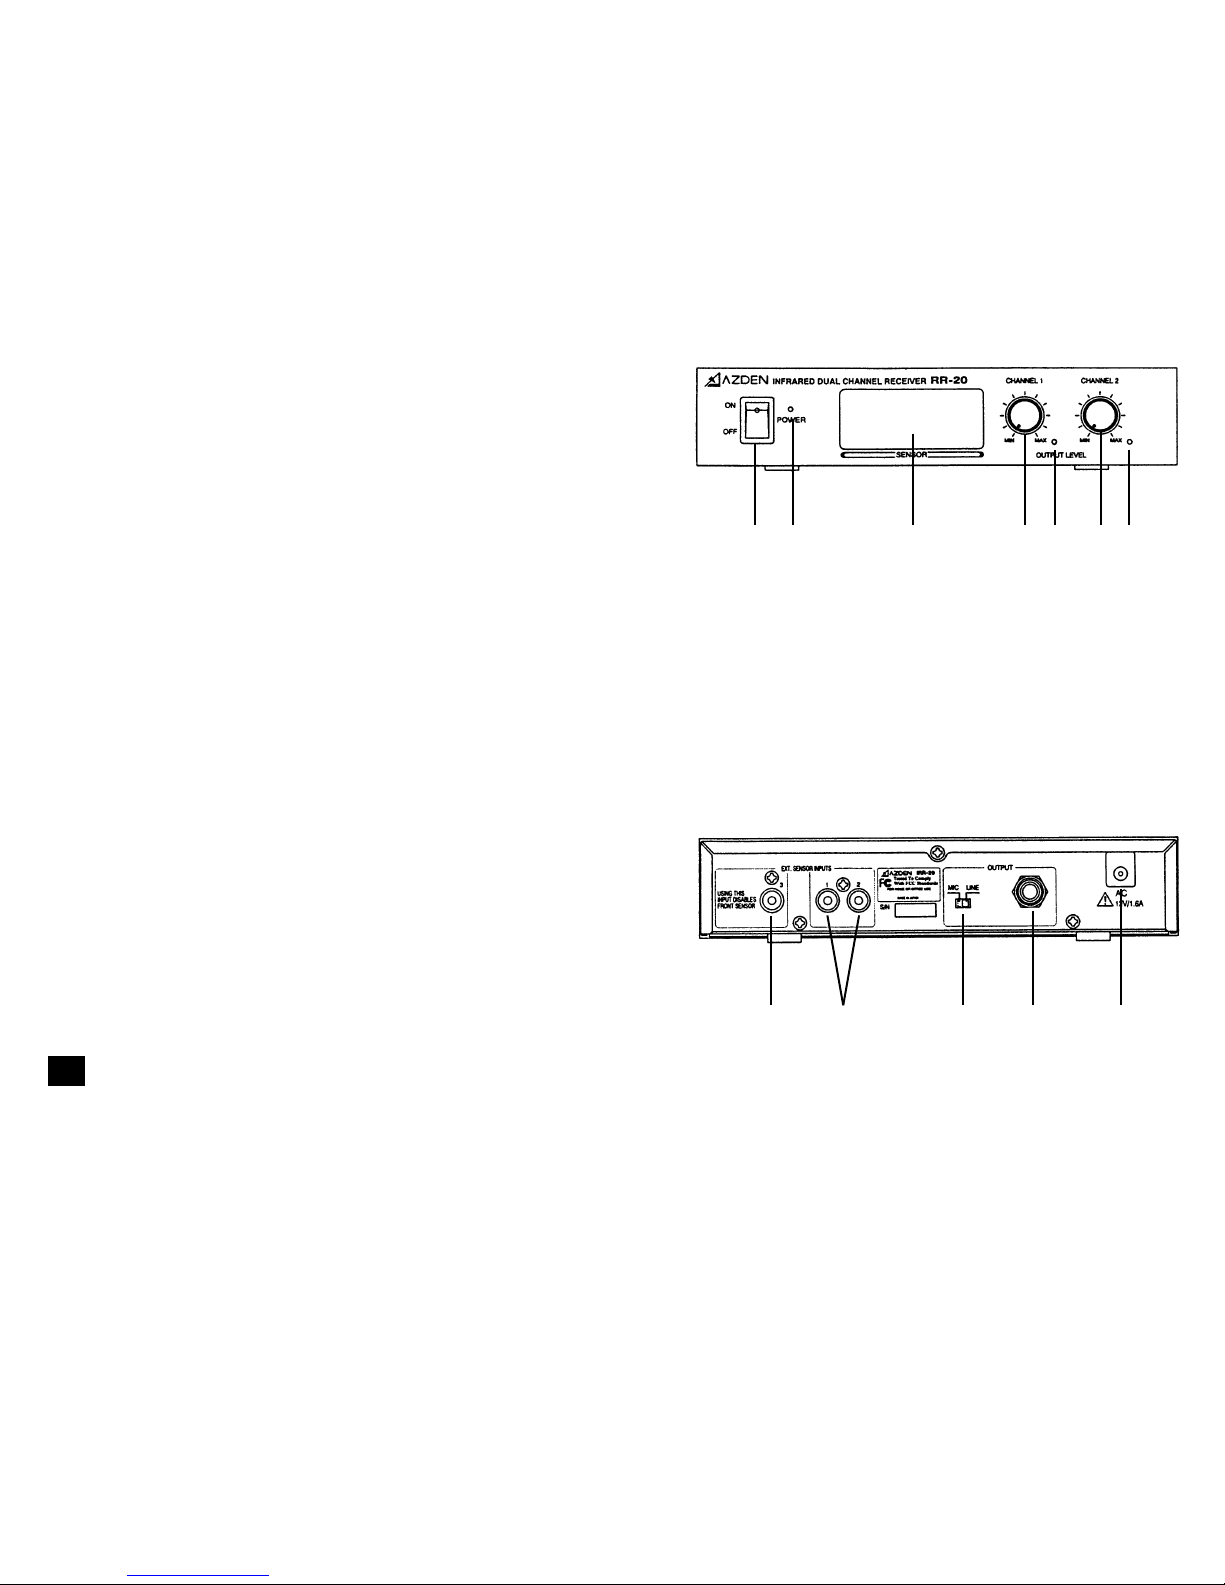
RECEIVER
Recei ver
Receiver front
Receiver back
1. POWER SWITCH
Turn the receiver ON and OFF.
2. POWER LED
Indicates if the receiver is ON or OFF.
3. RECEIVING SENSORS
Internal receiving infrared sensors
4. CHANNEL 1 VOLUME
Controls the volume for channel 1.
5. CHANNEL 1 INDICATOR
Glows red when receiving signal from
transmitter to channel 1.
6. CHANNEL 2 VOLUME
Controls the volume for channel 2.
7. CHANNEL 2 INDICATOR
Glows red when receiving signal from channel 2.
8. SWITCHED EXTERNAL SENSOR INPUT
(RCA CONNECTOR)
Plugging an external sensor in here turns the front
panel sensor (C) off. This will hardly ever get used.
9. 2-EXTERNAL INPUTS (RCA CONNECTORS)
Each sensor will extend the range by 1600 square
feet. One external sensor comes with the Freedom 2
Infrared Amplification System. This might not be
needed in some instances.
10. INPUT SELECTOR
Always have this in the LINE position.
11. OUTPUT JACK
This connects the receiver to the Lifeline
amplifier. Cable has been provided.
12. POWER INPUT
Plug the provided AC adapter (BC-28I) into a
standard electrical outlet.
1 2 3 4 5 6 7
8 9 10 11 12
 Loading...