

Life Ionizers MXL-5 C User Manual

1
LIFE MXL-5LifeIonizers.com/support

2
LIFE MXL-5 LifeIonizers.com/support
Welcome to the LIFE Ionizers family!
Congratulations on the purchase of your new alkaline mineral water
ionizer. We are grateful to our many customers for recognizing our
eorts in providing the best water ionizer available!
Ionized Alkaline Mineral Water promotes good health with its superior hydration, mineralization, oxygenation and cellular detoxication.
Our ionizers use a series of internal and external ltration systems
and the nest-quality platinum-coated titanium plates, to create
alkaline water with the highest anti-oxidant potential in the industry.
What do I need to know?
• Please read all safety warnings before the installation or
operation of your LIFE Ionizer to ensure proper product usage.
• To receive warranty service, you must register your warranty
online. Please see enclosed warranty card for detailed instructions.
• Refer to this manual when you have questions on adjustments
and how to change your lters. We also have instructional videos
and help guides online at LifeIonizers.com/support.
• Changing your lters is important! To ensure optimal performance and to guarantee your warranty, your ionizer has a new
RFID Technology built into the internal lters which will give you
a warning that your lter life is low and that you should replace
your lter. If the lter life runs out, the ionizer will not function
until the lter is changed. It’s important to have lters changed
on time so the performance of your ionizer will continue.

3
LIFE MXL-5LifeIonizers.com/support
Table of Contents
Safety Guide
Product Specications
Package Contents
Important to Remember
Parts of the Ionizer
MXL-5 Installation
Quick Connect Fittings and Tubing
Display Overview
Function Options
MXL-5 Operation Method
Internal Filter Replacement
Filter Reset Indicators
Citric Acid (Scaling) Cleaning Filter
Filtration Media
Pre-Filter Replacement
Acidic Cleaning Instructions & Routine Maintenance
Common Problems and Solutions
Operation Warnings/Error Messages
How Alkaline Water is Made
Alkaline/Acidic/Puried Water
Uses of Ionized Alkaline/Acidic Water
Performance Features
Frequently Asked Questions
4
7
8
10
12
14
16
17
18
23
24
25
26
28
29
30
31
32
33
34
35
38
39
4
LIFE MXL-5 LifeIonizers.com/support
Safety Guide
Power Plug
As with most electrical appliances, electrical parts in this
ionizer are electrically live even when the switch is o.
• Power cord should not be touched with wet hands
• Use only (110v) in the USA, Mexico and Japan. Most
other countries require (220v). The power cord cannot
be altered from manufacturer’s specs.
• Do not crimp or staple the power cord
• Power cord should be plugged directly into an
electrical outlet
• Dusty or dirty electrical outlets may cause safety
issues
• Bending, twisting, pulling or putting heavy objects
onto the power word may cause electrical problems
including re.
• If power cord, plug or electrical outlet are damaged,
discontinue use immediately.
• Unplug the electric power when
not in use for a long time (over 3
days)
5
LIFE MXL-5LifeIonizers.com/support
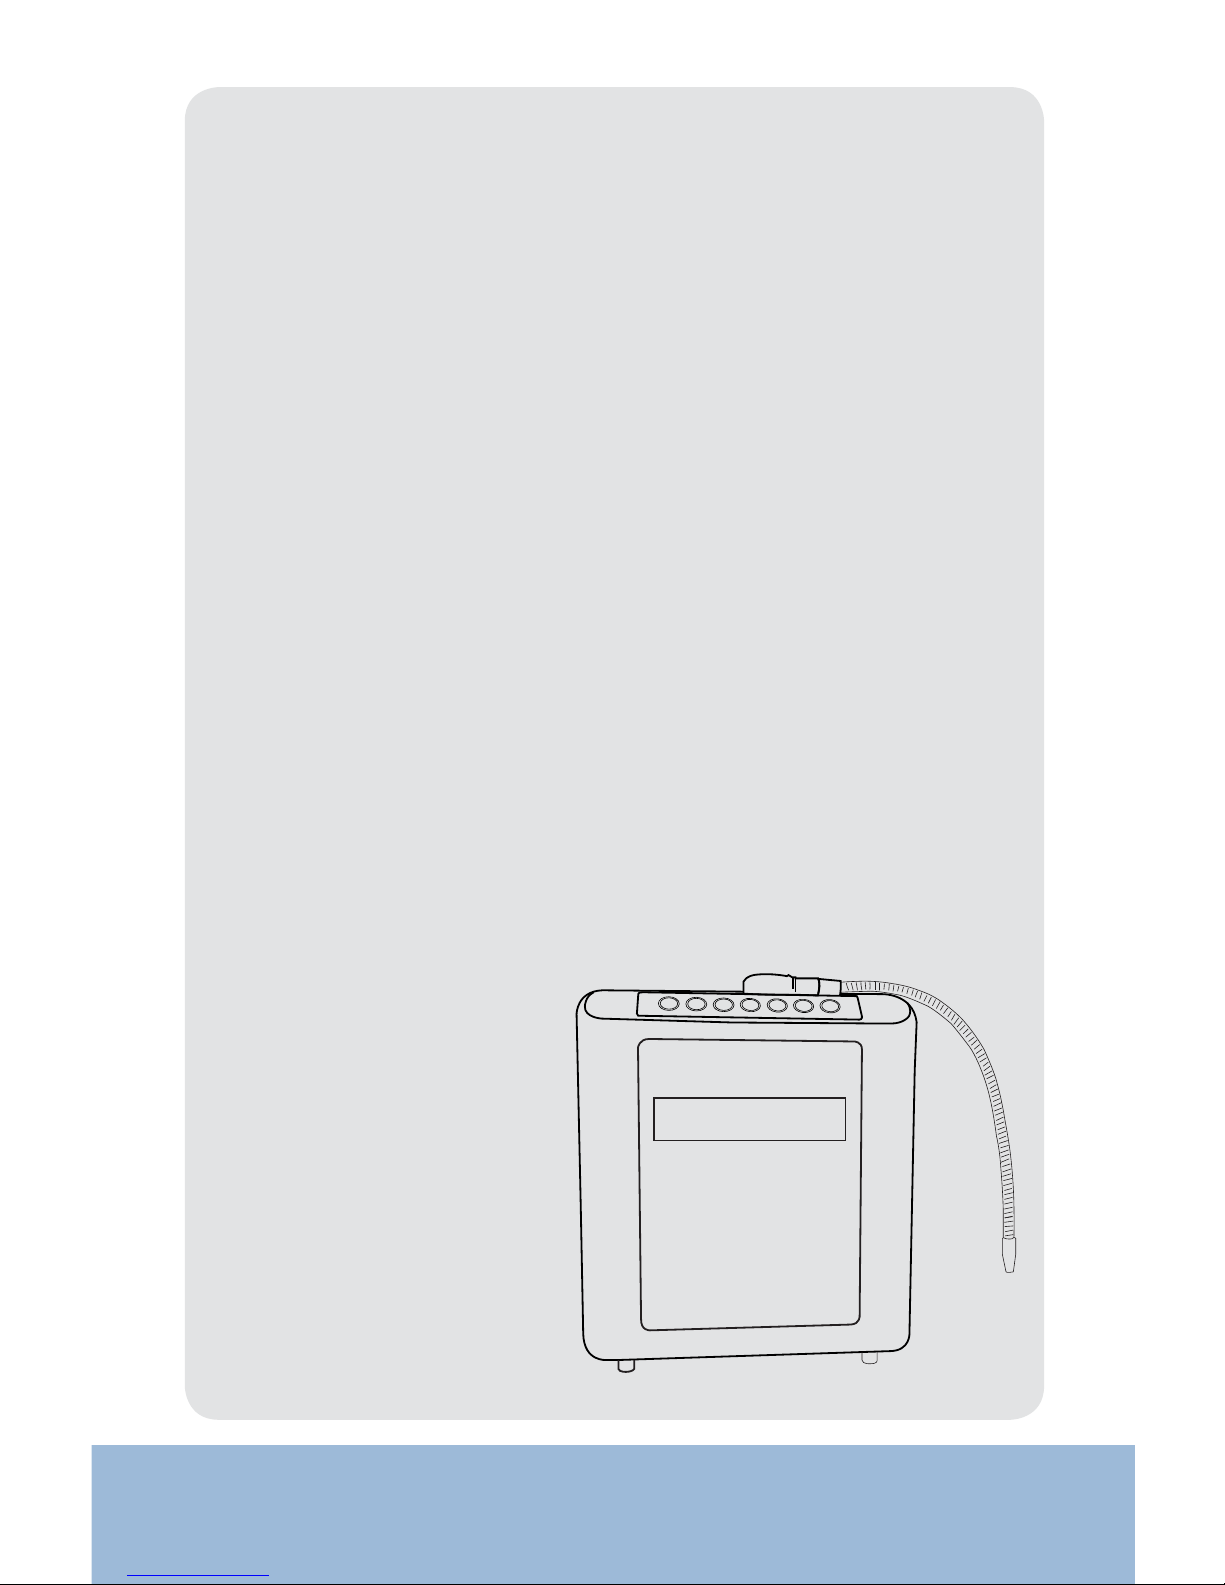
Ionizer
• Place machine in an upright position only
• Do not install this unit in direct sunlight or near a heater,
replace or other heat source
• Do not place the machine in humid areas such as
bathrooms
• If wall mounted, secure rmly and correctly
• Do not use water with a temperature of over 95
degrees Fahrenheit or 35 degrees Celsius
• This machine should not be repaired or otherwise
disassembled by any unauthorized person as it may
cause electrical re or shock and will void the
manufacturer’s warranty
• Do not clean this machine by spraying the ionizer with
water as it may cause electrical shock.
• Do not use benzene, thinner, or chemicals to clean the
unit as it can damage the housing.
• Do not block the unit vent as it can cause overheating
and/or electrical problems.
• Do not block the water passage or tubing
• Do not place anything on the unit
• Don’t shake or drop
the unit
• If the ionizer
machine falls into
water:
1. Unplug power cord
from electrical outlet
2. Wipe the machine
down and place in
shaded area
3. Contact your LIFE
Ionizer dealer
6
LIFE MXL-5 LifeIonizers.com/support
Ionized water
• If inexperienced with drinking Ionized Alkaline Water,
users are encouraged to start with level 1
• When drinking Ionized Alkaline Water - Do not take
prescription or other medications for approximately one
hour before and after drinking water. Ionized alkaline
water hydrates more eciently, therefore will deliver
more medication than tap water.
• Store Ionized Alkaline Water in an air-tight glass
container and refrigerate for up to 2 days
• DO NOT DRINK ACIDIC WATER
• Do not store Alkaline or Acidic water in metal containers,
although you can put alkaline water in the Water for LIFE
Stainless Steel bottles as they are designed to maintain
pH and ORP
• Aluminum and brass containers will be tarnished by
alkaline and acidic water
• If not used for several days, run water through the unit
for 1 to 3 minutes before starting
• If the machine will not be
used for several days:
1. Unplug the power cord
from the electrical outlet
2. Turn o the water valve to
avoid leaking
3. Remove lters, drain and
place in refrigerator in
plastic bags.
4. Let water run on the
“Puried Water” setting for
at least 3-5 minutes
before any operation
7
LIFE MXL-5LifeIonizers.com/support
Product Specications
Special features
Fully convertible: counter-top to
under counter
Cleaning function
Advanced RADC Cleaning System
Display
Full Color LED Display w/ Automatic
Voice Prompting
Filtration
Dual Internal, Custom Pre-lter
Flow Control
Automatic
Power in watts
Adjusts up to 250 watts
ORP Output
up to -500
(Enhanced ORP at drinkable levels)
pH Output
pH range from 5.5 up to 10.3
Protection
Automatic Heat Sensor
Power System
MAX Yield SMPS Power System™
Rated Voltage
Dual voltage input compatibility
110/220 volts. All you need is the
power plug or adapter. When
plugged into the power source the
unit automatically recognizes voltage.
Settings
1 Puried, 3 Acidic, 4 Alkaline
Warranty
7 Year Warranty
Dimensions
12.5” W | 15” H | 6.25” D
Plate Material
Platinum over Industrial Titanium
8
LIFE MXL-5 LifeIonizers.com/support
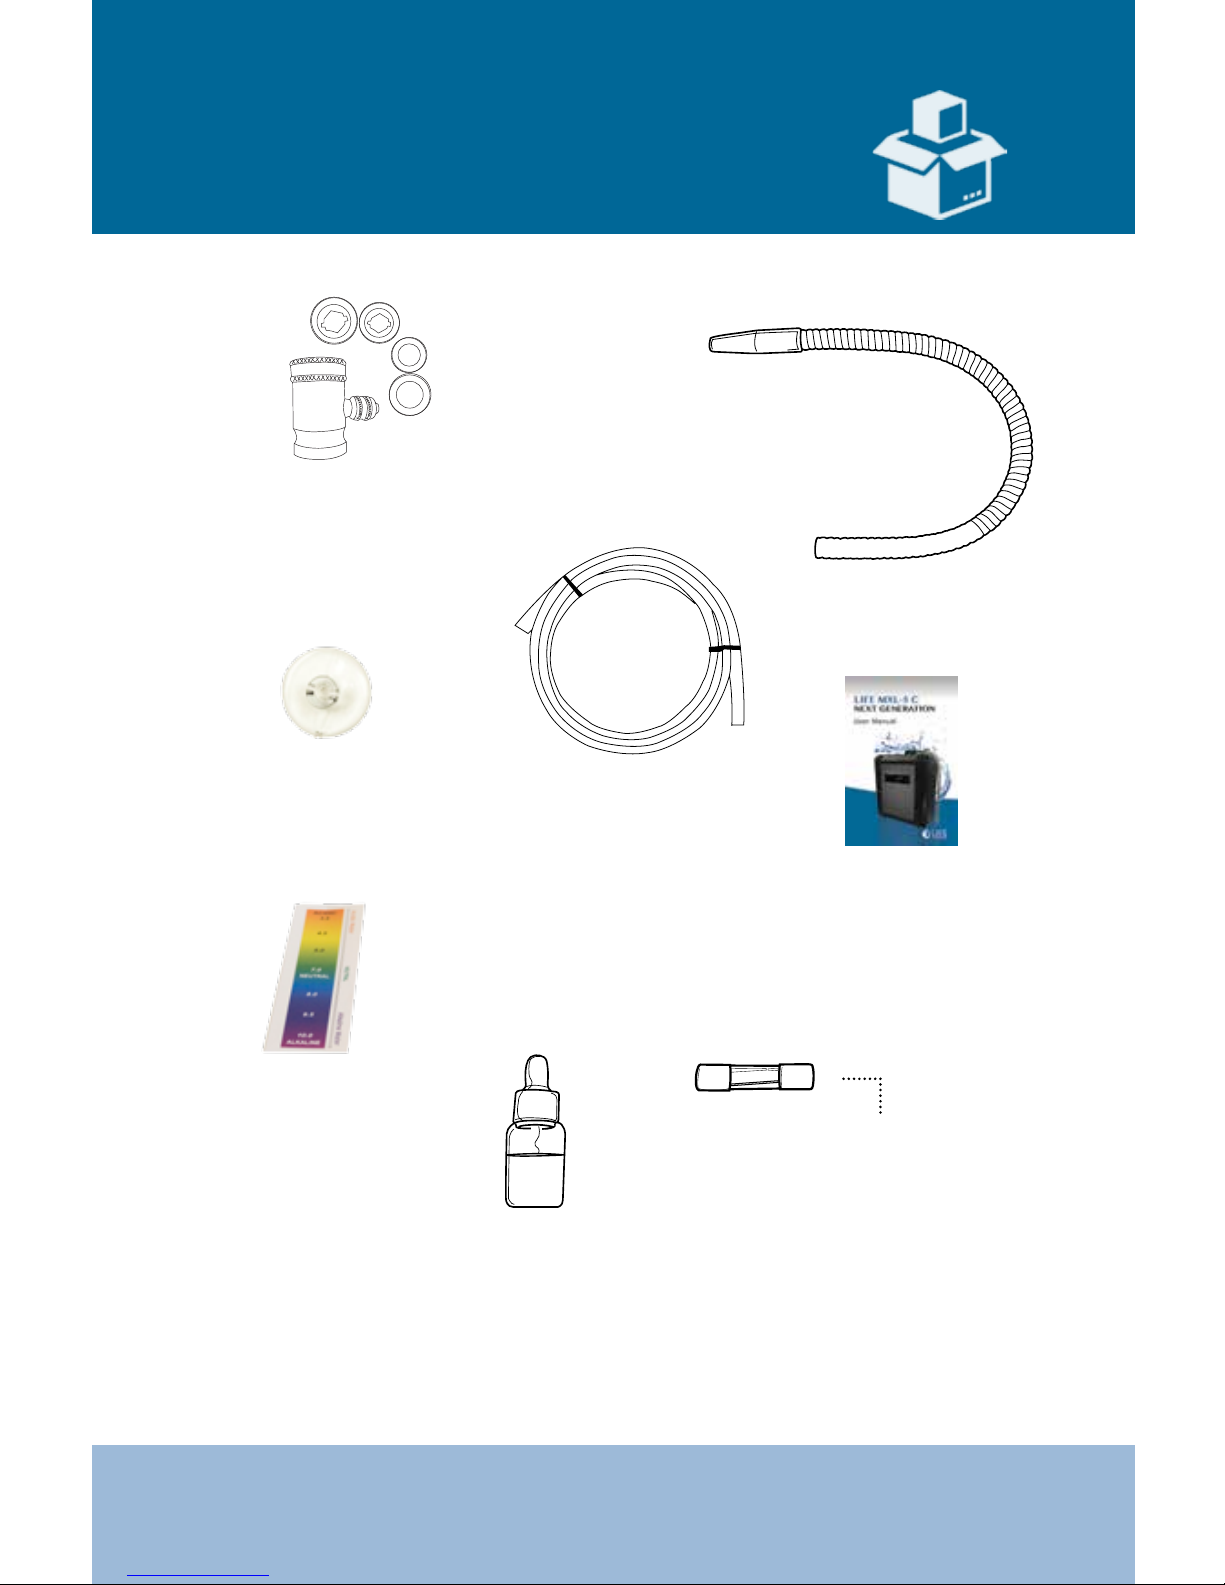
Package Contents
Extra Fuse
1/4” Tubing Hose
User Manual
BTB Chemical
pH Color
Chart
Reagent Drops
(pH Test Drops)
Suction Cup
Located in the Power
Switch at the bottom
of the machine
Flexible
Hose
Pull down
Diverter Valve

9
LIFE MXL-5LifeIonizers.com/support
10
9.0
8.0
7.0
6.0
5.0
4.0
Alkaline
Water
Acid
Water
Neutral
PH Tester Kit Instructions:
1. Place 1-2 ounces of water you are
testing into a glass
2. Add 2-3 drops of Reagent Drops
3. Stir water to observe the color
change
4. Compare to “pH COLOR CHART”
to determine pH and acid levels.
When handling the pH test (reagent drops):
1. Keep away from eye area. If eyes become irritated, ush
thoroughly and consult a doctor.
2. If accidentally swallowed, drink water and consult a doctor.
3. Store in an airtight container away from the reach of children.
4. Drops are ammable. Keep away from children.
How to measure the pH of your water
A pH color chart and a bottle of Reagent Drops are included with
your ionizer in case you would like to test the water from your new
ionizer.

10
LIFE MXL-5 LifeIonizers.com/support
• You must run 2-3 gallons of water through the pre-lters before
you connect them to the ionizer. To do this, install the pre-lters
into their housings, connect a piece of tubing to the outlet connection on the pre-lter housing and run it into the sink so you
can ush them out with water. This hydrates the lters and cleans
them from any loose media. After you nish this procedure, connect your pre-lter back to your ionizer and run normally. This
needs to be done every time you put in new pre-lters.
• The pre-lter housings must be replaced every 2 years.
SEE PAGE 14 FOR COUNTER TOP INSTALLATION INSTRUCTIONS
SEE PAGE 16 FOR UNDER COUNTER INSTALLATION INSTRUCTIONS
Important to Remember
Pre-lter Installation & Maintenance
Ionizer Installation
• Plugs located on the bottom of the ionizer must be removed
before installation.
• Do not overtighten the patch cable connection on the back of
the ionizer when plugging in patch cable.
• Run the ionizer and check for leaks at all tubing locations from
the Diverter Valve to the Ionizer itself before operating the unit.

11
LIFE MXL-5LifeIonizers.com/support
Settings
• Flow rate must be set before adjusting or running your ionizer.
• Set ow rate no higher than 2.5 liters per minute. Anything higher
could cause internal damage.
• When adjusting the settings, the buttons must be pressed
quickly as failure to do so will result in booting you out of the
program menu.
• The unit must be dispensing water before pressing the buttons.
• Adjust the ow rate (LPM) by slowing down the water ow to
ionizer from the source water:
- Cold Water Connect (for under undercounter units)
- Faucet Diverter ( for countertop units)
•
SEE PAGE 14 FOR COUNTER TOP INSTALLATION INSTRUCTIONS
SEE PAGE 16 FOR UNDER COUNTER INSTALLATION INSTRUCTIONS
Ionizer Care
• Do not twist top of faucet. This will damage the faucet.
• We recommend internal lters and pre-lters be changed
annually.
• Citric acid cleaning lter should be used 3 to 4 times
per year.
• Use cold water only with your ionizer
12
LIFE MXL-5 LifeIonizers.com/support
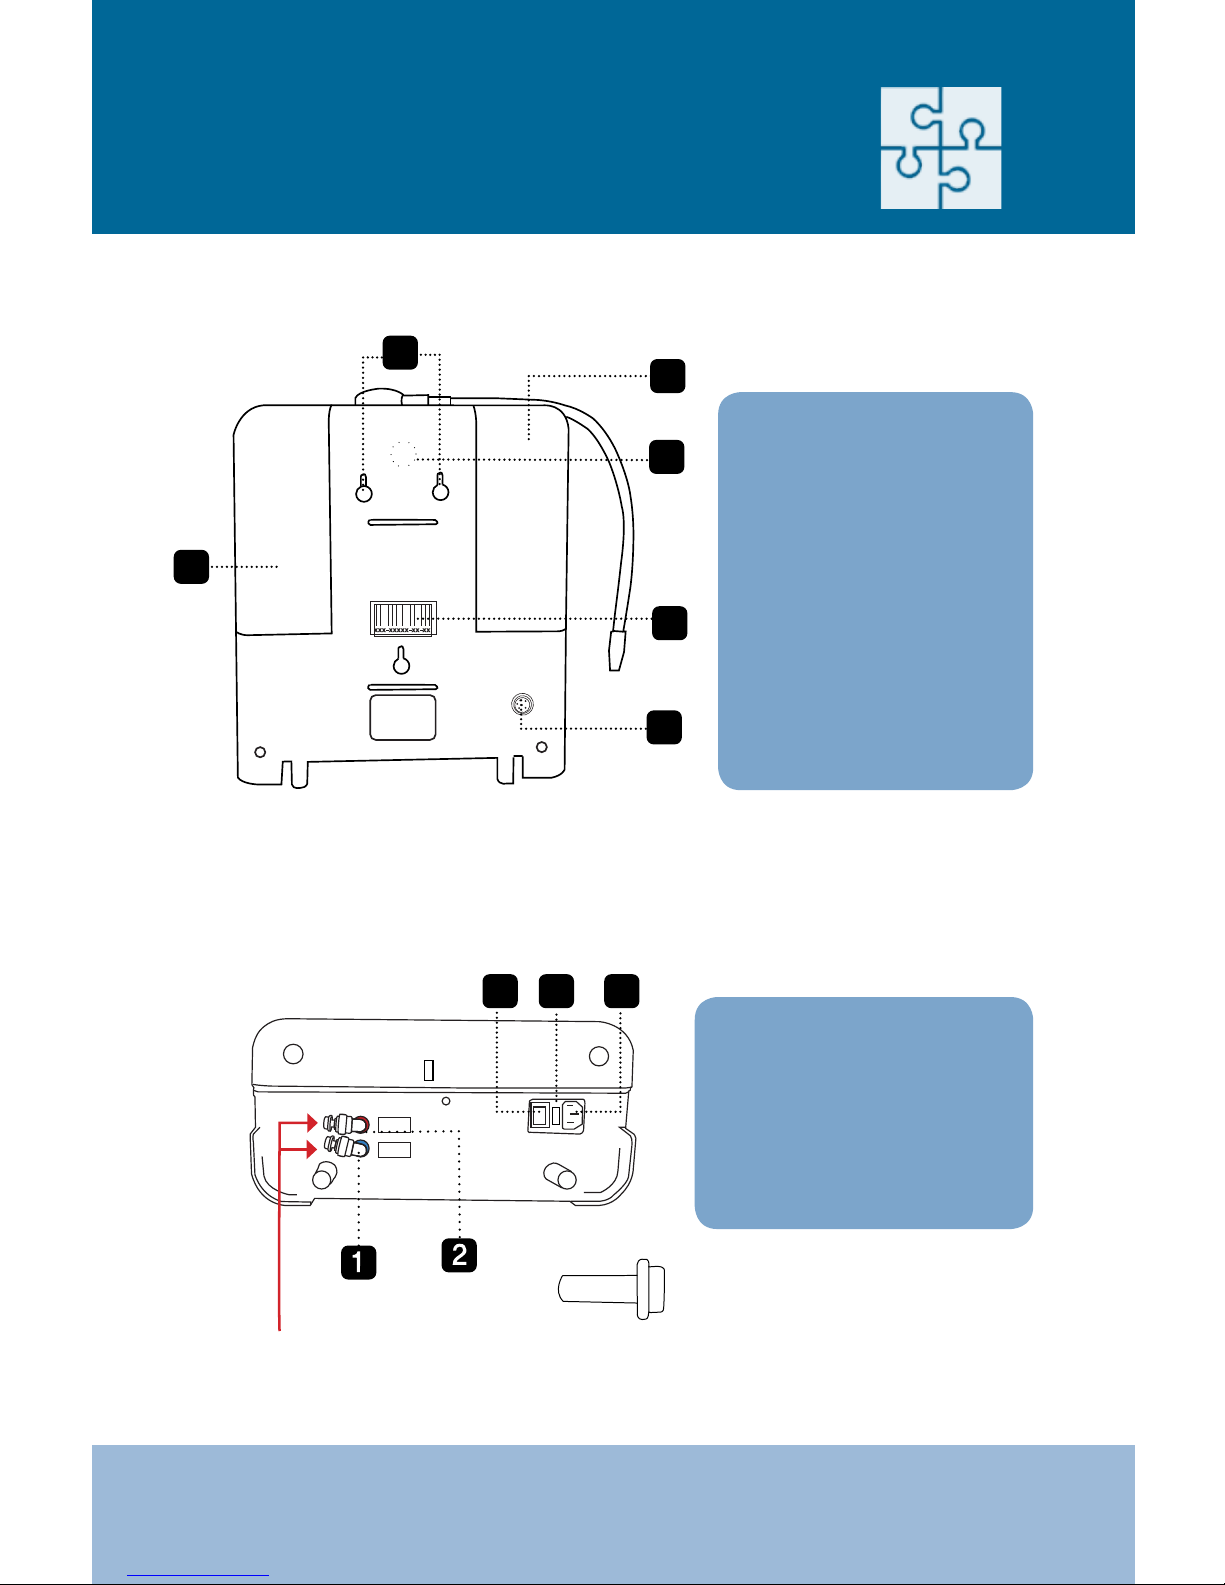
xxx-xxxxx-xx-xx
6
Inlet
Outlet
3
4
5
** Plugs must be removed before installation.
See page 18 for Quick Connect Fittings and Tubing instructions.
Parts of the Ionizer
BACK
BOTTOM
1. First Filter Cover
2. Wall Mount Screw
Holes
3. Speaker
4. Bar Code and Serial
Number
5. Second Filter
6. Under Counter
Installation
Plug/Connector
1. Source water inlet
2. Acidic outlet
3. On/O Power Switch
4. Fuse Box
5. Power Plug
5
1
2
3
4
13
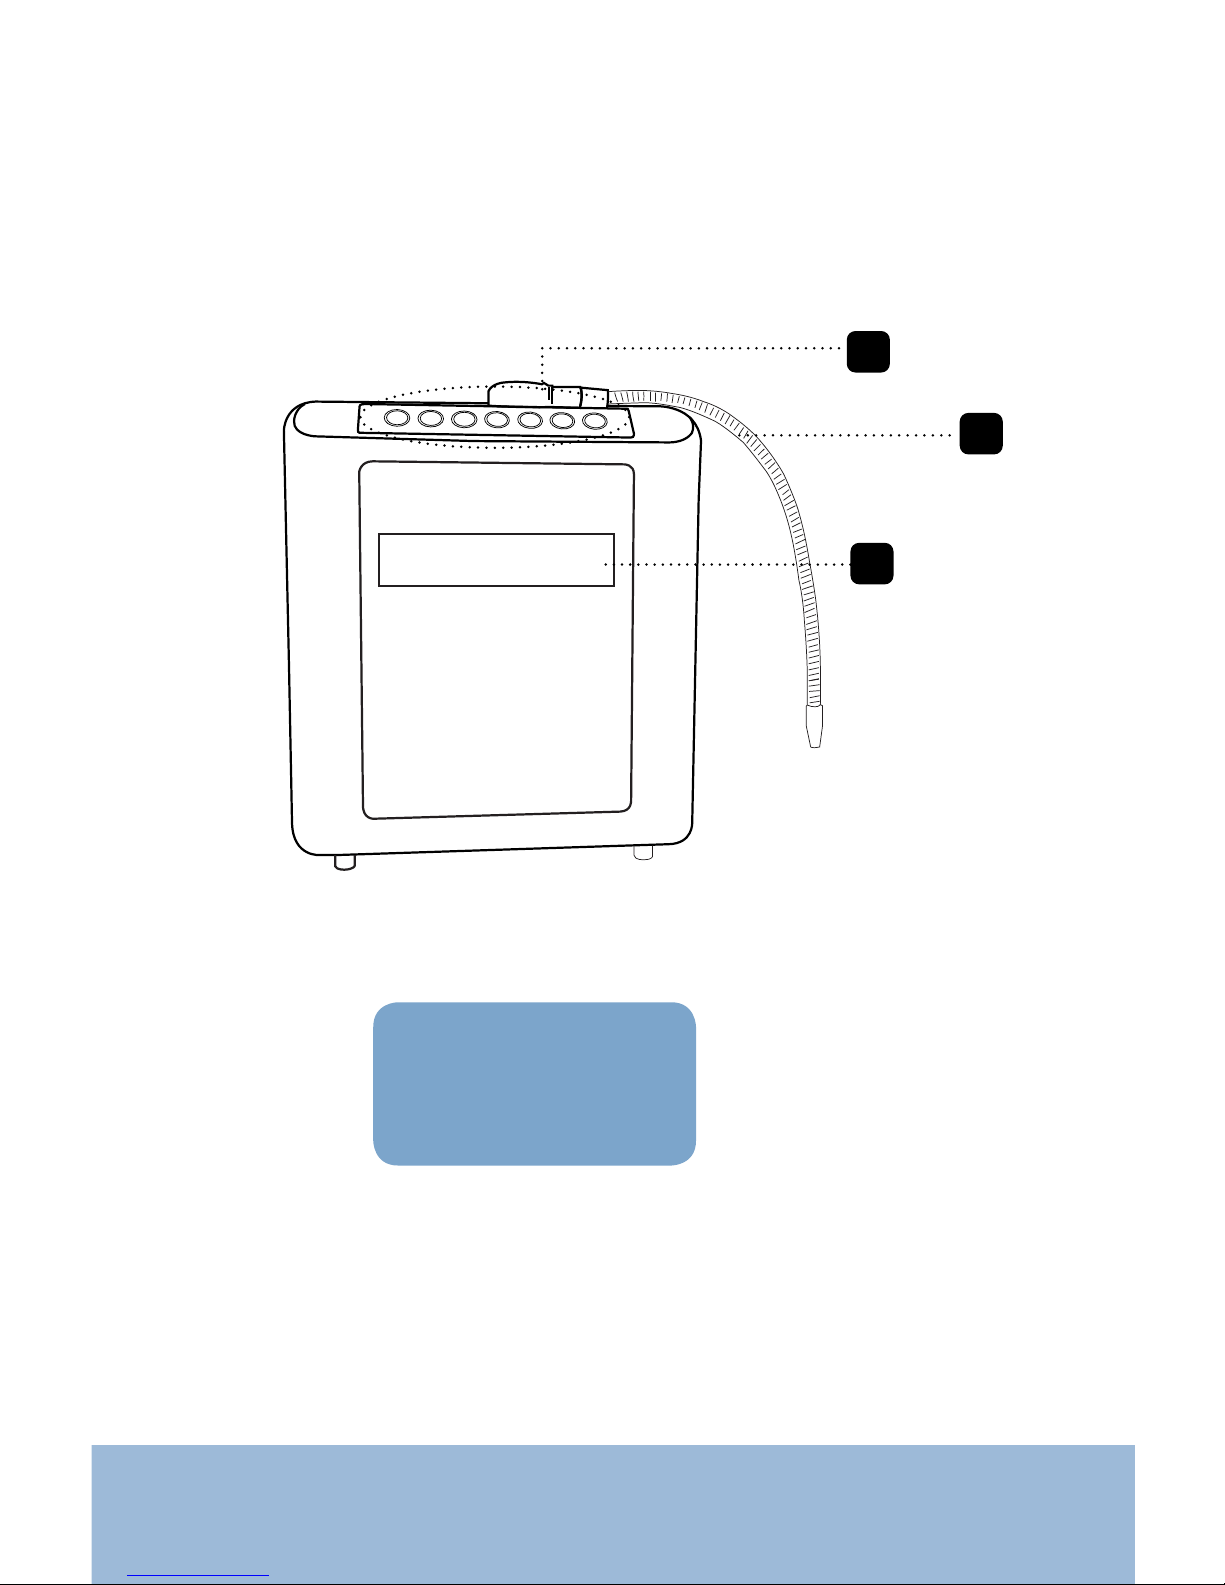
LIFE MXL-5LifeIonizers.com/support
1. Control Panel
2. Flexible Spout
3. LCD Panel
2
1
3
FRONT

14
LIFE MXL-5 LifeIonizers.com/support
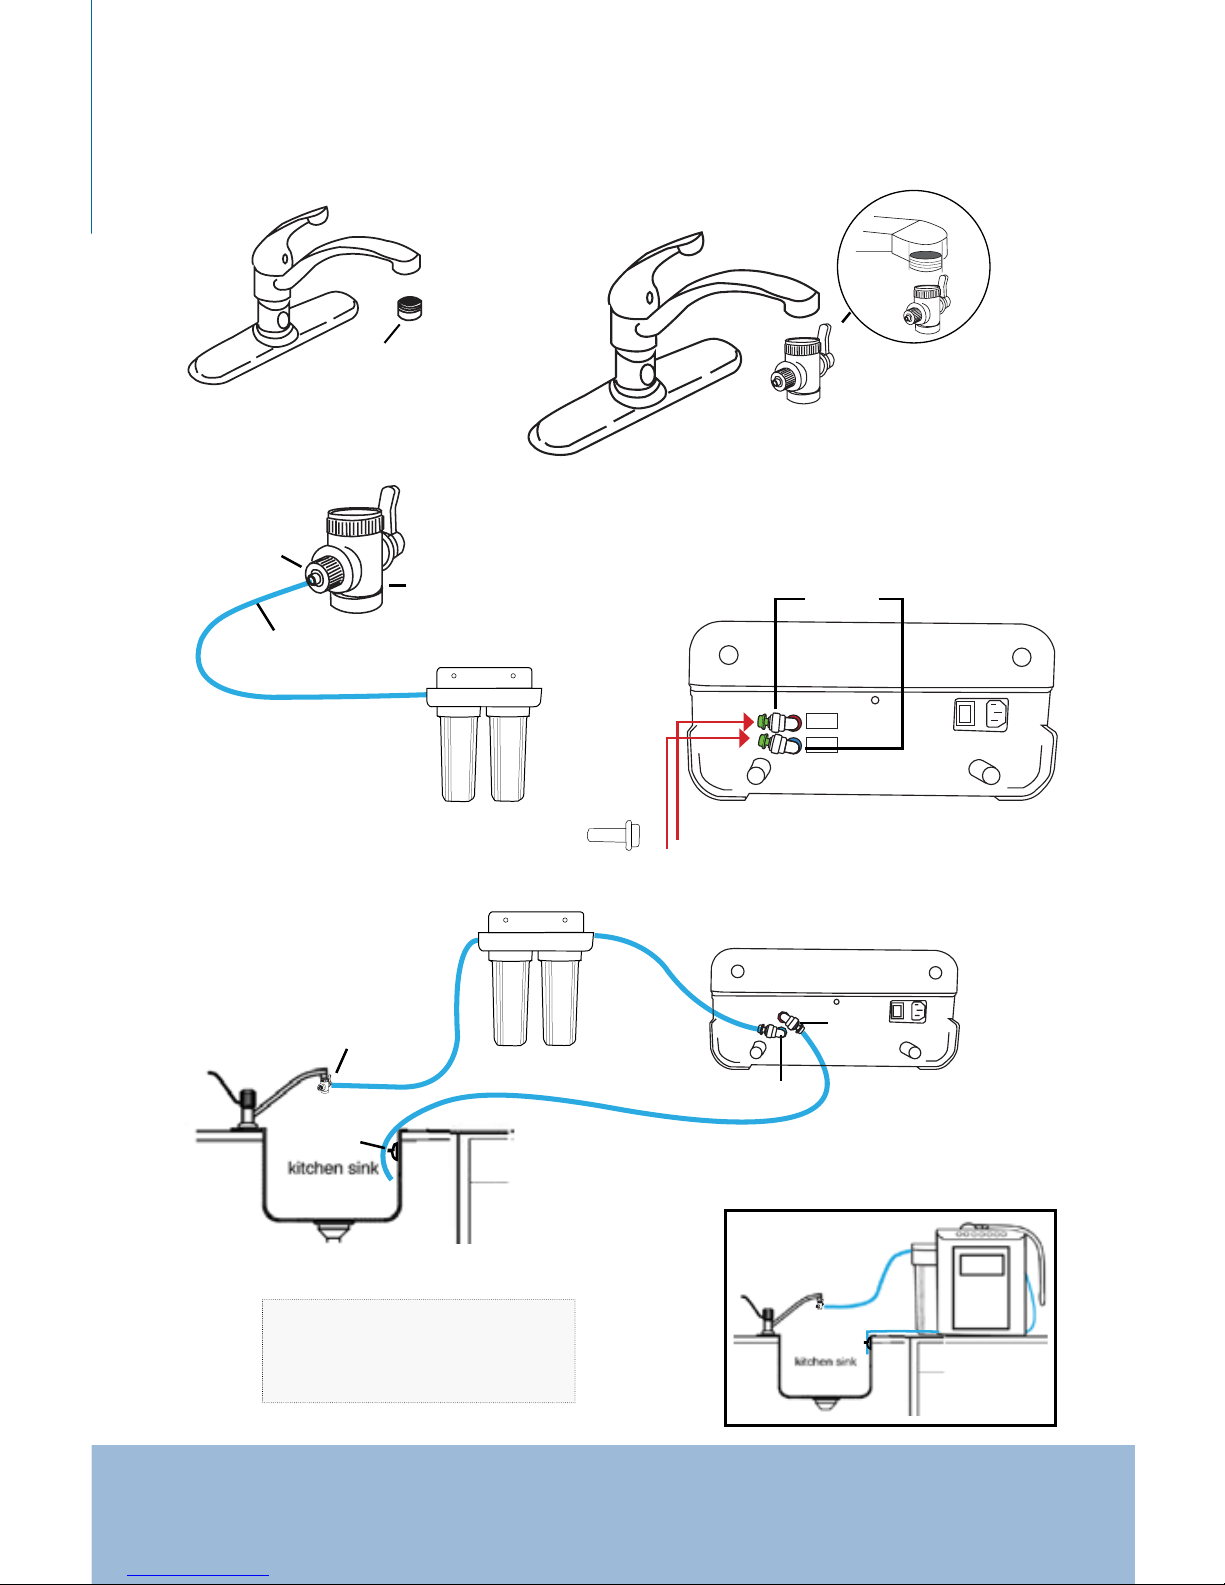
LIFE MXL-5 Installation
Refer to diagrams on page15.
(help video on LifeIonizers.com/support)
STEP 1: Unscrew the existing aerator from your faucet.
STEP 2: Use Teon plumber’s tape on the threads. Make sure the black rubber
washer is inside the diverter valve before you screw it onto your
faucet. This assures a proper seal. (Three dierent sized adaptors
are included for non-standard sized faucets).
STEP 3: Unscrew the round nut from the side of the diverter valve. Place the
1/4” tubing through the nut and over the opening. Press 1/4” tube on
the barb tting and screw the nut back onto the diverter valve over
the tubing. Tubing should now t snugly onto the diverter valve.
STEP 4: Run the other end of the 1/4” tubing that you attached to the
diverter valve to the (IN) on the Pre-lter. Connect another piece of
1/4” tubing to the (OUT) on the Pre-lter. Run 2-3 gallons of water
through the pre-lter before connecting them to the unit. This tube
will then go to the inlet valve on the bottom of the ionizer in STEP 6.
STEP 5: Remove the plugs in the following manner: Lay the ionizer down
on its back and you will see two white elbows extruding from the
bottom of the machine. There will be an o-white collar around the
base of the elbow (see page 18). Push in the collar against the face of
the tting. With the collar held in this position, you can extract the
plug from the machine. It is sometimes helpful to use the back of a
butter knife or screw driver to remove the plugs.
STEP 6: Insert the 1/4” tubing from the (OUT) on the Pre-lter to the inlet
valve on the bottom of the ionizer using the quick connect instruc-
tions on page 18. Insert another 1/4” tube in the outlet elbow on the
bottom of the ionizer and run the other end into the sink securing it
with the suction cup provided. Some units may contain water
Don’t be alarmed; we test units for quality before shipment.
STEP 7: Run the ionizer and check for leaks at all tubing locations from
the Diverter Valve to the Ionizer itself before operating the unit.
15
LIFE MXL-5LifeIonizers.com/support
Inlet
Outlet
DIVERTER CONNECTION
STEP 1:
STEP 2:
aerator
STEP 3:
round nut
1/4” tubing
Diverter valve
STEP 4:
elbows
STEP 5:
Bottom of ionizer
Diverter valve
inlet valve
outlet
valve
Bottom of ionizer
suction
cup
Pre-Filters
In
Out
plugs
(in green)
STEP 6:
NOTE: Run 2-3 gallons of water
through the pre-lters before you
connect them to the ionizer.
** Plugs must be removed before installation.
Pre-lters
Diverter valve
Option:
Diverter Valve Adapter if
needed for your type of sink.
16
LIFE MXL-5 LifeIonizers.com/support
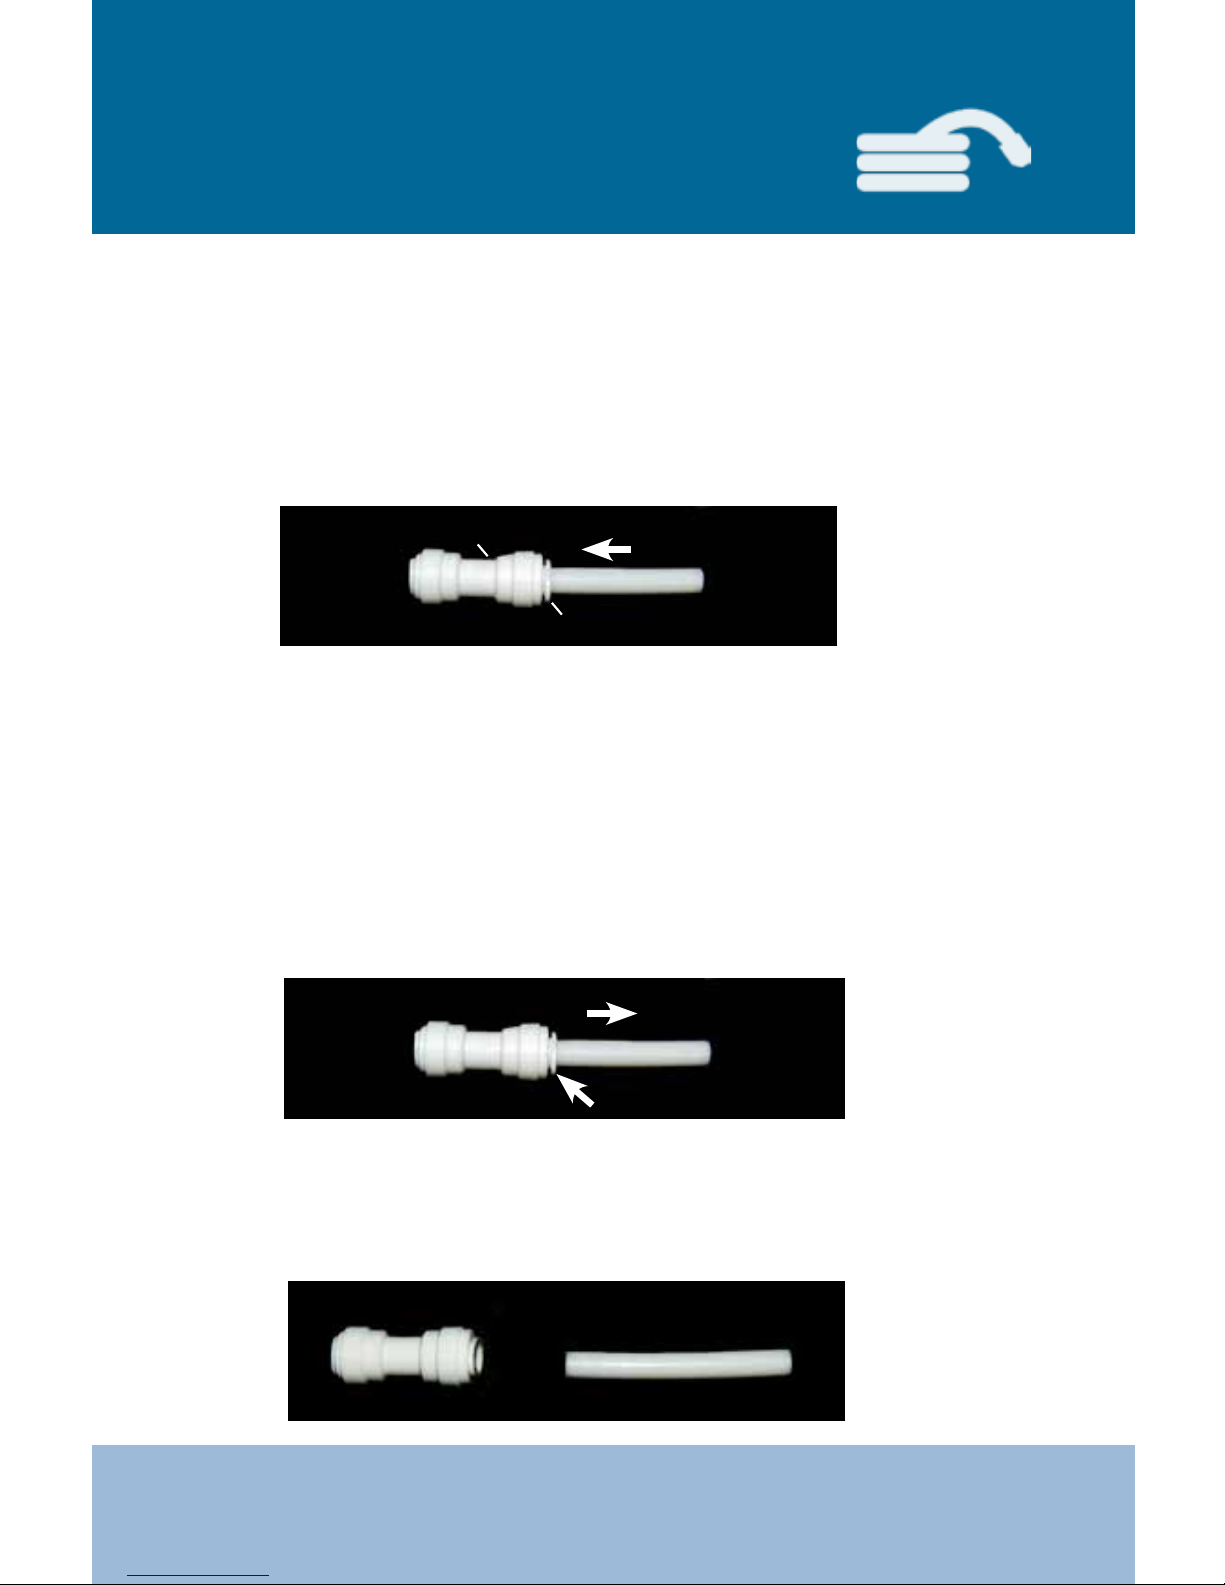
Quick Connect Fittings
and Tubing
Push the tubing into the quick connect. The collar (gripper )
has teeth which hold the tubing rmly in position while the “O” Ring
provides a permanent leak proof seal.
Check the Seal: Pull on the tubing to see if the seal is secure.
Check for leaks.
Ensure system is depressurized before removing ttings. Push in the
collar against the face of the tting. With the collar held in this position,
the tube can be removed. The tting can then be re-used.
collar
To ensure an optimal seal, tubing should be cut with the end square.
An angled cut or distortion of the tubing will not provide an ecient seal
and may cause leaks. Determine the length of tubing needed for
the connection and cut the segment of tubing to the appropriate length.
push in collar
pull tubing out
quick connect
TO CONNECT:
TO DISCONNECT:
 Loading...