

Page 1
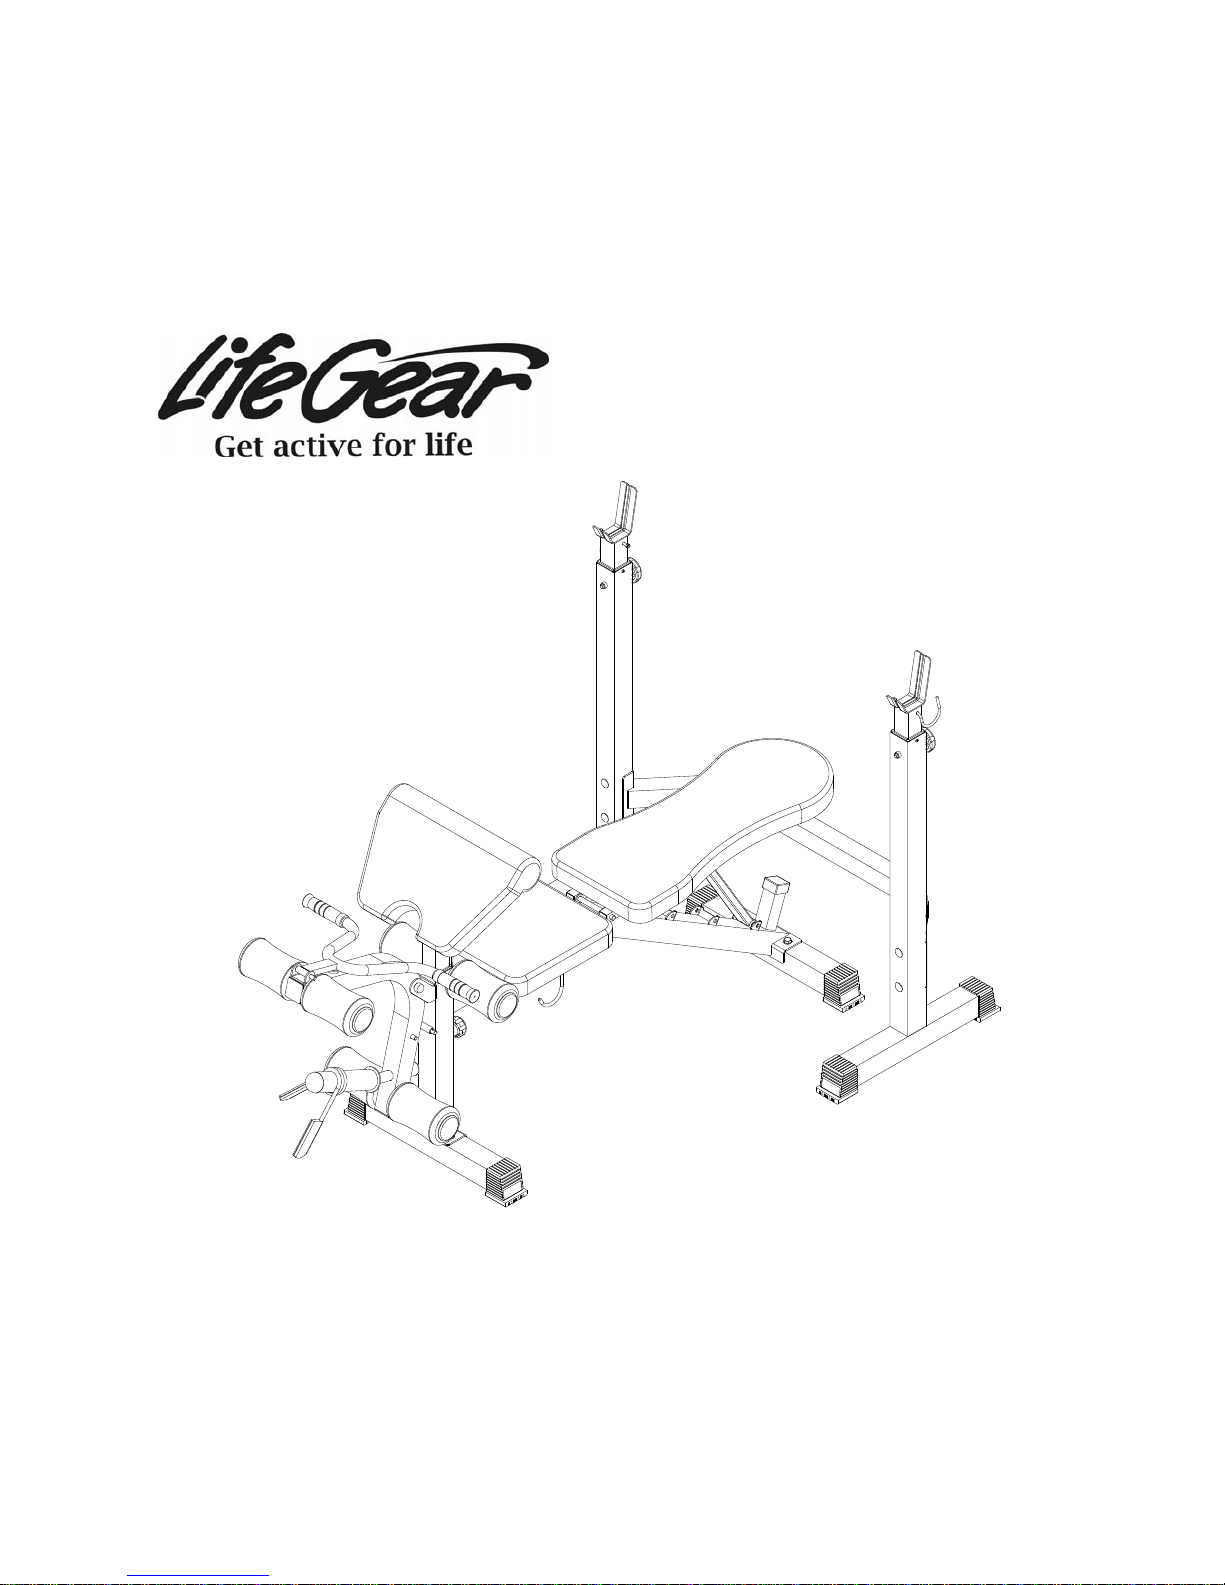
weight.detach/BENCH
ITEM NO: 76310
OWNER’S MANUAL
IMPORTANT: Read all instructions carefully before using this product. Retain this
owner’s manual for future reference.
The specifications of this product may vary from this photo and are subject to change without
prior notice.
2018, May
Page 2

1
TABLE OF CONTENTS
WARRANTY ------------------------------------------------------------------------------- 2
IMPORTANT SAFETY INSTRUCTIONS ------------------------------------------- 3
PARTS LIST ------------------------------------------------------------------------------- 4
HARDWARE PACK ---------------------------------------------------------------------- 5
TOOLS PACK ----------------------------------------------------------------------------- 6
PARTS BAG 1 ---------------------------------------------------------------------------- 6
PARTS BAG 2 ---------------------------------------------------------------------------- 7
EXPLODED VIEW ----------------------------------------------------------------------- 8
ASSEMBLY INSTRUCTIONS --------------------------------------------------------- 9
USING THE WEIGHT BENCH ------------------------------------------------------- 20
WARM UP AND COOL DOWN ROUTINE ----------------------------------------- 23
Page 3

2
ONE YEAR LIMITED WARRANTY
LifeGear Inc. warrants to the original purchaser that this product is free from defects in
material and workmanship when used for the purpose intended, under the conditions that it
has been installed and operated in accordance with LifeGear's Owner's Manual. LifeGear's
obligation under this warranty is limited to replacing or repairing free of charge, any parts
which may prove to be defective under normal home use. This warranty does not include
any damage caused by improper operation, misuse or commercial application.
From the date of purchase, the frame is warranted to be free from defects for 1 (one) year.
This warranty is offered only to the original owner and is not transferable. Proof of
purchase is required.
When ordering replacement parts please have the following information ready:
1. Owner's Manual
2. Model Number
3. Description of Parts
4. Part Number
5. Date of Purchase
Page 4

3
IMPORTANT SAFETY INSTRUCTIONS
Basic precautions should always be followed, including the following important
safety instructions when using this weight bench. Read all instructions before using
this weight bench.
1. Read all instructions and follow it carefully before using this weight bench. Make sure
this weight bench is properly assembled and tightened before use.
2. Before exercise, in order to avoid injuring the muscle, warm-up exercises are
recommended.
3. Please make sure all parts are not damaged and fixed well before use. This weight
bench should be placed on a flat surface when using.
4. Never drop or insert any object into any opening.
5. Keep hands and feet away from moving parts.
6. Make sure that the adjustment knobs are inserted completely and tightened into the
uprights before beginning any exercise.
7. Please wear proper clothes and athletic shoes when using this weight bench.
8. Do not attempt any maintenance or adjustments other than those described in this
manual. Should any problems arise, discontinue use and consult your local dealer.
9. Keep children and pets away from the weight bench and squat rack stand at all times.
10. Children should not use the weight bench without adult supervision.
11. Disabled person should not use the weight bench without a qualified person or
physician in attendance.
12. Do not jump on the weight bench and do not use the weight bench outdoors.
13. Inspect and tighten all parts each time before using this weight bench.
14. This weight bench is for household use only. It is not a commercial model.
15. Only one person at a time should use this weight bench.
16. Always exercise with a partner. When you are performing bench press exercises, your
partner should stand behind you to catch the barbell if you cannot complete a repetition.
17. If you feel any chest pains, nausea, dizziness, or short of breath, you should stop
exercising immediately and consult your physician before continuing.
18. Care should be taken in mounting or dismounting the weight bench.
19. Do not allow children to use or play on the weight bench. This weight bench is
designed for adults use. The minimum free space required for safe operation is not
less than two meters.
20. Maximum weight capacity on the barbell uprights: 150 kg.
21. Maximum user’s weight: 120 kg.
22. Maximum weight capacity on the leg developer: 30 kg.
WARNING: Before beginning any exercise program consult your
physician. This is especially important for the people who are over 35 years old or
who have pre-existing health problems. Read all instructions before using any
fitness equipment.
CAUTION: Read all instructions carefully before operating this product.
Retain this Owner’s Manual for future reference.
Page 5

4
PARTS LIST
No. Description Qty No. Description Qty
001 Main Frame of Squat Rack Stand 2 027
Square End Cap (□50x50)
2
002
Support Tube of Squat Rack
Stand
1 028 Square Cap 38x38 1
003 Barbell Upright 2 029 Bumper Ø25x30 1
004 Base Tube 2 030 Foot End Cap 60x60 8
005 Main Frame of Weight Bench 1 031 Handle Grip Ø25x125 2
006 Backrest Tube 2 032 Buffer Ø30 1
007 Leg Developer 1 033 Curl Post Adjustment Knob M16 1
008 Curl Post 1 034 Bushing 60x45 3
009 Handle 1 035 Nut Cap M10 2
010 Backrest Adjustment Tube 1 036
Barbell Upright Height Adjustment
Knob M10
2
011 Lock Pin 1 037 Spring Clip Ø50 1
012 Left Barbell Lock 1 038 Big Washer Ø6 8
013 Right Barbell Lock 1 039 Washer Ø8 6
014 Weight Plate Tube 1 040 Washer Ø10 10
015 Curl Pad 1 041 Hexagon Head Bolt M6x16 4
016 Backrest 1 042 Hexagon Head Bolt M6x40 4
017 Seat Pad 1 043 Hexagon Head Bolt M8x20 6
018 Foam Roll Tube Ø25x380 2 044 Hexagon Head Bolt M10x20 4
019 Foam Roll Tube Ø25x390 1 045 Hexagon Head Bolt M10x85 1
020 Foam Roll Ø23x Ø100x160 6 046 Square Neck Bolt M10x75 4
021 L Shaped Pin Ø10x50 1 047
Cross Recessed Pan Head Bolt
M4x6
6
022 L Shaped Pin Ø10x70 1 048 Nylon Lock Nut M6 2
023 Foam Roll End Cap Ø25 6 049 Nylon Lock Nut M10 5
024 Round End Cap Ø25 1 050 Hexagon Socket Bolt M8x10 1
025
Square End Cap (□25x25)
4 051 Hook Frame 1
026
Square End Cap (□38x38)
1
Page 6
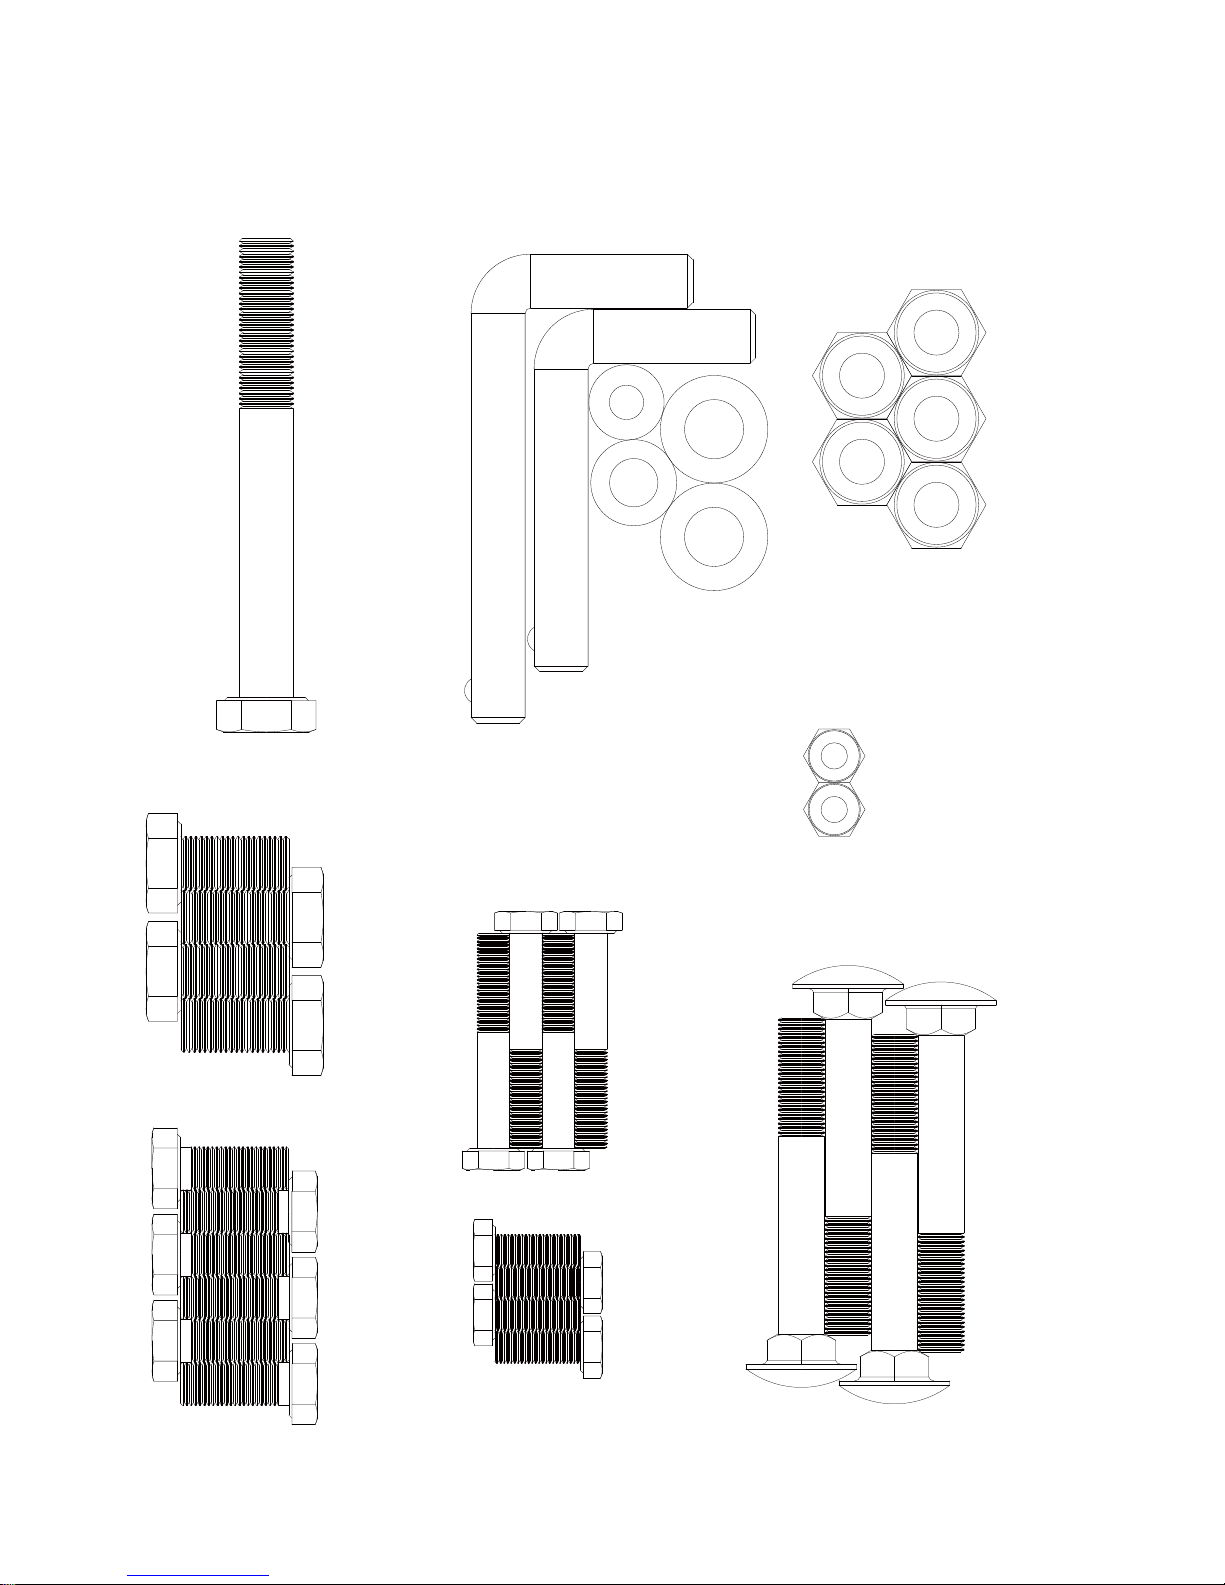
5
(43) Hexagon Head Bolt
M8x20
6 PCS
(44) Hexagon Head Bolt
M10x20
4 PCS
(45) Hexagon Head Bolt
M10x85
1 PC
(41) Hexagon Head Bolt
M6x16
4 PCS
(42) Hexagon Head Bolt
M6x40
4 PCS
(38) Big Washer Ø6 8 PCS
(39) Washer Ø8 6 PCS
(40) Washer Ø10 10 PCS
(21) L Shaped Pin
Ø10x50
1 PC
(22) L Shaped Pin
Ø10x70
1 PC
(46) Square Neck Bolt
M10x75
4 PCS
(48) Nylon Lock Nut M6
2 PCS
(49) Nylon Lock Nut M10
5 PCS
HARDWARE PACK
Page 7
6
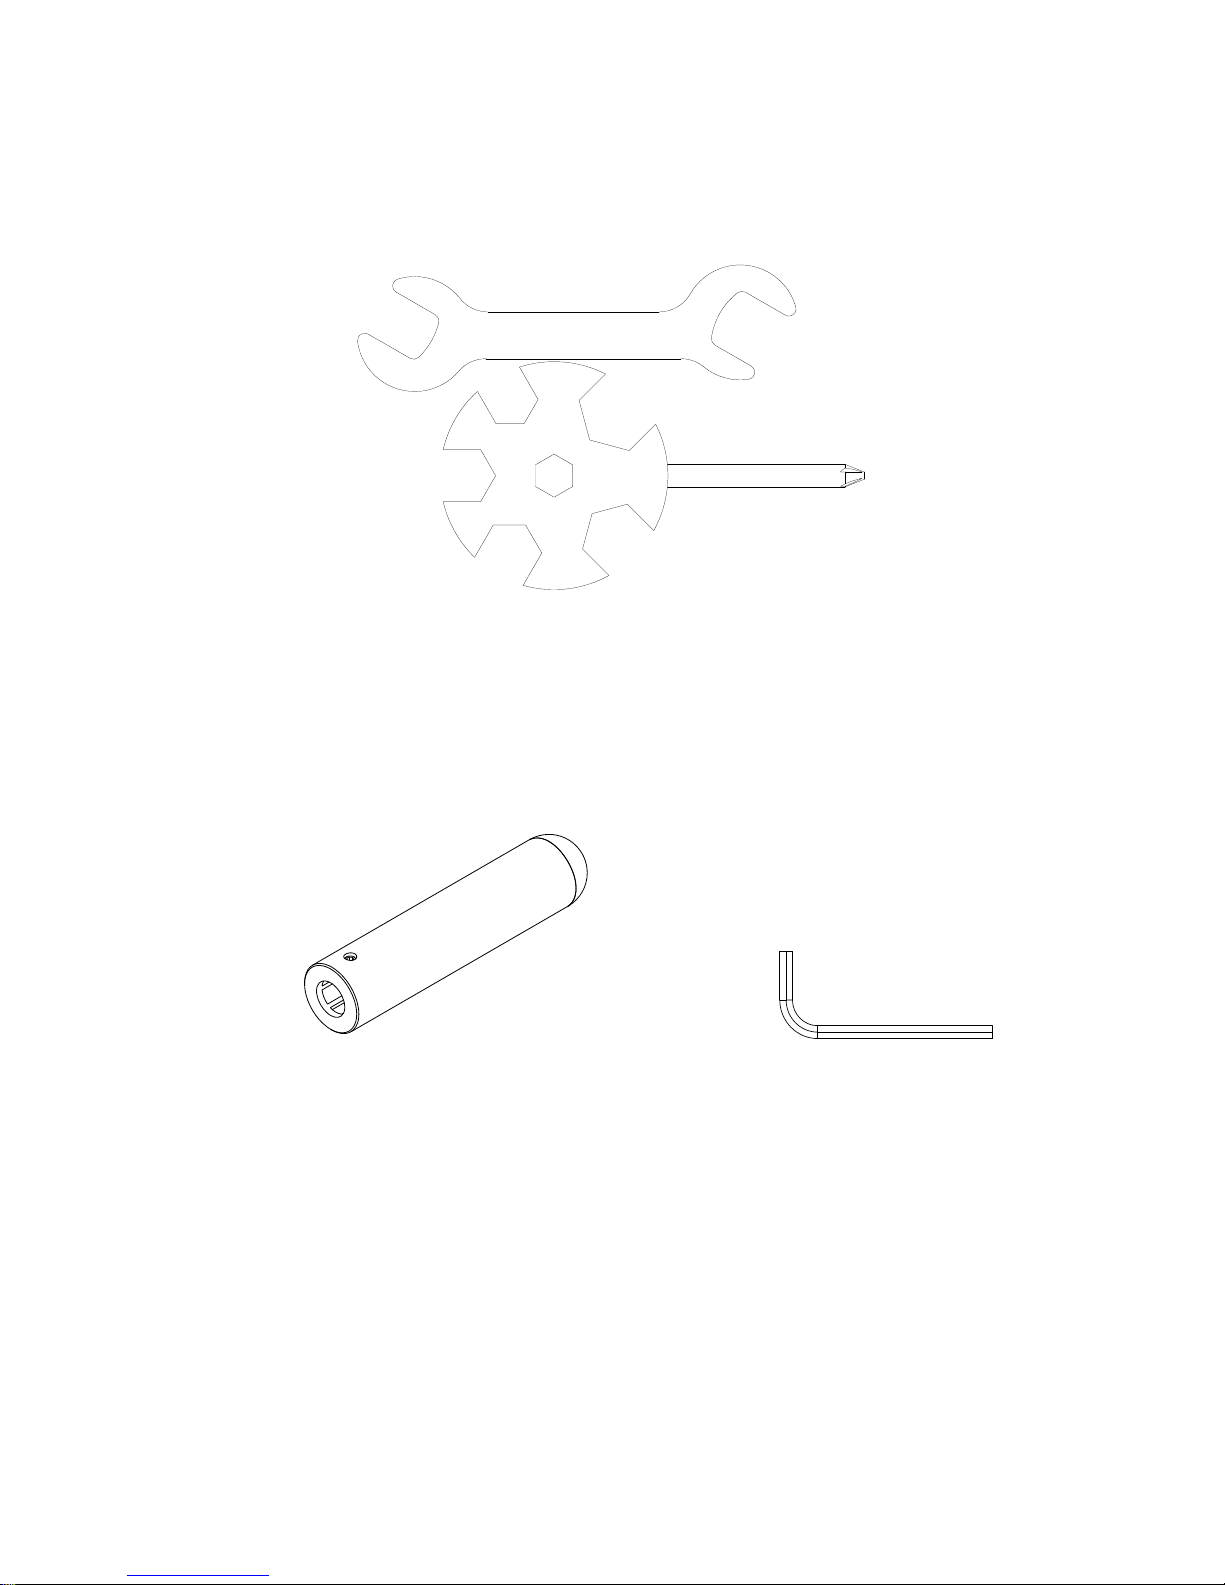
TOOLS PACK
PARTS BAG 1
Multi Hex Tool with Phillips Screwdriver
1 PC
Double Open End Wrench
1 PC
(14) Weight Plate Tube 1 PC
(50) Hexagon Socket Bolt M8x10 1 PC
Allen Wrench
1 PC
Page 8
7
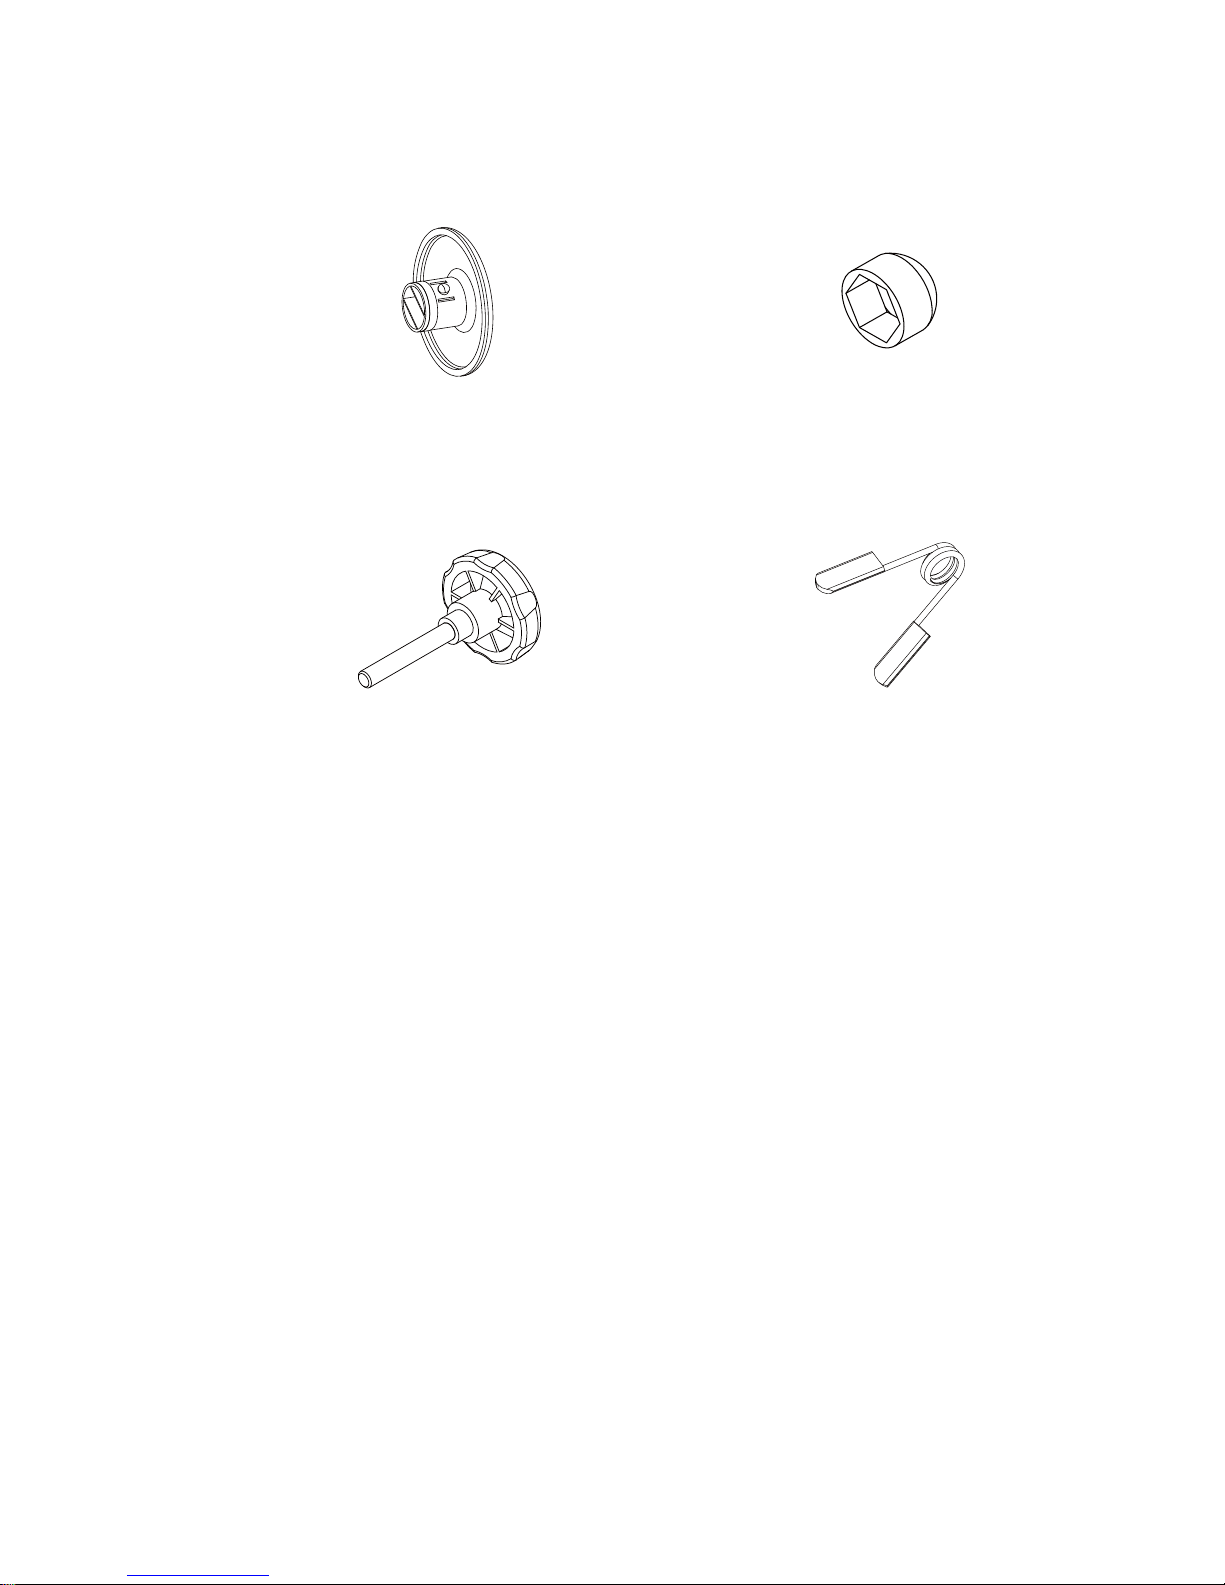
PARTS BAG 2
(23) Foam Roll End Cap Ø25
6 PCS
(35) Nut Cap M10
2 PCS
(36) Barbell Upright Height Adjustment Knob
2 PCS
(37) Spring Clip Ø50
1 PC
Page 9
8
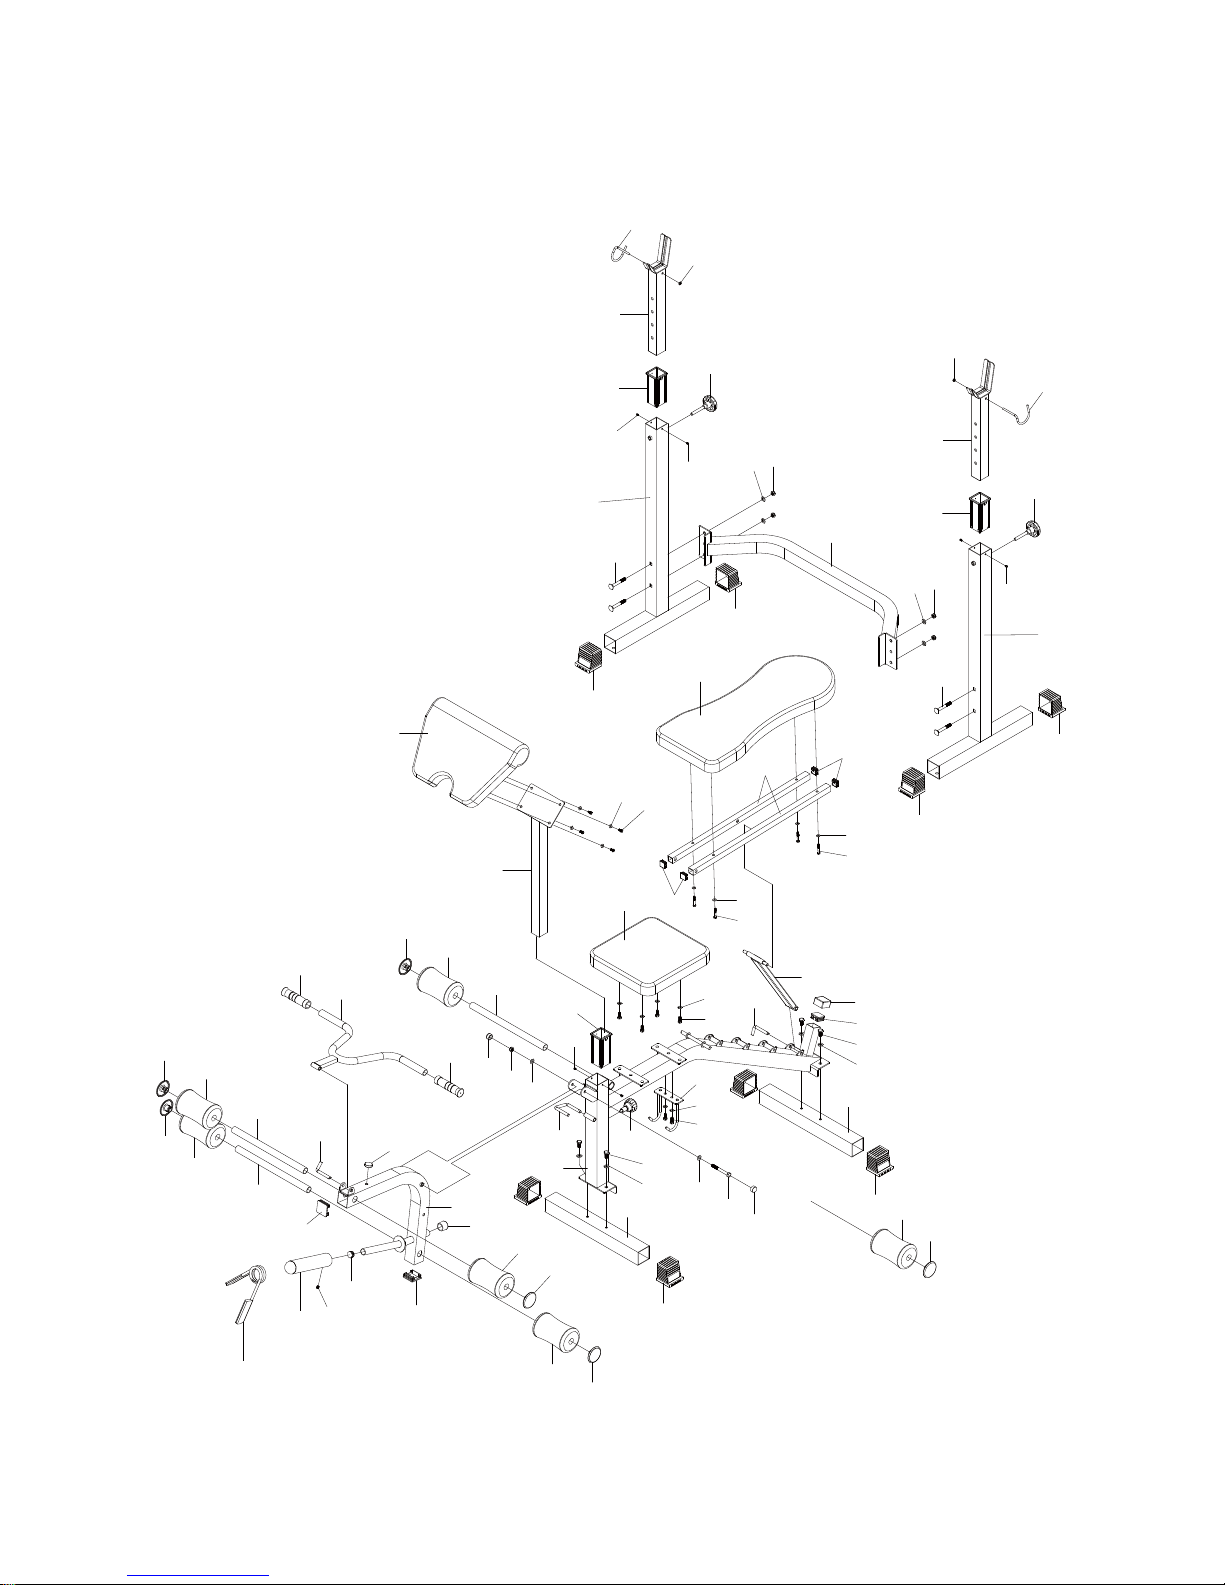
EXPLODED VIEW
13
48
36
47
23
23
37
14
50
24
27
29
7
20
35
45
40
39
43
25
38
42
10
28
26
44
40
4
31
9
11
19
35
49
18
21
4
32
5
27
33
17
22
15
8
38
41
25
16
30
34
1
12
40
49
1
46
2
6
3
48
34
34
47
47
47
36
46
40
49
40
30
30
30
30
20
23
23
20
20
23
20
23
18
31
30
44
40
20
38
42
3
39
43
51
Page 10
9
ASSEMBLY INSTRUCTIONS
NOTE: It is recommended to have a second person to help you to assemble this
weight bench.
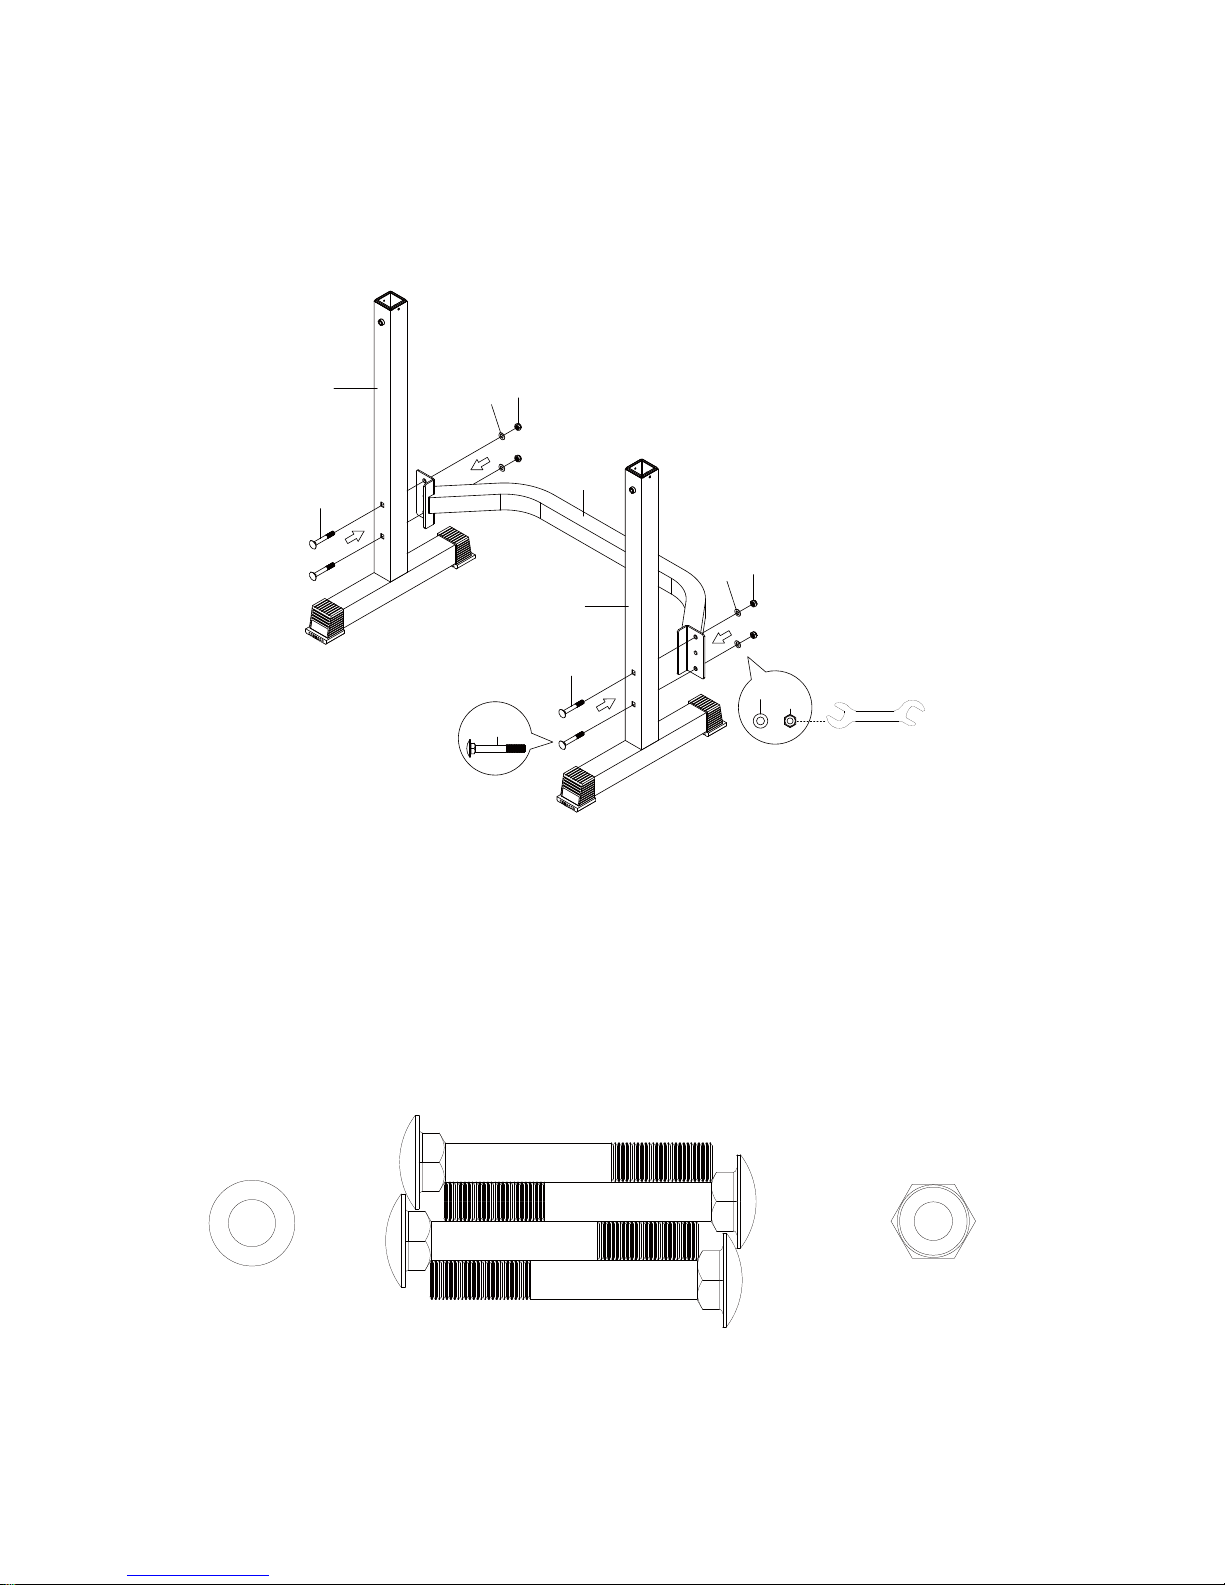
Step 1
It is recommended to have a second person assist with this step. One person should hold
the Support Tube of Squat Rack Stand (2) behind the both Main Frames of Squat Rack
Stand (1) and align bolt holes while the other person to secure the Support Tube of Squat
Rack Stand (2) onto the both Main Frames of Squat Rack Stand (1) with four M10x75
Square Neck Bolts (46), four Ø10 Washers (40), and four M10 Nylon Lock Nuts (49).
Tighten nylon lock nuts with the Double Open End Wrench provided.
Hardware:
40
49
1
46
40
49
46
1
2
46
40
49
(46) Square Neck Bolt 10x75
4 PCS
(49) Nylon Lock Nut M10
4 PCS
(40) Washer Ø10
4 PCS
Page 11
10
Step 2
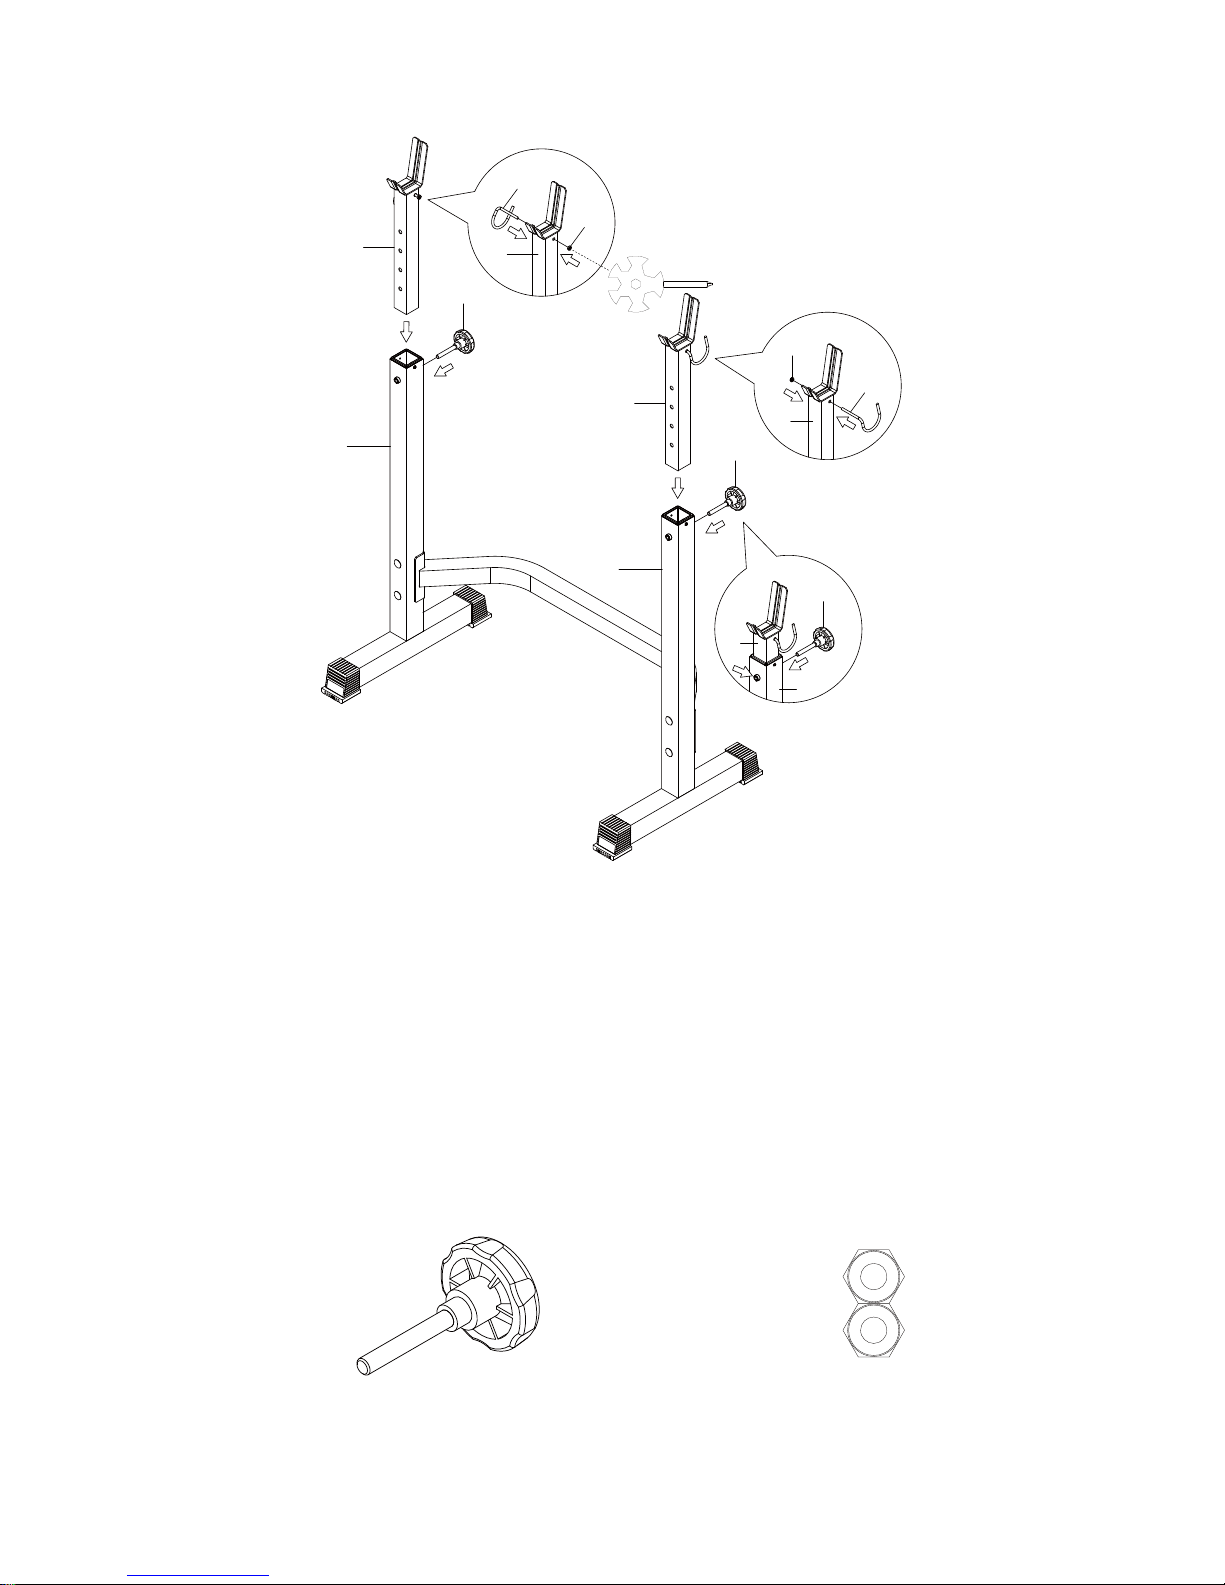
Slide a Barbell Upright (3) into Main Frame of Squat Rack Stand (1). Align one of the holes
in the Barbell Upright (3) with the hole in Main Frame of Squat Rack Stand (1). Insert a
Barbell Upright Height Adjustment Knob (36) through Main Frame of Squat Rack Stand (1)
and the Barbell Upright (3). Tighten the Barbell Upright Height Adjustment Knob (36) into
the welded nut.
Insert the other Barbell Upright (3) into the other Main Frame of Squat Rack Stand (1) in the
same manner. Both Barbell Uprights (3) must be set at the same height.
Attach the Left Barbell Lock (12) into the left side of the Barbell Upright (5) with one M6
Nylon Lock Nut (48). Tighten nylon lock nut with the Multi Hex Tool with Phillips
Screwdriver provided.
Attach the Right Barbell Lock (13) into the right side of the Barbell Upright (5) in the
same manner.
Hardware:
1
1
13
48
12
3
48
3
3
3
36
36
36
3
1
(36) Barbell Upright Height Adjustment Knob
2 PCS
(48) Nylon Lock Nut M6
2 PCS
Page 12
11
Step 3
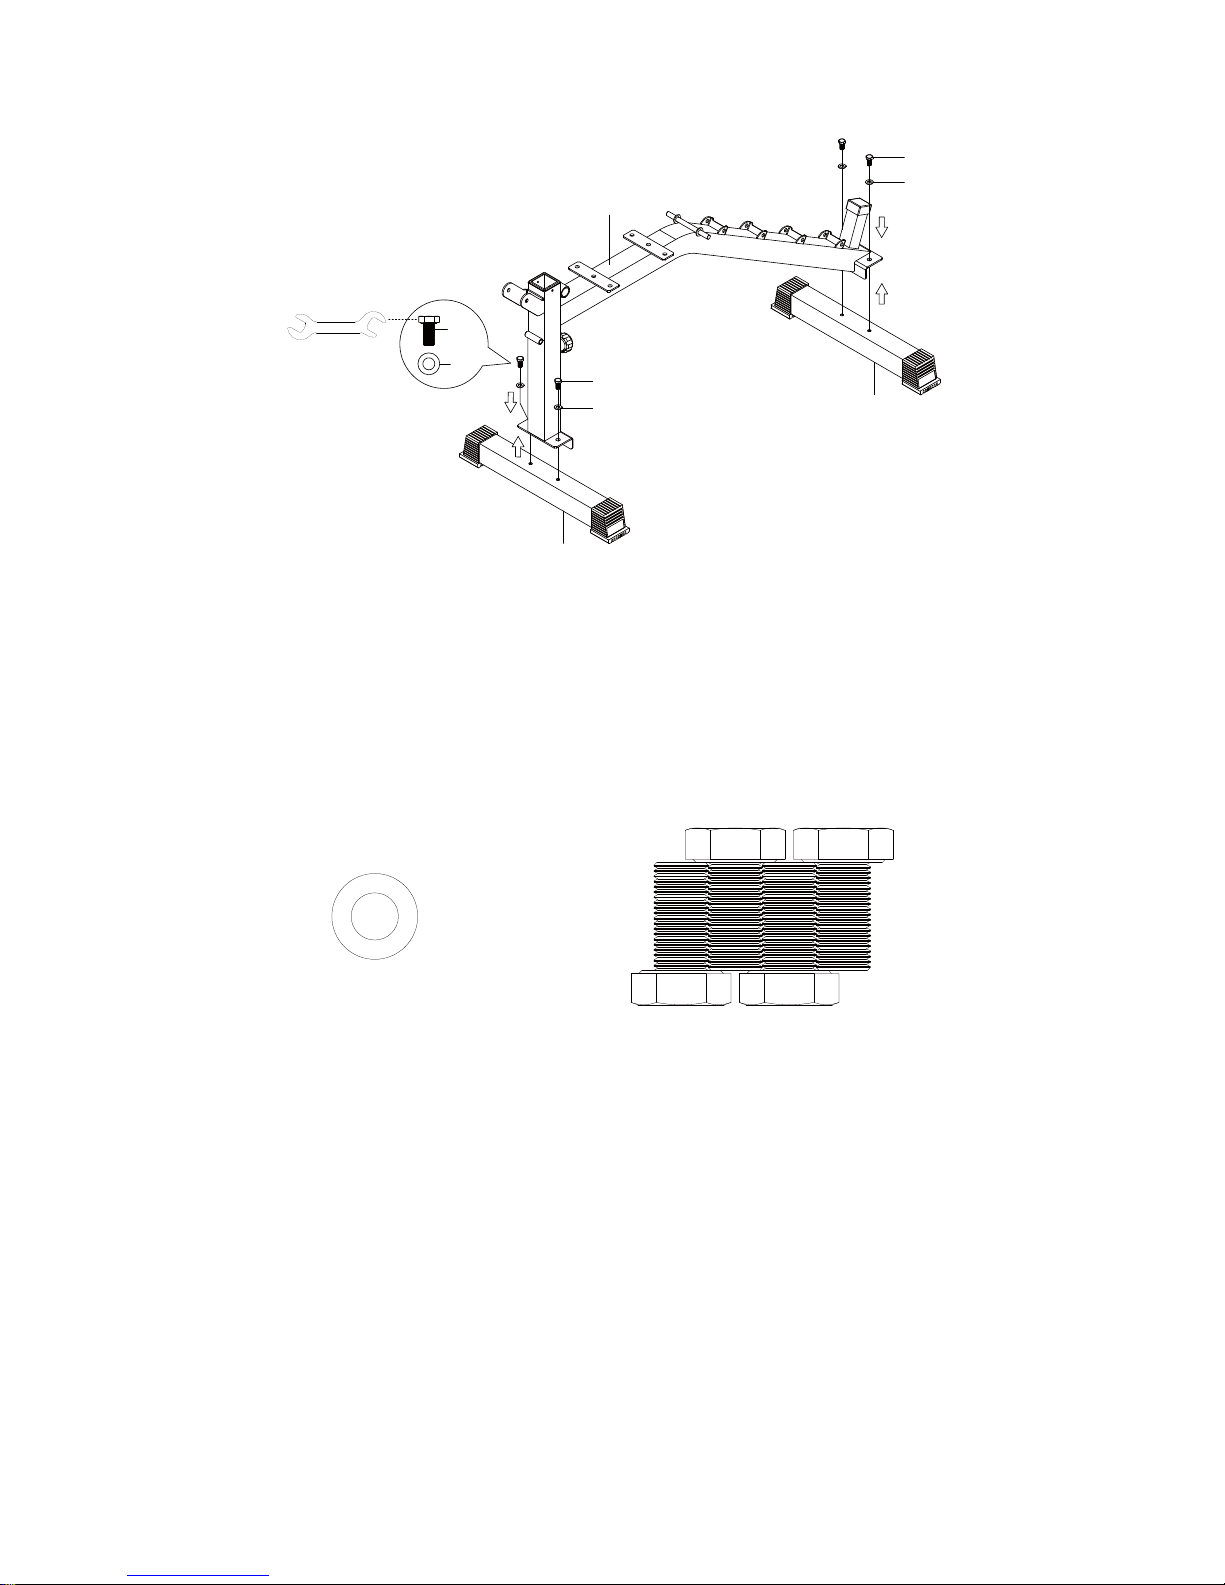
Position both Base Tubes (4) under the Main Frame of Weight Bench (5) and align bolt
holes.
Attach both Base Tubes (4) onto the bottom of the Main Frame of Weight Bench (5) with four
M10x20 Hexagon Head Bolts (44) and four two Ø10 Washers (40). Tighten bolts with the
Double Open End Wrench provided.
Hardware:
4
5
44
40
4
44
40
44
40
(44) Hexagon Head Bolt M10x20
4 PCS
(40) Washer Ø10
4 PCS
Page 13
12
Step 4
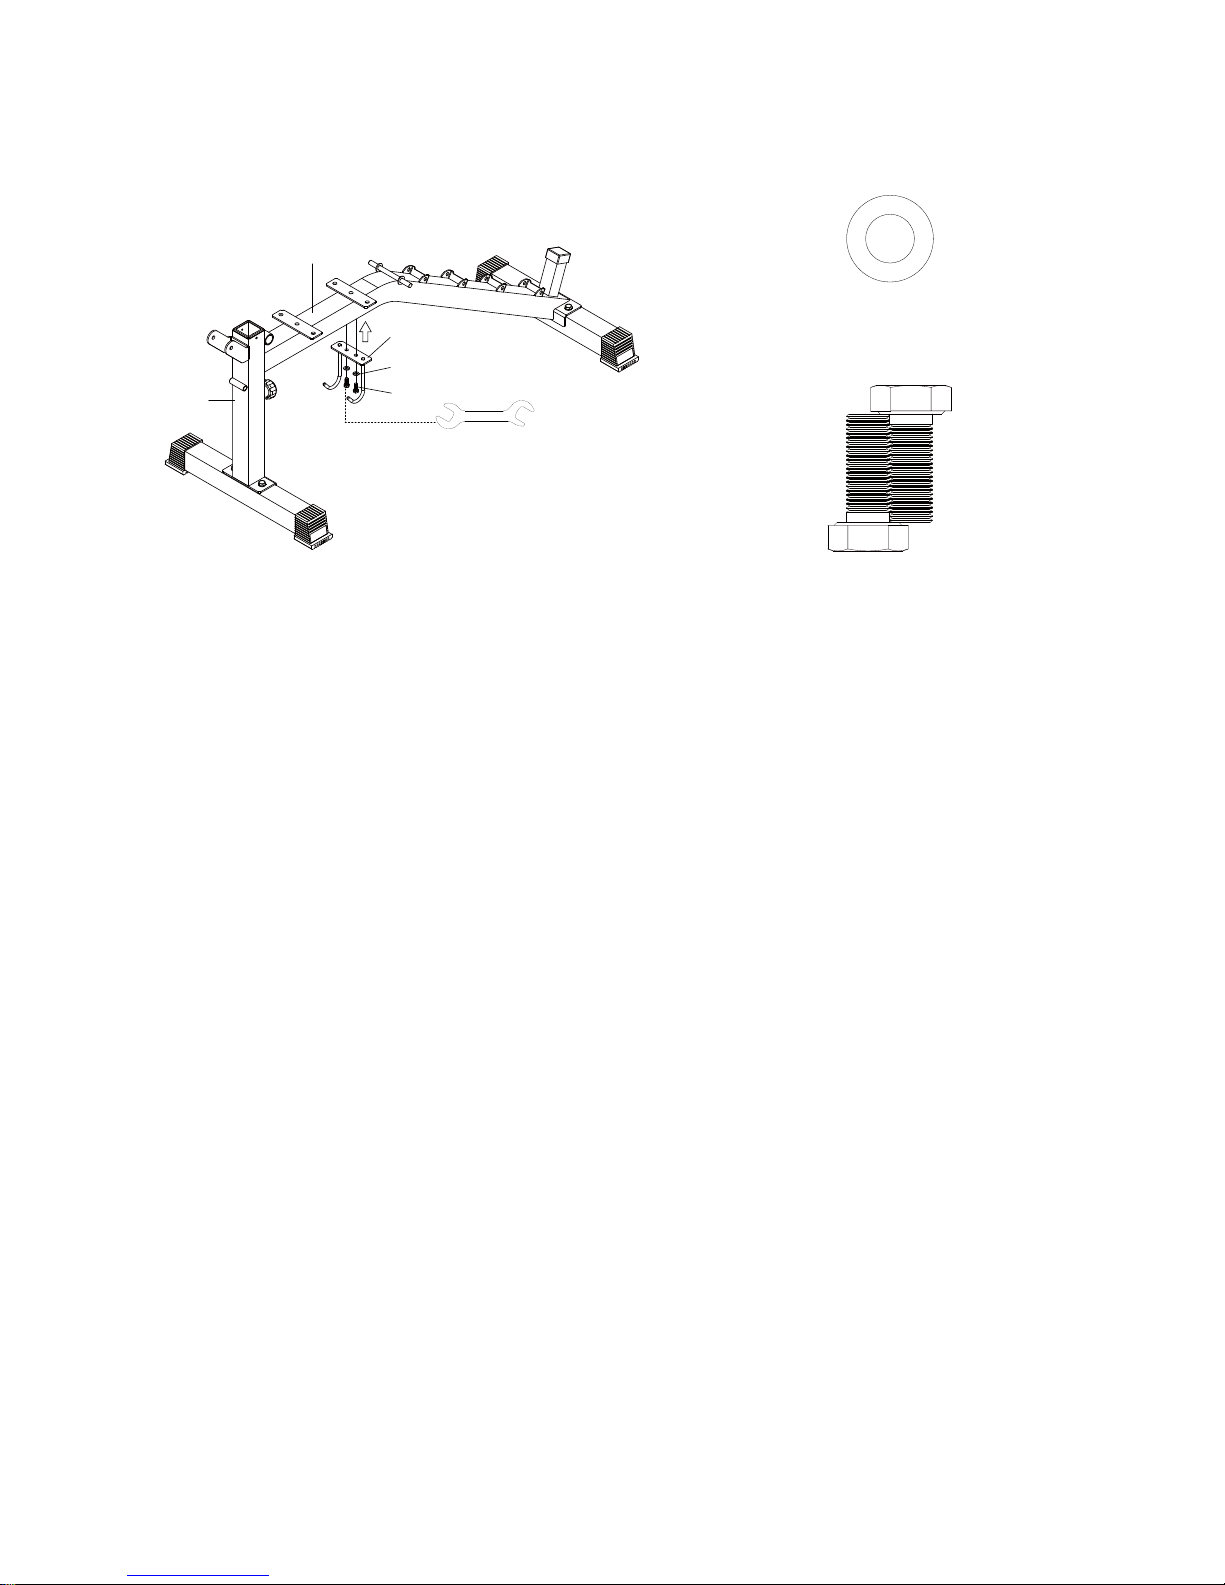
Position the Hook Frame (51) under the Main Frame of Weight Bench (5) and align bolt
holes.
Attach the Hook Frame (51) onto the Main Frame of Weight Bench (5) with two Ø8 Washers
(39) and two M8x20 Hexagon Head Bolts (43). Tighten bolts with the Double Open End
Wrench provided.
39
43
51
5
5
(39) Washer Ø8
2 PCS
Hardware:
(43) Hexagon Head Bolt M8x20
2 PCS
Page 14
13
5
10
6
10
6
6
6
5
Step 5
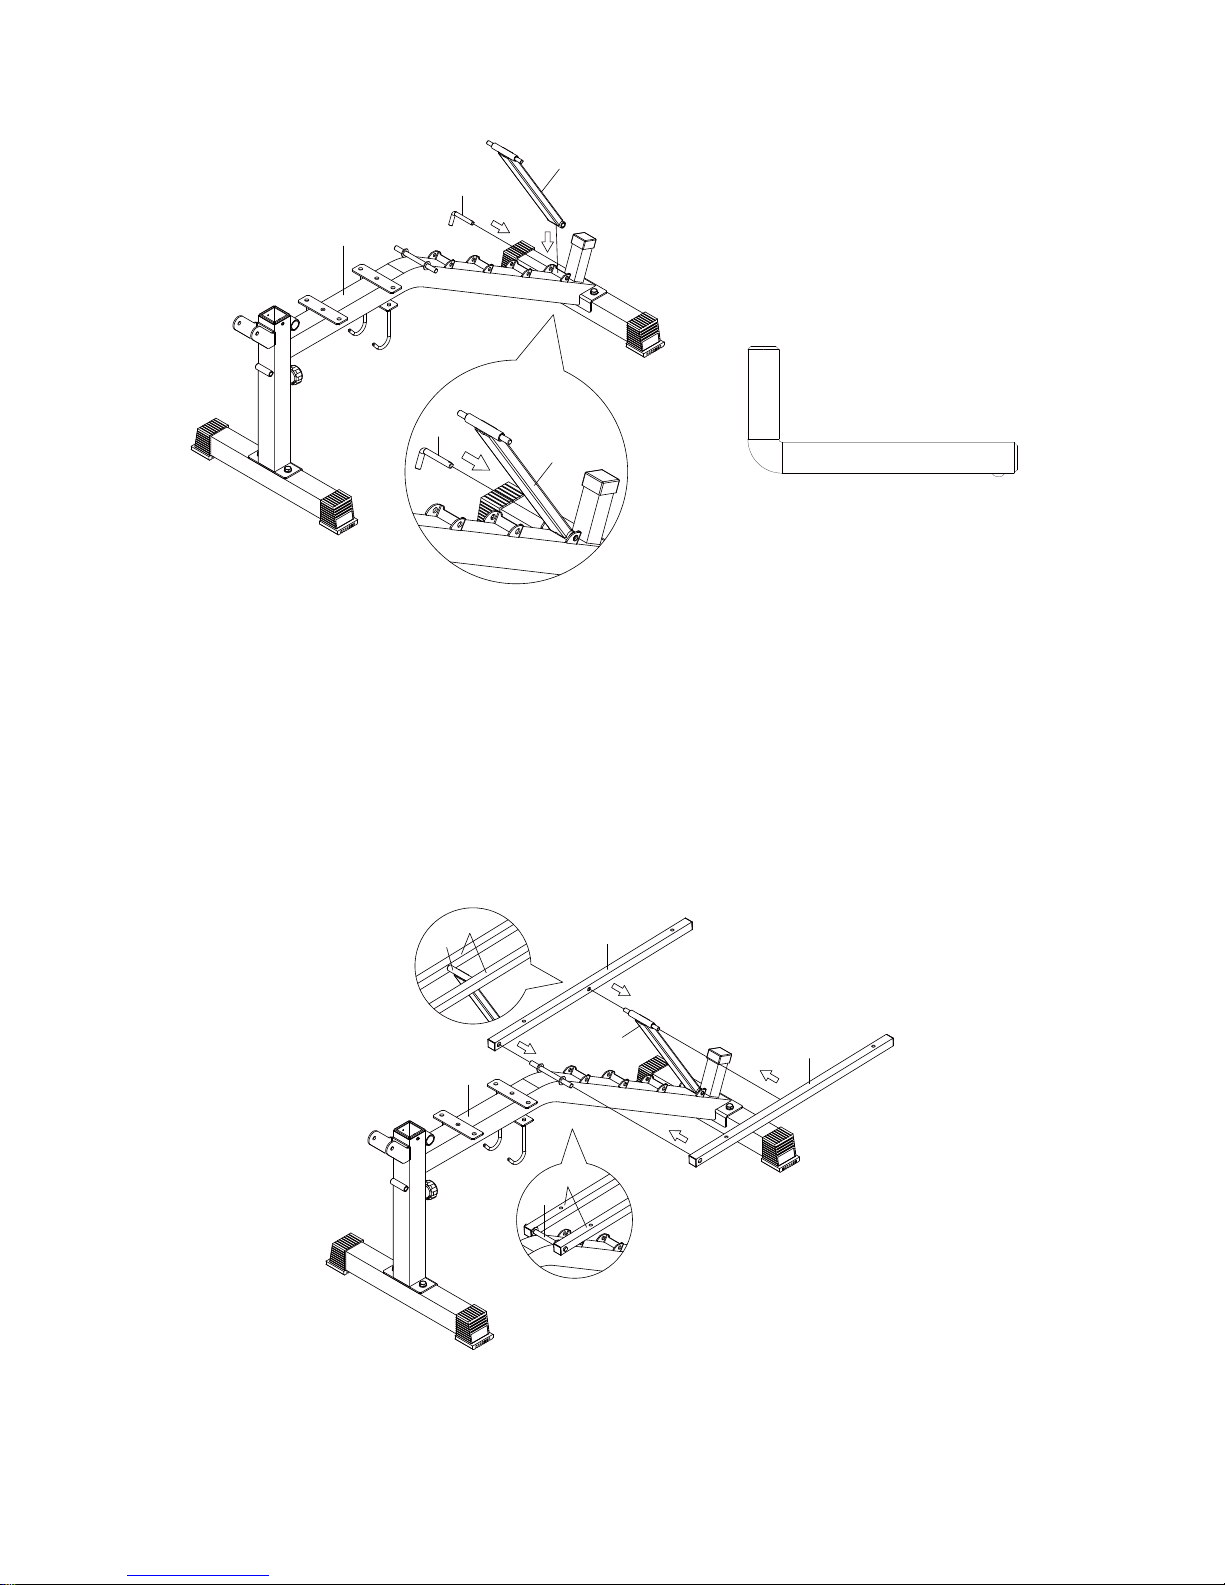
Install the Backrest Adjustment Tube (10) to the bottom selected backrest adjustment tube
holder in the Main Frame of Weight Bench (5). Align hole in the Backrest Adjustment Tube
(10) with the adjustment holes in the Main Frame of Weight Bench (5). Secure the
Backrest Adjustment Tube (10) to the Main Frame of Weight Bench (5) with the Ø10x70
L Shaped Pin (22) through the holes in the Backrest Adjustment Tube (10) and Main Frame
of Weight Bench (5). Make sure the Ø10x70 L Shaped Pin (22) is completely inserted
through the holes in the selected backrest adjustment tube holder in the Main Frame of
Weight Bench (5) and Backrest Adjustment Tube (10).
Step 6
Install the two Backrest Tubes (6) to the Main Frame of Weight Bench (5) and Backrest
Adjustment Tube (10).
5
22
10
10
22
(22) L Shaped Pin Ø10x70
1 PC
Page 15
14
Step 7
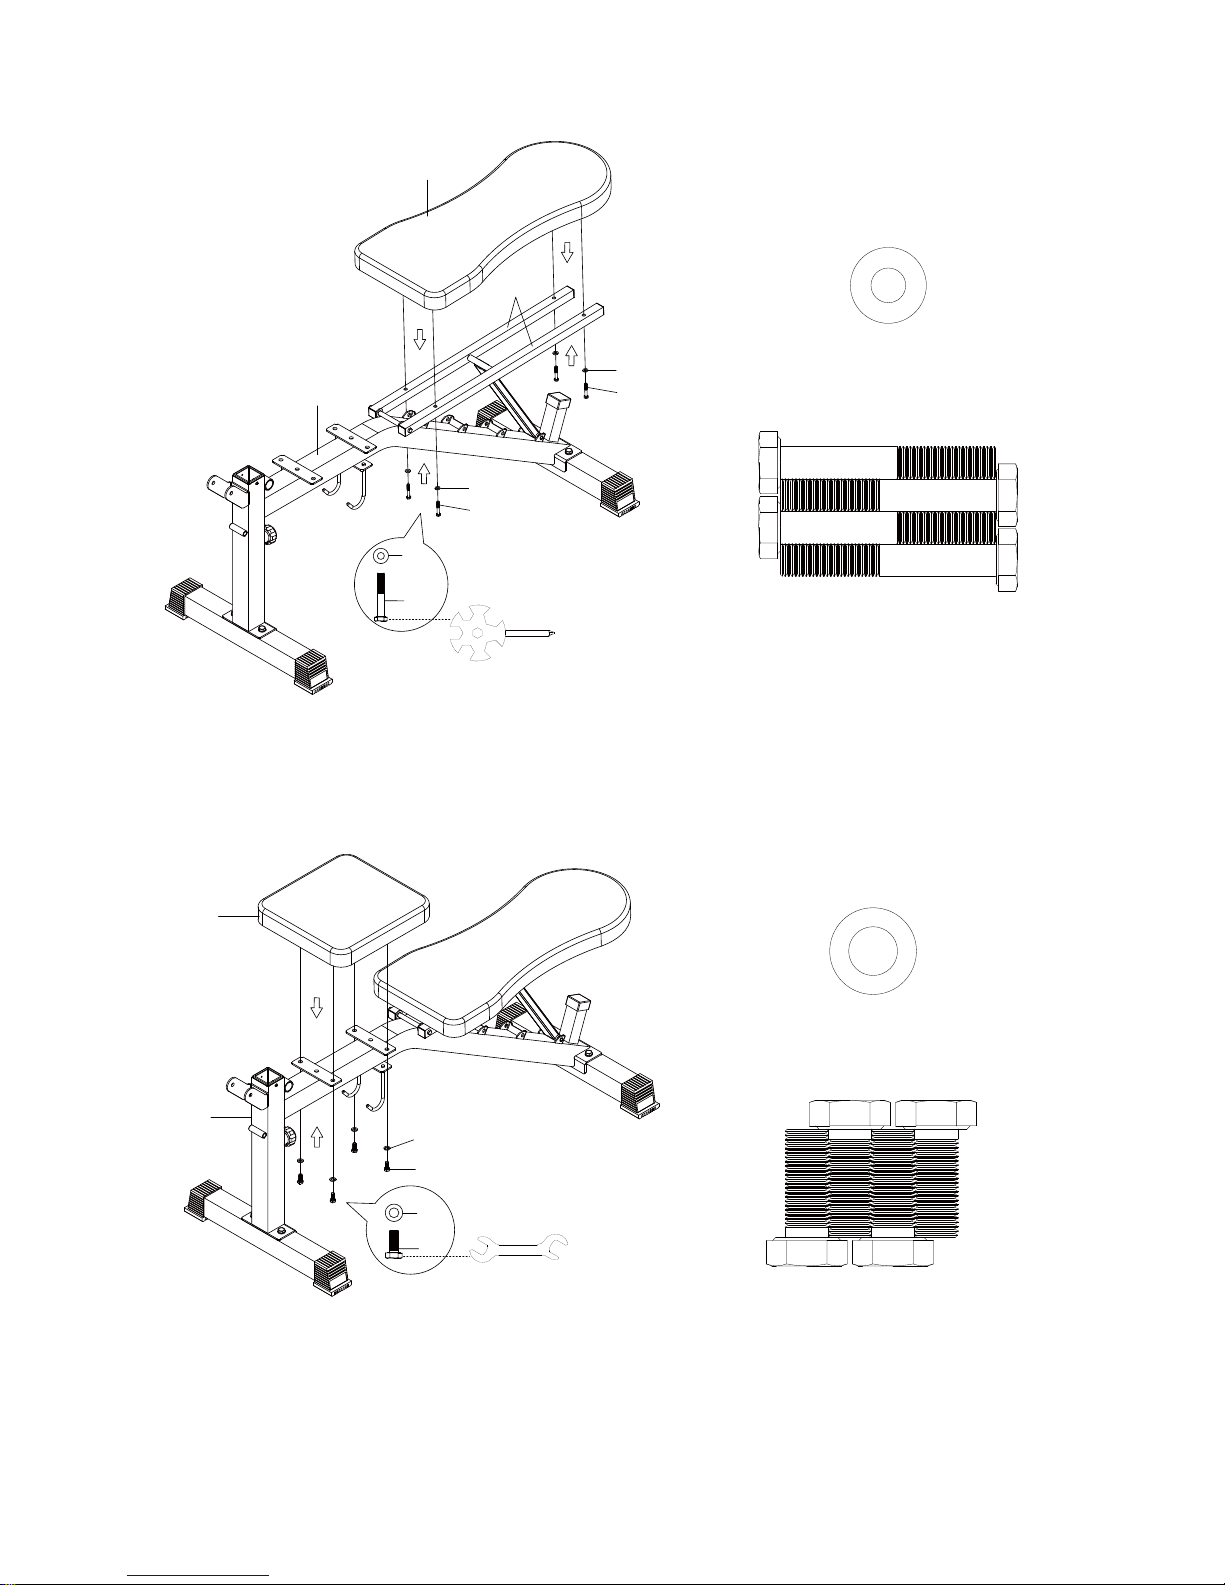
Attach the Backrest (16) onto the both Backrest Tubes (6) with four Ø6 Big Washers (38)
and four M6x40 Hexagon Head Bolts (42). Tighten bolts with the Multi Hex Tool with
Phillips Screwdriver provided.
Step 8
Attach the Seat Pad (17) onto the Main Frame of Weight Bench (5) with four Ø8 Washers
(39) and four M8x20 Hexagon Head Bolts (43). Tighten bolts with the Double Open End
Wrench provided.
38
42
16
5
38
42
6
38
42
Hardware:
(38) Big Washer Ø6
4 PCS
(42) Hexagon Head Bolt M6x40
4 PCS
5
39
43
17
43
39
(39) Washer Ø8
4 PCS
Hardware:
(43) Hexagon Head Bolt M8x20
4 PCS
Page 16
15
Step 9
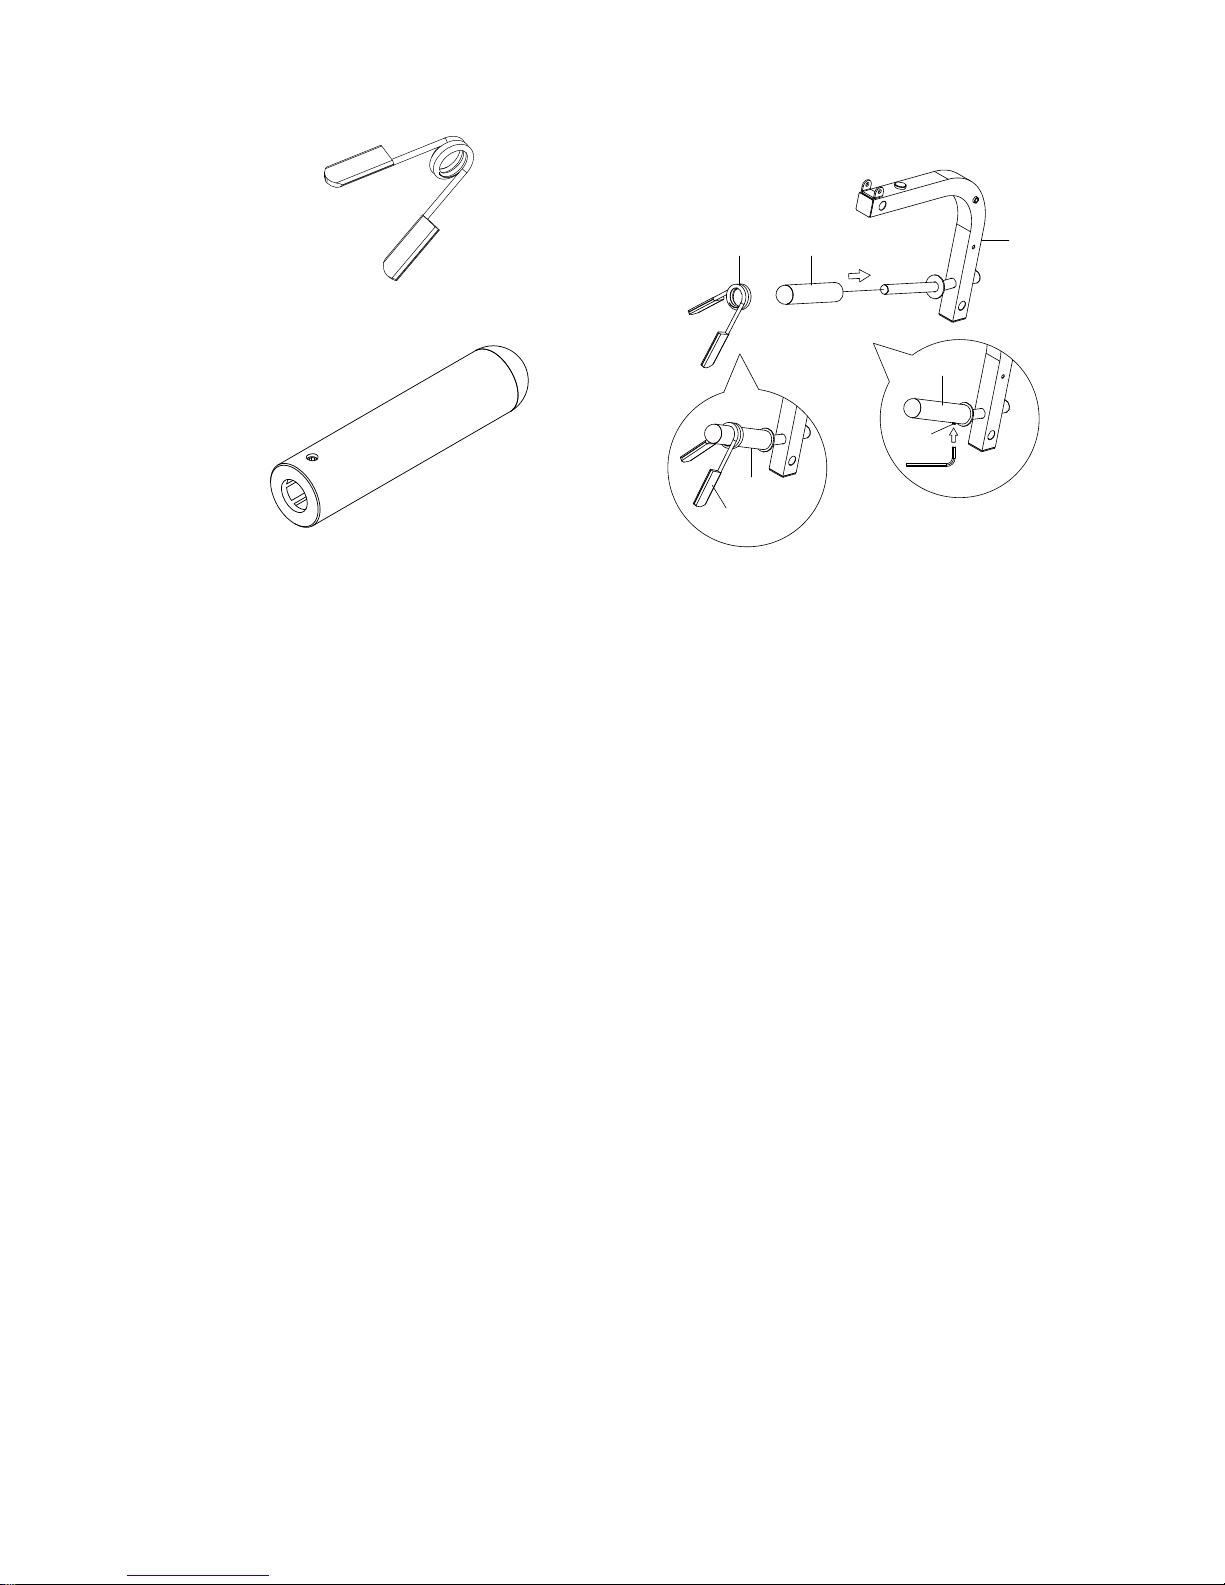
Slide the Weight Plate Tube (14) onto the weight post on the Leg Developer (70). Tighten
the M8x10 Hexagon Socket Bolt (50) with the Allen Wrench provided. Attach a Spring
Clip (37) onto the Weight Plate Tube (14).
37
14
7
50
14
14
37
(14) Weight Plate Tube 1 PC
(50) Hexagon Socket Bolt M8x10 1 PC
(37) Spring Clip Ø50
1 PC
Page 17
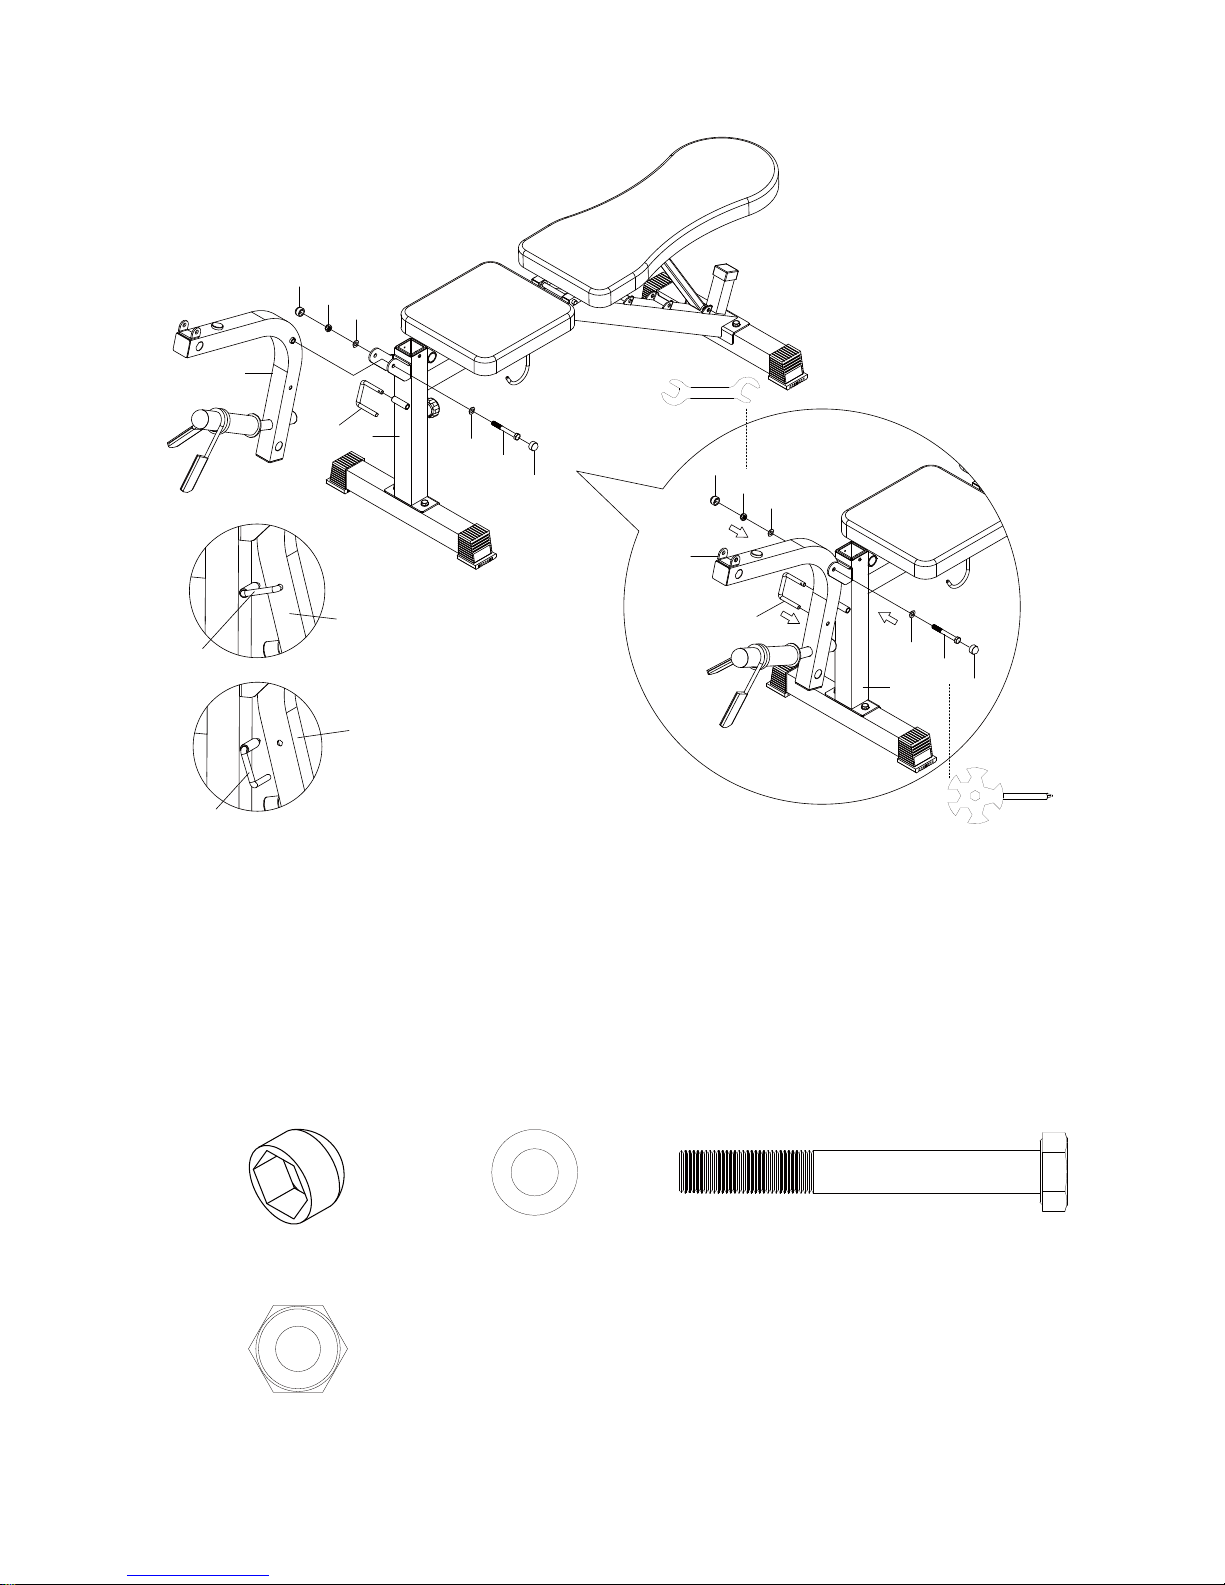
16
Step 10
Attach the Leg Developer (7) to the open bracket on the Main Frame of Weight Bench (5)
with one M10x85 Hexagon Head Bolt (45), one M10 Nylon Lock Nut (49), and two Ø10
Washers (41). Tighten bolt and nylon lock nut with one Double Open End Wrench and one
Multi Hex Tool with Phillips Screwdriver provided. Install two M10 Nut Caps (35) onto the
M10x85 Hexagon Head Bolt (45) and M10 Nylon Lock Nut (49). Secure the Leg Developer
(7) to the Main Frame of Weight Bench (5) with the Lock Pin (11) through the holes in the
Leg Developer (7) to the Main Frame of Weight Bench (5). .
Hardware:
(49) Nylon Lock Nut M10
1 PC
(40) Washer Ø10
2 PCS
(45) Hexagon Head Bolt M10x85
1 PC
(35) Nut Cap M10
2 PCS
7
35
45
40
35
49
5
40
35
45
40
35
49
40
11
11
7
5
7
11
7
11
NOTE: When you do
“Leg Extension”,
please pull out the Lock
Pin (11) for releasing
the Leg Developer (7).
Page 18
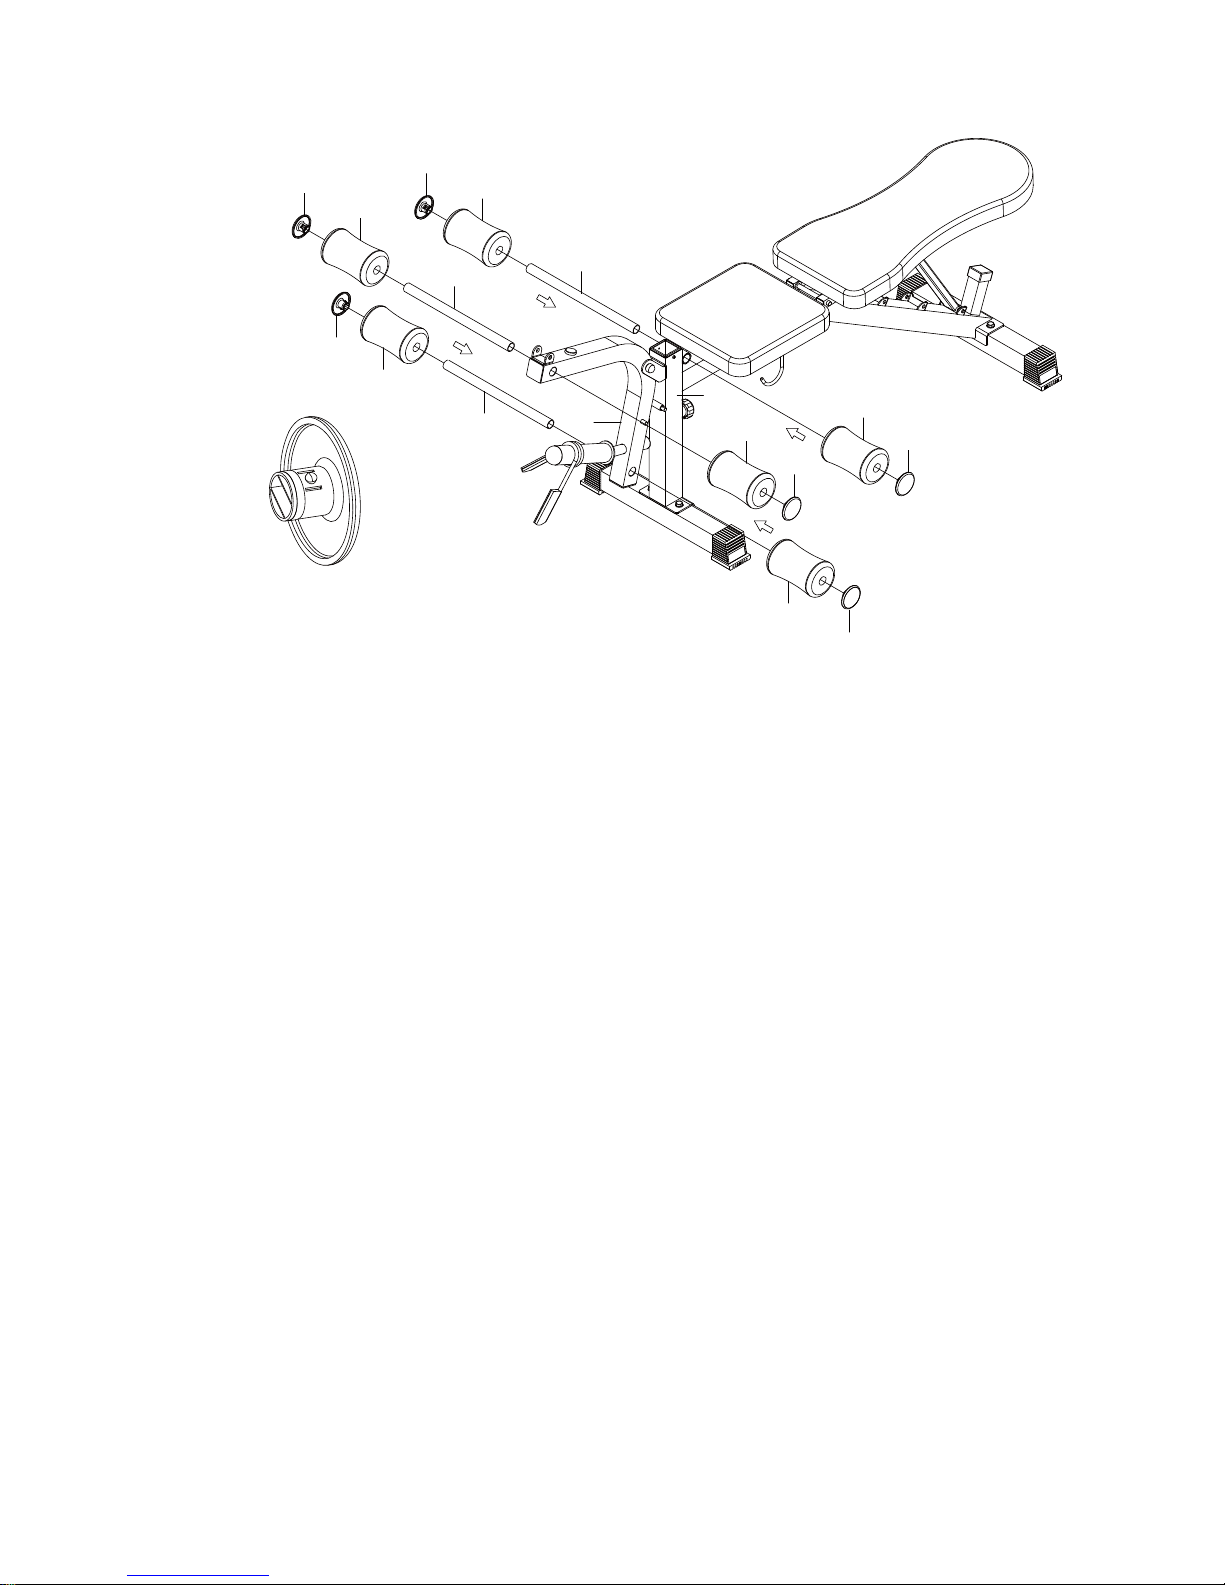
17
Step 11
Insert one Ø25x390 Foam Roll Tube (19) half way through the hole on the Main Frame of
Weight Bench (5).
Push two Foam Rolls (20) onto the Ø25x390 Foam Roll Tube (19).
Tap two Foam Roll End Caps (23) into both ends of the Ø25x390 Foam Roll Tube (19).
Insert two Ø25x380 Foam Roll Tubes (18) half way through the holes on the top and bottom
of the Leg Developer (7).
Push four Foam Rolls (20) onto the both Ø25x380 Foam Roll Tube (18).
Tap four Foam Roll End Caps (23) into both ends of the Ø25x380 Foam Roll Tubes (18).
23
20
19
18
20
23
23
20
20
23
20
23
18
23
20
5
7
(23) Foam Roll End Cap Ø25
6 PCS
Page 19
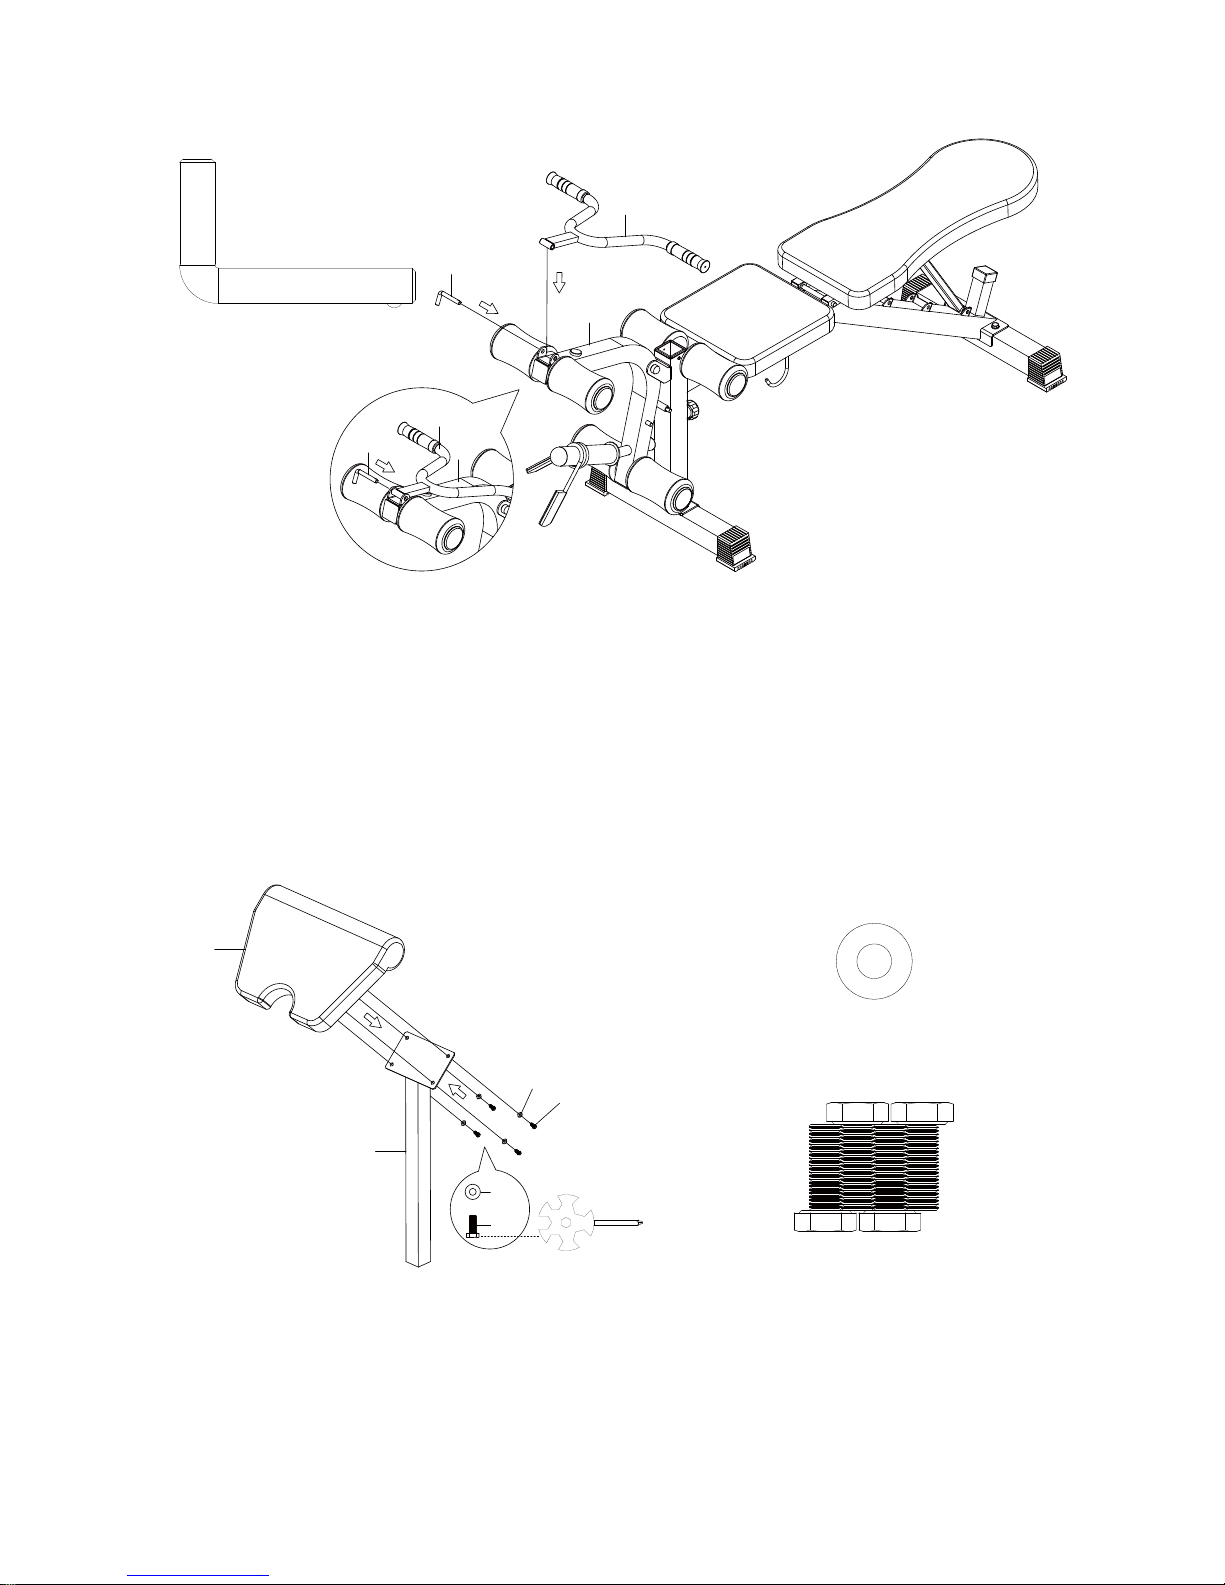
18
Step 12
Install the Handle (9) to the open bracket on the Leg Developer (7). Align hole in the
Handle (9) with the holes in the Leg Developer (7). Secure the Handle (9) to the Leg
Developer (7) with the Ø10x50 L Shaped Pin (21) through the holes in the Handle (9) and
Leg Developer (7). Make sure the Ø10x50 L Shaped Pin (21) is completely inserted
through the holes in the Handle (9) and Leg Developer (7).
Step 13
Attach the Curl Pad (15) onto the Curl Post (8) with four Ø6 Big Washers (38) and four
M6x16 Hexagon Head Bolts (41). Tighten bolts with the Multi Hex Tool with Phillips
Screwdriver provided.
9
21
7
9
21
7
(21) L Shaped Pin Ø10x50
1 PC
Hardware:
(38) Big Washer Ø6
4 PCS
(41) Hexagon Head Bolt M6x16
4 PCS
15
8
38
41
38
41
Page 20
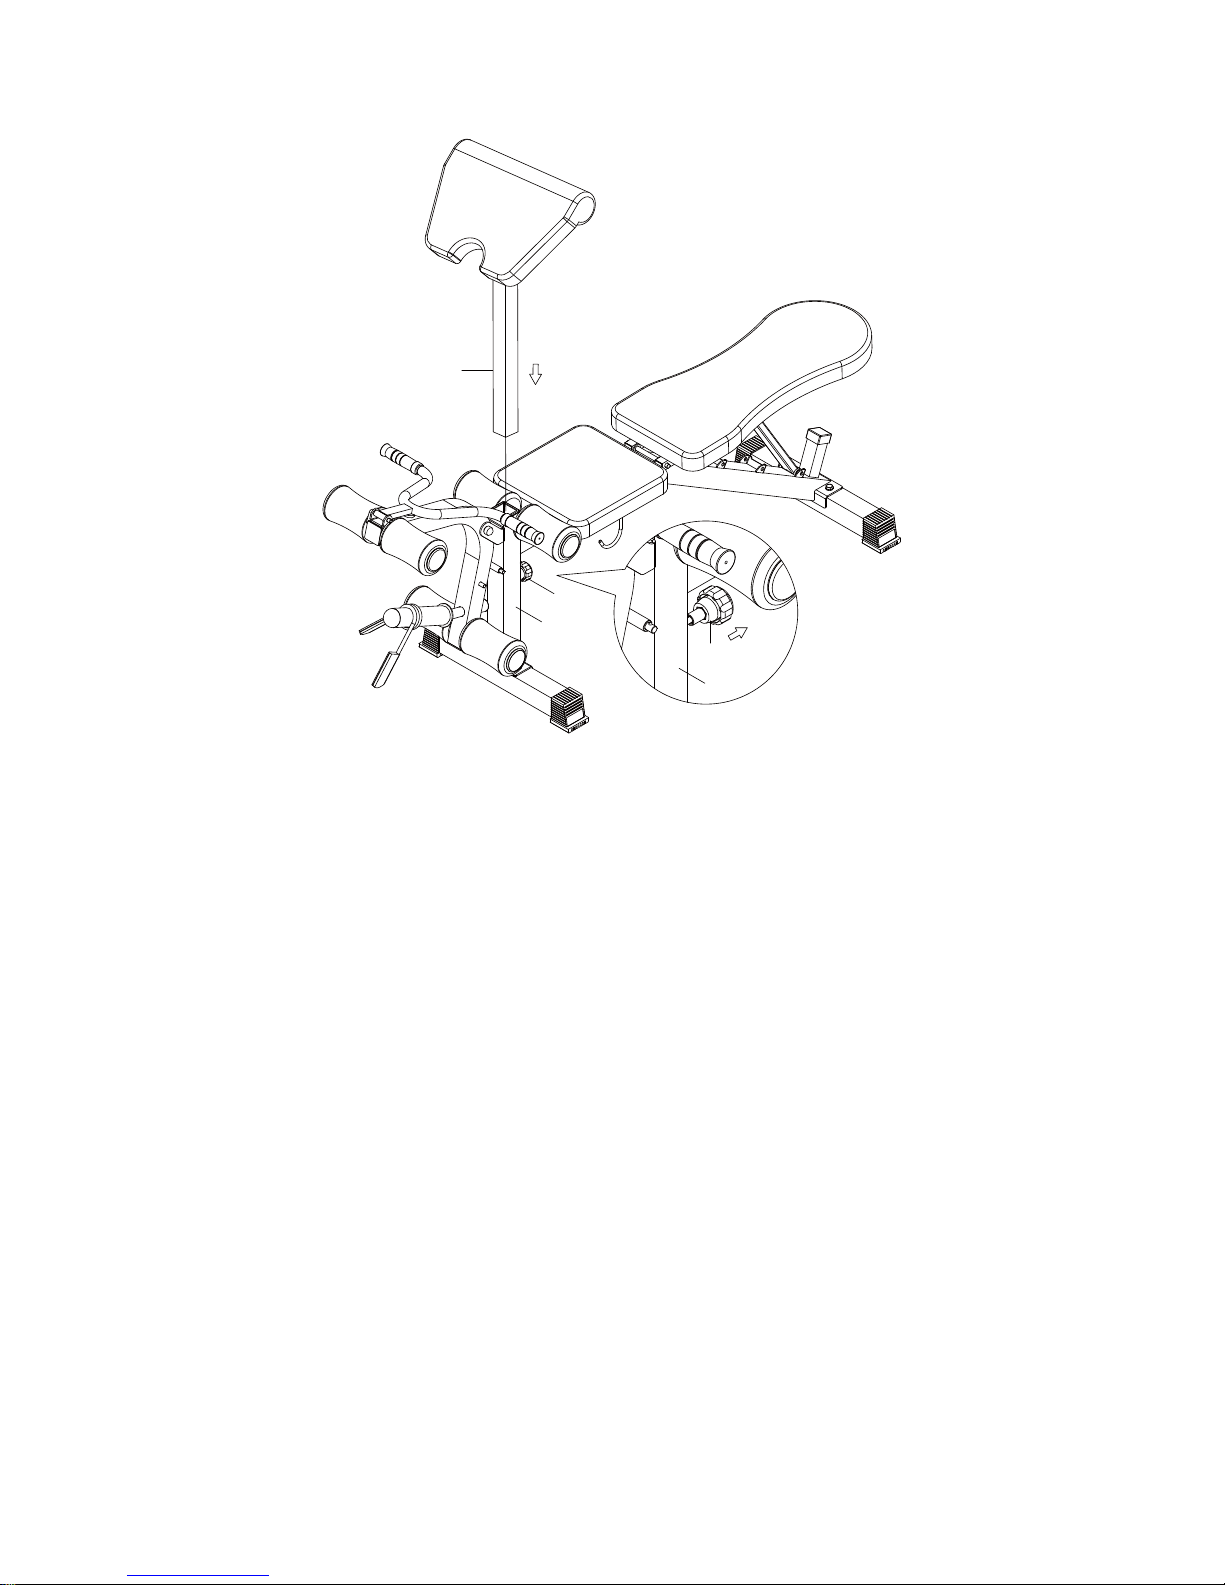
19
Step 14
Turn the Curl Post Adjustment Knob (33) in a counterclockwise direction until it can be pulled
out. Pull out the Curl Post Adjustment Knob (33) and then slide the Curl Post (8) into the
Main Frame of Weight Bench (5). Slide the Curl Post (8) up or down direction to the
suitable position. Lock the Curl Post (8) in place by releasing the Curl Post Adjustment
Knob (33) and sliding the Curl Post (8) up or down slightly until the Curl Post Adjustment
Knob (33) "pops" down into the locked position. For added safety, tighten the Curl Post
Adjustment Knob (33) in a clockwise direction.
8
5
33
33
5
Page 21
20
USING THE WEIGHT BENCH
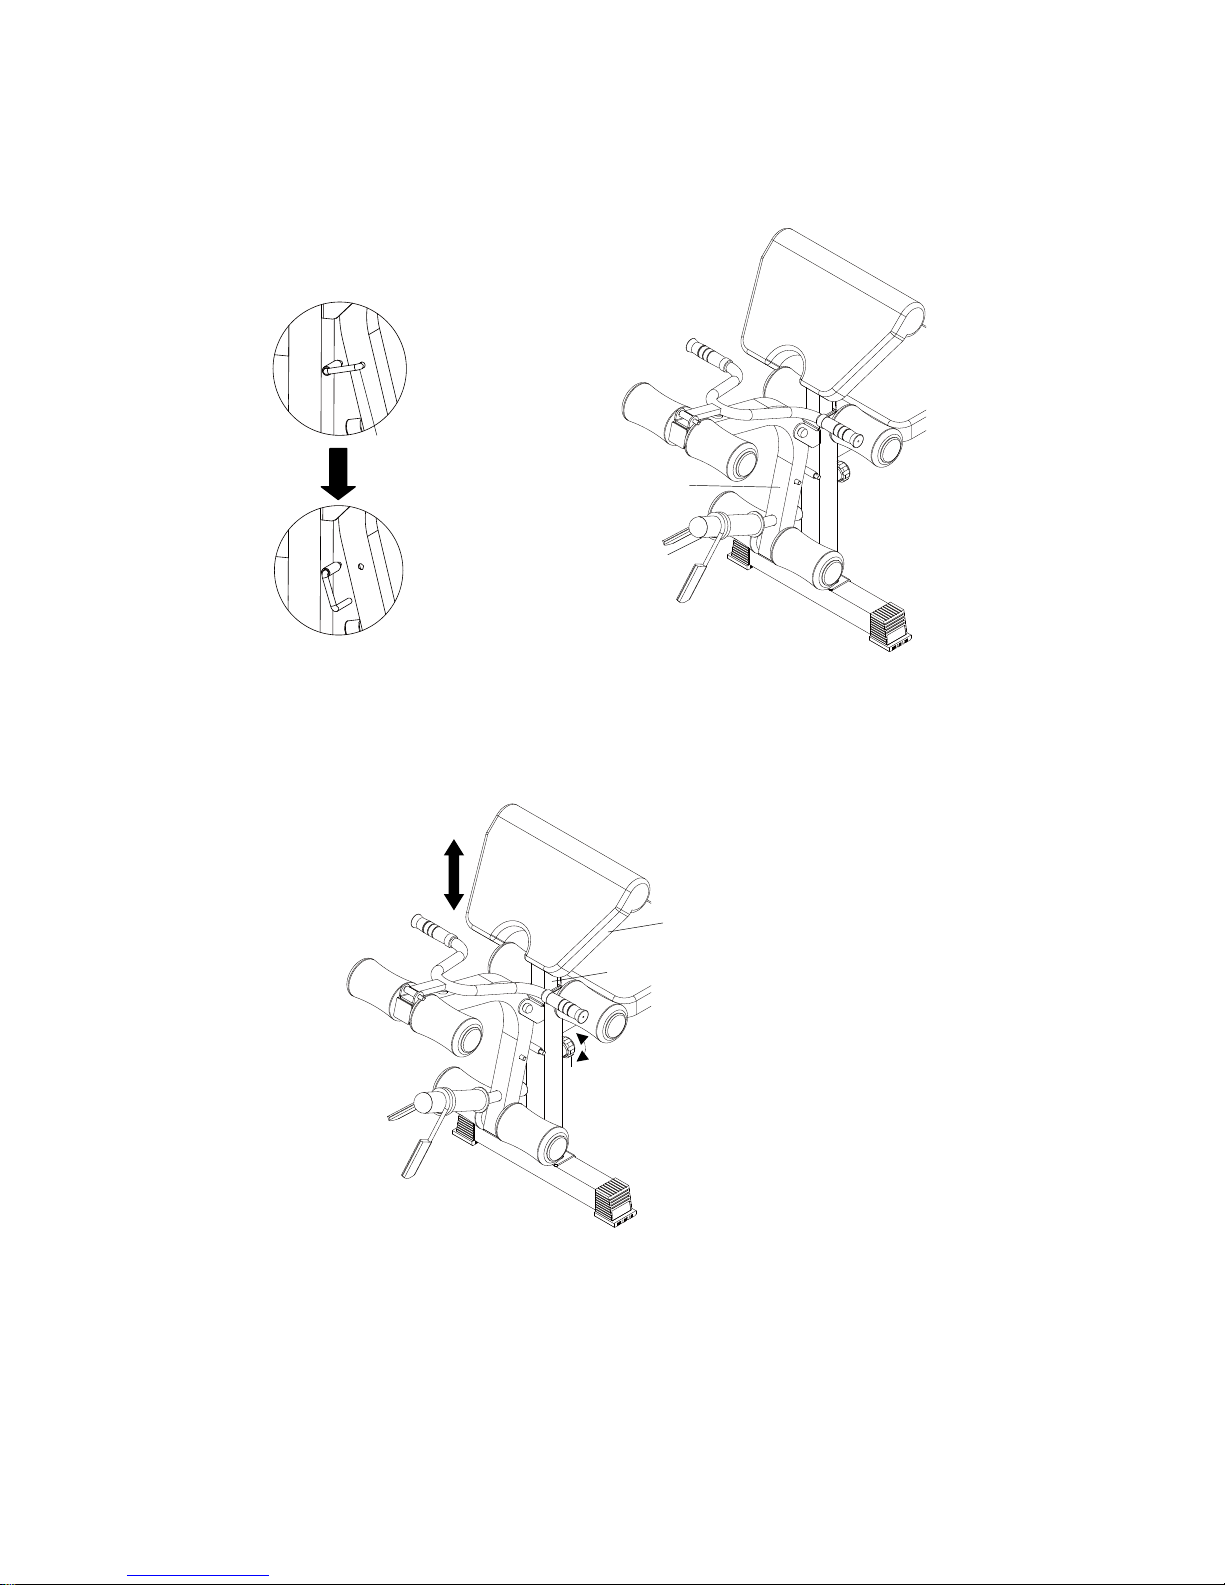
Attaching the Weight Plates to the Weight Plate Tube
To use the Leg Developer, remove the Lock Pin and slide the desired weight plates (not
included) onto the Weight Plate Tube.
Adjusting the Curl Pad Height
Turn the Curl Post Adjustment Knob in a counterclockwise direction until it can be pulled out.
Pull out the Curl Post Adjustment Knob and then slide the Curl Post up or down direction to
the suitable position. Lock the Curl Post in place by releasing the Curl Post Adjustment
Knob and sliding the Curl Post up or down slightly until the Curl Post Adjustment Knob
"pops" down into the locked position. For added safety, tighten the Curl Post Adjustment
Knob in a clockwise direction.
Lock Pin
Weight Plate Tube
Leg Developer
Curl Post Adjustment Knob
Curl Post
Curl Pad
Page 22
21
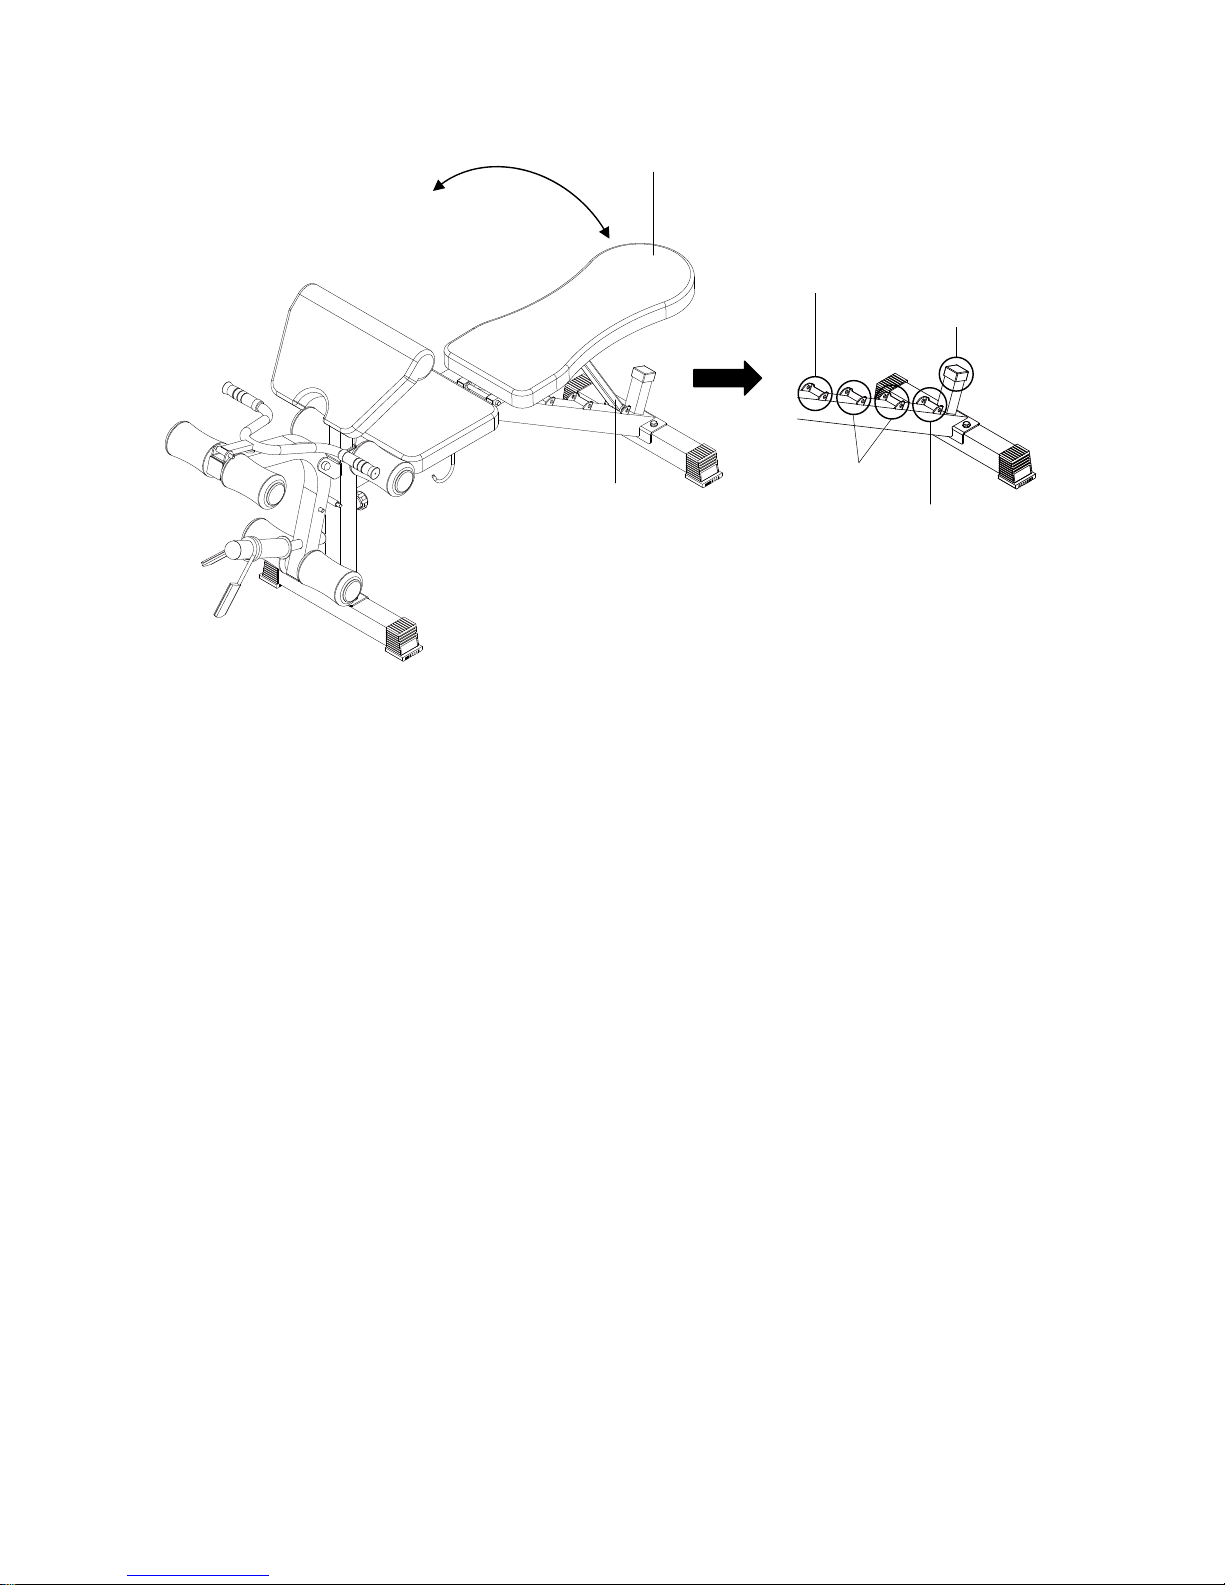
Adjusting the Backrest
The Backrest can be used in either a decline position, a level position, two incline positions,
or upright position.
WARNING: When adjusting the position of the backrest, make
sure that the L shaped pin is completely inserted through the holes in the
selected backrest adjustment tube holder in the main frame of weight
bench and backrest adjustment tube before beginning any exercise.
Level Position
Incline Positions
Upright Position
Decline Position
Backrest
Backrest Adjustment Tube
Page 23
22
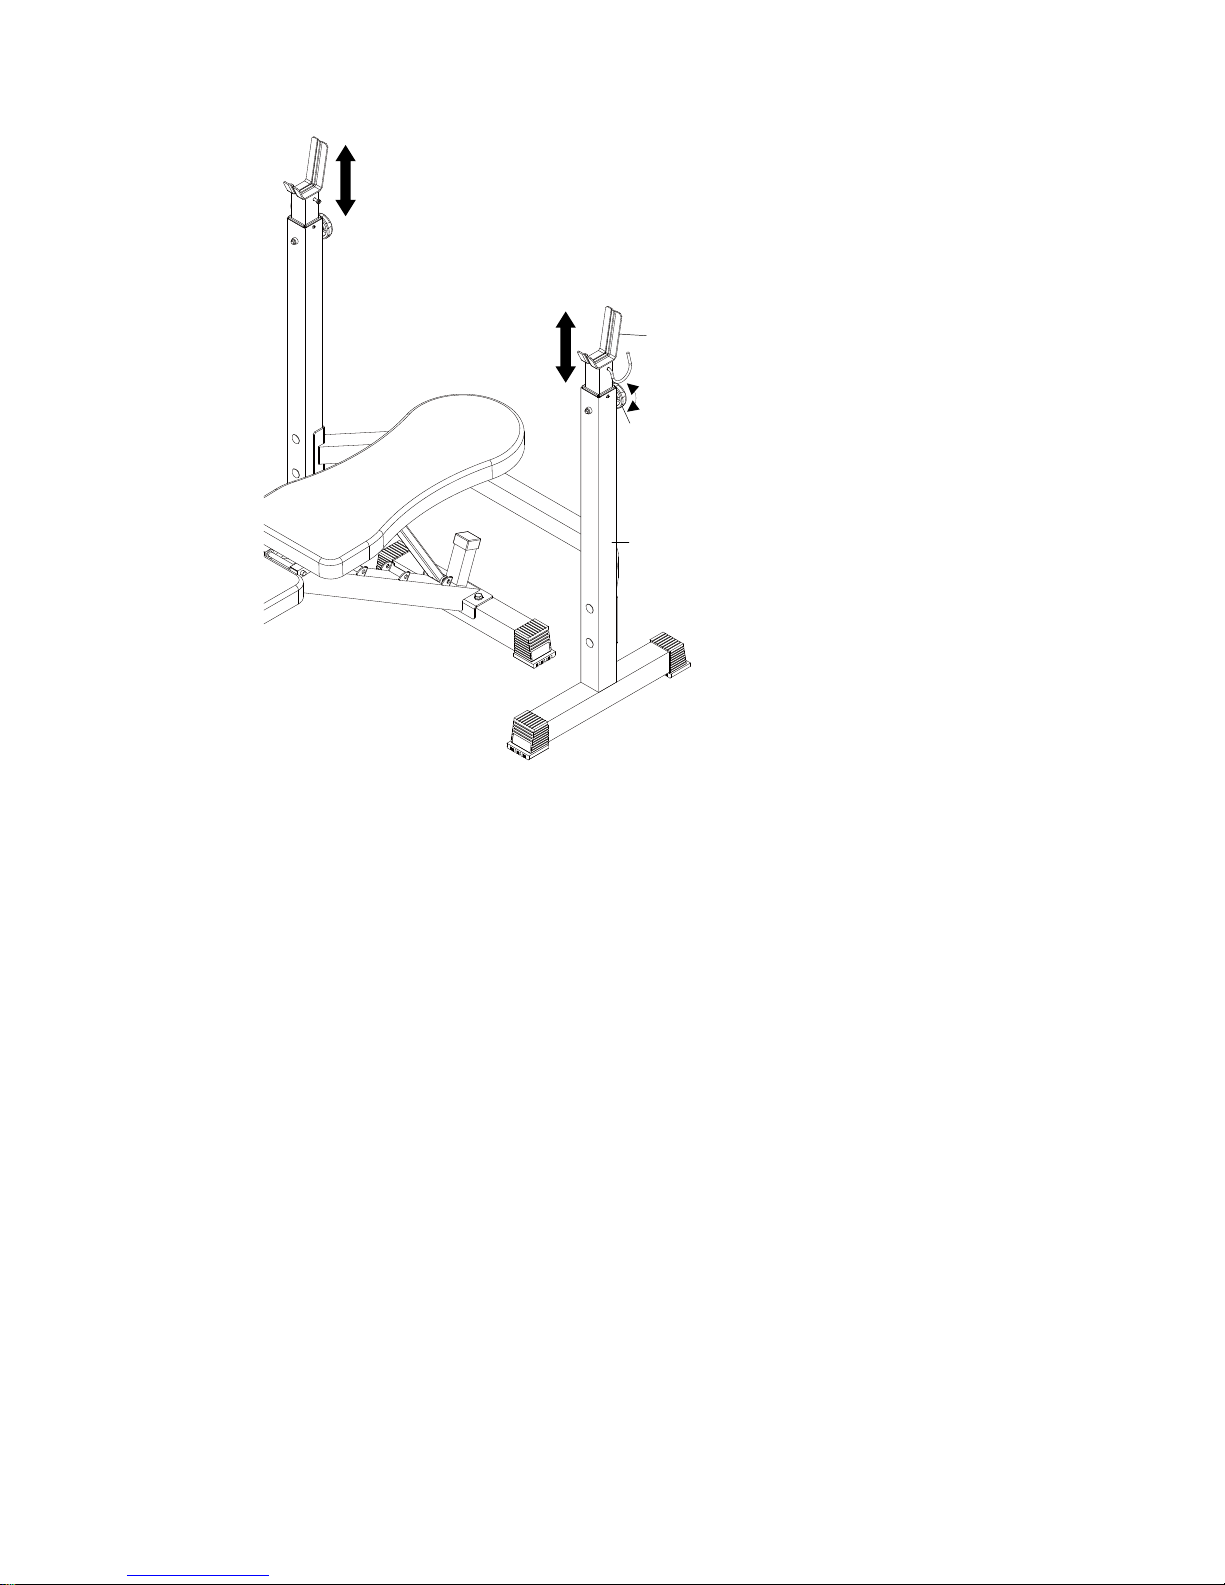
Adjusting the Barbell Upright Height
The Barbell Uprights can be adjusted to accommodate different exercises. To adjust the
height, remove the Barbell Upright Height Adjustment Knobs from both Barbell Uprights and
Main Frames of Squat Rack Stand. Slide the Barbell Uprights to the desired position and
re-insert the Barbell Upright Height Adjustment Knobs.
WARNING: Always set both barbell uprights at the same height.
Make sure that the barbell upright height adjustment knobs are inserted
completely and tightened into the barbell uprights before beginning any
exercise.
Barbell Upright
Height Adjustment
Knob
Barbell Upright
Main Frame of Squat Rack Stand
Page 24
23
WARM UP AND COOL DOWN ROUTINE
The WARM-UP is an important part of any workout. The purpose of warming up is to
prepare your body for exercise and to minimize injuries. Warm up for two to five minutes
before aerobic exercising. It should begin every session to prepare your body for more
strenuous exercise by heating up and stretching your muscles, increasing your circulation
and pulse rate, and delivering more oxygen to your muscles.
COOL DOWN at the end of your workout, repeat these exercises to reduce soreness in tired
muscles. The purpose of cooling down is to return the body to its resting state at the end of
each exercise session. A proper cool-down slowly lowers your heart rate and allows blood
to return to the heart.
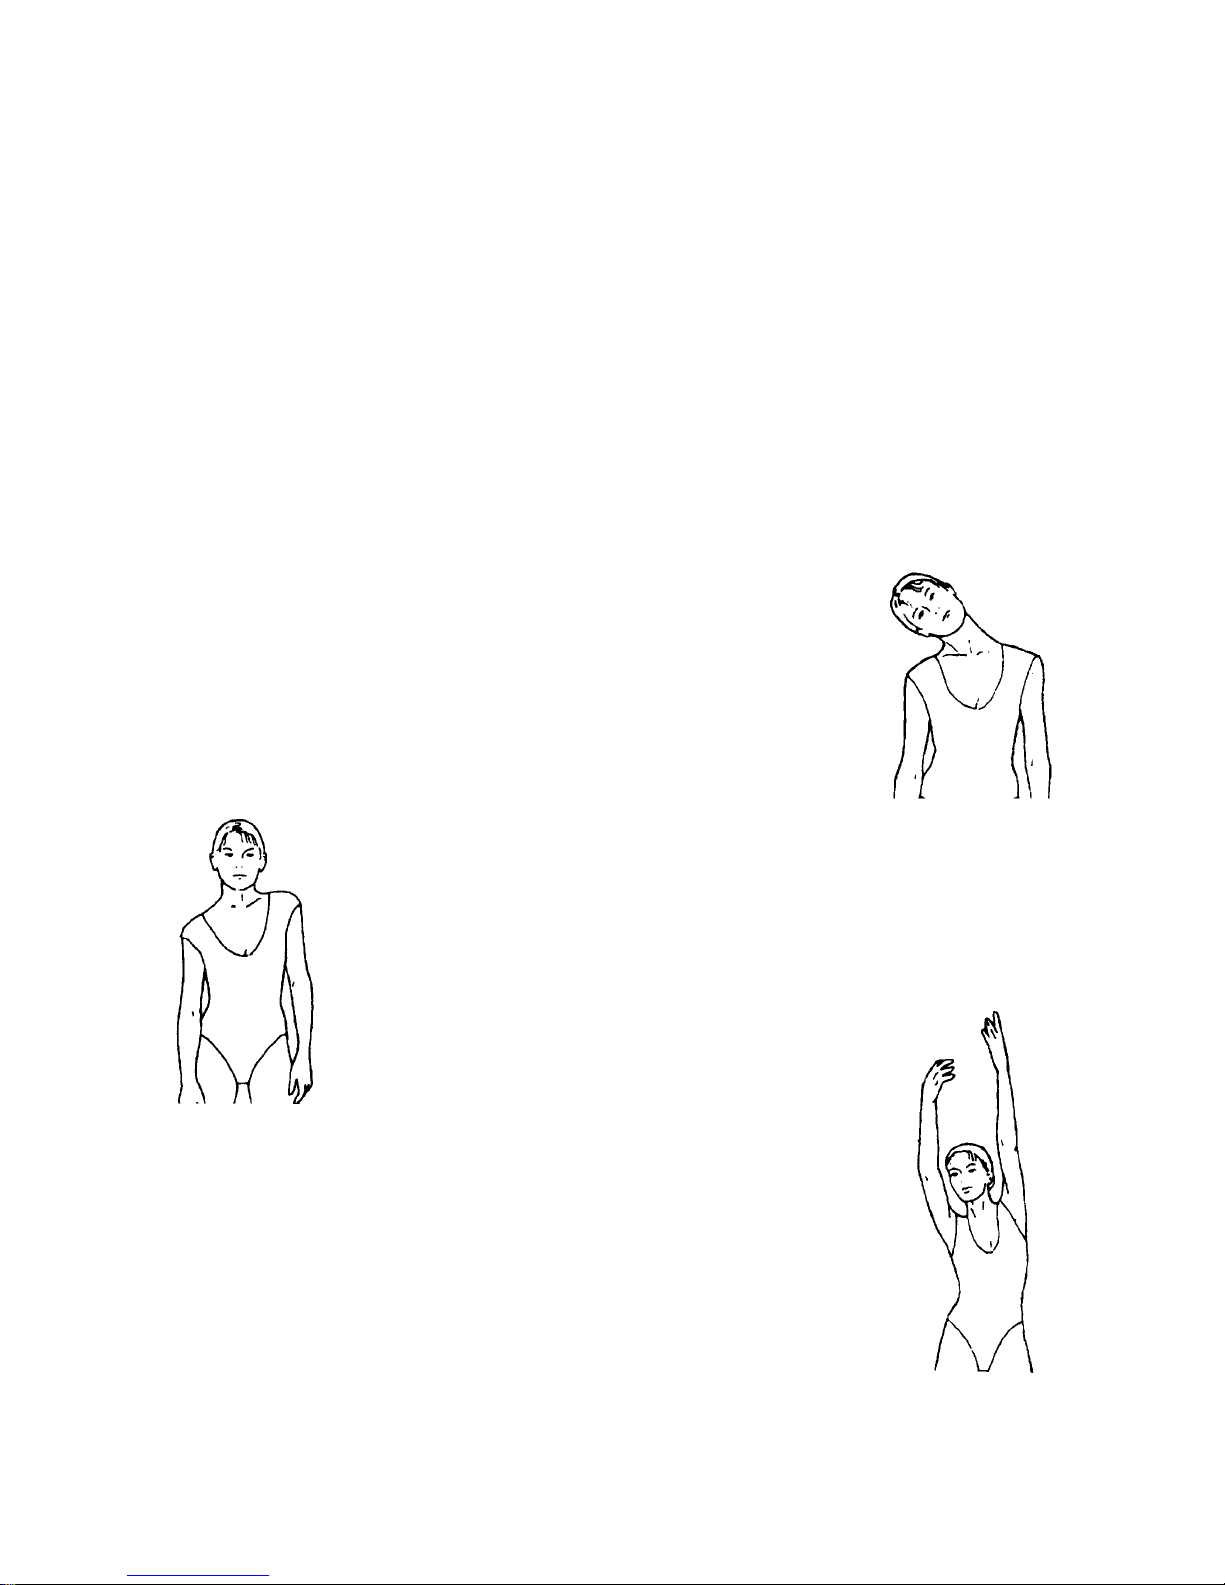
HEAD ROLLS
Rotate your head to the right for one count, you should feel a
stretching sensation up the left side of your neck. Then rotate your
head back for one count, stretching your chin to the ceiling and
letting your mouth open. Rotate your head to the left for one count,
then drop your head to your chest for one count.
SHOULDER LIFTS
Lift your right shoulder toward your ear for one count. Then lift your
left shoulder up for one count as you lower your right shoulder.
SIDE STRETCHES
Open your arms to the side and lift them until they are over your head.
Reach your right arm as far toward the ceiling as you can for one
count. Repeat this action with your left arm.
Page 25
24
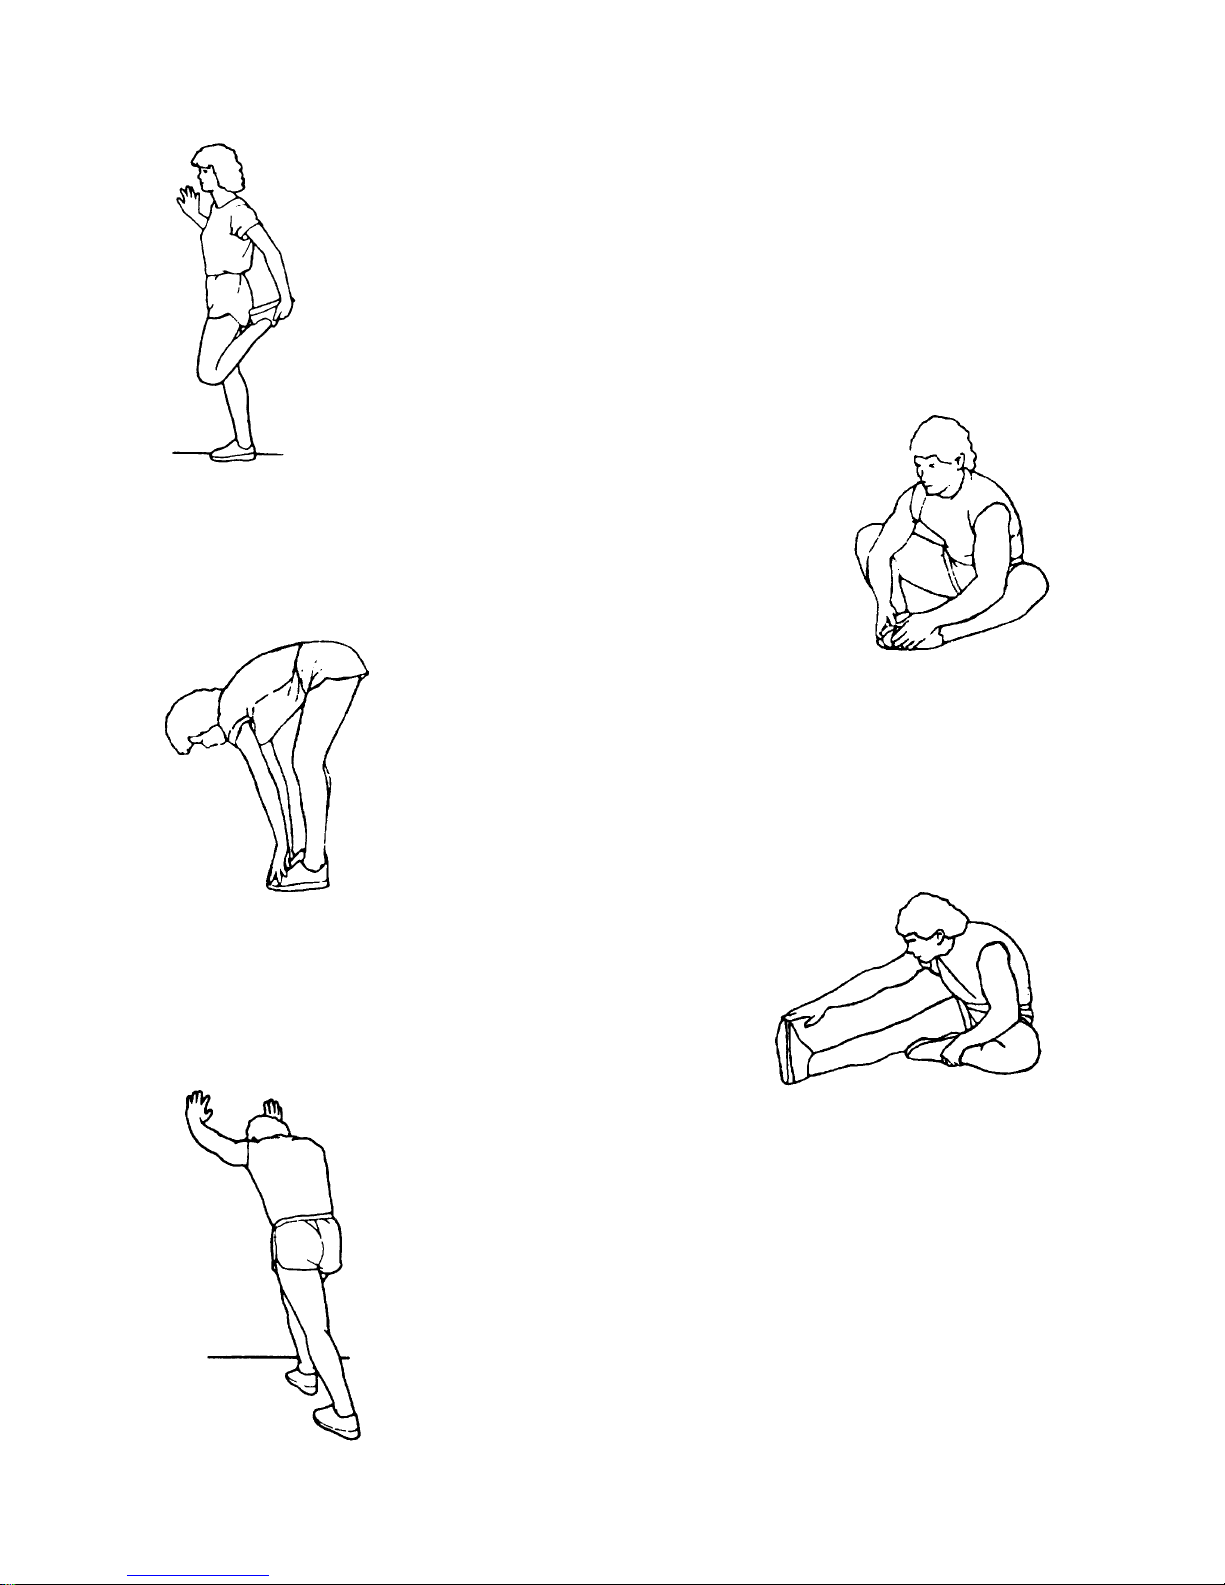
QUADRICEPS STRETCH
With one hand against a wall for balance, reach behind you and pull
your right foot up. Bring your heel as close to your buttocks as
possible. Hold for 15 counts and repeat with left foot.
HAMSTRING STRETCHES
Extend your right leg. Rest the sole of your left foot
against your right inner thigh. Stretch toward your toe
as far as possible. Hold for 15 counts. Relax and then
repeat with left leg.
CALF/ACHILLES STRETCH
Lean against a wall with your left leg in front of the right and
your arms forward. Keep your right leg straight and the left
foot on the floor; then bend the left leg and lean forward by
moving your hips toward the wall. Hold, then repeat on the
other side for 15 counts.
TOE TOUCHES
Slowly bend forward from your waist, letting your back and
shoulders relax as you stretch toward your toes. Reach as far as
you can and hold for 15 counts.
INNER THIGH STRETCH
Sit with the soles of your feet together and your knees pointing
outward. Pull your feet as close to your groin as possible.
Gently push your knees toward the floor. Hold for 15 counts.
 Loading...