

LifeForm CRiSis LF03953U, CRiSis LF03955U, CRiSis LF03956U, CRiSis LF03966U, CRiSis LF03968U Instruction Manual
...
Products by Nasco
CRiSis
™
™Manikins
LF03953U – Complete CRiSis
™
LF03955U – Deluxe CRiSis
™
LF03956U – Deluxe Plus CRiSis
™
LF03965U – CRiSis™ Auscultation
LF03966U – CRiSis
™
Auscultation w/Interactive ECG
LF03968U – Deluxe Plus CRiSis
™
Auscultation
INSTRUCTION MANUAL
NOTE: These products contain dry natural rubber.

Table of Contents . . . . . . . . . . . . . . . . . . . . . . . . . . . . . . . . . page
Introduction . . . . . . . . . . . . . . . . . . . . . . . . . . . . . . . . . . . . . . . . . . . . . . . . . . 4
Identifying Your Model. . . . . . . . . . . . . . . . . . . . . . . . . . . . . . . . . . . . . . . . 5-10
Procedure A: Setting Up Your Simulator
Airway Management Head
Introduction . . . . . . . . . . . . . . . . . . . . . . . . . . . . . . . . . . . . . . . . . . . . . . 11
Set-Up . . . . . . . . . . . . . . . . . . . . . . . . . . . . . . . . . . . . . . . . . . . . . . . . 11-12
Cleaning & Maintenance ..................................12-13
Using the Combitube®. . . . . . . . . . . . . . . . . . . . . . . . . . . . . . . . . . . . . . 13
Supplies/Replacement Parts for Airway Management Trainer ........ 13
Injectable Training Arm
Introduction . . . . . . . . . . . . . . . . . . . . . . . . . . . . . . . . . . . . . . . . . . . . . . 14
Internal Structure . . . . . . . . . . . . . . . . . . . . . . . . . . . . . . . . . . . . . . . . . . 14
Set-Up . . . . . . . . . . . . . . . . . . . . . . . . . . . . . . . . . . . . . . . . . . . . . . . . 14-16
Troubleshooting. . . . . . . . . . . . . . . . . . . . . . . . . . . . . . . . . . . . . . . . .16-17
Cleaning & Maintenance .................................... 17
Cautions . . . . . . . . . . . . . . . . . . . . . . . . . . . . . . . . . . . . . . . . . . . . . . . . 17
Supplies/Replacement Parts for Injectable Training Arm ............ 17
Blood Pressure Simulator
Introduction . . . . . . . . . . . . . . . . . . . . . . . . . . . . . . . . . . . . . . . . . . . . . . 18
Set-Up . . . . . . . . . . . . . . . . . . . . . . . . . . . . . . . . . . . . . . . . . . . . . . . . . . 18
Control Panel. . . . . . . . . . . . . . . . . . . . . . . . . . . . . . . . . . . . . . . . . . . . . 19
Pulse Feature . . . . . . . . . . . . . . . . . . . . . . . . . . . . . . . . . . . . . . . . . . 19-20
Using the Blood Pressure Simulator . . . . . . . . . . . . . . . . . . . . . . . . . 20-21
Low Battery . . . . . . . . . . . . . . . . . . . . . . . . . . . . . . . . . . . . . . . . . . . . . . 21
Limited Warranty
Nasco warrants to the purchasers of
CRiSis™
manikin products that they will
be free from defects in material and workmanship for a period of three years
from the date of purchase. Nasco will repair any defect reported within three
years of the date of purchase at no charge. Products found to be defective
may be returned to the authorized Nasco dealer from whom the item was
purchased, or returned directly to Nasco. Nasco will be liable under this limited warranty only if
CRiSis™
manikin products have been serviced properly
as directed in the operating manual.
Nasco will not be responsible for damage caused by unauthorized repairs or
modifications that have been made, or if the product has been damaged
through misuse, accident, or abuse. This warranty does not cover wear and
tear or expendables such as batteries, lubricant, and replacement lungs.
There are no other expressed or implied warranties of merchantability, fitness of
purpose, or otherwise on
CRiSis™
manikin products, parts, and accessories.

3
Table of Contents cont. . . . . . . . . . . . . . . . . . . . . . . . . . . . .page
Calibration Procedures . . . . . . . . . . . . . . . . . . . . . . . . . . . . . . . . . . . . . 21
Using Your Own Equipment . . . . . . . . . . . . . . . . . . . . . . . . . . . . . . . . . 22
Supplies/Replacement Parts for Blood Pressure Simulator . . . . . . . . . . 22
Defibrillation Chest Skin
Introduction . . . . . . . . . . . . . . . . . . . . . . . . . . . . . . . . . . . . . . . . . . . . . . 23
Connecting Your Arrhythmia Patient Simulator . . . . . . . . . . . . . . . . . 23-24
Troubleshooting. . . . . . . . . . . . . . . . . . . . . . . . . . . . . . . . . . . . . . . . . . . 24
Supplies/Replacement Parts for Defibrillation Chest Skin . . . . . . . . . . . 24
Procedure B: Interactive ECG Simulator
Introduction . . . . . . . . . . . . . . . . . . . . . . . . . . . . . . . . . . . . . . . . . . . . . . 25
Getting Started . . . . . . . . . . . . . . . . . . . . . . . . . . . . . . . . . . . . . . . . . . . 26
Defibrillation Training — Adult ................................ 27
External Pacer Training — Adult . . . . . . . . . . . . . . . . . . . . . . . . . . . . . . 27
Defibrillation Training — Pediatric . . . . . . . . . . . . . . . . . . . . . . . . . . . . . 28
External Pacer Training — Pediatric . . . . . . . . . . . . . . . . . . . . . . . . . . . 28
Procedure C: Auscultation
Introduction . . . . . . . . . . . . . . . . . . . . . . . . . . . . . . . . . . . . . . . . . . . . . . 29
Instructions for Use ........................................ 29
Supplies/Replacement Parts for Auscultation . . . . . . . . . . . . . . . . . . . . 29
Introduction to External Monitors ................................ 30
Procedure D: Light Controller Set-Up
Introduction — Light Controller . . . . . . . . . . . . . . . . . . . . . . . . . . . . . . . 30
Set-Up . . . . . . . . . . . . . . . . . . . . . . . . . . . . . . . . . . . . . . . . . . . . . . . . . . 30
Operation . . . . . . . . . . . . . . . . . . . . . . . . . . . . . . . . . . . . . . . . . . . . . 30-31
Troubleshooting. . . . . . . . . . . . . . . . . . . . . . . . . . . . . . . . . . . . . . . . . . . 31
Procedure E: Memory Unit Set-Up
Introduction — Memory Unit . . . . . . . . . . . . . . . . . . . . . . . . . . . . . . . . . 31
Set-Up . . . . . . . . . . . . . . . . . . . . . . . . . . . . . . . . . . . . . . . . . . . . . . . . 31-32
Operation . . . . . . . . . . . . . . . . . . . . . . . . . . . . . . . . . . . . . . . . . . . . . . . 32
Practice Modes . . . . . . . . . . . . . . . . . . . . . . . . . . . . . . . . . . . . . . . . . . . 32
Test Modes . . . . . . . . . . . . . . . . . . . . . . . . . . . . . . . . . . . . . . . . . . . . . . 33
Troubleshooting. . . . . . . . . . . . . . . . . . . . . . . . . . . . . . . . . . . . . . . . . . . 33
Procedure F: Printer Set-Up
Introduction — Printer . . . . . . . . . . . . . . . . . . . . . . . . . . . . . . . . . . . . . . 34
Set-Up . . . . . . . . . . . . . . . . . . . . . . . . . . . . . . . . . . . . . . . . . . . . . . . . . . 34
Waveform Printout . . . . . . . . . . . . . . . . . . . . . . . . . . . . . . . . . . . . . . . . . 34
Paper Installation. . . . . . . . . . . . . . . . . . . . . . . . . . . . . . . . . . . . . . . . . . 35
Troubleshooting. . . . . . . . . . . . . . . . . . . . . . . . . . . . . . . . . . . . . . . . .31-33
Supplies/Replacement Parts for Printer. . . . . . . . . . . . . . . . . . . . . . . . . 36
4
*Resusci® Anne™ is a trademark of Laerdal Medical Corporation.
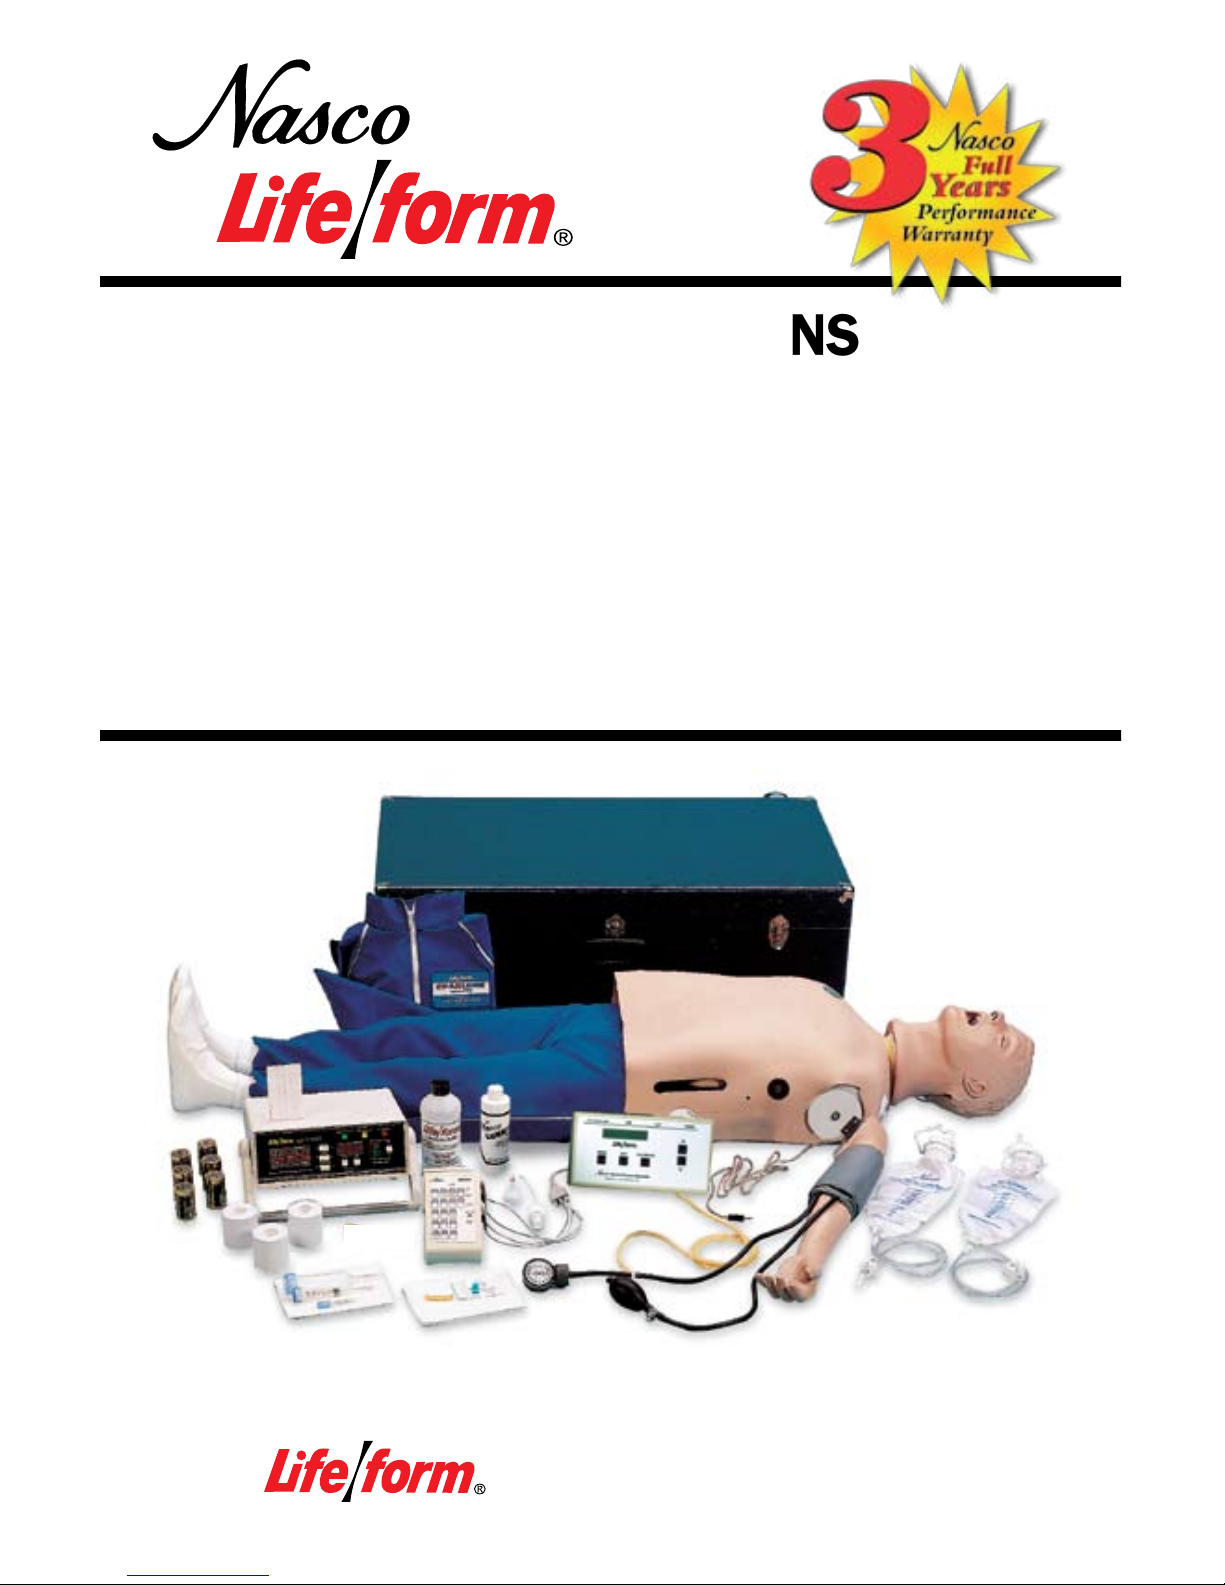
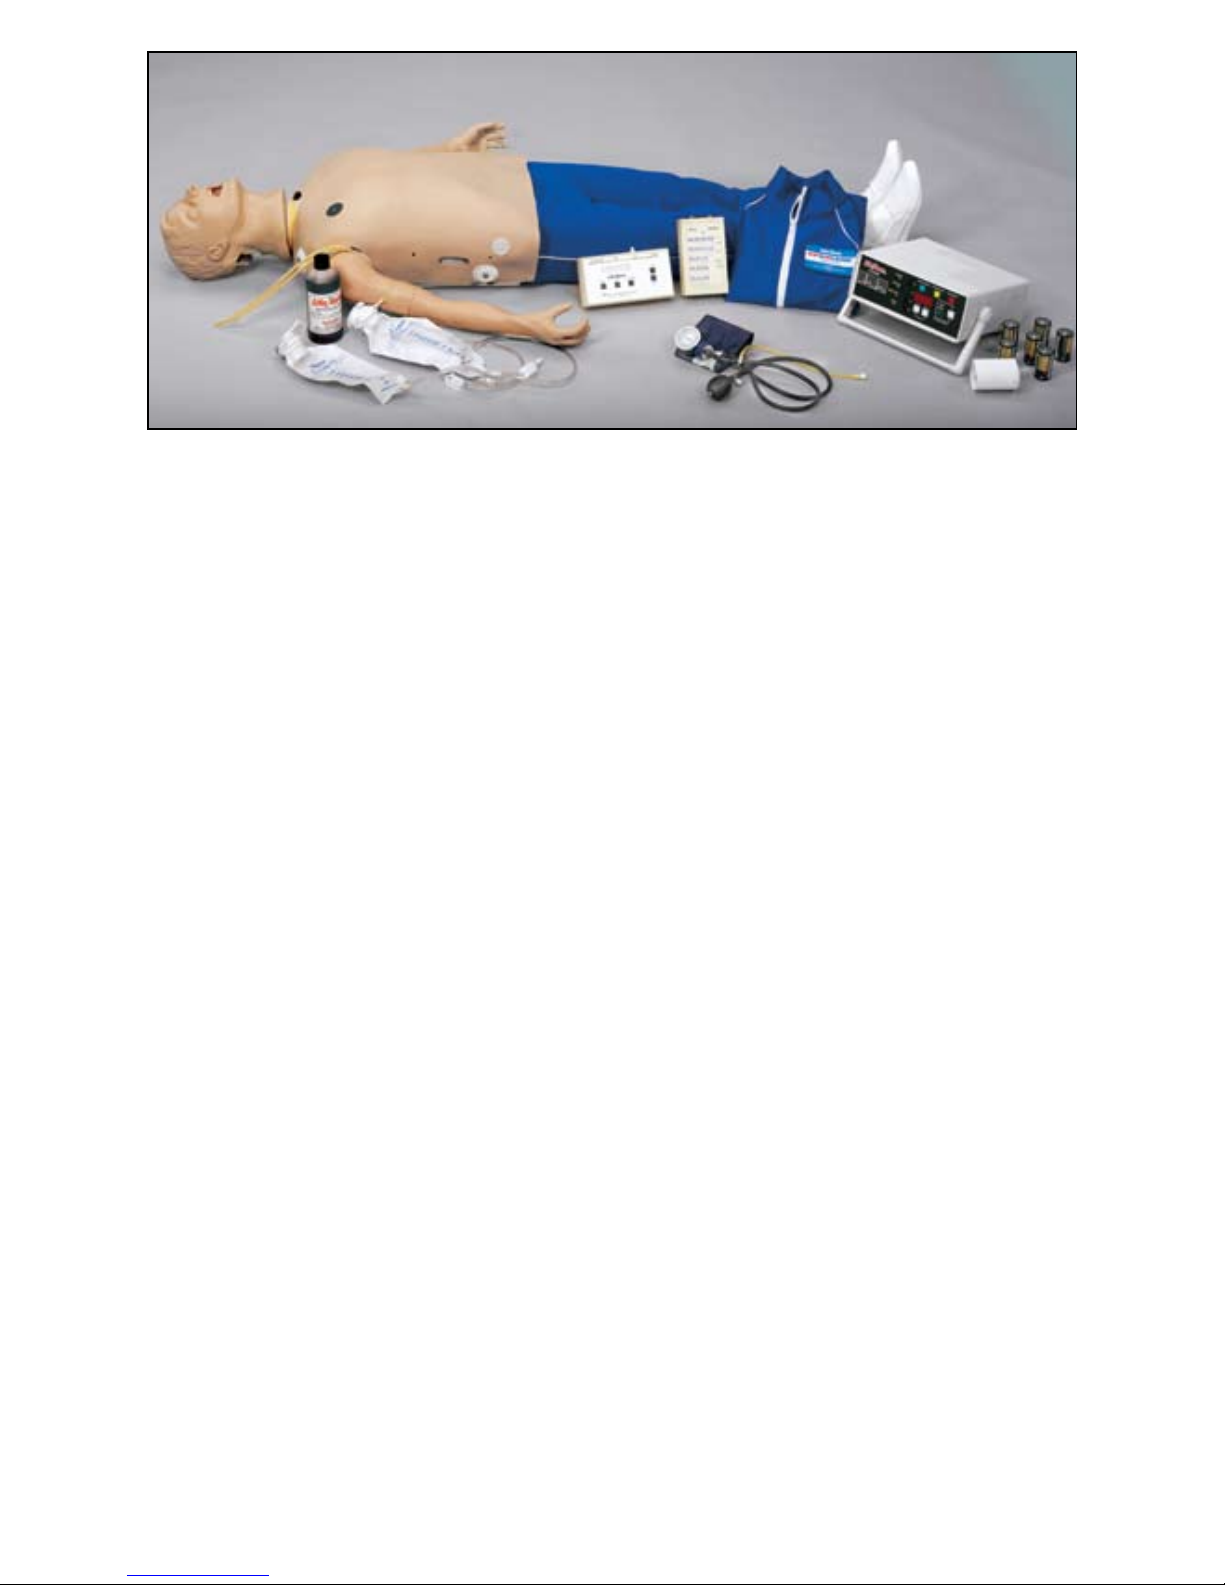
All of the Adult CRiSis™ Manikins
are Complete Resuscitation Systems
with five stations allowing you to
practice different scenarios. Each
manikin consists of a full body CPR
manikin, IV Arm, Blood Pressure Arm,
Defibrillation Chest Skin, and features
the Airway Larry Airway Management
Head. Ideal for ACLS, paramedic,
EMT, and nursing training at every
level. Modular components allow
you to create a manikin to suit your
needs.
This manual will guide you in setting up, using, and maintaining each
of the available components. Each
section also includes a list of replacement parts, supplies, and auxiliary
equipment.
By reading and following all instructions carefully and completely, you
can be sure your
Life/form
®
CRiSis™
Manikin will provide years of valuable
service.
IDENTIFYING YOUR MODEL
Pages 5-10 display the Adult CRiSis™
family of simulators. Identify your
Life/form
®
Adult CRiSis™ Manikins
model and refer to the Operation
Section pertaining to your model.
This guide has been carefully written
to guide you in the operation of your
unit. Depending on your model, please
read the procedure(s) indicated. All
models follow procedure A. Check
your model description to see if procedures B, C, D, E, or F pertain to your
model
Cleaning:
Normal surface soil can be removed
from the trainer with mild soapy water.
Do not allow water to contact electrical components. Stubborn stains
may be removed with REN Cleaner
(W09919U). Simply apply the REN
Cleaner to the soiled area and wipe
clean with a soft cloth.
NOTE: Avoid using cleaner around the
mouth area if students will be applying direct mouth-to-mouth resuscitation techniques, as the cleaner may
be toxic if ingested. NEVER place the
trainer on any kind of printed paper
or plastic. These materials, as well as
ballpoint pens, will transfer indelible
stains. Do not use any cosmetics.
5
Complete CRiSis™ Manikin — LF03953U
LIST OF COMPONENTS:
• CRiSis
™
manikin, Full Body Manikin with “Airway Larry”
Management Head
• IV Arm
• Blood Pressure Arm
• Electronic Blood Pressure Control Unit
• Defibrillation Chest Skin
• Pump Spray Lubricant
• 3 cc Syringe with Needle
• 12 cc Syringe with Needle
• Two IV Bags
• Three Pinch Clamps
• Two Small Towels
• Butterfly Infusion Set
• Synthetic Blood
• Sphygmomanometer
• Batteries Included
• No Electronic Connections
Follow Procedure A
6
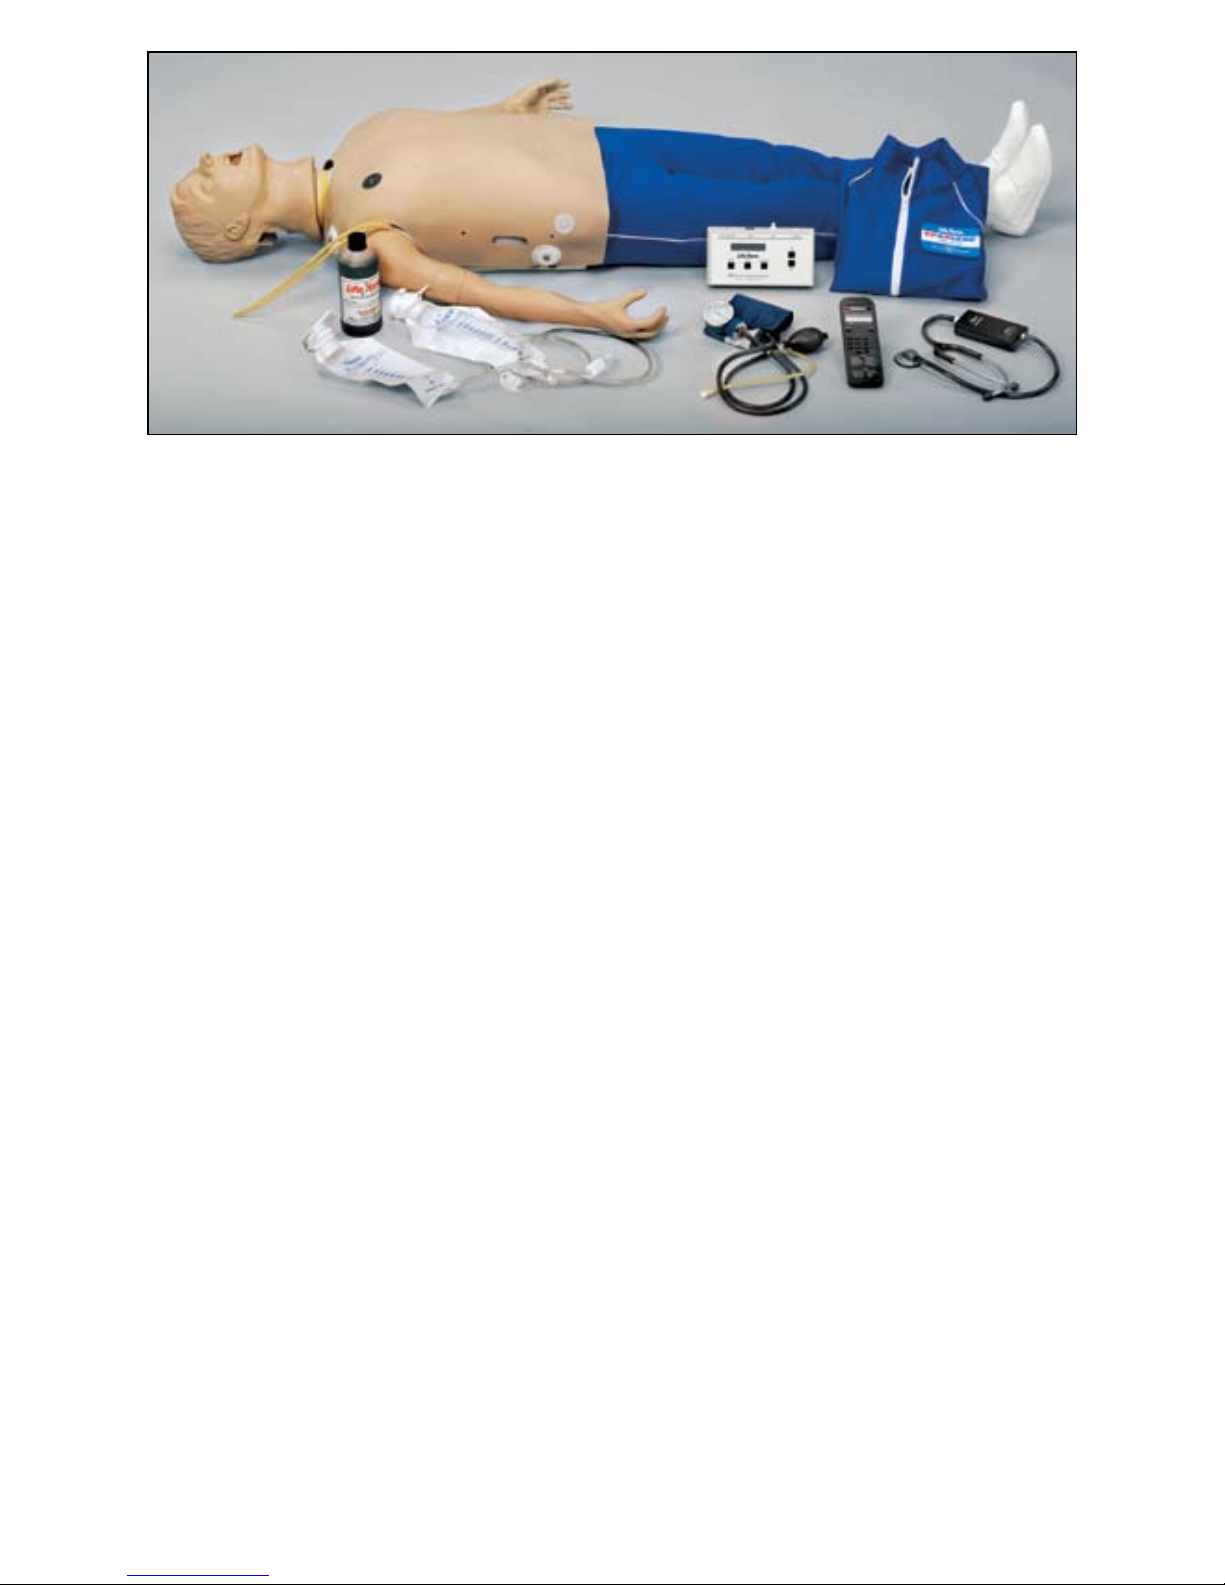
Deluxe CRiSis™ Manikin — LF03955U
LIST OF COMPONENTS:
• CRiSis
™
manikin, Full Body Manikin with “Airway Larry”
Management Head
• IV Arm
• Blood Pressure Arm
• Electronic Blood Pressure Control Unit
• Defibrillation Chest Skin
• Pump Spray Lubricant
• 3 cc Syringe with Needle
• 12 cc Syringe with Needle
• Two IV Bags
• Three Pinch Clamps
• Two Small Towels
• Butterfly Infusion Set
• Synthetic Blood
• Sphygmomanometer
• Batteries Included
• No Electronic Connections
• Interactive ECG Simulator
Follow Procedure A & B
7
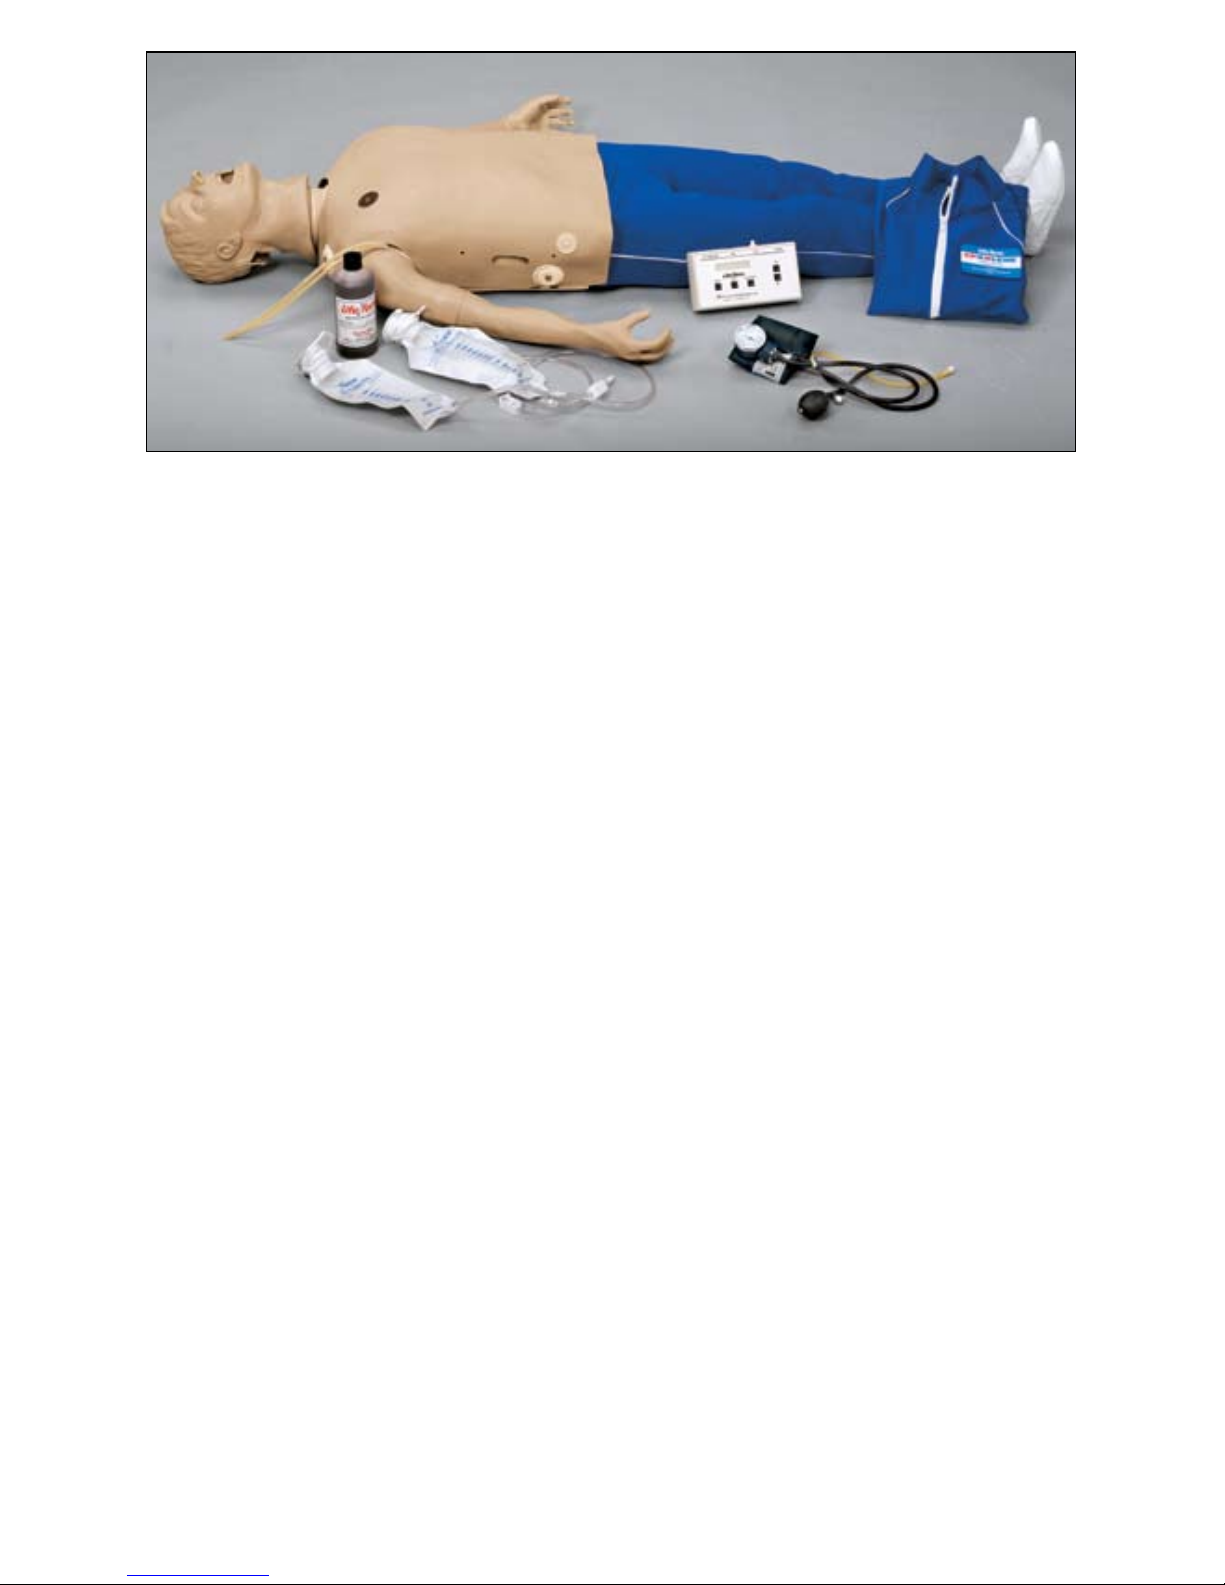
Deluxe Plus CRiSis™ Manikin — LF03956U
LIST OF COMPONENTS:
• CRiSis
™
manikin, Full Body Manikin with “Airway Larry”
Management Head
• IV Arm
• Blood Pressure Arm
• Electronic Blood Pressure Control Unit
• Defibrillation Chest Skin
• Pump Spray Lubricant
• 3 cc Syringe with Needle
• 12 cc Syringe with Needle
• Two IV Bags
• Three Pinch Clamps
• Two Small Towels
• Butterfly Infusion Set
• Synthetic Blood
• Sphygmomanometer
• Batteries Included
• No Electronic Connections
• Interactive ECG Simulator
• Electronic Memory Unit with Printer
• Three Rolls of Thermal Recording Paper
• Hard Storage Case with Wheels
Follow Procedure A, B, D, E, & F
8
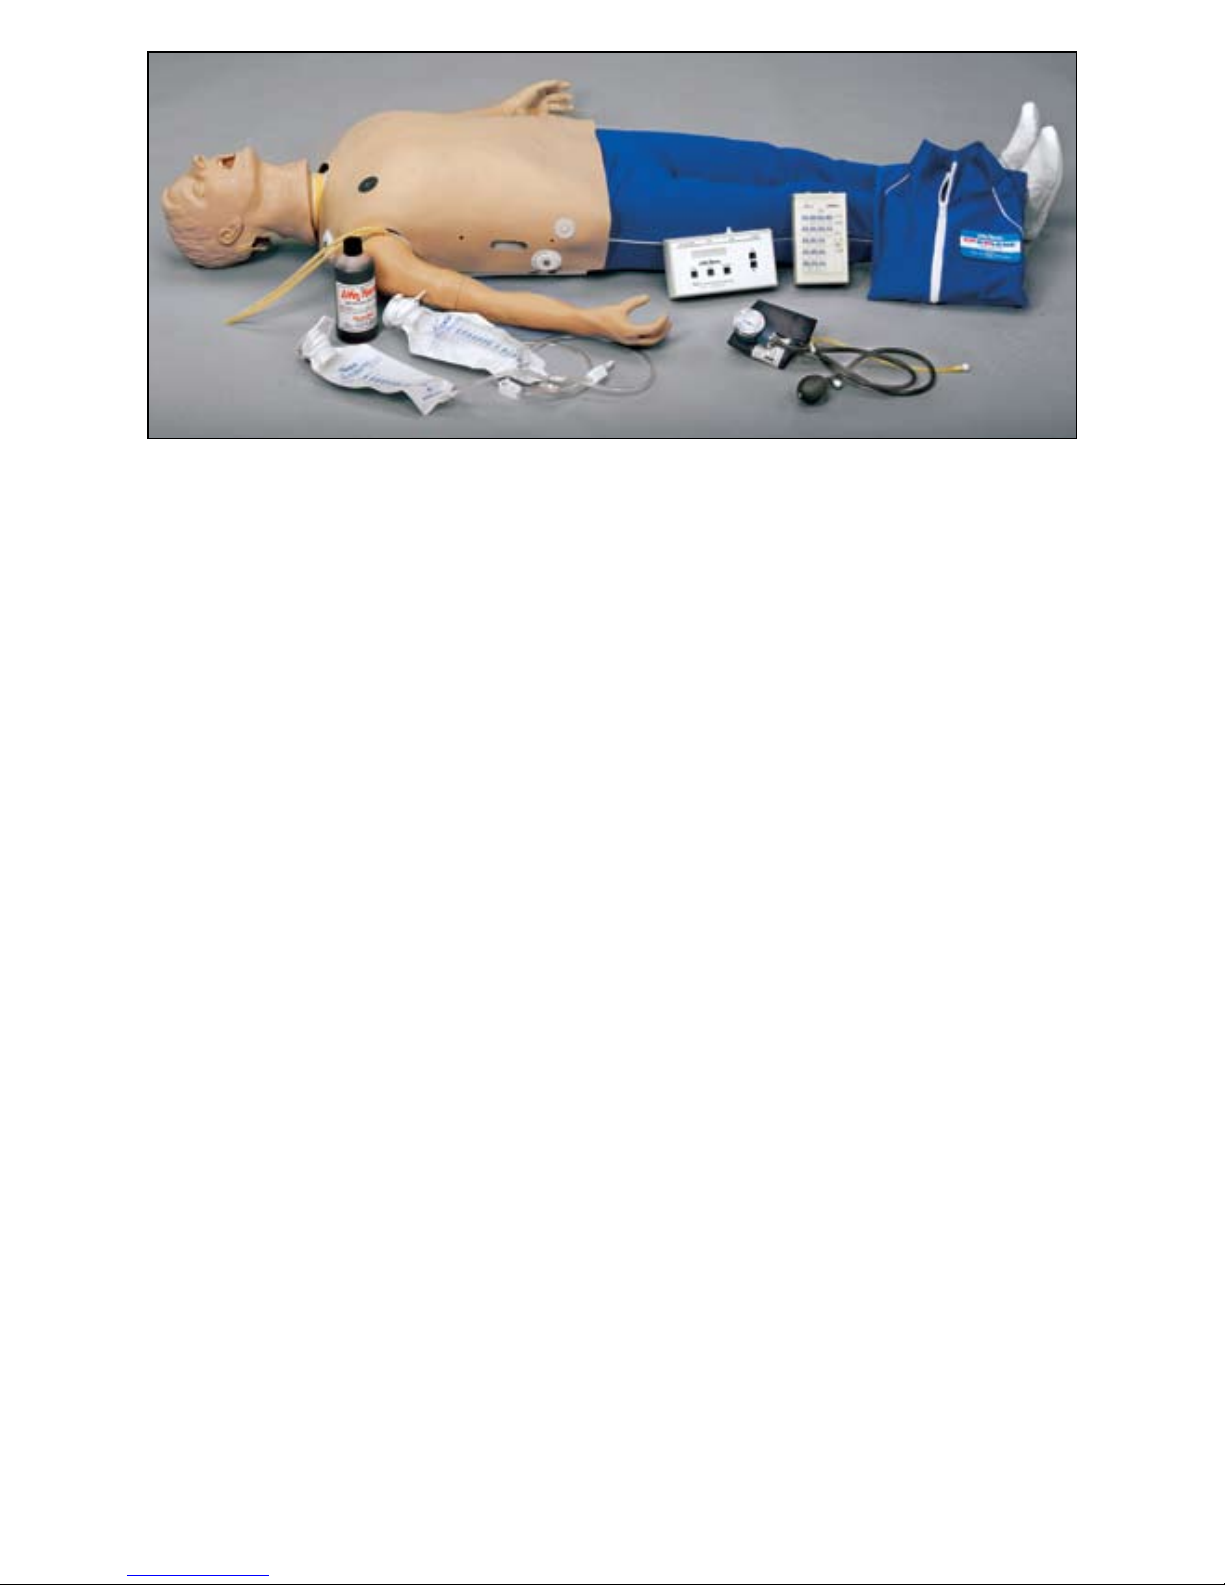
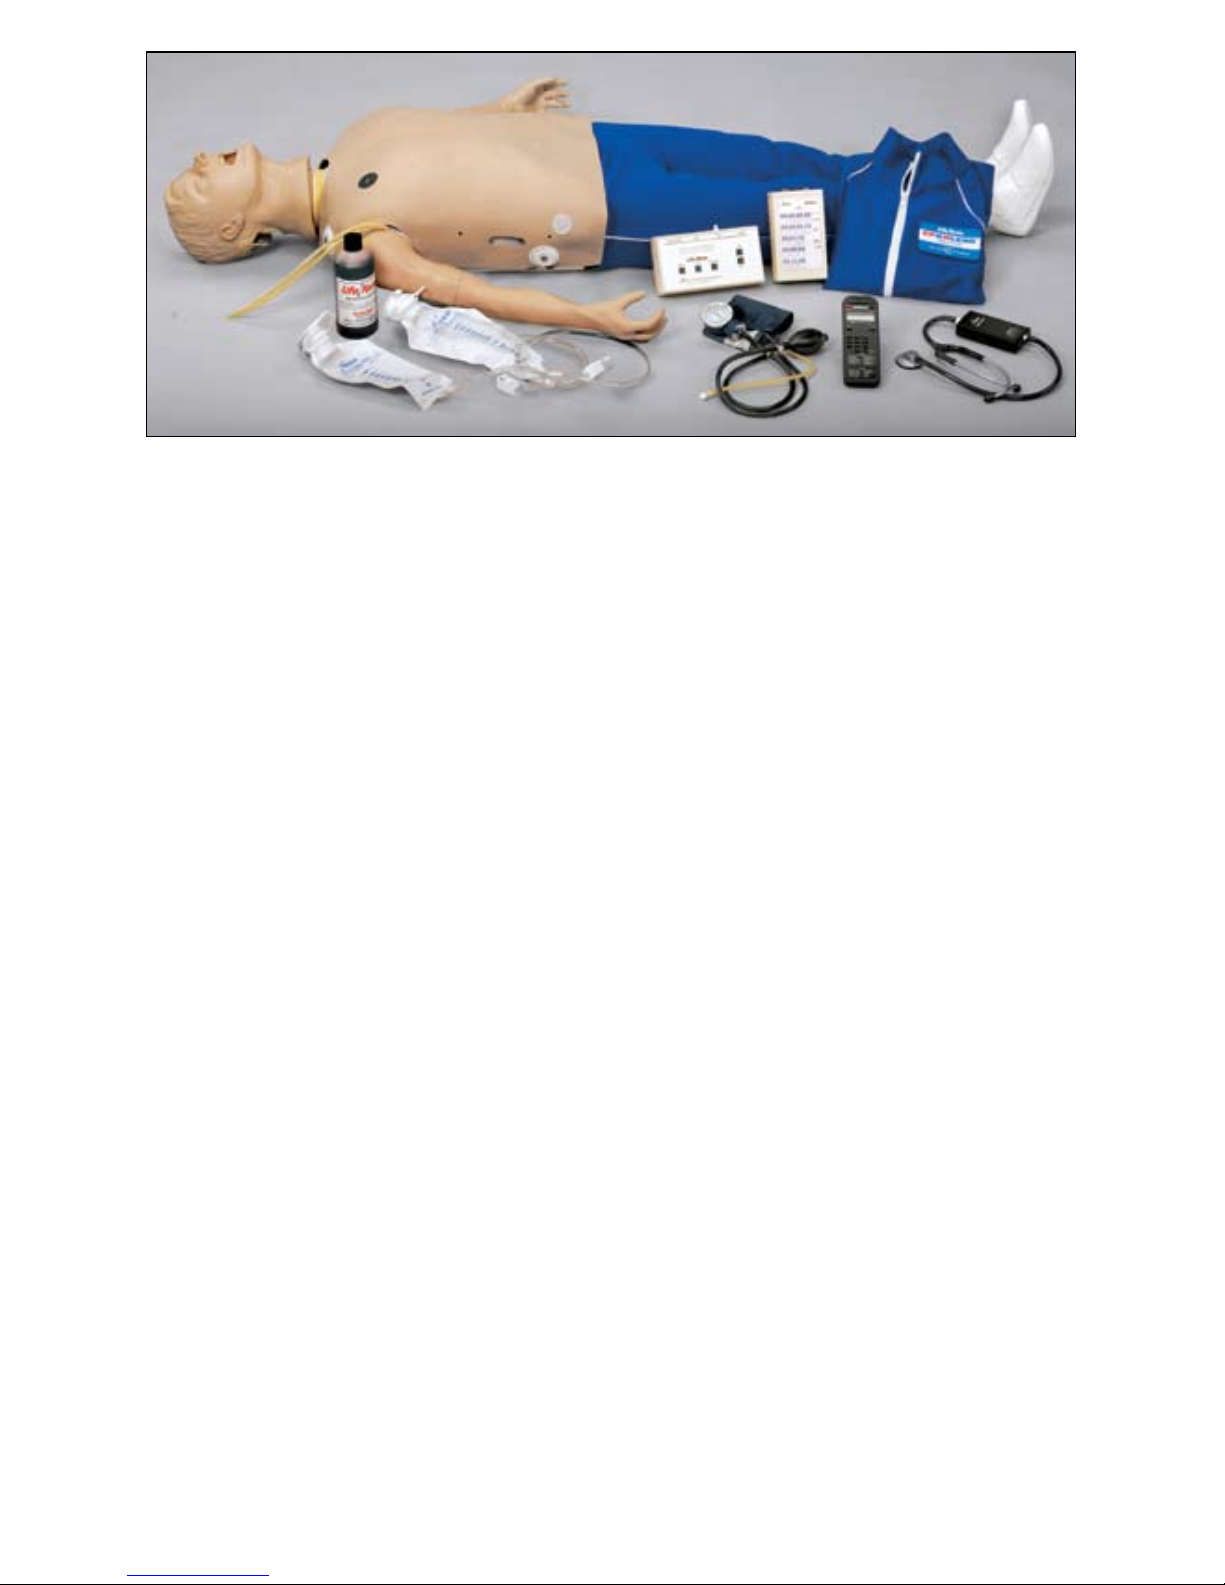
CRiSis™ Auscultation Manikin — LF03965U
LIST OF COMPONENTS:
• CRiSis
™
manikin, Full Body Manikin with “Airway Larry”
Management Head
• IV Arm
• Blood Pressure Arm
• Electronic Blood Pressure Control Unit
• Defibrillation Chest Skin
• Pump Spray Lubricant
• 3 cc Syringe with Needle
• 12 cc Syringe with Needle
• Two IV Bags
• Three Pinch Clamps
• Two Small Towels
• Butterfly Infusion Set
• Synthetic Blood
• Sphygmomanometer
• Batteries Included
• No Electronic Connections
• Auscultation Chest
• Auscultation Remote Control with SmartScope™
• Hard Storage Case with Wheels
Follow Procedure A & C
9
CRiSis™ Auscultation Manikin with Interactive ECG
Simulator — LF03966U
LIST OF COMPONENTS:
• CRiSis
™
manikin, Full Body Manikin with “Airway Larry”
Management Head
• IV Arm
• Blood Pressure Arm
• Electronic Blood Pressure Control Unit
• Defibrillation Chest Skin
• Pump Spray Lubricant
• 3 cc Syringe with Needle
• 12 cc Syringe with Needle
• Two IV Bags
• Three Pinch Clamps
• Two Small Towels
• Butterfly Infusion Set
• Synthetic Blood
• Sphygmomanometer
• Batteries Included
• No Electronic Connections
• Auscultation Chest
• Auscultation Remote Control with SmartScope™
• Interactive ECG Simulator
• Hard Storage Case with Wheels
Follow Procedure A, B, & C
10
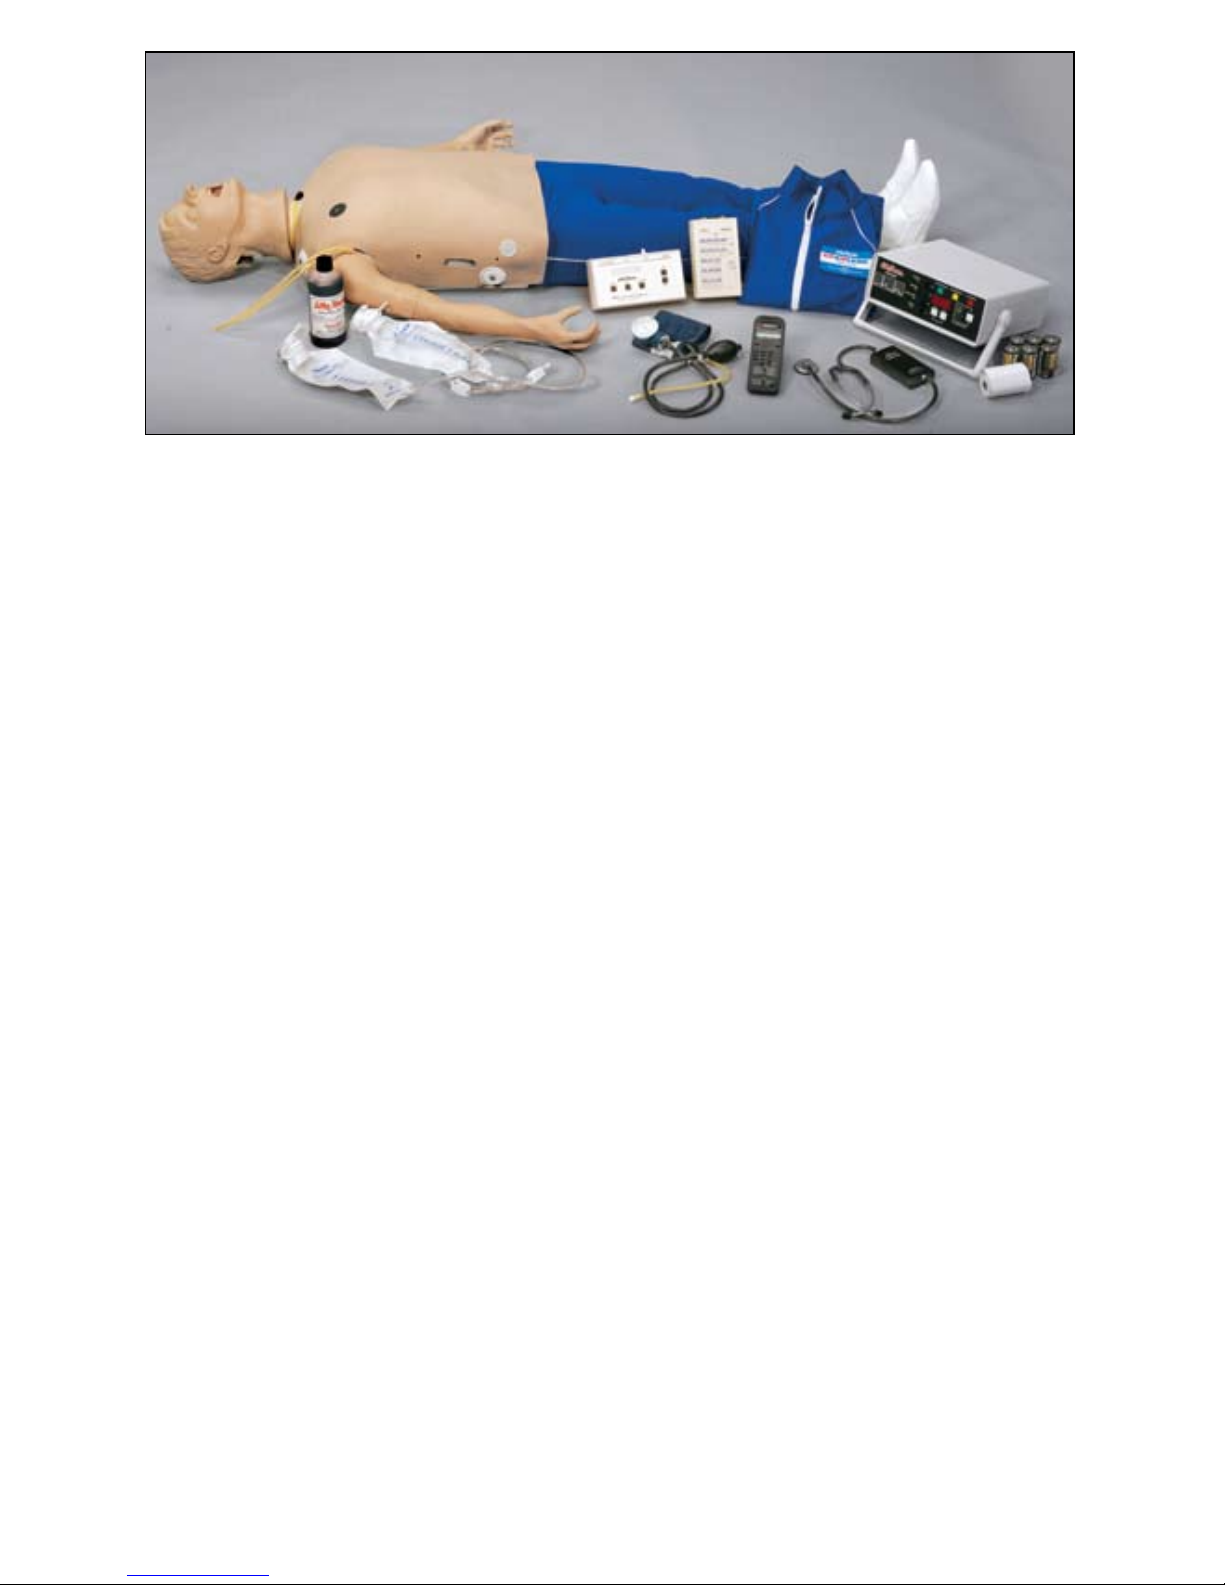
Deluxe Plus CRiSis™ Auscultation Manikin — LF03968U
LIST OF COMPONENTS:
• CRiSis
™
manikin, Full Body Manikin with “Airway Larry”
Management Head
• IV Arm
• Blood Pressure Arm
• Electronic Blood Pressure Control Unit
• Defibrillation Chest Skin
• Pump Spray Lubricant
• 3 cc Syringe with Needle
• 12 cc Syringe with Needle
• Two IV Bags
• Three Pinch Clamps
• Two Small Towels
• Butterfly Infusion Set
• Synthetic Blood
• Sphygmomanometer
• Batteries Included
• Electronic Connections
• Auscultation Chest
• Auscultation Remote Control with SmartScope™
• Interactive ECG Simulator
• Electronic Memory Unit with Printer
• Three Rolls of Thermal Recording Paper
• Hard Storage Case with Wheels
Follow Procedure A, B, C, D, E, & F
11
Nasco Life/form
®
“Airway Larry”
Airway Management Head
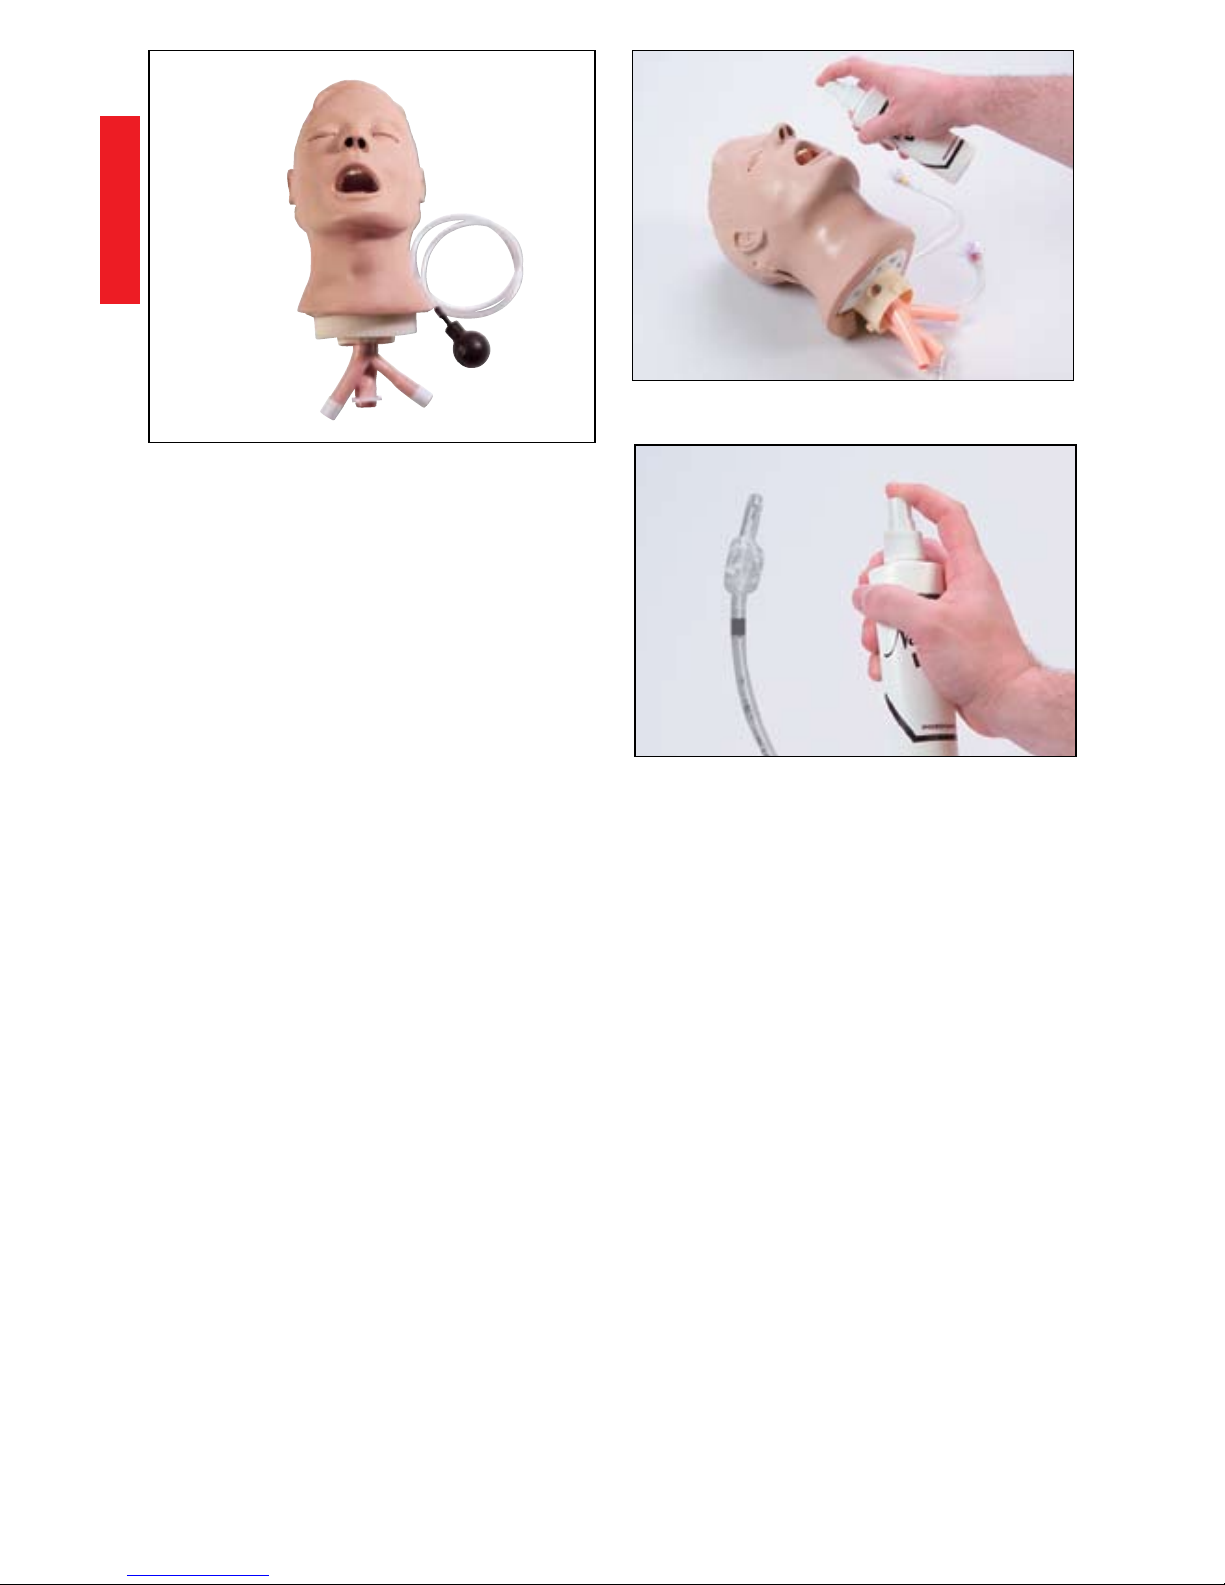
About the Simulator…
The
Life/form
®
“Airway Larry” Airway
Management Trainer is the most
realistic simulator available for the
training of intubation and other airway
management skills.
Nasco has taken great care to create an airway management trainer
that is anatomically correct in respect
to both size and detail. Landmarks
include: nostrils, teeth, tongue, oral
and nasal pharynx, larynx, cricoid
ring, epiglottis, arytenoid, false and
true cords, trachea, esophagus,
“Airway Larry” lung set, and stomach.
Nasco’s “Airway Larry” allows you
to practice oral, digital, and nasal
intubation. E.T., E.O.A., PTL
®
, and
Combitube
®
insertion can all be practiced as well (please see “Using the
Combitube®”). Suction techniques and
proper cuff inflation can also be performed and evaluated.
Lubricating the Airway Trainer Head:
Lubricate both the simulator and
supplies being used with the Nasco
pump spray lubricant provided. (See
figures 1 & 2.)
Figure 1
Figure 2
NOTE: Nasco recommends the use
of the provided lubricant or a similar
vegetable-based lubricant for the
Airway Management Trainer head.
The use of a silicone-based lubricant
may cause damage to the simulator,
thus voiding Nasco’s warranty on the
trainer.
Set Up:
A. Connecting the Airway
1. The manikin’s airway has been
disconnected to prevent damage
during shipping. To connect the
airway, remove the chest skin,
chest plate, compression springs,
and upper compression plate.
NOTE: Caution must be taken not to
damage the defibrillation electronics attached to the chest skin when
removing the skin from the manikin.
Procedure A
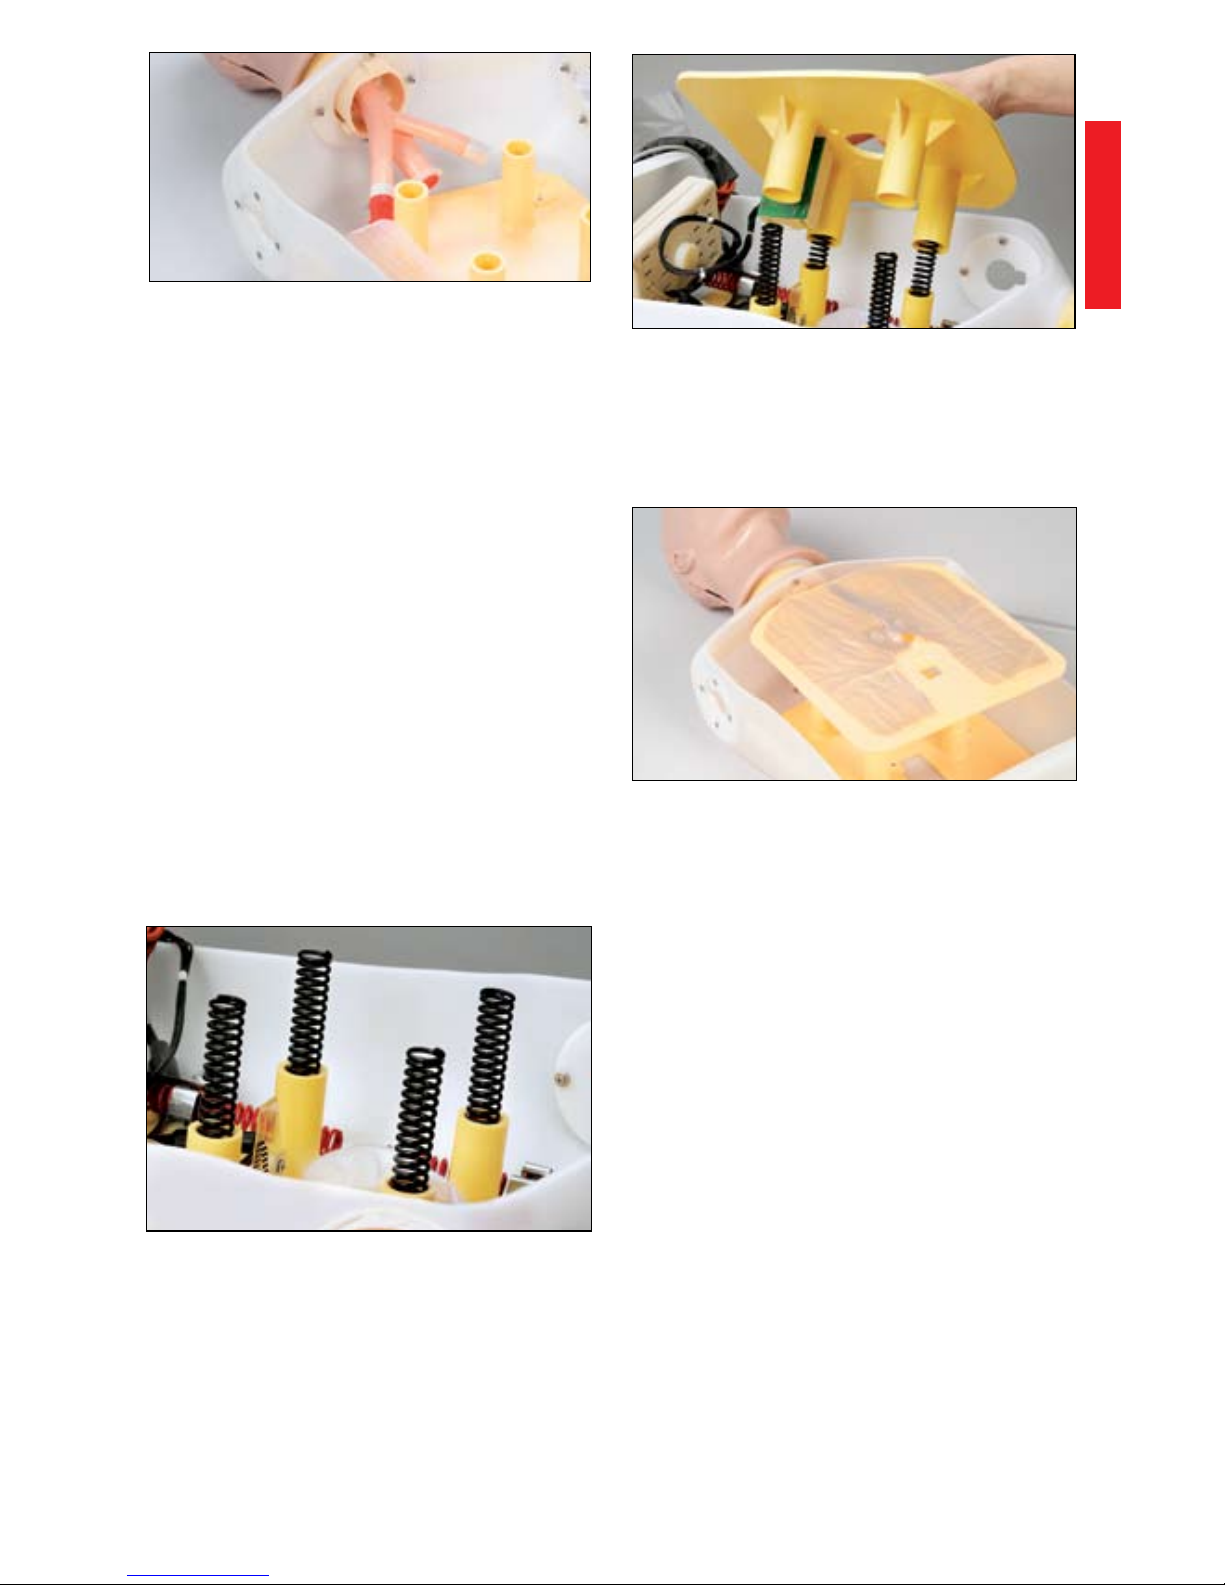
12
Figure 3
2. Remove the lung bags from
the upper compression plate.
Connect the right and left lung
bags to the adapters in the right
and left bronchi. (See figure 3.)
B. Installing the Chest
Compression Plate
1. Remove the compression springs
from packaging. Insert the springs
into the four plastic cylinders
extending up from the lower compression plate. (See figure 4.)
2. Before replacing the upper compression plate, make sure the
lung bags are connected to the
tracheal tube extending from the
lower portion of the neck of the
Airway Management Trainer head.
Figure 4
3. Position the upper compression
plate over the springs so that
each of the springs fits up into
a cylinder on the bottom of the
upper compression plate. (See
figure 5.)
Figure 5
4. Place the lung bags through the
hole in the center of the upper
compression plate so they rest on
top of the plate. (See figure 6.)
Figure 6
5. Place the chest plate back over
the upper compression plate and
lungs.
6. Reattach the chest skin by adjust-
ing the Velcro® edges. Again, be
careful not to damage the electronics attached to the chest skin.
Cleaning & Maintenance:
To clean the Airway Management
Trainer head, you will need to remove
the head from the manikin. To do so,
disconnect the lungs from the bronchi.
Then, rotate the head so that it is facing backwards. The large tab on the
front of the neck should be aligned with
the keyway in the torso. Tilt the head
upward until it snaps free. Disengage
the smaller rear tabs from the neck
opening and pull the head from the
body. (See figure 7.) Reverse these
steps to reattach the head.
Procedure A
 Loading...