

Page 1

Model
6000 lifecycle@ Aerobic Trainer
-- OPERATIONMANUAL:-
How To Get The Mos~
Out Of Your lifecycle Workout
-I
I
I
I
I
I
Page 2
INTRODUCTION
How To Get the Most
Out of Your Lifecycle@ Workout
Congratulations...and welcome to the world of Life Fitness. Inc. ard :.~~
Lifecycle~ aerobic trainer.
THE
i
LiFECYCLE@
I
IOPERATION
,MANUAL
Its patented Hill-profile. instant visual feedback and fitness scoring computation
provide the exceptional motivation that will help you stay with your conditioning
program.
Who rides the Lifecycle@? People who value time and who need to make every
minute count. Olympic athletes. movie stars. busy executives. top govemment
administrators, sports celebrities and housewives all make the Lifecycle@ their
exercise choice. Whether at a fitness facility, at home or at the office. riding a
Lifecycle~ is an excellent way to lose weight and improve your cardiorespiratory
condition. And it's fun!
other computerized stationary bike.
Why ride a Lifecycle@? Lifecycle@ aerobic training is more than just a motivating
experience. Regular aerobic exercise, such as on a Lifecycle~, improves energy
and endurance, reduces body fat, lowers your probability of heart disease, and
tends to prolong life.* Consistent workouts can also diffuse the effects of
everyday stress. Competitive athletes train aerobically to increase their heart
strength, lung capacity and muscular endurance.
Read this Manual Now. Before beginning your Lifecyclei!) Personal Exercise
Plan (PEP), it is essential that you read this entire manual. It explains how to
operate your Lifecycle@,and helps you design an aerobic workout tailored to
your personal fitness needs.
Your new Lifecycle~ is the culmination of over 17 years of
technological innovation. Today. it is recognized as the world's
most popular and most advanced computerized stationary
bicycle.
The Lifecycle~ offers a host of exclusive features designed to
help you achieve your fitness goals more quickfy and enjoyably.
More
health clubs use Lifecycle@for cycling than any
1
Ifyou have further questions regarding the operation of your Lifecycle@. please
call
PRODUCT SUPPORT
'Paffenbarger. R.S. Jr.. Hyde, R.T.. Wing. A.L, el al: Physical Activity, AlI~use ',1.0'-:2.'":,
Longevity of College Alumni. N Engl J Med 1986:314(March 6):605-613.
at (800) 351-3737 toll free, or (312) 451-0036.
a--=
3
Page 3
oC~~
A ~~
We bring frtness to life.~
Sales, Product Information
and Customer Service:
Ufe Frtness,lnc.
Customer Service
9601 Jeronimo Road
Irvine, Califomia 92718
(BOO)543-2925 Toll Free
(714) 859-1011
Telex: 4722127 UFE UI
Fax: (714)
Assistance on Installation, Operation,
Warranty, Parts and Repairs:
Ufe Fitness Inc.
Product Support
10601 West Belmont Avenue
Franklin Park,lIIinois 60131
(BOO)351-3737 Toll Free
(312) 451-0036
Telex: 721596
Fax: (312) 4514137
458-5711
Company
Europe:
Ufe
Fitness Europe GmbH
Siemensstrasse 3
8044 Unterschleisshem
Munich, West Germany
Telefon: 089 -3105087/8/9
Telex: 5215918 LSG
C 1989 Ufe FItness, Inc., a subsidiary of Baily. Manufacturing Corporation. The Ufecyc1e.
trademark is registered in the U.S. Patent and Trademark Office, Certificate No. 1,400,502 issued
July 8. 1986. Any use of this trademark, without the express written consent of Ufe FItness, Inc. is
forbidden. U.S. Patent No's. 3,767,195 and 4,358,105. (2/89) T177
4
Page 4

oCffk~
A rz:>~ Company
We bring frtness to life.~
Sales, Product Information
and Customer Service:
Life
FItneSS, Inc.
Customer Service
9601 Jeronimo Road
Irvine. California 92718
(800) 543-2925 Toll Free
(714) 859-1011
Telex: 4722127 UFE UI
Fax: (714) 458-5711
Assistance on Installation, Operation,
Warranty, Parts and Repairs:
Life
Frtness Inc.
Product Support
10601 West Belmont Avenue
Franklin Park, Illinois 60131
(800) 351-3737 Toll Free
(312) 451.0036
Telex: 721596
Fax: (312) 451-4137
Europe:
Life Frtness Europe GmbH
Siemensstrasse 3
8044 Unterschleisshem
Munich,
Telefon: 089 . 3105087/8/9
Telex: 5215918
C 1989 Ufe
trademark is registered in the U.S. Patent and Trademark Office, Certificate No. 1,400,502 issued
July 8, 1986. Any use of this trademark, without the express written consent of Ufe Fitness, Inc. is
forbidden. U.S. Patent No's. 3,767,195 and 4,358,105. (2189) 7777
West Germany
LSG
Fitness, Inc., a subsidiary of Bally. Manufacturing Corporation. The Ufecyc1e.
4
Page 5
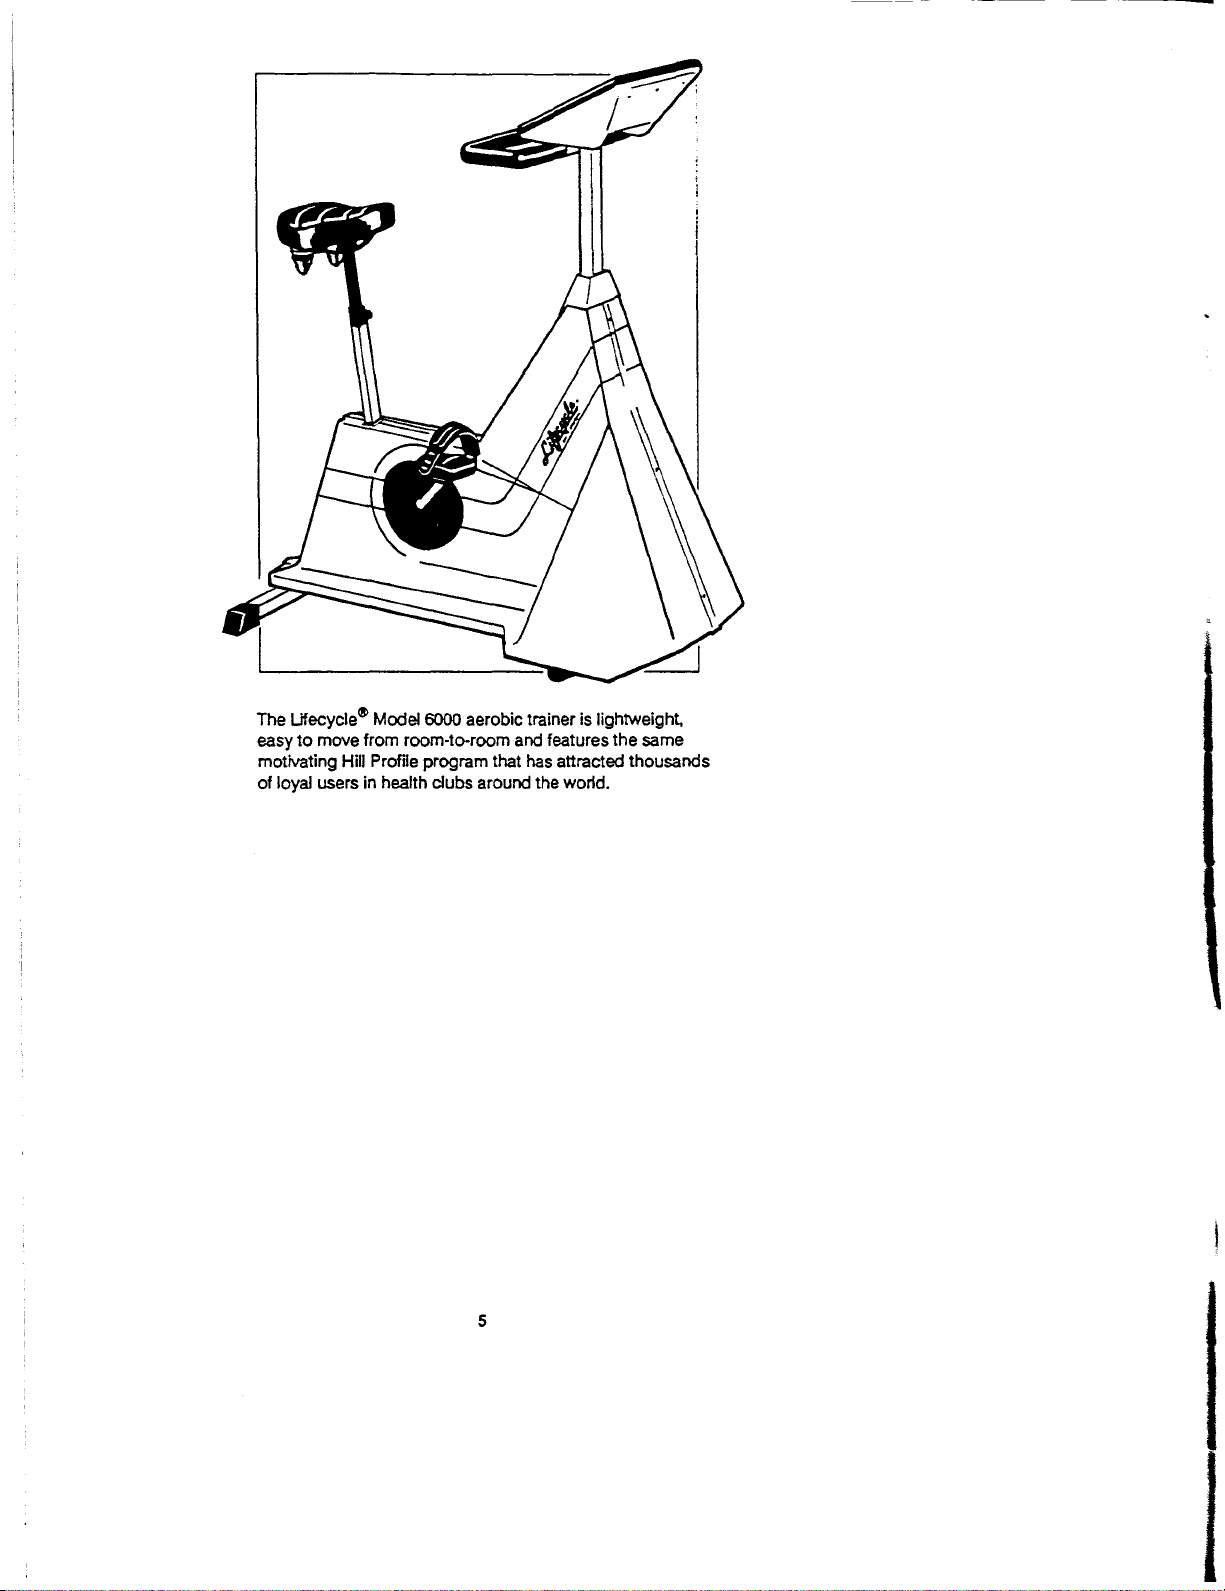
The Lifecycle~ Mcx:lel6000 aerobic trainer is lightweight,
easy to move from room-to-room and features the same
motivating Hill Profile program that has attracted thousands
of loyal users in health clubs around the world.
5
Page 6
TABLE OF CONTENTS
How to Use the Display Console 8
Howto Develop Your Personal Exercise Plan 11
Start with a Medical Exam 11
Planning YourAerobic Workout 11
Your Goals
FIT Guidelines
FREQUENCY
INTENSITY
TIME
How to Exercise Effectively 14.
Calculating Your Training Heart Rate Range (THRR)
Checking Your Pulse 15
..'"''''''''''''''''''''''''''''''''''''''''''''''''''''''''''''''''''''''''''''''''
"''''''''''''''''''''''''''''''''''''''''''''''''''''''''''''''''''''''''''''''
'"''''''''''''''''''''''''''''''''''''''''''''''''''''''''''''''''''''''''''''''
"""""'"''''''''''''''''''''''''''''''''''''''''''''''''''''''''''''''''''''''''
'"''''''''''''''''''''''''''''''''''''''''''''''''''''''''''''''''''''''''''''''''''''''''
'"''''''''''''''''''''''
Warming Up and Cooling Down 16
Proper Stretching Techniques 16
Stretching Exercises
Tips for Good Stretching Results 19
''''''''''''''''''''''''''''''''''''''''''''''''''''''''''''''''''''''''''''
Do'sand Don't's forMinimizingSoreness and MuscularStress
How to Choose An Aerobic Training Method 21
Interval Training 21
Steady-Pace Training 22
How to Choose a Lifecycle@ Computerized Program 23
The Hill Profile Program
The Random Program 25
The Manual ..Program 25
How to Choose the Correct Workout Intensity 26
How to Operate the Hill Profile Program 28
How to Make Changes During Your Ride 32
How to Operate the Random and Manual Programs 33
Howto Operate FITTeST 34
HowFITTESTWorks , 34
FIT TEST Tips """""'''''''''''''' 35
Your Resting Rate is Important 35
How to Stay Motivated ("Stayi~ With If')
How to Care for Your Ufecycle 39
How to Replace the Battery 40
How to Solve Operating Problems 41
Howto Adjust Footstraps 43
'"''''''''''''''''''''''''''''''''''''''''''''''''''''''''''''''''''''
''''''''''''''''''''''''''''''''''''''''''''''
11
12
12
12
12
14
17
20
''''''
23
37
FIGURES
Figure 1: Display Console 8
Figure 2: Keyboard ""'"'''''''' 9
Figure 3: Training Heart Rate Range (THRR) chart 15
Figure 4: Hill Profile """'" 24
Figure 5: Relative Program Intensities 27
Figure 6: Correct Seat Height Adjustment
Figure 7: Data Entry Display:
Figure 8: Selecting RANDOM or MANUAL Program 33
""''''''''''''''''''''''''''''''''''''''''''''''''''''''''''''''''''
"'"''''''''''''''''''''''''''''''''''''''''''''
Figure 9; FIT TEST Scoring Table 36
Figure 10: Replacing the Battery 40
Figure 11: Oiling Seat Springs 42
Figure 12: Adjusting the Footstraps
6
29
30
43
Page 7

TABLES
Table 1: Training Heart Rate Range (THRR) for Fat Loss and
Cardiorespiratory Improvement """""'"'''' ..., 44
Table 2: Weight Conversion Chart 46
-
UFECYCLE@ TRAINING LOG
(with blank pages for your use)
"""""' ,
47
U.S. Patent no.'s 3,767,195 and 4,358,105
7
Page 8
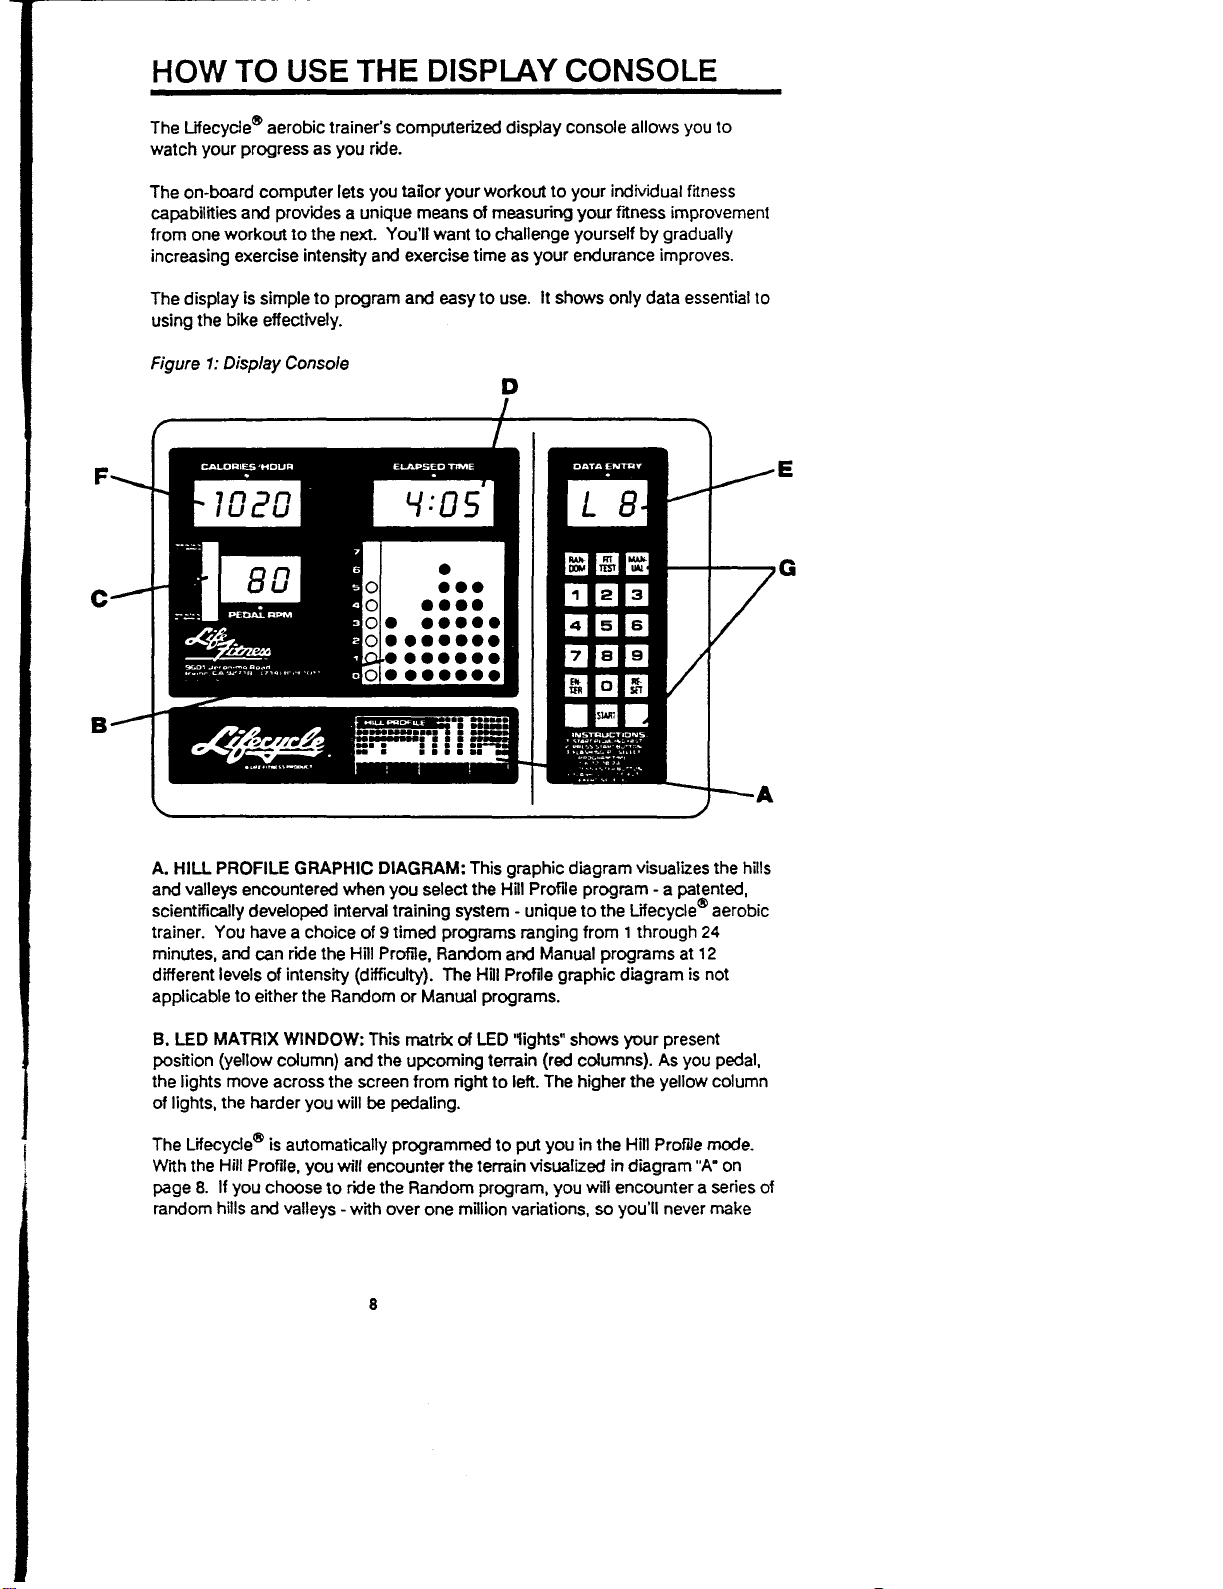
HOW TO USE THE DISPLAY
The Lifecycle~ aerobic trainer's computerized display console allows you to
watch your progress as you ride.
The on-board computer lets you tailor your workout to your individual fitness
capabilities and provides a unique means of measuring your fitness improvement
from one workout to the next. You'll want to challenge yourself by gradually
increasing exercise intensity and exercise time as your endurance improves.
The display is simple to program and easy to use. It shows only data essential to
using the bike effectively.
Figure 1: Display Console
CONSOLE
D
c
B
F
A. HILL PROFILE GRAPHIC DIAGRAM: This graphic diagram visualizes the hills
and valleys encountered when you select the HillProfile program -a patented,
scientifically developed interval training system - unique to the Lifecycle@ aerobic
trainer. You have a choice of 9 timed programs ranging from 1 through 24
minutes, and can ride the Hill Profile, Random and Manual programs at 12
different levels of intensity (difficulty). The Hill Profile graphic diagram is not
applicable to either the Random or Manual programs.
B. LED MATRIX WINDOW: This matrix of LED '1ights" shows your present
position (yellow column) and the upcoming terrain (red columns). As you pedal,
the lights move across the screen from right to left. The higher the yellow column
of lights, the harder you will be pedaling.
E
G
The Lifecycle~ is automatically programmed to put you in the Hill Profile mode.
With the Hill Profile, you will encounter the terrain visualized in diagram "A"on
page 8. If you choose to ride the Random program, you will encounter a series of
random hills and valleys -with over one million variations, so you'll never make
8
Page 9

the same ride twice. If you choose the Manual program, you will ride at a
steady-pace, that is, hills and valleys will not a~pear in the LED matrix window.
C. PEDAL RPM WINDOW: Your pedaling speed, measured in revolutions per
minute (RPM). is displayed here. A small red light in the narrow vertical window
to the left of the PEDAL RPM window instructs you to maintain either 80 APM or
100 RPM. The light flashes when you are pedaling faster or slower than the
recommended speed.
D. ELAPSED TIME WINDOW: The elapsed time indicates how long you have
been pedaling. The elapsed time window also functions as a STOP WATCH when
checking pulse. It is activated when either the "RESET" or "FITTEST" key is
pressed. (See specific instructions to reset the exercise program or to use the FIT
TEST feature described on page 34.)
E. DATA ENTRY WINDOW: This window displays the data of multiple functions.
First it displays the riding time you entered. Next it displays the level of difficulty
you entered (1 through 12), which remains visible during your entire ride, except
when you activate the AT TEST feature (see page 34 for a complete description
of FIT TEST)
Figure 2: Keyboard
fRAN-lrmlrMANl
DOM ITEST
I I
UAL I
F. CALORIES/HOUR WINDOW: This shows the
estimated number of calories per hour that you are
burning by working at the selected level of difficulty.
[I][gJ~
@][§][§]
[I]rnJ~
[QJ
8
NUMERIC KEYS: Use these keys to enter your riding time, level of difficulty and
FIT TEST data.
"ENTER" KEY: This key enters the riding time of your Hill Profile program into the
Lifecycle@>on-board computer. It is also used to separate each component of the
FIT TEST scoring feature. You do not have to press the "ENTER" key after
selecting a level of difficulty.
"RESET" KEY: Use this key to put your exercise program on hold or to re-start a
program. To put your exercise program on hold, press the key once and keep on
pedaling. (If you stop pedaling, all power is lost and the display goes blank.)
Pedal resistance is at a minimum while the program is on hold. You can use this
"rest" feature if you begin to feel tired to the point of discomfort.
G. KEYBOARD: The keyboard is used to enter
information. You can select a program duration of
1.2,3,4,5,6.12.18 or 24 minutes for the Hill Profile
program. (You cannot enter an exercise time for
the Random or Manual programs; which allow
indefinite. open-ended rides.) The keyboard is also
used to select a level of difficulty from 1 to 12 or
enter FIT TEST information (heart rate. age and
weight).
"START" KEY: This key is used to activate the
display console. press it only after you are
pedaling briskly at approximately 80 RPM. With
experience you'll get a "feel" for this speed.
9
Page 10

When
the "RESET" key is pressed once, the bike's stop watch feature is activated
and the time Is displayed In the ELAPSED TIME WINDOW. Use this stop watch to
time your rest period or to time the pulse check procedure. To resume your
exercise program, simply press the "ENTER" key.
To cancel the current exercise program, press "RESET" twice. (The current
exercise program is also cancelled when you stop pedaling.)
"FIT TEST" KEY: This key is used to calculate your relative level of
cardiorespiratory fitness. See page 34 for complete instructions before attempting
to operate this unique feature.
"RANDOM" KEY: Use it when you want to bypass the standard Hill Profile
program and access the computer's Random program which offers over one
million different combinations. The Random program is fun and challenging
because you never know what is coming up next! You can ride the Random
program indefinitely at a level of difficulty ranging from 1 to 12. Change the level
of difficulty at any time during a ride by simply entering another number.
"MANUAl" KEY: This
Profile program and exercise at a constant level of pedal resistance. It runs the
Manual program Indefinitely at a level of difficulty ranging form 1 to 12. Pedal
resistance is equal in Intensity to the highest hill encountered on the standard Hill
Profile program at the same intensity level. For this reason, the Manual program
provides a much more difficult workout than the HDI Profile program.
NOTE: See the section "How to Operate The Hill Profile Program" on page 28
for step-by-step display console programming instructions.
key is used when you want to bypass the standard Hill
10
Page 11

HOW TO DEVELOP YOUR
PERSONAL EXERCISE PLAN (PEP)
No two people are exactly alike, and therefore, no two Personalized Exercise
Plans should be identical. People vary widely in their health and fitness status.
Their goals, motivation, age, physical condition, exercise experience and time
constraints are different. That's why riding the Lifecycle$ aerobic trainer is an
ideal form of exercise. It is designed to deliver a computerized workout tailored
specifically to your individual training capacity.
-
START
WITH A
MEDICAL
'EXAM
recent physical exam, you should consider the start of our PEP as an appropriate
time to see your physician.
Medical clearance for use of the Lifecycle$ should definitely be obtained by
individuals over 45 who have a major risk factor for coronary disease, such as
heart disease, high blood pressure, high cholesterol levels, cigarette smoking or a
family history of heart disease. Medical clearance should be obtained by al
persons, regardless of age, with cardiorespiratory disorders, diabetes, bone
and/or joint disease, or persons who have any symptoms of coronary disease.
In general, anyone starting a vigorous exercise regimen should see a
physician for a medical exam. The extent of the exam will depend on the
physician's preliminary evaluation of the individual's health status.
Planning Your Aerobic Workout
YOUR GOALS:
Goals determine the direction and type of exercise plan that is right for you. An
individual wishing to reduce his or her risk of heart disease will train less
strenuously than a competitive athlete.
This section provides the general guidelines you need to develop
your PEP. Remember that you are your own best coach, since ~
know your limitations and expectations better than anyone.
The American College of Sports and Medicine and the American
Medical Association have established medical screening guidelines
for exercise, and we strongly recommend that ifyou have not had a
There are two major goals of aerobic exercise.
1. Cardiorespiratory improvement
2. Fat loss
Varying the frequency and intensity of the aerobic workout changes the focus
from one goal to the other. High intensity aerobic exercise for shorter periods of
time promotes cardiorespiratory improvement, and burns mostly muscle
glycogen as fuel. Low intensity aerobic exercise for longer periods of time
promotes fat loss, because these longer periods of exercise bum more calories
from stored fat.
11
Page 12

Ifyou are working to reduce the probability of heart disease or improve
endurance, you goal is to build a stronger heart and lungs (cardiorespiratory
improvement). By expanding lung capacity, your body's intake and utilization of
oxygen is increased. Regular aerobic exercise on the Lifecycle~ accomplishes
this and improves muscle endurance at the same time.
FIT Guidelines
FIT stands for FREQUENCY of exercise, INTENSITY of exercise and the amount
of TIME (duration) you spend exercising. These are the three variables in
designing an effective Personal Exercise Plan (PEP). Here's how to use the FIT
guidelines to develop your PEP:
FREQUENCY. . . refers to how many times you ride your Lifecycle@ each week.
Ifyour o~ective is to improve cardiorespiratory fitness, you should ride the
Lifecycle at least three times a week, with no more than two days between
workouts. At first, you should give your muscles a chance to adapt to increased
activity.
When you begin your FIT regimen, do not exercise more than once every other
day. This should prevent muscle soreness and fatigue. Even after you have
progressed sufficiently, the American College of Sports Medicine still
recommends that you workout not exceed 5 times per week. Increased
frequency yields minimal additional cardiorespiratory improvement and increases
the risk of muscle strain. Only highly trained, competitive athletes should
consider daily workouts. However, if your goal is fat loss, you should exercise
more frequently for longer periods of time at a lower level of intensity.
INTENSITY. . . refers to how hard you work your heart. A heart rate of 75% of
your theoretical maximum heart rate is the threshold above which optimum
cardiorespiratory training occurs for those who are medically fit 90% of your
theoretical maximum heart rate is a safe upper limitforthese same people.
Select a level of intensity that puts your heart rate between 75°k and 90% of your
*
theoretical maximum for cardiorespiratory improvement Beginners wnt want to
exercise at a heart rate which is closer to 75% while highly trained athletes may
want to exercise closer to 90% of the theoretical maximum heart rate. (See Table
1 on page 44 for an approximation of the theoretical maximum heart rate and
your Training Heart Rate Range (fHRR) for your age category.)
Adjust the intensity Qevel) of your workout to keep our heart rate within its most
effective range. You will find that it is more difficult to pedal at the same level of
intensity on the Hill Profile Rrogram. Figure 5 on page 27 compares the intensity
levels of the three Lifecycle@ programs.
TIME. . . refers to the number of minutes you spend exercising within yourTHRR.
Optimal cardiorespiratory and endurance improvements come with prolonged
use of 12 to 24 minute rides. Beginners might start with the 6 to 12 minute Hill
Profile program. As you adapt. extend the duration of your workout. The 18 to 24
minute HillProfile programs are available for this purpose. Be sure to keep your
heart rate within your THRR by adjusting the intensity level.
.American College of Sports Medicine, Guidelines for Exercise Testing and Prescription, Third
Edition (Lea & Febiger: Philadelphia, 1986), p. 32.
12
Page 13

Begin with
extend to 12 minutes, then to 18 or 24 minutes when you feel you are ready to do
so.
It is recommended that those just beginning to use the Lifecycle@, even if in
excellent condition, start with the standard Hill Profile program.
a 6 minute
Hill Profile program. As you become more comfortable,
If your objective is FAT
find that a lower level of intensity allows your to ride longer. You can increase the
intensity as you progress. A heart rate range of 65% to 75% of the theoretical
maximum heart rate is the preferred range for fat loss training.
LOSS,
it is better to ride for a longer duration. You will
c
y
T
~
R
13
Page 14

HOW TO EXERCISE EFFECTIVELY
Exercising too hard is as ineffective as not working hard enough. In fact,
overdoing it can be harmful. For an effective workout, determine
workout frequency, duration and intensity and stick to it!
your
optimal
Calculating
Your
Training
Heart Rate
Range
establish the upper limit. If your
establish
then by 90% to establish the upper limit.
Figure 3
maximum heart rate and THRR for your age category.
your
(page
To approximate your THRR, you must first calculate your
theoretical maximum heart rate. Subtract your age from 220.
(This formula is recognized by the American College of Sports
Medicine as a method for determining your theoretical
maximum heart rate.*) For example, if you are 35 years old,
your theoretical maximum heart rate is 185. If your goal is fat
loss, you can establish your THRR by multiplying this number
(185) by 65% to establish the lower limit, then by 75% to
goal
is cardiorespiratory fitness, you can
THRR by multiplying 185 first by 75% to establish the lower limit,
15) or Table 1 (page 44) can be used to determine your theoretical
Examples:
Cardiorespiratory Training for age 35:
Lower limit:
Upper limit:
Fat Loss Training Range for age 35:
Lower limit: (220 less 35
Upper limit: (220 less 35=185) x .75
Note: A stress
determining your maximum heart rate and overall cardiorespiratory condition.
We strongly recommend
program, especially
or if you are over the age of 45. You and your doctor can decide whether a
maximum stress
(220
less 35 =
(220 less 35 = 185) x.90 = 166 beats/min.
test
administered by your doctor, is the most accurate
if you have a history of high blood pressure, heart problems
test is advisable.
185) x .75
185) x.65
=
that
you see your doctor before
138 beats/min.
=
120 beats/min.
=
138 beats/min.
=
beginning any exercise
method
of
By making sure your heart rate stays within this range during
will
achieve
system. As you
your body will begin
"the training effect."
.American College of Sports Medicine, Guidelines for Testing and Prescription, Third Edition (lea &
Febiger: Philadelphia, 1986), p. 32.
optimal training
fitness program progresses, your aerobic
benefits
to show the
14
with minimal stress to
benefits
of what is referred to fitness
your
workout, you
your
cardiorespiratory
capacity wl1\ build and
experts as
Page 15

Figure
3: Training Heart Rate Range (THRR) chart
£~
'00%
TRAINING ZONE CHART
200
It is not recommended to train above 90% of your theoretical
maximum heart rate.
CARDIORESPIRATORY TRAINING RANGE - between 75% and
D
90% of your theoretical maximum heart rate.
AGE
FAT LOSS TRAINING RANGE - between 75% and 90% of your
theoretical maximum heart rate.
\>/>i\>1
~~ :~~~~~~~~r~~:~:~~ ~:~~~~~t
to achieve below
Checking Your Pulse
For best results. stay
pulse periodically during your workout on the Lifecycle(!!l. (See Figure 4 on page
24 for the times to check your heart rate during the Hill Profile program.)
You may wish to use an electronic pulse meter, but your own tvvo fingers will
suffice. Your pulse can be conveniently monitored in two locations: (1) half way
between the ear and wind pipe on your neck or (2) on the thumb side of the
inside of your wrist. To monitor your pulse, hold your index and middle fingers
together against either site. (The neck site is easiest during exercise.) CAUTION:
Do not press too hard, especially when taking a neck pulse. Excessive pressure
can reduce blood flow, and cause the heart to slow down.
A
15-second count is recommended. Your heart rate per minLt.e is 4 times the
15-second count.
within you THRRduring
exercise.
To do this. check your
15
Page 16

Warming
A warm-up ride on your Lifecycle~ gradually increases your pulse rate and your
recommended THRR.
the body's increased demand for oxygen. The length of the warm-up period of
the standard Hill Profile program will vary depending upon the duration of the ride
you selected. The warm-up period is 21/2 minutes if you select a 12 minute ride;
11/4 minutes in a 6 minute ride; 31/2 minutes in an 18 minute ride; and 41/2
minutes in a 24 minute ride.
The cool-<iown period, which lasts 1 1/2 minutes in a 6 minute ride; 3 minutes in a
12 minute ride; 41/2 minutes in an 18 minute ride; 6 minutes in a 24 ride,
decreases the activity level of your heart until it has returned to 55% of its
theoretical maximum rate. A proper cool-<iown period assures sufficient blood
flow to the muscles which helps remove the end products of exercise, including
lactic acid. Accumulation of these end products is a major cause of muscle
soreness. The harder the workout, the longer the cool-<iown should be.
Research suggests that in order to minimize the chance of injury, stretching
exercises should be performed after the cool-<iown period, whne muscles and
joints are still
a weight training session. Proper stretching techniques are illustrated on pages
17 and 18.
Up and Cooling Down
This
promotes blood flow to working muscles and meets
warm.
This is especially true if you follow your aerobic workout with
The Hill Profile program includes built-in warm-up and cool-<iown periods. The
Random and Manual programs do not.
programs, you should gradually increase the workload at the beginning of the
ride and then decrease you effort during the final minutes of the ride in order to
provide effective warm-up and cool-<iown periods.
Proper
Stretching is perhaps the most neglected element
because people
speed, strength and a lean body appearance.
flexibility, real gains in fitness are unnecessarny difficult to achieve and maintain.
Flexibility
as a
Fitness
Safety
discouraging
of
fitness
program of regular muscular and aerobic training.
See page 17 for
.
When using the Random and Manual
Stretching Techniques
of physical conditioning,
do not associate flexibilitywith the more glamorous aspects -
However, without
Umberjoints,
freedom of motion that makes exercise
enjoyable to perform and lessens the risk of injury.
proper, consistent stretching, ligaments and tendons can
muscles and connective tissue provides
easier and more
become taut and shortened, with decreased
inflexible tissues are more prone to chronic soreness or rupture
than loose, stretch-conditioned
tissues. And,
than nagging injuries. Stretching helps people of all ages and levels
to prepare
themselves
illustrations
for the exertion required to participate
of recommended stretching exercises.
significant
Without
circulation.
nothing
the
is more
in a
These
16
Page 17

STRETCHING EXERCISES
Follow
When stretching, remember to move slowly into a stretch to where you feel
resistance, but not pain. Hold that position and breathe deeply and slowly for
5-10 seconds. Remember to stretch both sides of your body when the illustration
calls for arm or leg stretching. When the illustration calls for shoulder or neck
rotation, perform fIVerotations in each direction.
the sequence indicated in these stretching illustrations.
2
3
4
5
9
10
6
7
l'
8
""".
.
""
"..
k~
12
13
17
Page 18

14
15
16
17
18
]
19
22
20 21
24
23
I
I
I
~
25
27
-Reproduced, in part, with permission of James M. Rippe, M.D., Co-Author. The Soorts
Performance Factors (Rippe and Southmayd). Putman Publishing Group,
18
26
1986.
Page 19

Tips
Stretching is a special discipline that requires concentration and patience for best
results. Follow these tips and practice the stretches shown in the illustrations that
follow at least 3 times a week for 15 minutes per session. You'll progress safely
and surely.
for Good Stretching Results
1. Dress Comfortably. Wear loose-fitting, soft fabric clothes without restrictive
belts, elastic or lager buttons or buckles. Breathable cotton or softly woven wool
is preferable to synthetic cloth. Go without shoes or slippers when stretching.
2. Stretch Slowly. Move in and out of your stretches with slow, controlled
motions and hold in a static position when you've stretched as far 2S comfortable.
Fast, bouncy, ballistic motions can actually signal the muscles to contract, and
defeat the purpose of stretching. Concentrate on the body part you are working.
You can close your eyes and imagine your muscles loosening slowly and
gradually.
3. Practice Abdominal Breathing. Learn to breathe from your diaphragm, so
that your stomach, rather than your rib cage and shoulders, rises and falls with
each breath. Abdominal breathing encourages relaxation, lessens muscular
tension and helps lower blood pressure.
4. Learn Your "Stretching Zone." Stretch gradually to the point that you feel
resistance, but never to the point of pain, and never use muscular effort to
increase a stretch. Some discomfort is natural, but the gentle forces of gravity
and your body weight willdetermine the limits of your safe, effective "stretching
zone."
5. Start Easy. Start each session withthe stretches you findeasiest. Thiswill
help you relax, concentrate and warm up for the more difficult parts of your
routine.
6. Empty Stomachs Make Stretching Easier. You'll find your stretching
routines easier and more pleasant ifyou do them on an empty stomach. This
refers to liquid as well as solid foods.
7. Pre- and Post-Workout Stretches. Always stretch to warm and loosen
tissues in preparation for exertion. And, since muscles tighten up after exertion,
stretch afterwards to promote circulation and minimize stiffness from lactic acid
build-up. You don't have to perform all the stretches pictured on the following
pages before and after you work out, but be sure to perform those that most
directly effect the muscles you use during exercise.
19
Page 20

Do's and Don't's
for Minimizing Soreness and Muscular Stress
The following do's and don't's wnt help reduce the chance of soreness and
increase the effectiveness of our workout.
. Do set realistic goals and objectives.
. Do exercise within your THRR.
. Do warm up and cool down properiy.
. Do stretching exercises before you begin your Ufecycle~ program.
. Do stretching exercises after you complete your cool~own.
. Don't increase duration by more than 10% per week.
. Don't increase intensity by more than one level per week.
. Don't increase intensity and duration at the same time.
. Don't overextend yourself in hot and/or humid weather.
. DO OBTAIN PROPER MEDICAL CLEARANCE PRIOR TO STARTING
YOUR PERSONAL EXERCISE PROGRAM, BY HAVING A PHYSICAL
EXAM.
J
20
Page 21

HOW TO CHOOSE AN
AEROBIC TRAINING
How hard you work out during your Lifecycle@ exercise session depends on your
fitness goals and physical condition. Your
fit your goals and preferences. If you don't enjoy your workout, you won't
continue. Basically, design a workout that you can live with. Page 11 explains
how to develop your Personal Exercise Plan.
This section describes the two aerobic training methods that are available on the
Lifecycle@ - interval training and steady-pace training.
Note: A Lifecycle@Training Log is included at the back of this manual so you can
record information on your progress.
METHOD
PEP
(Personal Exercise
Plan)
should
Interval Training
Interval training, which is offered by selecting the Hill Profile program or Random
program, provides periods of high-effort aerobic activity separated by regular
intervals of low-intensity exercise. By varying the workload throughout the
exercise session in this way. your heart rate will range between the high and low
ends
of your
by simply pressing a numbered key which is greater than the one your entered at
the beginning of your ride. Likewise, you can select a lower number.
THRR. You can also change the levels of intensity during your ride
The Lifecycle@ aerobic trainer is unique in the fitness industry. Its patented.
computerized interval training program has been scientifically demonstrated to
yield statistically significant cardiorespiratory improvement compared to
steady-pace training. And, the Lifecycle@ goes one step further. Its Hill Profile
program offers "interval training with progressive overload." Not only does it offer
the challenge of alternating hills and valleys, but the hills and valleys become
progressively more difficult during the course of the ride. (See Figure 4 on page
24.)
Interval training is extremely popular with individuals ranging from elite athletes,
whose performance depends on power and speed, to patients in medically
supervised rehabilitation facilities. A study conducted at the Human Performance
Laboratory of Oregon Health Sciences University. compared interval and
steady-pace training and concluded that interval training offered the following
advantages:
. Greater cardiorespiratory fitness gains per unit of time -. approximately 60%
greater than steady-pace training
. A feeling of less discomfort and less muscular fatigue than steady-pace
exercising
. Reduced boredom and the potential for increased adherence to the overall
exercise plan
-Allen,
D., McDougal, K.G. and Pickens, D.W., A Physiological Comparison of Interval vs.
Steady-Pace Training (Abstract), Medicine and Science in Sports and Exercise, 19:562, 1987.
21
Page 22

Steady-Pace Training
For those who prefer steady-pace training, ItIs available on the Ufecycle~. It is
activated by the Manual key on the Display console and provides a steady, fIXed
level of pedal resistance. You can create your own program using the Manual
program simply by changing levels during the course of your ride. For example,
Ifyou are riding the Manual program at Level 4 and wish to increase the pedal
resistance, merely press a numbered key which is greater than 4. Likewise, you
can select a lower number.
Some exercise physiologists believe in the combined use of bQ!h steady-pace
and interval training. The HillProfile and Manual and Random programs of the
Ufecycle~ offer this variety. If our time is limited, however, we recommend that
you choose the HillProfile program because it can provide 60% greater
cardiorespiratory improvement per unit of time than steady-pace training.
J
Iffor some medical or physiological reason you have been advised to maintain a
steady heart rate while you are exercising, select the Manual program. It is easier
to maintain a consistent heart rate using the Manual mode than the HillProfile or
Random modes.
Also, ifyour goal is fat loss, you may wish to use the Manual program at a low
level of intensity and ride for a longer period of time at each exercise session.
See page 33 for instructions on how to operate the Ufecycle@Manual
program.
.
..
22
Page 23

HOW TO CHOOSE A LIFECYCLE@
COMPUTERIZED PROGRAM
Three computerized programs are available on your Lifecycle@:
1. The Hill Profile Program
2. The Random Program
3. The Manual Program
The Hill Profile Program
The Lifecycle@ aerobic trainer's patented Hill Profile program (See Figure 4 on
page 24) offers the ideal configuration for interval training. The Hill Profile
program is available in various durations from 1 to 24 minutes. You can select
rides of 1, 2, 3. 4, 5, 6. 12. 18 and 24 minutes. Each Hill Profile program is
comprised of four periods: 1) Warm-Up, 2) Test, 3) Interval Training, and 4)
Cool-Down.
This unique
feature of
the Lifecycle@, "interval
training with progressive
overload," results in a
greater improvement in
cardiorespiratory fitness*
-- and it's this scientifc
innovation that
distinguishes the
Lifecycle@ from all other
aerobic training
equipment.
the last 1/3. The last 1/3 of this exercise period gradually reduces your heart rate
to the lower end of your THRR. It also allows your body to begin removing
accumulated end products of exercise, such as lactic acid, which tend to build-up
in muscles during your workout and contribute to muscle soreness.
An integral part of the end product dissipation process is the period of rapid
pedaling (100 RPM) midway throughout the cool-sown period mentioned above.
A small flashing "light" to the left on the Pedal RPM Window on the display
console signals you to increase from 80 RPM to 100 RPM and then to resume 80
RPM again.
Warm-Up
lower portion of your THRR and increases respiration.
Blood-flow to working muscles also increases.
Test Period:
your THRR. Take your pulse (HR check) at the end of the
test period to ensure that you have entered your THRR.
Interval Training Period:
valleys. During this period, you are confronted with four
successively higher hills. Each one is separated from the
next by a valley or recovery period. Take your pulse at the
end of the interval training period to ensure you have stayed
within your THRR.
Cool-Down
for pedaling at 80 RPM for 1/3 of the time, then faster (100
RPM) for the second 1/3, followed by a return to 80 RPM for
Period:
Gradually brings your heart rate into the
Increases your heart rate so that it is within
Comprised of a series of hills and
Period: Reduced pedal
resistance which calls
.
Allen, D., McDougal, K.G. and Pickens, D.W., A Physiological Comparison of Interval Training liS.
Steady-State Training (Abstract), Medicine and Science in Sports and Exercise, 19:562,
23
1987.
Page 24

Heart Rate Check Points: Your heart rate should be checked near
the end of the Test period and at the end of the interval training period.
(See Figure 4 below for the exact time of each heart rate check
point.) I>Jwaystake your pulse at the times indicated to make sure you
are staying within your personal THRR.
The Hill Profile program (Figure 4) shows the terrain encountered during the ride
on the Lifecycle@ aerobic trainer. Hills and valleys are simulated on the display
console by columns of red and yellow "lights" in the LED Matrix Window. The
columns move from right to left as you pedal.
Hill Profile information continued on page 28.
Figure 4: Hill Profile Program
J
Terrains (Hills
and Valleys)
6 min. ride
12 min. ride
18 min. ride
24 min. ride
1.5
WARM-UP
I
I I I I
Elapsed
1.5
1
1
2
3
4.5
3
2
4
6
TEST
II
CHECK POINT (1)
Time (minutes)
2 2.5 3 3.5
4 5 6 7
6 7.5 9 10.5
8 10 12 14
INTERVAL
TRAINING
FIRST HOUR
4 4.5
8 9
12 13.5
16 18
SECOND HOUR
CHECK POINT (2)
10 11 12
15 16.5 18
20 22 24
COOL.
II
A
5 5.5 6
DOWN
I
FOR CARDIORESPIRATORY TRAINING:
(1) FIRST HEART RATE CHECK POINT - At the first heart rate check point,
!
4
pulse should be between 75% -80% of the theoretical maximum for your age
category for cardiorespiratory training.
your
(2) SECOND HEART RATE CHECK POINT
--At the second
heart rate check point,
your pulse should be between 85% -90% of the theoretical maximum for your
age category for cardiorespiratory
training.
FOR FAT LOSS TRAINING:
(1) FIRST HEART RATE CHECK POINT
--At the first heart rate check point, your
pulse should be between 65% -70% of the theoretical maximum heart rate for
your age category for fat loss training.
(2) SECOND HEART RATE CHECK POINT -- At the second heart rate check point,
your pulse should be between 70% . 75% of the theoretical maximum for your
age category for fat loss
training.
24
Page 25

-,
Figure 5. Relative
Comparison of relative levels of intensity of the three LIfecycle~ exercise
programs.
Level of
Intensity
(Pedal Resistance)
Program Intensities
Hill
Profile
11-12
Random
3-4
5-6
7-8
9-10
5-6
7-8
10
11
12
2
3
4
9
Manual
1
2
3
4
5
6
7
8
9
10
11
12
Interpretation:Level3or4
Random
difficult to pedal at the same
Random
level
Program and Level 1 in the Manual program. In other words. it is more
program, and the Random program is more difficult to pedal
of intensity than the HDI Profile program.
in the Hill Prome program is equivalent to
level
of intensity in the Manual Program than
Level 2 in the
at the same
,
,
on the
27
,
,I
 Loading...