

Life Fitness ATV15-D-02 Owner's Manual
15” ATTACHABLE TV
(PAL/DVB-T2/DVB-C)
Owner's Manual ATV15-XXXD-02
1009362-0001 REV AA


Corporate Headquarters
Columbia Centre III, 9525 West Bryn Mawr Avenue, Rosemont, Illinois 60018 • U.S.A.
Service phone number: 800.351.3737 (toll-free within U.S.A., Canada)
International Offices
AMERICAS
North America
Life Fitness, Inc.
Columbia Centre III
9525 West Bryn Mawr Avenue
Rosemont, IL 60018 U.S.A.
Telephone: (847) 288 3300
Service Email: customersupport@lifefitness.com
Sales/Marketing Email:
commercialsales@lifefitness.com
Brazil
Life Fitness Brasil
Av Reboucas 2315
Jd. Paulistano
São Paulo, SP 05401-300
BRAZIL
SAC: 0800 773 8282
Telephone: +55 (11) 3095 5200
Service Email: suporte@lifefitness.com.br
Sales/Marketing Email:
lifefitness@lifefitness.com.br
Latin America & Caribbean*
Life Fitness, Inc.
Columbia Centre III
9525 West Bryn Mawr Avenue
Rosemont, IL 60018 U.S.A.
Telephone: (847) 288 3300
Service Email: customersupport@lifefitness.com
Sales/Marketing Email:
commercialsales@lifefitness.com
EUROPE, MIDDLE EAST, & AFRICA
(EMEA)Netherlands & Luxemburg
Life Fitness Atlantic BV
Bijdorpplein 25-31
2992 LB Barendrecht
THE NETHERLANDS
Telephone: (+31) 180 646 666
Service Email: service.benelux@lifefitness.com
Sales/Marketing Email:
marketing.benelux@lifefitness.com
847.288.3300 • FAX: 847.288.3703
Global Website: www.lifefitness.com
United Kingdom & Ireland
Life Fitness UK LTD
Queen Adelaide
Ely, Cambs, CB7 4UB
Telephone: General Office (+44)
1353.666017
Customer Support (+44) 1353.665507
Service Email: uk.support@lifefitness.com
Sales/Marketing Email: life@lifefitness.com
Germany & Switzerland
Life Fitness Europe GMBH
Siemensstraße 3
85716 Unterschleißheim
GERMANY
Telephone: (+49) 89.31 77 51.0 (Germany)
(+41) 0848 000 901 (Switzerland)
(+41) 043 818 07 20 (Switzerland)
Service Email: kundendienst@lifefitness.com
Sales/Marketing Email:
kundenberatung@lifefitness.com
Austria
Life Fitness Austria
Vertriebs G.m.b.H.
Dückegasse 7-9/3/36
1220 Vienna
AUSTRIA
Telephone: (+43) 1.61.57.198
Service Email: kundendienst@lifefitness.com
Marketing/Sales Email:
kundenberatung@lifefitness.com
Spain
Life Fitness IBERIA
C/Frederic Mompou 5,1º1ª
08960 Sant Just Desvern Barcelona
SPAIN
Telephone: (+34) 93.672.4660
Service Email: servicio.tecnico@lifefitness.com
Sales/Marketing Email:
info.iberia@lifefitness.com
Belgium
Life Fitness Benelux NV
Parc Industrial de Petit-Rechain
4800 Verviers
BELGIUM
Telephone: (+32) 87 300 942
Service Email: service.benelux@lifefitness.com
Sales/Marketing Email:
marketing.benelux@lifefitness.com
All Other EMEA Countries & Distributor Business
C-EMEA*
Bijdorpplein 25-31
2992 LB Barendrecht
THE NETHERLANDS
Telephone: (+31) 180 646 644
Service Email: service.db.cemea@lifefitness.com
Sales/Marketing Email:
marketing.db.cemea@lifefitness.com
ASIA PACIFIC (AP)
Japan
Life Fitness Japan
Japan Nippon Brunswick Bldg., #8F
5-27-7 Sendagaya
Shibuya-Ku, Tokyo
Japan 151-0051
Telephone: (+81) 3.3359.4309
Service Email: service@lifefitnessjapan.com
Sales/Marketing Email:
sales@lifefitnessjapan.com
Hong Kong
Life Fitness Asia Pacific LTD
32/F, Global Trade Square
21 Wong Chuk Hang Road
HONG KONG
Telephone: (+852) 2575.6262
Service Email: HongKongEnquiry@lifefitness.com
Sales/Marketing Email:
Marketing.HK.Asia@lifefitness.com
All Other Asia Pacific countries & distributor
business Asia Pacific*
32/F, Global Trade Square
21 Wong Chuk Hang Road
HONG KONG
Telephone: (+852) 2575.6262
Service Email: HongKongEnquiry@lifefitness.com
Sales/Marketing Email:
Marketing.HK.Asia@lifefitness.com
*Also check www.lifefitness.com for local representation or distributor/dealer
Page 3 of 39

Table of Contents
Getting Started
Safety Instructions..................................................................................................5
Antenna Grounding..............................................................................................5
Media Connections...............................................................................................6
Specifications DVB-S2 TV.....................................................................................7
Select Input Source................................................................................................8
First Time Installation............................................................................................8
Operation
Quick Reference - TV Menu Access..................................................................10
Basic Functions of TV Remote............................................................................10
Basic Functions - IR TV Remote..........................................................................12
TV Menu Access-Console Controls...................................................................14
Configuration
Channel Menu ATV/DTV....................................................................................15
Channel Menu Satellite Source.........................................................................18
Picture Menu........................................................................................................22
Sound Menu.........................................................................................................24
Time Menu............................................................................................................25
Lock Menu............................................................................................................27
Hotel Mode..........................................................................................................29
Setup Menu..........................................................................................................30
Electronic Programming Guide (EPG)..............................................................33
Maintenance and Troubleshooting
Cleaning...............................................................................................................35
Approved and Compatible Cleaners................................................................35
Troubleshooting..................................................................................................35
Advanced Troubleshooting...............................................................................36
Replace headphone jack on the wired remote control..................................37
Service...................................................................................................................37
Returning Equipment to Life Fitness.................................................................37
Warranty
What is Covered..................................................................................................38
Who is Covered...................................................................................................38
How long it is covered........................................................................................38
Who Pays Transportation and Insurance For Service.....................................38
What We Will Do To Correct Covered Defects...............................................38
What is Not Covered...........................................................................................38
What You Must Do:.............................................................................................38
How to get Parts and Service.............................................................................38
Exclusive Warranty..............................................................................................38
Changes in Warranty Not Authorized...............................................................39
Effects of State Laws............................................................................................39
Our Pledge To You..............................................................................................39
©
Copyright 2018, Life Fitness, a division of Brunswick Corporation. All Rights Reserved.
Columbia Center III - 9525 West Bryn Mawr Ave., Rosemont, IL 60018 • 847-288-3300
www.lifefitness.com • 1009362-0001 AA • 2018
Page 4 of 39

1. Getting Started
Safety Instructions
Caution: Any changes or modifications to this equipment could void the product warranty.
Warning: To reduce the risk of burns, fire, electric shock, or injury, it is imperative to connect each product to a
properly grounded electrical outlet.
Warning: To prevent injury, this product must be securely attached in accordance with the installation instructions.
Danger: To reduce the risk of electrical shock or injury from moving parts, always unplug product before cleaning
or attempting any maintenance activity.
• Never operate the product if it has a damaged power cord or electrical plug, or if it has been dropped, damaged, or
even partially immersed in water. Contact Customer Support Services.
• Position the product so that the power cord plug to the wall is accessible to the user. Make sure that the power cord
is not knotted or twisted and that it is not trapped under any equipment or other objects.
• Keep the power cord away from heated surfaces. Do not pull the equipment by the power cord or use the cord as a
handle.
• If the electrical supply cord is damaged, it must be replaced by the manufacturer, an authorized service agent, or a
similarly qualified person to avoid a hazard.
• Always follow the product instructions for proper operation.
• Never insert objects into any opening in these products. If an object should drop inside, turn off the power, unplug
the power cord from the outlet, and carefully retrieve it. If the item cannot be reached, contact Customer Support
Services.
• Do not use this product outdoors, near swimming pools or in areas of high humidity. Do not expose this product to
dripping or splashing liquids. If the product should be exposed to liquid, contact Life Fitness Customer Support
Services.
• Never operate the product with the air openings blocked. Keep air openings free of lint, hair, or any other obstructing
material.
• Use these products for their intended use as described in this manual. Do not use attachments that have not been
recommended by the manufacturer.
• Health and Environmental Regulations Warning - This product may contain chemicals known to the State of California
to cause cancer, birth defects, or other reproductive harm. For more information related to the European Commission
Regulation (EC) No. 1907/2006 (REACH) and the California Safe Drinking Water and Toxic Enforcement Act of 1986
(Proposition 65), please visit https://www.lftechsupport.com/web/guest/environmental-regulations-information.
Save these instructions for future reference.
Antenna Grounding
Note to the CATV Installer:
This reminder is provided to call the CATV system installer’s attention to Article 820-40 of the NEC that provides guidelines
for proper grounding and, in particular, specifies that the cable ground shall be connected to the grounding system of
the building as close to the point of cable entry as practical.
Antenna Grounding According to the NEC
Antenna Grounding According to the National Electrical Code, ANSI/NFPA 70.1.
Page 5 of 39
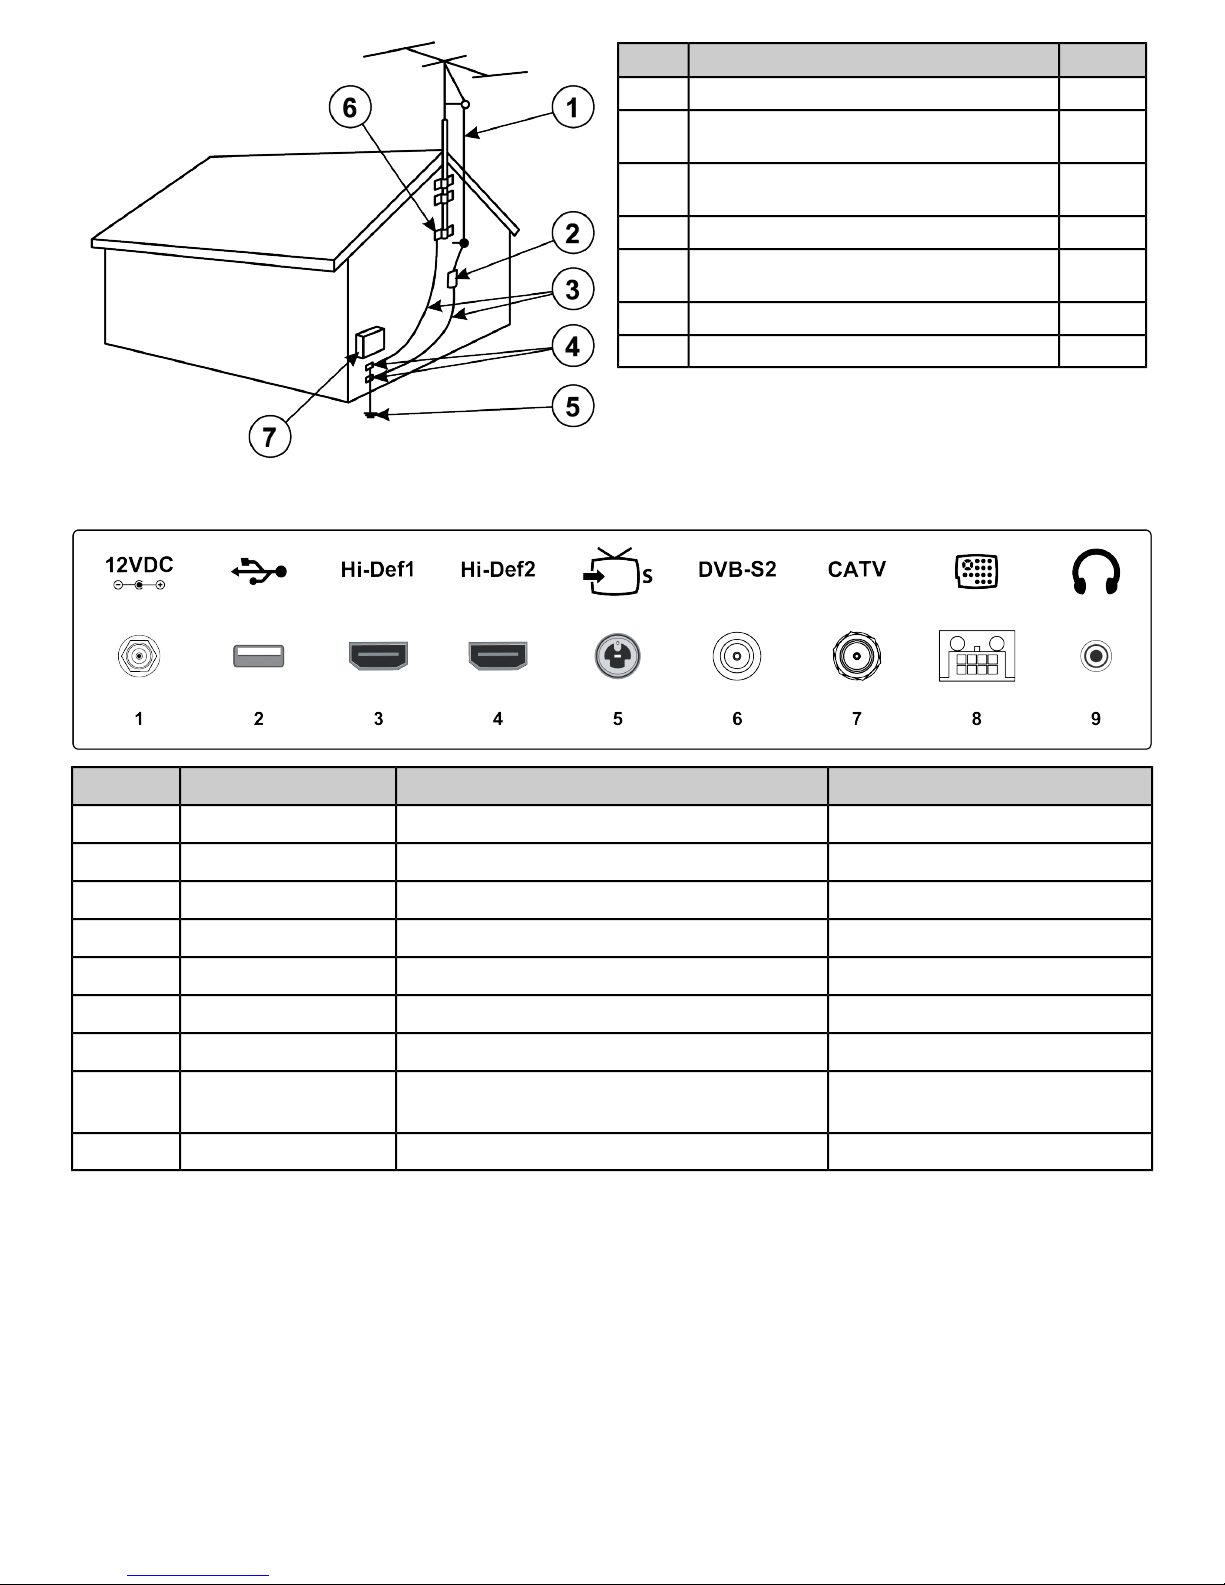
Media Connections
Antenna discharge unit (NEC Section
2
Grounding conductors (NEC Section
3
5
Power service grounding electrode
system (NEC Article 250,Part H)
810-20)
810-21)
QtyDescription
1Antenna lead in wire1
1
2
2Ground clamp4
1
1Ground clamp6
1Electric service equipment7
Connector TypeDescription
Power Jack12 Volt DC Power InPower In1
USB Type AUSB InputUSB2
HDMIHigh-Definition Audio & Video ConnectionHigh-Def13
HDMIHigh-Definition Audio & Video ConnectionHigh-Def24
S-VideoS-Video Signal InS-Video In5
RF F-Type (Male)Antenna / Cable connectionDVB-S26
RF F-Type (PAL Female)Antenna / Cable ConnectionRF Coaxial7
8
Wired Remote /
Media Cable
Remote ControlWired Remote Control Connection
3.5mm stereo jack, 0.3WHeadphone ConnectionAudio Out9
Page 6 of 39
Specifications DVB-S2 TV
15.6” Diagonal Wide Screen Format
16:9Aspect Ratio
160 degrees horizontal x 160 degrees verticalViewing Angle
High-definition television will accept content up to 1080pHD Channel Ready
13.5" L x 7.6" H (34.4 cm L x 19.4 cm H)Visible Screen Size
250 nits (cd/m2)Brightness
6-bit; 262,144 colorsDisplay Color
1.764 million pixels, 1920 (H) x 1080 (V) FHDResolution
700:1Contrast Ratio
S-video, High-Definition * 2
Video
Power Rating
RF Analog TV Systems: SECAM, PAL-B/G, PAL-D/K, PAL-I, PAL-LL
Digital Broadcasting System: DVB-T/T2, DVB-C. DVB-S2)
MPEG-2, MPEG-4, HEVC
NICAM/A2, MPEG-1, AC3+Audio
UHF, VHF, CATVChannel Coverage
75-ohm RF Input (+12dBmV +/ - 25dB)Antenna: RF
20W NominalPower Requirements
12Vdc 5AExternal Power Supply
AC Power Input: 100-240V ~ 50/60 Hz 1.5A
DC Supply Input: 12V ... 5A
3.5mm Stereo, 300 milliwattHeadphone Jack
13.5" (34.4 cm)LCD Screen Length
7.6" (19.4 cm)LCD Screen Height
75mm(H) x 75mm(W), 100mm (H) x 100mm (W)VESA Mounting Support
Shipped DimensionsPhysical Dimensions
Manufactured under license from Dolby Laboratories. Dolby and the double-D symbol are trademarks of Dolby
Laboratories.
21 in. / 53.3 cm16 in. / 40.2 cmLength
7 in. / 17.8 cm2.68 in. / 6.7 cmDepth
15 in. / 38.1 cm11.6 in. / 29.5 cmHeight
13.4 lbs. / 6.1 kg8.5 lbs. / 4.2 kgWeight
Page 7 of 39
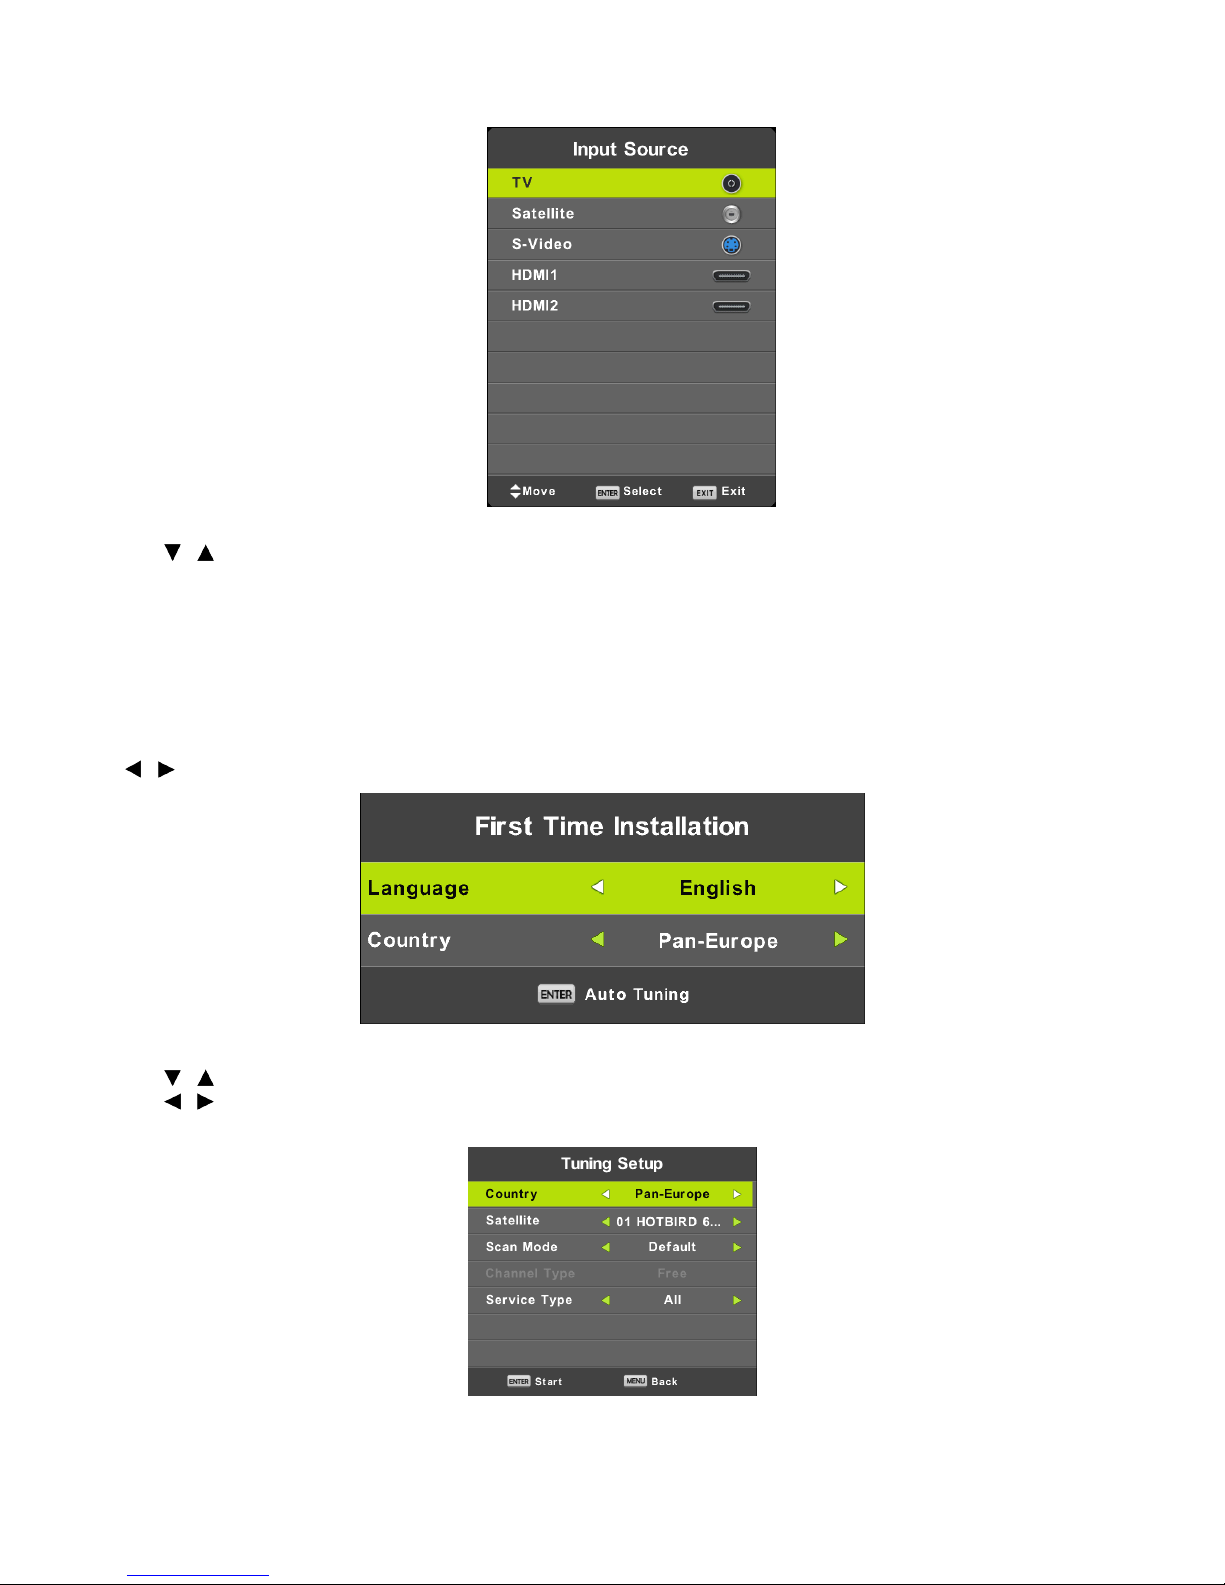
Select Input Source
1. Press INPUT button to display the input source list.
2. Press / or OK button to select the input source you want to.
3. Press OK button to enter the input source.
4. Press EXIT button to quit.
First Time Installation
Connect an RF cable from the “RF-IN” to your TV aerial socket.
Select Language
Press / button to select the language to be used for menus and message.
Select Country
1.
Press / button to highlight country menu.
2.
Press / button to select the country you want to.
Page 8 of 39
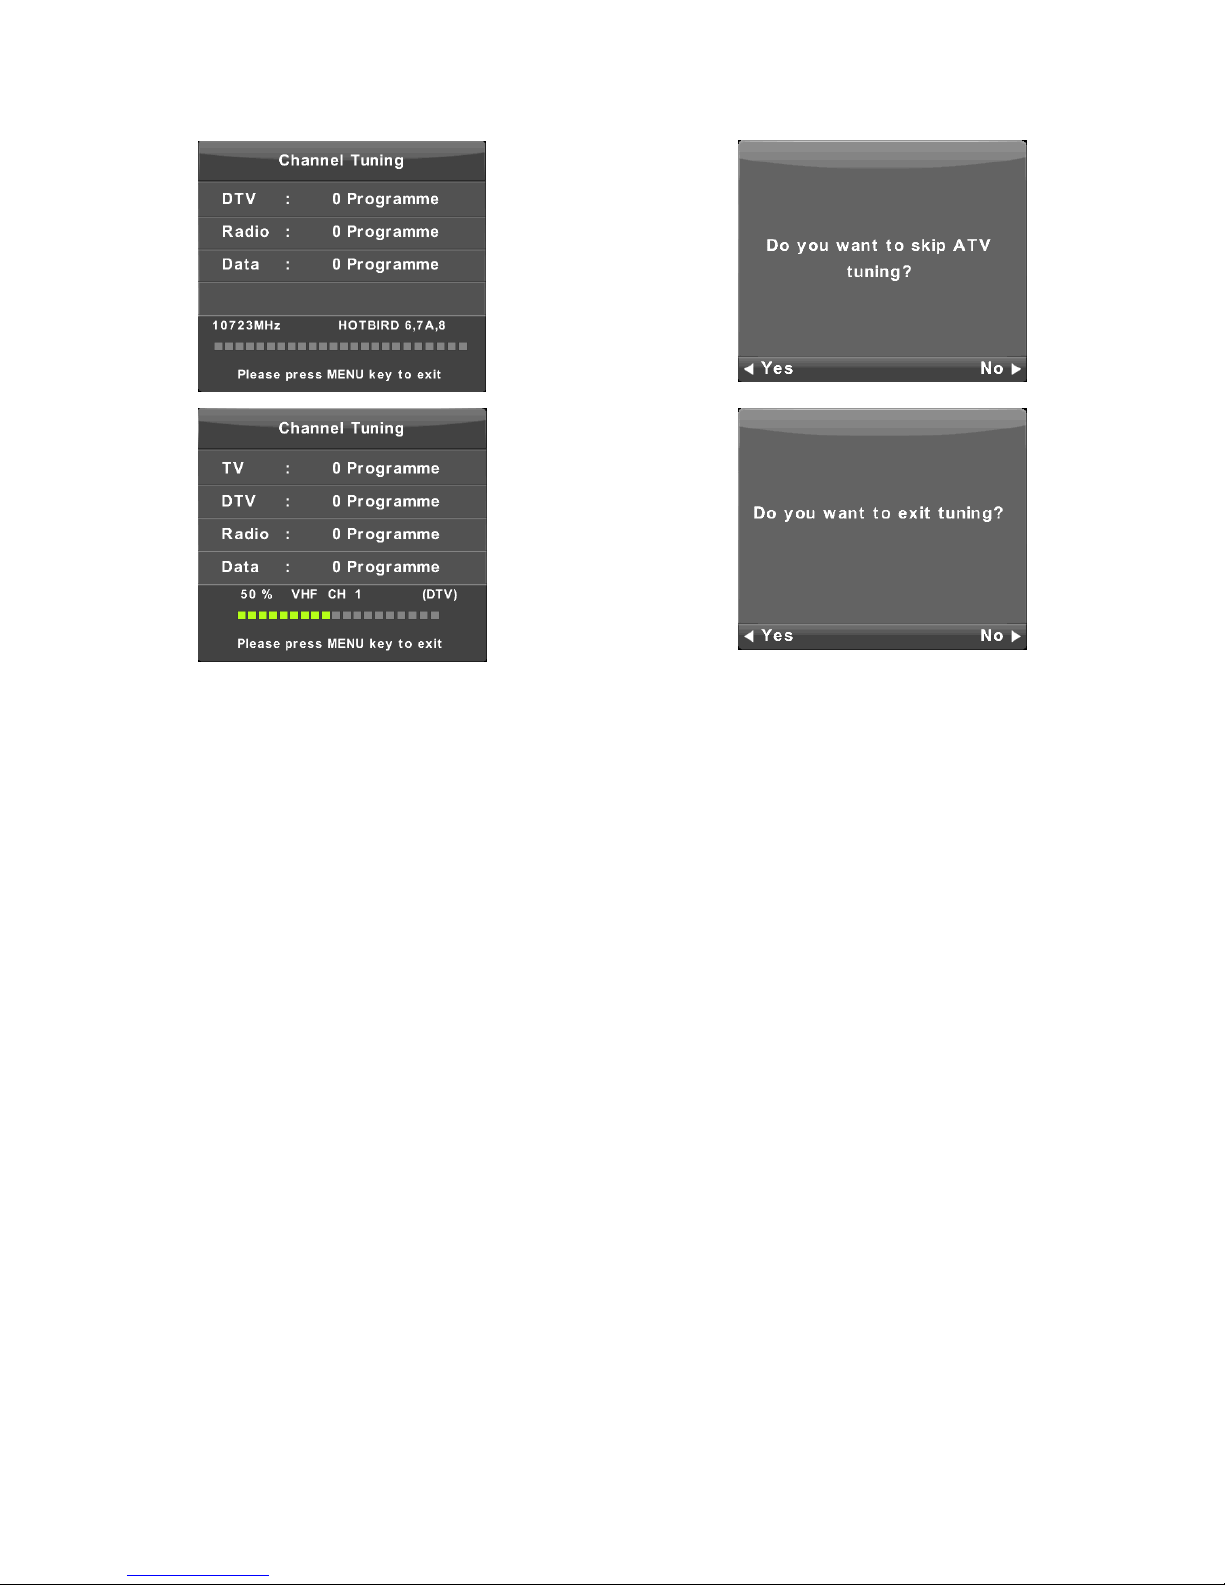
Auto Tuning
1. First tuning ATV, press Menu and left arrow button to skip ATV tuning.
2. Second tuning DTV, press Menu and left arrow button to skip DTV tuning.
Page 9 of 39
2. Operation
Quick Reference - TV Menu Access
LIFE FITNESS recommends programming the 15” Attachable TV by using an IR TV Remote.
The TV can also be programmed by using an attachable TV REMOTE if on the order (for Achieve consoles) and through
an Integrity, Inspire, or Discover SI console. Please follow the guidelines below to program the TV. The password key on
Life Fitness TVs is always 0000.
If you are unable to follow the guidelines above, do not have an IR TV REMOTE, or if there are any other issues with the
15” Attachable TV please promptly report the issue to Life Fitness Customer Support Services.
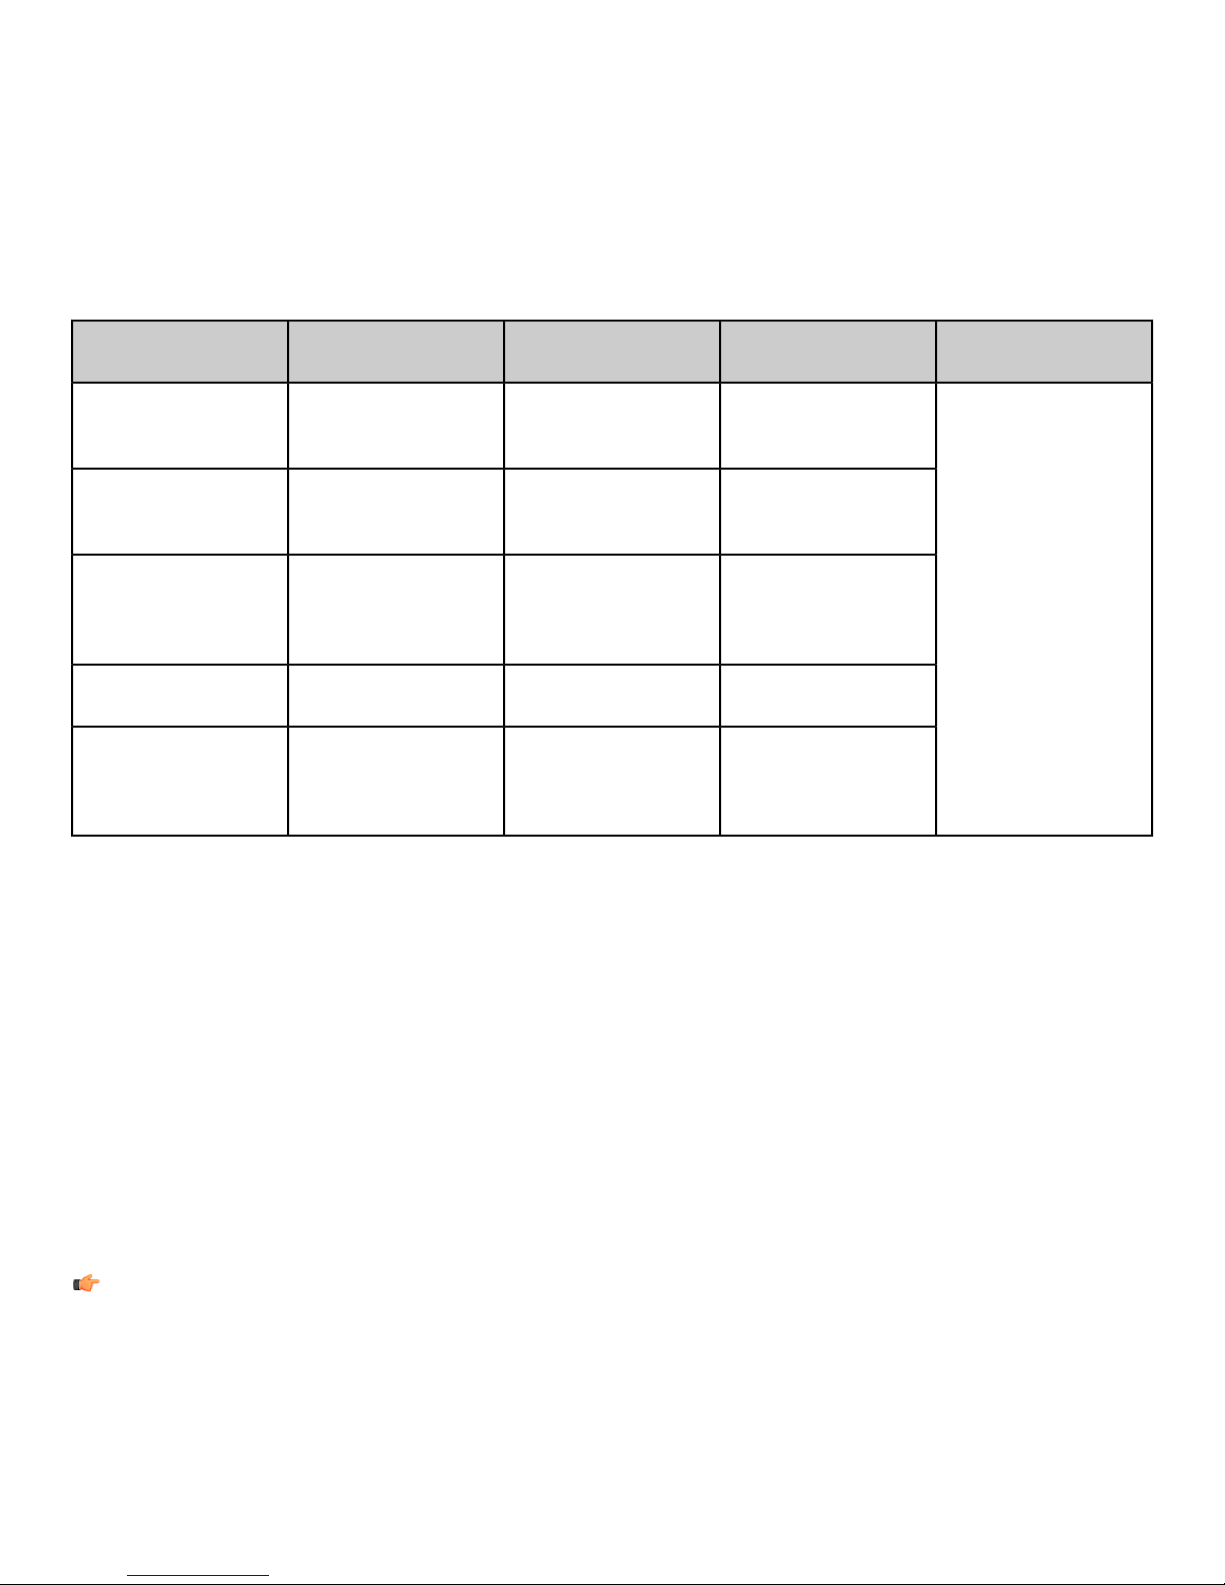
Inspire & Discover SI
Consoles
Enter the SYSTEM
OPTION MENU.
Enter TV SETUP
MENU.
Press the REMOTE key
in the lower left corner
of the screen (Discover
SI only).
Select the DVB Menu.
Use the ARROW keys
to navigate TV Setup.
Access Setup Menu
Scroll Menu
Make a Selection
Go Back
Exit Setup Menu
TV RemoteAction
Press and hold the
POWER key for 5
seconds.
Use the UP and
DOWN arrow keys.
Press the CLOSED
CAPTION (CC) button
or the RIGHT VOLUME
key.
Use the LEFT VOLUME
key.
Press and hold the
POWER key for 5
seconds.
Remote
Press MENU.
Use the UP and
DOWN arrow keys.
Press MENU or Press
Exit.
Integrity ConsolesIR (Infrared) TV
Press and hold TV
POWER key for 5
seconds.
Use the VOLUME and
CHANNEL UP and
DOWN arrow keys.
Press ENTER.Press ENTER.
N/APress MENU.
Press TV LAST key
once or press and hold
the TV POWER key for
5 seconds.
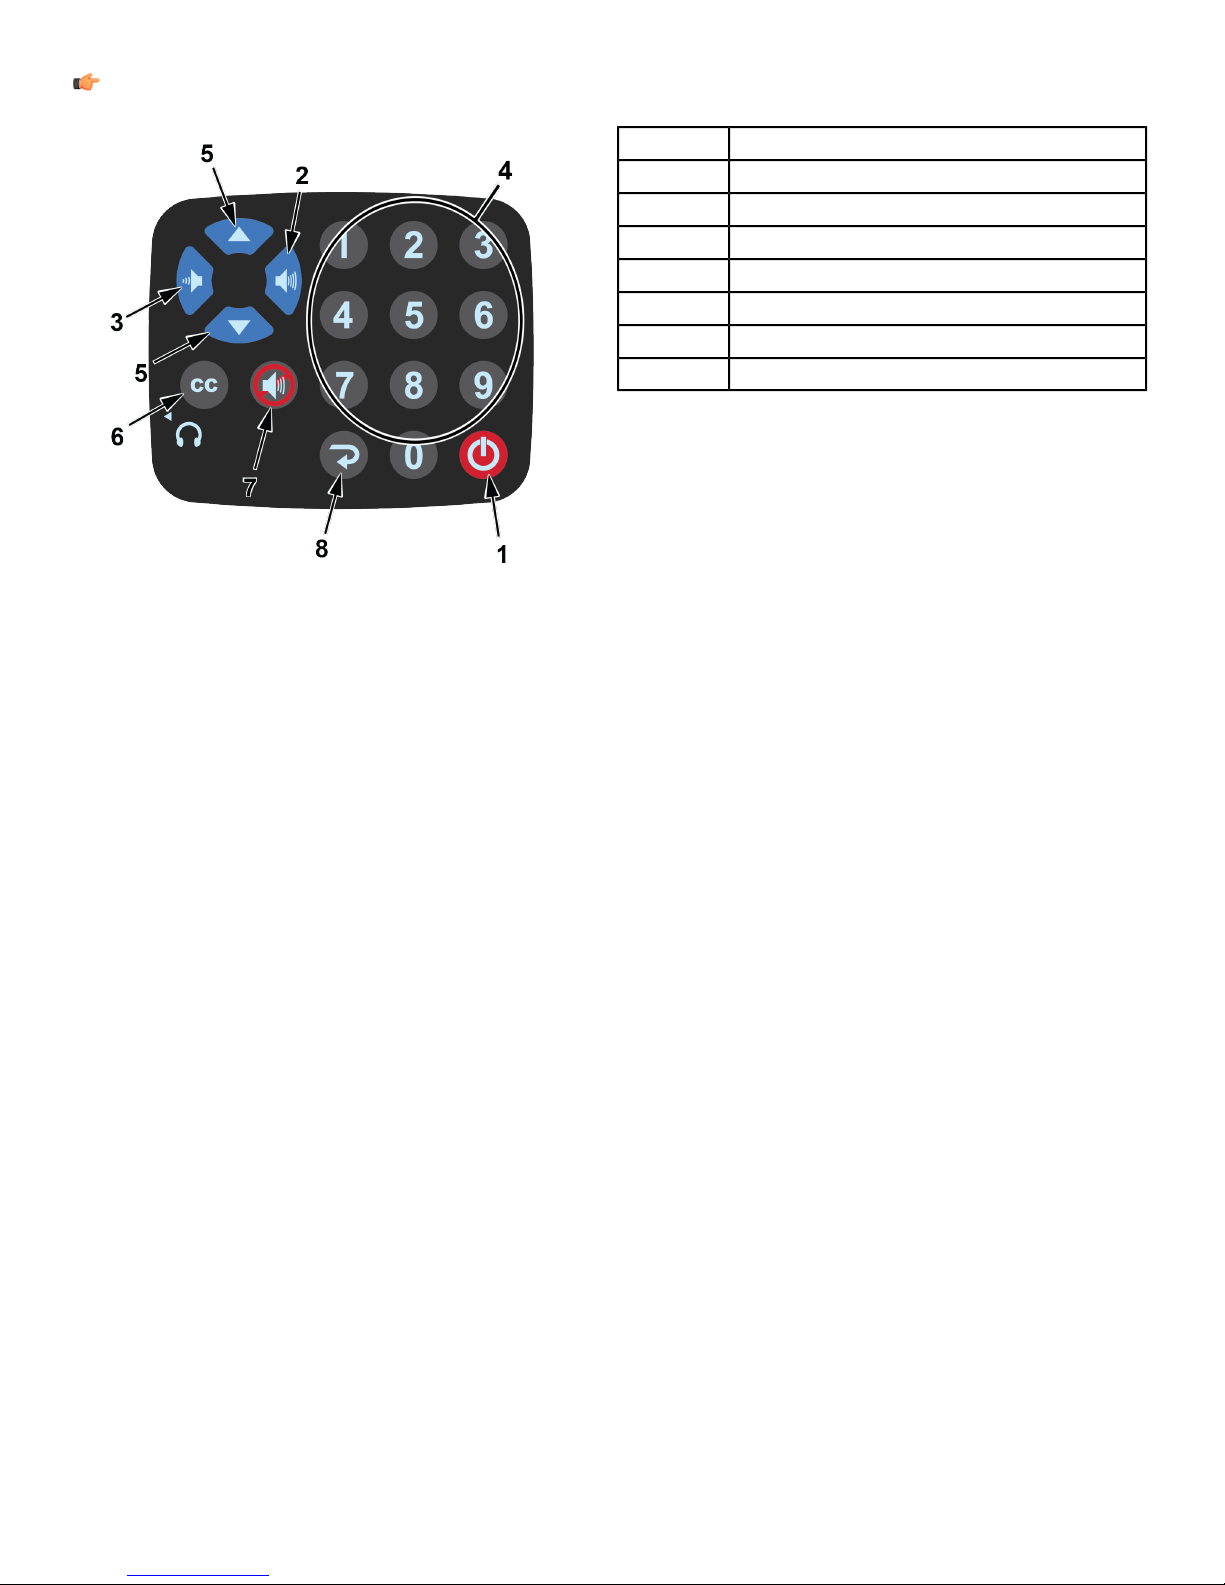
Basic Functions of TV Remote
Basic Functions
Turn the power on by pressing the ON/OFF key (1) on the remote control. A blue LED appears on the lower right corner
of the TV when the power is on. The LED blinks during SLEEP mode (the back light will be off).
Press the POWER key (1) and hold for 5 seconds to access the Setup Menu.
Use the RIGHT VOLUME key (2) and LEFT VOLUME key (3) to adjust volume. The RIGHT VOLUME key (2) increases
volume. The LEFT VOLUME key (3) decreases volume. A volume indicator will appear on the console while the volume
is being adjusted. The volume indicator will disappear after approximately 20 seconds of inactivity.
Use the RIGHT VOLUME key (2) to select a menu option. Use the LEFT VOLUME key (3) to go backwards through menu
options. Channels can be selected by using the NUMERIC KEYPAD (4) or by scrolling up or down through available
channels by pressing the UP and DOWN channel arrow keys (5).
Press the CLOSED CAPTION (CC) key (6) to turn the closed caption on/off.
Press the MUTE key (7) to mute the sound.
The PREVIOUS key (8) can be used to select the channel viewed immediately prior to the current channel. Repeatedly
pressing the PREVIOUS key can be used to toggle between two channels.
Note: The PREVIOUS key (8) acts as the - when entering channels. Example: Press 5 > PREVIOUS key > 1, to
enter 5-1 as the channel.
Headphones are necessary to hear any volume adjustments. Plug headphones into the HEADPHONE JACK located on
the side of the remote control.
Within Set-Up Menus
Use the RIGHT VOLUME key (2) to select a menu option. Use the LEFT VOLUME key (3) to go backwards through menu
options.
Use the CC key (6) to select menu options.
Page 10 of 39
Use the CC key (6) as the ENTER function when selecting channels.
Note: The Achieve™ console with Attachable TV includes the TV Remote. The Attachable TV System for new or
previously purchased silver/gray commercial cardio machines includes the TV Remote.
ON / OFF key1
RIGHT VOLUME key2
LEFT VOLUME key3
NUMERIC KEYPAD4
UP and DOWN channel arrow keys5
CC key6
MUTE key7
PREVIOUS key8
Page 11 of 39
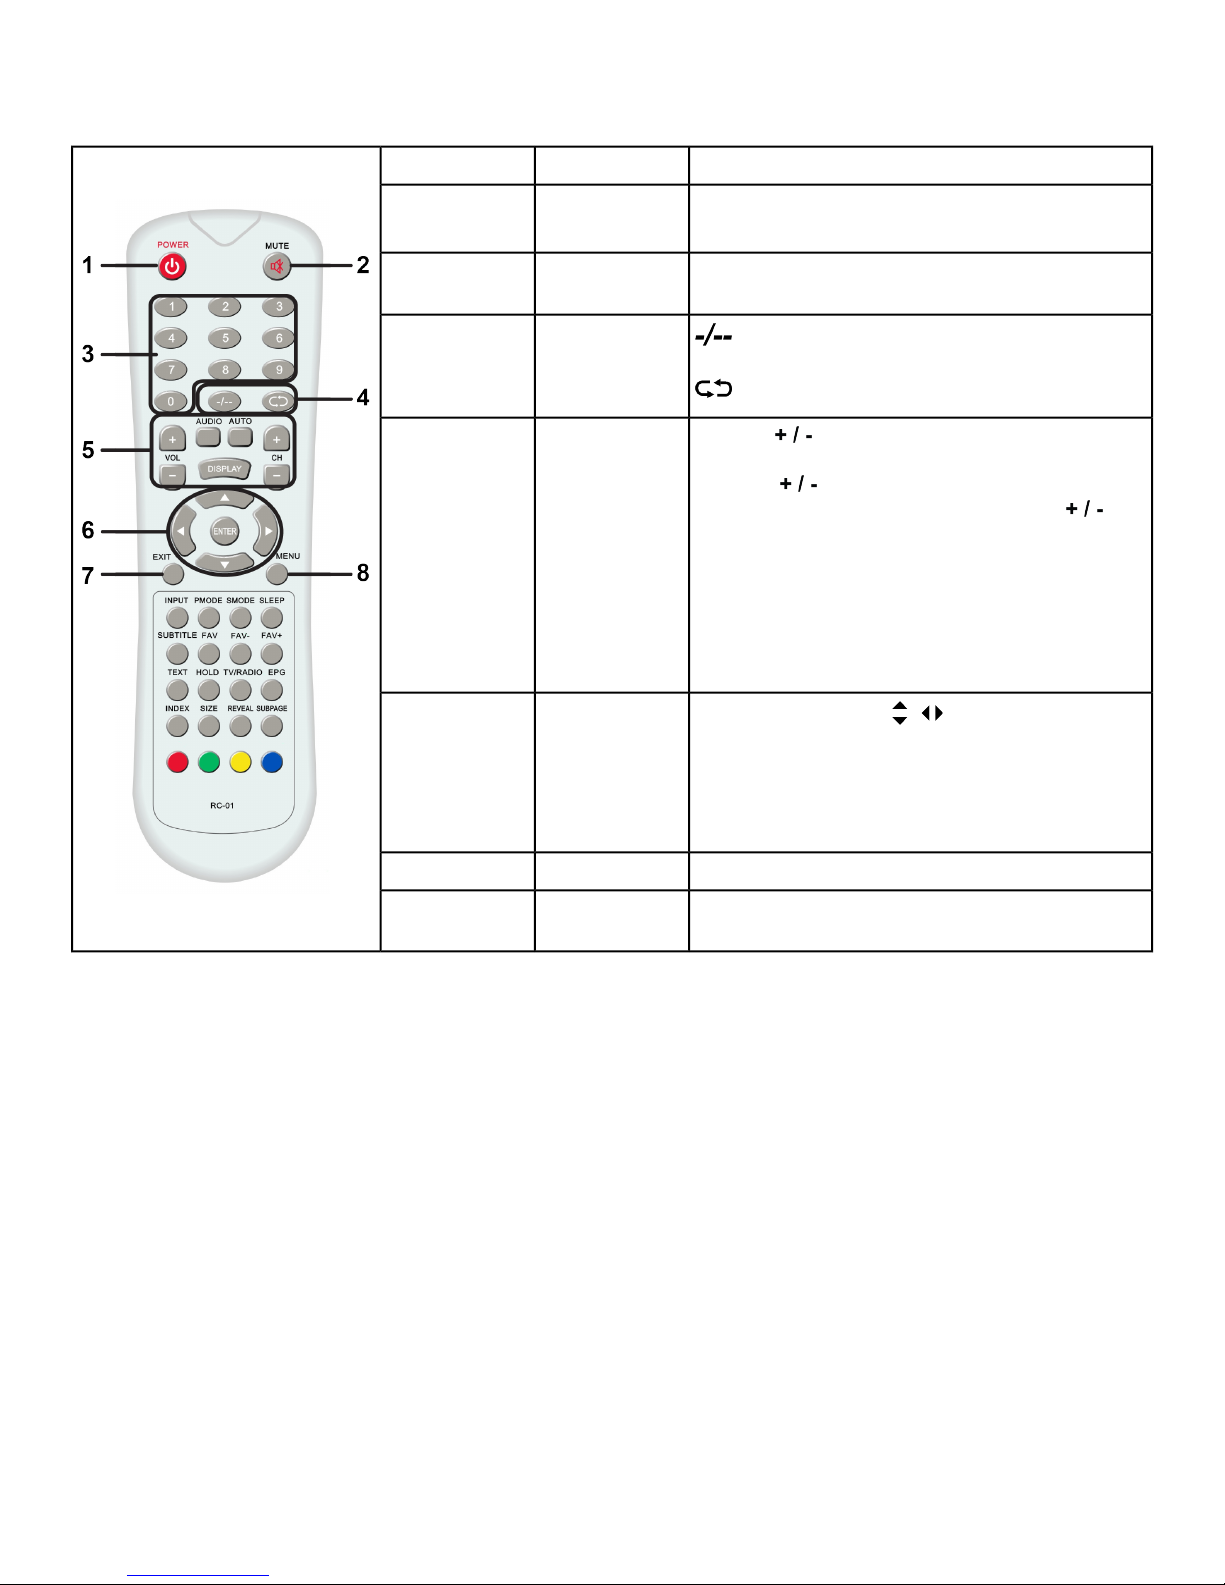
Basic Functions - IR TV Remote
IR TV Remote
Programming is easier with the optional IR TV Remote. Contact Life Fitness to order one or more
IR TV Remote controls if desired.
Press to turn TV On / Off.Power1
Mute2
3
4
5
Number
Buttons
Channel
buttons
Volume /
Channel /
Configuration
Press to mute the sound.
Press again to unmute (or press VOL+).
Press 0 - 9 to select a TV Channel directly.
Press this button to enter a specific channel
number.
Return to previous channel viewed.
Volume Press to increase or decrease sound
level.
Channel Press to scan through channels. To
scan quickly press and hold down either
buttons.
Audio Press to view audio languages.
Auto Press to do auto configuration directly.
Display Press to display the source and channel
information.
Thumbstick buttons
Allows navigation of the OSD menus and
Navigation6
Menu8
adjustment of settings to your preference.
Enter Press to enter sub menus and make
selections.
Press to exit out of OSD menu.Exit7
Press to display OSD menus (Channel, Picture,
Sound, Time, Lock, Hotel, Setup).
Page 12 of 39
 Loading...