

Page 1

USER GUIDE
Pathatrix® Auto Instrument
Catalog Number PATHATRIXAUTO
Publication Part Number 4478019 Rev. A
Revision Date April 2012
For use in food and environmental testing only.
Page 2

The information in this guide is subject to change without notice.
DISCLAIMER
LIFE TECHNOLOGIES CORPORATION AND/OR ITS AFFILIATE(S) DISCLAIM ALL WARRANTIES WITH RESPECT TO THIS
DOCUMENT, EXPRESSED OR IMPLIED, INCLUDING BUT NOT LIMITED TO THOSE OF MERCHANTABILITY, FITNESS
FOR A PARTICULAR PURPOSE, OR NON-INFRINGEMENT. TO THE EXTENT ALLOWED BY LAW, IN NO EVENT SHALL
LIFE TECHNOLOGIES AND/OR ITS AFFILIATE(S) BE LIABLE, WHETHER IN CONTRACT, TORT, WARRANTY, OR UNDER
ANY STATUTE OR ON ANY OTHER BASIS FOR SPECIAL, INCIDENTAL, INDIRECT, PUNITIVE, MULTIPLE OR
CONSEQUENTIAL DAMAGES IN CONNECTION WITH OR ARISING FROM THIS DOCUMENT, INCLUDING BUT NOT
LIMITED TO THE USE THEREOF.
Limited Use Label License: environmental testing, quality control/quality assurance testing, food and agricultural
testing
The purchase of this product conveys to the purchaser the limited, non-transferable right to use the purchased
amount of the product (a) to perform internal research for the sole benefit of the purchaser; and (b) for
environmental testing, quality control/quality assurance testing, food and agricultural testing, including reporting
results of purchaser’s activities in environmental testing, quality control/quality assurance testing, food and
agricultural testing for a fee or other commercial consideration. No other right is hereby granted expressly, by
implication, or by estoppel. This product is for environmental testing, quality control/ quality assurance testing,
food and agricultural testing and research purposes only.
The purchase of this product does not grant the purchaser any additional rights, including (without limitation) the
right to transfer or resell the product in any form or the right to use the product as a therapeutic agent or
diagnostics test component. For information on obtaining additional rights, please contact
[email protected] or Out Licensing, Life Technologies, 5791 Van Allen Way, Carlsbad, California 92008.
TRADEMARKS
The trademarks mentioned herein are the property of Life Technologies Corporation or their respective owners in
the United States and other countries.
TaqMan is a registered trademark of Roche Molecular Systems, Inc.
© 2012, Life Technologies Corporation. All rights reserved.
Page 3
Page 4
ABBREVIATED SAFETY ALERTS. Hazard symbols
and hazard types specified in procedures may be abbreviated in
this document. For the complete safety information, see the
“Safety” appendix in this document.
Before using this product, read and understand the
information in the “Safety” appendix in this document.
This user guide provides reference information for the Pathatrix® Auto
Instrument and describes how to install, maintain, and troubleshoot the
instrument. Refer to the appropriate Pathatrix® Auto protocol for details
of sample collection and preparation as well as the relevant test.
The Pathatrix® Auto Instrument is an automated system for highvolume, immuno-magnetic separation of pathogens and spoilage
organisms from a wide variety of complex sample matrices found in
food, environmental, and bio-threat samples. The instrument uses
consumable kits and associated antibody-coated beads (Table 2), and
requires common microbiology equipment, supplies, and reagents.
Organisms captured on the Pathatrix® beads are detected by such
methods as real-time PCR, ELISA, or selective agar plating.
Pathatrix® Auto consumable kits and associated beads (Appendix B) are
formatted for individual or pooled samples. The beads are available for
capturing one or two organisms, including, but not limited to,
Campylobacter spp., Listeria spp., Salmonella spp., E. coli O157:H7, and
Cronobacter sakazakii, as well as a general viral capture.
Page 5
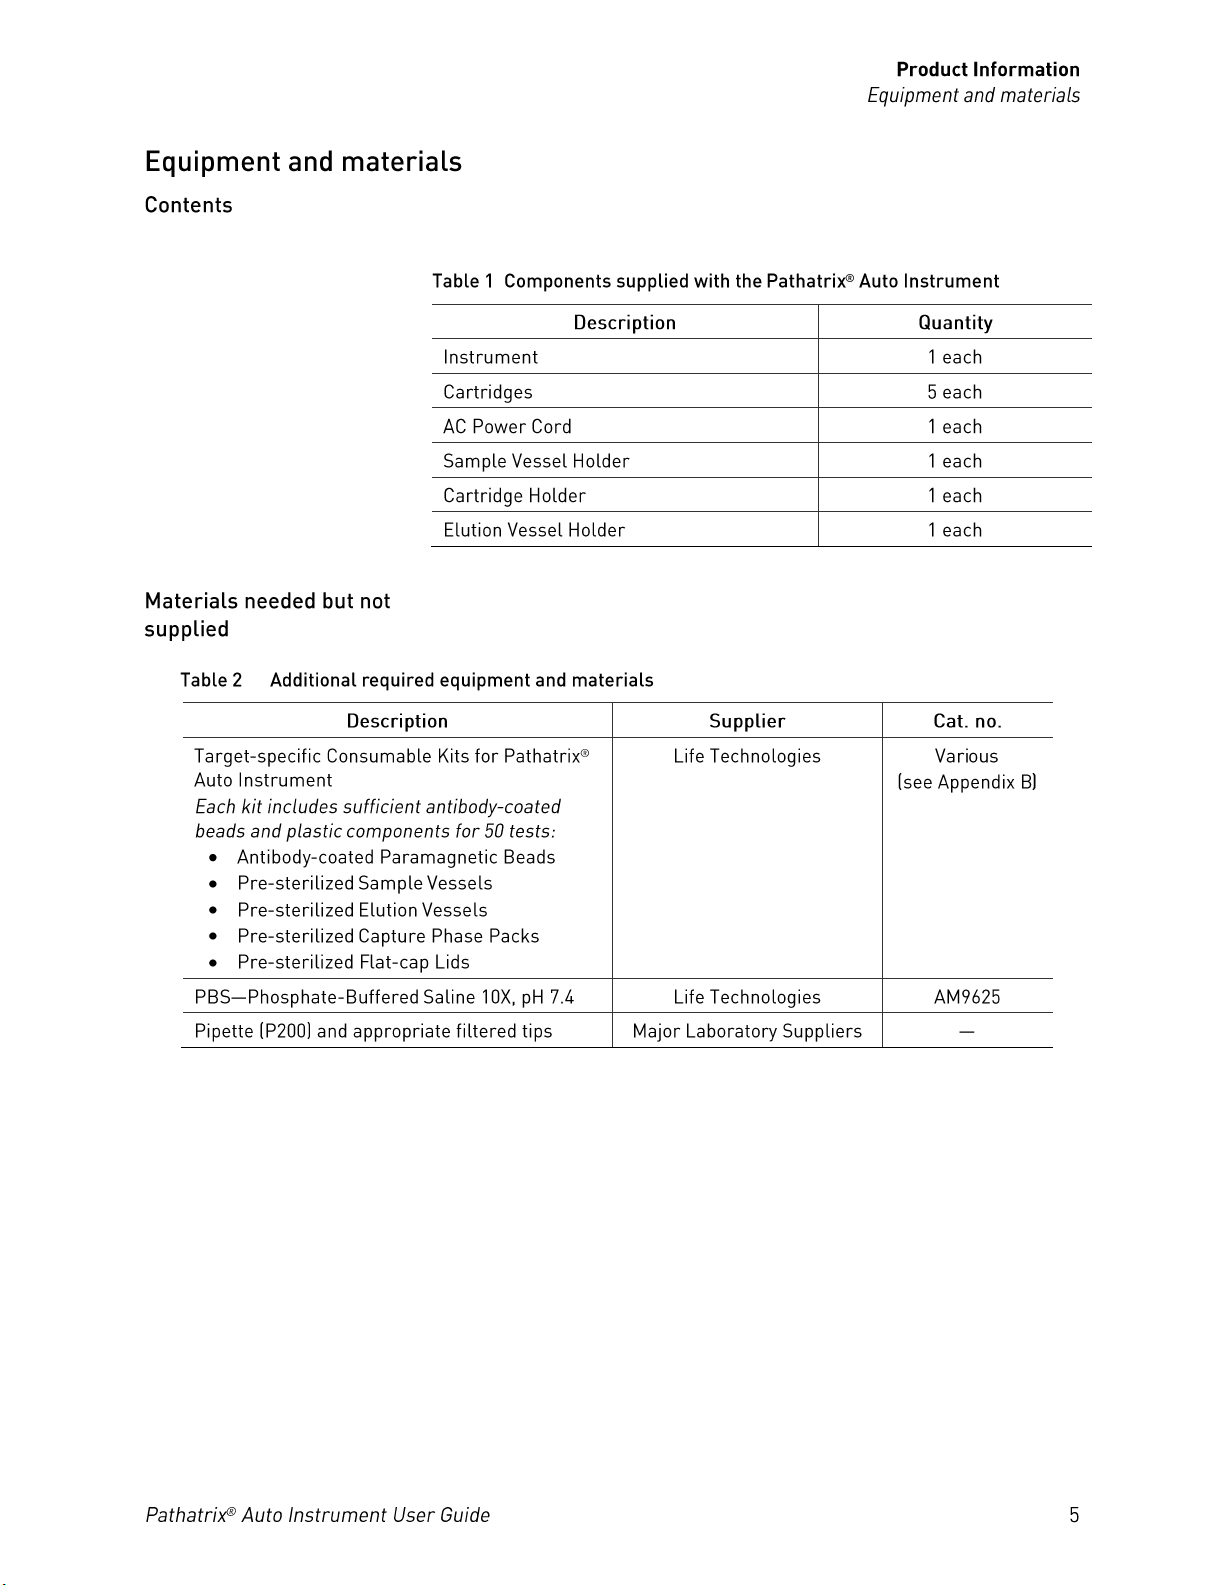
The components listed in Table 1 are supplied with the Pathatrix® Auto
Instrument (Cat. no. PATHATRIXAUTO).
The Pathatrix® Auto Instrument uses common microbiology equipment,
supplies, and reagents.
Page 6
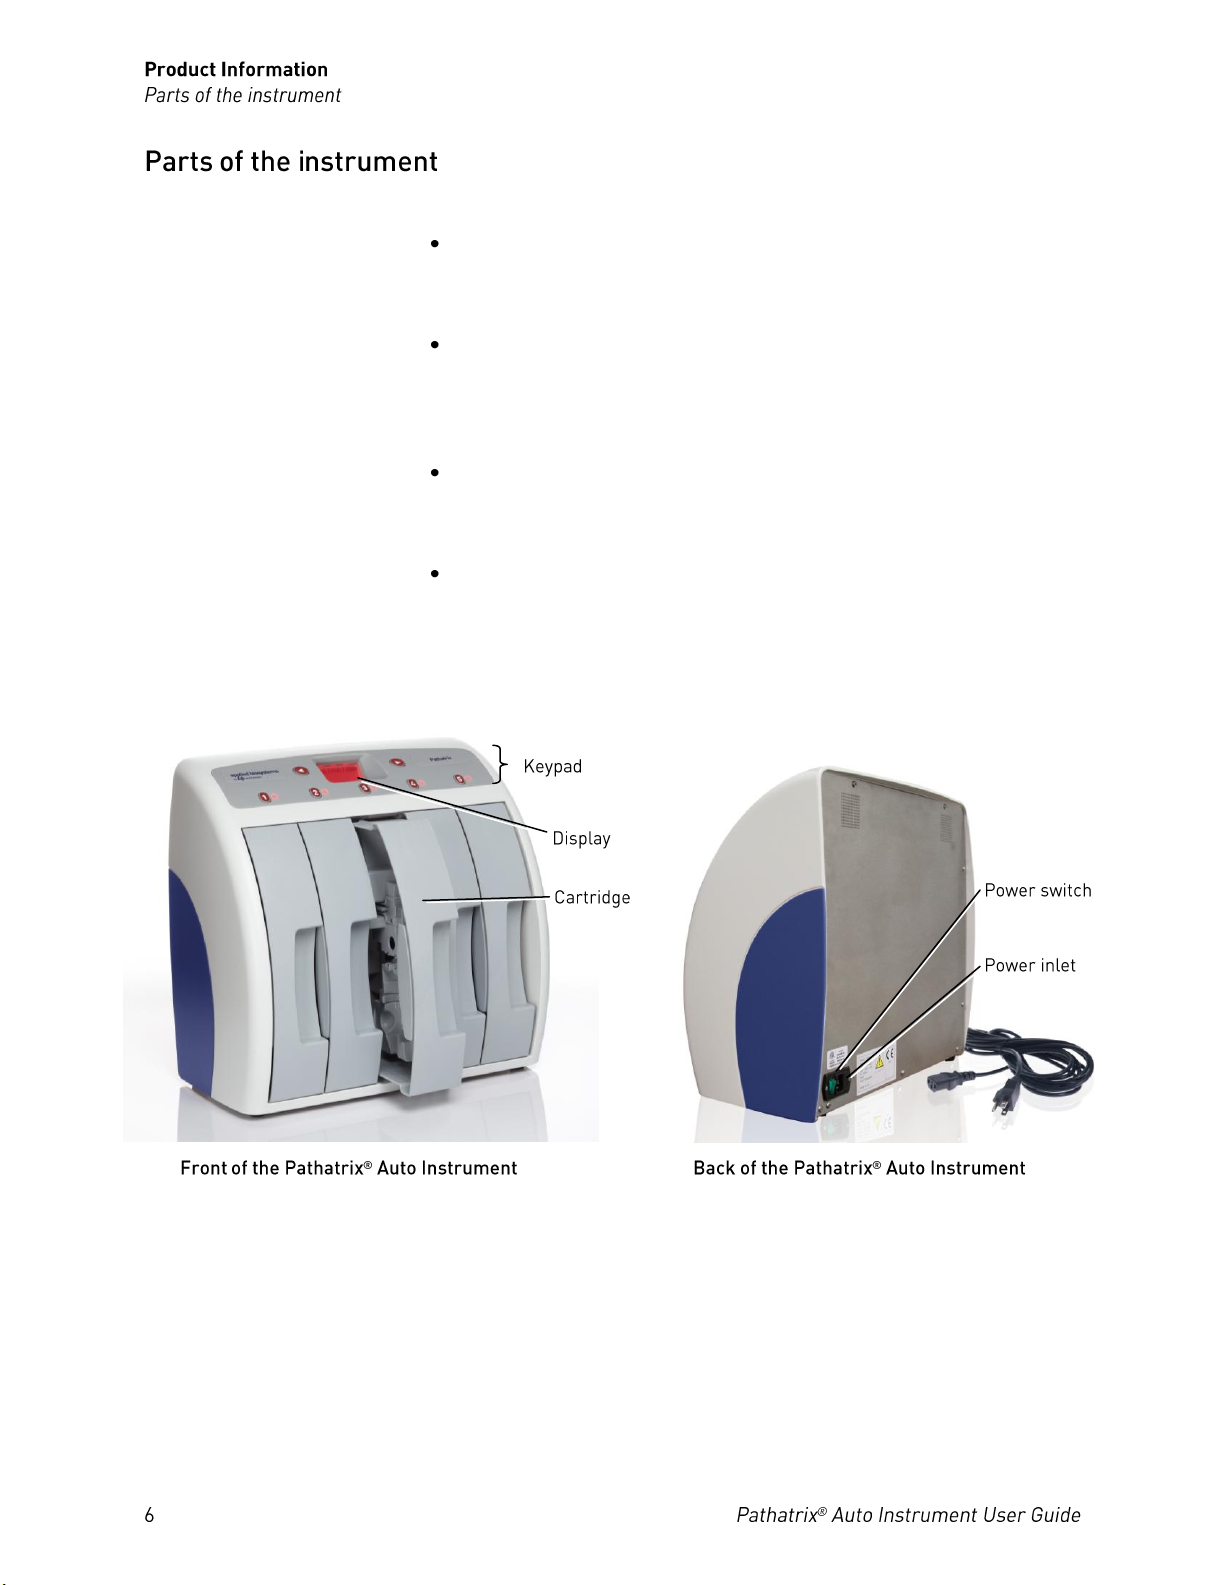
The main parts of the Pathatrix® Auto Instrument are as follows:
Keypad
The keypad is used to control and operate all functions of the
instrument.
Display
The display within the keypad shows the run and set options
available at any particular time, either in standby mode or during a
run. The display is also used to show any technical messages.
Cartridge
The cartridge accommodates the sample consumable (including
capture phase) when the Pathatrix® Auto run is in progress.
Power switch and power inlet
The “On/Off” power switch and power inlet are located at the back of
the instrument in the bottom right-hand corner. If the instrument will
not be used overnight, we recommend switching off the instrument.
Page 7

The Pathatrix® Auto Instrument runs with up to 5 Cartridges. Each
During the Capture cycle, the sample is repeatedly cycled over the
antibody-coated Pathatrix® beads that have been immobilized in the
capture phase by magnets. Periodically, all liquid is expelled from the
capture phase back into the Sample Vessel to ensure thorough mixing of
the entire sample. The sample is then drawn back into the capture phase,
and the cycling of the sample over the Pathatrix® beads continues.
When the Capture cycle is complete, the valve plunger isolates the
capture phase from the Sample Vessel and the Wash cycle starts
automatically.
The Wash cycle involves repeated washing of the beads with sterile
phosphate-buffered saline (PBS) buffer to remove any remnant sample
debris from the capture phase and clean the beads prior to elution. The
waste wash solution is then drained back into the Sample Vessel by
diverting the flow of liquid using the valve plunger.
Once the Wash cycle is complete, the magnets are automatically released
to the “open” position and completely disengage from the capture
phase. Then, the Elution cycle starts automatically.
During the Elution cycle, PBS drawn up from the Elution Vessel is
repeatedly flushed over the capture phase, and the beads are physically
washed off the phase. The resulting bead suspension is expelled from
the capture phase and is drained into the Elution Vessel. There is a single
magnet located in the Cartridge adjacent to the base of the Elution
Vessel. The Pathatrix® beads are drawn out of suspension and
accumulate on the side of the Elution Vessel next to the magnet.
When the Elution cycle is complete, the LED lights above each cartridge
alternate between red and green. The operator starts the Drain cycle by
pressing the numbered button above each cartridge position.
During the Drain cycle, excess PBS is removed from the Elution Vessel
and transferred into the Sample Vessel leaving behind the Pathatrix®
beads and a small volume of PBS.
After isolating the Pathatrix® beads, the sample is ready for downstream
processing to identify potential pathogens.
Cartridge run is independent, so you do not have to start all the
Cartridges at the same time.
After a simple sample-loading procedure, the Pathatrix® Auto
Instrument can be used to capture pathogens on antibody-coated beads.
The steps in the automated run are as follows:
Page 8
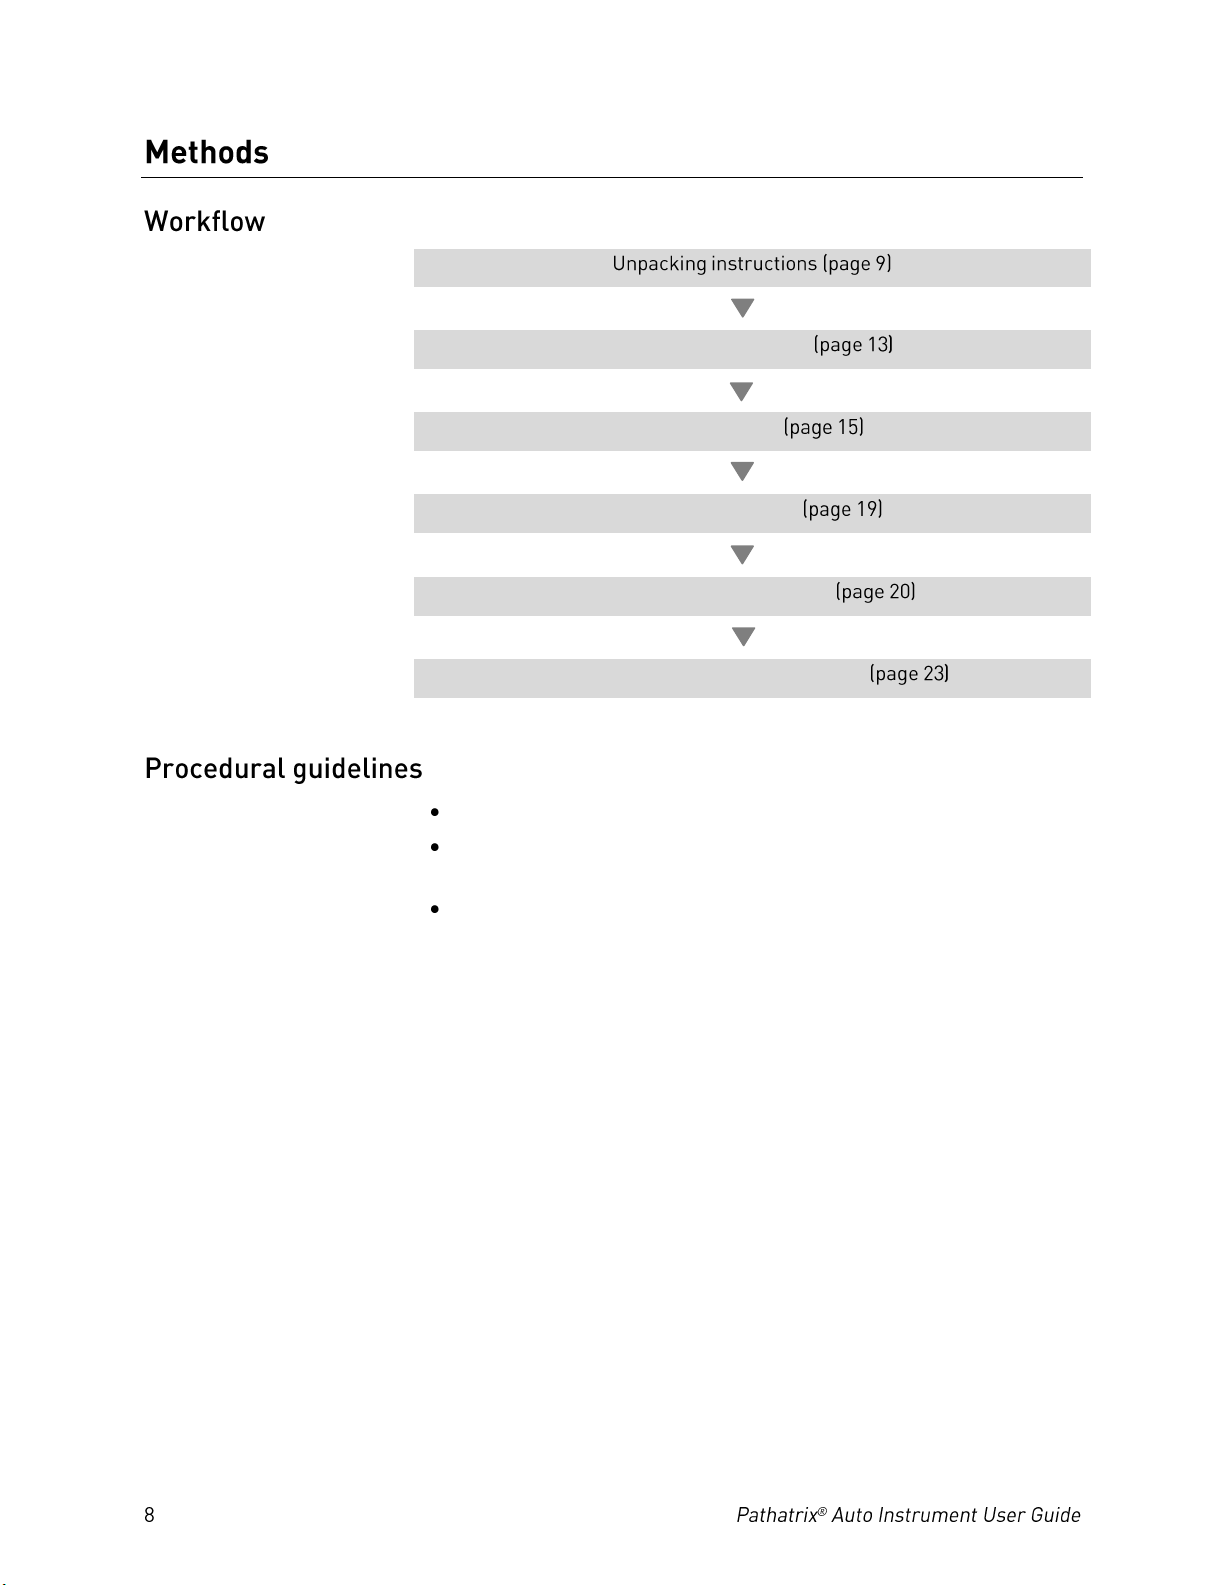
Installation and set up
Sample loading
Pathatrix® Auto run
Isolate the Pathatrix® beads
Clean and maintain the instrument
Use aseptic technique and good laboratory practices at all times.
Take care when handling plates or tubes that contain micro-
organisms.
Avoid generating aerosols, as pathogenic organisms may be present.
Page 9
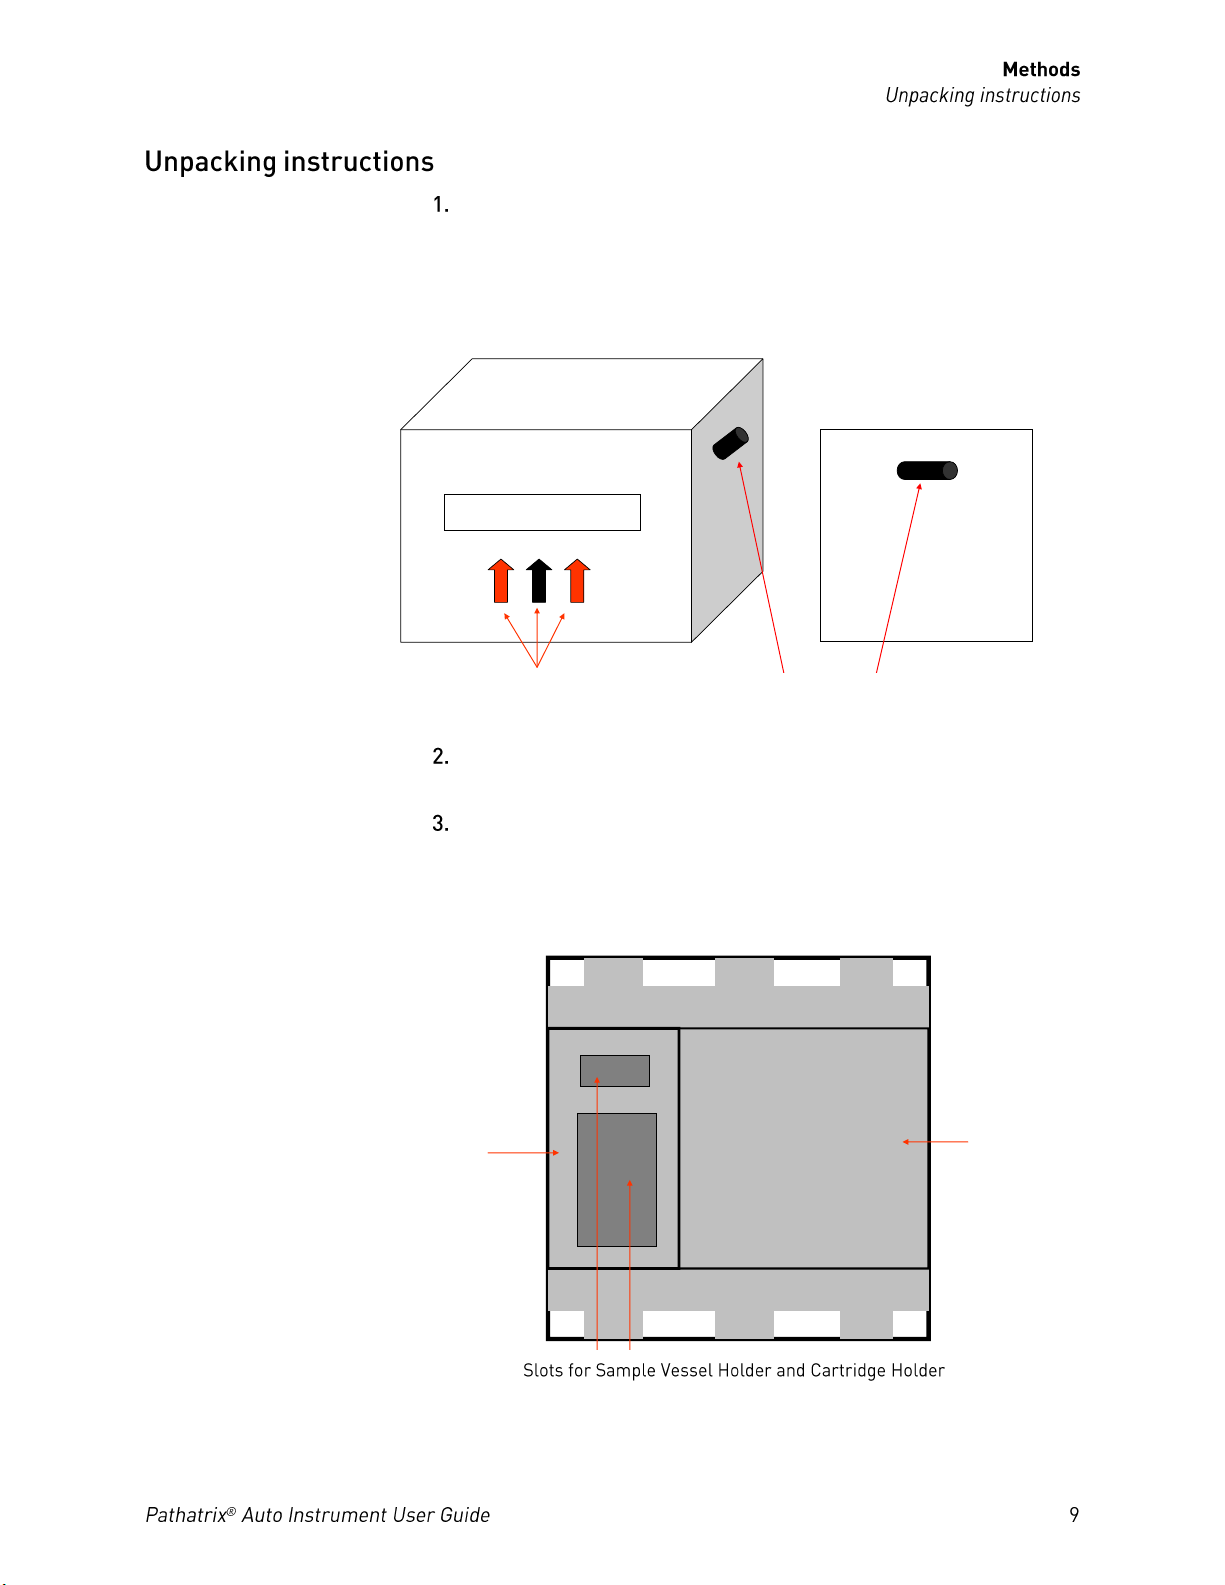
When boxed, the Pathatrix
NEW AUTO
Carrying Handles
Diagram (1)
Directional Arrows
Diagram (2)
Foam Insert
Piece A
Foam Insert
Piece B
Slots for TUBE HOLDER and CARTRIDGE HOLDER
®
Auto Instrument is designed to be
carried by two people, one on each side of the box, using the handles
provided. Until the instrument is unpacked, place the box on a stable
flat surface in the position indicated by the arrows on the side of the
box.
Remove the packing tape securing the top flaps of the box using a
safety blade, if necessary, and open the top of the box.
Remove the Sample Vessel Holder and Cartridge Holder from their
slots, and set aside for use with the instrument.
Remove Foam Insert Pieces A & B and retain with other packaging
materials after unpacking.
Page 10
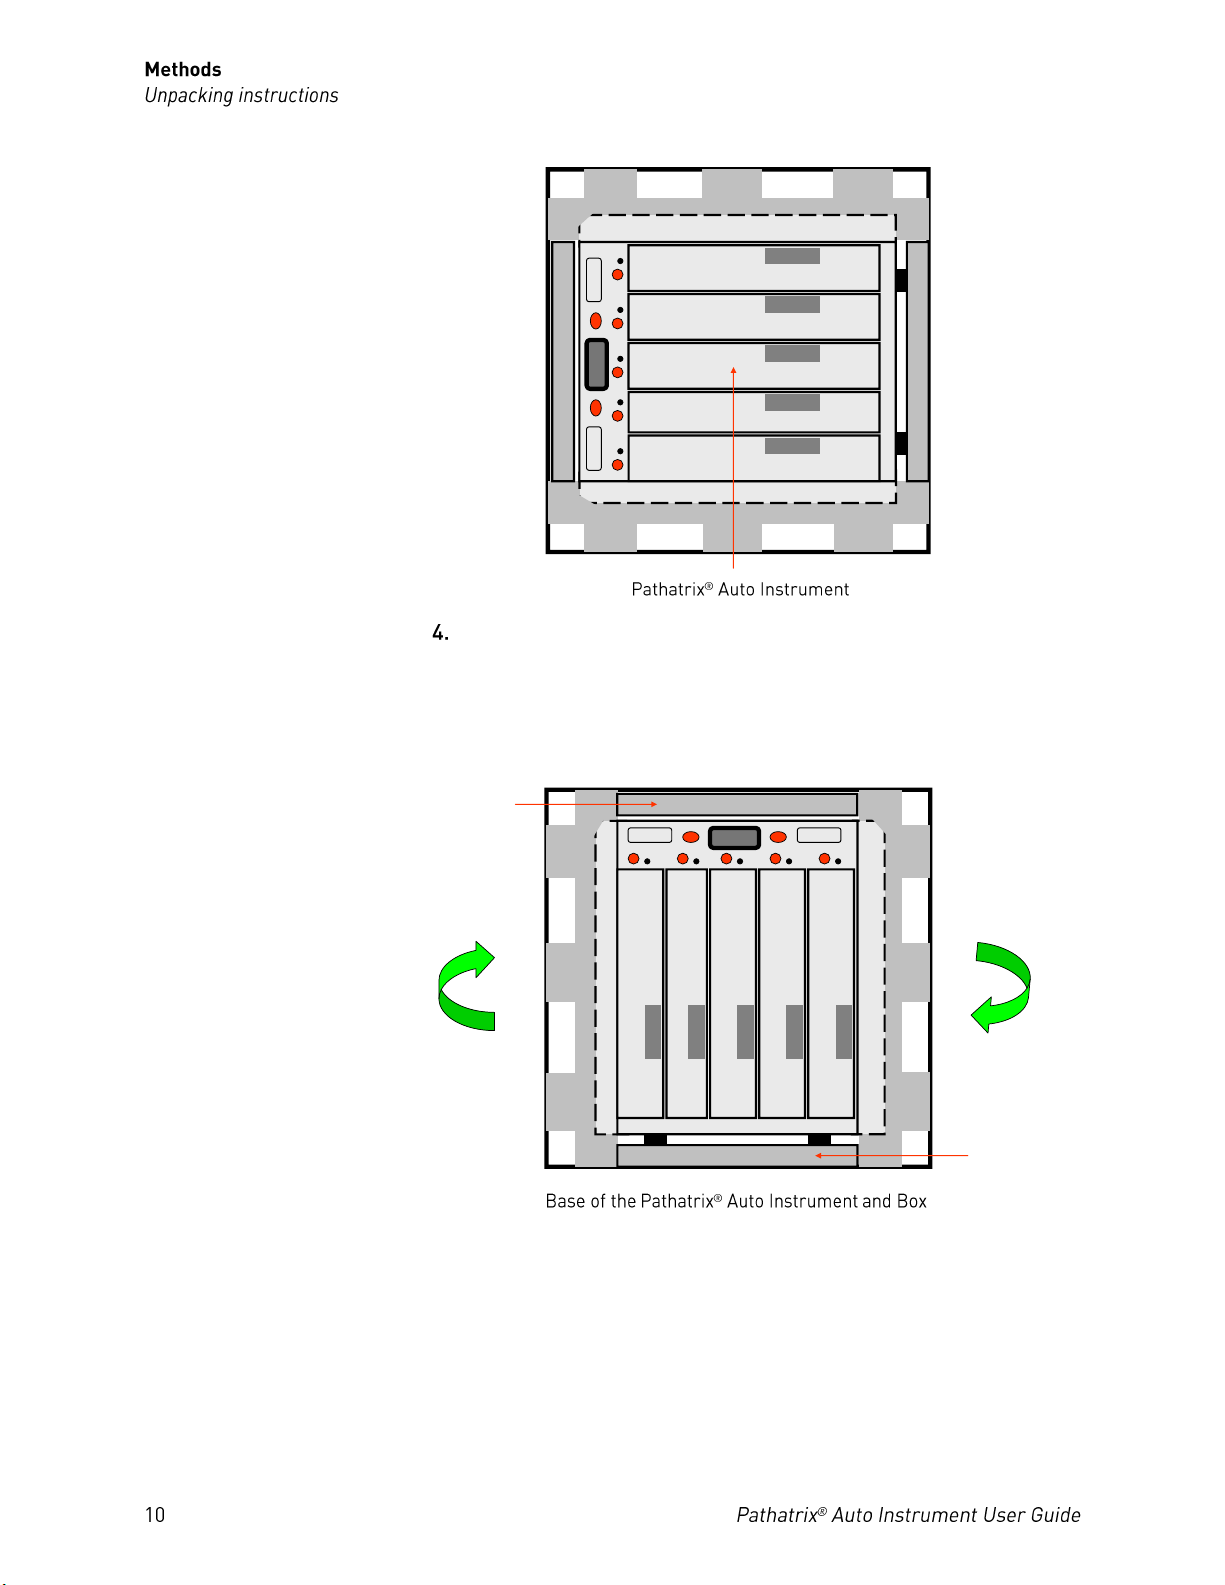
The front of the Pathatrix® Auto Instrument is now visible.
PATHATRIX®AUTO System
Diagram (3)
Diagram (4)
Base of the PATHATRIX® AUTO System and Box
Foam Insert
Piece C
Foam Insert
Piece D
Carefully rotate the box so that the box and the instrument are sitting
upright on a stable flat surface, preferably where the system will be
used to minimize handling.
Remove Foam Insert Pieces C & D and retain with other packaging
materials after unpacking.
Page 11
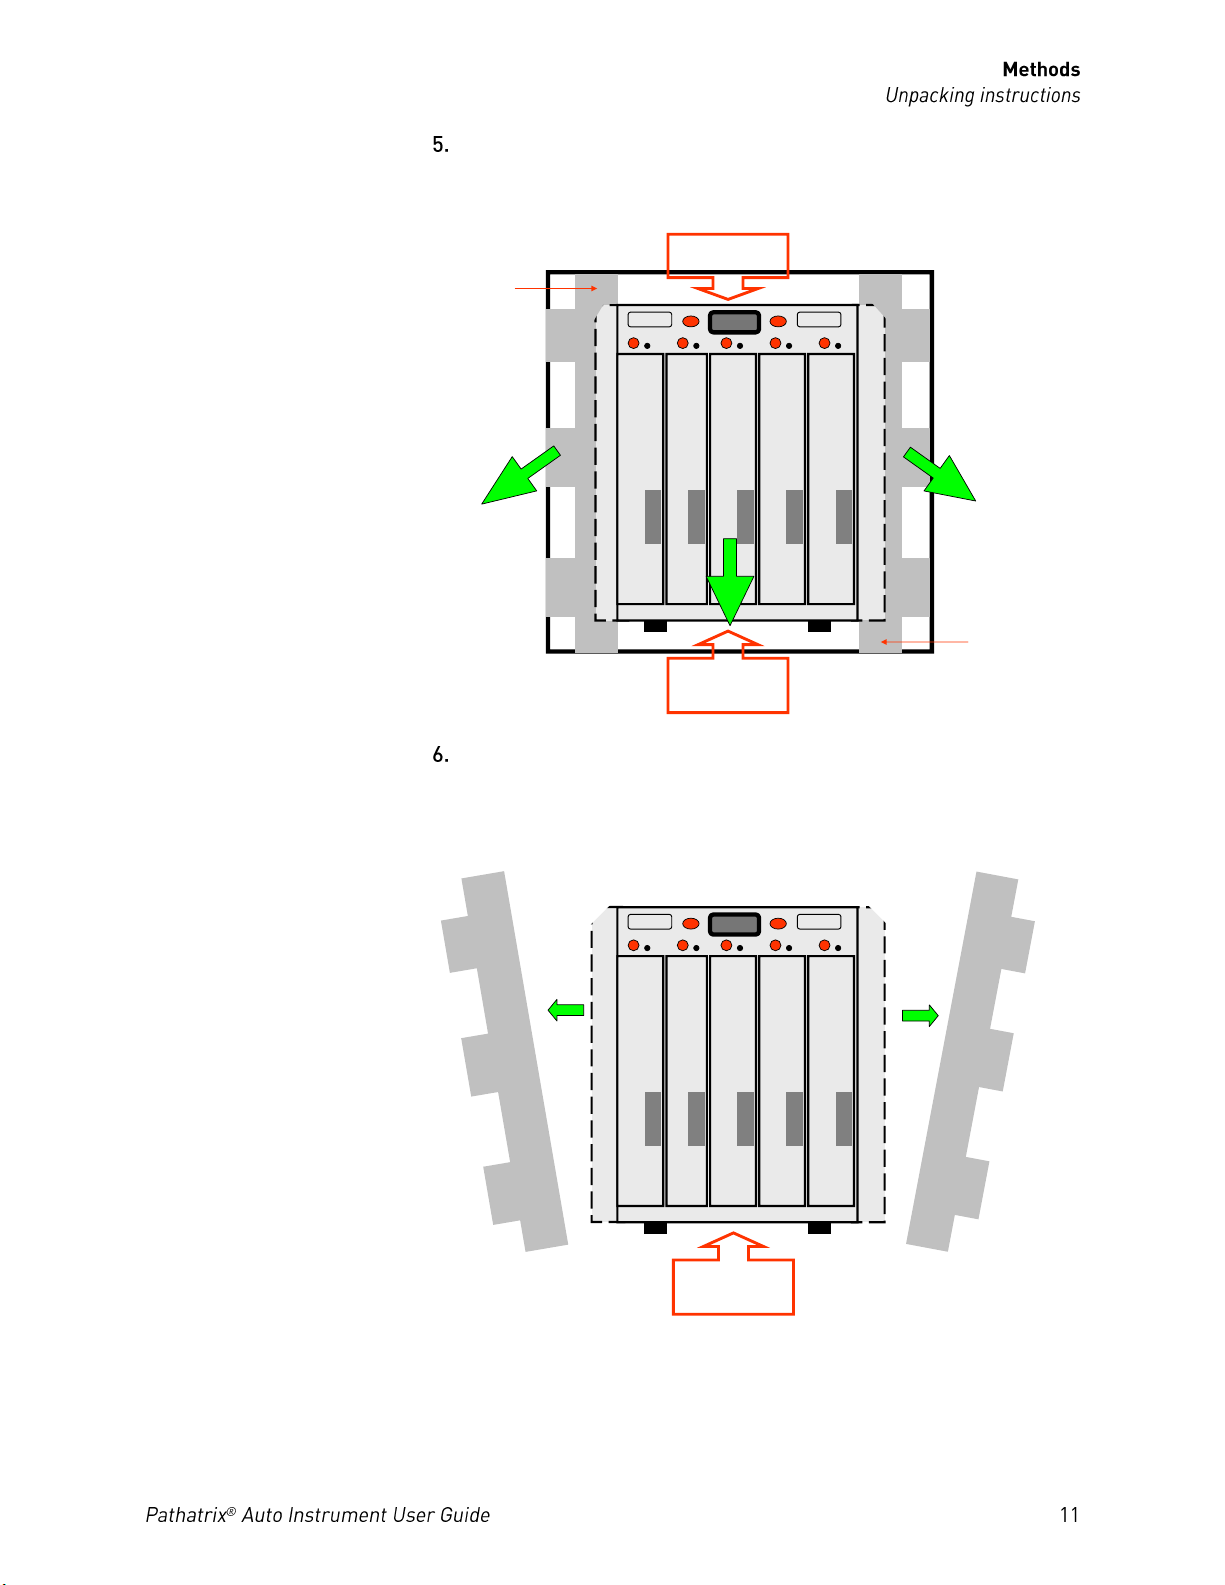
Supporting the top and base of the instrument, gently slide the
Diagram (5)
Foam Insert
Piece E
Foam Insert
Piece F
SUPPORT
SUPPORT
Diagram (6)
SUPPORT
instrument and Foam Insert Pieces E & F out of the box. We
recommend that two people perform this operation.
Remove the two remaining Foam Insert Pieces (E & F) from the
instrument, while supporting the base. Retain foam with other
packaging materials after unpacking. We recommend that two
people perform this operation.
Page 12
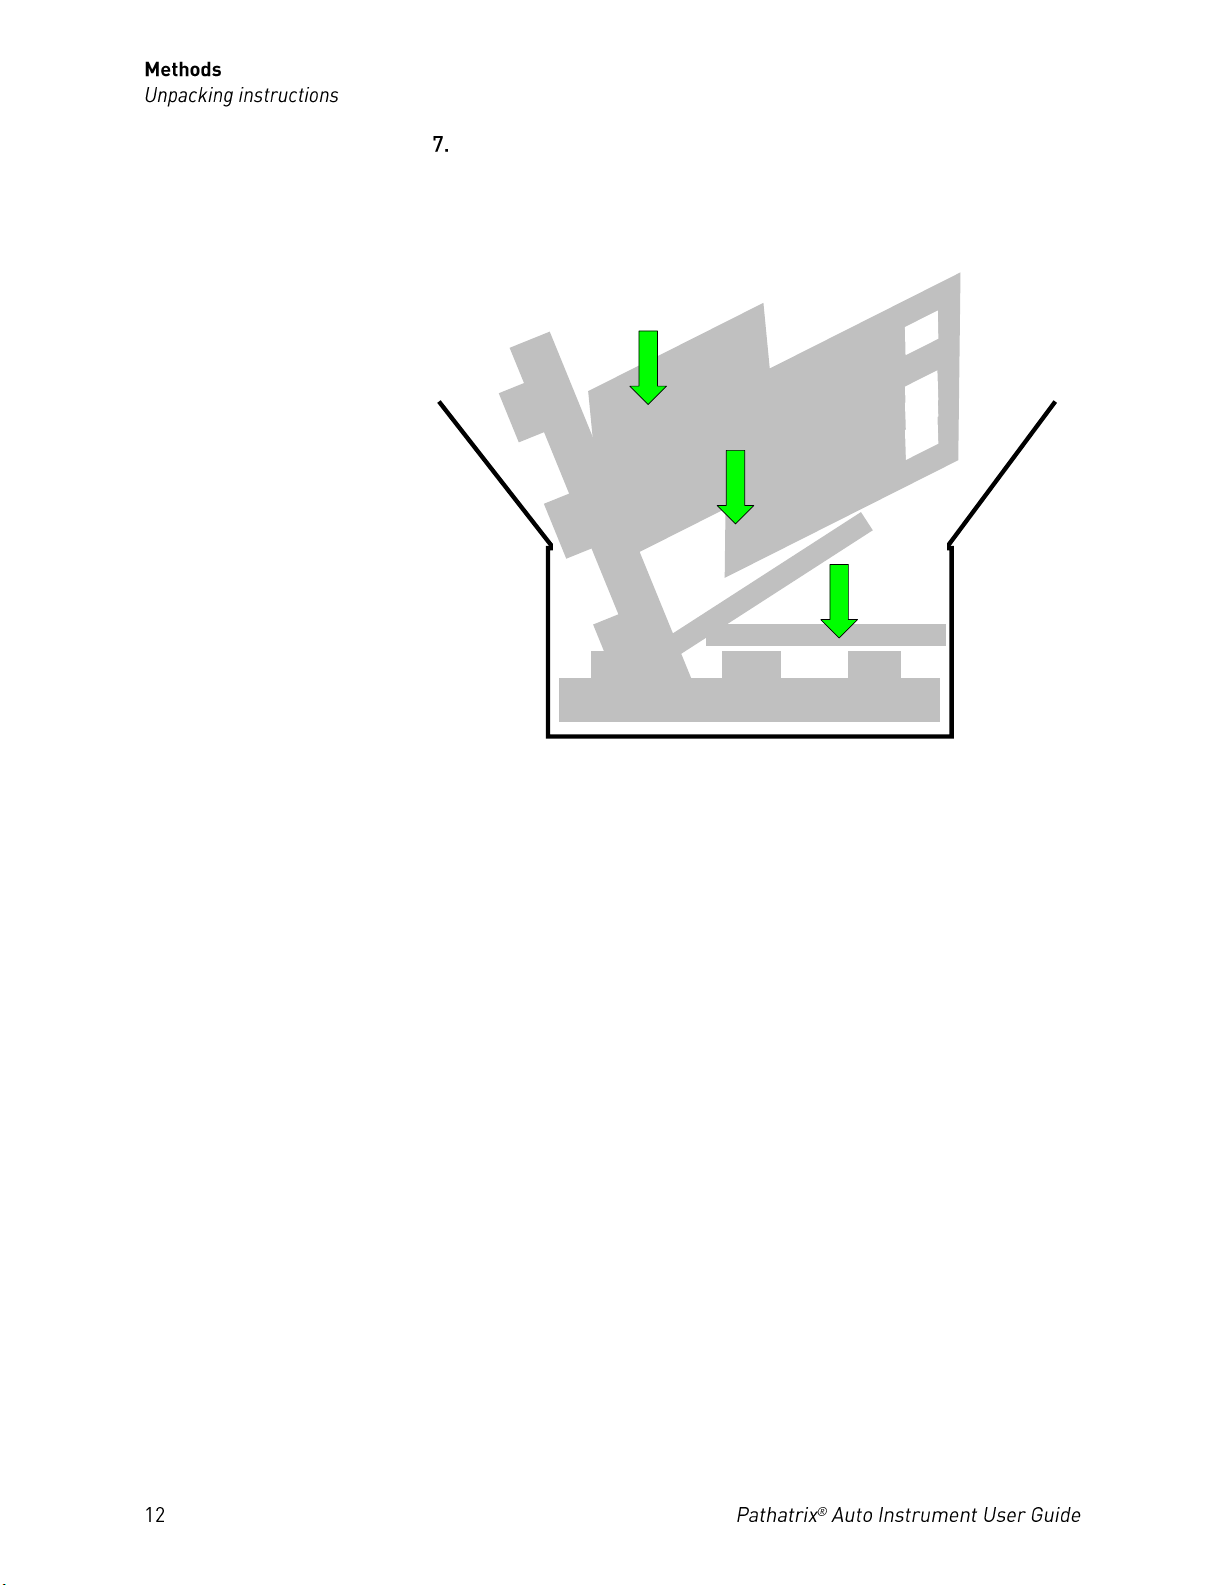
Ensure that all Foam Insert Pieces are placed back into the box as
Diagram (7)
they may be required in the future when returning the system for
service or maintenance.
The Pathatrix® Auto Instrument is now ready for installation and set up.
Page 13
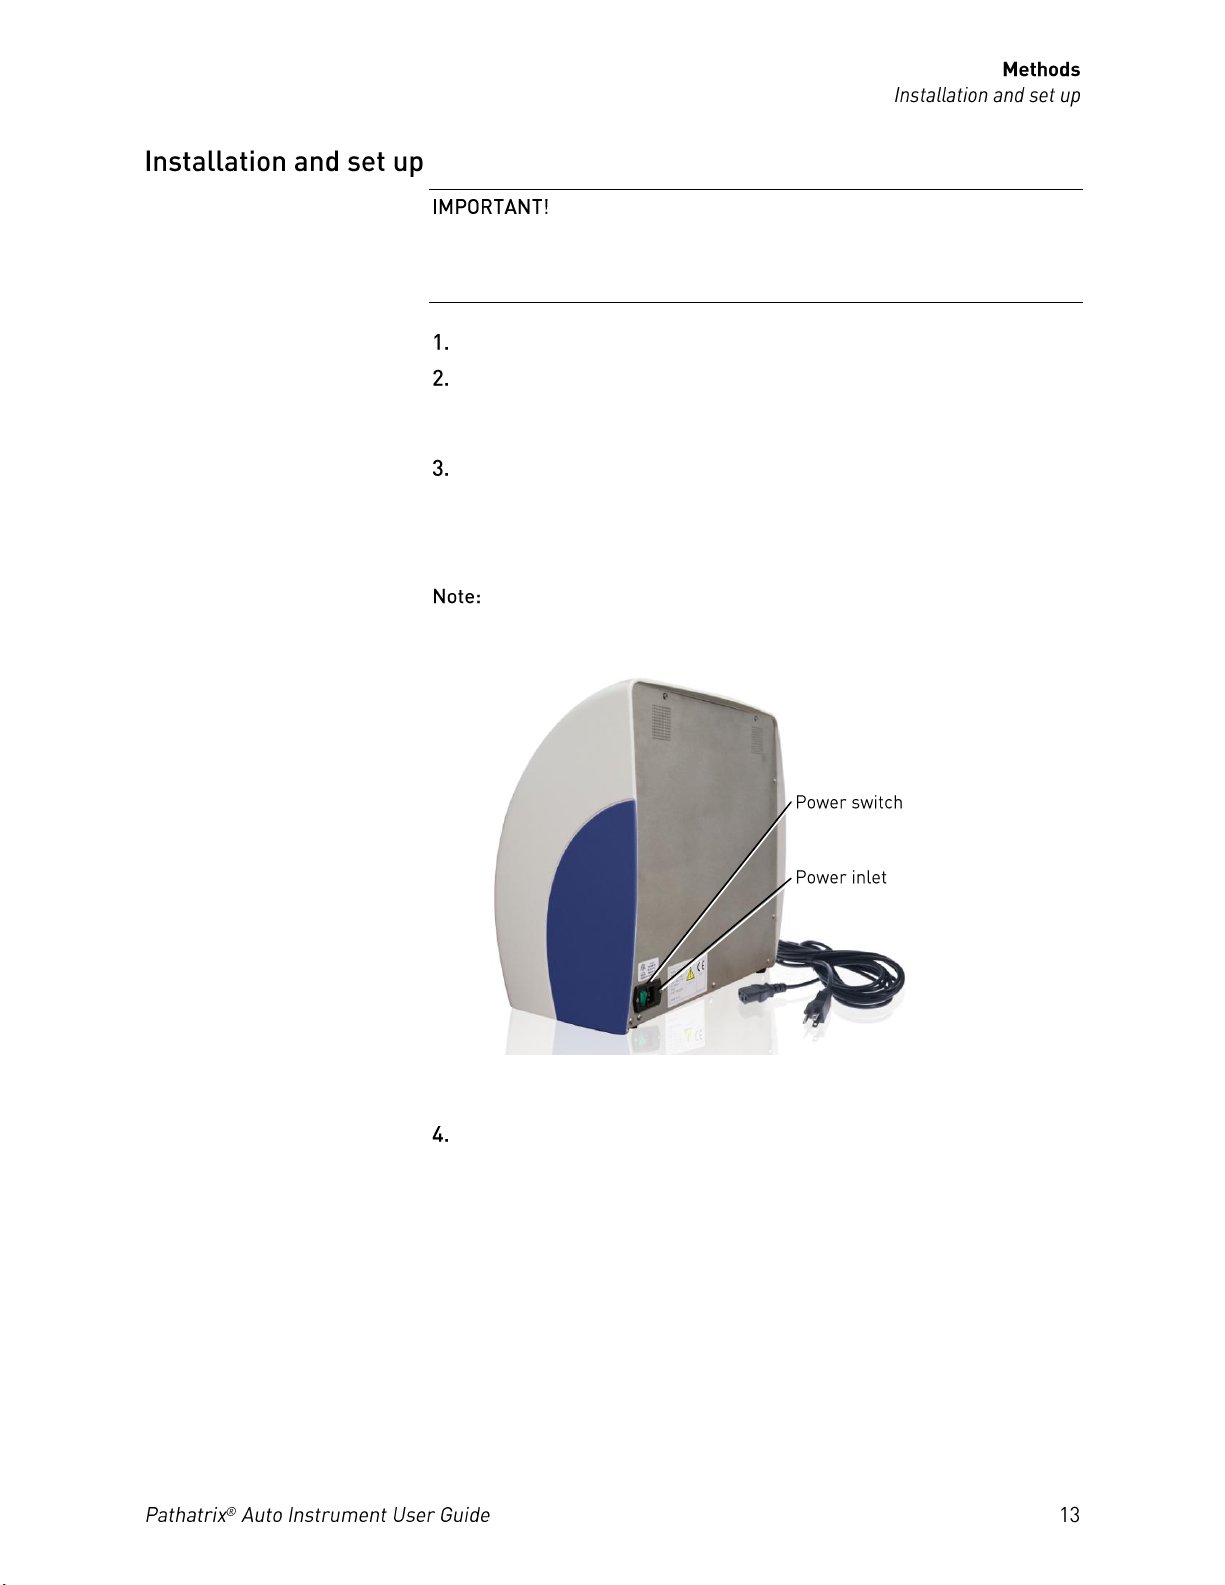
If the Pathatrix
®
Auto Instrument has been exposed to
cold temperatures (<10°C) during transit, unpack the instrument and
allow acclimatization to room temperature (2–24 hours, depending on
the environment).
Ensure the power switch is in the Off position.
Plug one end of the power cord into the power inlet of the
instrument and the other end of the power cord into the electrical
socket.
Use the power switch to turn on the instrument. A message,
“INITIALIZING PLEASE WAIT,” appears on the illuminated
display.
Both the power inlet and power switch are located on the back of
the Pathatrix® Auto Instrument in the bottom right-hand corner.
After approximately 10 seconds, the instrument enters standby
mode, and the display reads “PATHATRIX.”
The system is now ready to use, and the Cartridges can be removed
from the instrument in preparation for loading the samples.
Page 14
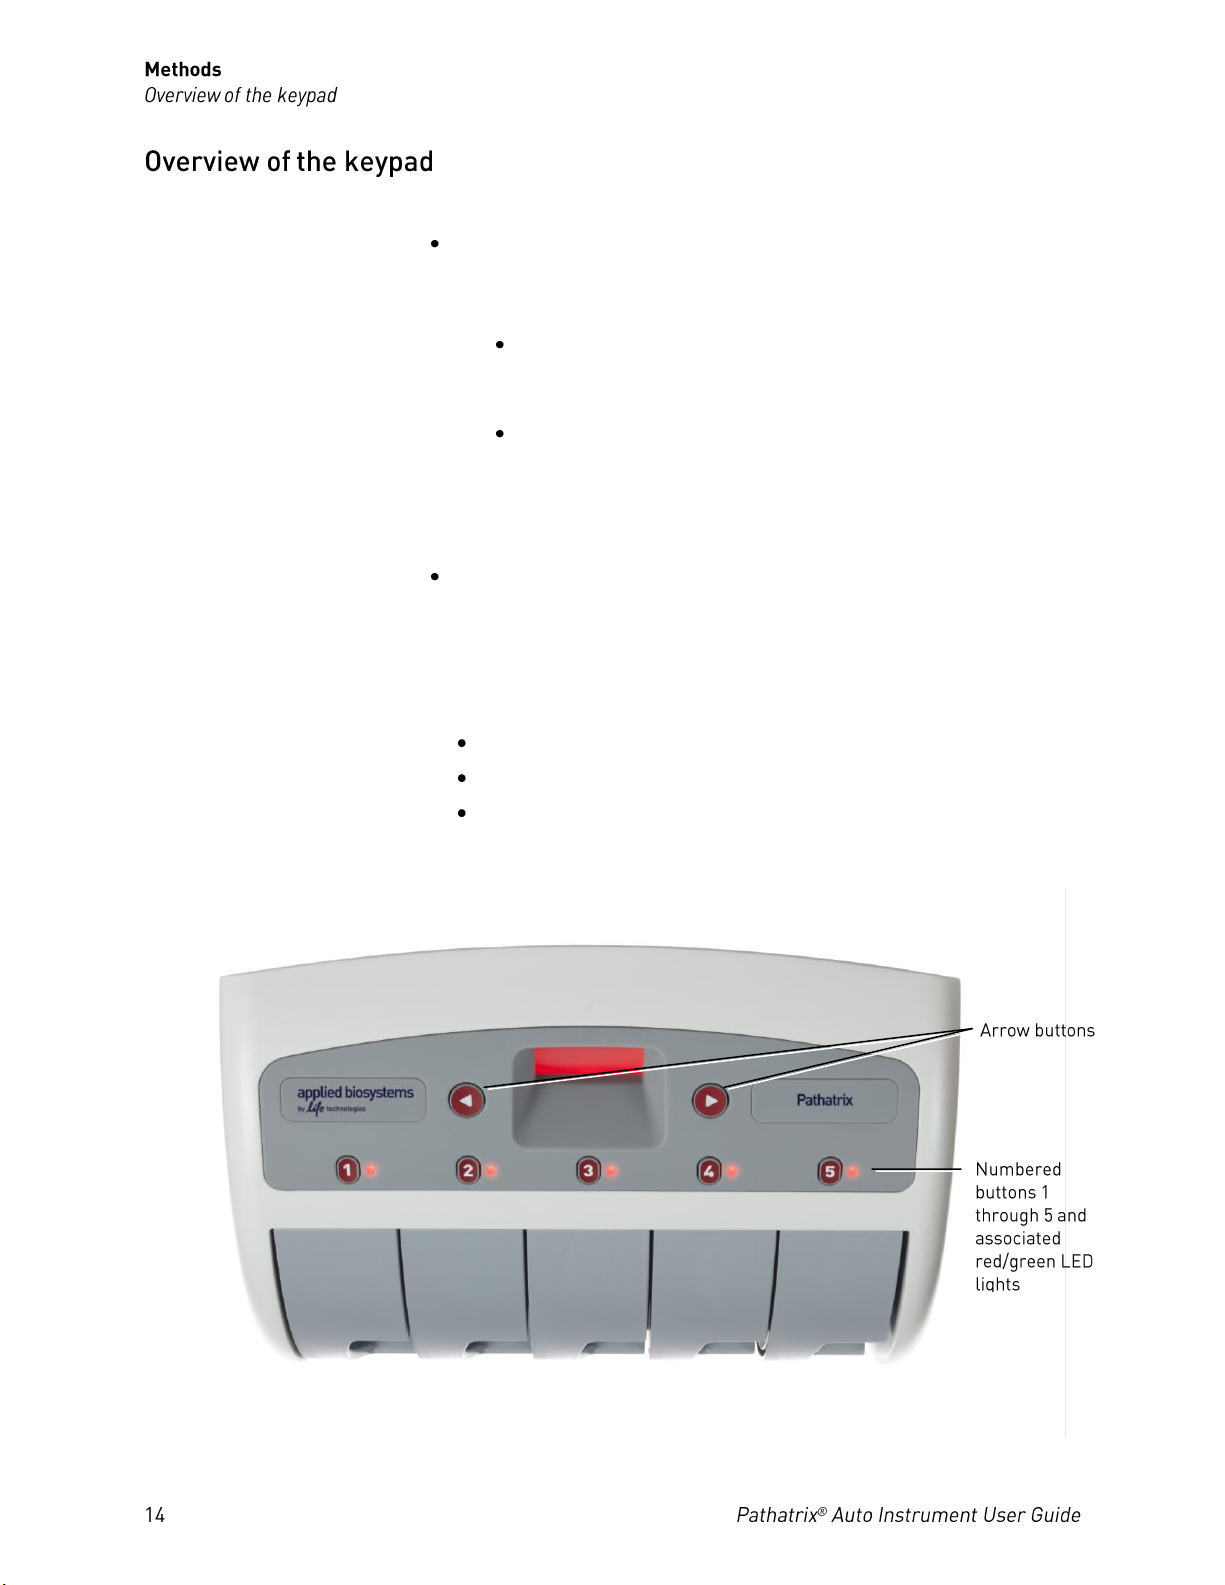
The keypad consists of the following buttons:
Arrow buttons left and right, used to scroll between options shown
on the display.
For example, the arrow keys are used to select one of two programs:
Program 1 (P1), the Default mode, is used for processing most
10- to 50-mL food and environmental sample types. This is
the recommended program in almost all instances.
Program 2 (P2) is used for processing 10-mL swab or sponge
samples for Listeria testing. This program is not validated by
AOAC, yet. However, using this program, we have observed
increased capture efficiency of Listeria from environmental
samples.
Numbered buttons 1 through 5, one for each cartridge position.
For each cartridge position, the numbered buttons can be used to start
a run, begin the Drain cycle, or cancel a run during the Capture cycle.
The LED indicator lights next to the numbered buttons signify the
following:
Green LED light indicates that a run is in progress.
Red LED light indicates standby mode or a completed run.
An alternating green and red LED light alerts the operator to
press the numbered button to start the Drain cycle of the
Pathatrix® Auto run.
Page 15
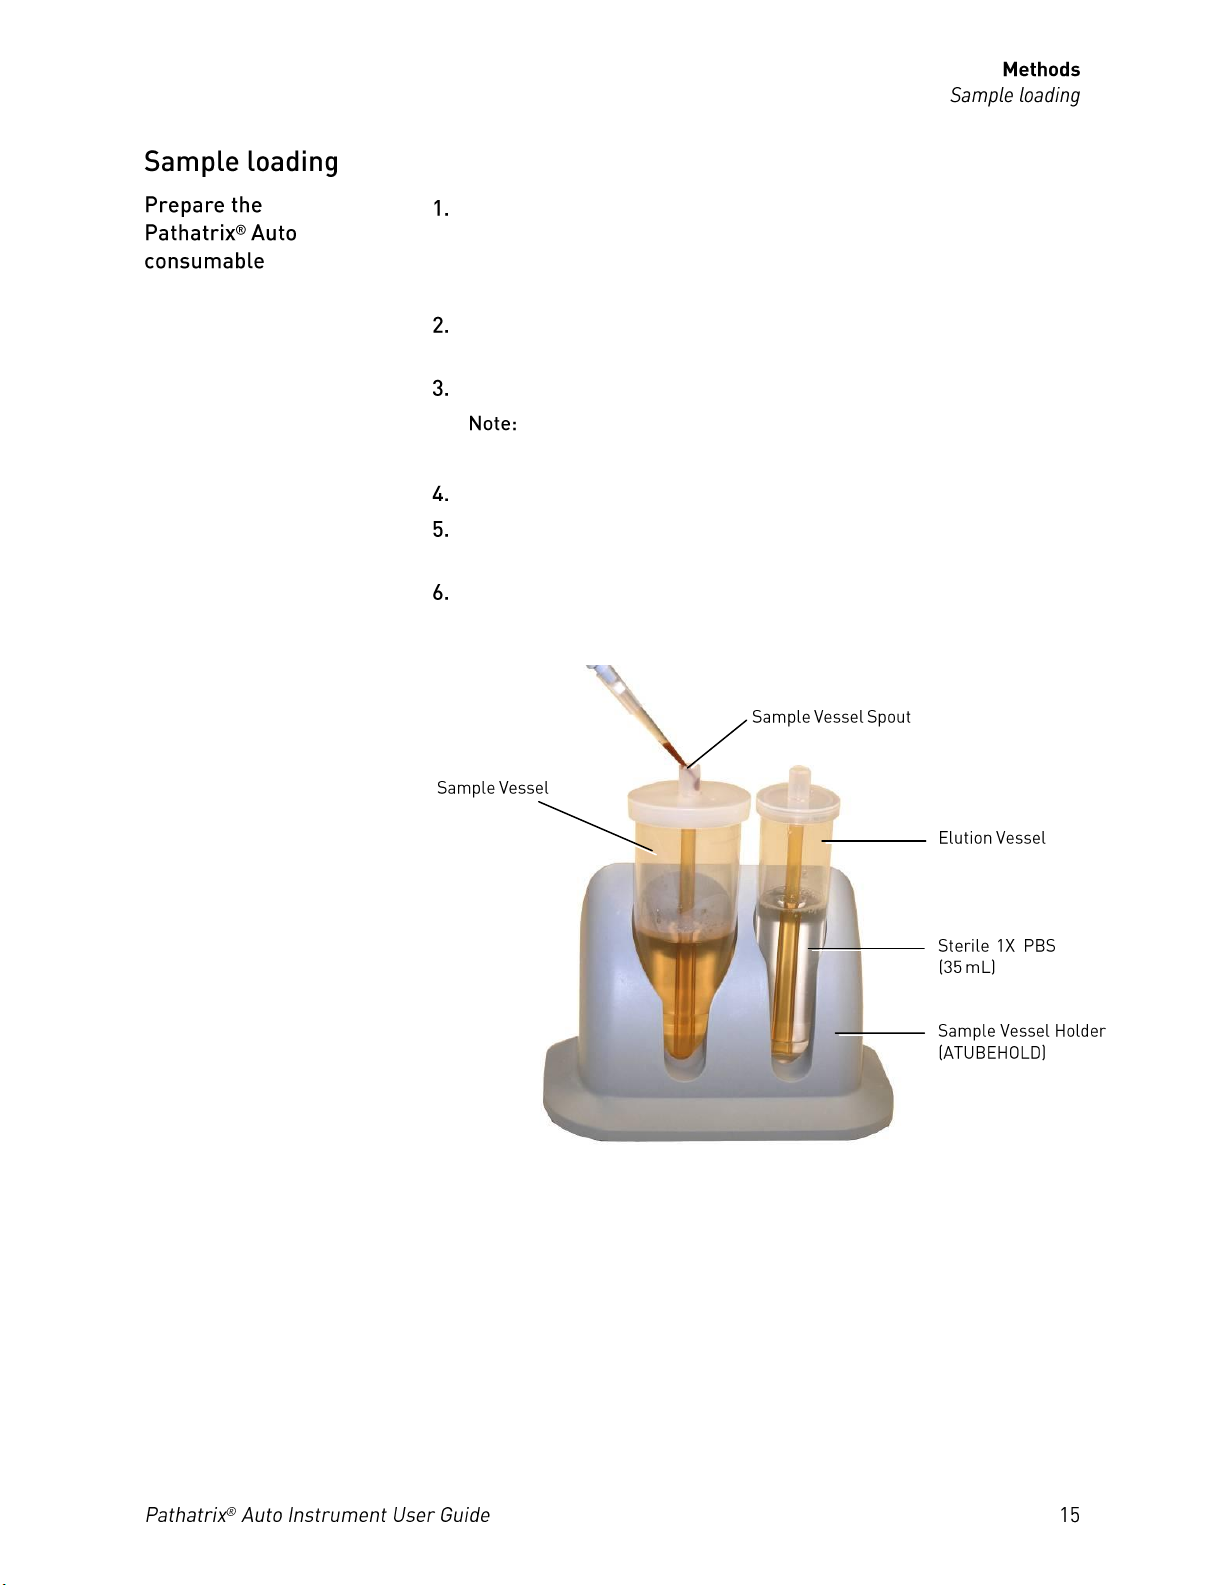
Unpackage the Elution and Sample Vessels with lids (from the
Pathatrix® Auto consumable kit), and place the Elution and Sample
Vessels in the Sample Vessel Holder (Cat. no. ATUBEHOLD;
provided with the instrument).
Remove the lid of the Elution Vessel and add sterile 1X PBS wash
buffer up to the 35-mL line.
Remove the lid of the Sample Vessel and add sample.
Refer to the appropriate Pathatrix
®
Auto protocol for details
about sample collection and preparation as well as the relevant test.
Replace lids onto the Elution and Sample Vessels.
Agitate the vial of Pathatrix
®
beads to ensure the beads are fully
resuspended (e.g., vortex or invert the sealed vial).
Add 50 µL of the appropriate Pathatrix
®
bead suspension to the
Sample Vessel through the spout on the lid.
Page 16
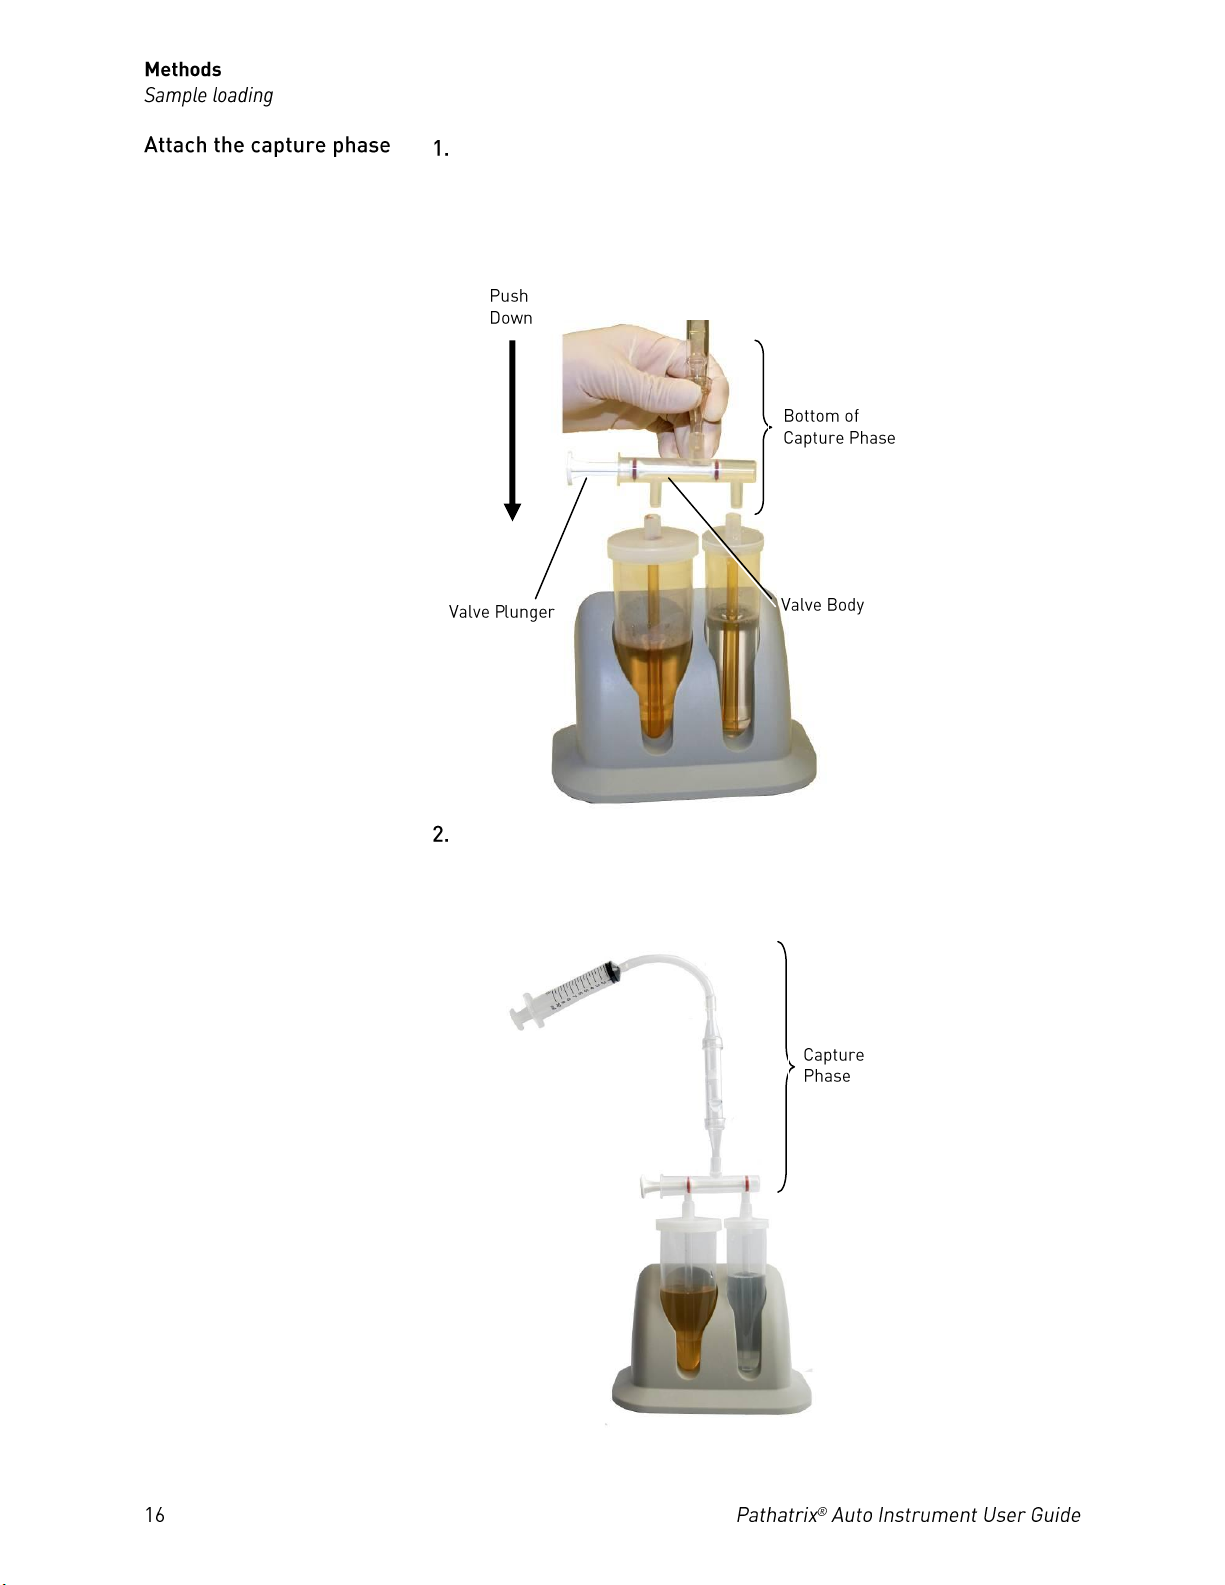
Unpackage the capture phase (from the Pathatrix
®
Auto
consumables kit) and attach the capture phase to the Elution and
Sample Vessels by inserting the valve body into the spout of the
vessel lids with the valve plunger pointing to the left.
Ensure that the lids on the Elution and Sample Vessels are fastened
securely. The assembled consumable is now ready to be inserted into
the Cartridge.
Page 17
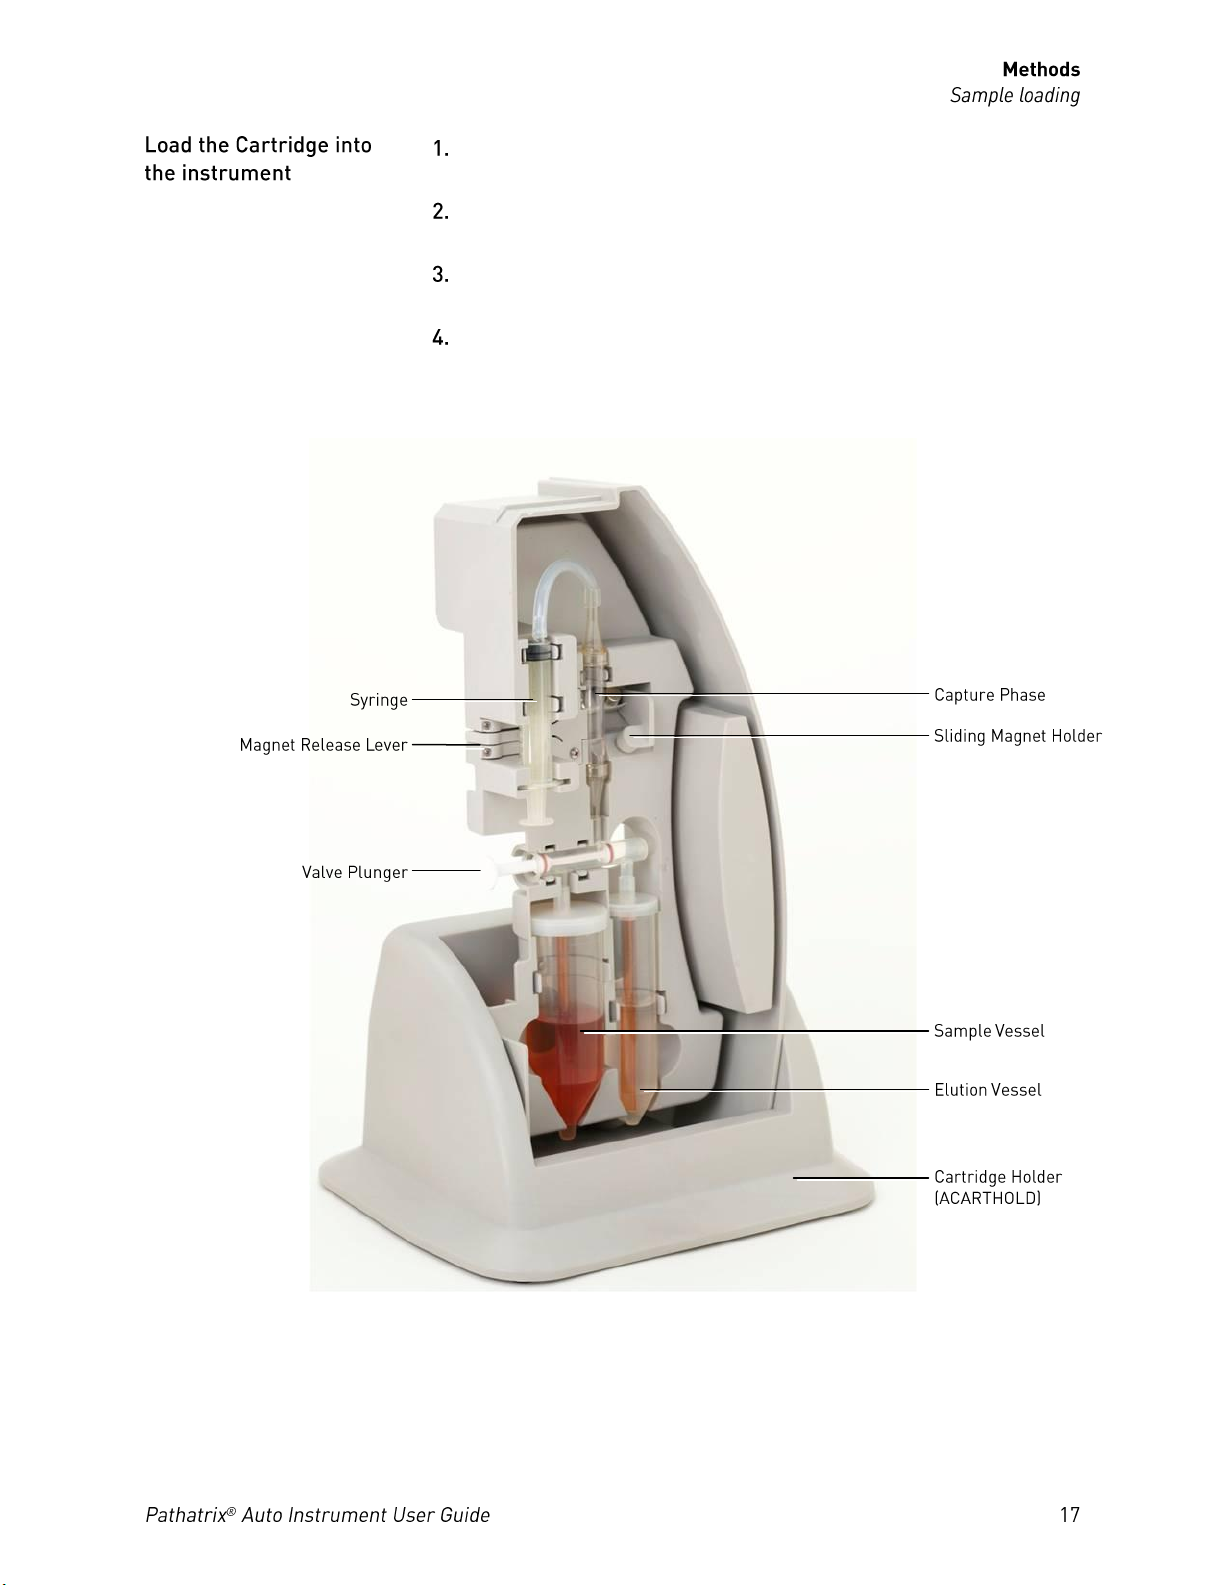
Remove Cartridge from the instrument and place in Cartridge
Holder (Cat. no. ACARTHOLD) provided with the instrument.
Remove the assembled consumable from the Sample Vessel Holder
by lifting the Elution and Sample Vessels.
Insert consumable into the Cartridge starting at the bottom (Elution
and Sample Vessels) and moving upwards.
Push firmly on each part of the consumable (e.g., Elution Vessel,
Sample Vessel, valve, capture phase, and syringe) to ensure that the
entire consumable is held securely within the molded recess of the
Cartridge.
Page 18
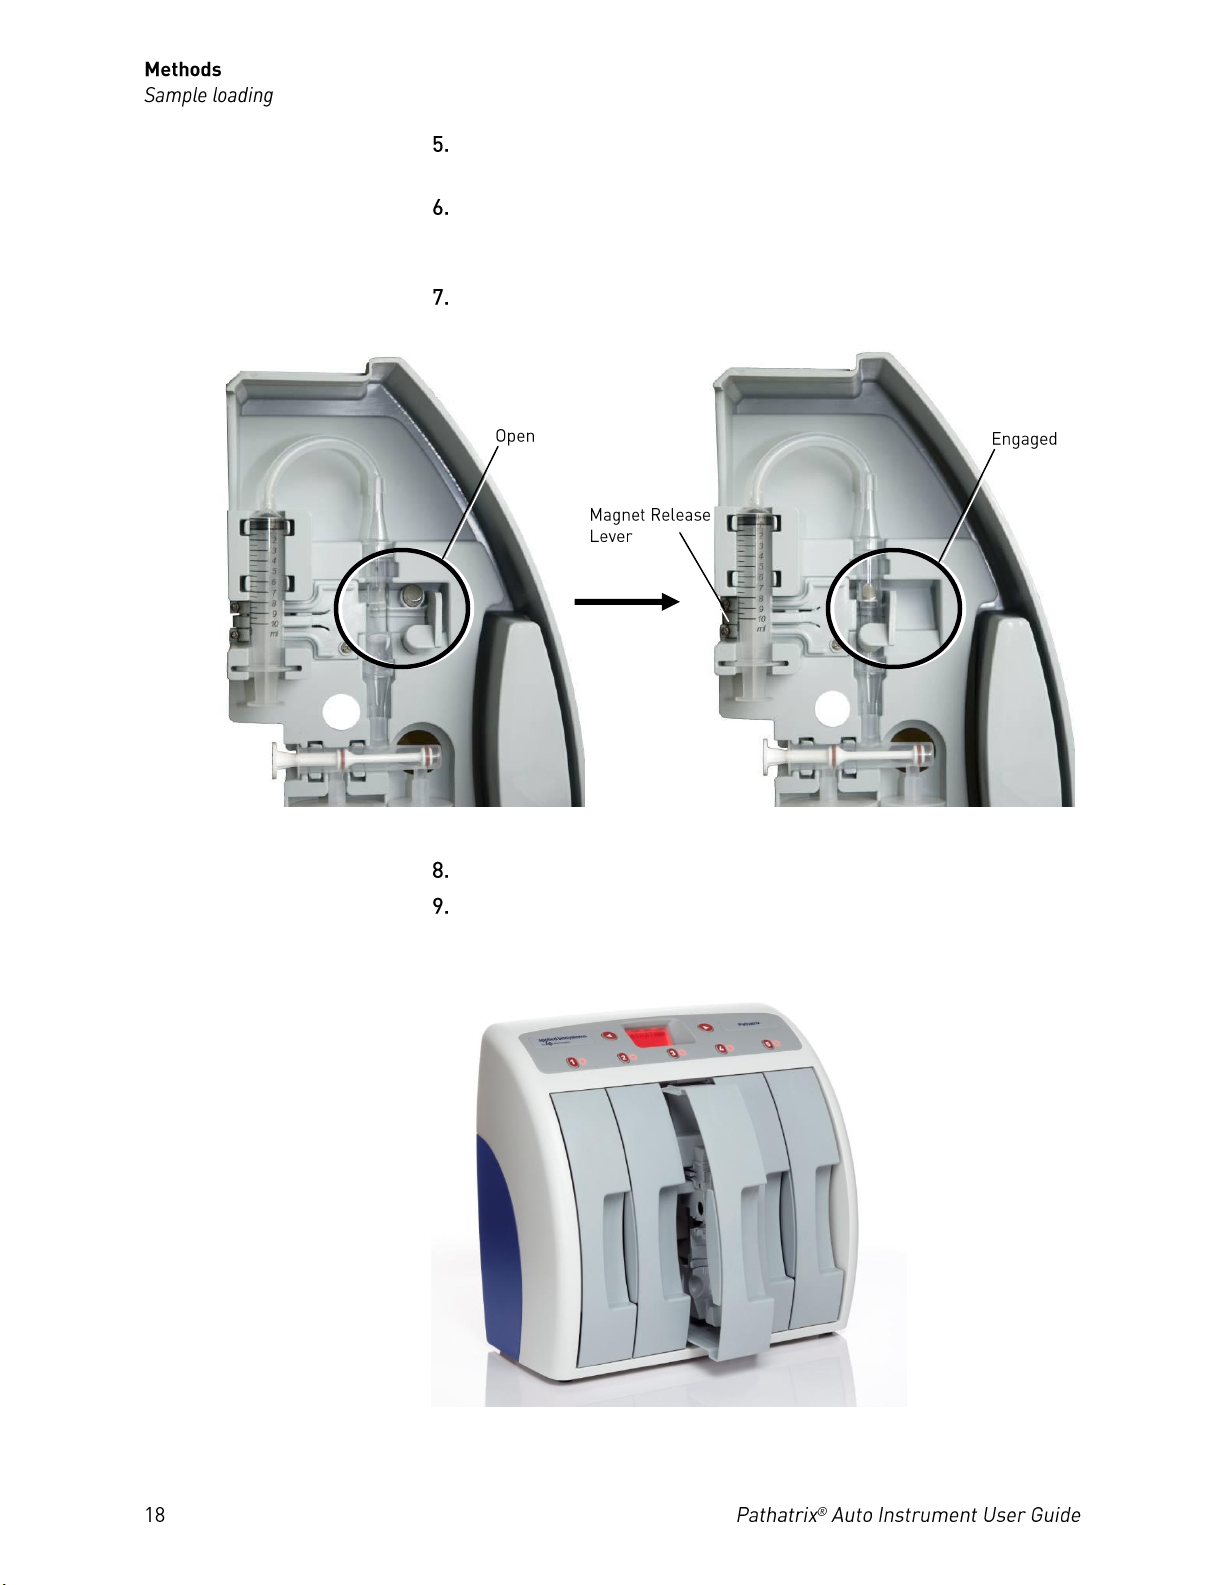
Slide the magnet holder to the left until it locks into the “engaged”
position to place the magnets against the capture phase.
Press the magnet release lever on the side of the Cartridge to verify
that the kit is positioned correctly and that the magnet can freely
disengage from the capture phase.
Reset the magnet into the “engaged” position.
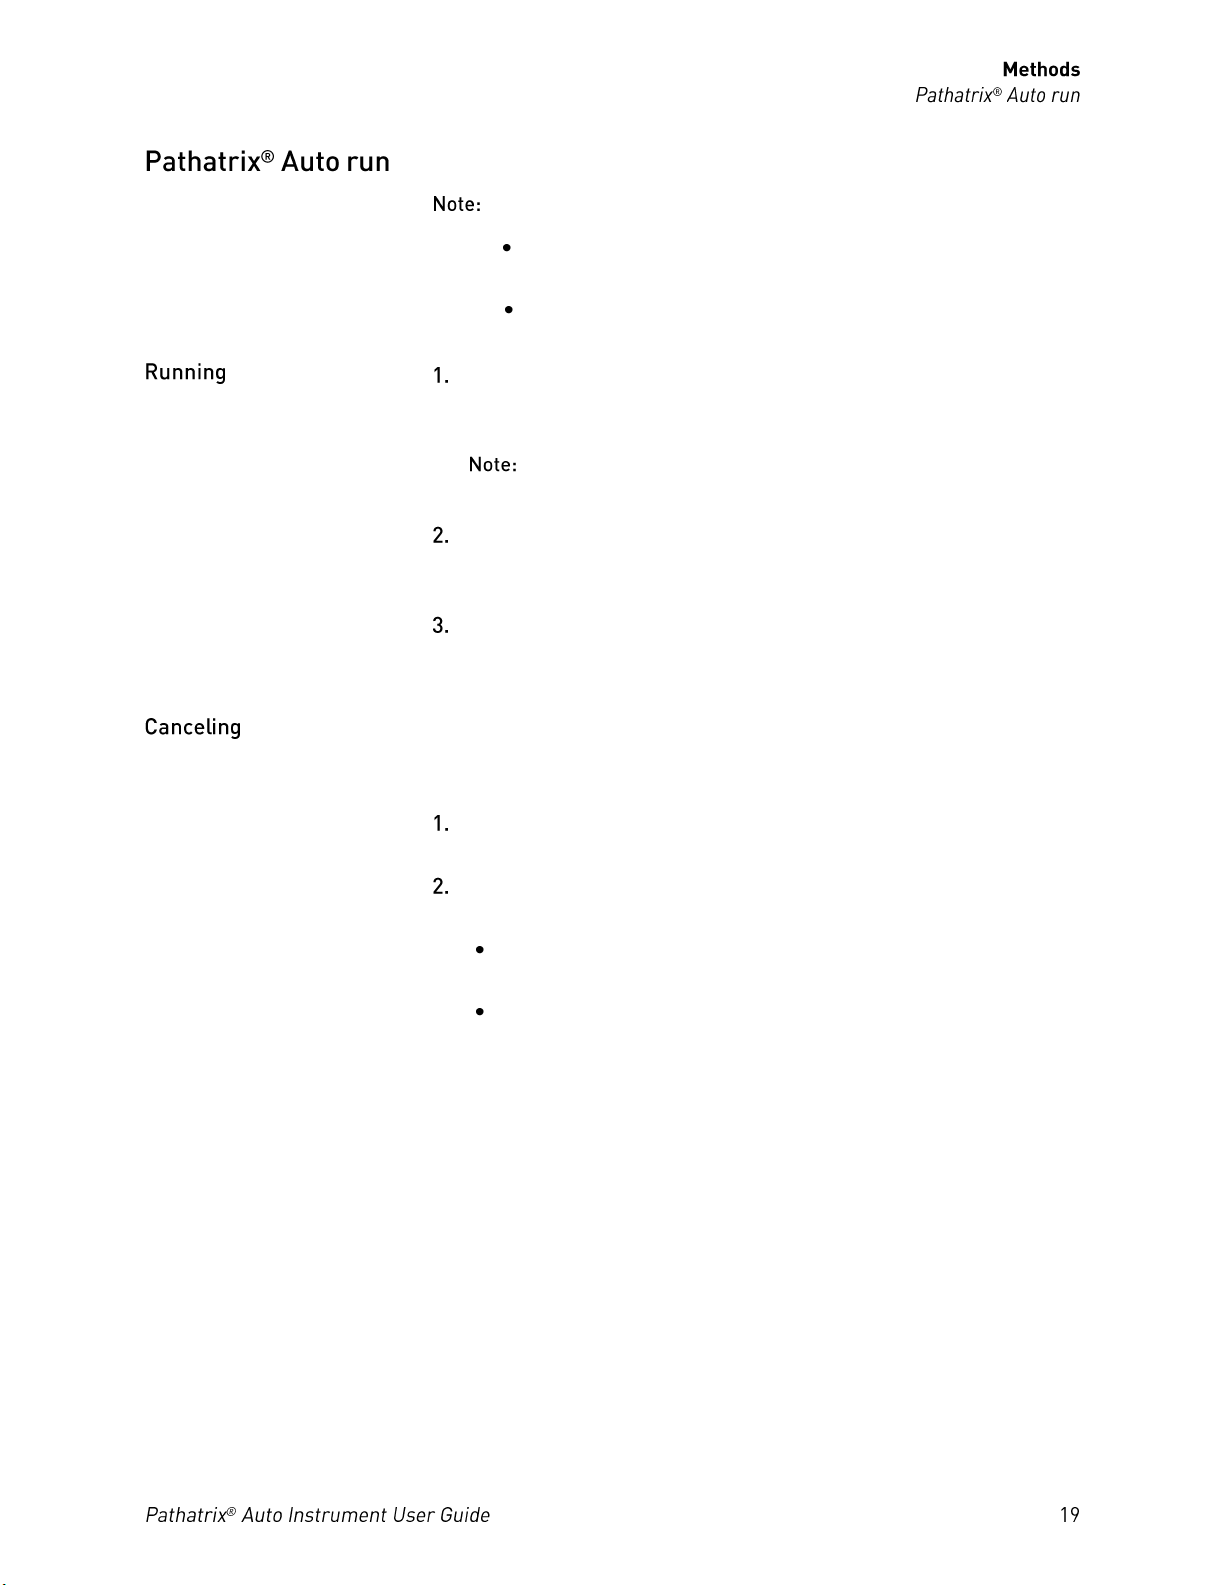
Remove the assembled Cartridge from the Cartridge Holder.
Align the Cartridge with the grey guide slots at the desired position
on the instrument and push the Cartridge forward until it clicks into
position.
Page 19
The Pathatrix
For most 10- to 50-mL samples, start the run by pressing the
numbered button located immediately above each Cartridge
position. This will start P1.
Use the following procedure to halt the Pathatrix® Auto Capture cycle
for a particular sample (e.g., if you need to confirm the addition of beads
or elution buffer):
®
Auto Instrument runs with up to 5 Cartridges.
Each Cartridge run is independent, so you do not have to
start all the Cartridges at the same time.
All active Cartridges must be running the same program (P1
or P2*).
The LED light next to the button changes from red to green to
indicate that the run is in progress.
In approximately 15 minutes (P1), the LED light above the Cartridge
position alternates between red and green, indicating that the
Elution cycle of the run is complete.
Start the Drain cycle by pressing the numbered button above each
Cartridge position.
Press and hold the numbered button for that Cartridge position for
5 seconds.
A message appears on the display asking if you wish to “CANCEL
TEST” for the sample in that particular Cartridge position:
Press the left arrow button for “YES” to stop the run,
or
Press the right arrow button for “NO,” which allows the run to
proceed as normal.
* P2 has not been validated by the AOAC. For more details about using P2, see the Pathatrix® Auto protocols for
Listeria.
Page 20
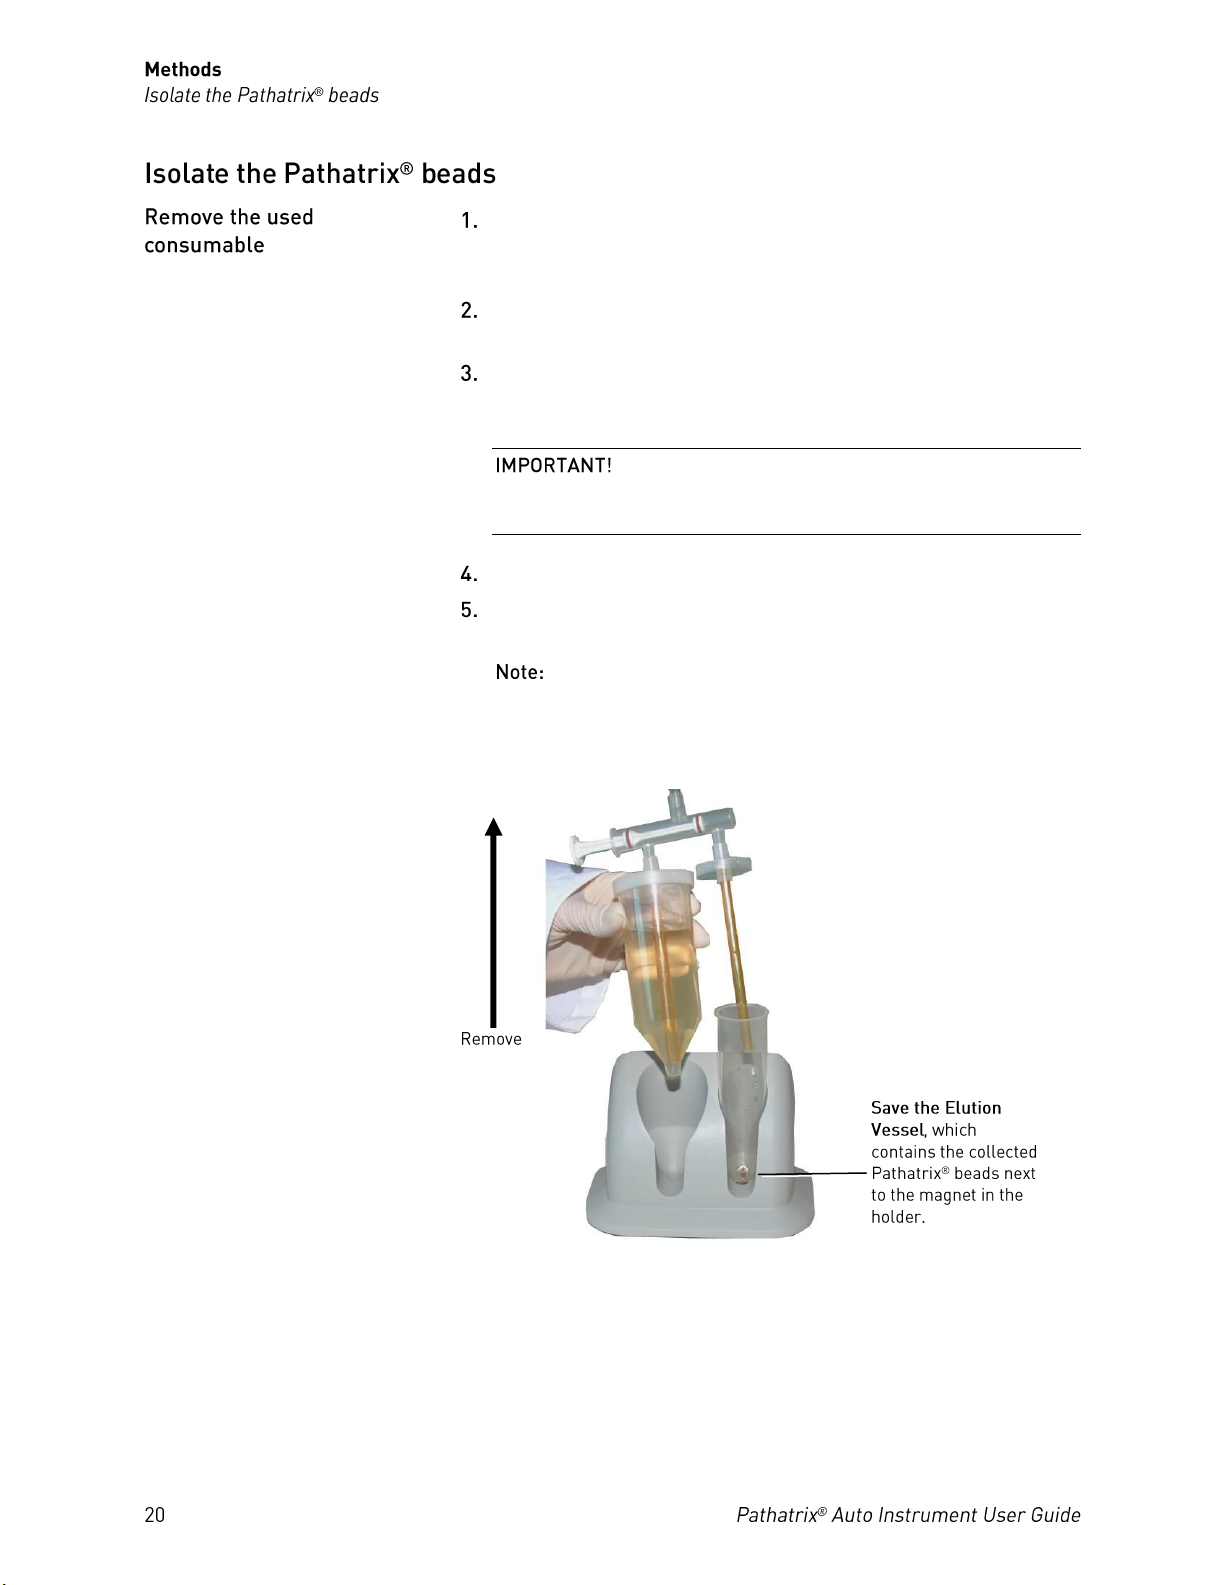
In approximately 1 minute, the LED light above the Cartridge
position illuminates at a constant red, indicating that the Drain
cycle is complete and the run has ended.
Remove the Cartridge from the Pathatrix
®
Auto Instrument and
place into the Cartridge Holder.
Starting from the top (syringe) and moving downwards, remove
the entire consumable from the Cartridge and place into the
Sample Vessel Holder.
To prevent spills, firmly hold the Elution and
Samples Vessels when transferring the consumables from the
Cartridge to the Sample Vessel Holder.
Release the cap from the Elution Vessel.
Discard the used consumable, including the Sample Vessel and
capture phase, as potential biohazardous waste.
Save the Elution Vessel. The Sample Vessel Holder and
the Elution Vessel Holder contain magnets that will be next to the
base of each Elution Vessel. This magnet keeps the beads out of
suspension prior to the final re-suspension step.
Page 21
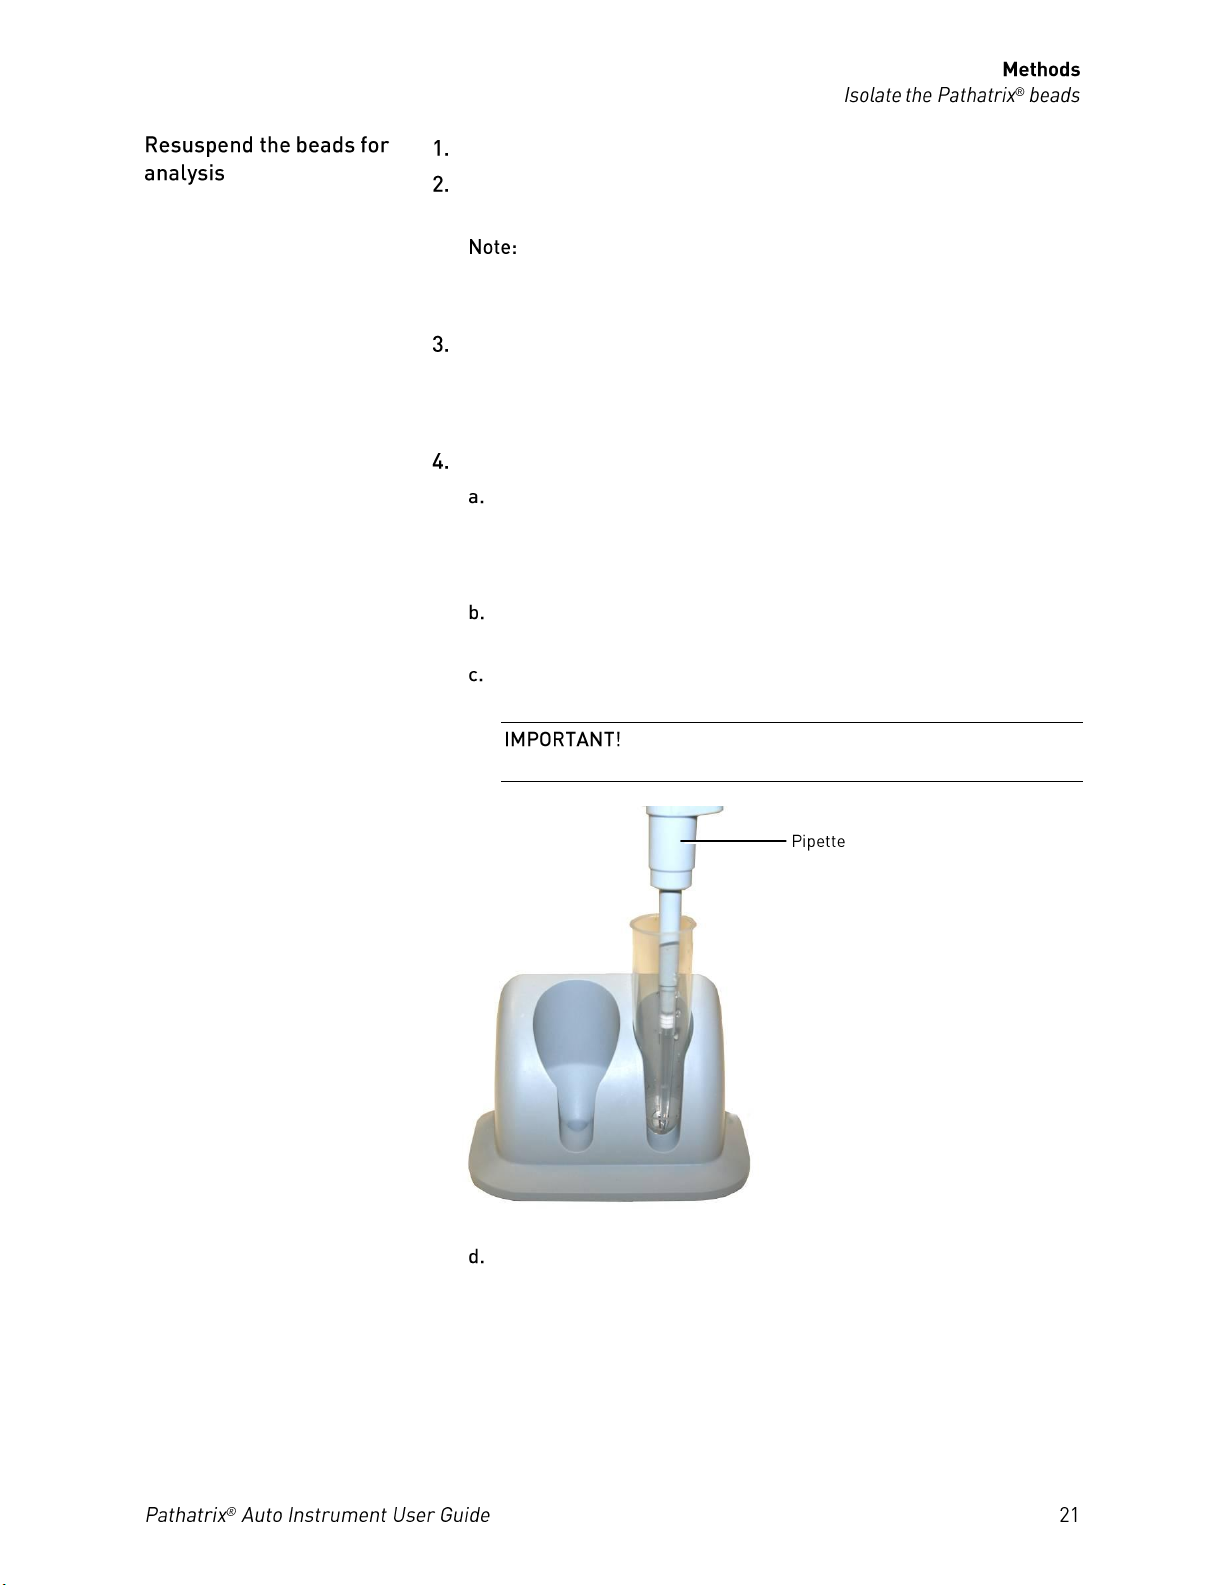
Remove the Elution Vessel from the holder.
Resuspend the Pathatrix
®
beads in the PBS remaining in the Elution
Vessel by pipetting up and down.
Appropriate aliquots of the Pathatrix
®
bead suspension can
now be analyzed using the chosen pathogen detection method (e.g.,
real-time PCR, ELISA, or selective agar plates).
Remove an aliquot of the resuspended Pathatrix
®
beads for
biochemical analysis on selective agar plates. (Refer to your specific
Pathatrix® Auto protocol for experimental details about plating
samples.)
Follow the next steps to obtain samples for PCR or ELISA:
Cap the Elution Vessel with a Flat Cap Lid from the Pathatrix
®
Auto consumables kit, and place the Elution Vessel containing
the remaining Pathatrix® bead suspension into the Elution Vessel
Holder (or Sample Vessel Holder).
Let Elution Vessel stand for approximately 1 minute to allow
capture of the beads next to the magnet in the holder.
Remove lid and remove any residual PBS wash buffer using a
pipette (or disposable plastic Pasteur pipette).
Leave the Elution Vessel in the holder and take
care not to displace any beads from the magnet.
Remove Elution Vessel from the holder, and resuspend beads in
the appropriate amount of reaction or lysis buffer for your PCR
or ELISA. (Refer to your specific Pathatrix® Auto protocol for
experimental details about downstream assays.)
Page 22

The bead suspension may be retained for later testing, if necessary.
PCR, ELISA, and Direct Plating: Transfer bead suspension to a
microcentrifuge tube, and store away from magnets at 2 to 8°C
for up to 24 hours.
or
PCR Only: Transfer bead suspension to a microcentrifuge tube,
and store away from magnets in a –20°C freezer for up to one
month.
After sample testing, dispose of the Elution Vessel and
unused sample as potential biohazardous waste.
Page 23
In the event of a liquid spill onto the surface of the instrument, turn off
the power before wiping the instrument with a damp cloth soaked in
weak detergent or disinfectant. We do not recommend using harsh
chemicals and/or abrasive cleaning agents, which may lead to permanent
damage to the instrument.
The Pathatrix® Auto Instrument should undergo an annual
service/maintenance check. Between 18–24 months from the initial
purchase, a routine maintenance and/or replacement of cartridges may be
required depending upon usage requirements. Customers should not
attempt to carry out any instrument maintenance by themselves. In the
unlikely event an instrument suffers a malfunction or failure, contact Life
Technologies Technical Support (visit
www.lifetechnologies.com/support or email [email protected]).
Page 24
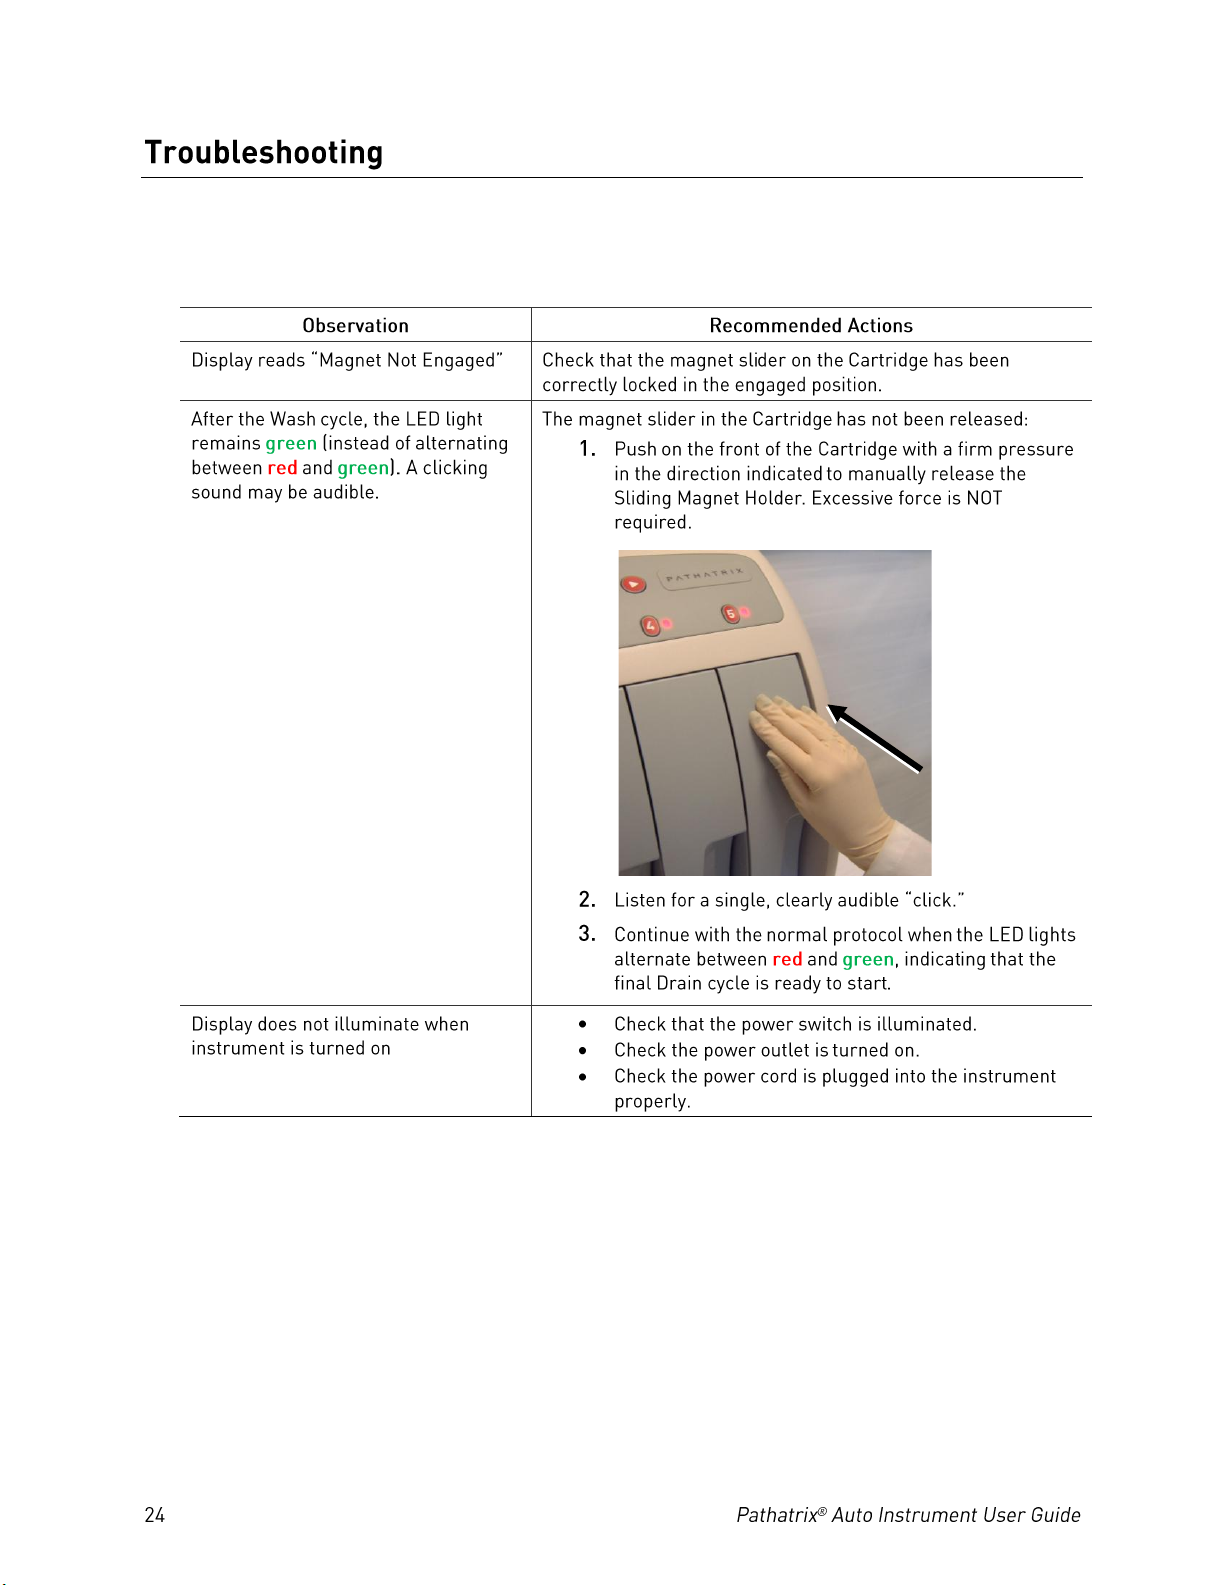
If troubleshooting does not resolve the problem, contact Life
Technologies Technical Support ([email protected]).
Page 25
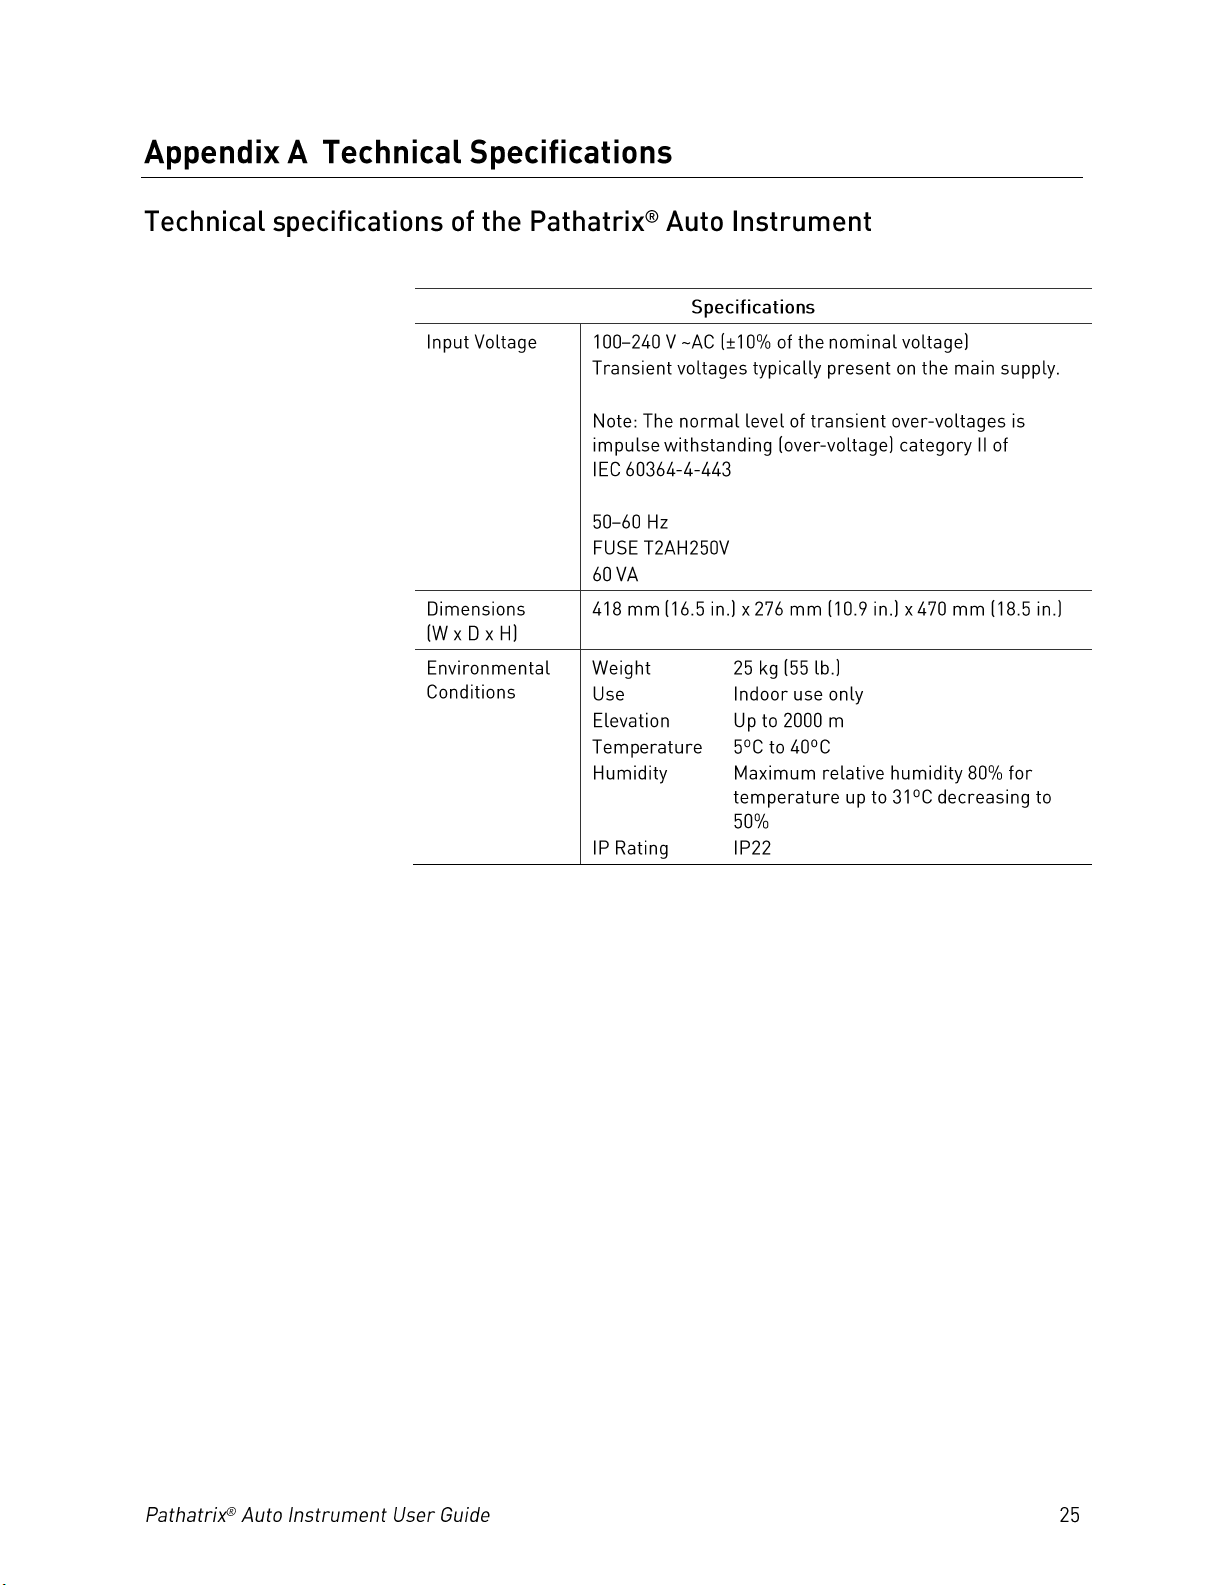
Page 26
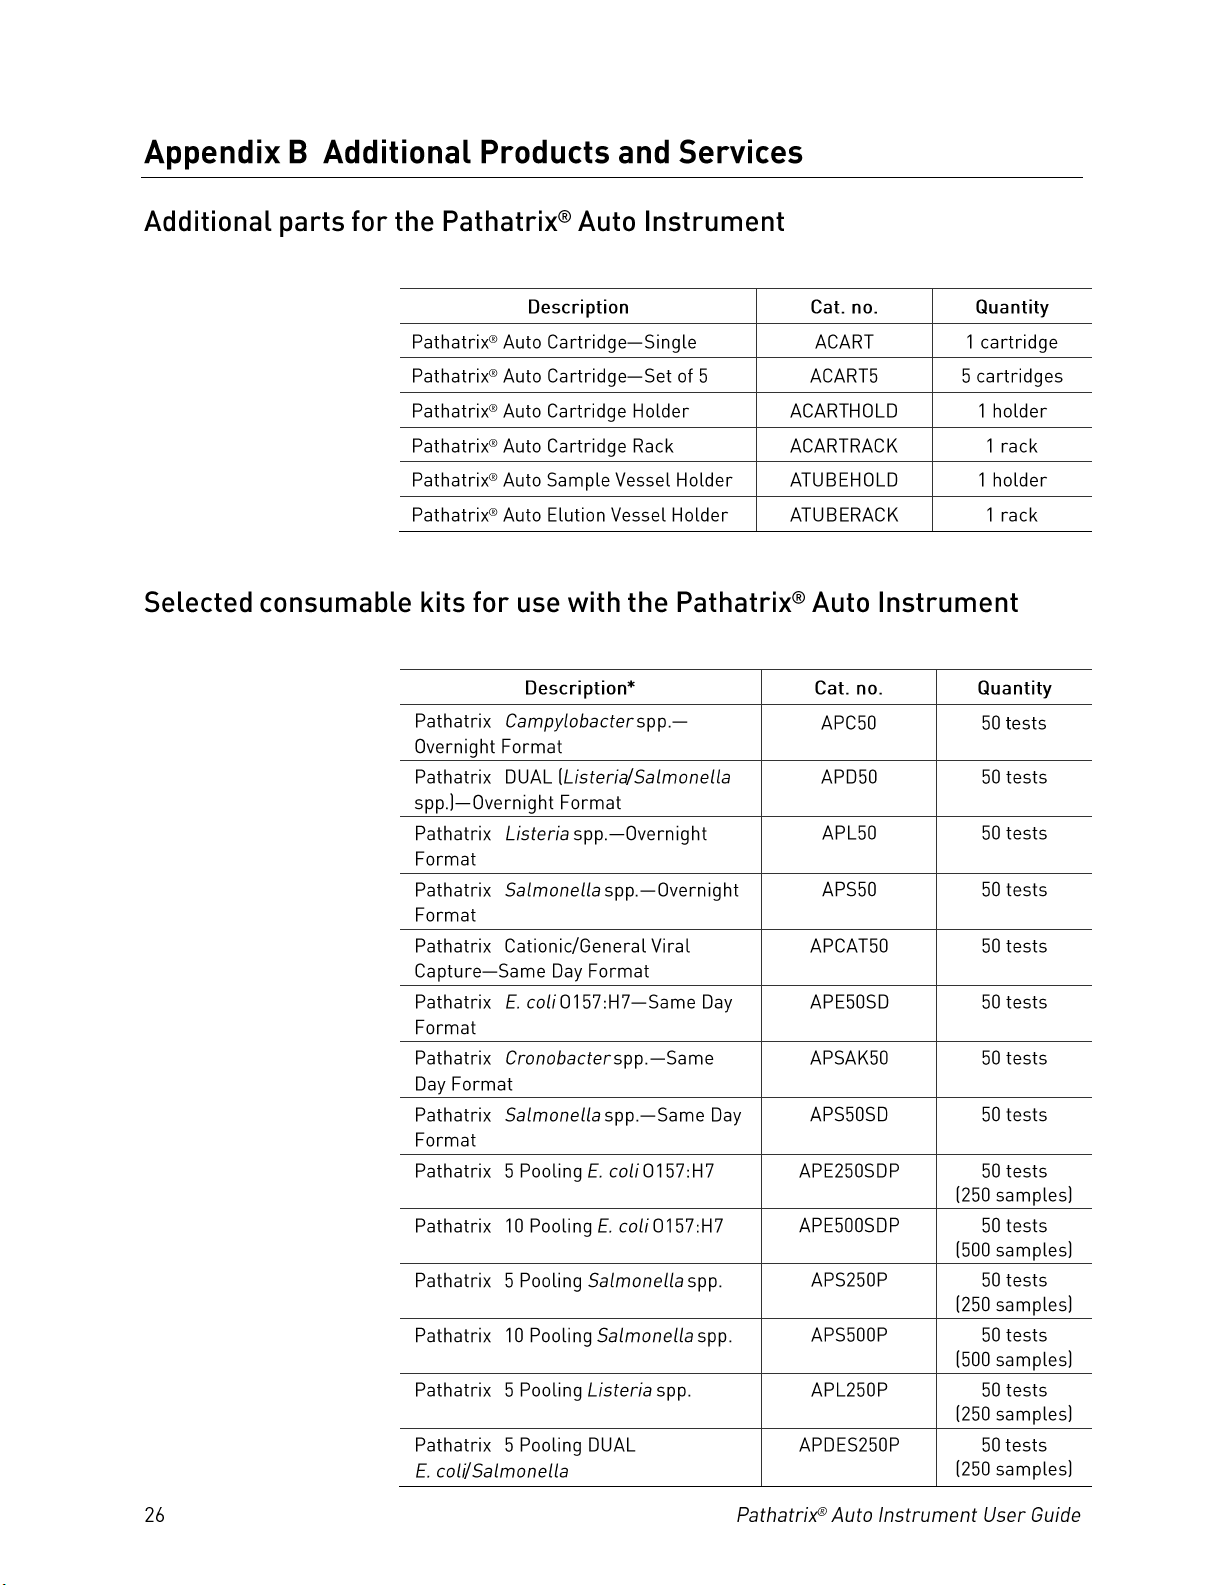
®
®®®®®®®
®®®
®
®
®
Page 27
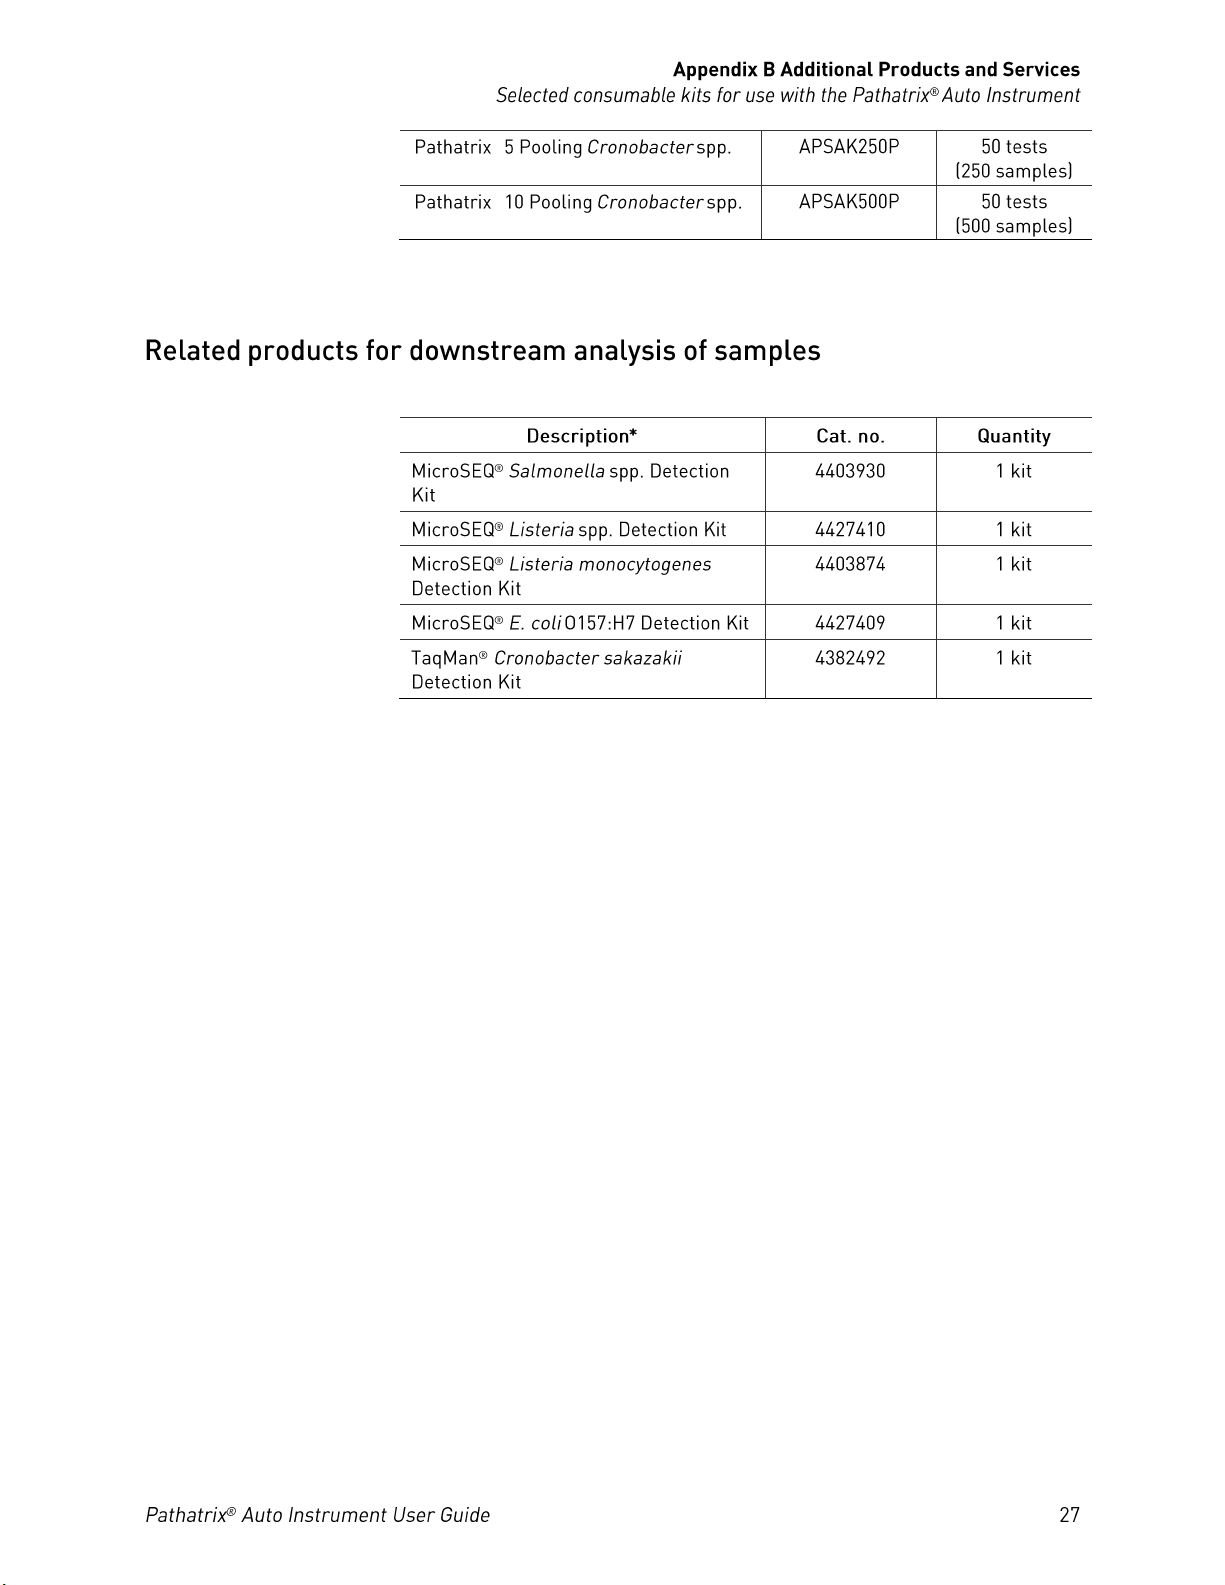
®
®
*For a complete list of current products, visit www.lifetechnologies.com.
*For a complete list of current products, visit www.lifetechnologies.com.
Page 28

Life Technologies Corporation and/or its affiliate(s) warrant their
products as set forth in the Life Technologies' General Terms and
Conditions of Sale found on Life Technologies’ website at
www.lifetechnologies.com/termsandconditions. If you have any
questions, please contact Life Technologies at
www.lifetechnologies.com/support.
Page 29
GENERAL SAFETY. Using this product in a manner
not specified in the user documentation may result in personal
injury or damage to the instrument or device. Ensure that anyone
using this product has received instructions in general safety
practices for laboratories and the safety information provided in
this document.
Before using an instrument or device, read and understand the
safety information provided in the user documentation
provided by the manufacturer of the instrument or device.
Before handling chemicals, read and understand all applicable
Safety Data Sheets (SDSs) and use appropriate personal
protective equipment (gloves, gowns, eye protection, etc.). To
obtain SDSs, see the “Documentation and Support” section in
this document.
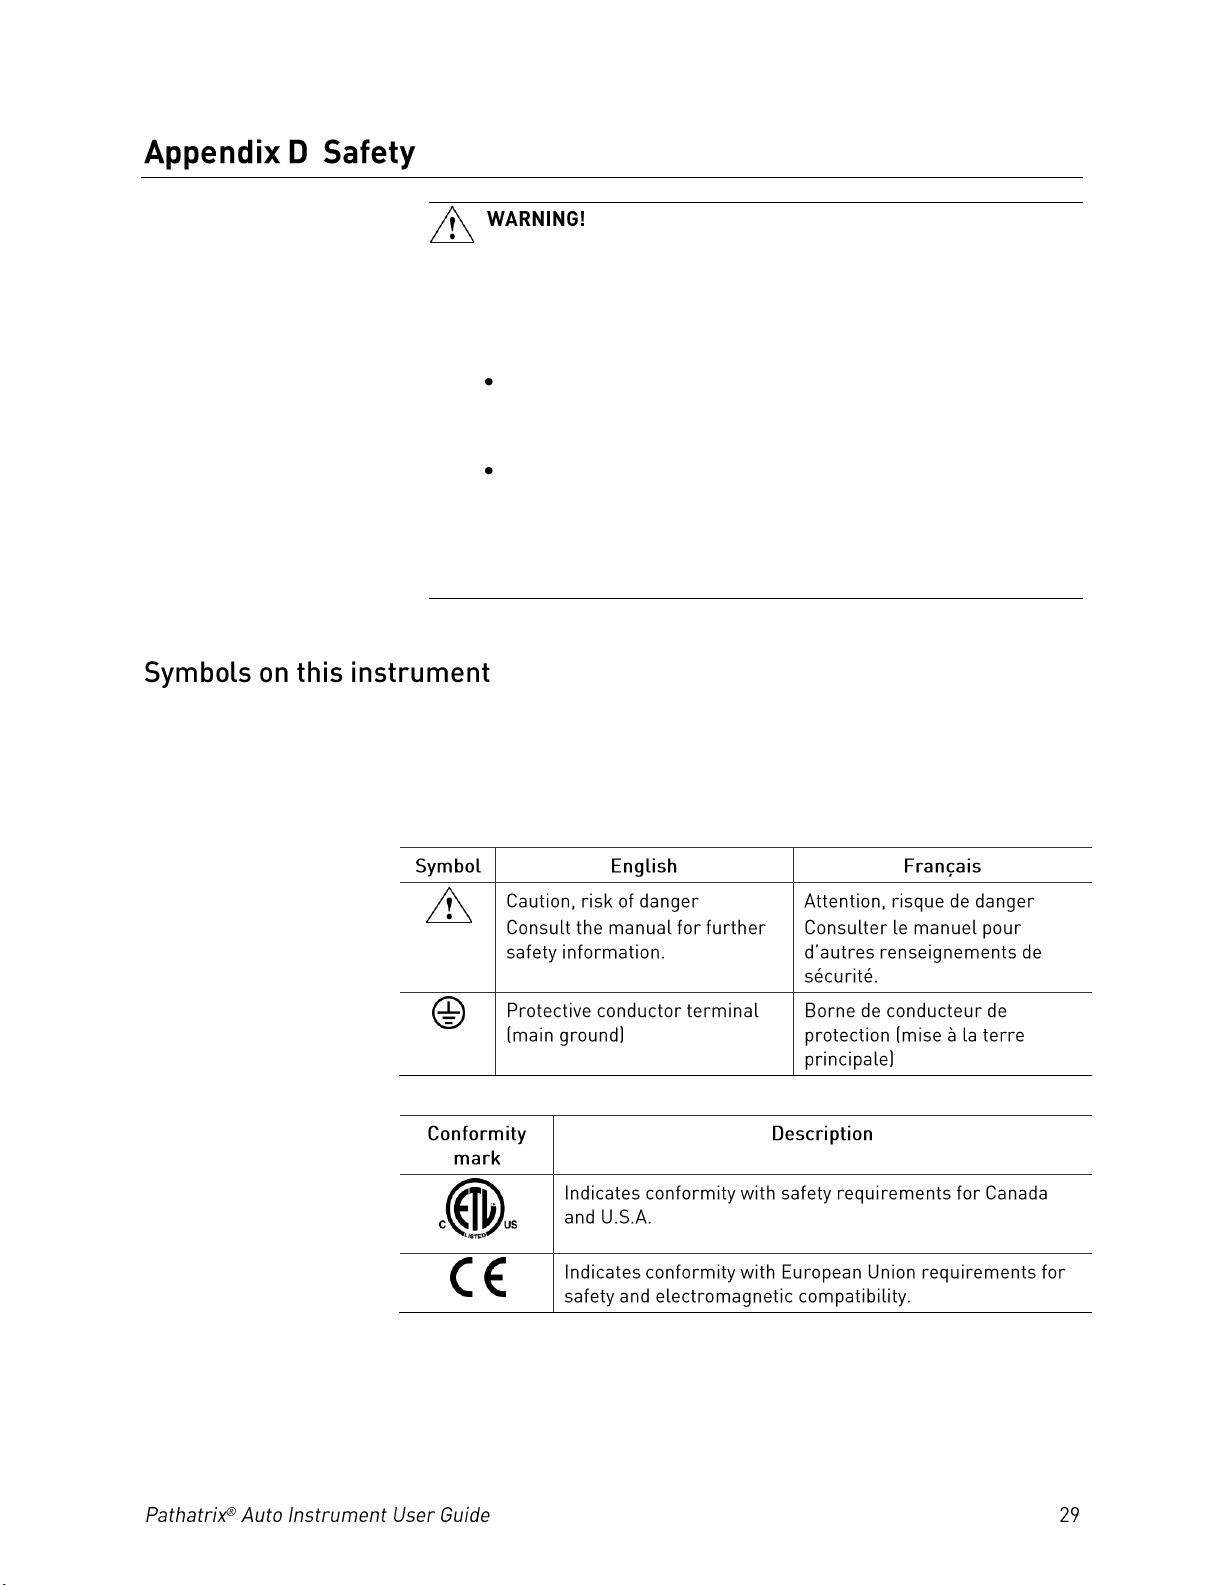
Symbols may be found on the instrument to warn against potential
hazards or convey important safety information. In this document, the
symbol is used along with user attention words described in the “About
This Guide” section to highlight important safety information. The
following table gives the meaning of these symbols.
Page 30
Do not remove instrument protective covers. If you
remove the protective instrument panels or disable interlock
devices, you may be exposed to serious hazards including, but not
limited to, severe electrical shock, laser exposure, crushing, or
chemical exposure.
Solvents and Pressurized fluids. Wear eye protection
when working with any pressurized fluids. Use caution when
working with any polymeric tubing that is under pressure:
Extinguish any nearby flames if you use flammable solvents.
Do not use polymeric tubing that has been severely stressed or
kinked.
Do not use polymeric tubing with tetrahydrofuran or nitric and
sulfuric acids.
Be aware that methylene chloride and dimethyl sulfoxide cause
polymeric tubing to swell and greatly reduce the rupture
pressure of the tubing.
Be aware that high solvent flow rates (~40mL/min) may cause a
static charge to build up on the surface of the tubing and
electrical sparks may result.
Page 31
Moving and Lifting Injury.
Improper lifting can cause painful and permanent back injury.
Things to consider before lifting or moving the instrument or
accessories:
Depending on the weight, moving or lifting may require
two or more persons.
If you decide to lift or move the instrument after it has
been installed, do not attempt to do so without the
assistance of others, the use of appropriate moving
equipment, and proper lifting techniques.
Ensure you have a secure, comfortable grip on the
instrument or accessory.
Make sure that the path from where the object is to where
it is being moved is clear of obstructions.
Do not lift an object and twist your torso at the same time.
Keep your spine in a good neutral position while lifting
with your legs.
Participants should coordinate lift and move intentions
with each other before lifting and carrying.
For smaller packages, rather than lifting the object from
the packing box, carefully tilt the box on its side and hold
it stationary while someone else slides the contents out of
the box.
Keep hands clear of moving parts while operating the instrument.
Disconnect power before servicing.
Moving Parts. Moving parts can crush, pinch and cut.
Page 32
Fuse Installation. Before installing the instrument,
verify that the fuses are properly installed and the fuse voltage
matches the supply voltage. Replace fuses only with the type and
rating specified for the unit. Improper fuses can damage the
instrument wiring system and cause a fire.
Cleaning and Decontamination.
If hazardous materials are spilled onto the instrument, the
instrument should be appropriately decontaminated.
Using cleaning or decontamination methods other than those
recommended by the manufacturer may compromise the safety
or quality of the instrument.
Care should be taken to not use decontamination or cleaning
agents which would cause a hazard as a result of a reaction
with parts of the equipment or with material contained in it.
For the protection of others, ensure the instrument is properly
decontaminated prior to having the instrument serviced at your
facility or before sending the instrument for repair,
maintenance, trade-in, disposal, or termination of a loan.
Decontamination forms may be requested from customer
service.
Ensure appropriate electrical supply. For safe
operation of the instrument:
Plug the system into a properly grounded receptacle with
adequate current capacity.
Ensure the electrical supply is of suitable voltage.
Never operate the instrument with the ground disconnected.
Grounding continuity is required for safe operation of the
instrument.
Power Supply Line Cords. Use properly configured
and approved line cords for the power supply in your facility.
Disconnecting Power. To fully disconnect power
either detach or unplug the power cord, positioning the
instrument such that the power cord is accessible.
Page 33
The instrument design and manufacture complies with the standards
and requirements for safety and electromagnetic compatibility as noted
in the following table:
GENERAL CHEMICAL HANDLING. To minimize
hazards, ensure laboratory personnel read and practice the general
safety guidelines for chemical usage, storage, and waste provided
below, and consult the relevant SDS for specific precautions and
instructions:
Read and understand the Safety Data Sheets (SDSs) provided
by the chemical manufacturer before you store, handle, or work
with any chemicals or hazardous materials. To obtain SDSs, see
the “Documentation and Support” section in this document.
Minimize contact with chemicals. Wear appropriate personal
protective equipment when handling chemicals (for example,
safety glasses, gloves, or protective clothing).
Minimize the inhalation of chemicals. Do not leave chemical
containers open. Use only with adequate ventilation (for
example, fume hood).
Check regularly for chemical leaks or spills. If a leak or spill
occurs, follow the manufacturer's cleanup procedures as
recommended in the SDS.
Ensure that the waste is stored, transferred, transported, and
disposed of according to all local, state/provincial, and/or
national regulations.
IMPORTANT! Radioactive or biohazardous materials may
require special handling, and disposal limitations may apply.
Page 34
Potential Biohazard. Depending on the samples used
on this instrument, the surface may be considered a biohazard. Use
appropriate decontamination methods when working with
biohazards.
BIOHAZARD. Biological samples such as tissues,
body fluids, infectious agents, and blood of humans and other
animals have the potential to transmit infectious diseases. Follow
all applicable local, state/provincial, and/or national regulations.
Wear appropriate protective equipment, which includes but is not
limited to: protective eyewear, face shield, clothing/lab coat, and
gloves. All work should be conducted in properly equipped
facilities using the appropriate safety equipment (for example,
physical containment devices). Individuals should be trained
according to applicable regulatory and company/institution
requirements before working with potentially infectious materials.
Read and follow the applicable guidelines and/or regulatory
requirements in the following:
In the U.S.:
U.S. Department of Health and Human Services guidelines
published in Biosafety in Microbiological and Biomedical
Laboratories found at: www.cdc.gov/biosafety
Occupational Safety and Health Standards, Bloodborne
Pathogens (29 CFR§1910.1030), found at:
www.access.gpo.gov/nara/cfr/waisidx_01/%2029cfr1910a_01.ht
ml
Your company’s/institution’s Biosafety Program protocols for
working with/handling potentially infectious materials.
Additional information about biohazard guidelines is available
at: www.cdc.gov
In the EU:
Check local guidelines and legislation on biohazard and biosafety
precaution and refer to the best practices published in the World
Health Organization (WHO) Laboratory Biosafety Manual, third
edition, found at:
www.who.int/csr/resources/publications/biosafety/WHO_CDS_
CSR_LYO_2004_11/en/
Page 35
Safety Data Sheets (SDSs) are available from
www.lifetechnologies.com/support
For the SDSs of chemicals not distributed by Life Technologies, contact
the chemical manufacturer.
Support email: [email protected]
For the latest services and support information for all locations, go to:
www.lifetechnologies.com/support
At the website, you can:
Access worldwide telephone and fax numbers to contact Technical
Support and Sales facilities
Search through frequently asked questions (FAQs)
Search for user documents, SDSs, vector maps and sequences,
application notes, formulations, handbooks, certificates of analysis,
citations, and other product support documents
Obtain information about customer training
Download software updates and patches
Page 36

Headquarters
5791 Van Allen Way | Carlsbad, CA 92008 USA | Phone +1 760 603 7200 | Toll Free in USA 800 955 6288
For support visit www.lifetechnologies.com/support
www.lifetechnologies.com
 Loading...