

Page 1
Operating instructions
Combined fridge-freezer
310816
7082 878-00
CN(P)(el) 42/43/48
Page 2
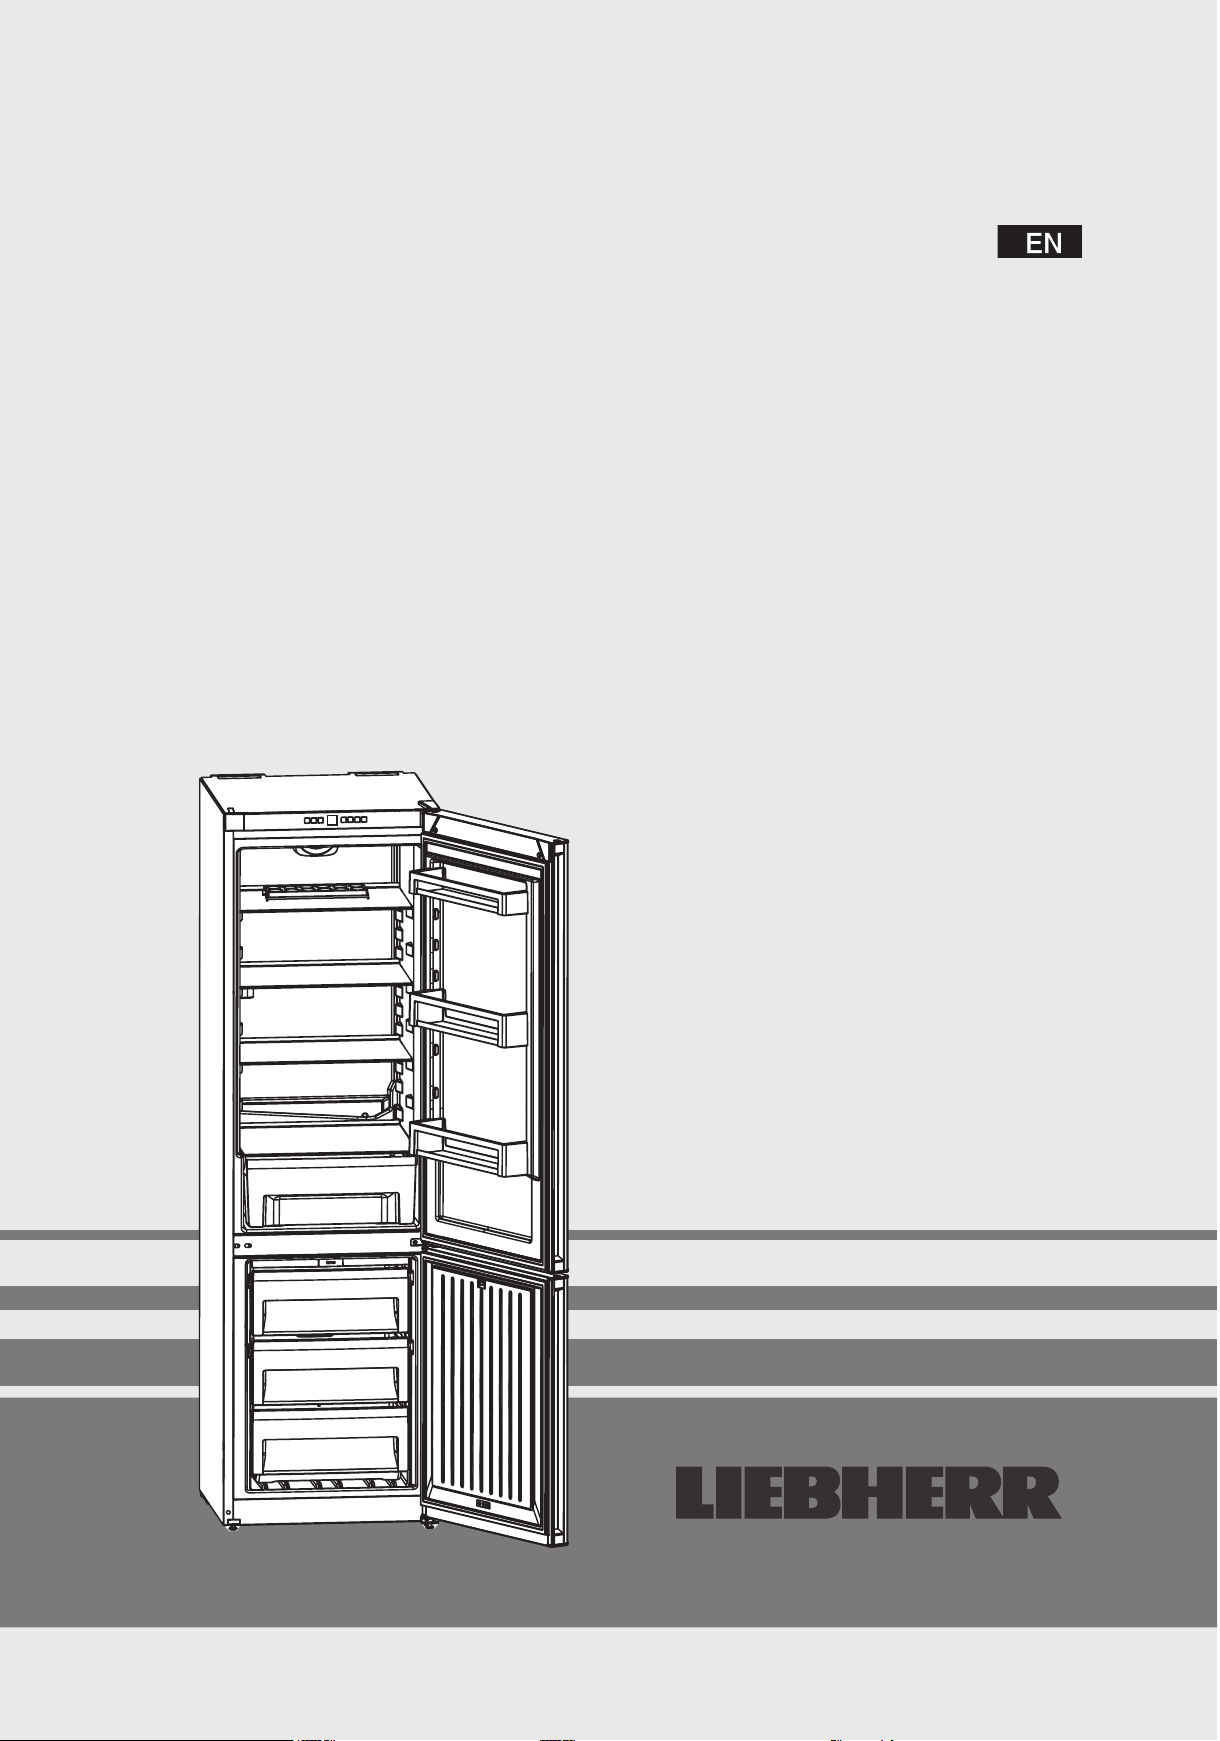
The appliance at a glance
Contents
1 The appliance at a glance .......................................10
1.1 Overview of the appliance and equipment .................. 10
1.2 Range of appliance applications ................................. 10
1.3 Conformity .................................................................. 10
1.4 Installation dimensions ............................................... 10
1.5 Saving energy ............................................................. 11
2 General safety information ..................................... 11
3 Operating and display elements ............................ 12
3.1 Operating controls ...................................................... 12
3.2 Temperature display ................................................... 12
4 Putting into operation ............................................. 12
4.1 Transporting the appliance ......................................... 12
4.2 Installing the appliance ............................................... 12
4.3 Changing the door swing ............................................ 13
4.4 Installing appliance in a row of kitchen units ............... 13
4.5 Disposing of packaging .............................................. 13
4.6 Connecting the appliance ........................................... 13
4.7 Switching the appliance on ......................................... 13
5 Operation .................................................................. 14
5.1 Child lock .................................................................... 14
5.2 Door alarm .................................................................. 14
5.3 Temperature alarm ..................................................... 14
5.4 Sabbath Mode ............................................................ 14
5.5 Fridge section ............................................................. 14
5.6 Freezer section ........................................................... 15
6 Maintenance ............................................................. 16
6.1 Defrosting with NoFrost .............................................. 16
6.2 Cleaning the appliance ............................................... 16
6.3 Customer service ....................................................... 16
7 Faults ........................................................................ 17
8 Shutting your appliance down ............................... 17
8.1 Switching o the appliance ......................................... 17
8.2 Shutting your appliance down .................................... 17
9 Disposing of the appliance ..................................... 17
All types and models are subject to continuous improvement
by the manufacturer. We therefore reserve the right to make
modications to the shape, equipment and technology.
To familiarise yourself with all the advantages your new appliance
has to oer, please read the information contained in these
instructions carefully.
The instructions apply to several models, so may vary slightly.
Sections that only apply to certain appliances are marked with an
asterisk (*).
Handling instructions are marked with a , handling
results with a .
1 The appliance at a glance
1.1 Overview of the
appliance and equipment
Please fold out the last page with the
illustrations.
Note
Sort food into types as shown in the illustration.
The appliance will then work with energy eciency.
When the appliance is delivered, the shelves, drawers and
compartments are arranged for optimum energy eciency.
Fig. 1
(1) Controls (8) Egg tray
(2) Door rack, adjustable (9) Type plate
(3) Bottle shelf (10) Freezer drawer
(4) Vegetable crisper (11) VarioSpace
(5) Coldest zone (12) Ice cube tray
(6) Drain opening (13) Front adjustable feet
(7) Shelf, adjustable (14) Transport handles
10
1.2 Range of appliance applications
Intended use
The appliance is only suitable for cooling
food products in a domestic or household-like
environment. This includes, for example, use:
- in sta kitchens, bed and breakfast operations,
- by guests in country houses, hotels, motels and
other accommodation,
- for catering and similar services in wholesale.
All other types of application are impermissible.
Foreseeable erroneous use
The following applications are expressly
prohibited:
- Storage and cooling of medication, blood
plasma, laboratory compounds or similar
substances and products subject to the
Medical Device Directive 2007/47/EC
- Use in explosive areas
-
Use on mo
ving substrates, such as in ships,
locomotive vehicles or aircraft
-
age of live animals
Stor
Misusing the appliance may result in damages to
the stored goods or cause them to spoil or decay.
Climate classes
Depending on its climate class, the appliance
is designed for operation within certain ambient
temperature limits. The correct climate rating for
your appliance is indicated on the type plate.
Note
In order to guarantee fault-free operation
comply with the specied ambient
temperatures.
Climate class for ambient temperatures from
SN 10 °C up to 32 °C
N 16 °C up to 32 °C
ST 16 °C up to 38 °C
T 16 °C up to 43 °C
1.3 Conformity
The refrigerant circuit has been tested for leaks. The appliance
meets the relevant safety conditions and the directives 2014/35/EU,
2014/30/EU, 2009/125/EC, 2011/65/EU and 2010/30/EU.
1.4 Installation dimensions
Fig. 2
h a b c d
CN(el) 4213 1861 600 657
CN(P)(el) 4313 1861 600 657
CN(P)(el) 4813 2011 600 657
* according to model and design
x
610 1200
x
610 1200
x
610 1200
x
x
x
Page 3
x
This dimension increases by 35 mm in case of appliances with
wall spacer brackets attached (see 4.2).
1.5 Saving energy
-
Always make sure there is good ventilation and aeration. Do
not cover ventilation openings or grilles.
- Always keep the vents clear.
- Avoid positioning the appliance in direct sunlight, near
cookers, radiators and similar sources of heat.
- The energy consumption is dependent on the installation
conditions, e.g. the ambient temperature (see 1.2). If the
ambient temperature deviates from the standard temperature
of 25°C, the energy consumption may dier.
- Open the appliance as briey as possible.
- The lower the temperature is set, the higher the energy
consumption.
- Organise foods into types (see “The appliance at a glance”).
- Keep all food properly packed and covered. This prevents
frost from forming.
- Only take food out for as long as necessary, so that it does
not warm up excessively.
- Inserting warm food: allow to cool down to room temperature
rst.
- Leave frozen food to defrost inside the fridge.
- With longer holiday periods, empty the fridge section and
switch o.
- Dust deposits increase energy consumption: Dust should
be removed from the refrigeration unit and heat exchanger metal grid at the back of the appliance - once a year. Fig. 10
2 General safety information
Risks for the user:
- This appliance can be used by children 8 years of
age and upwards, as well as persons with limited
metal, sensory and physical capabilities or with
a lack of experience and knowledge, if supervised
or following instruction regarding safe use of the
appliance, and if they understand the risks
associated with it. Children must not play with the
appliance. Cleaning and user maintenance must
not be performed by children when unsupervised.
Children from 3-8 years are permitted to load and
unload the appliance. Children under 3 years of
age must be kept away from the appliance unless
constantly supervised.
- When disconnecting the appliance from the mains,
always pull on the plug. Never tug on the cable.
- In case of faults, unplug the mains plug or switch
o the circuit breaker.
- Do not damage the mains cable. The appliance
must not be operated with a defective mains cable.
- Repairs, appliance interventions and changing
the mains cable must be performed by customer
service or another suitably trained specialist only.
- Only install, connect and dispose of the appliance
in accordance with the specications in the
instructions.
- Keep these instructions in a safe place and, if
necessary, hand them over to the next owner of
the appliance.
- Special lamps (light bulbs, LED, uorescent
General safety information
lamps) inside the appliance are used to illuminate
its interior and are not suitable for room lighting.
Risk of re:
- The refrigerant R 600a inside the appliance
is environmentally friendly, but ammable.
Leaking refrigerant may ignite.
• Do not damage the pipes in the coolant circuit.
• Do not use a naked ame or other source of
ignition inside the appliance.
• Do not use electrical devices inside the
appliance (e.g. steam cleaners, heaters, ice
cream makers, etc.).
• If the refrigerant leaks: remove any naked
ames or ignition sources from the vicinity of
the leakage point. Properly air the room. Inform
customer services.
- Do not use the appliance to store explosive
materials or aerosol cans with ammable
propellants, such as butane, propane, pentane
etc. These types of aerosol can be identied by
the list of contents printed on it, or by a ame
symbol. Any leaking gas may ignite due to
electrical parts.
- Keep burning candles, lamps and other objects
with naked ames away from the appliance, so
that these do not set re to the appliance.
- Alcoholic beverages and other containers bearing
alcohol must be sealed tight for storage. Any
leaking alcohol may ignite due to electrical parts.
Risk of falling and toppling:
- Do not use the base, drawers, or doors, etc. as
a step or a support. This applies in particular to
children.
Risk of food poisoning:
- Do not eat foods past their expiry date.
Risk of freezing, numbness and pain:
- Avoid extended skin contact with cold surfaces
or chilled/frozen goods, or implement protective
measures, for example use gloves. Do not eat
ice cream - particularly ice lollies or ice cubes immediately or when too cold.
Risk of injury and damage to the appliance:
- Hot steam can cause injuries. Do not use an
electric heater or steam cleaner, naked ames or
defrost spray to defrost.
- Do not remove ice with sharp objects.
Risk of crushing:
- When opening and closing the door, do not reach
into the hinge. Fingers may become trapped.
Symbols on the appliance:
The symbol may be found on the compressor. It
pertains to the oil in the compressor and indicates
the following danger: Can be fatal if swallowed
or with penetration of the respiratory tract. This
information is only signicant for recycling. No risk
exists with normal use.
* according to model and design
11
Page 4

Operating and display elements / putting into operation
Observe the specic information in the other
chapters:
DANGER Identies an immediately dangerous
situation that will result in death or serious bodily injuries if it is not prevented.
WARNING Identies a dangerous situation that
could result in death or serious bodily
injuries if it is not prevented.
CAUTION Identies a dangerous situation that
could result in minor or moderate bodily
injuries if it is not prevented.
ATTENTION Identies a dangerous situation that
could result in property damage if it is
not prevented.
Note Identies useful information and tips.
3 Operating and display elements
3.1 Operating controls
Fig. 11
(1) On/O button, (9) On/O button, freezer section
fridge section
(2) Ventilation button (10) SuperFrost symbol
(3) Adjustment button, (11) Alarm symbol
fridge section
(4) Temperature display, (12) Sabbath Mode symbol
fridge section
(5) Temperature display, (13) Menu symbol
freezer section
(6) Adjustment button, (14) Child lock symbol
freezer section
(7) SuperFrost button (15) Ventilation symbol
(8) Alarm button
3.2 Temperature display
The following are displayed in normal mode:
- the set freezer temperature
- the set fridge temperature
The temperature display on the freezer section ashes:
- the temperature setting is being changed
- the temperature is not yet suciently cold after switching on
- the temperature has risen by several degrees
4 Putting into operation
4.1 Transporting the appliance
CAUTION
Risk of injury and damage to the appliance with incorrect
transport!
Transport the appliance packaged.
Transport the appliance upright.
Do not transport the appliance alone.
4.2 Installing the appliance
WARNING
Risk of re due to moisture!
If live parts or the mains cable become damp, this can cause
a short circuit.
The appliance is only designed for use in closed rooms.
Do not operate the appliance outdoors or in moist areas or areas
12
in contact with spraying water.
WARNING
Risk of re due to short circuit!
In case of contact between the mains cable/plug on the
appliance or another appliance and the back of the appliance,
the mains cable/plug may be damaged by the appliance
vibrations, resulting in a short circuit.
Install the appliance so that it does not come into contact with
a plug or mains cable.
Do not connect the appliance or another appliance to sockets
in the vicinity of the rear of the appliance.
WARNING
Risk of re due to refrigerant!
The refrigerant R 600a inside the appliance is environmentally
friendly, but ammable. Leaking refrigerant may ignite.
Do not damage the pipes in the refrigerant circuit.
WARNING
Risk of re and damage to the appliance!
Do not place heat-emitting appliances, e.g. microwave oven,
toaster, etc., on top of the appliance!
WARNING
Risk of re and damage to the appliance with blocked ventilation
openings!
Keep the ventilation openings clear at all times. Always make
sure there is good ventilation and aeration!
ATTENTION
Risk of damage due to condensate!
Do not place the appliance directly next to another cooling/
refrigeration unit.
q If the appliance is damaged, contact your supplier immediately
- before plugging it in.
The oor on which the appliance stands must be horizontal and level.
q
q Avoid positioning the appliance in direct sunlight, near
cookers, radiators and similar sources of heat.
q Always position the appliance with the rear directly against the
wall, or with wall spacer brackets attached (see below) then
with these directly against the wall.
q The appliance may only be moved when empty.
q The oor beneath the appliance must be the same height as
the surrounding oor.
q Do not install the appliance without help.
q The more refrigerant R 600a there is in the appliance, the larger
the room must be in which it is located. In rooms that are too
small, a leak can produce a ammable gas/air mixture. According
to the standard EN 378, the room where the appliance is installed
must be at least 1 m3 per 11 g of refrigerant R 600a. The quantity
of refrigerant used in your appliance is indicated on the type plate
on the inside of the appliance.
Detach the connection cable from the rear of the appliance.
When doing so remove the cable bracket, otherwise the
appliance will generate vibration noise!
Remove the protective lm on the outside of the housing
and take o the trim strips.
Remove all the transport safety devices.
In order to achieve the stated energy consumption, it is necessary
to use the spacer brackets provided with some appliances.
This results in the appliance depth increasing by approx. 35 mm.
The appliance is fully functional without the spacer brackets, but
* according to model and design
Page 5

Putting into operation
its energy consumption will be slightly higher.
Fig. 9 In case of an appliance with wall spacer brackets, mount
these brackets on the rear side of the appliance, top left and right.
Dispose of the packaging. (see 4.5)
Fig. 4
Note
Clean the appliance (see 6.2).
If the appliance is installed in a very damp environment,
condensation may form on the appliance exterior.
Using the open-ended spanner provided and with
the aid of a spirit level, align and level the appliance via the
adjustable feet (A). Then support the door: Unscrew the
adjustable foot on the bearing block (B) until it touches the
oor, then a further 90°.
Always make sure there is good ventilation and aeration at the installation site.
4.3 Changing the door swing
You can change over the door hinges if necessary:
see assembly instructions provided.
Make sure that the following tools are to hand:
q Torx® 25
q Screwdriver
q If necessary, cordless screwdriver
q If necessary, a second person to assist with installation
Note
Take food out of the door racks before removing the door to
avoid food falling out.
CAUTION
Danger of injury when the door tilts outwards!
Hold the door well.
Carefully set down the door.
WARNING
Danger of injury due to door falling out!
If the bearing parts are not suciently rmly screwed in place, the
door may fall out. This can result in serious injuries.
Furthermore, the door may not close fully, whereby the appliance
cooling will not function correctly.
Screw the bearing blocks tight with 4 Nm.
Check all screws and tighten if necessary.
4.4 Installing appliance in a row of
kitchen units
The appliance can be tted into kitchen units.
see assembly instructions provided.
Ventilation requirements:
A [mm] B [mm] C [cm2] D [mm] E [mm]
x
657
x
This dimension increases by 35 mm in case of appliances with
wall spacer brackets attached (see 4.2).
The appliance may protrude further, depending on the depth of
the kitchen units and the use of wall spacer brackets.
ATTENTION
Risk of damage to the appliance due to overheating with
insucient ventilation!
The compressor may be damaged with insucient ventilation.
Ensure sucient ventilation.
Observe the ventilation requirements.
76 min. 300 min. 50 min. 19
4.5 Disposing of packaging
WARNING
Risk of suocation due to packaging material and lm!
Do not allow children to play with packaging material.
The appliance packaging is produced from recyclable
materials:
- Corrugated board/cardboard
- Polystyrene foam parts
- Polythene sheets and bags
- Polypropylene straps
- Nailed wooden frame with polythene panels*
Please take the packaging material to an ocial collection
point.
4.6 Connecting the appliance
ATTENTION
Incorrect connection!
Damage to the electrics/electronics.
Do not use stand-alone inverters.
Do not use energy-saving plugs.
WARNING
Incorrect connection!
Risk of re.
Do not use extension cables.
Do not use distribution strips.
Power supply (AC) and voltage at the operating point must
comply with the details on the type plate (see “The appliance
at a glance”).
The socket must be earthed and electrically protected. The
trigger current of the fuse must be between 10 A and 16 A.
The socket must be easily accessible, so that the appliance can
be quickly disconnected from the power supply in an emergency.
It must not be behind the appliance.
Check electrical connections.
Insert the plug.
4.7 Switching the appliance on
Note
To switch on the entire appliance, you only need to switch
on the freezer section. The fridge section is automatically
switched on with it.
The appliance should have been operating for about 2 hours
before you stock it with frozen food for the rst time.
Only place food in the freezer once the temperature display
shows at least -18°C.
4.7.1 Switching on the freezer section
Press On/O button for the freezer section Fig. 11 (9).
The appliance is switched on. The temperature display shows
the set temperature. The temperature display for the freezer
section and the alarm symbol ash until the temperature is
cold enough.
4.7.2 Switching on the fridge section
Note
When the fridge section is switched on, the freezer section
switches on automatically as well.
If the fridge section was switched o (e.g. with an extended
absence due to holiday), this can be switched on again separately.
Press On/O button for the fridge section Fig. 11 (1).
The interior light comes on when the door is open.
* according to model and design
13
Page 6

Operation
The temperature displays light up. The fridge and freezer
sections are switched on.
5 Operation
5.1 Child lock
Using the child lock, you can ensure that children
are unable to accidentally switch o the appliance when playing.
5.1.1 Setting the child lock
To switch on the function:
Activate the setting mode: Press SuperFrost button Fig. 11 (7)
for approx. 5 seconds.
The menu symbol Fig. 11 (13) is shown on the display.
S ashes on the display.
Using the adjustment button for the freezer section Fig. 11 (6)
select c.
Briey conrm with the SuperFrost button Fig. 11 (7).
c1 appears on the display.
Briey conrm with the SuperFrost button Fig. 11 (7).
The child lock symbol Fig. 11 (14) lights up on the display.
c ashes on the display.
The child lock function is switched on.
To cancel setting mode:
Briey press the On/O button for the freezer section Fig. 11 (9).
-or-
wait 5 min.
The temperature display shows the temperature again.
To switch o the function:
Activate the setting mode: Press SuperFrost button Fig. 11 (7)
for approx. 5 seconds.
The menu symbol Fig. 11 (13) is shown on the display.
c ashes on the display.
Briey conrm with the SuperFrost button Fig. 11 (7).
c0 appears on the display.
The child lock symbol Fig. 11 (14) goes out.
c ashes on the display.
The child lock function is switched o.
To cancel setting mode:
Briey press the On/O button for the freezer section Fig. 11 (9).
-or-
Wait 5 min.
The temperature display shows the temperature again.
5.2 Door alarm
For the fridge section
If the door is kept open for longer than 60 seconds,
the acoustic warning signal sounds.
The acoustic warning signal is automatically switched o
when the door is closed.
5.2.1 Switching the door alarm to mute
The acoustic warning signal can be switched to mute with an
open door. The warning signal mute function is eective while the
door is open.
Press alarm button Fig. 11 (8).
5.3 Temperature alarm
When the freezer temperature is no longer cold enough,
the acoustic warning signal sounds.
The temperature display and the alarm symbol ash at
the same time.
The following may be the cause of the temperature being too high:
- fresh hot food has been put in
- too much warm air has got in while you were sorting out the
freezer or removing items
- there has been an extended power failure
- the appliance is faulty
The acoustic warning signal is automatically switched o and the
alarm symbol goes out when the temperature is cold enough again.
If the alarm state remains: (See faults).
14
Note
If the temperature is not cold enough, food may go o.
Check the quality of the food. Do not consume food that has
spoiled.
5.3.1 Switching the temperature alarm to mute
The acoustic warning signal can be switched to mute. When the
temperature is cold enough again, the alarm function becomes
active again.
Press alarm button Fig. 11 (8).
5.4 Sabbath Mode
This function satises religious requirements on the
Sabbath and Jewish holidays. If Sabbath Mode is
activated, some functions of the control electronics
are switched o. After setting Sabbath Mode, you no
longer need to concern yourself with the control lamps, digits,
symbols, displays, alarm messages and fans. The defrost cycle
operates only for the specied time, without consideration to the
refrigerator consumption. After a power failure, the appliance
switches back to Sabbath Mode automatically.
WARNING
Risk of food poisoning!
If a power failure occurs while Sabbath Mode is active, this
message is not saved. After the power failure is over, the
appliance continues to operate in Sabbath Mode. Once this
comes to an end, no message is issued regarding the power
failure in the temperature display.
If a power failure has occurred in Sabbath Mode:
Check the quality of your food. Do not eat foods that have defrosted!
- All functions are blocked until Sabbath Mode is switched o.
- If functions such as SuperFrost, SuperCool, ventilation, etc.
are active when Sabbath Mode is switched on, these remain
active.
- No acoustic signals are issued and no warnings/settings are
displayed in the temperature display (e.g. temperature alarm,
door alarm).
- The interior lighting is deactivated.
5.4.1 Setting Sabbath Mode
Activate the setting mode: Press SuperFrost button Fig. 11 (7)
for approx. 5 seconds.
S ashes on the display.
The menu symbol Fig. 11 (13) lights up.
In order to call up the Sabbath Mode function: Press
SuperFrost button Fig. 11 (7) briey.
If S1 appears on the display:
To switch on Sabbath Mode, press the SuperFrost button
Fig. 11 (7) briey.
If S0 appears on the display:
To switch o Sabbath Mode, press the SuperFrost button
Fig. 11 (7) briey.
Deactivate the setting mode: Press On/O button for the
freezer section Fig. 11 (9).
-or-
wait 5 min.
The Sabbath Mode symbol is displayed in the temperature
display, as long as Sabbath Mode is active.
Sabbath Mode switches o automatically after 120 hours,
if it has not been manually switched o beforehand.
5.5 Fridge section
Natural air circulation in the fridge section results in dierent
temperature zones forming. The coldest zone is immediately
above the vegetable bins and at the rear wall. The warmest zone
is up the top at the front, and in the door.
5.5.1 Refrigerating food
* according to model and design
Page 7

Operation
Note
Insucient ventilation results in the energy consumption rising
and the refrigeration capacity falling.
Always keep the vents clear.
Particularly perishable foods such as cooked dishes,
meat and sausages should be stored in the coldest zone.
Store butter and preserves in the top area and in the door.
(See “The appliance at a glance”)
Use reusable plastic, metal, aluminium or glass containers and
food wrap as packaging material.
Always keep liquids and foods that give o or absorb odours
or avours covered, or store these in airtight containers.
Food that gives o a large amount of ethylene and foods that
are highly sensitive to this, such as fruit, vegetables, salad,
should always be separated or packed so as not to reduce
storage life; e.g. do not store tomatoes together with kiwi fruit
or cabbage.
Do not pack food too tightly, i.e. store in such a way that air can
circulate freely.
5.5.2 Setting the temperature
The temperature depends on the following factors:
- the frequency of opening the door
- the room temperature of the installation location
- the type, temperature and quantity of the food
Recommended temperature setting: 5 °C
The temperature can be changed sequentially. When the
setting 1 °C is reached, it begins again at 9 °C.
Call up the temperature function: Press the fridge adjustment
button Fig. 11 (3).
The previously set value is shown ashing in the temperature
display.
Changing the temperature in 1°C increments: Press the fridge
adjustment button Fig. 11 (3) repeatedly until the desired
temperature is shown on the temperature display.
During adjustment the value ashes on the display.
Approx. 5 sec. after the last button press, the new setting is
accepted. The interior temperature slowly adjusts to the new
value.
5.5.3 Fan
Cooling by circulating air is recommended:
- with high humidity levels
Cooling by circulating air uses slightly more energy.
To save energy, the fan automatically switches o when the door
is opened.
Switching on the fan
Press ventilation button Fig. 11 (2) briey.
The ventilation symbol Fig. 11 (15) is shown on the display.
The fan is active. With some appliances, it only switches on if
the compressor is running.
Switching o the fan
Press ventilation button Fig. 11 (2) briey.
The ventilation symbol Fig. 11 (15) goes out.
The fan is switched o.
5.5.4 Shelves
Moving or removing shelves
Fig. 6
To completely remove the shelf, observe the sequence of
actions indicated.
Insert shelf with the raised edge at the back pointing upwards.
5.5.5 Door rack
Removing the door rack
Fig. 7
Remove the rack as shown in the illustration.
5.6 Freezer section
You can store frozen and deep-frozen food, make ice cubes and
freeze fresh foods in the freezer section.
5.6.1 Freezing food
Only freeze the maximum number of kilograms of fresh food as
stated on the type plate (see “The appliance at a glance”) under
“freezing capacity .kg/24h” within a 24 hour period.
The drawers can each be loaded with max. 20 kg of
frozen food.
CAUTION
Danger of injury due to glass fragments!
Drinks bottles and drinks cans may explode during freezing.
This applies in particular to drinks containing carbon dioxide.
Do not freeze drinks bottles and drinks cans!
To ensure that food freezes right through, the following quantities
should not be exceeded per package:
- Fruit, vegetables, up to 1 kg
- Meat, up to 2.5 kg
Package food in portions in freezer bags, reusable plastic
metal or aluminium containers.
,
5.6.2 Storage times
Guideline values for the storage time of the various foods
in the freezer section:
Ice cream
Sausages, ham
Game, pork
Bread, bakery goods
Fish, oily
Fish, non oily
Cheese
Poultry, beef
Fruit, vegetables
The storage periods shown here are guideline values.
2 to 6 months
2 to 6 months
2 to 6 months
6 to 10 months
2 to 6 months
6 to 12 months
2 to 6 months
6 to 12 months
6 to 12 months
5.6.3 Defrosting food
- in the refrigerator
- in the microwave
- in the oven/fan oven
- at room temperature
Only take out the amount of food you need.
Use defrosted food as quickly as possible.
Only refreeze defrosted food in exceptional cases.
5.6.4 Setting the temperature
Recommended temperature setting: -18 °C
The temperature can be changed sequentially. When the setting
-26 °C is reached, it begins again at -16 °C.
Call up the temperature function: Press the freezer adjustment
button Fig. 11 (6).
The current temperature ashes on the temperature display.
Press the freezer adjustment button Fig. 11 (6) repeatedly until
the desired temperature is displayed.
5.6.5 SuperFrost
With this function, you can quickly freeze fresh
food through completely. The appliance operates at
maximum freezing capacity and the noises from the cooling unit
may be temporarily louder than usual.
Only freeze the maximum number of kilograms of fresh food as
stated on the type plate under “freezing capacity .kg/24h” in a 24
hour period. This maximum amount for freezing depends on the
model and climate class.
You will need to switch SuperFrost on promptly, depending on
how much fresh food is to be frozen.
Package the food and spread it as widely as possible. Do not
allow food which is to be frozen to come into contact with food
that is already frozen, to prevent this defrosting.
You do not need to switch on SuperFrost under the following
circumstances:
* according to model and design
15
Page 8

Maintenance / Faults
- when inserting foods that are already frozen
- if you are freezing up to approx. 2 kg of fresh food every day
Freezing with SuperFrost
Press SuperFrost button Fig. 11 (7) briey.
The SuperFrost symbol Fig. 11 (10) is shown on the display.
The freezing temperature is reduced, and the appliance
operates at the maximum freezing capacity.
Note
Pressing the SuperFrost button can cause the compressor
to switch on up to 8 minutes later, thanks to the integrated
switch-on delay. This delay increases the service life of the
compressor.
For a small amount of frozen goods:
Wait approx. 6 hours.
For the maximum amount of frozen goods (see type plate):
Wait approx. 24 hours.
Place packaged food in the top drawers.
SuperFrost switches o automatically after no more than
approx. 65 hours.
The SuperFrost symbol Fig. 11 (10) goes out when freezing is
nished.
The appliance continues in normal energy-saving mode.
5.6.6 Drawers
Note
Insucient ventilation results in the energy consumption rising
and the refrigeration capacity falling.
Appliances with NoFrost:
Leave the bottom drawer inside the appliance!
Always keep the inside vents at the rear wall clear!
Remove the drawers as shown in Fig. 5.
5.6.7 VarioSpace
Fig. 3
You can remove the drawers. This makes space for large freezer
items. Poultry, large joints of meat and game, and large bakery
goods can be stored and subsequently prepared whole.
The drawers can each be loaded with max. 20 kg of
frozen food.
Do not use chemical solvents.
Do not damage or remove the type plate inside the appliance.
It is important for customer service.
Do not tear o, bend or damage any cables or other
components.
Do not allow any cleaning water to enter the drain channel,
the ventilation grille or electrical components.
Use soft cleaning cloths and an all-purpose cleaner with
a neutral pH value.
Only use food safe cleaning materials and products inside the
appliance.
Empty the appliance.
Unplug the mains plug.
Clean the outer walls and interior surfaces,
as well as equipment parts by hand with lukewarm water
and a little detergent.
Only clean painted
cloth. In case of heavy soiling, use lukewarm water and
a neutral cleaning product.
Only clean painted door surfaces by wiping with a soft,
clean cloth. In case of heavy soiling, use a little water
or a neutral cleaning product. Optionally, a microbre cloth
can be used.
Clean the drain opening Fig. 8: If necessary remove deposits
with a thin object, such as a cotton bud or similar.
After cleaning:
Rub the appliance and equipment parts dry.
Connect the appliance again and switch it on.
Switch on SuperFrost (see 5.6.4).
When the temperature is cold enough once more:
Place the food in again.
side walls by wiping with a soft, clean
6.3 Customer service
Fig. 12
First check whether you can remedy the fault yourself.
(See faults). If this is not the case, please contact customer
service. Please see the enclosed customer service directory for
the address.
6 Maintenance
6.1 Defrosting with NoFrost
The NoFrost system automatically defrosts the appliance.
Fridge section:
The defrost water evaporates through the heat of the compressor.
Water droplets on the rear wall arise with the function and are
completely normal.
Clean the drain opening regularly so that the defrost water can
drain away. (see 6.2)
Freezer section:
The moisture collects on the evaporator, where it is periodically
defrosted and evaporated.
It is not necessary to defrost the appliance manually.
6.2 Cleaning the appliance
WARNING
Risk of injury and damage to the appliance due to hot steam!
Hot steam can cause burns and damage surfaces.
Do not use steam cleaning devices!
ATTENTION
Improper cleaning will damage the appliance!
Do not use cleaning agents in their concentrated form.
Do not use any abrasive or scouring sponges or steel wool.
Do not use sharp, abrasive cleaning agents, or products
containing sand, chloride or acid.
16
WARNING
Danger of injury due to unprofessional repair!
Repairs and interventions aecting the appliance and the
mains cable must be performed by customer service unless
expressly stated (see maintenance).
For the appliance designation Fig. 12 (1), service no. Fig. 12
(2) and the serial no. Fig. 12 (3) refer to the type plate. The type
plate is located on the left, inside the machine.
Inform customer service and describe the fault, appliance
designation Fig. 12 (1), service no. Fig. 12 (2) and serial no.
Fig. 12 (3).
This will make it possible to provide fast and accurate service.
Leave the appliance plugged in until customer service arrives.
The food will stay cold for longer.
Pull out the plug (do not tug on the connection cable here) or
switch o the circuit breaker.
7 Faults
Your appliance is designed and manufactured so that it will
operate safely and will have a long service life. Nevertheless,
if a fault should occur during operation, please check whether the
fault is due to incorrect operation. In this case we must charge
you for any costs incurred, also within the guarantee period.
Normal noises in the appliance:
Running noise due to speed-regulated compressors.
A bubbling or splashing sound from the coolant owing
* according to model and design
Page 9

Shutting your appliance down / disposing of the appliance
through the coolant circuit.
A quiet clicking, when the cooling unit (motor) switches itself on
and o automatically.
Brief humming noise, slightly louder:
- When the motor switches on, when SuperFrost is switched
on, if fresh food has been recently stored or the door has been
open for a long period, the freezing capacity automatically
increases.
- High ambient temperature (s. 1.2)
Deep humming - Noise of air owing through the fan.
The compressor runs for a long time:
- It switches to a lower speed when it requires a lower cooling
capacity, to save energy.
- SuperFrost is switched on.
External surfaces warm. The heat from the cooling circuit is
used to avoid condensate.
Faults that you can remedy yourself:
The appliance does not function:
- The appliance is not switched on.
Plug the plug into the mains socket correctly, check fuse
Vibration noises, if the appliance is not set up rmly on the oor.
Align the appliance with the adjustable feet.
Temperature is not cold enough:
- Appliance door is not fully closed.
Close appliance door.
- Ventilation and aeration insucient.
Clear and clean the ventilation grille.
- High ambient temperature
see 1.2.
- Excessive quantity of fresh food stored without actuating
SuperFrost.
see 5.6.4.
- The appliance was opened too frequently or for too long.
Wait to see if the appliance goes back to the required
temperature by itself. If not, contact customer services (see
maintenance).
- Temperature set incorrectly.
Set colder and check after 24 hours.
- Appliance is set up too close to a heat source.
Change the location of the appliance or adjust the heat source.
The interior light does not light up.
- Appliance is not switched on.
Switch on the appliance.
- The door was open for longer than 15 minutes.
Interior light switches o automatically if the door stays open
for approx. 15 minutes.
Icing up or condensate forming.
- The door seal may have also slipped out of its groove.
Check the door seal.
With the following faults, contact customer
service:
- The door seal is defective or requires replacement for another
reason. Door seal exchangeable.
- DEMO is shown in the temperature display.
- LED lighting is defective or the cover is damaged.
8 Shutting your appliance down
8.1 Switching o the appliance
Note
To switch o the entire appliance you only need
to switch o the freezer section. The fridge section is
automatically switched o with it.
8.1.1 Switching o the freezer section
Press On/O button for the freezer section Fig. 11 (9) for at
least 3s.
The temperature displays are dark. The entire appliance is
switched o.
8.1.2 Switching o the fridge section
Press On/O button for the fridge section Fig. 11 (1) for at least 3s.
The interior lighting goes out.
The temperature display of the fridge section is dark.
Note
If only the fridge section is to be switched o, e.g. during
holiday periods, always make sure that the temperature
display for the freezer section is illuminated.
8.2 Shutting your appliance down
Empty the appliance.
Switch the appliance o (see “Shutting your appliance
down”).
Unplug the mains plug.
Clean the appliance (see 6.2).
Leave the door open, so that no unpleasant odours arise.
9 Disposing of the appliance
The appliance still contains some valuable materials
and should be disposed of properly - not simply with
unsorted household refuse. The old appliance must be
properly and professionally disposed of in accordance
with the local applicable regulations and legislation.
When transporting the old appliance do not damage
the coolant circuit, so that the coolant inside
(information on the type plate) and the oil do not leak out
uncontrolled.
Disable the appliance.
Unplug the mains plug.
Disconnect the connection cable
WARNINGS:
Danger of injury due to electric shock!
Live parts are located beneath the cover.
• The LED interior lighting must be replaced or repaired by
customer service or trained specialist personnel only.
Danger of injury by LED lamp!
The light intensity of the LED lighting corresponds to laser class
1/1M.
If the cover is defective:
• Do not look directly into the lighting with optical lenses at close
proximity. This can cause injury to the eyes.
* according to model and design
17
Page 10

Fig. 5
Fig. 6
Fig. 1
Fig. 2
Fig. 7
Fig. 9
Fig. 11
Fig. 8
Fig. 10
Fig. 3
82
Fig. 4
Fig. 12
 Loading...