

Page 1
AC Power
For Business-Critical Continuity
Npower™ UPS
Operation & Maintenance Manual–30-130kVA, 60Hz, Single Module System
Page 2

Page 3

TABLE OF CONTENTS
IMPORTANT SAFETY INSTRUCTIONS . . . . . . . . . . . . . . . . . . . . . . . . . . . . . . . . . . . . . . . . . . . . . . . . 1
OVERVIEW OF MANUAL. . . . . . . . . . . . . . . . . . . . . . . . . . . . . . . . . . . . . . . . . . . . . . . . . . . . . . . . . 2
1.0 INTRODUCTION . . . . . . . . . . . . . . . . . . . . . . . . . . . . . . . . . . . . . . . . . . . . . . . . . . . . . . . . . .3
1.1 System Description. . . . . . . . . . . . . . . . . . . . . . . . . . . . . . . . . . . . . . . . . . . . . . . . . . . . . . . . . . . 3
1.1.1 Reliability . . . . . . . . . . . . . . . . . . . . . . . . . . . . . . . . . . . . . . . . . . . . . . . . . . . . . . . . . . . . . . . . . . . 4
1.1.2 Versatility . . . . . . . . . . . . . . . . . . . . . . . . . . . . . . . . . . . . . . . . . . . . . . . . . . . . . . . . . . . . . . . . . . . 4
1.2 Safety Precautions . . . . . . . . . . . . . . . . . . . . . . . . . . . . . . . . . . . . . . . . . . . . . . . . . . . . . . . . . . . 4
1.3 Modes Of Operation . . . . . . . . . . . . . . . . . . . . . . . . . . . . . . . . . . . . . . . . . . . . . . . . . . . . . . . . . . 5
1.3.1 Normal (Load On UPS) . . . . . . . . . . . . . . . . . . . . . . . . . . . . . . . . . . . . . . . . . . . . . . . . . . . . . . . . 5
1.3.2 Input Power Failure . . . . . . . . . . . . . . . . . . . . . . . . . . . . . . . . . . . . . . . . . . . . . . . . . . . . . . . . . . . 5
1.3.3 Recharge . . . . . . . . . . . . . . . . . . . . . . . . . . . . . . . . . . . . . . . . . . . . . . . . . . . . . . . . . . . . . . . . . . . . 5
1.3.4 Overload . . . . . . . . . . . . . . . . . . . . . . . . . . . . . . . . . . . . . . . . . . . . . . . . . . . . . . . . . . . . . . . . . . . . 6
1.3.5 Bypass (Internal) . . . . . . . . . . . . . . . . . . . . . . . . . . . . . . . . . . . . . . . . . . . . . . . . . . . . . . . . . . . . . 6
1.3.6 External Maintenance Bypass . . . . . . . . . . . . . . . . . . . . . . . . . . . . . . . . . . . . . . . . . . . . . . . . . . . 6
1.3.7 Off-Battery . . . . . . . . . . . . . . . . . . . . . . . . . . . . . . . . . . . . . . . . . . . . . . . . . . . . . . . . . . . . . . . . . . 6
1.4 Operator Controls. . . . . . . . . . . . . . . . . . . . . . . . . . . . . . . . . . . . . . . . . . . . . . . . . . . . . . . . . . . . 7
1.5 Options . . . . . . . . . . . . . . . . . . . . . . . . . . . . . . . . . . . . . . . . . . . . . . . . . . . . . . . . . . . . . . . . . . . . 7
2.0 THEORY OF OPERATION . . . . . . . . . . . . . . . . . . . . . . . . . . . . . . . . . . . . . . . . . . . . . . . . . . .8
2.1 General Component Description . . . . . . . . . . . . . . . . . . . . . . . . . . . . . . . . . . . . . . . . . . . . . . . . 8
2.1.1 UPS Module . . . . . . . . . . . . . . . . . . . . . . . . . . . . . . . . . . . . . . . . . . . . . . . . . . . . . . . . . . . . . . . . . 8
2.1.2 Battery System . . . . . . . . . . . . . . . . . . . . . . . . . . . . . . . . . . . . . . . . . . . . . . . . . . . . . . . . . . . . . . . 8
2.2 Detailed Component Descriptions . . . . . . . . . . . . . . . . . . . . . . . . . . . . . . . . . . . . . . . . . . . . . . . 9
2.2.1 Controls . . . . . . . . . . . . . . . . . . . . . . . . . . . . . . . . . . . . . . . . . . . . . . . . . . . . . . . . . . . . . . . . . . . . . 9
2.2.2 Rectifier/Charger . . . . . . . . . . . . . . . . . . . . . . . . . . . . . . . . . . . . . . . . . . . . . . . . . . . . . . . . . . . . 10
2.2.3 Battery Charging Circuit . . . . . . . . . . . . . . . . . . . . . . . . . . . . . . . . . . . . . . . . . . . . . . . . . . . . . . 10
2.2.4 Inverter . . . . . . . . . . . . . . . . . . . . . . . . . . . . . . . . . . . . . . . . . . . . . . . . . . . . . . . . . . . . . . . . . . . . 11
2.2.5 Static Bypass Switch . . . . . . . . . . . . . . . . . . . . . . . . . . . . . . . . . . . . . . . . . . . . . . . . . . . . . . . . . 12
3.0 OPERATION . . . . . . . . . . . . . . . . . . . . . . . . . . . . . . . . . . . . . . . . . . . . . . . . . . . . . . . . . . .14
3.1 Operator Controls. . . . . . . . . . . . . . . . . . . . . . . . . . . . . . . . . . . . . . . . . . . . . . . . . . . . . . . . . . . 14
3.1.1 Operator Control Panel . . . . . . . . . . . . . . . . . . . . . . . . . . . . . . . . . . . . . . . . . . . . . . . . . . . . . . . 16
3.1.2 Navigation Buttons . . . . . . . . . . . . . . . . . . . . . . . . . . . . . . . . . . . . . . . . . . . . . . . . . . . . . . . . . . 16
3.1.3 Rotary Switch . . . . . . . . . . . . . . . . . . . . . . . . . . . . . . . . . . . . . . . . . . . . . . . . . . . . . . . . . . . . . . . 17
3.2 Security Access and Passwords . . . . . . . . . . . . . . . . . . . . . . . . . . . . . . . . . . . . . . . . . . . . . . . . 18
3.3 Display Screens and Procedures . . . . . . . . . . . . . . . . . . . . . . . . . . . . . . . . . . . . . . . . . . . . . . . 19
3.3.1 Mimic Display Screen. . . . . . . . . . . . . . . . . . . . . . . . . . . . . . . . . . . . . . . . . . . . . . . . . . . . . . . . . 21
3.3.2 Startup . . . . . . . . . . . . . . . . . . . . . . . . . . . . . . . . . . . . . . . . . . . . . . . . . . . . . . . . . . . . . . . . . . . . 27
3.3.3 Shutdown . . . . . . . . . . . . . . . . . . . . . . . . . . . . . . . . . . . . . . . . . . . . . . . . . . . . . . . . . . . . . . . . . . 33
3.3.4 Status Reports . . . . . . . . . . . . . . . . . . . . . . . . . . . . . . . . . . . . . . . . . . . . . . . . . . . . . . . . . . . . . . 34
3.3.5 Configuration Screens . . . . . . . . . . . . . . . . . . . . . . . . . . . . . . . . . . . . . . . . . . . . . . . . . . . . . . . . 38
3.3.6 Manual Transfer. . . . . . . . . . . . . . . . . . . . . . . . . . . . . . . . . . . . . . . . . . . . . . . . . . . . . . . . . . . . . 56
3.3.7 Battery Management . . . . . . . . . . . . . . . . . . . . . . . . . . . . . . . . . . . . . . . . . . . . . . . . . . . . . . . . . 57
3.3.8 Auto Restart . . . . . . . . . . . . . . . . . . . . . . . . . . . . . . . . . . . . . . . . . . . . . . . . . . . . . . . . . . . . . . . . 66
3.3.9 System Status Monitoring . . . . . . . . . . . . . . . . . . . . . . . . . . . . . . . . . . . . . . . . . . . . . . . . . . . . . 68
i
Page 4

3.4 Faults, Alarms, Status . . . . . . . . . . . . . . . . . . . . . . . . . . . . . . . . . . . . . . . . . . . . . . . . . . . . . . . 71
3.4.1 Faults . . . . . . . . . . . . . . . . . . . . . . . . . . . . . . . . . . . . . . . . . . . . . . . . . . . . . . . . . . . . . . . . . . . . . 71
3.4.2 Alarms . . . . . . . . . . . . . . . . . . . . . . . . . . . . . . . . . . . . . . . . . . . . . . . . . . . . . . . . . . . . . . . . . . . . . 72
3.4.3 Status . . . . . . . . . . . . . . . . . . . . . . . . . . . . . . . . . . . . . . . . . . . . . . . . . . . . . . . . . . . . . . . . . . . . . 88
3.5 Communication Interfaces. . . . . . . . . . . . . . . . . . . . . . . . . . . . . . . . . . . . . . . . . . . . . . . . . . . . 88
3.5.1 RS-232 Port: Local Reporting Terminal . . . . . . . . . . . . . . . . . . . . . . . . . . . . . . . . . . . . . . . . . . 89
3.5.2 Worldwide Reporting . . . . . . . . . . . . . . . . . . . . . . . . . . . . . . . . . . . . . . . . . . . . . . . . . . . . . . . . . 89
3.5.3 Remote Alarm Status Panel. . . . . . . . . . . . . . . . . . . . . . . . . . . . . . . . . . . . . . . . . . . . . . . . . . . . 91
3.5.4 SiteScan . . . . . . . . . . . . . . . . . . . . . . . . . . . . . . . . . . . . . . . . . . . . . . . . . . . . . . . . . . . . . . . . . . . 91
3.5.5 Setting Up External Communication Devices . . . . . . . . . . . . . . . . . . . . . . . . . . . . . . . . . . . . . 92
3.6 Modes Of Operation . . . . . . . . . . . . . . . . . . . . . . . . . . . . . . . . . . . . . . . . . . . . . . . . . . . . . . . . . 92
3.6.1 Load on Bypass . . . . . . . . . . . . . . . . . . . . . . . . . . . . . . . . . . . . . . . . . . . . . . . . . . . . . . . . . . . . . . 92
3.6.2 OK to Transfer . . . . . . . . . . . . . . . . . . . . . . . . . . . . . . . . . . . . . . . . . . . . . . . . . . . . . . . . . . . . . . 92
3.6.3 Momentary Overloads . . . . . . . . . . . . . . . . . . . . . . . . . . . . . . . . . . . . . . . . . . . . . . . . . . . . . . . . 93
3.6.4 Input Power Failure (Load on Battery). . . . . . . . . . . . . . . . . . . . . . . . . . . . . . . . . . . . . . . . . . . 93
3.6.5 Automatic Operations . . . . . . . . . . . . . . . . . . . . . . . . . . . . . . . . . . . . . . . . . . . . . . . . . . . . . . . . 94
4.0 MAINTENANCE . . . . . . . . . . . . . . . . . . . . . . . . . . . . . . . . . . . . . . . . . . . . . . . . . . . . . . . . .96
4.1 Safety Precautions . . . . . . . . . . . . . . . . . . . . . . . . . . . . . . . . . . . . . . . . . . . . . . . . . . . . . . . . . . 96
4.2 Routine Maintenance . . . . . . . . . . . . . . . . . . . . . . . . . . . . . . . . . . . . . . . . . . . . . . . . . . . . . . . . 97
4.2.1 Record Log. . . . . . . . . . . . . . . . . . . . . . . . . . . . . . . . . . . . . . . . . . . . . . . . . . . . . . . . . . . . . . . . . . 97
4.2.2 Air Filters . . . . . . . . . . . . . . . . . . . . . . . . . . . . . . . . . . . . . . . . . . . . . . . . . . . . . . . . . . . . . . . . . . 97
4.2.3 Battery Maintenance . . . . . . . . . . . . . . . . . . . . . . . . . . . . . . . . . . . . . . . . . . . . . . . . . . . . . . . . . 97
4.2.4 Battery Safety Precautions . . . . . . . . . . . . . . . . . . . . . . . . . . . . . . . . . . . . . . . . . . . . . . . . . . . . 98
4.2.5 Torque Requirements . . . . . . . . . . . . . . . . . . . . . . . . . . . . . . . . . . . . . . . . . . . . . . . . . . . . . . . . . 99
4.3 Detecting Trouble . . . . . . . . . . . . . . . . . . . . . . . . . . . . . . . . . . . . . . . . . . . . . . . . . . . . . . . . . . 100
4.4 Reporting a Problem. . . . . . . . . . . . . . . . . . . . . . . . . . . . . . . . . . . . . . . . . . . . . . . . . . . . . . . . 100
4.5 Corrective Actions . . . . . . . . . . . . . . . . . . . . . . . . . . . . . . . . . . . . . . . . . . . . . . . . . . . . . . . . . 100
4.6 Recommended Test Equipment . . . . . . . . . . . . . . . . . . . . . . . . . . . . . . . . . . . . . . . . . . . . . . . 100
ii
Page 5

FIGURES
Figure 1 UPS controls and display screen (with example of the monitor/mimic screen). . . . . . . . . . . . . . . . 6
Figure 2 80 kVA UPS outside and inside views . . . . . . . . . . . . . . . . . . . . . . . . . . . . . . . . . . . . . . . . . . . . . . . 14
Figure 3 Operator control panel . . . . . . . . . . . . . . . . . . . . . . . . . . . . . . . . . . . . . . . . . . . . . . . . . . . . . . . . . . . 15
Figure 4 Navigation buttons . . . . . . . . . . . . . . . . . . . . . . . . . . . . . . . . . . . . . . . . . . . . . . . . . . . . . . . . . . . . . . 16
Figure 5 Rotary switch. . . . . . . . . . . . . . . . . . . . . . . . . . . . . . . . . . . . . . . . . . . . . . . . . . . . . . . . . . . . . . . . . . . 17
Figure 6 Configuration screen. . . . . . . . . . . . . . . . . . . . . . . . . . . . . . . . . . . . . . . . . . . . . . . . . . . . . . . . . . . . . 18
Figure 7 User settings screen, page 6 . . . . . . . . . . . . . . . . . . . . . . . . . . . . . . . . . . . . . . . . . . . . . . . . . . . . . . . 18
Figure 8 Menu tree . . . . . . . . . . . . . . . . . . . . . . . . . . . . . . . . . . . . . . . . . . . . . . . . . . . . . . . . . . . . . . . . . . . . . 19
Figure 9 Main menu screen . . . . . . . . . . . . . . . . . . . . . . . . . . . . . . . . . . . . . . . . . . . . . . . . . . . . . . . . . . . . . . . 21
Figure 10 Monitor / mimic display screen example: normal power flow. . . . . . . . . . . . . . . . . . . . . . . . . . . . . 21
Figure 11 Mimic display screen example: utility fail. . . . . . . . . . . . . . . . . . . . . . . . . . . . . . . . . . . . . . . . . . . . 22
Figure 12 Mimic display screen example: load on bypass, UPS module on and charging battery . . . . . . . . 22
Figure 13 Monitor / mimic display screen example: load on bypass, UPS module off, service mode . . . . . . 23
Figure 14 Mimic display screen detail . . . . . . . . . . . . . . . . . . . . . . . . . . . . . . . . . . . . . . . . . . . . . . . . . . . . . . . 23
Figure 15 Input status screen . . . . . . . . . . . . . . . . . . . . . . . . . . . . . . . . . . . . . . . . . . . . . . . . . . . . . . . . . . . . . . 24
Figure 16 DC bus / battery status . . . . . . . . . . . . . . . . . . . . . . . . . . . . . . . . . . . . . . . . . . . . . . . . . . . . . . . . . . . 24
Figure 17 Bypass input status . . . . . . . . . . . . . . . . . . . . . . . . . . . . . . . . . . . . . . . . . . . . . . . . . . . . . . . . . . . . . 25
Figure 18 Output load status screen. . . . . . . . . . . . . . . . . . . . . . . . . . . . . . . . . . . . . . . . . . . . . . . . . . . . . . . . . 25
Figure 19 Active faults and alarms screen . . . . . . . . . . . . . . . . . . . . . . . . . . . . . . . . . . . . . . . . . . . . . . . . . . . . 26
Figure 20 Active faults and alarms, loss of power . . . . . . . . . . . . . . . . . . . . . . . . . . . . . . . . . . . . . . . . . . . . . . 26
Figure 21 System ratings screen . . . . . . . . . . . . . . . . . . . . . . . . . . . . . . . . . . . . . . . . . . . . . . . . . . . . . . . . . . . . 27
Figure 22 Mimic display screen with load on bypass and switches closed . . . . . . . . . . . . . . . . . . . . . . . . . . . 27
Figure 23 Startup / shutdown procedures screen. . . . . . . . . . . . . . . . . . . . . . . . . . . . . . . . . . . . . . . . . . . . . . . 28
Figure 24 Manual startup screen, close static switch contactors screen . . . . . . . . . . . . . . . . . . . . . . . . . . . . 29
Figure 25 Target and ramp values . . . . . . . . . . . . . . . . . . . . . . . . . . . . . . . . . . . . . . . . . . . . . . . . . . . . . . . . . . 29
Figure 26 DC bus setpoint screen . . . . . . . . . . . . . . . . . . . . . . . . . . . . . . . . . . . . . . . . . . . . . . . . . . . . . . . . . . . 29
Figure 27 External maintenance bypass switch, dual-input UPS . . . . . . . . . . . . . . . . . . . . . . . . . . . . . . . . . 31
Figure 28 External maintenance bypass switch, single-input UPS . . . . . . . . . . . . . . . . . . . . . . . . . . . . . . . . 31
Figure 29 Set number of battery cabinets screen. . . . . . . . . . . . . . . . . . . . . . . . . . . . . . . . . . . . . . . . . . . . . . . 33
Figure 30 User shutdown screen. . . . . . . . . . . . . . . . . . . . . . . . . . . . . . . . . . . . . . . . . . . . . . . . . . . . . . . . . . . . 34
Figure 31 Manual transfer / retransfer screen when transfer is allowed . . . . . . . . . . . . . . . . . . . . . . . . . . . . 34
Figure 32 Manual transfer / retransfer screen when transfer is not allowed . . . . . . . . . . . . . . . . . . . . . . . . 34
Figure 33 Status report screen . . . . . . . . . . . . . . . . . . . . . . . . . . . . . . . . . . . . . . . . . . . . . . . . . . . . . . . . . . . . . 35
Figure 34 Event log report screen showing most recent event. . . . . . . . . . . . . . . . . . . . . . . . . . . . . . . . . . . . 36
Figure 35 Event log report screen showing previous event . . . . . . . . . . . . . . . . . . . . . . . . . . . . . . . . . . . . . . . 36
Figure 36 Event log report screen showing previous event . . . . . . . . . . . . . . . . . . . . . . . . . . . . . . . . . . . . . . . 36
Figure 37 History log metering report screen . . . . . . . . . . . . . . . . . . . . . . . . . . . . . . . . . . . . . . . . . . . . . . . . . 37
Figure 38 History log status report screen . . . . . . . . . . . . . . . . . . . . . . . . . . . . . . . . . . . . . . . . . . . . . . . . . . . . 38
Figure 39 History log faults/alarms report screen . . . . . . . . . . . . . . . . . . . . . . . . . . . . . . . . . . . . . . . . . . . . . . 38
Figure 40 Configuration screen . . . . . . . . . . . . . . . . . . . . . . . . . . . . . . . . . . . . . . . . . . . . . . . . . . . . . . . . . . . . 39
Figure 41 System ratings, page 1 . . . . . . . . . . . . . . . . . . . . . . . . . . . . . . . . . . . . . . . . . . . . . . . . . . . . . . . . . . . 40
Figure 42 System ratings, page 2 . . . . . . . . . . . . . . . . . . . . . . . . . . . . . . . . . . . . . . . . . . . . . . . . . . . . . . . . . . . 40
Figure 43 System settings screen, page 1. . . . . . . . . . . . . . . . . . . . . . . . . . . . . . . . . . . . . . . . . . . . . . . . . . . . . 40
Figure 44 Date setting screen . . . . . . . . . . . . . . . . . . . . . . . . . . . . . . . . . . . . . . . . . . . . . . . . . . . . . . . . . . . . . . 41
Figure 45 Time setting screen . . . . . . . . . . . . . . . . . . . . . . . . . . . . . . . . . . . . . . . . . . . . . . . . . .
Figure 46 System settings, page 2 . . . . . . . . . . . . . . . . . . . . . . . . . . . . . . . . . . . . . . . . . . . . . . . . . . . . . . . . . . 42
Figure 47 System settings, page 3 . . . . . . . . . . . . . . . . . . . . . . . . . . . . . . . . . . . . . . . . . . . . . . . . . . . . . . . . . . 42
Figure 48 Enter password screen . . . . . . . . . . . . . . . . . . . . . . . . . . . . . . . . . . . . . . . . . . . . . . . . . . . . . . . . . . . 42
Figure 49 Single /dual input screen . . . . . . . . . . . . . . . . . . . . . . . . . . . . . . . . . . . . . . . . . . . . . . . . . . . . . . . . . 43
. . . . . . . . . . . . 41
iii
Page 6

Figure 50 Options screen, page 1 . . . . . . . . . . . . . . . . . . . . . . . . . . . . . . . . . . . . . . . . . . . . . . . . . . . . . . . . . . . 43
Figure 51 10% passive filter settings screen . . . . . . . . . . . . . . . . . . . . . . . . . . . . . . . . . . . . . . . . . . . . . . . . . . 43
Figure 52 Options screen, page 2 . . . . . . . . . . . . . . . . . . . . . . . . . . . . . . . . . . . . . . . . . . . . . . . . . . . . . . . . . . . 44
Figure 53 Options screen, page 3 . . . . . . . . . . . . . . . . . . . . . . . . . . . . . . . . . . . . . . . . . . . . . . . . . . . . . . . . . . . 44
Figure 54 Options screen, page 4 . . . . . . . . . . . . . . . . . . . . . . . . . . . . . . . . . . . . . . . . . . . . . . . . . . . . . . . . . . . 44
Figure 55 Communication options Screen, page 1 . . . . . . . . . . . . . . . . . . . . . . . . . . . . . . . . . . . . . . . . . . . . . . 45
Figure 56 Auto dial screen. . . . . . . . . . . . . . . . . . . . . . . . . . . . . . . . . . . . . . . . . . . . . . . . . . . . . . . . . . . . . . . . . 45
Figure 57 Modem selection screen . . . . . . . . . . . . . . . . . . . . . . . . . . . . . . . . . . . . . . . . . . . . . . . . . . . . . . . . . . 45
Figure 58 Auto dial screen, page 2 . . . . . . . . . . . . . . . . . . . . . . . . . . . . . . . . . . . . . . . . . . . . . . . . . . . . . . . . . . 46
Figure 59 Pager support configuration . . . . . . . . . . . . . . . . . . . . . . . . . . . . . . . . . . . . . . . . . . . . . . . . . . . . . . . 46
Figure 60 Communications options screen, page 2 . . . . . . . . . . . . . . . . . . . . . . . . . . . . . . . . . . . . . . . . . . . . . 47
Figure 61 User settings screen, page 1 . . . . . . . . . . . . . . . . . . . . . . . . . . . . . . . . . . . . . . . . . . . . . . . . . . . . . . . 47
Figure 62 User settings screen, page 2 . . . . . . . . . . . . . . . . . . . . . . . . . . . . . . . . . . . . . . . . . . . . . . . . . . . . . . . 47
Figure 63 User settings screen, page 3 . . . . . . . . . . . . . . . . . . . . . . . . . . . . . . . . . . . . . . . . . . . . . . . . . . . . . . . 48
Figure 64 User settings screen, Page 4. . . . . . . . . . . . . . . . . . . . . . . . . . . . . . . . . . . . . . . . . . . . . . . . . . . . . . . 48
Figure 65 User settings screen, page 5 . . . . . . . . . . . . . . . . . . . . . . . . . . . . . . . . . . . . . . . . . . . . . . . . . . . . . . . 48
Figure 66 10% Passive filter settings screen . . . . . . . . . . . . . . . . . . . . . . . . . . . . . . . . . . . . . . . . . . . . . . . . . . 49
Figure 67 User settings screen, page 6 . . . . . . . . . . . . . . . . . . . . . . . . . . . . . . . . . . . . . . . . . . . . . . . . . . . . . . . 49
Figure 68 Factory settings screen . . . . . . . . . . . . . . . . . . . . . . . . . . . . . . . . . . . . . . . . . . . . . . . . . . . . . . . . . . . 49
Figure 69 Factory settings screen, page 2 . . . . . . . . . . . . . . . . . . . . . . . . . . . . . . . . . . . . . . . . . . . . . . . . . . . . 50
Figure 70 Factory settings screen, page 3 . . . . . . . . . . . . . . . . . . . . . . . . . . . . . . . . . . . . . . . . . . . . . . . . . . . . 50
Figure 71 Alarm / fault name screen . . . . . . . . . . . . . . . . . . . . . . . . . . . . . . . . . . . . . . . . . . . . . . . . . . . . . . . . 51
Figure 72 Alarm edit screen . . . . . . . . . . . . . . . . . . . . . . . . . . . . . . . . . . . . . . . . . . . . . . . . . . . . . . . . . . . . . . . 51
Figure 73 Customer alarm interface screen . . . . . . . . . . . . . . . . . . . . . . . . . . . . . . . . . . . . . . . . . . . . . . . . . . . 53
Figure 74 Customer alarm interface screen, page 2 . . . . . . . . . . . . . . . . . . . . . . . . . . . . . . . . . . . . . . . . . . . . 53
Figure 75 Programmable output relay board #1, AS400 assignment . . . . . . . . . . . . . . . . . . . . . . . . . . . . . . 53
Figure 76 Relay assignments . . . . . . . . . . . . . . . . . . . . . . . . . . . . . . . . . . . . . . . . . . . . . . . . . . . . . . . . . . . . . . 53
Figure 77 Programmable output relay board, standard set . . . . . . . . . . . . . . . . . . . . . . . . . . . . . . . . . . . . . . 54
Figure 78 Programmable output relay board, standard set, page 2 . . . . . . . . . . . . . . . . . . . . . . . . . . . . . . . . 54
Figure 79 Programmable output relay board, user defined . . . . . . . . . . . . . . . . . . . . . . . . . . . . . . . . . . . . . . 54
Figure 80 List of alarm faults screen . . . . . . . . . . . . . . . . . . . . . . . . . . . . . . . . . . . . . . . . . . . . . . . . . . . . . . . . 55
Figure 81 Manual transfer / retransfer screen when transfer is allowed . . . . . . . . . . . . . . . . . . . . . . . . . . . . 56
Figure 82 Manual transfer / retransfer screen when transfer is not allowed . . . . . . . . . . . . . . . . . . . . . . . . 57
Figure 83 Battery management screen. . . . . . . . . . . . . . . . . . . . . . . . . . . . . . . . . . . . . . . . . . . . . . . . . . . . . . . 57
Figure 84 Battery test screen . . . . . . . . . . . . . . . . . . . . . . . . . . . . . . . . . . . . . . . . . . . . . . . . . . . . . . . . . . . . . . 57
Figure 85 Automatic test screen . . . . . . . . . . . . . . . . . . . . . . . . . . . . . . . . . . . . . . . . . . . . . . . . . . . . . . . . . . . . 58
Figure 86 Set battery cycle screen . . . . . . . . . . . . . . . . . . . . . . . . . . . . . . . . . . . . . . . . . . . . . . . . . . . . . . . . . . 59
Figure 87 Set battery duration screen . . . . . . . . . . . . . . . . . . . . . . . . . . . . . . . . . . . . . . . . . . . . . . . . . . . . . . . 59
Figure 88 Battery equalizer screen . . . . . . . . . . . . . . . . . . . . . . . . . . . . . . . . . . . . . . . . . . . . . . . . . . . . . . . . . . 60
Figure 89 Auto screen . . . . . . . . . . . . . . . . . . . . . . . . . . . . . . . . . . . . . . . . . . . . . . . . . . . . . . . . . . . . . . . . . . . . 60
Figure 90 Manual screen . . . . . . . . . . . . . . . . . . . . . . . . . . . . . . . . . . . . . . . . . . . . . . . . . . . . . . . . . . . . . . . . . . 60
Figure 91 Equalize time period screen . . . . . . . . . . . . . . . . . . . . . . . . . . . . . . . . . . . . . . . . . . . . . . . . . . . . . . . 60
Figure 92 Equalize voltage screen . . . . . . . . . . . . . . . . . . . . . . . . . . . . . . . . . . . . . . . . . . . . . . . . . . . . . . . . . . 61
Figure 93 Battery temperature compensation charge screen . . . . . . . . . . . . . . . . . . . . . . . . . . . . . . . . . . . . . 61
Figure 94 Battery temperature compensation enable/disable screen. . . . . . . . . . . . . . . . . . . . . . . . . . . . . . . 61
Figure 95 Battery temperature compensation charge screen, page 2. . . . . . . . . . . . . . . . . . . . . . . . . . . . . . . 62
Figure 96 Battery temp compensation edit screen. . . . . . . . . . . . . . . . . . . . . . . . . . . . . . . . . . . . . . . . . . . . . . 62
Figure 97 Battery cycle monitor screen . . . . . . . . . . . . . . . . . . . . . . . . . . . . . . . . . . . . . . . . . . . . . . . . . . . . . . 62
Figure 98 Battery cycle monitor screen, page 2 . . . . . . . . . . . . . . . . . . . . . . . . . . . . . . . . . . . . . . . . .
. . . . . . . 63
Figure 99 0-30 seconds discharge cycles . . . . . . . . . . . . . . . . . . . . . . . . . . . . . . . . . . . . . . . . . . . . . . . . . . . . . . 63
iv
Page 7

Figure 100 Summary page screen. . . . . . . . . . . . . . . . . . . . . . . . . . . . . . . . . . . . . . . . . . . . . . . . . . . . . . . . . . . . 64
Figure 101 User settings, page 2. . . . . . . . . . . . . . . . . . . . . . . . . . . . . . . . . . . . . . . . . . . . . . . . . . . . . . . . . . . . . 65
Figure 102 Battery time low warning screen. . . . . . . . . . . . . . . . . . . . . . . . . . . . . . . . . . . . . . . . . . . . . . . . . . . 65
Figure 103 Auto restart setting screen . . . . . . . . . . . . . . . . . . . . . . . . . . . . . . . . . . . . . . . . . . . . . . . . . . . . . . . . 66
Figure 104 Auto restart screen layout . . . . . . . . . . . . . . . . . . . . . . . . . . . . . . . . . . . . . . . . . . . . . . . . . . . . . . . . 66
Figure 105 System status screen . . . . . . . . . . . . . . . . . . . . . . . . . . . . . . . . . . . . . . . . . . . . . . . . . . . . . . . . . . . . 67
Figure 106 System status screen, page 2 . . . . . . . . . . . . . . . . . . . . . . . . . . . . . . . . . . . . . . . . . . . . . . . . . . . . . . 68
Figure 107 System status screen, page 3 . . . . . . . . . . . . . . . . . . . . . . . . . . . . . . . . . . . . . . . . . . . . . . . . . . . . . . 68
Figure 108 System status screen, page 4 . . . . . . . . . . . . . . . . . . . . . . . . . . . . . . . . . . . . . . . . . . . . . . . . . . . . . . 68
Figure 109 Summary alarm in active position screen . . . . . . . . . . . . . . . . . . . . . . . . . . . . . . . . . . . . . . . . . . . . 71
Figure 110 Summary alarm editing screen . . . . . . . . . . . . . . . . . . . . . . . . . . . . . . . . . . . . . . . . . . . . . . . . . . . . 72
Figure 111 Pager support screen . . . . . . . . . . . . . . . . . . . . . . . . . . . . . . . . . . . . . . . . . . . . . . . . . . . . . . . . . . . . 89
Figure 112 Load on bypass, UPS not available . . . . . . . . . . . . . . . . . . . . . . . . . . . . . . . . . . . . . . . . . . . . . . . . . 91
Figure 113 Load on bypass (UPS available and battery charging). . . . . . . . . . . . . . . . . . . . . . . . . . . . . . . . . . 91
Figure 114 Utility fail, load on battery . . . . . . . . . . . . . . . . . . . . . . . . . . . . . . . . . . . . . . . . . . . . . . . . . . . . . . . . 92
TABL ES
Table 1 Key locations on UPS . . . . . . . . . . . . . . . . . . . . . . . . . . . . . . . . . . . . . . . . . . . . . . . . . . . . . . . . . . . . 14
Table 2 Key locations on operator control panel. . . . . . . . . . . . . . . . . . . . . . . . . . . . . . . . . . . . . . . . . . . . . . 15
Table 3 External maintenance bypass switch positions and actions . . . . . . . . . . . . . . . . . . . . . . . . . . . . . 32
Table 4 External maintenance switch configuration options . . . . . . . . . . . . . . . . . . . . . . . . . . . . . . . . . . . 32
Table 5 Default time settings . . . . . . . . . . . . . . . . . . . . . . . . . . . . . . . . . . . . . . . . . . . . . . . . . . . . . . . . . . . . 58
Table 6 Abbreviations used in alarm messages . . . . . . . . . . . . . . . . . . . . . . . . . . . . . . . . . . . . . . . . . . . . . . 72
Table 7 Alarms, functions, and corrective actions . . . . . . . . . . . . . . . . . . . . . . . . . . . . . . . . . . . . . . . . . . . . 73
Table 8 Service terminal command summary . . . . . . . . . . . . . . . . . . . . . . . . . . . . . . . . . . . . . . . . . . . . . . . 88
Table 9 Battery voltage record . . . . . . . . . . . . . . . . . . . . . . . . . . . . . . . . . . . . . . . . . . . . . . . . . . . . . . . . . . . 97
Table 10 Circuit breakers with compression lugs (for power wiring) . . . . . . . . . . . . . . . . . . . . . . . . . . . . . . 97
Table 11 Terminal block with compression lugs (for control wiring) . . . . . . . . . . . . . . . . . . . . . . . . . . . . . . 97
Table 12 Recommended test equipment and tools . . . . . . . . . . . . . . . . . . . . . . . . . . . . . . . . . . . . . . . . . . . . . 98
v
Page 8

vi
Page 9

IMPORTANT SAFETY INSTRUCTIONS
SAVE THESE INSTRUCTIONS.
This manual contains important instructions that should be followed during maintenance of your
Npower UPS and batteries.
WARNING
!
Exercise extreme care when handling UPS cabinets to avoid equipment damage or injury to
personnel. Refer to separate installation manual for equipment handling information and
installation procedures.
Follow all battery safety precautions in 4.0 - Maintenance when installing, charging, or
servicing batteries. In addition to the hazard of electric shock, gas produced by batteries can
be explosive and sulfuric acid can cause severe burns.
In case of fire involving electrical equipment, use only carbon dioxide fire extinguishers or
others approved for use in electrical fire fighting.
Extreme caution is required when performing maintenance.
Be constantly aware that the UPS contains high DC as well as AC voltages. With input power
off and the battery disconnected, high voltage at filter capacitors and power circuits should be
discharged within 30 seconds. However, if a power circuit failure has occurred, you should
assume that high voltage may still exist after shutdown. Check with a voltmeter before
making contact.
AC voltage will remain on the system bypass, the UPS output terminals and the static bypass
switch, unless associated external circuit breakers are opened.
Check for voltage with both AC and DC voltmeters prior to making contact.
When the UPS system is under power, both the operator and any test equipment must be
isolated from direct contact with earth ground and the UPS chassis frame by using rubber
mats.
Some components within the cabinets are not connected to chassis ground. Any contact
between floating circuits and the chassis is a lethal shock hazard. Exercise caution that the
test instrument exterior does not make contact either physically or electrically with earth
ground.
1
Page 10

OVERVIEW OF MANUAL
The Npower manual is organized so that information can be found quickly. Each major topic is separated by sections, and there is a Table of Contents for each section. The names of the sections and
their contents are described below.
Section 1 - INTRODUCTION is a summary of the Npower Uninterruptible Power System (UPS). It
describes some of the unique features and benefits of the Npower UPS, as well as the design principles and standards that Liebert follows in the manufacture of each system. A description of the
Npower system and an overview of its functions are also included.
Section 2 - THEORY OF OPERATION is an explanation of the major circuit groups of the Npower
UPS. This section is for individuals who want to know both the basics and the specifics of each major
component. The text explains how the UPS handles electrical disturbances and interruptions.
Section 3 - OPERATION is written for facility personnel responsible for the operation of the system.
It details the procedures required to start-up the system, to transfer the load between the available
sources, and to shut down the system. Both manual and automatic operations are described. Operator
controls and displays, including the solid state liquid crystal display (LCD) screen, are illustrated and
explained for the UPS Module.
Section 4 - MAINTENANCE lists routine maintenance checks and helps the Operator pinpoint and
quickly resolve problems if they arise.
If you require assistance for any reason, call Liebert Global Services at 1-800-LIEBERT. For best service, please have the following information available:
Part Numbers:
Serial Numbers:
kVA Rating:
Date Purchased:
Date Installed:
Location:
Input Voltage:
Output Voltage:
Battery Reserve Time:
2
Page 11

1.0 INTRODUCTION
1.1 System Description
The role of the UPS system is to supply uninterruptible, clean power to the critical load. It maintains
a full-voltage, low-distortion output, even if the utility source power sags or becomes distorted.
If there is an outage of the source power, the UPS maintains power to the load until an alternate
source of power is activated, or until the original power source is restored. If input AC power is not
restored, the UPS maintains the load (with the battery plant) long enough that the critical equipment
can be shut down in an orderly manner. The Npower UPS module displays the rate of battery discharge and calculates the amount of battery time remaining based on the actual connected load. The
time that the battery will maintain the load depends on the capacity of the battery backup plant and
the size of the load.
The system control logic automatically manages critical bus operation. System logic is resident in Digital Signal Processors (DSPs) for precise control and improved reliability.
If the critical load current exceeds the rated load of the Npower UPS system, the control logic determines the magnitude of the overload and reacts appropriately. Overloads are usually the result of
inrush current requirements. The UPS system supports loads that are 150% of the rated load for up
to 60 seconds, 125% of the rated load for up to ten minutes, and 104% of the rated load indefinitely.
If the load surpasses the overload capacity of the UPS, the load is automatically transferred to bypass
without interruption. When the load returns to within the UPS rating, it is either automatically or
manually returned (retransferred) to the UPS. How and when the load is returned to the UPS
depends on several factors: how long the overload lasted, how many overload conditions occurred
before transfer, whether there is an imminent failure of any part of the UPS, etc. In the unlikely
event of a fault within the UPS, the control logic, which continuously monitors all critical circuits
within the UPS system, transfers the load to bypass without interruption and simultaneously sets off
local and remote alarms. For a few specified faults, the UPS is shut down. The UPS can be manually
returned to service when the fault has been corrected.
Introduction
The Npower UPS display system provides precise monitoring of the UPS, fast alarm response, and
quick troubleshooting. For easy manual operations, menu-driven software provides access to several
step-by-step help screens. All operator functions are performed using menu-prompted displays and a
minimum number of operator controls. Available options include external communication capability
with both automatic dial-out and dial-in features for early warning and diagnosis of abnormal conditions.
The system software allows the operator or Liebert Global Services to enter application specific information. Overload, overvoltage, battery discharge, and shutdown limits can be set by the operator. In
effect, the software is tailored for each site.
The UPS system protects critical equipment from source power disturbances and outages, load faults,
and UPS malfunctions. This triple protection virtually eliminates computer and computing equipment downtime as a result of utility source power problems.
3
Page 12

1.1.1 Reliability
Reliability is the most important design goal for Uninterruptible Power Systems. All Liebert 3-Phase
UPS systems have demonstrated reliability by achieving a field-proven critical bus MTBF in excess of
one million hours. In addition, our Quality Assurance program is certified to the requirements of ISO
9001 standards.
Liebert UPS systems are ETL listed to the requirements of UL 1778, CSA Certified and (when applicable) CE marked. All equipment and components are manufactured to applicable UL, NEC, IEC,
EN, NEMA, ANSI, IEEE, EN50091-1, EN50091-2 and CSA standards and guidelines.
Designed For Success
The keys to reliability in the design of the UPS system are using conservatively rated components,
minimizing transfers to bypass, making operator controls understandable, and providing easy access
for maintenance and repair. Liebert UPS systems lead the industry in all these areas.
For example, the Npower can clear substantial overloads through the solid state static bypass switch
without transferring to the bypass source. By minimizing transfers to bypass, the Npower minimizes operation of electrical components and enhances system reliability.
As mentioned above, the system control logic has been packaged into Digital Signal Processors (DSPs)
to optimize system performance and eliminate the failure-prone discrete logic boards used in other
brands of UPS products. Furthermore, these DSPs are isolated from heat-generating components to
ensure optimal operating temperatures.
Factory Backup and Service Assistance
Introduction
Reliability depends on more than just UPS module design. Improper installation can cause any system to fail. To prevent this, service technicians from Liebert Global Services thoroughly inspect the
installation of all our systems to ensure they are installed properly and operating within performance
specifications.
Once a UPS is properly installed, you -- the on-site equipment operator -- are the most important factor in preventing critical bus failures or unplanned transfers to bypass. To make your task easier, the
UPS provides easy-to-follow, prompted instructions on its operator display screen.
If you ever need help, call your Liebert distributor or sales representative. Your attention to proper
installation, operation, and periodic maintenance will ensure that your mission-critical operations
receive the best possible protection from electrical disturbances and outages.
1.1.2 Versatility
The Npower has a number of features and options that can be customized to your specific needs. See
1.5 - Options for details. Visit the battery manufacturer’s Web site for information on obtaining the
manual if you don’t already have it.
1.2 Safety Precautions
Read this manual thoroughly, paying special attention to the sections that apply to you, before working with the UPS. Also read the battery manufacturer's manual before working on or near the battery.
Under typical operation and with all UPS doors closed, only normal safety precautions are necessary.
The area around the UPS system and battery should be kept free from puddles of water, excess moisture, or debris.
Special safety precautions are required for procedures involving handling, installation, and maintenance of the UPS system or the battery. Observe precautions in the separate Installation Manual
before handling or installing the UPS system. Observe precautions in 4.0 - Maintenance of this
manual before and during performance of all maintenance on the UPS or battery.
This equipment contains several circuits that are energized with high voltage. This is particularly
true for oscilloscopes. Always check with an AC and DC voltmeter to ensure safety before making contact or using tools. Even when the power is turned Off, dangerously high potentials may exist at the
capacitor banks. Observe all battery precautions when near the battery for any reason.
4
Page 13

Introduction
ONLY qualified service personnel should perform maintenance on the UPS system. When performing
maintenance with any part of the equipment under power, service personnel and test equipment
should be standing on rubber mats. The service personnel should wear insulating shoes for isolation
from direct contact with the floor (earth ground).
Unless all power is removed from the equipment, one person should never work alone. A second person should be standing by to assist and summon help in case an accident should occur. This is particularly true when work is performed on the battery.
Three types of messages are used throughout the manual to stress important text. Carefully read the
text below each Warning, Caution, and Note and use professional skills and prudent care when performing the actions described by that text.
A Warning signals the presence of a possible serious, life-threatening condition. For example:
WARNING
!
Lethal voltages may be present within this unit even when it is apparently not operating.
Observe all cautions and warnings in this manual. Failure to do so could result in serious
injury or death. Do not work on or operate this equipment unless you are fully qualified to do
so! Never work alone.
A Caution indicates a condition that could seriously damage equipment and possibly injure personnel.
For example:
CAUTION
!
Make sure you understand the proper sequence before operating any circuit breaker.
Operating a Maintenance Bypass circuit breaker out of sequence could cut off power to the
critical load.
A Note emphasizes important text. If the note is not followed, equipment could be damaged or may
not operate properly. For example:
NOTE
If the UPS system has a blown fuse, the cause should be determined before you replace the fuse.
Contact Liebert Global Services.
1.3 Modes Of Operation
Refer to 2.0 - Theory of Operation and 3.0 - Operation for more details.
1.3.1 Normal (Load On UPS)
The utility AC source provides power to the rectifier/charger in the UPS module. The rectifier/charger
converts the utility AC power to DC and supplies DC power to the UPS module inverter while simultaneously float charging the battery plant. The UPS inverter converts DC to AC and furnishes AC
power to the critical bus.
1.3.2 Input Power Failure
If the utility source power fails or is outside the acceptable range, the battery plant becomes the primary supplier of DC power to the inverter.
1.3.3 Recharge
After the utility source power is restored, or an alternate power source becomes available, the rectifier/charger slowly walks-in to once again power the inverters and recharge the battery plant.
5
Page 14

1.3.4 Overload
Overloads in critical systems may be caused by inrush currents during connected equipment startup
or by faults in the critical load or distribution network. The Liebert Npower UPS system can maintain
full output voltage regulation while sustaining the following overloads:
• Up to 125% for 10 minutes
• Up to 150% for 1 minute
• Up to 200% for 10 cycles
For momentary faults above 200% of rated current, the static switch turns on for 10 cycles to supply
power from the bypass source. Up to 6,000 amps of current can be supplied for the first half cycle.
The critical load remains on the UPS module for the above conditions. If the UPS system overload
capacity is exceeded, an automatic transfer to bypass is initiated, which keeps the static switch on
and opens the inverter output contactor.
Whenever you have an overload condition, you should determine the cause of the overload.
1.3.5 Bypass (Internal)
The UPS control logic initiates an automatic transfer to the bypass source if the overload-current-versus-time curve is exceeded or if specified UPS system faults occur. You can also manually transfer the
load to the bypass (without interruption) if you must take the UPS module out of service for maintenance.
With the rotary switch in the Bypass position, most key components and operating modes can be
checked without disturbing the critical bus. However, certain key power-carrying components will
require complete system shutdown or isolation through an external maintenance bypass cabinet for
100% service.
Introduction
1.3.6 External Maintenance Bypass
The installation of an External Maintenance Bypass Cabinet or panel board is recommended to allow
you to totally isolate the UPS from all power sources. Use of the External Maintenance Bypass is
described in SIB External Maintenance Bypass on page 30.
1.3.7 Off-Battery
The battery plant can be disconnected from the rectifier/charger by using an external Module Battery
Disconnect (MBD) circuit breaker. The UPS continues to function normally, though it does not have
power outage back-up capability until the battery plant is reconnected.
Figure 1 UPS controls and display screen (with example of the monitor/mimic screen)
MIMIC DISPLAY
SS
RECT.
BATTERY
CHG
INV.
SYS. STATUS
LOAD
6
Page 15

1.4 Operator Controls
Liebert Npower UPS modules are equipped with a microprocessor-based Operator Display Screen and
Control Panel designed for convenient and reliable operation. The front panel location of the monitoring and control system enables the Operator to quickly identify the current status of the UPS and to
perform most of the manual operations.
The operator display screen is driven by an easy-to-follow menu-prompted software program that controls and monitors the UPS system.
Detailed instructions on how to interpret the displays and use the controls are in 3.0 - Operation.
1.5 Options
A number of standard pre-designed options are available from Liebert for your UPS system.
Described below are the most frequently provided options. Note that the battery items (1 and 2) are
required to complete the UPS system. The remaining options provide improved system performance
or convenience.
1. Battery and Racks. The batteries provide power in the event of a power outage. The Liebert UPS
can use a variety of battery types, provided the battery plant is designed for the UPS DC voltage
range and the load requirements of your application.
2. Module Battery Disconnect. The UPS system utilizes a separate Module Battery Disconnect for
remotely located batteries. A sensing circuit in the UPS module, set at the battery low voltage
limit, trips the Module Battery Disconnect to safeguard the battery from excessive discharge. The
Module Battery Disconnect has an undervoltage release mechanism designed to ensure that
during any shutdown or failure mode all battery potential is removed from the UPS system.
3. Input Distortion Filter (Trap). This filter reduces input current reflected harmonic distortion to
less than 10% THD at full load. The filter is factory installed within the UPS. This filter also
improves the input power factor to better than 0.95 lagging.
4. Load Bus Synchronization (LBS). The Load Bus Sync (LBS) option keeps two independent UPS
modules (and therefore their critical load buses) in sync, even when the modules are operating on
batteries or asynchronous AC sources. This means that critical loads connected to both load buses
can switch seamlessly between the two.
5. SiteScan Central Monitoring System. Liebert manufactures a central monitoring system that
automatically displays key UPS measurements and alarms, as well as data from a variety of
sensors. This monitoring system signals alarms so corrective action can be taken. Events and
data can be printed in hard copy. Data can be logged for analysis. The SiteScan Interface port is
standard for the Npower.
6. Remote Alarm Status Panel. The UPS system may also be provided with an optional Remote
Alarm Status Panel. This Panel provides eight LED indicators and may be placed at a convenient
location near the critical load. A functional description of the Remote Alarm Status Panel is
provided in 3.5.3 - Remote Alarm Status Panel.
7. Open Comms - Discrete Output Option OC-DO (Programmable Relay Board). Each option has 8
channels. Up to two Programmable Relay options can be installed in the same UPS. Any alarm/
event can be programmed onto any channel or channels. Programming is performed through the
LCD display. Each relay channel has two sets of Form-C dry contacts rated 1 Amp @ 30 VDC or
250 mAmp @ 125 VAC.
8. Open Comms - Discrete Input Option OC-DI (Input Contact Isolator). Provides UPS module
interface for up to eight user relay inputs (normally open dry contacts) for user alarm messages.
The user through the LCD display can program the UPS alarm messages. The input alarm can
also be installed to trigger an Open Comms - Discrete Output Option channel. Each alarm can
have auto-dial, event log, and time delay (0 to 999.9 seconds).
9. Optional Power Supply (OPS). An additional control power supply is required when a Remote
Alarm Status Panel and/or three or more battery circuit breakers are present in the system.
10. Internal Modem. Provides a 2400-baud modem in the UPS capable of dialing out from the UPS or
accepting incoming calls and connecting to a remote terminal, computer or PC. A command set
allows the user to view the alarm status, event log status, history status and system settings. The
modem can also be configured to dial out two different telephone numbers, a primary and a
backup number as a result of a significant UPS event. The selection of dial-out events is
programmable by the Operator.
11. Network Interface Card - NIC. This option provides internal hardware and software to
communicate (via SNMP and HTTP) to any I.P.-based Ethernet network. Connection to the
network is made by a 10 baseT Ethernet cable provided by the user.
Introduction
7
Page 16

2.0 THEORY OF OPERATION
2.1 General Component Description
The UPS system includes all of the equipment necessary to continuously provide computer- grade AC
power to a critical load, even when there is an interruption of the utility line power. It consists of the
UPS modules and a back-up battery plant. Refer to Figure 2.
2.1.1 UPS Module
The UPS module consists of system controls, a rectifier/charger, an inverter, protective devices, and
other accessories.
System Controls: The system control logic automatically manages critical bus operation and monitors
performance of the UPS module. Microprocessor technology and dedicated firmware provide advanced
logic control and a comprehensive display of information. The UPS module status is displayed locally.
Optional ports permit communicating with external devices.
Rectifier/Charger: The rectifier/charger converts utility power from AC to DC to charge the battery
and provide the DC input to the inverter. Its design limits reflected harmonic current distortion to
source power and provides low-ripple DC power for charging batteries.
Inverter: The inverter converts DC power into the precise AC power required to supply a sensitive
critical load. The inverter converts DC power into a pulse-width-modulated (PWM) that is easily filtered into a clean sine wave output. The PWM also minimizes the harmonic voltage distortion caused
by typical switching power supplies and other nonlinear load components used in computers and
related electronics.
Theory of Operation
Static Bypass Switch: The static (solid-state) bypass switch immediately transfers the load from the
inverter to the bypass AC power source in the event of a severe overload on the system or a failure
within the UPS. This transfer takes place without any interruption of the power supplied to the load.
The system includes redundant circuits to detect and isolate shorted SCRs in the static switch.
Bypass Circuit: The bypass circuit consists of switches and associated synchronizing and control circuitry to transfer the load to/from the bypass source.
2.1.2 Battery System
The battery is used as the alternate source of power to supply DC power to the inverter if the AC supply voltage is outside the acceptable range. The battery supplies power to the inverter until the utility
power is restored or until an alternate power source is available. If AC source power is not restored or
an alternate power source is not available, the battery can be sized to provide power long enough for
an orderly shutdown of the load.
8
Page 17

2.2 Detailed Component Descriptions
2.2.1 Controls
Hardware
The Npower UPS operator interface display system is designed to provide all of the information that
is required for the operation of each UPS module. The following is a list of the hardware features:
1. The control logic performs automatic operations with minimal operator interface. The limited
number of manual controls are easy-to-use.
2. Each Npower UPS cabinet is equipped with an easy-to-read liquid crystal display (LCD) screen. It
presents information in a way that is easy to understand at an eye-level front panel location.
3. The display is controlled by a dedicated microprocessor with a non-volatile (EPROM) program
and a battery-backed event memory.
4. The Npower can be ordered with communication ports for:
a. Transmission of present status information to remote terminals via a resident auto-dial
communications program and an external or optional internal modem. This port also
responds to inquiries of the UPS and history from the remote terminal.
b. Reporting UPS and history information in response to inquiries from a local terminal (no
modem required).
c. Reporting information to a Liebert SiteScan Central Monitoring System.
d. Relaying selected alarm messages to a Liebert Remote Alarm Status Panel and to a separate
terminal board for customer use.
e. Reporting key systems information via SNMP interface to a network monitoring system.
Theory of Operation
NOTE
All external communication devices are optional equipment.
Firmware
The operator interface display system software enables the operator to monitor the UPS system status, to control the power flow through the UPS, to monitor all of the meter readings, to execute the
start-up, shutdown, and the load transfer procedures, to access the event history files, and to make
adjustments to the programmable parameters. The following is a list of the firmware features:
1. The menu-driven software prompts the operator for input.
2. Step-by-step instructions assist the operator during the start-up, shutdown, and the load transfer
procedures. This helps to eliminate operator errors.
3. Graphics-based mimic diagrams illustrate the position of internal switches and the power flow
through the UPS system.
4. The Present Status screen reports information about the system's present status. The History
Status screen chronicles the events leading up to and immediately after a fault. The Event
History screen lists all of the alarm messages that have been logged over a period of time.
Refer to 3.0 - Operation for a description of the controls and indicators located on the Operator Control Panel.
9
Page 18

2.2.2 Rectifier/Charger
The UPS module rectifier/charger consists of input fuses, AC current-limiting circuit, battery equalize
charge circuit, DC filter, battery charge-current-limiting circuit, and bridge rectifiers.
Operation
The rectifier/charger converts the AC input power to DC power. This conversion is accomplished by 3phase bridge rectifiers using SCRs. All phases are individually fused. For all modules, reflected input
current THD is less than 30% at full load (which may be reduced to less than 10% with optional filter).
The filtered output of the rectifier/charger provides regulated DC power to drive the inverter and
charge the battery.
Input
The input is sized to allow enough current to recharge the battery and supply a full-rated load at the
same time.
Input Current Limit
AC input current sensing transformers (CTs) are used to measure current levels. Control circuitry
monitors the CTs and restricts the AC current to less than 125% of the full input current rating by
reducing the battery charging voltage. This current limit is adjustable from 100 to 125% of the system
capacity measured in AMPS, with the default setting at 125% (maximum AMPS). An external dry
contact closure (field supplied) activates a reduced second level of the battery charge current limiting
circuit for use with a back-up generator.
Theory of Operation
Input Current Limit, Second Level
A second level of input current limit is initiated by an external contact closure (field supplied for use
with back-up generator), and is adjustable from 85 to 100% (factory set at 100%).
During a rectifier re-start following battery discharge, the current slowly ramps up (walks-in) from
20% of the rated input current to 100% over a 15 to 20 second period. The maximum rate of change of
the AC input current is 15% per second. The input current walk-in reduces the start-up surge distortion effects on all other equipment connected to the same source and prolongs the service life of internal components.
Input Current Inrush
The maximum sub-cycle of inrush current is typically less than 6-8 times normal.
Input Power Factor
The rated input power factor is no less than 0.80 lagging at the nominal input voltage and the full
rated UPS load. The optional input filter will improve the power factor to better than 0.92 lagging at
full load. Refer to drawings for your specific model.
2.2.3 Battery Charging Circuit
The UPS module charging circuit is capable of recharging the battery plant to 95% of full capacity
within 10 times the discharge time. Recharging the last 5% takes longer because of characteristics
inherent in the battery. DC ripple voltage is limited to 0.5% RMS to preserve battery life during longterm float charging while the UPS system is operating on utility source power.
Operation After Discharge
When commercial power is interrupted, the battery continues to supply DC power to the inverter
without interruption to the critical load. If the AC source power is restored before the battery has
fully discharged, the rectifier automatically restarts and resumes carrying the inverter and battery
recharge load requirements.
10
Page 19

Theory of Operation
Operation After End-of-discharge
The battery time screen displayed on the control panel enables you to estimate when battery shutdown will occur. You will have enough time to energize an alternate AC power source or to initiate an
orderly shutdown of the critical load. If the battery plant discharges to the shutdown point during an
outage, the UPS automatically disconnects the load, the AC input, and the battery. After AC input
power is restored, the rectifier can be manually restarted by the Operator.
Battery Disconnect
The module battery disconnect (MBD) circuit breaker is used to isolate the UPS module from the battery during maintenance, and to automatically disconnect the battery from the inverter at the end of
battery discharge. The MBD circuit breaker must be closed manually unless you have the optional
motorized battery breaker. (See 3.3.8 - Auto Restart).
Battery Charge Current Limiting
The battery recharge current, after a battery discharge, is limited to between 1 and 25% (adjustable)
of the full load maximum discharge current stated in AMPS. This regulates the amount of current
that flows from the power source to the battery while the battery is recharging.
The battery charge current limit is factory set at one-half of maximum or 12.5% for normal operation
and at 1% for alternate power source recharge operation.
Battery Equalize Charge Circuit
The battery equalize charge feature can be manually initiated or it can be programmed to operate
automatically. Either can be selected from the battery equalize screen displayed on the control panel.
The automatic battery equalizing charge circuit increases the rectifier/charger output voltage to
charge the battery anytime there is a power outage of 30 seconds or longer. The equalizing voltage is
slightly higher than the float voltage. This helps all the batteries in a string to reach a uniform state
of charge.
2.2.4 Inverter
The inverter is a solid state device that converts the DC output of the rectifier/charger or the battery
to AC power.
Operation
The inverter converts DC power from either the battery or the rectifier/charger into three pulsewidth-modulated/six-step waveforms. These waveforms are filtered into low-distortion sine wave
power. The inverter is controlled by a Digital Signal Processor (DSP). This DSP controls the precise
synchronization, amplitude, and frequency of the output voltage.
In addition to the inverter efficiently supplying a regulated AC output from a DC source, the inverter
output provides isolation between the critical load bus and the commercial source power. The inverter
is configured to handle most critical load inrush surges. It maintains output voltage Total Harmonic
Distortion (THD) within specifications even when handling nonlinear computer loads.
NOTE
The manufacturers of the valve-regulated batteries supplied with Liebert’s standard battery
cabinets recommend that when first installed the batteries be equalize charged. After that
initial equalize charge, they recommend no further equalize charging for their batteries. Other
manufacturers may have different recommendations for their products. Consult the battery
manufacturer’s manual for specific information about equalize charging.
Output Regulation and Overload Performance
The inverter is capable of sustaining full output voltage (±1% of the nominal voltage) for up to 150%
overload at the output for as long as 60 seconds without reducing the output voltage. It can also handle at least 125% of the rated current for up to 10 minutes. If an overload exceeds the system capacity
and a bypass source is available, the critical load is transferred to the bypass source and the inverter
is disconnected from the load.
11
Page 20

Nonlinear Load Characteristics
Computers and computer equipment with switching power supplies generate nonlinear currents rich
in fifth and seventh harmonics.
The inverter pulse-width-modulated waveform, coupled with the output filter, provides a natural
path for reducing the fifth and seventh harmonic currents produced by the load. The inverter/filter
limits the output voltage THD to less than 3% with up to 100% typical electronic data processing
(EDP) loads. EDP equipment characteristically includes both nonlinear and linear load components.
Unbalanced Load Characteristics
Unbalanced loads are actively regulated. The phase-to-phase voltage balance is maintained to within
2%, even with a 50% load imbalance.
2.2.5 Static Bypass Switch
A static bypass switch is an integral part of the UPS. An automatic transfer control circuit senses the
status of the operator controls, UPS logic signals and alarm messages, and critical bus operating conditions. If the inverter output can no longer supply the critical load, the static bypass switch automatically transfers the critical load to the bypass source without interruption.
Static Switch Backfeed Protection
The static bypass system is equipped with redundant disconnect circuits that prevent backfeed of
lethal voltage to the bypass input in the event of a shorted static switch SCR. If a shorted SCR is
detected, the static bypass switch is isolated and an alarm is annunciated at the UPS control panel,
while the critical load remains on UPS output power.
Theory of Operation
Pulsed Parallel Operation
When an overload condition such as magnetic inrush current or a branch load circuit fault exceeds
200% of the full-load current rating, the static bypass switch pulses on for 10 cycles. This allows up to
6000 amperes from the bypass line to clear the overload without a complete transfer to bypass (a Liebert design exclusive). The bypass source is in parallel with the UPS system, permitting the bypass
source to carry the initial overload current. If the overload clears before 10 cycles, a load transfer to
bypass is not made. If the overload condition continues to exceed the inverter capacity, the automatic
transfer is made (maintaining the load voltage within the specified limits).
Load Transfers
Transfers to (transfer) or from (retransfer) the bypass may be performed automatically or manually in
a make-before-break (MBB) sequence.
Manual load transfers and retransfers are initiated by the Operator from the UPS Control Panel.
Automatic transfers are initiated by the UPS system control logic when an overload is beyond the
specified capabilities of the UPS inverter or when a fault occurs within the UPS module. An automatic retransfer is initiated if this function is enabled and if system conditions for a retransfer are
present.
12
Page 21

Theory of Operation
Transfer and Retransfer Conditions
1. Automatic Transfers to Bypass:
Critical bus conditions that will initiate an automatic transfer of the critical load from the UPS
inverter output to the bypass source are:
a. Output Overload: overcurrent condition in excess of the current-versus-time overload capacity
curve.
b. Over/Under Voltage (OV/UV): critical bus voltage is outside the allowable tolerance.
c. Inverter Inoperative: inverter diagnostic circuitry senses an imminent inverter output OV/UV
condition:
d. Battery discharged to the shutdown voltage.
e. Inverter or rectifier fault condition (power, logic, or over-temperature) present or imminent.
f. Failure of system logic or logic power.
2. Manual Transfers:
Manual transfers may be initiated at any time provided no transfer inhibition conditions are
present.
3. Transfer Inhibited:
A manual transfer to the bypass source will be inhibited if any of the following conditions exist:
a. Bypass frequency deviates ±0.5 Hz from the nominal.
b. UPS system to bypass voltage difference (DV) exceeds a predetermined percentage (normally
10%).
c. OK to Transfer signal from the control logic is not present.
4. Automatic Retransfers to UPS:
Critical bus conditions that must be present to initiate an automatic retransfer (Auto-Rexfer) of
the critical load from the bypass source to the UPS system are:
a. The number of Auto-Rexfer Attempts selected must be greater than zero (0). If zero (0) is
selected, no automatic retransfer will occur.
b. Critical load was initially transferred to the bypass source due to a system overload only.
c. Overload has since been eliminated (the load has dropped below 100% of the rated load).
d. Both the Input contactor and Battery (MBD) circuit breakers have remained closed since the
overload transfer.
e. OK to Transfer signal received from the control logic for at least 10 seconds, within 5 minutes
of the overload transfer. (A manually initiated retransfer from bypass is required for
overloads lasting 5 minutes or more.)
f. Cyclic-type system overloads, which occur up to five (select range is 0 to 5) times in 60
minutes, are automatically returned to the UPS system for each event including the Nth
overload. A manually initiated retransfer from bypass is required for the N+1 overload.
5. Manual Retransfers:
Manual retransfers may be initiated at any time provided no retransfer inhibition conditions are
present.
6. Retransfer Inhibited:
A retransfer (automatic or manual) from the bypass source to the UPS system shall be inhibited if
any of the following conditions exist:
a. Retransfer Inhibitions:
1. Bypass frequency exceeds ±0.5 Hz of the nominal.
2. UPS system-to-bypass voltage difference (DV) exceeds a predetermined percentage
(normally 10%).
3. OK-to-Transfer signal from the control logic is not present.
4. Inverter or rectifier fault.
b. Automatic Retransfer Inhibitions (in addition to those above):
1. The load transfer to bypass was not caused by an output overload.
2. Excessive cyclical overloads within a one-hour period.
3. Retransfer conditions are not satisfied within 5 minutes of the initial transfer.
13
Page 22

3.0 OPERATION
3.1 Operator Controls
The Npower operator controls and indicators are located on the UPS Module Cabinet door and inside
the cabinet. See Figure 2. The Operator Control Panel is located in the upper lefthand corner of the
door, enabling the Operator to quickly identify the current status of the UPS system and to perform
most of the manual operations. The operator display screen is driven by an easy-to-follow menuprompted software program. The internal control system executes programs which generate messages on this display screen. Screen messages instruct the Operator during start up, operation, and
shutdown. The screen also displays status information upon request. Operating the UPS consists of
watching the indicators on the operator control panel and making appropriate responses. Further
UPS monitoring and testing is achieved by navigating through a series of menu selections on the display screen.
Figure 2 80 kVA UPS outside and inside views
Operation
1
2
3
Table 1 Key locations on UPS
Item Description Function
1 Operator Control Panel Contains Display screen, Navigation buttons and Emergency Power OFF button.
2 Rotary Switch Provides manual selection of Normal, Bypass and Service modes.
3 Fuse Blocks Contain fuses for UPS control power.
14
Page 23
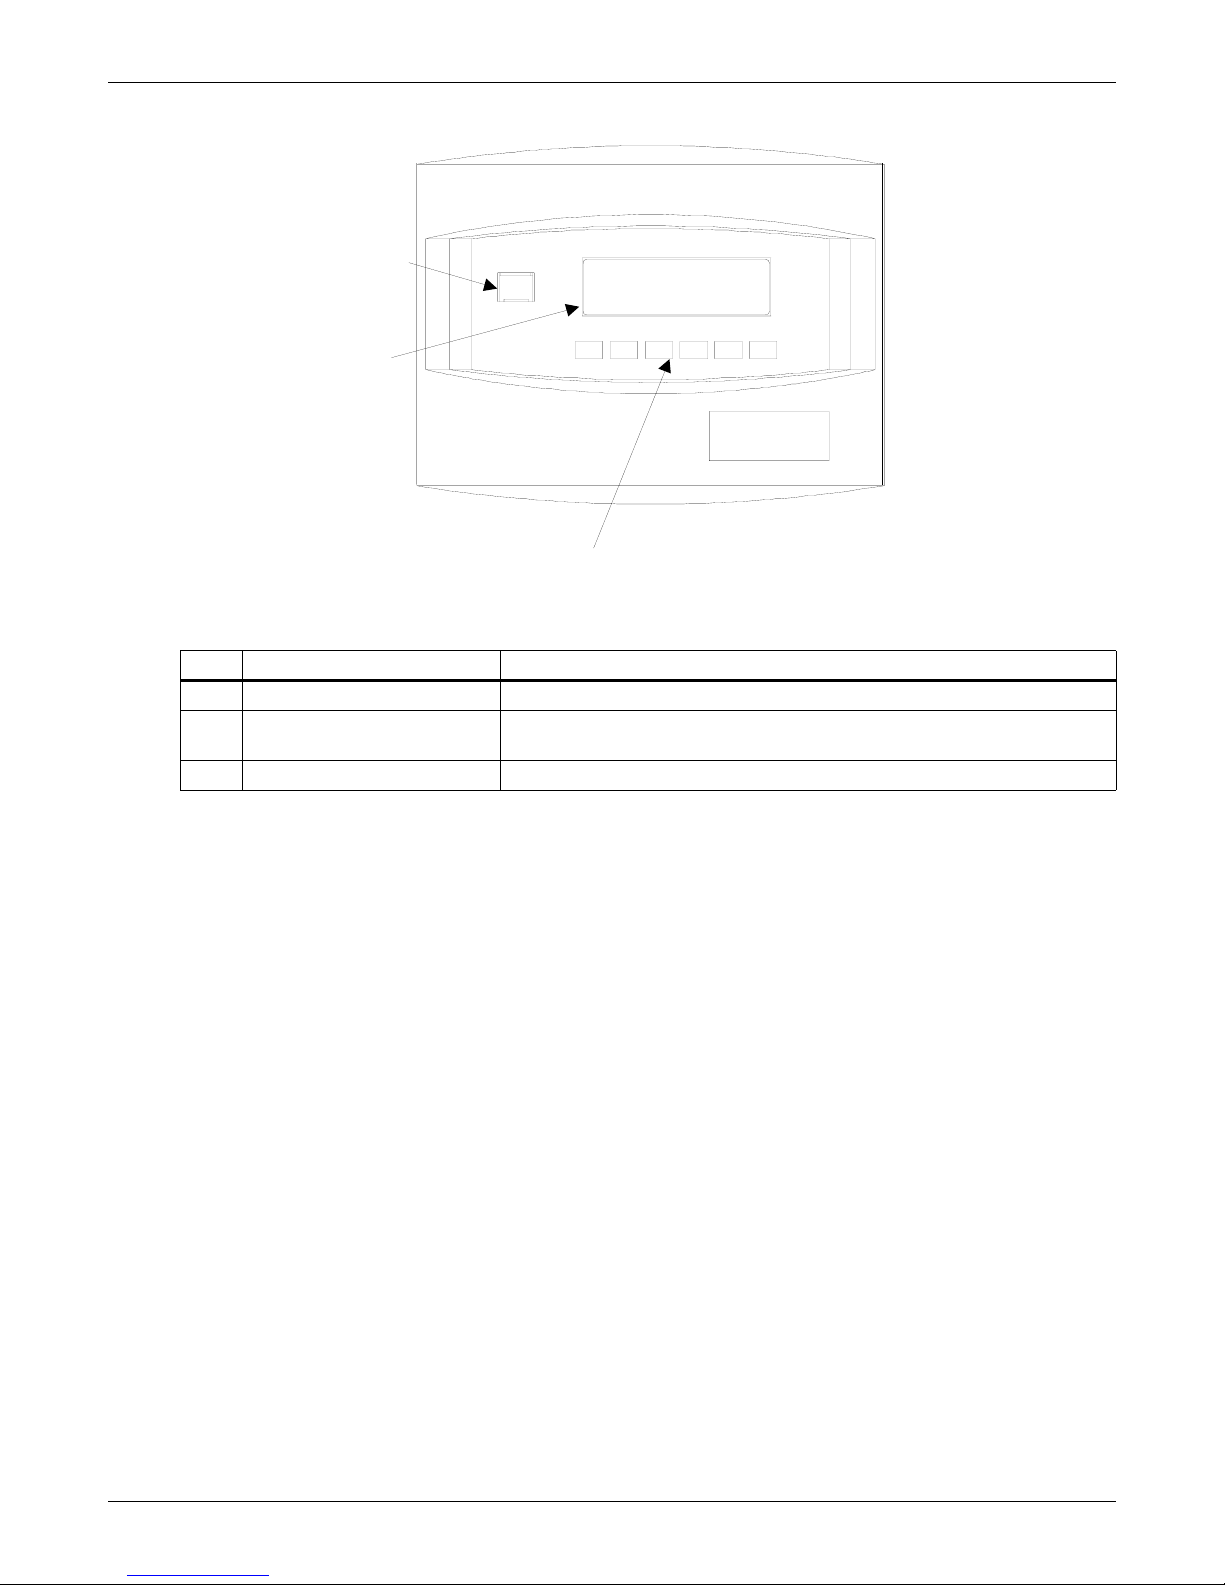
Figure 3 Operator control panel
1
2
Table 2 Key locations on operator control panel
Item Description Function
1 Emergency Power Off Button Turns power off in an emergency situation.
2 Display Screen Enables Operator to monitor power flow and meter readings, receive
3 Navigation Buttons Enables Operator to access menu screens and make selections.
Operation
3
reports, and execute operational procedures.
15
Page 24

3.1.1 Operator Control Panel
A
The Operator Control Panel enables the operator to perform the following tasks:
• Obtain a quick indication of operational status:
• Is the critical bus OK?
• Is the UPS system OK?
• Is the battery available?
• Is the bypass line available?
• Monitor the power flow through the UPS system and monitor all meter readings:
• Is the critical load being supplied power from the UPS system or bypass?
• Are input, battery, and output voltage, frequency, and current readings at nominal levels?
• How much battery time is still available during an outage?
• Is the battery recharging after discharge?
• Execute operational procedures:
• Perform critical bus transfer/retransfer between the UPS and the bypass line.
• Start-up and shutdown the UPS.
• Shutdown the system instantly in the event of an emergency.
• Access status reports and history files:
• Obtain a complete listing of the present status of the UPS including input, output, and battery voltage, frequency, and current readings, and any alarms that may be present.
• Review a complete history report of all events leading up to and immediately after a fault condition.
• Examine an archive listing of all alarm conditions that have occurred over a period of time.
• Make adjustments to programmable parameters (access limited by Security Access function):
• Set the date and the time functions.
• Change the auto-dial phone number and the modem options.
• Select the number of auto-retransfer attempts.
• Make adjustments to the UPS output voltage before performing a manual load transfer.
Operation
3.1.2 Navigation Buttons
The Navigation Buttons are located below the Display Screen.
Figure 4 Navigation buttons
STARTUP / SHUTDOWN
STATUS REPORTS
CONFIGURATION
SELECT
UP
MAIN MENU
DOWN
MANUAL TRANSFER
BATTERY MANAGEMENT
ALARM
RESET
LARM
SILENCE
ESCAPE
16
Page 25

The SELECT button is used to select a particular item from the options on the screen. When you
press this button, the screen that is selected will be immediately displayed.
The UP and DOWN buttons are used to move the cursor around the screen in order to highlight
appropriate selections.
The ALARM SILENCE button silences the audible alarm and discontinues the flashing of the alarm
messages.
The ALARM RESET button clears a latching alarm after the alarm condition is corrected.
The ESCAPE button is used to exit the screen and return to the Mimic Display.
3.1.3 Rotary Switch
The Rotary Switch is located on the lower right side of the panel inside the cabinet. This switch provides single-point control of the UPS.
NOTE
Improper positioning of the rotary switch can result in unwanted actions. Therefore it is
important to read the complete instructions before using this switch, and to follow Operator
prompts on the display screen.
Figure 5 Rotary switch
Operation
The Rotary Switch has 3 positions:
• NORMAL: The Normal switch position is used under most operational conditions.
• BYPASS: The Bypass switch position directs the power flow through the Internal Bypass Circuit.
The UPS module may be either on or off. If the UPS module is on and the batteries require charging, charging will take place.
• SERVICE: The Service switch position directs the load to the Internal Bypass Circuit so the UPS
can be serviced.
NOTE
For purposes of this manual, assume that the rotary switch will always be in the NORMAL
position.
NOTE
If the position of the rotary switch must be changed, as in servicing, it is imperative that the
Operator observe the light in the corner of the Rotary Switch panel before making any change.
The switch position may be changed only if the light is green. Never move the switch if the light
is red. Instead, call the Liebert Global Services technician.
NOTE
The LED light is positioned in the lower left-hand corner.
17
Page 26

3.2 Security Access and Passwords
Password protection is provided in the Npower UPS system to protect you from any unauthorized configuration of the system. A default password is installed on your system when you receive it.The
default password is NPWR. It is important, however, that you enter your own secure password as
soon as possible. The following procedure will enable you to do this.
1. From the MAIN MENU on the Display Screen, navigate to the primary CONFIGURATION
Screen. It will look like the figure below.
Figure 6 Configuration screen
CONFIGURATION
SYSTEM RATINGS
SYSTEM SETTINGS
FACTORY SETTINGS
ALARM MASK
CUSTOMER ALARM INTERFACE
Operation
EXIT
2. Highlight USER SETTINGS using arrow keys, and press SELECT.
3. The USER SETTINGS screen will come up.
4. Bracket NEXT using arrow keys and press SELECT five times. This will take you to the sixth
page of the USER SETTINGS screen.
Figure 7 User settings screen, page 6
USER SETTINGS
AUTO RESTART SETTING SYSTEM
ACTIVE FILTER ENABLE ENABLED
TEMPERATURE BATT. CB TRIP NO
CHANGE PASSWORD
INTERRUPTED TRANSFER ENABLE DISABLE
PREV.
Highlight CHANGE PASSWORD. This action will bring up the PASSWORD screen. You must know
the current password in order to change it. Next, you will be prompted to enter a new 4-digit password. The new password may contain letters from A through Z and/or digits from 1 through 9.
5. You now have 5 minutes to examine and configure password-protected screens.
6. After five minutes you must re-enter the password in order to unlock further password-protected
screens.
CANCEL
SAVE & EXIT
NOTE
eac
The TIME and DATE of all password changes are logged in the event log.
18
Page 27

3.3 Display Screens and Procedures
g
y
y
y
y Cy
g
g
g
y
y
y
y
The Operator Interface Display System of the Npower allows quick access to any screen the operator
chooses. The default screen is the Mimic Display Screen.
MENU TREE
The figure below shows the primary screens that you can access through the Operator Interface Display System.
Figure 8 Menu tree
Operation
Main MenuMain MenuMain MenuMain Menu
Bypass
Input
Status
(Dual
Input
Only)
Input
Status
Output
Load
Status
Battery
Status
System
Faults/
Alarms
Mimic /
Display
Manual Transf.
/ Retransfer
Auto
Startup
Manual
Startup
User
Shut
Down
Startup /
Shutdown
Instructions
InstructionsInstructionsInstructions
Battery
Mgmt.
Battery
Batter
Te st
Te st
Batter
Equilizer
Battery
Te mp
Compensation
Charge
Batter
cle
Monitor
Batter
Time
Remaining
Status
Reports
Confi
CalibrationCalibration
Event
Log
Histor
Log 1
Histor
Log 2
stem
S
Status
Clear
Histor
Logs
Clear
Event
Log
uration
System
Ratings
System
Settin
User
Settin
Factory
Settin
Alarm Mask
Customer
Alarm
Interface
s
s
s
NOTE
Any screens where changes in configuring, settings or data can be made (including all the
Configuration screens) are password-protected.
19
Page 28

Operation
Primary Screens
The Main Menu has eight primary screens. Please note that some screens have multiple pages
because not all the information can fit on one page. To access the next page, highlight NEXT and
press SELECT. To access the previous page, highlight PREV and press SELECT.
• Mimic Display. This graphic portrays the power flow through the UPS. Switch indications, system
status, and alarm messages are all displayed on this screen. Detail screens can display input voltage and current readings, battery status, and load characteristics and alarm info.
• Status Reports. This display consists of three sub-menu selections: present status, history log and
event log. These screens display data on the system's present and past performance. They also
display information about any faults that have occurred in the system. Total operating hours are
displayed here.
• Configuration. This screen displays the current configuration of the UPS system. It also enables
the operator to reset the date, time, dial-out phone numbers and System Options. System Options
include Temperature-Compensated Charging, Customer Alarm Definitions and Battery Load
Test. The operator can view, but can not change, any of the settings unless the password is
entered. See 3.2 - Security Access and Passwords for more information.
• Manual Transfer. This screen specifies all of the steps required to manually transfer the critical
load between the UPS and the bypass source. Comparisons of the voltage, frequency, and phase
synchronization of the UPS output and the bypass line are also illustrated to aid in the transfer or
retransfer procedure.
• Startup and Shutdown Procedures. These screens list step-by-step procedures to start up UPS or
to shut it down for maintenance or repairs. Screens include the following: Auto Startup, Manual
Startup, and two types of Operator Shutdown procedures.
• Battery Management. These screens display information on battery self tests, battery equalization, and battery compensated charging. This enables the operator to immediately see the effects
of load shedding on time remaining and to accurately assess his power resources. The battery
equalize screen lets the operator change the battery equalize recharging mode from manual to
automatic, and to observe or change the equalize time. Battery equalize charge voltage is higher
than battery float (constant) charge voltage.
NOTE
The manufacturers of the valve-regulated batteries supplied with Liebert’s standard battery
cabinets recommend that when first installed the batteries be equalize charged. After that
initial equalize charge, they recommend no further equalize charging for their batteries. Other
manufacturers may have different recommendations for their products. Consult the battery
manufacturer’s manual for specific information about equalize charging.
Secondary Screens
The secondary screens show detailed information relating to the primary screens. These screens are
illustrated below under each primary screen. Like the primary screens, the secondary screens may
also consist of multiple pages. To get to the next page, highlight and Select the word NEXT. To return
to the previous screen, highlight and Select the word PREV.
STATUS INFORMATION
Module status information is available on the display screen when the Control Power is ON, even
when the UPS module is not operating. The same system status information is also available at local
and remote terminals. See 3.3.4 - Status Reports for information on status reports and 3.5 - Com-
munication Interfaces for information on Operator communication interfaces.
If a module display screen is blank, either power is not available, the Rectifier Input (RIB) circuit
breaker (external to the UPS module) is open, or the Control Power is OFF. If power is available and
a display is blank, contact Liebert Global Services (1-800-Liebert, or 1-800-543-2378).
20
Page 29

Main Menu Screen
The Main Menu contains the primary menu selections that monitor and control the operation of the
UPS. To access one of these screens, use the NAVIGATIONAL BUTTONS beneath the screen.
First, press the UP or DOWN button until the desired screen is highlighted. Then press the SELECT
button.
From any screen, pushing the Escape button once will return you to the Mimic Screen.
Figure 9 Main menu screen
STARTUP / SHUTDOWN
STATUS REPORTS
CONFIGURATION
Operation
MAIN MENU
MANUAL TRANSFER
BATTERY MANAGEMENT
3.3.1 Mimic Display Screen
From Main Menu move the highlighted cursor to MIMIC DISPLAY and press the Select button. This
brings up the Mimic Display Screen.
The Mimic Display screen is the default screen on the Operator Display. It is a simplified block diagram showing an overall view of the power flow through the UPS system. Solid lines indicate power
flow; white lines with thin black edges indicate that power is not flowing in that area. The following
examples illustrate power flow under different conditions.
Figure 10 Monitor / mimic display screen example: normal power flow
MIMIC DISPLAY
SS
RECT.
BATTERY
CHG
INV.
LOAD
SYS. STATUS
21
Page 30
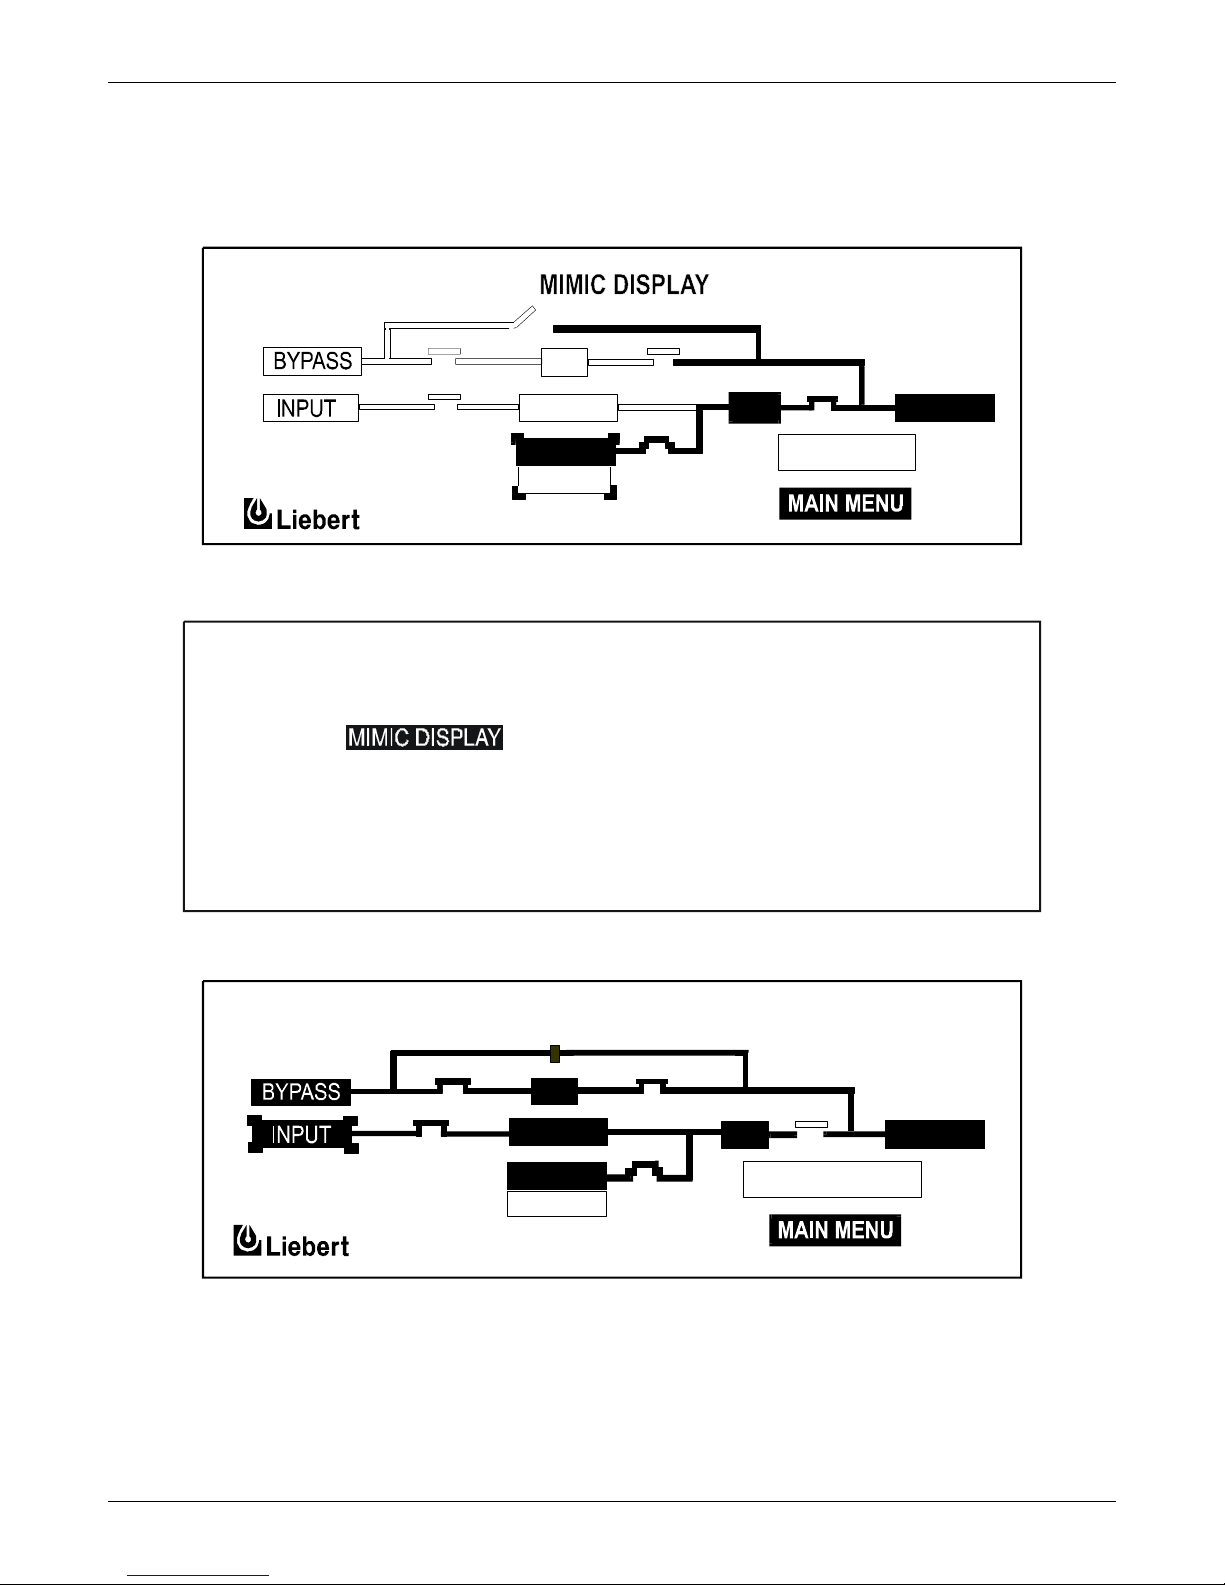
In this example, power is available from the normal and bypass sources, as well as from the battery.
Notice that the switching devices are all closed except for the bypass switch at the top. The load is
operating on conditioned power from the inverter. The battery is being charged by the rectifier. The
static switch is operative and ready to respond to momentary demands for overload current.
Figure 11 Mimic display screen example: utility fail
SS
Operation
RECT.
BATTERY
INV.
FAULTS
LOAD
DISCHG
In this example, we see that a utility failure has shut down both the normal and bypass power
sources. The battery is connected and supplying power to the load.
MAIN MENU
MANUAL TRANSFER
STARTUP / SHUTDOWN
STATUS REPORTS
CONFIGURATION
Figure 12 Mimic display screen example: load on bypass, UPS module on and charging battery
BATTERY MANAGEMENT
MIMIC DISPLAY
SS
RECT.
BATTERY
CHARGE
22
BP
INV.
FAULTS / ALARMS
LOAD
Page 31

In this example, the load is receiving power through the bypass switch. Notice that the input power
source is available and the battery is being charged.
Figure 13 Monitor / mimic display screen example: load on bypass, UPS module off, service mode
MIMIC DISPLAY
SERV
SS
Operation
In this example, the power is coming from the bypass source through the bypass switch to the load.
The UPS module is off, as shown by the open rectifier and inverter switches. Notice also that the battery circuit breaker is open.
THE MIMIC DISPLAY SCREEN
The illustration below shows the five major sections of the Mimic Display Screen. The numbers in the
illustration correspond with the explanation below for each numbered block
Figure 14 Mimic display screen detail
3
1
RECT.
BATTERY
NORM
MIMIC DISPLAY
SS
RECT.
BATTERY
INV.
SYS. STATUS
INV.
SYS. STATUS
LOAD
4
LOAD
2
23
5
Page 32

Detailed Information Reports
Detailed information reports are available through the following numbered blocks
1. INPUT STATUS. To access this screen, start with the Mimic Display Screen. Using the arrow
keys, bracket INPUT and press SELECT. The screen displays the UPS input voltage and current
as well as additional information. Press SELECT to return to the Mimic Display Screen.
NOTE
On the Mimic Display Screen, items are bracketed instead of highlighted so as not to confuse
highlighting with power pathways.
Figure 15 Input status screen
V L - L 209 209 210 TEMPS (DEG C)
I 37 37 35 INLET AIR 24
OUTLET AIR 27
HEAT SINKS
1:025 2:020 3:020
Operation
INPUT STATUS
A B C FREQ. 60.0 HZ
NOTE
All voltage readings are phase-to-phase measurements (A-B, B-C, and C-A). All current
readings are phase measurements (A, B, and C). The metered parameter values on the
following screens are updated at one-second intervals
The Input Status screen displays the following real-time data:
• Input AC Volts AB, BC, CA
• Input Current A, B, C
• Input Frequency
• Inlet Air Temperature
• Outlet Air Temperature
• Heat Sink Temperature (100 and 130 kVA will display 3 temperatures, 1 for each heatsink)
2. DC BUS / BATTERY. By highlighting and selecting BATTERY from the Mimic Display Screen,
the following screen comes up, displaying DC bus voltage and the charge or discharge current.
This screen also shows BATTERY TEMPERATURE. Press SELECT to return to the Mimic
Display Screen.
Figure 16 DC bus / battery status
DC BUS / BATTERY STATUS
NUMBER OF BATT. ONLINE 1
DC BUS VOLT 540
BATT VOLT 472
BATT CURR 4.1 (CHG)
BATT TEMP 25
C
LAST BATTERY TEST : 07/07/02
24
Page 33

The DC BUS/BATTERY status screen displays the following real-time data:
• DC Bus Volts
•Battery Volts
• Battery Current (Chg/disch)
• Battery Temperature (This reading is the temperature of the ambient air in the battery cabinet.)
• Battery Time Remaining
3. BYPASS INPUT. Selecting BYPASS from the Monitor Mimic Display displays the following
screen showing bypass input voltage and the bypass input frequency. Press SELECT to return to
the Monitor Mimic Display.
Figure 17 Bypass input status
V L - L 213 213 214 PHASE DIFF 0
Operation
BYPASS INPUT STATUS
A B C FREQ. 59.9 HZ
The Bypass Input Block displays the following real-time data:
• Bypass AC Volts AB, BC, CA
• Bypass Frequency
• Bypass Phase Difference
4. OUTPUT / LOAD. Select LOAD from the Monitor Mimic Display screen to bring up this block. It
displays total output power to the critical load in kVA and kW. The critical load current per phase
is also displayed in this block. Note that kW is not displayed when the load is on the bypass line.
During an overload condition, the time remaining before transfer is displayed at the bottom of the
load box. Press SELECT to return to the Mimic Display Screen.
Figure 18 Output load status screen
V L-L 205 203 207
V L-N 120 117 118
I 5 5 162
KVA 1 1 19
KW 1 1 15
OUTPUT LOAD STATUS
A B C
FREQ. 59.9 HZ
% OF RATED LOAD:
KVA 42 %
KW 42 %
OVLD COND (SEC.)
25
Page 34

Operation
The Output/Load status screen displays the following real-time data:
• Output AC Volts AB, BC, CA
• Output AC Volts AN, BN, CN
• Output Current A, B, C
• Output kVA, kW, A, B, C
• Output Frequency
• % rated kVA and kW
• Overload Condition (with timer in seconds)
5. SYSTEM STATUS. When the SYSTEM STATUS box on the Mimic Display Screen (Figure 14)
shows a flashing FAULTS AND ALARMS message, highlight it and press SELECT. This displays
information about faults and alarms. Fault messages are displayed in reverse video (highlighted light on dark) while alarm messages are displayed in regular video (dark on light). Alarm messages
activate the audible alarm until the ALARM SILENCE button is pressed. To clear a latching
alarm, you must also press the ALARM RESET button after the alarm condition is corrected.
Faults and Alarms
The Npower is designed to alert the Operator to system conditions that warrant careful monitoring
and/or corrective action. A fault is an undesirable system condition that can cause further damage to
the system or potentially drop the load if not acted upon. An alarm indicates an abnormal system condition significant enough to warrant being annunciated and logged. During normal operation no
alarm messages should be present.
Figure 19 Active faults and alarms screen
ACTIVE FAULTS AND ALARMS
USER SHUTDOWN
EXIT
If input power is lost, the following screen will be displayed:
Figure 20 Active faults and alarms, loss of power
ACTIVE FAULTS AND ALARMS
INPUT LINE FAIL
INPUT UNDERVOLTAGE
03:58:29 05/22/00
INPUT OT/UF
BYPASS OUT TOLERANCE
BYPASS LINE FAIL
NOTE
There are 45 different fault messages and 95 different alarm messages. For a complete list refer
to 3.4.1 - Faults and 3.4.2 - Alarms.
EXIT
SBS UNABLE
03:58:29 05/22/00
26
Page 35

3.3.2 Startup
There are two start up scenarios which can be followed depending on whether there is already power
supplied to the UPS and the UPS is on Bypass, or there is no power to the UPS. Follow the appropriate instructions.
First Scenario
Power is not supplied to the UPS (Upstream breakers are open). Locate the Rotary Switch located on
the inside of the cabinet on the lower right side as you face the cabinet. Turn the Rotary Switch to the
Normal position. For a Single Input unit close the upstream breaker so that power is applied to the
UPS. For Dual Input units close both the Input and Bypass line breakers so that power is applied to
the Input of the UPS and the Bypass line. At this time, power will be applied to the load through the
internal static bypass.
Figure 21 System ratings screen
Operation
SYSTEM RATINGS
KVA 40
SYSTEM POWER FACTOR 0.8
INPUT VOLTS 480
OUTPUT VOLTS 208
BYPASS VOLTS 480
NEXT
As soon as power is applied, you will see the SYSTEM RATINGS screen (Figure 21). These are the
ratings of the unit that were programmed in at the factory. Using the arrow keys highlight SAVE &
EXIT and push the SELECT button. This will advance you to the USER SETTINGS screen. The
USER SETTINGS have been pre-set at the factory. However, they may be customized for your site.
See 3.3.5 - Configuration Screens for detail information on configuration screens. You can change
these configurations at any time. Use the arrow keys to move the cursor to SAVE & EXIT and push
SELECT. This will move you to the MIMIC screen that will look like Figure 22. You are now ready to
follow the instructions for automatic start up; see Auto Startup on page 28. Service technicians
may alternately use the Manual Start Up procedure for troubleshooting purposes in Manual
Startup on page 29.
Figure 22 Mimic display screen with load on bypass and switches closed
EXIT
MIMIC DISPLAY
RECT.
BATTERY
INV.
SYS STATUS
LOAD
LOAD
27
Page 36

Operation
Second Scenario
Power is supplied to the UPS and the UPS is supplying the load. (Upstream breakers are closed).
The UPS should be showing either the SYSTEM RATINGS screen or the Mimic display. If the SYSTEM RATINGS screen is showing, use the arrow keys to select SAVE & EXIT and push SELECT.
This will advance you to the USER SETTINGS screen. The USER SETTINGS have been pre-set at
the factory. However, they may be customized for your site. See 3.3.5 - Configuration Screens for
detail information on configuration screens. You can change these configurations at any time. Use the
arrow keys to move the cursor to SAVE & EXIT and push SELECT. This will move you to the MIMIC
screen. Check the MIMIC screen to make sure the static switch contactors are closed. The screen
should look like Figure 22. If the Static Switch Contactors are open (Figure 24), transferring to the
NORMAL position will DISCONNECT THE LOAD. To close the Static Switch contactors, locate the
Rotary Switch located on the inside of the cabinet on the lower right side as you face the cabinet. Turn
the Rotary Switch to the SERVICE position. Wait for 10 seconds. Return the Rotary Switch to the
BYPASS position. This should reset the Static Switch contactors to the closed position and the
MIMIC panel should look like Figure 22. If the Static Switch contactors are closed, then the load is
supported by Static Switch and you are clear to move the Rotary Switch to the NORMAL position and
move on to Auto Startup on page 28. If the Static Switch contactors are not closed, repeat the above
procedure. If this still does not close the static switch, contact Liebert Global Services for assistance.
CAUTION
!
If on Static Bypass, make sure the Static Switch is closed (Figure 22) before turning the
Rotary Switch to normal. If the Static Switch is not closed and the Rotary Switch is turned to
the normal position, the load will be disconnected.
Figure 23 Startup / shutdown procedures screen
STARTUP / SHUTDOWN
MANUAL STARTUP
USER SHUTDOWN
EXIT
Auto Startup
Normally, the Operator will choose to start the system automatically for the sake of convenience. To
begin the auto start-up sequence, select MAIN MENU from the MIMIC screen. This will bring up the
MAIN MENU Screen (Figure 9). From this screen select STARTUP/SHUTDOWN. This will take you
to the STARTUP/SHUTDOWN screen, Figure 23. Move the cursor to AUTO STARTUP and press
SELECT. AUTO STARTUP mode starts the rectifier and inverter, and transfers the load to the
inverter. The operator needs only perform one action when prompted: CLOSE MANUAL BATTERY
BREAKER. This action must be performed promptly (within 90 seconds). Otherwise the startup operation is aborted and an error message will appear stating: UPS OPERATION CANNOT BE PERFORMED. Although no further operator interaction is required, the Operator has the option to abort
the Auto sequence.
Once the Operator has manually closed the Battery Breaker, the UPS automatically becomes fully
operational, at which point the Mimic Display Screen is displayed showing Normal Power Flow. See
Figure 10.
28
Page 37

Manual Startup
A
On occasion, a service technician may wish to start the UPS manually while performing diagnostic
testing. The manual startup, like the auto startup, requires that the Rotary Switch be in the NORMAL position. To start the system manually, highlight MANUAL STARTUP and press the SELECT
button on the navigation bar. This action brings up the MIMIC DISPLAY screen, prompting the
Operator to close the Static Switch contactors.
Figure 24 Manual startup screen, close static switch contactors screen
Operation
Press OK to close the SS contactors, turning on the Static Switch. Press SKIP only to proceed without
closing the Static Switch contactors. Either selection brings up the screen enabling modification of
input current limit.
Figure 25 Target and ramp values
MIMIC DISPLAY
SS
RECT.
INV.
BATTERY
INPUT
MODIFY CURRENT LIMIT
TARGET AND RAMP VALUES
TARGET (A) : 13
RAMP (S) : 10
SERV
OK
SKIP
LOAD
BORT
Press SKIP to proceed or OK to change values. If Operator selects SKIP, the Mimic Display screen is
momentarily displayed, followed by the screen enabling modification of DC Bus Setpoint.
Figure 26 DC bus setpoint screen
MODIFY DC BUS SET POINT
TARGET AND RAMP VALUES
TARGET (V) 540
29
OK
SKIP
Page 38

Operation
New Target and Ramp settings are temporary settings for diagnostic testing or special situations.
Each time the UPS is placed online, the settings return to the default values. Custom T and R entries
are only allowed when rotary switch is in Bypass position.
The Operator normally does not have to change Target and Ramp settings. Therefore, he should
select SKIP and proceed to the next step which is to turn on the Rectifier and Inverter.
Operator is issued the prompt on the Mimic Display, “Turn on Rect.” Pressing OK will turn on the rectifier which will take up to one minute. If the rectifier does not turn on within two minutes, the UPS
will automatically make a second attempt.
Next, Operator is issued the prompt, “Turn on Inv.” Pressing OK turns on the inverter, taking up to
one minute. If it does not turn on within two minutes, the UPS will make a second attempt.
Next, Operator is prompted to “Close Batt CB.” The battery circuit breaker does not have to be closed
to bring the unit online. This step can be skipped in both NORMAL and BYPASS positions. The
CLOSE BATT CB screen will offer a choice of OK or SKIP. If you wish to move ahead without bringing the battery online, select SKIP.
Last, the Operator will see the MANUAL TRANSFER/RETRANSFER screen. To move the unit from
BYPASS to UPS operation use the arrow keys to select RETRANSFER TO UPS and push the
SELECT button.
At any time during the above sequences, the Operator can choose to abort the procedure. The load will
remain on bypass while the rectifier and inverter are powered down. In addition, any internal failure
will automatically inhibit startup.
From here on the Operator may monitor faults/alarms data and other information by navigating to
primary screens from the Main Menu screen, or by navigating to secondary screens from any of the
primary screens.
SIB External Maintenance Bypass
An External Maintenance Bypass Switch can be added by Liebert or supplied by the Customer. The
Liebert supplied option is outlined in Figure 27 and Figure 28 for the single input and dual input
options, respectively. The rotary switch has three independent power contacts on a common shaft. A
set of auxiliary contacts is incorporated into the shaft to determine the power switch position. The
auxiliary contacts, if provided will be connected to pins 9-10 of TB70 of the UPS module. The UPS
module shipped from the factory will have pins 9-10 jumpered so that the UPS internal logic will
ignore the External Maintenance Bypass switch conditions.
Figure 27 External maintenance bypass switch, dual-input UPS
S1-B
Bypass Input
S1-A
IMBS
Critical Load
S1-C
Rectifier Input
SBS
Rect INV
Battery
30
Page 39

Figure 28 External maintenance bypass switch, single-input UPS
S1-B
Operation
UPS Input
S1-A
IMBS
SBS
Rect INV
Battery
Critical load
S1-C
The table below summarizes the External Maintenance Bypass switch positions and actions.
Table 3 External maintenance bypass switch positions and actions
Switch position S1-A S1-B S1-C AUX
Maintenance (Service) Open Closed Open Open
Test (Bypass) Closed Closed Open Open
On Line (Transition) Closed Closed Closed Open
On Line (Normal) Closed Open Closed Closed
When the External Maintenance Bypass switch is in Bypass or Maintenance position, the UPSC will
assert the bypass contactor close signal and the output contactor open signal. It will also turn on the
SBS. Automatic Retransfer operations will be disabled.
If the External Maintenance Bypass switch rotates from the Bypass or Maintenance to the Normal
position, then the UPSC will keep the bypass in the ON state, thus keeping the critical bus powered
via the bypass source. The user will be able to issue a “Manual Transfer to Inverter” command provided the retransfer conditions are satisfied. The user can also issue a shutdown or a start command.
If the External Maintenance Bypass switch rotates from the Normal to the Bypass or Maintenance
position, the UPSC will assert the bypass contactor close signal and the output contactor open signal.
It will also turn on the SBS. Automatic Retransfer operations will be disabled.
31
Page 40

External Maintenance Bypass Switch Configurations
The External Maintenance Bypass Switch has three configuration options:
• External maintenance bypass installed with interlock option
• External maintenance bypass installed without interlock option
• Not installed
Table 4 External maintenance switch configuration options
External
Maintenance Switch
Options
Installed with
Interlock Option
Not installed
Installed without
interlock option
Option Auxiliary Contact
Status User Prompt
open = On Test position or
Maintenance position, or jumper
removed
closed = On “ON LINE” position
(default jumper)
open = jumper removed
closed = default jumper
Open = Jumper removed
Closed = default jumper
Prompts the user to rotate to On Line position,
Just before retransfer.
Manual or automatic start (one button) is
allowed all the way to load being On-line
Prompts the user to install jumper just before
retransfer”
Manual or automatic start (one button) is
allowed all the way to load being On-line
Prompts the user to install jumper just before
retransfer”
Prompts the user to verify the switch is in online position before a retransfer is allowed
Operation
Regardless of how the configuration is set, if the auxiliary contacts are open, the user is unable to
issue a retransfer command through the manual transfer / retransfer screen.
If the option is installed and the auxiliary contact status is read as switch is in the Bypass or Maintenance position, the “critical load shutdown” message reads “UPS off”.
Multiple Battery Cabinets
The Npower system offers an option allowing for the installation of more than two battery cabinets.
The option consists of a Multiple Battery Breaker (MBB) board that mounts on the control door and
an Input Contact Isolator (ICI) board that mounts in the option area (See the Multiple Battery
Breaker Option in the options manual.)
The ICI board allows the Npower system to sense multiple battery cabinets, and the MBB board
allows the UPS to support multiple battery cabinets by supplying power to the UVR coil of additional
battery cabinets.
To access the screen for setting the number of battery cabinets in the system, navigate from the
MAIN MENU to CONFIGURATION to SYSTEM SETTINGS, page 3. Select NUMBER OF BATTERY CABINETS to bring up the following password-protected screen.
Figure 29 Set number of battery cabinets screen
NUMBER OF BATTERY CABINETS
MIN MAX
1 6
Set the number of battery cabinets by changing the number in the highlighted box. Pressing SELECT
will save this information and return Operator to the System Settings Screen.
32
Page 41

3.3.3 Shutdown
To shut down the UPS, navigate to the MAIN MENU, and select STARTUP/SHUTDOWN. This
action will display the STARTUP/SHUTDOWN screen. From there, highlight USER SHUTDOWN
and press SELECT. The following figure will appear.
Figure 30 User shutdown screen
The Operator can invoke two types of shutdowns from this interface screen:
• Transfer Load (Inverter Off). Selecting this option transfers the load to Bypass and turns off the
Rectifier and Inverter.
• Critical Load Shutdown. Selecting this option enables a total system shutdown for purposes of
servicing or repair. The critical load will be dropped once the command is acknowledged by the
controls. Once the Operator has initiated this command, a final warning message will be issued
that “The UPS load will be dumped if you continue.” If accepted (“Continue”), the system will shut
down.
Operation
USER SHUTDOWN
INVERTER OFF
CRITICAL LOAD SHUTDOWN
EXIT
When Operator selects TRANSFER LOAD (INVERTER OFF), the MANUAL TRANSFER/
RETRANSFER screen is displayed. This allows the Operator to transfer the critical load in and out of
the static switch bypass. This screen can be accessed only when the rotary switch is in Normal position. The screen is accessed from the MAIN MENU.
Figure 31 Manual transfer / retransfer screen when transfer is allowed
MANUAL TRANSFER / RETRANSFER
BYPASS OK
INVERTER OK
INT. BYP. SWITCH NORMAL
EXT. MAINT. SWITCH ON-LINE
INVERTER LAG 1 DEGREE
TRANSFER TO BYPASS
OK
Figure 32 Manual transfer / retransfer screen when transfer is not allowed
EXIT
MANUAL TRANSFER / RETRANSFER
BYPASS NOT OK
INVERTER OK
INTERNAL BYPASS SWITCH NORMAL
EXT. MAINT. SWITCH ON-LINE
INVERTER IN SYNC
TRANSFER NOT ALLOWED
OK EXIT
33
Page 42

The message Retransfer to UPS or Transfer to Bypass will appear depending on status of the critical
load. The operator has two choices: Either to accept OK or EXIT. If a transfer or retransfer is not
allowed, the FLASHING message Transfer Not Allowed is displayed. Press EXIT to return to the
MAIN MENU.
For more information, see 3.3.6 - Manual Transfer.
3.3.4 Status Reports
Status Reports contain sequential information about fault and alarm signals. To access the Status
Report screens, navigate to the MAIN MENU and highlight STATUS REPORTS. Press the Select
button and the following STATUS REPORTS screen is displayed
Figure 33 Status report screen
STATUS REPORTS
HISTORY LOG 1
HISTORY LOG 1
HISTORY LOG 2
HISTORY LOG 2
Operation
SYSTEM STATUS
CLEAR HISTORY LOGS
CLEAR EVENT LOG
EXIT
The Status Report screen is divided into six submenus: EVENT LOG, HISTORY LOG 1, HISTORY
LOG 2, SYSTEM STATUS, CLEAR HISTORY LOGS, and CLEAR EVENT LOGS.
To look at any of the reports, do the following:
1. From the Status Reports screen, press the Up or Down button to move the highlighted cursor to
the desired selection.
2. Press the Select button to view the desired report page.
To return to the Main Menu, highlight EXIT and press Select.
NOTE
The Event Log and History Log reports can be displayed on a remote terminal. For more
information see 3.5 - Communication Interfaces.
34
Page 43

Event Log
The Event Log screen displays the faults, alarms, and status messages. Every message will have a
time and date stamp.
The Event Log is a sequence of messages or events captured in individual frames. See the following
section on HISTORY LOGS for more information about frames.
The following three screens show the last 3 in a series of 20 messages. Notice that 20 messages have
accumulated in this example, and that marker moves from right to left as earlier messages are
viewed. The number of events prior to the alarm are displayed by an arrow pointing to the left, and
the number of events following the alarm is illustrated by an arrow pointing to the right. The maximum number of events that can be recorded is 512 events.
To view a previous event, highlight PREV and press SELECT.
Figure 34 Event log report screen showing most recent event
EVENT LOG
MESSAGE:
TYPE: ALARM
INITIATED BY: MICRO MONITOR
SYS TIME SET BY OP
Operation
TOTAL 20
0
19
PREV
Figure 35 Event log report screen showing previous event
NEXT
EXIT
02 : 24 : 21 6 / 10 / 00
EVENT LOG
MESSAGE:
TYPE: ALARM
INITIATED BY: MICRO MONITOR
Figure 36 Event log report screen showing previous event
UPSC - MM COMMUNICATION FAIL
PREV
NEXT
EXIT
02 : 23 : 21 6 / 10 / 00
EVENT LOG
MESSAGE:
TYPE: ALARM
INITIATED BY: MICRO MONITOR
SYS TIME SET BY OP
TOTAL 20
1
18
TOTAL 20
2
17
PREV
NEXT
EXIT
02 : 20 : 21 6 / 10 / 00
35
Page 44

Operation
History Logs
The History log contains pertinent data recorded just before and after an event that triggers a significant action such as an inverter failure.There are two History logs, each consisting of 64 frames. Each
frame is a sequential snapshot of UPS-generated parameters. The UPS records these frames continuously at 4 millisecond intervals during normal operation. When a fault occurs, the UPS stores 40
frames prior to the triggering event, the frame of the triggering event, and 23 frames immediately following the triggering event.
The frames are numbered -40 +23 with frame 0 designated as the triggering event that initiates the
fault or alarm condition. The Operator can go back 40 frames from the triggering event and forward
23 frames.
There are nine possible triggering events:
• Rectifier fail
• Battery Low Transfer
• Output Overvoltage Transfer
• Output Undervoltage Transfer
•Inverter Fail
• Inverter Overload Transfer
• Heatsink Overtemp Limit
• Outlet Air Overtemp Limit
• Fault Load Transfer to Bypass
The data logged in each frame consists of metering data, machine status information, active faults/
alarms and fault/alarm conditions.
Figure 37 History log metering report screen
HISTORY LOG 1 P1 - METERING
OUT-V OUT IN-V IN LOAD
(L - N) (I) (L - L) (I) ( KVA) ( KW)
A
B
C
The default page is the METERING page, which provides the following data:
• 3 phase Output Volts (L-N)
• 3 phase Output I (amps)
• 3 phase Input volts (L-L)
• 3 phase Input I (amps)
• 3 phase load kVA
• DC Bus Volts, DC I (charge + discharge -)
• Input Frequency and Output Frequency
•Battery Temperature
120 10 208 52 74 59
120 10 208 52 74 59
120 10 208 52 74 59
PREV
NEXT
STATUS
ALARMS
14 : 18: 49 02 / 10 / 00
DC
FREQ
(HZ)
540 V
+ 65 A
60.0 OUTPUT
60.0 INPUT
124 C
EXIT
FRAME 0
36
Page 45

The second page is the STATUS, which includes:
• Static Bypass Switch Line (Open/Closed)
• Static Bypass Switch Load (Open/Closed)
• Input Contactor (Open/Closed)
• Output Contactor (Open/Closed)
• Trap Filter (On/Off) (If installed)
• Int. MBP (Normal/Bypass Service)
• Ext. MBP (Open/Closed)
• Battery CB (Open/Closed)
•SBS (On/Off)
• Rectifier (On/Off)
• Inverter (On/Off)
Figure 38 History log status report screen
Operation
HISTORY LOG 1 P2 - STATUS
SBS LINE
SBS LOAD
INP DELTA
OUTPUT
PREV
The last page includes faults. The alarm conditions that cause the History Status buffer to store and
freeze data are:
• Rectifier fail
• Battery Low Transfer
• Output Overvoltage Transfer
• Output Undervoltage Transfer
•Inverter Fail
• Inverter Overload Transfer
• Heatsink Overtemp Limit
• Outlet Air Overtemp Limit
• Fault Load Transfer to Bypass
• Transfer Failed Shutdown
TRAP
INT. MBP SERVICE
EXT. MBP OPEN
BATT CB OPEN
NEXT
ALARMS
14 : 19: 50 02 / 10 / 00
SBS OFF
RECT. OFF
INV. OFF
EXITMETER
FRAME 0
Figure 39 History log faults/alarms report screen
HISTORY LOG 1 P3 - FAULTS / ALARMS
DC OV TRANSIENT
INPUT OF / UF
14 : 22: 29 02 / 10 / 00
RECTIFIER FUSE FAIL
INPUT OF / UF
PREVNEXT
METER
37
EXITSTATUS
FRAME 40
Page 46

As previously mentioned, faults are shown in reverse video, and alarms in regular video. For a complete list of all the alarm messages and corrective actions for these faults, refer to Table 7 - Alarms,
functions, and corrective actions.
NOTE
The Emergency Off and Hardware Shutdown alarms will also freeze the History Status buffer
with the Auto Transfer to Bypass alarm (if the load is on the UPS system when the alarm
condition occurs).
The History Status buffer does not resume collecting new frames until the fault is cleared.
3.3.5 Configuration Screens
The Configuration Screens are used to set specific parameters or to view settings configured by the
factory or Liebert Global Services (LGS). To access the System Configuration Screens, go to the Main
Menu, move the highlighted cursor to SYSTEM CONFIGURATION, and press Select.
Figure 40 Configuration screen
Operation
CONFIGURATION
SYSTEM SETTINGS
USER SETTINGS
FACTORY SETTINGS
ALARM MASK
CUSTOMER ALARM INTERFACE
EXIT
The System Configuration screen lists parameters that can be changed to adjust your UPS module to
your site requirements. Some of the information displayed is factory set and should only be changed
by LGS. Parameters that can be adjusted by the Operator include date, time, auto dial number, and
modem baud rate.
The System Configuration screen is categorized as a Security Access screen. This means that anyone
may review the present parameters, but only authorized Operators may make changes. See 3.2 -
Security Access and Passwords for more information on Security Access and Passwords.
The first time the UPS is powered up (by LGS), it allows the Operator to navigate through all of the
menu options in order to program the Non Volatile RAM. This is referred to as the COLD START.
Thereafter, only the SYSTEM RATINGS and Operator SETTINGS can be changed without Security
Access.
NOTE
If Operator accidentally sets a site parameter digit to a wrong value, return to the System
Configuration screen, navigate to the desired screen, and re-set.
38
Page 47

System Ratings
System rating parameters are normally entered by the factory or LGS.
To get to the System Ratings screen, begin at the Main Menu. Using the arrow keys, move to Configuration and press SELECT. This brings up the Configuration screen. (See Figure 40).
From the Configuration screen, highlight System Ratings and press SELECT.
Figure 41 System ratings, page 1
Operation
SYSTEM RATINGS
KVA 40
SYSTEM POWER FACTOR 0.8
INPUT VOLTS 480
OUTPUT VOLTS 208
BYPASS VOLTS 480
NOTE
The only time the System Ratings can be changed is when the UPS is first powered up. After
that, they remain locked.
Pressing NEXT at the System Ratings screen will bring up page 2 of System Ratings below.
Figure 42 System ratings, page 2
NEXT
SYSTEM RATINGS
DC BUS VOLTS 540
INPUT FREQUENCY 60.0
OUTPUT FREQUENCY 60.0
PREV
EXIT
EXIT
39
Page 48

System Settings
The System Settings are multiple screens that are used for setting the date, time, language, ID number, Tag number and other parameters.
The first page of the System Settings screen can be accessed by highlighting Systems Settings on the
Configuration screen (Figure 40) and pressing SELECT.
Figure 43 System settings screen, page 1
Operation
SYSTEM SETTINGS
Date
To set the system date:
• From the System Settings screen, press the Up or Down button to move the highlighted cursor to
DATE.
• Press Select. The DATE screen will appear.
• Press Select to move the arrow to the next digit to the right. When the arrow is on the digit to be
changed, press the Up button to increase the number or the Down button to decrease it. Press
Select to set the value and move to the next digit.
• After the correct month/day/year has been set, press Select again to return to the System Configuration screen.
Figure 44 Date setting screen
DATE
TIME
01/05/2001
11: 16: 441
LANGUAGE ENGLISH
ID NUMBER 00000000
TAG NUMBER 00000000
NEXT
SAVE & EXITCANCEL
CURRENT DATE
40
Page 49

Time
To set the system's real time clock, do the following:
1. From the System Configuration screen, press the Up or Down button to move the highlighted
cursor to TIME.
2. Press SELECT. The TIME screen will appear.
3. Press SELECT to move the arrow to the next digit to the right.
4. When the arrow is on the digit to be changed, press the Up or Down button to increase or decrease
the hour/minute/ second number. Press SELECT to set the value and move to the next digit.
5. After the correct hour/minute/second has been set, press SELECT again to return to the System
Configuration screen.
NOTE
1. Precise Date and Time functions are required for accurate archival and event history
purposes.
2. Both the Date and Time can be set from a remote terminal. Refer to Section 3.5 -
Communication Interfaces.
Figure 45 Time setting screen
Operation
CURRENT TIME
Figure 46 System settings, page 2
ORDER NUMBER 00000000
SYSTEM CONFIG SMS
SYSTEM / MODULE 1
NUMBER OF MODULES IN SYSTEM 1
NUMBER OF BATTTERY CABINETS 1
NEXT
To continue configuring the system, highlight NEXT and press SELECT.
SYSTEM SETTINGS
SAVE & EXITCANCELPREV.
41
Page 50

Figure 47 System settings, page 3
Operation
SYSTEM SETTINGS
SINGLE / DUAL INPUT
OUTPUT TRANSFORMER BYPASS WIND. NO
BYPASS AUTO TRANSFORMER T3 NO
OPTIONS . . .
COMM. OPTIONS . . .
The Single / Dual Input Screen is password protected. (See 3.2 - Security Access and Passwords
for more information on Security Access and Passwords.) After highlighting Single / Dual Input from
the System Settings Screen, and pressing SELECT, the following screen will appear.
Figure 48 Enter password screen
CANCELPREV.
SAVE & EXIT
ENTER PASSWORD
DUAL
You must enter your secure password to access the next screen. The position of each of the four digits
of the password is indicated by the mark below the zero. The system will remain password free for five
minutes, allowing changes to be made.
Highlighting either Single or Dual and pressing SELECT saves changes and returns the Operator to
the System Settings screen.
Figure 49 Single /dual input screen
SINGLE / DUAL INPUT
42
Page 51

Options
This multiple-page screen, accessed from the third page of the SYSTEM SETTINGS screen, enables
and disables optional features which might or might not be installed in your UPS. To enable or disable one of these options, do the following:
1. Highlight the option you wish to enable or disable.
2. Press UP or DOWN to toggle between enabled or disabled.
3. Press SELECT to set the desired status.
NOTE
Some of the options appearing on the following screens are reserved for future development.
Figure 50 Options screen, page 1
Operation
OPTIONS
ACTIVE FILTER NO
LBS NO
GENERATOR NO
AUTO RESTART NO
NEXT
NEXT
Highlighting 10% PASSIVE OPTIONS and pressing SELECT will bring up the following screen
allowing the Operator to decide whether or not the input trap filter should be disconnected at light
loads to prevent a leading power factor at the input. For more information, see Input Trap Filter in
the options manual.
Figure 51 10% passive filter settings screen
10% PASSIVE FILTER SETTINGS
FILTER DISCONNECT LEVEL 0
FILTER PREFERRED STATE CLOSED
10% PASSIVE FILTER CONTACTOR DISABLE
EXIT
EXIT
43
Page 52

Figure 52 Options screen, page 2
12 PULSE RECTIFIER 6 PULSE
BATTERY GND FAULT NO
GREEN MACHINE NO
FREQUENCY CONVERTER NO
LINE DROP COMPENSATION NO
Operation
OPTIONS
Figure 53 Options screen, page 3
ALTERNATE POWER POLE FAN NO
AUX. TEMP. NO
SFA NO
MOTORIZED BATT. BREAKER MANUAL
BATT. CELL MONITOR NO
NEXT
Figure 54 Options screen, page 4
NEXT
PREV. EXIT
OPTIONS
PREV.
OPTIONS
EXIT
EXTERNAL MAINT. BYPASS NO
PREV
EXIT
44
Page 53

Communication Options
Communication options are the various options that enable the operator to view data from remote
locations and to program the type of data to be viewed. For detailed information, see Section 3.5 -
Communication Interfaces.
The communication options screens can be accessed from the third page of the System Settings
screen. (See Figure 47.)
Figure 55 Communication options Screen, page 1
COMMUNICATION OPTIONS
Operation
The Internal Modem Option allows the system to dial out or receive incoming calls. To set dialing features, and to enable internal or external modem, press MODEM on the first page of the Communications Options screen. The Auto Dial screen will be displayed.
Figure 56 Auto dial screen
MODEM
DISABLED
PROGRAMMABLE RELAY #1 YES
PROGRAMMABLE RELAY #2 YES
INPUT CONTACT ISOLATOR YES
REMOTE ALARM #1 YES
NEXT
EXIT
AUTO DIAL
MODEM
PRIMARY LINE
SECONDARY LINE
INIT. STRING ATSO = 1
MAX. BAUD RATE 2400
INTERNAL
NEXT
To get to the Modem Selection screen, highlight MODEM and press SELECT. The following screen
will come up showing that the modem is disabled.
Figure 57 Modem selection screen
EXIT
D I SA BLED
EXTERNAL
INTERNAL
DISABLED
45
Page 54

To enable the modem, highlight INTERNAL or EXTERNAL and press SELECT. The Auto Dial screen
will return (Figure 56) except instead of DISABLED, the message will read INTERNAL or EXTERNAL.
After enabling the modem, the Operator can proceed to configure Auto Dial settings at the AUTO
DIAL screen. To input the phone number for the primary line, highlight PRIMARY LINE and press
SELECT. The Operator can input up to 20 digits.
In a similar manner, the Operator can input the numbers for the secondary line.
To set the initialization string, highlight INIT STRING and press SELECT. The default for the internal modem is ATS0 = 1. To change this setting, highlight INIT. STRING. After making the change,
press SELECT repeatedly until the cursor moves to the end of the line. Pressing SELECT one more
time will return the previous screen. Figure 56 - Auto dial screen. Consult the owner’s manual for
the external modem for help in setting the initializing string for this modem.
Next, the Operator can change the setting for the maximum baud rate by highlighting MAX BAUD
RATE and pressing SELECT. A screen will appear allowing the Operator to select 2400 or 9600.
From the Auto Dial screen, the Operator can access the second page by bracketing NEXT, and pressing SELECT. This action will bring up the following screen.
Figure 58 Auto dial screen, page 2
Operation
AUTO DIAL
MODEM HEALTH CHECK EVERYDAY
AUTO DIAL IN YES
AUTO DIAL OUT YES
PAGER NO
The settings for Modem Health Check, Auto Dial In, and Auto Dial Out, can be changed by highlighting the item and pressing SELECT, which will bring up the appropriate screen
To enable the pager and configure settings, highlight PAGER and press SELECT. The following
screen will come up.
Figure 59 Pager support configuration
PAGER SUPPORT CONFIGURATION
PAGER ENABLED
PAGER NUMBER
PAGER PIN 8773886786
A password is required to enter a pager number and change the pager pin number. See Figure 48
and Section 3.2 - Security Access and Passwords. Press SELECT will return the Operator to the
Communications Options Screen. (See Figure 55.) To go to the second page of the Communications
Options Screen, bracket NEXT and press SELECT. The following screen will come up.
46
Page 55

Figure 60 Communications options screen, page 2
COMMUNICATION OPTIONS
REMOTE ALARM #2 NO
REMOTE ALARM # 3 NO
SITESCAN
NIC NO
AS 400
Operation
NO
NO
NEXT
Select NEXT to go to the Communication Options screen, third page.
User Settings
The User Settings are accessed from the Configuration Screen (Figure 40).
Figure 61 User settings screen, page 1
OUTPUT PLL PHASE ADJUST 0.0
OUTPUT PLL SLEW RATE 0.5
OUTPUT PLL SYNC RANGE 1.0
DC BUS FLOAT VOLT 540
BATT. CHARGE I LIMIT 1.6
NEXT
Figure 62 User settings screen, page 2
PREV.
USER SETTINGS
CANCEL
EXIT
SAVE & EXIT
NEXT
USER SETTINGS
BATT. TIME LOW WARNING 5
BATT. TIME (T 1) AT 100% 15
BATT. TIME (T 2) AT 50% 45
BATT. EOD LOWER SET POINT 384
BATT. EOD UPPER SET POINT 427
PREV.
CANCEL
47
SAVE & EXIT
Page 56

Figure 63 User settings screen, page 3
A
BATT. EOD RAMP START 15
BATT. EOD RAMP END 60
BATT. TEMP. ALARM LIMIT 40
BATT. COMPARTMENT TEMP. LIMIT 50
INPUT PLL PHASE ADJUST 0.0
Operation
USER SETTINGS
NEXT
Figure 64 User settings screen, Page 4
INPUT PLL SLEW RATE 0.5
INPUT PLL SYNC RATE 1.0
INPUT I LIMIT WALK-IN 10
LCD CONTRAST
LED BRIGHTNESS
NEXT
Figure 65 User settings screen, page 5
USER SETTINGS
LARM AUDIO LEVEL
AUX. TEMPERATURE LIMIT 40
AUTO REXFER COUNTER / HR. 5
BATT. GND FAULT BREAKER TRIP YES
10 % PASSIVE FILTER SETTINGS
PREV.
CANCEL
USER SETTINGS
PREV.
CANCEL
SAVE & EXIT
SAVE & EXIT
NEXT
CANCELPREV
48
SAVE & EXIT
Page 57

Highlighting 10% PASSIVE FILTER SETTINGS will bring up the following Operator--interactive
screen.
Figure 66 10% Passive filter settings screen
10 % PASSIVE FILTER SETTINGS
FILTER PREFERRED STATE OPEN
10 % PASSIVE FILTER ENABLED
Figure 67 User settings screen, page 6
USER SETTINGS
Operation
EXIT
AUTO RESTART SETTING SYSTEM
ACTIVE FILTER ENABLE ENABLED
TEMPERATURE BATT. CB TRIP NO
CHANGE PASSWORD
INTERRUPTED TRANSFER ENABLE DISABLE
PREV.
Factory Settings
Figure 68 Factory settings screen
OUTPUT AC VOLTS AN 120
OUTPUT AC VOLTS BN 120
OUTPUT AC VOLTS CN 120
OUTPUT OF / UF 0.5
INVERTER DC OFFSET PHASE A
NEXT
CANCEL
SAVE & EXIT
FACTORY SETTINGS
CANCEL
SAVE & EXIT
49
Page 58

Figure 69 Factory settings screen, page 2
INVERTER DC OFFSET PHASE B
INVERTER DC OFFSET PHASE C
INPUT I LIMIT WITH TRAP 164.1
INPUT I LIMIT WITHOUT TRAP 190.8
INPUT I LIMIT ON GENERATOR 100
Operation
FACTORY SETTINGS
NEXT
NEXT
Figure 70 Factory settings screen, page 3
INPUT PID LOOP
ON GENERATOR DELAYED RESTART 10
BYPASS / OUTPUT PHASING 30
PREV.
Alarm Mask
The Alarm Mask sets parameters for all alarms that affect the UPS and output channels. The programmable attributes are described below. The letters L, D, F and E in Figure 71 refer to these features, allowing the operator to determine their status.
Latching
This option latches the alarm when it occurs. Latching alarms will not automatically clear from the
screen when the alarm condition ends, and must be cleared from the screen by the operator.
PREV.
CANCEL
SAVE & EXIT
FACTORY SETTINGS
CANCEL
SAVE & EXIT
Dial
When an alarm condition occurs, and the system has an Auto Dial option, the system will dial out to a
designated number in accordance with the Dial Out (Auto Dial) instructions set in the UPS. See
AUTO DIAL on page 52 for more information on this feature.
Freeze
This feature will freeze the History Log Buffer(s) if an alarm is detected. This feature is used mainly
for diagnostic purpose by Liebert Global Services and Engineering.
Event Logging
The list of alarms that can be masked are shown in Table 7. Most Events are automatically logged
into the Event History Buffer. Events that can be selected or deselected by the user are:
Input Line Fail
Input Under Voltage
Input Over Voltage
Bypass Sync Error
Bypass Voltage Out of Tolerance
Bypass Line Fail
Input Contact Alarms (if this option is installed)
50
Page 59

Delay
g
This refers to the time in seconds that must occur before the UPS recognizes an alarm function. The
delay can be anywhere from 0 to 99.9 seconds in 0.1 second intervals. If an alarm is set to Latch, it
will only recognize the alarm and latch after the delay period.
Figure 71 Alarm / fault name screen
ALARM / FAULT NAME L D F E
Operation
ALARM / FAULT NAME
BATT. FUSE FAIL Y Y N Y
BATT. LOW TRANSFER Y Y Y Y
Y Y N Y
DC OV TRANSIENT Y Y Y Y
INPUT PHASE ROT ERROR N N N Y
RECTIFIER FUSE FAIL Y Y Y Y
RECTIFIER DRIVE 1 FAIL Y Y Y Y
UP EXIT DESCRIPTION: L - Latchin
The Alarm / Fault Name Screen can be accessed from the Configuration Screen (Figure 40) by highlighting Alarm Mask and pressing SELECT.
When the Alarm / Fault Name Screen is displayed, the highlighted alarm will be flashing. (In the figure above, BATT. FUSE FAIL will be flashing.) The DESCRIPTION at the bottom of the screen
defines the letters L, D, F, and E. The DESCRIPTION scrolls from right to left, allowing the Operator
to see the entire list of features.
The Operator can determine the status of the Latching, Dial, Freeze and Event Log Mask, and change
certain attributes by following these steps.
NOTE
When additional navigational choices (UP, DOWN, and SELECT) appear at the bottom of the
display screen, the customary rules change slightly.
1. Select the alarm to be viewed.
a. To scroll down the list, highlight DOWN on the display screen and press the SELECT button.
Continue pressing SELECT until the appropriate alarm is moved to the top position on the
screen. Then use the arrow keys to highlight SELECT on the display screen. Press the
SELECT navigation button to bring up the Edit screen below.
b. To scroll up the list, highlight UP on the display screen and proceed as in a.
2. After editing the first alarm, select the next alarm to be viewed, and proceed as in the steps above.
DOWN
SELECT
...D - Dial...
Figure 72 Alarm edit screen
ALARM / FAULT NAME
LATCHING YES
DIAL YES
FREEZE NO
EVENT LOG YES
SAVE & EXIT
CANCEL
BATTERY FUSE FAIL
51
Page 60

Operation
To change the programmable attributes, highlight the attribute to be edited and press the SELECT
button. This action brings up a screen allowing the Operator to toggle between YES and NO.
NOTE
Some attributes cannot be edited.
AUTO DIAL
The Npower UPS can automatically dial (through the optional modem) each of two pre-programmed
telephone numbers (up to 12 digits) when specified alarm conditions occur within the UPS system.
The Npower attempts to dial the first number three times at 45 second intervals. If there is no
answer, the system rolls over to the second number and repeats the process. If there is no answer on
the second number, the system goes back to the first number, repeating the process. The system continues this sequence until connected or disabled.
Upon connection, the system transmits data, in ASCII format, that includes the system identification
code, the present alarm message(s) and the time that the alarm(s) occurred. Refer to 3.5 - Communi-
cation Interfaces.
Refer to the Special Functions column in Table 7 - Alarms, functions, and corrective actions to
see which alarm messages will initiate an auto-dial call.
If the auto-dial numbers were specified at time of order, the numbers are pre-programmed into the
system. However, if the numbers need to be changed, follow these steps:
1. From the System Configuration screen, press the Up or Down button to move the highlighted
cursor to Auto Dial and press SELECT.
2. The Auto Dial screen will appear. Highlight and select the first Auto Dial Number.
3. Press SELECT to move the arrow to the right.
4. To change a digit, press Up to increase the number or press the Down button to decrease it. Press
Select to set the value and move to the next digit.
5. After changes have been made, press SELECT again to return to the System Configuration
screen.
6. If required, go to the Second Number screen and enter the correct number.
7. If required, go to the Modem Baud Rate screen and choose from the available baud rates.
Customer Alarm Interface
The Npower UPS offers a Programmable Relay Board option allowing the Operator to program certain alarms or events to activate single or multiple output relays. (See Section 6 in the Options manual.) In addition to the user-defined programming capability of the system, the Npower offers two predefined relay assignments: AS400, where only the first 3 relay assignments are pre configured (with
the other 5 assignments available for user definition, and Standard Set, where the first 7 relays are
assigned with the remaining one left unprogrammed. (The 8th assignment is not available for user
definition.)
This means that the Operator can choose among the following three configurations for each of the two
Programmable Relay Boards.
•AS400
•Standard Set
•User Defined
The default configuration is User Defined.
To access the proper screen for configuring the Programmable Relay Boards:
1. Navigate from the MAIN MENU to the CONFIGURATION screen.
2. From the CONFIGURATION screen, use the arrow keys to highlight CUSTOMER ALARM
INTERFACE and press SELECT.
This action will bring up the following screen.
52
Page 61

Figure 73 Customer alarm interface screen
CUSTOMER ALARM INTERFACE
RELAY BOARD # 1 AS400
RELAY BOARD # 2 NOT INSTALLED
CONTACT BOARD
Operation
NEXT
If there is no board, the “NOT INSTALLED” message is displayed.
3. Pressing NEXT will bring up the second page.
Figure 74 Customer alarm interface screen, page 2
CANCEL
SAVE & EXIT
CUSTOMER ALARM INTERFACE
REMOTE LED BOARD # 1.....................................
REMOTE LED BOARD # 2.....................................
REMOTE LED BOARD # 3
PREV
To access the Programmable Relay Board #1, highlight RELAY BOARD #1 from the first page of the
CUSTOMER ALARM INTERFACE screen and press SELECT to bring up the following screen.
Figure 75 Programmable output relay board #1, AS400 assignment
CANCEL
SAVE & EXIT
PROGRAMMABLE OUTPUT RELAY BOARD # 1
RELAY ASSIGNMENTS...........................AS400
PROGRAMMABLE RELAY # 1
PROGRAMMABLE RELAY # 2
PROGRAMMABLE RELAY # 3
The AS400 pre-assigned relays are shown in this screen.
CANCEL
BATTERY DISCHARGING
LOW BATTERY WARNING
LOAD ON UPS / LOAD ON BYPASS
SAVE & EXIT
53
Page 62

To change the relay assignment, select RELAY ASSIGNMENTS from the screen and press SELECT.
The following screen will appear.
Figure 76 Relay assignments
RELAY ASSIGNMENTS
AS400
STD SET
USER DEFINED
If you select STD SET, the following screen will be displayed.
Figure 77 Programmable output relay board, standard set
PROGRAMMABLE OUTPUT RELAY BOARD # 1
Operation
RELAY ASSIGNMENTS...........................STD SET
PROGRAMMABLE RELAY # 1
PROGRAMMABLE RELAY # 2
PROGRAMMABLE RELAY # 3
PROGRAMMABLE RELAY # 4
CANCEL
Figure 78 Programmable output relay board, standard set, page 2
LOAD ON UPS
LOAD ON BYPASS
BATTERY DISCHARGE
LOW BATTERY WARNING
SAVE & EXIT
PROGRAMMABLE OUTPUT RELAY BOARD # 1
RELAY ASSIGNMENTS...........................STD SET
PROGRAMMABLE RELAY # 5
PROGRAMMABLE RELAY # 6
PROGRAMMABLE RELAY # 7
PREV
OVERLOAD
AMBIENT OVER TEMP
SYS SUMMARY ALARM
SAVE & EXIT
54
Page 63

If the Operator selects USER DEFINED from the RELAY ASSIGNMENTS screen, the following
screen will come up.
Figure 79 Programmable output relay board, user defined
PROGRAMMABLE OUTPUT RELAY BOARD # 1
RELAY ASSIGNMENTS...........................USER DEFINED
Operation
PROGRAMMABLE RELAY # 1
PROGRAMMABLE RELAY # 2
PROGRAMMABLE RELAY # 3
PROGRAMMABLE RELAY #4
CANCEL
All User Defined relays are programmable.
NOTE
Alarms have a separately programmable function that allows them to be latching or nonlatching. If the alarm is latched, then the programmable relay will also latch until the alarm is
reset.
To begin programming the User Defined Relays, highlight the relay to be programmed and press the
SELECT button. This action will bring up the List of Alarms/Faults screen. (Figure 80). Initially, the
box beneath the relay will be empty.
To attach an alarm to each relay, follow the steps under Navigating Protocol on page 56.
CAUTION
!
Navigating through screens with additional navigational selections at the bottom of the
display screen is slightly different from navigation involving only the navigation buttons
below the display screen. Specific instruction is given below.
PROGRAMMABLE RELAY #5
PROGRAMMABLE RELAY #6
PROGRAMMABLE RELAY #7
PROGRAMMABLE RELAY #8
SAVE & EXIT
Figure 80 List of alarm faults screen
ALARM / FAULT NAME
BATT. FUSE FAIL
BATT. LOW XFER
DC OV TRANSIENT
INP PHASE ROT ERROR
RECT. FUSE FAIL
RECT DRIVE 1 FAIL
UP
The alarm at the top of the screen will be flashing.
NOTE
If the Npower has Open Comms-Discrete Inputs (Input Contact Isolators, Section 7 of the
Options Manual, these will show up on the alarm list and can be selected to connect to a
programmable output relay.
DOWN
PROG RELAY # 1
BATTERY FUSE FAIL
CLEARREMOVEADD
EXIT
55
Page 64

Operation
Navigating Protocol
For the screen above and others like it, the normal screen navigation rules are changed. It is important to differentiate between the selections at the bottom of the display screen (UP/DOWN/ADD/
REMOVE/CLEAR/EXIT) and the navigation buttons or arrow keys below the display screen. To scroll
up the Alarm/Fault list, use the arrow keys to highlight the UP selection at the bottom of the display
screen. Next, press the SELECT navigation button. Continue this sequence until you have positioned
the proper Alarm/Fault in the active position at the top of the list. To scroll down the list, use the
arrow key to highlight the DOWN selection at the bottom of the display screen. Next, press the
SELECT navigation. Continue until the proper alarm is positioned at the top of the list.
When the selected Alarm/Fault is in the active position at the top of the list, it will be flashing. To
attach this alarm to a Programmable Relay, use the arrow keys to highlight ADD at the bottom of the
display screen. Press SELECT and your selection will now appear in the right hand box.
You may attach up to four alarms to each relay by following this procedure. Since there are almost
200 alarms, it is advised that you review the entire list and note which alarms you want connected to
each relay before beginning your selections. Keep in mind that if you attach more than 1 alarm to the
relay, and the relay is triggered, you will not be advised which of the alarms is activated. You may be
able to determine this through other diagnostic features of the Npower, but it will not be evident from
this feature.
If you decide to remove an alarm from the selected alarm set, scroll the list to put the alarm you want
to remove in the top (flashing) position on the ALARM/FAULT NAME list. Use the arrow keys to
move the cursor to REMOVE. Press SELECT to remove the alarm from the right hand (connected)
list.
If you wish to clear all the alarms and start over, move the cursor to CLEAR and press SELECT.
After you have selected the alarms you want connected to PROG RELAY #1 use the arrow keys to
move the cursor to EXIT, press SELECT. This will put you back to the PROGRAMMABLE OUTPUT
RELAY BOARD # 1 screen. Follow the procedure above to program the next relay. When all of the
relays you wish to program have been completed, highlight SAVE & EXIT and press SELECT.
CAUTION
!
You must select save & exit from the programmable output relay board screen or your
selections will not be saved.
If you have a second relay board installed, from the CUSTOMER ALARM INTERFACE screen,
repeat the same procedures for RELAY BOARD # 2.
3.3.6 Manual Transfer
The Manual Transfer screen allows the Operator to transfer the critical load to and from bypass
through the static bypass switch. This screen can only be accessed when the rotary switch is on Normal position. To access the screen, start at the MAIN MENU. Highlight MANUAL TRANSFER and
press SELECT. There are 3 status options for the Inverter: In sync, lag x degrees, and lead x degrees.
The message Retransfer to UPS or Transfer to Bypass will appear depending on status of the critical
load. The Operator can proceed with the transfer/retransfer by highlighting OK and pressing
SELECT or EXIT. If a transfer or retransfer is not allowed, the FLASHING message Transfer Not
Allowed is displayed and the only option is to Exit. If the Operator chooses to Exit, the screen returns
to the Main Menu.
Figure 81 Manual transfer / retransfer screen when transfer is allowed
MANUAL TRANSFER / RETRANSFER
BYPASS OK
INVERTER OK
INT. BYP. SWITCH NORMAL
EXT. MAINT. SWITCH ON-LINE
INVERTER LAG 1 DEGREE
OK
TRANSFER TO BYPASS
EXIT
56
Page 65

Figure 82 Manual transfer / retransfer screen when transfer is not allowed
MANUAL TRANSFER / RETRANSFER
BYPASS NOT OK
INVERTER OK
INTERNAL BYPASS SWITCH NORMAL
EXT. MAINT. SWITCH ON-LINE
INVERTER IN SYNC
TRANSFER NOT ALLOWED
OK EXIT
In the figure above, the message “TRANSFER NOT ALLOWED” will be flashing.
3.3.7 Battery Management
The Battery Management screens display information on battery self tests, battery equalization, battery temperature, and battery cycle monitoring. This information enables the operator to immediately
see the effects of load shedding on time remaining and to accurately assess remaining power
resources. The Battery Management screen is accessed from the Main Menu.
Figure 83 Battery management screen
Operation
BATTERY TEST
BATTERY EQUALIZER
BATTERY TEMP COMPENSATION CHARGE
BATTERY CYCLE MONITOR
BATTERY TIME REMAINING
Battery Test
The Battery Test screen allows the Operator to select between Auto Test and Manual Test.
Figure 84 Battery test screen
LAST BATTERY TEST: BATTERY TEST PASSED
BATTERY MANAGEMENT
SAVE & EXITCANCEL
BATTERY TEST
MANUAL TEST
The auto battery self test can be enabled / disabled from the Battery Test Screen. It is performed
unattended by programming Time, Date, Test Cycle and Test Duration in Battery Self Test Screen.
Selecting MANUAL TEST from the Battery Test screen will perform an Operator-initiated test.
EXIT
57
Page 66

Operation
The following conditions and features apply to either Auto or Manual Mode:
• If you go to the battery screen, it will indicate “Battery Test in Progress”. When the test is complete, the indication “Last Battery Test” will either say “Battery Test Passed” or “Battery Test
Failed.”
• One of two alarms are logged in the event log screen: “Battery Test Passed” or “Battery Test
Failed”. If failed, there will be accompanying alarm messages in the event log to describe the reason for failure. (i.e. Battery Recharging). “Battery Test Failed” message is also latched in the
active alarm/fault window of the Mimic screen.
• There are a number of pre-conditions which must exist before it is possible to start a battery test:
• The Battery CB, Input and Output contactors must all be closed.
• All phases of Input and Bypass volts must be within defined limits of 80% to 115%.
• Battery Charge must be greater than 90%.
• The test is interlocked to “Batt Ov Temp Warning” alarm. When this alarm is present, battery
test won’t start.
• DC volts must be greater than the DC Bus Float Voltage of 540 VDC.
• A load must be greater than 15% of rated kVA.
• The On Generator status must be False.
• Input frequency must be within limits.
• Auto and Manual tests are interlocked; only one can be active at a time.
• The recommended default time settings based on the battery size are shown in the table below.
Table 5 Default time settings
Battery Type Test Duration
15 Minute 1 Minute
30 Minute 2 Minutes
45 Minute 3 Minutes
60 Minute 4 Minutes
75 Minute 5 Minutes
90 Minute 6 Minutes
The factory default setting is 60 seconds and can be set between 30 to 900 seconds.
The test starts by commanding the rectifier control circuit to lower the Rectifier output voltage. The
rectifier stays on, but is phased back. This means the Rectifier is still available to support the load if
the battery fails.
A battery test will be aborted if any of the following become true:
• The battery Over-Temperature Warning becomes active.
• Battery CB, Input or Output contactors open.
• Any phase of the Bypass or Input volts exceeds the limit of 80% and 115%.
• If the battery voltage falls too quickly during the test.
Figure 85 Automatic test screen
AUTO TEST
BATT. TEST TIME 01:02:03
BATT. TEST DATE 07/13/00
CYCLE 2
DURATION 30
EXIT
58
Page 67

To enable the Auto Battery Self Test, Select “Auto Test Enable” from the Battery Test screen. Next,
set the Date and Time at which the first test will be performed. Set the Test Cycle period in weeks.
(The range is 2-9 weeks and the default is 2 weeks.) Finally, set the Test Duration time in seconds
according to the table above. The range is 30-900 seconds and the default is 60 seconds. Use the UP
DOWN navigation buttons to change the cursor position when setting battery parameters.
Figure 86 Set battery cycle screen
MIN 2 MAX 9
Figure 87 Set battery duration screen
BATTERY CYCLE
WEEK S
2
Operation
BATTERY DURATION
MIN 30 MAX 900
SECONDS
Battery Equalizer
In order to prolong battery life, the Npower system provides a User-programmable setting after each
battery discharge. The equalize setpoint is typically set to a higher float voltage.
When the input utility power is interrupted, the battery supplies DC power to the inverter so there is
no interruption of power to the critical load. When the AC input power is restored, the battery equalize recharging circuit can be activated automatically or manually to increase the rectifier/charger output voltage to recharge the battery. The battery equalize circuit may also be manually activated at
any time during normal float (constant) voltage operation. The equalizing time can be adjusted from 0
to 72 hours. The default setting is 0. A setting of 0 is interpreted as if the feature were disabled.
The Battery Equalize screen The battery equalize screen lets the operator change the battery equalize
recharging mode from manual to automatic, and to observe or change the equalize time. To access
this screen go to the MAIN MENU, highlight BATTERY MANAGEMENT, and press SELECT. This
brings up the Battery Management screen. Highlight BATTERY EQUALIZER and press SELECT.
The Battery Equalizer Screen (Figure 88) will appear.
CAUTION
!
The manufacturers of the valve-regulated batteries supplied with Liebert’s standard battery
cabinets recommend that when first installed the batteries be equalize charged. After that
initial equalize charge, they recommend no further equalize charging for their batteries.
Other manufacturers may have different recommendations for their products. Consult the
battery manufacturer’s manual for specific information about equalize charging.
59
Page 68

Figure 88 Battery equalizer screen
Operation
BATTERY EQUALIZER
From the Battery Equalizer Screen, you can choose one of the four options on the screen. The screens
for these options are illustrated below.
Figure 89 Auto screen
AUTO MODE—When the battery recharge control logic is in the AUTO MODE, the UPS battery
charger attempts the equalization process only if the EQUALIZE TIME PERIOD is greater than zero,
the battery voltage has been at or below the Battery Discharging alarm limit for longer than 30 seconds, and the battery breaker (MBD) is closed.
AUTO
MANUAL
EQUALIZE TIME PERIOD
EQUALIZE VOLTAGE
SAVE
AUTO
ENABLED
DISABLED
DISABLE
0
540
EXIT
MANUAL MODE. This mode enables the operator to manually initiate a battery equalize charge to
raise the DC bus voltage to correct a non-uniformity in the individual cell voltages or specific gravity
readings.
Figure 90 Manual screen
STOP EQUALIZE CHARGE—This selection lets the operator halt the equalizing charge to the battery at any time, whether the circuit was activated automatically or manually.
EQUALIZE TIME PERIOD. This selection permits the Operator to adjust the battery equalize time
in one hour increments from 0 to 72. The battery equalize time must be greater than zero for the battery to begin recharging in both the AUTO and the MANUAL modes. Use Up/Down buttons to set
battery equalize time and press SELECT.
MANUAL
STOP
START
60
Page 69

Figure 91 Equalize time period screen
MIN MAX
Operation
EQUALIZE TIME PERIOD
When the battery is at full voltage (not being recharged), this selection reads EQUALIZE TIME
PERIOD (hrs). When the battery is recharging, this selection reads EQUALIZE TIME REMAINING
(hrs). After the equalize recharge time has expired, the indication returns to the preset equalize time.
Figure 92 Equalize voltage screen
MIN MAX
520 580
The equalize voltage is also programmable. In the example above, the range is 520 to 580 volts with
the default being 540 volts.
0 72
000
EQUALIZE VOLTAGE
540
Battery Temperature Compensation Charge
The Battery Temperature Compensation Charge screen is accessed from the Battery Management
Screen (Figure 83). The Operator can enable or disable Battery Temp Compensation function. He
can also change the compensation setting by going into the edit screen. The values are in millivolts/
degree C.
Figure 93 Battery temperature compensation charge screen
BATTERY TEMP COMPENSATION CHARGE
15 C = TEMPERATURE 20 C 850
20 C = TEMPERATURE 25 C 1000
25 C = TEMPERATURE 30 C 1000
30 C = TEMPERATURE 35 C 850
< <
<<
< <
<<
NEXT
EXIT
61
Page 70

To enable or disable the Battery Temperature Charge, highlight the top line in the screen above and
press the SELECT button. This will bring up the following screen.
Figure 94 Battery temperature compensation enable/disable screen
BATTERY TEMP COMPENSATION
DISABLE
To access page 2 of the Battery Temp Compensation Charge Screen, press NEXT on the Battery Temp
Compensation Charge Screen (see Figure 93).
Figure 95 Battery temperature compensation charge screen, page 2
BATTERY TEMP COMPENSATION CHARGE
Operation
35 C = TEMPERATURE 40 C 800
40 C = TEMPERATURE 45 C 750
< <
<<
PREV
To edit the Battery Temperature Compensation, select the second line from the top in Figure 93 and
press the SELECT button. The following screen will come up.
Figure 96 Battery temp compensation edit screen
15 C = TEMPERATURE 20 C
< <
MIN
500
EXIT
MAX
1000
MV/ C
Battery Cycle Monitor
The Battery Cycle Monitor feature provides detailed data each time the batteries experience a discharge event. By keeping track of cycles imposed on the battery, the Operator has an indication of
consumption, amount of useful life left on the batteries, and an early warning to service and/or
replace the batteries. The data can be retrieved from the front panel LCD, remote terminal interface,
or a modem connection.
The Battery Cycle Monitor screen can be selected from the Battery Management screen (See
Figure 83). The default setting is set to ENABLE.
62
Page 71

Figure 97 Battery cycle monitor screen
BATTERY CYCLE MONITOR
BCM DISABLE
0 - 30 SECONDS DISCHARGE CYCLES 2
31 - 90 SECONDS DISCHARGE CYCLES 1
91 - 240 SECONDS DISCHARGE CYCLES 1
OVER 240 SECONDS DISCHARGE CYCLES 0
Operation
The second page, accessed by selecting NEXT (See Figure 98), allows the Operator to view the Summary Page and to erase the BCM time bucket data permanently from the non-volatile storage. (This
action requires the system password.) The Operator can also erase the summary information as well,
providing he inputs the proper password. However, this is not recommended for anyone except factory
technicians or Liebert Service Engineers.
Figure 98 Battery cycle monitor screen, page 2
BATTERY CYCLE MONITOR
SUMMARY PAGE
CLEAR BCM YES / NO
CLEAR SUMMARY YES / NO
DISCHARGE CYCLES
The Discharge Cycles Screens are accessed from the Battery Cycle Monitor Screen.
Each of the four buckets will have a format as illustrated in Figure 99 showing the 0-30 seconds dis-
charge cycles. The ID numbers are stamped in the order of occurrence.
For example, assume that the following four discharge cycles have occurred:
1 - On 03/09/01, there was discharge cycle that lasted 25 seconds.
2 - On 04/12/01, there was discharge cycle that lasted 96 seconds.
3 - On 04//25/01, there was discharge cycle that lasted 42 seconds.
4 - On 04/26/01, there was discharge cycle that lasted 21 seconds.
The 0-30 bucket should display event IDs 1 and 4, with #4 shown as the most recent discharge event.
The 31-90 bucket displays event #3, and the 91-240 bucket displays event #2.
The maximum field length for seconds is 99999 (5 digits) which equates to 27.78 hours. DC Bus volts
has xxx (3 digits).
FORMAT—Maximum discharge 1 is displayed in xx.x format (i.e. 65.5, 99.9 max) when the discharge
current is 6553 (unsigned integer / 10) for each cycle. The field length for KWH is 5. When less than
1000 KWH, it is displayed in xxx.x format (i.e. 340.8, 999.9 max). If it exceeds 999.9, the decimal point
is removed and the format becomes xxxx. The maximum displayed KWH is 6553 for each cycle. The
displayed range for battery temperature that can be displayed is from 0 to 126°C (product specifications call for the operating range of 0-40°C.) Any readings outside that range will be displayed as *.
To view the complete list in the event, use the UP and DOWN selections to scroll the page up or down.
NEXT
PREV
EXIT
EXIT
63
Page 72

Selecting the TIME button will display the time stamp of each cycle for three seconds after which it
repaints the column with DATE stamps again.
Figure 99 0-30 seconds discharge cycles
0 - 30 SECONDS DISCHARGE CYCLES
# DATE SEC MIN-DC MAX-A KWH C
4 04/26/01 21 443 100 1 25
1 02/09/01 25 439 89 1 24
Operation
TIME
SUMMARY PAGE LAYOUT
The Summary Page Screen is accessed from the Battery Cycle Monitor Screen.
The BCM summary page includes the following information:
Accumulated number of all discharge cycles.
Accumulated or active time on battery.
Accumulated or active battery AMP hours.
Accumulated or active battery KW hours.
The upper range of all the accumulated numbers is kept in two long integers to make certain they
don’t overflow.
Figure 100Summary page screen
ACCUMULATED NUMBER OF CYCLES 4
ACCUMULATED BATTERY TIME (SEC) 184
ACCUMULATED BATTERY AMP HOURS 6
ACCUMULATED BATTERY KW HOURS 3
DOWN
UP
SUMMARY PAGE
EXIT
DISCHARGE CYCLE DETECTION / RE-ARMING METHOD
A battery discharge cycle starts with the reversal of battery current (discharge AMPS). The discharge
current has to be greater than 2% of battery discharge rating. The cycle is terminated and re-armed
(reset conditions for next cycle) when battery current enters the Normal operating range of +/- 1%.
The normal range is displayed as NORM in the battery section of the one-line Mimic screen. When
battery current exceeds 1% in the positive direction, the displayed status is changed to CHG (charge)
and when drops in the negative direction by more than 1%, it is displayed as DIS (discharge). Battery
AMPS resolution is 0.1.
When an End of Discharge condition occurs (fault “BATT LOW TRANSFER”), the cycle is terminated,
cycle and summary data saved, and the cycle is re-armed. The same thing happens in the event of a
loss of communications with UPSC (alarm UPSC-MM COMM FAIL.”) After approximately 10 seconds, the BCM is re-armed for the next cycle.
EXIT
64
Page 73

Operation
(
BCM DATA DEFINITIONS / STORAGE
At the start of every discharge cycle, Time and Date are recorded along with Battery Compartment
Temperature in degrees C. While the cycle is in progress, the following data are stored: Lowest DC
Bus Voltage, Battery KW Hours, and Highest Battery Discharge AMPS. At the end of the cycle. all of
these parameters including Cycle Duration (in seconds), and Summary data including Accumulated
Number Of Cycles, Accumulated Battery Amp Hours, and Accumulated Battery KW hours are stored.
A total of 132 cycles are saved in a circular buffer.
BCM ALARM NOTIFICATION
When the number of cycles exceeds 128, an alarm message will be displayed to alert the user (local
and remote) that the end of buffer is near. The alarm messaged is defined as “BATT CYCLE BUFFER
FULL”. The alarm is kept active for a minimum of 30 seconds to allow the software to download the
128 cycles to the terminal port and also dial out with this alarm, providing the modem option is
installed and enabled. The cycle storage continues to 132. The 133rd event will override the first
event in the buffer. But the previous cycles will not be destroyed until overwritten with future BMC
cycle data.
REMOTE MONITORING
The information within each of the time buckets and summary status page can be retrieved via the
Terminal and Modem ports.
See 3.5.1 - RS-232 Port: Local Reporting Terminal for a list of commands used to retrieve Service
Terminal Information.
Battery Time Low Warning
The Battery Time Low Warning Feature alerts the Operator to the battery time remaining in minutes. The Operator can set the warning time by navigating from the CONFIGURATION Screen to
USER SETTINGS, Page 2. This screen is illustrated below.
Figure 101User settings, page 2
NEXT
USER SETTINGS
5
BATT. TIME (T 1) AT 100% 15
BATT. TIME
BATT. EOD LOWER SET POINT 384
BATT. EOD UPPER SET POINT 427
T 2) AT 50% 45
PREV.
CANCEL
SAVE & EXIT
65
Page 74

Highlight BATT TIME LOW WARNING and press SELECT to bring up the following password-protected screen.
Figure 102Battery time low warning screen.
BATT. TIME LOW WARNING
Operation
MIN
2
NOTE
The default setting is 5. The maximum limit changes according to the number of battery
cabinets, and the time rating of each. For a single battery, the upper limit is T1. For more than
one battery, the upper limit is approximately equal to the total battery time.
After setting the time, press SELECT to save the changes and return to the previous screen.
MAX
5
Battery Supplement
This feature allows the UPS to continue to supply power to the output from both the rectifier and the
battery when the input voltage sags. This mode of operation will keep conditioned-uninterruptible
power at the output for a longer period of time as compared to just turning off the rectifier when the
input voltage sags.
The feature is permanently enabled at the present time, and can be identified by an alarm reading
“Battery Supplement Active”. The alarm will clear when the Input Undervoltage alarm clears and/or
if the rectifier turns off and/or if the Battery Discharge alarm clears. There will be 1-second delay
before setting or clearing this alarm.
3.3.8 Auto Restart
The Auto Restart feature allows the UPS to restart without operator intervention after shutting down
due to loss of input power. When the utility is restored, this feature directs an automatic restart,
delivering the load power through the inverter, connecting the batteries to the DC bus, and recharging the batteries. To utilize this feature, your system must have Liebert motorized Battery Breakers
on each battery cabinet.
The first step is to enable the Auto Restart feature. From the Configuration Screen, select System
Settings, and then Options. From the Options Screen, select Auto Restart and select YES. (The factory default is set to NO.) This option is password protected.
After enabling the Auto Restart feature, proceed to the Auto Restart Setting screen. From this screen,
the Operator can set the restart to System (the default is Disabled), and program a source qualification timer. To access this screen, navigate to Configuration, and then to User Settings. Select Auto
Restart.
The following screen will come up.
66
Page 75

Figure 103Auto restart setting screen
AUTO RESTART SETTING SYSTEM
AUTO RESET TIMING 5
The source qualification timer dictates how long to allow for input and bypass voltages to return to
their nominal limits. The default value is 100 with a programmable range of 5-100 minutes. Since a
setting of 100 signifies an infinite wait time, the finite range can be set between 5 and 99 minutes.
Normally, 5 minutes is adequate.
Setting the Auto Restart to SYSTEM, automatically changes the setting for Motorized Battery
Breaker to “Motorized”. The battery type setting cannot be changed back to Manual once Auto
Restart is set to YES. However, if Auto Restart Option is Disabled (Set to NO), battery type can be
independently set to Motorized. To access the proper screen, navigate to Configuration, then System
Settings, then Options, then Motorized Battery Breaker, and select Motorized.
Once in Auto Restart mode, a new screen will report the progress. (See Figure 104).
Operation
AUTO RESTART
Figure 104Auto restart screen layout
The message, AUTO RESTART IN PROGRESS will be displayed during the Auto Restart sequence.
The text line below this message signifies the condition being checked, and flashes in reverse video
while the message is displayed.
The Operator can cancel the Auto Restart operation by selecting and acknowledging CANCEL. When
this is done, a message will appear asking, “Canceling will abort Auto Restart operation. Are you sure
you want to cancel? The Operator can then select YES or NO”.
Alarm Notifications
At the start of Auto Restart operations, an alarm condition is recorded to log “Auto Restart Initiated”.
If during the process Auto Restart is halted as a result of failed condition, a subsequent alarm is
recorded as “Auto Restart Failed”. This will be a latched alarm and must be acknowledged and reset
by the Operator. See Alarm Messages on page 74 for a complete description of these alarms.
AUTO RESTART
AUTO RESTART IN PROGRESS
QUALIFYING INPUT POWER
CANCEL
Auto Restart Trigger Condition
Any time the UPS detects and records an EOD (End of Discharge) condition occurring at the same
time the input contactor is open, it recognizes that the batteries can no longer support the load. This
scenario sets the Auto Restart flag, initiating the Auto Restart sequence.
In a Dual Input system, both Input and Bypass must be available to enable Auto Restart.
67
Page 76

3.3.9 System Status Monitoring
In addition to the standard UPS metering and alarm information, Npower monitors and calculates
other relevant data. This data can be accessed by starting from the Main Menu, selecting Status
Reports, then System Status.
The counters start from the time LGS or in special cases the contractor complete the startup procedure and customer accepts the system. Once the unit is accepted, LGS will go to the System Status
screen and complete the sign off procedure. This is a password-protected screen. Once the sign off procedure is completed (easy to follow on screen prompt messages), the software will record the Real
Time Clock’s time and date. The sign off screen will no longer be displayed in any subsequent entries
in System Status screen. Only the Date and Time of system sign off will be shown as reference. All
future data gathering will start from this date and time.
The System Status Screens contain the following data which is updated real time:
• Accumulated Installed Hours
• Accumulated Operating Hours on UPS
• Accumulated Operating Hours on Bypass
• Accumulated Backup Minutes
• Accumulated # of Brown Outs
• Accumulated # of Black Outs
• Accumulated # of Manual Transfers
• Accumulated # of Manual Retransfers
• Accumulated # of All Transfers
• Accumulated # of All Retransfer
• Accumulated # of Overload Conditions
• Accumulated # of Unsuccessful Auto Retransfers
• Average Load%
Operation
Figure 105System status screen
INSTALLED HOURS 0H
OPERATING HOURS ON UPS 0H
OPERATING HOURS ON BYPASS 0H
BACKUP TIME 5 H 50 M 18 S
SIGN OFF DATE 10/30/01
SYSTEM STATUS
NEXT
EXIT
68
Page 77

The Sign Off Date segues to Sign Off Time and back every 5 seconds.
Figure 106System status screen, page 2
SYSTEM STATUS
MANUAL XFERS 0
MANUAL REXFERS 0
ALL XFERS 0
ALL REXFERS 0
Operation
SIGN OFF DATE 10/30/01
Figure 107System status screen, page 3
BROWN OUTS 0
BLACK OUTS 0
BACKUP TIME 0 H 00M 00S
SIGN OFF DATE 02/15/02
A brownout occurs when an Input Undervoltage condition exists for more than 5 minutes. During this
time, Input Line Fail condition is not active. To determine the brown out count, highlight BROWN
OUTS and press SELECT. Once a count is made, allow 30 minutes to re-arm the counter.
The condition for blackout occurs any time all 3 phases of the input voltage sources falls below 60% of
the rated input voltage rating. The counter starts from the time the Liebert Global Services completes
the startup procedure, and signs off the SYSTEM STATUS Screen. The counter is automatically reenabled when all 3 phases of the input voltage source rise above the 60% limit.
The Accumulated Number Of Blackouts (Blackout Counter) can be viewed by highlighting BLACK
OUTS and pressing SELECT.
NEXT
SYSTEM STATUS
NEXT PREV SAVE & EXIT
PREV
EXIT
Figure 108System status screen, page 4
AVERAGE LOAD 74%
OVERLOAD CONDITIONS 0
UNSUCCESSFUL AUTO REXFERS 1
AUX TEMP
SIGN OFF DATE 10/30/02
STATUS DEFINITIONS AND CONDITIONS
Accumulated Installed Hours
SYSTEM STATUS
69
PREV
EXIT
Page 78

Operation
Once the “UPS Sign Off” is acknowledged, it is stamped with RTC time and date. This step must be
performed by LGS personnel. The software will keep track of the elapsed hours from that point on by
subtracting the current time and date from the sign off time and date.
Accumulated Operating Hours on UPS
With output contactor closed and load KVA greater than 1%, software accumulates operating hours
that the load is supported by UPS.
Accumulated Operating Hours on Bypass
With bypass contactor closed and load KVA greater than 1%, software accumulates operating hours
that the load is supported by Bypass.
Accumulated Backup Hours
With Battery breaker closed and battery discharge current greater than 2% rated (Ibatt), software
accumulates Hours or fraction of hours (i.e. 0.2, 1.9) that the load is supported by the battery system.
Ibatt > 0.02 (Rated KW)/0.96/Vbatt
Accumulated # of Brown Outs
An “Input Undervoltage” condition must exist for more than 5 minutes. During this time “Input Line
Fail” condition must not be active. Once a count is made, allow 30 minutes to re-arm the counter.
Accumulated # of Manual Transfers
User initiated and successful transfers to bypass commanded from the manual transfer screen. MM
checks the status of output and SBS contactors to verify a transfer has successfully taken place.
Accumulated # of Manual Retransfers
User initiated and successful retransfers to inverter commanded from the manual transfer screen.
MM checks the status of output and SBS contactors to verify a transfer has successfully taken place.
Accumulated # of All Transfers
All transfers, manual and auto are counted.
Accumulated # of All Retransfers
All retransfers, manual and auto are counted.
Accumulated # of Overload Conditions
For detection of an overload condition, software monitors 6 alarms (Inv Ovld phA, Inv Ovld phB, Inv
Ovld phC, SBS Ovld phA, SBS Ovld phC, SBS Ovld phC). It increments the count if one or more of
these alarm conditions are reported.
Accumulated # of Unsuccessful Auto Retransfers
The count is incremented upon receipt of an “Auto Retransfer Failed” alarm from UPSC (UPS Control
board).
Average Load%
Running average of 256 KVA samples over 256 seconds.
70
Page 79

3.4 Faults, Alarms, Status
This section defines the active fault, alarm, and status indicators, their causes, and the associated
system operations performed upon their detection.
3.4.1 Faults
A fault is defined as an undesirable system operating condition that could cause further damage to
the system or potentially drop the load. Once detected, faults may trigger an appropriate emergency
action such as transferring the load to an alternative power source. Many fault conditions can only be
resolved through Operator intervention or service by an LGS technician.
A fault condition must be valid for a certain amount of time before it is recognized as an active fault.
This prevents spurious signals from causing false fault detection and unnecessary state changes.
All fault occurrences are time-stamped and recorded in the Event Log for later analysis, and sent to
the Operator display.
Fault Messages
Fault messages are displayed in reverse video, as compared with alarm messages which are displayed
in regular video.
The following faults are detected by Rectifier DSP.
• Battery Overcharge
• Battery Fuse Fail
• Battery Low Transfer
• DC Overvoltage Transient
• Input Phase Rotation Error
• Rectifier Fuse Fail
• Rectifier Drive 1 Fail
• Rectifier Drive 2 Fail
•Trap Fuse Fail
• Delta/WYE Current Imbalance
Operation
The following faults are detected by Inverter DSP:
• Bypass Frequency Error
• Bypass Overload Shutdown
• Bypass Phase Rotation Error
•IDC Peak
•IGBT Drive Fail
• Inverter Overload Transfer
•Inverter Fuse Fail
• Output Overvoltage Transfer
• Output Undervoltage Transfer
• SBS SCR Open
• SBS SCR Shorted
• Inverter current Limit Transfer
• Inverter DC Offset
71
Page 80

Operation
The following faults are detected by the UPS controls. Corrective actions, where possible, are automatic.
• Active Filter Fail
• Battery Overtemp CB Trip
• Battery Ground Fault CB Trip
• Bypass Power Supply Fail
• EPO Shutdown
• Heatsink Overtemp Limit
• Input Power Supply Fail
• Output Power Supply Fail
• Outlet Air Overtemp Limit
• Power Supply F1 Fail
• SWGR Power Fail
• DC Undervoltage Steady State
• DC Overvoltage Steady State
• Rectifier Fail
•Inverter Fail
• Overtemp Time out Shutdown
• Fault Transfer Failed - Shutdown
• Controller Fault -SBS on.
• Hardware Shutdown.
• MM Control Power Fail.
• MM Memory Fail.
• Option Power Supply Fail
3.4.2 Alarms
An alarm is an indication of an abnormal system condition significant enough to warrant being
annunciated and logged. Alarm conditions may indicate that a UPS system parameter is out of its
normal operating range, or may signal an external problem. In some cases an alarm may trigger a
corrective action. Many alarm conditions will return to normal in due time and the alarm itself will no
longer be “active.”
Summary Alarm
The Npower system features a Summary Alarm, which captures the presence of individual faults and
alarms. This alarm may be assigned to any PRB relay. See Customer Alarm Interface on page 52.
The Summary Alarm can be accessed from the list of alarms / faults (Figure 80) by scrolling up and
down the list. (For navigation instructions, see Customer Alarm Interface on page 52). When the
Summary Alarm is in the active position, it will be flashing at the top of the screen.
Figure 109Summary alarm in active position screen
ALARM / FAULT NAME
Y Y N Y 55.15
ON BATTERY Y Y Y Y 0 0
INPUT CONTACT #1 Y Y Y Y 0 0
INPUT CONTACT # 2 Y Y Y Y 0 0
INPUT CONTACT # 3 Y N Y Y 0 0
INPUT CONTACT # 4 Y Y Y Y 0 0
UP EXIT DESCRIPTION: L - Latching...D - Dial...
DOWN
L D F E DELAY
72
Page 81

Highlight the SELECT position on the display screen to bring up the Summary Alarm Editing screen,
allowing the Operator to edit the parameters of the summary alarm.
Figure 110Summary alarm editing screen
LATCHING NO
DIAL NO
FREEZE NO
EVENT LOG NO
SAVE & EXIT
CANCEL
When the New Alarm, System Summary Alarm, or Module Summary Alarm is activated, you can get
more information at the Operator Display Panel, through a remote terminal or a modem. For further
information, see 3.5 - Communication Interfaces.
Table 6 Abbreviations used in alarm messages
Auto Automatic
Avail Available
Batt Battery
Byp Bypass
Cap Fuse Capacitor Fuse
Cont Power Control Power
Equip Equipment
H/W Hardware
Inv Fuse Inverter Fuse
OF/UF Over/Under Frequency
Ov-temp Overtemperature
O-volt Overvoltage
Ph Seq Phase Sequence
Rect Fuse Rectifier Fuse
Rexfer Retransfer
Shutdn Shutdown
Static Sw Static Switch
Un-volts Undervoltage
Xfer Transfer
Operation
SUMMARY
73
Page 82

Alarm Messages
The alarm message area displays the alarm conditions that are present within the UPS system. The
table below shows the default values of masks for each alarm/fault, the meaning of the Alarm and
possible corrective actions.
The following information applies to the table.
1. Latch Masks, Dial Masks and unshaded Event log masks may be changed by the user. The user
may not change any Freeze Masks.
2. The default alarm names for Input Contact 1 through Input Contact 8 can be modified by the
user.
Table 7 Alarms, functions, and corrective actions
Actual
Alarm/fault
Name
Displayed
On Front
Panel
Battery Fuse
Fail
Battery Low
xfer
DC Ov
Transient
Inp Phase
Rot Error
Rectifier Fuse
Fail
Description
of Alarm/
Fault
Battery Fuse
Fail
Battery Low
Transfer
DC Overvolt
Transient
Input Phase
Rotation Error
Rectifier Fuse
Fail
Fault
Or
Alarm
Fault YES YES NO YES
Fault YES YES YES YES
Fault YES YES NO YES
Fault NO NO NO YES
Fault YES YES NO YES
Latch
Mask
Dial
Mask
Freeze
Mask
Operation
Event Log
Mask Meaning and Corrective Action(s)
Control Logic has determined that the
battery breaker(s) is closed and the battery
fuse has been open for 10 seconds or
longer. Battery back-up is no longer
available. Liebert Global Services should
be called immediately.
Control Logic has determined that the
battery breaker(s) is closed and the battery
voltage has dropped below the End of
Discharge limit. The UPS will transfer to
bypass. If the transfer is successful, the
UPS will be shut down. If the transfer was
unsuccessful, logic will attempt to complete
a System Shutdown before control power is
lost. Verify that input power is now available
and restart the UPS following the
instructions in this manual. If the system
fails to restart properly contact Liebert
Global Services.
DC bus voltage is 15% or more over the
nominal DC Bus Voltage. The UPS will
transfer the load to Bypass and will shut
down and isolate the UPS Module. Contact
Liebert Global Services immediately
The power conductors on the Input line are
not wired to the UPS in the required
sequence. This alarm should appear only
during initial start-up or after a repair to the
source power system. Disconnect power
from the Input line and correct the wiring.
Liebert Global Services must be present
during initial start-up of your UPS System.
At least one fuse has opened. The UPS
automatically transfers the critical load to
the bypass line. Contactors trip open to
shut down and isolate the UPS module.
Contact Liebert Global Services
immediately. Do not attempt to reset the
circuit breakers.
74
Page 83

Table 7 Alarms, functions, and corrective actions (continued)
Actual
Alarm/fault
Name
Displayed
On Front
Panel
Trap Fuse
Fail
On Battery On Battery Alarm NO NO NO YES
Battery
Overcharge
Byp Freq
Error
Byp ovld
Shutdown
Byp Phase
Rot Error
IDC Peak IDC Peak Fault YES YES NO YES
Description
of Alarm/
Fault
Fault
Or
Alarm
Latch
Mask
Dial
Mask
Freeze
Mask
Event Log
Mask Meaning and Corrective Action(s)
Trap Fuse Fail Fault NO YES NO YES
Battery
Overchg
Fault YES YES NO YES
Bypass
Frequency
Fault NO NO NO YES
Error
Bypass
OverLoad
Fault YES YES NO YES
Shutdown
Bypass Phase
Rotation Error
Fault NO NO NO YES
Operation
On units equipped with an input filter,
Control Logic has determined that one or
more of the filter fuses is open. The logic
will open the Input filter contactor. The UPS
will continue to run, without input filtering.
Contact Liebert Global Service to check
and repair the input filter.
Reports an On Battery state as long as the
battery CB is closed, Input Undervoltage
alarm exists, and the status bit ON UPS is
set.
Battery charge current is 50% above the
Battery Charge Current Limit for longer than
5 seconds. The load will be transferred to
Bypass. If Bypass is not available the UPS
will attempt to run from the battery. If both
battery and bypass are not available, a full
system shutdown will be initiated. This fault
will inhibit start-up. Contact Liebert Global
Services immediately
The bypass frequency is outside the ± 5%
of the system rating. If the load is on
bypass the static switch will be shut down
and power will be lost to the load. If the load
is on UPS, transfer to bypass will be
inhibited, until this fault clears or is
corrected. This fault will inhibit startup. If
fault persists check the bypass source for
the cause of the frequency irregularity.
Contact Liebert Global services if you have
questions.
With the load on Static Bypass the system
has determined that at least one phase of
the Bypass has exceeded the KVA, KW, or
RMS current vs. Time overload spec. The
Static Bypass switch will be turned of and
the system will be shut down. Power to the
load will be turned off. Remove the excess
load from the UPS and attempt to re-start. If
the load is below the rating of the UPS and
it will not re-start, contact Liebert Global
Services.
The power conductors on the bypass line
are not wired to the UPS in the required
sequence. This alarm should appear only
during initial start-up or after a repair to the
source power system. Disconnect power
from the bypass line and correct the wiring.
Liebert Global Services must be present
during initial start-up of your UPS System.
The system has detected a failed IGBT.
The unit will transfer to Bypass if available.
Contact Liebert Global Services
immediately.
75
Page 84

Table 7 Alarms, functions, and corrective actions (continued)
Actual
Alarm/fault
Name
Displayed
On Front
Panel
Inverter Ovld
xfer
Inverter Fuse
Fail
Output Ov
xfer
Output Uv
xfer
SBS SCR
Open
SBS SCR
Shorted
Description
of Alarm/
Fault
Inverter
Overload
Transfer
Inverter Fuse
Fail
Output
Overvolt
Transfer
Output
Undervolt
Transfer
SBS SCR
Open
SBS SCR
Shorted
Fault
Or
Alarm
Latch
Mask
Dial
Mask
Freeze
Mask
Event Log
Mask Meaning and Corrective Action(s)
Fault YES YES YES YES
Fault YES YES NO YES
Fault NO YES YES YES
Fault NO YES YES YES
Fault YES YES NO YES
Fault YES YES NO YES
Operation
With the load on UPS, at least one phase of
the UPS KVA or KW has exceeded the
rated KVA, KW, or RMS current vs. Time
equation. (Note: This fault would have been
preceded by an “Inverter Overload Phase x
alarm.) The UPS will transfer the load to
Static Bypass if it is available. If the fault or
overload clears the UPS will automatically
transfer from SBS to UPS. Remove the
excess load from the UPS and attempt to
re-start. If the load is below the rating of the
UPS and it will not re-start, contact Liebert
Global Services.
One or more Output Fuses are open.
(because of capacitance in the system it
may take up to 1 minute after a fuse failure
to detect this fault). The system will transfer
the load to Static Bypass if available and
then shut down the UPS. Contact Liebert
Global Services Immediately.
The UPS module output voltage is above
the maximum (+10%) deviation from
nominal. The load automatically transfers to
the bypass line. The UPS module is shut
down and isolated. Contact Liebert Global
Services at once. Do not attempt to reset
circuit breakers.
The UPS module output voltage is under
the minimum (-12%) deviation from
nominal. The load automatically transfers to
the bypass line. If the alarm condition is no
longer present, reset the alarm and
retransfer the load from bypass to UPS.
Contact Liebert Global Services if alarm
persists.
This fault can only be detected when the
load is on bypass. One or more of the Static
Bypass phases are open. The static switch
will be shut down and the UPS will shut
down. Power to the load will be lost.
Contact Liebert Global Services
Immediately.
The system has detected a shorted SCR in
the Bypass line. If the unit is in the start-up
mode, start- up will be inhibited. If the unit is
on UPS, the unit will transfer to Bypass and
open the output contactor to prevent back
feed to the inverter from the Bypass line.
Contact Liebert Global Services
Immediately.
76
Page 85

Table 7 Alarms, functions, and corrective actions (continued)
Actual
Alarm/fault
Name
Displayed
On Front
Panel
Inv I limit xfer
Batt ovtemp
cb trip
Batt gnd CB
trip
Byp pwr
supply fail
EPO
shutdown
Description
of Alarm/
Fault
Inverter
Current Limit
Transfer
Battery
Overtemp CB
Trip
Batt gnd fault
CB trip
Bypass Power
Supply Fail
EPO
Shutdown
Fault
Or
Alarm
Latch
Mask
Dial
Mask
Freeze
Mask
Event Log
Mask Meaning and Corrective Action(s)
Fault NO YES NO YES
Fault YES YES NO YES
Fault NO YES NO YES
Fault NO YES NO YES
Fault NO YES NO YES
Operation
The instantaneous inverter current of any
one phase has exceeded its Pulse by Pulse
current limit value. An “Inverter Current
Limit” alarm was already issued and pulse
parallel operation was initiated. At the end
of pulse parallel the load current has not be
reduced below 150% The load will transfer
to Static Bypass. If the fault or over load
clears the unit will retransfer to UPS. Check
the total load compared to the UPS rating,
reduce load where necessary. If the UPS
does not retransfer when the load is below
100% of the rated load or if the unit shuts
down, contact Liebert Global Services
Immediately.
With the battery breaker closed and the
Battery Overtemp…Breaker Trip” option
enabled, the internal battery temperature
has exceeded its Maximum set point value.
The battery UV trip will be activate and the
battery will be disconnected from the UPS.
Battery Back up is no longer available.
Check the battery to determine the possible
cause of the overload and remove if
possible. Once the battery has cooled
below the set point temperature, the battery
may be brought on line again. If the
problem recurs contact Liebert Global
Services.
With BGF option installed, BGF breaker trip
enabled, and batt breaker closed, Comms
DPS sees its BGF input asserted by the
SWGR. It will issue a batt breaker UV trip
and motor op disable. To correct, repair and
restart batt via the MM. Contact Liebert
Global Services for assistance.
With Bypass source available, the UPS has
determined that the bypass power supply
has failed. The SBS will be turned off and
the contactors opened. SBS will not be
available. This fault will inhibit transfers and
start-up. Contact Liebert Global Services
immediately.
The Emergency Power Off switch has been
pressed, which caused the UPS system to
shut down and remove all power from the
critical load. Determine the cause of the
emergency condition and correct it if
possible. Contact Liebert Global Services if
you require assistance.
77
Page 86

Table 7 Alarms, functions, and corrective actions (continued)
Actual
Alarm/fault
Name
Displayed
On Front
Panel
Hsink ovtemp
limit
Inp pwr
supply fail
Out pwr
supply fail
Ups Ambient
Limit
Pwr Supply
F1 Fail
SWGR Power
Fail
Description
of Alarm/
Fault
Heatsink
Overtemp
Limit
Input Power
Supply Fail
Output Power
Supply Fail
UPS Ambient
Ot Limit
Power Supply
F1 Fail
SWGR Power
Fail
Fault
Or
Alarm
Latch
Mask
Dial
Mask
Freeze
Mask
Event Log
Mask Meaning and Corrective Action(s)
Fault YES YES YES YES
Fault NO YES NO YES
Fault NO YES NO YES
Fault YES YES YES YES
Fault NO YES NO YES
Fault NO YES NO YES
Operation
The maximum heat sink temperature limit
has been exceeded. (Should be preceded
by a “Heatsink” Overtemp Warning alarm).
The load will be transferred to the Static
Bypass if available. If the load was already
on SBS when this alarm occurred, the
system will shut down. The fault will clear
when the temperature falls below the
Heatsink Overtemp Warning threshold. (If
this fault doesn’t clear soon enough it will
lead to an “Overtemp Time-out Shutdown”).
If the unit is still running it will make an
attempt to auto-retransfer when the fault
clears. If the faults do not clear; contact
Liebert Global Services.
The input source is present, but the input
power supply has failed. The unit has
redundant power supplies on both the input
and the output. Contact Liebert Global
Services immediately.
The output source is present, but the output
power supply has failed. The unit has
redundant power supplies on both the input
and the output. Contact Liebert Global
Services immediately.
The Outlet air temperature has exceeded
its maximum set point. The UPS will
transfer the load to bypass if available. If
already on bypass the system will
shutdown. The fault will clear when the
temperature falls below the Outlet Air
Overtemp Warning threshold. (If this fault
doesn’t clear soon enough it will lead to an
“overtemp Time-out Shutdown”.). If the unit
is still running when the fault clears it will
auto retransfer to UPS. Check all air inlets
and exhausts for blockage and check the
air filter. Check the actual load against the
UPS rating. Remove any excess load.
Contact Liebert Global Services if the alarm
persists.
Failure of this fuse will remove control
power. The UPS will attempt to transfer to
Static Bypass if available. Locate the cause
of any failure, before replacing a fuse or
Contact Liebert Global Services
Immediately.
UPS will transfer to Static Bypass if
available and shut down the UPS. Start-up
will be inhibited. Contact Liebert Global
Services.
78
Page 87

Table 7 Alarms, functions, and corrective actions (continued)
Actual
Alarm/fault
Name
Displayed
On Front
Panel
Rectifier Fail Rectifier Fail Fault YES YES YES YES
Inverter Fail Inverter Fail Fault YES YES YES YES
Ovtemp timeout Sd
Transfer
Failed Sd
Ctrl Fault
SBS on
Hardware Sd
Opt pwr
supply Fail
Description
of Alarm/
Fault
Overtemp
Time-out
Shutdown
Transfer Failed
Shutdown
Controller fault
SBS on
Hardware
Shutdown
Option Power
Supply Fail
Fault
Or
Alarm
Latch
Mask
Dial
Mask
Freeze
Mask
Event Log
Mask Meaning and Corrective Action(s)
Fault YES YES NO YES
Fault YES YES YES YES
Fault YES YES NO YES
Fault YES NO NO YES
Fault YES YES NO YES
Operation
This is a summary event based on the
detection of at least one of these faults
being active: Battery Overcharge; DC
Overvoltage Steady State; DC Overvoltage
Transient; DC Undervoltage Steady State;
Delta-Wye Current Imbalance; Rectifier
Fuse Fail; Rectifier Drive 1 Fail; Rectifier
Drive 2 Fail. All actions are controlled by the
causal fault.
This is a summary event based on the
detection of at least one of the following;
IDC Peak; IGBT Drive Fail; Output
Overvoltage Transfer; Output Undervoltage
Transfer; Inverter DC Offset. All actions are
controlled by the causal faults.
An Equipment Over-temperature condition
has persisted for more than 10 minutes.
The load is transferred to the bypass line
and the UPS module is shut down. Check
the air intake, air exhaust, and filters before
attempting to start-up the UPS.
A transfer to Static Bypass was
unsuccessfully attempted and power to the
load was lost. Attempt to restart the system.
Contact Liebert Global Services.
Indicates that the unit has transferred to
SBS without the knowledge of the UPSC. It
occurs when the UPSC’s Watchdog Fail
line is automatically asserted during a
UPSC reset. This is a permanent (latched)
condition which requires service. Contact
Liebert Global Services at once.
At least one of the following alarm
conditions is present: Inverter Fault,
Rectifier Fuse Blown, Reverse Power, Over
load Shutdown, logic power supply failure,
or inverter output symmetry failure. The
load automatically transfers to the bypass
line. The UPS module is shut down and
isolated. Contact Liebert Global Services at
once. Do not attempt to reset the UPS.
The Option Power Supply has failed.
Remote Alarm Status panels may be
disabled. Contact Liebert Global Service.
79
Page 88

Table 7 Alarms, functions, and corrective actions (continued)
Actual
Alarm/fault
Name
Displayed
On Front
Panel
Batt
Discharging
Input I
Imbalance
Input Line Fail Input Line Fail Alarm NO NO NO YES
Input OF/UF Input OF/UF Alarm NO YES NO YES
Input Phase
Loss
Input
UnderVoltage
Description
of Alarm/
Fault
Battery
Discharge
Input Current
Imbalance
Input Phase
Loss
Input Under
Voltage
Fault
Or
Alarm
Latch
Mask
Dial
Mask
Freeze
Mask
Event Log
Mask Meaning and Corrective Action(s)
Alarm NO YES NO YES
Alarm NO YES NO YES
Alarm NO YES NO YES
Alarm NO NO NO YES
Operation
The battery is discharging. This occurs
whenever the battery supplies power to the
load for more than five seconds because of
input power failure, a rectifier problem, or
an overload condition. If the input power or
a source of auxiliary power is restored to
the UPS module, the UPS automatically
returns to normal operation. Watch the
battery voltage carefully. Reduce the load
(begin controlled shutdown) to extend the
battery back-up time. Start the back-up
generator, if available. Reset the UPS
alarms after the input power is restored.
The message clears after 30 seconds.
With input current levels above 30% of
nominal and all three phase voltages within
5% of each other, there is a difference
between any single input phase current and
the average input phase current of more
than 25%. The UPS will open the Input filter
Contactor. The alarm will clear when the
difference in current falls below 20%, but
the Input filter contactor will need to be
reset, using the front panel. Refer to
manual start up instructions.
The rectifier input line voltage is outside of
specified limits or the input circuit breaker is
opened while the battery circuit breaker
remains closed. The battery supplies power
to the critical load through the UPS inverter.
The input frequency is > ± 5% of the
nominal frequency. The UPS will begin
using the battery to supply power, if by the
end of discharge the problem is not
corrected, for single input units power to the
load will be lost, for dual input units the
system will attempt transfer to Bypass if
qualified and available.
For all of these input problems the system
will supply power from the battery until the
end of discharge. At that point single input
systems will lose power to the load. Dual
input systems will attempt to transfer to
bypass if qualified and available. Call
Liebert Global Services for Assistance.
For all of these input problems the system
will supply power from the battery until the
end of discharge. At that point single input
systems will lose power to the load. Dual
input systems will attempt to transfer to
bypass if qualified and available. Call
Liebert Global Services for Assistance.
80
Page 89

Table 7 Alarms, functions, and corrective actions (continued)
Actual
Alarm/fault
Name
Displayed
On Front
Panel
Input
OverVoltage
Input current
limit
Battery CB
Open
Batt Supp
Active
Bypass Sync
Error
Byp out
Tolerance
Bypass Line
Fail
Description
of Alarm/
Fault
Input Over
Voltage
Input Current
Limit
Battery CB
Open
Batt sup-
plement is
active
Bypass Sync
Error
Bypass
Voltage Out of
Tolerance
Bypass Line
Fail
Fault
Or
Alarm
Latch
Mask
Dial
Mask
Freeze
Mask
Event Log
Mask Meaning and Corrective Action(s)
Alarm NO NO NO YES
Alarm NO YES NO YES
Alarm NO YES NO YES
Alarm NO YES NO YES
Alarm NO YES NO YES
Alarm NO YES NO YES
Alarm NO YES NO YES
Operation
For all of these input problems the system
will supply power from the battery until the
end of discharge. At that point single input
systems will lose power to the load. Dual
input systems will attempt to transfer to
bypass if qualified and available. Call
Liebert Global Services for Assistance.
The RMS input current has reached the
Input Current Limit setting. Check the UPS
load.
The module battery circuit breaker (MBD) is
open. This circuit breaker might have been
opened either manually or automatically in
a UPS shutdown procedure. If the UPS is
operating with this breaker open, the critical
load is not protected from loss of the utility
source power. Manual closure of the battery
breaker is inhibited. You must use the front
panel to set up the sequence for manual
battery re-closure. Follow the instructions in
manual start-up.
This condition is indicated when the Batt
Discharging and Input Undervoltage alarms
are simultaneously active. The alarm will
clear when the Inp. Undervoltage alarm
clears and/or if the rectifier turns off and/or
if the Batt Dischg alarm clears.
The bypass is out of sync to a sufficient
degree that transfer to Static Bypass is
inhibited. An interrupted transfer will be
permitted only in the case of a critical fault.
If this alarm persists, contact Liebert Global
Services.
One or more bypass voltages is below 80%
or above 115% of the nominal value. If the
load is on UPS, and the unit is a dual input
unit, transfers to bypass will be inhibited. If
the unit is a single input unit, the system will
shut down. The Alarm will be cleared 5
seconds after all voltage are again with 85110% of nominal. If the load has been shut
down, re-start will be required.
The bypass source has dropped below 35V
per phase. On single input units, the UPS
will shut down. On dual input units, transfer
to the bypass will be inhibited. The alarm
will be cleared five seconds after all
voltages again exceed 45V. If the unit is
already on Bypass when this occurs, power
to the load will be lost.
81
Page 90

Table 7 Alarms, functions, and corrective actions (continued)
Actual
Alarm/fault
Name
Displayed
On Front
Panel
SBS Ovld
Phase A
SBS Ovld
Phase B
SBS Ovld
Phase C
Inverter I
Limit
Output OF/UF Output OF/UF Alarm NO YES NO YES
Inv Ovld
Phase A
Inv Ovld
Phase B
Description
of Alarm/
Fault
SBS Overload
Phase A
SBS Overload
Phase B
SBS Overload
Phase C
Inverter
Current Limit
Inverter
Overload
Phase A
Inverter
Overload
Phase B
Fault
Or
Alarm
Latch
Mask
Dial
Mask
Freeze
Mask
Event Log
Mask Meaning and Corrective Action(s)
Alarm NO NO NO YES
Alarm NO NO NO YES
Alarm NO NO NO YES
Alarm NO NO NO YES
Alarm NO YES NO YES
Alarm NO YES NO YES
Operation
With the load on Static Bypass, the phase A
output kVA or kW or RMS current has
exceeded 115% of the nominal per-phase
kVA or kW or RMS current rating. The UPS
will show time remaining until a shutdown
will occur, per the Overload vs. time curve.
The alarm will clear when the overload falls
to below 110% of the rating.
With the load on Static Bypass, the phase B
output kVA or kW or RMS current has
exceeded 115% of the nominal per-phase
kVA or kW or RMS current rating. The UPS
will show time remaining until a shutdown
will occur, per the Overload vs. time curve.
The alarm will clear when the overload falls
to below 110% of the rating.
With the load on Static Bypass, the phase C
output kVA or kW or RMS current has
exceeded 115% of the nominal per-phase
kVA or kW or RMS current rating. The UPS
will show time remaining until a shutdown
will occur, per the Overload vs. time curve.
The alarm will clear when the overload falls
to below 110% of the rating.
The instantaneous inverter current of any
one phase has exceeded its pulse-by-pulse
current limit value. The UPS will shutdown
when the Current Overload vs. time curve is
exceeded.
Output frequency differs from the nominal
(60Hz) by more than 0.5Hz. No transfer or
shutdown occurs. Contact Liebert Global
Services at once.
With the load on UPS, Phase x output KVA
or KW or RMS current has exceeded 105%
of the nominal per phase rating. The UPS
will begin sending the time remaining until a
transfer or shutdown will occur, per the
Overload vs. Time Curve. The alarm
condition will clear when the overload
returns to below the nominal rating.
With the load on UPS, Phase A output kVA
or kW or RMS current has exceeded 105%
of the nominal per phase rating. The UPS
will begin sending the time remaining until a
transfer or shutdown will occur, per the
Overload vs. Time Curve. The alarm
condition will clear when the overload
returns to below the nominal rating.
82
Page 91

Table 7 Alarms, functions, and corrective actions (continued)
Actual
Alarm/fault
Name
Displayed
On Front
Panel
Inv Ovld
Phase C
Low Pwr
Factor Warn
Pulse
Paralleling
Auto rexfer
failed
Excessive
Auto Rexfer
Aux Power
Fail
EPO Power
Fail
LBS Power
Fail
Description
of Alarm/
Fault
Fault
Or
Alarm
Latch
Mask
Dial
Mask
Freeze
Mask
Event Log
Mask Meaning and Corrective Action(s)
Inverter
Overload
Alarm NO YES NO YES
Phase C
Low Power
Factor
Alarm NO YES NO YES
Warning
Pulse Parallel
Activated
Alarm NO YES NO YES
Auto
Retransfer
Alarm YES YES NO YES
Failed
Excessive
Auto
Alarm YES YES NO YES
Retransfer
Aux Power Fail Alarm NO YES NO YES
EPO Power
Fail
LBS Power
Fail
Alarm NO YES NO YES
Alarm NO YES NO YES
Operation
With the load on UPS, PhaseB output KVA
or KW or RMS current has exceeded 105%
of the nominal per phase rating. The UPS
will begin sending the time remaining until a
transfer or shutdown will occur, per the
Overload vs. Time Curve. The alarm
condition will clear when the overload
returns to below the nominal rating.
On any output phase that is supplying at
least 15% of its rated KVA, the measured
output power factor is below 0.50, leading
or lagging.
With the load being supplied by the inverter,
the measured load current exceeds the
auto-Parallel Current Limit or the Pulse-byPulse Current Limit set point values. If the
Static Bypass is available, the SBS supplies
supplemental power. If at the end of 10
cycles the load current has not returned to
below 105%, the Static Bypass will be left
on and the inverter will be turned off. If the
over current has cleared the Inverter will be
left on and the SBS will be turned off.
After performing a recoverable transfer to
bypass, with Auto Rexfer enabled, the Auto
Rexfer time out (default=5minutes) has
elapsed before retransfer could be
performed. A manual retransfer must be
performed, which will then clear the lockout
and zero the retransfer/ hour counter. If the
manual transfer is inhibited, the Inverter
may be latched off due to another fault.
Contact Liebert Global Services.
The UPS has determined that the actual
number of Auto Retransfers in the past hour
has exceeded the permitted maximum.
(user settable, default=5). This alarm
should not be issued if auto retransfers are
disabled by setting the maximum attempts
to “0”. A manual retransfer must be
performed, which will then clear the lockout
and zero the retransfer/hour counter.
If the unit is supplying power to an Auxiliary
device, this alarm indicates that the system
has detected a failure in the Aux. Power
circuit.
If the unit is supplying power to an Auxiliary
device, this alarm indicates that the system
has detected a failure in the Aux. Power
circuit.
Power to the Load Bus Sync circuit has
been lost. Check external wiring. Contact
Liebert Global Services.
83
Page 92

Table 7 Alarms, functions, and corrective actions (continued)
Actual
Alarm/fault
Name
Displayed
On Front
Panel
Batt Gnd
Fault
Aux Ovtemp
Warning
Batt Ovtemp
Warning
Heatsink
Ovtemp
Inlet Air
Ovtemp
Ups Ambient
OvTemp
Pwr pole Fan
1 Fail
Pwr pole Fan
2 Fail
Pwr pole Fan
3 Fail
Description
of Alarm/
Fault
Battery ground
fault alarm
Aux Overtemp
Warning
Battery
Overtemp
Warning
Heatsink
Overtemp
Warning
Inlet Air
Overtemp
Warning
UPS Ambient
OvTemp
Power pole
Fan 1 Fail
Power pole
Fan 2 Fail
Power pole
Fan 3 Fail
Fault
Or
Alarm
Latch
Mask
Dial
Mask
Freeze
Mask
Event Log
Mask Meaning and Corrective Action(s)
Alarm NO YES NO YES
Alarm YES YES NO YES
Alarm NO YES NO YES
Alarm NO YES NO YES
Alarm NO YES NO YES
Alarm NO YES NO YES
Alarm NO YES NO YES
Alarm NO YES NO YES
Alarm NO YES NO YES
Operation
With the Batt Gnd Fault option installed and
the batt breaker closed, the DSP sees its
BGF input asserted by the SWGR. No
action required.
With the Auxiliary temp sensor installed, it
is reading 85% or more of the specified
Maximum Aux temperature set point value.
With the battery breaker closed the battery
has exceeded the “Battery Temperature
Alarm Threshold” set point value.
Sensors on the power semiconductor
heatsinks detect temperatures above the
steady state limits for these components.
The control logic sets off the alarm but does
not shut down the UPS module if the
condition lasts less than 10 minutes. Check
the air intake, air exhaust, and filters.
Reduce the load or transfer it to bypass.
Contact Liebert Global Services if the alarm
persists.
The intake air to the UPS module exceeds
the specified maximum temperature. This
condition only causes an alarm, but should
be corrected immediately to prevent
equipment overheating. Check to make
sure nothing is blocking the inlet air and that
the air filter is clean.
The Outlet air temperature has exceeded
85% of its “Maximum outlet air temperature”
limit.
A fault in the designated Fan motor has
occurred. This condition only causes an
alarm, but if not promptly corrected it could
cause an equipment over-temperature
condition that would shut down the UPS
Module. Check the Fans for proper
operation. Contact Liebert Global Services
if you require assistance or to replace a fan.
A fault in the designated Fan motor has
occurred. This condition only causes an
alarm, but if not promptly corrected it could
cause an equipment over-temperature
condition that would shut down the UPS
Module. Check the Fans for proper
operation. Contact Liebert Global Services
to replace a fan.
A fault in the designated Fan motor has
occurred. This condition only causes an
alarm, but if not promptly corrected it could
cause an equipment over-temperature
condition that would shut down the UPS
Module. Check the Fans for proper
operation. Contact Liebert Global Services
to replace a fan.
84
Page 93

Table 7 Alarms, functions, and corrective actions (continued)
Actual
Alarm/fault
Name
Displayed
On Front
Panel
System Fan
Fail
EPO Latched EPO Latched Alarm NO NO NO YES
SBS
Unable
Transfer To
Byp OK
Low batt
capacity
Inv Off by
User
Batt Low
Warning
Batt Test
Failed
Batt Test
Passed
Config
Modified
Description
of Alarm/
Fault
System Fan
Fail
Fault
Or
Alarm
Latch
Mask
Dial
Mask
Freeze
Mask
Event Log
Mask Meaning and Corrective Action(s)
Alarm NO YES NO YES
SBS Unable Alarm NO NO NO YES
Transfer To
Bypass OK
Alarm YES YES NO YES
Reduced
Battery
Alarm YES YES NO YES
Capacity
Inv Off by User Alarm YES YES NO YES
Battery Low
Warning
Battery Test
Failed
Battery Test
Passed
Config
Modified
Alarm YES YES NO YES
Alarm YES YES NO YES
Alarm NO NO NO YES
Alarm NO NO NO YES
Operation
A fault in the designated Fan motor has
occurred. This condition only causes an
alarm, but if not promptly corrected it could
cause an equipment over-temperature
condition that would shut down the UPS
Module. Check the Fans for proper
operation. Contact Liebert Global Services
to replace a fan.
During start up the EPO switch is sensed as
being activated. Startup is inhibited until the
alarm is cleared. Clear the latched EPO via
the push-button switch located on the
SWGR Board, then perform start up.
The UPS output is not synchronized to the
bypass power source, the static bypass
switch is disconnected, or it has failed
internally. Emergency and overload transfer
to the bypass source is not available. If the
module does not have a manual disconnect
switch, open and re-close the static switch
fuseholder. If the alarm conditions are
automatically corrected, reset the alarm to
clear it. Contact Liebert Global Services if
the alarm stays on.
Shows after a successful transfer to
Bypass. Display is only momentary.
Occurs on systems with multiple battery
cabinets. Indicates that at least one battery
breaker is on and one or more battery
breakers in the string are off. In this state,
the calculations for battery time remaining
and End of Discharge are adjusted
accordingly.
The User has turned the inverter off through
the front panel. Puts data into the event
history log.
With the battery breaker closed, the UPS
has determined that the DC bus voltage
has reached the user settable “Battery Low
Warning” set point. Complete the controlled
shutdown of the critical load. Reset the
alarms if the input power is restored before
shutdown.
With the battery breaker closed, the battery
has failed the self-test. Momentary display.
Sets flag in the event history log
With the battery breaker closed, the battery
has passed the self-test. Momentary
display. Sets flag in the event history log
The User has modified and saved one or
more settings on the configuration screen.
Momentary display. Sets flag in the event
history log
85
Page 94

Table 7 Alarms, functions, and corrective actions (continued)
Actual
Alarm/fault
Name
Displayed
On Front
Panel
Delayed Batt
Charge
Reduced I
Limit
Event Log
Clear
Batt Not
Charging
UPSC-MM
comm. Fail
User
Shutdown
Cant Exec
Batt Test
Batt Not
Charged
Sys Time Set
By Op
Manual XFER
Manual
ReXFER
Batt Cycle
Buff Full
Description
of Alarm/
Fault
Delayed
Battery Charge
Reduced
Current Limit
Event Log
Clear
Battery Not
Charging
UPSC-MM
Comm Fail
User
Shutdown
Cannot
Execute
Battery Test
Battery Not
Charged
System Time
Set By
Operator
Manual
Transfer
Manual
Retransfer
Battery Cycle
Buffer Full
Fault
Or
Alarm
Latch
Mask
Dial
Mask
Freeze
Mask
Event Log
Mask Meaning and Corrective Action(s)
Alarm NO NO NO YES
Alarm NO NO NO YES
Alarm NO NO NO YES
Alarm YES NO NO YES
Alarm YES YES NO YES
Alarm YES YES NO YES
Alarm NO NO NO YES
Alarm NO NO NO YES
Alarm YES YES NO YES
Alarm NO NO NO YES
Alarm NO NO NO YES
Alarm NO NO NO YES
Operation
The generator option is installed, the
system is on generator and the “Delayed
Battery Charge” is suppressing battery
charging to reduce the load on the
generator.
The UPS recognizes that the source is a
generator and has reduced the current limit
setting to avoid generator overloading.
Per the user request, all event logs have
been cleared. This will be the first alarm in
the new log. Momentary display. Sets flag
in the event history log.
With the battery breaker closed, the battery
voltage has not reached 95% of the units
“DC Float Voltage” set point within a
calculated time (based on the test duration.)
This calculation will start immediately at the
end of a successful (“Passed”) battery self
test.
The UPS has detected a communication
failure between its UPS controls and it
monitoring system. Contact Liebert Global
Service.
The User has initiated an “Inverter Off” or
“System Shutdown” through the User
Shutdown screen.
The battery test could not be performed.
See 3.3.7 - Battery Management.
A battery test cannot be executed because
the battery charge is less than 90%.
The User has changed the Date or Time
from the front Panel. Momentary display.
Sets flag in the event history log.
The User has ordered a manual transfer
from UPS to Bypass from the front panel
controls. Momentary display. Sets flag in
the event history log.
The User has ordered a manual transfer
from Bypass to UPS from the front panel
controls. Momentary display. Sets flag in
the event history log.
With batt breaker closed, Monitor has
determined that the buffer that keeps track
of the number of hits the battery has taken
is full. No action required.
86
Page 95

Table 7 Alarms, functions, and corrective actions (continued)
Actual
Alarm/fault
Name
Displayed
On Front
Panel
Auto Restart
Failed
Auto Rexfer
Primed
LBS Active LBS Active Alarm NO NO NO YES The Load Bus Sync Option is active.
On Gen
Active
Load On UPS Load On UPS Alarm NO NO NO YES
Load On
Bypass
Password
Entered
Auto Restart
Init
Normal
Operation
User Startup
init
Input Contact #1Input Contact
Input Contact #2Input Contact
Input Contact #3Input Contact
Description
of Alarm/
Fault
Auto Restart
Failed
Fault
Or
Alarm
Latch
Mask
Dial
Mask
Freeze
Mask
Event Log
Mask Meaning and Corrective Action(s)
Alarm NO NO NO YES
Auto
Retransfer
Alarm NO NO NO YES
Primed
On Gen Active Alarm NO NO NO YES
Load On
Bypass
Password
Entered
Auto Restart
Initiated
Normal
Operation
Alarm NO NO NO YES
Alarm YES NO NO YES
Alarm NO NO NO YES
Alarm NO NO NO YES
User Startup Alarm NO NO NO YES
#1
#2
#3
Alarm YES YES NO YES
Alarm YES YES NO YES
Alarm YES YES NO YES
If Auto Restart feature is installed and
enabled, and the last shutdown was due to
a failed Batt Low Transfer, the Monitor will
automatically attempt to perform the
“normal” startup sequence when power is
reapplied to normal value. This alarm is
issued if the restart could not be performed
before the Auto Restart timeout expired.
The Monitor will abort the auto restart.
An automatic retransfer will be initiated
when the OK to Transfer condition has
been present for 10 seconds, if the
overload has dropped below 100% of the
rated load.
A generator is supplying the system.
The Static Switch is off and the load is on
UPS. Momentary display. Sets flag in the
event history log.
The critical load is being supplied power
from the bypass line, and is therefore
exposed to utility power disturbances. Clear
all of the alarms before attempting to
retransfer the load from the bypass line to
the UPS
The User has modified the Password.
Momentary display. Sets flag in the event
history log.
If the Auto Restart feature is installed and
enabled, and the last shutdown was due to
a failed Batt Low Txfer, the Monitor
automatically initiates the “normal” startup
sequence when the source power is
reapplied to normal value. This alarm is
issued as notification that auto-restart has
begun. No action required.
Notification that no active alarms/faults
exist. Sets flag in the event history log.
User has initiated either a Manual or Auto
Start-up from the Start-up/Shutdown
screen.
The System has been notified from the OCDI option that a customer alarm has been
activated. The system will substitute userdefined text when displaying these alarms.
The System has been notified from the OCDI option that a customer alarm has been
activated. The system will substitute userdefined text when displaying these alarms.
The System has been notified from the OCDI option that a customer alarm has been
activated. The system will substitute userdefined text when displaying these alarms.
Operation
87
Page 96

Table 7 Alarms, functions, and corrective actions (continued)
Actual
Alarm/fault
Name
Displayed
On Front
Panel
Input Contact #4Input Contact
Input Contact #5Input Contact
Input Contact #6Input Contact
Input Contact #7Input Contact
Input Contact #8Input Contact
Description
of Alarm/
Fault
#4
#5
#6
#7
#8
Fault
Or
Alarm
Alarm YES YES NO YES
Alarm YES YES NO YES
Alarm YES YES NO YES
Alarm YES YES NO YES
Alarm YES YES NO YES
Latch
Mask
Dial
Mask
Freeze
Mask
Event Log
Mask Meaning and Corrective Action(s)
Operation
The System has been notified from the OCDI option that a customer alarm has been
activated. The system will substitute userdefined text when displaying these alarms.
The System has been notified from the OCDI option that a customer alarm has been
activated. The system will substitute userdefined text when displaying these alarms.
The System has been notified from the OCDI option that a customer alarm has been
activated. The system will substitute userdefined text when displaying these alarms.
The System has been notified from the OCDI option that a customer alarm has been
activated. The system will substitute userdefined text when displaying these alarms.
The System has been notified from the OCDI option that a customer alarm has been
activated. The system will substitute userdefined text when displaying these alarms.
NOTE
There are 8 alarms on the Remote Alarm Status Panel. See 3.5.3 - Remote Alarm Status
Panel
3.4.3 Status
Status conditions give the Operator additional knowledge about UPS operation. Some are indicated
on the Mimic Display screen by a text message while others are depicted graphically.
The following status messages may appear in the Operator display.
• Static Switch Connected. The static switch is connected (the disconnect switches are closed - ON)
and is ready to provide a current path from the bypass input to the load.
• Static Switch Disconnected. The static switch is disconnected (the disconnect switches are open OFF) for maintenance procedures.
• OK to Transfer. The UPS system voltage, frequency, and phase match the bypass line. This
means that a transfer between the bypass line and the UPS is permitted.
• Not OK to Transfer. Either the UPS or bypass voltage, frequency, or phase is not within the specified limits or the static bypass switch is not available. Therefore, manually-initiated transfer
between the bypass line and the UPS is not permitted. Emergency or overload transfer to bypass
may still be available provided the “Static Switch Unable” alarm is not indicating.
• Time to Overload Transfer. During an overload condition, the time remaining before transfer (in
seconds) is displayed at the bottom of the load block.
3.5 Communication Interfaces
The Npower UPS can be configured with various communication ports to assist the Operator in monitoring the UPS system.
88
Page 97

3.5.1 RS-232 Port: Local Reporting Terminal
The Npower transmits UPS system status and history information to a remote terminal through an
RS-232 Port in ASCII Format. This feature is called the Service Terminal. The service terminal interface is intended to be accessed via PC terminal emulation software like Procomm Plus, Microsoft Windows Terminal or Hyperterminal, or directly through a standard ASCII terminal.
A summary of Npower service terminal commands is provided in Table 8 below. Two types of commands are identified: operational (OPS) and diagnostic (DIAG). Operational commands deal primarily with machine operations: metering, alarm events and transient analysis. This information is also
available through the front panel Operator interface. Diagnostic commands are intended to allow
manipulation of the internal machine operating parameters. Access to these commands is limited
through password protection.
Table 8 Service terminal command summary
Command Type Description
? OPS Reports a command listing (same as HELP?) OR provides help with specific
commands.
AA? OPS Reports active alarms.
AF? OPS Reports active faults.
DATE? OPS Reports the current date.
EL? OPS Reports entire event log, most recent on top.
HELP? OPS Reports a command listing (same as?) OR provides help with specific commands.
HL? OPS Reports the entire requested history log (comma delimited) if frozen, from oldest frame
to newest.
SPT? OPS Reports setpoints for group number.
SR? OPS Reports active status reports.
TIME? OPS Reports the current time in military format.
UPMDR? OPS Reports metering data using real values.
Operation
In addition to the local RS-232 Port, Npower will interface with an External modem which uses the
same ASCII command set. Likewise the SiteScan port can support SiteScan communications. Whatever communication options are installed in the Npower UPS can all be used simultaneously.
3.5.2 Worldwide Reporting
The Npower has a standard Interface Terminal Block to connect to an optional external modem. An
internal optional modem can also be installed, although the external modem cannot be utilized if the
system is configured with an internal modem. The internal modem is compatible with standard analog telephone lines and most standard telephone equipment. The internal or external modems allow
you to configure the UPS to:
1. Make outgoing calls to a computer in an attempt to notify of a pressing alarm condition.
2. Accept incoming calls so a remote computer can connect to the UPS and serve as a monitoring
station.
3. Make outgoing calls to a pager.
Auto-Dial
The Npower will automatically dial a pre-programmed (customer-selected) phone number when specified alarm conditions occur. The auto-dial phone number, an alternate number, and the modem baud
rate are programmed by using the System Configuration screen. (See Options Manual for programming instructions.) The alarm messages that initiate an auto-dial call are identified in Table 7.
When the auto-dial function is initiated, automatic dial attempts three times to dial the first phone
number at 45 second intervals. If unanswered, the system rolls over to the second number and
repeats the sequence. After three tries on each line, the auto dial function is discontinued, at which
point the pager module (See Dial Out Pager on page 90) gains access to the modem.
Once a connection is made, the system transmits the information on the Present Status Report
screen, then hangs up. The Present Status Report in ASCII Format includes the UPS system identification number, date, time, alarm messages and metered parameter indications.
89
Page 98

Operation
Requesting Information
If your Npower UPS is equipped with a modem and telephone line, you can call the UPS and receive
system status and historical information. You can place the call from either a remote terminal or a
personal computer with a communications program.
Follow the instructions for your terminal or your communications program to call the UPS. (See
Options Manual for details.) Once connected, the UPS will respond to your specific requests for information (See Table 8).
For example, to see a copy of information on the active status reports, enter the command, “SR” and
press ENTER. The Npower UPS will send the data, which will be displayed on your screen. Please
note that the data on the screen is like a snapshot -- the status of the UPS at the moment you
requested the information. The information sent remotely is not updated, although you can repeat the
process at intervals to request the present information.
Some screens contain data that you may wish to import into a spreadsheet for further calculations. To
put this data into a usable format, use the screen-capture feature of your communications software
(or a separate screen-capture program) to save all or part of the data to disk. Hint: If you save the file
with an extension of “.txt,” it can then be imported into a spreadsheet program and converted to worksheet format.
To terminate your connection to the Npower, type “Quit” and press Enter. The UPS will hang up its
modem and await your next call.
Dial Out Pager
The Dial Out Pager requires the modem option to be installed. (It works with both the external and
internal modems) Its function is to provide pager support (alphanumeric and numeric)for the Npower
system.
The Pager Support Screen can be accessed by starting with SYSTEM CONFIGURATION, and navigating to COMM OPTIONS, and then to PAGER SUPPORT CONFIGURATION.
Figure 111 Pager support screen
PAGER ENABLED : YES
PAGER PHONE NUMBER : 8003433433
PIN NUMBER : 11111111
From this screen you can enable or disable the pager, and set it to the pin number required for alphanumeric paging on Skytel.
The PAGER ENABLED field can be set to YES or NO. This is interlocked with the modem option.
Pager support requires the modem.
PAGER SUPPORT CONFIGURATION
EXIT
The PAGER PHONE NUMBER: can have a maximum of 20 digits. This entry is blank when the
NVRAM is first initialized.
The PIN NUMBER can have a maximum of 20 digits. The default pin number is 00000000
Note: Changes to these pager parameters aren’t saved into NVRAM until you select “Save & Exit”
when you leave the configuration menu screens.
90
Page 99

PROTOCOL
The pager module uses the Telocator Alphanumeric Protocol (TAP), which is the protocol used for
SkyTel pagers. A copy of this protocol is included with the pager option. Pager support requires the
same hardware that modem support requires. The internal modem is quite adequate.
Since the pager option uses the same modem that the modem option uses, careful thought has gone
into the sharing of one modem. For example, incoming connections take precedence over dial out
alarms or pager alarms. When a dial out alarm is articulated, each number is tried at least 3 times
before giving up. After giving up, the pager module gains access to the modem, and will begin trying
to send the alarm to a pager. If modem dial out is disabled but pager dial out is enabled, the pager
alarm will skip the modem dial out module and proceed immediately to the pager module dial out.
When an alarm message is sent to the pager, it includes a system header and a data portion that
looks like the following:
System ID# 00000000 System Tag # 00000000
1 BATTERY FUSE FAIL 5/11/01 3:22 PM
A list of alarms, masks, and corrective action is shown in Table 7.
3.5.3 Remote Alarm Status Panel
The NPower UPS may be ordered with an Optional Remote Alarm Status Panel. This remotelymounted panel (within 500 feet), provides an LED indication of the following Alarm conditions:
• Load On UPS
• Load On Bypass
• Battery Discharge
• Low Battery Warning
• Overload
• Ambient Overtemp
• System Summary Alarm
• New Alarm
Operation
The Remote Alarm Status Panel housing is a NEMA Type I enclosure, available for remote mounting
on walls or columns. The Remote Alarm Status Panel displays the 8 alarms specified above. Signals
for the alarms are carried over a 4-wire connection (customer supplied) which connects the Npower
CANBUS data link and Optional Power Supply to the Remote Alarm Status Panel.
3.5.4 SiteScan
The SiteScan port sends UPS system information to a Liebert SiteScan Central Monitoring System.
UPS operation, environmental control systems, and facility security can all be monitored from a single location.
91
Page 100

3.5.5 Setting Up External Communication Devices
All external communication devices, including the modem, are optional equipment. Connections to
communication ports are made by wiring cables to terminal boards. Connection points are shown on
the Control Wiring Interconnect Diagram in the Installation Manual. Contact Liebert Global Services
for assistance when attaching an external device to your UPS system.
Any terminal that accepts the standard 7-bit ASCII codes and conforms to the data link requirements
can be used to interface with the Npower UPS. If a printer is used, the terminal must support it. The
UPS does not send or receive any printer control commands.
Data link requirements are:
• Asynchronous RS-232 communication
• Terminals may be configured as DTE or DCE
• Baud Rate:
Modem 1200 or 2400
Terminal 9600 only
•Data Bits: 8
•Stop Bits: 1
•Parity: None
• Handshaking: Not required
•Full Duplex
Operation
3.6 Modes Of Operation
This section illustrates the flow of power through circuit breakers, switches, and UPS components during various modes of operation. The same modes of operation apply to all configurations of the Liebert
Npower UPS. Highlighted (thick) lines in the diagrams indicate power flow and power availability.
3.6.1 Load on Bypass
Load on bypass, with the UPS not available, is shown in the figure below. The UPS system could be in this
mode of operation during either initial startup or UPS system shutdown and isolation for maintenance.
Figure 112Load on bypass, UPS not available
3.6.2 OK to Transfer
The OK to Transfer status message will be displayed when the bypass line and UPS system output
power are both available, their voltage, frequency, and phase synchronization are matched within
specifications, and the Static Switch Disconnects are closed (ON). An alarm message may be displayed to indicate Load on Bypass. If no alarm is displayed, the operating status is Load On UPS.
When the OK to Transfer message is displayed, you can perform a manual transfer of the load from
the UPS system to bypass, or a manual retransfer of the load from bypass to the UPS system. See
3.3.6 - Manual Transfer for more information.
MIMIC DISPLAY
SS
RECT.
BATTERY
NORM
SERV
INV.
SYS. STATUS
LOAD
92
 Loading...