

Liebersew 737 Operations Manual And Parts Book
SUPER
HIGH
SPEED
OVERLOCK
SEWING
MAGHINE
Operation
Manual
Parts
Book
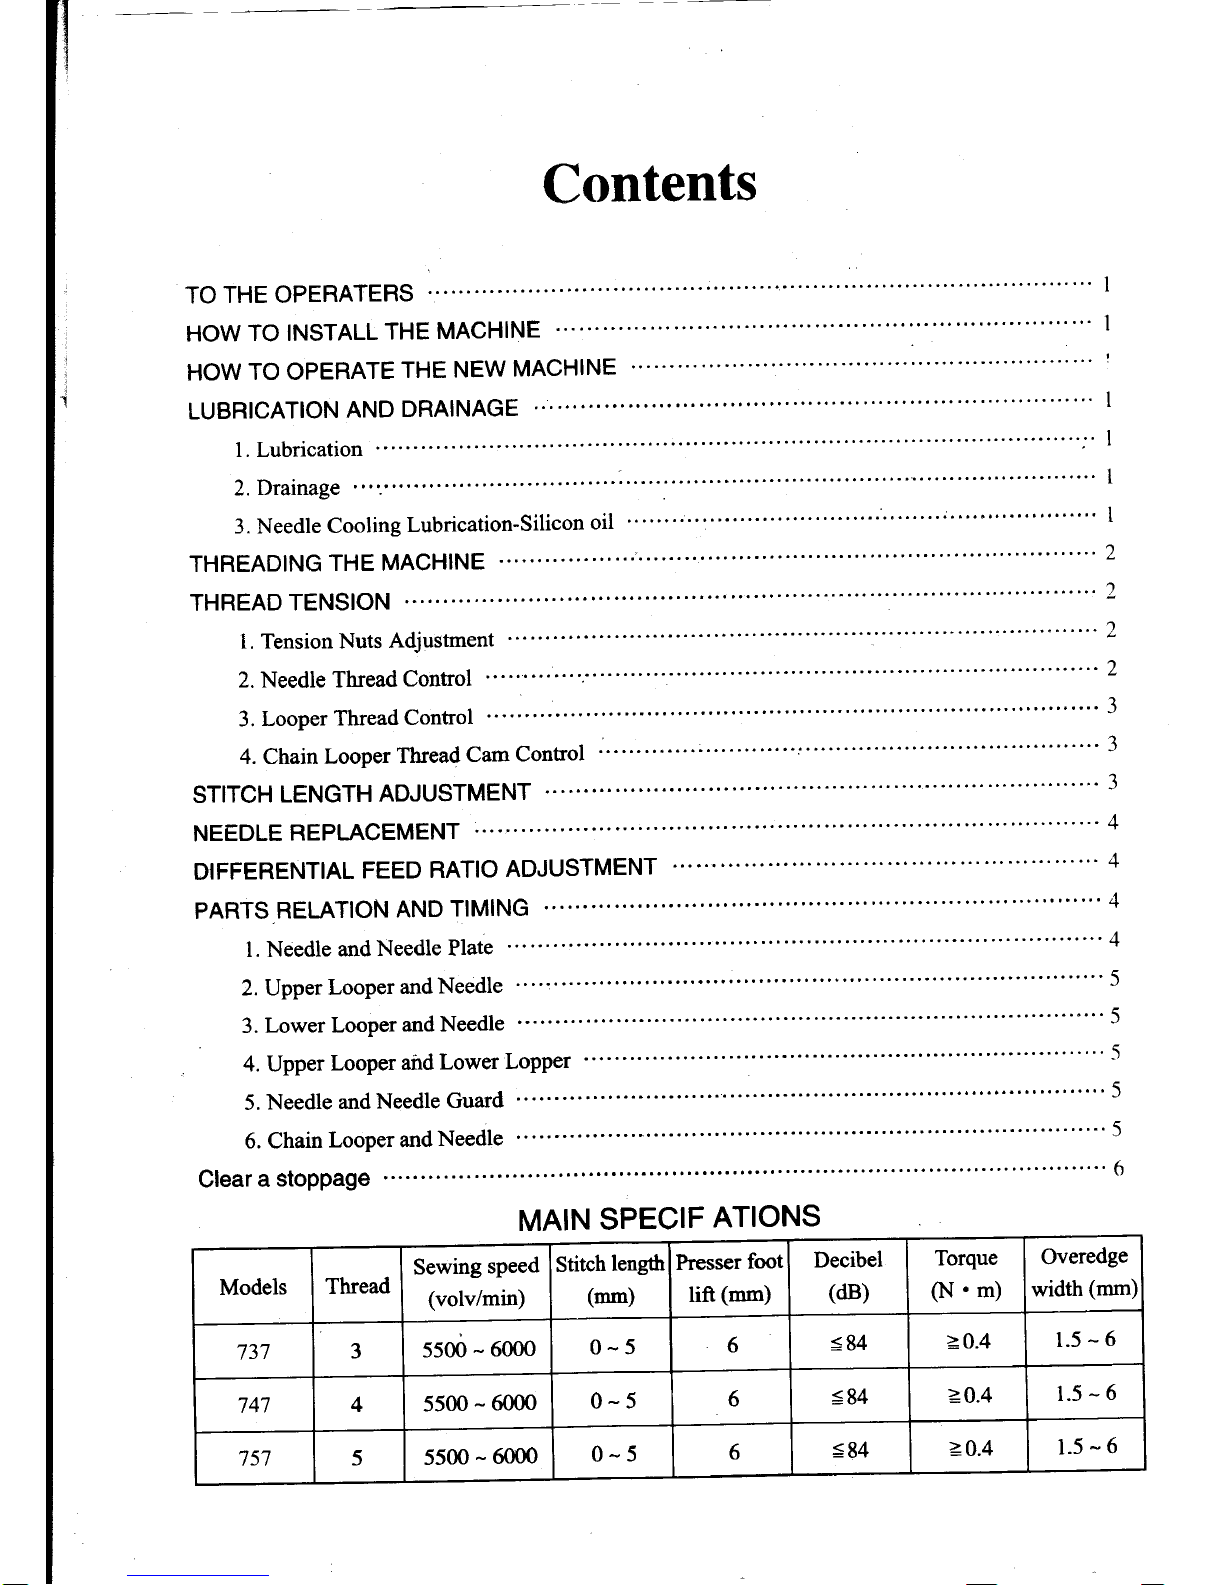
Contents
TO
THE OPERATERS
......
HOW
TO INSTALL
THE
MACHINE
...
HOW
TO OPERATE
THE
NEW
MACHINE
LUBRICATION
AND
DRAINAGE
""''""
I
l.Lubrication
"""""'
"""""""
I
2.Drainage
3. Needle
Cooling
Lubrication-silicon
oil
""""":"""""""
"
j""""""""""'
I
THREADING
THE MACHINE
""'"''
2
THREAD
TENSION
.",...",
2
l.TensionNutsAdjustment
"""
""""""2
2. Needle Thread
Control
3.
LooperThreadControl
"""""""'3
..',....3
4. Chain Looper
Thread
Cam
Contol
""""""
ST]TCH LENGTH
ADJUSTMENT
...
"""
3
NEEDLE
REPLACEMENT
:...".".''
DIFFERENTIAL
FEED
RATIO
ADJUSTMENT
."
"""
4
PARTS
RELATION
AND
TIMING
...."
'""""'"
4
l. Needle
and
Needle Plate
"'
"""
4
2. Upper
Looper
andNeedle
3. LowerlooperandNeedle
"""""""""'5
4. Upper
Looper
aird
Lower
LoPPer
5.
Needle
and
Needle
Guard
"""""""""
5
6. Chain
Looper and
Needle
" "
"
5
Clear
a
stoppage
""""""'
6
MAIN
SPECIF
ATIONS
Models
Thread
Sewing
speed
(volv/min)
Stitch
length
(mm)
Presser
foot
lift
(mm)
Decibel
(dB)
Torque
(N'm)
Overedge
width
(mm)
3
5500
-
6000
0-5
6
=84
=0.4
1.5-6
747
4
5500
-
6000
0-5
6
=84
=0.4
1.5-6
7s7
5
5500
-
6000
0-5
6
s84
>_o.4
1.5-6
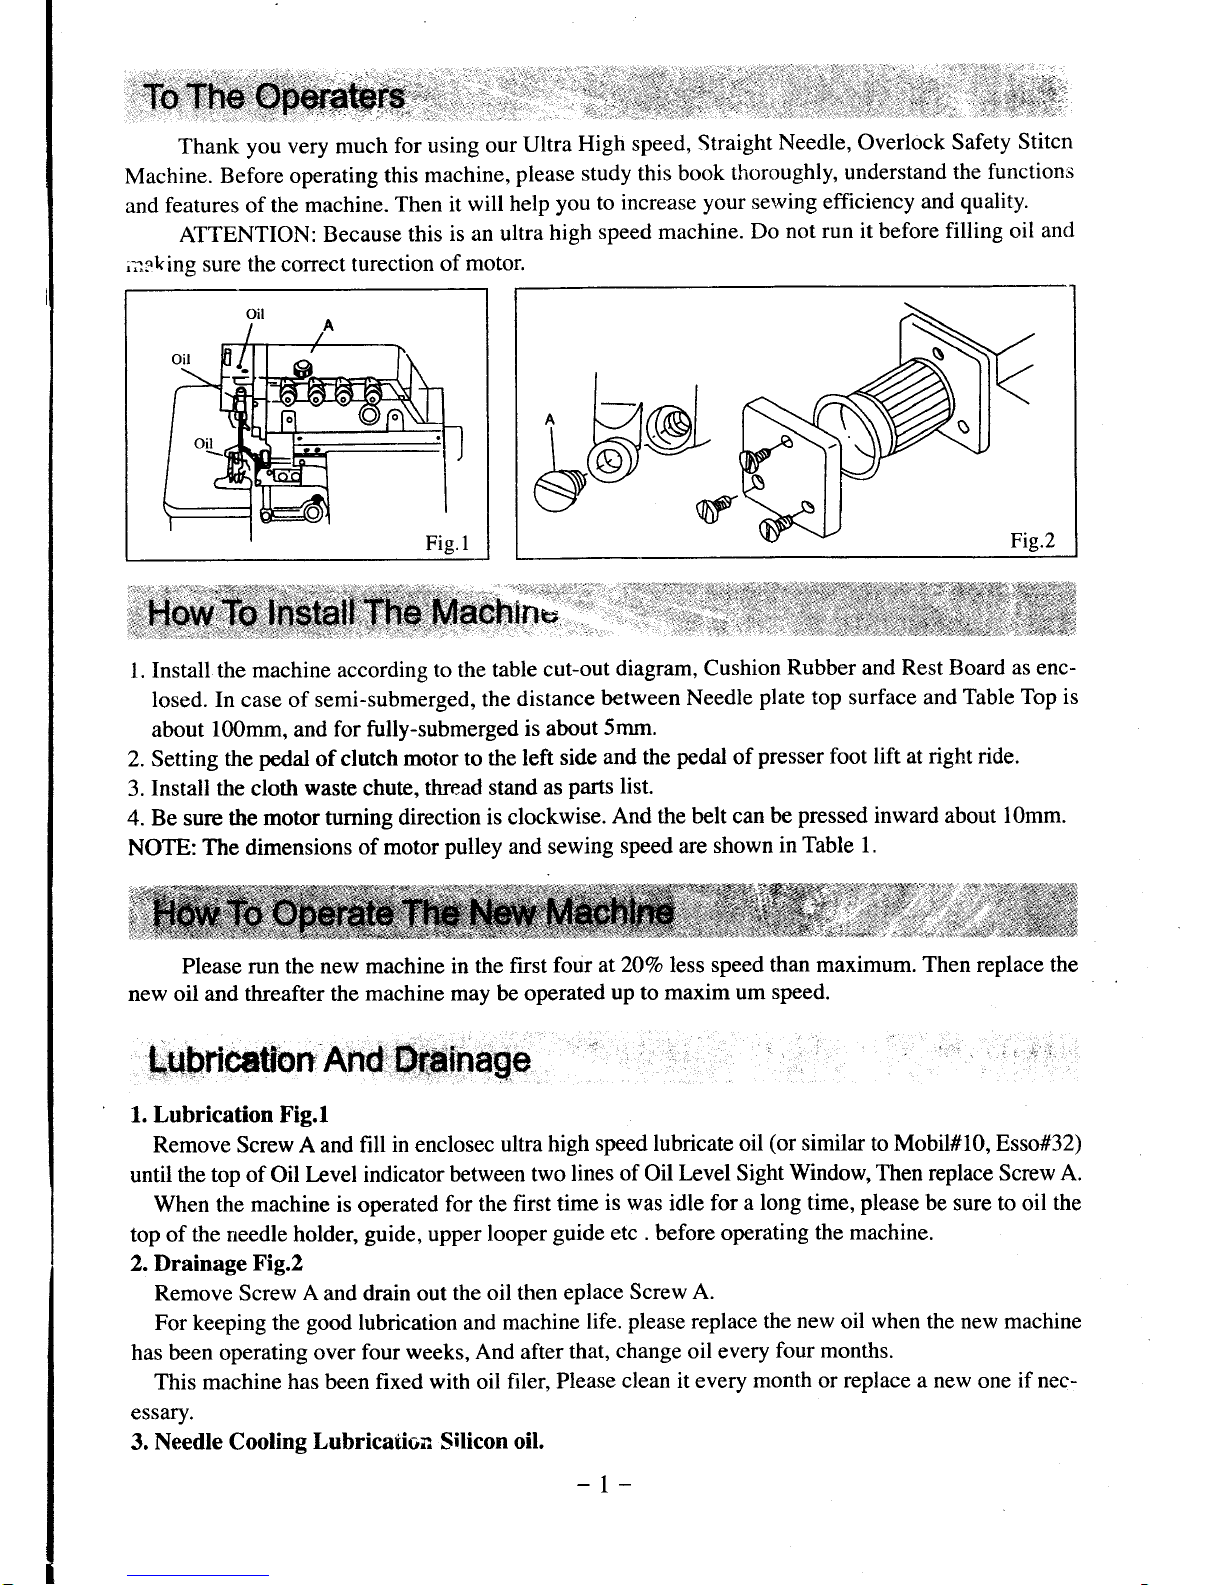
Machine.
Before operating
this machine,
please
study this book
thoroughly,
understand
the functions
and
features of the
machine. Then
it
will help
you to
increase
your
sewing efficiency
and
quality.
ATTENTION:
Because
this
is an ultra
high
speed machine.
Do
not run it before filling oil
and
i::king
sure the correct turection
of
motor.
ffi
1. Install
the machine according
to the table
cut-out
diagram, Cushion
Rubber
and Rest Board
as enc-
losed. In case of semi-submerged,
the
distance
between Needle
plate
top surface and Table
Top is
about
100mm,
and
for fully-submerged
is about
5mm.
2. Setting
the
pedal
of
clutch motor
to the left
side
and the
pedal
of
presser foot lift at right ride.
3.
Install the
cloth
waste
chute,
thread stand
as
parts
list.
4. Be sure the motor
turning direction
is clockwise.
And the belt can
be
pressed
inward about 10mm.
NOTE:
The dimensions
of motor
pulley
and sewing
speed are
shown
in Table 1.
Please run the new machine in the
first
four at20Vo less
speed than maximum. Then replace the
new oil and threafter the machine
may be operated
up
to
maxim um
speed.
Lubricatdn.And'
age
1. Lubrication Fig.l
Remove Screw A and fill
in enclosec
ultra high
speed lubricate oil
(or
similar
to Mobil#lO, Esso#32)
until
the top of
Oil
level indicator between
two
lines
of
Oil
Level Sight
Window,
Then replace Screw A.
When the
machine
is operated
for the
first time
is was
idle for
a long time,
please
be
sure to oil
the
top of
the needle holder,
guide,
upper
looper
guide etc . before operating
the machine.
2. Drainage
Fig.2
Remove Screrv
A
and drain out
the oil then
eplace Screw
A.
For keeping the
good
lubrication and
machine
life.
please
replace the
new
oil
when
the new machine
has been operating
over four
weeks, And after
that,
change
oil every
four months.
This machine
has been fixed with oil
filer, Please
clean it every
month or replace a new
one
if nec-
essary.
3. Needle Cooling
Lubrication
Silicon
oil.
_,:-
.:
:
:
. i
.
'.:
"
'
.:
S,
l,
:,.,.
1'11'11:::11r:r,,:L:;1
-1-
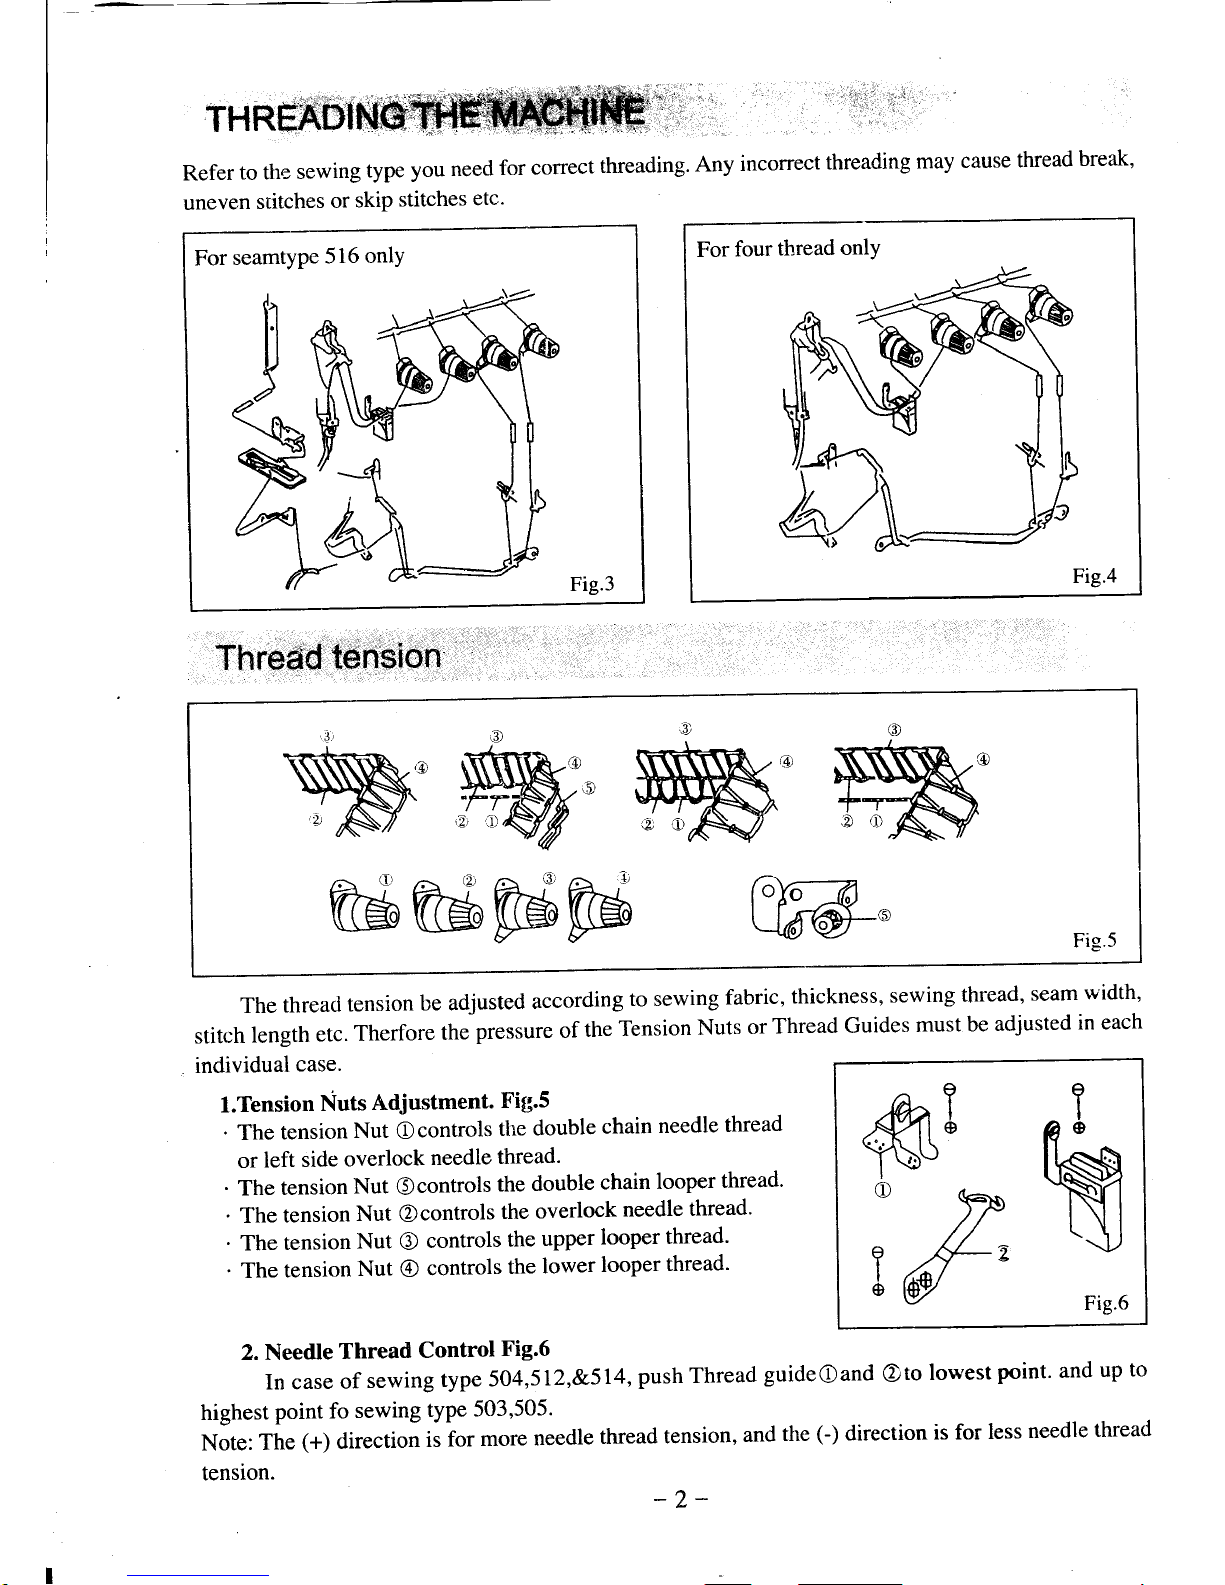
Refer
to the
sewing
type
you
neecl
for correct
threading.
Any
incorrect
threading
may
cause
thread
break'
uneven
stitches
or
skip
stitches
etc.
For
seamtypc
516
onlY
Fig.3
Thre€ftI&n's'ion
tubG@@
Fig.5
The
threaci
tension
be adjusted
according
to sewing
fabric,
thickness,
sewing
thread,
seam
width,
stitch
length
etc.
Therfore
the
pressure
of
the
Tension
Nuts
or
Thread
Guides
must
be
adjusted
in each
individual
case.
l.Tension
Nuts
Adjustment.
Fig.S
.
The
tension
Nut
Ocontrols
the
double
chain
needle
thread
or
left
side
overlock
needle
thread.
'
The
tension
Nut
Ocontrols
the
double
chain
looper
thread'
'
The
tension
Nut
@controls
the
overlock
needle
thread'
'
The
tension
Nut
O
controls
the
upper
looper
thread'
'
The
tension
Nut
@
controls
the
lower
looper
thread'
2. Needle
Thread
Control
Fig.6
In case
of
sewing
type
504,512,&5l4,push
Thread
guideOand
Oto
lor*'est
point.
and
up
to
highest
point fo
sewing
type
503,505.
Note:
The
(+)
direction
is
for
more
needle
thread
tension,
antl
the
(-)
direction
is for
less
needle
thread
tension.
-2-
i
ffi3
[i
:PN
Ttr'
.,,U
For
four
thread
onlY
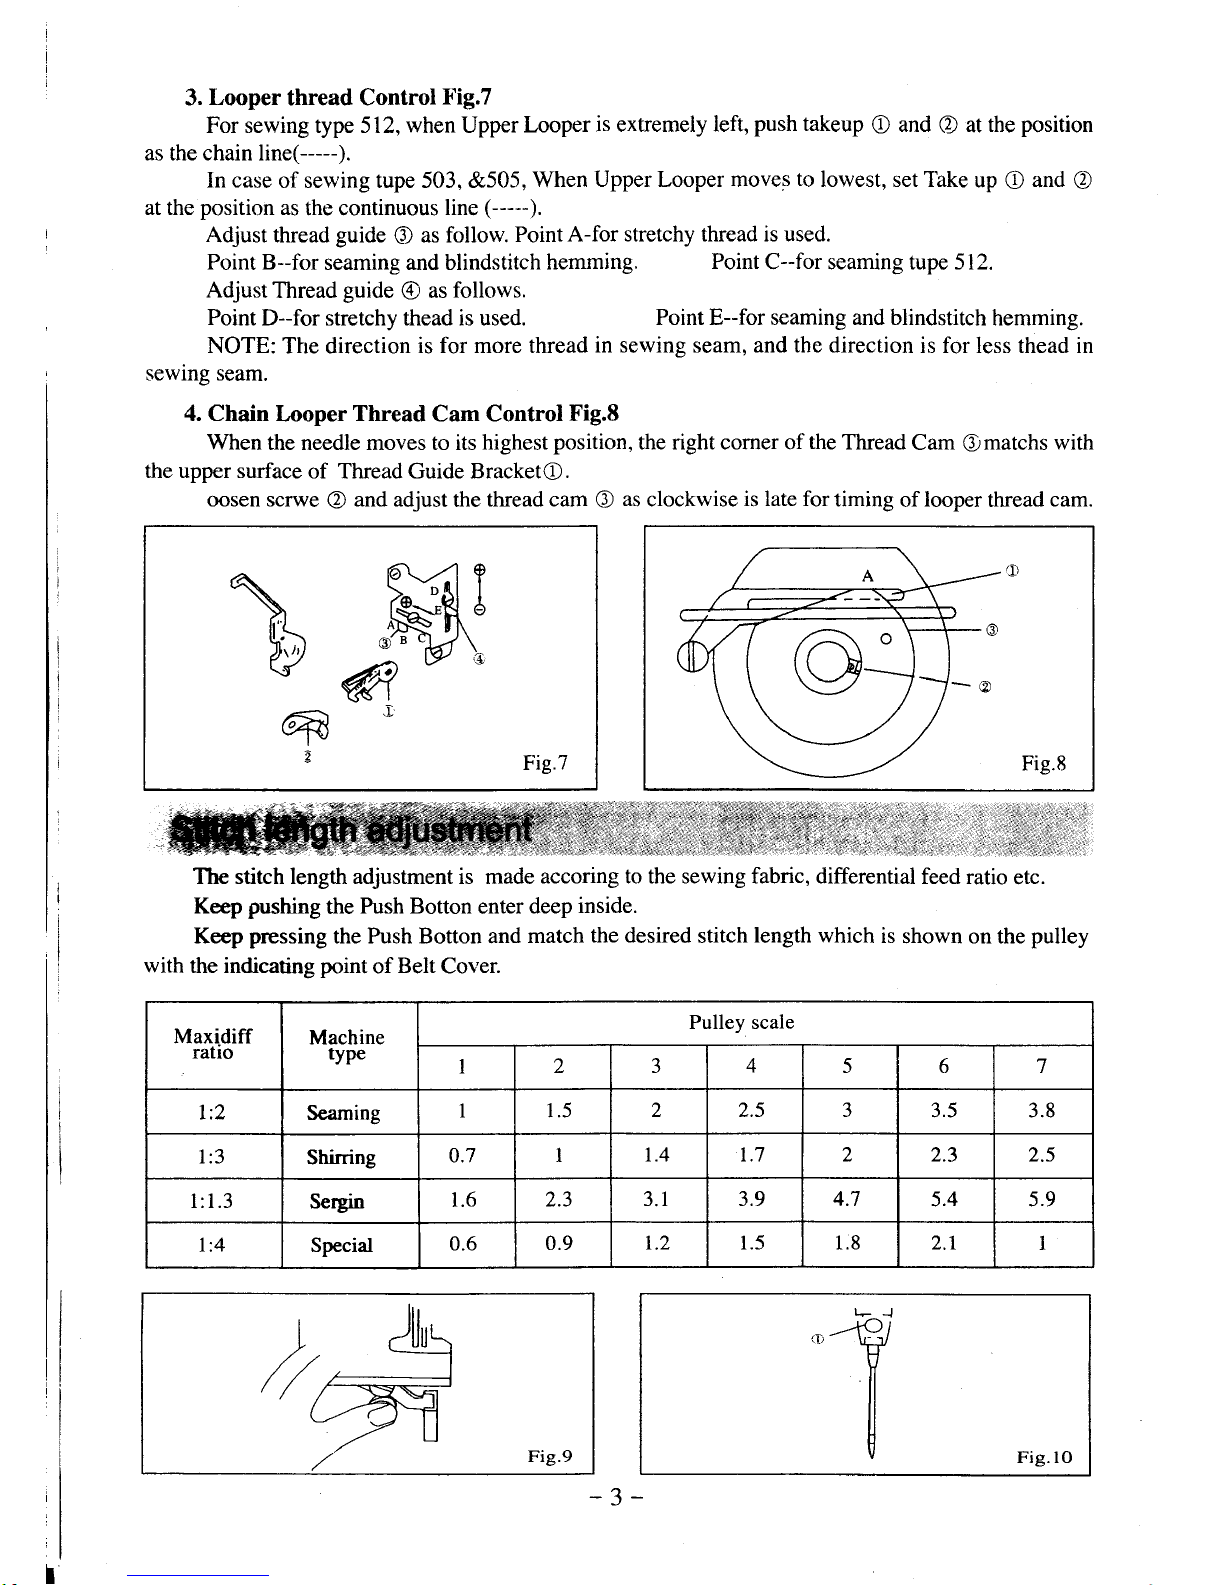
3.
Looper
thread Control
l'ig.7
For sewing type 512,
when
Upper
Looper
is extremely left,
push
takeup
O
and
(D
at
the
position
as the chain line(-----).
In case
of sewing tupe 503, &505,
When
Upper Looper moves
to
lowest, set Take
up
O
and
O
at the
position
as
the continuous
line
(-----).
Adjust thread
guide
G)
as follow.
Point
A-for stretchy thread is used.
Point B--for
seaming and blindstitch
hemming.
Point
C--for seaming tupe 512.
Adjust
Thread
guide
@
as
follows.
Point
D--for stretchy thead is used.
NOTE:
The direction
is for more thread
in
sewing seam.
4. Chain
Looper
Thread
Cam Control
Fig.8
When
the needle moves to its
highest
position,
the right corner of
the
Thread
Cam
Omatchs
with
the upper surface
of Thread Guide BracketO.
oosen scrwe @ and adjust
the
thread cam
O
as
clockwise
is late for
timing
of
looper
thread
cam.
Point E--for seaming and blindstitch
hemming.
sewing seam, and the direction
is for less thead in
\
b
@
2
Fig.7
The stitch length adjustment is made
accoring to the sewing fabric, differential
feed ratio
etc.
Keep
pushing
the
Push Botton
enter
deep
inside.
Keep
pressing
the Push Botton and
match
the desired
stitch
length which
is
shown on the
pulley
with
the indicating
point
of
Belt
Cover.
Maxidiff
ratio
Machine
type
Pulley scale
I
2
J 4
5 6 7
l:2
Seaming
I 1.5
2 2.5
J
3.5 3.8
l:3
Shirring
0.7
I
1.4 1.7 2 2.3 2.5
1:1.3
Sergin
1.6
2.3 3.1 3.9 4.7
5.4 5.9
l:4 Special
0.6
0.9
r.2 1.5 1.8 2.1
I
Fig.9
Fig. lO
-3-
Please
use
DCX27
or
equivalent
needle
size'
Loosen
ScrewOand
remove
the
old
needle'
Insert
the
needle
which
long
groove
faces
you
and
pusl
it up deep
into
the
needle
hole
until
it
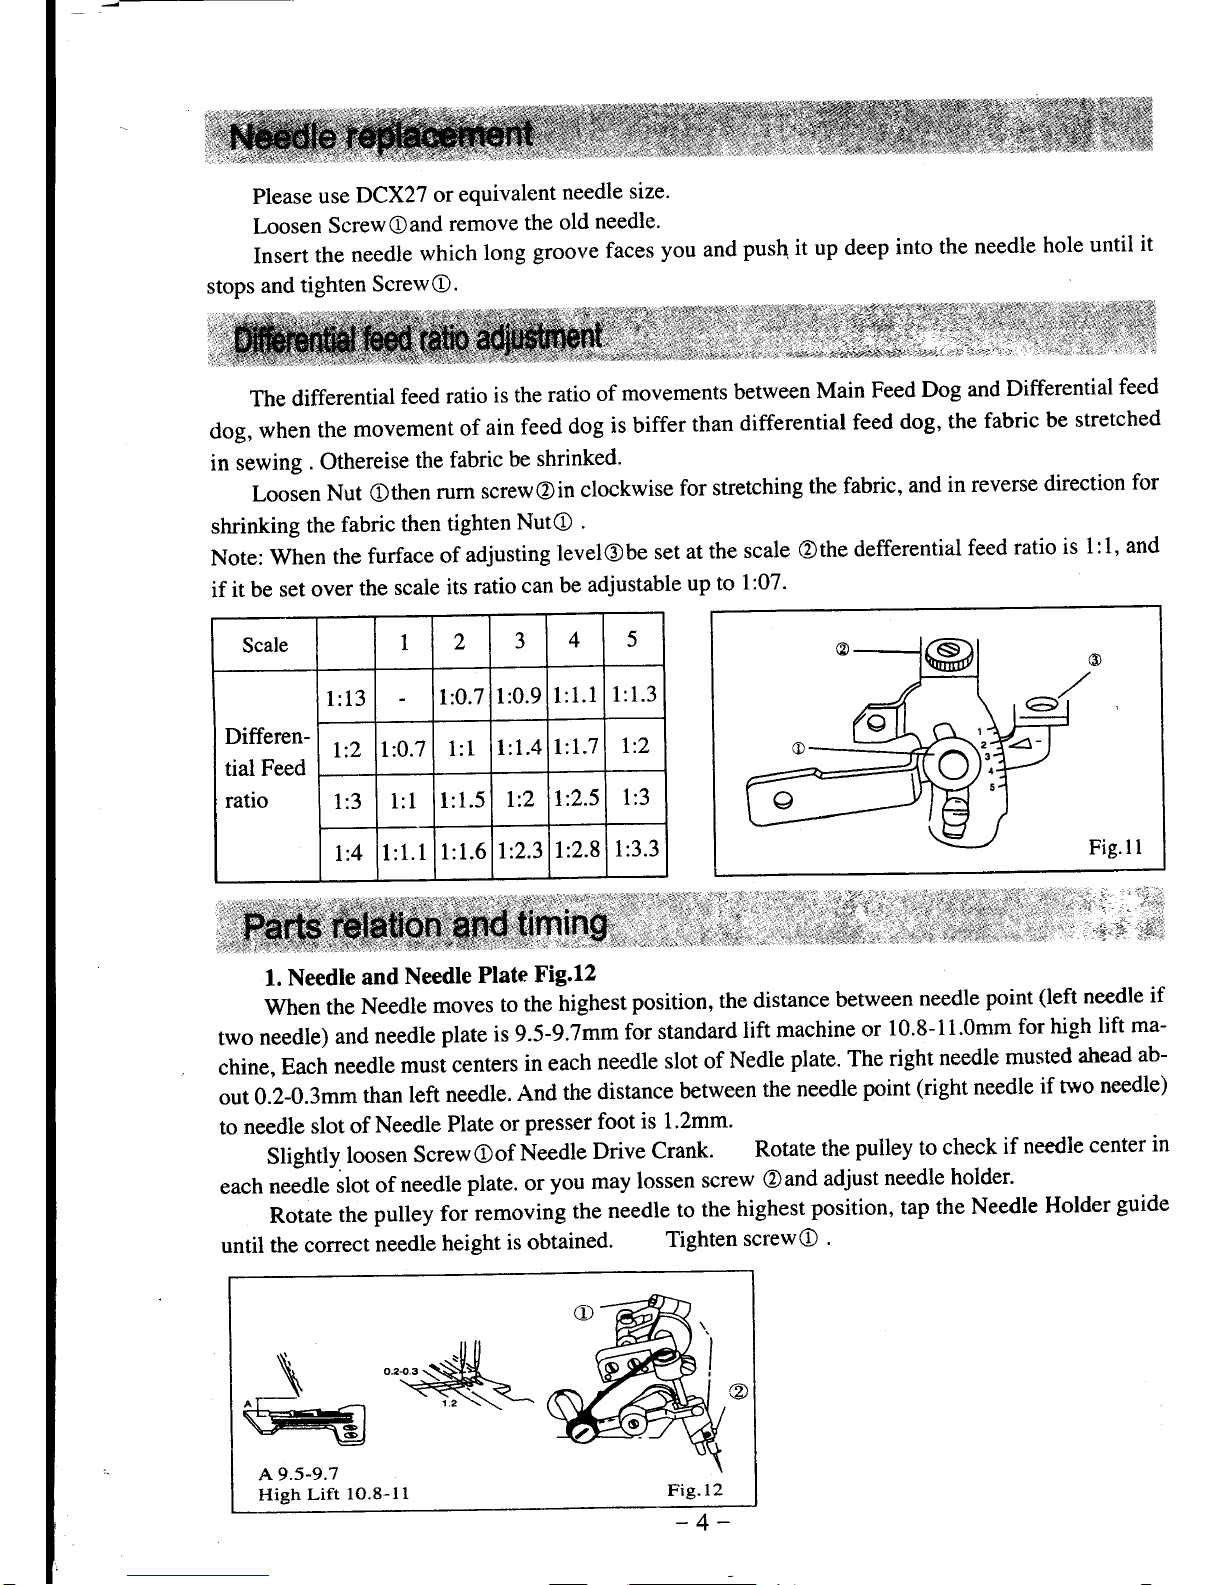
The
differential
feed
ratio
is the
ratio
of
movements
between
Main
Feed
Dog
and
Differential
feed
dog,
when
the
movement
of
ain
feed
dog
is biffer
than
differential
feed
dog,
the
fabric
be stretched
in sewing
. Othereise
the
fabric
be shrinked.
Loosen
Nut
Othen
rum
screwq)in
clockwise
for stretching
the fabric,
and
in reverse
direction
for
shrinking
the
fabric
then
tighten
NutO
'
Note:
When
the
furface
of
adjusting
level@be
set
at
the
scale
@the
defferential
feed
ratio
is
1:1,
and
if it be set over
the
scale
its
ratio
can
be
adjustable
up to
1:07'
Scale
I 2
3
4
5
Differen-
tial Feed
ratio
1:13
l:0.7
l:0.9
1:1.1
l:1.3
I:2
1:0.7
1:1
l:I.4
l:1.7
l:2
l:3 l:l
1:1.5
I:2
l:2.5
1:3
1:4
l:1.1
l:1.6
l:2.3
l:2.8
1:3.3
Fig.l
I
stops
and
tighten
ScrewO.
1. Needle
and
Needle
Plate
Fig.12
When
the
Needle
moves
to
the
highest
position,
the
distance
between
needle
point
(left
needle
if
two
needle)
and
needle
plate
is
9.5-9.7mm
for standard
lift
machine
or
10'8-ll.Omm
for
high
lift
ma-
chine,
Each
needle
must
centers
in each
needle
slot of
Nedle
plate.
The
right
needle
musted
ahead
ab-
out 0.2-0.3mm
rhan
left
needle.
And
the
distance
between
the
needle
point
(right
needle
if nvo
needle)
to
needle
slot of
Needle
Plate
or
presser
foot
is 1'2mm'
Slightly
loosen
ScrewOof
Needle
Drive
Crank.
Rotate
the
pulley to
check
if
needle
center
in
each
needle
slot
of
needle
plate. or
you may
lossen
screw
@and
adjust
needle
holder.
Rotate
the
pulley foiremoving
the
needle
to the
highest
position, tap
the Needle
Holder
guide
until
the correct
needle
height
is obtained.
Tighten
screwO
'
\
+E--<-r
.reJ
A9.5-9.7
High
Lift
rO.8-11
Fig.
l2
-4-
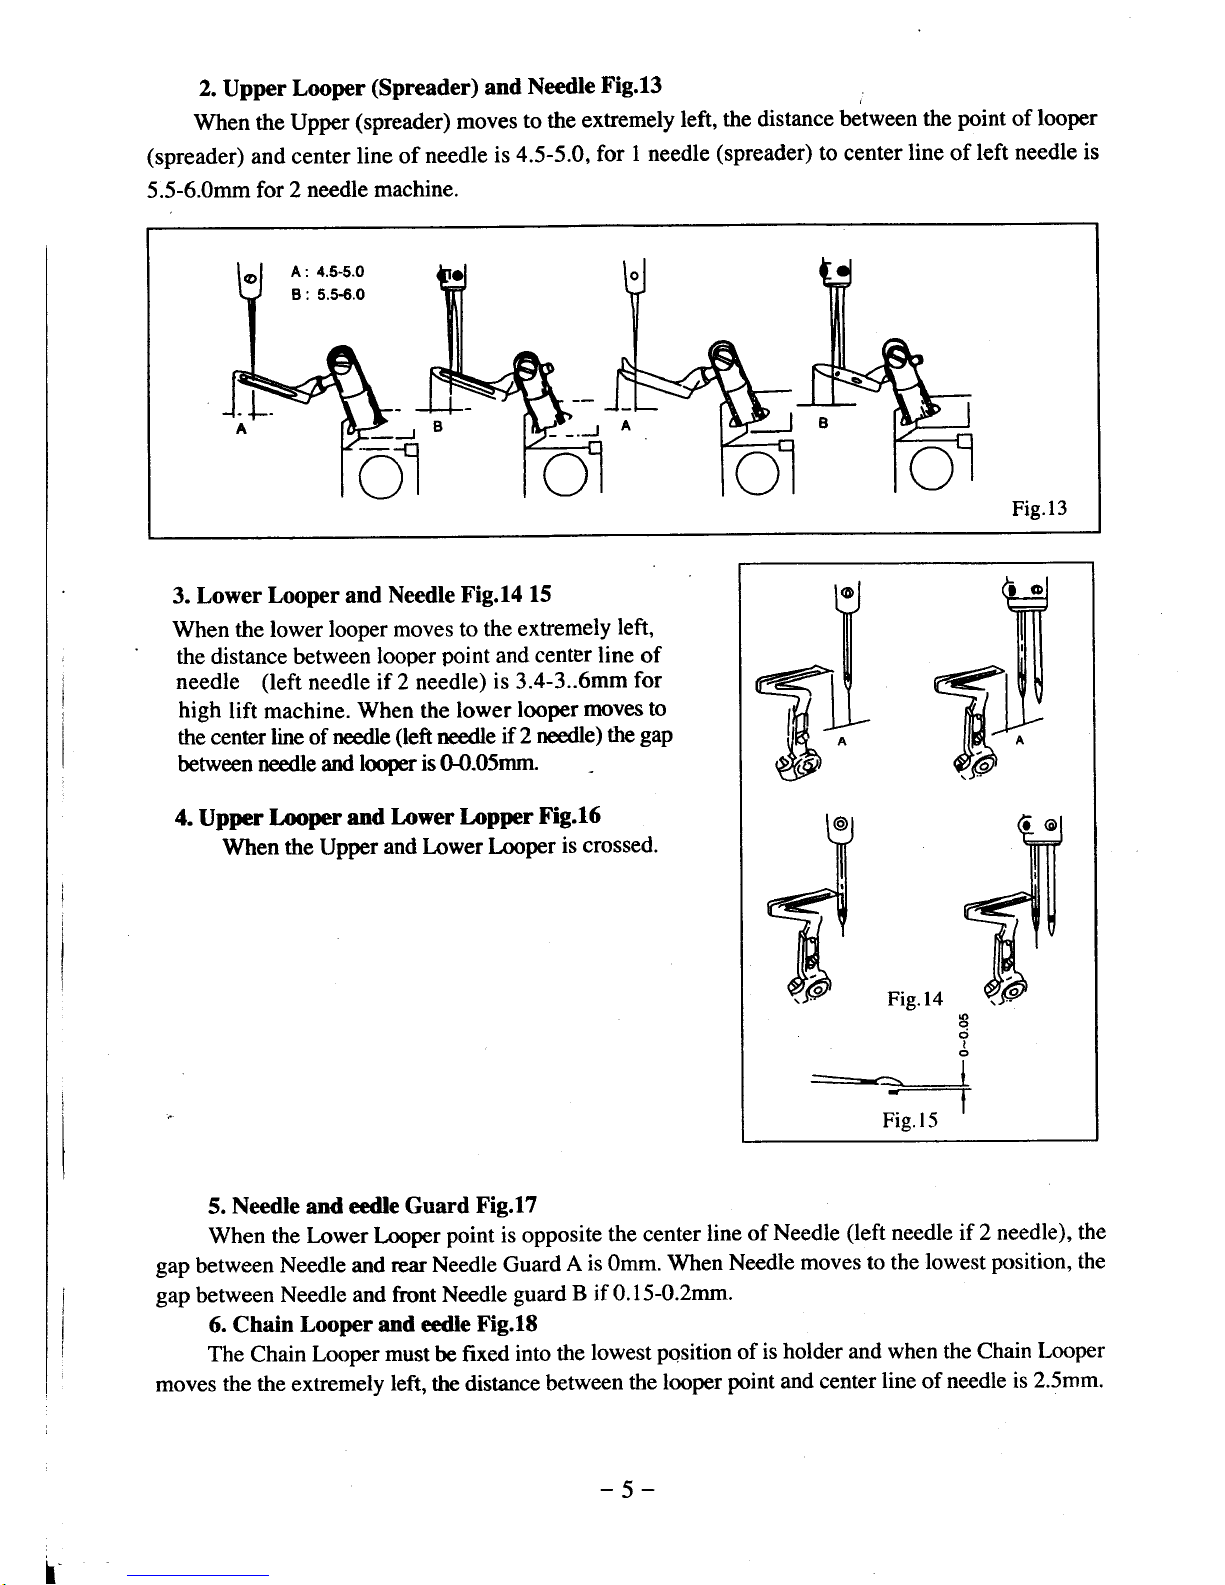
2.
Upper
Looper
(Spreader)
and
Needle
Fig.13
When the Upper
(spreader)
moves
to the
extremely
left,
the distance
between the
point
of
looper
(spreader)
and center
line of
needle
is
4.5-5.0,
for
I needle
(spreader)
to center
line
of
left needle is
5.5-6.0mm for 2
needle machine.
A: 4.5-5.0
B: 5.S.0
Fig.l3
3.
Lower
Looper and Needle
Fig.14
15
When the lower looper
moves to the
extremely
left,
the distance between
looper
point
and
center line
of
needle
(left
needle if 2 needle)
is
3.4-3..6mm
for
high
lift machine.
When the
lower
looper
moves to
the center line of
needle
(eft
needle
if 2
needle)
the
gap
beween needle and
looper is 04.05mm.
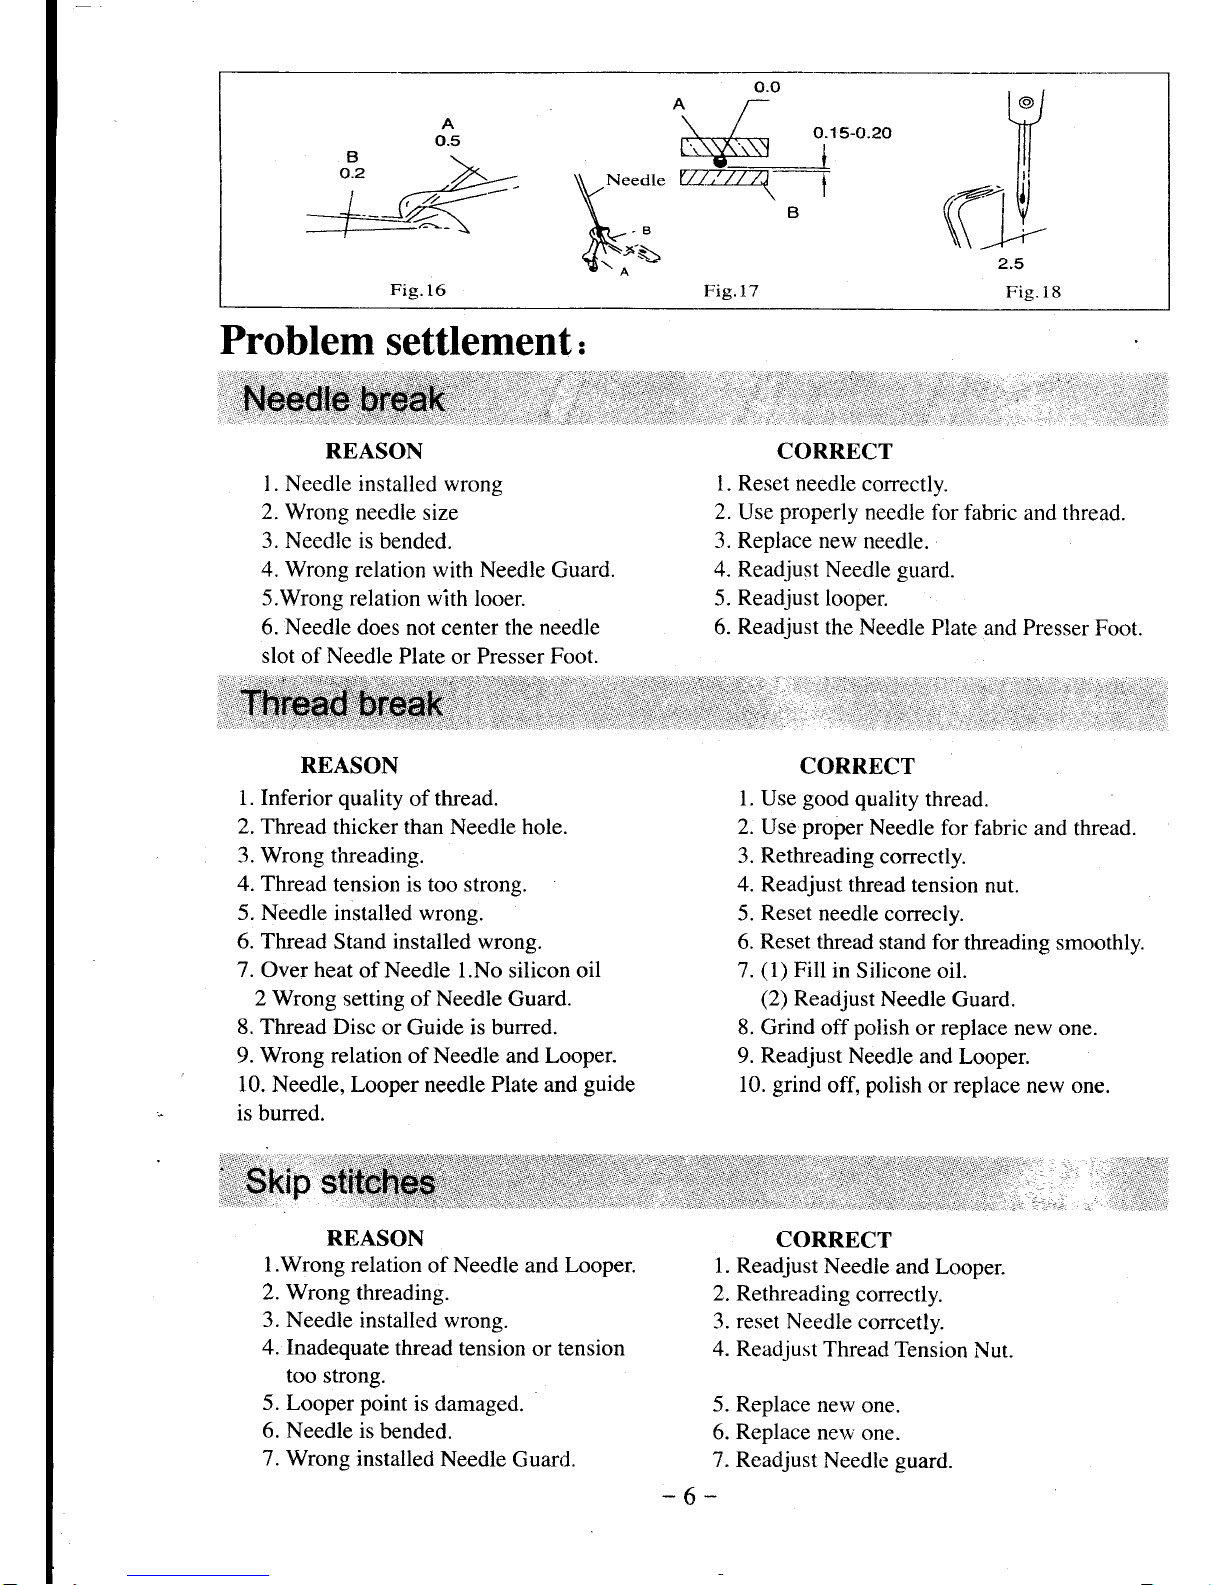
4.
Upper
Looper
and
Lower Lopper
Fig.16
When
the
Upper
and l,ower l-ooper
is crossed.
5. Needle and eedle
Guard
Fig.17
When
the Lower
Looper
point is opposite
the center
line
of
Needle
(left
needle if 2 needle), the
gap
between
Needle and rcar
Needle Guard
A
is Omm. When
Needle
moves to the lowest
position, the
gap
between
Needle and front Needle
guard
B if 0.15-0.2mm.
6. Chain
Looper and eedle
Fig.18
The
Chain
Looper
must
be fixed
into
the
lowest
pgsition
of
is
holder and when the Chain
Looper
moves
the the
extremely
left,
the distance
between
the looper
point
and center
line
of needle
is
2.5mm.
d
d
o
g
o
I
o
I
-----
|
F;;-T
-5-
\i7
K-y
2.5
Fig. 18
Fig.l6
Fig. 17
Problem
settlement,
REASON
l. Needle installed wrong
2.
Wrong needle
size
3. Needle
is bended.
4.
Wrong relation with
Needle Guard.
5.Wrong relation
with looer.
6. Needle does
not center the
needle
slot
of
Needle
Plate
or
Presser Foot.
REASON
1. Inferior
quality
ofthread.
2.
Thread thicker than
Needle
hole.
3. Wrong threading.
4. Thread
tension is too strong.
5. Needle
installed
wrong.
6. Thread
Stand
installed wrong.
7.
Over
heat
of Needle 1.No silicon oil
2 Wrong
setting of Needle Guard.
8. Thread Disc
or Guide is burred.
9.
Wrong relation
of Needle and Looper.
10. Needle, Looper needle Plate and
guide
is burred.
REASON
l.Wrong
relation
of Needle and Looper.
2. Wrong
threading.
3. Needle
installed wrong.
4. Inadequate
thread tension
or
tension
too
strong.
5. Looper point
is damaged.
6. Needle is
bended.
7. Wrong installed
Needle
Guard"
CORRECT
1. Readjust
Needle
and Looper.
2. Rethreading
correctly.
3. reset Needle
corrcetly.
4. Readjust
Thread
Tension
Nut.
5. Replace
new
one.
6.
Replace
new
one.
7. Readjust
Needle
guard.
-6-
i+
:,',,'n,:,::i1:r:,:i.i;iit'';+.ir+lit:ti::liiti::.i:':l ,::.,.r,-:!"1;::,r;.
,::,..
':.i:.,:'
i I
ir:.i,;i:i
CORRECT
l. Reset needle
correctly.
2.
Use
properly
needle
for fabric and thread.
3. Replace new
needle.
4. Readjust
Needle
gr.rard.
5.
Readjust
looper.
6.
Readjust
the Needle
Plate
and
Presser
Foot.
CORRECT
l. Use
good
quality
thread.
2.
Use
proper
Needle
for fabric
and thread.
3. Rethreading
correctly.
4. Readjust
thread tension
nut.
5.
Reset
needle
correcly.
6.
Reset
thread
stand for threading smoothly.
7.
(1)
Fill
in
Silicone oil.
(2)
Readjust
Needle
Guard.
8. Grind off
polish
or
replace
new one.
9.
Readjust
Needle
and Looper.
10.
grind
off,
polish
or
replace
new one.
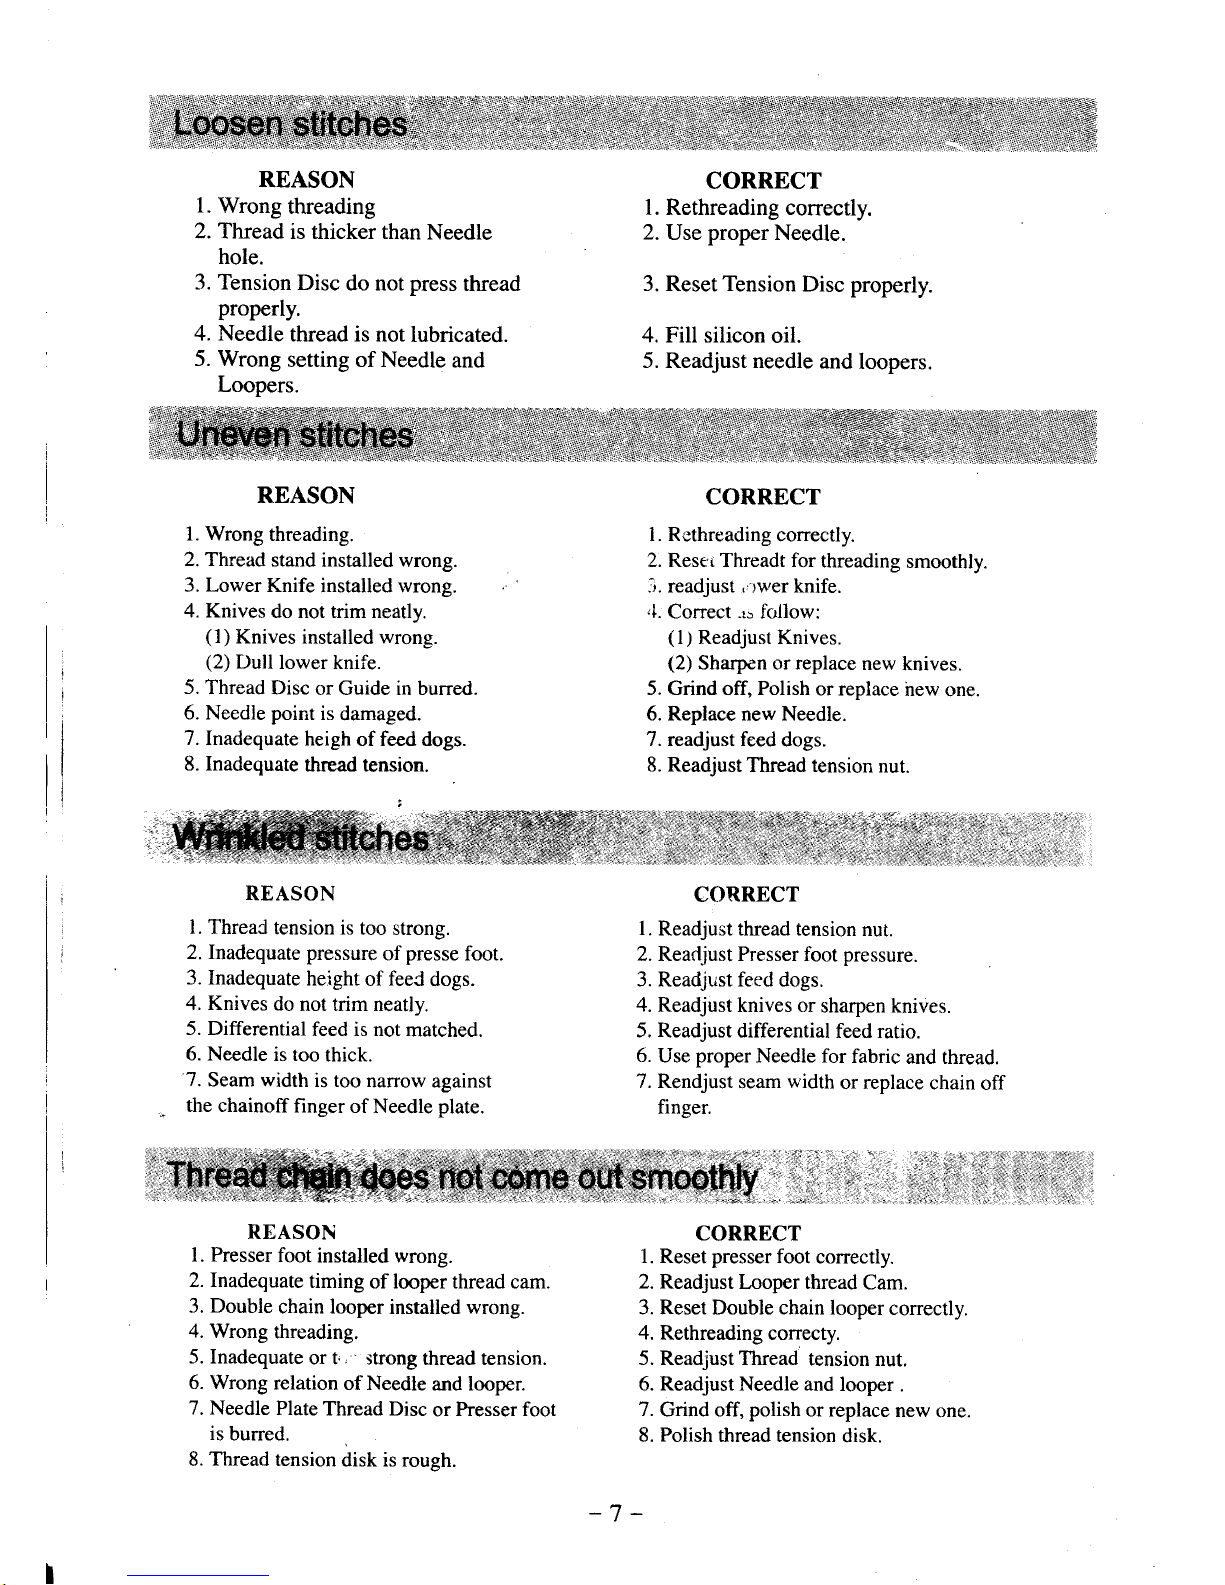
REASON
1.
Wrong
threading
2. Thread
is thicker than
Needle
hole.
3. Tension
Disc
do not
press
thread
properly.
4. Needle
thread is not
lubricated.
5. Wrong
setting of Needle
and
Loopers.
CORRECT
1. Rethreading correctly.
2.
Use
proper
Needle.
3. Reset Tension
Disc properly.
4. Fill silicon
oil.
5. Readjust needle
and
loopers.
REASON
l. Wrong
threading.
2. Thread
stand
installed wrong.
3. Lower Knife
installed rvrong.
4. Knives
do not trim neatly.
(1)
Knives installed wrong.
(2)
Dull
lower knife.
5. Thread
Disc
or Guide in burred.
6. Needle point
is
damaged.
7. Inadequate
heigh
of feed dogs.
8. Inadequate
thread tension.
REASON
l. ThreaC
tension is too
strong.
2. Inadequate
pressure
ofpresse foot.
3. Inadequate
height
of
feeC
dogs.
4. Knives
do
not trim neatly.
5. Differential
feed is not
matched.
6. Needle
is too
thick.
7.
Seam
width
is too
narrow against
the chainoff
finger
of Needle
plate.
REASON
l. Presser
foot
installed wrong.
2. Inadequate
timing
of looper thread cam.
3.
Double
chain looper
installed wrong.
4.
Wrong
threading.
5. Inadequate
or t,,
'
strong
thread tension.
6. Wrong
relation
of Needle
and looper.
7. Needle
Plate
Thread Disc
or
Presser foot
is
burred.
8.
Thread
tension
disk is rough.
CORRECT
l. Rethreading
correctly.
2. Resei Threadt for
threading
smoothly.
ii. readjust ,.rwer knife.
,1.
Correct
-r"
follow:
(l)
Readjust Knives.
(2)
Sharpen or replace
new
knives.
5. Grind off, Polish
or replace
irew
one.
6. Replace new Needle.
7. readjust feed
dogs.
8. Readjust
Thread tension
nut.
CORRECT
R.eadjust thread tension
nut.
Readjust Presser foot pressure
Readjrist feed dogs.
Readjust knives or
sharpen knives.
Readjust differential
feed ratio.
Use
proper
Needle for
fabric
and thread.
Rendjust
seam
width
or replace
chain
off
finger.
l.
2.
4.
5.
6.
"7.
+irffi$iffi
CORRECT
l. Reset presser foot
correctly.
2.
Readjust Looper thread
Cam.
3. Reset Double chain looper
correctly.
4.
Rethreading correcty.
5. Readjust Thread tension
nut.
6. Readjust Needle and
looper
.
7.
Grind off,
polish
or replace
new
one.
8.
Polish
thread tension
disk.
-7
-
 Loading...