


Description of signal words ................................Page 5
Customer service ..........................................................Page 5
List of pictograms used ...........................................Page 6
Intended use ...........................................................................Page 6
Parts description .....................................................................Page 7
Technical data ........................................................................Page 10
Contents ..................................................................................Page 11
Important safety instructions ............................Page 12
Safety warnings for batteries.................................................Page 14
Initial Use............................................................................Page 16
Setting up the products ..........................................................Page 16
Starting the outdoor sensor / Changing batteries ................Page 16
Starting the main station / Changing batteries .....................Page 16
Radio signal (WWVB) ...........................................................Page 17
Information in base mode ...................................Page 21
The clock field ........................................................................Page 21
The barometric pressure field ................................................Page 22
The indoor temperature field .................................................Page 23
The outdoor temperature field ...............................................Page 24
Settings ................................................................................Page 26
Basic settings ..........................................................................Page 26
Temperature alarm .................................................................Page 28
Activating the temperature alarm ..........................................Page 28
Alarm ......................................................................................Page 29
Accessing stored data ...........................................................Page 30
296586_1901_aur_Funk-Wetterstation_Content_US.indd 3 24.06.19 11:47
3 US-EN

Manually activating signal reception ........Page 31
Activating WWVB signal reception ......................................Page 31
Activating reception from the outdoor sensor ......................Page 31
Backlight .................................................................................Page 32
Reset function .........................................................................Page 32
Troubleshooting ...........................................................Page 32
Cleaning and care .......................................................Page 33
Disposal ...............................................................................Page 33
Three year limited warranty .............................Page 34
296586_1901_aur_Funk-Wetterstation_Content_US.indd 4 24.06.19 11:47
4 US-EN

DESCRIPTION OF SIGNAL WORDS
WARNING indicates a hazardous
situation that, if not avoided, could
result in death or serious injury.
CAUTION indicates a hazardous
situation that, if not avoided, could
result in minor or moderate injury.
NOTICE indicates information con-
sidered important, but not hazard
related (e.g. messages related to
property damage).
CUSTOMER SERVICE
Call customer service at 1 (844) 543-5872
Visit the Website Customer Service Platform at
www.lidl.com/contact-us
Visit a LIDL store for further assistance.
296586_1901_aur_Funk-Wetterstation_Content_US.indd 5 24.06.19 11:47
IAN 296586_1901
Please have your IAN number
ready.
5 US-EN
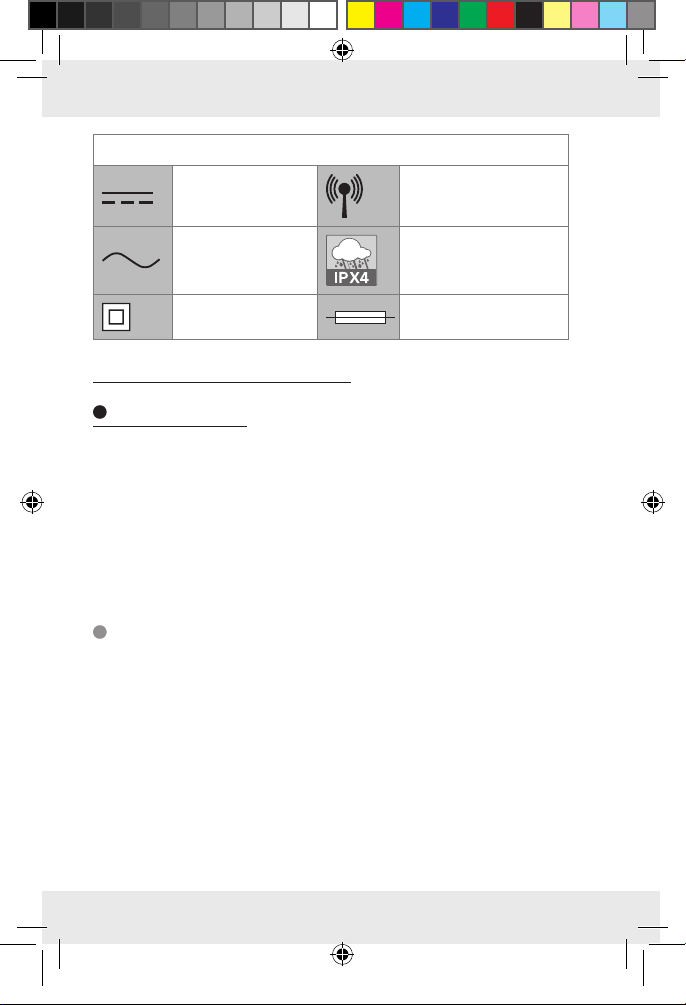
List of pictograms used
Direct current Radio controlled
Alternating
current
Safety class II Fused
Splash-proof
Wireless weather station
Introduction
Congratulations on your purchase. You have selected a quality product.
The instructions for use are a part of the product. They contain important information about the safety, use and disposal of the product. Before
using the product, please learn about all the safety information and
usage instructions. Only use the product as described and for the specified applications. If you lend the product to someone else, please also
give all the instructions.
Intended use
This product displays the indoor and outdoor temperature, indoor and
outdoor humidity, and barometric pressure. It features a radio-controlled
clock and several alarm functions. The expected weather trend is calculated based on data collected. The product is not intended for commercial purposes.
296586_1901_aur_Funk-Wetterstation_Content_US.indd 6 24.06.19 11:47
6 US-EN
Parts description
2
2
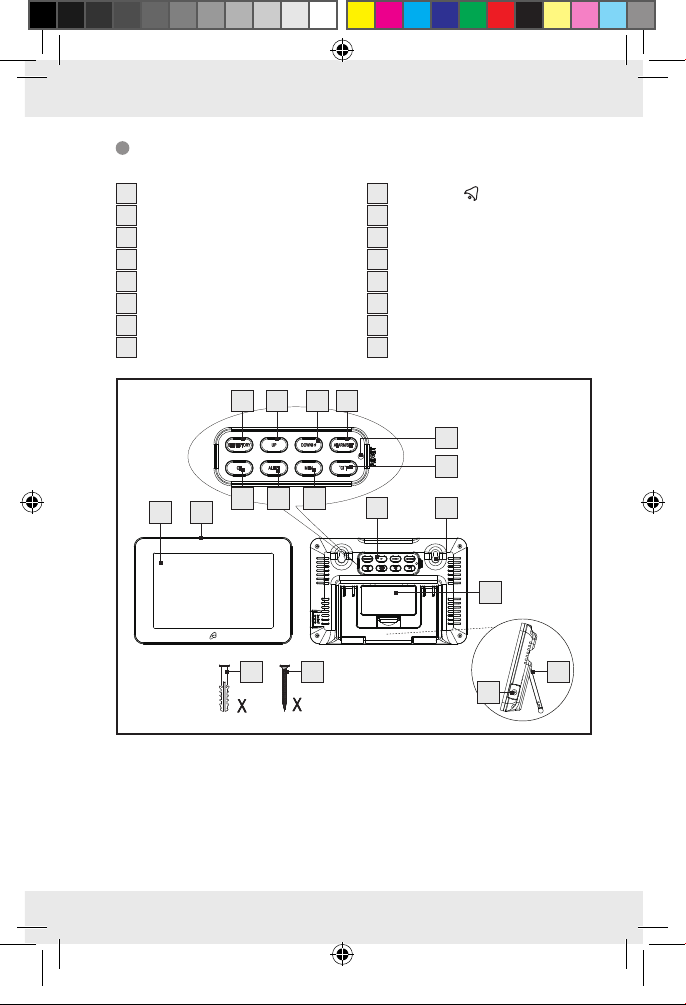
Main station
1
Display
2
SNOOZE- / LIGHT field
3
Keypad
4
Main station eyebolt
5
Battery compartment cover
6
Stand
7
SET / HISTORY button
8
UP button
7 8 9 10
1 2
15 14 13
9
DOWN / button
10
ALARM / SET button
11
Reset button
12
°C / °F button
13
MEM button
14
ALERT button
15
CH button
16
Battery compartment
11
12
3 4
31
5
63233
296586_1901_aur_Funk-Wetterstation_Content_US.indd 7 24.06.19 11:47
7 US-EN
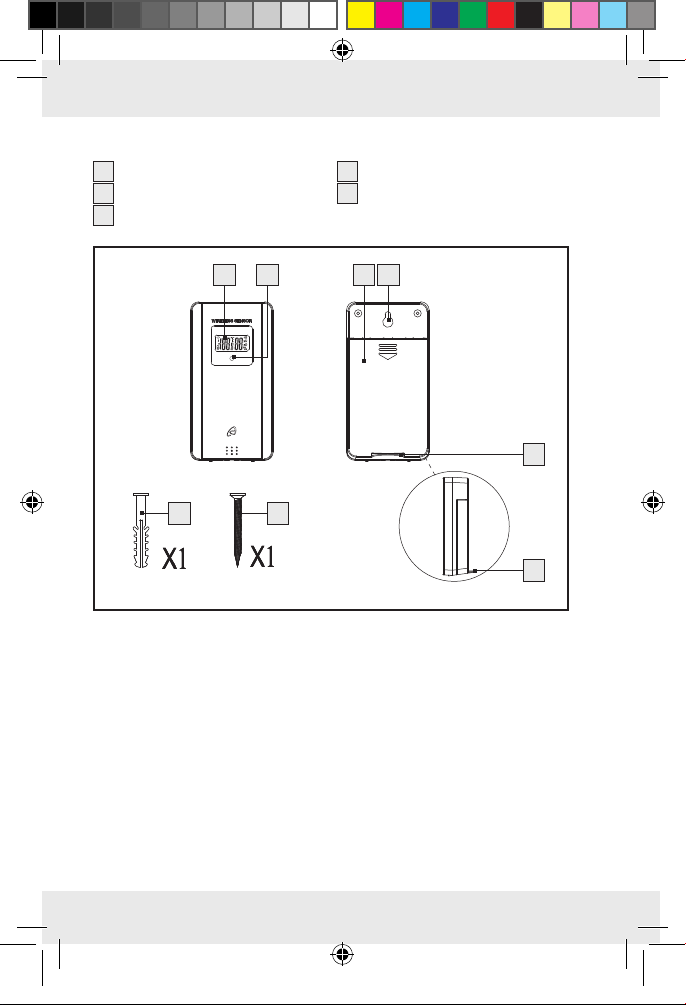
Outdoor sensor
17
Signal LED
18
Battery compartment cover
19
Outdoor sensor eyebolt
26 19
20
Outdoor sensor stand
21
Outdoor sensor battery
compartment
17
3233
18
20
20
296586_1901_aur_Funk-Wetterstation_Content_US.indd 8 24.06.19 11:47
8 US-EN
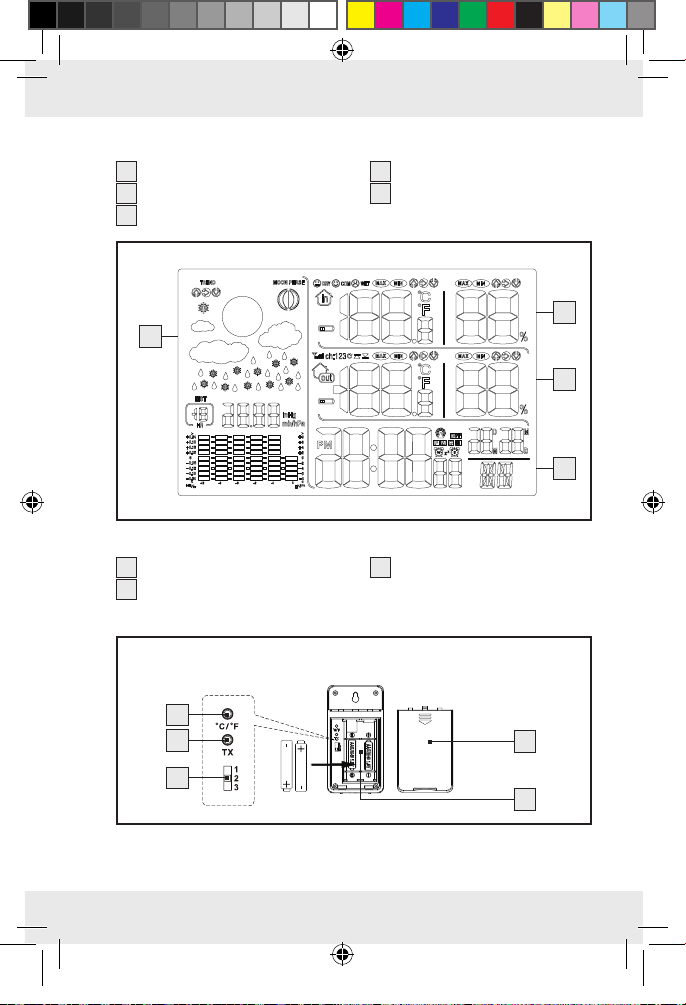
Display
22
Indoor temperature field
23
Outdoor temperature field
24
Clock field
25
25
Barometric pressure field
26
Outdoor sensor display
Outdoor sensor buttons next to battery compartment
27
°C / °F button
28
TX button (channel
29
Channel selector switch
reset button)
27
28
18
22
23
24
296586_1901_aur_Funk-Wetterstation_Content_US.indd 9 24.06.19 11:47
29
21
9 US-EN
Optional Power Supply
30
Mains adapter
31
Mains adapter socket
Mounting materials:
32
Screw (Dia. 0.125 in / 3 mm)33 Dowel (Dia. 0.3 in / 8 mm)
5
296586_1901_aur_Funk-Wetterstation_Content_US.indd 10 24.06.19 11:47
30
33 32
16
Technical data
Main station:
Temperature measurement range: 0 °C to 50 °C
32 °F to 122 °F
Humidity measurement range: 20 % to 95 %
Radio-controlled clock: WWVB
Batteries: 2 x LR06 (UM-3), 1.5 V
(direct current) (size AA)
Barometric pressure
measurement range: 850 hPa to 1050 hPa
25.1 inHg to 31.1 inHg
Frequency band: 60 kHz, 433.050 MHz to
434.790 MHz
10 US-EN

Model: HG05124A-US-RX,
HG05124B-US-RX,
FCCID: 2AJ9O-HG05124RX
Mains adapter:
Input: 100–240 V~(alternating current),
50–60 Hz, 200 mA MAX
Output: 5.0 V
(direct current),
500 mA
Model no: HX06-0500500-AU-001
Protection class:
Outdoor sensor:
Temperature measurement range: -20 °C to +50 °C
-4.0°F to + 122 °F
Humidity measurement range: 20 % to 95 %
Wireless range: max. 328 ft (100 m) (open area)
Batteries: 2 x LR06 (UM-3), 1.5 V
(direct current) (size AA)
Degree of protection: IPX4 (outdoor & indoor use)
Model: HG05124A-US-TX,
HG05124B-US-TX
FCCID: 2AJ9O-HG05124TX
Frequency band: 433.050 MHz to 434.790 MHz
Transmitted maximum
radio-frequency power: 433.92 MHz, -10.77 dBm
296586_1901_aur_Funk-Wetterstation_Content_US.indd 11 24.06.19 11:47
Contents
1 Main station
1 Outdoor sensor
4 Batteries, type LR06, 1.5 V
1 Mains adapter
3 Screws
3 Dowels
1 Instructions for use
11 US-EN

IMPORTANT SAFETY
INSTRUCTIONS
READ ALL INSTRUCTIONS. KEEP FOR FUTURE REFERENCE.
INCLUDE ALL DOCUMENTATION WHEN PASSING THIS PRODUCT
ON TO OTHERS.
Failure to observe the following
warnings may result in death or serious injuries.
This product may be used by children 8 years and up
and persons with reduced physical, sensory or mental
capabilities or lacking experience and knowledge when
supervised or instructed on the safe use of the product and the
associated risks. Do not allow children to play with this product.
Never allow children to clean or maintain the product unsupervised.
Do not use the product if it is damaged.
Before using the product, verify the available line voltage matches
the voltage required to operate the product (120 V∼, 50–60 Hz).
Verify the product, the power supply and the cable connection
aren’t damaged before using this product! Never use a damaged
product!
The product must be plugged into an easily accessible outlet so
it can easily be unplugged in the event of an emergency.
The product is only suitable for use with the included mains adapter.
Changes or modifications to this product not expressly approved
by the party responsible for compliance could void the user‘s authority to operate the product.
Note: This product has been tested and complies with the limits
for a Class B digital device, pursuant to Part 15 of the FCC Rules.
These limits are designed to provide reasonable protection against
harmful interference in a residential installation. This product
296586_1901_aur_Funk-Wetterstation_Content_US.indd 12 24.06.19 11:47
12 US-EN
generates, uses and can radiate radio frequency energy and, if
not installed and used in accordance with the instructions, may
cause harmful interference to radio communications.
However, there is no guarantee that interference will not occur in
a particular installation. If this product causes harmful interference
to radio or television reception, which can be determined by turning
the product off and on, the user is encouraged to try and correct
the interference by one or more of the following measures:
• Reorient or relocate the receiving antenna.
• Increase the separation between the equipment and receiver.
• Connect the product into an outlet on a circuit different from
that to which the receiver is connected.
• Consult the dealer or an experienced radio / TV technician
for help.
Do not expose the main station to moisture or direct sunlight.
This product does not contain any parts that can be serviced by
the user. The LEDs are not replaceable.
To completely switch the product off, unplug the mains adapter
from the outlet.
Do not expose the product to an extremely high electromagnetic
field. This may impair the correct functioning of the product.
Please note, the warranty does not cover damage due to improper
use, failure to observe the instructions for use, or unauthorized
product modifications.
The RF exposure compliance distance is 0.78 in (20 mm).
296586_1901_aur_Funk-Wetterstation_Content_US.indd 13 24.06.19 11:47
13 US-EN
Safety warnings for
batteries
When used correctly, cells and batteries provide a safe and dep
able source of portable power. However, if they are misused or
abused, this may result in leakage, burns, fire, or explosion.
Store batteries in a dry place at room temperature. Batteries are
sensitive to high and low temperatures. Such thermal exposure
may lead to leakage, fire, or explosion.
Keep cells and batteries out of reach of children, especially small
batteries. Ingestion may lead to choking or acute and serious personal injury.
Keep cells or batteries clean and dry both during use and storage.
Wipe metal terminals with a soft, dry cloth if they become dirty.
Immediately seek medical attention if a cell or battery has been
swallowed. Also, contact your local poison control center.
In the event that the electrolyte comes into contact with the skin or
eyes, immediately flush with fresh water for at least 15 minutes
and seek medical attention.
Store unused batteries in their original packaging or in safe place
and away from metal objects that may short-circuit them.
Exercise care in handling batteries in order to prevent shorting with
conducting materials, such as rings, coins, bracelets, and keys. The
battery or the conductor can overheat and cause burns, leakage,
fire, or explosion.
Clean the battery contacts and also those of the product prior to
battery installation. Keep the contacts clean.
Remove batteries from the product that will not be used for an
extended period of time (months or longer).
Remove discharged batteries from product promptly to avoid
possible damage from leakage.
Choose the proper battery for the intended application.
end-
296586_1901_aur_Funk-Wetterstation_Content_US.indd 14 24.06.19 11:47
14 US-EN
Always take care to correctly insert batteries observing (+) and (-)
polarity marks on the battery and the product for which it is int
Proper polarity must be observed to avoid damage to either product
or batteries.
Always replace the whole set of batteries at one time, taking care
not to mix old and new ones, or batteries of different types, capacities, or manufacturers.
Never heat batteries in order to revive them.
Never charge a battery unless the battery label specifically states
the battery is rechargeable. Charging a non-rechargeable battery,
may result in leakage, fire, or explosion.
Use only the power cord supplied with the product. The use of
other cords may result in the batteries inside the product being
charged.
Do not open or mutilate a battery or cell. Electrolyte from the cell
is corrosive and can cause damage to the eyes or skin. The cell
contents can also be hazardous if ingested.
Do not drop or subject the cell or battery to strong mechanical
shock.
Batteries should not be disassembled, crushed, punctured, or
otherwise mutilated. Such abuses may result in leakage, fire, or
explosion.
Do not dispose of the battery in a fire. Failure to observe this
precaution may result in an explosion.
Dispose of batteries properly and in accordance with government
regulations.
ended.
296586_1901_aur_Funk-Wetterstation_Content_US.indd 15 24.06.19 11:47
SAVE THESE
INSTRUCTIONS
15 US-EN
Initial Use
Note: First insert the batteries in the outdoor sensor, then the main
station.
Setting up the products
ATTENTION: First start the outdoor sensor, then the main station.
If possible, do not expose the outdoor sensor or main station to
direct sunlight. Place it on a horizontal, level surface or mount to
a plumb wall.
The main station can be hung by the main station eyebolt 4 or
flip out the stand
6
to place it on a horizontal, level surface.
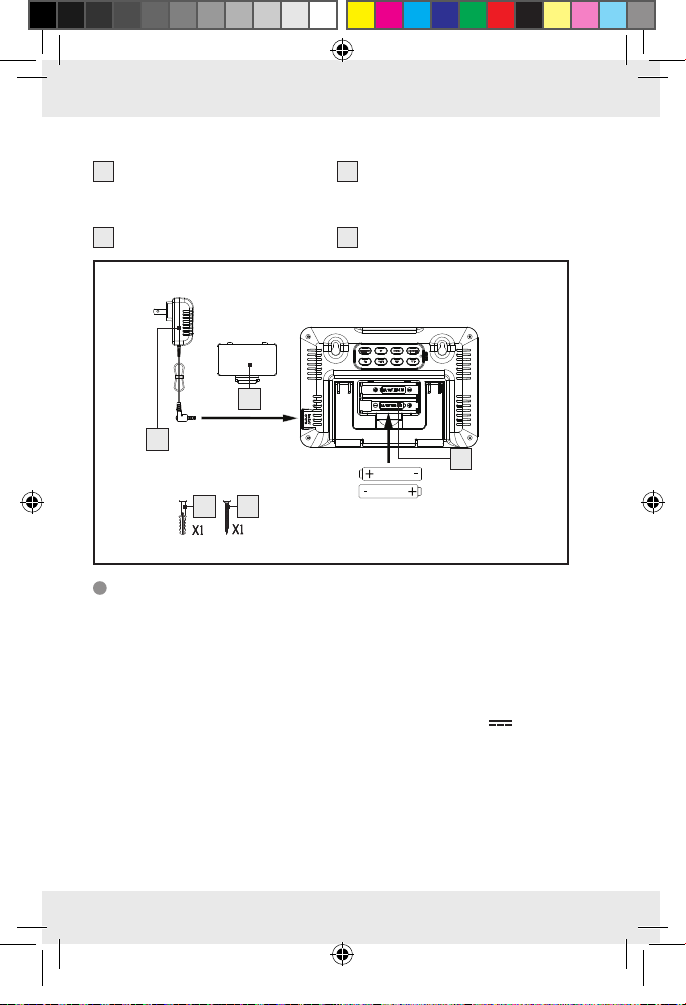
Starting the outdoor sensor /
Changing batteries
Open the battery compartment 21 on the back of the outdoor
sensor by sliding the battery compartment cover
of the arrow.
First remove the old batteries when changing batteries.
Insert the new batteries, type LR06, in the battery compartment 21.
Please note the battery polarity. This is indicated in the battery
compartment.
Close the battery compartment cover. The signal LED 17 on the
front of the outdoor sensor will briefly light up. The signal LED will
then flash about twice a minute, indicating wireless transmission.
18
in the direction
Starting the main station /
Changing batteries
Open the battery compartment cover 5 at the back of the main
station by pulling up on the tab at the bottom of the battery com-
partment.
First remove the old batteries when changing batteries.
296586_1901_aur_Funk-Wetterstation_Content_US.indd 16 24.06.19 11:47
16 US-EN
Insert the new batteries, type LR06, in the battery compartment 16.
Please note the battery polarity. This is indicated in the battery
compartment.
Close the battery compartment cover. The display 1 will briefly
light up and run a brief check of all display elements.
Alternatively, first remove the batteries from the battery compartme
Plug the low voltage plug from the mains adapter 30 into the
power socket
31
on the main station and plug the mains adapter
into an easily accessible outlet. The display will permanently light
up and run a brief check of all display elements.
The outdoor temperature field 23 will show an animation of the
reception symbol
, indicating the main station is searching for
the signal from the outdoor sensor.
If the outdoor temperature does not appear after 3 minutes, the
main station will stop searching. The animation of the reception
symbol will turn off and the outdoor temperature field will show
--._ °C and --._ %. The signal most likely cannot be received due
to structural factors, reinforced concrete walls, the brickwork being
too solid, or the distance between the units. After finding a better
location for the outdoor sensor you will need to restart reception.
Press and hold the CH button 15 on the back of the main station for
3 seconds until the reception signal becomes animated again.
The product will automatically start receiving the outdoor sensor
signal, regardless if signal from the outdoor sensor was received
or not. The clock field
bol
, indicating the receiver for the WWVB signal is starting to
24
will show an animated radio tower sym-
receive the time.
nt.
296586_1901_aur_Funk-Wetterstation_Content_US.indd 17 24.06.19 11:47
Radio signal (WWVB)
The WWVB-Signal (time signal transmitter) is made up of time pulses
transmitted from one of the highest precision clocks in the world close
to Fort Collins, Colorado.
17 US-EN
If the signal is detected the clock display 24 will show the current
Central European Time, date and day of the week. A static radio
tower symbol
appears. For more details please refer to section
Basic Settings.
If the attempts to receive a signal fail the main station will stop atte
to receive a signal after 7 minutes and the radio tower symbol
mpting
will
disappear. For information on how to resolve this issue please refer to
section Troubleshooting.
After successfully receiving the WWVB signal, press the UP button
to select the time zone display between P = Pacific UTC-8; M =
Mountain UTC-7, C = Central UTC-6, E = Eastern UTC-5 in the Clock
24
field
.
You may reactivate reception by pressing and holding the
DOWN /
symbol
button 9 for three seconds until a radio tower
in the clock display 24 becomes animated.
The time can also be set manually. For more details please refer
to section Basic Settings.
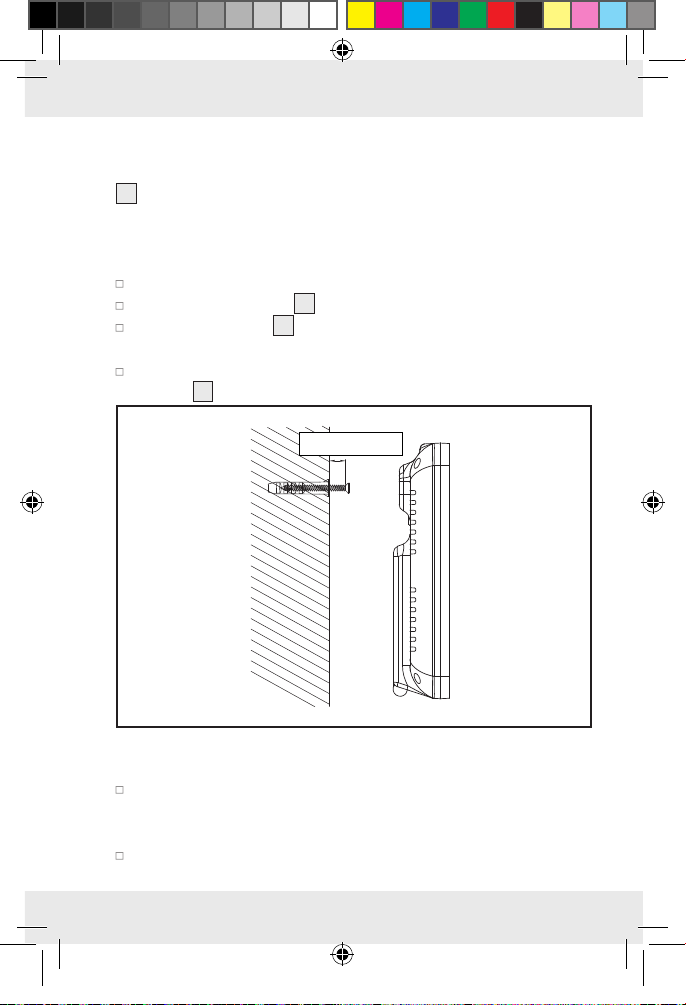
Wall-mounting the temperature station and / or the
outdoor sensor:
Note: This step requires an electric drill and a crosshead screwdriver.
DANGER TO LIFE, RISK OF INJURY AND PROPERTY
DAMAGE! Carefully read the instructions for use and safety
notes for your drill.
DANGER TO LIFE! Be careful that you do not hit electrical, gas
or water lines when drilling into the wall. If necessary, check the
wall with a wall scanner before drilling.
18 US-EN
8
296586_1901_aur_Funk-Wetterstation_Content_US.indd 18 24.06.19 11:47
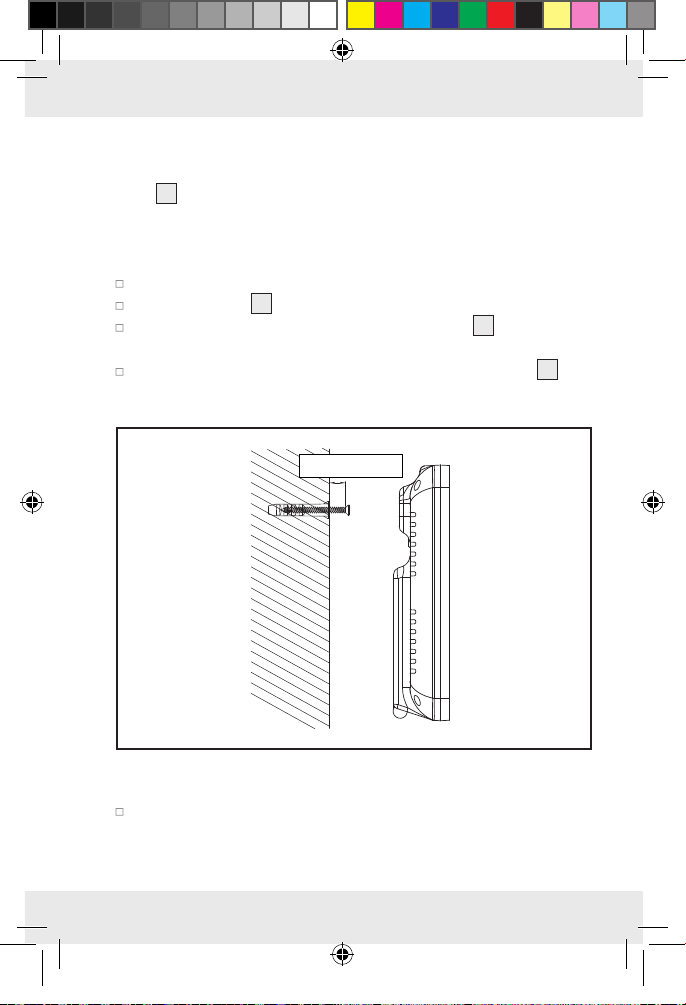
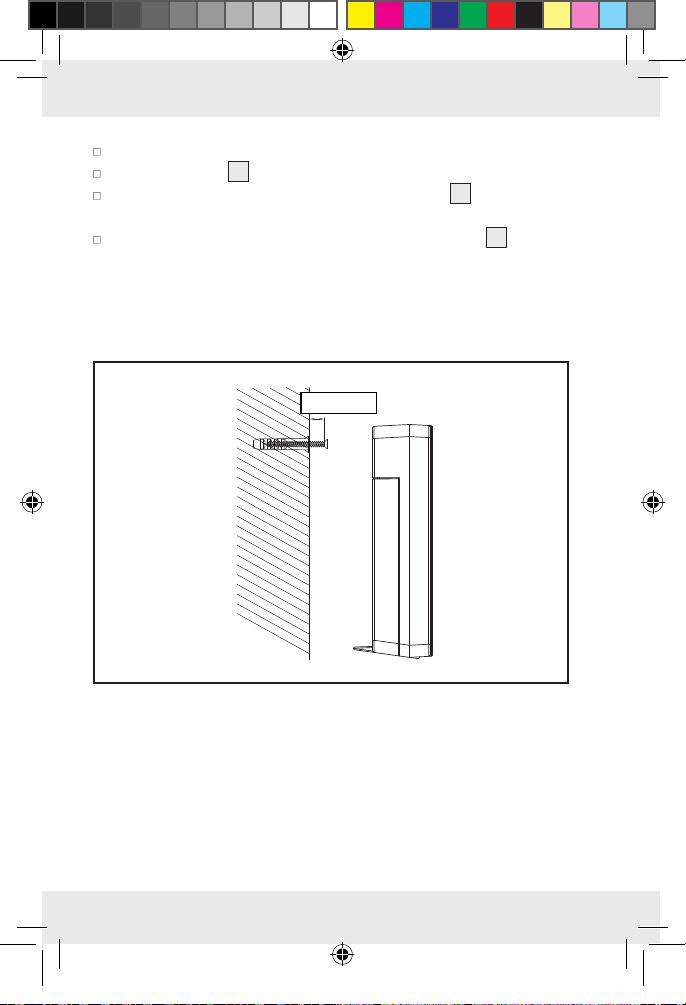
Temperature station
Note: Before mounting the temperature station, please remove the
6
stand
from the back. Mark the location of the hole (D 0.3 in / 8 mm)
on the wall.
Note: Use the included drilling template intended for marking the
drill holes.
Drill the hole with an electric drill.
Push the dowel 33 into the drilled hole.
Using a crosshead screwdriver, screw the screw 32 into the wall
anchor.
Hang the temperature station by placing the hanging slot 4 on
the screw.
0.125in / 0.3mm
0.125 in/3 mm
296586_1901_aur_Funk-Wetterstation_Content_US.indd 19 24.06.19 11:47
Outdoor sensor
Mark the location of the hole (D 0.3 in / 8 mm) on the wall.
Note: Use the included drilling template intended for marking
the drill holes.
19 US-EN
Drill the hole with an electric drill.
0.125in / 0.3mm
0.125 in/3 mm
Push the dowel 33 into the drilled hole.
Using a crosshead screwdriver, screw the screw 32 into the wall
anchor.
Hang the outdoor sensor by placing the hanging slot 19 on the
screw.
Note: Never immerse the outdoor sensor in water and protect
from direct sunlight. Electronic devices may adversely affect the
wireless signal reception.
0.3 in/8 mm
Once the main station has received the signal from the outdoor sensor
and the WWVB signal, it enters into basic mode.
In base mode the main station will display the following information:
20 US-EN
296586_1901_aur_Funk-Wetterstation_Content_US.indd 20 24.06.19 11:47
Information in base mode
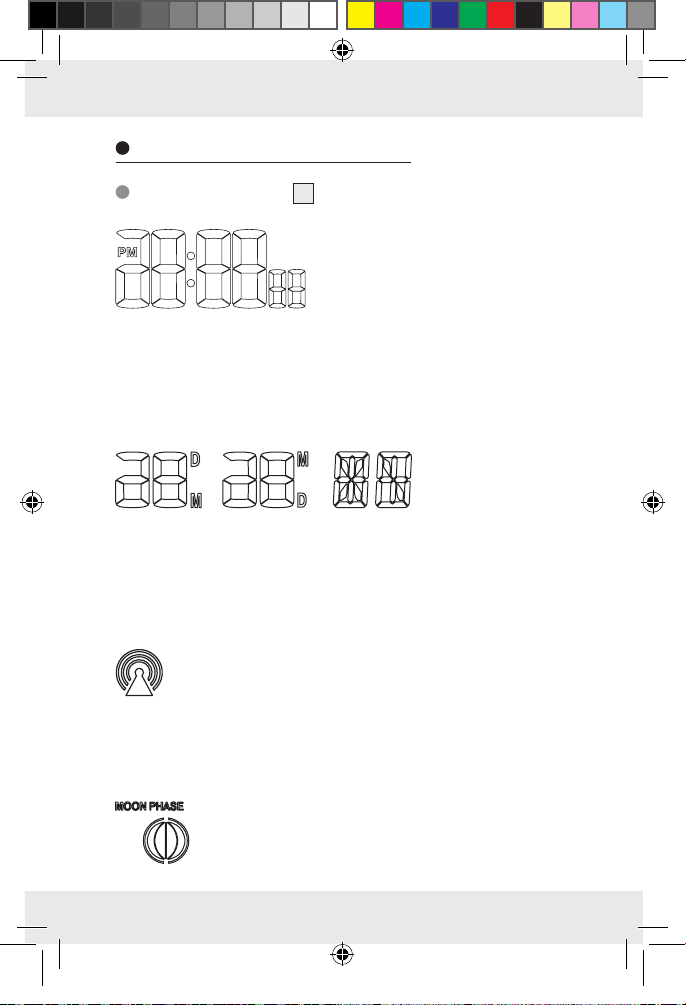
The clock field
24
Time:
T
he default time display is 24 hour forma
When selecting 12 hour mode in basic
settings, the time from 12:00 o‘clock in
the afternoon until 11:59 o‘clock at
night will show PM (Latin for “post meridiem“ = afternoon) in front of
the time.
During Daylight Saving Time DST will appear at the top between the
hour and minute. This display is only available for WWVB signal.
Date and day:
To the left of the abbreviation D (Day) is the
current date, and to the
left of the abbreviation M (month) current month. On the right you will
see the abbreviation for the current day of the week. The default language for this abbreviation is German, but can be changed. Please
refer to section Basic Settings.
The radio tower symbol:
The radio tower symbol indicates the WWVB signal is being
received. The main station synchronizes its internal clock
with the time station every night. This symbol will flash while
synchronizing. If reception was successful the symbol will be static until
the next reception cycle.
t.
296586_1901_aur_Funk-Wetterstation_Content_US.indd 21 24.06.19 11:47
The lunar phase:
The current lunar phase is indicated as follows:
The portion of the moon not illuminated will be dark
in the display.
21 US-EN
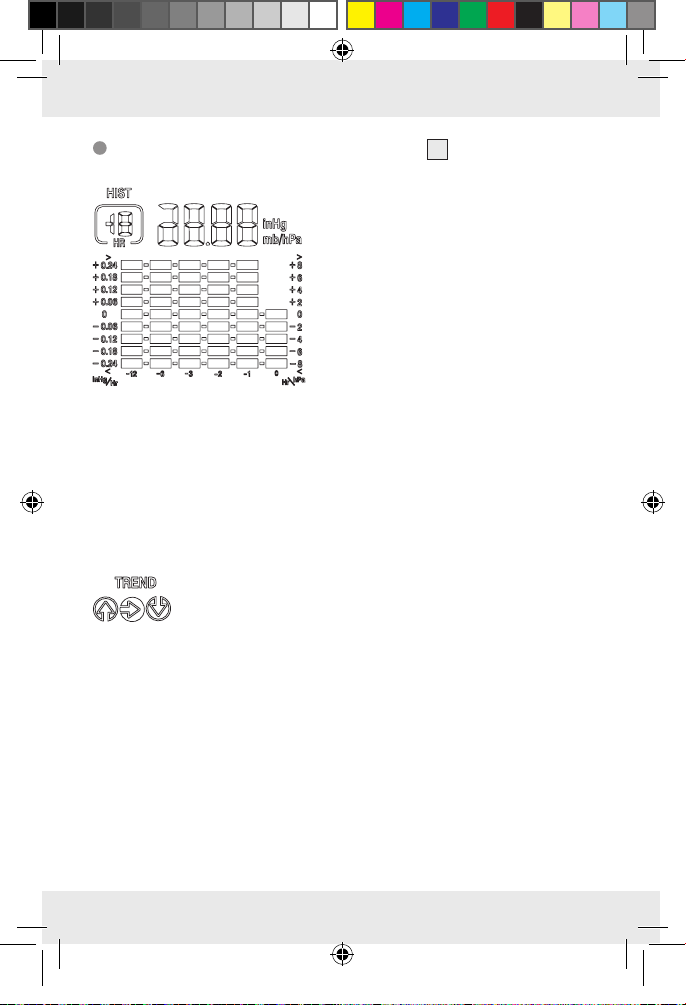
The barometric pressure field
25
Barometric pressure display:
At the top right is the barometric
pressure at the time shown in the
HIST field (history).
If LLL (or LL.LL when setting the unit
inHg), the display range is below
850 hPa (25.1 inHg), if HHH (or
HH.HH), it is above.
By default the current barometric pressure (HIST = 0) is shown in the
unit mb (millibar) or hPa (hectopascal). However, the display can also
be set to the uncommon unit inHg (inch of mercury). Please refer to
section Basic Settings.
The bar graph shows the barometric pressure trend over the past
0, 1, 2, 3, 6 and 12 hours.
The barometric pressure trend:
The trend will appear as rising (or dropping), when the
barometric pressure changes by 2 hPa (= 0.06 inHg)
or more within an hour and will maintain the direction for one hour
even when it remains steady.
The weather forecast:
The main station calculates a weather forecast for the next about 12
hours based on the barometric pressure trend. Of course this forecast
can‘t compare to that of professional weather services supported by
satellites and advanced computers, but merely provides an approximate
indication of current developments.
296586_1901_aur_Funk-Wetterstation_Content_US.indd 22 24.06.19 11:47
22 US-EN
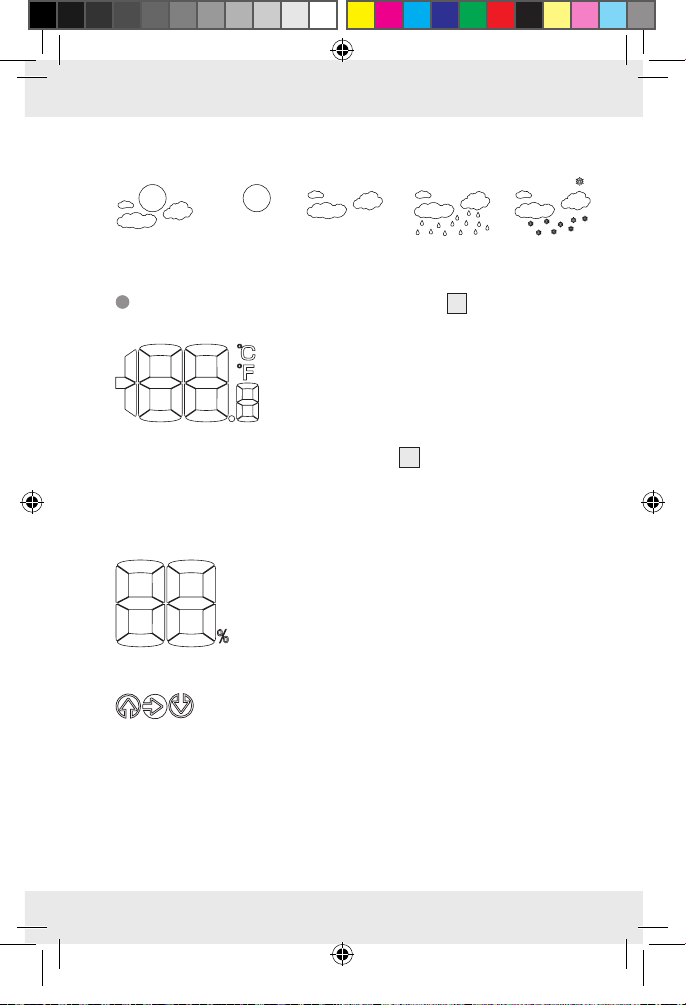
Available graphic forecasts are:
partly cloudy sunny cloudy rain snow
The indoor temperature field
22
The indoor temperature:
The indoor temperature measured by the main
station is displayed with indexing up to a tenth
of a degree. The temperature unit °C (for degrees Celsius) appears at the top right. The
temperature unit can also be set to °F (de-
grees Fahrenheit). Press the °C / F button
12
to switch to this unit. If
LL.L appears, it is below the measurement range of 0 °C to 50 °C (or
32 °F to 122 °F), when HH.H appears it is above.
The relative humidity:
This displays the relative humidity the weather
station is exposed to.
The temperature- or humidity trend:
The trend will appear as rising (or dropping), when
the temperature changes by 2 °C (= 3.6 °F) or more
within an hour and will maintain the direction for one hour even when
it remains steady. The humidity trend will respond accordingly if the
humidity changes by 2 %.
296586_1901_aur_Funk-Wetterstation_Content_US.indd 23 24.06.19 11:47
23 US-EN

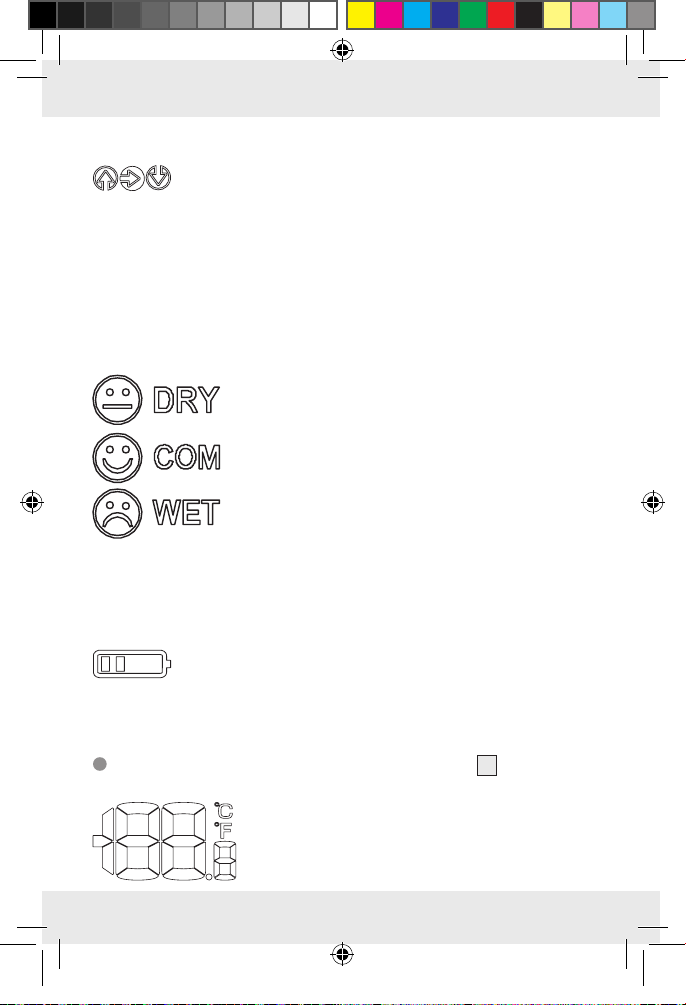
Indoor climate rating:
The main station will rate the indoor climate based on the indoor
humidity and temperature using the following key:
DRY humidity below 40 %
COMFORT humidity between 40 and 70 %, and
a temperature range between 20 °C–28 °C
(68 °F–82.4 °F).
WET humidity higher than 70 %
When the indoor temperature is outside the 20 °C–28 °C (or 68 °F
to 82.4 °F) range no indoor climate rating will appear.
Low battery:
If the battery symbol appears the batteries in the main
station should be replaced as soon as possible. Please
refer to the instructions in section Starting the Main Station /
Changing Batteries.
296586_1901_aur_Funk-Wetterstation_Content_US.indd 24 24.06.19 11:47
The outdoor temperature field
23
The outdoor temperature:
The outdoor temperature is displayed with indexing up to a tenth of a degree. The temperature
unit °C (for degrees Celsius) appears at the
top right. The temperature unit can also be set
to °F (degrees Fahrenheit).
Press the °C / F button 12 to switch to this unit.
If LL.L appears, it is below the measurement range of -20 °C to
50 °C (or - 4 °F to 122 °F), when HH.H appears it is above.
24 US-EN

The relative humidity:
This displays the relative humidity the outdoor sensor
is exposed to.
The temperature- or humidity trend:
The trend will appear as rising (or dropping), when the
temperature changes by 2 °C (= 3.6 °F) or more within
an hour and will maintain the direction for one hour even when it rem
ains
steady. The humidity trend will respond accordingly if the humidity
changes by 2 %.
Channel display:
The main station automatically receives the outdoor
signal once you have completed all the settings.
Note: Please select a different channel for the outdoor
sensor by pressing the CH button
channel selector switch
29
15
on the mains or the
on the outdoor sensor if interference from nearby equipment transmitting radio signals
occurs. The relevant data is shown in the LC-display.
- 1: Outdoor sensor on channel 1
- 2: Outdoor sensor on channel 2
- 3: Outdoor sensor on channel 3
-
: automatic channel change
296586_1901_aur_Funk-Wetterstation_Content_US.indd 25 24.06.19 11:47
Low battery:
If the battery symbol appears the batteries in the outdoor
sensor should be replaced as soon as possible. Please refer
to the instructions in section Starting The Outdoor Sensor /
Changing Batteries.
25 US-EN

Settings
ATTENTION: Firmly touching the top of the housing will turn on the
backlight (Fig. E). 10 seconds after releasing it the display backlight
will turn off again.
Please note, the main station does not respond to two buttons being
pressed at once. Hence, if the unit does not respond to a button being
pressed, you are probably also pressing the SNOOZE / LIGHT field.
Release when this occurs!
Basic settings
Press and hold the SET / HISTORY button 7 for 3 seconds to
change the basic settings.
Now press the UP button 8 or the DOWN / button 9 to
change the respective flashing value.
296586_1901_aur_Funk-Wetterstation_Content_US.indd 26 24.06.19 11:47
TIP: Pressing and holding the UP button or the DOWN /
button
will quickly scan up or down through the numbers.
ATTENTION: When no buttons are pressed for 20 seconds the
main station will return to base mode.
Briefly pressing the SET / HISTORY button will confirm the setting
and switch to the next option in the clock settings.
This allows you to change the following settings in sequence:
Note: If the main station has received the WWVB signal the year,
month, day, hour and minute settings will remain unchanged. If you
are in a different time zone than Germany you may set your local time
under time zone.
Year
Month
Day
26 US-EN

Language setting for displaying the weekday at the bottom
right of the clock display.
The following codes will flash and can be changed in the following
sequence by pressing the UP / DOWN button: GE (German),
DA (Danish), ES (Spanish), NE (Dutch), FR (French), IT (Italian),
EN (English)
Clock format: select from 24 Hr for 24-hour format (0:00
o‘clock –23:59 o‘clock). 12 Hr indicates the 12-hour format
(1:00 o‘clock –12:59 o‘clock). In 12-hour mode the time from
12:00 o‘clock in the afternoon until 11:59 o‘clock at night will
show PM (Latin for “post meridiem“ = after noon) in the display.
Hour
Minute
Time zone: The time zone can be set ranging from +12 to –12
hours.
Weather forecast: The main station computes the weather
forecast based on changes in the barometric pressure. Since no
data related to barometric pressure changes is available when
starting the unit, the weather forecast will be random at this time.
It will take a few days for the main station to be able to compute
the forecast.
However, when starting the unit you may use the UP or DOWN /
button to set a forecast based on the forecast on TV or the internet
to slightly speed up the weather forecast adjusting automatically.
Setting the barometric pressure: The barometric pressure
will indicate the absolute barometric pressure in mb,or hPa based
on the default setting. Here you may now set the display to the
altitude-related barometric pressure for your location. Please obtain the correct current data from the internet or the local weather
forecast. Please note, the data must be entered in the unit displayed
at the time the setting is made.
Setting the barometric pressure: The default is the official
European unit hPa. However, you may also select the unit inch of
296586_1901_aur_Funk-Wetterstation_Content_US.indd 27 24.06.19 11:47
27 US-EN

mercury (inHg). When changing the unit at this time the indicated
value will automatically be converted to the new unit.
Temperature alarm
You have the option to set a temperature range for the outdoor sensor.
With the temperature alarm activated, the main station will sound an
alarm if the outdoor sensor measures a temperature outside of this
temperature range.
Activating the temperature alarm
Press and hold the ALERT button 14 for three seconds until the
temperature display flashes in the outdoor temperature field
A flashing up arrow
will appear to the left of the temperature.
Now press the UP button 8 or the DOWN / button 9 to set
the maximum temperature for the desired temperature range.
TIP: Press and hold the UP button or the DOWN /
quickly scan up or down through the numbers.
Press the ALERT button to confirm the value. The temperature dis-
play will now flash again and a down arrow
will start flashing.
Press the UP button or the DOWN / button to now set the
minimum temperature for the desired temperature range.
Press the ALERT button to confirm the value. The temperature range
is now set.
Briefly press the ALERT button to now activate or deactivate the
temperature alarm.
With the temperature alarm activated a static double arrow will
appear in the outdoor temperature field below OUT:
If the outdoor sensor measures a temperature outside this tempera-
ture range the main station will sound an alarm for one minute.
This alarm can be silenced by pressing any button on the keypad.
23
button to
.
296586_1901_aur_Funk-Wetterstation_Content_US.indd 28 24.06.19 11:47
The temperature which triggered the alarm will flash as a visual
alarm along with the part of the double arrow indicating the
28 US-EN

direction of the temperature deviation. Press the ALERT button to
turn the alarm off.
Alarm
The main station features two alarms which can be set and activated
separately.
Weekday Alarm, Single Alarm
Weekday alarm: Mo to Fr weekday alarm
Single Alarm: one time alarm
This alarm will not repeat.
Setting the alarm
Press and hold the ALARM- / SET button 10 for 3 seconds to go
to alarm settings. The last alarm setting will appear instead of the
time, with the hour flashing. The symbol
right of the alarm time.
Set the hour for alarm W (weekday) or S (single) alarm using the
UP button
8
or the DOWN / button 9.
TIP: Press and hold the UP button or the DOWN /
quickly scan up or down.
Press the ALARM/SET button again to confirm your entry; the
minutes will start flashing. These can be changed the same way.
Activating The Alarm
In clock mode press the DOWN / button 9. In addition to the
time, a bell and 1 will appear:
the DOWN /
button again and the alarm symbol 1 will disap-
pear. Alarm symbol 2:
. Alarm 1 is now activated. Press
. will appear. Pressing the DOWN /
button again will activate alarm 1 and alarm 2. Both alarm symbols
will appear:
. Pressing the DOWN / button a fourth time
will deactivate both alarm 1 and alarm 2.
will appear to the
button to
296586_1901_aur_Funk-Wetterstation_Content_US.indd 29 24.06.19 11:47
29 US-EN

Turning the Alarm Off
The alarm will go off at the set time and the backlight will be acti-
vated. If you do not turn off the alarm, it will sound for 2 minutes
before stopping automatically.
Press the SNOOZE / LIGHT field 2 to snooze the alarm. The cl
display will flash
, indicating the snooze function has been
ock
activated: the alarm will sound again after 5 minutes.
Press any button on the keypad to actually turn the alarm off.
2
Accessing stored data
Maximum Temperatures
Press the MEM button again; both temperature fields will appear
23
and
next to the temperature and MAX next to the humidity. The re-
spective maximum indoor and outdoor value will be shown. Press the
MEM button twice; MIN will appear next to the temperature, and the
respective lowest indoor and outdoor value will be shown. After 5 seconds the current values will be displayed again.
22
296586_1901_aur_Funk-Wetterstation_Content_US.indd 30 24.06.19 11:47
30 US-EN

TIP: Min / Max Temperature are measured from the history (after inserting batteries/connecting to power). To erase the stored Min / Max
Temperature, hold the MEM button
Barometric Pressure History
Repeatedly briefly pressing the SET / HISTORY button will display the
barometric pressure over the past 12 hours. The barometric pressure
25
field
next to the barometric pressure display shows the history ,
indicating how many hours ago the barometric pressure is from.
13
for 3 seconds.
Manually activating signal reception
Activating WWVB signal reception
Every night the main station synchronizes the internal clock with the
WWVB signal. However, you may also activate WWVB reception
manually. To do so, press and hold the DOWN /
3 seconds until the radio tower symbol
received the radio tower symbol will be static. If reception fails, the
radio tower symbol
Activating reception from the outdoor sensor
The outdoor sensor will transmit a signal about twice a minute, which
is automatically received by the main station. However, you may also
manually activate reception of the signal. To do so, press and hold the
CH button
When a signal is received the symbol animation will disappear and
the transmitted temperature and humidity will appear in the display.
15
will disappear.
for three seconds until the channel symbol flashes.
flashes. When a signal is
button 9 for
296586_1901_aur_Funk-Wetterstation_Content_US.indd 31 24.06.19 11:47
31 US-EN

Backlight
Touch the SNOOZE / LIGHT field 2. The backlight will light up
for 10 seconds. With the mains adapter plugged in there are
3 backlight levels.
Reset function
Pressing the reset key will reset the product, which will then need
to be set up again.
Troubleshooting
This product has delicate electronic components. Radio transmitting
equipment in the immediate vicinity may therefore interfere with the
product. If the display shows interference, move such objects away
from the product.
Electrostatic discharge can cause malfunctions.
If the product fails to work, briefly remove and reinsert the batteries.
O
bstacles, e.g. concrete walls, may interfere with reception. In this ca
change the location. Please note, the outdoor sensor should always
be set up within a range of max. 328 ft. (100 meters) (open area)
from the main station. The specified range is the open area range,
meaning there should be no obstructions between the outdoor sensor
and the base. “Visual contact” between the outdoor sensor and the
base will often improve transmission.
Cold (outdoor temperatures below 32 °F (0 °C)) may also negatively
affect performance of the batteries in the outdoor sensor, thus wireless
transmission. Another factor which may interfere with reception is
drained or weak batteries in the outdoor sensor. Replace these with
new batteries.
If the product is not working correctly, briefly remove and reinsert the
batteries.
se,
296586_1901_aur_Funk-Wetterstation_Content_US.indd 32 24.06.19 11:47
32 US-EN

Cleaning and care
Never immerse the product in water or other liquids. These can
damage the product.
Use a dry, soft cloth for eyewear for cleaning and care.
Disposal
Dispose of the packaging through your local recycling facilities and in
compliance with all federal, state and local regulations.
Please note the package markings regarding waste sepa-
b
ration, indicated by abbreviations (a) and numbers (b),
a
meaning: 1–7: plastics / 20–22: paper and cardboard /
80–98: composite materials.
Contact your local waste management authority for additional information on how to dispose of the used product.
To help protect the environment, please dispose of the product properly
when it has reached the end of its useful life, do not throw in the garbage. Information on collection sites and their opening hours is available from your local authority.
Improper disposal of rechargeable batteries
can damage the environment!
296586_1901_aur_Funk-Wetterstation_Content_US.indd 33 24.06.19 11:47
Never throw rechargeable batteries in the garbage. They may contain
toxic heavy metals and must be handled as special waste. The chemical symbols of heavy metals are: Cd = cadmium, Hg = mercury, Pb =
lead. Used rechargeable batteries should therefore be disposed of
through a local collection point.
33 US-EN

Three year limited warranty
What does this warranty cover?
The warranty covers:
· Damage, breakage or inoperability due to defect.
· Damage not caused by normal wear and tear or failure to follow
the safety and maintenance instructions provided in the user manual.
What is not covered by the warranty?
The warranty does not cover damage caused by:
· Normal wear and tear of the product, including fragile parts (such
as switches, glass, etc.);
· Improper use or transport;
· Disregarding safety and maintenance instructions;
· Accidents or acts of nature (e.g. lightning, fire, water, etc.);
· Tampering with the product (such as removing cover, unscrewing
screws etc.).
Consequential and incidental damages are also not covered under this
warranty. However, some states do not allow the exclusion or limitation
of incidental or consequential damages, so this limitation or exclusion
may not apply to you.
What is the period of coverage and warranty resolution?
The warranty is for 3 years from the date of purchase. At our discretion,
product will either be refunded or replaced.
296586_1901_aur_Funk-Wetterstation_Content_US.indd 34 24.06.19 11:47
What will we not do?
We will not:
· Start a new warranty period upon product exchange;
· Repair product.
34 US-EN

How to process the warranty?
To initiate, please:
· Call customer service at 1 (844) 543-5872
· Visit the Website Customer Service Platform at
www.lidl.com/contact-us
or
· Visit a LIDL store for further assistance
To ensure the quickest warranty return process, please have the following
available:
· The original sales receipt that includes the date purchased;
· The product and manual in the original package;
· A statement of the problem.
What must you do to keep the warranty in effect?
· Retain the original receipt;
· Follow all product instructions;
· Do not repair or modify the product.
How does state law relate to this warranty?
This warranty gives you specific legal rights, and you may also have
other rights which vary from state to state. All implied warranties are
limited by the duration and terms of this warranty. Some states do not
allow limitations on how long an implied warranty lasts, so the above
limitation may not apply to you.
296586_1901_aur_Funk-Wetterstation_Content_US.indd 35 24.06.19 11:47
35 US-EN

Descripción de las palabras
de advertencia ........................................................... Página 38
Servicio al cliente ..................................................... Página 38
Lista de pictogramas utilizados .................. Página 39
Introducción ................................................................. Página 39
Uso previsto ........................................................................ Página 39
Descripción de las piezas ................................................. Página 40
Información técnica ........................................................... Página 43
Alcance de suministro ........................................................ Página 45
Instrucciones importantes
de seguridad ............................................................... Página 45
Advertencias de seguridad para baterías ........................ Página 47
Puesta en marcha ................................................... Página 49
Configurar los productos ................................................... Página 50
Encender el sensor exterior / reemplazar las baterías .... Página 50
Encender la estación principal / reemplazar las baterías .... Página 50
Señal de radio (WWVB) ................................................... Página 52
Información en modo básico ......................... Página 55
El campo del reloj .............................................................. Página 55
El campo de presión barométrica ..................................... Página 56
El campo de temperatura interior ..................................... Página 57
El campo de temperatura exterior .................................... Página 58
296586_1901_aur_Funk-Wetterstation_Content_US.indd 36 24.06.19 11:47
Configuración ............................................................. Página 60
Configuración básica ........................................................ Página 60
Alarma de temperatura ..................................................... Página 62
Activar la alarma de temperatura ..................................... Página 62
36 US-ES

Alarma ................................................................................ Página 63
Acceder a los datos almacenados ................................... Página 65
Activar la recepción de señal
de forma manual ..................................................... Página 66
Activar la recepción de señal de la WWVB .................... Página 66
Activar la recepción del sensor exterior ........................... Página 66
Retroiluminación ................................................................. Página 66
Función de restablecimiento .............................................. Página 66
Resolución de problemas ................................. Página 67
Limpieza y mantenimiento .............................. Página 67
Eliminación .................................................................... Página 68
Garantía limitada de 3 años .......................... Página 69
296586_1901_aur_Funk-Wetterstation_Content_US.indd 37 24.06.19 11:47
37 US-ES

DESCRIPCIÓN DE LAS PALABRAS
DE ADVERTENCIA
ADVERTENCIA indica una situación
peligrosa, que puede provocar la
m
uerte o lesiones graves si no se ev
PRECAUCIÓN indica una situación
peligrosa, que puede provocar lesiones leves o moderadas si no se evita.
AVISO indica información que se
considera importante, pero que no
implica un peligro (p. ej. mensajes
relacionados co
n daños materiales).
SERVICIO AL CLIENTE
Llame al Servicio de atención al cliente al 1 (844) 543-5872
Visite el Portal de atención al cliente en
www.lidl.com/contact-us
Visite una de nuestras tiendas LIDL en caso de cualquier inquietud.
ita.
296586_1901_aur_Funk-Wetterstation_Content_US.indd 38 24.06.19 11:47
IAN 296586_1901
38 US-ES
Por favor tenga su número IAN a
la mano.

Lista de pictogramas utilizados
Corriente directa Controlado por radio
Corriente alterna
Clase de
seguridad II
A prueba de
salpicaduras
Protección con fusibles
Estación meteorológica inalámbrica
Introducción
Felicidades por la compra de su nuevo producto. Usted ha seleccionado un producto de calidad. Las instrucciones de uso son parte del
producto. Contienen información importante respecto a la seguridad,
el uso y la eliminación. Antes de usar el producto, familiarícese con
toda la información de seguridad y las instrucciones de uso. Utilice la
unidad únicamente como se describe y para las aplicaciones indicadas.
Si traspasa el producto a alquien más, por favor asegúrese de incluir
toda la documentación con él.
Uso previsto
Este producto muestra la temperatura interior y exterior, la humedad
interior y exterior, así como la presión barométrica. Cuenta con un
reloj controlado por radio y varias funciones de alarma. La tendencia
probable del clima se calcula con base en los datos recolectados. El
producto no está diseñado para uso comercial.
296586_1901_aur_Funk-Wetterstation_Content_US.indd 39 24.06.19 11:47
39 US-ES

Descripción de las piezas
2
2
Estación principal
1
Pantalla
2
Campo de SNOOZE- / LUZ
3
Teclado
4
Cáncamo de la estación
principal
5
Cubierta del compartimiento
de las baterías
6
Pedestal
7
Botón de AJUSTE /
HISTORIAL
7 8 9 10
1 2
15 14 13
8
Botón ARRIBA
9
Botón ABAJO
10
Botón ALARMA / A JUSTE
11
Botón de restablecimiento
12
Botón °C / °F
13
Botón MEM
14
Botón ALERTA
15
Botón CH
16
Compartimiento de
las baterías
11
12
3 4
5
31
63233
296586_1901_aur_Funk-Wetterstation_Content_US.indd 40 24.06.19 11:47
40 US-ES

Sensor exterior
17
LED indicador
18
Cubierta del compartimiento
de las baterías
19
Cáncamo del sensor exterior
26 19
17
20
Pedestal del sensor exterior
21
Compartimiento de las
baterías del sensor exterior
18
20
3233
20
296586_1901_aur_Funk-Wetterstation_Content_US.indd 41 24.06.19 11:47
41 US-ES

Pantalla
22
Campo de temperatura
interior
23
Campo de temperatura
exterior
25
24
Campo del reloj
25
Campo de presión
barométrica
26
Pantalla del sensor exterior
Botones del sensor exterior junto al
compartimiento de las baterías
27
Botón °C / °F
28
Botón TX (botón de
29
Interruptor de selección
de canal
restablecimiento del canal)
22
23
24
296586_1901_aur_Funk-Wetterstation_Content_US.indd 42 24.06.19 11:47
42 US-ES
27
28
29
18
21

Fuente de alimentación opcional
30
Adaptador de corriente
31
Conexión del adaptador
de corriente
Material de montaje:
32
Tornillo (diá. 0.125 in / 3 mm)33 Taquete (diá. 0.3 in / 8 mm)
5
296586_1901_aur_Funk-Wetterstation_Content_US.indd 43 24.06.19 11:47
30
33 32
Información técnica
Estación principal:
Rango de medición de
temperatura: 0 °C a 50 °C
32 °F a 122 °F
Rango de medición de
humedad: 20 % a 95 %
Reloj controlado por radio: WWVB
Baterías: 2 x LR06 (UM-3), 1.5 V
(corriente directa) (tamaño AA)
16
43 US-ES

Rango de medición de la
presión barométrica: 850 hPa a 1050 hPa
25.1 inHg a 31.1 inHg
Banda de frecuencias: 60 kHz, 433.050 MHz a
434.790 MHz
Modelo: HG05124A-US-RX,
HG05124B-US-RX,
FCCID: 2AJ9O-HG05124RX
Adaptador de corriente:
Entrada: 100–240 V~(corriente alterna),
50–60 Hz, 200 mA MAX
Salida: 5.0 V
(corriente directa),
500 mA
N° de modelo: HX06-0500500-AU-001
Clase de protección:
Sensor exterior:
Rango de medición
de temperatura: -20 °C a +50 °C
-4.0 °F a + 122 °F
Rango de medición
de humedad: 20 % a 95 %
Alcance inalámbrico: máx. 328 ft (100 m) (al aire libre)
Baterías: 2 x LR06 (UM-3), 1.5 V
(corriente
directa) (tamaño AA)
Clase de protección: IPX4 (para uso en interiores y exteriores)
Modelo: HG05124A-US-TX,
HG05124B-US-TX,
FCCID: 2AJ9O-HG05124TX
Banda de frecuencias: 433.050 MHz a 434.790 MHz
296586_1901_aur_Funk-Wetterstation_Content_US.indd 44 24.06.19 11:47
44 US-ES

Potencia transmitida
máxima de
radiofrecuencia: 433.92 MHz, -10.77 dBm
Alcance de suministro
1 estación principal
1 sensor exterior
4 baterías, tipo LR06, 1.5 V
1 adaptador de corriente
3 tornillos
3 taquetes
1 instrucciones de uso
INSTRUCCIONES
IMPORTANTES DE
SEGURIDAD
LEA TODAS LAS INSTRUCCIONES. CONSERVE PARA FUTURAS
REFERENCIAS. AL CEDER ESTE PRODUCTO A TERCEROS, ASEGÚRESE DE INCLUIR TODA SU DOCUMENTACIÓN.
El incumplimiento de las siguientes ad-
vertencias puede provocar lesiones graves o la muerte.
Este producto puede ser usado por niños de 8 años
en adelante, así como por personas con capacidades
físicas, sensoriales o mentales reducidas o con falta de
experiencia o conocimiento, siempre y cuando estén supervisadas
e instruidas en el uso seguro del producto y los riesgos asociados.
No permitir a los niños jugar con este producto. La limpieza y mantenimiento no deberán ser realizados por niños sin supervisión.
No use el producto si éste está dañado.
296586_1901_aur_Funk-Wetterstation_Content_US.indd 45 24.06.19 11:47
45 US-ES

Antes de usar el producto, asegúrese de que el voltaje de alimen-
tación disponible corresponde al voltaje de operación de la fuente
de alimentación (120 V∼, 50–60 Hz).
¡Antes de usar el producto, verifique que el producto y la fuente
de alimentación y la conexión del cable no estén dañados!
¡Nunca use el producto si está dañado!
El producto debe conectarse a una toma de corriente de fácil
acceso, para que pueda desconectarse fácilmente en caso de
emergencia.
El producto solo es apto para usarse con el adaptador de corriente
que se incluye
.
Los cambios o las modificaciones a este producto que no sean ex-
presamente aprobados por la parte responsable del cumplimiento
podrían anular la autorización al usuario para operar el producto.
Nota: este producto ha sido probado y cumple con los límites
para un dispositivo digital clase B, de acuerdo con el apartado
15 de las normas de la FCC. Estos límites están diseñados para
proveer protección razonable contra interferencias perjudiciales
en una instalación residencial. Este producto genera, usa y puede
emitir energía de radiofrecuencia y en caso de no ser instalado y
utilizado de acuerdo a las instrucciones puede causar interferencias
perjudiciales a las radiocomunicaciones.
Sin embargo, no existe ninguna garantía de que no se produzcan
interferencias en una instalación en particular. Si este producto
causa una interferencia dañina a la recepción de radio o televisión,
la cual puede ser determinada encendiendo y apagando el producto, se alienta al usuario a intentar corregir las interferencias
siguiendo las siguientes medidas:
• Oriente o localice de nuevo la antena receptora.
• Aumente la separación entre el equipo y el receptor.
• Conecte el producto a la toma de corriente en un circuito
distinto de aquel al que esté conectado el receptor.
296586_1901_aur_Funk-Wetterstation_Content_US.indd 46 24.06.19 11:47
46 US-ES
• Solicite ayuda a su proveedor o a algún técnico experto
de radio / TV.
No exponga la estación principal a la humedad o a la luz solar
directa.
Este producto no contiene piezas que requieran el mantenimiento
del usuario. Los LED no son reemplazables.
Para apagar completamente el producto, desconecte el adaptador
de corriente de la toma de corriente.
No exponga el producto a un campo electromagnético extrema-
damente alto. Esto podría afectar el funcionamiento correcto del
producto.
Por favor, tome en cuenta que la garantía no cubre daño causado
por uso incorrecto, por no seguir las instrucciones o por el manejo
del producto por personas no autorizadas.
La distancia para cumplir con la exposición a RF es de 0.78 in
(20 mm).
Advertencias de seguridad
para baterías
Cuando se usan correctamente, las celdas y baterías proporcionan
una fuente segura y confiable de energía portátil. Sin embargo, si
se usan mal o se maltratan, se puede provocar fugas, quemaduras,
incendio o explosión.
Almacene la baterías en un lugar seco a temperatura ambiente.
Las baterías son sensibles a temperaturas altas y bajas. Este tipo
de exposición térmica pueden hacer que la baterías se chorreen,
se incendien o exploten.
Mantenga las celdas y las baterías fuera del alcance de los niños,
en especial las baterías pequeñas. Si se ingieren pueden provocar
asfixia o lesiones graves y agudas.
296586_1901_aur_Funk-Wetterstation_Content_US.indd 47 24.06.19 11:47
47 US-ES

Mantenga las celdas o las baterías limpias y secas durante su uso
y almacenamiento. Limpie las terminales metálicas con un trapo
suave y seco si se ensucian.
Busque ayuda médica inmediata si se ha tragado una celda o
batería. De igual forma, póngase en contacto con el centro local
para el control de intoxicaciones.
En caso de que el electrolito entre en contacto con la piel o los
ojos, enjuague inmediatamente con agua fresca durante al menos
15 minutos y solicite atención médica.
Almacene las baterías no usadas en su empaque original o en
un lugar seguro y alejadas de objetos metálicos que puedan provocarles cortocircuito.
Tenga cuidado al manipular la baterías para evitar que haya
cortocircuito con materiales conductores, como anillos, moneras,
pulseras y llaves. La batería o el conductor se pueden sobrecalentar y provocar quemaduras, chorreaduras, incendio o explosión.
Limpie los contactos de la batería, tanto en la batería como en
el producto antes de instalar la batería. Mantenga los contactos
limpios.
Retire la baterías del producto si no se va a usar por un perio
do
prolongado de tiempo (meses o más).
Retire la baterías agotadas del producto tan pronto como sea
posible para evitar posibles daños por fugas.
Elija la batería adecuada para la aplicación prevista.
Siempre tenga cuidad de insertar la baterías cor rectamente, fiján-
dose en las marcas de polaridad (+) y (-) en la batería y en el
producto para el cual está diseñada. Se debe tener en cuenta la
polaridad correcta para evitar daños al producto, al cargador o
la baterías.
Cambie siempre el juego completo de baterías a la vez, tenie
ndo
cuidado de no mezclar baterías nuevas con viejas, o baterías de
distintos tipos, capacidades o fabricantes.
Nunca caliente la baterías para revivirlas.
296586_1901_aur_Funk-Wetterstation_Content_US.indd 48 24.06.19 11:48
48 US-ES

Nunca recargue una batería a menos que la etiqueta de la bate-
ría indique específicamente que se trata de una batería recargable. Cargar una batería no recargable puede hacer que las se
chorreen, se incendien o exploten.
Use solo el cable de alimentación proporcionado con el pro-
ducto. El uso de otros cables puede provocar que las baterías
dentro del producto se carguen.
No abra o mutile una batería o celda. El electrolito de la celda
es corrosivo y puede provocar lesiones en los ojos o la piel. El
contenido de la celda puede ser peligroso si se ingiere.
No deje caer ni someta la celda o la batería integrada a tensión
mecánica intensa.
No se deben desmontar, aplastar, perforar o mutilar la baterías.
Este tipo de acciones pueden hacer que la baterías se chorreen,
se incendien o exploten.
No elimine la batería en el fuego. De lo contrario, se puede
provocar una explosión.
Elimine los productos con batería o celda integrada de forma
adecuada y de acuerdo a las disposiciones gubernamentales.
GUARDE ESTAS
INSTRUCCIONES
Puesta en marcha
296586_1901_aur_Funk-Wetterstation_Content_US.indd 49 24.06.19 11:48
Nota: primer inserte las baterías en el sensor exterior y luego en la
estación principal.
49 US-ES

Configurar los productos
ATENCIÓN: primero encienda el sensor exterior y luego la estación
principal.
De ser posible, no exponga el sensor exterior o la estación princip
directamente a la luz solar. Colóquela en una superficie horizontal
y nivelada o móntela en una pared vertical.
La estación principal se puede colgar del cáncamo 4 o desplegar
el pedestal
nivelada.
6
para colocarla sobre una superficie horizontal y
al
Encender el sensor exterior /
reemplazar las baterías
Abra el compartimiento de las baterías 21 en la parte trasera del
sensor exterior deslizando la cubierta del compartimiento de las
baterías
Primero retire las baterías viejas al reemplazar la baterías.
Inserte las baterías nuevas, tipo LR06, en el compartimento de
las baterías
el compartimiento de las baterías.
Cierre la cubierta del compartimiento de las baterías. La luz LED 17
en la parte frontal del sensor exterior se encenderá brevemente.
La luz LED parpadeará dos veces en un minuto, lo que indica
transmisión inalámbrica.
18
en dirección de la flecha.
21
. Tenga en cuenta la polaridad. Esto se indica en
Encender la estación principal / reemplazar
las baterías
Abra el cubierta de las baterías 5 en la parte trasera de la esta-
ción principal jalando la pestaña en la parte inferior del compartimiento de las baterías.
Primero retire las baterías viejas al reemplazar la baterías.
Inserte las baterías nuevas, tipo LR06, en el compartimento de
las baterías
el compartimiento de las baterías.
16
. Tenga en cuenta la polaridad. Esto se indica en
296586_1901_aur_Funk-Wetterstation_Content_US.indd 50 24.06.19 11:48
50 US-ES

Cierre la cubierta del compartimiento de las baterías. La pantalla
1
encenderá brevemente y ejecutará una pequeña revisión de
todos los elementos de la pantalla.
De forma alterna, primero retire las baterías del compartimiento
de las baterías.
Conecte el enchufe de bajo voltaje del adaptador de corriente 30
en la conexión del adaptador de corriente
31
en la estación principal y conecte el adaptador de corriente en una toma de corriente
de fácil acceso. La pantalla encenderá permanentemente y ejecutará una pequeña revisión de todos los elementos de la pantalla.
El campo de temperatura exterior 23 mostrará una animación del
símbolo de recepción
, lo que indica que la estación principal
está buscando la señal del sensor exterior.
Si no se muestra la temperatura exterior después de 3 minutos, la
estación principal dejará de buscar. La animación del símbolo de
recepción se apagará y el campo de temperatura exterior mostrará --._ °C y --._ %. Lo más probable es que la señal no puede
recibirse debido a factores estructurales, como paredes reforzadas
de concreto, paredes de ladrillos demasiado sólidas o la distancia
entre las unidades. Después de encontrar un mejor lugar para el
sensor exterior, será necesario reiniciar con la recepción.
Mantenga presionado el botón CH 15 en la parte trasera de la
estación principal durante 3 segundos hasta que la señal de recepción se vuelva a animar.
El producto comenzará automáticamente a recibir la señal del
sensor exterior, sin importar si se recibió o no señal del sensor
exterior. El campo del reloj
radio
, que indica que el receptor de la señal de la WWVB
24
mostrará un símbolo de torre de
está comenzando a recibir la hora.
296586_1901_aur_Funk-Wetterstation_Content_US.indd 51 24.06.19 11:48
51 US-ES
Señal de radio (WWVB)
La señal de la WWVB (transmisor de señal de tiempo) consiste en
pulsos de tiempo emitidos por uno de los relojes más precisos del
mundo en Fort Collins, Colorado.
Si la señal se detecta la pantalla del reloj
Central Europea la fecha y el día de la semana. Un símbolo estático
de torre de radio
aparecerá. Para conocer más detalles, consulte
la sección Configuración básica.
Si fallan los intentos para recibir la señal, la estación principal dejará
de intentar recibir la señal después de 7 minutos y el símbolo de torre
de radio
desaparecerá. Para mayor información sobre cómo resol-
ver este problema, consulte el capítulo Resolución de problemas.
24
mostrará en la Hora
296586_1901_aur_Funk-Wetterstation_Content_US.indd 52 24.06.19 11:48
Tras recibir exitosamente la señal WWVB, presione el botón UP
8
para elegir la zona horaria entre P = Pacífico UTC-8; M = Montaña
UTC-7, C = Central UTC-6, E = Este UTC-5 en el campo de reloj
24
.
Puede reactivar la recepción manteniendo presionado el botón
ABAJO /
símbolo de torre de radio
9 durante tres segundos hasta que se anime el
en la pantalla del reloj 24.
También tiene la opción de ajustar la hora de forma manual. Para
conocer más detalles, consulte la sección Configuración básica.
Montaje de pared para la estación meteorológica y / o
el sensor exterior:
Nota: Este paso requiere un taladro eléctrico y un desarmador de cruz.
¡PELIGRO DE MUERTE, RIESGO DE LESIONES Y DAÑOS
MATERIALES! Lea cuidadosamente las instrucciones de uso y
seguridad de su taladro.
¡PELIGRO DE MUERTE! Tenga cuidado de no perforar tube-
rías eléctricas, de agua o gas al taladrar la pared. De ser necesario, inspeccione con un detector de pared antes de taladrar.
52 US-ES
Estación meteorológica
Nota: Antes de montar la estación meteorológica, retire el soporte
6
de la parte trasera. Marque el lugar a taladrar (D 0.3 in / 8 mm)
en la pared.
Nota: Use la plantilla para taladrar incluida y diseñada para marcar
el orificio a taladrar.
Perfore el orificio con un taladro eléctrico.
Introduzca el taquete 33 en el orificio taladrado.
Atornille el tornillo 32 usando un desarmador de cruz en el so-
porte de pared.
Cuelgue la estación meteorológica colocando la ranura para
4
colgar
en el tornillo.
0.125in / 0.3mm
0.125 in/3 mm
296586_1901_aur_Funk-Wetterstation_Content_US.indd 53 24.06.19 11:48
Sensor exterior
Marque el lugar para el orificio (D 0.3 in / 8 mm) en la pared.
Nota: Use la plantilla para taladrar incluida y diseñada para
marcar el orificio a taladrar.
Perfore el orificio con un taladro eléctrico.
53 US-ES

Introduzca el taquete 33 en el orificio taladrado.
0.125in / 0.3mm
0.125 in/3 mm
Atornille el tornillo 32 usando un desarmador de cruz en el so-
porte de pared.
Cuelgue el sensor exterior colocando la ranura para colgar 19
en el tornillo.
Nota: Nunca sumerja el sensor exterior en agua y protéjalo de
la luz directa del sol. Los dispositivos eléctricos pueden afectar la
recepción de la señal inalámbrica.
0.3 in/8 mm
Una vez que la estación principal ha recibido la señal del sensor
exterior y la señal de la WWVB, ingresa a modo básico.
En modo básico, la estación principal mostrará la siguiente información:
296586_1901_aur_Funk-Wetterstation_Content_US.indd 54 24.06.19 11:48
54 US-ES

Información en modo básico
El campo del reloj
24
Hora:
La hora se mostrará en formato de 24
horas de acuerdo con la configuración
predeterminada. Al seleccionar el for-
mato de 12 horas en la configuración
básica, la hora de las 12:00 de la tarde hasta las 11:59 de la noche
mostrará PM (que en latín significa "post meridiem" = tarde) en frente
de la hora.
Durante el Horario de Verano, aparecerá DST en la parte superior
entre las horas y los minutos. Esta pantalla solo sirve cuando se recibe
la señal de la WWVB.
Fecha y día:
A la izquierda de la
abreviatura D (día),
aparecerá la fecha del
día actual, y a la izquierda de la abreviatura M (mes), la fecha del
mes actual. A la derecha aparecerá la abreviatura del día actual de
la semana. El idioma predeterminado para esta abreviatura es alemán,
pero se puede cambiar. Consulte la sección Configuración básica.
El símbolo de torre de radio:
El símbolo de la torre de radio indica una recepción exitosa
de la señal de la WWVB. La estación principal sincroniza su
reloj interno con la estación de la hora toda las noches. Este
símbolo parpadeará mientras se sincroniza. Si la recepción tiene éxito,
el símbolo de quedará estático hasta el siguiente ciclo de recepción.
296586_1901_aur_Funk-Wetterstation_Content_US.indd 55 24.06.19 11:48
55 US-ES

La fase lunar:
La fase lunar actual se indica como sigue:
La porción de la luna no iluminada estará oscura en la
pantalla.
El campo de presión barométrica
25
Pantalla de presión barométrica:
En la parte superior derecha está la
presión barométrica a la hora mostrada en el campo HIST (historial).
Si es LLL (o LL.LL cuando se ajusta la
unidad en inHg), el rango de indicación es debajo de 850 hPa (25.1
inHg), si es HHH (o HH.HH), es por
encima.
De fábrica, la presión barométrica actual (HIST = 0) se muestra en la
unidad mb (milibar) o hPa (hectopascal). Sin embargo, la pantalla
también se puede ajustar con la unidad poco común inHg (pulgadas
de mercurio). Consulte la sección Configuración básica.
La gráfica de barras muestra una gráfica de la presión barométrica
hace 0, 1, 2, 3, 6 y 12 horas.
La tendencia de presión barométrica:
La tendencia aparecerá en ascenso (o descenso), si la
presión barométrica cambia en 2 hPa (= 0.06 inHg) o
más en una hora y mantiene la dirección durante más de una hora
sin más cambios.
El pronostico del clima:
La estación principal calcula un pronóstico del clima para aproximadamente las siguientes 12 horas con base en la tendencia de presión
296586_1901_aur_Funk-Wetterstation_Content_US.indd 56 24.06.19 11:48
56 US-ES

barométrica. Naturalmente, este pronóstico no es comparable al de
los servicios profesionales del clima, que se basan en información de
satélites y computadoras de alto desempeño, pero ofrece simplemente
una indicación aproximada de los desarrollos actuales.
Los pronósticos gráficos disponibles son:
parcialmente
nublado soleado nublado lluvioso nieve
296586_1901_aur_Funk-Wetterstation_Content_US.indd 57 24.06.19 11:48
El campo de temperatura interior
22
La temperatura interior:
La temperatura interior medida por la estación
principal se muestra con indexación hasta una
décima de grado. La unidad de temperatura
°C (para grados Celsius) aparece en la parte
superior derecha. La unidad de temperatura
también se puede ajustar en la unidad actualmente poco frecuente de
°F (grados Fahrenheit). Para cambiar esta unidad presione el botón
12
°C / F
. Si aparece LL.L, está debajo del rango de medición de
0 °C a 50 °C (o 32 °F a 122 °F), si aparece HH.H, está por encima.
La humedad relativa:
Esto muestra la humedad relativa a la que está
expuesta la estación principal.
57 US-ES
La tendencia de temperatura o humedad:
La tendencia aparecerá como en ascenso (o descenso),
si la temperatura cambia en 2 °C (= 3.6 °F) o o más
en una hora y mantiene la dirección durante una hora, incluso sin
cambio adicional. La tendencia de humedad responderá acordemente
con un cambio de 2 % en humedad.
Clasificación del clima en interiores:
La estación principal clasificará el clima interior con base en la
humedad y la temperatura interiores usando la siguiente clave:
DRY humedad debajo de 40 %
COMFORT humedad entre 40 y 70 %, y un
rango de temperatura entre 20 °C–28 °C
(68 °F–82.4 °F).
WET humedad mayor al 70 %
Cuando la temperatura interior está fuera del rango de 20 °C–28 °C
(o 68 °F a 82.4 °F) no aparecerá una clasificación del clima interior.
Batería baja:
Si el símbolo de batería aparece, las baterías en la es-
tación principal se deben reemplazar tan pronto como
sea posible. Consulte las instrucciones en la sección Encender la
estación principal / reemplazar las baterías.
296586_1901_aur_Funk-Wetterstation_Content_US.indd 58 24.06.19 11:48
El campo de temperatura exterior
La temperatura exterior:
La temperatura exterior se muestra con indexación hasta una décima de grado. La unidad
de temperatura °C (para grados Celsius)
58 US-ES
23

aparece en la parte superior derecha. La unidad de temperatura también se puede ajustar en la unidad actualmente poco frecuente de °F
(grados Fahrenheit).
Para cambiar a esta unidad presione el botón °C / F 12.
Si LL.L aparece, está debajo del rango de medición de -20 °C a
50 °C (o - 4 °F a 122 °F), si aparece HH.H, está por encima.
La humedad relativa:
Esto muestra la humedad relativa a la que está
expuesta el sensor exterior.
La tendencia de temperatura o humedad:
La tendencia aparecerá como en ascenso (o descenso),
si la temperatura cambia en 2 °C (= 3.6 °F) o o más
en una hora y mantiene la dirección durante una hora, incluso sin
cambio adicional. La tendencia de humedad responderá acordemente
con un cambio de 2 % en humedad.
Indicación de canal:
La estación meteorológica recibe la señal del sensor exterior automáticamente después de haber hecho todas
las configuraciones.
Nota: seleccione un canal distinto para el sensor ex-
terior presionando el botón CH
cipal o el selector de canal
15
en la estación prin-
29
en el sensor exterior en
caso de interferencia de equipo cercano que transmite
señales de radio. Los datos correspondientes se muestran en la pantalla LC.
296586_1901_aur_Funk-Wetterstation_Content_US.indd 59 24.06.19 11:48
- 1: sensor exterior en canal 1
- 2: sensor exterior en canal 2
59 US-ES

- 3: sensor exterior en canal 3
-
: cambio automático de canal
Batería baja:
Si aparece el símbolo de batería, las baterías en el sensor exterior se deben reemplazar lo más pronto posible.
Consulte las instrucciones en la sección Encender el sensor
exterior / reemplazar las baterías.
Configuración
ATENCIÓN: si toca firmemente la parte superior de la carcasa se
encenderá la retroiluminación (fig. E). 10 segundos después de soltarlo,
la retroiluminación de la pantalla se volverá a apagar.
Tenga en cuenta que la estación principal no responde a dos botones
presionados al mismo tiempo. Por tanto, si la unidad no responde
cuando presiona un botón, probablemente también está presionando
el campo de SNOOZE / LUZ. ¡Suéltelo cuando esto ocurra!
Configuración básica
Mantenga presionado el botón AJUSTE / historial 7 durante
3 segundos para cambiar a la configuración básica.
Al presionar el botón ARRIBA 8 o el botón ABAJO / 9 se
puede cambiar al valor que está parpadeando.
CONSEJO: mantener presionado el botón ARRIBA o el botón
ABAJO /
ATENCIÓN: si no se presionan botones durante 20 segundos, la
estación principal regresará a modo básico.
pasará rápidamente hacia adelante o atrás lo números.
296586_1901_aur_Funk-Wetterstation_Content_US.indd 60 24.06.19 11:48
Presionar brevemente el botón AJUSTE / historial confirmará el ajuste
y cambiará a la siguiente opción en la configuración del reloj
Esto le permite cambiar los siguientes ajustes en secuencia:
60 US-ES
.

Nota: si la estación principal recibió la señal de la WWVB, permanecerán sin cambio el año, mes, día, hora y minuto. Si se encuentra
en una zona horaria distinta a la de Alemania, puede ajustar su hora
local en zona horaria.
Año
Mes
Día
Ajuste de idioma para mostrar el día de la semana en la
parte inferior derecha de la pantalla del reloj.
Los siguientes códigos parpadearán y se pueden cambiar en la
siguiente secuencia presionando el botón ARRIBA / ABAJO: GE
(alemán), DA (danés), ES (español), NE (holandés), FR (francés),
IT (italiano), EN (inglés)
Formato del reloj: seleccione formato 24 Hr para formato de
24 horas (0:00 – 23:59). 12 Hr indica el formato de 12 horas
(1:00 – 12:59). En el formato de 12 horas, la hora de las 12:00
de la tarde hasta las 11:59 de la noche mostrará PM (que en latín
significa "post meridiem" = tarde) en la pantalla.
Hora
Minuto
Zona horaria: la zona horaria se puede ajustar de las +12 a
las –12 horas.
Pronóstico del clima: la estación principal calcula el pronóstico
del clima con base en cambios en la presión barométrica. Debido
a que no hay datos sobre los cambios de la presión barométrica
cambios cuando se enciende la unidad, el pronóstico del clima
será aleatorio a esa hora. La estación principal solo podrá calcular el pronóstico después de unos días.
Sin embargo, al encender la unidad puede usar el botón ARRIBA
o ABAJO /
para establecer un pronóstico con base en el pronóstico en la televisión o internet para acelerar un poco la autorregulación del pronóstico del clima.
296586_1901_aur_Funk-Wetterstation_Content_US.indd 61 24.06.19 11:48
61 US-ES

Ajustar la presión barométrica: la presión barométrica in-
dicará la presión barométrica absoluta en mb o hPa de acuerdo
con el ajuste predeterminado. Ahora puede ajustar la indicación
a la presión barométrica en relación con la altitud de su ubicación.
Obtenga los datos actuales de internet o del pronóstico del clima
local. Tenga en cuenta que los datos se deben ingresar en la unidad mostrada a la hora en que se hace el ajuste.
Ajustar la presión barométrica: de fabrica se encuentra la
unidad europea de hPa. Sin embargo, también puede seleccionar
la de pulgadas de mercurio (inHg). Cuando cambie la unidad a
esta hora, el valor indicado se convertirá automáticamente a la
nueva unidad.
Alarma de temperatura
Cuenta con la opción de definir un rango de temperatura para el
sensor exterior. Con la alarma de temperatura activada, la estación
principal emitirá una alarma si el sensor exterior mide una temperatura fuera de este rango de temperatura.
Activar la alarma de temperatura
Mantenga presionado el botón ALERTA 14 durante tres segundos
hasta que la indicación de temperatura parpadee en el campo de
temperatura exterior
a la izquierda de la temperatura.
Ahora presione el botón ARRIBA 8 o el botón ABAJO / 9
para establecer la temperatura máxima para el rango de temperatura.
CONSEJO: mantenga presionado el botón ARRIBA o el botón
ABAJO
para pasar rápidamente hacia adelante o atrás los
números.
Confirme el valor presionando el botón ALERTA. La indicación de
temperatura ahora volverá a parpadear y empezará a parpadear
una flecha hacia abajo
23
. Aparece´ra una flecha parpadeando
.
296586_1901_aur_Funk-Wetterstation_Content_US.indd 62 24.06.19 11:48
62 US-ES

Presione el botón ARRIBA o el botón ABAJO / para establecer
la temperatura mínima para el rango de temperatura deseado.
Confirme el valor presionando el botón ALERTA. El rango de tem-
peratura está ahora ajustado.
Presione brevemente el botón ALERTA para activar o desactivar
la alarma de temperatura.
Con la alarma de temperatura activada, aparecerá una flecha
doble estática en el campo de temperatura exterior debajo de
OUT:
Si el sensor exterior mide una temperatura fuera de este rango
de temperatura, la estación principal emitirá una alarma durante
un minuto. Esta alarma se puede silenciar presionando cualquier
botón en el teclado.
La temperatura que activa la alarma parpadeará como una alarma
visual, y la parte de la flecha doble que indica la dirección de la
desviación de temperatura. Presione el botón ALERTA para apagar
la alarma.
Alarma
La estación principal cuenta con dos alarmas que se pueden configurar
y activar de forma separada.
Alarma para día de la semana, alarma individual
Alarma para día de la semana: alarma de lunes a viernes
Alarma individual: alarma para una sola vez
una vez que termina se
desactivará automáticamente.
296586_1901_aur_Funk-Wetterstation_Content_US.indd 63 24.06.19 11:48
Configurar la alarma
Mantenga presionado el botón ALARMA / AJUSTAR 10 durante
3 segundos para ingresar al modo de configuración de la alarma.
El último ajuste de alarma aparecerá en lugar del reloj, con la
63 US-ES

hora parpadeando. La marca aparecerá a la derecha de la
hora de alarma.
Ajuste la hora para alarma W (día de la semana) o alarma S (in-
dividual) usando el botón ARRIBA
8
o el botón ABAJO / 9.
CONSEJO: mantenga presionado el botón ARRIBA o el botón
ABAJO /
para avanzar rápidamente hacia adelante o atrás.
Presione el botón ALARMA / AJUSTAR nuevamente para confirmar
su ajuste los minutos comenzarán a parpadear. Estos se pueden
cambiar de la misma forma.
Activar la alarma
En el modo de reloj presione el botón ABAJO / 9. Además
de la hora, aparecerá una campana con 1:
activada ahora. Presione el botón ABAJO /
. La alarma 1 está
nuevamente y
desparecerá el símbolo de alarma 1. Aparecerá el símbolo de
alarma 2:
. Si presiona el botón ABAJO / nuevamente se
activará la alarma 1 y la alarma 2. Aparecerán ambos símbolos
de alarma:
. Si se presiona el botón ABAJO / cuatro
veces se desactivará la alarma 1 y la alarma 2.
Apagar la alarma
La alarma sonará a la hora establecida y se encenderá la retroilu-
minación. Si no se apaga, la alarma sonará durante 2 minutos
antes de detenerse automáticamente.
Presione el campo SNOOZE / LUZ 2 para interrumpir la alarma.
La pantalla del reloj parpadeará
, indicando que se activó
la función de snooze: la alarma sonará de nuevo después de
5 minutos.
Presione cualquier botón en el teclado para apagar definitivamente
la alarma.
296586_1901_aur_Funk-Wetterstation_Content_US.indd 64 24.06.19 11:48
64 US-ES

2
Acceder a los datos almacenados
Temperaturas máximas
Presione el botón MEM nuevamente y se mostrarán ambos campos
de temperatura
medad. Se mostrará el valor máximo interior y exterior, respectivamente.
Presione el botón MEM dos veces y MIN aparecerá junto a la temperatura, y se mostrará el valor mínimo interior y exterior correspondiente.
Después de 5 segundos se volverán a mostrar los valores actuales.
CONSEJO: las temperaturas mín. / máx. se miden en todo momento
desde el inicio (después de insertar las baterías / conectar la fuente
de alimentación). Para eliminar las temperaturas mín. / máx., mantenga
presionado el botón MEM
Historial de presión barométrica
Presione repetidamente el botón de AJUSTE/historial y se mostrará la
presión barométrica de las últimas 12 horas. El campo de presión barométrica
22
y 23 junto a la temperatura, y MAX junto a la hu-
13
durante 3 segundos.
25
junto a la indicación de la presión barométrica el historial
296586_1901_aur_Funk-Wetterstation_Content_US.indd 65 24.06.19 11:48
65 US-ES

indica hace cuántas horas era actual la presión barométrica que
se muestra.
Activar la recepción de señal de forma manual
Activar la recepción de señal de la WWVB
La estación principal sincroniza el reloj interno con la señal de la WWVB
toda las noches. Sin embargo, también puede activar la recepción de
la WWVB de forma manual. Para hacerlo, mantenga presionado el
botón ABAJO /
torre de radio
torre de radio quedará estático. Si la recepción falla, el símbolo de
torre de radio
9 durante 3 segundos hasta que el símbolo de
parpadee. Tras las recepción exitosa, el símbolo de
desaparecerá.
Activar la recepción del sensor exterior
El sensor exterior transmitirá una señal unas dos veces por minuto, que
se recibe automáticamente en la estación principal. Sin embargo, también puede activar de forma manual la recepción de la señal. Para
hacerlo, mantenga presionado el botón CH
hasta que el símbolo de canal
la animación del símbolo desaparecerá y aparecerá la temperatura
y humedad transmitidas en la pantalla.
parpadee. Tras la recepción exitosa,
15
durante tres segundos
Retroiluminación
Toque el campo de SNOOZE / LUZ 2. La retroiluminación se
encenderá durante 10 segundos. Con el adaptador de corriente
conectado existen 3 niveles de retroiluminación.
296586_1901_aur_Funk-Wetterstation_Content_US.indd 66 24.06.19 11:48
Función de restablecimiento
Botón de restablecimiento, si se presiona se restablece todo el
producto, se debe volver a configurar.
66 US-ES

Resolución de problemas
El producto contiene componentes electrónicos delicados. Por tanto,
es posible que los equipos de transmisión de radio en los alrededores
inmediatos puedan provocar interferencia en el producto. Si la pantalla
muestra interferencia, aleje estos objetos del producto.
Las descargas electrostáticas pueden provocar mal funcionamiento.
En caso de que el producto deje de funcionar, retire las baterías
durante un breve momento y vuelva a colocarlas.
Los obstáculos, como las paredes de concreto, pueden hacer que la
recepción sea susceptible a interferencia. En este caso, cambie la
ubicación. Tenga en cuenta que el sensor exterior siempre debe estar
dentro de un radio de máx. 328 ft. (100 metros) (al aire libre) de la
estación principal. El rango especificado es el rango de campo abierto
y significa que no debe haber obstáculos entre el sensor exterior y la
base. El “contacto visual“ entre el sensor exterior y la base suele mejorar la transmisión.
El frío (temperatura exterior debajo de 32 °F (0 °C) puede puede
afectar negativamente el desempeño de la batería del sensor exterior
y, por tanto, de la transmisión inalámbrica. Otro factor que puede interferir con la recepción son las baterías agotadas o débiles en el sensor
exterior. Reemplácelas con baterías nuevas.
Si el producto no está funcionando bien, retire brevemente y vuelva a
insertar las baterías.
Limpieza y mantenimiento
296586_1901_aur_Funk-Wetterstation_Content_US.indd 67 24.06.19 11:48
Nunca sumerja al producto en agua u otros líquidos. De lo contra-
rio, se puede dañar el producto.
Use un trapo seco y suave para para lentes para limpiar y dar
mantenimiento al producto.
67 US-ES

Eliminación
Deshágase del empaque mediante sus instalaciones de reciclaje loca-
les y de acuerdo con las regulaciones federales, estatales y locales.
Observe las señales del material de empaque para la
b
separación de residuos, los cuales están señalados con
a
abreviaturas (a) y números (b) que significan lo siguiente:
1–7: plásticos / 20–22: papel y tablero de fibra / 80–98:
materiales mixtos.
Contacte a las autoridades locales correspondientes para
la eliminación de desechos para mayor información sobre
cómo desechar su producto desgastado.
Para ayudar a proteger el medio ambiente, elimine el producto adecuadamente al final de su vida útil, no lo tire en la basura normal. Puede
obtener información de sus autoridades locales sobre los puntos de
recolección y horarios de atención.
¡La eliminación inadecuada de las baterías
puede causar daños ambientales!
Las baterías no deben ser eliminadas con los desechos del hogar. Éstas
pueden contener metales pesados tóxicos y requieren ser tratadas como
desechos especiales. Los símbolos químicos de los metales pesados son:
Cd = Cadmio, HG = Mercurio, Pb = Plomo. Por esta razón es importante
eliminar las baterías usadas en un punto de recolección local.
296586_1901_aur_Funk-Wetterstation_Content_US.indd 68 24.06.19 11:48
68 US-ES

Garantía limitada de 3 años
Lo que cubre la presente garantía
La garantía incluye:
· Daños, quebraduras o incapacidad para funcionar debido a defectos.
· Daños que no hayan sido causados por el desgaste propio del uso
o por no seguir las instrucciones de seguridad y mantención incluidas
en el manual para el usuario.
Lo que no cubre esta garantía
La garantía no cubre daños causados por:
· El desgaste propio del uso del producto, incluidas las partes frágiles
(como interruptores, piezas de vidrio, etc.).
· Uso o transporte no indicado del producto.
· Desatención a las instrucciones de seguridad y mantención.
· Accidentes o causas de fuerza mayor (e.g. relámpagos, incendio,
inundación, etc.).
· Manipulación mal intencionada del producto (retirar la cubierta,
tornillos, etc.).
La presente garantía tampoco cubre daños indirectos o emergentes.
Sin embargo algunos estados no permiten la exclusión o limitación
de daños indirectos o emergentes, por lo que dicha exclusión o limitación pudiera no aplicarse en su caso.
Período de cobertura y resolución de la garantía
La garantía es válida por 3 años a partir de la fecha de compra. La
empresa, según lo estime conveniente, devolverá el dinero o repondrá
el producto.
296586_1901_aur_Funk-Wetterstation_Content_US.indd 69 24.06.19 11:48
69 US-ES

La empresa no:
· Dará inicio a un nuevo período de garantía al hacerse el cambio
del producto.
· Reparará el producto.
¿Cómo se tramita la garantía?
Recomendamos que primero usted:
· Llame al Servicio de atención al cliente al 1 (844) 543-5872.
· Visite el Portal de atención al cliente en www.lidl.com/contact-us
· Visite una de nuestras tiendas LIDL en caso de cualquier inquietud.
A fin de acelerar el trámite de la garantía, tenga a bien contar con
lo siguiente:
· Recibo de venta original que incluya la fecha de compra.
· Producto y manual en su empaque original.
· Descripción del problema.
¿Qué debe hacer usted para mantener la garantía
vigente?
· Guardar el recibo original.
· Seguir todas las instrucciones para el uso del producto.
· No realizar ninguna reparación ni alteración al producto.
¿De qué manera influyen las leyes estatales con
esta garantía?
La presente garantía le otorga derechos legales específicos, y pudiera
usted contar con otros derechos los cuales varían de un estado a otro.
Todas las garantías implícitas se encuentran limitadas a la duración y
términos de la presente garantía. Algunos estados no permiten limitaciones al período de tiempo y términos de la garantía implícita, por
lo que dichas limitaciones pudieran no aplicarse en su caso.
296586_1901_aur_Funk-Wetterstation_Content_US.indd 70 24.06.19 11:48
70 US-ES
 Loading...