


US-EN ................................................................... 2
US-ES .................................................................. 16
V 1.1

FLORABEST FFGT 433 A1
Table of Contents
1. General Information ......................................... 3
1.1. Read and retain the operating manual .......................... 3
1.2. Explanation of symbols used .......................................... 3
2. Safety ............................................................... 4
2.1 Intended use ...................................................................... 4
2.2. Safety Instructions ............................................................ 4
3. Package Contents ............................................. 6
4. Description of Parts and Controls ...................... 6
5. Technical Data .................................................. 7
6. Copyright ......................................................... 7
7. Before Initial Use .............................................. 7
7.1 Inserting/changing the batteries ..................................... 7
7.2 Connecting the temperature sensor ................................ 8
7.3 Setting the unit of temperature ......................................... 8
8. Initial Use ......................................................... 8
8.1 Position during operation ................................................. 8
8.1.1 Receiver (1) ............................................................... 9
8.1.2 Transmitter (13) ......................................................... 9
8.2 Selecting type of meat/setting doneness ........................ 9
8.3 Measuring the core temperature ................................... 10
8.4 Doneness table ............................................................... 11
8.5 Timer function .................................................................. 12
9. Cleaning ......................................................... 12
9.1 Storage when not in use ................................................ 12
10. Troubleshooting ........................................... 13
11. Environmental information and disposal ...... 13
12. FCC hints ....................................................... 14
13. Warranty...................................................... 14
2 - US-EN

FLORABEST FFGT 433 A1
Congratulations!
By purchasing the FLORABEST SBB 433 A1 wireless grill
thermometer, hereafter referred to as the grill thermometer, you
have opted for a high quality product.
1. General Information
1.1. Read and retain the operating manual
This operating manual contains important
information regarding the safe use of the device
as well as details on day-to-day use and
disposal. Carefully familiarize yourself with the
operating manual, paying special attention to the safety
instructions before using the device, and use it only for the
application areas and purposes described. If you give the
device away or sell it, please ensure that you also pass on the
operating manual. It is part of the product.
1.2. Explanation of symbols used
The following symbols and signal words are used in this
operating manual, on the device, or on the packaging.
This symbol / signal word indicates a hazard with a medium
level of risk that if not prevented could result in death or serious
injury.
This symbol / signal word indicates a hazard with a low level
of risk that if not prevented could result in minor or moderate
injury.
This signal word warns of possible damage to property.
This icon indicates danger of scalding.
This symbol indicates further information on
handling and use.
US-EN - 3

FLORABEST FFGT 433 A1
2. Safety
2.1 Intended use
This grill thermometer is used to measure and monitor the core
temperature of dishes such as fish, beef, pork, chicken,
hamburgers, and other kinds of meat. The grill thermometer is
not intended for business or commercial use. The grill
thermometer is solely for private purposes; any other use is
deemed improper. This device meets all relevant norms and
standards in conjunction with UL conformity. Compliance with
these standards is no longer guaranteed if a change is made to
the grill thermometer without the authorization of the
manufacturer. The manufacturer shall not be liable for any
damages or faults arising as a result. Only use the accessories
provided by the manufacturer.
Please observe the national regulations and/or laws of the
country in which the device is used.
2.2. Safety Instructions
IMPORTANT SAFEGUARDS
Read all instructions.
When using electrical appliances, basic safety precautions
should always be followed, including the following:
1. Read all instructions.
2. Close supervision is necessary when any appliance is used
by or near children.
SAVE THESE INSTRUCTIONS
For household use only.
Danger to children and persons with reduced
physical, sensory or mental capabilities (for
example, partially disabled, elderly people with
limited physical and mental abilities), or lack of
experience and knowledge (for example, older
children).
Do not allow children under eight years of age to operate
this device.
The device can be used by people with reduced physical
sensory or mental abilities or who lack experience and/or
knowledge, providing they are supervised or have been
instructed in the safe use of the device and understand the
resulting dangers.
Greatest attention is required if the device is used by or near
children or persons with reduced physical, sensory or mental
abilities or disabilities.
Keep the packaging film away from children. There is a risk
of suffocation.
Under no circumstances may the device be immersed in
water or held under running water.
In case of battery leakage, remove the batteries to avoid
damaging device. You can remove leaked battery fluid with
4 - US-EN

FLORABEST FFGT 433 A1
a dry, absorbent cloth. Wear suitable gloves to do so!
Contact with the skin must be avoided. In the case of contact
with eyes, rinse eyes immediately with plenty of water and
seek medical attention.
Always take care to install your batteries correctly observing
the “+” and “-” marks on the battery and the device.
Always replace the whole set of batteries at one time, taking
care not to mix old and new ones, or batteries of different
types.
Remove discharged batteries from equipment promptly to
avoid possible damage from leakage.
Never dispose of batteries in fire, except under conditions of
controlled incineration. (Failure to observe this precaution
may result in an explosion.)
Never attempt to recharge primary batteries as this may
cause leakage, fire, or explosion.
Never short circuit batteries as this may lead to high
temperatures, leakage, or explosion.
Never heat batteries in order to revive them.
Never attempt to disassemble or open batteries as this can
lead to electrolyte burns.
Keep batteries out of the reach of children, especially those
batteries fitting within the limits of the truncated cylinder as
defined in Figure 1.
Figure 1:
inner dimensions
in millimeters
(mm)
Immediately seek medical attention if a cell or battery has been
swallowed. Also, contact your local poison control center.
Never use the product if you determine it to be damaged in
any way. There is a risk of injury.
Please note that a health hazard may result from eating food
of animal origin that is not fully cooked. This poses a
particular risk to small children, pregnant women, and
people with weakened immune systems.
The inside of the product must be kept free of foreign bodies.
The product should not be subjected to strong vibrations or
mechanical loads. Damage can be avoided in this way.
The product does not contain any components that require
maintenance.
Contact the manufacturer’s service department in the event of
damage, defects, or other problems.
US-EN - 5

FLORABEST FFGT 433 A1
Risk of burns
Always handle the product in such a way that other people,
children, or animals cannot be burned by it.
Wear protective gloves or oven mitts when touching the
temperature sensor (14) during or after use.
Improper use of the product can lead to injuries.
Keep the product and accessories away from open fires.
Never use the product in a microwave oven or conventional
oven.
The transmitter cable must not be kinked.
The product is not waterproof. Do not use the product in the
rain, and keep the transmitter (13) and receiver (1) away
from moisture.
Switch off the transmitter (13) and receiver (1) when not in
use.
3. Package Contents
1 receiver
1 transmitter
1 temperature sensor
1 fastening clip
2 Velcro fasteners
4 AAA batteries (1.5 V)
This operating manual
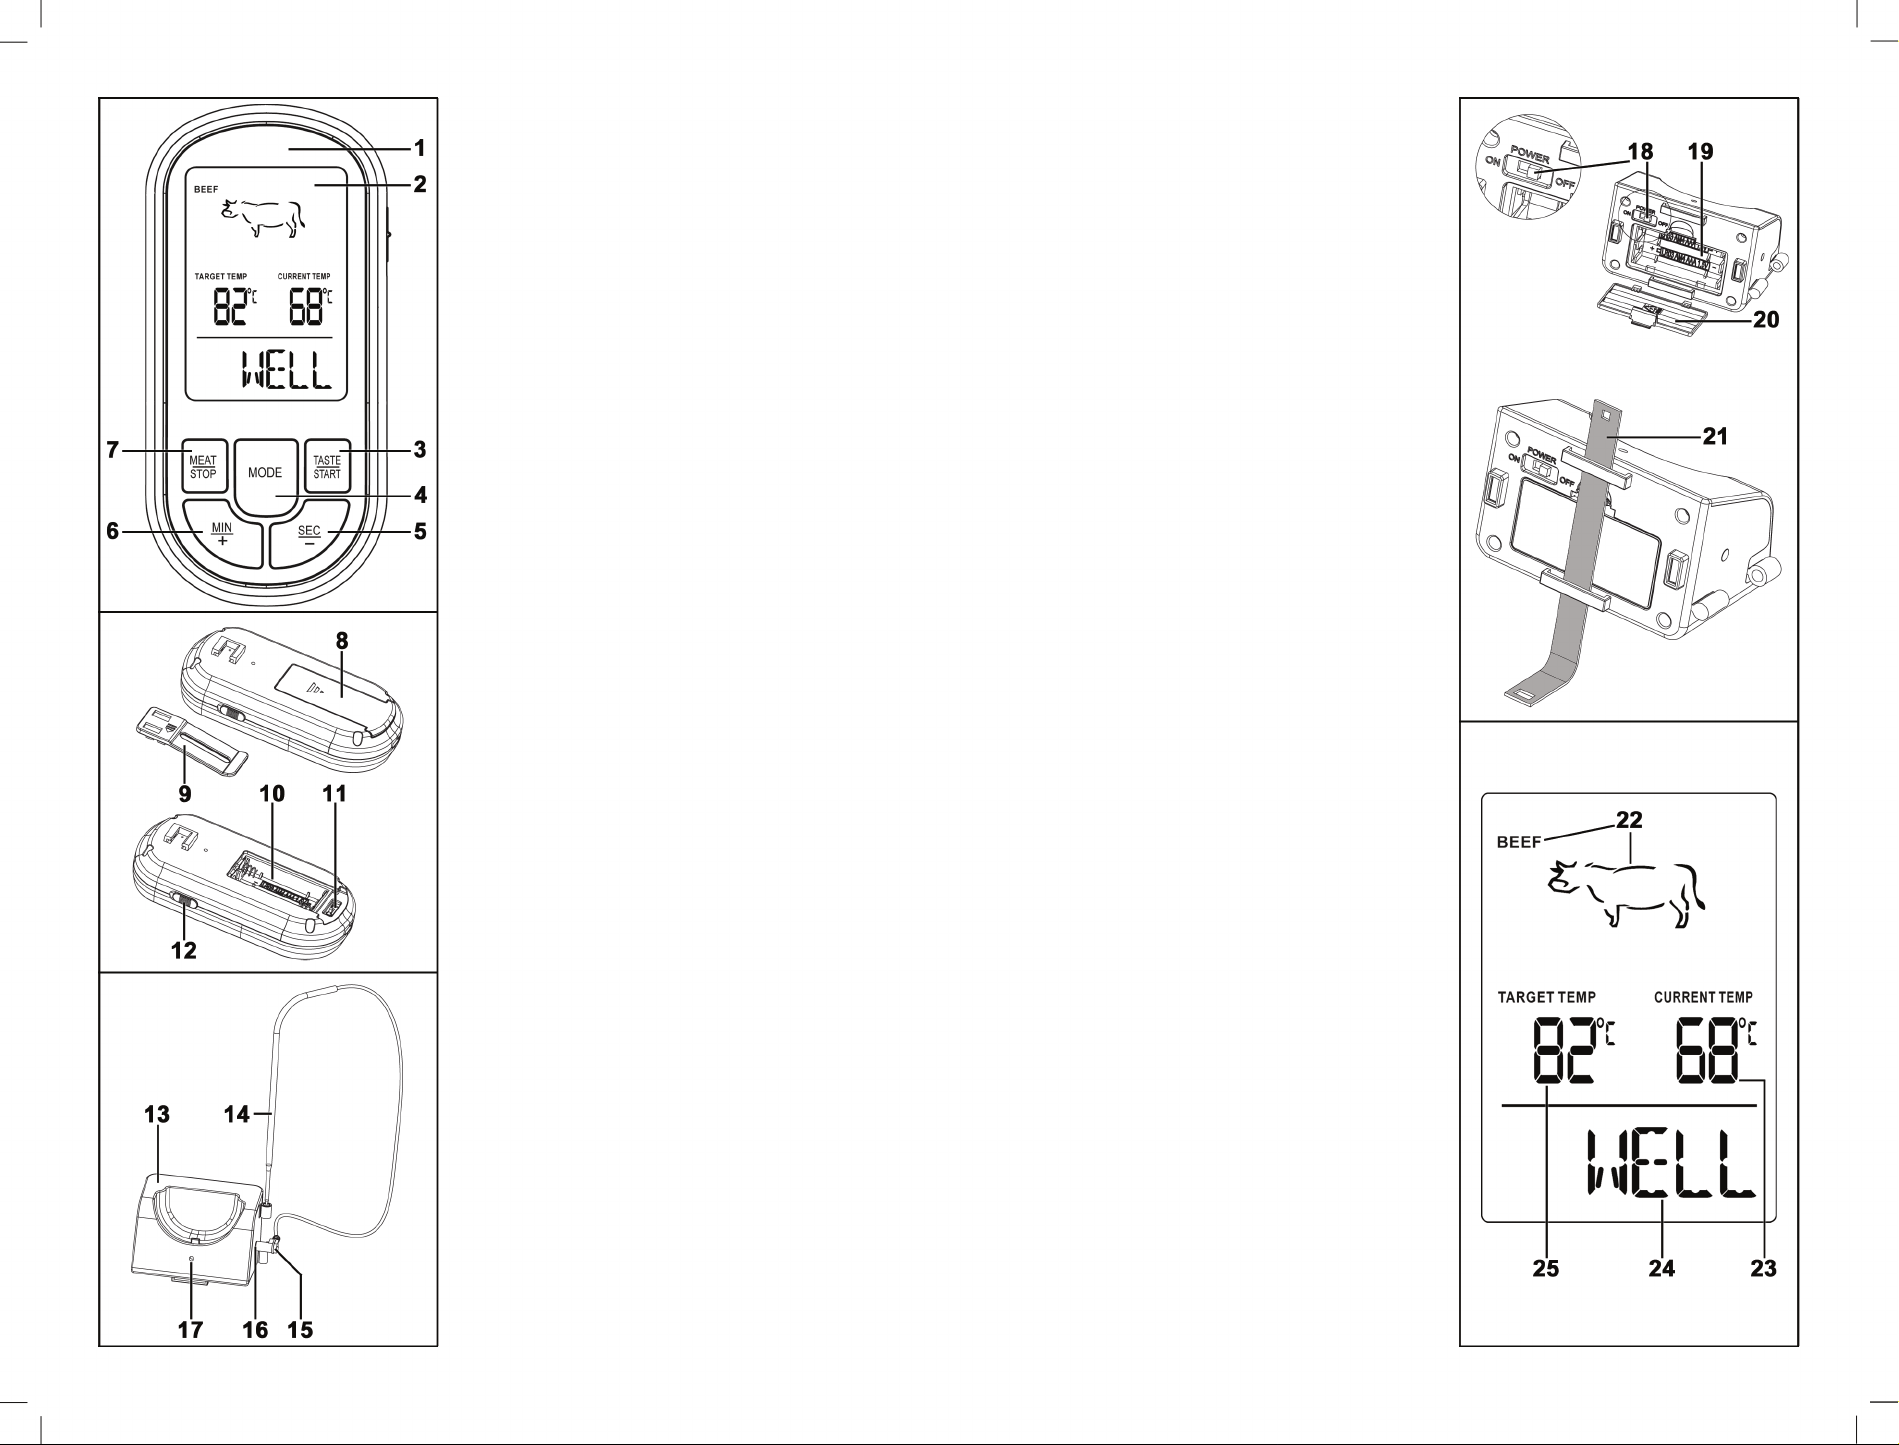
4. Description of Parts and Controls
Receiver
Receiver
1
Liquid-crystal display
2
TASTE/START button
3
MODE button
4
SEC/- button
5
MIN/+ button
6
MEAT/STOP button
7
Battery compartment cover
8
Fastening clip (with integrated magnets)
9
Battery compartment
10
Selector switch (for setting unit of temperature to °C
11
or °F)
ON/OFF switch
12
6 - US-EN

FLORABEST FFGT 433 A1
Transmitter
Transmitter (with integrated magnets)
13
Temperature sensor (with cable)
14
Plug (temperature sensor)
15
Jack (for temperature sensor plug)
16
Red LED
17
ON/OFF switch
18
Battery compartment
19
Battery compartment cover
20
Velcro fastener
21
LCD
Type of meat
22
CURRENT TEMP indicator (actual core temperature)
23
Doneness
24
TARGET TEMP indicator
25
5. Technical Data
Receiver
Power supply 2 batteries:
1.5 V AAA (Micro LR3)
Temperature
measurement range
Transmission range approx. 49.2 feet/15 meters
Transmitter
Power supply 2 batteries:
0°C - 300°C/
32°F - 572°F
1.5 V AAA (Micro LR3)
6. Copyright
All contents of these operating instructions are subject to
copyright law, and are provided to the user solely as a source
of information. Any form of copying or reproduction of data
and information is prohibited without the express written
permission of the author. This also concerns commercial use of
the contents and data. The text and illustrations correspond to
the technical standards at the time of printing. Subject to
alterations.
7. Before Initial Use
Remove the grill thermometer and all accessories from the
packaging and check to ensure that nothing is missing. Remove
all protective film. Do not use the grill thermometer if you
determine that something is damaged. Instead, contact to the
manufacturer’s service department. We recommend cleaning
the temperature sensor (14) before using it for the first time.
7.1 Inserting/changing the batteries
Transmitter:
Turn off the transmitter (13) via the ON/OFF switch (18).
Remove the Velcro fastener, if one is attached (21).
Unlock the battery compartment lid (20) and remove it.
Insert two AAA 1.5 V batteries (Micro LR3), ensuring that
the polarity is correct. Follow the marking in the battery
compartment (19).
US-EN - 7

FLORABEST FFGT 433 A1
Close the battery compartment (19) by putting the cover
(20) back in place. Make sure that it snaps audibly into
place.
Receiver:
Turn off the receiver via the ON/OFF switch (12).
Remove the fastening clip (9) from the back by sliding it to
the left.
Now remove the battery cover (8) by pressing it gently
and sliding it in the direction of the arrow.
Insert two AAA 1.5 V batteries (Micro LR3), ensuring that
the polarity is correct. Follow the marking in the battery
compartment (10).
Close the battery compartment (10) by putting the cover
(8) back in place and sliding it away from the direction of
the arrow.
Now attach the fastening clip (9) by positioning it on the
open side of the guide and sliding it as far to the right as it
will go.
7.2 Connecting the temperature sensor
Plug the plug (15) into the jack (16) on the side of the
transmitter (13). When not in use, the temperature sensor (14)
can be stored in the holder next to the jack (16).
7.3 Setting the unit of temperature
You can choose between two temperature units (°C and °F).
To do so, slide the selector switch (11) in the battery case (10)
to the desired position.
8. Initial Use
Set the transmitter’s (13) ON/OFF switch (18) to the ON
position. The red LED (17) blinks every four seconds
during operation.
Now turn on the receiver (1) by setting the ON/OFF
switch (12) to the ON position. A beep sounds and the
LCD (2) lights up briefly with blue backlighting before
switching to red.
If the temperature sensor (14) is not connected to
the sensor (13) or the wireless connection between
the transmitter (13) and receiver (1) is interrupted,
the LCD (2) will display ‘- - -’ as the current
temperature.
If this happens, ensure that the plug (15) is plugged
into the jack (16) correctly and that the distance
between transmitter (13) and receiver (1) is not too
great. If necessary, turn off the transmitter (13) and
receiver (1) for around three seconds and turn them
on again. That should fix the problem.
8.1 Position during operation
The transmitter (13) has a range of approximately
49.2 feet/15 meters. Please make sure that the
transmitter (13) and receiver (1) are not too far
apart. Otherwise, it will not be possible to measure
the temperature correctly.
8 - US-EN

FLORABEST FFGT 433 A1
8.1.1 Receiver (1)
You can configure the receiver (1) via the transmitter (13)
The fastening clip (9) lets you attach the receiver to, for
example, your clothes (belt or pocket).
The fastening clip (9) has two integrated magnets. They
can be used to attach the receiver (1) to a magnetic
surface.
8.1.2 Transmitter (13)
There are two magnets on the underside of the transmitter
(13). They can be used to attach the transmitter (13) to a
magnetic surface.
The Velcro fasteners (21) included in the package can be
used to attach the transmitter (13) to the handle or base of
a grill. Use one or both Velcro fasteners (21), depending
on the circumstances.
When positioning the transmitter (13), make sure
that the cable of the temperature sensor (14) can
easily reach the grilled meat whose core
temperature has to be measured.
The transmitter (13) is made of plastic.
Consequently, it should not be attached to parts of
the grill that are very hot, such as the grill cover or
coal tray. The transmitter (13) could become
damaged as a result.
8.2 Selecting type of meat/setting doneness
Press the MEAT/STOP button (7) to set the type of meat.
The LCD (2) shows the selection. Each push of the button
changes the selection in the order listed in the following
table.
BEEF
LAMB
VEAL
PORK
TURKEY
CHICKEN
HAMBURGER
FISH
Once you have selected the type of meat, press the
TASTE/START button (3) to set the doneness level. Each
push of the button changes the selection in the order listed
in the following table. The currently selected target
temperature is displayed on the LCD (2) under TARGET
TEMP (25).
US-EN - 9

FLORABEST FFGT 433 A1
Indicator Meaning
WELL Well done
M WELL Medium well
MEDIUM Medium
M RARE Medium rare
RARE Rare
Please note:
For health and other reasons, some options are
unavailable for some types of meat.
For example, poultry should always be well done.
This is therefore the only available setting for
poultry.
You also have the option to set the target temperature, TARGET
TEMP (25), manually. To do this, proceed as follows:
Press the MODE button (4) for approximately three
seconds. A beep sounds and TARGET TEMP (25) blinks
on the LCD (2). You can now change the setting with the
MIN/+ (6) and SEC/- (5) buttons. Press the MODE (4)
button to set the TARGET TEMP (25) to the current
selection.
To override the manual selection or select another type of
meat, press and hold the TASTE/START (3) button for
approximately three seconds. Alternatively, you can turn
the receiver (1) off and back on again with the ON/OFF
switch (12).
Low core temperatures are only suitable for meat
that is fresh and in excellent condition. In general,
low core temperatures are inadequate for deep-
frozen or vacuum-packed meat.
8.3 Measuring the core temperature
The temperature will only be measured correctly
when no other devices of the same type are turned
on and located nearby. Otherwise, the current
temperature will not be displayed correctly and
clearly on the LCD (2).
Insert the tip of the temperature sensor (14) into the
thickest part of the meat to be grilled. It is a good idea to
insert the temperature sensor into the side of the meat so
that you can turn the meat easily later on.
Avoid positioning the temperature sensor (14) in
such a way that it touches bone. Otherwise, the
temperature measurement may be inaccurate. For
the same reason, the temperature sensor (14)
should not be stuck in pure fat.
After a few seconds, the core temperature of the meat
appears under CURRENT TEMP (23). It increases as the
meat cooks until the specified TARGET TEMP (25) is
reached. At that point, the LCD (2) begins to blink red and
a beep is emitted in time with the blinking.
Press the MEAT/STOP (7) button to stop the beep and the
temperature measurement.
If multiple pieces of the same meat that are of
similar quality have been placed in the pan or on
the grill at the same time, it is safe to assume that the
other pieces, too, have reached the specified
doneness level.
10 - US-EN

FLORABEST FFGT 433 A1
8.4 Doneness table
The following doneness table serves as a guide. The specified
values may vary slightly depending on the quality of the meat.
(Rare)
RARE
63 °C / 145 °F
M RARE
(Medium rare)
66 °C / 150 °F
63 °C / 145 °F
63 °C / 145 °F
(Medium)
MEDIUM
71 °C / 159 °F
71 °C / 159 °F
70 °C / 158 °F
71 °C / 159 °F
M WELL
(Medium well)
75 °C / 167 °F
77 °C / 170 °F
74 °C / 165 °F
75 °C / 167 °F
WELL
(Well done)
82 °C / 179 °F
82 °C / 179 °F
82 °C / 179 °F
82 °C / 179 °F
87 °C / 188 °F
87 °C / 188 °F
75 °C / 167 °F
63 °C / 145 °F
BEEF
LAMB
VEAL
PORK
TURKEY
CHICKEN
HAMBURGER
Meat/
Doneness
US-EN - 11
FISH

FLORABEST FFGT 433 A1
8.5 Timer function
Should you be unsatisfied with the doneness level, you can use
the timer function to grill the meat for an additional length of
time. There is no need to leave the temperature sensor (14) in
the meat for this. Proceed as follows:
Briefly press the MODE (4) button to access the timer
function.
Select the desired time by pressing the MIN/+ (6) and
SEC/- (5) buttons. You can hold the buttons down to move
more quickly through the numbers.
Press the TASTE/START button (3) to start the countdown.
The time on the LCD (2) now runs backwards and the
remaining time can be read at any time.
Press the MEAT/STOP button (7) to pause the countdown,
for example, to check or turn the meat. Resume the
countdown by pressing the TASTE/START button (3).
When the countdown reaches zero, the LCD (2) begins to
blink red and a beep is emitted in time with the blinking.
Press the MEAT/STOP button (7) to stop the beep.
Otherwise, the beep will stop on its own after
approximately two minutes.
9. Cleaning
Before each cleaning, let the grill thermometer
cool off completely! There is a risk of burns.
Clean the grill thermometer after each use. This goes
especially for the temperature sensor (14).
Do not use cleaning agents that are harsh or contain
solvents. Brushes with metal bristles or metallic objects
such as knives, spatulas, etc. should also not be used.
The grill thermometer and accessories are not suitable for
cleaning in the dishwasher.
Never immerse the grill thermometer or accessories in
water or other liquids.
Clean the transmitter (13) and receiver (1) with a soft,
damp cloth. Use a mild cleaning agent, if necessary.
Clean the temperature sensor (14) with a soft cloth and a
little dishwashing liquid.
Let all the parts dry thoroughly after cleaning.
9.1 Storage when not in use
If you plan not to use the grill thermometer for a long
period of time, clean it as described in the preceding
chapter.
Remove the batteries from the transmitter (13) and receiver
(1) to avoid the risk of leakage.
Store the grill thermometer in a cool, dry, dust-free place.
12 - US-EN

FLORABEST FFGT 433 A1
10. Troubleshooting
Doesn’t work at all.
Are the batteries in the transmitter (13) and/or receiver (1)
worn out? Put in new batteries, if necessary.
The LCD (2) is dim.
Are the batteries in the receiver (1) worn out? Put in new
batteries, if necessary.
The red LED (17) on the transmitter doesn’t light up.
Are the batteries in the transmitter (13) worn out? Put in
new batteries, if necessary.
The LCD (2) displays ‘- - -’ as the current core
temperature (23).
Check whether the plug (15) for the temperature sensor
(14) is plugged into the jack (16) correctly. Plug the plug
in correctly.
The transmitter (13) and receiver (1) are too far apart.
Move them closer together, if necessary.
If necessary, turn off the transmitter (13) and receiver (1)
for three seconds and then turn them back on. That should
fix the problem
The LCD (2) blinks with red backlighting and
displays ‘HI’ and a warning signal sounds.
The maximum permissible temperature for the temperature
sensor (14) has been exceeded. Press the MEAT/STOP
button (7) to turn off the warning signal and end the
measurement.
.
11. Environmental information and
disposal
Disposal of Packaging
Sort the packaging prior to disposal. Dispose of
the packaging with the local utility company.
Disposal of Used Devices
Do not dispose of used devices together with
household waste! If at any time in the future
you should not use this device anymore, please
dispose of it in compliance with the applicable
regulations in your state or country. This ensures
professional recycling of used devices and
excludes negative consequences for the
environment.
Make sure that the disposal is in compliance
with local regulations and EPA
recommendations (www.epa.gov).
Questions?
Call customer service at 1 (844) 543-5872
Visit the Website Customer Service Platform at
www.lidl.com/contact-us
US-EN - 13

Note : Th is eq ui pment h as b een t es ted and f ou nd to c om ply wit h th e
limi ts f or a Cl as s B digit al d evi ce , pursu an t to pa rt 1 5 of the FC C
Rule s. T hes e li mits ar e de sig ne d to prov id e rea so nable p ro tecti on
agai ns t har mf ul inte rf ere nc e in a resi de nti al i nstal la tion. T his
equi pm ent g en erate s, u ses a nd c an radi at e rad io f reque nc y energ y
and, i f no t ins ta lled an d us ed in a cc ordan ce w ith t he i nstru ct ions,
may ca us e har mf ul inte rf ere nc e to radi o co mmu ni catio ns . Howev er,
ther e is n o gua ra ntee th at i nte rf erenc e wi ll no t oc cur in a pa rt icula r
inst al lat io n. If thi s eq uip me nt does c au se ha rm ful int er feren ce to
radi o or t ele vi sion re ce pti on , which c an b e det er mined b y tu rning t he
equi pm ent o ff a nd on, th e us er is e nc ourag ed t o try to co rrect t he
inte rf ere nc e by one or m or e of th e fo llowi ng m eas ur es:
—Reo ri ent o r re locat e th e rec ei ving an te nna .
—Inc re ase t he s epara ti on be tw een the e qu ipm en t and rec ei ver.
—Con ne ct th e eq uipme nt i nto a n ou tlet on a c ir cuit di ffere nt f rom
that t o wh ich t he r eceiv er i s con ne cted.
—Con su lt th e de aler or a n ex per ie nced ra di o/T V te chnic ia n for hel p.

FLORABEST FFGT 433 A1
How to process the warranty?
To initiate, please:
Call customer service at 1 (844) 543-5872
Visit the Website Customer Service Platform at
www.lidl.com/contact-us
or
Visit a LIDL store for further assistance
To ensure the quickest warranty return process, please have the
following available:
The original sales receipt that includes the date purchased;
The product and manual in the original package;
A statement of the problem.
What must you do to keep the warranty in effect?
Retain the original receipt;
Follow all product instructions;
Do not repair or modify the product.
How does state law relate to this warranty?
This warranty gives you specific legal rights, and you may also
have other rights which vary from state to state. All implied
warranties are limited by the duration and terms of this
warranty. Some states do not allow limitations on how long an
implied warranty lasts, so the above limitation may not apply to
you.
Country of origin: China
US-EN - 15

FLORABEST FFGT 433 A1
Índice
1. Información general ....................................... 17
1.1. Lea y conserve las instrucciones de uso ...................... 17
1.2. Explicación de los símbolos usados ............................. 17
2. Seguridad ....................................................... 18
2.1 Uso previsto .................................................................... 18
2.2. Instrucciones de seguridad ........................................... 18
3. Material incluido ............................................ 20
4. Descripción de las piezas y los elementos de
control ................................................................ 20
5. Información técnica ........................................ 21
6. Derechos de propiedad intelectual ................. 21
7. Antes de poner en funcionamiento el aparato 22
7.1 Colocar / reemplazar las baterías ............................... 22
7.2 Conectar el sensor de temperatura ............................... 22
7.3 Seleccionar la unidad de temperatura ......................... 22
8. Puesta en funcionamiento .............................. 23
8.1 Posición durante la operación ....................................... 23
8.1.1 Receptor (1) ............................................................ 23
8.1.2 Emisor (13) .............................................................. 23
8.2 Seleccionar el tipo de carne / ajustar el nivel de
cocción ................................................................................... 24
8.3 Medir la temperatura interna ........................................ 25
8.4 Tabla de cocción ............................................................ 26
8.5 Función de temporizador ............................................... 27
9. Limpieza ......................................................... 27
9.1 Almacenamiento cuando no se utiliza .......................... 27
10. Resolución de problemas .............................. 28
11. Información medioambiental y eliminación .. 28
12. Indicaciones de la FCC ................................... 29
13. Garantía ....................................................... 29
16 - US-ES

FLORABEST FFGT 433 A1
¡Felicidades!
Al comprar el termómetro inalámbrico para parrillas
FLORABEST FFGT 433 A1, en adelante el termómetro para
parrilla, ha elegido un producto de primera calidad.
1. Información general
1.1. Lea y conserve las instrucciones de uso
Este instructivo de uso contiene información
importante relacionada con el uso seguro del
aparato, así como detalles sobre su uso
cotidiano y su eliminación. Familiarícese con el
instructivo de uso, ponga atención especial a las instrucciones
de seguridad antes de usar el aparato, y úselo solo para las
áreas de aplicación y los fines descritos. Si cede el aparato o
lo vende, asegúrese de ceder también el instructivo de uso. Es
parte del producto.
1.2. Explicación de los símbolos usados
Los siguientes símbolos y palabras claves se usan en este
instructivo de uso, en el aparato o en el empaque.
Este símbolo/palabra clave indica peligro con un nivel medio
de riesgo que, de no evitarse, podría ocasionar una lesión
grave o incluso la muerte.
Este símbolo/palabra clave indica peligro con un nivel bajo de
riesgo que, de no evitarse, podría ocasionar una lesión menor
o moderada.
Esta palabra clave advierte sobre un posible daño material.
Este símbolo identifica peligros para la salud
por escaldamientos.
Este símbolo indica mayor información sobre el
manejo y el uso.
US-ES - 17

FLORABEST FFGT 433 A1
2. Seguridad
2.1 Uso previsto
Este termómetro para parrilla sirve para medir y vigilar la
temperatura interna de alimentos como p. ej. pescado, carne
de res, carne de cerdo, aves, hamburguesas y otros tipos de
carnes. El termómetro para parrilla no está diseñado para
usarse en empresas o de modo comercial. Utilice el
termómetro para parrilla solamente en el ámbito personal;
cualquier otra utilización se considera un uso indebido. Este
aparato cumple con todas las normas y estándares
correspondientes, además de contar con aprobación de UL. En
caso de realizar una modificación del termómetro para parrilla
no acordada con el fabricante, no será posible continuar
garantizando el cumplimiento de estas normas. El fabricante
declina cualquier responsabilidad relacionada con los daños o
las fallas que puedan resultar de ello. Utilice solo los
accesorios suministrados por el fabricante.
Respete las normas aplicables en cada caso a escala nacional
o las leyes del país en el que se utilice el aparato.
2.2. Instrucciones de seguridad
MEDIDAS DE SEGURIDAD
IMPORTANTES
Lea todas las instrucciones.
Al usar aparatos eléctricos, siempre se deberán seguir las
precauciones básicas de seguridad, incluyendo las siguientes:
1. Lea todas las instrucciones.
2. Se necesita supervisión cercana cuando los niños utilicen el
aparato o se utilice cerca de ellos.
CONSERVE ESTAS
INSTRUCCIONES
Para uso doméstico únicamente.
Peligro para niños y personas con capacidades
físicas, sensoriales o mentales reducidas (por
ejemplo, discapacitados, personas mayores con
capacidades físicas y mentales limitadas), o sin la
experiencia y el conocimiento necesarios (por
ejemplo, niños mayores).
No permita que los niños menores de ocho años usen este
aparato.
El aparato puede ser usado por personas con capacidades
físicas, sensoriales o mentales reducidas, o sin experiencia o
conocimiento, siempre y cuando hayan sido instruidas
acerca del uso seguro del aparato y comprendan los
peligros implícitos.
Se requiere una gran atención cuando los niños utilicen el
aparato o se utilice cerca de ellos, o de personas con
capacidades físicas, sensoriales o mentales limitadas o
discapacidades.
18 - US-ES

FLORABEST FFGT 433 A1
Mantenga el plástico del empaque alejado de los niños.
Existe riesgo de asfixia.
Por ningún motivo sumerja el aparato en agua ni lo coloque
debajo del chorro de agua.
En caso de que la batería chorree, retire las baterías para
evitar dañar el aparato. Puede eliminar el líquido chorreado
de la batería con un trapo seco y absorbente. ¡Use guantes
de protección! Evite el contacto con la piel. En caso de
contacto con los ojos, enjuáguelos inmediatamente con
agua abundante y busque ayuda médica.
Asegúrese siempre de instalar las baterías correctamente,
tomando en cuenta las marcas «+» y «-» en la batería y en
el aparato.
Siempre reemplace el juego completo de baterías a la vez,
asegurándose de no mezclar baterías viejas y nuevas, o de
distintos tipos.
Retire las baterías agotadas del equipo para evitar posibles
daños por fugas.
Nunca elimine las baterías en el fuego, excepto en
condiciones de incineración controlada. (De lo contrario, se
puede provocar una explosión.)
Nunca intente recargas las baterías primarias, ya que esto
puede provocar que se chorreen, un incendio o una
explosión.
Nunca haga cortocircuito en las baterías, ya que esto puede
provocar sobrecalentamiento, fugas o explosión.
Nunca caliente las baterías para revivirlas.
Nunca intente desensamblar o abrir las baterías, ya que
esto puede provocar quemaduras con el electrolito.
Mantenga las baterías fuera del alcance de los niños, en
especial las conexiones dentro de los límites del cilindro
trunco, como se define en la figura 1.
Figura 1:
dimensiones
internas en
milímetros (mm)
Busque atención médica inmediata si traga una celda o una
batería. De igual forma, póngase en contacto con el centro
local para intoxicaciones.
Nunca utilice el producto si detecta daños. Existe peligro de
lesiones.
Tenga en cuenta que el consumo de alimentos de origen
animal con una cocción incompleta podría ser nocivo para
la salud. Este riesgo es particularmente importante para
niños pequeños, mujeres embarazadas o personas con el
sistema inmunitario débil.
US-ES - 19

FLORABEST FFGT 433 A1
No deben penetrar cuerpos extraños en el interior del
producto.
El producto no debe ser sometido a agitaciones o tensiones
mecánicas fuertes. De esta forma se evitan daños.
El producto no contiene piezas que requieran
mantenimiento.
En caso de daños, defectos u otros problemas, póngase en
contacto con el centro de atención del fabricante.
Peligro de quemaduras
Asegúrese siempre de que otras personas, niños o mascotas
no se puedan quemar con el producto.
Utilice guantes de protección o para horno cuando toque
sensor de temperatura (14) durante su uso o después.
El uso inadecuado del producto puede provocar lesiones.
Mantenga el producto y los accesorios alejados del fuego.
Nunca utilice el producto en un microondas o en un horno.
El cable del emisor no debe doblarse.
El producto no es resistente al agua. No lo use cuando esté
lloviendo y proteja el emisor (13) y el receptor (1) de la
humedad.
Apague el emisor (13) y el receptor (1) cuando no los use.
3. Material incluido
1 receptor
1 emisor
1 sensor de temperatura
1 clip de fijación
2 cierres de ganchos y felpa
4 baterías de 1.5 V / AAA
Estas instrucciones de uso
4. Descripción de las piezas y los
elementos de control
Receptor
Receptor
1
Pantalla LC
2
Botón «TASTE / START»
3
Botón «MODE»
4
Botón «SEC / -»
5
Botón «MIN / +»
6
Botón «MEAT / STOP»
7
Tapa del compartimiento de las baterías
8
Clip de fijación (con imanes integrados)
9
Compartimiento de las baterías
10
Selector (para unidad de temperatura °C o °F)
11
Botón de encendido/apagado (ON/OFF)
12
20 - US-ES

FLORABEST FFGT 433 A1
Emisor
Emisor (con imanes integrados)
13
Sensor de temperatura (con cable)
14
Enchufe (sensor de temperatura)
15
Conector (para el enchufe del sensor de
16
temperatura)
LED rojo
17
Botón de encendido/apagado (ON/OFF)
18
Compartimiento de las baterías
19
Tapa del compartimiento de las baterías
20
Cierre de ganchos y felpa
21
Pantalla LC
Tipo de carne
22
Indicador «CURRENT TEMP» (temperatura interna
23
actual)
Estado de cocción
24
Indicador «TARGET TEMP» (temperatura objetivo)
25
5. Información técnica
Receptor
Alimentación eléctrica 2 baterías:
1.5 V AAA (Micro LR3)
Rango de medición de
temperatura
Rango de emisión aprox. 49.2 ft / 15 metros
Emisor
Alimentación eléctrica 2 baterías:
0 °C - 300 °C /
32 °F - 572 °F
1.5 V AAA (Micro LR3)
6. Derechos de propiedad intelectual
Todo el contenido de estas instrucciones de uso está sometido
a la legislación sobre propiedad intelectual y se pone a
disposición del lector únicamente como fuente de información.
Sin la autorización expresa y por escrito del autor se prohíbe
copiar o reproducir datos e información contenidos en ellas.
Esto también se refiere al uso comercial del contenido y de los
datos. El texto y las imágenes corresponden al estado
tecnológico en el momento de imprimirse las instrucciones.
Reservado el derecho de realizar modificaciones.
US-ES - 21

FLORABEST FFGT 433 A1
7. Antes de poner en funcionamiento el
aparato
Retire el termómetro para parrilla y todos los accesorios del
empaque y verifique que estén intactos. Retire todas las
películas de protección. En caso de detectar daños, no utilice
el termómetro para parrilla, y póngase en contacto con el
centro de atención del fabricante. Le recomendamos que
limpie el sensor de temperatura (14) antes de usarlo por
primera vez.
7.1 Colocar / reemplazar las baterías
Emisor:
Apague el emisor (13) con el botón de
encendido/apagado (18).
Retire los cierres de ganchos y felpa (21).
Abra la tapa del compartimiento de las baterías (20) y
quítela.
Coloque dos baterías de 1.5V de tipo AAA (Micro LR3)
teniendo en cuenta la polaridad. Para ello, consulte el
dibujo en el compartimiento de las baterías (19).
Cierre el compartimiento de las baterías (19) colocando
de nuevo la tapa del compartimiento de las baterías (20).
Asegúrese de que encaje haciendo sonido.
Receptor:
Apague el receptor con el botón de encendido/apagado
(12).
Retire el clip de fijación (9) de la parte posterior
deslizándolo hacia la izquierda.
Retire ahora la tapa del compartimiento de las baterías
(8) deslizándola levemente en dirección de la flecha
hacia abajo.
Coloque dos baterías de 1.5V de tipo AAA (Micro LR3)
teniendo en cuenta la polaridad. Para ello, consulte el
dibujo en el compartimiento de las baterías (10).
Cierre el compartimiento de las baterías (10) colocando
de nuevo la tapa del compartimiento de las baterías (8)
en sentido contrario de la flecha hacia arriba.
Instale ahora el clip de fijación (9) colocándolo en el lado
abierto de la guía y deslícelo hasta el tope.
7.2 Conectar el sensor de temperatura
Conecte el enchufe (15) en el conector (16) en el costado del
emisor (13). Cuando no se use, el sensor de temperatura (14)
se puede guardar en el soporte junto al conector (16).
7.3 Seleccionar la unidad de temperatura
Puede seleccionar dos unidades de temperatura (°C y °F).
Para ello deslice el selector (11) en el compartimiento de las
baterías (10) a la posición deseada.
22 - US-ES

FLORABEST FFGT 433 A1
8. Puesta en funcionamiento
Encienda el emisor (13) con el botón de
encendido/apagado (18) en posición «ON». El LED rojo
(17) parpadea durante la operación en intervalos de
aprox. 4 segundos.
Ahora encienda el receptor (1) colocando el botón de
encendido/apagado (12) en posición «ON». Suena una
señal y se enciende la pantalla LC (2) brevemente primero
en azul y luego con iluminación de fondo roja.
En caso de que el sensor de temperatura (14) no
esté conectado al emisor (13) o que se haya
interrumpido la conexión inalámbrica entre el
emisor (13) y el receptor (1), la pantalla LC (2)
mostrará como temperatura actual «- - -».
En estos casos, asegúrese de que el enchufe (15)
esté conectado en el conector (16) correcto y que
la distancia entre el emisor (13) y el receptor (1) no
sea demasiado grande. Si es necesario, apague el
emisor (13) y el receptor (1) durante aprox. 3
segundos y vuelva a encenderlos. De esta forma se
debe resolver el problema.
8.1 Posición durante la operación
El alcance del emisor (13) es de aprox.
49.2 ft / 15 metros. Asegúrese de que la distancia
entre el emisor (13) y el receptor (1) no sea
demasiado grande. De lo contrario no se podría
medir la temperatura.
8.1.1 Receptor (1)
Puede colocar el receptor (1) en el emisor (13)
Con el clip de fijación (9) puede fijar el receptor a su ropa
(cinturón o bolsa).
El clip de fijación (9) cuenta con dos imanes integrados.
De esta forma puede fijar el receptor (1) también a una
superficie magnética.
8.1.2 Emisor (13)
En la parte inferior del emisor (13) hay dos imanes. Con
ellos puede fijar el emisor (13) a una superficie
magnética.
Con los cierres de ganchos y felpa (21) puede fijar el
emisor (13) al mango o a una pata de la parrilla. Use uno
o dos cierres de ganchos y felpa (21) según lo requiera.
Al colocar el emisor (13), asegúrese de poder
alcanzar el alimento con el cable del sensor de
temperatura (14) sin problemas, para poder medir
la temperatura interna.
El emisor (13) está hecho de plástico. Por tanto, no
lo coloque en lugares de la parrilla donde se
pueda calentar mucho, p. ej. en la tapa de la
parrilla o en la charola para carbón. El emisor (13)
podría resultar dañado.
US-ES - 23

FLORABEST FFGT 433 A1
8.2 Seleccionar el tipo de carne / ajustar el
nivel de cocción
Presione el botón «MEAT / STOP» (7) para ajustar el tipo
de carne. La pantalla LC (2) muestra la selección. Con
cada presión del botón cambia la selección en el orden
de la siguiente tabla.
Tras seleccionar el tipo de carne, presione el botón
«TASTE / START» (3) para ajustar el nivel de cocción.
Con cada presión del botón cambia la selección en el
orden de la siguiente tabla. La temperatura objetivo
ajustada se muestra en la pantalla LC (2) en «TARGET
TEMP» (25).
Indicadores Significado
WELL bien cocido
M WELL tres cuartos
MEDIUM medio
M RARE medio rojo
RARE rojo
Tenga en cuenta lo siguiente:
Por motivos de salud, las posibilidades de selección
no están disponibles en todos los tipos de carne.
Por ejemplo, las aves siempre deberán estar bien
cocidas. Por este motivo, en este caso solo está
disponible este nivel de cocción.
Usted tiene la posibilidad de ajustar de forma manual la
temperatura objetivo «TARGET TEMP» (25). Para hacerlo,
proceda de la siguiente manera:
RES
CORDERO
TERNERA
CERDO
PAVO
POLLO
HAMBURGUESA
PESCADO
Mantenga presionado el botón «MODE» (4) durante
aprox. 3 segundos. Suena una señal y en la pantalla LC
(2) parpadea la temperatura objetivo «TARGET TEMP»
(25). Con los botones «MIN / +» (6) y «SEC / -» (5)
puede cambiarla. Presione el botón «MODE» (4), para
confirmar la temperatura objetivo «TARGET TEMP» (25).
Para salir de la selección manual o seleccionar otro tipo
de carne mantenga presionado el botón "TASTE/START"
24 - US-ES

FLORABEST FFGT 433 A1
(3) durante unos 3 segundos. También es posible apagar
y volver a encender el receptor (1) con el botón de
encendido/apagado (12).
Para temperaturas internas bajas solo es apta la
carne que esté fresca y en excelente estado. Por lo
general, las temperaturas internas bajas no bastan
para la carne congelada o empacada al vacío.
8.3 Medir la temperatura interna
La medición de temperatura solo puede ser correcta
si no se hallan cerca y encendidos otros aparatos
del mismo tipo. De lo contrario, la temperatura
actual en la pantalla LC (2) no será correcta ni
precisa.
Inserte la punta del sensor de temperatura (14) en la
parte más gruesa del alimento. Es aconsejable insertar el
sensor de temperatura por un costado del alimento, de
forma que se pueda voltear bien incluso estando
conectado.
Evite que el sensor de temperatura (14) toque
huesos. De lo contrario se pueden obtener
resultados imprecisos en la medición de la
temperatura. Por este motivo, el sensor de
temperatura (14) no se debe insertar en grasa
pura.
Después de un breve tiempo, se mostrará la temperatura
interna del alimento en «CURRENT TEMP» (23). Esta
aumenta conforme avanza el tiempo de cocción hasta
que se alcanza la temperatura objetivo ajustada «TARGET
TEMP» (25). En este momento comienza a parpadear en
rojo la pantalla LC (2) y suena una señal junto con el
parpadeo.
Presione el botón «MEAT / STOP» (7) para finalizar la
señal y la medición de temperatura.
Si puso en el sartén o en la parrilla al mismo tiempo
varios trozos del mismo alimento con características
similares, puede asumir que también estos habrán
alcanzado el nivel de cocción ajustado.
US-ES - 25

FLORABEST FFGT 433 A1
8.4 Tabla de cocción
La siguiente tabla de cocción sirve solo como orientación. Los
valores pueden variar un poco, dependiendo de la calidad de
carne que se tenga.
(rojo)
RARE
63 °C / 145 °F
(medio rojo)
M RARE
66 °C / 150 °F
63 °C / 145 °F
63 °C / 145 °F
(medio)
MEDIUM
71 °C / 159 °F
71 °C / 159 °F
70 °C / 158 °F
71 °C / 159 °F
(tres cuartos)
M WELL
75 °C / 167 °F
77 °C / 170 °F
74 °C / 165 °F
75 °C / 167 °F
WELL
(bien cocido)
82 °C / 179 °F
82 °C / 179 °F
82 °C / 179 °F
82 °C / 179 °F
87 °C / 188 °F
87 °C / 188 °F
75 °C / 167 °F
63 °C / 145 °F
Alimento /
nivel de cocción
RES
CORDERO
TERNERA
CERDO
PAVO
POLLO
HAMBURGUESA
PESCADO
26 - US-ES

FLORABEST FFGT 433 A1
8.5 Función de temporizador
En caso de que no esté satisfecho con la el nivel alcanzado de
cocción, puede usar la función de temporizador para seguir
cocinando el alimento durante otro cierto tiempo. El sensor de
temperatura (14) no necesitar seguir insertado en el alimento.
Para hacerlo, proceda de la siguiente manera:
Presione brevemente el botón «MODE» (4) para entrar a
la función de temporizador.
Seleccione el tiempo deseado presionando los botones
«MIN / +» (6) y «SEC / -» (5). Puede mantener los
botones presionados para que las cifras avancen más
deprisa.
Presione el botón «TASTE / START» (3) para iniciar la
cuenta regresiva. El tiempo en la pantalla LC (2) correrá
en sentido inverso y podrá leer en todo momento el
tiempo restante.
Con el botón «MEAT / STOP» (7) puede interrumpir la
cuenta regresiva, p. ej. para verificar o voltear el alimento.
Continúe con la cuenta regresiva presionando el botón
«TASTE / START» (3).
Si la cuenta regresiva ha terminado, la pantalla LC (2)
comienza a parpadear en rojo y suena una señal junto
con el parpadeo.
Presione el botón «MEAT / STOP» (7) para detener la
señal. De lo contrario, se apaga sola la señal tras aprox.
2 minutos.
9. Limpieza
Deje que el termómetro para parrilla se enfríe por
completo antes de limpiarlo. ¡Peligro de
quemaduras!
Tras cada uso, limpie el termómetro para parrilla, en
particular el sensor de temperatura (14).
No utilice limpiadores agresivos o con solventes, cepillos
con cerdas metálicas ni objetos metálicos como cuchillos,
espátulas o similares.
El termómetro para parrilla y los accesorios no son aptos
para lavarse en el lavavajillas.
Nunca sumerja el termómetro para parrilla y los
accesorios en agua u otros líquidos.
Limpie el emisor (13) y el receptor (1) con un trapo suave
y ligeramente húmedo. En caso necesario, utilice un
detergente suave.
Limpie el sensor de temperatura (14) con un trapo
húmedo y un poco de detergente.
Deje que todas las piezas se sequen bien después de
limpiarlas.
9.1 Almacenamiento cuando no se utiliza
Si no va a usar el termómetro para parrilla durante un
tiempo prolongado, límpielo tal como se describe en el
capítulo anterior.
Retire las baterías del emisor (13) y el receptor (1) para
evitar que se chorreen.
US-ES - 27

FLORABEST FFGT 433 A1
Guarde el termómetro para parrilla en un lugar seco,
fresco y sin polvo.
10. Resolución de problemas
No funciona
¿Están agotadas las baterías en el emisor (13) o el
receptor (1)? Coloque baterías nuevas.
La pantalla LC (2) ilumina de forma débil
¿Están agotadas las baterías en el receptor (1)? Coloque
baterías nuevas.
El LED rojo (17) en el emisor no enciende.
¿Están agotadas las baterías en el emisor (13)? Coloque
baterías nuevas.
En la pantalla LC (2) se muestra como temperatura
actual (23)«- - -»
Verifique que el enchufe (15) del sensor de temperatura
(14) esté conectado correctamente en el conector (16).
Conecte el enchufe de forma correcta.
La distancia entre el emisor (13) y el receptor (1) es
demasiado grande. Disminuya la distancia.
Si es necesario, apague el emisor (13) y el receptor (1)
durante aprox. 3 segundos y vuelva a encenderlos. De
esta forma se debe resolver el problema.
La pantalla LC (2) parpadea con iluminación de
fondo roja, muestra «HI» y suena una señal.
Se superó la temperatura máxima permitida en el sensor
de temperatura (14). Presione el botón «MEAT / STOP»
(7) para detener la advertencia y finalizar la medición.
11. Información medioambiental y
eliminación
Eliminación del empaque
Separe el empaque antes de eliminarlo. Elimine
el empaque de acuerdo con el servicio de
recolección municipal.
Eliminación de aparatos usados
¡No tire el aparato usado con la basura
común! Si en el futuro ya no usara este
aparato, elimínelo de acuerdo con las normas
correspondientes de su estado o país. Esto
garantiza que se realice un reciclaje
profesional de los aparatos usados y evita
consecuencias negativas para el
medioambiente.
Asegúrese de que lo elimina de acuerdo con
las normas locales y las recomendaciones de
¿Tiene preguntas?
Llame al servicio de atención al cliente al 1 (844) 543-
5872
Visite el sitio web de la plataforma del servicio de
atención al cliente en www.lidl.com/contact-us.
EPA (www.epa.gov).
28 - US-ES

FLORABEST FFGT 433 A1
12. Indicaciones de la FCC
Este dispositivo cumple con el reglamento de la FCC. Su
funcionamiento está sujeto a las siguientes dos condiciones:
(1) este dispositivo no deberá ocasionar interferencias dañinas
y
(2) este dispositivo deberá aceptar cualquier interferencia
recibida, incluso aquella que produzca un funcionamiento no
deseado.
Por favor, tenga en cuenta que cualquier cambio o
modificación no aprobados expresamente por la parte
responsable del cumplimiento puede anular el derecho del
usuario a utilizar el equipo.
13. Garantía
Garantía limitada de 3 años
Lo que cubre la presente garantía
La garantía incluye:
Daños, quebraduras o incapacidad para funcionar
debido a defectos.
Daños que no hayan sido causados por el desgaste
propio del uso o por no seguir las instrucciones de
seguridad y mantención incluidas en el manual para el
usuario.
Lo que no cubre esta garantía
La garantía no cubre daños causados por:
El desgaste propio del uso del producto, incluidas las
partes frágiles (como interruptores, piezas de vidrio, etc.).
Uso o transporte no indicado del producto.
Desatención a las instrucciones de seguridad y
mantención.
Accidentes o causas de fuerza mayor (e.g. relámpagos,
incendio, inundación, etc.).
Manipulación mal intencionada del producto (retirar la
cubierta, tornillos, etc.).
La presente garantía tampoco cubre daños indirectos o
emergentes. Sin embargo algunos estados no permiten la
exclusión o limitación de daños indirectos o emergentes, por lo
que dicha exclusión o limitación pudiera no aplicarse en su
caso.
US-ES - 29

FLORABEST FFGT 433 A1
Período de cobertura y resolución de la garantía
La garantía es válida por 3 años a partir de la fecha de
compra. La empresa, según lo estime conveniente, devolverá el
dinero o repondrá el producto.
La empresa no:
Dará inicio a un nuevo período de garantía al hacerse el
cambio del producto.
Reparará el producto.
¿Cómo se tramita la garantía?
Recomendamos que primero usted:
Llame al Servicio de atención al cliente al 1 (844) 543-
5872.
Visite el Portal de atención al cliente en
www.lidl.com/contact-us
Visite una de nuestras tiendas LIDL en caso de cualquier
inquietud.
A fin de acelerar el trámite de la garantía, tenga a bien contar
con lo siguiente:
Recibo de venta original que incluya la fecha de compra.
Producto y manual en su empaque original.
Descripción del problema.
¿Qué debe hacer usted para mantener la garantía
vigente?
Guardar el recibo original.
Seguir todas las instrucciones para el uso del producto.
No realizar ninguna reparación ni alteración al producto.
¿De qué manera influyen las leyes estatales con
esta garantía?
La presente garantía le otorga derechos legales específicos, y
pudiera usted contar con otros derechos los cuales varían de
un estado a otro. Todas las garantías implícitas se encuentran
limitadas a la duración y términos de la presente garantía.
Algunos estados no permiten limitaciones al período de tiempo
y términos de la garantía implícita, por lo que dichas
limitaciones pudieran no aplicarse en su caso.
País de origen: China
30 - US-ES
 Loading...